1
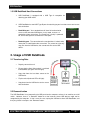
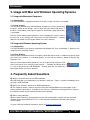
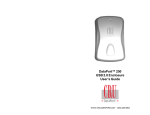
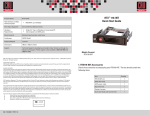
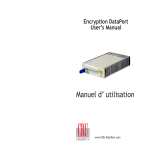
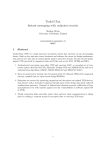
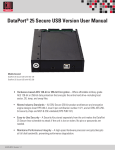
USB DataDiode™
USER MANUAL
Revised December 16, 2010
Features
•
Allows a USB data storage device to be connected to both classified and non-classified
computers, while allowing no classified data to be written back to either the USB device
or non-classified computer
•
Prevents human error – the user is not required to plug a data storage device into the
classified computer
•
Easy to set up and use
•
Host select switch toggles between read/write and read-only connections. Only one
connection can ever be active at a time.
•
Remount button allows changing/resetting attached device without detaching USB
DataDiode from computer
U s e r M a n u a l f o r U S B D a t a D i o d e ( A9-000-0006) REV 1.0
-1-
CRU-DataPort
Table of Contents
1. Pre-Usage Steps
3
1.1 Box Contents
3
1.2 Identifying Parts
3
1.3 USB DataDiode Host Connections
3
2. Usage of USB DataDiode
3
2.1 Transferring Data
3
2.2 Remount Button
3
3. Usage with Mac and Windows Operating Systems
4
4. Frequently Asked Questions
4
5. Technical Specifications
5
1. Pre-Usage Steps
1.1 Box Contents Check the accessories with your USB DataDiode unit. Please contact CRUDataport if any parts are missing or damaged. The box should contain the following items:
USB DataDiode unit
1
USB cable
User’s manual and warranty
information
2
1
1.2 Identifying Parts Take a moment to familiarize yourself with the parts of the USB DataDiode.
This will help you to better understand the remaining instructions.
Host indicator LEDs
Read only LED
Host select switch
Read/Write port
Read Only port
Remount button
USB device port
U s e r M a n u a l f o r U S B D a t a D i o d e ( A9-000-0006) REV 1.0
-2-
CRU-DataPort
1.3 USB DataDiode Host Connections
1. USB DataDiode is equipped with a USB Type A receptacle for
attaching your USB media.
2. USB DataDiode has two USB Type B ports for attaching to your host data source and secure
host destination.
•
Read/Write port - Your standard host will have full read and write
access to the connected USB device. In this mode, no access is
granted to or from secure host. The “Read Only” circuitry is powered
off, and no data path exists between the host ports.
•
Read-Only port - The connection to the standard host is halted, and a
connection is established to the secure host. The secure host can only
copy files from the USB device, but cannot write files to the USB
device.
2. Usage of USB DataDiode
2.1 Transferring Data
•
Properly connect the unit.
•
Ensure that the Host Select switch is switched
to Read/Write (the green LED will light).
•
Copy data from the host data source to the
USB device.
•
Flip the switch (both red LEDs will light).
•
Copy data from the USB device to the secure
host destination.
2.2 Remount button
The USB DataDiode is bus-powered by the USB port from the computer so there is no need for an on/off
switch. However, there is a “Remount” button for a few instances where USB devices might not be
recognized by the computer. If that is ever the case, unplug the USB device from USB DataDiode, and
then plug it back in and press the “Remount” button.
U s e r M a n u a l f o r U S B D a t a D i o d e ( A9-000-0006) REV 1.0
-3-
CRU-DataPort
3. Usage with Mac and Windows Operating Systems
3.1 Usage with Macintosh Computers
3.1.1 Compatibility
The USB DataDiode is compatible with Mac OS X 10.5 or newer. No drivers are needed.
3.1.2 Using Volumes
The hard drive attached to the USB DataDiode will appear as an icon representing
the drive’s volume on the desktop. You can begin using the volume right away. If
the drive is unformatted, a message will appear on the desktop saying that the disk
is unreadable.
Eject the volume before powering down the unit by dragging the volume’s icon to
the trash bin, or by selecting the volume then pressing Command-E. Shutting
down the unit without first ejecting the volume can result in data loss.
3.2 Usage with Windows Operating System
3.2.1 Compatibility
The USB DataDiode is plug-and-play compatible with Windows XP, Vista, and Windows 7. No drivers are
needed on these operating systems.
3.2.2 Using Volumes
When the USB DataDiode and drive are properly connected and turned on, a window may open to allow
you access to the volume. If no window appears, you can find the volume by double-clicking the “My
Computer” icon.
Eject the volume before powering down the unit by single-clicking the green arrow
icon on the task bar, then selecting “Safely remove….” Windows will indicate when
it is safe to disconnect the USB DataDiode. Shutting down the unit without first
ejecting the volume can result in data loss.
(Windows XP)
4. Frequently Asked Questions
Q: Where’s the on/off switch on the USB DataDiode?
A: USB DataDiode is bus-powered by the computer’s USB port. Power is available immediately when
you plug in USB DataDiode.
Q: What is the “Remount” button on the USB DataDiode for?
A: The “Remount” button is there for instances where the USB DataDiode may need a power cycle in
order to mount the drive/device. If you get an error that says “USB device not recognized” then simply hit
the “Remount” button and the volume will mount to the computer.
Q: What is write protection?
A: Also called “Read only,” write protection ensures that no information is written from the connected
computer to the attached USB drive. This is useful to prevent confidential information from leaving a
secure network.
For more FAQs and additional information, please visit www.cru-dataport.com.
U s e r M a n u a l f o r U S B D a t a D i o d e ( A9-000-0006) REV 1.0
-4-
CRU-DataPort
5. Technical Specifications
Part Number
Data Speeds
LEDs:
Operating System
Requirements:
Compatibility
Switch:
Remount Button:
Shipping Weight:
Dimensions:
Warranty:
31290-0192-0000
• Read/Write: Full speed of connected USB Device.
• Read Only: Up to 9 MB/s.
(Note: Drive speeds will vary depending on the drive model/type, and
operating system).
3: two host indicator LEDs, one Read only LED
• Windows XP, Vista, Windows 7
• Mac OS X 10.5
USB 2.0, USB 1.1 backwards compatible.
Toggles between read/write and read-only connections.
Allows changing/resetting attached device without detaching USB
DataDiode from computer.
0.4 lbs (6.4 Oz)
78mm W x 110mm L x 53mm H (including rubber feet)
2-year limited warranty. See warranty statement for details and
limitations. CRU offers phone support (800-260-9800) or email support
available at [email protected].
Limited Product Warranty
CRU-DataPort (CRU) warrants USB DataDiode to be free of significant defects in material and workmanship for a
period of two years from the original date of purchase. CRU’s warranty is nontransferable and is limited to the original
purchaser.
Limitation of Liability
The warranties set forth in this agreement replace all other warranties. CRU expressly disclaims all other warranties,
including but not limited to, the implied warranties of merchantability and fitness for a particular purpose and noninfringement of third-party rights with respect to the documentation and hardware. No CRU dealer, agent or employee
is authorized to make any modification, extension, or addition to this warranty. In no event will CRU or its suppliers be
liable for any costs of procurement of substitute products or services, lost profits, loss of information or data,
computer malfunction, or any other special, indirect, consequential, or incidental damages arising in any way out of
the sale of, use of, or inability to use any CRU product or service, even if CRU has been advised of the possibility of
such damages. In no case shall CRU’s liability exceed the actual money paid for the products at issue. CRU reserves
the right to make modifications and additions to this product without notice or taking on additional liability.
DataDiode is a trademark of CRU Acquisitions Group, LLC. Other marks are the property of their respective owners.
© 2010 CRU Acquisitions Group, LLC. All rights reserved.
If you have any questions or problems, please visit http://www.cru-dataport.com or e-mail [email protected]
for technical support. We appreciate being able to serve you!
U s e r M a n u a l f o r U S B D a t a D i o d e ( A9-000-0006) REV 1.0
-5-