1
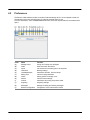
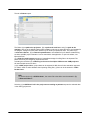
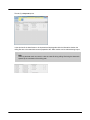
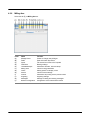
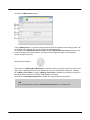
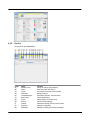
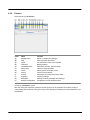
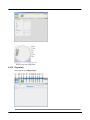
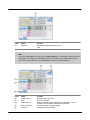
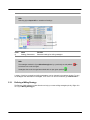
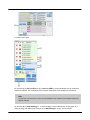
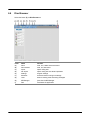
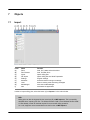
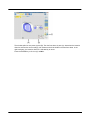
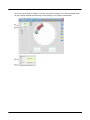
ZENOTEC CAM V3
Manual
C A D / CA M
www.wieland-dental.de
Index
Part I Introduction
3
Welcome
................................................................................................................................... 3
Copyright
.......................................................................................................................................................... 3
Layout...................................................................................................................................
of the Manual
4
Policy
.......................................................................................................................................................... 4
Definitions
.......................................................................................................................................................... 4
Sym bols
.......................................................................................................................................................... 4
Syntax and Conventions
.......................................................................................................................................................... 4
Part II Installing the Software
5
Requirements
................................................................................................................................... 5
Installing
...................................................................................................................................
the License Dongle
5
Installation
...................................................................................................................................
der Software
5
Software
...................................................................................................................................
Update
5
Part III Update Manager
6
Launch
................................................................................................................................... 6
Perform
...................................................................................................................................
Update
6
Part IV Zenotec CAM Setup
8
Startup...................................................................................................................................
Screen
8
Preferences
................................................................................................................................... 9
Manage Users.......................................................................................................................................................... 10
Paths
.......................................................................................................................................................... 13
Im port
.......................................................................................................................................................... 15
CAM Area
.......................................................................................................................................................... 17
Tooth/Bars/Drops
.......................................................................................................................................................... 20
Milling Area .......................................................................................................................................................... 22
Colors
.......................................................................................................................................................... 24
Service
.......................................................................................................................................................... 25
Printout
.......................................................................................................................................................... 27
Engraving
.......................................................................................................................................................... 28
Brow ser Configuration
.......................................................................................................................................................... 30
Messages
.......................................................................................................................................................... 32
Part V Zenotec CAM Milling Strategies
34
Startup
...................................................................................................................................
Screen
34
Settings
................................................................................................................................... 35
Descriptons
................................................................................................................................... 35
Defining a Milling
..........................................................................................................................................................
Strategy
37
Default Milling..........................................................................................................................................................
Strategy
39
41
Part VI Discs
Startup
...................................................................................................................................
Screen Menu
41
Create
...................................................................................................................................
New Disc
42
Open...................................................................................................................................
Existing Disc
43
Archive
...................................................................................................................................
Existing Disc
44
Disc Library
................................................................................................................................... 45
Disc Browser
................................................................................................................................... 47
Part VII Objects
49
Import
................................................................................................................................... 49
WP Import
...................................................................................................................................
- Work Preparation
50
Select Milling..........................................................................................................................................................
Machine
53
Select Material
.......................................................................................................................................................... 54
Select Restoration
..........................................................................................................................................................
Type
55
Select Data
.......................................................................................................................................................... 56
Select Milling.......................................................................................................................................................... 58
Color Fissure
.........................................................................................................................................................
Milling
60
Insertion.........................................................................................................................................................
Directions
61
Nesting
................................................................................................................................... 63
Set / Change /..........................................................................................................................................................
Delete Bars
70
Set / Delete Drops
.......................................................................................................................................................... 72
Connect Bars.......................................................................................................................................................... 73
Group
.......................................................................................................................................................... 73
Milling Strategy
.......................................................................................................................................................... 74
Calculate
...................................................................................................................................
Milling Path
75
Milling
...................................................................................................................................
/ Mill Manager
77
1
Introduction
1.1
Welcome
D ear custom er
Thank you for the confidence you have placed in us by choosing the Zenotec CAM software application.
In terms of concept and implementation, the Zenotec CAM software represents the current state of the
art and is optimized for use with Zenotec milling machines.
In order to obtain the best possible results and ensure that the software is always ready for use, it is
essential for users to receive detailed training from our specialists. This also guarantees that the milling
system is constantly available.
This user manual is intended as documentation for training purposes and for reference. It should be kept
accessible to users at all times. It is important therefore to keep this manual within easy reach of the
system at all times.
Your feedback is w elcom e.
We always welcome suggestions for improvement and constructive input or comments. Your assistance
can help us to optimize the Zenotec CAM software and the accompanying documentation. If you have
any questions, please contact your specialist at Wieland Dental + Technik GmbH & Co. KG.
W ie la nd De nta l + Te chnik Gm bH & Co. KG
Lindenstrasse 2
75175 Pforzheim
Germany
CAD/CAM S upport
Telephone: +49 72 31 / 37 05 400
Fax: 0 72 31 / 35 79 59
Email: [email protected]
www.wieland-dental.de
1.1.1
Copyright
All rights reserved. This manual may not be copied, photocopied, reproduced, translated nor converted
into any electronic or machine-readable form, neither in total nor in parts without the prior written consent
of Wieland Dental + Technik GmbH & Co. KG.
3
1.2
Layout of the Manual
1.2.1
Policy
Our policy is to enable you to use the Zenotec system as professionally, quickly and efficiently as
possible. This includes finding your way around this manual. As a result of ongoing development work
carried out in the interest of our customers, this manual is constantly subject to improvement and
revision. This means that this manual is not applicable to other systems. To ensure that the manual is
complete and up to date at all times, we ask you not to make extracts of individual sections.
The current revision status of the handbook can be found on the web site of Wieland Dental + Technik
GmbH & Co. KG via the following link:
http://www.wieland-dental.de/de/service/download-center/
1.2.2
Definitions
Wieland Dental GmbH & Co. KG's system for milling virtual designs is referred to as the Zenotec milling
system.
1.2.3
Symbols
Please note the meaning of the following symbols
N.B.
These symbols indicate important notes, tips or tricks for using the Zenotec CAM software
1.2.4
Syntax and Conventions
The following syntax and conventions are used in this manual:
Bold type for emphasis or for paragraph headers
Letters in parentheses before or after expressions refer to labels in the illustrations.
For example: "..select from the "submenu" (D)..."
<<xyz>>Bold type enclosed in double angled parenthesis (arrows) indicate elements on the
user interface that can be selected.
Click means click once with the left mouse button.
Double click means press the left mouse button twice.
Right click means click once on the right-hand mouse button.
Drag & drop means select the object with the left mouse button and hold it down.
The object can be positioned by moving the cursor position. Release the mouse button
to position the object at the place it was last moved to.
Rotating or pressing the scroll wheel means turning the scroll wheel up or down or pressing it.
4
2
Installing the Software
2.1
Requirements
The following hardware requirements must be fulfilled in order to install and use the software
successfully.
Recommended
2.2
Minimum
Processor
I7 Processor
Dual Core Processor
Operating System
Windows™ 7 64bit
Windows™ 7 64bit
Interfaces
Network
Network
RAM
8 GB
8 GB
Hard drive
80 GB
80 GB
Input device
Mouse with scroll wheel
Keyboard
Mouse with scroll wheel
Keyboard
Installing the License Dongle
Insert the software license dongle from Wieland Dental + Technik GmbH & Co. KG into a vacant USB
port. Do not permit Window to perform an automatic driver installation.
2.3
Installation der Software
N.B.
In order to install the software on a PC, you must have administrator privileges.
Insert the Installation CD provided into your drive.
Double click on the Zenotec CAM installation file <<Wieland Cam Setup>> to launch the software
installation automatically. Select the installation language and accept the license agreement. Installation
is now carried out automatically. The Zenotec CAM icons now appear on the desktop. <<Wieland
CAM>>, <<Update Manager>> and <<STL Grabber>>.
2.4
Software Update
The Installation CD supplied does not always contain the latest software release. Before using the
software for the first time, you should therefore launch the <<Update Manager>>. This will update the
software.
5
3
Update Manager
3.1
Launch
Double click on the icon to launch the Update Manager
3.2
on your desktop.
Perform Update
Label
(A)
Name
Step 1
(B)
(C)
(D)
(E)
(F)
(G)
(H)
(I)
Step 2
Step 3
Step 4
Step 5
Installation Folder
Language
Back
Next
Function
Check to see if the current Update
Manager is installed.
Check the existing Zenotec CAM Version on the update server
Display the EULA
Display version information
Download and install the Zenotec CAM coftware
Option to specify an installation directory
Option to specify language
One step back
One step forward
1st step:After launching, first the Update window is displayed. A check is carried to verify that you have
the latest version of the Update Manager. Confirm by pressing (I) <<Next>>2nd step:A check is carried out to determine whether you have the latest Zenotec CAM software. Press
the button (I) <<Next>>in the (J) program window to display the current update versions. If the version
number shown is higher than your (K) currently installed version number, activate the version to be
installed. Click on (I) <<Next>>to continue.
6
3rd step:Accept the EULA. Click on (I) <<Next>>to continue.
4th step:Confirm the version information. Click on (I) <<Next>>to continue.
5th step:The required files will be installed.
N.B.
Check for updates once a month.
7
4
Zenotec CAM Setup
4.1
Startup Screen
Label
(A)
(B)
(C)
(D)
(E)
(F)
(G)
(H)
(I)
Name
Discs
Disc Browser
Import
WP Import
Settings
Machines
Tools
Mill Manager
Quit
Function
Load, find, create and archive discs
Load, find and filter discs
Import milling files
Import milling files into Work Preparation
Program settings
Protected area for milling unit settings
Area for entering tools and milling strategies
Launches the Mill Manager
Closes the application
8
4.2
Preferences
The Zenotec CAM software includes a number of optional settings which can be adjusted to meet the
requirements of the user and which serve to make the software easier to use.
From the Start Menu, select <<Preferences>>and then select the required tab from the window which
opens.
Label
(A)
(B)
(C)
(D)
(E)
(F)
(G)
(H)
(I)
(J)
(K)
(L)
Name
Manage Users
Paths
Import
CAM Area
Tooth/Bars/Drops
Milling Area
Colors
Service
Printout
Engraving
Messages
Browser Configuration
Function
Assign and change user privileges
Save and search directories
File extensions of the file types to be imported
Nesting settings
Parameters for teeth, bars and drops
Various milling parameters
Setting options for display color
Various service settings
Parameters for printing out position sheet
Engraving settings
Settings for dialog and warning messages
Configuration of the tooth browser entries
9
4.2.1
Manage Users
Select the tab (A) <<Manage Users>>.
Label
(A)
(B)
(C)
(D)
(E)
(F)
(G)
(H)
(I)
(J)
(K)
(L)
Name
Manage Users
Paths
Import
CAM Area
Tooth/Bars/Drops
Milling Area
Colors
Service
Printout
Engraving
Messages
Browser Configuration
Function
Create or change user privileges
Save and search directories
File extensions of files to be imported
Nesting settings
Parameters for teeth, bars and drops
Various milling parameters
Setting options for display color
Various service settings
Parameters for printing the position sheet
Settings for engraving
Set dialog and warning messages
Configuration of tooth browser entries
10
The tab <<Manage Users>>opens.
Pos
(A)
(B)
(C)
Label
Manage Users
File Management
Dialog Messages and
Buttons
Function
User settings
Settings for folders
Settings for functions and messages
The Manage Users function enables personalized user privileges to be assigned.
In order to add a new individual user, a new user must first be added by selecting <<Copy User>>. The
name, password and language of the user can be changed. The current user is shown in the upper
display bar.
The user privileges of an existing or new user can be assigned by selecting the checkboxes for various
rights via the tabs (A) <<Manage Users>>, (B) <<File Management>> and (C) <<Dialog Messages
and Buttons>>.
11
12
4.2.2
Paths
Select the tab (B) <<Paths>>.
Label
(A)
(B)
(C)
(D)
(E)
(F)
(G)
(H)
(I)
(J)
(K)
(L)
Name
Manage Users
Paths
Import
CAM Area
Tooth/Bars/Drops
Milling Area
Colors
Service
Printout
Engraving
Messages
Browser Configuration
Function
Create or change user privileges
Save and search directories
File extensions of the files to be imported
Nesting settings
Parameters for teeth, bars and drops
Various milling parameters
Setting options for display colors
Various service settings
Parameters for printing the position sheet
Engraving settings
Settings for dialog and warning messages
Configuration of tooth browser entries
13
The tab <<Paths>>opens.
The folders (A) <<path to the projects>>, (B) <<path to the archive>> and (C) <<path to the
settings>> are set to the default settings after installation and route to setup files which are important for
the program. Changes to these paths should only be made by experienced users. The paths to (D)
<<external editors>>, (E) <<external spreadsheets>> are needed if a list of dentists created using
an editor and XML project information is to be saved within the application. To open the editors, use
Microsoft Excel.
(F) <<Path for tooth browser>>serves as intermediate storage for milling files to be imported. The
paths should only be changed by experienced users.
Activating the checkbox (G) <<Warning in the event of multiple CAM access to CAM projects>>
will avoid multiple access to discs.
In (H) <<XML project info>>, project data can be exported in XML format for documentation purposes.
To make it easier to select dentists when importing milling files, (I) lists can be be entered in <<Edit
Dentist List>>.
N.B.
To use the function (I) <<Edit Dentist>>, the correct file to the editor must be entered in (D)
<<External Editor>> .
Selecting (J) <<Additional info in the project tree according to patient>>exports the selected data
in the nesting project tree.
14
4.2.3
Import
Select the tab (C) <<Import>>.
Label
(A)
(B)
(C)
(D)
(E)
(F)
(G)
(H)
(I)
(J)
(K)
(L)
Name
Manage Users
Paths
Import
CAM Area
Tooth/Bars/Drops
Milling Area
Colors
Service
Printout
Engraving
Messages
Browser Configuration
Function
Assign or change user privileges
Save and search directories
File extensions of files to be imported
Settings for nesting
Parameters for teeth, bars or drops
Various milling parameters
Setting options for display color
Various service settings
Parameters for printing out a position sheet
Engraving settings
Settings for dialog and warning messages
Configuration of tooth browser entries
15
The tab (C) <<Import>>opens.
In the window all the data formats to be imported are listed together with the information whether the
milling files are to be nested without work preparation WP. Data meshes can be reduced during import.
N.B.
Reducing the data mesh can result in a less accurate fit during milling. Reducing the data mesh
speeds up the calculation of the milling path.
16
4.2.4
CAM Area
Select the tab (D) <<CAM Area>>.
Label
(A)
(B)
(C)
(D)
(E)
(F)
(G)
(H)
(I)
(J)
(K)
(L)
Name
Manage Users
Paths
Import
CAM Area
Tooth/Bars/Drops
Milling Area
Colors
Service
Printout
Engraving
Messages
Browser Configuration
Function
Create or change user privileges
Save and search directories
File extensions of the files to be imported
Nesting settings
Parameters for teeth, bars and drops
Various milling parameters
Setting options for display colors
Various service settings
Parameters for printing the position sheet
Engraving settings
Settings for dialog and warning messages
Configuration of tooth browser entries
17
The tab (D) <<CAM Area>>opens.
(A) <<correction factor usage calculation>> affects how the disc usage is displayed and should not
be changed or should only be changed in the event of major discrepancies.
The (B) <<Area limit for CPU>>should be adjusted to match the speed of the processor. This will
ensure that the processor gives best performance and optimize computation time.
The guideline value is:
N.B.
The higher the (B) <<Area limit for CPU>> is, the less processing capacity remains available for
other open applications.
The (C) <<Mesh Size [mm]>> affects the mesh displayed inside the blank in the main window.
Selecting (D) <<Rotation Increment [°]>> enables the increment of the object positioned within the
blank to be defined by rotating the scroll wheel on the mouse or via the keyboard.
Activating the following options makes additional functions available:
Label
(E)
Name
Show Cross Hairs
(F)
Enable Transparent
Dialogs
Enable Tooth
Once the objects are inserted in the blank they can immediately be
Movement Immediately positioned without the need for a further mouse click.
After Adding
Change To Add Bars After positioning the tooth, enable bars to be positioned immediately
without the need for a further mouse click.
Milling edge check
As soon as an object is placed too close to the edge of the blank, its
position is automatically corrected.
Patient And Dentist
The milling path can not be calculated until the names of the patient
fields Are Mandatory
and dentist have been entered
(G)
(H)
(I)
(J)
Function
The center of the object inserted into the
blank is identified by cross hairs.
No function (only when using older graphic cards)
18
N.B.
The names of patient and dentist are automatically imported when the Wieland data output
formats Zenotec CAM 3.2 and Zenotec CAM 4.0 are used.
Label
(K)
(L)
(M)
(N)
(O)
Name
Tooth-Tooth Collision
Check
Calculation On Graphic
Card
Preparation – After
Selecting Contour
Curves
Preparation - After
Selecting Insertion
Direction Curves
Display "Did you
know?" Dialog
Function
The software prevents the milling objects
from overlapping.
The milling path can be calculated via the graphic card. This makes
the calculation much faster.
Once a contour curve has been set, the system jumps to the next
object.
Once an insertion direction curve has been set, the system jumps to
the next object.
A help text is shown when the program is launched.
In (P) and (Q) <<preview settings>, the pixel setting for the icons is defined.
19
4.2.5
Tooth/Bars/Drops
Select the tab (E) <<Tooth/Bars/Drops>>.
Label
(A)
(B)
(C)
(D)
(E)
(F)
(G)
(H)
(I)
(J)
(K)
(L)
Name
Manage Users
Paths
Import
CAM Area
Tooth/Bars/Drops
Milling Area
Colors
Service
Printout
Engraving
Messages
Browser Configuration
Function
Assign or change user privileges
Save and search directories
File extensions of the files to be imported
Nesting settings
Parameters for teeth, bars and drops
Various Milling Parameters
Setting options for the display color
Various service settings
Parameters for printing out the position sheet
Engraving settings
Settings for dialog and warning messages
Configuration of the tooth browser entries
20
The tab (E) <<Tooth/Bars/Drops>>opens.
The (A) <<Default Sinter Shrinkage>>is used to make a preliminary calculation of the tooth height in
the tooth browser, i.e. the higher this value is, the greater the calculated height of the object will be.
The value (B) <<Drop Diameter>>is selected automatically when a drop is positioned on the object.
With Zenotec Zr materials, a value of 2.0mm is recommended. The value can be changed at any time
during the positioning of the object.
The function (C) <<Top of Drop>>can be used to select the length of the drop. It is recommended to
set the drops at the upper edge of th blank. Exceptions to this are low objects in high blanks. In these
cases, the option Option 0.5mm Above Tooth should be selected.
The (D) <<Bar Diameter>>can be defined for various materials. The following values are recommended:
Zenotec
Zenotec
Zenotec
Zenotec
Zr
PMMA
WAX
NEM
2.0
1.5
1.5
1.0
In (E) <<Default Bar Separation>>, a percentage value can be entered for the final separation of the
bars. The option (F) <<Mill without bars>>enables objects to be positioned and milled with setting
bars. This option is not recommended
The value (G) <<Bar clearance from below>> defines the distance of the bars from the cervical edge.
The value can be changed within the application. The option (H) <<Set bars automatically>>adds bars
automatically during nesting. The value (I ) <<Minimum number>>defines the minimum number of bars
per object. The slider (J) <<Density>>indicates the distance to the bar. The further the slider is moved to
the right (+), the greater the distance to the bars is. (G) <<Show finished teeth>>enables the view of
the already milled teeth to be selected.
21
4.2.6
Milling Area
Select the tab (F) <<Milling Area>>.
Label
(A)
(B)
(C)
(D)
(E)
(F)
(G)
(H)
(I)
(J)
(K)
(L)
Name
Manage Users
Paths
Import
CAM Area
Tooth/Bars/Drops
Milling Area
Colors
Service
Printout
Engraving
Messages
Browser Configuration
Function
Create or change user privileges
Save and search directories
File extensions of files to be imported
Nesting settings
Parameters for teeth, bars and drops
Various milling parameters
Setting options for display colors
Various service settings
Parameters for printing out the position sheet
Engraving settings
Settings for dialog and warning messages
Configuration of the tooth browser entries
22
The tab (F) <<Milling Area>>opens:
In the <<Milling Area>>, a number of settings,some of which are important for the milling process, can
be adjusted. Some settings may only be changed by experienced users.
The functions (A) <<Minimum Value For 3ax>> and (B) <<Minimum Value For 5ax>>can be used
to set the milling area around the object. The option to set the approach angle in 5 axis operation
requires a larger milling area.
Milling around the object
The function (C) <<Milling Area Wall Angle>> describes milling in a specific angle to the center of the
object. This is especially useful in 5 axis operation and a correct setting saves milling time. Selecting
(D) <<Milling Time Offset>> and (E) <<Milling Time Factor>> enables any necessary correction to
the milling times indicated in the Zenotec CAM software to be made.
Selecting (F) <<Calculation Sequence>> enables the milling sequence to be defined.
N.B.
It is recommended to set the (F) <<Calculation Sequence>> to 'as positioned'.
23
4.2.7
Colors
Select the tab (G) <<Colors>>.
Label
(A)
(B)
(C)
(D)
(E)
(F)
(G)
(H)
(I)
(J)
(K)
(L)
Name
Manage Users
Path
Import
CAM Area
Tooth/Bars/Drops
Milling Area
Colors
Service
Printout
Engraving
Messages
Browser Configuration
Function
Create or change user privileges
Save and search directories
File extensions of the files to be imported
Nesting settings
Parameters for teeth, bars and drops
Various milling parameters
Setting options for the display color
Various service settings
Parameters for printing out the position sheet
Engraving settings
Settings for dialog and warning messages
Configuration of tooth browser entries
The tab (G) <<Colors>>opens. In the <<Colors>> subprogram, the color settings for various display
visualizations can be set. This area is explained clearly in the description.
24
4.2.8
Service
Select the tab (H) <<Service>>.
Label
(A)
(B)
(C)
(D)
(E)
(F)
(G)
(H)
(I)
(J)
(K)
Name
Manage Users
Paths
Import
CAM Area
Tooth/Bars/Drops
Milling Area
Colors
Service
Printout
Engraving
Messages
Function
Assign or change user privileges
Save and search directories
File extensions of files to be imported
Nesting settings
Parameters for teeth, bars and drops
Various parameters
Setting options for display color
Various service settings
Parameters printign out the position sheet
Settings for engraving
Settings for dialog and warning messages
25
(L)
Browser Configuration
Configuration of the tooth browser entries
The tab (H) <<Service>> opens.
The left-hand pane shows the support address. In (A) <<Overview of Dongle Functions>>,
administrator defined licenses can be seen. These are only for use when support is required. Selecting
(B) <<Wieland Web Site>>gives access to the manufacturer's home page. Select (C) <<Check for
Updates>>to launch the Update Manager. The function (D) <<Dongle Update>>is used to create or
load licenses.
26
4.2.9
Printout
Select the tab (I) <<Printout>>.
Label
(A)
(B)
(C)
(D)
(E)
(F)
(G)
(H)
(I)
(J)
(K)
(L)
Name
Manage Users
Path
Import
CAM Area
Tooth/Bars/Drops
Milling Area
Colors
Service
Printout
Engraving
Messages
Browser Configuration
Function
Define or change user privileges
Save and search directories
File extensions of files to be imported
Nesting settings
Parameters for teeth, bars and drops
Various milling parameters
Setting options for display colors
Various service settings
Parameters for printing the position sheet
Engraving settings
Settings for dialog messages and warnings
Configuration of tooth browser entries
The tab (I) <<Printout>> opens.
After the milling files have been created, a position printout can be generated. This makes it easy to
clearly identify the positioned milling jobs. Some of the settings are variable and can be adjusted to your
requirements.
27
Position printout w ith variable fields
4.2.10 Engraving
Select the tab (J) <<Engraving>>.
28
Label
(A)
(B)
(C)
(D)
(E)
(F)
(G)
(H)
(I)
(J)
(K)
(L)
Name
Manage Users
Paths
Import
CAM Area
Tooth/Bars/Drops
Milling Area
Colors
Service
Printout
Engraving
Messages
Browser Configuration
Function
Assign or change user privileges
Save and search directories
File extensions of files to be imported
Nesting settings
Parameters for teeth, bars and drops
Various milling parameters
Setting options for display color
Various service settings
Parameters for printing out the position sheet
Engraving settings
Settings for dialog and warning messages
Configuration of tooth browser entries
The tab (J) <<Engraving>> opens.
In the tab (J) <<Engraving>>, variables for imprinting a numerical code onto the object can be be set.
By selecting (A) <<Select Font>> and (B) <<Font Size>>, the font and the font size of the number to
be engraved into the object can be defined. A sample text can be entered into the text field; this will then
be displayed in the preview for verification. The fields (C) <<Actual Text Size>> and (C) <<Font>>
display the values selected. The function (D) <<Default Entry>> can be used to determine whether the
numbering is to be carried out automatically when the object is positioned.
29
4.2.11 Browser Configuration
Select the tab (K) <<Browser Configuration>>.
Label
(A)
(B)
(C)
(D)
(E)
(F)
(G)
(H)
(I)
(J)
(K)
(L)
Name
Manage Users
Paths
Import
CAM Area
Tooth/Bars/Drops
Milling Area
Colors
Service
Printout
Engraving
Messages
Browser Configuration
Function
Create or change user privileges
Save and search directories
File extensions of the files to be imported
Nesting settings
Parameters for teeth, bars and drops
Various milling parameters
Setting options for display colors
Various service settings
Parameters for printing the position sheet
Engraving settings
Settings for dialog and warning messages
Configuration of tooth browser entries
30
The tab (K) <<Browser Configuration>> opens.
In the tab <<Browser Configuration>>, the view layout and the information contained in the browser
can be set.
31
4.2.12 Messages
Select the tab (L) <<Messages>>.
Label
(A)
(B)
(C)
(D)
(E)
(F)
(G)
(H)
(I)
(J)
(K)
(L)
Name
Manage Users
Paths
Import
CAM Area
Tooth/Bars/Drops
Milling Area
Colors
Service
Printout
Engraving
Messages
Browser Configuration
Function
Assign or change user privileges
Save and search directories
File extensions of files to be imported
Nesting settings
Parameters for teeth, bars and drops
Various milling parameters
Setting options for the display color
Various service settings
Parameters for printing out the position sheet
Engraving settings
Dialog and warning message settings
Configuration of the tooth browser entries
32
The tab (L) <<Messages>> opens.
Various information and warning messages are displayed when activated.
33
5
Zenotec CAM Milling Strategies
5.1
Startup Screen
Pos
(A)
Bezeichnung
Discs
(B)
(C)
(D)
(E)
(F)
(G)
(H)
(I)
Disc Browser
Import
AV Import
Einstellungen
Maschinen
Werkzeuge
Fräsmanager
Beenden
Funktion
Discs laden, suchen, erstellen und
archivieren
Discs laden, suchen, filtern
Fräsdateien importieren
Fräsdateien in Arbeitsvorbereitung importieren
Programmeinstellungen
geschützter Bereich zum Einstellen der Fräseinheit
Bereich zur Eingabe von Werkzeugen und Frässtrategien
Startet den Fräsmanager
Beendet die Anwendung
34
5.2
Settings
The Zenotec CAM software contains options for setting and defining individual milling strategies. Milling
strategies can affect the fit parameters, optical parameters and milling speeds.
To do this, select (G) <<Tools>> from the start-up menu.
N.B.
In Zenotec CAM, proven milling strategies for Zenotec milling systems, Zenotec tools and
Zenotec materials are preset. These milling strategies can not be changed. For milling strategies
defined by the user, no guarantee can be given in respect of machine, material or results.
5.3
Descriptons
This guide does not include detailed descriptions of milling strategies. Only experienced users can
modify these or change the settings; alternatively, this can be carried out for a fee by Wieland service
staff upon receipt of a specification brief.
Label
(A)
Name
Tool Position
(B)
Reset All Settings
Function
Refer to the manual of the milling
machine for further information
Reset all settings to installation mode
N.B.
All changes are lost and can not be restored.
35
Label
(C)
Name
Diameter
Function
Diameter and path parameters for the
tools
N.B.
If the (C) <<Tool Path>> exceeds the (C) <<Max. Distance>>, a message is returned when the
milling path is calculated to indicate that the current tool needs to be changed. After this has
been done, set the parameter (C) <<Tool Path>> manually by overwriting with 0.
Label
(D)
(E)
(F)
Name
Material Filter
Back
Select Material
(G)
(H)
Milling Strategies
Functions
Function
Material usage of the tools
Closes the window
Different materials require different milling strategies. Only the
strategies for the selected materials are displayed.
List of all available milling strategies
Add/export/import strategies
36
N.B.
Selecting (H) <<Import All >> overwrites all settings.
Label
(I)
Name
Strategy Parameters
Function
Parameter settings for milling strategies
N.B.
The strategies marked in (G) <<Show Strategies>> by a previously set red padlock
locked and can not be changed.
are
Strategies that can be changed are marked with an open green padlock.
A variety of machine, material and milling parameters can be changed in the settings window. To carry
out strategies and refinements of strategies, click on the icon and on the button (J) <<Advanced>>.
5.3.1
Defining a Milling Strategy
The Zenotec CAM software includes functions to help you create milling strategies quickly. Right click
on a (G) <<Milling Strategy>>.
37
A context menu opens.
By selecting (A) <<move to ZrO>>to (A) <<move to CER>>, existing strategies can be moved from
material to material. This is helpful because the basic parameters for the strategy are transferred.
N.B.
Any file that is moved must in each case be adapted to the material. Each material requires its
specific settings.
By selecting (B) <<Copy Strategy>>, a current strategy can be copied and by clicking again on a
milling strategy and selecting the function (G) <<Add Strategy>> a copy can be inserted.
38
Select (C) <<Rename Strategy>> to change the name, if required. Select (D) <<Delete Strategy>> to
irrevocably delete the strategy. Strategies can be locked by selecting <<Prevent editing>> or released
for editing by selecting <<Make editable>> .Individual strategies can be saved by selecting (E)
<<Export>> and inserted by selecting (F) <<Import>> .
5.3.2
Default Milling Strategy
When an object is positioned in the disc, the milling strategies for the various areas or indication may
already have been defined.
Right click on a required milling strategy. A context window opens. Select (A) <<Set Default To …>>
to define the strategy as the default strategy for an area of indication. Once a default strategy has been
defined, a symbol appears in front of its name. This identifies the strategy as the standard strategy. The
following strategies can be defined:
Symbol
Area of indication
Copings, crowns
Bridges
Abutments
Abutment bridges
Telescopes
Inlays
Onlays
Veneers
Models
Dies
39
N.B.
When using the Zenotec CAM 4.0 and Zenotec CAM 3.2 output formats, the indication is
automatically identified when the file is loaded into the software and displayed in the preview
window.
Straight STL files must be identified manually. This is described in a subsequent
section of the manual.
40
6
Discs
6.1
Startup Screen Menu
Label
(A)
(B)
(C)
(D)
(E)
(F)
(G)
(H)
(I)
Name
Discs
Disc Browser
Import
WP Import
Settings
Machines
Tools
Mill Manager
Quit
Function
Load, find, create and archive discs
Load, find and filter discs
Import milling files
Import milling files into Work Preparation
Program settings
Protected Area for milling unit settings
Area for entering tools and milling strategies
Launches the Mill Manager
Closes the application
In order to load, find, crate or archive discs, select menu item (A) <<Discs>>. A submenu opens for
further applications.
Alternatively, discs which have already been used can be selected by clicking on (B) <<Disc
Browser>>.
41
6.2
Create New Disc
Select the tab (A) <<New Disc>>.
N.B.
When using the Wieland reader, all required parameter are set automatically.
The tab <<New Disc>> opens.
Click on tab (D) to select the material. Click on the icon for a blank in order to transfer the blank size
into (E) <<Disc Type>> .
All other parameters from (E) <<Batch>> to (E) <<Sinter shrinkage factor>> must be entered. Select
(F) <<Information on Label>> to select a printable text for a label printer.
42
The parameters (H) <<Preferred Machine>> should be selected if there is more than one milling
system. When using milling systems with more than one milling chamber, the preferred holder can be
entered if required. This will immediately place the the disc in the correct holder file in the Mill Manager,
which however can easily be changed. .
To complete the disc creation process, click the button (G) <<New blank project with these
settings>> .
Diagram of disc creation process:
Select
Material
6.3
>>>
Select Disc
Thickness
>>>
Enter
Parameters
>>>
If
necessary,
select
blank
holder and
machine
>>>
Save
Open Existing Disc
Select the tab (B) <<Open Existing Disc>>.
43
The tab (B) <<Open Existing Disc>>opens.
A list of all discs in the library is displayed in the table. Enter a filter option (E) <<Filter>> to reduce the
number of discs displayed in the list. For example, entering the number 14 will display all discs with a
disc thickness of 14 and those with the number 14 in the name. Double click on a disc in the list or
press the button (D) <<Open>> to load the disc into the main window for further processing.
6.4
Archive Existing Disc
Select the tab (B) <<Open Existing Disc>>.
44
The tab (B) <<Open Existing Disc>>opens.
It is recommended to maintain an up to date list of all discs. This is achieved by archiving discs that
have already been milled. Mark the discs that have been milled in the list and press the button (F)
<<Copy to Archive>>to move the disc to the archive.
N.B.
Archived discs can not be reloaded into the program. It is recommended to print out the required
data before archiving the discs.
6.5
Disc Library
Select the tab (C) <<Library>>.
45
The tab (C) <<Library>> opens.
N.B.
Information about all discs should be read into tab (C) <<Library>.
The function (D) <<Display>> enables all information displayed in the list to be configured and modified.
For archiving or statistical purposes, the displayed table can be exported to a file by clicking on (E)
<<Open and export table>>.
46
6.6
Disc Browser
Select the button (B) <<Disc Browser>>.
Label
(A)
(B)
(C)
(D)
(E)
(F)
(G)
(H)
(I)
Name
Discs
Disc Browser
Import
WP Import
Settings
Machines
Tools
Mill Manager
Quit
Function
Load, find, create and archive discs
Load, find, filter discs
Import milling files
Import milling files into Work Preparation
Program settings
Protected area for milling unit settings
Area for entering tools and milling strategies
Launches the Mill Manager
Terminates the application
47
The window <<Disc Browser>>opens.
In the Disc Browser, all current discs in use are displayed. A variety of filter options enables a suitable
disc to be located quickly by double clicking on the disc in the process window.
48
7
Objects
7.1
Import
Label
(A)
(B)
(C)
(D)
(E)
(F)
(G)
(H)
(I)
Name
Discs
Disc Browser
Import
WP Import
Settings
Machines
Tools
Mill Manager
Quit
Function
Load, find, create and archive discs
Load, find filter discs
Import milling files
Import milling files into Work Preparation
Program settings
Protected area for milling unit settings
Area for entering tools and milling strategies
Launches the Mill Manager
Terminates the application
In order to import milling jobs, select the button (C) <<Import>> in the main window.
N.B.
Milling jobs can also be imported via the menu item (D) <<WP Import>>. This is especially
advisable when importing STL files. The Wieland Zenotec CAM 3.2 and Wieland Zenotec CAM
4.0 files already contain all the data required for a successful milling operation.
As a rule, beginners are recommended to use the function <<WP Import>>.
49
A dialog field opens for the next application. The object must be selected and opened. Please note that
the correct file format must be selected in <<File Type>>.
7.2
WP Import - Work Preparation
In the <<WP - Import>> module, you are guided step by step through the process up to the nesting
stage. Additional information needed for the milling process can be assigned to the files, e.g.
Material Selection
Restoration Type
Patient and Dentist Data
Milling Strategy
Repair Object (complete faulty data)
Painter
Occlusal Planes
Insertion Direction
50
Label
(A)
(B)
(C)
(D)
(E)
(F)
(G)
(H)
(I)
Name
Discs
Disc Browser
Import
WP - Import
Settings
Machines
Tools
Tool Manager
Exit
Function
Load, find, create and archive discs
Load, find and filter discs
Import Milling Files
Import milling files into Work Preparation
Program settings
Protected area for milling unit settings
Area for entering tools and milling strategies
Launch the Tool Manager
Close the application
Select (J) <<Import>> to select the required milling file and load it into Work Preparation.
51
N.B.
As a rule, STL files do not contain material settings, restoration type nor any individual insertion
directions that may be needed.
Missing information is shown red in the <WP - Import>> module and must be entered.
The Zenotec CAM 4.0 output format already includes all required information, so only the milling
strategy needs to be entered, if required.
Select the restoration in the right-hand pane of the <<WP - Import>> window to load the file into the
job window. The mouse can be used to move the file within the window.
Icon
Function
Description
Left click and hold down
Rotate the object within the job window
Scroll wheel
Zoom in and out on the object within the job window
Right click and hold down
Move the object within the job window
For best results, it is advisable to work through the stages in the menu bar step by step.
52
7.2.1
Select Milling Machine
If several milling machines are available, the required machine (B) must first be selected.
Label
(A)
(B)
(C)
(D)
(E)
(F)
(G)
(H)
(I)
(J)
Name
Import
Milling Machine
Material
Restoration Type
Data
Milling
Object Edit
Painter
Save
Finished
Function
Another milling file can be imported
The required milling machine can be selected
The material used for the restoration type must be selected
The restoration type must be selected
Further information about the restoration can be entered
Area for entering tools and milling strategies
Faulty data can be repaired
Special milling areas can be marked
Save the changes
Save changes and close the application
53
7.2.2
Select Material
In the tab (C) <<Material>> the material needed for the job is selected. Pass the mouse over the button
to open all available materials. Click on the button to activate the material and highlight it in yellow.
Label
(A)
(B)
(C)
(D)
(E)
(F)
(G)
(H)
(I)
(J)
Name
Import
Milling Machine
Material
Restoration Type
Data
Milling
Edit Object
Painter
Save
Finished
Function
A further milling file can be imported
The required milling machine can be selected
The material used and the restoration type must be selected
The restoration type must be selected
Further information about the restoration can be entered
Area for entering tools and milling strategies
Faulty data can be repaired
Special milling areas can be marked
Save the changes
Save changes and close Work Preparation
N.B.
The choices of milling strategy are assigned to the respective material and must therefore be
correctly selected.
Different milling strategies are assigned to the restoration type.
54
7.2.3
Select Restoration Type
In the tab (D) <<Restoration Type>> the restoration type for the job is entered. Move the mouse over
the button to open all available restoration types. Click on the button to activate the restoration type and
highlight it in yellow.
Label
(A)
(B)
(C)
(D)
(E)
(F)
(G)
(H)
(I)
(J)
Name
Import
Milling Machine
Material
Restoration Type
Data
Milling
Edit Object
Painter
Save
Finished
Function
Another milling file can be imported
The required milling machine can be selected
The material used for the restoration type must be selected
The restoration type must be selected
Further information about the restoration can be entered
Area for entering tools and milling strategies
Faulty data can be repaired
Special milling areas can be marked
Save the changes
Save changes and close Work Preparation
55
N.B.
The milling strategy selections are assigned to the restoration types and must therefore be
correctly selected.
Various milling strategies are assigned to the restoration type.
7.2.4
Select Data
To make identification easier, customer-specific <<data>> (E) can be entered.
56
Label
(A)
(B)
(C)
(D)
(E)
(F)
(G)
(H)
(I)
(J)
Name
Import
Milling Machine
Material
Restoration Type
Data
Edit Milling
Edit Object
Painter
Save
Finished
Function
Another milling file can be imported
The required milling machine can be selected
The material used for the type of restoration must be selected
The restoration type must be selected
Further information about the restoration can be entered
Area for entering tools and milling strategies
Faulty data can be repaired
Special milling areas can be marked
Save the changes
Save changes and close Work Preparation
57
7.2.5
Select Milling
In (F) <<Select Milling Strategy>>the milling strategies and a number of helpful view functions can be
selected. The milling strategies shown depend on the material selected and the restoration type.
Label
(A)
(B)
(C)
(D)
(E)
(F)
(G)
(H)
(I)
(J)
Name
Import
Milling Machine
Material
Restoration Type
Data
Edit Milling
Edit Object
Painter
Save
Finished
Function
Another milling file can be imported
The required milling machine can be selected
The material used and the restoration type must be selected
The restoration type must be selected
Further information about the restoration type can be entered
Area for entering tools and milling strategies
Faulty data can be repaired
Special milling areas can be marked
Save the changes
Save changes and close Work Preparation
Depending on the (A) milling strategy, further data entry submenus (B) / (C) open.
58
59
Label
(A)
Name
Milling Strategies
(B)
Mill Colors - Fissure
(C)
Mill Colors - Interdental Area
Depth Limit
In the case of abutment drill holes, the
depth limits must be set
Insertion directions must be set separately
Insertion
Directions
Function
Milling
strategies are
shown
according to the
material and the
restoration type
Fissures are
marked and
milled
separately
The interdental area is milled with a
separate tool
N.B.
All relevant buttons for the milling strategy must be highlighted in yellow. Red buttons must be
edited.
7.2.5.1
Color Fissure Milling
In the case of milling strategies for full-contour crowns, small tools are used in the area of the fissures.
Selecting (B) <<Auto>> enables these fissures to be detected automatically. Alternatively, the fissures
can be colored in with a brush. To do this, select (E) <<Manual>>. Hold down the Shift key and press
the left mouse key to mark the tooth. The diameter of the brush can be increased or decreased by
pressing the Shift key and rotating the scroll wheel on the mouse.
Confirm by pressing (D) <<OK Back>>.
60
7.2.5.2
Insertion Directions
Especially in the case of divergent stumps, it is necessary to align the << insertion directions >> (A).
The insertion directions for bridges can be set automatically by means of (B) <<Auto>>. (H)
<<Features>> can be used to define the insertion direction for working with drill holes e.g. of
abutments.
The Auto function does not automatically detect the insertion direction. This must be set manually. (C)
<<Select Curve>> or alternatively (I) <<Set Polyline>> can be used to mark the preparation margin by
holding down the SHIFT key and left clicking. To use the function (C) <<Select curve>>, it is only
necessary to click on the preparation margin
61
The window splits into two panes (A) and (B). The view from above in pane (A) determines the insertion
direction and must be set accordingly. No undercuts should be visible in the view from above. In the
right-hand pane, the insertion direction is indicated by an arrow.
Press the ENTER key or click on (C) <<OK>>.
62
7.3
Nesting
Label
(A)
(B)
(C)
(D)
Function
Tab for displaying objects or discs (project tree)
Table of all available discs or objects
Material filters and machine filters if appropriate
Function buttons
63
The list (B) shows either discs or objects depending on which tab (A) is selected. Double clicking on a
disc in the table loads it into the main window.
The (E) height of the object is now highlighted in color. Green means that the objects will fit into the disc
already loaded into the process window. Red (E) means that the objects exceed the height of the blank.
If objects are highlighted in yellow (A), this means that the objects can be nested in a disc with a
reduced height.
N.B.
The height of the Zenotec Zr objects is automatically calculated on the basis of the sinter
shrinkage value entered.
Icons may appear inside the preview window of the tooth browser. The icons draw attention to special
functions or areas of indication.
64
Icon
Indications
Copings, crowns
Bridges
Abutments
Abutment Bridge
Telescopes
Inlay
Onlay
Veneer
Model
Die
Height optimization carried out
N.B.
Icons and identification of the indications are shown automatically in the case of Zenotec CAM
4.0 and Zenotech CAM 3.2 output formats.
Drag and drop or double click on the object to load it into the disc and use the mouse to move it to the
required position. Turn the mouse scroll wheel to rotate the object and and click to confirm its position.
To rotate the object quickly, press the SHIFT key and turn the scroll wheel. Click repeatedly on the
object to release and reposition it. Alternatively, right click on the object and select a new position by
using the function <<Move Tooth>>.
N.B.
When STL files are used, it may be necessary to enter the names of patient and dentist. This
function can be defined during setup.
Bars can be set immediately by moving the mouse cursor along the tooth bar. Double click on an
existing bar to delete it. Click on the background to save the current settings and deactivate the object
from further settings. The color of the object changes to gray.
65
Click on the object again to activate it. The color of the object changes to red. Use the left-hand button
bar (D) to display the data and selected (F) milling strategy for the currently activated disc.
66
The right-hand button bar is activated and the units in the disc can be edited.
67
Label
(A)
(B)
(C)
(D)
(E)
(F)
(G)
(H)
(I)
(J)
(K)
(L)
(N)
(O)
(P)
(Q)
(R)
(S)
Function
Set Bars
Job to Job function; connect bars
Show dialog for bar settings
Launch group mode
Group all unmilled objects
Zoom in
Show/hide disc edge
Show/hide grid
Show standard view
Show metal effect view
Show undercuts
Launch height optimization
Set Drops
Delete object from group
Delete entire group
Dynamic Display
Show axis
Show background image
68
These and other functions are available by right clicking on the object.
Label
(A)
(B)
(C)
(D)
(E)
(F)
(G)
(H)
(I)
(J)
(K)
(L)
(N)
(O)
(P)
Name
Move Tooth
Add Bars
Auto Bars
Add Drop
Delete Milling Paths
Delete Tooth
Delete All Bars
Delete All Drops
Change Milling Area
Tooth Information
Preparation Dialog
Create Milling Group
Delete From Group
Delete Group
Group All
Function
Tooth can be moved
A bar can be added
Bars are automatically positioned at the object.
A drop can be added to the object.
Delete the milling path calculation.
Delete the object from the blank and move it into the tooth browser.
Delete all bars
Delete all drops
The milling area around the object can be changed.
Display milling information about the object
Launch WP
Launch group mode
Remove object from milling group
Delete entire milling group
Group all unmilled objects together
69
7.3.1
Set / Change / Delete Bars
Right click on the object to perform these and other functions.
Label
(A)
(B)
(C)
(D)
(E)
(F)
(G)
(H)
(I)
(J)
(K)
(L)
(N)
(O)
(P)
Name
Move Tooth
Add Bars
Auto Bars
Add Drop
Delete Paths
Delete Tooth
Delete All Bars
Delete All Drops
Change Milling Area
Tooth Information
Preparation Dialog
Create Milling Group
Remove From Milling
Group
Unlink Milling Group
Group All
Function
Tooth can be moved
A bar can be added
Bars are automatically positioned at the object
A drop can be added to the object
Delete the milling path calculation
The object is deleted from the blank and moved to the tooth browser
Delete all bars
Delete all drops
The milling area around the object can be changed
The object's milling information is displayed
Launch WP
Launch Group mode
Delete object from group
Delete entire grouping
Group all unmilled objects
Right click on the object and select (B) <<Add Bars>> or click on the corresponding icon
in the
menu bar to add bars to the object. The position of the bars is defined by moving the mouse along the
preparation margin and clicking. Double click on an existing bar to delete it. Alternatively, right click and
select (G) <<Delete All Bars>> to remove all bars attached to the object.
The distance/height of the bars from the preparation margin can be changed during positioning by using
the scroll wheel; this action is displayed in the lower pane of the preview window.
70
After positioning, the thickness of bars can be adjusted and a variable value for separating the bars can
be entered after the milling work is complete. Activating the object (displayed in red) and clicking in the
menu bar on (C) <<Bars>> opens a separate window.
Here, the required values can be entered. Selecting (O) <<Assign>> confirms the value and a mouse
click assigns it to the modified bars.
71
7.3.2
Set / Delete Drops
Label
(A)
(B)
(C)
(D)
(E)
(F)
(G)
(H)
(I)
(J)
(K)
(L)
(N)
(O)
(P)
Name
Move tooth
Add Bars
Auto Bars
Add Drop
Delete paths
Delete Tooth
Delete All Bars
Delete All Drops
Change Milling Area
Tooth Information
Preparation Dialog
Create Milling Group
Remove From Milling
Group
Delete Milling Group
Group All
Function
Tooth can be moved
A bar can be added
Bars are automatically positioned at the object
A drop can be added to the object
Delete the milling path calculation
Delete the object from the blank and move it to the tooth browser
Delete all bars
Delete all drops
The milling area around the object can be changed
Display milling information for the object
Launch WP
Launch group mode
Remove object from group
Delete entire milling group
Group together all unmilled objects
In a similar way to the function (B) <<Add Bar>>, drops can be added to the objects. By right clicking
on the object and selecting <<Add Drops>> or clicking on the icon
in the menu bar, drops can be
added to the object. The position of the drop is defined by clicking on the object. Right clicking and
selecting (H) <<Delete All Drops>>, will delete all drops added to the object.
The length of the drop is variable and can be defined for each object.
72
To do this, activate the object and select in the right-hand window <<Milling/Tooth Setting>>the option
(F) <<Drop Top Edge To>>. Two options are available.
Name
Disc Surface
0.5mm above tooth
7.3.3
Description
The drops extend as far as the surface of the blank
The drops are in a plane 0.5mm above the highest object
Connect Bars
Activate the icon
to enable bars to be connected. Move the freshly positioned tooth within the milling
radius of the tooth already positioned. Set the bars as usual. As soon as the bar turns green, it is
connected to the bar opposite.
Deleting a bar breaks the connection.
7.3.4
Group
The Group function can be used to link objects and mill them as a group. This speeds up the milling
process.
Advantage:
Disadvantage:
Milling jobs are carried out faster. Tool changes are reduced to a minimum.
In the event of an error during milling, it is possible that no object will be fully
milled.
73
Clicking on (D) <<Group>> then on the object adds this object to a group and similarly, clicking on (O)
<<Remove from Group>> deletes an object from a group. Clicking on (E) <<Group All>> groups all
objects that have not yet been milled together in a single group and (P) <<Delete Group>> deletes all
objects from the group.
7.3.5
Milling Strategy
The standard milling strategy for the area of indication as defined during setup can be changed at any
time. To do this, activate the object and select the the required milling strategy (G) from the drop down
field in the Edit menu.
N.B.
Milling strategies differ in the calculation of the milling path and surface quality of the object.
74
7.4
Calculate Milling Path
Once the nesting process is complete, the milling paths can be calculated by clicking on (G) <<Mill>>.
Label
(A)
(B)
(C)
(D)
(E)
(F)
(G)
(H)
(I)
(J)
Name
Discs
Import
WP Import
Settings
Machines
Tools
Mill
Mill Manager
Save
Quit
Function
Load, find, create and archive discs
Import milling files
Import milling files into Work Preparation
Program settings
Protected area for milling unit settings
Area for entering tools and milling strategies
Launch milling path calculation
Launch the Mill Manager
Save the current nesting process
Terminate the application
Another window opens and the milling paths are calculated. Some useful settings are displayed. Drag
and drop or double click the object in the left-hand bar to load it into the view window.
75
Label Name
(A)
Progress and
performance view
(B)
Objects
(C)
Sound function
(D)
View functions
(E)
Simulation
(F)
Milling Paths
(G)
Mill
Function
A milling path simulation can be displayed
Individual milling path steps can be displayed or
hidden
Launch the Mill Manager
Selecting the button (F) <<Milling Path>>displays the calculated milling paths. This is especially
helpful in the case of drill holes for abutments. The milling paths must pass fully through the screw hole.
N.B.
76
Always carry out a (E) <<Mill simulation>>. This enables potential problems to be identified on
screen.
Select (G ) <<Mill>> to open the Mill Manager. This is the last step that needs to be taken.
7.5
Milling / Mill Manager
A number of further functions are carried out In the <<Mill Manager>>. Begin by clicking on button (G)
in the milling path calculation window.
Label Name
(A)
Display progress and
performance
(B)
Object
(C)
Sound function
(D)
View functions
(E)
Simulation
Function
A milling path simulation can be displayed.
77
(F)
Milling Paths
(G)
Mill
Individual milling path steps can be shown or
hidden.
Launch the Mill Manager
78
Alternatively, the Mill Manager can be opened by clicking on the button (H) <<Mill Manager>> in the
main window of the application.
Label
(A)
(B)
(C)
(D)
(E)
(F)
(G)
(H)
(I)
(J)
Name
Discs
Import
WP Import
Settings
Machines
Tools
Mill
Mill Manager
Save
Quit
Function
Load, find, create and archive discs
Import milling files
Import milling files into the Work Preparation
Program settings
Protected area for milling unit settings
Area for entering tools and milling strategies
Launch the milling path calculation
Launch the Mill Manager
Saves the current nesting process
Terminates the application
A number of functions are implemented in the Mill Manager. These include, for example, selecting the
file output directory for the NC file or the type of NC file. Also, a position printout of the nested disc can
be printed. The functions are described below.
79
Label Name
(A)
Filter
(B)
Single File
(C)
(D)
Group File
Holder File
(E)
Machine File
(F)
Output Settings
(G)
Explore Last NC File / Output Path
(H)
Icon 1
Icon 2
Icon 3
View of the current disc to be milled
Disc list
List of all objects to be milled
(I)
(J)
(K)
Function
Discs can be filtered
by material type
Each object is created as a single file --> many
NC files
Milling groups are formed
All the objects of a blank are grouped together -> 1 NC file
Objects and discs of several milling chambers
are grouped together into a single file
Opens a window to generate an automatic
name for the NC file
Shows the last NC file saved / shows the
currently selected output path for the NC file.
The output path can be selected by clicking on
the icon next to to the output path.
Shows/hides the marking of the tooth unit
Opens the position printout
Returns the blank to the blank list
Discs can be moved from the holder file to the disc directory by dragging and dropping and vice versa, a
disc can be dragged from the disc directory into the holder and then passed on for milling.
80
Selecting the buttons (B) <<Single File>>, (C) <<Group File>>, (D) <<Holder File>> or (E)
<<Machine File>> sends the created milling file to the machine. A file window opens to enable a
number of save parameters to be entered.
A number of file names can be entered in field (L). These are only used for identification purposes during
loading into the milling machine. They are finally saved by clicking on button (B) <<Save>>.
81
Nesting and milling scheme for a milling job
Load object Load disc into
Load object
into the tooth
the main
into the disc
browser
window
Select milling
strategy if
necessary
Calculate
milling path
Set bars
Set drops
if
necessar
y
Perform milling
Save
Launch Mill Manager
simulation
milling file
82
LEADING DIGITAL ESTHETICS
Wieland Dental sets the standards in dental technology and stands for innovation
and quality. As a medium-sized enterprise with over 140 years‘ experience we are
one of the world‘s leading suppliers in the field of dental technology. Future-ready
integrated technologies and materials are the hallmarks of our expertise and prowess.
Wieland Dental + Technik GmbH & Co. KG
Lindenstraße 2, 75175 Pforzheim, Germany
Fon +49 72 31 / 37 05 - 0
■
www.wieland-dental.de
[email protected]
535112e.00.2013-12-09
Wieland Dental opens up the way to progress in dental technology. www.wieland-dental.de