1
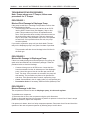
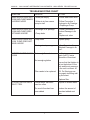
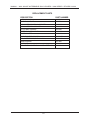
USER MANUAL
UM80 SERIES
(UM80W, UM80WA & UM80WF)
WALL MOUNT SPRAY GUN CLEANERS
FOR WATERBORNE PAINTS
CAUTION
FOR WATER BORNE PAINTS ONLY
THIS UNIT IS NOT DESIGNED
FOR USE WITH SOLVENT BASED PAINT
UNI-RAM CORPORATION • ONTARIO • CANADA
Revised 2010-09
MANUAL - WALL MOUNT WATERBORNE GUN CLEANERS - UM80 SERIES REVISED 2010-09
CONTENTS
INTRODUCTION . . . . . . . . . . . . . . . . . . . . . . . . . . . . . . . . . . . . . . . . . . . . . . . . . . . . . . . . . . . . . . 3
SETUP
INSPECTION . . . . . . . . . . . . . . . . . . . . . . . . . . . . . . . . . . . . . . . . . . . . . . . . . . . . . . . . . . 3
PLACEMENT AND AIR SUPPLY . . . . . . . . . . . . . . . . . . . . . . . . . . . . . . . . . . . . . . . . . . . 3
PAIL SETUP and ADDITION OF UNI-RAM AQUA-KLEEN . . . . . . . . . . . . . . . . . . . . . .3-4
CLEANING SPRAY GUNS. . . . . . . . . . . . . . . . . . . . . . . . . . . . . . . . . . . . . . . . . . . . . . . . . . . . . . . 4
FLOCCULATION . . . . . . . . . . . . . . . . . . . . . . . . . . . . . . . . . . . . . . . . . . . . . . . . . . . . . . . . . . . . . . 4
PICTURES . . . . . . . . . . . . . . . . . . . . . . . . . . . . . . . . . . . . . . . . . . . . . . . . . . . . . . . . . . . . . . . . . . . 5
TROUBLESHOOTING PROCEDURES. . . . . . . . . . . . . . . . . . . . . . . . . . . . . . . . . . . . . . . . . . . . . 6
TROUBLESHOOTING CHART . . . . . . . . . . . . . . . . . . . . . . . . . . . . . . . . . . . . . . . . . . . . . . . . . . . 7
FLOW DIAGRAMS. . . . . . . . . . . . . . . . . . . . . . . . . . . . . . . . . . . . . . . . . . . . . . . . . . . . . . . . . . . .8-9
REPLACEMENT PARTS . . . . . . . . . . . . . . . . . . . . . . . . . . . . . . . . . . . . . . . . . . . . . . . . . . . . . . . 10
WARRANTY . . . . . . . . . . . . . . . . . . . . . . . . . . . . . . . . . . . . . . . . . . . . . . . . . . . . . . . . . . . . . . . . . 11
2
MANUAL - WALL MOUNT WATERBORNE GUN CLEANERS - UM80 SERIES REVISED 2010-09
INTRODUCTION
Uni-ram holds many patents on designs used in its innovative products. Every machine is tested
for compliance with Quality Assurance standards. Follow the directions in this manual under Setup,
Operation and Maintenance in order to operate this machine safely and effectively. Not following these
instruction can lead to malfunction or damage to the machine. Follow directions under the section
below, Cautions and Warnings and on labels attached to the machine. Ensure that the manual is readily available to the operator at all times. If you have any questions about the operation of this machine,
call your distributor or a Uni-ram Service Engineer:
North America: Uni-ram Technical Service 1-800-417- 9133
Other Continents: Contact Your Supplier
SETUP
INSPECTION
•
Report any transport damage immediately to the carrier and your vendor. Initiate a freight claim with
the carrier. The manufacturer is not responsible for freight damage.
Accessories:
•
Manual
•
Coag-Kleen FP, flocculant granules (WF Model only)
•
Air Blow Gun
•
Aqua-Kleen Cleaner
•
Whip Air LIne with Coupler
•
PLACEMENT AND AIR SUPPLY
•
Mount the cleaning unit to a wall (hardware not included) in a Spray Booth or another convenient
location in the shop.
• Remove the cover on the "Air Input" (right side of machine) and attach an air supply adapter (not
supplied).
• Attach the Whip Air Line Coupler (left side of machine) to your spray gun using a a quick connect
fitting (not supplied) on the Spray Gun.
• Remove the Air Blow Gun from the acessories bag and place it onto the bracket on the right side
of the unit. Connect the air supply tube (blue) to the Air Blow Gun Fitting by inserting the tube. To
disconnect the tube, push down on the collar and pull the tube out.
• WF Model only: make sure the valve for the Flocculation Drain is in the closed position (horizontal).
• Make sure the Brush Valve is in the closed (horizontal) position. The valve is located on the front
of the WF Model and on the right side of the W and WA Models.
The air supply pressure must be set to 60 PSI maximum and the air must be free from contaminants
such as water, dust, rust, tar, grease etc.
To prevent damage to the Diaphragm Pump an internal Air Pressure Regulator has been installed to limit
the air pressure. Do not install a second air pressure regulator or use a pressure set below 60 PSI.
PAIL SETUP and ADDITION OF UNI-RAM AQUA-KLEEN
Aqua-Kleen is a state-of-the-art cleaning additive with an enhanced corrosion inhibitor for optimal protection of spray guns.
UM80W / UM80WA
Two bottle-type pails are included with the unit.
• Fill one container with clean water and add half of a bottle of Uni-ram Aqua Kleen
• Insert the suction tube (thin) into this container.
• Insert the drain tube (thick) into the other, empty, container.
• Place both containers under the unit.
3
MANUAL - WALL MOUNT WATERBORNE GUN CLEANERS - UM80 SERIES REVISED 2010-09
UM80WF
• Move the Drain Valve handle to the "closed" (horizontal) position if it is not already there.
• Move the pail outside the unit. Remove the two filters. Pour half of a bottle of Uni-ram Aqua Kleen
into the pail and add tap water until the combined liquid level reaches the bottom of the filter holder. Replace filter.
• Insert the manual wash suction tube into the pail between the Filter Holder and the wall of the pail.
Move the pail into the cabinet.
CLEANING SPRAY GUNS
•
Connect the spray gun to the whip air line or leave it connected to the main air supply line.
•
To clean the paint channel, press the opening of the paint channel against the Cleaning Nozzle,
squeeze the trigger, then press and HOLD the "Press To Clean Button". Hold the gun and Button in
this position for about 15 seconds while moving the gun up and down on the nozzle several times to
improve the cleaning of the paint channel opening. Release the Button.
•
Clean the Cap by rubbing it on the Flat Brush mounted on the inside of the tank.
• If necesssary, clean the exterior of the gun with the Flow-through brush. Activate the flow of water
through the Brush by turning the Brush Control Lever to the "OPEN BRUSH" position. When finished,
turn it to the "CLOSE" position.
•
Use the Air Blow Gun to dry the outside of the spray gun.
•
To dry the paint channel, squeeze the spray gun trigger.
•
To adjust the flow of water through the Brush or Nozzle, use the individual controls on the right side.
The controls are pre-set at the factory - change only if necessary. To increase the flow, back off the
outer nut. To decrease the flow, tighten this nut inwards. Adjust the inner nut to lock the outer one in
place.
CAUTION: MAKE SURE THE GUNS ARE COMPLETELY DRY AFTER USE
FLOCCULATION (WF Model Only)
The dirty water from cleaning accumulates in the flocculation resrvoir during use. When the Wash Pail is
empty follow these steps to treat the water for re-use:
•
•
•
•
•
•
•
•
Remove the Screen at the bottom of the work area and sprinkle 1 full scoop of the flocculant,
COAG-KLEEN, evenly over the dirty water. Replace the screen and turn the Flocculation Timer
fully to the 5 minute position. When the Timer is finished wait one minute and then turn the timer a
second time to the one minute mark. Note: As the flocculation proceeds, the water should become
clear. The debris consisting of paint absorbed into the flocculant will collect in the filters during the
next step.
To allow the water-flocculant mixture to flow into filters, open the Flocculation Drain valve.
Clean the tank with the Brush which is activated by moving the Lever to the OPEN (vertical) position. Move to CLOSE position (horizontal) after use.
Close the Flocculation Drain valve (horizontal position).
Ensure that the Air Agitator in the bottom of the tank lies flat.
Leave the two filters containing the debris in place until the next day to allow for them to dry
throughly. When the debris is dry, it should have an "oatmeal like" consistency. The debris can now
be disposed of according to local environmental regulations.
If the filtered water is not clean, see the Troubleshooting section.
The treated water can be reused until it becomes "silky" to the touch and then it should be disposed of according to local environmental regulations. When adding fresh water, refill until the
water reaches the bottom of the filter holder.
4
MANUAL - WALL MOUNT WATERBORNE GUN CLEANERS - UM80 SERIES REVISED 2010-09
UM80W / UM80WA
UM80WF
UM80W / UM80WA
UM80W / UM80WA
UM80WA HAS ADDTIONAL
AIR OUTLET FOR EXTERNAL
FLOCCULATION
5
UM80WF
UM80WF
MANUAL - WALL MOUNT WATERBORNE GUN CLEANERS - UM80 SERIES REVISED 2010-09
TROUBLESHOOTING PROCEDURES
Note: Pumps shown are 4" Pumps; follow same
procedures for 2" Pumps.
PROCEDURE 1
Blocked Fluid Passage In Diaphagm Pump
If the pump sounds like it is working but liquid does not flow, clear
the fluid passage as follows:
• Remove suction tube from the pail and blow air at 60 PSI
into the INLET Sovent Hose (see diagram). Step on foot
pedal. This procedure may have to be repeated several
times. If this procedure does not help, blow some water into
the suction hose using a spray gun, wait one minute and
step on foot pedal. This procedure may have to be repeated
several times. If this procedure does not work, the pump
must be replaced.
If you need to replace the pump call your local dealer. The warranty on the diaphragm pump is two years from date of purchase.
This procedure will also clear a blockage in the fluid line for
the wash gun.
PROCEDURE 2
Blocked Air Passage In Diaphragm Pump
If there is a steady hissing sound and the pump is not cycling, the
spool valve has stalled due to a blocked air passage. Follow the
procedure below to clear the blockage.
•
•
•
Connect a blow gun to an 60 PSI source. Locate the blue
hose that extends from the air exhaust port of the diaphragm
pump. Use a blow gun to blow air into the open end of this
hose. Turn timer. If the procedure is successful, the pump will
start working. The procedure may have to be repeated several times. If this procedure does not work, replace the pump.
Cause: Contaminants in the air supply (water, oil, solid particles etc)
Preventative Action: If necessary, install an Airline (Moisture) Filter.
PROCEDURE 3
Blocked Passage in Air Line
The components in the air line are the diaphragm pump, air valve and regulator.
To troubleshoot a component:
1) Disconnect the air line to the component using the quick disconnect.
2) Step on foot pedal and check for presence of positive air pressure in the air line. If there is ample
positive air pressure, replace the component.
If air pressure is absent, there is a faulty component upstream. Reconnect the air line and check the
operation of the next component upstream by following steps 1 and 2 above.
6
MANUAL - WALL MOUNT WATERBORNE GUN CLEANERS - UM80 SERIES REVISED 2010-09
TROUBLESHOOTING CHART
SYMPTOM
WASH WATER DOES NOT
FLOW AND PUMP MAKES
A HISSING NOISE
REASON
• Wash pail empty
ACTION
• Check wash wash level
• Water in air line causes
pump to stall
• Follow Procedure 1,
Blockage in Air Passage
in Diaphragm Pump
WASH WATER DOES NOT
FLOW AND PUMP DOES
NOT MAKE A NOISE
• Blockage in air passage
• Follow Procedure 2,
Blocked Passage in Air
Line
• Replace air valve
WASH LIQUID DOES NOT
FLOW, PUMP DOES NOT
MAKE A NOISE
Pump leaks
Replace pump
Blockage in air passage
Follow Procedure 3,
"Blocked Passage in Air
Line".
Not enough flocculant
Do filtering procedure
again. Add 1-2 extra
spoonfuls of flocculant.
FILTERED WATER IS NOT
CLEAN
• Pump leaks
Not enough agitation
Filter needs to be replaced
FILTERED WATER HAS A
"SILKY" FEEL
Filtered water has been
used too often
Too much flocculant has
been added
7
Ensure that the Agitator is
flat on the bottom of the
tank and the air pressure
to the unit is at least 40
PSI. Do filtering procedure again including adding flocculant.
Replace filter.
Dispose of filtered water.
Reduce the amount of
flocculant added next
time.
MANUAL - WALL MOUNT WATERBORNE GUN CLEANERS - UM80 SERIES REVISED 2010-09
FLOW DIAGRAM - UM80W (WA Model not shown)
Use the diagram to trace the flow of compressed air and water.
8
MANUAL - WALL MOUNT WATERBORNE GUN CLEANERS - UM80 SERIES REVISED 2010-09
FLOW DIAGRAM - UM80WF
Use the diagram to trace the flow of compressed air and water.
9
MANUAL - WALL MOUNT WATERBORNE GUN CLEANERS - UM80 SERIES REVISED 2010-09
REPLACEMENT PARTS
DESCRIPTION
PART NUMBER
AIR BLOW GUN
102-7010
DIAPHRAGM PUMP
UDP2TA
AQUA-KLEEN PAINT GUN CLEANER
102-8200
COAG-KLEEN FLOCCULANT
102-8300
FILTER BAG, PRIMARY
102-8125
FILTER BAG, SECONDARY
102-8126
FILTER HOLDER
102-8120
WASH PAIL FOR UM80WF
103-8111P
PAIL, BOTTLE TYPE, FOR UM80W
103-8111B
WASH SCREEN
102-3030
WHIP LINE
102-3980
FLOW-THROUGH BRUSH + HOSE & FITTINGS
144-390
10
MANUAL - WALL MOUNT WATERBORNE GUN CLEANERS - UM80 SERIES REVISED 2010-09
Full Product Warranty
These Uni-ram products have been engineered and manufactured to high performance standards.
Each unit has been subjected to detailed factory testing before shipment.
This product comes with a one-year full warranty from the date of purchase. Uni-ram Corporation
reserves the right to repair or replace the unit, free of charge, to the original purchaser if a part is
found to be defective in material or workmanship as determined by factory service personnel. The
items listed below under "Conditions of Warranty" as consumables are not covered.
Uni-ram reserves the right to direct the customer to ship the unit collect to the Uni-ram factory or to
an approved Service Center for repair using the Uni-ram Return Goods Procedure or to repair the
unit on-site. To prevent damage in transport, the purchaser must ship the unit in the original packaging or use alternate adequate packaging. All units must be shipped clean and dry.
Diaphragm Pump:
We are pleased to advise that the warranty on the diaphragm pump, the heart of the spray gun
cleaner, comes with a 2 year replacement warranty. If, in the unlikely event your diaphragm pump
fails during the first two years of service, call Uni-ram Service at 1-800-417-9133. We will send you
a new pump free of charge and arrange for the return of your original pump.
Conditions of Warranty:
As Uni-ram Corporation has no control over the working conditions or circumstances under which
the purchaser stores, handles or uses the product, Uni-ram makes no warranty or claim, either
expressed or implied with respect to this product's fitness for any purpose or the result to be
obtained from its use. This condition applies to the sale of all products and no representative or distributor of Uni-ram Corporation has the authority to waive or change these conditions.
This warranty applies only to the original purchaser and does not apply if the unit has been misused,
overloaded, neglected, altered or used for any purpose other than those specified in the operating and installation instructions. Deterioration due to normal wear is not covered by this warranty.
Damage due to accident, transportation, fire, floods or acts of God is also not covered. Units whose
serial numbers have been altered or removed are not covered. The warranty is invalid if unauthorized chemicals or solvents with acid content are used in this unit. Unauthorized attempts at selfrepair or alterations by the owner also invalidate this warranty. Interior or exterior finishes are not
covered by this warranty.
Consumable Items are not covered by this warranty.
This warranty replaces all other warranties expressed or implied by statute or otherwise.
To make a claim, call Uni-ram Service at 1-800-417-9133 and quote the serial number of the
unit.
11