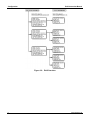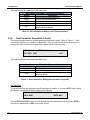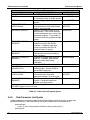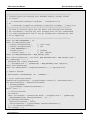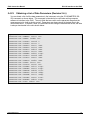
1
INSTRUCTION MANUAL
INTERNAL DATA ACQUISITION SYSTEM
(iDAS)
35 INVERNESS DRIVE EAST
ENGLEWOOD, CO 80112
USA
TOLL-FREE SUPPORT:
FAX:
TEL:
E-MAIL:
WEBSITE:
Copyright 2009
Teledyne Monitor Labs, Inc.
800-846-6062
303-799-4853
303-792-3300
[email protected]
http://www.teledyne-ml.com
028370000
REV. B
July 2009
THIS PAGE IS INTENTIONALLY LEFT BLANK
iDAS Instruction Manual
Table of Contents
TABLE OF CONTENTS
TABLE OF CONTENTS ............................................................................................................................ I
LIST OF FIGURES ................................................................................................................................... II
LIST OF TABLES ..................................................................................................................................... II
USER NOTES ........................................................................................................................................ IV
1. INTRODUCTION .............................................................................................................................. 1
1.1.
1.2.
1.3.
1.4.
1.5.
DESIGN OBJECTIVES.................................................................................................................................... 1
INSTRUMENTS CONTAINING IDAS ................................................................................................................. 1
EVOLUTION OF THE IDAS .............................................................................................................................1
EXAMPLES USED IN THIS MANUAL ................................................................................................................ 2
TYPOGRAPHIC CONVENTIONS USED IN THIS MANUAL .................................................................................... 2
USER NOTES .......................................................................................................................................... 4
2. CONFIGURATION ............................................................................................................................ 5
2.1.
DATA PARAMETERS, TRIGGERING EVENTS, AND DATA CHANNELS ................................................................. 5
2.1.1.
Data Parameters ..............................................................................................................................6
2.1.2.
Triggering Events .............................................................................................................................7
2.1.3.
Data Channels .................................................................................................................................. 7
2.2.
MENU TREE FOR CONFIGURING IDAS......................................................................................................... 10
2.2.1.
Editing the List of Data Channels ................................................................................................... 10
2.2.2.
Editing the Data Channel’s Properties ........................................................................................... 11
2.2.3.
Editing the List of Data Parameters ................................................................................................ 12
2.2.4.
Editing the Data Parameter’s Properties ........................................................................................ 13
2.3.
MODIFYING THE IDAS CONFIGURATION ...................................................................................................... 13
2.3.1.
Configuring Data Channels ............................................................................................................ 14
2.3.2.
“Easy” Data Channel Properties in Detail ....................................................................................... 15
2.3.3.
“Hard” Data Channel Properties in Detail ....................................................................................... 19
2.3.4.
Configuring Data Parameters ......................................................................................................... 21
2.3.5.
Data Parameter Properties in Detail ............................................................................................... 22
2.4.
CONFIGURATION EXAMPLES ....................................................................................................................... 25
2.4.1.
Sampling at Regular Intervals ........................................................................................................ 25
2.4.2.
Sampling during Calibration ........................................................................................................... 26
2.4.3.
Sampling after Exceptional Events ................................................................................................. 27
2.5.
MAXIMUM NUMBER OF CHANNELS, PARAMETERS, AND RECORDS ................................................................ 27
3.
OPERATING THE IDAS ................................................................................................................. 31
3.1.
3.2.
3.3.
3.4.
4.
VIEWING THE STORED DATA ..................................................................................................... 33
4.1.
4.2.
4.3.
4.4.
5.
WHEN THE IDAS IS OPERATING ................................................................................................................. 31
DISABLING THE IDAS ................................................................................................................................. 31
IDAS STATUS INDICATORS ......................................................................................................................... 31
AVERAGES IN PROGRESS WHEN INSTRUMENT IS POWERED OFF .................................................................. 31
MENU FOR VIEWING THE DATA CHANNEL STATUS ....................................................................................... 33
MENU FOR VIEWING THE STORED DATA FOR A CHANNEL ............................................................................. 34
DATA IS STORED AS TWO DIMENSIONAL TABLE ........................................................................................... 35
DELETING THE STORED DATA FOR A DATA CHANNEL................................................................................... 36
RS-232 INTERFACE TO THE IDAS .............................................................................................. 37
5.1.
CONFIGURING THE RS-232 INTERFACE ...................................................................................................... 37
5.1.1.
Setting the Baud Rate .................................................................................................................... 37
5.1.2.
Setting the Interface Mode ............................................................................................................. 37
5.1.3.
Recommended Mode Settings ....................................................................................................... 38
5.2.
COMMAND LINE INTERFACE ........................................................................................................................ 38
5.3.
GENERAL COMMANDS................................................................................................................................ 38
5.4.
IDAS COMMANDS ...................................................................................................................................... 39
5.4.1.
Printing the iDAS Configuration ...................................................................................................... 40
5.4.2.
Modifying the iDAS Configuration (Revision 2.1+) ......................................................................... 42
5.4.3.
iDAS Configuration Script Syntax ................................................................................................... 43
5.4.4.
Data Channel Definition Syntax...................................................................................................... 43
028370000 Rev B
i
Table of Contents
iDAS Instruction Manual
5.4.5.
Data Parameter List Syntax............................................................................................................ 44
5.4.6.
Data Parameter Definition Syntax .................................................................................................. 45
5.4.7.
Deleting iDAS Channels (Revision 2.7+)........................................................................................ 45
5.4.8.
iDAS Configuration Script Error Handling ...................................................................................... 45
5.4.9.
Limitations of Remote iDAS Configuration ..................................................................................... 46
5.4.10.
Obtaining the Number of Stored Data Records (Revision 2.4+) .................................................... 47
5.4.11.
Modifying the Stored Data Records ............................................................................................... 47
5.4.12.
Printing the Stored Data Records ................................................................................................... 47
5.4.13.
Printing a Specific Number of Records .......................................................................................... 48
5.4.14.
Printing Records by Date/Time Range (Revision 2.4+) ................................................................. 48
5.4.15.
Verbose iDAS Report Format ......................................................................................................... 49
5.4.16.
Compact iDAS Report Format ........................................................................................................ 50
5.4.17.
Hexadecimal iDAS Report Format ................................................................................................. 51
5.4.18.
Hexadecimal iDAS Report Format (Revision 2.4-2.9) .................................................................... 52
5.4.19.
Hexadecimal iDAS Report Format (Revision 3.0+) ........................................................................ 53
5.4.20.
Hexadecimal iDAS Report Format Programming Details .............................................................. 54
5.4.21.
Hexadecimal iDAS Report Format Sample Source Code .............................................................. 54
5.4.22.
Obtaining a List of Triggering Events (Revision 2.4+) .................................................................... 62
5.4.23.
Obtaining a List of Data Parameters (Revision 2.4+) ..................................................................... 63
LIST OF FIGURES
Figure 2-1:
Figure 2-2:
Figure 2-3:
Figure 2-4:
Figure 2-5:
Figure 2-6:
Figure 2-7:
Figure 4-1:
Figure 4-2:
Figure 4-3:
Figure 5-1:
iDAS Overview ...................................................................................................................................... 5
iDAS Overview ...................................................................................................................................... 8
Editing the List of Data Channels ....................................................................................................... 10
Editing the Data Channel’s Properties ................................................................................................ 11
Editing the List of Data Parameters .................................................................................................... 12
Editing the Data Parameter’s Properties ............................................................................................ 13
Data Record Format (Revision 3.0+) .................................................................................................. 28
Viewing the Data Channel Status ....................................................................................................... 33
Viewing the Stored Data for a Channel .............................................................................................. 34
Stored Data File Format...................................................................................................................... 35
Sample iDAS Configuration Script ...................................................................................................... 42
LIST OF TABLES
Table 1-1: Instruments Containing iDAS ................................................................................................................... 1
Table 1-2: iDAS Revision History ..............................................................................................................................2
Table 1-3: Special RS-232 Symbols.......................................................................................................................... 3
Table 2-1: Data Parameter Properties....................................................................................................................... 6
Table 2-2: Data Channel Properties .......................................................................................................................... 9
Table 2-3: Menu Buttons for Editing List of Data Channels .................................................................................... 14
Table 2-4: Menu Buttons for Editing Data Channel Properties ............................................................................... 15
Table 2-5: Converting 2-Digit Year to 4-Digit Year .................................................................................................. 19
Table 2-6: Menu Buttons for Editing List of Data Parameters ................................................................................. 22
Table 2-7: Menu Buttons for Editing Data Parameter Properties ............................................................................ 22
Table 2-8: Data Channel Configuration for Monitoring Ozone Concentration......................................................... 25
Table 2-9: Data Channel Configuration for Monitoring Slope ................................................................................. 26
Table 2-10: Data Channel Configuration for Capturing Photometer Lamp Temperature Warnings ....................... 27
Table 2-11: iDAS Configuration Limits .................................................................................................................... 27
Table 2-12: iDAS Storage Capacity......................................................................................................................... 28
Table 3-1: SAMPLE LED Indicator Meaning ........................................................................................................... 31
Table 4-1: iDAS Record View Format ..................................................................................................................... 34
Table 5-1: Typical RS232_MODE Settings ............................................................................................................. 37
Table 5-2: RS-232 Commands for iDAS ................................................................................................................. 39
Table 5-3: Data Channel Property Syntax ............................................................................................................... 44
Table 5-4: Data Parameter Property Syntax ........................................................................................................... 45
ii
028370000 Rev B
iDAS Instruction Manual
Table of Contents
Table 5-5: Configuration Script Processing Result Messages ................................................................................ 46
Table 5-6: Verbose iDAS Report Format................................................................................................................. 50
Table 5-7: Compact iDAS Report Format................................................................................................................ 51
Table 5-8: Hexadecimal iDAS Report Format (Revision 2.4-2.9) ........................................................................... 52
Table 5-9: Hexadecimal iDAS Report Format (Revision 3.0+)................................................................................ 53
028370000 Rev B
iii
Table of Contents
iDAS Instruction Manual
USER NOTES
iv
028370000 Rev B
iDAS Instruction Manual
1.
Introduction
INTRODUCTION
This manual describes the built-in data acquisition system (iDAS) present in AMX-based analyzers.
The terms analyzer and instruments are used interchangeably throughout this manual. This
manual describes the most recent revision of the iDAS, however, differences between the most
recent revision and earlier revisions are pointed out.
1.1.
Design Objectives
The iDAS is designed to implement “predictive diagnostics” that stores historical trending data so
users can anticipate when an instrument will require service. The stored data is in a form that
makes it easy to process with another computer application and plot graphically.
The iDAS is designed to be flexible. It has a consistent user interface in all instruments, but each
instrument’s differences are accommodated. New data parameters and triggering events can be
added to the instrument firmware as needed. Users have full control over which data is stored and
when it is stored.
The iDAS is designed to store a large amount of data. Depending on the sampling frequency and
the number of data parameters, the iDAS can store more than a year’s worth of data. The data is
stored in non-volatile memory, where it is retained even when the instrument is powered off or a
new firmware version is installed.
The iDAS permits users to access the stored data via the instrument’s front panel or the remote
interface. The latter is designed for a remote computer to automatically download the stored data
for further processing.
1.2.
Instruments Containing iDAS
Currently, the iDAS is present only in air pollution analyzers, though it could be installed in
calibrators. It is also available only in AMX-based instruments because of the large memory
requirements.
Instruments Containing iDAS
TML10
TML20
TML30
TML41
TML50
TML87/60
Note: Many of the instruments listed
above include numerous variations. All
the variations of each instrument also
contain the iDAS
Table 1-1: Instruments Containing iDAS
1.3.
Evolution of the iDAS
The iDAS has been around for many years and it has gone through a lot of evolution. The table
below summarizes the significant features that were added to each revision of the iDAS. The main
purpose of this table is to help iron out compatibility issues, particularly in cases where a computer
028370000 Rev B
1
Introduction
iDAS Instruction Manual
is attempting to interface to the iDAS. The iDAS revision number is the same as the library revision
number, which can be viewed in most instruments by pressing SETUP-CFG and pressing NEXT
repeatedly until the library revision number is displayed.
Revision
3.3
3.2
3.0
2.7
2.4
2.3
2.1
iDAS Revision History
Features Added
Increased the maximum number of records.
Added an RS-232 command to cancel the
downloading of records in progress.
Increased the storage capacity in the “TML” –
Series instruments.
Added an option to store the number of samples
in an average. Changed the hexadecimal
record download format.
Added commands to add and delete individual
channels through the RS-232 interface.
Added an RS-232 command to obtain the
number of records available for each channel.
Added options to request iDAS records by date
range.
Added a hexadecimal record download format
to increase the download speed and improve
reliability.
Added support for configuring the iDAS through
the RS-232 interface.
Table 1-2: iDAS Revision History
1.4.
Examples Used in this Manual
The examples used in this manual refer to specific instruments. Keep in mind that the names of
things will be different in other instruments.
1.5.
Typographic Conventions Used in this Manual
In this manual, front panel push buttons are indicated using bold capital characters, for example,
SETUP. Push-button sequences are denoted by a series of button names, separated by dashes,
such as SETUP-MORE-COMM-BAUD.
Names of things such as properties, keywords, events, and setup variables are indicated using
italicized capital characters, as in PARAMETERS, or ATIMER, or RS232_MODE.
RS-232 printouts are enclosed in a shaded box, with user input in lower case, and instrument
output in upper case, like so:
d report “pnumtc” records = 1 compact<CR>
D
79:12:00
0400 PNUMTC:
1
719.6
2
29.8<CR-LF>
028370000 Rev B
iDAS Instruction Manual
Introduction
In RS-232 printouts, non-printable characters are denoted by special symbols consisting of several
characters enclosed in angle brackets, as shown in the table below. All commands must be
terminated by a carriage return, so if a <CR> symbol is not shown in an RS-232 command, it is
implied. Similarly, all messages transmitted by the instrument are terminated by a carriage returnline feed pair; so if a <CR-LF> symbol is not shown in an RS-232 output, it is implied.
Symbol
<ESC>
<SP>
<BS>
<CR>
<LF>
<CR-LF>
Special RS-232 Symbols
Character Represented
Escape
Space
Backspace
Carriage Return
Line Feed
Carriage Return, Line Feed pair
Table 1-3: Special RS-232 Symbols
028370000 Rev B
3
Introduction
iDAS Instruction Manual
USER NOTES
4
028370000 Rev B
iDAS Instruction Manual
2.
Configuration
CONFIGURATION
This section explains how to configure the iDAS to collect the data you want. Configuration mainly
consists of creating data channels and setting their various properties as desired. These topics are
described in detail below.
2.1.
Data Parameters, Triggering Events, and Data Channels
The iDAS is comprised of three principal objects: data parameters, triggering events, and data
channels. While reading the following descriptions of these objects refer to the diagram below for
an understanding of how these objects work together.
Figure 2-1: iDAS Overview
028370000 Rev B
5
Configuration
2.1.1.
iDAS Instruction Manual
Data Parameters
Data parameters are the data points in the instrument that may be measured and stored. The list of
data parameters is arbitrary, but it essentially consists of readings that appear in test
measurements on the display, as well as some internal parameters, such as the concentration just
prior to calibrating the instrument.
The list of data parameters is specific to each instrument, although some data parameters are
present in all instruments. Refer to each instrument’s documentation for the list of data parameters
for that instrument. The data parameter names are limited to six characters because of display size
constraints. The list of data parameters is not customizable in any way by the user. You can
obtain a list of all the data parameters through the RS-232 interface. Refer to the section titled RS232 Interface to the iDAS for more information.
Most data parameters have measurement units associated with them, such as mV, PPB, cc/m, etc.,
although some have no units. The iDAS is not designed to permit these units to be changed. This
restriction is mainly due to the fact that the instruments themselves do not support changing the
measurement units of most of its readings. If a computer is being used to interface to the iDAS,
that computer can perform unit conversions.
One exception to this rule is the concentration units. Since the primary function of most instruments
is to measure concentration, they all permit users to change the concentration units. Beginning with
iDAS revision 3.0, when you change the concentration units in an instrument, data parameters with
units of concentration will be reported in the current instrument units. An exception to this is when
you download reports using the hexadecimal format. Because this format downloads raw records
for maximum performance, performing unit conversions would involve too much overhead. When
downloading records using the hexadecimal format, which can only be done by a computer anyway,
it is the receiving computer’s responsibility to perform any desired unit conversions.
Data parameters have a few user-configurable properties, which are summarized in the table
below.
Property
PARAMETER
SAMPLE MODE
PRECISION
STORE NUM.
SAMPLES1
1
Data Parameter Properties
Description
Instrument-specific data point name
INST: Records instantaneous reading
AVG: Records average reading during reporting interval
MIN: Records minimum reading during reporting interval
MAX: Records maximum reading during reporting interval
Decimal point precision for display purposes
If ON, stores the number of samples in each average for
only this parameter. If OFF, stores only the average.
This property is really only useful when the AVG sample
mode is used.
Revision 3.0+.
Table 2-1: Data Parameter Properties
6
028370000 Rev B
iDAS Instruction Manual
2.1.2.
Configuration
Triggering Events
Triggering events trigger data channels to store data parameters. Triggering events are things such
as expired timers, exiting from calibration, or the occurrence of a warning condition.
The list of triggering events is specific to each instrument, although some triggering events are
present in all instruments. Refer to each instrument’s documentation for the list of triggering events
for that instrument. The triggering event names are limited to six characters because of display
constraints. The list of triggering events is not customizable in any way by the user. You can
obtain a list of all the triggering events through the RS-232 interface. Refer to the section titled RS232 Interface to the iDAS for more information.
2.1.3.
Data Channels
Data channels connect the triggering events to the data parameters. For each data channel the
user selects one triggering event and one or more data parameters to store. This means that there
are many possible combinations of triggering events and data parameters, which is the key to the
system’s flexibility. Users may create up to 20 data channels, each with up to 50 data parameters.
Each instrument has some default data channels defined in the firmware. The user is free to modify
or delete the default data channels. Refer to each instrument’s documentation for the list of default
data channels for that instrument.
The diagram below shows how data channels link triggering events and data parameters together.
It also shows the menu button sequences required to edit the lists of data channels and data
parameters.
028370000 Rev B
7
Configuration
iDAS Instruction Manual
Figure 2-2: iDAS Overview
8
028370000 Rev B
iDAS Instruction Manual
Configuration
Data channels have a few user-configurable properties, which are summarized in the table below.
Property
NAME
Data Channel Properties
Description
The data channel’s name (for reports and
RS-232 access)
Initial Setting
“NONE”
EVENT
The event that triggers this data channel
to measure and store its data parameters.
ATIMER
PARAMETERS
The number of data parameters sampled
by this data channel. You don’t edit this
number directly. It’s set when you edit
the list of parameters for the channel.
1
REPORT PERIOD
The amount of time between each report
000:01:00
NUMBER OF
RECORDS
The number of reports that will be stored
in the data file.
100
RS-232 REPORT
CHANNEL
ENABLED
CAL. HOLD OFF
STARTING DATE
SAMPLE PERIOD
COMPACT
REPORT
Indicates whether a report will be printed
automatically to the RS-232 channel
Provides a convenient means to
temporarily disable a data channel
Disables sampling of data parameters
while instrumentation is in calibration
mode
“Hard” Properties
The date when the first sample will be
taken. Each additional sample is taken in
multiples of SAMPLE PERIOD from the
starting date.
The amount of time between each sample
1 to 50
000:00:01 to
366:23:59
(Days:Hours:Min.)
1 to 999,999
(limited by
available storage
space)
OFF
OFF or ON
ON
OFF or ON
OFF
OFF or ON
Midnight,
January 1st of
the current year
000:00:01
Indicates whether the report printed on
the RS-232 channel will be compact or
verbose. This is only the default format.
You can override this setting by
specifying options when requesting
reports.
Setting Range
Up to 6 letters
and digits
Any of the events
listed in the table
of triggering
events shown
above.
OFF
01-JAN-1970 to
31-DEC-2069
000:00:01 to
366:23:59
(Days:Hours:Min.)
OFF or ON
Table 2-2: Data Channel Properties
028370000 Rev B
9
Configuration
2.2.
iDAS Instruction Manual
Menu Tree for Configuring iDAS
This section describes the menu tree used to configure the iDAS; it assumes that the user is
familiar with the instrument’s menu-driven user interface. The entire menu tree is quite large-too
large to comfortably fit in a single diagram – so it is broken up into four separate diagrams.
2.2.1.
Editing the List of Data Channels
The diagram below shows the menu tree for editing the list of data channels, starting from the
instrument’s main menu.
Figure 2-3: Editing the List of Data Channels
If you press EDIT, you will go to the data channel property menu described in the next section.
10
028370000 Rev B
iDAS Instruction Manual
2.2.2.
Configuration
Editing the Data Channel’s Properties
The diagram below shows the menu tree for editing the data channel’s properties, starting from the
previous menu.
Figure 2-4: Editing the Data Channel’s Properties
If you press EDIT while viewing the PARAMETERS property, you go to the menu described in the
next section.
028370000 Rev B
11
Configuration
2.2.3.
iDAS Instruction Manual
Editing the List of Data Parameters
The diagram below shows the menu tree for editing the list of data parameters, starting from the
previous menu.
Figure 2-5: Editing the List of Data Parameters
If you press EDIT, you will go to the data parameter property menu described in the next section.
12
028370000 Rev B
iDAS Instruction Manual
2.2.4.
Configuration
Editing the Data Parameter’s Properties
The diagram below shows the menu tree for editing the data parameter’s properties, starting from
the previous menu.
Figure 2-6: Editing the Data Parameter’s Properties
2.3.
Modifying the iDAS Configuration
The previous sections gave an overview of the iDAS organization and the menu tree. This section
describes the configuration in more detail.
While modifying the iDAS configuration data collection is suspended and remote
access is inhibited.
028370000 Rev B
13
Configuration
2.3.1.
iDAS Instruction Manual
Configuring Data Channels
You configure the data channels by editing the list of data channels and changing the properties for
data channels. Refer to Figure 2-3: Editing the List of Data Channels to see how to get to this
menu. Once you get into this menu, the instrument displays a summary of the first data channel
that looks like the following. The underlined portion constitutes the data channel summary.
SETUP C.7 0) CONC :ATIMER, 1,800
PREV NEXT
INS
DEL
EDIT PRINT EXIT
“0” in this example is simply the data channel’s index in the list. The first data channel in the list is
at index 0; the second is at index 1, and so on.
“CONC” in this example is the name of the data channel. It may be any six-character, user-defined
name.
“ATIMER” is the triggering event. In this example, the data channel is triggered by an automatic
timer.
“1” in this example is the number of data parameters that the data channel will sample. In this
case, there is only one parameter.
Finally, “800” is the number of records that will be stored in the data channel’s data file. In this
example, the file stores only the most recent 800 records.
You can move to the next data channel by pressing NEXT until you get to the end of the list, when
you will see the following.
SETUP C.7 END OF DATA CHANNELS
PREV
INS
PRINT EXIT
The menu buttons are described in the table below.
Menu Buttons for Editing List of Data Channels
Button
Description
PREV
Move to previous data channel
NEXT
Move to next data channel
INS
Insert a new data channel before current one.
Delete current data channel. When you delete a
data channel, the memory consumed by its data
DEL
file is recovered. Therefore, you should delete
any unneeded data channels before inserting
new ones.
Edit properties for current data channel. See
EDIT
sections below for details.
Print configuration of all data channels to RSPRNT
232 interface.
Table 2-3: Menu Buttons for Editing List of Data Channels
14
028370000 Rev B
iDAS Instruction Manual
2.3.2.
Configuration
“Easy” Data Channel Properties in Detail
This section describes each of the data channel properties in detail. Refer to Table 2-2: Data
Channel Properties for a summary of the properties. Once you get into this menu, the instrument
displays the value of the first data channel property similar to the following.
SETUP C.7 NAME:CONC
<SET SET> EDIT PRNT
EXIT
The menu buttons are described in the table below.
Menu Buttons for Editing List of Data Channels
Button
Description
<SET
Move to previous property
SET>
Move to next property
Edit current property. See property descriptions
EDIT
below for details.
Print configuration of current data channel to
PRNT
RS-232 interface.
Table 2-4: Menu Buttons for Editing Data Channel Properties
NAME
Each data channel must have a unique name. This name appears in the menus and on the RS-232
interface. This name is also used to request iDAS reports via the RS-232 interface. In order to
view the entire name on the front panel display, it should consist of no more than six letters and
digits. However, if you are configuring the iDAS through the RS-232 interface and using the iDAS
primarily with the RS-232 interface, you can assign a channel a longer name, consisting of not only
upper case letters and digits, but lower case letters as well, as in “Concentration.” Note that if you
subsequently view the channel on the front panel display, only the first six characters will be shown.
If you press EDIT while viewing this property, you will see a display similar to the following.
SETUP C.7 NAME:CONC - C
O
N
C
-
-
ENTER EXIT
You may change the data channel’s name and then press ENTR to accept the changes or EXIT to
abort the changes. The first (left-most) dash in the name denotes the end of the name.
EVENT
Each data channel has one triggering event that triggers data collection. All triggering events
except ATIMER also generate a report that is stored in the data channel’s data file. ATIMER events
generate a report only after the report period has elapsed.
028370000 Rev B
15
Configuration
iDAS Instruction Manual
If you press EDIT while viewing this property, you will see a display similar to the following.
SETUP C.7 EVENT:ATIMER
PREV NEXT
ENTER EXIT
Use the PREV and NEXT buttons to scroll through the list of events and then press ENTR to select
the new event or EXIT to keep the old one.
PARAMETERS
When viewing the property summary in the configuration menu this property shows only the number
of data parameters that the data channel samples, as shown below.
SETUP C.7 PARAMETERS:1
<SET SET> EDIT PRNT
EXIT
If you press EDIT while viewing this property, you go to another menu that edits the list of data
parameters. Refer to Figure 2-5: Editing the List of Data Parameters for detailed information.
If you modify the list of data parameters, the data file and all of the data it contains is
deleted and a new data file is created, be sure you have saved the old data before you
modify the list of data parameters.
REPORT PERIOD
This property controls when reports are generated for ATIMER events only. For all other events,
reports are issued immediately when the event occurs. The report period is specified in units of
days, hours, and minutes, measured from midnight of the STARTING DATE property.
For example, if the data channel was created on 15-Oct-2001 and REPORT PERIOD is 000:01:00
(one hour), then the first report will be generated at 1:00 AM, 15-Oct-2001, the second report will be
at 2:00 AM, and so on.
If REPORT PERIOD is 001:00:00 (one day), then the first report will be generated at 12:00 AM, 16Oct-2001, the second at 12:00 AM, 17-Oct-2001, and so on.
If you press EDIT while viewing this property, you will see a display similar to the following.
SETUP C.7 REPORT PERIOD DAYS: 0
0
0
0
ENTR EXIT
You should enter the number of days between each report and press ENTR to accept the changes
or EXIT to abort the changes. If you press ENTR, you will go to the next display.
16
028370000 Rev B
iDAS Instruction Manual
Configuration
SETUP C.7 REPORT PERIOD TIME: 01:00
0
1:
0
0
ENTR EXIT
You should enter the number of hours and minutes between each report and press ENTR to accept
the changes or EXIT to abort the changes. Note that the hours and minutes are added to the days
to form the total report period. Therefore, if the number of days is one and the number of hours is
one, then the total report period is 25 hours.
NUMBER OF RECORDS
This property specifies how many records (reports) are stored in the data file. Each record consists
of a time stamp and one or more data parameters. Once the data file has reached its capacity the
iDAS begins replacing the oldest records in the file with new ones. Thus, the data file contains only
the most recent records.
If you press EDIT while viewing this property, you will see a display similar to the following.
SETUP C.7 NUMBER OF RECORDS: 800
0
8
0
0
ENTR EXIT
You should enter the number of records to store and press ENTR to accept the changes or EXIT to
abort the changes.
If you modify the number of records, the data file and all of the data it contains is
deleted and a new data file is created. Be sure you have saved the old data before you
modify the number of records.
When you are finished editing a channel, the instrument creates the data file for storing the
channel’s records. If you specify a large number of records, such as 10,000, you will probably see
a display like the following while the instrument creates the data file:
SETUP C.7 CREATING NEW DATA FILE XXX%
Depending on the number of records you specified, it can take up to a couple of minutes to create
the data file, so be patient.
RS-232 REPORT
If this property is enabled, then every time a new report is generated it is printed to the RS-232
interface. Regardless of the setting of this property, reports are always stored in the data file and
may be retrieved later, even via the RS-232 interface.
028370000 Rev B
17
Configuration
iDAS Instruction Manual
Usually you would enable this property only if you have a printer connected to the instrument for
maintaining an audit trail. If you have a computer connected to the instrument, it is better to have
the computer explicitly request the reports using commands.
If you press EDIT while viewing this property, you will see a display similar to the following.
SETUP C.7 RS-232 REPORT: OFF
OFF
ENTR EXIT
Select ON to have reports printed to the RS-232 or OFF to disable printing and press ENTR to
accept the changes or EXIT to abort the changes.
CHANNEL ENABLED
This property enables sampling of a channel’s data parameters. This property provides a
convenient means to temporarily disable a channel while retaining its configuration and data. Later,
you can re-enable the channel and resume data collection.
If you press EDIT while viewing this property, you will see a display similar to the following.
SETUP C.7 CHANNEL ENABLED: ON
ON
ENTR EXIT
Select ON to enable data sampling or OFF to disable sampling and press ENTR to accept the
changes or EXIT to abort the changes.
CAL HOLD OFF
When enabled, this property inhibits data sampling while the instrument is in any calibration mode.
Some parameters, such as concentration, should not be sampled while in calibration mode. This
property should really be used only with data channels that are triggered by an ATIMER event.
Data sampling is also inhibited for a few minutes after the instrument exits calibration and returns to
sample mode. The duration of this post-calibration hold off is controlled by the DAS_HOLD_OFF
setup variable. The post-calibration hold off is the same for all data channels that have this
property enabled.
If you press EDIT while viewing this property, you will see a display similar to the following.
SETUP C.7 CAL. HOLD OFF: ON
ON
ENTR EXIT
Select ON to enable calibration hold off or OFF to disable it and press ENTR to accept the changes
or EXIT to abort the changes.
18
028370000 Rev B
iDAS Instruction Manual
2.3.3.
Configuration
“Hard” Data Channel Properties in Detail
These properties are seldom used so they are normally hidden from view. Contact the factory for
instructions on modifying these properties.
STARTING DATE
This property specifies the first date to begin sampling data. Reports are generated at REPORT
PERIOD intervals measured from midnight of the starting date. Normally STARTING DATE is the
date that the data channel was created. However, if you want to begin collecting data some time in
the future you can change this property.
If you press EDIT while viewing this property, you will see a display similar to the following.
SETUP C.7 STARTING DATE: 15-OCT-01
1
5
OCT 0
1
ENTR EXIT
Enter the starting data and press ENTR to accept the changes or EXIT to abort the changes.
Notice that you may enter only two digits for the year. The century portion of the year is determined
according to the following table.
Converting 2-Digit Year to 4-Digit Year
2-Digit Year
4-Digit Year
00 - 69
2000 - 2069
70 - 99
1970 - 1999
Table 2-5: Converting 2-Digit Year to 4-Digit Year
SAMPLE PERIOD
This property controls how frequently data parameters are sampled for ATIMER events only. For
all other events, the data parameters are sampled immediately when the event occurs. As for the
REPORT PERIOD property, the sample period is specified in units of days, hours, and minutes,
measured from midnight of the STARTING DATE property. The sample period should be less than
the report period. Otherwise, the reports may not contain any samples. Refer to the REPORT
PERIOD property for examples of how these periods are measured.
If you press EDIT while viewing this property, you will see a display similar to the following.
SETUP C.7 SAMPLE PERIOD DAYS: 0
0
028370000 Rev B
0
0
ENTR EXIT
19
Configuration
iDAS Instruction Manual
You should enter the number of days between each sample and press ENTR to accept the changes
or EXIT to abort the changes. If you press ENTR, you will go to the next display.
SETUP C.7 SAMPLE PERIOD TIME: 00:01
0
0
0
1
ENTR EXIT
You should enter the number of hours and minutes between each sample and press ENTR to
accept the changes or EXIT to abort the changes.
COMPACT REPORT
This property controls the default format of reports printed to the RS-232, including those printed
automatically and those explicitly requested by RS-232 commands. When compact reports are
enabled, the reports are printed as shown below.
D
D
D
288:10:11
288:10:12
288:10:13
0400
0400
0400
CONC
CONC
CONC
:
:
:
1
1
1
11.2
11.2
11.2
Notice that except for the data channel’s name, the report above contains only numeric data. The
simpler format makes this report easier for a computer to parse.
Furthermore, the compact report can print up to five parameters on a single line, whereas the
verbose format prints each parameter on a separate line. Therefore, the compact report format
uses far fewer characters to report the same information, which is important when downloading
iDAS data from remote instruments.
When compact reports are disabled, the reports are printed as shown below.
D
D
D
288:10:11
288:10:12
288:10:13
0400
0400
0400
CONC
CONC
CONC
:
:
:
AVG
AVG
AVG
O3CNC1=
O3CNC1=
O3CNC1=
11.2
11.2
11.2
PPB
PPB
PPB
If you press EDIT while viewing this property, you will see a display similar to the following.
SETUP C.7 COMPACT REPORT: OFF
OFF
ENTR EXIT
Select ON to print compact reports or OFF to print verbose reports and press ENTR to accept the
changes or EXIT to abort the changes.
20
028370000 Rev B
iDAS Instruction Manual
2.3.4.
Configuration
Configuring Data Parameters
You configure the data parameters by editing the list of data parameters and changing the
properties for data parameters. Refer to Figure 2-5: Editing the List of Data Parameters to see
how to get to this menu.
If you modify the list of data parameters in any way, the data file and all of the data it
contains is deleted and a new data file is created. Be sure you have saved the old data
before you modify the list of data parameters.
Once you get into this menu, the instrument displays a summary of the first data parameter that
looks like the following. The underlined portion constitutes the data parameter summary.
SETUP C.7 0) PARAM=O3CNC1, MODE=AVG
PREV NEXT
INS
DEL
EDIT
EXIT
“0” in this example is simply the data parameter’s index in the list. The first data parameter in the
list is at index 0; the second is at index 1, and so on.
“O3CNC1” is the specific data parameter that will be sampled. In this example it’s “ozone
concentration for range1.” Refer to each instrument’s documentation for the list of data parameters
for that instrument.
“AVG” is the sampling mode. In this case, the mode is “average.” Refer to Table 2-1: Data
Parameter Properties for a complete list of sampling modes.
You can move to the next data parameter by pressing NEXT until you get to the end of the list,
when you will see the following.
SETUP C.7 END OF PARAMETERS
PREV
028370000 Rev B
INS
EXIT
21
Configuration
iDAS Instruction Manual
The menu buttons are described in the table below.
Menu Buttons for Editing List of Data Parameters
Button
Description
PREV
Move to previous data parameter.
NEXT
Move to next data parameter.
INS
Insert a new data parameter before current one.
DEL
Delete current data parameter.
Edit properties for current data parameter. See
EDIT
section below for details.
Table 2-6: Menu Buttons for Editing List of Data Parameters
2.3.5.
Data Parameter Properties in Detail
This section describes each of the data parameter properties in detail. Refer to Table 2-1: Data
Parameter Properties for a summary of properties. Once you get into this menu, the instrument
displays the value of the first data parameter property similar to the following.
SETUP C.7 PARAMETER: O3CNC1
<SET SET> EDIT
EXIT
The menu buttons are described in the table below.
Menu Buttons for Editing Data Parameter Properties
Button
Description
<SET
Move to previous property
SET>
Move to next property
Edit current property. See property descriptions
EDIT
below for details.
Table 2-7: Menu Buttons for Editing Data Parameter Properties
PARAMETER
This property selects the instrument-specific data point to sample. If you press EDIT while viewing
this property, you will see a display similar to the following.
SETUP C.7 PARAMETER: O3CNC1
PREV NEXT
ENTR EXIT
Use the PREV and NEXT buttons to scroll through the list of parameters and then press ENTR to
select the new parameter or EXIT to keep the old one.
22
028370000 Rev B
iDAS Instruction Manual
Configuration
SAMPLE MODE
This property selects the sampling mode for the parameter. The AVG, MIN, and MAX modes are
really only useful in data channels that are triggered by ATIMER events because only these events
can cause multiple readings to be taken between each report. In data channels that are triggered
by other events, use the INST sampling mode.
If you press EDIT while viewing this property, you will see a display similar to the following.
SETUP C.7 SAMPLE MODE: AVG
INST AVG MIN
MAX
ENTR EXIT
Select the desired sampling mode and then press ENTR to accept the changes or EXIT to abort the
changes.
PRECISION
This property specifies the number of digits to display to the right of the decimal point. If you press
EDIT while viewing this property, you will see a display similar to the following.
SETUP C.7 PRECISION: 1
1
ENTR EXIT
Enter a number from 0 to 4 and then press ENTR to accept the changes or EXIT to abort the
changes.
STORE NUM. SAMPLES (Revision 3.0+)
This property specifies whether to store the number of samples that make up each report.
For example, if the sample period is one minute, and the report period is one hour, then 60 samples
will be taken for each report. If the sample mode is AVG, then these 60 samples will be averaged
and a single average value will be stored in the data file. Setting the STORE NUM. SAMPLES
property to ON will store not only the average value, but also the number 60. When you request
reports for this channel later, the number of samples in each report will be printed, as shown below.
D
D
D
288:09:00
288:10:00
288:11:00
0400
0400
0400
CONC
CONC
CONC
: AVG
: AVG
: AVG
O3CNC1=
O3CNC1=
O3CNC1=
11.2
11.2
11.2
PPB
PPB
PPB
SAMPLES=
SAMPLES=
SAMPLES=
18
60
60
Notice that the first report shown above contains only 18 samples, whereas the rest contain 60
samples. The number of samples can give you some idea of the validity of the data. You cannot
obtain the individual samples that make up the average.
If you press EDIT while viewing this property, you will see a display similar to the following.
028370000 Rev B
23
Configuration
iDAS Instruction Manual
SETUP C.7 STORE NUM. SAMPLES: ON
ON
ENTR EXIT
Select the desired mode for this property and then press ENTR to accept the changes or EXIT to
abort the changes.
24
028370000 Rev B
iDAS Instruction Manual
2.4.
Configuration
Configuration Examples
This section describes some typical iDAS data channel configurations.
2.4.1.
Sampling at Regular Intervals
Most trending information can be stored at regular intervals by triggering a data channel with an
automatic timer. One possible configuration for collecting ozone concentration readings is
summarized in the table below.
Data Channel Configuration for Monitoring Ozone Concentration
Setup Property
Setting
Description
User-defined name for the data channel.
NAME
CONC
This name is only significant to the user.
Data channel will be triggered by a timer.
The default sample period is one minute so
EVENT
ATIMER
the concentration will be sampled once per
minute.
A concentration report will be stored in the
REPORT PERIOD
000:01:00
data file every hour. This could be every
few minutes or every few days instead.
800 reports will be stored in the data file.
NUMBER OF RECORDS 800
The number of records is limited only by
the available memory.
The hourly reports will not be printed on the
RS-232 REPORT
OFF
RS-232 interface. The reports can be
printed to the RS-232 interface later.
The data channel is enabled. This property
CHANNEL ENABLED
ON
is useful for temporarily disabling a data
channel.
The concentration will not be sampled while
the instrument is in calibration mode. Not
CAL. HOLD OFF
ON
all data parameters are affected by
calibration so this setting is not pertinent to
some parameters.
The data channel will sample the ozone
PARAMETER
O3CNC1
concentration for range #1.
The data channel will average the
concentration samples during the hour.
MODE
AVG
Since the sample period is one minute, this
average will consist of 60 one-minute
samples.
The concentration average will be
PRECISION
1
displayed with one digit to the right of the
decimal point.
Table 2-8: Data Channel Configuration for Monitoring Ozone Concentration
028370000 Rev B
25
Configuration
2.4.2.
iDAS Instruction Manual
Sampling during Calibration
It might be desirable to monitor the instrument’s slope to look for drift. Since the slope changes
only following a calibration, it is easiest to trigger the data channel with an event such as SLPCHG.
The table below shows one possible configuration.
Data Channel Configuration for Monitoring Slope
Setting
Description
CALDAT
User-defined name for the data channel.
Data channel will be triggered whenever
EVENT
SLPCHG
the slope is recalculated.
This property is used only when the event
REPORT PERIOD
---is ATIMER.
NUMBER OF RECORDS 200
200 reports will be stored in the data file.
The reports will not be printed on the RSRS-232 REPORT
OFF
232 interface.
CHANNEL ENABLED
ON
The data channel is enabled.
Do not enable this or else the slope will not
CAL. HOLD OFF
OFF
be sampled since its sampled while in
calibration mode.
The data channel will sample the slope for
PARAMETER
SLOPE1
range #1.
The data channel will take a single slope
MODE
INST
sample.
The concentration average will be
PRECISION
3
displayed with three digits to the right of the
decimal point.
Setup Property
NAME
Table 2-9: Data Channel Configuration for Monitoring Slope
26
028370000 Rev B
iDAS Instruction Manual
2.4.3.
Configuration
Sampling after Exceptional Events
The previous two examples are ordinary ones. The following example would probably be used only
to diagnose a problem with an instrument. Suppose you had an instrument that periodically
generated photometer lamp temperature warnings. The following configuration would record the
photometer lamp temperature at the time the warning was issued.
Data Channel Configuration for Capturing Photometer Lamp Temperature Warnings
Setup Property
Setting
Description
NAME
LMPWRN
User-defined name for the data channel.
Data channel will be triggered whenever a
EVENT
PHTMPW
photometer lamp warning occurs.
This property is used only when the event
REPORT PERIOD
---is ATIMER.
NUMBER OF RECORDS 10
10 reports will be stored in the data file.
The reports will be printed on the RS-232
interface. So on the audit trail you’ll see
RS-232 REPORT
ON
the warning message and the temperature
that triggered it.
CHANNEL ENABLED
ON
The data channel is enabled.
Do not enable this or else the warning will
CAL. HOLD OFF
OFF
not be stored if the instrument is in
calibration mode.
The data channel will sample the
PARAMETER
PHTEMP
photometer lamp temperature.
The data channel will take a single
MODE
INST
temperature sample.
The concentration average will be
PRECISION
1
displayed with one digit to the right of the
decimal point.
Table 2-10: Data Channel Configuration for Capturing Photometer Lamp Temperature Warnings
2.5.
Maximum Number of Channels, Parameters, and Records
Because the instruments have a finite storage capacity, there are some limits on the number of
iDAS objects you can create, as summarized in the table below.
iDAS Configuration Limits
Feature
Maximum Number 1
Data channels
20
Data parameters per data channel
50
Total data parameters that may be monitored
1,000
Records stored per data channel
999,999
1
Actual number is limited by available storage space and will be less than
the maximum.
Table 2-11: iDAS Configuration Limits
028370000 Rev B
27
Configuration
iDAS Instruction Manual
The actual number of data parameters that may be stored depends on the available storage space
and the number of parameters being sampled by a channel.
Sensor-e instruments have a total of 1024 KB (1,048,576 bytes) of space for storing iDAS data
(Revision 3.2+. Prior to revision 3.2, the storage capacity was 128 KB.). About 3 KB is used by the
file system, and about 1 KB is reserved for future use. That leaves about 1020 KB (1,044,480
bytes) available for storing data.
Each record in a channel’s data file consists of a time stamp, the number of samples in the value for
the parameter, the value for the parameter, and a CRC for the entire record, as shown below.
Figure 2-7: Data Record Format (Revision 3.0+)
The number of samples is optional and separate for each parameter. Based on the record format
shown above, the size of each record is:
record size (bytes) = 4 + (4 x S) + (4 x N) + 2,
Where S is the number of parameters with the STORE NUM. SAMPLES property set to ON and N
is the number of parameters. The minimum record size, storing a single parameter, is 10 bytes.
The maximum record size, storing 50 parameters and the number of samples for each, is 406
bytes. The total number of records that you can store in a channel is simply equal to the
instrument’s available storage space divided by the record size. Therefore, for example, if the
instrument has 62,464 bytes of space available, and the record size is 10 bytes, the instrument can
store 6,246 records. The table below shows the iDAS storage capacity in terms of records and
parameters, based on the number of parameters in a channel.
Number of Parameters in
a Channel
1
10
20
30
iDAS Storage Capacity
Maximum Number of
Records that May Be
Stored
104,448
22,706
12,145
8,289
Maximum Number of
Parameters that May Be
Stored
104,448
227,060
242,900
248,670
Table 2-12: iDAS Storage Capacity
28
028370000 Rev B
iDAS Instruction Manual
Configuration
The data channel’s file size can be calculated by multiplying the record size by one plus the number
of records, as shown below:
file size (bytes) = <record size> x (1 + R ),
Where R is the number of records.
When configuring the iDAS using a configuration script (see Modifying the iDAS Configuration
below), you should calculate the file size for each data channel using the above equations to ensure
that the total required space does not exceed the space available in the instrument. Otherwise,
unpredictable problems will result.
028370000 Rev B
29
Configuration
iDAS Instruction Manual
USER NOTES
30
028370000 Rev B
iDAS Instruction Manual
3.
OPERATING THE iDAS
OPERATING THE IDAS
3.1.
When the iDAS is Operating
The iDAS operates automatically whenever any data channels are enabled and while the iDAS
configuration is not being modified. While the iDAS configuration is, being modified the iDAS is
suspended.
3.2.
Disabling the iDAS
You can disable the iDAS only by setting the CHANNEL ENABLED property of each data channel
to OFF or by deleting all the channels.
3.3.
iDAS Status Indicators
The green SAMPLE LED on the instrument front panel provides a general indication of the iDAS
status, as summarized in the table below.
LED State
Off
Blinking
On
SAMPLE LED Indicator Meaning
iDAS Status
Not sampling (e.g. in zero or span calibration).
Not sampling. In hold off mode.
Sampling normally.
Table 3-1: SAMPLE LED Indicator Meaning
3.4.
Averages in Progress when Instrument is Powered Off
The iDAS is capable of averaging data parameter samples over very long time intervals. For
example, each concentration report typically consists of the average of 60 one-minute samples. If
the instrument is powered off in the middle of the averaging interval, the samples accumulated so
far are saved in non-volatile memory. If the instrument is powered back on during the same
averaging interval, the iDAS resumes adding samples to the same average.
For example, suppose a data channel is set up to average the concentration for a one-hour interval.
If the instrument is powered off 20 minutes into the averaging interval, the average will contain 20
samples, which will be stored in non-volatile memory. If the instrument remains off for 10 minutes
before being powered back on, the data channel will accumulate another 30 samples into the same
average. Therefore, the average will contain 50 samples for that one-hour averaging interval. If the
number of samples were stored, then for this report, the value of 50 would be stored in the data file
in addition to the average.
028370000 Rev B
31
OPERATING THE iDAS
iDAS Instruction Manual
USER NOTES
32
028370000 Rev B
iDAS Instruction Manual
4.
Viewing the Stored Data
VIEWING THE STORED DATA
Once you have stored some data you will probably want to view it. This section describes how to
view the stored data. Whereas data sampling is suspended while configuring the iDAS, data
sampling continues normally while viewing the data.
4.1.
Menu for Viewing the Data Channel Status
The diagram below shows the menu tree for viewing the status of data channels, starting from the
instrument’s main menu.
Figure 4-1: Viewing the Data Channel Status
When you enter this menu, the instrument shows the status of the first data channel, similar to the
following display.
SETUP C.7 PNUMTC: DATA AVAILABLE
PREV NEXT VIEW
EXIT
The example above indicates that data has been stored for the data channel named “PNUMTC.” If
no data had been stored for the channel the display would look like this.
SETUP C.7 PNUMTC: NO DATA AVAILABLE
PREV NEXT
EXIT
You can press the PREV and NEXT buttons to view the status of other channels. If you press
VIEW, you will go to the stored data view menu described in the next section.
028370000 Rev B
33
Viewing the Stored Data
4.2.
iDAS Instruction Manual
Menu for Viewing the Stored Data for a Channel
The diagram below shows the menu tree for viewing the stored data for a single channel, starting
from the previous menu.
Figure 4-2: Viewing the Stored Data for a Channel
When you enter this menu, the instrument shows the first stored data record for the data channel,
similar to the following display. This example is for the data channel named “PNUMTC.”
SETUP C.7 79:12:00 SMPFLW=719.6 cc/m
PV10 PREV NEXT NX10 <PRM PRM>
EXIT
The format of the display above is described in the table below.
Display Field
79:12:00
SMPFLW
719.6
cc/m
iDAS Record View Format
Description
This is the record’s time stamp in the format of
day-of-year:hours:minutes. This record was
recorded on the 79th day of the year at 12:00
noon.
This is the data parameter being sampled.
This value was sampled for the data parameter.
This is the unit of measurement that the
sampled value is in.
Table 4-1: iDAS Record View Format
34
028370000 Rev B
iDAS Instruction Manual
Viewing the Stored Data
If the data channel has more than one data parameter the <PRM and PRM> buttons will appear.
Since the data channel in this example has two parameters the <PRM and PRM> buttons are
shown. If you press the PRM> button the instrument will show the stored data for the next
parameter in the record, SMPPRS in this example, as shown below.
SETUP C.7 79:12:00 SMPPRS=29.8 InHg
PV10 PREV NEXT NX10 <PRM PRM>
EXIT
Notice that the time stamps in the above two displays are the same. This is because both
parameters are part of the same record. Use the PREV and NEXT buttons to move between
records, and the <PRM and PRM> buttons to move between data parameters in the same record.
4.3.
Data is Stored as Two Dimensional Table
The data for each data channel is stored in the data file as a two dimensional table, with each row
storing one record, and each column storing one data parameter. The diagram below shows how
the data is stored in the data file.
Figure 4-3: Stored Data File Format
028370000 Rev B
35
Viewing the Stored Data
4.4.
iDAS Instruction Manual
Deleting the Stored Data for a Data Channel
Since the iDAS is designed to ensure the integrity of the data it stores, there is no easy way to
delete the stored data. If you must delete the data, however, you can edit the data channel
configuration and edit the NUMBER OF RECORDS property. You do not have to actually change
the number of records; simply press ENTR without changing the number. That will delete the
existing data file and create a new one.
36
028370000 Rev B
iDAS Instruction Manual
5.
RS-232 Interface to the iDAS
RS-232 INTERFACE TO THE IDAS
This section describes the RS-232 interface to the iDAS. It does not discuss the general-purpose
features of the RS-232 interface built into the instrument. Refer to the separate RS-232 interface
documentation for general information on commands and configuring the RS-232 interface.
5.1.
Configuring the RS-232 Interface
As a minimum, you may need to select the desired baud rate and operating mode of the RS-232
interface.
5.1.1.
Setting the Baud Rate
To set the baud rate in most instruments, press SETUP-MORE-COMM-BAUD and select one of the
choices. Then press ENTR to accept the changes or EXIT to abort the changes.
In the Sensor-e instruments, press SETUP-MORE-COMM-COM1/2, press <SET or SET> to scroll
to the baud rate property, and then EDIT to edit the baud rate. Select one of the baud rate choices
and press ENTR to accept the changes or EXIT to abort the changes.
5.1.2.
Setting the Interface Mode
To set the interface mode, edit the instrument’s list of setup variables, go to the one called
RS232_MODE, and enter a value based on the following table. To enable several features simply
add the decimal values shown in the table.
Decimal Value
1
2
4
16
32
64
128
256
4096
Typical RS232_MODE Settings
Feature Description
Turns on quiet mode (messages suppressed).
Places instrument in computer mode (no echo).
Enables security feature (log on required).
Enables alternate communication protocol.
Enables multi-drop support.
Enables modem support.
Disables hardware error checking (not
recommended).
Disables XON/XOFF handshaking.
Display command prompt. Useful when using a
terminal.
Table 5-1: Typical RS232_MODE Settings
In Sensor-e instruments, press SETUP-MORE-COMM-COM1/2, press <SET or SET> to scroll to
the mode property, and then EDIT to edit the mode. Enable the desired mode settings and press
ENTR to accept the changes or EXIT to abort the changes.
028370000 Rev B
37
RS-232 Interface to the iDAS
5.1.3.
iDAS Instruction Manual
Recommended Mode Settings
If you are planning to connect to the instrument with a terminal or a terminal program, you should
set RS232_MODE to a value of 0 (zero). In the Sensor-e instruments, turn all of the mode settings
off.
If you are planning to connect to the instrument with a computer, you should set RS232_MODE to a
value of 3. In the Sensor-e instruments, you should turn “QUIET MODE” and “COMPUTER MODE”
on, and turn the rest of the mode settings off.
For other settings, refer to the RS-232 interface documentation.
5.2.
Command Line Interface
The RS-232 interface is command line oriented. You issue commands to the instrument and it
returns response messages.
All commands sent to the instrument must be terminated by a carriage return and/or line feed
character. You may enter commands in upper or lower case.
All messages sent from the instrument are terminated with a carriage return-line feed pair.
5.3.
General Commands
You can obtain a list of the general-purpose RS-232 commands using the ? (question mark)
command. Refer to the RS-232 interface documentation for detailed information on these
commands.
38
028370000 Rev B
iDAS Instruction Manual
5.4.
RS-232 Interface to the iDAS
iDAS Commands
This section briefly describes the RS-232 commands that pertain to the iDAS. The commands are
summarized in the table below.
RS-232 Commands for iDAS
Command
Description
Prints the configuration of the data channel(s). The
SCRIPT option prints the configuration in script
D [id 1] PRINT [“name” 2] [SCRIPT 4] [!]
format, suitable for subsequent uploading. The
exclamation point option includes the “hard”
properties in the printout.
Prints the number of data records stored for the data
1
2 5
D [id ] RECORDS [“name” ]
channel(s).
Prints the data records stored for the data channel(s).
The RECORDS option specifies the number of
1
2
D [id ] REPORT [“name” ]
records (from most recent backwards in time). The
[RECORDS=<number>] [FROM=<start
FROM and TO options select records by date. The
3,5
3,5
date> ] [TO=<end date> ] [VERBOSE|
FROM and TO options take precedence over the
COMPACT | HEX]
RECORDS option. The VERBOSE, COMPACT, and
HEX options control the print format.
Cancels a record download initiated with the D
REPORT command. The instrument may issue
D [id 1] CANCEL 7
several more reports after you send this command
because the reports are queued in the instrument’s
RS-232 transmit buffer.
Uploads a completely new iDAS configuration, totally
DASBEGIN [<data channel definitions>]
replacing the existing configuration, and discarding all
DASEND
existing data.
Uploads a single iDAS channel, replacing an existing
CHANNELBEGIN propertylist
channel of the same name and discarding its data.
CHANNELEND 6
Deletes one or more iDAS channels and their data
CHANNELDELETE “name” [“name”…]6
files, but leaves the other channels and their data
intact.
Prints a list of all the available triggering events in the
1
5
D [id ] EVENT
instrument.
Prints a list of all the available data parameters in the
D [id 1] PARAMETER 5
instrument.
1
The instrument ID number. This field in the command is optional and is used when multiple
instruments are connected to the same RS-232 channel in a multi-drop fashion.
2
The command is executed for all data channels if “name” is omitted. If “name” is provided, the
command is executed for the specified data channel only. If provided, the name must be in double
quotes.
3
The start and end date format is MM/DD/YYYY (or YY) [hh:mm:ss]. MM is months (1-12); DD is date
(1-31); YY is 2-digit year (00-99); YYYY is 4-digit year (1970-2105); hh is hours (0-23); mm is
minutes (00-59); ss is seconds (00-59). hh:mm:ss is optional, but all three fields must be specified if
this is used.
4
Revision 2.1+.
5
Revision 2.4+.
6
Revision 2.7+.
7
Revision 3.3+.
Table 5-2: RS-232 Commands for iDAS
028370000 Rev B
39
RS-232 Interface to the iDAS
5.4.1.
iDAS Instruction Manual
Printing the iDAS Configuration
You can obtain a printout of the entire iDAS configuration or the configuration of a single data
channel using the D PRINT command. For example, the command D PRINT will print the
configuration of all the data channels in a format similar to the following. The command is shown in
lower case.
d print<CR>
SETUP PROPERTIES FOR
NAME:
EVENT:
REPORT PERIOD:
NUMBER OF RECORDS:
RS-232 REPORT:
CHANNEL ENABLED:
CAL. HOLD OFF:
PARAMETERS:
PARAMETER=CONC1,
CONC:
CONC
ATIMER
000:00:01
70000
OFF
ON
OFF
1
MODE=AVG, PRECISION=1, STORE SAMPLES=ON
SETUP PROPERTIES FOR
NAME:
EVENT:
REPORT PERIOD:
NUMBER OF RECORDS:
RS-232 REPORT:
CHANNEL ENABLED:
CAL. HOLD OFF:
PARAMETERS:
PARAMETER=PHREF,
O3REF:
O3REF
ATIMER
001:00:00
2000
OFF
ON
OFF
1
MODE=AVG, PRECISION=1, STORE_SAMPLES=OFF
SETUP PROPERTIES FOR PNUMTC:
NAME:
PNUMTC
EVENT:
ATIMER
REPORT PERIOD:
001:00:00
NUMBER OF RECORDS: 360
RS-232 REPORT:
OFF
CHANNEL ENABLED:
ON
CAL. HOLD OFF:
OFF
PARAMETERS:
3
PARAMETER=SMPFLW, MODE=AVG, PRECISION=1, STORE_SAMPLES=OFF
PARAMETER=SMPPRS, MODE=AVG, PRECISION=1, STORE_SAMPLES=OFF
PARAMETER=VACUUM, MODE=AVG, PRECISION=1, STORE_SAMPLES=OFF
SETUP PROPERTIES FOR O3GEN:
NAME:
O3GEN
EVENT:
ATIMER
40
028370000 Rev B
iDAS Instruction Manual
RS-232 Interface to the iDAS
REPORT PERIOD:
001:00:00
NUMBER OF RECORDS: 360
RS-232 REPORT:
OFF
CHANNEL ENABLED:
ON
CAL. HOLD OFF:
ON
PARAMETERS:
1
PARAMETERS=O3DRIV, MODE=AVG, PRECISION=1, STORE SAMPLES=OFF
SETUP PROPERTIES FOR CALDAT:
NAME:
CALDAT
EVENT:
SLPCHG
NUMBER OF RECORDS: 200
RS-232 REPORT:
OFF
CHANNEL ENABLED:
ON
CAL. HOLD OFF:
OFF
PARAMETERS:
3
PARAMETER=SLOPE1, MODE=INST, PRECISION=3, STORE_SAMPLES=OFF
PARAMETER=OFSET1, MODE=INST, PRECISION=1, STORE_SAMPLES=OFF
PARAMETER=ZSCNC1, MODE=INST, PRECISION=1, STORE_SAMPLES=OFF
The command D PRINT “CONC” <CR>will print the configuration of just the data channel named
“CONC” in a format similar to the following. Note that the double quotes around the data channel
name are required.
d print “conc” <CR>
SETUP PROPERTIES FOR
NAME:
EVENT:
REPORT PERIOD:
NUMBER OF RECORDS:
RS-232 REPORT:
CHANNEL ENABLED:
CAL. HOLD OFF:
PARAMETERS:
PARAMETER=CONC1,
CONC:
CONC
ATIMER
000:00:01
70000
OFF
ON
OFF
1
MODE=AVG, PRECISION=1, STORE_SAMPLES=ON
The command D PRINT “CONC” ! (with an exclamation point) will print the configuration of the data
channel, including its “hard” properties, in a format similar to the following.
d print “conc” !<CR>
SETUP PROPERTIES FOR
NAME:
EVENT:
STARTING DATE:
028370000 Rev B
CONC:
CONC
ATIMER
01-JAN-01
41
RS-232 Interface to the iDAS
SAMPLE PERIOD:
REPORT PERIOD:
NUMBER OF RECORDS:
RS-232 REPORT:
COMPACT REPORT:
CHANNEL ENABLED:
CAL. HOLD OFF:
PARAMETERS:
PARAMETER=CONC1,
iDAS Instruction Manual
000:00:01
000:00:01
70000
OFF
OFF
ON
OFF
1
MODE=AVG, PRECISION=1, STORE_SAMPLES=ON
The command D PRINT “CONC” SCRIPT ! (with an exclamation point) will print the configuration of
the data channel, including its “hard” properties, in script format similar to the following.
d print “conc” script !<CR>
dasbegin
channelbegin
name “CONC”
event “ATIMER”
startdate 1/1/2001
sampleperiod 000:00:01
reportperiod 000:00:01
records 70000
report disabled
compact disabled
status enabled
holdoff disabled
paramlistbegin
1
parameter “CONC1” AVG 1 storesamples
paramlistend
channelend
dasend
--1
Revision 3.0+.
Figure 5-1: Sample iDAS Configuration Script
Once you have downloaded the script, you can modify it, and then upload it (see below).
Downloading the current configuration as a script is the easiest way to get one started and to review
the script syntax.
5.4.2.
Modifying the iDAS Configuration (Revision 2.1+)
In addition to printing the iDAS configuration, you can modify it through the RS-232 interface. The
basic procedure is to upload a configuration script file to the instrument. You can think of this script
file as a program of sorts. In fact, it looks somewhat like a computer program, as shown in Figure
5-1: Sample iDAS Configuration Script above.
42
028370000 Rev B
iDAS Instruction Manual
RS-232 Interface to the iDAS
Once the iDAS configuration script is created, you simply transmit it to the instrument as you would
any other command. If you were using a terminal emulator program on a PC, you would upload the
script as a text file.
The uploaded configuration completely replaces the existing one and discards all data
currently stored in the instrument.
There is one important difference between the iDAS configuration script statements and other
commands such as D PRINT. Although the iDAS configuration script may be transmitted as a
series of individual statement lines, you may not intersperse other commands in between the
statement lines of the script. To state it another way, you may not put arbitrary commands between
the dasbegin and dasend keywords. The iDAS configuration script has a very specific syntax, as
described below.
5.4.3.
iDAS Configuration Script Syntax
In the syntax definitions below, keywords are italicized and must be spelled exactly as shown.
Items in angle braces (<>) are required, but do not include the angle braces in the script. Items in
square braces ( [ ] ) are optional. Upper and lower case does not matter except in the case of the
data channel name. You can include lower case letters in the data channel name and they will be
retained. Line indentation does not matter, and you can put multiple statements on a single line.
However, each line must not exceed 100 characters in length.
dasbegin
[ <zero or more data channel definitions (see syntax below)> ]
dasend
The simplest script consists of just dasbegin followed by dasend, which defines no data channels.
If you view the iDAS configuration using the instrument front panel, the data channels will appear in
the same order that they appear in the script.
5.4.4.
Data Channel Definition Syntax
A data channel definition consists of the keyword channelbegin, followed by zero or more data
channel properties, and terminated by the keyword channelend, as shown below.
channelbegin
[ <zero or more data channel properties (see table below)> ]
[ <data parameter list (see syntax below)> ]
channelend
Beginning with Revision 2.7, you can upload a single channel without altering any of the existing
channels by simply sending a single channel definition as shown above. That is, you omit the
dasbegin and dasend statements. If a channel of the same name already exists, it will be replaced
by the new channel. Otherwise, the new channel will simply be added to the list of channels.
You need only specify the properties that you want to change from the default setting. This is
advantageous since omitting properties that you are not changing reduces the upload time. Refer
to Table 2-2: Data Channel Properties above for the default settings.
028370000 Rev B
43
RS-232 Interface to the iDAS
iDAS Instruction Manual
Data Channel Property Syntax
Description
Example
“Easy Properties”
NAME <name>
User-defined name for the channel,
name “CONC”
1-6 characters long, in double quotes.
EVENT <name>
Name of triggering event, in double
event “ATIMER”
quotes.
REPORTPERIOD1
The number of days, hours, and
reportperiod
<DDD:HH:MM>
minutes between each data channel
000:01:00
report. Up to one year.
RECORDS <number>
Number of records to store for this
records 800
data channel. Each record consists
of a timestamp and one or more data
parameter readings. The number of
records is limited by available storage
space.
report disabled
REPORT DISABLED |
Disables or enables printing data
ENABLED
channel records to the RS-232
interface. If enabled, each data
record is printed to the RS-232
interface when it is stored.
STATUS DISABLED |
Disables or enables the data channel. status enabled
ENABLED
Data channel can record readings
only if enabled.
holdoff enabled
HOLDOFF DISABLED |
Disables or enables data collection
ENABLED
hold-off. If enabled, data channel
does not collect data during
calibration.
“Hard” Properties
STARTDATE1
The date that the channel begins
startdate 1/1/1996
<MM/DD/YYYY>
collecting data. Format of date is
month/date/4-digit year.
SAMPLEPERIOD1
The number of days, hours, and
sampleperiod
<DDD:HH:MM>
minutes between each data
000:00:01
parameter sample. Up to one year.
COMPACT DISABLED |
Disables or enables compact RS-232 compact disabled
ENABLED
reports. If enabled, reports are
printed in compact format.
1 You may specify these properties, and they will be stored in the data channel even if the
“ATIMER” trigger event is not used.
Syntax
Table 5-3: Data Channel Property Syntax
5.4.5.
Data Parameter List Syntax
A data parameter list consists of the keyword paramlistbegin, followed by zero or more data
parameter definitions, and terminated by the keyword paramlistend, as shown below.
paramlistbegin
[ <zero or more data parameter definitions (see syntax below)> ]
paramlistend
44
028370000 Rev B
iDAS Instruction Manual
RS-232 Interface to the iDAS
The simplest data parameter list consists of just paramlistbegin followed by paramlistend, which
defines no data parameters. Of course, if there are no data parameters, then no data will be stored.
If you view the iDAS configuration using the instrument front panel, the data parameters will appear
in the same order that they appear in the script.
5.4.6.
Data Parameter Definition Syntax
A data parameter definition consists of the keyword parameter, followed by the name of the
parameter, the mode to use to sample the parameter, and the display precision (digits to the right of
the decimal point), as shown below.
parameter <parameter name> <sampling mode> <display precision> [storesamples]
For example:
parameter “CONC1” AVG 1 storesamples
Syntax
<parameter name>
<sampling mode>
<display precision>
storesamples 1
1
Data Parameter Property Syntax
Description
Instrument-specific parameter name, in double
quotes. Refer to each instrument’s
documentation for the list of data parameters for
that instrument.
The sampling mode may be one of the modes
listed in Table 2-1: Data Parameter Properties
above.
The number of digits to the right of the decimal
point to display (0-4).
If included in the parameter definition, stores the
number of samples in each average.
Revision 3.0+.
Table 5-4: Data Parameter Property Syntax
5.4.7.
Deleting iDAS Channels (Revision 2.7+)
You can delete individual iDAS channels, leaving the other channels and their data intact, using the
CHANNELDELETE “name” [ “name” …] command. You can specify one or more channel names,
each enclosed in double quotes, to delete. The specified channels and their data files will be
deleted, but the other channels and their data files will not be touched.
5.4.8.
iDAS Configuration Script Error Handling
If there are any syntax errors in the script the instrument will not store the configuration, but it also
does not indicate where the errors are. The precise location of errors is not reported because the
remote iDAS configuration feature is designed to be used by a host computer, which can ensure
028370000 Rev B
45
RS-232 Interface to the iDAS
iDAS Instruction Manual
that there are no syntax errors before transmitting the configuration script. Also, if a host computer
is transmitting the configuration script, indicating the precise location of errors will be of little value
to the host computer. Such information is only useful to a human user.
After processing the entire configuration script, the instrument will indicate success or failure with
one of the single-line messages listed in the table below.
Configuration Script Processing Result Messages
Message
Description
“New iDAS Configuration stored.”
Script contained no errors, and the new
configuration was stored. If you sent a script
using the dasbegin/dasend syntax, then all
existing data was discarded. If you used the
channelbegin/channelend syntax then only
the data for that channel was discarded.
“Unable to lock iDAS configuration
It is not possible to modify the iDAS
for exclusive access. iDAS
configuration right now, probably because
configuration not modified.”
the instrument is in the SETUP-iDAS-EDIT
menu.
“N syntax error(s) encountered.
Script contained N syntax errors. Check the
iDAS configuration not modified.”
syntax, make sure that numbers are within
the data entry limits, and try sending the
script again.
“No channel name specified.”
You issued the CHANNELDELETE
command but did not specify a channel
name.
“Channel x x x not found.”
You issued the CHANNELDELETE
command and specified a channel name
“XXX” that does not exist.
Table 5-5: Configuration Script Processing Result Messages
5.4.9.
Limitations of Remote iDAS Configuration
The instrument does not employ as much sanity checking when processing iDAS configuration
scripts as it does when you configure the iDAS through the front panel interface. Consequently, it
would be possible to create an iDAS configuration script that attempts to store more data than the
instrument can accommodate, which will cause unpredictable problems.
Before transmitting your iDAS configuration script, you should calculate the total storage space
required by all of the data channels in your script to ensure that you do not exceed the total data
storage capacity. Refer to the section titled Maximum Number of Channels, Parameters, and
Records for more information on the data storage capacity.
Remote iDAS configuration cannot be used in a multi-drop environment where all the
instruments will receive the iDAS configuration script because they will all attempt to
process the script. If you have the instruments connected to a software-controlled
switch, then you can upload the iDAS configuration script to a specific instrument.
46
028370000 Rev B
iDAS Instruction Manual
5.4.10.
RS-232 Interface to the iDAS
Obtaining the Number of Stored Data Records (Revision 2.4+)
You can obtain the number of stored data records using the D RECORDS command, which will
produce a printout similar to the following.
d records<CR>
D
95:19:23
D
95:19:23
D
95:19:23
0400
0400
0400
“CONC” RECORDS=235
“PNUMTC” RECORDS=47
“CALDAT” RECORDS=0
The number of records returned is the number currently stored rather than the maximum capacity.
The maximum capacity can be determined by using the D PRINT command. This command is
useful to determine if there are any records available for downloading.
To obtain the number of stored data records for a specific channel, include the channel name in the
command, as shown below.
d records “conc”<CR>
D
95:19:23
0400
5.4.11.
“CONC” RECORDS=235
Modifying the Stored Data Records
You cannot modify the stored data records through the RS-232 interface or the front panel.
5.4.12.
Printing the Stored Data Records
You can obtain a printout of the stored data records for a single data channel using the D REPORT
command. For example, the command D REPORT “PNUMTC” RECORDS = 3 will print the most
recent three records stored for the data channel named “PNUMTC” in a format similar to the
following. Note that the double quotes around the data channel name are required.
d report “pnumtc” records =
D
79:12:00 0400 PNUMTC:
D
79:12:00 0400 PNUMTC:
D
79:13:00 0400 PNUMTC:
D
79:13:00 0400 PNUMTC:
D
79:14:00 0400 PNUMTC:
D
79:14:00 0400 PNUMTC:
3<CR>
AVG SMPFLW= 719.6 cc/m<CR-LF>
AVG SMPPRS= 29.8 InHg<CR-LF>
AVG SMPFLW= 719.6 cc/m<CR-LF>
AVG SMPPRS= 29.8 InHg<CR-LF>
AVG SMPFLW= 719.6 cc/m<CR-LF>
AVG SMPPRS= 29.8 InHg<CR-LF>
Notice that although RECORDS = 3 was specified, the printout above contains six lines. That is
because each record in this example contains two data parameters, and each parameter is printed
on a separate line in verbose mode. Notice that every pair of lines has the same time stamp.
The command D REPORT “PNUMTC” RECORDS = 3 COMPACT will print the most recent three
records stored for the data channel in a format similar to the following.
028370000 Rev B
47
RS-232 Interface to the iDAS
iDAS Instruction Manual
d report “pnumtc” records = 3 compact<CR>
D
79:12:00 0400 PNUMTC:
1
719.6
D
79:13:00 0400 PNUMTC:
1
719.6
D
79:14:00 0400 PNUMTC:
1
719.6
29.8<CR-LF>
29.8<CR-LF>
29.8<CR-LF>
Notice that except for the data channel’s name, the compact printout above contains only numeric
data. The simpler format makes this report easier for a computer to parse.
Furthermore, the compact report can print up to five parameters on a single line, whereas the
verbose format prints each parameter on a separate line. Therefore, the compact report format
uses far fewer characters to report the same information, which is important when downloading
iDAS data from remote instruments.
The verbose and compact formats print invalid readings (i.e. readings taken while the
instrument is in hold-off mode) as “XXXXXX.” If a computer is processing the records,
it must take into account this possible data format.
If the STORE NUM. SAMPLES property of a parameter is enabled, the number of samples will be
printed in verbose reports, like so:
d report “conc” records =
D 288:16:05 0400 CONC
D 288:16:06 0400 CONC
D 288:16:07 0400 CONC
5.4.13.
3<CR>
: AVG
: AVG
: AVG
CONC1 = 191.6 PPB
CONC1 = 191.6 PPB
CONC1 = 191.6 PPB
SAMPLES=
SAMPLES=
SAMPLES=
1
1
1
Printing a Specific Number of Records
You can print the most recent N records by using the RECORDS = N command line option. If you
do not use the RECORDS option or the FROM or TO options, then all the records will be printed.
For example, the command D REPORT “PNUMTC” RECORDS = 3 will print the most recent three
records.
5.4.14.
Printing Records by Date/Time Range (Revision 2.4+)
You can print records by a range of dates and times by using the FROM and TO command line
options. If you do not use the FROM or TO options or the RECORDS option, then all the records
will be printed. The FROM and TO options take precedence over the RECORDS option.
FROM Option
The FROM option selects records whose time stamps are greater than or equal to the specified
date. For example, the command D REPORT “PNUMTC” FROM = 4/5/99 will print all the records
stored on or after midnight, April 5th, 1999. You can specify the year with two or four digits.
TO Option
The TO option selects records whose time stamps are less than or equal to the specified date. For
example, the command D REPORT “PNUMTC” TO = 4/5/99 will print all the records stored on or
before midnight, April 5th, 1999.
48
028370000 Rev B
iDAS Instruction Manual
RS-232 Interface to the iDAS
Combining FROM and TO Options
You can combine the FROM and TO options to select records between a range of dates. For
example, the command D REPORT “PNUMTC” FROM = 4/1/99 TO = 4/5/99 will print all the
records stored on after midnight, April 1st, 1999, and on or before midnight, April 5th, 1999. You can
specify the FROM or TO options anywhere on the command line.
Specifying Times
You can specify the time stamps with one-second resolution by including the time in the FROM or
TO options. For example, the command D REPORT “PNUMTC” FROM = 4/5/99 10:00:00 will print
all the records stored on or after 10 AM, April 5th, 1999. If you specify the time, it must include the
hours, minutes, and seconds; it must immediately follow the date; and you may not specify the time
without the date. The command D REPORT “PNUMTC” FROM = 4/5/99 10:00:00 TO = 4/5/99
12:00:00 will print all the records in the two hour interval from 10 AM to noon on April 5th, 1999.
Caveats
iDAS reports are generated with one-minute resolution. In order to ensure that the reports are
generated within the proper one-minute interval, they are actually generated approximately one
second after the minute interval begins. Therefore, you should take this additional second into
account when specifying date ranges, particularly when using the TO option. For example, the
command D REPORT “PNUMTC” TO = 4/5/99 will print all the records stored on or before midnight,
April 5th, 1999. However, this command will probably miss the report generated at midnight
because that report will actually occur one second after midnight. To include that report, use the
command D REPORT “PNUMTC” TO = 4/5/99 00:00:05, which will include reports that occur up to
five seconds after midnight.
5.4.15.
Verbose iDAS Report Format
You can print records in verbose format, regardless of the default format, by using the VERBOSE
command line option, like so:
d report “conc” records
D 288:16:05 0400 CONC
D 288:16:06 0400 CONC
D 288:16:07 0400 CONC
028370000 Rev B
=
:
:
:
3 verbose<CR>
AVG CONC1 = 191.6 PPB SAMPLES=1<CR-LF>
AVG CONC1 = 191.6 PPB SAMPLES=1<CR-LF>
AVG CONC1 = 191.6 PPB SAMPLES=1<CR-LF>
49
RS-232 Interface to the iDAS
iDAS Instruction Manual
Verbose reports print one line for each data parameter in the record. The table below describes the
format of verbose reports, field by field.
Verbose iDAS Report Format
Description
All messages that may be generated automatically start
with a single character denoting the message category.
The letter D stands for diagnostics, as in predictive
diagnostics, which is an alternate name for the iDAS.
This is the record’s time stamp in the format of day-ofyear:hours:minutes. This record was recorded on the
288th day of the year at 16:05.
This is the instrument’s ID number. You may change the
ID number by pressing SETUP-MORE-COMM-ID.
This is the name of the data channel.
This is the sampling mode for this data parameter.
This value was sampled for the data parameter.
This is the number of samples making up this average.
All reports are terminated with a carriage-return, line-feed
pair.
Message
D
288:16:05
0400
CONC:
AVG
CONC1 = 191.6 PPB
SAMPLES = 1
<CR-LF>
Table 5-6: Verbose iDAS Report Format
5.4.16.
Compact iDAS Report Format
You can print records in compact format, regardless of the default format, by using the COMPACT
command line option, like so:
d report “conc” records =
D 288:16:05 0400 CONC
D 288:16:06 0400 CONC
D 288:16:07 0400 CONC
50
3 compact<CR>
:
1
191.6<CR-LF>
:
1
191.6<CR-LF>
:
1
191.6<CR-LF>
028370000 Rev B
iDAS Instruction Manual
RS-232 Interface to the iDAS
Compact reports print up to five data parameters in the record on a line. The table below describes
the format of compact reports, field by field.
Message
D
288:16:05
0400
CONC:
1
191.6
<CR-LF>
Compact iDAS Report Format
Description
All messages that may be generated automatically start
with a single character denoting the message category.
The letter D stands for diagnostics, as in predictive
diagnostics, which is an alternate name for the iDAS.
This is the record’s time stamp in the format of day-ofyear:hours:minutes. This record was recorded on the
288th day of the year at 16:05.
This is the instrument’s ID number. You may change the
ID number by pressing SETUP-MORE-COMM-ID.
This is the name of the data channel.
This is the line number for this record. Since only five
data parameters may be printed per line, a single record
may span multiple lines. If so, each line has a different
line number so that a computer parsing the data can
distinguish the lines.
This value was sampled for the CONC1 data parameter.
All reports are terminated with a carriage-return, line-feed
pair.
Table 5-7: Compact iDAS Report Format
5.4.17.
Hexadecimal iDAS Report Format
You can print records in hexadecimal format, regardless of the default format, by using the HEX
command line option. The hexadecimal format was created for use by computers that are
downloading the stored data. It is superior to the other formats for the following reasons:
•
It transmits significantly fewer bytes, reducing download times.
•
It is much simpler to process than any of the text formats, reducing download times.
•
It includes a checksum to ensure that the record is received without errors.
•
It sends the entire record time stamp, including the year and seconds.
•
It sends each parameter with full floating-point precision, which is independent of the
formatted precision.
•
It remains fully text-based (as opposed to binary), which ensures compatibility with existing
communication methods and iDAS commands.
There are actually two different hexadecimal formats: one for iDAS revisions 2.4 through 2.9, and a
different one for iDAS revisions 3.0 and later. The two different formats are described separately
below.
028370000 Rev B
51
RS-232 Interface to the iDAS
5.4.18.
iDAS Instruction Manual
Hexadecimal iDAS Report Format (Revision 2.4-2.9)
This section describes the hexadecimal report format used in iDAS revisions 2.4 through 2.9. The
command D REPORT “PNUMTC” HEX will print the records in a format similar to the following.
d report “pnumtc” hex<CR>
D11ec0837aa5a2b44295cef4139<CR-LF> (described in table below)
D69ee0837aa5a2b44295cef412a<CR-LF>
The table below describes the format of hexadecimal reports, field by field. This description uses
the first hexadecimal report (i.e. “D 11ec0837 aa5a2b44 295cef41 39”) for the “PNUMTC” data
channel shown above as an example. Hexadecimal reports print each entire record on one line.
Hexadecimal iDAS Report Format (Revision 2.4-2.9)
Message
Description
D
All messages that may be generated automatically start
with a single character denoting the message category.
The letter D stands for diagnostics, as in predictive
diagnostics, which is an alternate name for the iDAS.
11ec0837
This is the record’s local instrument time stamp in UTC
format, formatted as a 32-bit, printable, little-endian,
lower case hex number. “11ec0837” represents the hex
number 0x3708ec11, which is 923331601 decimal, which
corresponds to 5 April 1999 17:00:01 local time.
Aa5a2b44
This is the IEEE single-precision floating point value that
was sampled for the SMPFLW data parameter, formatted
as a 32-bit, printable, little-endian, lower case hex
number, “aa5a2b44” represents the hex number
0x442b5aaa, which is 685.4166. Notice that having the
raw floating-point representation yields more numeric
precision than the formatted number does.
295cef41
This iEEE single-precision floating-point value was
sampled for the SMPPRS data parameter. “295cef41”
represents the hex number 0x41ef5c29, which is
29.9200.
39
This is the 2’s complement of the message checksum,
starting with the first character in the message (i.e. ‘D’)
and including the time stamp and all of the data
parameters, formatted as an 8-bit printable, lower case
hex number.
<CR-LF>
All reports are terminated with a carriage-return, line-feed
pair.
Table 5-8: Hexadecimal iDAS Report Format (Revision 2.4-2.9)
52
028370000 Rev B
iDAS Instruction Manual
5.4.19.
RS-232 Interface to the iDAS
Hexadecimal iDAS Report Format (Revision 3.0+)
This section describes the hexadecimal report format used in iDAS revisions 3.0 and later. The
command D REPORT “CONC” HEX will print the records in a format similar to the following.
d report “conc” hex<CR>
95ceca3b0100000097a9324184b3<CR-LF> (described in table below)
d1ceca3b0100000097a932411063<CR-LF>
ddeecb3b00000000ffffff7f6a70<CR-LF>
Each line of the report above contains one complete record. In fact, the record format depicted in
Figure 2-7: Data Record Format (Revision 3.0+) is simply converted to 2-character printable hex
and transmitted, CRC and all. Therefore, we do not need to compute a new checksum when
transmitting the message; we simply use the one already stored in the record.
The table below describes the format of hexadecimal reports, field by field. This description uses
the first hexadecimal report (i.e. “95ceca3b01000000 97a93241 84b3”) for the “CONC” data
channel shown above as an example.
95ceca3b
01000000
97a93241
84b3
<CR-LF>
Hexadecimal iDAS Report Format (Revision 3.0+)
Message
Description
This is the record’s local instrument time stamp in UTC
format, formatted as a 32-bit, printable, little-endian,
lower case hex number. “95ceca3b” represents the hex
number 0x3bcace95, which is 1003146901 decimal,
which corresponds to 15 October 2001 11:55:01 local
time.
This is the number of samples making up the average
reading, formatted as a 32-bit, printable, little-endian,
lower case hex number. “01000000” represents the hex
number 0x00000001, which is 1 decimal, meaning that
the average contains one sample.
This is the IEEE single-precision floating-point value that
was sampled for the CONC1 data parameter, formatted
as a 32-bit, printable, little-endian, lower case hex
number. “97a93241” represents the hex number
0x4132a997, which is 11.16640. Notice that having the
raw floating-point representation yields more numeric
precision than the formatted number does.
This is the record CRC of the fields described above;
formatted as a 16-bit, printable, little-endian, lower case
hex number. “84b3” represents the hex number 0xb384.
All reports are terminated with a carriage-return, line-feed
pair.
Table 5-9: Hexadecimal iDAS Report Format (Revision 3.0+)
028370000 Rev B
53
RS-232 Interface to the iDAS
5.4.20.
iDAS Instruction Manual
Hexadecimal iDAS Report Format Programming Details
This section describes the hexadecimal record format at a level of detail required by programmers
wishing to interface a computer to the iDAS. The two different iDAS record formats are described
separately below.
Little-endian format is used because X86 CPU’s, which are rather abundant, use little-endian
representation, so it’s relatively easy to convert the hexadecimal record format to binary on these
systems. Simply start with the leftmost pair of hex characters and convert each pair of hex
characters to one byte. For instance, the hexadecimal string “11ec0837” would get converted to the
following sequence of bytes (from low memory to high memory): 0x11 0xec 0x08 0x37.
To convert the binary data to other data types (e.g. unsigned long, float) simply use a type cast
such as “*( float * ) pabyRecord”. However, there is a catch: whereas the verbose and compact
record formats send invalid readings as “XXXXXX,” the hexadecimal record format sends invalid
readings as binary 0x7fffffff. This value corresponds to an IEEE floating-point value of NAN (not-anumber). If you simply perform the type cast shown above on a NAN, it will generate a floatingpoint exception. So you must first examine the number as an unsigned long integer and explicitly
check for the value 0x7fffffff, which should be treated as an invalid reading.
The hexadecimal format sends invalid readings (i.e. readings taken while the
instrument is in hold-off mode) as binary 0x7fffffff. A computer that is processing the
records must take into account this possible value.
Revisions 2.4 through 2.9
The hexadecimal portion of the message is formatted using lower case characters to aid error
recovery. If the record stream should be corrupted, you can search for the upper case ‘D’ to locate
the beginning of a record.
The checksum is 2’s complement rather than a simple checksum because this new record format
was originally designed to be a binary format, in which case using the 2’s complement of the
checksum makes it easy to verify; you would simply sum the bytes of the message, including the
checksum, and verify that the sum is zero. However, since the format is now text rather than
binary, using the 2’s complement has no benefit. Nevertheless, it cannot be changed now because
that would cause compatibility problems with instruments already in the field that use 2’s
complement.
Revisions 3.0 and Later
In revision 3.0, the hexadecimal format was simplified in that the instrument simply takes the entire
record, converts it to 2-character hexadecimal, and transmits it. The instrument does not compute
a new checksum for the record; it uses the CRC already contained in the record. The receiving
computer can then convert the 2-Character hexadecimal back to binary, verify the CRC, and then
process the record.
5.4.21.
Hexadecimal iDAS Report Format Sample Source Code
The C++ code below shows how to convert both hexadecimal record formats to binary data and
then extract the time stamp and data parameters from it. It also shows how to check for invalid data
parameters.
54
028370000 Rev B
iDAS Instruction Manual
RS-232 Interface to the iDAS
extern unsigned char HexCharToNibble( char ch );
///////////////////////////////////////////////////////////////////
// allocate space for message plus decoded record; message format
// is either
//
“D<timestamp><reading>[<reading>...]<checksum>\r\n”
// or
//
“<timestamp>[<samples>]<reading>[[<samples>]<reading>...]<CRC>\r\n”
///////////////////////////////////////////////////////////////////
// we need to allocate space for the worst case message size because
// the instrument’s setting may have changed since we last downloaded
// its iDAS configuration and it may be sending more information than
// we’re expecting
//////////////////////////////////////////////////////////////////
const int MAX_PARAMETERS = 20;
const int MAX_RECORD_SIZE
= sizeof( unsigned long )
// time stamp
+ sizeof( unsigned short )
// CRC
+ ( MAX_PARAMETERS * (
sizeof( float )
// reading
+ sizeof( long ) ) );
// num. samples
const int MAX_MESSAGE_SIZE = MAX_RECORD_SIZE
char *const pszMessage = new char[ MAX_MESSAGE_SIZE + MAX_RECORD_SIZE ];
if( pszMessage != 0 ) {
unsigned char *const pabyRecord
= ( unsigned char * ) pszMessage + MAX_MESSAGE_SIZE, *pbyData;
const char *pcMessage;
const int nRecordSize = ComputeRecordSize(); // expected size
// request records
m_pInstrument->SendCommand( “d”, sCmdArgs );
// start receiving records
CConnection &rConnection = *m_pInstrument->GetSite()->GetConnection();
int nReceiveTimeout = bUseInitialTimeout
? INITIAL_TIMEOUT
: m_pInstrument->GetReceiveTimeout();
while( true ) {
// receive message
int nBytes;
const int nLength = rConnection.Read( ( unsigned char * ) pszMessage
MAX_MESSAGE_SIZE, nReceiveTimeout, ‘\n’ );
if( bUseInitialTimeout ) {
bUseInitialTimeout = false;
nReceiveTimeout = m_pInstrument->GetReceiveTimeout();
} // if( bUseInitialTimeout )
if( nLength <= 0)
028370000 Rev B
55
RS-232 Interface to the iDAS
break;
iDAS Instruction Manual
// received all records
// null-terminate message primarily for logger and
// in case it’s used anywhere else as a C-string
pszMessage[ nLength ] = ‘\0’;
// verify and decode message
bool bValidMessage = false;
if( m_pInstrument->HasNewDas() ) {
// Revision 3.0+
// CRC is calculated on binary record; so convert
// message to binary record first and then
// verify CRC
pcMessage = pszMessage;
pbyData = pabyRecord;
for( nBytes = nLength – 2; nBytes > 0; nBytes -= 2, pcMessage += 2 )
*pbyData++ = ( HexCharToNibble( *pcMessage ) << 4 )
+ HexCharToNibble( *( pcMessage + 1 ) );
const int nCrcBytes = nRecordSize – sizeof( unsigned short );
if( *( unsigned short * ) ( pabyRecord + nCrcBytes )
== Crc16( pabyRecord, nCrcBytes ).Read()
) {
// message looks OK
bValidMessage = true;
} // if( *( unsigned short * ) ...
} // if( m_pInstrument->HasNewDAS() )
else {
// Revision 2.4-2.9
// checksum is calculated on message, including
// leading ‘D’; so the last four characters should
// be the 2 checksum characters, plus CR-LF
if( Checksum8( pszMessage, nLength – 4 ).Read2sComp()
== ( ( HexCharToNibble( pszMessage[ nLength – 4 ] ) << 4 )
+ HexCharToNibble( pszMessage[ nLength – 3 ] ) )
) {
// message looks OK, convert to binary record
pcMessage = pszMessage + 1; // start just after ‘D’
pbyData = pabyRecord;
for( nBytes = nLength – 5; nBytes > 0; nBytes -= 2, pcMessage += 2 )
*pbyData++ = ( HexCharToNibble( *pcMessage ) << 4 )
+ HexCharToNibble( *( pcMessage + 1 ) );
bValidMessage = true;
} // if( Checksum8( ...
} // if( m_pInstrument->HasNewDAS() ), else
if( bValidMessage ) {
// extract time stamp from record
56
028370000 Rev B
iDAS Instruction Manual
RS-232 Interface to the iDAS
const unsigned long ulTimeStamp = *( ( unsigned long * ) pabyRecord );
// if records were requested by date range, only
// include records within requested range
if(
( ! bUseStartDate || ulTimeStamp >= startDate )
&& ( ! bUseEndDate || ulTimeStamp <= endDate )
) {
///////////////////////////////////////////////////////////////////////
// extract readings for each selected parameter; we need to look at
// each reading as a long integer because invalid readings are sent as
// 0x7fffffff, which is NAN and will cause a floating point exception;
// it’s also important that each parameter contain the same number of
// records, even if some of the records are invalid; this is because we
// can perform some operations, such as saving records, on groups of
// parameters, and the record time stamps need to be synchronized,
// which will only happen if there is the same number of records in
// each parameter list
///////////////////////////////////////////////////////////////////////
pbyData = pabyRecord + sizeof( unsigned long ); // start after time stamp
iterator = m_ParameterList.GetHeadPosition();
while( iterator != NULL ) {
pParameter = ( CDASParameter * ) m_ParameterList.GetNext( iterator );
if( IsSelected() || pParameter->IsSelected() ) {
// append this sample to parameter set
long lSamples;
if( pParameter->IsRemoteStoreNumSamples() ) {
// this field is the number of samples
lSamples = *( long * ) pbyData;
pbyData += sizeof( long );
} // if( pParameter->IsRemoteStoreNumSamples() )
else
lSamples = 1;
const unsigned long ulSample = *( unsigned long * ) pbyData;
pbyData += sizeof( unsigned long );
CDataRecord *const pDataRecord =
( ( ulSample & 0x7ffffffful ) <= 0x7f800000ul )
? new CDataRecord( *( ( float * ) &ulSample ),
lSamples, ulTimeStamp )
: new CDataRecord( 0, 0, ulTimeStamp, false );
if( pDataRecord != 0 )
pParameter->AddRecord( pDataRecord );
else
break;
} // if( IsSelected() ...
else {
028370000 Rev B
57
RS-232 Interface to the iDAS
iDAS Instruction Manual
// discard this sample
if( pParameter->IsRemoteStoreNumSamples() )
pbyData += sizeof( long );
pbyData += sizeof( unsigned long );
} // if( IsSelected() ..., else
} // while( iterator ...
} // if( ( ! bUseStartDate ...
} // if( bValidMessage )
} // while( true )
delete[] pszMessage;
} // if( pszMessage ...
The C++ code below shows how the 8-bit checksum is calculated.
class Checksum8 {
protected:
unsigned char m_byChecksum;
public:
Checksum8( void );
Checksum8( const void *pvBuf, int nCount );
unsigned char Write( const void *pvBuf, int nCount);
unsigned char Read( void ) const;
unsigned char Read2sComp( void ) const;
void Reset( void );
}; // class Checksum8
Checksum8::Checksum8( void )
{
m_byChecksum = 0;
} // checksum8::Checksum8()
Checksum8::Checksum8( const void *pvBuf, int nCount )
{
m_byChecksum = 0;
Write( pvBuf, nCount );
} // Checksum8::Checksum8()
//
// name:
// desc:
//
// inputs:
58
Checksum8::Write()
computes 8-bit checksum on a block of data; may call Write()
repeatedly to compute checksum across multiple blocks
pvBuf: pointer to buffer of arbitrary data to compute checksum on
028370000 Rev B
iDAS Instruction Manual
RS-232 Interface to the iDAS
//
nCount: number of bytes in pvBuf to compute checksum on
// outputs: none
// returns: 8-bit checksum
//
unsigned char Checksum8::Write( const void *pvBuf, int nCount )
{
unsigned char byChecksum = m_byChecksum;
const unsigned char *pbyData = ( unsigned char * ) pvBuf;
while( nCount-- > 0 )
byChecksum += *pbyData++;
return ( m_byChecksum = byChecksum );
} // Checksum8::Write()
inline unsigned char checksum8::Read( void ) const
{
return m_byChecksum;
} // Checksum8::Read()
inline unsigned char Checksum8::Read2sComp( void ) const
{
return ~m_byChecksum + 1;
} // Checksum8::Read2sComp()
inline void Checksum8::Reset( void )
{
m_byChecksum = 0;
} // Checksum8::Reset()
The C++ code below shows how the 16-bit CRC is calculated.
class Crc16 {
protected:
enum {
TABLE_SIZE
INITIAL_VALUE
XOR_OUTPUT
}; // enum
028370000 Rev B
= 256,
= 0xffffu,
= 0x0000u
59
RS-232 Interface to the iDAS
iDAS Instruction Manual
static unsigned short far m_wCrcTable [ TABLE_SIZE ];
unsigned short m_wCrc;
public:
Crc16( void );
Crc16( const void *pvBuf, int nCount );
unsigned short Write( const void *pvBuf, int nCount );
unsigned short Read( void ) const;
void Reset( void );
}; // class Crc16
unsigned short far Crc16::m_wCrcTable[] =
{
// polynomial 0x1021, non-reflected
0x0000, 0x1021, 0x2042, 0x6063, 0x4084,
0x8108, 0x9129, 0xa14a, 0xb16b, 0xc18c,
0x1231, 0x0210, 0x3273, 0x2252, 0x52b5,
0x9339, 0x8318, 0xb37b, 0xa35a, 0xd3bd,
0x2462, 0x3443, 0x0420, 0x1401, 0x64e6,
0xa56a, 0xb54b, 0x8528, 0x9509, 0xe5ee,
0x3653, 0x2672, 0x1611, 0x0630, 0x76d7,
0xb75b, 0xa77a, 0x9719, 0x8738, 0xf7df,
0x48c4, 0x58e5, 0x6886, 0x78a7, 0x0840,
0xc9cc, 0xd9ed, 0xe98e, 0xf9af, 0x8948,
0x5af5, 0x4ad4, 0x7ab7, 0x6a96, 0xla71,
0xdbfd, 0xcbdc, 0xfbbf, 0xeb9e, 0x9b79,
0x6ca6, 0x7c87, 0x4ce4, 0x5cc5, 0x2c22,
0xedae, 0xfd8f, 0xcdec, 0xddcd, 0xad2a,
0x7e97, 0x6eb6, 0x5ed5, 0x4ef4, 0x3e13,
0xff9f, 0xefbe, 0xdfdd, 0xcffc, 0xbf1b,
0x9188, 0x81a9, 0xb1ca, 0xa1eb, 0xd10c,
0x1080, 0x00a1, 0x30c2, 0x20e3, 0x5004,
0x83b9, 0x9398, 0xa3fb, 0xb3da, 0xc33d,
0x02b1, 0x1290, 0x22f3, 0x32d2, 0x4235,
0xb5ea, 0xa5cb, 0x95a8, 0x8589, 0xf56e,
0x34e2, 0x24c3, 0x14a0, 0x0481, 0x7466,
0xa7db, 0xb7fa, 0x8799, 0x97b8, 0xe75f,
0x26d3, 0x36f2, 0x0691, 0x16b0, 0x6657,
0xd94c, 0xc96d, 0xf90e, 0xe92f, 0x99c8,
0x5844, 0x4865, 0x7806, 0x6827, 0x18c0,
0xcb7d, 0xdb5c, 0xeb3f, 0xfble, 0x8bf9,
0x4a75, 0x5a54, 0x6a37, 0x7a16, 0x0af1,
0xfd2e, 0xed0f, 0xdd6c, 0xcd4d, 0xbdaa,
0x7c26, 0x6c07, 0x5c64, 0x4c45, 0x3ca2,
0xef1f, 0xff3e, 0xcf5d, 0xdf7c, 0xaf9b,
0x6e17, 0x7e36, 0x4e55, 0x5e74, 0x2e93,
60
0x50a5,
0xd1ad,
0x4294,
0xc39c,
0x74c7,
0xf5cf,
0x66f6,
0xe7fe,
0x1861,
0x9969,
0x0a50,
0x8b58,
0x3c03,
0xbd0b,
0x2e32,
0xaf3a,
0xc12d,
0x4025,
0xd31c,
0x5214,
0xe54f,
0x6447,
0xf77e,
0x7676,
0x89e9,
0x08e1,
0x9bd8,
0x1ad0,
0xad8b,
0x2c83,
0xbfba,
0x3eb2,
0x60c6,
0xe1ce,
0x72f7,
0xf3ff,
0x44a4,
0xc5ac,
0x5695,
0xd79d,
0x2802,
0xa90a,
0x3a33,
0xbb3b,
0x0c60,
0x8d68,
0x1e51,
0x9f59,
0xf14e,
0x7046,
0xe37f,
0x6277,
0xd52c,
0x5424,
0xc71d,
0x4615,
0xb98a,
0x3882,
0xabbb,
0x2ab3,
0x9de8,
0x1ce0,
0x8fd9,
0x0ed1,
0x70e7,
0xf1ef,
0x62d6,
0xe3de,
0x5485,
0xd58d,
0x46b4,
0xc7bc,
0x3823,
0xb92b,
0x2a12,
0xabla,
0x1c41,
0x9d49,
0x0e70,
0x8f78,
0xe16f,
0x6067,
0xf35e,
0x7256,
0xc50d,
0x4405,
0xd73c,
0x5634,
0xa9ab,
0x28a3,
0xbb9a,
0x3a92,
0x8dc9,
0x0cc1,
0x9ff8,
0x1ef0
028370000 Rev B
iDAS Instruction Manual
};
RS-232 Interface to the iDAS
// Crc16::m_xCrcTable[]
Crc16::Crc16( void )
{
m_wCrc = INITIAL_VALUE;
} // Crc16::Crc16()
Crc16::Crc16( const void *pvBuf, int nCount )
{
m_wCrc = INITIAL_VALUE;
Write( pvBuf, nCount );
} // Crc16::Crc16()
//
//
//
//
//
//
//
//
//
//
name:
desc:
Crc16::Write()
computes 16-bit CRC on a block of data using the table-driven,
non-reflected algorithm for high speed; may call Write() repeatedly
to compute CRC across multiple blocks
inputs: pvBuf: pointer to buffer of arbitrary data to compute CRC on
nCount: number of bytes in pvBuf to compute CRC on
outputs: none
returns: 16-bit CRC
unsigned short Crc16::Write( const void *pvBuf, int nCount )
{
const unsided char *pbyData = ( unsigned char * ) pvBuf;
while( nCount-- > 0 )
m_wCrc = m_wCrcTable[ ( unsigned char ) ( m_wCrc >> 8 ) ^ *pbyData++ ]
^ ( m_wCrc << 8 );
return m_wCrc /* ^ XOR_OUTPUT */;
} // Crc16::Write()
inline unsigned short Crc16::Read( void ) const
{
return m_wCrc /* ^ XOR_OUTPUT */;
} // Crc16::Read()
inline void Crc16::Reset( void )
{
m_wCrc = INITIAL_VALUE;
} // Crc16::Reset()
028370000 Rev B
61
RS-232 Interface to the iDAS
5.4.22.
iDAS Instruction Manual
Obtaining a List of Triggering Events (Revision 2.4+)
You can obtain a list of all the triggering events in the instrument using the D EVENT RS-232
command, as shown below. This command is intended to be used when writing computer software
to interface to the iDAS. The only field that is useful is the event name in double quotes. In
addition, the events named “BGHOLD” and “ENHOLD” are used internally for implementing the
calibration hold-off and should not be used directly.
d event<CR>
TIMEREVENT LOW “ATIMER” 0xd726
EVENT LOW “EXITZR” 0x1117
EVENT LOW “EXITLS” 0x1e75
EVENT LOW “EXITHS” 0xdb93
EVENT LOW “EXITMP” 0xd7d8
EVENT LOW “SLPCHG” 0xd5e2
EVENT MED “EXITDG” 0xe93c
EVENT MED “PHREFW” 0x59f8
EVENT MED “PHTMPW” 0xc74e
EVENT MED “O3REFW” 0x2c11
EVENT MED “O3LMPW” 0x4fb8
EVENT MED “O3TMPW” 0x8717
EVENT MED “STEMPW” 0x2cb7
EVENT MED “SFLOWW” 0xd9f0
EVENT MED “SPRESW” 0x627a
EVENT MED “VPRESW” 0x3c6a
EVENT MED “OTEMPW” 0xfa7c
EVENT MED “OFLOWW” 0x648f
EVENT MED “BTEMPW” 0x6f49
EVENT MED “DCPSW” 0x479b
EVENT HIGH “BGHOLD” 0x8b15
TIMEREVENT HIGH “ENHOLD” 0x6fcc
62
028370000 Rev B
iDAS Instruction Manual
5.4.23.
RS-232 Interface to the iDAS
Obtaining a List of Data Parameters (Revision 2.4+)
You can obtain a list of all the data parameters in the instrument using the D PARAMETERS RS232 command, as shown below. This command is intended to be used when writing computer
software to interface to the iDAS. The only fields that are useful are the parameter name and the
measurement units, both in double quotes. Parameters are always stored in the data files in the
units shown below. In addition, when you download records using the hexadecimal format, the data
is always downloaded in the units shown below.
d parameter<CR>
DATAPOINT LOW “PHMEAS” 0x5136 “mV”
DATAPOINT LOW “PHREF” 0xfbd9 “mV”
DATAPOINT LOW “SLOPE1” 0xe2ad “”
DATAPOINT LOW “SLOPE2” 0x31aa “”
DATAPOINT LOW “OFSET1” 0x4917 “PPB”
DATAPOINT LOW “OFSET2” 0xc92f “PPB”
DATAPOINT LOW “ZSCNC1” 0xb3cf “PPB”
DATAPOINT LOW “ZSCNC2” 0x39a9 “PPB”
DATAPOINT LOW “PHTEMP” 0x6b0e “DegC”
DATAPOINT LOW “O3CNC1” 0xa0ed “PPB”
DATAPOINT LOW “O3CNC2” 0x85e3 “PPB”
DATAPOINT LOW “STABIL” 0x4fb1 “PPB”
DATAPOINT LOW “O3REF” 0x2663 “mV”
DATAPOINT LOW “O3DRIV” 0x6a87 “mV”
DATAPOINT LOW “O3TEMP” 0xf766 “DegC”
DATAPOINT LOW “SMPTMP” 0xae7a “DegC”
DATAPOINT LOW “SMPFLW” 0xb33b “cc/m”
DATAPOINT LOW “SMPPRS” 0x313d “InHg”
DATAPOINT LOW “VACUUM” 0x1C19 “InHg”
DATAPOINT LOW “OFCTMP” 0x8a2c “DegC”
DATAPOINT LOW “BOXTMP” 0xdce2 “DegC”
DATAPOINT LOW “DCPS” 0xba67 “mV”
028370000 Rev B
63
RS-232 Interface to the iDAS
iDAS Instruction Manual
USER NOTES
64
028370000 Rev B
iDAS Instruction Manual
Appendix A. Glossary
APPENDIX A. GLOSSARY
AMX - the real-time operating system that the instrument firmware runs on.
Carriage return – ASCII character code 13 decimal.
Channel – see data channel.
DAS – Acronym for Data Acquisition System, old acronym for iDAS.
Data channel – specifies which data parameters to store and the event that triggers the storing of
data.
Data channel property – user-configurable attributes of data channels such as the name, the
number of records to store, etc.
Data file – each data channel stores its data records in a separate data file in non-volatile memory.
Data parameter – a single data point in an instrument such as a concentration or a flow. These are
instrument-specific, although some, such as the DC power supply, are common to all instruments.
Data record – single stored data channel record that consists of a time stamp and at least one data
parameter.
Download – to receive data, such as the current iDAS configuration, from the instrument via the
RS-232 interface.
Event – see triggering event.
Firmware – the software program embedded within the instrument, and which controls the
instrument.
Front panel – refers to the display and keyboard on the front of the instrument.
GMT – Greenwich Mean Time.
iDAS – Acronym for Internal Data Acquisition System.
iDAS configuration – the list of all the data channels and parameters along with all their settings.
Keyword – a reserved word, such as dasbegin, used in an iDAS configuration script.
Line feed – ASCII character code 10 decimal.
Local time – the time of day where the instrument resides, as opposed to GMT.
Menu – refers to the instrument’s menu that is accessible from the front panel.
Non-volatile memory – medium for storing the instrument configuration, including the iDAS
configuration and data.
Parameter – see data parameter.
Predictive diagnostics – the process of monitoring an instrument in order to observe trends and
predict instrument service.
Record – a single iDAS record stored by a data channel in a data file. A record consists of a time
stamp and one or more data parameters.
Report – see record.
RS-232 interface – refers to the physical RS-232 port of the instrument and/or the command set
used to control the instrument and access stored data.
028370000 Rev B
A-1
Appendix A. Glossary
iDAS Instruction Manual
Script – a text file consisting of one or more program statements describing an iDAS configuration
to be uploaded to an instrument.
Setup variable – a variable for configuring an instrument’s operation. Setup variables may be
accessed by pressing SETUP-MORE-VARS on the instrument’s front panel.
Stored data – data records stored by the iDAS.
Time stamp – When the iDAS report was issued and the record was stored. All the time stamps
are local time (not GMT) in UTC format. You must explicitly perform any desired time zone
conversions.
Triggering event – an instrument-specific event such as a calibration, an automatic timer, or a
warning condition that triggers storing one or more data parameters.
Upload – to transmit data, such as an iDAS configuration script, to the instrument via the RS-232
interface.
UTC – Universal Time Coordinated. The number of seconds since midnight, January 1st, 1970,
GMT. This is a common way of representing time stamps in UNIX and PC computer systems.
A-2
028370000 Rev B