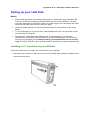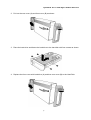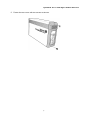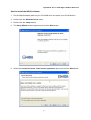
1
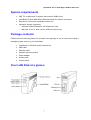
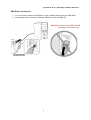
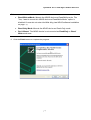
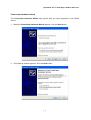
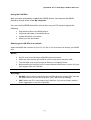
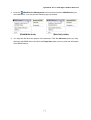
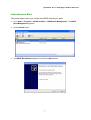
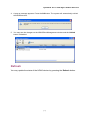
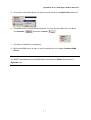
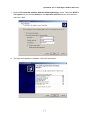
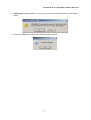
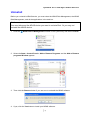
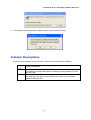
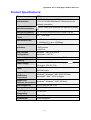
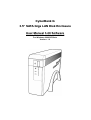
CyberBank G 3.5” SATA Giga LAN Disk Enclosure User Manual 3.20 Software For Windows 2000/XP/Vista Version: 1.0 INDEX Trademarks................................................................................................................... 1 Introductions ................................................................................................................. 1 System requirements ................................................................................................... 2 Package contents ......................................................................................................... 2 Your LAN Disk at a glance ........................................................................................... 2 LAN Disk Application Mode Overview ......................................................................... 3 Setting up your LAN Disk ............................................................................................. 5 NDAS software installation....................................................................................... 8 NDAS Device Registration ................................................................................... 13 Introduce the NDAS Device Management .............................................................. 21 The NDAS Device Management .......................................................................... 21 Switching the Mount (Read/Write) Mode to the Mount (Read-only) Mode......... 25 Changing from Read-Only Mode to Read/Write Mode ....................................... 26 The NDAS Device Status Modes ......................................................................... 27 NDAS Bind Management ......................................................................................... 28 Bind ....................................................................................................................... 29 Unbind................................................................................................................... 34 Refresh.................................................................................................................. 35 Other NDAS Bind Management Functions .......................................................... 36 Formatting the NDAS Device................................................................................... 40 Initialize the NDAS Device ................................................................................... 40 Partition NDAS Device ......................................................................................... 42 Format the NDAS Device through My Computer ................................................ 46 Uninstall .................................................................................................................... 48 Indicator Descriptions............................................................................................... 49 Product Specifications:............................................................................................. 50 FAQ........................................................................................................................... 51 CyberBank G 3.5” SATA Giga LAN Disk Enclosure Trademarks All names and products mentioned below are registered trademarks of their respective companies. Introductions Thank you for purchasing our CyberBank G 3.5” SATA Giga LAN Disk Enclosure, this guide contains information of product features, 3.5” hard drive installation procedure and detail functions. Please read this guide thoroughly before start using and retain it for future reference. The CyberBank G LAN Disk is an external network hard drive enclosure, also name as NDAS (Network Direct Attached Storage) Device or NetDisk. It performs like as mini file server that can share and store files or data from multiple computers by a network 1000Base-TX Ethernet port without needing any particular computer. The LAN Disk storage works as a local drive on each PC with a bundle software driver. It is a very convenience for your home or small office users. For a single user, you also can directly attach the CyberBank G LAN Disk via an USB port for personal data backup. Product features: Single 3.5" SATA hard drive up to 1TB. Provides both USB 2.0 High Speed and Giga LAN Connection for HDD Access. Shared network storage for your home or office. Sleek, portable and optimized heat sink design. Driver based management interface, easy configuration, setting and management. Supports of multi-languages, access management and optional applications. Optional bind management for Aggregation, DAID0 or RAID1 (PC only). Key Code security protection. USB 2.0 port for PC connection. 1 CyberBank G 3.5” SATA Giga LAN Disk Enclosure System requirements IBM PC or Macintoshcomputer with one free USB2.0 port. 1000 Base-TX Auto MDI/ MDI-X Ethernet switch for network connection. Requires 3.5” hard drive installation before use. Operation System supporting: o Windows2000/ Windows XP/ Windows Vista o MAC OS 10.3.X or later version (USB connection only) Package contents Please check the following items are included in the package. If any of items are missing or damaged, please return to your local dealer. CyberBank G LAN Disk (without hard drive) USB cable Ethernet cable Software and manual disc Power adapter Screws pack Vertical stand Your LAN Disk at a glance 2 CyberBank G 3.5” SATA Giga LAN Disk Enclosure LAN Disk Application Mode Overview Network Data sharing connection: 1. Connects the supplied Ethernet cable from the Ethernet port on the LAN Disk to the 1000Base-TX Fast Ethernet switch hub. 2. Each computer must install the software driver in first time; then the LAN Disk works as a local drive on each PC. 3. No PC server required. Wireless User connection: Wireless users can connect the LAN Disk to your wireless access point or router by Ethernet cable. 3 CyberBank G 3.5” SATA Giga LAN Disk Enclosure USB Direct Connection: You can directly attach the LAN Disk to a PC’s USB2.0 host port by an USB cable. No software driver required in Windows 2000/ XP/ Vista and Mac OS. Warning: Do not use the USB and LAN connection at the same time. 4 CyberBank G 3.5” SATA Giga LAN Disk Enclosure Setting up your LAN Disk Notice: Electrostatic discharge may damage the electronic components of the LAN Disk. Be sure your LAN Disk is properly grounded before you set up the LAN Disk. You may touch the metal part of computer’s chassis or power supply unit to discharge any static electricity that may have built up inside your body. Handle a plastic bracket and do not touch any electronic components on the circuit board. To avoid damaging to your hard drive, please handle with care. Do not shake or drop your hard drive in progress. All electronic components have lifetime cycle, it may damage by a component degeneration, electrostatic shock accident or personal carelessness. For the reason, we strong recommend you that always backup your important file for one or more copy to a CD-R, DVD-R or other storage media for prevent your precious data missing. Installing a 3.5” hard drive to your LAN Disk Follow the below steps to install a 3.5” hard drive to your LAN Disk. 1. Remove the two screws on the rear cover of the LAN Disk with a philips screwdriver and remove the rear cover. 5 CyberBank G 3.5” SATA Giga LAN Disk Enclosure 2. Pull out the rear cover (A) and front cover (B) as shown. 3. Place the hard drive and fasten the hard drive to the hard disk with four screws as shown. 4. Replace the front cover with hard drive (A) and then rear cover (B) to the Hard Disk. 6 CyberBank G 3.5” SATA Giga LAN Disk Enclosure 5. Fasten the rear cover with two screws as shown. 7 CyberBank G 3.5” SATA Giga LAN Disk Enclosure NDAS software installation Before using the LAN Disk, you must install the supplied NDAS software to your PC. Please follow the below steps to start the installation progress. Notice for Mac user: The hard drive in the LAN Disk should be formatted as FAT 32/ NTFS before using the LAN Disk. Notice for all user: Make sure to plug the power cable on the wall outlet. Make sure to connect the LAN Disk to the PC by the USB cable or Ethernet cable. Make sure to close all the executing files on your task bar. 8 CyberBank G 3.5” SATA Giga LAN Disk Enclosure Start to install the NDAS software. 1. Put the NDAS software disk into your CD-ROM drive and select your CD-ROM drive. 2. Double click the Windows Driver folder. 3. Double click the setup.exe file. 4. The Setup Wizard window appears and click the Next button 5. Select the I accept the terms in the license agreement option and click the Next button. 9 CyberBank G 3.5” SATA Giga LAN Disk Enclosure 6. Click the Install button. 7. Wait for a while till the installation is finished. Note: During the installation, you may press the Cancel button to end the installation. 10 CyberBank G 3.5” SATA Giga LAN Disk Enclosure 8. Click the Continue Anyway button if the following window pops up. 9. Click the Finish button to complete the installation. 11 CyberBank G 3.5” SATA Giga LAN Disk Enclosure 10. A message window appears. Click the Yes button to restart your computer or click the No button to restart the computer later. 12 CyberBank G 3.5” SATA Giga LAN Disk Enclosure NDAS Device Registration Each PC must register a set of NDAS device ID number and Write key to configure the authority of data access before you use the NDAS Disk. You can find an ID number and write key code on the aluminum housing of your LAN Disk. Then Use the NDAS Device Registration Wizard (see Registering by the NDAS Device Registration Wizard on page 13) to start registering. Registering by the NDAS Device Registration Wizard 1. Click the NDAS Device Management located on the system tray and select the Register a New Device. 2. The NDAS Device Registration Wizard window appears. Enter the name of the NDAS device and click the Next button. 13 CyberBank G 3.5” SATA Giga LAN Disk Enclosure 3. Enter the NDAS device ID and Write Key (You can find your ID and Write key number label on the Aluminum housing of your LAN Disk), click the Next button. Note: You must enter the NDAS device ID, or you cannot progress the next step. The Write Key is optional. If you enter the Write Key, you can read and write the data from the NDAS Disk to your computer, whereas you can only read the data from the LAN Disk. The NDAS device ID and Write Key do not allow to enter the letter “O”. Please replace the letter “O” as the number “0”. The NDAS device ID number in the above graphic is an installation sample. You should get your own ID labeled on the aluminum housing of your LAN Disk of inside PC board. 14 CyberBank G 3.5” SATA Giga LAN Disk Enclosure 4. Wait for checking the NDAS device status. 5. Select an option to mount the NDAS device to your system. 15 CyberBank G 3.5” SATA Giga LAN Disk Enclosure Note: Read/Write mMode: Mounts the NDAS device as Read/Write mode. The “Yes, I want to mount this NDAS device as Read/Write Mode” option is disabled if a user do not enter the Write Key (see NDAS software installation on page 8) Read-Only Mode: Mounts the NDAS device as Read-Only mode. Don’t Mount: The NDAS device is not mounted as Read/Only or Read/ Write mode now. 6. Click the Finish button to complete the progress. 16 CyberBank G 3.5” SATA Giga LAN Disk Enclosure Found new hardware wizard The Found New Hardware Wizard may appear after you have registered a new NDAS device. 1. When the Found New Hardware Wizard appears, click the Next button. 2. The following window appears. Click the Next button. 17 CyberBank G 3.5” SATA Giga LAN Disk Enclosure 3. If the following window appears. Click the Continue Anyway or Yes button. 4. After finishing the procedure, the following window appears. Click the Finish button to complete the process. 18 CyberBank G 3.5” SATA Giga LAN Disk Enclosure Mounting the NDAS device 1. Click the NDAS Device Management icon located on the system tray. Select the Mount (Read-Only) or Mount (Read/Write) option and click it. The system is mounting immediately and the following message appears. 2. When the message disappears automatically, the mounting progress is finished. Note: There is an icon beside the NDAS device. Depending on the mounting mode, the icon displays the different color. The following pop-up windows are in the Read/Write mode and Read-Only mode. (More information about the NDAS device status, please refer The NDAS Device Management on page 21). (Read-Only mode) (Read/Write mode) If you cannot see your NDAS device, please select NDAS device > Refresh Status and check it again. 19 CyberBank G 3.5” SATA Giga LAN Disk Enclosure Using the LAN Disk Now you have successfully installed the NDAS device. You may see the NDAS device as a local driver in the My computer. You can use the NDAS device like a local drive on your PC and you may do the following: Drag and drop files to the NDAS device. Copy and paste data to the NDAS device. Create and delete your folders. Share your files and folders. Sharing your LAN Disk in a network When the NDAS disk connects to your PC, any PC in your local area can access your NDAS disk. Notice: Any PC must in the Windows 2000/XP/Vista environment: When the users access the LAN Disk, all PCs must be on the same LAN. The LAN Disk must be connected via Ethernet or Wireless Router. Before sharing the LAN Disk, all PCs must install the NDAS driver (version 3.2) and must register onto the LAN Disk. Warnings: DO NOT format, partition and check the LAN Disk when the multiple PCs mounted the NDAS device. If do the above actions, your LAN Disk may damage. ONLY when one PC is connected to the LAN Disk, you just can format, partition, check, aggregate, or mirror the LAN Disk. 20 CyberBank G 3.5” SATA Giga LAN Disk Enclosure Introduce the NDAS Device Management The NDAS Device Management The NDAS Device Management offers the following six options to manage the NDAS device. You may see the following table to view the functions of the options. The option Function NDAS device Display the NDAS registered device. Every registered NDAS device has a square with color to show the current status of the NDAS device (see The NDAS Device Status Modes on page 21). Register a New Device Register a new device to your computer. (See Registering by the NDAS Device Registration Wizard on page 13) Refresh Status Update the status of the NDAS device when you change the status of the NDAS device. About NDAS Software View the information of the NDAS software. Options Customize the NDAS device management features and the error messages/ dialogs. Exit Exit and end the NDAS Device Management. 21 CyberBank G 3.5” SATA Giga LAN Disk Enclosure To view the status of the registered NDAS device 1. Click the NDAS Device Management located on the system tray. The NDAS Device Management Menu appears. You may see the all registered NDAS devices display on the menu. To view the NDAS device in Offline Mode There are three options in the submenu of Offline, as below: Offline: The current status of NDAS device. Deregister: Deregister the NDAS device. Properties: Displays the properties of the NDAS device. 22 CyberBank G 3.5” SATA Giga LAN Disk Enclosure To view the NDAS device in Online Mode Online: The current status of NDAS device. Mount (Read-only): Mount the NDAS device to the Read-Only mode. Mount (Read/Write): Mount the NDAS device to the Read/Write mode. Deregister: Deregister the NDAS device. Properties: Display the properties of the NDAS device. To mount the NDAS device in the Read/Write/ Read-only mode 1. After registering, click the NDAS Device Management icon located on the system tray and select a NDAS Device. You may see the following pop-up window. 2. Select the Mount (Read-only) or Mount (Read/Write) option and click it. Then the following window appears. 3. When the above pop-up message disappears, the progress of the mounting is finished. 23 CyberBank G 3.5” SATA Giga LAN Disk Enclosure 4. Click the NDAS Device Management icon once and select the NDAS Device you mounted before. You may see the following pop-up window. (Read/Write mode) (Read-only mode) 5. You may see the other two options in the submenu. Click the Dismount option you may dismount the NDAS device and click the Properties option you may view the information of the NDAS device. 24 CyberBank G 3.5” SATA Giga LAN Disk Enclosure Switching the Mount (Read/Write) Mode to the Mount (Read-only) Mode 1. Click the NDAS Device Management icon located on the system tray and select the NDAS device you want to switch. 2. Select the Dismount option and click it. 3. The following message appears. Press the Yes button. 4. The NDAS device’s mode is changed. The blue square change to the white square indicated the Online mode. 5. Click the NDAS Device Management icon and select the NDAS device you have just dismounted again. 25 CyberBank G 3.5” SATA Giga LAN Disk Enclosure 6. Select the Mount (Read-Only) option and click it. The white square beside the NDAS device changes to green. Changing from Read-Only Mode to Read/Write Mode 1. The steps are the same as the above. (see the on page 25) 26 CyberBank G 3.5” SATA Giga LAN Disk Enclosure The NDAS Device Status Modes The NDAS device provides the six basic modes for user. The below table describes the NDAS device modes and the square with color correspond with each mode. NDAS Device Color Green Icon Read-Only Mode Users can only read from the NDAS device. Read/ Write Mode Users can read and write to the NDAS device. (Mounted RW) White Online Mode The NDAS device is currently disabled on your computer and is ready to be mounted (enable). (Online) Black (Offline) Mode / Meaning Icon (Mounted RO) Blue NDAS Device Offline Mode The NDAS device is registered but your system cannot find the NDAS device. 27 Power card, Ethernet cable, or USB cable may be unplugged. Make sure any Anti-virus/ Firewall software/ Spyware is not interfering with the connection. CyberBank G 3.5” SATA Giga LAN Disk Enclosure NDAS Bind Management The NDAS Bind Management performs the function of Bind/ Unbind /Refresh/Others. When you bind the NDAS devices, there are Aggregation, Stripe (RAID 0), and Mirror (RAID 1) options for selecting. Open the NDAS Bind Management from the Start > All Programs > NDAS Software > NDAS Bind Management. You may see the three buttons and five columns are described as below: Bind: Press the Bind button to aggregation, stripe (RAID 0), and mirror (RAID 1) the NDAS devices displayed on the screen. Unbind: Press the button to unbind your bound NDAS devices. Refresh: Refresh the status of your NDAS devices. There are five columns in the NDAS Bind Management to display the NDAS device’s information. They are described as below: Column Name Description Name Display the name of the NDAS devices. Capacity Display the storage size of the NDAS devices. Status Display the status of the NDAS devices. RAID status Display the RAID status of the NDAS devices. Comment Display the comment of the NDAS devices. 28 CyberBank G 3.5” SATA Giga LAN Disk Enclosure Bind The NDAS Bind Management offers three selections to bind: Aggregation, Stripe (RAID0) and Mirror (RAID1). These three ways are described as below: Aggregation o Allow 2 to 8 disks to aggregate as one large disk. o Extremely useful when a larger storage device is needed. o No fault tolerance. If one unit fails, all data is lost. Stripe (RAID0) o Allow 2, 4, or 8 disks to be recognized as a single large disk drive. o Extremely useful when a larger storage device is needed. o No fault tolerance. If one unit fails, all data is lost. o Type of Aggregation method used for faster performance while writing to NDAS devices. Mirror (RAID1) o Allow 2 NDAS device units to be mirrored at the same time. o Fault tolerant. If one unit fails, data is retrieved from other units. o When the NDAS devices that have been aggregated, the one can be also use the Mirror. Requirements for Bind Before binding, you must connect at least two or more devices to the LAN disk enclosure. Each NDAS device must enter a Write Key when registering a new device. The bound NDAS devices must be formatted. Cannot bind the bound NDAS devices. The NDAS devices of all PCs must be dismounted and in Online mode before binding. Other users can mount the bound NDAS devices once binding is completed. Note: The Aggregation/ Stripe (RAID0) / Mirror (RAID1) can only be performed in Windows XP/ 2000/ Vista. 29 CyberBank G 3.5” SATA Giga LAN Disk Enclosure Online Mode Before binding, confirm the NDAS devices are dismounted and in Online mode. If the devices are not in this mode, please follow the below steps. Or you may skip the following steps to the Instructions for Bind on page 31 if the devices are in this mode. 1. Click the NDAS Device Management icon located on the system tray and select a NDAS device you want to bind. If the NDAS device is in Offline mode, try to reconnect it. If the NDAS device is in Mounted mode, select Dismount. 2. A waning message may appear. 3. Click “Yes“. 4. Wait a few seconds for dismounting. When the message disappears, it means finished. 5. Repeat the above 1 – 4 steps to dismount all NDAS devices you want. 6. Confirm the NDAS devices of other PCs are dismounted and in Online mode. 30 CyberBank G 3.5” SATA Giga LAN Disk Enclosure Instructions for Bind The below steps instruct you to bind the NDAS devices you want. 1. Go to Start > Programs > NDAS Software > NDAS Bind Management. The NDAS Bind Management appears. 2. Click the Bind button. 3. The NDAS Bind Wizard appears and clicks the Next button. 31 CyberBank G 3.5” SATA Giga LAN Disk Enclosure 4. Select one binding type and one number of disks. Then press the Next button. Aggregation: can bind any number of units between 2 and 8. Stripe (RAID0): can bind 2, 4 or 8 units. Mirror (RAID1): can bind 2, 4, 6 or 8 units. Note: Currently RAID4 is not supported. 5. Select a device you want to bind. Then click the Add button to move the device to the Selected block. Repeat this step to move the other devices. Note: The Next button turns on after you move two devices to the Selected block. Click the Remove button to move back one device to the Available block. Click the Remove All button to move back all devices back to the Available block. 32 CyberBank G 3.5” SATA Giga LAN Disk Enclosure 6. Click the Next button. A warning message pops up. 7. Press the Yes button. You may see the following window and then press the Finish button. 8. The following window displays the bound devices. 9. Repeat the above 1 – 8 steps to bind the other devices you want. 33 CyberBank G 3.5” SATA Giga LAN Disk Enclosure Unbind You may unbind the NDAS devices from a bound group. This section instructs you how to unbind the bound devices. Please follow the following steps. 1. Go to Start > Programs > NDAS Software > NDAS Bind Management. The NDAS Bind Management appears. 2. Click the Unbind button. 3. The following window appears. Click the OK button. 34 CyberBank G 3.5” SATA Giga LAN Disk Enclosure 4. A pop-up message appears. Press the OK button. The system will automatically unbind the NDAS devices. 5. You may see the changes on the NDAS Bind Management window and the Unbind button is disabled. Refresh You may update the status of the NDAS devices by pressing the Refresh button. 35 CyberBank G 3.5” SATA Giga LAN Disk Enclosure Other NDAS Bind Management Functions The NDAS Bind Management also comes with the other functions. You may select the Tool option on the NDAS Bind Management to browse. For more details, see the following information to instruct you how to perform them. Mirror Recognizes the mirrored NDAS devices that have been mirrored using earlier driver. 1. Using the mirrored NDAS devices The driver 3.20 does not support the Mirror that has been offered by our earlier driver versions. However, the driver 3.20 may recognize the mirrored NDAS device and display them on the NDAS Bind Management. Users can continue to use mirrored NDAS devices as before. But users cannot modify the mirrored NDAS devices. If so, the mirrored devices may break. 1.1. Upgrading the driver without breaking the mirrored NDAS devices 1.1.1. Disable all NDAS devices. (Both of the single and bound devices). 1.1.2. Uninstall the driver. 1.1.3. Install the 3.20 driver. 1.1.4. Need to register NDAS devices again. Note: When registering the bound NDAS devices, the NDAS Device Registration Wizard may only allow the bound NDAS devices to be mounted when both of the bound NDAS devices are registered. During the registration of the first device, the Wizard will only allow the device to be registered as Online mode. 1.1.5. Go to the NDAS Device Management and mount the mirrored NDAS devices. 1.1.6. Now you can use the mirrored NDAS devices. Note: Cannot modify the mirrored NDAS devices. If so, the NDAS devices must be re-mirrored using RAID1 and all the data will be lost. 36 CyberBank G 3.5” SATA Giga LAN Disk Enclosure Add Mirror You may mirror the first network drive to the second network drive. Using this function, the secondary network drive must be of equal or greater size. Follow the below steps to perform this function. 1. Go to Start > Programs > NDAS Software > NDAS Bind Management. The NDAS Bind Management appears. 2. Press the Tool option. Select the Add Mirror and click it. 3. A pop-up message appears. Select a device and press the OK button. 37 CyberBank G 3.5” SATA Giga LAN Disk Enclosure 4. The following window appears when finished. Reset bind information You may use the function to reset all configuration information or upgrade a higher version of NDAS software. Select an unbind NDAS device and press Tool > Reset bind information. The function performs automatically. Migrate If a user upgrades his/her driver to 3.20, we recommend everyone else sharing the NDAS devices to upgrade their driver to 3.20 as well. Once the user with 3.20 migrates the mirrored NDAS device’s binding information, other users sharing the mirrored NDAS device will no longer have access to the Mirrored NDAS devices. Here are two options: 1. We recommend all users sharing the mirrored NDAS devices upgrade their driver to 3.20. 2. Unbind the mirrored NDAS device and use them as two single devices that can be shared by both users using 3.20 and earlier drivers. 38 CyberBank G 3.5” SATA Giga LAN Disk Enclosure Add spare disk You may add a unbind device as a spare disk in Mirrored disk (RAID 1). The spare disk is replaced automatically when any disk in Mirrored disk (RAID 1) goes missing or out of order. Select a Mirrored Disk (RAID 1) and press Tool > Add spare disk. Choose a disk and click the OK button. You may see a spare disk on the NDAS Bind Management. Use as a RAID member A NDAS device can be used as a RAID member. Before performing this function, you must convert a NDAS device in Mirrored disk (RAID 1). Select a NDAS device is not a RAID member and press Tool > Use as a RAID member. The function performs automatically. Clear defective mark You may clear the defective marks when some errors comments appear on the NDAS Bind Management. Select a NDAS device and press Tool > Clear defective mark. The function performs automatically. Configure RAID without this disk Select a NDAS device and press Tool > Configure RAID without this disk. The function performs automatically. Convert to a basic disk The bound devices can be converted as an unbound device after performing this function. Select a bound NDAS device and press Tool > Convert to a basic disk. The function performs automatically. 39 CyberBank G 3.5” SATA Giga LAN Disk Enclosure Formatting the NDAS Device Initialize the NDAS Device 1. Right click the My Computer and select the Manage option. 2. The Computer Management window appears. 3. There is a list in the Computer Manage to display all disks in the computer. 4. Find the NDAS device you want to initialize. If you see “Not Initialized” in the following block, this means this is the NDAS device. Note: If the NDAS device is described as Basic or Healthy in the gray block, please skip the step of the initialization and start the step of the partition (see Partition NDAS Device on page 42). 40 CyberBank G 3.5” SATA Giga LAN Disk Enclosure 5. Click right on the NDAS device you want to format. Select the Initialize Disk and click it. 6. The NDAS device is automatically initialized. You may see the difference in the block. The Unknown becomes the Basic . 7. The step of initialization is completed. 8. Before the NDAS device is used, it must be partitioned. See Chapter Partition NDAS Device. Note: It is VERY important that your NDAS Device is listed as a Basic disk and not a Dynamic one. 41 CyberBank G 3.5” SATA Giga LAN Disk Enclosure Partition NDAS Device 1. From the Computer Management window, right click the NDAS device you want to partition. 2. Select New Partition and click it. 3. The New Partition Wizard appears. Then click the Next button. 4. Select the Primary partition and click the Next button. 42 CyberBank G 3.5” SATA Giga LAN Disk Enclosure 5. Specify the partition size and press the Next button. Note: The partition size is automatically set. Do not change the size. 6. Assign the Drive Letter or the Path. Select the Assign the following driver letter and choose a letter for the drive from the list. Click it. 43 CyberBank G 3.5” SATA Giga LAN Disk Enclosure 7. Select the Format this partition with the following Settings: option. Select the NTFS in File system column and the Default in the Allocation unit size column and enter the name for a disk. 8. The step of the partition is finished. Click the Finish button. 44 CyberBank G 3.5” SATA Giga LAN Disk Enclosure 9. You may see the partitioned disk, as below: 45 CyberBank G 3.5” SATA Giga LAN Disk Enclosure Format the NDAS Device through My Computer 1. Double click on the My Computer icon on the desktop. 2. The My Computer window appears. Right click on your NDAS device and select the Format option. Then click this option. 3. The Format window appears with a few options. Mark the Quick Format check box (Recommended). 46 CyberBank G 3.5” SATA Giga LAN Disk Enclosure 4. A Warning message appears. If you are sure you want to format the drive, click the Ok button. 5. Click on the Ok button and the step of the format is finished. 47 CyberBank G 3.5” SATA Giga LAN Disk Enclosure Uninstall Before you uninstall a NDAS device, you must close the NDAS Disk Management, the NDAS Bind Management, and all the applications in the task bar. Notice: You must dismount the NDAS device you want to uninstall first. Or you may not uninstall the NDAS device. 1. Click the NDAS Device Management located on the system tray and select the Exit. 2. Select the Start > Control Panel > Add or Remove Programs and the Add or Remove programs Window appears. 3. Then click the Remove button if you are sure to uninstall the NDAS software. 4. If yes, click the Yes button to install your NDAS software. 48 CyberBank G 3.5” SATA Giga LAN Disk Enclosure 5. The following message appears. Restart the PC once to finish the step. Indicator Descriptions There are three indicators in front of panel, each function describes as following. Power ON indicator HDD Hard Drive data Read/Write indicator This indicator will flash while data is reading or writing between PC and the LAN Disk. LAN Ethernet Link indicator This indicator may light up when Ethernet port have connected and linked an Ethernet Hub. 49 CyberBank G 3.5” SATA Giga LAN Disk Enclosure Product Specifications: Chipset XiMeta Host Interface 1. USB 1.1/2.0 port for USB direct connection 2. RJ-45 10/100/1000 Base-TX Ethernet port for Network connection Hard Drive Interface SATA * Hard drive interface are different by model no. Hard Drive Capacity 3.5” 80/120/160/200/250/500/750GB/1TB, etc. Hard Drive From Factor 3.5”, 1 inch high Data transfer rate 1. USB 2.0 up to 480Mbps 2. 1000Base-TX up to 1000Mbps * Power ON/OFF Indicators * HDD access * LAN Link Disk Partition Configuration Heat cooling Windows: FAT 32 or NTFS Macintosh: FAT 32 By aluminum housing or cooling FAN Housing Aluminum housing and plastic cover Power Supply Cable Support OS (USB Direct Connection) Support OS (Network Connection) AC input: 100-240VAC, auto-ranging. DC output: 12V/ 5V 2.0A 1M USB cable 1M RJ45 cable Windows: Windows ME/ 2000/ XP/Vista. Macintosh: Mac 10.3X or higher Windows: Windows 2000/ XP/Vista. Unit Dimensions 40*120*225 mm (W*H*D) Storage Temperature -40C~125C Operating Temperature 0C to 70C Certificated: FCC、CE. All Materials: RoHS compliant The specification is subject to change without notice. 50 CyberBank G 3.5” SATA Giga LAN Disk Enclosure FAQ What Operating Systems does your LAN Disk support? Windows 98SE/ ME/ 2000/ /2003/ XP/ Vista and Mac OS X 10.0 - 10.3. If you use the LAN disk via USB, then the LAN Disk uses the built-in drivers of the Operating System. You DO NOT install any drivers. If you use the Windows 98SE, then you may download the USB drivers from our website. If you use the Windows 2003 Server, then we recommend you to reformat the drive from the 2003 Server before using the LAN Disk. The LAN Disk Wireless supports the following operating system: Windows 2000 /2003/ XP/Vista only. What file system does your LAN Disk use or come preformatted to? The file system of the LAN Disk is independent. Your Operating System has specific file system requirements. LAN Disk does come pre-formatted in NTFS, but can be formatted to any file system that your OS can support. How many users can use the LAN Disk? Theoretically, there is no limit, but we recommended not more than 20 simultaneous connections. Do I must install the LAN Disk software on all my computers? As long as the computers that access the LAN Disk in NDAS (Ethernet network connection), all computers need to install the LAN Disk software. If you use the LAN Disk via USB, you do NOT require any drivers to install the LAN Disk software unless you are using the Windows98SE. Does the LAN Disk have an IP address? The LAN Disk does not use an IP Addressing and does not run TCP/IP. 51 CyberBank G 3.5” SATA Giga LAN Disk Enclosure I have just installed the LAN Disk; why is the NetDisk showing up as a white square in the NDAS Device Management (3.x Only)? This means that your computer may be in the progress of mounting the NetDisk, installing the drivers, or that another computer with a different version of the NDAS software may have access. 1. Go to the white square in your NDAS Device Management tool and see what options are provided. If it gives you the Mount (Read/Write) or the Mount (Read-Only) options, click on the desired mode. This should make a new drive appear in My Computer or Windows Explorer. 2. If you do not see an option for mounting, then it may already be in the mounting progress. Check your Device Manager for any exclamation marks that may be the NetDisk related. If there are any, then right click on it and select the Update Driver option. This brings up a wizard that asks you where the drivers for this device are located. Allow it to find the drivers automatically, and the device should be installed by Window shortly thereafter. 3. If there are not any problems indicated in the Device Manager, you may need to RESET the connection from our NDAS Device Management tool. Please right click on the NDAS Device Management tool and then select the Properties of your NetDisk. From there, click on the Advanced tab and then the RESET button. 4. Please also make sure all other computers have the same version of NDAS software and there are not any Windows 98SE/ME, MAC, or Linux computers that might have NDAS enabled. I have clicked on the NDAS Device Management Tool on my desktop and nothing happens. The icon on the desktop is only used to launch our icon into the System Tray, if for some reason it is not already in there. The icon in the system tray is used for Mounting /Dismounting, to Register/Deregister, and switching modes for Read/Write or Read-Only on LAN Disk. Sometimes when I transfer files to my LAN Disk, why is the speed so slow? This is a result of a bad connection between the computer and the LAN Disk. Please make sure that you are using the only networking switches and routers, and that you are not using any network hubs. Also, if you have any software firewalls installed on your computer (ie. Norton Internet Security, McAfee Personal Firewall, etc.), make sure to add Admin.exe and LDServ.exe into their list of programs to Allow with full access. You can also try disabling your Antivirus software to see if that makes a difference. Please Try updating your Network Card's 52 CyberBank G 3.5” SATA Giga LAN Disk Enclosure drivers to the latest from the manufacturer. If your network card has the option of changing the transmission and receive the buffers to both 128 (in the card's properties in device manager), please try doing that. If you have an nForce chipset, try updating your Nvidia nForce drivers to the latest Unified Drivers from Nvidia's website. Please also make sure that you are using 100mb switch as well. Does the LAN Disk perform or provide the Data Recovery Services? The LAN Disk does not perform any data recovery services. If you are unable to access data on your LAN Disk due to a defective Hard Drive, you may wish to contact an independent, data recovery service provider. If the Hard Drive is still functioning, there is Data Recovery software out there that can get your data back. I click on my files and get "Access Denied." What should I do? If you are using the Windows XP Professional: Open up My Computer > Tools > Folder options > View tab and at the bottom enable the Use simple file Sharing box. Then please go to the instructions below: If you are using Windows XP Home (plug in via USB): Restart your computer and hold F8 during bootup to go into the Safe mode. Once in the Safe mode, please go to the instructions below: Windows 2000/XP computers, please follow the instructions: Open up My Computer and right-click on the NetDisk drive. Select the Properties > Security tab and click the Advance button. If the Everyone group is not in there, please add the group and give it Full Control permissions. Then click on the Owner tab and at the bottom you should be able to change the owner to Administrators instead of what it is already. If it asks you to replace permissions on all subdirectories, click YES. Then you should be able to access contents. This is related to the Operating System's security features. My NetDisk shows up as a Black dot when used with USB. When use the LAN Disk via the USB mode, the software is not needed, therefore you see a black dot (Offline) in the system tray as that is an indicator for NDAS (Ethernet) mode. P/N: M-709HEU362 53