1
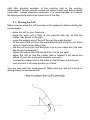
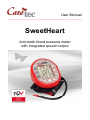
User Manual ___________________________________________________________ SweetHeart Automatic blood pressure meter with integrated speech output Table of Contents 1: 2: 3: 4: Introduction Description of the device Power Supply Keyboard Layout 4.1: Horizontally Arranged Keys 4.1.1: Left key – Volume Control 4.1.2: On/Off Key 4.1.3: Right Key – Memory 4.2: Vertically Arranged Keys 4.2.1: Upper and Lower Key - Announcement of Date and Time 4.2.2: Middle Key – Menu 4.3: Escape Function 4.4: Keylock 5: Measurement Process 5.1: Placing the Cuff 5.2: Start the Measurement 5.3: Repeat the Measuremnent 5.4: Save Measurement 6: Menu 6.1: Memory Management 6.1.1: Recall Triple Values 6.1.2: Recall Single-Values (within the chosen memory) 6.1.3: Delete Triple Values 6.1.4: Copy Triple Values to other Memory 6.2: Delete Memory 6.3: Set Target Value 6.4: Set Time 6.5: Set Date 7: Data transfer to the PC 8: Safety Instructions 9: Cleaning the device 10: Technical data 11: Guarantee and Service 12: Legal Notice on the Disposal of Electronic Devices 12.1: Disposal of used Electronic Devices 12.2: Recycling Batteries 13: Symbols used 14: Manufacturer 2 page 3 page 4 page 5 page 6 page 6 page 6 page 6 page 7 page 7 page 7 page 7 page 7 page 7 page 7 page 8 page 9 page 9 page 9 page 10 page 10 page 10 page 10 page 11 page 11 page 11 page 12 page 12 page 12 page 13 page 13 page 13 page 14 page 14 page 15 page 15 page 15 page 16 page 16 1: Introduction SweetHeart is a fully automatic blood pressure and pulse meter with integrated speech output. Its outstanding features are: state-of-the-art technology: measurement starts during inflation; this accelaretes the process and is less strenuous for the heart acoustic signals with every heart beat announcement of deviations 3 different memories for up to 300 entries measurement is stored with date and time stored data can easily be recalled systolic, diastolic and pulse values can be repeated separately easy handling due to integrated speech output ultralarge display (8,5 x 7 cm) clear, natural voice, 6 volume levels time and date announcement CONSULT INSTRUCTIONS BEFORE USE! Do not operate SweetHeart without reading the instruction manual. Get acquainted with the device and all the accessories. Keep the instruction for reference reading and pass it on with the device. Caution: Practice the right handling of the device supervised by a professional. Measurements have to be carried out as recommended. If necessary consult your doctor. 3 2: Description of the device To get acquainted with the device, place it in front of you so that the lower edge of the front side is facing you. Upper Side In the middle of the slightly sloping surface is a very large display with 3 lines. Each line is labeled on the left side of the display (top-down): systole, diastole and puls. On the right side you find one button for each line. When not operated, the display shows the time in the first line, the day and month in the middle line and the year in the lower line. You can call up this information by pressing the corresponding buttons. Right below the display are 3 buttons, two smaller ones on the right and on the left, a bigger one right in the middle. Left Side On the left side of the device, is the outlet for the rubber tube of the hand cuff. Right Side On the right side are two outlets, the one farther away is for the transfer kit which enables you to connect the device to a PC and transfer the data. The one nearer to you is an earphone socket. Backside On the back side of the device is the socket for the power supply. Bottom Side On the bottom of the device you will find 5 little rubber feet, the loudspeaker grill, the battery compartment and the specification plate “Modell: SH-01” as well as the identity of the producer. 4 3: Power Supply SweetHeart can be operated by batteries or by a power supply unit. Stored data will maintain in the memory even if the power supply has been disconnected. Batteries SweetHeart can be operated with 4 x 1.5 V AA Mignon batteries. The battery compartment is located on the bottom of the device. The lid of the battery compartment is partly ribbed. To remove the battery lid press the ribbed part with both thumbs and push it away from you. The batteries ought to be placed in such a way that the smooth end of the battery always turn towards the coil spring in the battery compartment. Inside the compartment tactile markings indicate how the batteries have to be inserted (ring = negative pole / point = positive pole). If the batteries have been inserted correctly, you will hear a short jingle. The battery lid has 3 little noses on one longside. To close the lid, make sure these 3 noses face towards you and put them in the corresponding dents of the compartment. Then push the lid towards you by using the fingers of both hands until it locks into place. Power Supply SweetHeart can also be operated with a power supply unit. The socket for the power supply can be found on the back side of the device. Caution: Replace the batteries as soon as the device announces „battery weak“. 5 4: Keyboard Layout 4.1: Horizontally Arranged Keys The horizontally arranged keys right below the display are the left key, the On/Off key and the right key. 4.1.1: Left key – Volume Control You can choose one of 6 different volume levels by pressing the left key. A short press will increase the volume; a longer press (about 2 seconds) decrease the Volume. 4.1.2: On/Off Key The On/Off key has a clear tactile marking. Press this key once to start a measurement. You can cancel the measurment by pressing the ON/OFF key again. 6 4.1.3: Right Key – Memory To choose one of the 3 possible user memories (person 1, person 2 or person 3) press the right key once or repeatedly. 4.2: Vertically Arranged Keys The vertically arranged keys on the right side of the display are the upper key, the middle key and the lower key. 4.2.1: Upper and Lower Key - Announcement of Date and Time SweetHeart has an integrated electronic watch showing the date and time whenever the device is not being operated. To hear the time, press the upper key shortly, to hear the date, press the lower key shortly. 4.2.2: Middle Key – Menu To enter the menu, press the middle key shortly. The menu offers different functions and settings (see chapter 6). 4.3: Escape Function The measurement can be stopped by pressing the On/Off key again. To escape the menu, press simultaneously the left and the right key. The device switches off automatically after 2 minutes. 4.4: Key lock To lock the keys of the device, simultaneously press and hold the left and the upper key. To deactivate the key lock simultaneously press and hold the left and the upper key once again. 5: Measurement Process Experience has shown, that one arm usually shows higher values than the other. The measurements should be carried out on this arm. If measurements on both arms deviate too much (systole more than 20, diastole more than 10), consult your doctor. Make sure to rest at least 5 minutes before the next measurement. Never carry out a measurement 7 right after physical exercise. In the morning and in the evening, measurement should only be carried out before meals and before taking medication. Unless otherwise instructed, it is recommended to measure the blood pressure around the same time of the day. 5.1: Placing the Cuff Make sure you place the cuff correctly on the upper arm before starting the measurement. place the cuff on your bare arm place the open cuff in front of you (smooth side up), so that the rubber tube points to the right move the bulging end of the cuff through the metal bracket tilt this end of the cuff over the metal bracket and close the cuff at the velcro to form a loose-fitting loop slip the cuff over your arm and push it up to your upper arm (the tube has to point downwards) tighten the velcro (the cuff should fit but not be too tight) adjust the cuff so that the rubber tube is located 3 cm above the ellbow of your arm and points towards your wrist connect the rubber tube to the outlet on the left side of the device rest your arm in an easy position on a table You can now start the measurement. Make sure you are not moving or talking during the measurement! 8 5.2: Start the Measurement press the On/Off key announcement: "measurement has been started" cuff inflates automatically beep-sounds during the measurement indicate the pulse announcement: "Systole 120, Diastole 93, Puls 88" If you activated a target value, the device will announce the deviations from this target value, e.g. "deviation systole -10, diastole +5", puls +1". You can now remove the cuff. 5.3: Repeat the Measurement Right after the measurement, you can repeat the values as often as you like. to repeat all values press the upper and lower key for about 2 seconds to repeat the systole value press the upper key for about 2 seconds to repeat the diastole value press the middle key for about 2 seconds to repeat the pulse value press the lower key for about 2 seconds If you like to escape without saving the measurment, press the ON/OFF key again. The device will also switch off automatically after 2 minutes. 5.4: Save Measurement You can store the values right after the measurement. They can be stored in one of the 3 user memories called “person 1”, “person 2” or “person 3”. choose memory: repeatedly press the right key announcement: e. g. "person 2" save measurement: long press of the right key announcement: "person 2 – values saved“ followed by beep-sound To recall the stored values, enter the menu (see chapter 6.2). 9 6: Menu The menu offers the possibility to recall and administer stored values, to set time and date and enter a personal target value. To enter the menu, proceed as follows: access the menu: short press of middle key announcement: "Menu" choose menu function: repeatedly press upper or lower key recall short information: short press of middle key confirm menu function: long press of middle key 6.1: Memory Management This menu function enables you to recall the unit of all 3 values or single values, as well as delete them and/or copy them to another user’s memory. Triple-values are always announced with the exact date and time of the measurement. The average value will be calculated automatically. 6.1.1: Recall Triple Values choose memory: repeatedly press right key recall triple-values: long press of middle key announcement: e.g. "person 1 – average value, systole 120, diastole 84, puls 73“ recall entries: repeatedly press upper/lower key You can change between the different user memories by repeatedly pressing the right key. 6.1.2: Recall Single-Values (within the chosen memory) systole value: long press of upper key diastole value: longer press of middle key puls value: long press of lower key You can recall the single values of each entry by shortly pressing the upper or lower key. To return to the triple values, shortly press the middle key. 10 Caution: When recalling the single values, you will always hear the single value of the last chosen triple value, e.g. when you recalled the second entry of the triple values and now change to the systole values, it will start with the systole value of the second entry. 6.1.3: Delete Triple Values Triple values can easily be deleted from the user’s memory. recall triple values as described above delete triple values: long simultaneous press of upper and lower key 6.1.4: Copy Triple Values to other Memory If a measurement has accidently been stored in the wrong memory, you can easily delete the triple values (see 6.1.3) and immediately after that copy them to another user’s memory (e.g. from “person 2” to “person 1”). delete triple-values as described above choose other memory: short press of right key copy triple-values: long press of right key 6.2: Delete Memory The menu function "delete memory" enables you to delete all the entries of one user’s memory or of all the user’s memories. confirm menu function: long press of middle key announcement: "delete all" choose user’s memory: short press of upper/lower key announcement: e.g. "memory person 1 - deleted" delete user’s memory: long simultaneous press of upper and lower key announcement: e.g. "person 1 – all values deleted" If you like to delete all entries in all the three user’s memories, choose and confirm the option “delete all”. 11 6.3: Set Target Value This menu function enables you to enter your personal target value. Deviations from this target value will automatically be announced after the measurement. To enter your target value, proceed as follows: confirm menu function: long press of middle key announcement: e.g. "target value person 1 – not active“ choose user’s memory: short press of right key announcement: e.g. "Person 2 – not active" enter target value: short press of upper/lower key confirm choice: short press of middle key automatic announcement of the systole standard value: 120 change value: repeatedly press upper/lower key confirm value: short press of middle key A short beep confirms your setting and will automatically bring you to the next value. Enter the value as described above until all three values are set. At the end of this procedure, the settings will once again be confirmed. 6.4: Set Time confirm menu function: long press of middle key announcement: "time – 10 o’clock a.m." set hour: short press of upper/lower key confirm setting: short press of middle key automatic announcement of the minutes set minutes: short press of upper/lower key confirm setting: short press of middle key announcement of the time You will automatically move to the next value. Set the value as described above until the time is set. 6.5: Set Date confirm menu function: long press of middle key announcement: "set date – 2007" set year: short press of upper/lower key confirm setting: short press of middle key 12 You will automatically move to the next value. Set the value as described above until the date is set. 7: Data transfer to the PC The stored data can be transferred to the PC. A more detailed manual for the data transfer is included in the transfer kit (optional). 8: Safety Instructions For indoor use only. Consult your doctor whenever you think that, according to the measurements taken, you might need different medication! Do not expose the device to extreme humidity, heat, cold, dust or dirt. When exposed to splash water, wipe the device off. If water enters the device, remove the batteries and make sure the device is dry. In case of any damage (e.g. due to water or falling off), send the device back to the producer for repair. SweetHeart should not be used under extreme temperature conditions, but only within the ideal operating temperature of 10° and +40° Celsius. As soon as the device announces “battery weak”, do not carry out any more measurements and chang the batteries immediately. When not using the device for a longer period, remove the batteries, so they can not damage the device by leaking. Make sure the batteries are inserted in the correct way. Make sure that SweetHeart is not used as a kids toy. When using earphones, make sure to use an accurate volume level to avoid ear damages. 9: Cleaning the device Use a lightly moistened cloth to clean the case of the device. 13 Caution: No liquids should enter the device! Avoid strong acid or scrubbing cleansers and do not clean the surface with rough sponges as they might damage the case of the device. 10: Technical data Dimensions: L/B/H: 170 x 136 x 90 (30)mm; 480 g Weight: 480 g Power Supply 4 x 1,5V AA Mignon batteries power supply Measuring Rate: Cuff Pressure: 0 – 280mm/Hg ( ± 3%) Pulse Rate: 30 – 160 S/min ( ± 5%) Included in Delivery: SweetHeart – talking blood pressure meter 4 x 1,5V AA Mignon batteries 1 x cuff standard size (big or small cuff on demand) carrying bag printed user manual Optional: earphones, power supply, data transfer kit (incl. Software CD) 11: Guarantee and Service From the date of purchase, we issue to the original purchaser of this product a guarantee of: twenty-four (24) months on the device itself, twelve (12) months on the accessories (e.g. power supply, earphones etc.), six (6) months on wear parts (e.g. battery, case etc.) Please note that we do not issue any guarantee on batteries! 14 During the guarantee periods mentioned above, the product will be either repaired or replaced free of charge. In no event shall CareTec be liable for indirect, special or consequential damages. The exposure of the device to liquids, strong electromagnetic fields, heat as well as dropping the device or opening the case causes immediate loss of guarantee. In case of problems please contact CareTec or your local distributor before returning the device without any apparent reason. We will then inform you about the necessary procedures. The device may only be opened by authorized technicians! CareTec reserves the right to make any changes or improvements to its products without further notice. 12: Legal Notice on the Disposal of Electronic Devices 12.1: Disposal of used Electronic Devices This product must be disposed of separately from household waste at specially designated collection and recycling points. For further information please contact your local authorities. 12.2: Recycling Batteries Batteries must not be disposed of in household waste. As a consumer you are legaly obligated to bring your old batteries to public collecting points (in your community or any shop that provides these batteries). Pb-Cd-Hg These signs can be found on contaminant-laden batteries. Pb = containing lead Cd = containing cadmium Hg = containing mercury 15 13: Symbols used Caution Additional information Must be disposed off separately from household waste Manufactured by 14: Manufacturer CareTec International GmbH Stubenbastei 1, 1010 Vienna, Austria Phone: (+43 1) 513 80 81 0 Fax: (+43 1) 513 80 81 9 E-mail: [email protected] Web: www.caretec.at SweetHeart 09/2011 16