1
nuuo
The Intelligent Surveillance Solution
I
Step 1: Unpacking the Unit
This package contains the following items:
•
•
The unit
Quick Start Guide
•
Screws for disk drives (1 package)
•
Power cord
•
•
Warranty card
12V DC power transformer (2 bay unit)
•
CD with Install Wizard. Backup, Live View, and Playback
application, user manual. and quick start guide
~
NVRmini
Quick Start Guide
£
o
Warning
The electronic components within the unit can be damaged by
Electro-Static Discharge (ESD). Please take precautions at all
times when handling the unit or its sub-assemblies.
Important
To configure the unit, you must install the software onto a
desktop/ laptop running Windows Vista, 2003. XP Professional.
or 2000.
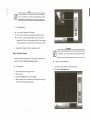
2 bay unit (4 channels) front view
Disk Drive
r~!!=!!!!!!!!!!!!=~~;§-1
• --~"'--' -. ~
!~~~~~~~~~~;~~9'"
o
0-.;-
iliiiiiiiiiiiiiiiiiiiiiiiiiiiiiiiiii;¥O
~
Drive Carrier
Drive Status LED
I
Drive Activity LED
Ethernet Activity
LE 0
'h.. Power button
System Status LED
2
2 bay unit (4 channels) rear view
4 bay unit (8/16 channels) rear view
I
I
8
USB Connection
R,145 \Jet-IJork Ccnll€ction
rnrn
Power Connectioo
4 bay unit (8/16 channels) front view
Step 2: Installing Disk Drives
n
~~;rq:
Disk Drive
r-
Drive Carrier
,
Drive Status LED
You can populate this unit with SATA 1.5 Gb/s or 3.0 Gb/s disk drives. For
optimal performance, install disk drives of the same model and capacity.
Your disk drives will become a RAID Volume on this unit.
1. Open the lid on the front of the unit enclosure.
Powerbulton
System Status
LED
Ethernet Activity
LED
2. Pull a disk drive carrier from the enclosure. See the front view figure.
3. Carefully lay the disk drive into the drive carrier, making sure that the
screw holes on the sides of the carrier align with the screw holes in the
drive.
4. Insert the screws through the holes in the drive carrier and into the sides
of the disk drive.
•
Install only the counter-sink screws supplied with the unit.
•
Install four screws per disk drive.
•
Make sure each screw is securely tightened, but be careful not to
over-tighten.
5. Reinstall the drive carrier into the unit enclosure.
6. Repeat step 2 through 5 for the other disk drives.
7. Close the lid on the front of the unit.
4
I
I
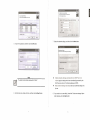
Setting time zone, dille and time.
Plc.:um choose your time lone, dille llnd tlme
from the dtopdown menus.
Discovering tlUUO tlVRmim.
Please choose
<II NUUO NVRJnlm
from thc list.
Time Zone fO-MT+S' T&iPe~ Beijint,. Perth, SinD:pore. Hen.a: Ken&, UlMn B61:W
I SeJ\l~TNeme
!qa_4~yjem'J$
1",,2040_703137
9:(,,_2baYJl~ssur
J.l:la....2btlyJ&,y
:sq,,_4bay_klUY
Y." 12008
Model
IP Address
.:::.1
NV4080
192.168331
192.168.3.123
192.1683.'3
192.168333
192.168334
Y2040
~Y2040
NY2040
NV408(1
I,>
Clid. NEXT to continue.
r
Cb;kNEXT D continut.
[
_;;:1
«BACK
II
\lEXT»
«BACK
II
NEXT»
II
CANCEL
I
1l--CAIlCEL-1
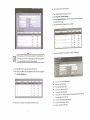
7. Select the network settings, and then click the Next button.
5. Type in the password, and then click the OK button.
Makino
r~C1work
Sl.-ttings
Ple<lse ChoOlolC II method 01 moklOg nctwork ,settings.
I
"M='~ 'W,."
..- :
I
P=voxd
I
I
II
OK
o Obklin netwott.SIlt!in&te.u.lonwically from DHCP $lCMTorwiwrl..
I
CANCEL
Ohfe.kenfltlVOrkSiltfin&$manually.
I
ClickHEXTloconhnue.
r
o
Note
The default Administrator password is "admin".
•
«BACK
-11
NEXT»
II
CANCEL
]
Obtain network settings automatically from DHCP server or
wizard: apply all settings which are automatically generated by the
DHCP server, such as IP, netmask, gateway, and DNS.
•
6. Set the time zone, date, and time, and then click the Next button.
Make network settings manually: select your preferred settings one
by one.
8. If you need to set a new disk(s), check the "Create new storage" option.
After checking, click the Next button.
7
8
I
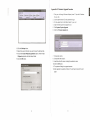
Step 7: Adding Cameras
,(i)I
PrQ1cctino Your Dati.
•
Plene choose 8 protection (unction (or you... stonoe.
Add UPnP Cameras
1. Open Internet Explorer and log in to the unit.
DCrwenewstora&e
2. Click IP Cameral Camera Settings.
The Wiwd isconfllUrinl)'Our NVRmini.
3. Click the Camera Search tab.
4. Click the Search button to search for UPnP cameras.
Click NEXT» continue.
[---:;'-BACI( 11
•
•
NEXT..
II
CANCEL
I
Data Protection: set the RAID level to RAID 1 (2 bay). Set the RAID
level to RAID 5 (4 bay).
Maximum Capacity: set the RAID level to RAID 0 (2 bay). Set the
RAID level to RAID 0 (4 bay).
5. The system will list all the cameras it can currently find. Click the
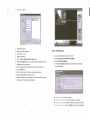
9. Review your settings. If the settings are correct, click the Finish button
icon to add a camera into your camera list.
to exit the settings procedure and activate the system.
Reviewing your sctUnoll
Plclllsu check da1a on lhu 11$1.
CarenSetthgs
~perameklr
VJtniWN:
Time ZoM
:De¥n'fme
PAdd"$$
;kJR,p Type
IU;erName
BACK to chenge Sefti'lgs.
AcJdress
Vendor
IPAddress
Vendor
Model
Model Name
MAC
Mac Address
Vol",
;':'Jk)'..PJt$$Uf
iffi8
~:Il
192.168.1.2
6. After clicking the" icon, the camera settings page will pop-up. Click
U"'honro
",;"
the item to which you want to add a camera.
7. Enter the camera name, user name, and password of the camera.
CIct: fNSHto ~llIrt system rileflon.
[
«BACK
IL F1NISH_JI
CANCEL
1
Caution
Once the "Finish" button is clicked, the unit will start working. In
order to ensure the stability of your unit, never pull any disks out
when the system is running.
10
9
•
Add Cameras without UPnP function
1. Open Internet Explorer and login the unit.
--j
,p
Pon 'so
"ddr~S5
User ,
I
riame
MalO
Password
Protocol
etlanne!
'endor
2. Click IP Cameral Camera Settings.
3. Click the Camera Settings tab, and the camera list will be displayed in
I~odel
Vendor
Add
-==:1
~[
the bottom of the page.
4. Click the item which you want to add a camera.
HTTP
Modet Name
(eocel
16ea-allst
Current camera settings
Channel
C-amera Name
Vendor
lPAdd(
I
none -
2
I -oone-
3
-none
-none
-0009
-0009
4
6
- none
-none
I
:
~C
il·L
7
- none-
Address
_---1 . ...-
•
l___
~=~T.
l
,-"
- ::- '"
..
..
1
i
..
B
o
~ Port
Model
Vendor
I
+:Io• •.I.i,i.
:
5
-none
I -oooe
~.....l.
-none
- none-
I
I
Camera Name
Index
I.lodel
-,",
...
\
BO
- none-
- none
BO
- none-
- none
BO
-0008-
- none-
BO
- none
- none-
BO
- none-
- none-
BO
- none
BO
- none-
I
- none-
-none
5. Insert the information of this camera on the top of the page.
Note
Some cameras will limit the login authority to the administrator. In
this case, you will need to change the user name and password
to the administrator's to log into those cameras.
Camera Name ~
AdOless
8. Click the Add button to add finish adding the camera.
User ~~ame
II
11:::
r.
,
r
p""iRn
: -1
I
_ d..--t
9. After clicking the Add button, the updated camera list will be displayed
in the Camera Settings tab.
....lle\OCIIOIl
iiicamera list
II
Channel
Camera Name
Address
Pon
Vendor
l:Iodel
i¥@1i4;WM:i.MWWMWhiffii"
BO
- none-
BO
- none
- none-
BO
- none
- none-
BO
- none-
BO
-none-
- none-
BO
- none
- none
BO
B
10. Repeat step 5 through 8 to add other cameras in your list.
II
•
•
•
•
•
•
•
•
•
Camera name: name this camera.
Address: the IP address.
Port: the transmission port.
User name: login user name.
Password: login password.
Video Channel: select the number of analog cameras supported by
one video server from the list.
Protocol: data transmission protocol.
Vendor: camera vendor name.
Model: camera model name.
12
o
I
Note
Some cameras will limit the login authority to the administrator
only. In this condition, you need to change the login user name
and password to the administrator's to login those cameras.
6. Click the Save button.
•
Save: save the information of this camera.
•
Reset: return to the latest saved settings of the selected camera.
•
Auto Detection: after inserting IP address, port, user name, and
password, click this button to automatically find out all the information
of this camera. (such as Camera Channel, Protocol, Vendor, Model)
7. Repeat step 4 through 6 to add other cameras in your list.
Step 8: Live View Function
c'"'7f
lY..J
Important
When running Internet Explorer, do not use the function "Open in
New Window", as it may cause the browser to become unstable.
There are two ways to implement the live view function: through Internet
Explorer or through the Remote Live Viewer application.
•
Internet Explorer
•
Remote Live Viewer Application
1. Go to Start> NUUO NVRmini > Remote Live Viewer.
2. Click the Live View Setting button.
1. Open Internet Explorer and log in to the unit.
2. Set the cameras.
3. Click the Live view button on the top of the page.
4. Select a camera(s) from the camera list on the right and then drag it to
where you wish the image to be displayed.
13
14
I
3. Insert the unit name.
Server
I Group I OSD 1
rS91V8fSeUlng
'iJ
I
I
I
-
Address:
I
____
Port 15150
User Name:
r
Password:
I
SavePas'SW'CJrd:
r
r
L '
I
l::lep.artment 1 (192.168.3.58)
Department 2 (192.168.3.57)
s....., Nom.'
AulD login:
T."S.....,
I
~~
4. Insert the IP address.
Step 9: Set Recording
5. Modify the port if necessary.
6. Insert the user name.
7. Insert the password.
1. Open Internet Explorer and log in to the unit.
8. Check the Save Password/ Auto Login option.
2. Click Recording & Event/Recording settings.
9. Click the Test Server button to test the connection between the local
3. Click the Recording Mode tab.
4. If selecting Always Recording, the chosen cameras will begin to
application and the remote unit.
record immediately.
10. Click the Add button to add this unit into your remote server list.
11. Click the OK button.
12. Click the unit you wish to access in your remote server list.
Recording Mode
13. Click the Log In button to access your unit.
....
I
Reconflng Mode _
14. Select a camera(s) from the camera list on the right and then drag it to
@ No Recording
o RecordIng by Schedule
where you wish the image to be displayed.
Recordmg Mode I
0
~ays Recordlng
o Camera 1
o Camera 5
llulomallc Recyde
Save
•
15
j
0
0
Camera 2
Camera 6
0
0
Camera 3
Camera 7
0
0
Camera 4
Camera 8
D Enable
Reset
No Recording: turn off the recording.
•
Recording by Schedule: record according to a schedule.
•
Always Recording: the chosen cameras are constantly recording
•
Automatic Recycle: check the Enable option to recycle disk space
16
automatically when the disk space is full.
•
Schedule Configuration
Keep Video: set a period during which the recorded video clips will
be kept intact.
r.:Ti7ne- -
-
the cameras.
1Post-record
7. Click the Recording Schedule tab.
160)
8. Click the schedule of the camera which needs to be modified.
1r,..<:l.udIo -
L0
-
-
.,
Mode
I
o Always Record
o Record on Event
~:~
160)
6. Click Recording & Event/Recording settings.
-
~:~
1 Start Time:
1End Time:
1Pre-record
5. If selecting Recording by Schedule, you need to set the schedules of
-
_
0
se{;. (Max:
0
sec. (Max:
1
1
r
1
-
-
-
-
-
Enable audio
9. Click the column in the bottom of the page.
~I
Cancel
I
11. Choose the recording mode.
Sob......
I
.....II _ IX! CA •
..................
_
Cam2
I
Cam3
I
Cam4
LocaUon2
Location3
Camara 4
Camera 5
Camerae
Camera 7
CameraS
eo
Cam1
0)
~
U.
f}1
tl<
I[
1\
11
'3
141
e
Ii
I~
'.
11
XI
21
.
12 11 ,.
_
. . . . . . . . . . . . . . . . . . . . . . . . . . . . . . . . . . . . . . . . . . . . . . . . . . . . . . . . . . . . . . . . . . . . . . . . . . . . . . . . 1111
....................
,
.u
..
-.
...
................._
_ _ _ _
_ .
............................................._
_...................•.....
earn5
..........................................................•............._...•...•.•............
I Cam6 ................................................................................................
Cam7
..................................................................................................
CamS
. . . . . . . . . . . . . . . . . . . . . . . . . . . . . . . . . . . . . . . . . . . . . . . . . . . . . . . . . . . . . 11
. . . . . . . . . . . . . . . . . . . . .1.11
. . . . . . . . . . . . . . . . . . 11 . . 11
11
. . . . . . . . . .11.11
Record on Event: record only when triggered by an event. The event
1111
11111111
1
. . . . . . . . . . . . . . . . . . 11 •• 11
. . . . . . . . . . . . . . . . . . . . . 11
Always Record: always record.
•
can be triggered by Motion or Digital input.
11.
111
•
..
1111
11
11 ••• 11
11
111.1111 •• 1111
11
11
11.11
12.lf you want to add another new schedule, click the Insert button to add
11 ••••
a new one.
..
11
..
13. Repeat step 12 to add new schedules for the selected camera .
14. Repeat step 8 through 12 to set other cameras.
Audio
--
15. Click the Save button.
Step 10: Playback Function
•
Insert: insert new schedules.
There are two ways to implement the playback function: through Internet
•
Delete: delete the selected schedule.
Explorer or through the Playback System application.
•
Configure: modify the schedule and recording mode setting.
•
Internet Explorer
10. The default setting of the camera's recording schedule is from 00:00 to
24:00. If you want to modify the time slot, click the Configure button to
1. Open Internet Explorer and log in to the unit.
modify the default setting first.
2. Click the Playback button on the top of the page.
3. Click the Open Record button.
4. The Record Display Window will show the information of the available
video clips. Select the date of the record you wish to search for. See
user manual for more details about this Record Display Window.
5. Highlight the video records that you want to review. See user manual for
17
18
I
more details.
I
4. Insert the IP address of that unit.
5. Modify the port if necessary.
Woo PI~~
[);,h) Tlnllf.l PerkJd
00
tnanTlm.
_2000
SMTWTFS
F.nllTlflll)
6. Insert the user name.
I M1000a ~I05UIlO-:
I Ml.rnJOI-7-'loo,(SClO 7
7. Insert the password.
8. Check the Save Password option.
1 2 J " 5 6 7
, l:f Y1Ull~1'31'"
~
!S 16 17 10 1920 21
222'32"~.,litJ~/za
9. Click the Test Server button to test the connection between the local
"'''''
application and the remote unit.
10. Click the Add button to add this unit into the remote server list.
11. Click the OK button.
IP
11
11
n
I
'"'
l~
,..
-l
12. Click the Open Record button.
13. Click the icon
on the top of the Date-Time Panel to obtain the
Remote Playback Site Management dialog, and then select the server
§1
--R.Icordlllw'.ys
- - Racoo1onEvent
~~
video clips. Select the date you want to search the record from. See
user manual for more details about this Record Display Window.
6. Click the OK button.
•
you want to access.
14. The Record Display Window will show the information of the available
15. Highlight the video records that you want to review. See user manual for
more details.
Playback System Application
1. Go to Start> NUUO NVRmini > Playback System.
~I(ll1~Perlod"--
Start TIm.: l6Il()f7(lOA
2. Click the Remote Server button.
EndTlmo.
I Monooa
VklUDPJ~lY'N
--
~IO'3'fla
:B
"B 108 5900 "B
I SSlVer Salting
Server Name:
f
Address:
I
I
Port r:5-:C16:::0--"::-="::~:':'
Password:
I
I
Save Password:
r
User Name:
I
T"'SeMl~
§1
~['elt't
- - ReoordNifm
t2:EJ I)C
--RecordcnEvwlt
~~
16.Click the OK button.
3. Insert the name of your unit.
19
20
c..". I
I
Appendix A: Backup Function
00 Looout
There are three ways to backup your files: through Internet Explorer,
through Playback System application, or through Backup System
Size
application.
•
Internet Explorer
1. Open Internet Explorer and login the unit.
2. Click the Open Record button to select data.
3. Click the Backup button.
4. Set the Start Time and End Time you want to back up.
5. Select the cameras you want to back up.
6. Select the directory where you want to save the backup data.
7. Click the Backup button.
7. Select the record date.
•
Playback System Application
1. Go to Start> NUUO NVRmini > Playback System.
2. Click the Open Record button to select data.
QMRocUClD.WJ
D.iIfTlm,hnOCl
'WItOPrWfW
o EI1:lldo PItMIYW
_;sxo,f19/U
_ _110
_!'!!I!l'JIIl
.:>rmtrII1lYJ
3. Click the Backup button.
4. Set the Start Time and End Time you want to back up.
5. Select the cameras you want to back up.
6. Select the directory you want to save the backup data.
Selle',,"
I DI••
II(I"'II)
7. Click the Backup button.
"
•
Backup System Application
1. Go to Start> NUUO NVRmini > Backup System.
2. Insert the IP address of your unit in the login window.
. / OK
3. Insert the user name.
J
xo«-J
4. Insert the password.
8. Set the Start Time and End Time you want to back up. (or highlight the
5. Click the OK button.
video records which you want to back up)
6. Click the New Period button.
9. Select the cameras you want to back up.
10. Click the OK button.
11. Select the time slot which you want to back up.
21
22
I
II
llackup
Appendix B: Firmware Upgrade Function
t!ep
jJ New PerKld
i:s. Remove PerKld
Slort D." Time
.
@j Backup
0 Delete 00 Logoot
c.me,.(,)
End D." Time
Size I
1. Find your unit through Windows Explorer (insert "\\" plus the IP address
I
of your unit).
"11IT:I:IIIIII:
ftaJITITI
2. Use the administrator's 10 and password to login.
3. Put the update file into the folder "public" in your unit.
4. Open Internet Explorer and login the unit.
5. Click System/ System Upgrade.
6. Click the Firmware Upgrade tab.
I VOLU"~E 1
Volume
;;;;;;;;;;;;;
Folder IIJ PUBI.J(,;
FIleName
il
---10
12. Click the Backup button.
OK
Cancet
13. Select the way and directory you want to save the backup data.
14. Check the Include Playback application option, which will add
7. Choose the volume.
Playback application into the backup folder.
8. Choose the folder "pUblic".
15. Click the OK button.
9. Insert the entire file name, including the extension name.
10. Click the OK button.
Media
11. The system will begin the upgrade process.
-
.
ID\
12.After upgrade, the system will reboot. You will need to log into the unit
I ~.~;I
o Backup on HardDlsk
_
again.
o Backup using CDROM
D Include Playback application
./
23
OK
I
X
Cancel
I
\
\
24
I