1
~LCAN '"
][08
User's Manual
Table Of Contents
Limited Warranty & Disclaimer
og_ ..._ .. _ ....
~ ~ _,0IIII""''''-' H
.... OtMo ondCo:wc.- eo ..
...,~
10<, poonod 011 y_l""" ,1Ia cSaIo 0IOOOj<n" , ..... _ _ ~ E_"'Il .... " .. ,..... IhaI. - . _ _
"....... "'"G'"'' m"'.. on _ ,~, __ ~ _., ... "0'''' .. ,," '''''''
_""""1110<. _
01.100 d,,,, ''''''''lia .... 01 01111_' "",a..... An, ........ _
mOl.,,,,,. ....
d.'.ocl. in
... '" ,.,. ..4: "''''''''''''
pttId'""'" _, ... ""'"""
......."." moOl_ ....... _
to tho ~ E'1I"'"'"'II
n... ..... '''''Y ~ _
bo _
I ro" ... tho ~ "' ....... t 10, ""I" .. ".. "",pol' II,..., .. 0 " _ "", .}"OII _
.. , dot.ocl. " - "
E'III'"_"'11 ..., . . . "1"""" __ 01 ,...,. ....,., ... Aw"od Env-m\l PI"""". prow .... ,.... '"'"'" "'" prod""
dunn;lhO ...,,_ "."'d.
PI_". 10 AwOod ["II~
"_on
U II ."flnIY IDglI .. '0 IhI origin.' ",.11 ay,ch 'm gn'. Thor.IO,•. "..... 111<1 ..... COpj" 01 "'.
........ ......,. .. I """......,. ......11' mO\' '" - - . . IlhO pr-.a .. 10 '" ..,. 10 ~ ~"'II br .....
tho purcha_ wiI """'. , ... PKl<ogo '" .. ,um. M ,...,..".....,. \Of 10.. 0< d.mogo cIoMg 011_ p"", 10
, .... twill , ... Plod,"" "" ... ~ ... ,
<.011....",..., E"II""o<"'Il rodlncal S_Io< . Rolli" ~"".01
{RlAAIIOHIIbof _ 011_ ..... fI>Cbont.
_01",,,,
_~....,
E'O. ,""... ....,"'" E"II"'_"'Il M! ,..,'" "'" _ ......
"" " .. ,......, .. _ _ _ _ ............ , 01 _
"' _
~,,,..."'''''' .... ... ""'~.
00"·"
.....nd rou. '"' ""'''''''''.
pooriOlm."".
'" "'.... "". _cui .. ""'poM
ro\
~
'" ..
_01""" _
,..
EoglM""Il
W. " ' ....... to ,.. ,. .....1'" ,.. _ " ' , .....
one! , . . _
,...,
,....,11. ,..
_or.""" "'*"".....
d. ...,.. or....u'""'!! ,I\o.rn .. ,....... to ,1\0. Q~'''' ON!
••
INTRODUCTION· ABOUT TIlE VULCAN
The Software
iv
GS/OS (GS and Retrofit Only)
Iv
GS/OS Native Mode Driver (GS and Retront Only) v
Backup [[
v
The Partition Manager
Park Heads
The SCparnte DiSks
The Vulcan's Fan
"
The Power Supply
vii
Running Progrnms from Vulcan
,
"
"
"
,
CHAPTER ONE - U GS L.'iSTALUnON
"11""'" '"_ """'
.•,,.,,,,"".
•.."....10
r ... """.... , ...., ,ot"",," ... ""'" - . - . or . . ."'0. ..... and '" 100. 01 all 01..., •. or .. 01 ~'''''''.
~ _
E"II'"_"'Il do ..... og . ... or on>ptoy. . " " ,.....,,'" 10 ...... ."., '"""~':O''''''
tho!
"""roy
ooIl_
"",t. .
1 _ " _ _ 1"""'_...,...... ~'111"'" by ""'""" E _ " ' I l _ "
'VOS , ......... lkIO .. "" ""1'1'''11''' "''''. IM ......... I '" th, _.." ....., ..,. t>o _ . " ...- '" ., "",,, _ . ,
"""'-. ""","'01 ~ E_"9,''''''''' " ",.-..... " .. 01"" _ ... '" .,"' .... on OIdwol "'PI' 1 ~
no! • .,.. _
., t>o "'_,,, ......... " ....... or ... _, t><o . t ", .... _ ....
(..-,n .
""'" "' _
"cepI"'" __
orct\tw
_I
10 ,11''':''_
m" '" _, 00..... or ;"'"• ., .nor"" po''''''. lIM..... "'~. «>I'V"Il ......... ~'""'''''II "".
ooIl_. "".ny ""'"p<M! O~.... by rou "'-', " ... _ <>MOl '"
""""" 10"11_ or """,,' Vou "'01' OM '"II
..-!o< .... """"'..
II<'' ' ' !O'. ,~o! J'OII'" ,..,.... 1lOI ... 01 ""'..... '" I"" ooIIw." ibo..",,",. I",,,. or
_"", "w",", ,, ' ........ 01 So ,or. to <10""" ..." I""' d,.1or '" ___ e.............. "" """..n""," on
""'._ u.p<I".' _.",. ~ E"II""""'V .....".. <h. ''II'' 10 m.~. "" "" ...... "' ... . 10 """, ...
AppI.6cI EIIQ'_o'IQ taMOl
_0<1... ,""'" afty _ ' .......d ""II'''''''Il " . '''''''' "010.",, ",""0<1.
...,... and ...,... fto. or•
......."'..........0101........
""""" eo.oo"",,,. "'"
DOs 3 3. P_..., PIOOOS .... _
eo.n,... • . he
Eng",","'Il
.og~,,,
U_.",.
"'11_'" ......""-
ep".. ... , _ ' " "adom .... 01 0'11' 11 _
.. "". he
Applied Engineering
P.O So,51oo
C."01.",,. Tela.]SO"
SaIl. (21., 2"-m6(l 9 M'< " PM ICSTI7 <1.1"
1~ Svppor!
9 M'< 1230. 135·5 PM {CSTI Mond-a, Fn<Iay
Tec;llno;al Svppor! 'eieptlllno ,.,.. c.annol De acGessed 'hrougI'1 1he Sale. <!epaI1melll I
en-
(2,.,2.,·61)69
.. ',.
7
CUAl"1"F.R TWO _ USL"lG GS/ OS AND PRoDOS 8
9
Maximum Files in (he Root Directory
Booting from VulC'Jn
Setting 1be Vulcan to BoO!
Copying a Different GS/OS System 10 the Vulcan
Vulcan Speed Under GS/OS
ProOOS 8
CnAPTER THREE - TIlE PARTITION MANAG E R
og"',,'" ._."'01
""""'" E"II ........
01 _
["II .......
_ e _ ' " I I ....
YL.oI:an and RMlkHpor ...
Poocal • •
Installation Procedure
What Now?
First..
Abou( the Panition Manager
Backing Up the Pal1ilions
Running the Panition Manager
TIle MODIFY Mode
Entering MODIFY Mode
Locking/Unlocking Pal1itions
9
9
9
10
II
12
13
13
13
,4
i4
"
""
Totlle of Coo,'''''''
I'anition Names
setting the Partition Size
TUrning Partitions On or Off
selecting the Opel1lting System
selecting the !loot Panition
Leaving MO[)JFY Mode
Cam;eling/Saving Changes
Formatting
Print
QUit
Final Check
Quitting
CIlAPTER fOUR - OOS 3.3, PAS CAL, ANO CP/ M
OOS 3.3
Patched DOS 3.3 Notes
Volume SiZC5
Copying Files to the DOS 3.3 Panition
Other DOS 3.3 Goodies
CP/M
Pascal
CHAPTER FIVE - lSACKL"IG UP nUl VULCAN
Introduction
Backup 11 for ProDOS
Number of Disks Requi,,:d
Suggested Backup SChedule
Before You Back Up
Running Backup 11
Backup Entire ProDOS Partition
Backup Modified Files
Listing Files
Restore Individual Files
Restore Entire Volume
•
vlACon
i6
17
ZO
A, Trouble Shootin g
[f you
21
22
23
23
23
II:
24
2S
2S
2S
27
27
29
29
29
33
""
'I
42
42
44
can~
boot
"
47
ProDOS can't Find All Four Vulcan Partitions 47
Two Drive Devices per S[ot
47
Eight Total Drive DcviCC5
48
The Vulcan Classic Desk Accessory
49
Accessing the Desk Accessory
49
SCt !loot Partition
SO
Write Pro(eC\ I>anition
SO
Park Heads
51
About Vulcan ..
51
Quit
Copy the Vulcan CDA to Your E300I Disk
51
Ha rdware
53
Switches
What They Do
How To Set Them
53
Remote Ught Jack
54
" I nt e rlea\'er~ (20 and 40 Megs on ly)
55
About Interleave
55
Using Interleaver
56
A Brief ProooS Tutoria l
58
Opel1lting System
58
Naming Volume~
58
Root Directory and Subdirectory
58
Pathname
59
System FilC5
60
Additional ResourCC5
60
61
Getting Help
62
Returning a Product
RMA Number, "Attention· Sh(.'Ct. and IIwoicc62
'."t'hen You Ship
When We Receive
'I
c,
"
"
D,
E,
37
37
37
37
38
38
38
38
4,
AP PENDICES
f:
""
t,"IUEX
'"
Tobia 01 Conten!>
•
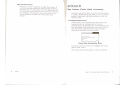
INTRODUCT ON
About the Vulcan
The Software
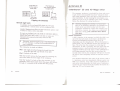
The Vulcan comes prcformaued and set into I'roDOS
p.utitions.
Compucer
Size
'or ]>reset
,
Contents
Pa.dllons
lies
(.'1<1
20Mcg
reLm/",V
lies
40 Meg
(.tId ",uofou
~
Vulcan
lie.
IOOMcg
(.no;! re'rOOt)
,
•
GSJOS, L:tils
n
G.'>IO~,
"
.,""
Empty
Utll,
\) GS/OS, L'tils
Empty
~:mp{\
Empty
GS/ OS (GS ond Retrofit Only)
We've included GS!OS 5.02 on Ihe firs! partItion of the
IIGS and retrofit Vulcans. You must have al least 768K of
system memory to NO GS/OS. The hard drive contains
the complete sy5!crn while the 3.5" disk has a strippeddown. boot version. You may wan! (0 make 1I copy of the
compJt'lC 5.02 \'cr.sion onto your own 3.5" disks as
back up. Use the Fjnder to copy the contents of the
System.Disk folder and the System.Tools folder \0 3.5"
disks. COpen Ihe SysICrn.Disk folder, Select All and drag il
10 a formatted disk, Do the same with the System.Tools
folder.)
Vulcon
•
Whcn you boot lile Vulain, you'll be in Itle Finder Refer'
-Apple JIGS System rusk User's Guide- before
culling Tec:b,.lcul Support wltb llues t/orrs ubout tbe
Finder. nle User's Guide, included wuil your lieS, will
,ell you wh3t you need 10 know aboul using the Finder to
copy, eraS<.), and format disks, launch p'ograms and more.
If you do nor have a copy of the User"s Guide, see your
Apple dealer
'0
GS/ OS Nolive Mode Driver (GS ond Retrofit Only)
Included In the System Om'elS foklcr is Vulain's nallve
mode dnver whICh speeds up Vulain's access time
dramalically The drh'er is described in Ch3pter 2:.
Bock up II
Backup II is Applc's ProDOS b ackup utility for backing
up the Prol>OS partitions. For inSlnJdlons on using
Backup II, rder to Ihe Chapter ').
The Partition Monoge.
Because Prol>OS allows a maximum of 32: Meg per drh'c
device, Ihe 20 Meg Vulains arc shipped wuh one
formllned Prol>OS TXlrtulon, the 40 Meg Vulcans are
shippo.'(\ wilh tWO formancd Prol>OS p:lrtllions and the 100
Meg Vulcan~ arc shipped with four formaucd PruooS
partitions.
The Part ition Manager program ( PAII.T MA NAGER) a llows
you to configure the Vulcan in up to 16 dIfferent
scgmen!s Howe,-e r, you don 't need to St.... up a :;eTXIrate
partItion fOf c:leh program Sct up your own partitions if
yoo wanlto run operating systems Cltler than ProooS Of
if you wan! 10 resize and add to Ihc existing ProooS
TXlnnions. Any pannion can be SCI up 10 run Undef
I'rol>OS, 1>05 3.3, Pascal, or CP/ M n,e Partilion Manager
allows you to resi7.c partitions, formal p.1nnions, activate
partili ons and .select which partilion to boo!
nIC ProOOS 8 versIon providt:d on the Vulcan and the
floppy dISks has been patched to ano", ProOOS 8 to usc
four Pronos partitions from the Vulcan ioslead of only
two (the Prol>OS rcgriction).
VlACCO
Pork Heodl
The P:uk lleads program n'IO"CS the hoIrd drive's
readfwrite heads 10 a "ure' posilion Oil lhe diSk This
pft;.'(!nl5 the heads from bouocing on a piece of the disk
and destroying the dna there. You need to run Park
He~ds only when you plan 10 move thc Vulcan Of your
compUlCr. Run it just before turning o ff your compUicr
II Is included in Ihe Vulcan COA (sec Appendi.x U) and b
also a sund·alooe program OIl the Vulcan
<0-
Meg dri~<es Iu,'c an auto-park feature
which mows the ht.':IW to lhe "safe' position cach
lime you shut down
NOkr 100
The Separote Obkl
Ttli' 3 5" disk inc1ude<l with Ihe Vulcan TIcs and retrofil I~
a backup of the files necessary to boOl GS/OS , II also
contains the Vulcan's utilities such liS lhe nallVC mOOt.'
dnver, Panition Manager, Park Hl':lds, llackup II, and a
m(xMed }>roDOS 8.
The OJ 25" d,sk is tl'lO sided, The rront side contal05
Vulcan's l'roOOS 8 ulllilies including llackup 11, Partilion
Manager, I'ark HC:lds, and I'roDOS patchcr. The back ~Idc
has lhe 1>05 3.3 system and various DOS 3-3 utlll1k'S
includll'l8 If.'s version of I'ID, which support the VulC",m
( Refer 10 the DOS 33 SCction of Chapter 4.)
The Vulc:on', fon
1l1C Vulain's fan kl'Cp! the power suppl)' and hard
drive cool. If you h3~'e scveral powerful cards in
)'Our computcr ho ..... e'-cf, consider a 5Cpar.IIC
cooling fan for your system_
The Power Supply
n'e Vulcan's builHn power supply replaces your
computef's powcr supply Apphl'(\ EngirlCering dC$iKnt:u
Vulc:.n's po'"Ief supply to be both more compact and
more po ..... erful th:ln the one Included with your
computef
FeQIu,..
D
D
D
D
Q
Q
Q
Q
Q
power supplyFCC Ccrtifi(:d
ught-weight aluminum case
F..xtemally accessible fuse wilh spare.
110I22Q VAC, 50/60 Hz
Buill-in Fan
Cool Running
- 4O'C wlfan
- 6o'c wlo fan under full load
Power componcnts 10 case
70 full w-~tts wlo fan
Adju5table 5 Volts DC
Running Progrom$ from Vulcan
You do,, 't "eed to create a separate ptlrlllloPlfor
each program you U'tlPlt to run. The number of
HAPTER
NE
IIGS Installallon
In$fal/olion Procedure
You'll need no special tools to install the Vulcan. Simply
fonow the instructions ix:low.
0)
1)
Nore: Iktrofit owners. the installation is oosically
the same when installing intO a lie Cllse. Follow the
same instructions.
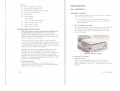
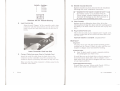
Tum Off and Ope,.. Computer
Tum off the computer and then press in the two latchc.> at
the rear of Ihe case with your forefingers while using
your thumbs to push Ihe lid up and towards you. (See
picture following.)
programs each partition can hold is limilcd only by the
space you have allotted 10 lhe partition. Copy the
programs to the Vulcan partition just as you would copy
from one floppy disk to another.
If you have ix:en using the Finder or OIher program
Iluncher to run your programs, you can continue to U.'>C II
to run programs from the Vulcan. (Refer \0 the manual,
"Apple I1GS System Disk User's Guide," that was included
wilh your GS for Findcr inStructions.)
Although you don1 n(.'(.'(\ separate partitions for each
program, If you're using GS/OS version 5.02, some
programs arc not compatible and will not run properly. If
you're having trouble running a non-copy protected
program from GS/OS, set up a separate partition with the
soI"tW;lre's operating system inslalled and boot from that
partition [0 run the software.
Copy PrOlK'''' l'fOgroms
Copy protected programs are an except,on: some
programs arc written to run only from floppy disk and
cannOlix: run from ;I hard disk.
VulCOt'l
Remove the IIGS cover
2)
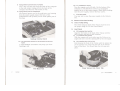
lI.mo.... Power Supply
D R_ _ oIa4 .,..,. card.
If you have a card installed into slol I. you'll need to
remove it (0 give yourself room to reach the internal
power plug. Refer to your slot 1 card's manual for proper
removal.
Ch. , - IGS Installollon
I) Unplug
e_"'" COld
!fom
boc~
01
c......,.......
Ivb) (// e c ..... ) R _ e le.eWl..
This is [he cord that Nns from [he back of [he computer
to the wall :;.ocket. Unplug it from [he back of [he
computer and from [he wall :;.ocket as well.
m
Tu rn [he compute r on ilS left siue. On the bottom of [he
computer you will find four screws in a rectangular
pal1em [he size of the power supply. While finnly holding
onto the power supply. rcmove Ihe four screws.
lJnI*>glntemol COld /rom ,,~boo";I.
The internal power cord is the multi-wi re cord running
from the power supply tol'o'Jrd Ihe back of Ihe
motherboard. Pull up finnly on [he white plastic part of
lhe plug.
LlII out POW" suppIv.
vI
You may wam
b,,,,
10
store the power su pply in Ihe Vulcan's
3)
lIemove Vuleon from Pocking.
4)
Check Voltage seltlng
The sw itch scuing on back of [he VulC"'~n must be set
Ihe prorx:r voltage (115 in Ihe United Stalcs).
5)
[0
IN8fI VuleCW'l
Iol
01&1 c(IMoS) 1nMfI bock end Ilrsl.
Align [he three holes in the back of lhe Vulcan with the
three prongs In the hack of the computer.
Ib)
._,
Unplug Internal Cord
Iva) [GS cOHO) ~ PIA bock on lob 01 boIIom /ront 01 POW"
A small flalbladc screwdriver may keep you from
breaking a nail.
(J (e C(lMoS)
InMoI f<orn end r~st
With the computer still on its side, turn lhe Vu lcan at an
angle and insert il imo the orx:ning lefl by Ihe old supply.
ia)
OIQS COH1) Snop
clown lnIo "0111 lab.
Push down on lhe from of Ihe vulGlfl umilthe pllslic lab
on Ihe computer case snaps imo the hole 3t the bottom
from of the Vulcan You should hC'.u the lab snap into
place.
Snap Vulcan Into Front Tab
,
Vulcan
en. I _IGS nsrolah:>n
,
Ib)
VI. c-.)
u.. '- Je,.... ~ 10 ...,... Yulc:on
Align the holes on the balOrn of the Vulcan and the
computer case. Do flO( use the screws from the old power
supply. Do not over-tighten the screw.
6)
Plug Il'IlemoI Power COld 11'110 Motnerboorci.
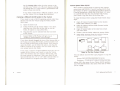
Check thc switches on the a.rd. 1be switch block is
the red rectangular box toward the bOItom right of
the card, The switches should be set as shown below
You'll probably need to remove the tape covering the
switches first. (For a complcte description of the
functiOns of the Switches, refer to App. C.)
The Vulcan's internal power oord plugs into the
mOIherbcxlrd In the same place as the old power supply's
cord. The conne<:'lo(s tab should be toward the right side
of the computer
~
Notc.· Do tI()( rOfCC the COfll'll"Clor,
ClIsily in one direction.
11
USe a small, pointed
oo,ea, like a wooden tocthpick
or bcnt-out p;l.perclip to change a switch setting. The
circle on each switch represents the end that should
be pressed for a SlarKbrd JIGS SClllp.
will plug In
Swil c h
Se tting
1
OPEN
CLOSED
CLOSED
OPEN
,
2
•
r~Uj ~ ~
Default Switch Setting
SIoI J
•Plug Internel Cord
7)
11'110 Motherboard
S.I Swltche. Accord ll'lg to SIoI
The Controller Card will work from any slot
However, there arc ~ few conditions of which you
1'Il'l-d to be awuc.
Do 1101 in5taU the C'.ud into the Memory Expansion
slot We recommend Inslalling the card imo slot 6 or
7.
~
•
lltc~ ~-SIoItk>g)
If your slot 7 docs not have a card in it, but is
Pascal NOl(!: If you will be using Apple Pascal
vl .3, you muSi il'lSlall the controller into slot <I, 5,
or 6. Pseudo-s1oumg must 001: be enabled.
blockl-d. you can Install the card into another slot and
make It appear to be in slot 7. This is most valuable if
you have slOt 3, <I, or 5 unoccupied. You can leave the
5\01; containing the card SCI to that slot's function This
leaves slot 3 frl'e for its 80 column function, slot "
free for mouse control. or slot 5 frt.'e for Smal1 1'011
(disk drive control). Thls process is call1''d pseudoslotting.
If you
w:lnt to pseu<Jo.slOt tile card, you'll need to
make a simple adjustmCTlt to the card firsl_
Locate the switch block on the contro!ler
card.
2) If a piece of tape is covering the SWllchcs,
remove it
3) Set the Switches in the position shown
folloWing
I)
o..l-IGS~_'
,
Switch
1
2
3
4
SctUPS
OPEN
CLOSED
CLOSED
CLOSED
Switches Set for Pseudo-Slonlng
8)
Insert Card Inla Sial
Align the gold -fingers' of the controller end's L-dgC
connector with the slot and then use the heel of on~·
hand to push the card down into the slOi and scat it
firm I)'.
10) hlrlltal Any Cards hmoved
Replace any cards you have removed for the installation
following th~ cards' installation instructions.
+
WARNINGllF YOU HAVE A CARD IN SWT I, usc
the insulator card (Z" x 6") included with the
Vulcan package. Applied Engineering will not be
responsible for damage to any other products so
be careful when reinstalling your cards.
11) ClaM Compute'
Replace the lid by sliding the front of the lid in first,
lowering the back edge into place and then pushing gently
and firmly on the back comers of the lid until II POp5 into
place.
12) Plug In E.lemol Powel COld
This is the same cord as your original power supply used.
Connect It to the back of the Vulcan and then plug it into
the wall socket.
WhotNow1
Ustng GSICS
_h. . . .
You may want to usc only the GS/OS oper:ning system
included with the vulcan. If that'S the case, read the next
chapter to configure your hard disk for booting.
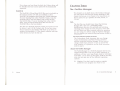
Insert Controller Card into Slot
9)
COl'Inecl Coble Irom power Orlve 10 Conlroller Cord
Attach the wide flat cable from the hard drive to the
conneclOr on the controller card. The connector and
socket are keyed so that they will anKh in only one way.
Make sure that the cable connector is finnly seated in the
controller card socket.
+
Note: You don 't nL"ed to create a separate panition
for each program you want to run.
If you'd like \0 set up the hard drive so that it appears to
be several separate hard disks, refer to Chapter 3 now.
Most users can usc Ihe drive as shipped and won't n~'t.--d 10
sct up separate panitions.
LoodIng DIll....,. Operollng Sysl.....
If you'd like to usc your Vulcan under Pascal, CP/ M or
OOS 3.3 you'll need to read Chapters 3 and 4.
,
VulCan
CHA!2:IlJL TWQ
Using GS/ OS and ProDOS 8
Maximum Files In the Roof Dlreclory
Both ProOOS 8 and PruDOS 16 limit the ffial(imum files in
the rlX>! directory to 51. You may, however, put a vinuall y
unlimited number of files into subdirectories/folders.
Booting (rom Vulcan
Most likely, you will want to boot GS/OS from the
VulOln; it's much faster than booting from noppy and you
don~ have to put In and take out disks.
~
Vulcan
s.tt1ng The Vulc an to 1001
1)
Boot Computer and Set Sims
You must set the slot containing the controller
card to 'Your Card' under Slots option of the
Control Panel. Refer to your IIGS owners manual
for more information on Selling the slO1
Slot 7 Exception (pSCydo-SiottjOli>
If you want the card to appear to be in slot 7 even
though it'S installed into another slot (as mentioned
earlier) you'll need to set your slots as follows:
I)
2)
+
Leave the S101 in which the controller card i5
installed sct to that slot's function (i.c. not
· Your Card")
Set slot 7 to "Your Card:
Note: M3kc sure that you've set the Switches
on the card to the proper position.
[~M ~ ~
Switches Set for Pseudo-Slotting
2)
•
vucon
Set to Boot rrom the Vulcan
•
Set the Startup Slot under the SI0I5 option to the
slot that your Vulcan is in. (If you're pseudo-slotting,
set Stanup Slot to 7.1 11le Vulcan is preformaned and
ready to boot into GS/OS.
If you want \0 boot from a different panition, you'll
use the Vulcan CDA to change boot partitions.
Copying a Different GS; OS System to the Vulcan
If you want to copy a GS/OS operating system other than
release 5.02 onto the Vulcan using the Finder, follow
these steps,
1)
2)
3)
~
Open the di5k's iron
Select ProDOS and the SySlem folder if you don't
need the rest of the files on lhe disk or use the
Select All o ption to copy all the files.
Drag the files you've selec::tcd from the boot di5k
to the Vulcan
Note: Simply dragging the di5k icon conlllining the
System folder to the Vulcan will get you an
"Unable 10 load ProDOS" error mcs,s;lo(e.
If you have already dragged the iron of the System disk to
the Vulcan iron (using the Finder). all the boot files will
be in a folder of their own on the Vulcan. You'lI need to
open this folder, use the Select All option, and drag the
folder's coments to the Vulcan. You can throwaway Ihe
now empty System di5k folder.
If you copy a version of GS/OS different from the one wc
supply on the Vulcan, you 'll need to copy the Vulcan
driver for GS/OS to the new system's Drivers file . (SCe
the next section for directions.) Also copy both PH and
Stan.GS.OS from the 3.5" or 5.25" disk's System folder to
allow ProDOS 8 to recognize more than 2 panitioru;,
Vucon
Vulcan Speed Under GS/ OS
We've wrillen a special driver to speed up the Vulcan's
access time under GS/OS. If you're booting GSfOS from
the Vulcan, thi5 driver is automatically installed, However.
If you're Jxx:xing from a RAM disk, ROM di5k, 3.5" drive,
or a GS/OS other than the one provided with Vulcan,
you'll need 10 copy the driver to the boot disk.
To ropy the Vulcan Driver using the Finder follow these
steps:
I)
2)
3)
4)
5)
Open the Vulcan's System folder (or the System
folder of the Vulcan's 3.5" di5k).
Open the Vulcan'S Drivers folder (located within
the System folder).
Open the SySlem folder of the di5k from which
you WlInt 10 boot.
Locate the Drivers folder within the System folder.
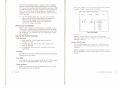
Drag the file VULCAN from the Vulcan's Drivers
folder to the boot disk's Drivers folder.
•
I
El-LJ--tJ
BOOT DISK
SYSTEM
DRlVERS
Where 10 Put the Vulcan Driver
You can also use your favorite ropy progQm to ropy the
driver.
SOurce: fA El fSYSTEM/DRIVERS(VULCAN
Destination: /YOU R.Il00T.DISKlSYSTEM/DRIVERS
where fAEl is the name of your Vu lcan GS/OS partition
and IYOUR.IlOOT.DlSK is the name of the disk to which
you're copying,
"
Now when you boot from the disk, the Vulcan driver will
be inst:l.Hed and your access speed will be dramatically
improved.
CHAPTER THREE
The Partition Manager
ProDOS 8
The ProDOS 8, P8 and Sl:art.GS.OS files we've included on
the Vulcan and the 3.5" disk arc modified to allow
ProWS 8 to recognize more than two Vulcan partitions.
If you're booiing from c.xher ProWS 8 disks, copy the
ProWS 8 file to the 0001 disk{s) and rtO( the P8 and
Start.GS/OS flies. If you're booilng from other GS/OS
disks, copy the P8 and SUrt.GS,OS flles and not the
ProDOS 8 file to the boo: disk(s).
The first two ProDOS partitions which are turned on will
be drives I and 2 of the Vulcan's 5101. If you have more
than 2 turned on, the (Xher(s) will show up as drives in
another slot (probably I). This doesn't interfere with any
c.xher device you have in that slO(.
This chapter is an in-depth look at the Panition Manager.
You may want to read over the section headings irt this
chapter and then go on to Chapter 4 for insturctlons on
how to quickly set up a partition for DOS, Pascal, or
Cl'/ AM.
First.,.
The first thing YOll should know arollt the Partition
Manager (pM) is that it is a jomwlling utility.
Modificatioru to the si7.c of a partition and Switching
operating sy!lem change the basic structure of the disk
and will deStroy lIny data currently within the partitions
you are resizing. So, before using the Partition Manager,
save any dat~ that you want to keep and restore it after re·
partitioning.
n.. v,*,,,,, CIoo* DMIc Acc MSO/'y tor the ttGs
The Vulcan Classic Desk Accessory IeI5 you change
Vulcan 0001 partitions and Write Protect partitions
without rundng the Partition Manager. If you want to
change only the 0001 partition or tum on and off the
write prO(ection of a partition. usc the Desk Accessory.
{refer to App. B.
About the Parlltbn Manager
The Partition Manager is a ProOOS program that let5 you
segment the hard disk, You can use these scgrnent5, or
partitions, a~ if they were large floppy disks or individual
hard disks. Each can have itl; own name, hold itl; own files,
even nm umer anyone of four different operating
systems.
.0-
Nem{'Idi!r: You don't need to create a separate
panitior for each program you want to run .
Vulccn
u
The Partition Manager allows a maximum of 16 separate
sections. ProooS and CP/ M operating sySl:etnS can both
have up to four panitions turned on at the same time. OOS
3.3 and Pascal allow for only 2 sections active at the same
time. You could set up all 16 panitions as ProDOS, for
example. but only four of these can be accessed (turned
on) at one time.
<0>
Running the Parlltlon Manog.,.
From the Finder
2)
3)
AE VULCAN PARTITION IQ.NAGER
MODIFY
PC Transporter users: You can also use the hard
disk as an MS-ooS storage device by creating an
MS-DOS hard volume on a ProDOS panition.
Follow the directions in the PC Transponer
manual for using a hard disk.
Backing Up the Porlilion.
Make ProDOS backups with Backup Il, included on the
Vulcan drive. Make OOS 3.3 backups with FlD, Included
on Vulcan's OOS 3.3 disk. Backup Pascal and CP/M with
the programs you currently use for copying files under
these systems.
J)
Once the program is run. you'll see the current partition
senlngs. A sample screen is shown below:
Boot from the Vulcan hard disk or from the
Vulcan 3.5" disk.
Double-dick the AEI or the Vulcan disk icon to
open its window.
Double-dick the loon PAR! . MANAGER 10 run [he
application.
From Disk
Boot the 5.25' ProooS Utilities disk and choose Partition
,,,
•,
,,
WO,
name
AE.l
~.,
PRlNT
FORMAT
~1ze
""
32?6?5K
~46D.
OK
IV
x.x)
QUIT
,-,
~ ystern
-,
PROCOS
."
."
."
."
CLEAR
CLEAR
CLEAR
CC~
"
CLEAR
The PM Menu
TIle MODIFY Mode
While in modify mode you can enter the Partition
Manager options table to configure your hard drive into
different partitions.
Entering MODIFY Mode>
Usc the left and right arrow keys (or J ~nd K keys) to
select MODIfY from thc top menu bar and then prcs.~
<rerum>.
While in MODIfY mode, the Partition Manager is .'oCt up
like a spread sheet. Use the arrow keys to movc from cell
10 cell.
Maf13ger from the menu.
From BOlle
From BASIC, set your curren! prefix to the VULCAN disk
and enter -PA RT.MANAGER at the BASIC prompt.
Other Launche...
Follow the instructions for the launcher you use to run
the application PART. MANAGER.
V..cccn
01. 3 - Tho Pcrtrlioo McYIOge<
To
move the cuaor
"P
down
left
right
U 5C
"'" or up arrow
"M' or down arrow
T or left arrow
'K" or right arrow
_h_
3)
+
Name can be up to 10 characters long.
Note: ProOOS actually aliows names to be 15
characters long, however. the I'M allows only 10.
To name a partition, while in MODIFY mode:
Locking/Unlocking Portillon,
Locking a partition protects that pa n ition from being
wrilten 10, refoqnanoo, erased or resized. A locked
partition functions the same as a write protected disk.
«>
Note: You can also lock and unlock (write protecO
the partitions from the Vulcan CI)A. Refer to
Appendix B.
To lock or unlock a drive. while in MODIFY mode:
J)
2)
Move the cursor to the lOCK column of the
panilion you want to lock or unlock. Locked
partilions are marked with an asterisk (0).
Press the <return:> key to toggle between locked
and unlockL"<I.
Porllllon Nome,
Each partition can have its own name. The name you
assign a panition is an easy way for yOl.l to keep track of
the panilions when setting the boot drive and active
partitions.
The opcr.lting systems will not actually usc these names
exccpt as defaults when formaning. So, you could name a
ProDOS partition "lAURA" under the Partition Manager,
format the panition using the default, lAURA, and then, in
the Finder you can rename it STIJFF.O.lAUKA.
Name R......
Panition names basically follow the roles of Pro[)OS
ru~.
These rulcs are:
1)
Name can include leners, numbers, or periods but
not spaces.
2)
•
Yuk:on
Name must begin with a letter.
I)
2)
3)
4)
Move the cursor to the NAME column of the
partition you want 10 name.
Press <return:>.
Type in the name for the partition. (Nefer to Name
Rules above for acceptable names.)
Press <return:>
Conc~1ng
R..........
To cancel a rename, while in the ENTER NAME mode.
press <esc:>. The name will be left as it was.
setting the Partition Size
When we shipped your Vulcan, we 31101100 the maxtmum
allowable space to the first partilion with a ProOOS
system installed. ProDOS allows a ma)(imum of 32
Megabytes per drive. Any available disk space above the
maximum is shiftoo to the ne)(t partition(s).
If you decide to resize the partitiOTl5 remember this
importam guideline:
BACK UP!
When you enlarge a panition, you're taking space away
flOm another partition. The space you take away may be
the portion that contains important files or applications.
Backup copies of the partitions let >,ou correct any slips
you might make.
The p3rtition you have sclectc<l will give space to or take
space from the next panition(s) down.
.....-
o
Move the cursor to the SYSTEM column of the
partition you want to resize.
H) Press <return>.
iiD Usc the arrow keys to toggle through the
system options umil you re2ch CLEAR.
iv) Press <return>
When sizing, keep in mind the following rules:
1)
2)
3)
4)
5)
6)
7)
8)
~
You must have the operating system of both the
partition you are resizing as well as the partition
next in line SCI 10 CLEAR.
Any sequential files Iha1 are also SCI to CLEAR may
also be mooifled.
ProDOS allows a maximum partition size of 32
contained in a single partition arc SCI from the
froma\ option.
In DOS 3.3, you'll need at least onc 140K volume
10 make the partition boatable.
PaSCII allows a maximum partition size of 16 Meg
06,383.5K _. S7ffF).
CP/ M allows a maximum partition size of 8 Meg
(8192.0K - 54(00).
IMPORTANT 1 you currently have ties within thc
partitions you are resizing, you could Jose these
flies. Back up Ihc parutions mal will be involved in
resizing before makin,R any changes.
When resizing a partition, you'll need to,
1)
2)
Unlock the partitions Ihat will be involvctl in
resizing. Refer to ' locking/Unlocking Partitions"
above.
set the partition to CLEAR.
This allows you to t:J.ke space away from one partition
and distribute it to others.
To set the SYSTEM to CLEAR, while in MODIFY
modo,
"
Vulcan
3l
Meg.
005 3.3 allows a maximum partition size of 32 Meg
rruldc up of seve",1 volumes which must be either
1<iOK or 400K.
In DOS 3.3, Ihc number of 140K and 400K volumes
Set the partition size.
To select the size for a partition;
t) Move the cursor to the SIZE column of the
partition you want 10 change.
ii) Press <return>.
Iii) select the size for the partition using the same
keys tha! move the cursor.
Use
To
increase size by 321\ "I" or up aITOW
decrease size by 32K "M" or down arrow
increase size by 0.5K "K' or right arrow
decrease size by O.5K "J" or left arrow
iv) Press <return>
The sizes are dependent UJXln the tOOl available spacc. All
of the hard disk memory must be al10cncd to one
partition or another. When you shift space from any
pMition. il will affect the space of the next panition.
Allot the sizes to higher number panitions in a "trickle
down" method; pass memory from the partitions with
lower numbers to the partitions with higher numbers.
,
,"'"
3
4
5
,,
"'ME
SIZE:
ON SYS T EM
20000 , OK
SOOO.OK
SOOO . OK
5000 . OK
2500 . 0K
2S00 .0K
,,"
CLEAR
CLEAR
CLEAR
CLEAR
PASC AL
CP/ M
CL EAR
' 00'
•
In the example above, partitions 1-4 would be the only
ones affected by a SIZE change I:x=use 5 and 6 arc not
clear.
0}
Imporuml: A ter c
nglng t e si7£ 0 t e partition.
ou'li need to leset the SYS"reM and FORMAT.
Tumtng Partillons On or Of!
Although you ClIn :;cgment the drive into 16 partitions,
due to the restrictions imposed by the various operating
systems, all 16 cannot be aC1ive at once. You can have four
active partitions at one time under ProDOS and CP/M.
DOS ],3 and Pascal, however, allow only two partitions at
one time.
You can decide which partition you want to usc dUring a
particular scs~ion by turning them ON (.) or OFF (blank).
When a drive is off (inactive), it will not be recognizt:d by
the computer hut all data stored within that partition is
saved, tt's tikI' saving fite-. to a disk and then pulling the
disk out of the drive,
(-
~
Note: If you have the maximum number of
partitions for the oper.lting system turned ON,
when you attempi to tum another one ON, the PM
will beep and 001 let you.
3)
Use the arrow keys to move to your next option
or press <esc> to rerum [0 the main menu.
S.leetlng the Operotlng System
Under the SVS"reM option, the Partition Manager gives
you five settings from which to choose, These are:
PRODOS
PASCAL
DOS 3,3
CP/M
CLEAR
0>
also turn on and off the p3rtitions
from the Vulcan CDA, Refer to Appendix B.
No/c' You ClIn
ProDOS can recogni~e only 8 online volumes,
may want to ha\'C less than four drivcs active
depending on your sy5lem's setup.
Be<.:au~
~·ou
When selecting an operating system, while In the MODIfY
mode you'll need to:
1)
Anoth{'r example: teachers can u:;c different partitions to
StOre different classes' flies. They can turn off all the
partitions except for the current class',
To fUm the partition ON or OFF while in the MODIFY
"""'"Move the CUrM>r to the ON column of the partition
1)
2)
Vulcan
you want to turn ON or OFF.
Press <return> to toggle between the ON setting
(.) and the OFF setting (blank).
Unlock the partitions for which you want 10 chose
Refer to "locking/Unlocking Partitioru"
above.
Move the cursor to the SYSTEM column of the
partition you want to resize.
Press <return>.
Usc the arrow keys or l,j, K, M keys to IOggle
through the system options until you reach the
desired system.
Press <return>.
Changing sy5lems automatically turns off that
partition so tum on the panition if you wam it
active.
a system.
For cXllmple. if you hJve [\\,0 S.lS" drivcs. tWO 3.5" drives
and J ItAM disk, you would only want thret.' Vulcan
partitions active. If you have four turned on. one drive
unit will not show up properly.
IMPORTANT: I you current y. nave, Ii es within :.~~
partitions for which you are changing the SYS"reM
:;ctting, you'll lose these files. If there is
information that is valuable to you on these
partiliO~, back them up before making any
changes.
2)
3)
4)
S)
6)
01. 3 . The ParTi!"", Morog&r
After you've seleded a system, you'll still need to format
the pa n ilion by using the FORMAT option before you can
adually usc the pallition for file Stof"<lgc and booting.
S.lKtlng Itoe Boot Partition
leaving MODtFY Mode
IMOf. '"-"'rI
Before you leave MODIFY mode, make sure your
settings are the way you want them.
a
The boot Flag tells the computer which partition to go to at
sta.rtup.
..... ~
o
Note: You can also set the boot partition from the
Vulcan CDA. Refer to Appendix B.
flow To Leao •
To leave the MODIFY mode and return to the tOP of
the menu, press <esc>. If you have made any changes
to the pan.itions, you will be asked if you want to sa"c
( UPDATE) or caoccl (UNDO) the modifications. (See
Ix:low.)
When selecting a boot partition kt:ep the following rules
in mind:
a
a
a
a
a
o
o
You can have only one partition set to boot.
The partition you set to boot can be any of the
four operating sySlems.
The boot partition does nor have to be the first
partition of that operating system.
The boot partition must have the boot files
required for that system copied into the partition.
Under DOS 3.3, the first volume of the boot
partition must contain the boot files.
To boot from a Vulcan partition, you'll need to
have the Startup SIOi set to the slOi containing the
Vutcan's controller card or to slot 7 if you're
pseudo-slotting the card. (Refer to Ch. I, Slot 7
Exception, for information about pseudo--slottingJ
If you do not set the Startup Slot \0 the Vulcan's
drive, the computer will ignore the Pan.ition
Manager's boot nag.
Se4 i0oi PorIltk:or\
To set the boot pan.ition. while In MODIFY mode;
If there is not already an asterisk in the boot
column of the partition you want to boot from.
move the cursor to that column.
2) Press <return>.
llle aSlerisk w11l be removed from Its current position and
will apJX'ar In that column you currently have selected.
!)
VUccn
Have you SCt the partition to the system you
want)
Arc the partitions you wanl adive turned
ON?.
Canceling/Saving Changes
When you leave the MODIFY mode, you're asked if you
want to UPDATE or UNDO the changes you have made.
To
Save modifications
Cancel modifications
Return to MODIFY mode
Press
y
N
<esc>
Updating the changes will save the changes you have made
and leave you in the main menu. You' ll m.""t:d to format any
mexUfied p:!.nUions [0 make them useable.
Undoing the modifications wl!l reset the partition table to
the settings it had before you last enlered the MODIfY
mode and leave you in the main menu.
<esc> will return you to the last position you were in on
the pan.ition table With all recent modifications
unchanged.
Formatting
~
Note: formatting ,,:,il: comp ete y erase everyt ing
that may still reside on the partition being
formaued. You should have all impomnt files
backed uo bv this time.
Once you have your partitions set to the desired Sil.c and
operating systcm, you'll want to fotmllt the partition for
their p;inlcular sr.;tem $0 they can be wnnen to and read
r,=
<0>
NoIe: You don't
nc..-ed [0 aher the panluons to
reformat; you can leave the panitions unmodified
and ~ill use the fomm command.
When you're ready to leave Ihe P3nilion Manager, use the
QUIT option.
FInQICh«k
Ileforc you leave the PM, check your setungs to make
sure they are as you want them.
To f()ml3[ a panition,
a
While in the lOp pan of the menu, select FORMAT.
2) I'ress <rclurn>.
A selection bar will appear O\'er the p;inilion rows.
a
!)
3)
Use the arrow keys to select the panilion you
~nt to format
4) When you have [he selection bar 0\I1'r Ihe desired
p;inition, press <return>.
The Panition Maruger will format the panition accon.ling
to the system you have chosen fOf that partition.
<¢'
Note: In OOS ~.3, you can set up several different
volumes per drive. You'll be asked how many
small volumes (l40K) you want The rest of the
space will be used for large volumes ('lOOK). As
you sek'CI how many I<lOK drives you want. the
fomm table will upcbte the number of <lOOK drives
to be formatted and tell you how much disk space
is unused. )'Qu 'li UN'" ai/roil QtlC {10K driW If
l'QU "'mil lQ boo£ from Ibm DDS txil1ilio 'l
5)
Sck.'CI anothcr p;lnition 10 format or press <esc> to
r\.1um to the main menu
Prin'
The PRINT option lets you print the C'Urrcnt PM screen if
you ha,·c a printer online. You may want to print after
making modifications to the PM to remind )·ou of your
current settings.
To print the CUfTCnt setup, seLect PRINT from the lop p;ln
01 the menu, I)·pc in the slol number of your primer (or
<esc> to cancel) and then press <return>.
Have you formatted the
resi~
and new
panitiOns~
a
the panilions you want active turned on?
Do)'OU have the boot fur.g sel to the proper
Are
pannion?
"""""
You can leave the PM by selecting QUIT from the top pan
of the menu followed by <return>.
Once you've saved the modifICations and fotmllued the
partitions, you can copy files 10 lhe active panitions or
restore files from the backuJl'\.
H PTER
DOS 3.3, Pascal, and CP/ M
If you rarely use DOS 3.3, Pascal, or CP/M you'll
probably be bel1cr off running them from floppy and
using your Vulcan to run Prol>OS only. However, if
you're a frequent user of DOS 3.3, Pascal, or CP/ M read
this chapter to quickly set up partitions for the different
systcrru;.
.A::
Vulcan
You mUSt be within a partition's opcr:uin8 system before
you can copy files to it. For example, you can't copy 10
the OOS 3.3 partitions while in ProDOS. Only the
panitions that are currently ON and conlain the system
currently booted will be recognized .
Usc this chapter to quickly set up partitions for DOS 3.3,
Pascal or CP/ M. Refer 10 Chapter 3 for specific
instructiOns and rulc.os about using the Partition Manager.
DOS J .J
DOS 3.3
The following is an abbreviated, step-by-step guide to
setting up a OOS 3.3 partition. The Instruction..<; assume that
your Vulcan is either inst311l,o'd in or pseudo-sloucd to Slot
7 and thaI your S.2S" VulC3n Utility d isk Is In Slot 6, Drive
1. If you have your system (:onfigure<l differently, modify
the steps a(:oordingly.
1)
2)
3)
4)
S)
Boot the Vulcan and run the Partition Manager.
( Refer to the previous (:hapter for instructions.)
Choose "MODIFY" from the Partition Manager
menu.
.5et up the number of partition(s) you want for
DOS 3.3 and lum the partitionCs} on. You can lurn
on up 10 Ju!Q OOS 3.3 p3rtilions at a time.
fonnal the panition(s). 11le filSl volume must be a
l40K volume for the partition to be bootab!e.
Quit the Partition Manager.
Ch. •. ProDOS
a. oos 3.3. PcocaI. end CP(M
6)
7)
S}
9)
10)
I J}
12)
13)
14)
IS)
16)
•
lk)o1 the back oithe vulcan 5.25" disk. (Run
BASIC.SYSlD1, type PR~ :at the prompt :and then
press the <return> key.)
from the menu, select "S" InSl:all Vulc:ln Plitch
then press 3ny key to return to the menu
Press "9" to quit to the BASIC prompt
Type IN_7 and press Return This Informs DOS 3.3
that your Vulcan Is in Slot 7. You should see two
flashing cursors on your screen.
Insert the disk in the drive containing the HELLO
program you w:ant 10 load onto the Vulcan. You
an IClive the Vulcan DOS 3.3 Ut!1lties disk in the
drive if you want to boot intO the Vulcan Main
Menu.
TYpe "LOAD HEUO, 56· and press <rerum>.
Type "INrr HEUO. S7,DI,VI" :and press <return>.
If:an I/O error occurs, you didn't Install the
Vulcan patch. Go back 10 Slep 6.
With the Vu1c:an DOS 3.3 Utilities disk in 56, 01,
type. · RUN HELLO, 56."
PTCS$ 'S" -- INSTAll. VULCAN PATCH and then
press any key to return to the menu
Press ·5" - AE no.
Press "I" - COPY F1LF,S and <retu rn>.
SOURCE SLOT' 6
DR IVE? 1
DESTINATION SLOT' 7
DRIVE? 1
VOLUME? 1
When copying other DOS 3.3 tiles to the Vulc:a.n.
run FID:and enter the dcsln.-d DeSlinatlOn Volume.
For example, with a 13401' DOS 3.3 partition, you
may IllIve three 4001' volumes in addition to the
first volume of I40K. You can Set the Destination
Volume to anyone of the live.
FllENAMP The L'Qu:a1 sign Is a w!1dcard meaning ·copy all
files." If you want to copy only specific files. cnter
the names of the files :at this prompt
DO YOU WANT PROMPTING? (Y/ N) N
17) Press "9" 10 quit when the copy routine is
uxnplete
~toom"DOSU_
To make the DOS .H panJlion boouble, run the Vulcan
CDA and select the DOS 3.3 p:.Irtilion as the: 1300( Panition
Refer to Appendix U for Vulcan CDA instrt.lC1ion$ .
Potcl'lKl DOS 3.3 No'-,
The version of DOS you've installed with the INIT HEUO
command Is a patched version. The patched version :allow
OOS to acceptlowerc:ase letters, reduces loading time, and
corrects :an error in the :append command.
Do not use thiS version to INIT floppy disks. The p:itched
vcrsion will look for :a Vulcan and will noc boot if it
cannex find one. Instead. use the unmodified version of
OOS 3.3 Included on the floppy disk to INIT OIher noppy
disks.
If you c~nge the Vulcan's slot. you'll need to repeat the
process detailed in the two sections :alxwe. TIle patched
version expectS to find the Vu1c:an in :a particular slot If
you 5witch slots, DOS won't be :able to find the Vulcan
until you repeal the necessal)' steps.
Volume Slle.
The sizes oilhe DOS 3.3 volumes depend upon the sizes
you chose while in the Partition M:anagcr. Use thc chart
below 10 delermine the m:aximum number oi files e:lch of
your DOS 3.3 volumes wUlllold
Pir1!tloo Size
Maximum Files
14QK
105
400K
217
Copying Fllltlio !he DOS 3.3 Portitton
Non copy-protected DOS 3.3 files can be copied to the
DOS 3.3 partltion(s) using J£'s own version of Apple file
J!evclopcr program (FlO) included on the Vulcan'S DOS
3.3 floppy disk. Uy oow, you've probably already used
F1D to copy the boot filcs to your DOS p:.Irtitlon
0\ 4 - PIoD05 a. OOS3.3.PaocoI.cndCP/M
"
CopyIng fIlM...., flO
:3.3 files and
applica[ions from one disk [0 another. Apple's original
version does noI. recognizc hard drives as an option.
We've modified [he version included on Ihe Vulcan's DOS
3.3 disk [0 recognizc Ihe Vulcan's DOS 3.3 panilions and
allow you to copy files to them.
Applied Engineering
Product Registration Card
flO is a binary program which will copy DOS
Applie<! Enginttrlng congr>!Ul.ol<:S you on yow pu~ r:i one r:i "'" enh.1.""........."
produ",". Willi proper ,n<taltaUon ~nd are, YOU' II! enh.""""",n' prodoo .... ill pro'ide
you ""I11}'<'If> r:i trouble-free operalion.
5<)
To e,.;ccu[e AE flO,
Ei[her:
I)
2)
Boot Vulcan's DOS 3.3 floppy disk.
Select AE f lD from the main menu.
AF.ProduC"! ________________________________________
Scnal :''umbcr (if .ppliable)'___________
Or:
1)
Run BASIC.
2)
Type BRUN M.FlD at the BASIC prompt (I)
Note: The following instructions assume that
you've already formatted the volume you're
copying 10 and thai you arc copying from your
Slot 6, Drive 1 5.25· drive to a Vulcan panition in
Slot 7.
Applied Englnttflng
Po. IlOJI 5100
Carrollton, TlI 7SOli
£Oks· (2H) 241-6060
T~h S.. pport . VoiCe· M>dAmip (214) l41~ / Apple II (214) 241~
EllIS (214) HI.(,677
Applied Engineering
Product Registration Card
You can exit from most pans of Ihe program by pressing
<esc>.
,
Iu!:i:: (M J,D'rd l!J ~mum?)
6 (or floppy drive sloO
,
7 (or Vulcan's Slol)
3.1
VulCon
DaIC of PuKha5e _____________
l"leaI ....5 Na"", and Addt""" _____________________________________
with Vulcan's OOS 3.3 floppy disk in an online drive
Once Ihe program is running, follow Ihe steps below to
copy files to your DOS 3.3 panition(s).
.,.
III., we =y handle YOU' prod"", ro< .ny S<."fV>CC r.ceds 0< upgndc oII"ers, plcase
I) ComplC!c!hi.< ,Ide r:i YOU' RcgiSU;>~on Card.
2) Attach you, Invoice 0< bi.lI of ..lc to "'" uppe' poruon
3) K~ thc lOp portion fo< YOU' 'ewrds.
4) Return lIIe bouom porIlon!O Applied EnII,r>eenng (Rcqu"es pos,card SUnlP.)
To OU' .... lued cuOlomer·
Result
Selem option 1 (Copy files)
from the AE flO main menu.
Specifies slot 6 as thc source
slot.
Specifies drive I as the
source drive.
Specifies slot 7 (or
whichever SIOi Vulcan is set
up for) as Ihe destination
slot.
PI~ romplC!c """ mall .... soon .... pos&bIc
At: Prod"", ,"\"a"", ___________________________________________
kn.1l Number (,{
app~
... lk) ___________ Da!e r:i
Pu,cha>c ____________
You, 1'."", ________________________________________________
,""0>-----------------------------------------0"' _____________________
_________________
~«
u' ________ Tcleph""", 11""", (
Compul~'
) ___ '_____
lIu",,..,.. {
L-... ____
Model __________________ 00<"1 ComputeD _____________
Pu,du$cd F'<lrn _________________________________________
'''"'-----------------------------------------1111poruoL: Pwor of pu,chase Is reqUired .... h... requ.cslJng ••",,,,, ur.def "':;ltranfY
!itt "'" .... rr.nly proc.-durc for ad<Ltlorullnf<ll'"OUtlon.
Appllet(l Engineering
Umlted W.rraniy
Attention!
'" ..... t ....... Applon!'~ tnb~ product II warnntcd 10""" 0f1&ir>0.l """~
purdLuct otdy The W1I't1J'IfY on }"JUt product Is ~ In your Usd, !obr>.>aI Warnncy and
Return Merchandise Sheet
!hKb....... f'ItIII'
(hm.ov. from
W.,r.nly Pl'oc.dulto
You, I't<J<Iua R~u.on Cltd ~kI be filled out and .....It!d EO Appbtd Engtnccnng a!I soon
a. ro<-"bIe afief ....., OOIl'na1 putdluc da", Kttp th(, _net'J pottlon W8flhe<
)'OUt """lOtt
(If lIcIJ "I
fo< .,.... tanty servICe (abo ' pph"" lO upgrade oIfCf1)
..-"n
»'"
Should yuu ~'p"nentt a pttJblem rcquln"81echnk::l! """"'''''''. piC""" """'laC! ou, TC'ChI\lOlJ
f,crvI<:C I>cpo.nmcnl, See u..., Included R"",,,, Mcn:tu.ndIse Shecl fa mQI'e Infotnuuun .boulthe
""urN p.ocedu.e
I
I
Monuol 0IId
~)
In otdn lO obWn ....., mHlmUm bmdilt from)'<lll' "'''''"'"''''~ plase ....ad)'<lll'
" ........ nu.oJ lint 10 fully undcntand)'OU. pmduct'. opobWtIQ If)'OU feel )'OU OIIll
need ICCbnoc::aJ u ..JtI""" Of .... ope<:! )'OU have. dcfcalve JIfOduct, pIooc COII2(\
....., <lnln ftorn ",110m you purctw.cd the ord If)'OU"" ""fJ<"1tnC1nM dlffl('UltIQ
"'Itil one pattlru!u program, CONut oM PfOIII2m." aulho< or publlshe'
!n !he evenl th., !he <In!e. or tile JoIi"",re publisher's suppon pet!lonncl onl'lOl
.tIlI..",)'QU' C!UC$IIOn, con Applltd En~1'oC'CI'in3 TfiIInic:oJ Suppon. Ple.uc: p""'Ide
Technical Suppon ... ,LlI !he [ollQoo;fna Inmm"";,,r'l;
In the e"""' thai ~rnnly 5n'o'ltt .. tCQIIIfed, send )'OU' produa 1Og<Ihc, ",th )'OU' invO<:c or
11>11 d ~'" {lqIbIc photoropy aCttp(llbld alonjj ..,th )'OU' compkItd ""urn form.
In..,.,.um. Ttl.VOId a ltandhng chatge,)...... Involtt a BIn 01 Sak n'O.ISI1oIXOmpIny any
pn><lun
f", ""'tnflCy JCfVICC OuI-d-... tnflCy ~" ..-111 be >UI".a 10 a ltano:lhnjj
<ha,JIC .nd/or a ... I<:C c~
~
.=nw:d
~
~
'hop )"'" ftIUIpmmI III II> 0f>&ItI;ll r:ortQn a cqIIl"'lmI. fully inJU.td and prt'p.aI<I. PIea>e
""...,. (on ....., mum fotmJ a <OtnpIeIc dacnplJOtl 01 .....,
....."a and \be probkmo
e.pmcnttd If)'OO< do nor. have a IeWrn form, JIfO">Ik' a oompIc1e del<:nptoon d )'00<'
n""pmcnI (0JmPU11:I tTIIJdd. IIlIUJItd pmphctab. e\(.) and ....., p<Oh!cmo (.ncIuoling !IoIt... ~
,,>Cd .. hctI p<Obktn c:ncou~ '" a IcI1ct lO be >hIpped" Ith \be I'ftIImtd pro<kI<I.
~
"""'1""'t'II
~
--.
~
The "pplltt! fngu'ottt\nl ptQdu(l male(!
to}"JUt qucoI>On and III tc>""'"
numbe.
The ongma.land eu.rmI mnnoty con/l(fW:Il>Otl 01 the card (,I aprb<ablc)
The rnodd and '""_ 01 )'QU' tompUIet
VOltaI pmpl>cnts art be"'a usN and ...... , corth .,., In eoch .....
The nome, ~ tnd reYIOoItlII IcYcI ollhe ~ a1lh ..modi rou lie
e><penen<ina probIcmI
The =uItJ ollny tcR 1"fOa"I""" WlII>"""'IQ. Of II'OUbIe>hooonli done 1'1'
)'OU, )'OU. deokf. Of )'OUt f<>fI""'re pU_er's ouppon dcpanmml
If an A[ lectuuoan <lr!cnrotlll thai tile prOducI """'" lO be O'tIumtd,
rw
"""
"'"
Stamp
ItllolA'
.i..;;;;;;;:;;:;
Applied Engineering
Technical Support
3210 Belt Unc Road. Suite 1504
DaUu. TX 75H4
Applied Engineering
P.O. Box 5100
Carrollton, TX 75011
""I!
.ect'lve a Rerurn M.."""l Aulhonutlon (RMA) ItUrTbef Onccc 1M RMA. hu bcc:n
LUucd, plc2>c complcle Ih<:: form on 1M back 01 tlus p.g<: .n<! omd II .lana "'1Ih
the dd(!Cll.e [lfnd"", and . ropy oI)'OUt OOgl ....1 iny",,,,, ,"
Thc mumtd prod"'" ..... y be ~ EO a so:r<>a: chalJlC ' f
I) ~ ......... 10 Ir'<IInIaJ ..ppon ..,Ihouc an Ill"""".
I
\
2) lJW 'e>!
"""Its ......... thai """ product
l) thoc prudua II .... In III
II
nor. ddecb ....
orwnal AE rrcmot}' configura"""
Applied Engineering
Technical Suppon
Voice Un6-
MIIC/Amlgl (H4) 24 1-6084
Apple II (214) 14 1_606,
90\.\1 10 11 jO , .. It I j5 POI 10 5 ,-,,<an Monday lII.oug/l Fn~y
!""ktln _I'd SyOlem , (lt~) loil
lOO/lMtHOO baud 8 B... M Panty. ~uu Du"",x, MW-S
14 I ..... .,. 7 0.." • Week
Mt."
:..r.--- --- --- -- -- ---- -- --- -----,
I
, RMA#
Applied Engineering
Technical Support
:
,
32 10 Belt Line Road, Suite 154
,
,
AE . F!o(or-l
file to copy. The equal sign
Dallas, TX 75234
L ______________________ • ____ ,
l
Computer
o
Model
rut out and tape or glue to package
Peripherals:
Amiga
0 Monitorc_ _ _ _ _ __
,~
0 Printer _- _ _ _ __
DApple U
_ _ _ ~.__
Macintosh
0 Modem _ _ _ _ __
Other _ _ _ __
Cards & Slot Positions
o
o
o
Specifics drive 1 as the
destination d rive.
SpecifiC5 volume I as the
destination volume.
Specifies filename of first
(-) is a wild card character
meaning ·copy aU ",
Repeat the aoove steps for each file you want copied or, if
you've pressed "- ", you won'l need to repeat the steps for
individual file copying.
s (or any key)
,
Returns you 10 the AE FlD
menu.
Quits and returns you [0 the
BASIC prompt.
CATALOG
,....
~nlol
Usts the directory of the
deslinalion disk.
AD
Following is a description of each of AF. flO's menu
options.
Symploms·
<1>
COPY FIlES
As in the irumuctioru; above, this command lets you
(r:tnsfer files from source to destination. Use "-'
(equal sign) for ' copy all. ' You can also use it to
copy all files with certain letters. For example, -FXwill copy all file with FX in the name.
Descrjpljou of Software
",'Slew lPpHg!!!!D
Prompting will list each file and wait for you to type
YQ'$!gn cnhillWI!!:0U <:!£ )
"Y' to copy or 'N" to skip to the next file.
<2>
Steps 10 Duplicate Problem'WGS users Include slot S\?ltjnus)
CATALOG
This commaoo gives you a directory listing of the
DOS volumes currently o nline.
The first time you seloo this option in a session,
you'll be asked to specify the slot, drive, and volume.
The subsequent times, you'll be returned to the
volume 1:I.5t chosen. To view a different volume, usc
<7> RESET SLOT AND DRIVE before prc5.'ling <2>
again.
Ot. 4· PtQCX)S B. DOS 3.3. Posc<::tI. ond Cf'1M
31
<3>
SPACE ON DISK
Usc this command to reset the slot. drive, and volume
selection of options 1-6 and 8. Afler selecting this
option, the OIher 0iXlons will again ask you to specify
the slot, drive, and volume number.;.
Use this command to show the amount of space
(.'iCC!0r.;) free and used for <::lch volume
140K volulflC!i will hne 5ZS .seCIOrli free after
initializing. 400K volumes will have 1536 sec!0fS free.
If you use INTT to write a boot image to volume I,
you'll ha\'e 490 M!'C!0fS free. (VI muS! be a I40K
volume).
The first time you select this opllon in a session,
you'll be asked to specify the slot, drive, and volu me.
The subsequem times, you'll be returned to the
volume laS! chosen. To vIew a dIfferent volume, use
<7> RESET SLOT AND DRiVe before pressing <3>
again.
<4>
UNLOCK FILES
To unlock iodividual files, usc IhiS commaod
The fir.;t lime you select thiS oplion In a session,
)'()U'I] be asked to $pccify the slot, drive, and volume
The subsequent times, you'll be returned to the
volume IaSI chosen. To work with a different volume,
use <7> RESET SLOT AND DR IVE before pressing
<3> again.
U$C "." (equal sign) for "unlock all." This is most
often easier than trying to remember specific
filenames.
When you use "." you'll be asked if you want
pronliXing. PromiXing will list <::leh file and wait for
you \0 type "Y· 10 unlock or "N" to skip to the next
file.
<5>
LOCK FILES
Same as above bul for Locking insl<::ld of Unlocking
indIVidual files.
<6>
DE1.£TE FILES
P".rm:lOently erascs files from the disk. DEllTE uses
the same operation method as LOC K and UNlOCK.
<7>
<8>
VERIFY FILF.5
This <»Xion makes sure that the files ate as Ihey
should be. Same operation mcthOO as UNLOCK
<9>
QUIT
The QUIT Opllon exits FlO and returns you to Ihe
main menu or to the BASIC prompt.
Othe, DOS 3.3 Good ie,
We've included .some other h".lpful utilities on the OOS
3.3 disk.
Run Volume 2 Be Uo - Runs Hello program on V2 of
the same partillon.
Park Heads · Moves hard drive's hcads to safe place.
use jusl before shul down
Ca lalog All Volumes - complete Iisling of all OOS 3.3
~-olumes in aCli~e p:!rt'tion (Press any key for next
volume, <return> or <csc> for main menu.)
Edit Volume Na mes • ~lIows you to changes names
of volumes.
AE FD) . utility that enable:. you to ropy, lock, unlock.
delete, and venfy flies and morc
Partilion Man age r - DOS vcr..ion of Vulcan's
Parution M3nager
Re move Vulcan Patc h - rcmovt'S patch dcSCTiI>ed
below Usc before fonnalling noppy disks.
Ins tall Vulcan P:llc h - program that p:!.tche5 DOS
when you boo! included disk and enter [NIT
HEllO comm~nd Allows DOS 3.3 to acrep( 1o....'Cf
case characters. loads syMem faS!er, and fixes bug
in APPEND command.
800( ProDOS PanitlOfl - Uoots fir.;t acti~c Vulcan
ProDOS partition. BKUN from rTI<l in directory.
RESET SLOT & DRIVE
O"l •. ProOOS t. DOS 3.3. Poled. cntI CP/M
•
CP/ M
Vulcan can be partitioned to run If 's vcrs ion of the CP/ M
Operating syslem, CP/ AM CP/ AM software is included
with t~ Z-80 Plus and Z.aoc cards. TIle follOWing is .:.m
ilbb~l3 ted, S(~by·step guide to setli ng up a CP/ M !
partitIOn. 1be IIlSinlctiQM il.S.Sl.Jme thil t your Vulcan is
either insblled in or p6CucJo.sloot:d to Slot 7 and that your
5.25" Vulcan UtiliI,)' disk i.s In Slot 6, Drive 1. ]f you h~ ve
your system configure d ifferently, modify thc steps
accOrdi ngly.
I)
lloot thc Vulcan and run the I'"nition Ma nagcr.
( Refer to Chaptcr 3 for Instructions on running
f'lI n ition Manager).
2)
Choose "MO DI FY" from the I'artillon Manager
~, .
3)
4)
5)
6)
7)
8)
9)
10)
Ii)
12)
13)
14)
15)
Set up the number of pannion(.s) you W<lnt for
Q>/ M! and !Urn the panition(s) on, You ClIn turn
on u p to.!l2luCP/ M , panitiQM ilt a time.
Set the boot sm to the CP/ M ! partition from
which you want to boot
Quit the PartJliOn Manager. You don 't need to
Formal the pa rtitions YCt
Enter the Control Pa nel and set the Z-80 ClIrd'S slot
to "Your C3rd ' If It is not al ready SCI.
UooI into the CP/AM system (disk In Slot 6).
Ru n the 1'C.COM program
Prcss ' A" to select Add I)cvices.
f>rcss"7 " to registcr the Vulcan Slot
1'teS$ "S ' to install Vulcan :IS the (0: ) drivc
PteS$ "5- to set the last ""lid device
Press'S" to select Vulcan :IS the last valid device.
Press Return to s,ave the configuration
!'reM ' Y" .
]9) Change the specified A drive to be the Vulcan,
20) Change the speciflcd S drivc to be the 5.25" drive .
Ma ke sure to follow the prompts and !i:I\'C.' the
oonfigur.nion
21) Go back 10 l'roOOS. cnter the Control Panel, and
set S\oI: 7 (dIC Vulcan 's sial) as the boot slot:.
22) Reboot the 5~tem
After followi ng these steps the first time , yoo ClIn run
CP/ AM a nytime by using the Vulcan CDA to selcct the
CP/ M' partition as the boot partition and then rebootirtg.
Refer to AppendIx B rOr Vulcan CDA instructions.
Pascal
.eo
Note.' You must USC Pascal 1.3 with the Vulcan and
the controller card must be in slot 4, 5, or 6 with
pseudo-slotting disabled
Once )'OU've .set up and rormatted your Pascal partitiOns
and ha vc one or two turned ON ( :IS described 10 the
previous (lu pter), the partition is ready 10 usc. Copy to It
from yoor P:a.scal disks u you would to a floppy. Be sure
to copy the necessary system files 10 the boot partition
Kc:.'t:p In mind that Pa:sc:llhas a maximum flIe limit of n
flies .
16) Press Return. You should be atlhe (A:) prompt.
]7) Type ' PI P A: ~ S, ' " _. this ooplcs ~lIlhe nics from
lhe A drive to the B drive.
18) Ru n the PC.COM program as§lln
•
Ch. • •
I'IOOOS" DOS 3.3. PQcal, ana CP/M
E
H
Ba cking Up the Vulcan
Introduction
lleouse Vulcan's (XInJllons ~C'[ as separate di.$b, you'll
need to oockup the panl1ions scpar.ucly.
We've included Apple ConlpUtcr'S Backup II program on
the I'mooS partition 01 the Vulcan for backing up the
!'roooS panitions
To back up the DOS 3.3.
P~sa.I.
and CP/M partitions, usc
an appropriate b:lckup progr.lm for tho:5e SySK'fllS
~
Vulcan
Backup IIfOf ProDOS
ItIckup II is Apple'~ PIODOS volume backup program. It
uses the full BOOK of 35" disks by segmenting the files to
conserve space. This mI.':IllS that if it is in the middle of
copying a me when il nms OUt of room on ooc: disk, it
finishes that file on Ihe neXI d,sk. When you festOre, the
scgmcntli are rejoined
*
Jf you don't under.;tand what pathnarnes,
fifes, folders, Of dlr<:ctorics aIC, p1C3S4.' refer 10 A
Drief ProDOS Tutorial In the appendices of Ihls
manual
NQle:
Number 01 Disk.
R~ulred
Refer to the chan below 10 determine about how ffilny
disks it will lake 10 back up your ProOOS p;lnniOns
To bac k uo
KCQ u 1rr 5
Or
20 Meg
40 Meg
100 Meg
25 BOOK disks
50 BOOK di~ks
125 BOOI( disks
143 1401( disk.s
Z86 1401( dIsks
714 1401( disks
If lhe drives 3rc 1101 completely full, il will probably lake
fewer disks for Ihe backup.
Sugge$l~ kx:kup Schedule
If you use your compuler constantly, we recommend thai
you make a backup of the entire hard disk on a weekly
basis aod back up Individual moellfled files daily. If you
don't use your computer thn much, a bimonthly 01" even
monthly full backup may be all you need. BUI always back
up any important documents after creating or modifyIng
To backu p the entire contents ci the Vulcan, follow these
.steps:
•
""-m.
lelor. You kx:k Up
You should have plemy of disks and labels re2dyas weJl
as a mari<er 10 bbel the backups.
•
Note: Format .~:-: i.o;l(.~. rlrst.
. ~"'n Bac~up II wi
format the disks, it will run Quite 3 bit faster lind
require you 10 answer less promptS if you format
first. Backup II renamc.'l the disks with Its own
sequence of names so it docs not mallcr wJ"tII you
call them when ·00 fOfTTlat
I)
2)
3)
prefo rma l the disks Instead of letting ru:ckup II do
it. Re fer 10 the cha rt al Ihe beginnin g of Ihls
chapter to get an idea of how many d isks 10
p re format.
Run Back up II.
Label one of the blank formaned disks /nU l along
with the date and insert it into the drive 10 whlch
you'll be backing up.
While in the main menu, pres.o; I and then the
<return> key. This selectS the "Backup Files"
o ption
> I. &ackup file.
2. Res~ore Files
Runnng kx:kUp II
3.
To run Ibckup II. double·dick the Ibckup II icon on the
Finder
You can also run the program from any OIher program
seketors that you use, Select BACKUPII.
Note: Remember that Irs much qui cker to
4)
Pres.o;
Qo.>l~
2
<retu rn> 10 select "Backup by pa lhOllme",
1. Backup modified tiles
Once in the program, rou'll be given thfL'C OplioJ1$ as
shown below:
> 2.
8sc~up
by
~thn.me
J. Return to . . In . . nu
I. 8sckup riles
2. Re'tore rlle~
5) AI the "&ckup from" prompt,
type In a slash
(ollowed by the OlIme of your Vulcan partHion Elt:
J. Q\llt
IB'IIWLC;:J.IIl
CkUP fron:
lockup Enll18 P,OOOS I'<IlfIlion
If rou use your computer heavily, you should backup
your ent1re hard disk weekly. Ughl users may feel
comfortable With IJUking backups bimonthly or even
monthly_
•
6)
7)
I
This w ill back up tnc entire comenlS or the
panition.
Press <relum>.
At lhe "To device" promp:, type in the slot: number
eX your floppy drive (usually "5" for 3.5" and "6·
ror 5.25").
8)
•
Now type in the drive number of your noppy
d rive
Warning! I you're booting rom a IbmKeeper.~t~
3.5" dri,~e number will be 2. If you emer 5, 1. you'll
be wrilinl( to Ihe RamKeeper
device:
(SIOl 5 Odve 11
To
9) Press <return>
10) Select where to OUlput the file list,
-0- Note: We recommend keeping a primed lise of the
d isks' COOtentS if you're able.
(J
(J
Press <relurn> for screen only
Press !'-<rdurn> and then the printer's slot
number and <return> \0 send the li5t to the
primer and screen if you have a printer
connected
aockup ModfIed ru.1
You should always kee p backups of any data tJut is
Imponant to you. If you use your computer daily, get into
the habit of ~ving your modirled files a t the end of each
"'y.
To backup modified files, follow these steps:
+
Note: Do 001. use your ~ of m:.Jln backup disks:
use a blank fOrmlued disk. (Again, B3ck up " will
fOrmll but it is quicker 10 (onnat beforehand.)
1)
Run Backup II.
l.:lbel o ne of the blank fonnalled disks !MODI
along wilh the datc and lose n it into the drive
you'll be backing up to.
From Backup II's main menu, press the B key on
your kcyboard. This selccl.'J the "lb.ckup Files"
optiOn
Z)
3)
Backup II will then begin the backup p l1X."edure TIle
progr.lm will tell you which disk il is currenlly backing
up as well as how m:.Jny 10la1 disks il fIl.'Cds. A.o; n finIShes
filling e:Ich disk, il wLll .send Ihe following message 10 the
bouorn of ihe screen:
Replace wi t h the next backup volume.
P~e~s R£
PN to continue
> I. Backup rile.
2. Restore rIle,
3. Qui t
4)
The progr.tm n~ mcs the disks !BACKUP VOLUME" where
" is Ihe sequenCial number of the d isk
II) While the prClgr.lm is copying one dISk , wnte the
bbel of the next disk(fBUZ [date], IUU3 (date/).
When u's done backing up the panilion. the program will
send rou the message
> I. Bac k up _cUrled fll.,
2. Backup by pnh"" ....
J.
5)
Operation co.plete,
Press RETURN to continu~.
•
Retu~n
to .sin . .nu
At the "Backup from " prompt, type in a slash
fo llowf..-d by the name o f your Vulcan pan!tiOn. Ell
i . CkuP tro.:
. C! VULCAlil
I
If you've pnnted the file lUicing, keep it wnh the SCI o f
backup dISks.
Rcpe:...1 the proccs.s for the O(her ProOOS panitions you
WlInt to blckup
I'ress I <relurn> to select "Backup modifif..-d Illes".
6)
I're.s.s <TC"Iurn>.
"
7)
At the 1"0 device" prompt, type in the slot number
of your floppy drive (usually "5" for 3.5" and "6"
for 5.25"),
8)
Now type in the drive number of your Iloppy
drive (usually I, if you're booting from a
RamKeepcr however, the 3.5" drive number will
be 2).
9)
•
3)
Press <return>.
]0) Selea where to output the file liS!;
+ Note: We rerommend keeping a printed liS! of the
disks' COntents if you're able.
Q
o
Note: If you don't tuve a list of what files are ~
wtut disks, you can list the contents of each dLSk
following the instructions under the Listi'18 Hies
section above.
from Backup 11'5 nuln menu, p~ lhe R key on
your keyboard. ThiS selects the "Restore files "
option
I. Ba c kup
> 2.
r il e .
J . Quit
Press <return> to send the liSt to the screen
only
Press P-<return> and thcn thc printer's slot
number and <return> 10 send Ihe lisl 10 the
printcr and screen if you have a printer
connCClI."<i.
R~s t o r ~
r u ..
4)
Press
~
I33ckup /I wUJ then begin constructing a table of conlenlS
lbc progfllm wilJ lell you which disk it is currently
backing up as well as how many toul disks il needs.
2
<return>
10
select "Rcstore by palhname ".
1 . Re St o re e n ti ~ e volu.e
2 . Re store by p a thn a .e
J , Li at t i le s On
4 . Retur n
~o
~ e k up
. .di .
. . in -enu
I J) While the progfllm is copying one dISk, wrile Ihe
label of the nCllt (fMOD2 (wte!. / MOD3 iwtcD.
5)
lIIrng fila,
To get a printOUt of thc backup diSk conlcnlS at any time,
run Backup II und select li5t Files from the Restore Files
menu.
6)
i • • tor. IndM duol Flies
If a panicul3r file or group of files gelS corrupted., 1051,
stoien, etc" you can restore ttut file or group from a
backup by doing the following:
~
Vo,kan
Note: If you 're restoring a file or folder ttut
already CXiSIS, the existing file or foldcr will be
replaced by the restored version.
J)
Run 63ckup II
2)
losen the disk romaining the file you 'll be
restoring into the proper Iloppy drive.
AI the "Reslore from" pl'QlTlpt, type m the slOl
number of your Iloppy drive ( usually "5" for 3.5"
drives.)
Now type in the drive number of your "oppy
drive (uswlly 1, however, the 3.5" drive number
Will be 2 if you're booting from a JUmKeeper).
IISl o t
RestOte tr o.:
7)
s, tlrhe 11
You'll then be given the palhname of the disk in
the Iloppy drive, ex:
IRe.tore froe.:
!/aAelW' , VO Ll/!!!l l1
8)
Enter the pathruuTle of the file or directory you
WlIITlt to rt$lote, CJI:
,I
!lIestore TrOll:
!/BACKUP.VQ~UMEI1/NY . 'J LZ*
I
I
In this example, if MYFlLF..s W2$ a directory, the
entire directory would be rCSl.ored
9) I'res.s <return::'.
10) AI the -Restore to the directory" prompt, [)'pC in
the name of the directory (and the p3thname if so
desired) to which you'll be rcstoring the file or
files, ex:
ITOthe
~!rectory,
!/VUt.CAJil
I
I
II) SeI(."C\ where to output the restored file list;
o
o
]>ress <return::. to send the list 10 lhe screen
only
Press ]>-<retum::. lind then the pnmers slO1
number and <return::. 10 send tne 1151 w the
pnnter lind screen If you tulle 11 printer
connected.
Ibekup II will then begin the re5l0re procedure. lbe
progr~m wi!] tell you whiCh me is currently being
rcstort:d. When it's done, it will give you the message,
I"'"'~'~"~'~""O'<j"lL'OQ"'O'"I"Q.''-__________-,
OPERATION COfoWLtTt,
Resl ore Enlire-Valume
]f you need to restOre your entire Ilolume, follow the
SlIme general procedure lI$ for rc5l0ring indillidual files
The program will caution you that restoring an enlU"C
volume may delete files Ihat were no! there when you
backed up the volume.
Also make sure that you ha,<e enough space on your
Ilolume to replace all the riles you backl-d up
END
ES
TIle following appendices arc included for funner
reference and reading enjoyment
A
Trouble Shoottrlg
B
The Vulcan Classic Desk Accessary
C
Hardware
D
Interleaver
E
A Brief PraDOS Tutoriol
F
Getting Help
Trouble Shooting
A::
Vulcan
H you can" boot
Cl trouble shOOIlngCheck the switch settings (refer to
chapters 1 and 2).
0 Check which drive is sct to boot under the Partition
Manager.
0 Is the boot paTtllion turned ON under the Panition
Manage r?
0 Does the panillon sct to boot contain the necessary
boot files1
0 Tum off the computer then sec if the controller ClIrd
and cables are correctly installed.
0 Make sure the Stanup Device i!i sct to the vulcin's slot
in the SIoo; o ption of the 110S Control Panel
0 If you're trying 10 run a panirubr progr.lm ;lnd il
won't boot, cOt.-ck the sy5lem version of the softWllrc'~
master disk(s). It may nOl be GS/OS 5.0- compatible. To
remedy this, you m3y need to SCt up a separ.lte
paTtillon with the softwuc's oper.lting system Inst~llIed
and txxx from that plnitlon to run thc program.
ProDOS Can" Find All Four Vulcan Porlilions
Two Olive Oevll;: e, per Slot
ProDOS 8 has a !lmit of tll>'O dm'e devices per ~10( (except
for Slot 5). For ProDOS R to recognize Ihr('(' or four
active panilions. you'lJ TlI,.'f,.'<I 10 copy the palctK.-d I't'r~ion
of ProDQS to )'OUr boOl diSks. llIc patched version of
ProDOS is included on lhe Vulcan's first ProDOS panlliOO
bs shipped) and on the Vu)on's 3.5" and 5.25" Prol)()s
disk in Ihe System directorytfokler
->
Note: Gstos users will nex.-d to copy P8 and
START.GS.OS, not I'RO I)QS
Eight '0101 Drtve Devlcel
ProOOS ClIn a = a maximum c( eight drive devices. If
roo have more tll;ln eight drive dcvice5 under ProOOS (a
RAM disk. two 3.5" dISk drives. two 5,25" disk drives and
four ProOOS Vulcan partitions), one of the drives will r'IOI
be recogni7£d. You'll need 10 either lum off one of the
Vulan part'tions or di5.:1ble one of the other drive
devICes.
NDI
The Vulcan ClassIc Desk Accessory
Included in the S)'5tem folder o n the first VulC'an partition
is a Classic Desk AtteSSOry th:it allows you to set the boot
partition, write protCCt individual partitions, or park the
Vulcan's heads,
Accelling the Delk Accel$Of'f
Vulcan ClaSSiC Desk AccessoryAccess the Classic Desk
ACcessories mcnu by holding down the OA and
<control> keys whlJc pressing <csc;>. Pressing thc.'iC tlm..-c
keys ""ill display a Desk Acce5S0rles menu much like the
one shown below (appcllr2ncc may vary accordmg to
which Desk Accessories )'OU h:i,'c loaded ).
COo"ol P60.1
AI •• ' .... D'oploy ObOe
...
v.leo~
~"
Classic Desk Accessories Menu
Usc the up and down arrow keys to highlight thc Vulan
oplion. Press <return>,
The Vulcan main menu will appc;if as shown following
..,... ..,
....... ,,......... ...... ,..
'
1)
-•..
2)
'''''''-
3)
Usc the up Of down arrow keys to highlight the
panition you want to write pfOlect.
Usc the k:h or righl arrow k<.'Y to put an aslerisk
beside any plrtnion you want to protect .
Press <return> to return to the Vulcan main menu
or <esc> 10 leave the Write PrtXcction menu as it
~.
" ""
000
.-
J...
.".;;";..',~:,';.
.., .. <o J!
....
,~
Vulcan Ma In Menu
Again, usc the up and down arrow keys 10 select [he
oPlion. llle differenl oPlions and their funclions are
described below
000
Vulcan Classic Desk AccessoryChoosc this OPllOn 10
.select from which partitIOn you wam 10 boo! A check
mark appears nexi 10 Ihe partilion currently se! 10 boo!
Use the up or down alTOw keys \0 highlight the
partition you wam to SCt as the boo! partition.
2) U.se the left o r right alTOW key to move the check
mark to the highlighted p;&nition
3) Pn."SS <retum> to return to lhe Vulcan main menu
or <esc> to leave the boo!: p;&nition as II ....'as .
000 NOlt!c You muSl .set the Sunup SIoI: (in the Siru
OJl(ion of the Conlrol Panel menu) to the Vulcan's
skM before the p;&rtlllOn boo! selting will be actIVe.
I)
Writ. Protecl PClrIition
• ore Ihe write prOK'CIion
Pork Heods
Vulcan Classic Desk AccesSOry l' arklng (he hea~ mo~cs
the read/write heads 10 a more dUr.lble pan of the hard
disk to reduce the risk of damaging the drives when Ih.:
hard disk is being moved. YOu don't really nct."d to park
Ihe hc3ds unless you pbn to mo"c you r computer
s.t Boo! Portitlon
To change Ihe boo! p3rtition, follow the.se steps,
Note: You must rc
rnn take effect.
Able: If you press <esc> after selecting the P~rk
Heads opllon, you'll be returned to the Vule'ln
m3in menu and the he:lds will no longer be
parked.
AboVI VulcCJn. ..
...
About Vulcan tells you the version number of the Vul C"~n
Desk Acccse;ory. u:lls you who created the Vu lcan. and
gives you the numbers for Sales and Tech Suppon
Selecting Quit returns you to tile Desk Accessories main
~".
Copy /hit Vulcan COA 10 Your Boo, Disk
If booting from a disk <>Iller than AE1 , you'll need to copy
lhe Vulcan desk lcces5Of}' to the boot disk's Desk
Accessory folder in the System folder.
Aaivating the wrile pr<>lect feature Is the same on fu nction
as write pr<>lccting a floppy disk . You will not be able to
store ne ....· inform ation 10 Ihe wrile protected pa rtllions.
To wrile protect 3 partilion. follow thc:se Sleps:
"
Hardware
Switches
The comrollcr ClIrd has a block of fOUf switches IOCIL-d
in [he lower right hand comer.
Where to Put the Vulcan ClassIc Desk Acces sory
You ca n .1lso use your favorite copy Pl"Ogr.lm to rnny ,he
driver.
~- ...
Saurc\:. IAEl/SYSTEM!OESf(. ACeS/VULCAN. eOA
Destination: /YQUR. BOOT. OJ SKI SYSTEM/DESK . ACeS
where IAEl (S!llC name o f your Vulcan GS/OS panUlon
and,/YOUR. ~ooT. DISK is lhc 1"IlrTl(! of the dl.<.k 10 which
you re COPYI nS
Now when you i)()QI from Ihc disk, the Vu lca n ClaS$ic
Ilcsk Accessory wi(l be Ioodcd.
What
n,..,. Do
Switch I , Inte rrupt: Enable . This switch must b<!
clo6cd In order for any InterruptS geoenlt.'<i by
the Hard Drive 10 paS5 through to the Apple
(lnterrupcs arc nQI used 1Illhis lime.)
Swllc h 2 , PS Enable - When pscudcrs loning in the
Apple JIGS, th is switch must be closed. Wkn
pseudo-slOlling in a lie or I~. Ihls switch mUSt be
open.
switc h 3, 1+ Bool Enable . Leaving this SWItch open
allows a 11+ or a n unenhanccd lIe 10 boo( dHl,'CIly
from the hard disk If the hard disk Is not 10 be the
boo( device in these systems, this swlIch should be
clO5Cd. In a IIGS or:ln enhanced lIe, thiS SWItch
should also be closed,
Switc h 4 , Pseudo-SIOI Enable - When \hls switch Is
clost."Cl, the controller cud will show up in 5101 7.
no nuner which slol i1 is in. With it open, the card
uses the slot in which il is pllC(:d.
How To
s.t
~m
To change the SWitch settings, use a small, pointed
ot>;ect, li ke a wooden 1000hpick or bent-out paperclip.
The circle on each swilch represents thc end thai is
p ressed.
•
Vulcan
"cP
c· >IotOwo,.
Push down on
number side to
dose (ON)
Pushdown on
side marked "OPEN"
10 open (OFF)
d
n~o~
~~-==y Side View
,"",<91'1_)
Flipping the Switches
liemOle Ugh' Jock
In addition 10 the on·bo:.Jrd LED, there Is a two pin
COnnector for a remOle drive actIVity indicator LEO
Applied Engineering offers an LED extension option. Call
A:: Sales to Ofdcr at (214) 2~ 1-6060
If you're so inclined, you CIIn make an extension tighl to
run from the connector a nd allach il under the from panel
next to the green LED, MJke Sure thJt no wires arc
expo5ed; any exposed Wires may soon out the
moIherboard.
Warning: Apptiea Engineering is not responSible
for any wmage resulting from modifications to
--'you r computer.
The connector IS wired a$ follows;
Pin J (the right pin when fa cing the board from the
chi p.side righl side up) Anode of the LED
PIn 2 Cathode of the LED
With the lid off. remove the front panel by releasmg the
three uhs under Ihe front edge of the computer
Note the "pocket" in back of the elellr window on the
undefliide of lhe front panel where the green LEO shines
through. It Is possible to fit 3n LED Into this pocket.
PP NDIX
D
"Inter/eaver" (20 and 40 Megs only)
lhe progl'2m, InterJe:lVer, IS included for those who W3nt
get all the sJl(.'(.-d po6Sible from their Vulcan for their
most used appUGltion. Fiflil. we'll give a brief overview of
wlul interleave Is, If. 3fter reading the description. you
dt:eide you WlInt 10 Iry to optimize your setup, carefully
follow the diK'Ctions for using InterJt."aver.
10
Warnln.s Cnangi~,~~e int:~eave ~~ you~.2>~~'::.
drive Is not nCCCS5:lry··genernlly, the inter!cave to
which we SCI your drive WOOl> well for ITIOSI
application.'>. IntcrlCOlV{'r copies a nd rewrites your
lurd drive's COlUents. So. unless you understand
wlul )'ou'f\' doing, )'ou could do ",ore barm
Ibm.
Rood.
Aboul Inlerleove
A dLSk's interleave IS the manner in which the disk is 'iet
up to be (COld E:le h tfllck on the disk is dIvided into
sc"ernl seetOfli, tOl:almg anywhere from 26 to 32
depending uJXln the manufaaurcr. When infonnal!on I~
pulled from J disk, the different sectors are read one al a
lime. TIle whole time lhe compuler is retrieving Ihe
infonnallon, the disk Is spinning TIle first sector Ihal Ihe
progl'2m accesses Is read and processed and lhen Ihe
computer looks for the next sector If the infonnation i)
still being processed from the first sector ",hen the
second!iCClor SpillS by. the comput~>r will h..we to W;1I1 for
the disk to rotate completely around to read the ~'COnd
sector.
Tbc: interle:lve detennincs the order of the !iCCl0fS. With a
\; I imerleave. sector two imme<liately follows ~'CtOf one
With a 2; I interlt.';avc, every OI:her sector is numbert.'d. W
Ihal seclor two is physically the Ihird sector. lnlcrJca.es
can be set up 10 one less th~n the number of St.'C'!ors on ~
disk (e.g. 25: I on 3 26 S(:Clor disk).
•
Wanf/"g: DO NOT RESET WlIll.E THE
PROGRAM IS RUNNINGI lnterleaver is copying
and rewriting tracks. If yoo StOp the program in
mid-SHearn. your data will be COrnJ ted.
22
6
"
8
"
" , ,,),~,""'M~;Y"r'l)
o
20
14
1:1 Interleave
<IncIlon " ' _
" ~-?'c-f::573 262 1
7:1 Inlerleave
_.-
I' rogr:ams diITer in their ffic:.1hods of gening information
from disk. So while one progr:am that CoIn I't.-ad 3nd
process [n(ommion very quickly may work more
c(ft."'CIivcly 31 a I:J imcrlc;lvc, a slower progr:am ma y nl'Cd
a 15 :1 ratio 10 work oplirnall y_
TIle vulatns arc fonnanc(\ With an inter1eave that will run
mo st applicat iOns ;u a fairly qu ick speed If, however, you
W:Orll 10 cxpcnmcm and see how your fT\OSt often u.scd
programs perform at djffercm intcrle:lves, you can change
the Vu1c:'n 's Interleave and time your V3rious progr:ams
pcrformllig slar\dard opcr:a lions (opening files ,
spreadsheet ca lculations, formaning, ctc.). Keep in mind
1hoit while aile of rour progr:ams may perform oplinully a1
a 8'\cn mlcrlca,'c. anod'\er flU)' suffer a sigmfk ant spo.."t.>d
dCCTe:lse.
o
o
o
o
You can run the program from the Vulc:ln or from
floppy.
The program on uke up to 30 mlnutcs dcpcndms upon
the size of your disk ~nd how full il Is.
Ikfore you run the program, run your IT\06t freque ntly
used programs and time them doing various tasks.
Changing the interleave docs no! help a drive thaI uses
track oching. The 100 Meg Vulon uses track caching.
Do not SCt the in1crlc~vc below the Native interleave
(shown on the Imerle:lve Changer screen) or
pcrfollTlll.nce will suffer
Hemem
Un es.s you un rsta
v.: at you 're
doin . ou could do ",ore barm tbaH QOd..
When yoo run Interleavcr, you 'll s('''C a version of the
Interleave Changer screen following
. .
•• "'" WI.< .... I. 0=
.....,. .- "
...,,,,,,,,,
~'C l lOU' _ " '
. ."...
Follo wing Is a lis!. of the th ings to keep in mind when
using Inlerlca l'cr'
tJ
Q
•
Make a nOl:e of the interle~ve to which your drive WlIS
SCt when shipped. You may want to set it ba ck to the
factory set interleave.
Interlca\'er will noc destroy the data slOroo o n the
Vulcan drive jf run oollTlll.lly. n ut do no! stop the
program until It has Ilnished .
"e,,",
.,
1r.tJ.lU............
~-
Using In'erleaver
..,-. ,;" '"
,
OU'IWI
....,... 011 . , ' . . ' """U<T . .
.. ,." .... .., ..... "
.,.to v.=
""'..... to """'"
Once you 've SCI the desired lIltcrlell\'e using the arrow
keys or [he I. J. K and M keys . press Return and Ie! the
program do the res\. Once finish<-od, quit the program and
then lime your programs again.
ApI)
0 - 1nI\tIIaOJeI
•
!
A pPENDIX
1)
F;
2)
A Brief ProDOS Tutorial
This is ~ brief explan~ljon of the .emfes.o;ional ,Ql5k
Opcr.UI~g SYilcm, ProOOS. for those who are completely
new to II All of thiS Information and more Is included in
your APPt. Oumen Guide, but we have provided it here
for your convenience
3)
Put 1'ilC$ dircClly Imo the root directory like
potting documents waight imo the file drawer.
Put rues within subdirectories like pUlling
doc\Jment.S In folders.
Put subdirectories within subdirectories like
pulling folders with in folders.
Pafhnom.
The name of the directory combined with the names of
one or more subdirectories is called a pathname. Volume
nart"ICS and subdirectory names arc preceded by a slash,
(NOI:e that 50me applic:ltions add the slash fOl" you,)
For example, you could halle a llOIume named /MY . DISK
and a file oiled MY .rILE on the tOOl. directory of that
d isk To access that file, you would use the pathnamc
/MY . DISK/MY. FlU:. You could also tulle a file JUL.l'.UG
In a sutxhft.'CtOl)' (folder) a.lled PHONE on a disk oiled
/81 LLS, To access that file, you would use the palhname
/BILLS/PHONE/ JUL. DEC. Refer to the diagram below
-r
Operafing Sysl.",
ProDO~ is one of sc"cral opcl'llling SySlcrT1S for the Apple
Others II1dudc: I)OS 3.3 aocl PaSCII Operating syslems as
defined in the Apple OuTler's GuUles, are programs I~I
control how infonnaliOn is loaded into memory, how the
compo,lIef handles the information, how the information is
scored on a disk. and how Ihe computer communicllcs
with the prinu;:r and OI:hcr peripher.lls.
Naming Vo/um ••
!'roDOS must have a w:I)' to 10000te which disk (often
c:lllcd 'volume') you W3nlIO ateCM. Instead of typing in
It,le location of the disk 3S in DOS 3.3 (ex 56,DJ), you
Simply typc In the rt:Imc of the disk (the volume name).
Some roles for volume names arc
!)
I ILt.S
1_ ell,)
,,"".JUN
"UL_D~C
Name can Include ]cUers, numbers, or periods but
001
spaccs_
2)
3)
Name must hegin with a lcner_
Name can be up!O IS charaClcrs long
TIleS!.' rul~ also hold true for sutxiircC10ry names,
floot DI(tK;'ory and SubdlflJCfory
The main dircctoty of the Ilolume is ailed the 1001.
dlft.'Ctory_ The mol directory uses the same name as your
dISk Subd.ft."<:torics arc ProOOS' way of organizing
inform;auon on a diSk
tUII)
"",,_,rUN (hint
.1IlL.DtC
fOMOOJSI"-~
WILD
TK!.KID
lIO.aACGIM$
(''''")
ProDOS Directory Structure
Now when an applicatiOn asks you for the pathname of a
I'ile. you'll tulle a oosic understanding of whal it expectS_
Think of the tOOl. dlft.'Ctory as a I'ile drawer and the
sulxhrcclOncs as folders wnhin the drawer. You can
""". E·" inti ProOOSluronoI
Syslem Files
A s~lem file is a PmOOS file lhal starts an applic;llion
TypICally, lhese files have lhe suffix ,SYSTEM (e
/APLWORKS.SYSTO[, /ACCOUNT . SYSTEM lsec at!vel
CIT.). ~n you boot PmDOS, il runs the firsl sy5lem' file
lI51ed In ilS dircaory. So, if IlASIC.SYSTF. M is the ill'S!
synem file on your PmOOS boot disk , PmOOS will boo!
and then put you in BASIC.
Additlonol Resources
The following ixxlks are availablc Ihrough most ixxlk
slores:
Apple D ?wner's Manual (Applc Computer, Inc.)
Supplied with your Applc Compuwr Take the time
10 read it
Basic Programming with ProOOS (Addison-Wesley
Pubhshlng) Gwes a dClailcd cxplan:lIion of now to
usc ProOOS from ApplcSoft Basic
kneath Apple ProDOS (Quality Software) Provides
InfOllTl3tion about ProOOS for both the oovice
Apple user and the :ldvanted progrnmmer.
ProOOS Ins ide and O UI (TAB Books) Very good
book for both thc beginning and ad\'~nced BASIC
Pmgt;l:mmcr
"mOOS User's Manual (Applc Computer, [nc.)
Pmvldes an O\'crview of PmDOS and cxplains
how [0 usc [he l' mooS US<!r's Disk
Getting Help
If you have a technical quC51ion relating to the Vulcan Hard
Drive or any other Applied Engineering product thaI
js
OO!
rovered in lhe manual, plC2Se conCH:! lhe dealer from whom you
purchased the product. If you are experiencing diflkullics wilh
one particubr proglllm, contact the prognm's author or
publisher.
[n the event that Ihe dealer o r the publisher's support pe~nnd
canoot answer your question, call Applied Engineering
Technical Support The support represcnlatives arc cxperienced
in the applications and uses of Applied f.ngim.-ering products.
but In order to provide a quick and effective answer to YOUf
qlJe5lion, they will need to know as much as pm.slble aboul the
hardware and software specifically related to your qUC5110n
Please provide the tochnical support rcpresenta\Jve With the
followi ng infOlTlUotion
o
o
o
o
o
o
The Applied Engineering product relaled 10 your
question and ilS revision number.
The original and current memory configuTlltion of the
card (if applic:ablc).
TIle model and revision of your computcr
Whal peripherals are being llsed and whal cards are
in each 51a.
TIle name, version, and revision level 0( the software
with which you :Ire experiencing problems
lbe results of any (esl programs, diolgnoslics, Of
iTOUblcshooting done by you, your dealer, or yOUf
50ftware publisher'S support deparunenl.
Applied Engineering
Technical Support
(214) 241 -6069
9 AM 10 12,30 PM & 1:35 P M 10 5 j'M(CSl')
Monday Thmugh friday
(Plcase call only the nllmber above for tc<:hnlcal support Our
sales office c:annOl tt;l:nsfer calls to Ihe support hnes.)
"
Rttlumlng 0 Produc f
RMA N~, "Art.nllon" ~t, and Invole.
If your product needs 10 be returned, Ihe tcchniC<lI suppon
reprcscnt2tlve WIll give you 3 Return M2teriaJ AUlhori7.21
(RMA) number.
Ion
Q
Q
Q
Q
->
R(.'COm thc RMA number for your own records.
Wme the HMA number on your packllge 12bel.
Fill OUt the Ik1urn Form on bad< of the yellow
sheet m2rXcd 'Ancntion!' A complete fonn will
greuly reduce the time it ukes 10 return your
p:.tck:igc.
Aluch 2 copy of your orig1fl21 invoice to the fonn
Wanrlllg If you don't include 2n Invoice products
will be UC2t(.'(\ as out of warranty Produ~ 2nd will
be return<.'d to you C.O.D. for the 2moum of the
servIce cil2rge.
Wh«I You Ship
If you don't luve the original packing materilti, wr:lp the boom
In anti-Sialic materiltl (prefefllbly the anti-sulic bag in which the
card WllS originally shlp!XXi; ho....'Cver, aluminum foil will work
One). Pack it in 2 .5Iurdy box cushioned wilh wadded p:.Ipcrs
(I.e. used cornpuwr JXlpcr or newspaper).
If you·re shipping a Vulcan 20 or 40 Meg. VulCltn, remember to
p:.Irk the heads using the '>ark Heads progr.lm. The heads on the
]00 Meg vukans park autOfTl2hcal1y.
•
Wand,,& . If your product is <b.m:lgcd due to
hudequate p:lcking, your WlIrDnty will be void
Include the return fonn 2nd inVOIce.
Send the package, shipping prepaid,
10;
KMA'_l_
Applied Engineering
Technical Suppon
3210 Bell Une Road, Sulle 154
D:illas TX 7 5234
.... _
You should insure your package. A: will nO( lIssume any
responsibility for inadequate p:lcking or loss or wmage dl.lring
shipping.
'"L
.. _,
" '''-...-""."..-
-,~
---....---......--...
.,
.,
.,
.
'
When
-...-,
~
~
w.
Recetve
Our service depanment will usc your completcd fonn tn an
attempt 10 duplicate the problem
If it is detcnnined tlut your product is defective due to a
m~nufacturing defect, your card will be repaired or replaced at
..10'5 option.
Any mISuse. 2buse, or non-If. ~l.Ithorized alter.llion.
moolflcation, and/or repair to the Applied Engin(.-ering prool.lCl
will void the W1Irranty. ThLs wamillty will also be void if yOI.l
use the It: product for any purpose other than ilS intendt.-d use.
Your product will be fully tested before il is shipped back to
you. tr.llnsponalion prepaid, vil UPS regular delivery.
o:!
Vulcan
p.lrtl1lOn
formalllng 2~
name. 16, 17
hmn
=
M. nl>)O
bockup
I~
""'off '"
I~~l
~17.1g
modof~
ftlcs ~I
Ibdcup U 37, 38, 39, 40,
.... n'[1M Mmagrr IX, 13,
B , I~. 16, 2i.15
I'ucaJ 27, 35
bout partlt'on
paw." wpply x, xi
1'1111\,24
.,
rulcs 22
P.oDOS
~"
boollng
CI'/ AM
OaSlioc Desk Acces.ory
"
rop~"'g me .. ptogRfIlilI
•
OOS33~,J5
CP A\I J.4,'5
boot,ng '5
(:1' M 27, J.1
Desk Ac~f)' 13
I>OS 3 3 27, 19. 30
buoting ?J
ulIl,ucs 33
bnll
IlD 2'1, 30. 31
File I)e,.·elopn 19
G~'OS""',9. 10.11
bo:»nll .'. 9
1II(C:t\e:;r,-.: 56
Iruc:rl",wer 56, 57
LED 5S
Lock,nlYt.:nlocklnll
Pann,,,,,,, 16
MOnrFY rnodr
~"'lc"n8 IS
Je;r,"r13 2j
J'ark II<:ads x, 52
Vuleon
I
ITIlIximllm m"" 9
3S
1>0533 ?J
GSIOS AI, 9
~
N OTES
Moml59
l'roDOS 8 12
~dcr.wocbng
5
q.u:st''''''' 62
.rn1Qte I,glll 55
'c51Ofe
eflllre "ohlin.., ~1
f,1cs12
rt'lU ....ng Vulcan 63
J".-,[ches 5-t
trouble shOOltng
l'."lX)
U
"
CPDATE 23
Vulan
ClaSSIC l)e,;k
A~50,51,
"
Dr,..er IX, II
".
o
ES
OT
OTES
I