1
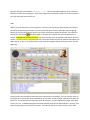
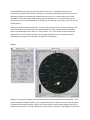
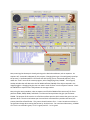
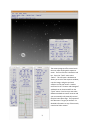
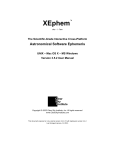
Introduction
The Tinsley Laboratory built Ritchie-Chretien 30 inch Telescope has been in near continuous operation at
Leuschner Observatory since 1968. It has seen many upgrades during those years with the newest
renovation, a collaboration between SFSU and UC Berkeley, being completed in early 2011. While the
telescope frame and optics remain mostly unchanged and in great condition, the mechanical drive and
control system have been completely redesigned and rebuilt to reflect the technological advances since
it was last used. Using higher precision drive and electronic components, the telescope is capable of
better tracking and pointing performance.
The control system has also been updated to offer both remote and fully robotic operation. The
telescope can still be controlled from the observatory but nearly all of its functions can be accessed
remotely. As with any highly automated telescope, the user must be more aware of safety concerns due
to limited feedback and the operator must be fully trained in its use.
Hardware Overview
The telescope’s f/8 Ritchie-Chretien optics have an Effective Focal Length (E.F.L.) of 240in and the
primary instrument is a 35mm format SBIG STL-11000M-C1 CCD imager (4008 x 2672) with a pixel scale
of .3 arcsec/pixel. The telescope frame is a fork type equatorial mount with off axis mounting to preload
the worm drive gears and eliminate telescope backlash. Observatory and instrument control is
achieved through the use of Talon open source control software. The majority of telescope features can
be accessed through the use of Talon, but some auxiliary systems have their own interface.
Dome
All Dome features, including rotation, tracking, slit control, and moisture sensing, are remotely operable
from within Talon. The dome has its own battery supply which is trickle charged by a 25 Watt solar cell.
The battery provides power for the slit control, mirror relay module, precipitation sensor, and
associated electronics. There are benefits and drawbacks to having a battery supply. One benefit is that
if the observatory power fails, the dome slit, using its own power source, will automatically close the slit
to protect the observatory from damage. A major drawback is that during short rainy winter days the
solar cell may not provide sufficient charge to power all of the electronics and the battery will drain. If
this happens, the dome slit would be inoperable. There should always be enough charge for the dome
to close itself, since it does not rely on any electronics, but it will not open again until it has sufficient
voltage to power the mirror relay module. This is something that should be kept in mind. If everything
else appears to be working but you are not getting any images, it is possible that the dome has closed.
This is fairly easy to diagnose using the webcam as explained in the telescope operation section. This is
one of the few legacy systems carried forward from the previous design but it is still fairly robust and
has only failed once within the last 10 years.
Telescope Operation
Before operating the telescope,
you should first check that the
webcam is working. To do this,
point a browser to the following
link:
http://leuschner.berkeley.edu:82.
The user name and passwords for
all login screens will be provided
for you. Enter the appropriate user
name and password and move the
camera around to ensure that it is
working and it is providing a live
feed. The camera has a relatively
slow frame rate and it may take
several seconds for any motion to
be seen. Keep this limitation in
mind when operating the
telescope. Luckily, the telescope does not move all that fast so you should have sufficient time to abort
an operation if deemed necessary.
If the camera is working,
next check that the telescope
is powered up. To do this,
point a browser to
http://leuschner.berkeley.ed
u:81. Once again, enter the
appropriate user name and
password. This will take you
to the power controller.
Power to most of the devices
that you will use can be
controlled remotely. All of
the components on Bus A
(position 1-4) are used to power the telescope. They should all be switched to the on position. In most
cases, they will already be switched on. Next check that position 5 on Bus B is also ON. This controls the
power to the CCD imager. Make sure that when your observing session is completed, you switch off
power to the CCD imager (position 5 on Bus B).
You will then need to create a remote desktop connection to the Talon control computer. This can be
done by double clicking the No Machine Leuschner Icon on the remote computer desktop. Enter your
login credentials and this will connect you to the control computer. Once you are logged in, open a
terminal and type the command “startTel -all”. This will start XObs, XEphem, all the necessary
daemons, and the camera program. All of these programs are explained in detail in the Talon manual so
they will only briefly be covered here.
XObs
XObs is the main observatory control program. From here you can do just about anything you need to
do aside from operating the camera. You can control the dome, focuser, telescope, and the lighting.
Before you can use the telescope, the RA, Dec, Dome, and Focuser need to be homed. This is done by
clicking the “Find Homes” button within XObs. This opens up a window with the axes which can be
homed. CAUTION: Do not home the Filter. We have rewritten some of the XObs code to work with our
camera. Our filter wheel is integrated with our camera and we do not have the external filter wheel that
XObs expects. If you try to home the filter, it will crash the program and you will have to start from the
beginning.
Once all of the axes have been homed and Talon knows where everything is, you can slave the dome to
the telescope by clicking the “Auto” radio button in the “Roof” section of XObs. XObs will first open the
Dome Slit. This should not take more than about 60 seconds. If it takes significantly longer, then there
is likely an error. Troubleshooting these and other possible errors will be discussed later. Once the slit is
open, the telescope cover will be opened next. The indicator above the “Open” button in the “Roof”
section of XObs will turn green once the slit and cover are open. The Dome will now move to
synchronize its position with that of the telescope. From this point forward, whenever you move the
telescope, the dome will automatically follow to keep the slit in sync. Always keep an eye on the
“Messages” section within XObs when working with the telescope. This is the area where you will
receive most of your telescope feedback. If something is not working as you expect, your first clue will
usually be here.
You are now ready to point the telescope. You have several options when it comes to pointing. If you
know exactly where you want to look, the easiest method is to enter your RA and Dec coordinates
directly into XObs and push the “Slew” or “Track” button. The “Track” button slews and tracks the
target, while the “Slew” button only points to the target but does not track. Another method of
controlling the pointing of the telescope is through the use of XEphem.
XEphem
XEphem is an ephemeris program and it also allows control of telescope pointing using SkyView. If the
proper catalogs are loaded in XEphem, you can graphically select the object you want to view and point
the telescope from within SkyView. Before you can use SkyView to control the telescope, you have to
enable telescope control. From the SkyView main menu, select “Telescope” and enable both “Telescope
Marker” and “Telescope Control”. Once telescope control has been enabled, right click on the desired
target and select “Set Telescope” to slew to and track the target. Alternatively, if you want to search for
an object by name you can do so from XEphem. From the XEphem main menu, select “Data” and then
“Search, ObjX, Y, Z . . .”. This will open a window with your search criteria. You can also scroll the list to
the right of the window to find your desired target. When you have located your target, click on it to
bring up its information. If the selected target is correct, click “Set Tel”. This will slew the telescope to
the desired location and begin tracking the target. XEphem and SkyView have too many options to list
here. Look over the manual if there is something specific you would like to know.
Camera
As a first step, check the status of the camera from within XObs in the “Camera” section. If information
on “Temp” or “Status” is not being displayed, camerad, the camera daemon, has not been started. In a
terminal type the command “camerad &”. This will bring up the camera daemon and begin
communicating to XObs.
To actually use the camera, you will need to open the Camera program. To do this, run the command
“camera &” in a terminal window. Once the camera window is open, select “Expose” from the main
menu and then “Setup”. This will bring up a window with the exposure settings. At the bottom of the
window, you will see the cooler options. You can turn on the cooler and change its set point. Depending
on the ambient temperature, the camera will typically cool to about -17 C. This is also where you set
your exposure duration and number of exposures.
To save your pictures, you have a couple of options. You could save only the exposures that you want or
you can autosave every exposure and delete the ones you don’t need after your session is over. From
the Camera main menu select “File” and then “Save”. You should save all of your data to
/nas/talon/UGAstro/fall20xx/groupX/ where X is your group number. If you want autosave enabled,
click the radio at the bottom of the dialog screen. Do not write to the talon home directory or any other
place except for /nas/talon/UGAstro/fall20xx/ directory. The /nas directory (Network Attached Storage)
is the only location that is backed up.
Focus
Focus is achieved through Talon by moving the secondary mirror. Focus will likely have the biggest
impact on the quality of the imaging. A movement of only 10-20 microns of the secondary will make the
difference between 2.5 and 3.5 arc sec seeing. While Talon has the capability to perform autofocus, this
feature is currently disabled and focusing must be done manually. The focusing range for the SBIG
camera is between 25700 – 26100 microns and one method of focusing will be explained below.
From XObs, select “Paddle” in the “Control” section. This will open a telescope control paddle for
manual override. Click the “Focus/Filter” radio button. CAUTION: Do not press the left or right button
while controlling the “Focus/Filter”. This will crash the program and you will have to restart XObs and
re-home all of the axes. Start with the focus position at around 25700 microns, as shown in the Focus
readout in the “Camera” section of XObs.
Next, assuming the telescope is already pointing to the desired coordinates, take an exposure. An
exposure of 1-4 seconds is adequate for this purpose. Changing binning to 2:2 would greatly speed up
the process (~5 sec download for a full frame with 2x2 binning versus ~30 seconds without). Next,
under the “Tools” menu of the camera program, select “Magnifying Glass, FWHM”. This brings up
another window that will determine the Full Width Half Max (FWHM) of the object centered in the
magnifying glass. Changing the glass size can make it easier to focus in on the object of interest. Check
the FWHM for a couple of stars and jot down the average number.
Next, using the same procedure, take an exposure and find the FWHM of the same star(s) for focus
positions 25800, 25900, 26000, and 26100. Find the two Focus positions that give you the lowest
FWHM. The purpose of this exercise is to find the smallest spot size which means that you are at your
optimum focus. Once the two lowest spot sizes and their associated focus positions are found, the
process should be refined further. This process should continue for 1 – 2 more iterations until there is
no significant change when moving the focuser by 10-20 microns. For Leuschner Observatory, a FWHM
of 1.5 to 2.0 arc seconds is great, 2.0 -2.5 is good, and 2.5 – 3.0 is typical.
The camera program offers several tools
that can make working with exposures
easier. The first of these is the basics tool
bar. From the “Tools” menu select
“Basics”. This will open a window that
allows you to resize the exposure window,
crop the image, and gives you basic
statistics on the pixel counts. Another
useful tool is the “Contrast and Histogram”
window that can be accessed from the
“Tools” menu. From here you can select
different methods to control contrast and
you can manually or dynamically control
the pixel count plot range. The purpose of
this document is to get you started. For
detailed information on any of these tools,
consult the Talon manual.