1
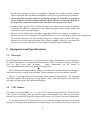
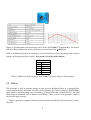
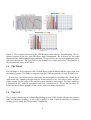
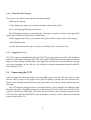
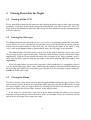
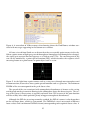
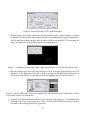
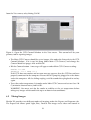
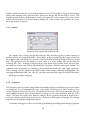
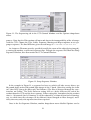
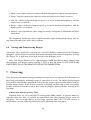
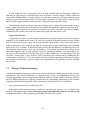
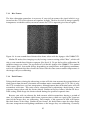
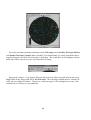
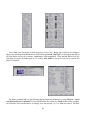
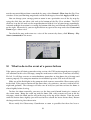
Queen’s University Observatory Manual
July 23, 2007
1
Notes to this version
Version 2 - edited by T. Bridges and M. Hall
The Queen’s University CC04 telescope installation was completed on March 8, 2000 and
again on August 25, 2000 after a remounting. The Queen’s Observatory Operating Manual
has been written and compiled by Kathy Perrett, Terry Bridges and Melanie Hall and is intended for internal use by the staff and students of Queen’s University. Technical assistance
has been provided by Bernie Ziomkiewicz, Dave Stiff, Mike Ulin and the kind folks at Torus
Technologies.
The reference manual for the Observatory Control and Astronomical Analysis System
(OCAAS) for Linux provides a complete overview of the telescope control system. A copy
of the OCAAS manual can be found in the Observatory (not to be removed), or copies can
be signed out from the Observatory Coordinator.
This remains a work-in-progress, and we invite comments and contributions by email at
[email protected]. This manual is also available online at www.astro.queensu.ca.
i
Contents
1 Before Observing
1
1.1
Bookings and Keys . . . . . . . . . . . . . . . . . . . . . . . . . . . . . . . . . .
1
1.2
Rules and Safety . . . . . . . . . . . . . . . . . . . . . . . . . . . . . . . . . . . .
1
2 Equipment and Specifications
2
2.1
Telescope . . . . . . . . . . . . . . . . . . . . . . . . . . . . . . . . . . . . . . . .
2
2.2
CCD Camera . . . . . . . . . . . . . . . . . . . . . . . . . . . . . . . . . . . . . .
2
2.3
Filters . . . . . . . . . . . . . . . . . . . . . . . . . . . . . . . . . . . . . . . . . .
3
2.4
The Telrad . . . . . . . . . . . . . . . . . . . . . . . . . . . . . . . . . . . . . . .
4
2.5
The GPS . . . . . . . . . . . . . . . . . . . . . . . . . . . . . . . . . . . . . . . .
4
2.6
The Weather Station . . . . . . . . . . . . . . . . . . . . . . . . . . . . . . . . . .
5
3 Opening for the Night
6
3.1
The Dome . . . . . . . . . . . . . . . . . . . . . . . . . . . . . . . . . . . . . . .
6
3.2
Logging In . . . . . . . . . . . . . . . . . . . . . . . . . . . . . . . . . . . . . . .
6
3.2.1
From the Galileo Console . . . . . . . . . . . . . . . . . . . . . . . . . . .
6
3.2.2
From the Dome Laptop . . . . . . . . . . . . . . . . . . . . . . . . . . .
7
3.2.3
Logging into Mars . . . . . . . . . . . . . . . . . . . . . . . . . . . . . .
7
Connecting the CCD . . . . . . . . . . . . . . . . . . . . . . . . . . . . . . . . .
7
3.3
4 Closing Down For the Night
8
4.1
Turning off the CCD . . . . . . . . . . . . . . . . . . . . . . . . . . . . . . . . .
8
4.2
Parking the Telescope . . . . . . . . . . . . . . . . . . . . . . . . . . . . . . . . .
8
4.3
Closing the Dome . . . . . . . . . . . . . . . . . . . . . . . . . . . . . . . . . . .
8
4.4
Logging Out . . . . . . . . . . . . . . . . . . . . . . . . . . . . . . . . . . . . . .
9
ii
4.5
Filling Out the Logsheet . . . . . . . . . . . . . . . . . . . . . . . . . . . . . . .
9
4.6
Leaving for the Night . . . . . . . . . . . . . . . . . . . . . . . . . . . . . . . . .
9
5 Telescope Controls
10
5.1
Linux . . . . . . . . . . . . . . . . . . . . . . . . . . . . . . . . . . . . . . . . . .
10
5.2
XObservatory . . . . . . . . . . . . . . . . . . . . . . . . . . . . . . . . . . . . .
11
5.2.1
Before Moving the Telescope . . . . . . . . . . . . . . . . . . . . . . . .
13
5.3
Homing . . . . . . . . . . . . . . . . . . . . . . . . . . . . . . . . . . . . . . . . .
14
5.4
Focus . . . . . . . . . . . . . . . . . . . . . . . . . . . . . . . . . . . . . . . . . .
14
5.5
Finding the optimal Focus . . . . . . . . . . . . . . . . . . . . . . . . . . . . . .
16
5.6
Filters . . . . . . . . . . . . . . . . . . . . . . . . . . . . . . . . . . . . . . . . . .
18
6 CCD Imaging: MaxIm DL
18
6.1
CCD Setup . . . . . . . . . . . . . . . . . . . . . . . . . . . . . . . . . . . . . . .
18
6.2
Taking Images . . . . . . . . . . . . . . . . . . . . . . . . . . . . . . . . . . . . .
19
6.2.1
Expose . . . . . . . . . . . . . . . . . . . . . . . . . . . . . . . . . . . . .
20
6.2.2
Sequence . . . . . . . . . . . . . . . . . . . . . . . . . . . . . . . . . . . .
20
6.3
Adjusting Images . . . . . . . . . . . . . . . . . . . . . . . . . . . . . . . . . . .
22
6.4
Saving and Transferring Images . . . . . . . . . . . . . . . . . . . . . . . . . . .
23
7 Observing
7.1
7.2
23
Taking Calibration Images . . . . . . . . . . . . . . . . . . . . . . . . . . . . . .
24
7.1.1
Bias Frames . . . . . . . . . . . . . . . . . . . . . . . . . . . . . . . . . .
25
7.1.2
Dark Frames . . . . . . . . . . . . . . . . . . . . . . . . . . . . . . . . . .
25
7.1.3
Flat Fields . . . . . . . . . . . . . . . . . . . . . . . . . . . . . . . . . . .
26
Standard Stars and Fields for Photometry . . . . . . . . . . . . . . . . . . . . .
27
iii
8 Solar Observing
28
8.1
Using the 16” . . . . . . . . . . . . . . . . . . . . . . . . . . . . . . . . . . . . .
28
8.2
Using the Coronado . . . . . . . . . . . . . . . . . . . . . . . . . . . . . . . . . .
29
9 XEphem: Maps and More
29
10 What to do in the event of a power failure
33
11 Important Phone Numbers and Observer Safety
34
11.1 Who to Call . . . . . . . . . . . . . . . . . . . . . . . . . . . . . . . . . . . . . .
34
11.2 Working at the Observatory and Getting Home Safely . . . . . . . . . . . . . .
34
11.2.1 AMS WalkHome Service . . . . . . . . . . . . . . . . . . . . . . . . . . .
35
11.2.2 Lone Worker Program . . . . . . . . . . . . . . . . . . . . . . . . . . . .
35
11.2.3 Escort Program . . . . . . . . . . . . . . . . . . . . . . . . . . . . . . . .
35
11.2.4 EMERGENCIES . . . . . . . . . . . . . . . . . . . . . . . . . . . . . . . .
35
12 Quick Startup/Shutdown Guide
37
13 Trouble-Shooting Guide
38
iv
1 Before Observing
1.1 Bookings and Keys
The Queen’s Observatory is run by the Queen’s University Astronomy Research Group (QUARG)
and the Queen’s Physics Department. It is used primarily for student training and public
outreach programs. All telescope operators must be appropriately trained before using the
facility and there must be a minimum of two experienced operators present at each observing session unless prior special arrangements have been made with the Coordinator. By
University regulation, all operators must be Queen’s University students or staff members.
Currently, the Queen’s Observatory Coordinator is Terry Bridges, Room 375 in Stirling
Hall. Terry can be reached by phone (613) 533-2711 where a message can be left or by email
at [email protected] or [email protected].
The Observatory Coordinator must be notified before using the facility. Qualified telescope operators must sign out keys in advance from the Coordinator or from the Physics
Office before 4:00pm and will be asked to leave their student ID card until the keys have
been returned. Observing time allocation is subject to availability and priority is given to
students and tour groups with advanced bookings.
1.2 Rules and Safety
• A Queen’s Observatory Rules and Safety Sheet must be read and signed by each trained
Telescope Operator before they are permitted to observe without supervision. A copy
of this sheet is kept on file in the Physics Department. By signing this form, users are
asserting that they have read and agree to abide by the rules stated therein.
• For safety and security reasons, no one is ever permitted to observe alone. At minimum two people must be present at the Observatory at all times. The Telescope
Operator(s) must be trained Queen’s faculty/staff member(s) or student(s).
• The Observatory Coordinator must be notified prior to using the facility and equipment.
• All Operators present during an observing session are responsible for the proper use of
the equipment and facility, as well as the safety of all others present at the Observatory.
It is the Operators’ responsibility and duty to ensure that the equipment is handled
correctly and safely, and that Observatory safety procedures are followed. Report all
problems immediately.
• Check the weather before opening the dome shutter. If it is precipitating (even a fine
mist), exceptionally humid (> 75% humidity), windy, or threatening a thunderstorm,
1
do not open the dome or use the equipment. Monitor the weather carefully during
your session and close the dome immediately at the first sign of changing conditions.
• Never point the telescope at the Sun without the proper Hα solar filter or projection
screen. Exposure to direct sunlight without a filter will cause irreparable damage to
the chip in the camera or human vision. For solar viewing please see Sect 8.
• An Observing Logsheet must be filled out after every Observatory session, regardless
of whether the dome was opened or not. Failure to report an observing session will
result in loss of telescope privileges.
• All users of the Observatory and other computing facilities on campus are subject to
the Queen’s University Computer User Code of Ethics ( www.ccs.queensu.ca/pubs/rules/code.html
All network activity on the Observatory computer is logged and verified. The Coordinator reserves the right to monitor Observatory computer activity at any time and
suspicious activity by any users will be reported and dealt with accordingly.
2 Equipment and Specifications
2.1 Telescope
The Ellis Hall Observatory houses a 16-inch diameter Torus Technologies (since bought out
by Optical Mechanics: www.opticalmechanics.com) CC04 Cassegrain reflecting telescope
with an open truss tube assembly.
More information can be found at
www.opticalmechanics.com/cassegrain telescopes.htm.
Never touch the telescope mirrors. Mirrors must only be cleaned with special techniques,
and should never be wiped with anything. Do not attempt to clean the mirrors yourself.
There is a warning sticker on the telescope mount marked “Pinch-Point”. The telescope
will rotate quickly when slewing, so keep fingers, cables and other objects away from the
telescope to avoid injury and equipment damage.
2.2 CCD Camera
The camera is an AltaU9000 3056 × 3056 pixel2 CCD (charge coupled device). The pixel scale
is 0.600 /pixel (1x1 binning), and the total coverage is 30 arcminutes on a side; the pixel coordinates increase from the upper-left corner of the image. See Figure 1 for more information.
As is typical of most CCD cameras, there are several hot (errant) pixels in the array, which
can appear as bright pixels or columns in output images. A list of these hot pixels is given in
2
Figure 1: Specifications and sensitivity curve of the AltaU9000 CCD provided by the manufacturer. More information can be found at www.ccd.com/alta u9000.html.
Table 1; unfortunately, there is nothing we can do to fix these pixels, and image data in these
regions will not generally be usable. Also need a list of the bad columns
Hot Pixels
Row Column
897
821
647
508
481
578
1175 all
295
all
Table 1: Hot Pixels on the Apogee AltaU9000 CCD at the Queen’s Observatory.
2.3 Filters
The telescope is able to capture images in one of seven different filters in a rotating filter
wheel mounted to the telescope. The filter wheel contains the Cousins-Johnson UBVRI filters
from Schüler Astro-Imaging (now Astrodon), all 4mm thick and narrowband Hα and OIII
filters from Astronomik with a thickness of 1.05mm. There is also a clear position, which is
the default upon startup.
Figure 2 provides response functions for each filter provided by their respective manufacturers.
3
Figure 2: The response function of the UBVRI filters from Schüler Astro-Imaging. The response function of the Hα and OIII filters from Astronomik: The red lines are the most
important lines from artificial light pollution. The green lines are the most prominent emission lines for nebulas. The grey curve is the human eye’s night-sensitivity. The blue line is
the transmission curve of the filter.
2.4 The Telrad
The telescope is also equipped with a Telrad finder scope mounted on the upper side near
the primary mirror. The finder is aligned with the CC04 and provides a large field of view.
If necessary, the Telrad can be turned on and its brightness controlled by a knob on its
right-hand side. Looking straight into the Telrad when it is on, you will see three red concentric circles. At the centre of the smallest circle should be your target. The inner circle has
a diameter of 0.5◦ , and the outermost circle has a diameter of 4◦ . Please do not leave the
Telrad on for extended periods of time as this will wear down the battery.
2.5 The GPS
The system is hooked up to a Global Positioning System (GPS) which will provide accurate
time and location readings. If the GPS is unable to find a lock or provides an incorrect
reading, please notify the Observatory Coordinator.
4
To verify that the GPS is functioning properly, go to an xterm window (one is opened by
default in virtual window 4) and type date; rdate time.nrc.ca. The first part of that command
checks the system date as set by the GPS, and the second part grabs the exact time from NRC.
The two times should be the same to within a second. If they aren’t, contact the Coordinator
to restart the GPS properly.
If the pointing is off substantially because of the GPS and you can’t find the Coordinator
(but wish nonetheless to continue observing) you can attempt to make use of the Telrad for
positioning. The Telrad should already be centered with respect to the telescope view, so
please do not adjust it. Pick a bright star near to the target you wish to find. With one observer looking through the Telrad and one controlling the telescope motion with the Paddle,
centre the star in the innermost ring of the Telrad. Make use of the intercom to communicate
with the telescope operator. Once the star is centered in the ring, track on the star (XObs:
Track) and centre the image in the telescope view using images from the camera. Take note
of the coordinates of the star as registered by XObs (Current), and compare with the true coordinates of the star in the XEphem catalogue (Objects – Search, ObjX,Y,Z – click on target
in the list on the right). Now look up the target objects in the XEphem catalogue as well.
You might expect a similar coordinate offset (in RA mostly, hopefully) for your target, so
calculate the appropriate “telescope coordinates” accordingly. You can start up a calculator
tool from the Utilities Menu or by typing xcalc& in an xterm window. Type in the expected
coordinates in the RA and Dec boxes under Telescope in XObs, and click Track. Hopefully,
that’ll do the trick temporarily.
2.6 The Weather Station
The weather station is currently not operable.
Various parts of the weather station have been installed on the roof of Ellis Hall. This includes a temperature and humidity sensor, air pressure sensor, rain gauge and anemometer
to measure wind speed and direction. Weather information is communicated to the observatory control software and is also displayed on the small black monitor on the desk by the
computer terminal.
Even with the weather station hooked up, Telescope Operators must remain vigilant
about the weather. Ensure that at least one person is responsible for keeping an eye on the
weather and that the dome is closed IMMEDIATELY in the event of precipitation, lightening, elevated humidity (> 75%) or high winds. Obviously, the telescope and camera will be
damaged if they get wet.
5
3 Opening for the Night
3.1 The Dome
The dome should be opened a minimum of 15 minutes prior to the start of observing in
order for the inside temperature to equilibrate to that of outside. To reduce the effects of air
currents, it is wise to keep the hatch to the dome closed during observations and shut the
door of the warm room to the hall. And yes, we realize that the name ”warm room” is a
misnomer (the room is not heated!). This will become painfully obvious during mid-winter
observations, so bundle up!
The dome shutter control box is located on the left of the panel at the top of the staircase
into the dome. To open the upper shutter, turn the switch to the left and to the right to
close. Please note that if you switch directions too quickly, the shutter will not respond
properly and may continue in the same direction. Pause for a second or two before switching
directions.
The ambient sky-light can be quite high in certain areas of the sky, especially when the
Tyndall Field lights are on or during a Full Moon. We recommend that you keep the lower
dome shutter closed during your observing session whenever possible to cut down on the
incoming light near the horizon. If you need to open the bottom shutter, turn the crank on
the right of the shutter to lower it slowly. You will need to close this part first when it
comes time to shut things down– otherwise the dome will not be sealed properly, and
water/snow can enter the dome.
Never exit the dome by the shutter. There is a five story drop off the roof and no fence.
Do not place anything or step on the lower shutter.
3.2 Logging In
3.2.1 From the Galileo Console
Currently, the telescope operates under XObservatory controlling software (See Sect. 5.2) on
the Linux machine at Ellis Hall named Galileo. A username and password are required to
login, and will be supplied upon request. Galileo will normally be running, and the login
screen visible. Enter your username and password, and the XObservatory software and
Xephem will automatically startup. If Galileo is not running, try the “reset” button to reboot;
this will take ∼5 minutes as several disks need to be checked. If this doesn’t work, please
contact the Observatory Coordinator.
6
3.2.2 From the Dome Laptop
The system can also be accessed from the dome laptop:
• Boot up the laptop
• Once booted up, open up a terminal window, and ssh into Galileo:
ssh -X [email protected]
This will prompt for the password for the “telescope” account on Galileo, again provided
upon request from the Observatory Coordinator.
• Once logged into Galileo, you need to start up the XObservatory software by typing:
./StartXObservatory
(usually this command can be entered by recalling via the “up-arrow” key)
3.2.3 Logging into Mars
The CCD camera is controlled by MaxIm DL CCD imaging software on Mars, the Windows
machine on the right side of the desk. This will require a different username and password to
login (see Observatory Coordinator). Once logged in, turn on the external hard drive sitting
next to the computer to save files to. See Section 6 for more information about MaxIM DL
and using the CCD.
3.3 Connecting the CCD
If the telescope has been previously used for public tours, then the CCD may not be setup
for use, and an eyepiece will appear in its place for public viewings. Be sure to contact the
Observatory Coordinator before observing so that the CCD camera will be mounted on the
telescope.
The CCD must be plugged into an extension cord as well as through the USB port, both
located in the dome. Plugging in the power cord to the CCD will effectively turn on the CCD,
and you will hear the fans begin. To ensure that the CCD has been correctly connected, the
CCD interface software (MaxIm DL, Sect 6) should be started, and the software connection
process begun (Sect 6.1).
7
4 Closing Down For the Night
4.1 Turning off the CCD
Please turn off the cooler for the camera before closing up for the night so that it can warm up
gradually. To do this, return to the Setup tab in MaxIm DL and select Cooler Off. The CCD
must also be disconnected, under the same Setup tab hit Disconnect to stop communication
with the software.
4.2 Parking the Telescope
The Stow position for the telescope in XObs is set to leave it pointing horizontally and southward. Please leave the telescope in this position to prevent dust build-up on the primary
mirror and to avoid accidents when observers are entering the dome in the dark. Using
XObs, click on the Stow button to automatically move the telescope to this position.
The Stow button will occasionally fail to slew to the correct position, and in this event
the telescope must be stowed manually. To do this, click on Stow (which will load the Stow
coordinates), click on Track (which will move the telescope to the Stow position), and finally click on Stow again to stop the telescope at the Stow position (this last step is very
important!)
If the telescope makes an unusually large noise (and sounds like it is struggling) when it
is in the parked position, don’t worry. Sometimes the encoders which control the motion of
the telescope get stuck between encoder steps. Simply slew the telescope a tiny bit using the
Paddle until the noise stops.
4.3 Closing the Dome
The lower shutter of the dome must be closed tightly before closing the upper shutter. The
lower shutter crank is found to the right of the dome opening; turn the crank until the shutter
has closed tightly. Close the upper shutter by turning the switch on the leftmost box on the
panel at the top of the Observatory staircase to the right to close.
If for whatever reason there is no power to the dome controls, the dome can be closed
manually using the long crank in the corner of the warm room. Please be extremely careful
not to hit the telescope when using the crank.
8
4.4 Logging Out
Ensure telescope is safely parked at the Stow position before logging off computers.
Galileo:
Important! Do not shut down or reboot the computer when you leave! Make sure you
log yourself out, but leave the computer at the login prompt. Log out by clicking the left
mouse and selecting Exit and Yes, Really Quit.
Dome Laptop:
You do not need to exit from the XObservatory software: merely shutdown the laptop
(click on “Red Hat” button on lower left, click on “shut down”, and then on Shut Down).
Mars:
Ensure that the external hard drive is turned off, and then log off from the computer: go
to Start Menu - Shutdown, then choose Log Off. Do not shutdown Mars
4.5 Filling Out the Logsheet
An observing logsheet MUST be filled out after every observatory session, even if you did
not open the dome. Failure to fill out the logs will result in loss of Observatory privileges.
If you had arrived to find the Observatory in disarray or if there were signs that the
equipment was not handled appropriately by a previous group, please make note of this
in the logbook. If you encountered any equipment problems during your Observatory session, explain how and when the problem occurred and describe it as completely as possible.
Contact the Observatory Coordinator as soon as possible.
4.6 Leaving for the Night
Please ensure that all windows are shut tightly and that the lights are off. Double check that
all is well in the dome before you go. Shut (slam) the door closed when you leave and make
sure it is locked.
Please return the keys to the Observatory Coordinator as soon as possible the next working day.
9
5 Telescope Controls
The telescope is currently controlled through the Linux operating system Fedora on the leftmost computer in the observatory, Galileo. If the user is unfamiliar with Linux platforms it
is recommended to learn the basic concepts and commands in Linux (Sect 5.1) to better understand the process. It is however not pertinent that the user know much more than how
to login and logoff, since all other commands can be executed through the XObservatory
interface (see Sect. 5.2).
When the user first logs on to Galileo from the console, a terminal window will appear
on the Desktop, and the XObservatory software will start automatically.
To control the telescope from the dome, the user must remotely access from the laptop
located beside the telescope, as described in Section 3.2. The computer should be turned off
(as it should be left at the end of any observing session) and so must be turned on (username
and password not required for the laptop). Galileo can then be accessed through ssh from
the dome, where the user is prompted with another username and password– see Sect 3.2.
5.1 Linux
Linux is an open source operating system, used for a wide variety of computer hardware,
including several home computer distributions such as Fedora, Debian or Ubuntu. Most
astronomical data aquisition and reduction is performed using a Linux operating system for
ease of data manipulation. The Linux operating system is much different from the more
common Windows or Macintosh platforms with its most notable difference being that it operates using a terminal window, much like the DOS prompt in Windows. All commands are
typed into the terminal window to easily access different applications or programs, although
desktop navigation is still available.
TIP: Several different desktops are located along the bottom of the desktop, and can be accessed by
selecting one, or by using ALT+CTRL+arrow keys.
Some very basic Linux commands are listed below. A short table of common commands
in Linux can be found in Figure 3, and more complete tutorials can be found almost anywhere on the web:
http://www.ee.surrey.ac.uk/Teaching/Unix/
http://www.ischool.berkeley.edu/∼kevin/unix-tutorial/toc.html
10
Command
pwd
ls
cd <path>
../
mkdir <file>
rmdir <directory>
rmdir -r <directory>
mv <file> <path>
cp <file> <path>
rm <file>
ls files > list.dat
ssh
exit
tab
left mouse click
center mouse click
Description
Display current directory
List contents of current directory
Change directory
Move up one directory
Create a new directory
Deletes a directory (if empty)
Recursively deletes entire directory
Move a file to another directory
Copy a file to another directory
Remove a file (delete)
List a group of files into a text file
Remote access to another Unix
computer
Close the terminal
Hit tab after starting filename to
complete it automatically
Highlights text
Pastes any highlighted text to
the command line
Example
pwd
ls
cd obsproj
../
mkdir newfolder
rmdir oldfolder
rmdir -r oldfolder
mv image001.fts ../newfolder
cp image001.fts ../otherfolder
rm image001.fts
ls m31* > complet m31 list.dat
ssh -X [email protected]
exit
–
–
–
Figure 3: List of basic Linux commands.
5.2 XObservatory
Your default (top-left) virtual window shows a large control panel entitled XObservatory.
This is used to control the telescope and to monitor equipment status. The various sections
of the window and uses for XObs are described in this section.
11
Pointing Schematic: At the top left corner of the window is a schematic of the telescope
location with respect to the inside of the dome (the northwest direction is labelled NW). The
telescope position is represented by a small circle which gets filled with a green cross when
the telescope is slewing. The positions of the Sun and Moon are shown by yellow and grey
filled circles respectively: if you are observing during the day, ensure that you do NOT point
the telescope directly at the Sun.
Positions: Along the top of the window are the current telescope coordinates and tracking
information. The quality of the pointing and tracking is evident from the Difference coordinates.
Camera: The active Filter is displayed on the left. If you left click on the Filter button, a
drop-down menu will appear which gives the list of available filters. You can switch filters
by selecting your desired setting. Below the Filter selector, the current Focus position is
displayed in µm. The Lights buttons can be set to (1), (2) or (3) settings, where (3) is obtained
by selecting (1) and (2) together.
Control: Towards the left of the window are many of the Control buttons, including Find
Homes, Paddle, and Auto Focus which may be of use. The red Stop button will stop the
12
telescope motion suddenly if necessary, and Quit will allow you to quit the program. No
Confirm will turn off the windows that ask you to confirm that you wish to execute a specified command (activating this No Confirm button is not recommended). Batch Mode tells
XObs to relinquish control of the telescope (don’t do it!) Activate the Sounds button to hear
the computer beep while the telescope is in motion (recommended). More on the rest of the
buttons later.
Status: At the centre of the XObs window you will find Status information to tell you what
the telescope is up to at the moment. When the telescope is tracking on a target, the Tracking
button will be green. During the Find Homes procedure, Homing will be illuminated. The
Weather button should be green when the weather station is functioning.
Roof: Dome controls are not yet implemented.
Telescope: At the far right of the XObs window is the Telescope motion control which you
can use to move the telescope. The Stow position is set to point horizontally, due south (ie.
over the stairs). The telescope should be left in this Stow position after every observing
session. To Slew or Track on an object, type the source name (eg. M31 or Moon) into the box
and click Slew to move to the object or Track to move to it and continue tracking the target
across the sky. If your selected target is beyond the limits of telescope motion (i.e through
the floor), an error message will appear in the Messages window.
Site Information: The top bar under Site Information provides the current date and time,
as well as the positions of the Sun and Moon. UT stands for Universal Time which is 5
hours ahead of Eastern Standard Time (not Daylight Savings Time). LST stands for Local
Sidereal Time, the value of Right Ascension which is currently crossing the meridian, JD
refers to Julian Date. The times for Dusk and Dawn are also shown. The lower bar gives
the temperature and other weather information as detected by the weather station (weather
station is currently not operable). In the event of high winds, excessive humidity or rainfall,
do NOT open the dome. And don’t just rely on the weather station for information...check
the weather yourself periodically!
Messages: Information about system status and telescope position are output to the Messages window. You can scroll up to previous messages using the scrollbar on the right. Keep
an eye out for error messages in this window.
5.2.1 Before Moving the Telescope
IMPORTANT! Before you attempt to move the telescope, go up into the dome and ensure
that the cable for the camera has enough slack in it to accommodate telescope motion, without so much slack that the cable gets caught on the fork assembly when undergoing large
motions in Declination. Someone should be present in the dome every time the telescope is
slewed to ensure that it does not get snagged on anything.
13
Currently, the cable to the dome shutter control is dangling from the top of the dome.
Until we affix this cable and/or automate the dome control, you must ensure that the cable
is well out of the way of the telescope each time it is moved. If you are not planning to open
and close the shutter, unplug the dome shutter cable temporarily and loop the cable out of
the way. Remember to plug it in when you are done.
While slewing to a new target or finding its Home positions, the telescope will move
very quickly. Be careful to warn observers before slewing the telescope so as to avoid injury.
Other items (chairs, step stools etc.) should also be moved away from the area.
5.3 Homing
The homing of the telescope effectively lets the telescope get its bearings when it is first
turned on for the night. The telescope will attempt to home in the x, y and z directions to
orient itself as well as try to find the Dome Home, which will always fail since the dome
is not connected to the telescope control center. Figure 4 shows a screenshot of the homing
procedure, outlined below:
1. Hit Find Homes to open the homing options window.
2. Hit Home All. At this point, the telescope will begin to slew around the dome, and
end pointing straight up at zenith.
3. After all the homing has been completed, the Message window will read that the dome
homing has failed (as expected) and more likely than not, that the z axis focus has
timed out, giving the following message:
Focus:
Axis Z timed out finding home.
This indicates that the focus (the z axis) has not homed properly, and so must be homed
again individually.
4. If z axis timeout has occured, hit Focus button in the Find Homes window to repeat
only the focus homing. Repeat until the timeout message no longer occurs, and instead
the following message appears, indicating success:
Focus:
Homing complete.
Now going to 10114.4um
5.4 Focus
To obtain crisp images with the CCD, the telescope must first be well focussed so the light
obtained from a source is as concentrated as possible. However, unlike focussing the light
in your binoculars, focussing light into a telescope is not quite as straight forward.
14
Figure 4: A screenshot of XObservatory when homing shows the Find Homes window centered with messages appearing in the bottom text window.
All stars viewed from Earth are so distant that they are actually point sources in the sky.
When a point source of light gets passed through our atmosphere and through the telescope,
the signal gets smeared out and appears as a disk on our CCDs. The smearing out of the
star can be modeled by a point spread function (PSF), which describes the response of all
smearing factors to a point source or point object such as a star.
Figure 5: As the light from a point source such as a star passes through our atmosphere and
instrumentation, it convolves into a point spread function such as a gaussian. The minimum
FWHM of the star corresponds to the peak focus value.
The spread of the star associated with atmospheric disturbances is known as the seeing
and depends on the air currents flowing in the atmosphere above the observing site. The seeing at the Queen’s Observatory is typically no better than ???? because of the poor location
and the nearby lake which provides plenty of upper atmospheric disturbances.
Although the PSF due to seeing cannot be avoided, the PSF of a source is also dependent
on the telescope focus, which we can control. The FWHM of a star is measured at different
focus values until a minimum FWHM is found, corresponding to the optimal focus value. A
15
built-in tool in MaxIm DL has been constructed to make easy the task of focussing quickly,
outlined in Sect 5.5.
The focus of the telescope is shown in the top lefthand panel of the XObservatory interface measured in µm, and is controlled using the Paddle window. On the paddle, OUT
pushes to a smaller focus value, and IN makes the focus larger. The default focus value upon
homing is 10114.4µm, and must usually be changed to approximately 7000µm (See Table 2)
to begin from.
Each of the seven filters will hvae a slightly different focus value. A table of previously
measured peak focus values below can be used to quickly focus, but for more precise work
it is recommended that a focus run be perfomed at the start of the night, as described in
Sect 5.5. Once a focus has been set, one can assume that the five main passbands UBVRI are
parfocal and so the focus need not be reset between these bands. It is however a good idea
to perform more than one focus run if observing for a long period, to ensure that the images
are still well focussed.
Filter
OIII
Hα
I
R
V
B
U
Focus (µm)
7360
7070
6990
7060
7000
7160
7170
Table 2: Approximate focus values for each filter. Note that these will not be exact, and the
telescope should be refocussed to obtain crisper images.
At the beginning of each night, the peak focus value must be found to obtain good images. Approximate values to begin the focus run are given in Table 2, and are a good starting
point.
5.5 Finding the optimal Focus
Begin by finding a field with at least one star which is not too bright and not too dim, which
will be imaged.
1. Use the Focus tab under the MaxIm DL CCD control window, turn off Dark and Continuous options, and ensure that the whole CCD (0 to 3096 pixels in Subframe) is being
imaged. Set an appropriate exposure time and hit Start Focus.
This will take an full field image of a star field from which one star will be selected
which is not too bright and not too dim.
16
Figure 6: Focus tab in the CCD Control Window
2. On the image, create a box around the selected star using the ? mouse button, as shown
in Figure 7 and the width and height of the box will automatically appear in Subframe.
For all subsequent focus images, only this box will be read from the CCD, reducing the
chip’s readout time and speeding up the focussing process.
Figure 7: A subframe in the entire 3096 x 3096 image has been selected using the cursor.
3. Hit Start Focus again to see the box imaged by itself. Select the Inspect tab in the CCD
window. A 3D depiction of the PSF is shown, giving the FWHM value for the star in
the field, which will be at a minimum when the optimal focus value is reached.
Figure 8: The 3D PSF of the selected star in the field. The FWHM values will become smaller
as the focus reaches its maximum.
4. Activate the Continuous mode in the Focus window with a delay of ∼15 seconds. This
will allow for a series of images to be taken, to have their FWHM analysed as well as
the focus value changed between exposures.
17
5. Set the telescope focus value to +/- 500µm of the approximate peak value given in
Figure 2 for the filter being used. Between exposures, the focus value is increased and
recorded along with the FWHM of the star to tabulate values and to hone in on the
optimal focus value.
6. Click Start Focus and start the measurements!
5.6 Filters
The filters are controlled in the XObservatory interface and are changed using the dropdown menu on the left hand panel of the main window. The filters rotate in a filter wheel
constructed for the Queen’s Observatory. Although the first two slots are labelled Empty,
the first slot actually houses the OIII filter (position 2 really is empty! This is the default
filter after homing). The remaining slots are labeled by band colour, UBVRI and Ha (Hα)
with the second slot containing no filter at all. Specifications of these filters can be found in
Section 2.3.
OIII
Empty
Ha
I
R
V
B
U
6 CCD Imaging: MaxIm DL
MaxIm DL is an advanced CCD imaging software, which supports astronomical CCD imaging and analysis. It is currently installed on the Windows machine (Mars, and can be accessed from the Desktop. The basic operations of the software described below will give the
basic skills needed to perform accurate and efficient CCD imaging. It is recommended that
those who are interested in learning about any of the other many features offered by MaxIm
DL consult the MaxIm DL Help Menu, or read through the MaxIm DL User Manual located
in the observatory.
6.1 CCD Setup
Ensure that the CCD is powered up and the USB cable connected in the dome and on
Mars. To connect the CCD camera from Mars, the CCD Control Window must be opened
18
from the View menu, or by hitting Ctrl-W.
Figure 9: Open the CCD Control Window in the View menu. This control will be your
primary tool in aquiring images.
• The Main CCD Camera should be set to Apogee Alta under the Setup tab in the CCD
Control Window. If it is not, hit Setup under Main CCD Camera, and change the
Camera Model to Apogee Alta and hit OK.
• Hit the Connect button. A message will appear under Main CCD Camera reading:
Cooler is off
Setpoint -20.0 Temp 20.0
If the CCD does not connect and an error message appears, then the CCD has not been
properly connected to the computer. Ensure that it is properly plugged in at the dome
and at the computer. All else failing unplug, wait 10 seconds then plug back in and try
again.
• To set the cooler temperature, hit cooler under Main CCD Camera and set to at least -20
C (minimize thermal noise) and hit OK.
WARNING: You must wait for the cooler to stabilize at the set temperature before
taking any images which could take up to an hour in hot conditions!
6.2 Taking Images
MaxIm DL provides two different modes of imaging under the Expose and Sequence tab.
The Expose tab allows quick Light, Bias, Dark or Flat images to be taken and stored in
19
buffers which can either be saved or deleted once viewed. This mode is suggested for testing
things like pointing and exposure times, where the images do not need to be saved. The
Sequencing tab is more efficient when a series of exposures is to be taken of the same source
which can include bias and dark frames during the same session, but performs the same
basic operations as Expose.
6.2.1 Expose
Figure 10: The Expose tab in MaxIm DL.
The Expose tab is fairly straight forward, the only trick being that it stores images in
buffers instead of saving them to file. If you’d like to have multiple buffers open, then click
New Buffer and each image will go into a seperate buffer instead of being written over and
lost. The option to save the image is yours while it is in the buffer, and can be done by
selecting File, Save. To begin, select the image type under Type as Bias, Dark, Flat or Light,
of which the former two will be closed shutter exposures, and the latter open shutter. An
exposure time in minutes or seconds is also entered for Dark, Flat and Light exposures.
These settings will be added to the FITS header of the image, although unfortunately the
telescope information (RA, Dec, HA, UT, etc) does not (currently) appear in the FITS header.
Hit Expose to begin imaging.
6.2.2 Sequence
The Sequence tab is a feature which allows for multiple images of different types to be taken
in succession. It will automatically save each image which has been taken under an Autosave Filename chosen by the user. The option to overwrite files is located under the Options pulldown menu and will overwrite any image in the same directory with the same
name. This may be useful if the first few images of the sequence turn out to be of no use,
and you wish to reset the Start at counter to 1. To create a full sequnce of images, select Setup
Sequence in the Options drop-down menu.
A window will appear with several fields to be filled in pertaining to the image aquisition
20
Figure 11: The Sequencing tab in the CCD Control Window and the Options drop-down
menu.
process. Note that the Filter option will not work due to the incompatibility of the telescope
with the CCD. Choose the Type, Suffix, Exposure, Binning and Repeat options to set up a
proper sequence. The final filename given to each image is filename001Suffix.fit
An Autosave Filename must be specified (usually the name of the object being imaged),
a starting file number, a suffix and exposure time. To begin the sequence hit OK on the Setup
Sequence Window, then Start under the CCD Control Window.
Figure 12: Setup Sequence Window.
In the example in Figure 12, a sequence has been set which will take twenty biases, ten
30 second darks and ten 30 second light images in the V band. (Note that setting the suffix
to V does NOT change the filter, only the filename.) The filter is changed through the XObs
interface on Galileo. The Delay Between setting will set a delay between the end of the
readout from the CCD and the next exposure. When setting this, remember that the readout
time is ∼30 seconds (for 1x1 binning: it will be reduced by a factor of four for 2x2 binning,
etc), in which time the telescope can be dithered, focus changed or filter changed, and a
delay time may only take up more time than expected.
Once in the Set Sequence Window, another drop-down menu labelled Options can be
21
utilized to manipulate the sequence further. The Group by Slot option is very important as
it will tell the sequencer to take all 20 biases first, then the 10 darks, then the 10 lights. If this
option is not selected, then the sequencer will image in a round: bias001 then dark001, then
light001 and then start over again at bias002, dark002, light002 etc.
Another option is to save the sequence which you have created with the Save Sequence
As option so you may run the same sequence more than once.
6.3 Adjusting Images
Once an image has been read from the CCD and is being displayed on the MaxIm DL screen,
one can manipulate the stretch and the zero point to better display the image. The Screen
Stretch Window appears automatically when MaxIm DL is started, but if it does not appear,
it can be accessed through View, Screen Stretch Window, or by hitting Ctrl-H.
Figure 13: Screen Stretch Window.
The red arrow is the Minimum Level control, which sets the brightness level in the image
that corresponds to black on the display. The green arrow is the Maximum Level control,
which sets the brightness level in the image that corresponds to white (full brightness) on
the screen. These two controls can be moved over the histogram image of the CCD image
on the Screen Stretch Window to set a desired stretch and zero-point (minimum level).
For a quick and easy stretching, the Automatic Stretch can be used from the drop-down
menu shown in Figure 13.
• Low - low contrast setting with dark background
• Medium - a medium contrast setting with dark background
• High - high contrast setting with dark background
22
• Moon - even higher contrast setting with dark background, slightly saturated pixels
• Planet - highest contrast but adjusted so that no feature in the image saturates
• Max Val - adjust so that the brightest pixel is set to the maximum brightness, and the
zero level is set to black.
• Range - adjust so that the brightest pixel is set to the maximum brightness, and the
darkest pixel is set to black.
• Manual - user adjustments either using the mouse, histogram, or Minimum and Maximum field.
This Automatic Stretch can also be implemented by right clicking on the image and setting Screen Stretch to one of the above options.
6.4 Saving and Transferring Images
All images taken should be stored on the external harddrive connected to the Windows
computer. Choose Select Destination Path under the drop-down menu in Sequence Settings
(See Figure 11). A path may be created, or a previous directory used.
Since each image (binned 1x1) is approximately 18MB, transferring many images from
the computer will require either burning a DVD or moving them via FTP. THE HARD
DRIVE SHOULD NOT BE REMOVED FROM THE OBSERVATORY.
7 Observing
Once the basic astronomical imaging concepts become clear, it is obvious that the process of
observing and properly reducing images is somewhat of an art. The objects being imaged
are carefully selected to be positioned well in the sky, proper exposure times chosen and calibration images taken. If one of these elements is missing, an observing session can quickly
become a disaster, therefore each of these must be properly planned before arriving at the
telescope.
A Brief Note About Exposure Time
Exposure times are set by MaxIm DL starting from 0.001 seconds. In practise however,
exposure times less than ∼5 seconds are undesirable since they produce shutter errors on
the image. For very bright objects or very large exposure times, the CCD will saturate at
65535 counts, and no accurate photometry can be obtained from that object.
23
If your exposure time is too high, you may find vertical trails or “bleeding” along the
columns of your image in which bright stars are found, and the images will be saturated
(more than 65,000 counts). Longer images are also more prone to telescope tracking errors
and so it is generally better to take a series of short exposures (1-2 min) and average them to
obtain higher signal-to-noise rather than by taking one long exposure image.
Obtaining the correct exposure time for an image can be tricky. One may attempt to perform sample signal-to-noise calculations to estimate the optimum exposure time for an nth
magnitude object observed at a given wavelength in a given aperture (an exercise recommended for the reader), but trial and error often seems to work just as well.
Target Not In Frame
A good idea is to take a short exposure before observing your target to ensure it is placed
properly in the middle of the frame. If you select a target and begin tracking it only to find
that it is not in your image, there are several possible explanations. First, verify that you are
indeed tracking on the target in question by checking the target coordinates and Tracking
light in the XObs window. If that checks out, ensure that the dome is not blocking the view
(we all make this mistake at one time or another). Also, check for cloud cover. Next, check
that your exposure time is long enough if you are attempting to find a very faint object: try
slewing to and tracking on a bright star to see if that works out. Is your image way out
of focus? Failing that, verify that the GPS is obtaining the correct time by following the
instructions in Section 2.5. It is also possible that the telescope pointing calibration has been
overwritten accidentally, so please notify the Coordinator if the pointing and/or tracking
have failed.
7.1 Taking Calibration Images
A minimal amount of preprocessing is necessary to obtain nice-looking images and accurate
photometry. For image reduction, we suggest using XVista, an astronomical image processing application, or the Image Reduction and Analysis Facility (IRAF) software package
off-site. Both programs are currently installed on the Astronomy computers in the student
computer cluster in Stirling Hall, and a reduction manual for XVista is available at
www.astro.queeensu.ca/∼mhall/phys315.
Experiment with exposure times, number of exposures to average, etc. to achieve the
desired calibration images. New calibration images should be obtained at every observing
session, preferably at the beginning and middle/end of each session.
24
7.1.1 Bias Frames
The bias subtraction procedure is necessary if you wish to remove the signal which is registered on the CCD in the absence of exposure to light. The bias level of an image typically
incorporates an additive offset, meant to ensure the CCD is operating in a linear regime.
Figure 14: A zero second closed shutter bias frame taken with the Apogee Alta U9000 CCD.
MaxIm DL makes bias imaging easy by having a camera setting called “Bias”, which will
take a zero second closed shutter exposure (See Sect 6.2). To get the best bias calibration, 10
to 20 bias images are taken. The typical bias level for the Apogee Alta U9000 CCD is around
1209 counts/pixel, but could change depending on temperature and lighting conditions,
and so it is imporant that these frames be taken with the same camera cooler temperature as
the images they are calibrating.
7.1.2 Dark Frames
Taking dark frames during the observing session will take into account the accumulation of
dark current from thermal, electronic and random noise surrounding the CCD. This is why
the CCD is cooled to a very low temperature, although counts due to thermal noise will still
accumulate with time. This noise can be accounted for by obtaining a dark frame, a time
exposure image taken with the shutter closed. Similar to the bias frames, MaxIm DL has a
Dark setting which keeps the shutter closed during the specified exposure time.
Because you wish to subtract the dark current which accumulates during a period of
time, it is important to choose dark frame exposure times which are equal to the exposure
times of the images they are calibrating. For example, a 30s exposure of M31 will require
30s dark frames to be taken. Similar to bias frames, the dark frames must be taken under
the same temperature and lighting conditions as the images they are calibrating. Generally
25
Figure 15: A closed shutter 120 second dark frame taken with the Apogee Alta U9000 CCD.
several dark frames are taken for a single exposure time to ensure good statistics in the final
image.
7.1.3 Flat Fields
In order to remove the large scale variations in sensitivity across the CCD chip, you must
divide the image by a so-called flat field. There are three ways of obtaining flats: by taking
a short exposure of twilight sky (twilight flats), taking a short image of a field with flat
illumination (dome flat) or by taking several dithered images of the night sky (sky flats).
Twilight flats are difficult to obtain, but groups arriving in the early evening might wish
to give it a try. You must find a field with no bright objects, and take an exposure just long
enough to get the typical number of counts in a pixel to between 20 000 and 45 000. Do not
saturate the chip in any area (i.e. maximum number of counts must be < 65 535. It is a good
idea to turn the tracking off while doing a sky flat so that potentially uneven sky illumination
is smeared out, and star images can be removed by median-combining the flats.
Dome flats are typically easier, but sometimes less effective. You will notice a screen
affixed to the inside of the dome. That’s your flat field. Point the telescope using the Paddle
under XObs until the telescope is more or less pointing at the level of the screen board.
Rotate the dome until the screen is directly in front of the telescope.
The screen is then illuminated using the lights attached to the sides of the telescope, and
controlled using the Lights setting in the XObs interface. Three levels of lighting are available, 1 being the dimmest and 3 being the brightest (obtained by selecting 1 and 2 together).
These lights are unfortunately generally too bright or too dim for efficiently imaging dome
flats, but setting 1 can be imaged for approximately 200 seconds to yield ∼ 45000 counts.
26
This long exposure time becomes cumbersome once one realises that several flat fields are
required to make a good flat frame when reducing images (3−5 in each filter).
Figure 16: Donut patterns due to dust on the mirror and hot pixels due to cosmic rays hitting
the CCD are a common feature in flat fields, as seen in this 200s dome flat.
The last way to create a flat field is the sky flat. A sky flat is created by taking a series of
dithered images of the night sky. The idea behind dithering the images is that later during
the reduction procedure, the median of all the fields can be taken, to remove stars and other
objects. It is therefore important when choosing your field for the flats that it not contain
too many stars or bright extended objects. To dither the fields, simply use the Paddle to
move the telescope slightly between exposures. The final product of taking the median of
the dithered flat fields is a flat field containing no stars, which can be used to divide out the
pixel to pixel sensitivities in the object images.
Need recommended exposure times for sky flats
7.2 Standard Stars and Fields for Photometry
Throughout the night, atmospheric extinction will change the magnitude of any object being
observed depending on the length of the air path, called the air mass. If photometry is the
intended use for the images being observed, then it is important to know the airmass at
the location of the object. The air mass can be calculated if one knows the latitude of the
observation site, the declination of the object and the hour angle at which the observation is
being taken, so be sure to note these in an observing log for each set of images.
The basic principle behind finding the extinction of the sky is to measure the flux from
stars of known standard magnitude (i.e. “standard stars”), which can be found in the Landolt Standards catalog online in several filters:
27
http://mthamilton.ucolick.org/techdocs/standards/index.html
http://www.noao.edu/wiyn/obsprog/images/tableA.html
A star or field should be chosen to meet the observer’s needs (RA, DEC and band). Several standard star images must be taken at different air masses throughout the night, and
compared to their known standard magnitudes. A more in depth look at airmass extinction
and standard stars can be found at
http://www.astro.queensu.ca/∼mhall/phys315/corr mag.html
8 Solar Observing
Need pictures here of the solar observing setup, both with 16” and Coronado
The Queen’s Observatory is equipped with several instruments for solar observing.
8.1 Using the 16”
With the 16”, it is important that the CCD not be used for solar viewing as it will damage
the chip. More important still is that the Sun is not observed directly through the eyepiece
as it can cause serious eye damage. The image of the Sun is instead projected onto a screen
provided in the dome.
To block out some of the light from the Sun, a shield is provided with a circular opening,
which is attached to the barrel of the telescope with the supplied screws. Simply slew the
telescope to a position where it is in reach, and screw each of the three screws into place.
A white metal sheet with a bracket to attach to the telescope is provided to mount underneath the viewing eyepiece with four more screws. Once the telescope is slewed to the Sun,
a disk the size of the sheet should appear, slightly out of focus. This is the Sun!
The telescope focus should be set to the smallest possible value, -30µm in order to view
the Sun. Further focussing can be conducted manually with the focussing knobs next to
the eyepiece. Focussing will be made easiest if there are sunspots present on the surface of
the Sun on which to focus. Otherwise, the edge of the Sun may be used as a guide to the
sharpest image.
28
8.2 Using the Coronado
To Be Done
9 XEphem: Maps and More
Now look at the XEphem utility which, by default, appears in the top right virtual window.
The location parameters for the Queen’s Observatory in Kingston, Ontario will need to be
set by clicking under Local (where by default it is set to Chicago, Illinois), typing Kingston
and hitting Set. Clicking the Update button at the bottom of the window will make the
changes.
Now left click on View and select Sky View to bring up a map of the sky. This is the
current sky visible at your location, with North at the top and East at the left.
29
To set the telescope control and marker, select Telescope and set Enable Telescope Marker
and Enable Telescope Control (boxes shaded). You should now see white crosshairs showing the direction in which the telescope is pointing. The scroll bars at the bottom and on
both sides allow you to vary the view shown in the map.
Now pick a target: a star, planet, Messier object or any other celestial item on the map.
Right click on the target and select Set Telescope. The telescope should now be slewing to
track on your object of choice. Check any error messages in the dialog box in your XObs
window to see if there are any problems.
30
To alter the display and target settings for the Sky View window, click on the Control then
select Options and Filter. These windows are shown in the figures below. Options controls
the display settings: for example, you can switch to an RA-Dec view, add a coordinate grid,
add or subtract constellation labels and change the proportion of objects that are labelled
in the view. Click on Close to shut the window. Filter controls the types of objects that
are displayed on the map. Click to toggle on or off the various target groups: if you are
particularly interested in globular clusters, for example (as most astronomers would be, of
course!) click on the Toggle button at the bottom to turn all objects off, then click on the
button beside Globular under the Clusters section. Click Apply to apply the changes. If you
want to increase the limiting magnitude of the display (ie. see fainter objects), use the Deep
Sky Lim Mag slide switch at the bottom to set your desired limit. Again, click Apply to
make it so. The All button will select all object types. When you are done fiddling with this,
click Ok at the bottom to activate the settings and close the window.
31
Can’t find your favourite nebula or galaxy in the sky? Bring up a full list of catalogue
objects by clicking on the Data menu and selecting Search, ObjX,Y,Z.1 Left click on the object
of your choice to reveal its nature, coordinates and magnitude. Click on Set Tel to slew the
telescope to your selected target if it is visible, Sky Mark if you just want to see where the
object is located.
We don’t recommend you go deleting objects from the memory by using Objects – Load
and delete objects in memory. If you accidentally do, either use Load in that same window
to reload the relevant database or simply exit and restart xephem from the menu. To filter
32
out the unwanted objects from a crowded sky map, select Control – Filter from the Sky View
window. Select your limiting magnitudes and desired targets, then click Apply or OK to set.
You can change your vantage point or zoom in on a particular area of the sky map by
using the slide bars on either side and at the bottom of the Sky View window. The FOV
slide bar is on the left and sets the magnification or field of view of your image accordingly.
Azimuth or Right Ascension is set using the bottom slide bar, and Altitude or Declination is
on the right. Alternatively, you can right-click on any part of the map and select Center and
Zoom to get a closer view.
To refresh the map and return to a view of the current sky above, click History – Sky
Above (annotated) in the menu.
10 What to do in the event of a power failure
If the power goes off during your observing session, the UPS (uninterrupted power supply)
will continue to drive the telescope, computer and camera until it has 5 minutes of battery
life left. It will then execute an auto-shutdown procedure to shut down the telescope and
camera properly. The computer monitor is not hooked up to the UPS and will shut off.
Make use of the flashlights in the computer desk to move around the Observatory safely
in the dark. If the power remains off for more than a few minutes, you may wish to call it a
night and go home. The telescope will take care of itself, but you must ensure the dome is
closed tightly before leaving.
To close the dome manually, you may use the long crank found leaning in a corner of
the warm room. Bring the crank up into the dome and, with extreme care not to hit the
telescope, attach the hook on the end to the ring at the top of the shutter. Turn the crank
until the shutter closes tightly (you will need to have closed the lower shutter first). Return
the long crank to its place downstairs.
Please notify the Observatory Coordinator as soon as possible that there has been a
33
power outage.
11 Important Phone Numbers and Observer Safety
11.1 Who to Call
Service
Internal
External
Campus Emergency
3-6111
533-6111
AMS Walk-Home Service 3-2662
533-2662
Weather Recording
9-545-8550 545-8550
Fireball Hotline
7-7608
533-6000-77608
Observatory Coordinator 7-4781
533-6000-74781
Queen’s Observatory
533-2711
In the event of an emergency (fire etc.), contact Campus Security (36111) immediately. We
strongly encourage the use of the AMS Walk-Home Service for Observatory users leaving the
premises alone after dark.
In the event of equipment problems, notify the Observatory Coordinator (Terry Bridges)
immediately at extension 32711. In an emergency, Terry’s home number is on the sheet by
the phone (late night calls of questionable importance may not be appreciated, so make sure
you check the Troubleshooting section of this manual before you call Terry at home!)
If you answer a call to the Observatory line from someone seeking information that you
cannot supply, please take a brief message and notify the caller that the Observatory Coordinator will return their call as soon as possible. Please leave voice-mail with the message
at extension 32711. Thanks!
11.2 Working at the Observatory and Getting Home Safely
So you’ve just captured an image of a new Supernova and reported your findings to the
world. Great! Fame and fortune will soon follow. Until then, it’s 4 A.M. and you’re a little
worried about your walk home through the empty streets of Kingston. What do you do?
Here are a few programs at your disposal to make both your night of observing and your
trip home as safe and productive as your observations were. Please do not hesitate to call
any of the numbers listed below if you feel at all nervous at anytime.
34
11.2.1 AMS WalkHome Service
The WalkHome Service is an escort service for students provided by the Alma Mater Society. Staffed by students who will walk you from one point to another within WalkHome’s
boundaries, WalkHome’s hours are
Sunday to Wednesday 7 p.m. to 2 a.m.
Thursday to Sunday
7 p.m. to 3 a.m.
in the fall and winter, and 9 p.m. to 1 a.m. in the summer. A team of one male and one
female will walk or bike with you to your destination. Stop by the Infobank in the lower
JDUC or call 533-WALK (533-9255).
Campus Security Programs
http://www.queensu.ca/security/programs.html
11.2.2 Lone Worker Program
Since you will be observing in groups of 2 or more (no one may work alone at the Observatory), this will not apply. Nonetheless, if you work alone at night (or weekends, holidays,
etc.) feel free to phone Campus Security at 533-6733 and report where you are working, how
long you will be there, and the phone number of the closest phone. The operator will ask
you: to call again when you leave, approximately what time you expect to leave, and if you
would like a security escort when leaving. If you do not call at the end of your work period,
security staff will come and check on you.
11.2.3 Escort Program
Campus Security provides escorts from one point on campus to another for staff, faculty and
students when WalkHome is off duty. This service is provided at any time day or night, all
year round. Anyone who wishes to be escorted may phone Security at 533-6080 and request
an escort. Security Staff will be sent to meet you and will escort you to your destination.
11.2.4 EMERGENCIES
In case of any emergency, call the Emergency Response Centre (ERC) at 533-6111, 24 hours a
day, 7 days a week. The above Campus Security programs can also be reached at this number. In the event of Observatory equipment problems, contact the Observatory Coordinator
35
immediately at any time of day or night at 533-6000 ×74781. Leave a voice-mail message if
there is no answer.
36
12 Quick Startup/Shutdown Guide
Startup
1. Check the weather!
2. Close the door to the hallway and open the dome shutter to equilibrate the temperature
with that outside.
3. Log into both computers.
4. Begin MaxIm DL and connect the CCD (Sect 6.1).
5. Set and start the cooler temperature ASAP - it will take a while to cool down.
6. Begin XObservatory on Galileo.
7. Verify that the telescope area is clear of barriers before moving the telescope. Someone
should be upstairs when the telescope is slewing.
8. Find Homes under XObs and verify output messages, repeating Focus homing several
times if necessary.
9. Slew to an object using XObs.
10. Rotate the dome to centre the telescope in the slit opening.
11. Turn off the lights in the dome, the warm-room and close the hatch before doing any
imaging.
12. Choose a filter and conduct a focus run, outlined in Sect 5.5.
13. Observe! Follow instructions on how to use MaxIm DL (Sect 6) and be sure to take biases, darks, flat fields and standard fields in addition to your object images if necessary
(Sect 7.1).
Shutdown
1. Turn off the CCD cooler and disconnect the CCD in MaxIm DL.
2. Make sure your images are stored on the external hard drive or that you have removed
them from the computer in some other way.
3. Safely Remove Hardware for both CCD and external hard drive
4. Close the dome; you must shut the lower hatch before the upper.
5. Rotate the dome so the hatch points roughly North-West.
37
6. Move the telescope to the Stow position, manually if necessary.
7. Log off the computers. If using dome laptop, shut it down. Do not turn off Galileo or
Mars.
8. Fill out the logbook entry and sign it.
9. Tidy up after yourself, please.
10. Close the windows and turn off the lights (in the dome too!). Make sure you have your
keys when you leave.
11. Shut the door and return the keys as soon as possible the next working day.
13 Trouble-Shooting Guide
To Be Done
38