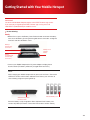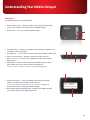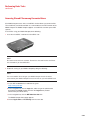
1
XFINITY Internet 2go
Device User Guide
4G/3G Mobile Hotspot
©2011 Comcast. All rights reserved. The information contained in this document is
subject to change without notice and should not be construed as a commitment by
Comcast.
Patents and Licenses
Visit www.novatelwireless.com/patents for a complete list of all Novatel Wireless
patents.
Software License
Proprietary Rights Provisions:
The software drivers provided with this product are copyrighted by Novatel
Wireless and/or Novatel Wireless’ suppliers. Although copyrighted, the software
drivers are unpublished and embody valuable trade secrets proprietary to Novatel
Wireless and/or Novatel Wireless’ suppliers. The disassembly, decompilation,
and/or Reverse Engineering of the software drivers for any purpose is strictly
prohibited by international law. The copying of the software drivers, except for
a reasonable number of backup copies is strictly prohibited by international law.
It is forbidden by international law to provide access to the software drivers to any
person for any purpose other than processing the internal data for the intended
use of the software drivers.
U.S. Government Restricted Rights Clause:
The software drivers are classified as “Commercial Computing device Software” and
the U.S. Government is acquiring only “Restricted Rights” in the software drivers and
their Documentation.
U.S. Government Export Administration Act Compliance Clause:
It is forbidden by US law to export, license or otherwise transfer the software drivers
or Derivative Works to any country where such transfer is prohibited by the United
States Export Administration Act, or any successor legislation, or in violation of the
laws of any other country.
II
Trademarks and Service Marks
Comcast, the Comcast logo, XFINITY, and the XFINITY logo are registered
trademarks or trademarks of Comcast. Novatel Wireless is a trademark of Novatel
Wireless, Inc., and the other trademarks, logos, and service marks (collectively the
“Trademarks”) used in this user manual are the property of Novatel Wireless or their
respective owners. Nothing contained in this user manual should be construed as
granting by implication, estoppel, or otherwise, a license or right of use of Novatel
Wireless or any other Trademark displayed in this user manual without the written
permission of Novatel Wireless or its respective owners.
• MobiLink™, Novatel Wireless™, and the Novatel Wireless logo™ are all trademarks
of Novatel Wireless, Inc.
• MiFi® and the MiFi logo® are registered trademarks of Novatel Wireless, Inc.
• Microsoft and Windows® are either registered trademarks or trademarks of
Microsoft Corporation in the United States and/or other countries.
• Apple®, Mac®, and Mac OS® are trademarks of Apple, Inc., registered in the U.S.
and other countries.
• Linux® is the registered trademark of Linus Torvalds in the U.S. and other countries.
The names of actual companies and products mentioned in this user manual may be
the trademarks of their respective owners.
Contact Information
For technical assistance/warranty claims, call XFINITY Internet 2go Technical
Support at 1.866.206.2182; for all other questions, call Comcast Customer Care at
1.800.XFINITY (1.800.934.6489).
FCC ID: PKRNVWMIFI4082
PN: 90026317 R1
Please visit http://customer.comcast.com/2go for the latest information about your
Mobile Hotspot.
III
Table of Contents
1.1
Introducing the XFINITY 4G/3G Mobile Hotspot
4.1
Troubleshooting
1.1
Features
4.1
Overview
1.1
Package Contents
4.1
Common Problems and Solutions
1.1
Minimum Requirements
1.2
Getting Started with Your Mobile Hotspot
5.1
Glossary
1.7
Understanding Your Mobile Hotspot
1.9
Caring for Your Mobile Hotspot
6.1
Recording Your Settings
6.1
Quick reference of important Mobile Hotspot settings
6.1
Record your settings so you don’t forget!
2.1
Performing Basic Tasks
2.2
Checking the Status of the Mobile Hotspot
2.5
Charging/Recharging the Battery
2.6
Extending Battery Usage
2.8
Sharing the Mobile Hotspot Network
2.12 Customizing Your Mobile Hotspot’s Security
2.16 Manage Security Settings
2.20 Controlling Your Cost (Roaming Controls)
2.21 Changing 4G/3G Mobile Connection Settings
2.22 Accessing Shared Files among Connected Users
2.24 Updating Your Mobile Hotspot’s Software
2.26 Resetting the Mobile Hotspot to the Factory Defaults
3.1
Accessing Advanced Features
3.2
Displaying the Advanced Menu
3.3
Turning Off WiFi When Connected via USB
3.4
Restricting Access by Using MAC Filtering
3.6Blocking Internet Access for Specific Applications
(Port Filtering)
3.7
Allowing Incoming Internet Traffic (Port Forwarding)
3.9
Disabling the DHCP Server Feature (TCP/IP)
3.10 Disabling VPN Passthrough
3.11 Backing Up and Restoring the Configuration File
IV
Introducing the XFINITY 4G/3G Mobile Hotspot
Thank you for choosing the XFINITY 4G/3G Mobile Hotspot!
Your 4G/3G Mobile Hotspot enables connection of your WiFi enabled devices to the
Internet from anywhere within the XFINITY Internet 2go coverage area.
Features
With your Mobile Hotspot, you can:
• Connect your WiFi enabled devices to the Internet anywhere within the XFINITY
Internet 2go coverage area.
• Connect up to five (5) of your WiFi enabled devices to the 4G/3G Mobile
Hotspot (via WiFi) and access the Internet to browse the Internet, access email,
run business applications, and more, for up to four (4) hours on battery power.
• Control use of and customize the settings of your Mobile Hotspot through an
easy-to-use, web-based interface.
Additional features include:
• File sharing using an optional microSDHC card (up to 32GB).
• Automatic selection of 4G or 3G network for connection to the Internet.
Package Contents
The Mobile Hotspot package includes:
• 4G/3G Mobile Hotspot
• Rechargeable Li-Ion battery
• AC power adapter
• USB cable
• Carrying pouch
• Getting Started Guide
Minimum Requirements
Hardware
WiFi enabled device (supporting WiFi 802.11 b/g/n)
Service
XFINITY Internet 2go service
Browser
If a change in default settings is desired, one of the following browsers is required:
• Internet Explorer® v6-v8
• Safari®
• Firefox®
1.1
Getting Started with Your Mobile Hotspot
IMPORTANT!
Use of the 4G/3G Mobile Hotspot requires active XFINITY Internet 2go service.
If you have not yet signed up for XFINITY Internet 2go service, please call
1.800.XFINITY (1.800.934.6489) to establish service.
Do the following:
Ready
• Before first use, press the Battery Cover Release button to remove the battery
cover, insert the battery (ensuring that the gold contact connectors are aligned
correctly), and close the battery cover.
Battery’s
Gold Contact
Connectors
Battery Cover
Release
Button
Battery
Compartment’s
Gold Contact
Connectors
• Connect your Mobile Hotspot to the AC power adapter and plug into an
electrical outlet. (The battery will be fully charged within four hours.)
NOTE:
W
hile charging your Mobile Hotspot with the power off, the Power / Connection
LED flashes amber, and the Status Indicator Panel’s battery icon animates to
show a battery progressively being filled up.
OR
OR
Animated Battery Icon
Amber-flashing Power /
Connection LED
When the battery is fully charged, the Status Indicator Panel’s battery icon
remains fully filled. (The Power / Connection LED continues to flash amber.)
1.2
Getting Started with Your Mobile Hotspot
continued
Set
• After the Mobile Hotspot is fully charged, disconnect it from the AC power
adapter and press and hold the Power button for two seconds.
Look for the following indicators that the Mobile Hotspot is powered on:
• The Status Indicator Panel flashes white before displaying the battery icon
and, once a signal is acquired, the signal strength icon.
Powered off
Flashes white
Powered on
• The Power / Connection LED turns amber and then green (3G connection) or
blue (4G connection) once a signal is acquired.
3G signal acquired
• Locate the WiFi network name (SSID) and WiFi Key on the back of your
Mobile Hotspot.
WiFi Network Name (SSID)
Network Name:XFINITY ### Secure
WiFi Key: 00000000000
Change Settings: http://settings.hotspot
WiFi Key
1.3
Getting Started with Your Mobile Hotspot
continued
Connect!
• Access the list of available WiFi networks from your WiFi enabled device.
The following illustrates some common access methods:
Windows XP System Tray
Windows Vista System Tray
Wireless Network Connection
Not connected, Right-click here for more options.
Not Connected
Wireless networks are available.
1:58 PM
3:15 PM
Windows 7 System Tray
Mac Dock
Mon 4:20 PM
Not connected - Connections are available
(1:20)
5:45 PM
5/7/2011
TIP:
he steps to connect to a WiFi network vary, depending upon your operating
T
system and what type of utility or third-party software you use to connect
to WiFi networks. Generally, you click an icon (often in the System Tray for
Windows or Dock on a Mac) where you can select “View Available Wireless
Networks.” If you are unfamiliar with how to connect to WiFi networks, consult
your WiFi enabled device’s help system.
1.4
Getting Started with Your Mobile Hotspot
continued
• Select and connect to XFINITY ### Secure.
NOTE:
T
he actual WiFi network name (SSID) for your Mobile Hotspot appears on the
sticker affixed to the back of your Mobile Hotspot, and the “###” characters in
the name “XFINITY ### Secure” are unique for each Mobile Hotspot.
Windows XP System Tray
Windows Vista System Tray
Windows 7 System Tray
Mac Dock
1.5
Getting Started with Your Mobile Hotspot
continued
• When prompted, type, and then retype, the WiFi Key exactly as it appears on
the back of your Mobile Hotspot.
TIP:
our WiFi enabled device may use a different name for the WiFi Key, such as
Y
network key, password, wireless password, or pre shared key.
Indicators that you have connected to your Mobile Hotspot include the wireless
network connection manager icon in the system tray animating to show network
activity (Windows), a check mark appearing next to your WiFi network name
(SSID) in the Dock (Mac), a Disconnect button replacing the Connect button in
the wireless network connection manager window, and a dot appearing on the
Mobile Hotspot’s Status Indicator Panel’s connection status icon.
You’re now connected to XFINITY Internet 2go!
At this point, you can download, upload, and browse the web wherever business,
vacation, and everyday activities take you!
Additionally, when you access the Mobile Hotspot browser interface
(http://settings.hotspot) when connected to XFINITY Internet 2go, the Landing
Page’s status bar shows your network signal strength and connection status, either
“4G Connected” or “3G Connected,” depending upon your coverage area.
1.6
Understanding Your Mobile Hotspot
Components
Your Mobile Hotspot has the following parts:
1. Status Indicator Panel — displays network signal strength, roaming, battery
charge, and number of users connected to the Mobile Hotspot.
1
2. Power Button — turns on and off the Mobile Hotspot.
2
3. microSDHC Slot — supports a removable memory storage microSDHC card
(microSDHC card not included).
3
4
4. microUSB Port — use this port to connect the AC power adapter or USB cable.
5. Power / Connection LED — displays network connection and status.
(See “LED Operation” on page 1.8 for a detailed list of the colors and their
defined states.)
5
6. WPS Button — initiates a WiFi Protected Setup (WPS) enrollment with a
WiFi enabled device. (For more information about WPS, see
“Sharing a Secure Network Connection with WPS” on page 2.9.)
6
7
7. Master Reset Button — resets your Mobile Hotspot to factory default
settings. (Located under the battery cover.) Please see
“Resetting the Mobile Hotspot to the Factory Defaults” on page 2.26
for instructions before resetting your Mobile Hotspot.
Network Name:XFINITY ### Secure
WiFi Key: 00000000000
Change Settings: http://settings.hotspot
8. WiFi Network Information (SSID) Label — identifies your Mobile Hotspot’s
specific WiFi network name (SSID) and WiFi Key.
8
1.7
Understanding Your Mobile Hotspot
continued
LED Operation
The Mobile Hotspot’s Power / Connection LED provides valuable information about
the state of the Mobile Hotspot and the connection.
LED Color
Status
No light
Green
Indicates
Device is powered off.
Flashing:
Device is powered on, connected
to 3G, and active data transfer is
occurring.
Solid:
Device is powered on, 3G service is
available/connected, but active data
transfer is not occurring.
Flashing:
Device is powered on, connected
to 4G, and active data transfer is
occurring.
Solid:
Device is powered on, 4G service is
available/connected, but active data
transfer is not occurring.
Amber
Flashing:
Device is powered on, no 3G or 4G
service is available or the device is in
standby mode.
Purple
Flashing:
Device is powered on and firmware is
being downloaded and installed.
Red
Flashing:
Device is powered on but there is a
device error.
Blue
1.8
OR
OR
Understanding Your Mobile Hotspot
continued
Status Indicator Panel
The Status Indicator Panel is located on the right side of the top of the
OR Mobile
Hotspot. When the Mobile Hotspot is powered on, the Status Indicator Panel briefly
flashes white once and then the icons display current status information.
(When the
OR
Mobile Hotspot is powered off, the Status Indicator Panel goes blank.)
OR
Caring for Your Mobile Hotspot
OR
Mobile Internet network signal strength indicator; displays
more bars as the signal strength improves.
Network roaming status; appears when roaming outside
of the XFINITY Internet 2go service area and can result in
additional usage charges, depending upon your service plan.
Battery status; indicates the amount of battery life
remaining. When the Mobile Hotspot is connected to AC
power, this icon animates and remains solid when charging
is complete.
Devices connected status; displays one dot for each WiFi enabled
device currently connected to the Mobile Hotspot (that is, two dots
means two WiFi enabled devices connected, and so on).
As with any electronic device, the Mobile Hotspot must be handled with care
to ensure reliable operation. Comcast recommends the following handling
guidelines:
• Avoid applying additional adhesive labels to the Mobile Hotspot because the
labels may cause the Mobile Hotspot to overheat or alter the performance of
the antenna system.
• Gently slide the microUSB connector from the provided AC power adapter
into the microUSB slot on the Mobile Hotspot. The connector should fit
easily. Forcing the connector could damage the Mobile Hotspot.
• Protect the Mobile Hotspot from liquids, dust, and excessive heat.
• Store the Mobile Hotspot in a safe place when not in use.
1.9
Performing Basic Tasks
Your 4G/3G Mobile Hotspot supports a range of features to manage your
mobile Internet activity and multiuser connectivity. Basic capabilities include
monitoring usage and system status, changing Mobile Hotspot security settings,
and file sharing.
This section include the following topics:
• Checking the Status of the Mobile Hotspot
• Charging/Recharging the Battery
• Extending Battery Usage
• Sharing the Mobile Hotspot Network
• Customizing Your Mobile Hotspot’s Security
• Controlling Your Cost (Roaming Controls)
• Changing 4G/3G Mobile Connection Settings
• Accessing Shared Files among Connected Users
• Updating Your Mobile Hotspot’s Software
• Resetting the Mobile Hotspot to the Factory Defaults
2.1
Performing Basic Tasks
continued
Checking the Status of the Mobile Hotspot
The Mobile Hotspot browser interface is an on-device, web-based utility that you
access from your WiFi enabled device’s browser, allowing you to perform basic, as
well as advanced, administrative and maintenance functions.
When you first access the Mobile Hotspot, the Landing Page appears, providing you
with high-level general information about your Mobile Hotspot.
Navigation bar
Status Icons
Quick Links
Connected Devices
The Mobile Hotspot Landing Page contains frequently used information. Any
user connected to your Mobile Hotspot (that is, you and any other user currently
connected via a WiFi enabled device to your Mobile Hotspot) can interact
independently with the Landing Page.
To access the Mobile Hotspot browser interface, do the following:
In your WiFi enabled device’s web browser, go to: http://settings.hotspot.
The Mobile Hotspot browser interface Landing Page appears. When you
access this page, the navigation bar at the top of the page indicates you are a
“guest.”
The Landing Page consists of the following sections:
• Navigation bar
• Status icons
• Quick Links panel
• Connected Devices panel
2.2
Performing Basic Tasks
continued
Navigation Bar
At the top of the Landing Page is the navigation bar. The options that appear on the
navigation bar are dynamic according to the page you visit.
The following images are examples of the navigation bar:
• The navigation bar prior to logging in:
Hello, Guest
Settings
MiFi Administration
Login
Help
• T
he navigation bar after you log in but before you go to the Settings section of
the site:
Hello, Admin
Settings
MiFi Administration
Login
Help
NOTE:
Online context-sensitive help is available from the navigation bar on all pages of the
Mobile Hotspot browser interface.
Quick Links Panel
On the left side of the Landing Page is the Quick Links panel, which provides links to
a number of useful resources, including a usage monitor and troubleshooting aids.
Connected Devices Panel
On the right side of the Landing Page is the Connected Devices panel, which
provides a visual representation of the current and available connections to your
Mobile Hotspot.
Status Icons
At the top right corner of the window, status icons tell you about such conditions as
the battery life, microSDHC card availability, WiFi status when connected via USB,
network roaming status, and mobile Internet network strength. (Status icons appear on
every page in the Mobile Hotspot browser interface.)
Battery charging; indicates when the Mobile Hotspot is connected
to power/charging via the AC power adapter or USB cable.
Battery 100% charged; indicates the battery is fully charged.
Battery partially charged; appears filled in to varying degrees to
indicate how much battery life is remaining (for example, 75%
remaining).
2.3
Performing Basic Tasks
continued
Memory card; displays only when a microSDHC card has been
inserted into the Mobile Hotspot.
WiFi enabled and is being broadcast by your Mobile Hotspot.
WiFi disabled and is not being broadcast by your Mobile Hotspot;
appears only if a WiFi connection to the Mobile Hotspot is not
allowed when a WiFi enabled device is connected via a USB cable
to the Mobile Hotspot.
Network roaming status; indicates that the Mobile Hotspot is
roaming on another network, which can result in additional usage
charges, depending upon your service plan.
Mobile Internet network signal strength indicator; fills in more bars
as the signal strength improves.
Connection status; click this button to connect to or disconnect
from the mobile Internet network.
NOTE: Icon not displayed in Guest Mode.
Each icon varies according to the current status and may vary
depending on your network operator and conditions.
2.4
Performing Basic Tasks
continued
Charging/Recharging the Battery
Under typical usage conditions with a single connected WiFi enabled device to
your Mobile Hotspot, your Mobile Hotspot’s battery typically enables you to access
the Internet for about four hours. You can detect the status of your battery by
looking at the battery life indicator on the Status Indicator Panel on the front of
your Mobile Hotspot.
NOTE:
The battery should be fully charged (for a minimum of four hours) before using the
Mobile Hotspot for the first time. After the initial set up and use, you may use the
Mobile Hotspot with the battery or AC power adapter.
Connect the AC power adapter to the Mobile Hotspot’s microUSB port and
plug the other end of the AC power adapter into an electrical outlet. The battery
indicator icon in the Status Indicator Panel animates while the Mobile Hotspot
is charging and remains fully filled once charging is complete.
WARNING!
Use only batteries and chargers with your Mobile Hotspot that have been approved
by Comcast or by Novatel Wireless. Always use Novatel Wireless original batteries
and chargers. The warranty does not cover damage caused by non-Novatel Wireless
batteries and/or chargers.
2.5
Performing Basic Tasks
continued
Extending Battery Usage
With the goal of prolonging battery life and reducing power consumption, your
Mobile Hotspot can turn itself off when it is idle and running on battery power, as
well as go into standby mode. (You can also set your Mobile Hotspot to standby
when using AC power.) Additionally, you can set your Mobile Hotspot to operate in
stealth mode, which turns off the Status Indicator Panel and LED, further reducing
power consumption.
You manage these settings from the Power Management page of the Mobile
Hotspot browser interface. This page allows you to set the timing for automatic
shutdown and standby mode (when using either battery and AC power), as well as
enable stealth mode.
To set power management options, do the following:
1. In your WiFi enabled device’s web browser, go to: http://settings.hotspot.
2. In the navigation bar, click the Login link, and then type the administrator
password in the Login text box and click the Login button.
(Default administrator password: admin)
3. In the navigation bar, click the MiFi Administration link.
4. The Mobile Hotspot Home page appears.
5. Choose Device > Power Settings from the menu bar.
The Power Management page opens:
2.6
Performing Basic Tasks
continued
6. Use the following to extend your battery life:
• Stealth mode — turns off the Status Indicator Panel and Power / Connection
LED. To turn on/off stealth mode, check/uncheck the Enable stealth mode
check box. Turning off the Power / Connection LED will extend the battery
life slightly.
• Standby mode for battery or AC power — sets the Mobile Hotspot into a
“sleep” status that minimizes power consumption when the Mobile Hotspot
has been idle (that is, no WiFi enabled device is connected to the Mobile
Hotspot and there has been no activity on the USB port) for a specified length
of time. To set the timing for standby mode from Never to 60 minutes, do
the following:
–In the When on battery power, switch to standby mode drop-down
list box, select a time longer than any time you expect to be temporarily
disconnected.
-In the When on AC power, switch to standby mode drop-down list box,
select a time longer than any time you expect to be temporarily away. (This
setting will not save battery life.)
• Automatic shutdown timer — turns off your Mobile Hotspot when the Mobile
Hotspot has been idle (that is, no WiFi enabled device is connected to the
Mobile Hotspot and there has been no activity on the USB port) for a specified
length of time. To set the timing for automatic shutdown from Never to 60
minutes, in the When on battery power, shutdown drop-down list box, select
a time that would indicate that you are done with your Mobile Hotspot session.
7. After you select your power management options, click Apply.
Battery Tips
• Fully charging the battery with the AC power adapter normally takes at least
four hours.
• When one WiFi enabled device is accessing mobile data while your Mobile
Hotspot is using battery power, the Mobile Hotspot’s battery lasts up to four
hours.
• The battery discharges more rapidly as additional WiFi enabled devices access
your Mobile Hotspot.
• Battery life depends on the network, signal strength, temperature, features, and
accessories you use.
• New batteries or batteries stored for a long time may take more time to charge.
• When charging your battery, keep it near room temperature.
• When storing your battery, keep it uncharged in a cool, dark, dry place.
• Batteries do gradually wear down and require longer charging times. If you
notice a change in your battery life, you may want to purchase a new battery.
2.7
Performing Basic Tasks
continued
Sharing the Mobile Hotspot Network
You can connect any 802.11 b/g/n wireless device to your Mobile Hotspot, such as
laptops and smartphones.
Your Mobile Hotspot lets you create a WiFi network of up to five WiFi enabled
devices. By default, your Mobile Hotspot employs a secure profile so that others
within range of your Mobile Hotspot cannot connect unless you allow them.
If security is not a concern, you can configure your Mobile Hotspot with an open
profile, which lets anyone within range of your Mobile Hotspot access your WiFi
network without a WiFi Key; however, we strongly advise against use of the open
profile, as use of your Mobile Hotspot could occur without your knowledge. All
usage of your Mobile Hotspot is applied to your service plan; thus, usage without
your knowledge could lead to overage charges, depending upon your service plan.
To facilitate the “secured” sharing of your network, your Mobile Hotspot supports
WiFi Protected Services (WPS), a method of providing network information to a WiFi
enabled device. This sharing method requires that your WiFi enabled device also
supports WPS.
The following sections describe these methods. Sharing can be done using any one
of these methods, which provides you with the option to choose the appropriate
balance of security and convenience for your needs.
Sharing a Secure WiFi Network Connection
To share using a secure WiFi network profile, do the following:
1. With your Mobile Hotspot turned on, provide the other user(s) with your WiFi
network name (SSID) and WiFi Key.
NOTE:
Using a secure WiFi network profile is the default. The original WiFi network name
(SSID) appears on the sticker affixed to the back of your Mobile Hotspot, and the
“###” characters in the name “XFINITY ### Secure” are unique for each Mobile
Hotspot.
2. On the other WiFi enabled device(s), access the list of available WiFi networks.
3. On the other WiFi enabled device(s), connect to XFINITY ### Secure.
4. On the other WiFi enabled device(s), enter the WiFi Key exactly as it appears on
the back of your Mobile Hotspot.
TIP:
Your WiFi enabled device may use a different name for the WiFi Key, such as
network key, password, wireless password, or pre shared key.
You are now sharing your secure Mobile Hotspot.
2.8
Performing Basic Tasks
continued
Sharing a Secure Network Connection with WPS
You can use WiFi Protected Setup (WPS) to automatically configure the WiFi network
name (SSID) and WiFi Key for your Mobile Hotspot and connect WiFi enabled
devices that support WPS.
While your Mobile Hotspot supports two methods of WPS enrollment (that is, the
“push” method and the “PIN” method), the “push” method is the easiest, whereby your
Mobile Hotspot “pushes” the appropriate network connection information to the WiFi
enabled device, securely connecting the WiFi enabled device to your Mobile Hotspot.
NOTE:
Windows 7 and many smartphones support WPS. Refer to your WiFi enabled
device’s documentation to find out if WPS is supported.
To connect a WiFi enabled device using the “push” method of WPS enrollment,
do the following:
1. On your Mobile Hotspot, press the WPS button
WPS Button
NOTE:
While WPS enrollment is active, the Status Indicator Panel’s connection status icon
continually flashes each of the five connection dots, sequentially one at a time.
OR
Animated Battery Icon
OR
2.9
Performing Basic Tasks
continued
2. On the WiFi enabled device, connect to the Mobile Hotspot using the WiFi
enabled device’s network connection manager by doing the following:
a. From the system tray, click the network connection manager.
The following illustrates some common access methods:
Windows XP System Tray
Windows Vista System Tray
Wireless Network Connection
Not connected, Right-click here for more options.
Not Connected
Wireless networks are available.
1:58 PM
3:15 PM
b.Select and connect to XFINITY ### Secure.
NOTE:
The actual WiFi network name (SSID) appears on the sticker affixed to the back
of your Mobile Hotspot, and the “###” characters in the name “XFINITY ###
Secure” are unique for each Mobile Hotspot.
Windows 7 System Tray
Windows Vista System Tray
2.10
Performing Basic Tasks
continued
The network connection manager may momentarily display a dialog box,
prompting for the WiFi Key before disabling the text box and then displaying a
message that the Mobile Hotspot is sending (that is, pushing) the appropriate
network connection settings to the WiFi enabled device.
Once all the network connection information is received, a
message box may appear, indicating the WiFi enabled device
is connecting to the Mobile Hotspot.
When this message box disappears, the WiFi enabled device
is connected to the Mobile Hotspot.
You are now sharing your secure Mobile Hotspot.
2.11
Performing Basic Tasks
continued
Sharing an Open WiFi Network Connection (Not Recommended)
To share using an open WiFi network profile, do the following:
1. Change your Mobile Hotspot to use an open profile by doing the following:
a.In your WiFi enabled device’s web browser, go to: http://settings.hotspot.
b.In the navigation bar, click the Login link, and then type the administrator
password in the Login text box and click the Login button. (Default administrator
password: admin)
c.In the navigation bar, click the MiFi Administration link.
The Mobile Hotspot Home page appears.
d.Select WiFi > Settings from the menu bar.
e.In the Profile drop-down list box, select Open.
NOTE:
y using an open profile, anyone within range of your Mobile Hotspot can find
B
your Mobile Hotspot’s WiFi network and connect to the Internet using your
Mobile Hotspot without your permission.
2. Then, on the other WiFi enabled device, access the list of available WiFi networks.
3. Connect to the Mobile Hotspot WiFi network (XFINITY ###, where “###” is
unique for each Mobile Hotspot).
You are now sharing your open Mobile Hotspot (no password required).
Customizing Your Mobile Hotspot’s Security
During the manufacturing of your Mobile Hotspot, it is configured to use a secure
profile that requires a WiFi Key in order to connect to the Mobile Hotspot.
From the Mobile Hotspot browser interface, you can customize the security settings
to either improve security (that is, make it more difficult for unauthorized access) or
increase compatibility (that is, make it easier to connect to your Mobile Hotspot).
To change your security settings, you can:
• Use the Setup wizard for customizing a number of basic security settings.
• Individually manage all security settings (see page 2.16).
Use the Setup Wizard for Basic Security
If desired, a Setup wizard is available that provides a step-by-step approach to
quickly customize essential settings on your Mobile Hotspot, including basic
security. You access the Setup wizard from the Mobile Hotspot Home page.
To display and use the Setup wizard, do the following:
1. In your WiFi enabled device’s web browser, go to: http://settings.hotspot.
2.12
Performing Basic Tasks
continued
2. In the navigation bar, click the Login link, and then type the administrator
password in the Login text box and click the Login button. (Default administrator
password: admin)
3. In the navigation bar, click the MiFi Administration link.
The Mobile Hotspot Home page appears:
4. Click Setup Wizard.
The Setup wizard appears:
5. Click the Next button.
2.13
Performing Basic Tasks
continued
The Setup wizard’s Activation page appears:
This page indicates that your Mobile Hotspot has successfully completed
activation.
6. Click the Next button.
The Setup wizard’s Administrator Password page appears:
7. To change the administrator password for the Mobile Hotspot browser interface,
do the following:
a.Check the Change Password check box.
b.In the New Password text box, type the new password (from 6 to 64
characters).
c.In the Verify New Password text box, retype the new password.
8. Click the Next button.
2.14
Performing Basic Tasks
continued
The Setup wizard’s WiFi Settings page appears:
9. To change the WiFi network settings for the Mobile Hotspot, do the following:
a. Check the Change WiFi Settings check box.
b. In the Network Name (SSID) text box, specify a different name for the
network.
c. In the Security drop-down list box, specify a different security mode.
d. In the Network Key text box, specify a different WiFi Key for the network.
10. Click the Next button.
The Setup wizard’s Finish page appears:
11. Click the Finish button. The Setup wizard closes. All changes have been made.
2.15
Performing Basic Tasks
continued
Manage Security Settings
The Mobile Hotspot browser interface allows you to individually manage your Mobile
Hotspot’s security settings.
You can do any of the following:
• Change the administrator password.
• Manage your WiFi security settings on the WiFi Settings page (see page 2.17).
TIP:
We recommend changing the administrator password used to log in to the Mobile
Hotspot browser interface. For improved security, you should not only change the
default password when you first log in, but also periodically change the administrator
password, for example, every three months.
NOTE:
When you first get your Mobile Hotspot, the default administrator password is:
admin.
Change the administrator password
Do the following:
1. In your WiFi enabled device’s web browser, go to: http://settings.hotspot.
2.In the navigation bar, click the Login link, and then type the administrator
password in the Login text box and click the Login button.
(Default administrator password: admin)
3.In the navigation bar, click the MiFi Administration link.
The Mobile Hotspot Home page appears.
4.Choose Device > Admin Password.
The Password page appears:
2.16
Performing Basic Tasks
continued
5.Type your current password in the Current Password text box.
6.Type the new password (must have 6 to 64 characters) in the New Password
text box and again in the Verify New Password text box.
7. Click Apply. Use this new administrator password when you log in to the
Mobile Hotspot browser interface.
IMPORTANT!
Be sure to record the new password. You will have to reset your Mobile Hotspot
using the master reset button if you lose the administrator password. For
instructions to use the master reset button, see “Resetting the Mobile Hotspot
to the Factory Defaults” on page 2.26.
Manage your WiFi security settings
Do the following:
1. In your WiFi enabled device’s web browser, go to: http://settings.hotspot.
2. In the navigation bar, click the Login link, and then type the administrator
password in the Login text box and click the Login button.
(Default administrator password: admin)
3. In the navigation bar, click the MiFi Administration link.
The Mobile Hotspot Home page appears.
4. Choose WiFi > WiFi Settings from the menu bar.
The WiFi Settings page opens:
Profile
Broadcast Network Name
Security
Network Key
2.17
Performing Basic Tasks
continued
5. You can do any of the following:
• Change your WiFi network profile in the Profile drop-down list box to one of
the following:
-Open — allows anyone able to see the WiFi network to connect without a
WiFi Key.
WARNING! It is highly recommended that you maintain security for your Mobile Hotspot.
If you do not configure security for your wireless network, data on your
network is easily accessible to others.
- Secure — requires a WiFi Key to connect.
• Specify the maximum number of WiFi connections to your Mobile Hotspot you
want to allow (up to five, which is the default setting) in the Maximum number
of WiFi devices drop-down list box.
TIP:
ou can implement a measure of security by only allowing one WiFi enabled
Y
device to connect to your Mobile Hotspot.
• Select whether or not your Mobile Hotspot uses the “broadcast WiFi network
name (SSID)” feature (also known as SSID broadcast) by checking/unchecking
the Broadcast Network Name (SSID) check box.
When this feature is enabled, your Mobile Hotspot sends out the WiFi network
name (SSID) where the SSID can be picked up by nearby computers and other
WiFi enabled devices. This WiFi network name (SSID) is what you see when
you “View Available Wireless Networks” from your WiFi enabled device.
By disabling WiFi network name (SSID) broadcasting, you have to manually
enter the WiFi network name (SSID) to see the SSID on the WiFi enabled device
you are trying to connect with, thereby making it more difficult for unauthorized
users to connect to your Mobile Hotspot.
• If using an open WiFi network profile in the Profile drop-down list box, the
Network Name (SSID) field shows the name of the active WiFi network name
(SSID), and you can change the network name if you desire.
• If using a secure WiFi network profile in the Profile drop-down list box,
configure any of the following profile settings in the Secure Profile section:
-Network Name (SSID) — shows the name of the active WiFi network name
(SSID).
2.18
Performing Basic Tasks
continued
-Security — shows the active security and allows you to select between the
following security options, depending upon the current 802.11 mode in use:
~WEP (64-bit) — select only if your WiFi enabled device only supports WEP,
which is the least secure method. (This security mode is only available when
not using 802.11n.)
~WEP (128-bit) — select only if your WiFi enabled device only supports
WEP, which is the least secure method. (This security mode is only
available when not using 802.11n.)
~WPA-PSK — allows you to set up your own personal WiFi Key and
provides more security than the older WEP. (This security mode is only
available when not using 802.11n.)
~WPA2-PSK — supports connections to many newer WiFi enabled devices,
is the most secure method, but may not support older WiFi enabled
devices.
~WPA/WPA2 mixed mode — supports both WPA and WPA2 WiFi enabled
devices. This security mode supports the most WiFi enabled devices when
using 802.11n.
NOTE:
or your protection, you should generally use a secure profile. The WiFi enabled
F
devices that connect to your Mobile Hotspot must support the security setting.
If you change your security setting, any connected WiFi enabled device must be
changed accordingly.
• Network Key — shows the active WiFi Key, which you can change by typing a
new WiFi Key.
IMPORTANT!
Be sure to record the new WiFi Key. You will have to reset your Mobile Hotspot
using the master reset button if you lose the WiFi Key. For instructions to use
the master reset button, see “Resetting the Mobile Hotspot to the Factory
Defaults” on page 2.26.
6. Click Apply.
IMPORTANT! If you change the WiFi Key, your wireless connection will be disabled at this point.
You must reconnect with the new WiFi Key you just established.
2.19
Performing Basic Tasks
continued
Controlling Your Cost (Roaming Controls)
The Mobile Settings page of the Mobile Hotspot browser interface lets you set
roaming controls for your Mobile Hotspot.
To set roaming controls on the Mobile Settings page, do the following:
1. In your WiFi enabled device’s web browser, go to: http://settings.hotspot.
2. In the navigation bar, click the Login link, and then type the administrator
password in the Login text box and click the Login button. (Default administrator
password: admin). The Mobile Hotspot Home page appears.
3. Choose Mobile > Settings from the menu bar.
The Mobile Settings page opens:
4. In the Network Options section, in the 3G Roaming drop-down list box, select
one of the following:
• Home Network — auto-connects your Mobile Hotspot only to the home
network when powered on, which prevents you from incurring roaming charges.
• Automatic — connects your Mobile Hotspot to any available network when
powered on, which could result in roaming charges. (Default setting: turned on)
5. Check, if appropriate, the Allow International Roaming check box.
(Default setting: unchecked so 3G international roaming is blocked)
IMPORTANT!
Additional charges may apply for international roaming. If you have any questions,
please contact Comcast Customer Care at 1.800.XFINITY (1.800.934.6489).
6. After selecting your network options settings, click Apply.
2.20
Performing Basic Tasks
continued
Changing 4G/3G Mobile Connection Settings
The Mobile Settings page of the Mobile Hotspot browser interface lets you modify
network connection options.
To modify network connection options, do the following:
1. In your WiFi enabled device’s web browser, go to: http://settings.hotspot.
2. In the navigation bar, click the Login link, and then type the administrator
password in the Login text box and click the Login button. (Default administrator
password: admin)
3. In the navigation bar, click the MiFi Administration link.
The Mobile Hotspot Home page appears.
4. Choose Mobile > Settings from the menu bar.
The Mobile Settings page opens:
The Network Options section of this page lets you specify
the following:
• Mobile Mode — select one of the following:
-3G Only — use this setting when preventing an automatic switch of
connection and maximum coverage is needed (for example, when using a
VPN and you are either mobile or in an area with intermittent 4G coverage).
-4G Only — use this setting when an automatic switch to a 3G connection
would interrupt the connection and you are in “solid” 4G coverage.
-4G Preferred — use this setting when you want to connect to the fastest
network when available but fallback to 3G when needed.
5. After modifying your network connection options, click Apply.
2.21
Performing Basic Tasks
continued
Accessing Shared Files among Connected Users
Your Mobile Hotspot comes with a microSDHC slot that allows you to transfer files.
The microSDHC card will be available as a network drive on the WiFi network of the
Mobile Hotspot. The Mobile Hotspot supports a microSDHC card with up to 32GB
capacity.
To share files using your Mobile Hotspot, do the following:
1. Insert the microSDHC card into the microSDHC slot.
NOTE:
Be careful not to touch the contacts. Do not force the card into the slot. Check
the orientation if you have difficulties.
2. Enable file sharing on your Mobile Hotspot by doing the following:
NOTE:
You must establish file sharing on your Mobile Hotspot in order for others
connected to your Mobile Hotspot to access the files on your microSDHC card.
a.In your WiFi enabled device’s web browser, go to:
http://settings.hotspot.
b.In the navigation bar, click the Login link, and then type the administrator
password in the Login text box and click the Login button. (Default
administrator password: admin)
c.In the navigation bar, click the MiFi Administration link.
The Mobile Hotspot Home page appears.
d.Choose Applications > File Sharing from the menu bar.
2.22
Performing Basic Tasks
continued
The File Sharing page opens:
From this page, you can see how much free space you have available on the
microSDHC card and enable file sharing.
e.Check the Enable File Sharing check box in the Configuration section.
f. In the Share Name text box, type the name of the folder to share. (You should
avoid special characters such as #, $, and %.)
g.Select your security setting from the Authentication drop-down text box.
h.If you selected password security, type your username and password in the
appropriate fields and then click Apply.
3. Access shared files on your Mobile Hotspot by doing the following based on your
operating system:
Windows
a.Connect to your Mobile Hotspot using WiFi.
b.Open My Network Places. This name might vary depending on your version of
Windows.
c.In the address bar, type the Mobile Hotspot’s IP address and the Mobile
Hotspot’s share name (for example: \\192.168.0.1\mifi, if your share name is the
default name).
d.If authentication is enabled, you are prompted for a username and password.
Specify the username and password set on the File Sharing page.
You can now browse the folders and files on the microSDHC card inserted in
your Mobile Hotspot.
2.23
Performing Basic Tasks
continued
Mac OS X (v10.4 and later)
a.Connect to your Mobile Hotspot using WiFi.
b.Select Go > Connect to Server.
c.In the address bar, type the Mobile Hotspot’s IP address and the Mobile
Hotspot’s share name (for example: \\192.168.0.1\mifi, if your share name is the
default name).
d.Click Connect.
• Mac OS X v10.4 only: An authentication window opens. If you set
authentication (username and password) on the File Sharing page, type
the appropriate username and password in the window. If you did not set
authentication, click OK to access the Share.
NOTE:
If no password is set, but you are prompted for a name, use the following
name: guest.
• Mac OS X v10.5 and later: If you set authentication (username and password)
on the File Sharing page, type the username and password when prompted.
If you did not set authentication, a Finder window opens.
You can now browse the folders and files on the microSDHC card inserted in
your Mobile Hotspot.
Updating Your Mobile Hotspot’s Software
The Software Update page of the Mobile Hotspot browser interface allows you to
review the software version history and to check for and then download and install
network updates.
To open the Software Update page, do the following:
1. In your WiFi enabled device’s web browser, go to:
http://settings.hotspot.
2. In the navigation bar, click the Login link, and then type the administrator
password in the Login text box and click the Login button. (Default administrator
password: admin)
3. In the navigation bar, click the MiFi Administration link.
The Mobile Hotspot Home page appears.
4. Choose Device > Software Update from the menu bar.
2.24
Performing Basic Tasks
continued
The Software Update page opens:
5. Click Check Now to check for the latest network updates.
6. If the Status field indicates an update is available, connect your Mobile Hotspot
to the AC power adapter and then click Download & Install.
A download progress bar appears. When the download finishes, a message
appears, indicating the download is complete and the Mobile Hotspot must be
restarted to install the update, which will close your network connection and may
take several minutes. A Restart Now button also appears.
NOTE:
The Download & Install button is disabled if the Mobile Hotspot is connected
via a USB cable to a computer. You need to disconnect the USB and then plug
the Mobile Hotspot into the AC power adapter.
7. Click Restart Now. The Install message box appears, asking you to confirm the
restart and install.
8. Choose OK.
NOTE:
The Power / Connection LED flashes purple while the Mobile Hotspot is updating.
When the software update is finished, you may need to power on and reconnect
to your Mobile Hotspot via WiFi.
2.25
Performing Basic Tasks
continued
Resetting the Mobile Hotspot to the Factory Defaults
CAUTION:
Upon reset, any personalized settings will be lost, and the Mobile Hotspot will revert
to the factory settings, including the WiFi network name (SSID) and WiFi Key as
listed on the sticker on the bottom of your Mobile Hotspot. If you previously saved
personal settings as a custom profile (that is, backed up a configuration file), all
customized settings can be recovered by uploading that profile; otherwise, these
settings cannot be recovered and must be manually reentered.
To reset your Mobile Hotspot to its original factory settings, do the following:
1. Make sure the Mobile Hotspot is powered on.
2. Locate the master reset button on the back of the Mobile Hotspot.
(Under the battery cover, next to the top left side of the battery)
3. Insert a paperclip into the hole and then hold the button down for six seconds
until the Power / Connection LED turns off and then on again.
4. Your Mobile Hotspot is now reset to its original factory settings, as shipped.
2.26
Accessing Advanced Features
NOTE:
Using these advanced features could result in you losing the capability to connect
to your Mobile Hotspot and then having to reset it. We recommend backing up your
current settings prior to using these features.
This section provides information on the following advanced functions:
• Displaying the Advanced Menu
• Turning Off WiFi When Connected via USB
• Restricting Access by Using MAC Filtering
• Blocking Internet Access for Specific Applications (Port Filtering)
• Allowing Incoming Internet Traffic (Port Forwarding)
• Disabling the DHCP Server Feature (TCP/IP)
• Disabling VPN Passthrough
• Backing Up and Restoring the Configuration File
3.1
Accessing Advanced Features
continued
Displaying the Advanced Menu
The Mobile Hotspot browser interface supports two menu systems:
• Simple menu — provides access to basic features, such as power
management, security, and file sharing. (Default menu)
• Advanced menu — provides access to advanced features (for example, MAC
filtering, Internet traffic controls) that could result in you losing the capability to
connect to your Mobile Hotspot and having to reset your Mobile Hotspot. Prior to
using these features, you should back up your current settings. (For instructions,
see “Backing Up and Restoring the Configuration File” on page 3.11.)
To display the advanced menu system, do the following:
1. In your WiFi enabled device’s web browser, go to: http://settings.hotspot.
2. In the navigation bar, click the Login link, and then type the administrator
password in the Login text box and click the Login button. (Default administrator
password: admin)
3. In the navigation bar, click the MiFi Administration link.
The Mobile Hotspot Home page appears.
4. Choose Device > Settings from the menu bar.
The Device Settings page opens:
5. To display the advanced menu, uncheck the Use simple menu system
check box.
6. Click Apply.
The advanced menu system adds the Router menu, as well as additional
commands to the Applications and Device menus, to the menu bar.
3.2
Accessing Advanced Features
continued
NOTE:
To redisplay the simple menu in the future, return to this page and check the Use
simple menu system check box, and then click Apply.
Turning Off WiFi When Connected via USB
By default, other WiFi enabled devices can still connect to your Mobile Hotspot
through WiFi when it is connected to a computer via USB.
To block WiFi connections when connected via USB, do the following:
1. In your WiFi enabled device’s web browser, go to: http://settings.hotspot.
2. In the navigation bar, click the Login link, and then type the administrator
password in the Login text box and click the Login button. (Default administrator
password: admin)
3. In the navigation bar, click the MiFi Administration link.
The Mobile Hotspot Home page appears.
4. Choose Device > Settings from the menu bar.
The Device Settings page opens:
5. Uncheck the Enable WiFi when USB is connected check box.
6. Click Apply.
3.3
Accessing Advanced Features
continued
Restricting Access by Using MAC Filtering
MAC filtering allows you to restrict access to your Mobile Hotspot to only those WiFi
enabled devices with a specific MAC address. By using this feature, even a user
that knows your network name (SSID) and WiFi Key cannot connect to your Mobile
Hotspot unless you have specifically authorized the MAC address for that user’s
WiFi enabled device. The same applies even if you have set up your Mobile Hotspot
with an open profile.
The MAC address is a unique code specific to a particular piece of hardware,
such as a network adapter. The MAC address is also known as a hardware
or physical address for a device. The MAC address consists of six pairs of
numbers and letters. The pairs of numbers may be separated by “-” or “:”
(for example, 00-21-9B-1C-64-34 or 00:21:9B:1C:64:34).
To allow only specific MAC addresses to connect to your Mobile Hotspot, do the
following:
1. Find the MAC address for the wireless network adapter of your WiFi enabled
device(s) by doing the following:
• On a Windows PC, run ipconfig /all from a command prompt window (cmd).
The MAC address is referred to as the “Physical Address.”
• On a Mac, open System Preferences > Network. In the Show list, click
AirPort, then click Advanced. The MAC address is the “Airport ID.”
• From the Mobile Hotspot browser interface, you can view the MAC address of any WiFi
enabled device currently connected to your Mobile Hotspot in the WiFi Connected
Devices section of the WiFi Status page by doing the following:
a. In your WiFi enabled device’s web browser, go to: http://settings.hotspot.
b. In the navigation bar, click the Login link, and then type the administrator
password in the Login text box and click the Login button. (Default
administrator password: admin)
c. In the navigation bar, click the MiFi Administration link.
The Mobile Hotspot Home page appears.
d. Choose WiFi > Status from the menu bar. The WiFi Status page opens.
You can see the MAC address for all connected WiFi enabled devices.
IMPORTANT!
Make sure you get the MAC address for the wireless network adapter and
not the Ethernet adapter.
2. In the Mobile Hotspot browser interface, specify the appropriate MAC addresses
by doing the following:
a. In your WiFi enabled device’s web browser, go to: http://settings.hotspot.
3.4
Accessing Advanced Features
continued
b. In the navigation bar, click the Login link, and then type the administrator
password in the Login text box and click the Login button. (Default administrator
password: admin)
c. In the navigation bar, click the MiFi Administration link.
The Mobile Hotspot Home page appears.
d. With the advanced menu system active, choose WiFi > MAC Filter from the
menu bar. The MAC Filter page opens:
The MAC Filter page allows you to enable or disable MAC filtering and to add
or delete MAC addresses from the trusted client list.
IMPORTANT!
Do not enable MAC filtering unless you have added your own MAC
address to the trusted client list. Otherwise, you will be unable to
access your Mobile Hotspot until you use the master reset button.
(For instructions to use the master reset button, see
“Resetting the Mobile Hotspot to the Factory Defaults” on page 2.26.)
e. Select the Enable MAC Filter check box.
f. Type the MAC address for your WiFi enabled device into the Add Trusted
Client MAC Address text box and click Add.
NOTE:
You can copy and paste your WiFi enabled device’s MAC address from the
WiFi Connected Devices section of the WiFi Status page.
3.5
Accessing Advanced Features
continued
g. If desired, type the MAC address for other WiFi enabled devices into the Add
Trusted Client MAC Address text box and click Add.
h. Click Apply.
Blocking Internet Access for Specific Applications
(Port Filtering)
Port filtering allows you to enhance the security of your system by only allowing
certain applications to reach the Internet.
To create a list of common applications to allow access to the Internet, and set up
custom applications for access to the Internet, do the following:
1. In your WiFi enabled device’s web browser, go to:
http://settings.hotspot.
2. In the navigation bar, click the Login link, and then type the administrator
password in the Login text box and click the Login button. (Default administrator
password: admin)
3. In the navigation bar, click the MiFi Administration link.
The Mobile Hotspot Home page appears.
4. With the advanced menu system active, choose Router > Port Filtering from
the menu bar.
The Port Filtering page opens:
3.6
Accessing Advanced Features
continued
5. Select the Enable Port Filtering check box.
6. Do any of the following:
• To set up port filtering for standard applications, do the following:
a. In the Allowed Applications section, select the check boxes for the
applications you want to allow access to the Internet.
b. Click Apply.
NOTE:
The Mobile Hotspot uses standard ports for these applications. If you have
applications that do not use the standard ports or that are not listed under
Allowed Applications, you have to set port filtering for custom applications.
• To set up port filtering for custom applications, you need to know the port
numbers (up to five ports or port ranges) and the protocol (TCP, UDP, or both)
used by outgoing traffic. Do the following:
a. In the Custom Applications section, check an open check box.
b. Enter a name for the application and click the Ports link. The Ports for
Application # entry area overlays the page.
c. Enter the port number or port number range. You can enter up to five ports or
port ranges for each application.
• Single port — enter the port number in both fields.
• P
ort range — enter the beginning port in the left field and the ending port
in the right field.
d. F
or each port row, select the protocol (TCP, UDP, or both) used by that port or
port range.
e. Click Hide.
f. Click Apply on the Port Filtering page.
Allowing Incoming Internet Traffic (Port Forwarding)
Incoming traffic from the Internet is normally prevented by the firewall from
reaching WiFi enabled devices on your local wireless network. Use port forwarding
to allow Internet users to reach any server you are running on your computer,
such as an FTP server. Additionally, some online games require incoming access
to work properly.
IMPORTANT!
You need to set up static IP addresses on your WLAN for each WiFi enabled device
that has an application you want to forward to.
3.7
Accessing Advanced Features
continued
To set up port forwarding, do the following:
1. In your WiFi enabled device’s web browser, go to: http://settings.hotspot.
2. In the navigation bar, click the Login link, and then type the administrator
password in the Login text box and click the Login button. (Default administrator
password: admin)
3. In the navigation bar, click the MiFi Administration link.
The Mobile Hotspot Home page appears.
4. With the advanced menu system active, choose Router > Port Forwarding from
the menu bar.
The Port Forwarding page opens:
This page allows you to enter the local static IP address for each application that
you want to receive traffic from the Internet.
5. Do any of the following:
• To set up port forwarding for standard applications, do the following:
a.In the Port Forwarding Applications section, select the check boxes for the
applications you want to enable.
b.Enter the local static IP address of the WiFi enabled device hosting the
application in the IP Address of WiFi Client field.
c.Click Apply.
3.8
Accessing Advanced Features
continued
• To set up port forwarding for custom applications, you need to know the
incoming port range, the protocol (TCP, UDP, or both), and the IP address of the
WiFi enabled device hosting the custom application. Do the following:
a.In the Custom Applications section, check an open check box.
b.Enter a name for the application.
c.Enter the port number range.
d.Select the protocol (TCP, UDP, or both) used by the port range.
e.Enter the local static IP address of the WiFi enabled device hosting the
application in the IP Address of Client field.
f. Click Apply on the Port Filtering page.
IMPORTANT!
Port forwarding creates a security risk and should be disabled when
not required.
Disabling the DHCP Server Feature (TCP/IP)
By default, the DHCP Server feature is enabled on your Mobile Hotspot. The
TCP/IP page allows you to control whether or not this feature is enabled. Dynamic
Host Configuration Protocol (DHCP) is a network protocol that enables a server to
automatically assign an IP address to a computer from a defined range of numbers
(that is, a scope) configured for a given network. Additionally, this page lets you view
the local (WLAN) IP address and the MAC address for your Mobile Hotspot.
To disable the DHCP Server feature, do the following:
1. In your WiFi enabled device’s web browser, go to: http://settings.hotspot.
2. In the navigation bar, click the Login link, and then type the administrator
password in the Login text box and click the Login button. (Default administrator
password: admin)
3. In the navigation bar, click the MiFi Administration link.
The Mobile Hotspot Home page appears.
4. With the advanced menu system active, choose Router > TCP/IP from the
menu bar.
3.9
Accessing Advanced Features
continued
The TCP/IP page opens:
This page gives you status information about your TCP/IP, the DHCP Server, and
the guests currently connected to your Mobile Hotspot.
5. To disable the DHCP Server, uncheck the DHCP Server enable check box.
6. Click Apply.
Disabling VPN Passthrough
By default, VPN passthrough is enabled on your Mobile Hotspot. The Router
Settings page lets you control whether or not this feature is enabled. VPN
passthrough is required if you are going to connect to a VPN (such as to your office).
To disable VPN passthrough, do the following:
1. In your WiFi enabled device’s web browser, go to: http://settings.hotspot.
2. In the navigation bar, click the Login link, and then type the administrator
password in the Login text box and click the Login button. (Default administrator
password: admin)
3. In the navigation bar, click the MiFi Administration link.
The Mobile Hotspot Home page appears.
4. With the advanced menu system active, choose Router > Settings from the
menu bar.
3.10
Accessing Advanced Features
continued
The Router Settings page opens:
5. To disable VPN passthrough, uncheck the Enable VPN Passthrough check box.
6. Click Apply.
Backing Up and Restoring the Configuration File
The Backups page of the Mobile Hotspot browser interface allows you to store
a copy of the configuration file on your computer, as well as upload a previously
stored file to the Mobile Hotspot from your computer. The backup file is stored in
an encrypted binary format.
To back up or restore a configuration file, do the following:
1. In your WiFi enabled device’s web browser, go to: http://settings.hotspot.
2. In the navigation bar, click the Login link, and then type the administrator
password in the Login text box and click the Login button. (Default administrator
password: admin)
3.In the navigation bar, click the MiFi Administration link.
The Mobile Hotspot Home page appears.
4. With the advanced menu system active, choose Device > Backup from the
menu bar.
The Backups page opens:
3.11
Accessing Advanced Features
continued
5. Do any of the following:
• To back up your Mobile Hotspot’s configuration file to your computer, do the
following:
a. Click Download File.
b. C
lick Save to place the file “config.xml.savefile” on your computer. You may
rename the file. (If the file opens in your browser instead of downloading, use
your browser’s File menu to save the file to your computer.)
• To restore a saved configuration file on your computer onto your Mobile
Hotspot, do the following:
a. Click Browse.
b. Locate and select the appropriate configuration file.
c. Click Upload File.
3.12
Troubleshooting
Overview
When properly used, the 4G/3G Mobile Hotspot is a highly reliable product, but
there are times when troubleshooting guidance is helpful. This chapter contains
information on possible problem scenarios with suggested solutions and details on
how to get additional help when needed.
Common Problems and Solutions
Following are possible problem scenarios and suggested solutions.
My Mobile Hotspot has no power. The Power / Connection LED light does not
come on when the Power button is pressed.
Ensure the following:
• The AC power adapter is not connected to the Mobile Hotspot, and you
pressed the Power button for two seconds.
• Battery is properly installed inside the Mobile Hotspot.
• Battery is fully charged. (If not, attach the AC power adapter to the Mobile
Hotspot and plug it into an electrical outlet for about four hours; you can use
the Mobile Hotspot while it is charging.)
I cannot locate or read the sticker on the Mobile Hotspot that lists the
default WiFi network name (SSID) and WiFi Key.
If the default WiFi network information sticker on the back of the Mobile Hotspot
is not available or unreadable/damaged, the information can be obtained from the
copy of the original sticker that was placed on the back of your Getting Started
Guide. If the original Getting Started Guide is not available or you have changed your
WiFi Key from the Mobile Hotspot’s browser interface.
Do the following:
1. Connect the Mobile Hotspot to a computer via the USB cable.
2.Open your browser, ensuring that the Mobile Hotspot has a connection.
3.Connect to the Mobile Hotspot browser interface (http://settings.hotspot).
4.From the Landing Page, log in to the browser interface and click the MiFi
Administration link located at the top of the page.
5.Choose WiFi > WiFi Settings from the menu bar.
4.1
Troubleshooting
continued
The Secure Profile section displays the network name (SSID) and the WiFi Key
(that is, the Network Key field).
I changed my administrator password for the Mobile Hotspot browser
interface and cannot remember it.
If you have changed the original factory setting for the administrator password and
cannot recall the new password, you will not be able to access the Mobile Hotspot
browser interface to manage your Mobile Hotspot settings. To access the Mobile
Hotspot browser interface in this situation, you must reset the Mobile Hotspot to its
factory settings.
CAUTION:
Upon reset, any personalized settings will be lost, and the Mobile Hotspot will revert
to the factory settings, including the WiFi network name (SSID) and WiFi Key as
listed on the sticker on the bottom of your Mobile Hotspot. If you previously saved
personal settings as a custom profile (that is, backed up a configuration file), all
customized settings can be recovered by uploading that profile; otherwise, these
settings cannot be recovered and must be manually reentered.
Do the following:
1. Make sure the Mobile Hotspot is powered on.
2.Locate the master reset button on the back of the Mobile Hotspot. (Under the
battery cover, next to the top left side of the battery)
4.2
Troubleshooting
continued
3.Insert a paperclip into the hole and then hold the button down for six seconds
until the Power / Connection LED turns off and then on again.
4.Your Mobile Hotspot is now reset to its original factory settings, as shipped.
You can log in to the Mobile Hotspot browser interface with the original
administrator password: admin.
“XFINITY ### Secure” does not appear in the network list.
If the Mobile Hotspot’s WiFi network name (SSID) does not appear right away, wait
about 15 seconds for your WiFi enabled device to recognize the Mobile Hotspot and
then refresh the network list. If this does not correct the problem, then:
1. Check your WiFi enabled device setup. This is entirely dependent on your
operating system. Two of the most common scenarios follow:
• Windows-based systems
a. Click Refresh Network List on the left side of the Wireless Network
Connection screen.
b. If that does not work, open Network Connections.
c. R
ight-click Wireless Network Connection and select Properties.
d. Click the Wireless Networks tab.
e. Select the configuration button for the wireless card you are connecting with
and make sure that it is configured as on.
NOTE:
S
ome systems also have an external hardware switch to enable wireless
networking — make sure any external hardware switch is on as well.
f. Click OK to close the dialog box and then try to connect again.
• Mac-based systems
a. Click the AirPort icon in the menu bar at the top of the screen. Select Turn
Airport Off. Then, select Turn Airport On.
b. If that does not work, click the AirPort icon, and then select Open Network
Preferences.
c. Be sure AirPort is selected in the left column, and then click the Advanced
button. A sheet drops down.
d. S
elect the AirPort tab at the top of the sheet. The list of preferred networks is
right below the tabs.
e. C
lick OK, close the Network Preferences pane, and then try to connect
again.
2. If the WiFi network name (SSID) still does not appear, check the following:
• Be sure the WiFi enabled host computer you are trying to connect with is
within range (that is, within 30 feet) of the Mobile Hotspot.
4.3
Troubleshooting
continued
• Verify the Mobile Hotspot’s Power / Connection LED is on and is not showing
an error condition (that is, the Power / Connection LED is flashing red). If it is
flashing red, reset the Mobile Hotspot.
• Try another WiFi enabled host computer to verify that the WiFi functionality on
your host computer is working properly. You may want to attempt a reboot of your
host computer to ensure that the correct WiFi settings are in effect.
• If none of the previously defined steps result in your Mobile Hotspot appearing
in the network list, you may need to reset the Mobile Hotspot.
CAUTION:
Upon reset, any personalized settings will be lost, and the Mobile Hotspot
will revert to the factory settings, including the WiFi network name (SSID) and
WiFi Key as listed on the sticker on the bottom of your Mobile Hotspot. If you
previously saved personal settings as a custom profile (that is, backed up a
configuration file), all customized settings can be recovered by uploading that
profile; otherwise, these settings cannot be recovered and must be manually
reentered.
Do the following:
a.Make sure the Mobile Hotspot is powered on.
b.Locate the master reset button on the back of the Mobile Hotspot.
(Under the battery cover, next to the top left side of the battery)
c.Insert a paperclip into the hole and then hold the button down for six
seconds until the Power / Connection LED turns off and then on again.
d.Your Mobile Hotspot is now reset to its original factory settings, as
shipped. Once again attempt a WiFi connection.
3. If you are still unable to connect to the Mobile Hotspot WiFi network, please
note any error messages and contact XFINITY Internet 2go Technical Support
at 1.866.206.2182.
My laptop (or notebook) will not accept the WiFi Key when I try to connect to
the “XFINITY ### Secure” WiFi network.
First ensure that you are entering the correct WiFi Key, which you can verify in the
Mobile Hotspot browser interface on the WiFi Settings page (WiFi > WiFi Settings).
You can connect the Mobile Hotspot to the host computer via USB to access the
Mobile Hotspot browser interface in those instances where the Mobile Hotspot will
not connect via WiFi. If the WiFi Key is correct, it is likely that there is a mismatch
between the level of security specified on the Mobile Hotspot and WiFi enabled host
computer you are trying to connect to the Mobile Hotspot WiFi network. The security
options on the Mobile Hotspot are WEP (64- or 128-bit), WPA-PSK, WPA2-PSK, or
WPA/WPA2 mixed mode, depending upon the 802.11 mode in use. Please make sure
the WiFi client on your WiFi enabled host computer is using a compatible security
level setting on its WiFi management software.
4.4
Troubleshooting
continued
I am able to connect to the “XFINITY ### Secure” WiFi network, but my
connection indicates “Limited or No Connectivity.”
If this situation occurs, something is either wrong in the LAN setup or there
is a conflict of IP name resolution services with your wireless networking
software. Please note that you will probably have related issues connecting to
http://settings.hotspot, resulting in an error message that is some variant of
“unable to connect” or “address not found.”
This situation can usually be cleared up by updating the network profile for the
Mobile Hotspot on your WiFi enabled host computer. You can also try power cycling
the Mobile Hotspot to see if it resolves the issue.
Check and correct the following:
• Attempt to connect the Mobile Hotspot to a different WiFi enabled host
computer. If the second host computer works correctly, the problem is likely
not with the Mobile Hotspot, and you should correct any potential setup
problems with the first WiFi enabled host computer.
• If you suspect that your WiFi enabled device has setup problems, check for a
pre-existing “XFINITY ### Secure” profile that is not correctly configured. This
situation is best corrected by deleting and recreating the profile.
• Try power cycling the Mobile Hotspot to restart the network services.
• If none of the previously defined actions correct the issue, perform a master
reset of the Mobile Hotspot.
CAUTION:
Upon reset, any personalized settings will be lost, and the Mobile Hotspot
will revert to the factory settings, including the WiFi network name (SSID) and
WiFi Key as listed on the sticker on the bottom of your Mobile Hotspot. If you
previously saved personal settings as a custom profile (that is, backed up a
configuration file), all customized settings can be recovered by uploading that
profile; otherwise, these settings cannot be recovered and must be manually
reentered.
Do the following:
a.Make sure the Mobile Hotspot is powered on.
b.Locate the master reset button on the back of the Mobile Hotspot.
(Under the battery cover, next to the top left side of the battery)
c.Insert a paperclip into the hole and then hold the button down for six
seconds until the Power / Connection LED turns off and then on again.
d.Your Mobile Hotspot is now reset to its original factory settings, as
shipped. Once again attempt a WiFi connection.
e.If you are still unable to connect to the Mobile Hotspot WiFi network,
please note any error messages and contact XFINITY Internet 2go
Technical Support at 1.866.206.2182.
4.5
Troubleshooting
continued
I can connect to the Mobile Hotspot browser interface via WiFi, but I have
a problem connecting to the Internet.
3G
When you try to connect to the Internet via a 3G connection, one of the following
occurs:
• There is no 3G signal and the Mobile Hotspot cannot connect to the Internet.
• There is a 3G signal with limited capability so you are unable to connect to the
Internet.
Do the following:
• Check for a 3G signal — to see if you have a 3G signal and/or if your signal
is strong enough to connect.
You can determine if you are detecting a 3G signal and if the signal is strong
by doing the following:
- Your Power / Connection LED should display green when you have access
to a 3G network.
- Your Status Indicator Panel displays the signal strength.
If you do not detect any of these conditions, attempt to relocate your
Mobile Hotspot to various locations (for example, closer to a window
or outside if you are within a building, attempt to go to higher ground if
you are outdoors). Monitor the signal strength to determine if moving the
Mobile Hotspot has any effect on signal strength. You can also check for
the availability of a 3G signal if you have other 3G devices (such as PCS
telephone) and can make a call or access data.
• Check for roaming — if you are not in your home network area and roaming is
not supported by your service plan or if you have disabled roaming functions
in your settings, your Mobile Hotspot will not connect to the Internet.
First check that the roaming settings on your Mobile Hotspot are correct.
To view and, if appropriate, modify your roaming controls, see
“Controlling Your Cost (Roaming Controls)” on page 2.20. If your Mobile Hotspot
settings are correct, there may be problems with your account.
NOTE:
When you are on a “roaming network,” a network roaming status icon
(triangle) appears in the Status Indicator Panel on the front of your Mobile
Hotspot and on the status bar at the top of your Mobile Hotspot browser
interface. However, when roaming is not enabled, you will never be active on
a roaming network.
4.6
Troubleshooting
continued
• C
heck for a profile update — if you are still unable to establish an Internet
connection after verifying the existence of a good 3G signal and that
roaming is correctly configured, you may need to perform a profile update.
To update the profile, log in to the Mobile Hotspot browser interface, and
then display the Service Updates section of the 3G page (Mobile > 3G), and
click the Update Profile button.
If you are still unable to connect to the Internet, call XFINITY Internet 2go
Technical Support at 1.866.206.2182 with your ESN and MAC ID.
4G
When you try to connect to the Internet via a 4G connection, various conditions
could cause an inability to connect. Error symptoms could include receiving a
connection timeout error on your browser, which would indicate the connection for
4G access is lost or is operating with limited capability. One of the following could
be the cause:
• Unable to find a signal (poor or no reception).
• 4G/3G service is not available (your account is not correctly configured).
Check the following:
• Is the 4G signal weak?
A nearby structure may be blocking the signal. Change the position
or location of the Mobile Hotspot. For example, try moving the Mobile
Hotspot closer to a window if indoors or to higher ground if outdoors.
• Are you completely outside of all coverage areas?
• Is there a problem with your account?
If possible, log in to your account at www.comcast.com by entering your
Comcast username and password.
Confirm that your “Mobile Hotspot” is on the account with your desired
mobile Internet connection plan.
If your Mobile Hotspot is correctly listed on your Comcast account you
can verify your Mobile Hotspot has the latest network profile by logging in
to the Mobile Hotspot browser interface, and then displaying the Service
Updates section of the 3G page (Mobile > 3G), and clicking the Update
Profile button.
If you do not see your Mobile Hotspot listed or if you have additional
concerns about your network profile, contact XFINITY Internet 2go
Technical Support at 1.866.206.2182 to complete setting up the Mobile
Hotspot on your account. Please have the following available before
calling:
• Your Comcast account information.
• The ESN number of your Mobile Hotspot (on the sticker under the
battery of the Mobile Hotspot).
4.7
Troubleshooting
continued
I can connect to the Internet via the 4G network, but I land on an XFINITY
web page indicating I have a message.
When connected to 4G and you are redirected to this page (see below for an
example), clicking through to the message returns another page with a message
stating that “The Mobile Broadband device you are using is not recognized on
the Mobile 4G Network.” This is an indication that there is an issue with your
account. To correct this issue, contact Comcast Customer Care at 1.800.XFINITY
(1.800.934.6489).
I cannot connect to the Mobile Hotspot browser interface
(http://settings.hotspot).
Check the following:
• If using VPN or other virtual network connection, temporarily disconnect the
VPN connection and retry accessing http://settings.hotspot.
NOTE:
All virtual networks block the Mobile Hotspot browser interface.
• Instead of using the http://settings.hotspot URL, try http://198.162.0.1.
• If the suggestions above do not correct the problem perform a master reset of
the Mobile Hotspot.
CAUTION:
Upon reset, any personalized settings will be lost, and the Mobile Hotspot
will revert to the factory settings, including the WiFi network name (SSID) and
WiFi Key as listed on the sticker on the bottom of your Mobile Hotspot. If you
previously saved personal settings as a custom profile (that is, backed up a
configuration file), all customized settings can be recovered by uploading that
profile; otherwise, these settings cannot be recovered and must be manually
reentered.
4.8
Troubleshooting
continued
Do the following:
1. Make sure the Mobile Hotspot is powered on.
2.Locate the master reset button on the back of the Mobile Hotspot.
(Under the battery cover, next to the top left side of the battery)
3.Insert a paperclip into the hole and then hold the button down for six
seconds until the Power / Connection LED turns off and then on again.
4.Your Mobile Hotspot is now reset to its original factory settings, as shipped.
Once again attempt a WiFi connection.
5.If you are still unable to connect to the Mobile Hotspot WiFi network,
please note any error messages and contact XFINITY Internet 2go
Technical Support at 1.866.206.2182.
My Mobile Hotspot’s Power / Connection LED is blinking red.
This indicates an error on the Mobile Hotspot that requires a hardware reset. You
should reset your Mobile Hotspot to factory defaults using the master reset button
as indicated in the previous section. If the reset does not correct the problem,
please contact XFINITY Internet 2go Technical Support at 1.866.206.2182.
My Mobile Hotspot’s battery life is less than I expected.
You can configure your Mobile Hotspot to minimize the draw on the battery,
thereby increasing the time before a charge is required. For more information, see
“Extending Battery Usage” on page 2.6.
NOTE:
Batteries do gradually wear down and require longer charging times. If you notice a
change in your battery life, you may want to purchase a new battery.
The Internet connection is slow.
Do the following:
1. Check the signal.
You can view the signal strength status icon (the more filled-in bars, the
stronger the signal) on either:
• Status Indicator Panel on the front of your Mobile Hotspot
•S
tatus bar at the top of the Mobile Hotspot browser interface
2.If you see a weak signal, relocate the Mobile Hotspot.
A nearby structure may be blocking the signal. Change the position or
location of the Mobile Hotspot. For example, try moving the Mobile Hotspot
closer to a window if indoors or to higher ground if outdoors.
4.9
Troubleshooting
continued
3.Try changing the orientation of your WiFi enabled device with respect to the
Mobile Hotspot.
4.Try changing the battery if the battery is weak.
I need to upgrade my Mobile Hotspot.
Typically, you should only perform the following upgrades to the Mobile Hotspot
when directed by XFINITY Internet 2go Technical Support:
• Profile Update — this update could resolve when the connection fails.
• PRL — this update could help resolve issues when your Mobile Hotspot is
roaming, but you think the home network should be available.
• Firmware (software update) — this update installs the latest drivers and system
software onto your Mobile Hotspot.
These actions affect the files, drivers, and software on the Mobile Hotspot; therefore,
exercise caution when upgrading your Mobile Hotspot.
Profile Update
To update the profile, do the following:
1. Log in to the Mobile Hotspot browser interface.
2.From the menu bar, choose Mobile > 3G.
The 3G page appears:
4.10
Troubleshooting
continued
3.In the Service Updates section, click Update Profile.
PRL
To update the PRL, do the following:
1. Log in to the Mobile Hotspot browser interface.
2.From the menu bar, choose Mobile > 3G.
The 3G page appears:
3.In the Service Updates section, click Update PRL.
4.11
Troubleshooting
continued
Firmware (software update)
To perform a firmware upgrade, do the following:
1. Log in to the Mobile Hotspot browser interface.
2.From the menu bar, choose Device > Software.
The Software Update page appears:
3.Click Check Now to check for the latest network updates.
4.If the Status field indicates an update is available, connect your Mobile Hotspot
to the AC power adapter and then click Download & Install.
A download progress bar appears. When the download finishes, a message
appears, indicating the download is complete and the Mobile Hotspot must be
restarted to install the update, which will close your network connection and
may take several minutes. A Restart Now button also appears.
NOTE:
The Download & Install button is disabled if the Mobile Hotspot is connected
via a USB cable to a computer. You need to disconnect the USB and then plug
the Mobile Hotspot into the AC power adapter.
5.Click Restart Now. The Install message box appears, asking you to confirm
the restart and install.
6.Choose OK.
4.12
Troubleshooting
continued
NOTE:
The Power / Connection LED flashes purple while the Mobile Hotspot is
updating. When the software update is finished, you may need to power on
and reconnect to your Mobile Hotspot via WiFi.
How Do I Get Additional Help?
If you continue to have issues with your Mobile Hotspot, do the following:
1. Please note your ESN number, which can be found:
• on the sticker under the battery of the Mobile Hotspot
• on the 3G Modem section of the 3G page of the Mobile Hotspot browser
interface
2.Contact XFINITY Internet 2go Technical Support at 1.866.206.2182 for further
assistance.
4.13
Glossary
3G — Third Generation. 3G refers to the third generation of mobile telephony
technology. The evolution of 3G technology is as follows:
CDMA technologies
• 1xRTT offered speeds up to 144 Kbps (2002).
• EV-DO increased downlink speeds up to 2.4 Mbps (2004).
• EV-DO Rev A boosted downlink speeds to 3.1 Mbps (2006).
• EV-DO Rev B can use 2 to 15 channels with each downlink peaking at 4.9 Mbps.
4G — Fourth Generation. 4G refers to the fourth generation of cellular wireless
standards. It is a successor to 3G and 2G families of standards. The nomenclature
of the generations generally refers to a change in the fundamental nature of the
service, non-backwards compatible transmission technology, and new frequency
bands. A 4G system is expected to provide a comprehensive and secure all-IP
based solution where facilities such as IP telephony, ultra-broadband Internet
access, gaming services, and streamed multimedia may be provided to users.
802.11 (b, g, n) — A set of WLAN communication standards in the 2.4, 3.6 and 5
GHz frequency bands.
Access Point (AP) — A device that allows wireless communication devices to
connect to a wireless network using a standard such as WiFi.
Authentication — This read-only field on the WiFi Settings page is informational
only, in case your WiFi enabled device requires an authentication option to be
selected. “Open Access” is always used.
bps — bits per second. The rate of data flow.
Broadband — High-capacity high-speed, transmission channel with a wider
bandwidth than conventional modem lines. Broadband channels can carry video,
voice, and data simultaneously.
CDMA — Code Division Multiple Access. It is the underlying channel access
method used by some mobile phone standards.
Computing Device — Any of a variety of computer-like devices (for example,
desktop computer, laptop, tablet PC, smartphone, and PDA).
DHCP — Dynamic Host Configuration Protocol. Software found in servers and
routers that automatically assigns temporary IP addresses to clients logging into
an IP network.
DHCP Server — A server or service with a server that assigns IP addresses.
DNS — Domain Name System. A system for converting host names and domain
names into IP addresses on the Internet or on local networks that use the TCP/IP
protocol.
Encryption — This read-only field on the WiFi Settings page is informational only,
in case your WiFi enabled device requires an encryption option to be selected. The
encryption method is determined by the “Security” setting.
ESN — Electronic Serial Number. A unique 32-bit number embedded in a wireless
device that identifies the device.
5.1
Glossary
continued
Firewall — A hardware or software boundary that protects a network or single
computer from unwanted outside traffic.
Firmware — A computer program embedded in an electronic device. Firmware
usually contains operating code for the device.
FTP — File Transfer Protocol. A network protocol for exchanging files over a TCP
network.
Gateway — A network point that acts as an entrance to another network that uses
a different protocol.
Host Name — The unique name by which a network-attached device is known on a
network.
Hotspot — A WiFi (802.11) access point or the area covered by an access point.
Used for connecting to the Internet.
Hot-Swappable — The ability to safely remove and replace a component (for
example, a memory card or USB device) from a device or computer while it is
powered on.
HTTP — Hypertext Transfer Protocol. An application-level protocol for accessing the
World Wide Web over the Internet.
IEEE — Institute of Electrical and Electronics Engineers. An international technical/
professional society that promotes standardization in technical disciplines.
IMAP — Internet Message Access Protocol. An Internet standard protocol for email
retrieval.
IP — Internet Protocol. The mechanism by which packets are routed between
computers on a network.
IP Type — The type of service provided over a network.
IP Address — Internet Protocol address. The address of a device attached to an IP
network (TCP/IP network).
ISP — Internet Service Provider. Also referred to as the service carrier, an ISP
provides Internet connection service. (See Network Operator)
Kbps — Kilobits per second. The rate of data flow.
LAN — Local Area Network. A type of network that lets a group of computers, all in
close proximity (such as inside an office building), communicate with one another.
It does not use common carrier circuits though it can have gateways or bridges to
other public or private networks.
MAC Address — Media Access Control. A number that uniquely identifies each
network hardware device. MAC addresses are 12-digit hexadecimal numbers.
Mbps — Megabits per second.
microSD / microSDHC — A small, removable flash memory card available in
various storage sizes. Some products have a slot that allows them to utilize this
external memory.
MSID — Mobile Station IDentifier. A number for a mobile phone that identifies that
phone to the network. These numbers are carrier specific.
5.2
Glossary
continued
MSL — Master Subsidy Lock. A numeric code for accessing certain phone settings.
NAI — Network Access Identifier. A standard way of identifying users who request
access to a network.
NDIS — Network Driver Interface Specification. NDIS is a Windows specification for
how communication protocol programs (such as TCP/IP) and network device drivers
should communicate with each other.
Network Mask — A number that allows IP networks to be subdivided for security
and performance.
Network Operator — The vendor who provides your wireless access. Known by
different names in different regions, some examples are: wireless provider, network
operator, and service provider.
Network Technology — The technology on which a particular network operator’s
system is built; such as GSM, HSPA, CDMA, EDGE, and EVDO.
NNTP — Network News Transfer Protocol. An Internet application protocol for
reading and posting Usenet (newsgroup) articles.
PDA — Personal Digital Assistant. A handheld device used for organization, notes,
address books, etc.
POP — Post Office Protocol. An Internet protocol for retrieving email from a remote
server over a TCP/ IP connection.
Port — A virtual data connection used by programs to exchange data. It is the
endpoint in a logical connection. The port is specified by the port number.
Port Forwarding — A process that allows remote devices to connect to a specific
computer within a private LAN.
Port Number — A 16-bit number used by the TCP and UDP protocols to
direct traffic on a TCP/IP host. Certain port numbers are standard for common
applications.
PPP — Point-to-Point Protocol. A method of connecting a computer to the Internet.
PPTP — Point-to-Point Tunneling Protocol. A method for implementing virtual
private networks that does not provide confidentiality or encryption but relies on the
tunneling process for security.
PRL — Preferred Roaming List. A list that your wireless phone or device uses to
determine which networks to connect with when you are roaming. (Network operator
specific)
Protocol — A standard that enables connection, communication, and data transfer
between computing endpoints.
Proxy — A firewall mechanism that replaces the IP address of a host on the internal
(protected) network with its own IP address for all traffic passing through it.
RAS — Remote Access Service. A Windows NT/2000 Server feature that allows
remote users access to the network from their Windows laptops or desktops via
modem.
Rev A — CDMA EV-DO Rev. A is a leading-edge wireless technology with higher
data rates and higher system capacity. It is a fully backward compatible standard
and remains interoperable with deployed EV-DO networks and devices around the
5.3
Glossary
continued
world. The increased data rates on Rev. A’s physical layer enable richer applications
and services. For more information, visit www.cdg.org.
RFB — Remote Frame Buffer. A protocol for remote access to graphical user
interfaces.
Router — A device that directs traffic from one network to another.
RTP — Real-time Transport Protocol. A packet format for streaming multimedia over
the Internet.
SMTP — Simple Mail Transfer Protocol. An Internet standard for email transmission
across IP networks.
SSID — Service Set IDentifier. The name assigned to a WiFi network.
TCP — Transmission Control Protocol. A core protocol for transmitting and receiving
information over the Internet.
TCP/IP — Transmission Control Protocol/Internet Protocol. The set of
communications protocols used for the Internet and other similar networks.
Telnet — Telecommunication Network. A network protocol used on the Internet or
on local area networks.
TFTP — Trivial File Transfer Protocol. A file transfer protocol with a subset of FTP
functionality.
UA — User Agent. Any device or software used to access a web page. A user agent
might be a web browser, a smartphone, or a screen reader.
UDP — User Datagram Protocol. A simple transport protocol used to transfer
information on the Internet.
UI — User Interface. The part of a software application or hardware device that a
user sees and interacts with.
USB — Universal Serial Bus. A connection type for computing device peripherals
such as a printer, mobile modem, etc. USB connectors may be used for data transfer
or charging.
USB Port Types — The USB ports on computers and hubs have a rectangular Type
A socket, and peripheral devices have a cable with a Type A plug. Peripherals that
do not have an attached cable have a square Type B socket on the device and a
separate cable with a Type A and Type B plug. Ports and connectors are available in
different sizes (for example, standard, mini, and micro).
VNC — Virtual Network Computing. A graphical desktop sharing system that uses
the RFB protocol to remotely control another computer.
VPN — Virtual Private Network. A secure private network that runs over the public
Internet. Commonly used to connect to an office network from elsewhere.
VPN Passthrough — A feature that allows a client to connect to a VPN server.
WAN — Wide Area Network. A public network that extends beyond architectural,
geographical, or political boundaries (unlike a LAN, which is usually a private
network located within a room, building, or other limited area).
WEP — Wired Equivalent Privacy. An IEEE standard security protocol for 802.11
networks. Superseded by WPA and WPA2.
5.4
Glossary
continued
WiFi — Wireless Fidelity. Any system that uses the 802.11 standard developed and
released in 1997 by the IEEE.
WiFi Client — A wireless device that connects to the Internet via WiFi.
WLAN — Wireless Local Area Network. A typically low-power network that transmits
a wireless signal over a span of a few hundred feet and usually only to stationary
devices.
WPA/WPA2 — WiFi Protected Access. A security protocol for wireless 802.11
networks from the WiFi Alliance.
WWAN — Wireless Wide Area Network. Wireless network technologies deployed
over a large geographical area to a large number of users (see WLAN). This service
is usually provided through cellular providers. WWAN connectivity allows a user with
a laptop and a WWAN device to surf the Internet, check email, or connect to a virtual
private network (VPN) from anywhere within the coverage area of the
network operator.
5.5
Recording Your Settings
Quick reference of important Mobile Hotspot settings:
The WiFi Settings page of the Mobile Hotspot browser interface lets you modify
network connection options.
Setting
Purpose
Administrator Password
To access your Mobile Hotspot settings, such as
WiFi network name (SSID) and security.
WiFi Network Name (SSID)
WiFi network name (SSID) for your Mobile
Hotspot.
WiFi Key
Also referred to as network key, password,
wireless password, or pre-shared key.
This functions as a security key to enter into
your network. Prevents other WiFi users from
accessing your Mobile Hotspot network without
your permission.
Record your settings so you don’t forget!
Administrator Password
WiFi Network Name (SSID)
WiFi Key
(e.g., Network Key, Password, Wireless Password, or Pre-Shared Key)
6.1