1
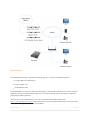
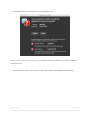
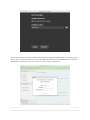
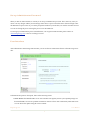
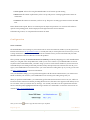
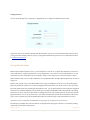
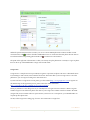
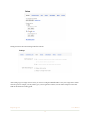
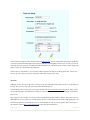
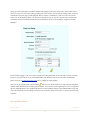
L
I
T
T
L
P
E
H
O
N
E
B
O
&
L
P
B
C
O
N
T
R
O
L
L
User Manu al
RINGNOLOGY LLC
Copyright 2011
w w w. r i n g n o l o g y. c o m
E
R
X
You heard VoIP (Voice over IP) can significantly cut telephone cost.
But are you aware of it can provide more flexibilities?
Image the following situations:
•You want to have multiple phone lines connected to your home and do not want to depend on one phone company;
•You want to use Google Voice, which provides FREE phone services across North America (to at least the end of
2012) as your landline;
•You have relatives and friends in other countries and want to enjoy totally FREE phone call with them, but do
not like the inconvenience of using computer software like Skype;
•You want your relatives and friends in other countries to call your US numbers for FREE; and
•You want the VoIP solution that can be easily set up and manage.
Here comes LittlePhoneBox proudly developed by Ringnology LLC. A small PBX system based on the popular Asterisk platform, LPB runs on an embedded system with low power consumption. With the bundled controller software,
LPB Controller, you can easily set up LittlePhoneBox with your VoIP services and start enjoying both low cost and
high flexibility.
Major features of LittlePhoneBox include:
• Support multiple VoIP phone service providers;
• Support Google Voice;
• Freely defined extensions using either SIP or IAX2 protocol;
• Voice mail system with email delivery;
• Call records monitoring; and
• Bundled DNS service for global connection.
This document shows you how to set up LittlePhoneBox and configure it with LPB Controller with minimum technical skills required. You can then enjoy the freedom of calling....
Big Picture
The following diagram shows how LPB server works with other components to deliver phone service. It will run on
your home network, connecting to the public phone network through VoIP service providers, such as Google Voice or
Sipgate. Different types of extensions can, with the help of LPB Connection Service, work with LPB server to place or
receive phone calls.
R i n g n o l o g y L L C!
User Manual
2
Installation
The LittlePhoneBox package you purchase from Ringnology LLC is composed of the following items:
• A compact PBX server (LPB Server);
• A Power adapter; and
• A CAT5 Ethernet cable.
The LittlePhoneBox is to run on you home network through a wired network connection to your router. The power
adapter has an input of 110-240V and an output of 10V. To avoid any damage, please only use the accompanied
power adapter with the phone box.
After you have set up LittlePhoneBox on your network, please download LPB Controller from
http://www.ringnology.com/software and install it on one of your computers located on the same network. Please
follow to the following steps for the software installation:
R i n g n o l o g y L L C!
User Manual
3
1.
Click the Install button (as shown below) to start installation process
Note: we are in the process of acquiring coding signing certificate for LPB Controller. Before then, you will see “UNKNOWN”
for the publisher field.
2.
Click the Continue button (as shown below) to install LPB Controller in the default installation location.
R i n g n o l o g y L L C!
User Manual
4
After installation, please start LPB Controller. It should be able to detect the LittlePhoneBox server running on your
network. If you see the screen like below, it means that LPB Controller has found the LittlePhoneBox server and established data communication. Now, you can start to set up it and your VoIP services.
R i n g n o l o g y L L C!
User Manual
5
Set up Administrator Password
When you first run LPB Controller, it will ask you to set up an administrator password. This is necessary, since you
do not want any changes without your knowledge. Please choose a password with at least 4 characters length. After
the administrator password is set, you will be prompted to authorize yourself when you start the controller software.
You can also change the password using the process to be described later.
If you forget your administrator password and therefore, can not get into LPB Controller, please email us at
[email protected], so that we can help you reset it.
User Interface
After authentication and entering LPB Controller, you will see the user interface like the one in the following screenshot.
In the Information panel on the top left, there are the following entries:
• Server Version: the LittlePhoneBox server version number. We regularly release system update packages for
the LittlePhoneBox server to fix problems and add new features. This is done automatically inside LPB server.
You can observe the update using this version number.
R i n g n o l o g y L L C!
User Manual
6
• Server Uptime. It shows how long the LittlePhoneBox server has been up and running.
• Phone Lines: the number of phone lines you have set up. The process of setting up phone lines will be described later.
• Extensions: the number of extensions you have set up. The process of setting up extensions will be described
later.
Below the Information panel, there is an accordion panel for major setup functions. You can click each of them to
open the corresponding panel, which is displayed on the right side of the software interface.
In the following sections, we will present these functions in detail.
Configuration
Server Connection
The LittlePhoneBox server running on your local network can not be accessed from outside. If you only plan to have
internal extensions (see Set up Extension section), it is totally fine and you can skip this section. However, if you want
to assign extensions to your relatives and friends from all around the world, you need to let them find your LittlePhoneBox and then connect to it. How do we solve this problem?
This is partially solved by the LPB Connection Service (LPB-CS) provided by Ringnology LLC. Each LittlePhoneBox
sold by us is assigned with a unique DNS name, which you can use to connect to your LittlePhoneBox server from
anywhere in the world. Besides DNS, you need to assign your server with a static IP address on your local network
and enable the port forwarding for the UDP port 4569 (used by IAX2 protocol) from external to the static IP you assign to your LittlePhoneBox server. Please refer to your router manual for setting these up. Or you can go to the website http://portforward.com to find more information.
Once you finish these settings, you can give the DNS together with the extension information to your relatives and
friends so that they can connect to your LittlePhoneBox server and enjoy free calling among all of you.
When you purchase LittlePhoneBox, you automatically get the LPB Connection Service free for one year, which can
be renewed with a nominal cost. Besides providing the DNS service, the LPB-CS also supports email delivery service
for voice mails, so that you will not miss any message. You can find your LPB-CS service expiration date from the
Server Connection panel, highlighted in the following screenshot. You will find how to renew this service from our
website at http://www.ringnology.com.
Note: you can use the
button to copy the DNS name to your clipboard.
R i n g n o l o g y L L C!
User Manual
7
Change Password
You can use the Change Password panel (as displayed below) to change the administrator password.
Type in new password, confirm it and then click the Set button. Your new password will take effect next time when
you log into LPB Controller software. Again, if you forget the administrator password for your LPB, please email us
at [email protected].
Set up Phone Lines
Different from traditional phone service, you are not limited to only one or two phone lines linked to your home in a
VoIP world. There is no physical phone line to set up and therefore, you can have as many VoIP number as you subscribe. There are many VoIP phone service companies, which you can register your account and acquire a regular
phone numbers. Then you can use the credentials to set up LittlePhoneBox, through which the phone call can come in
and go out.
But how does a phone call to your LittlePhoneBox server ring your telephone, and how do you call out through it?
That is the function of extensions. You can have multiple extensions based on your needs. In face, even if you do not
link to the public phone network through a VoIP phone service, you can still make phone calls among the configured
extensions. It is much like building a private phone network using LittlePhoneBox. The internal phone calls (among
extensions) are always free. Due to be fact that everything is based on VoIP, extensions are not constrained to specific
physical locations. You can set up extensions for your family and friends all around the world and they will become
part of your own phone network. The detailed instructions for extension setup can be found in the next section.
Note: because of resource limitation, LittlePhoneBox can only support up to 5 phone lines and 6 extensions.
The following screenshot shows the user interface for the phone line setup panel, which you can invoke by clicking
“Phone Lines” tab in the accordion panel.
R i n g n o l o g y L L C!
User Manual
8
Within the opened sub-panel of the accordion, you can see a list of defined phone line numbers and their current
connection status. The
icon shows that the LittlePhoneBox server is connected to the VoIP phone network and can
be reached with the corresponding phone number. The
icon means it is disconnected.
The panel on the right side of the interface is where you actually set up the phone lines. Currently two types of phone
lines can be set up with LittlePhoneBox: Google Voice and SIP trunk.
Google Voice
Google Voice is a VoIP phone service provided by Google Inc. It provides free phone call service within North America (including US and Canada) at least until the end of 2012. That means that if you use Google Voice as one of the
phone lines, you can enjoy free calling in US and Canada now.
If you do not have a Google Voice account, please go to the website: http://www.google.com/voice to register. For
the detailed steps of the registration process, please refer to the online instructions:
http://www.ehow.com/how_5400426_set-up-google-voice.html.
Please pay attention to a few things. First, if you currently have a Google account for Gmail, it is better to register
another Google account. Otherwise phone calls made to your Google Voice number will be forwarded to the Gtalk
(Google Chat) session in Gmail when it is open Gmail in your browser. As a consequence, your LittlePhoneBox can
not pick up those phone calls.
Second, on the Google Voice setting page, choose to forward all calls to Google Chat.
R i n g n o l o g y L L C!
User Manual
9
Finally please turn off Call Screening under the Calls tab.
After setting up your Google Voice account, you can now configure LittlePhoneBox to use your Google Voice credentials. The process is simple; you only need to give your Google Voice number, account name and password to data
fields in the Phone Line Setting panel.
R i n g n o l o g y L L C!
User Manual
10
Please note that Google Voice does not provide E911 (Enhanced 911) service, and therefore, the option is disabled. If
you want to make international phone calls using Google Voice, which requires credits in your account, you need to
enable this option by selecting “Can Make International Phone Call”. This information is used to restrict calling capability of extensions, which will be described later.
In the section of “To Extension”, you can choose which extensions will ring for incoming phone calls. You may not
have set up your extensions yet. This step will be clearer after extensions are set up.
SIP Trunk
Although you can use only Google Voice, you may set up some other phone lines (from variout service providers) as
backup. Also, you may want to do it for lower international calling rate.
In VoIP industry, the most common service type is based on SIP (Session Initiation Protocol) protocol. Many companies provide SIP trunks and enable their customers to connect to the public phone networks through connections to
their servers.
Take “Sipgate” as an example. You can get a location based phone number from this company and connect your LittlePhoneBox to its server. Then you can make phone call at 1.9 ¢/min within US and Canada. Although Sipgate costs
more than Google Voice, it provides E911 service, which channels 911 calls to your local police office. Please refer to
the company website (http://www.sipgate.com) for the latest price information.
R i n g n o l o g y L L C!
User Manual
11
Setting up account and obtain a the phone number from Sipgage is pretty easy. Please follow to the online instructions to set up your account. After setting up and log into your account, you can click the Settings button on the top
and enter the setup web page. On the right side, there is a button “+VoIP Phone”. Click it to create a new phone,
whose icon will be displayed. Move your mouse over the phone icon, you can see a drop-down list and select SIP
Credentials. Please record SIP-ID and SIP-Password information and you will use them to configure your LittlePhoneBox.
Please note that sipgage is just one of many companies providing SIP Trunks. If you subscribe to service from other
provider, you may be able to set up your LittlePhoneBox with similar process. If you encounter any difficulties,
please contact us at [email protected] and we will help to fix the problem.
After you set up each phone line, please click the
button to save the information. You will notice that the phone
number will be added into the accordion panel on the left, the control bar on the top changes its color to orange and
the Save & Reload button is now enabled. This button is used to push the changes to the LittlePhoneBox Server and
restart the VoIP phone service running on it. But you do not need to click it now, because we need to add some extensions first.
Set up Extensions
R i n g n o l o g y L L C!
User Manual
12
You have set up phone lines for LittlePhoneBox and now it is the time to add extensions. Then you can start making
internal or external phone calls.
LittlePhoneBox supports various types of extensions:
• Soft phone running on a computer;
• Soft phone running on a smart phone;
• IP phone; and
• Regular phone connected through an analog telephone adapter (ATA).
A soft phone is a software running on either a computer or a smart phone. You can configure it to connect to your
LittlePhoneBox server and make or receive phone calls. An excellent soft phone program is ZoIPer, which has customized builds for computers running various operating system (Windows, Mac OS X or Linux) and smart phone
(iPhone or Windows Mobile). Its vendor, zoiper.com, provides free soft phones for personal use with limited features,
which, however, are sufficient for working with LittlePhoneBox. You can download ZoIPer software using the given
URLs:
• Mac version: Download URL;
• Windows version: Download URL;
• Linux version: Download URL;
For the iPhone or iPod Touch application, please search “zoiper” in the iPhone App Store.
An IP phone looks like a regular phone, except that it connects to the server using an Ethernet cable instead of an
RJ11 cable. You can find the information about some recommended IP phones on our website:
http://www.ringnology.com
It is most likely that you have a regular phone set at home. If so, reusing it through an ATA adapter is the most cost
effective. You only need to connect the ATA to your router with an Ethernet cable and then connect your phone set to
the ATA with an RJ11 cable. After necessary system settings, your regular phone set becomes an extension for your
LittlePhoneBox and you can use it to make free phone calls. Please check our website: http://www.ringnology.com
for the ATA products we have for sale.
Based on the utilized network protocols, the soft phones, IP phones and ATAs can be classified into different types.
The two most common types are SIP and IAX2. For simplicity, we recommend SIP devices for the extensions to be set
up on your local (home) network, and IAX2 devices for the extensions located outside of your network. The reason is
that SIP is not a good solution for traversing through routers, while IAX2 protocol is more capable of doing that. In
the meantime, SIP based ATAs and IP phones are much cheaper and you can enjoy lower cost for local extension
setup.
After an introduction about the technical basics, we can now set up extensions for you LPB. To do so, please click the
“Extensions” accordion tab and the Extension Setting panel will be displayed (see the following screenshot).
R i n g n o l o g y L L C!
User Manual
13
To set up an extension, you need to assign it a number, which may have one to four digits. The Caller IDs, is the name
you gives an extension. It will be displayed on the telephone supporting caller id. You also need to set up the password for the extension. The extension number and the password serve as the extension credentials, which you will
use to set up your soft phone, IP phone or ATA. If you set up the extension for your relative or friend, you need to
send the credentials to him/her.
Note: You cannot use “911” as the extension number.
You now need to choose the Server Connection Type based on where the extension will be located: insider your network or outside. Please remember that to choose SIP for internal extensions and IAX2 for external extensions. When
you buy a soft phone, IP phone or ATA for an extension, you need to choose a product supporting the corresponding
protocol.
Based on the calling privilege, the extensions are categorized into 3 groups:
• No Restriction (default);
• Allow Domestic Phone Call; and
• Only Internal Phone Call.
This classifications is necessary since you may not want to let your friend use your phone lines to make international
phone calls. You can enforce the restriction on the extension through choosing an appropriate privilege group.
R i n g n o l o g y L L C!
User Manual
14
You can set up voice mail support for an extension you are adding. The recorded voice mail will be attached in a notification email delivered to the Recipient Email address. The email delivery support is part of LPB Connection Service described earlier. For the voice mail setting, you can also specify the phone ringing time (in sections).
Lastly, you can assign phone line for the extensions that can make domestic and international phone call (please refer
to the phone line setting section).
After you finish setting up an extension, click the
button to save it. It will be added to the extension list in the
Extensions accordion panel and the top control bar changes its color to orange. Now, you are ready to push all of the
changes to the LittlePhoneBox server and reset it with the new configuration.
Save & Reload
Click the “Save & Reload” button to push the changes you have made to the LittlePhoneBox server and reload the
system. A rolling wait icon will appear to show action progress. When it is done, all of your changes are in effect.
Now, you can set up the soft phone, IP phone and ATA with the extension information (extension number and password) you have created and connect them to your LittlePhoneBox. Please be aware that for internal extensions, use
the IP address displayed in the top control bar as the server address. For extensions located outside your local network, please use the DNS name (a name ended with .ringnology.com) instead.
Vi e w C a l l R e c o r d s
LittlePhoneBox tracks all of the phone calls you make. You can see these records by clicking the “Call Records” accordion tab. In the accordion panel, a table shows the basic statistics: Call Count, Incoming Call, Outgoing Call and
Total Call Time (in minute) On the right side of the interface, you can see the detail record of each phone call.
R i n g n o l o g y L L C!
User Manual
15
You can clean the call records by clicking the
ing the
button in the accordion panel or refresh the call record list by click-
button.
Note:
Google Voice is trademark of Google, Inc.
Sipgate is trademark of Sipgate, Inc.
R i n g n o l o g y L L C!
User Manual
16