1
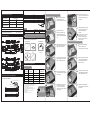
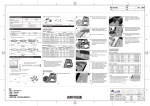
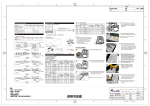
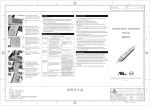
05
Install the power supply and
drill a hole near the end of
T -wire, then treat the wire
through hole to protect the wire
from chasing.
Symptoms
None LED
light works
Connect T-wire to the power
supply output correctly and cap
both ends of T-wire for good
protection.
Possible Causes
07
Note: The maximum connectable
quantity needs to meet the
requirement shown in the table
below the connection illustration,
forbid exceeding!
NOTES
1. Installation Notes
(1) Clean the installing surface before installing the products.
(2) Make sure the polarity of connections made at the rigid LED
light and power supply is correct, otherwise the product will
not be illuminated.
(3) Connect the rigid LED light to power supply firmly, it will be
fine until the wires cannot be pulled out by hand.
(4) The maximum quantity in parallel connection for Z2472CA is
6pcs.
2.Notes for Optional Supplies
(1) Forbid using any acid or alkaline adhesive to secure the
product.
(2) The maximum connectable quantity is shown in the table
below the connection illustration. Please choose the
safety-certificated switch power supply with DC 12V output
voltage (with short-circuit, overvoltage and overcurrent
protections; the tolerance range for output voltage of the
switch power supply is ±5%).If more products are needed,
ensure the power supply has more than 20% load allowance.
Solutions
Power on.
2. Short circuit occurs at the input of
power supply; No primary power for the
power supply; The power supply is auto Remove any short or open
protected since the short or open circuit circuits and other
occurs at the output of the power supply. malfunctions, and energize
the fixture.
3. The input wires of the rigid LED lights
are connected reversely.
1. No primary power for some switch
power supplies.
Some LED
lights don't
work
If the rigid LED light is not long
enough, please connect the
ends of rigid LED lights
together.
overloading. If more products are needed, the additional T-wire
must be connected to a separate power supply. If any T-wire is
Malfunction & Solutions Table
1.There is no primary power.
06
The maximum load power per T-wire is 180W, forbid
Malfunction &Solutions Table
2. Some rigid LED lights are wrongly
connected to the power supply.
3. Some rigid LED lights' polarities are
connected reversely.
Check the power supply and
remove malfunctions.
Connect the wires correctly.
4. Some T-wires are connected wrongly. Connect the T-wires correctly.
Brightness
of the LED
is dim or
not even
LEDs are
blinking
1. The power supply is over loaded.
Use higher or more power
supplies.
2. The wire loss of the power supply is
too much.
Make sure the working voltage of
rigid LED light is within 95%-105% of
the rated voltage, shorten the supply
wire between the power supply and
the first rigid LED light or use thicker
supply wires.
3. Too many rigid LED Lights are
connected.
Adjust the length of LED lights
for each branch to meet the
maximum connectable length.
1. Intermittent connections exist.
Find the intermittent
connections and remove
any malfunctions.
2.Switch power supply doesn't work.
Replace the power supply.
left unused, please cut the unused part and protect the cut end
against short circuit.
Declaration
Warranty: 3 years or 13,000 hours, whichever comes first.
If the external flexible cord of this luminaire is damaged, it shall be
exclusively replaced by the manufacturer or his service agent or
a similar qualified person in order to avoid a hazard.
All the data and pictures in this manual are subject to actual
products.
Information provided is subject to change without notice.
Galaxy Series
Double-sided Rigid LED Light
Manual
Z2436CA
Z2472CA
WARNING
This product is non-waterproof, only used indoors. Forbid
exposing it to outdoor or semi-outdoor environment directly.
Do not disassemble or modify this product.
Turn power off before installing and serving the products.
Have a licensed electrician install, maintain and serve the
products!
The space between two rigid LED lights is no less than
50mm(2.0in), otherwise the over-temperature in light box will
reduce the expected lifetime of rigid LED light.
Forbid using acid or alkaline adhesive to secure the product.
When use the neutral glass glue to fix the products, do not seal
the products until the glue solidified in open environment.
The supply wire between the power supply and the rigid LED
light is no longer than 2m(78.7in), otherwise the line loss will
increase, which will cause the brightness difference between
the two ends.
Check the supply voltage and wire connections before power on.
Read this manual carefully before using this product and keep it!
V1.0
Model and Specification
Installation Procedures with Brackets
01
Galaxy Series
Series Name
Model
Z2436CA
Z2472CA
Color
White
White
Rated Power(W)
13
07
After cleaning the installing
surface, determine the
installing position and quantity.
Connect T-wire to the power
supply output correctly and cap
both ends of T-wire for good
protection.
Grey wire(Anode)
White wire(Cathode)
25
Power Appearance
(Only for reference)
Working Voltage (V):
DC12
Operating Temperature (℃[°F]):
-25~60[-13~140]
Model
Storage Temperature(℃[°F]):
-25~70[-13~158]
Maximum Connectable Quantity(pcs)
Appendix
Z2436CA
2
Z2472CA
1
08
02
The maximum load power per T -wire is 180W, forbid overloading. If more
products are needed, the additional T-wire must be connected to a separate
power supply. If any T-wire is left unused, please cut the unused parts and
protect the cut end against short circuit.
Profile Drawings
Unit : mm[in]
Fix the brackets on the
framework of light box and
adjust the bracket spacing
according to the depth of light
box.
Note: The maximum connectable
quantity needs to meet the
requirement shown in the table
below the connection illustration,
forbid exceeding!
2.Product Parts and Tools Required:
(1)Product Parts
Installation Procedures with End caps
(2)Tools Required
03
After fixing the brackets, put the
lights into the brackets and
fasten them respectively.
01
After cleaning the installing
surface, determine the
installing position and quantity.
Electrical Drill
& Drilling Bit
Self-tapping Screws
(ST2.9)
Galaxy Series
Products
If the rigid LED light is not long
enough, please connect the
ends of rigid LED lights
together.
Fig . 1 Z2436CA
04
Bracket
T-wire
Connect the T-wire to the wires
of rigid LED lights and secure
the T-wire well with screws.
02
Installation and Application
Put the rigid LED lights into the
corresponding positions and
secure the end caps at both
ends with screws.
Layout Guidelines
Fig . 2 Z2472CA
Depth of Light
Box(mm[in])
dz=200[7.9]
Product Parts and Tools Required
1.Connection Illustration:
Power Appearance (Only for reference)
White wire(Cathode)
Grey wire(Anode)
Layout Spacing Installing Quantity
(mm[in])
(pcs)
Illuminance Range
of Z2436CA(lux)
dy=60[2.4]
14
2800-3200
dz=240[9.4]
dy=70[2.8]
12
2300-2500
dz=320[12.6]
dy=120[4.7]
7
1500-1800
dz=360[14.2]
dy=140[5.5]
6
1400-1500
dz=400[15.7]
dy=160[6.3]
5
1200-1300
Notes:
1. The above data are tested with Z2436CA rigid LED light;
2. Tested in 3mm(0.12in) depth acrylic board with 54.4%
luminous transmittance;
3. Light box size: 600mm*1000mm(23.6in*39.4in);
4. The brightness of SAMSUNG LED is about 30% higher
than Rishang LED.
5. The layout of Z2472CA light can refer to that of
Z2436CA light.
6. The above data are for reference only.
05
06
Connect the rigid LED lights
(male socket to female socket)
and fix them.
Install the power supply and
drill a hole near the end of
T -wire, then treat the wire
through hole to protect the wire
from chasing.
03
04
Connect the T-wire to the wires
of rigid LED lights and secure
the T-wire well with screws.
Connect the rigid LED lights
(male socket to female socket)
and fix them.