1
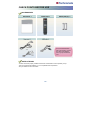
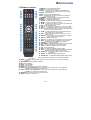
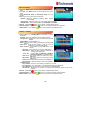
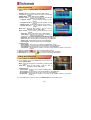
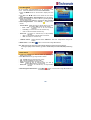
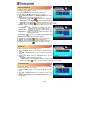
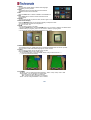
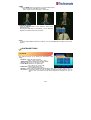
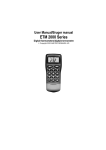
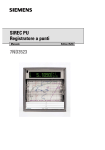
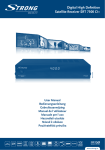
1. INTRODUCTION
Overview…………………………………………………………………………..………………...……... 2
Main Features……………………………………………………………………………... ...………... ....4
2. EASY INSTALLATION GUIDE...…………...…………...…………...…………...……….. .. 3
3. SAFETY Instructions.………………………………………………………………………… …6
4. CHECK POINTS BEFORE USE……………………………………………………………… 7
Accessories
Satellite Dish
5. CONTROLS/FUNCTIONS……………………………………………………………………….8
Front/Rear panel
Remote controller
Front Display
6. EQUIPMENT CONNECTION……………………………………………………………....… 11
CONNECTION WITH ANTENNA / TV SET / A/V SYSTEM
7. OPERATION…………………………………………………………………….………………….. 12
Getting Started
System Settings
Edit Channels
EPG
CAM(COMMON INTERFACE MODULE) Only
CAS(CONDITIONAL ACCESS SYSTEM)
USB Menu
PVR Menu
8. Explain how to download S/W by USB and how to upload and download
channels by USB……………………….……………………………………….…………………31
9. HOW TO DOWNLOAD SOFTWARE FROM PC TO RECEIVER…………….…32
10. Trouble Shooting……………………….……………………………………….………………34
11. Specifications…………………………………………………………………….……………….35
12. Glossary of Terms……………………………………………………………….……………...37
1
INTRODUCTION
OVERVIEW
This combo receiver is designed for using both free-to-air and encrypted channel reception.
Enjoy the rich choice of more than 20,000 different channels, broadcasting a large range of culture,
sports, cinema, news, events, etc. This receiver is a technical masterpiece, assembled with the
highest qualified electronic parts.
MAIN FEATURES
• High Definition Tuners : DVB-S/DVB-S2 Satellite & DVB-T Terrestrial Compliant
• DVB-S/DVB-S2 Satellite Compliant(MPEG-II/MPEG-IV/H.264)
• Output resolution : 1080i & 720p & 576p & 576i & 480i
• 2 Smart Card Reader & 2 Common Interfaces(2 CI)
• HDMI & Component Output(YPbPr) with Upscaler to Improve Picture Quality
• Over 20,000 TV & Radio Channels
• PVR Ready via SATA or Internal /external HDD or USB Flash Drive(memory stick) with time-shift
Record & Playback functions
• MP3 Player and JPEG viewer via SATA or Internal/external HDD or USB Flash drive
• Front/Rear USB 2.0 USB flash memory drive(memory stick) selection through menu
• Software & Channel list download via USB 2.0
• Fully Featured VFD text Front Display
• Support 4:2:0
• Less than 1 second channel change
• Sensitive Tuner
• DiSEqC 1.0, 1.1, 1.2, 1.3(USALS) Compatible
• Dolby Digital Optical S/PDIF
• Auto Navigation system select as many satellites as you want to search
• On-screen display with full color resolution.
• Channel control by favorites, Lock, Skip, Move & Delete
• Enhanced 16 Favorite channel groups
• Channel sort by : All, Alphabet, Transponder & CAS
• Multilingual OSD Menu
• Extended EPG and program reservation on EPG
• Teletext & Subtitle by OSD and VBI
• Last channel memory function
• Factory default channel list
• Software & channel list upgrade via RS-232C: PC to STB, STB to PC, STB to STB
• Parental , Installation & Receiver Lock
• User save default channels & restore default channels
• Zoom function on Pause & Live channel
• Multipicture display
• Enhanced 16 Timers with one time, every day, every week :
Sleep, Wake up, Duration, PVR Record
• Support two SCART for TV & VCR & Mode Control : RGB, CVBS
• Support Recall function & Multipicture display
• Support for multiple language broadcasts
• SCPC & MCPC receivable from C/Ku band satellites LNBs supported :
Universal, Single, Single - S & C band wideband LNBs
• 90-240V AC 50/60Hz
• LNB Short Circuit protection onboard
• Support TV Type(4:3/16:9)
• Screen Mode(Full Frame/Letter Box/Pan & Scan/Pilar Box/CCO)
• e-SATA(External SATA Interface, 7200RPM support only)
• LAN 10Base-T/100Base-Tx Ethernet
• Support two RCU & Blind Search function
2
EASY INSTALLATION GUIDE
Part 1
Using the Preinstalled Satellite & Channel list
This receiver is preinstalled with Satellites and default Channels and is fully configured.
No settings need to be changed.
After turning ON the receiver, select a language. Go to system setting and Factory Reset Menu.
If you select Restore default channels, You can use preinstalled default channel list.
How to add/delete Satellites
Press the MENU button on the remote and go to Installation.
Press OK on the Installation setup. Press OK again and a Satellite List will appear.
To add satellites, press the YELLOW(
) button on the remote.
To delete satellites, Press the BLUE(
) button on the remote.
How to setup a DiSEqC 1.3 USALS System
Press the MENU button on the remote. Press OK on Installation. Go to Motorized setup and press
OK.
Go to the Third line(DiSEqC Motor) and use the Left/Right arrow buttons on the remote to select
USALS. Then go to Position Setting and press OK. Then go to Longitude and Latitude and enter
the coordinates of where you live (London’s Longitude is 00.1 West and South of UK’s Latitude is
51.5 North). Press the EXIT button on the remote. Go to GOTO and press OK. Wait until the Signal
Quality is more than 40% in the progress bar. When a satellite is found, then all the selected
satellites are fully configured for a Motorized system.
If the Signal Quality is below 40%, then the settings are incorrect and the Longitude needs to be
adjusted.
For example : 00.2, 00.3, 00.4, 5/6/7/8/9 West or East. The Latitude may also need to be adjusted.
If you still have not got a signal, then the external installation (dish, etc) needs to be adjusted.
How to setup DiSEqC 1.2 Motorized System
Press the MENU button on the remote and go to Installation and press OK. Go to Motorized setup
and press OK. Press OK again to open the satellite list. Select a satellite from the list and press OK.
Go to the Third line(DiSEqC Motor) and use the Left/Right buttons on the remote to select
DiSEqC1.2. Go to Move and press and hold the Left/Right buttons on the remote until you get a
Signal Quality of more than 40%. Go to Command Type and use the Left/Right buttons to select
Save Position.
Then press OK to save. Press the RED(
) button on the remote to scan.
To scan extra satellites, repeat the above.
Part 2
New Installation from start (No Satellites/Channels)
How to do a Factory Reset to Delete the Preinstalled Satellites and Channels
If you want to start the receiver without the preinstalled Satellites and Channels, press the MENU
button on the remote and go to System setting and press the OK button. Go to Factory Reset,
Press OK and enter 0000. Then select Factory Reset and select YES.
3
How to Install a New Satellite(Fixed Non-Motorized System)
Press the MENU button on the remote and press the OK button on Installation setup.
Press OK on satellite to display a Satellite List. To add a satellite, press the YELLOW(
) button
on the remote. Press the EXIT button on the remote to exit the list.
When the quality bar is at its highest level, press the RED(
)button on the remote to scan the
satellite. You can see Search popup menu. Press OK button to search channels.
If you scan multi-satellites, Go to Auto Navigation menu.
How to Setup a Monoblock or DiSEqC Switch(Up to 4 LNBs / Dishes)
Press the MENU button on the remote and press the OK button on Installation setup.
Press OK on satellite to display a Satellite List. Select a Satellite(e.g. Hotbird 13E and Astra 19.2E)
and press the YELLOW(
) button on the remote for each Satellite to save, Press the EXIT button
on the remote to exit the list.
Go to DISEQC 1.0 for 4 DiSEqC Switch or DISEQC 1.1 for over 4 DiSEqC Switch.
(e.g. Hotbird 13E as Number 1 and Astra 19.2E as Number 2).
When the quality bar is at its highest level, press the RED(
)button on the remote to scan the
satellite. You can see Search popup menu. Press OK button to search channels.
If the above installation was not successful, change the DiSEqC Switching number.
(e.g. Hotbird 13E as Number 2, Astra 19.2E as Number 1).
How to Setup a DiSEqC 1.2 Motorized System.
Press the MENU button on the remote and press the OK button on Installation setup.
Press OK on satellite to display a Satellite List. Select a Satellite(e.g. Hotbird 13E and Astra 19.2E)
and press the YELLOW button on the remote for each Satellite to save, Press the EXIT button on
the remote to exit the list.
Press the EXIT button again. Press OK on Motorized Setup. Press OK again to display a Satellite
List. Select a Satellite and press OK. Go to the Third line(DiSEqC Motor) and use the Left/Right
buttons on the remote to select DiSEqC 1.2.
Go to Move and press and hold the Left/Right buttons on the remote until you get a Signal Quality
of more than 40%.
Go to Command type and select Save Position and press OK to save.
Press the RED(
) button on the remote to scan. Repeat the above for more satellites.
How to Setup a USALS Motorized System.
Press the MENU button on the remote and press the OK button on Installation setup.
Press OK on satellite to display a Satellite List. Select a Satellite(e.g. Hotbird 13E and Astra 19.2E)
and press the YELLOW(
) button on the remote for each Satellite to save, Press the EXIT button
on the remote to exit the list.
Press the EXIT button again. Press OK on Motorized Setup.
Press OK again to display a Satellite List. Select a Satellite and press OK.
Go to the Third line(DiSEqC Motor) and use the Left/Right buttons on the remote to select USALS.
Go to Position Setting and press OK. Then go to Longitude and Latitude and enter the coordinates
of where you live.(London's Longitude is 00.1 West, South of UK's Latitude is 51.5 North).
Press the EXIT button on the remote. Go to Command Type and select Go To Position and press
OK. Wait until the Signal Quality is more than 40% in the progress bar.
Press the RED(
) button on the remote to scan.
If the Signal Quality is below 40%, then the settings are incorrect and the Longitude needs to be
adjusted, for example : 00.2, 00.3, 00.4, 5/6/7/8/9 West or East.
The Latitude may also need to be adjusted. If you still have not got a signal, then the external
installation(dish,etc) needs to be adjusted.
4
How to restore default channels
Press the MENU button on the remote. Go to Factory Reset and insert PIN Code(default 0000)
Then go to Restore default channels, press OK button on the remote. Select YES
It will retrieve default channels.
Active Transponders
For Technomate Motorized Systems
No
1
2
3
4
5
6
7
8
9
10
11
12
13
14
15
16
17
18
19
20
21
22
23
24
25
26
27
28
29
30
31
32
33
34
35
36
37
38
39
Satellite Name
INTEL 707
INTEL 1R
INTEL 3R 11K
INTEL 903K
INTEL 801
HISPASAT
NSS 7
INTEL901
TELSTAR 12
ATLANTIC BIRD 1
EXPRESS 3
TELECOM 2D
NILESAT 101
ATKANTICBIRD 3
AMOS 1
THOR
SIRIUS 4
EUTEL W3
EUROBIRD 9
EUTEL W1
HOTBIRD
EUTEL W2
ASTRA 1
EUTEL W6
ASTRA 1E
EUROBIRD 2
BADR 3/4
ASTRA 2
ARAB 2B
ASTRA 1D
EURODIRD 3
EUTEL W4
HALLASAT 2
EXPRESS AM1K
TURK 2A/3A
EXPRESS AM22
INTEL 904
INTEL 902
INTEL 7/10K
Degree
53.0° W
45.0° W
43.0° W
34.5° W
31.5° W
30.0° W
22.0° W
18.0° W
15.0° W
12.5° W
11.0° W
8.0° W
7.0° W
5.0° W
4.0° W
0.8° W
4.8° E
7.0° E
9.0° E
10.0° E
13.0° E
16.0° E
19.2° E
21.6° E
23.5° E
25.5° E
26.0° E
28.2° E
30.5° E
31.5° E
33.0° E
36.0° E
39.0° E
40.0° E
42.0° E
53.0° E
60.0° E
62.0° E
68.5° E
Frequency
11632
11496
10722
10969
11493
11577
11563
11057
11060
11025
11516
10972
11747
11512
10722
11166
11727
10928
11727
10970
10719
10957
10744
10972
10862
11005
11727
10714
12515
11747
11093
12532
10984
11097
11960
10974
10964
10961
10970
5
Symbol Rate
03111
07593
30000
20000
08000
27500
06111
01950
19279
03382
07780
27500
27500
29950
27500
01450
27500
30000
27500
04167
27500
02821
22000
02170
22000
06430
27500
22000
03000
22000
01428
04340
08050
04800
03333
08150
03327
05300
30000
Polarity
V
V
V
V
V
V
H
H
H
V
V
H
V
V
H
V
H
H
V
V
V
H
H
V
H
V
H
H
H
V
H
H
V
H
V
H
H
V
H
Safety Instructions
1. Be sure to read this User's Manual before starting the operation of the receiver.
2. Do not touch a power cord with wet hands as it may cause electric shock.
3. Never open the cover. It is very dangerous to touch the inside of the unit due to the
possibility of an electric shock.
4. Place the unit in a well ventilated and no-heat environment.
5. When you do not use this unit for a long time, make sure that the power cord is pulled
out from the outlet. Also do not uses a damaged power cord as it cause fire or an
electric shock.
6. A professional installation is required. If reception is interrupted, contact your local
service centre.
7. Place the unit horizontally. An uneven placement may cause the unit to be damaged.
8. Do not put heavy items such as a TV on the unit. This may damage the unit.
9. Do not leave the unit near water.
10. Do not put water containing items such as vase on the unit.
11. Do not install the unit :
•Where it is subject to vibrations.
•Where it is exposed to direct sunlight.
•Where there is humidity.
•Where the temperature is too high or too low.
•Where there is no ventilation.
12. Moving the unit to a hot area from a cold one will cause condensation. Do not
operate the unit for one or two hours or unit it has dried completely.
13. The mains plug is used as the disconnect device.
14. The disconnect device shall remain readily operable.
15. The socket-outlet shall be installed near the equipment and shall be easily
accessible.
6
CHECK POINTS BEFORE USE
ACCESSORIES
If any accessories listed
above are missing, contact
the sales representative
where you purchased this
unit.
SATELLITE DISH
You dish should be properly installed and azimuth and elevation must be precisely set up.
This unit is working with DiSEqC 1.2 on a compatible antenna positioner.
Ask your dealer for more information.
7
CONTROLS/FUNCTIONS
FRONT/REAR PANEL
Watching TV status (Live mode)
1. Power
2. Menu
3. Exit
4. Volume +/5. OK
6. Channel +/-
Connector
1. CABLE IN
2. LOOP OUT
3. LNB INPUT
4. LNB OUTPUT
5. LAN
6. USB
7. e-SATA
8. RS232
9. HDMI
10. SPDIF
11. S-VIDEO
12. Component Out
13. VIDEO
14. Audio L/R Out
15. TV/VCR SCART
16. RF OUT UHF
17. TV ANT IN
18. Power Cord
OSD operating status (OSD mode)
Turns the receiver on/off.
To enter or exit the Main Menu.
To change a previous menu or live mode. Current channel displays in VFD display screen.
To change volume level
To change parameter value.
To open channel list
To Select / Confirm an item
To change current channel.
To move cursor up/down.
IDC-169-2 FEMALE
IEC-169-2 MALE
IDC-169-24 FEMALE
IDC-169-24 FEMALE
RJ-45
USB A-type
E-SATA
DB-9
HDMI
Fiber Optic
MINI-DIN
RCA cinch
RCA cinch
RCA cinch
SCART
21-69 IEC 169-2 MALE
IEC 169-2 FEMALE
(See Page 7)
Functions
Cable signal input to digital tuner
Loop-through output from digital tuner
IF Input from LNB to digital tuner
IF loop-through output from digital tuner
10Base-T/100Base-Tx Ethernet
USB 2.0
External SATA
Low speed serial port
Digital Video/Audio Output
Digital audio output(Optical)
S-VHS Output
Component video output (Y, Pb, Pr connectors)
Composite video output
Left/Right audio output
CVBS, RGB Video Input/Output, Audio Input/Output
Output to TV
Input from analog terrestrial antenna
Receives electric power.
8
REMOTE CONTROL
1. POWER : To turn the receiver On/Off.
2. MUTE : To turn the Sound On/Off.
3.TV/SAT : To switch the TV output source between the
satellite input and the UHF/VHF antenna input.
4. ZOOM : To zoom In/Out.
5. EDIT : To go to Edit Channels Menu.
6. UHF : To adjust UHF channel. Use Volume key ◀/▶ to
control UHF Channel
7. TV/RADIO : To Switch between TV and Radio modes.
8. MOSAIC : To display multiple pictures.
9. SLEEP : To adjust the Sleep Timer.
10. PAUSE : To pause the video. Press again to resume the video.
11. MENU : To enter or exit the main menu.
12. CH▲ : To change channels in non-menu mode and move
the cursor up in menu mode.
13. SAT : To show Satellite list.
14. VOL ◀ : To change the volume level in non-menu mode.
15. VOL▶ : To change the volume level in non-menu mode.
16. OK : To show the channel list in non-menu mode and select
an item or confirm in menu mode.
17. CH▼ : To change channels in non-menu mode and move
The Cursor down in menu mode.
18. EXIT : To exit from the present menu and to go to the
previous menu.
19. RECALL : To go to the previous channel menu. Used for
special function in menu mode.
20. USB : To show the USB menu.
21. VOL UP : To change the volume level in non-menu mode.
22. INFO : To show information about the current program.
Press twice to show detailed information.
23. FILELIST : To display the filelist.
24. VOL DOWN : To change the volume level in non-menu mode.
25. FAV : To show favorite list in the favorite group.
26. POS : To show the DiSEqC motor view control.
27. A-Z : To sort channel list.
28. EPG : To show the TV/Radio program guide.
29. TEXT : To show the teletext contents if teletext is transmitted.
Used for special function in menu mode.
30. SUBTITLE : To show the subtitle contents if subtitle is
transmitted.
31. AUDIO : To show Multi-language audio track.
32. COLOR KEY : To adjust Color and Brightness and Contrast.
33. V.FORMAT : To change video output’s resolution and the stereo-mono mode and subtitle
information.
34. WIDE : To select a TV aspect ratio with Pan Scan or Letter-Box(4:3). Full screen or Pillar
box(16:9).
35. BOOKMARK : Set the bookmark position.
36. REC : Start recoding.
37. STOP : Stop Playback.
38. PLAY : Play Content.
39. PAUSE : Pause playback or start time-shift mode.
40. RWD : Rewind a file/ Arrow UP : To move to the previous page when many pages are
available.(It is worked when in Menu List)
41. FWD : Forward a file/ Arrow Down : To move to the next page when many pages are
available.(It is worked when in Menu List)
42. ADVANCE : Go to live channel at time-shift mode.
43. SLOW : Playback in show mode.
9
FRONT DISPLAY
1
Power On/Off mode
2
It is displayed when a Satellite channel is viewing
3
It is displayed when a Terrestrial channel is viewing
4
It is displayed when a USB device is connected.
5
It is displayed when a channel is recording
6
It is displayed when the channel is HD
7
Displays the video output’s resolution
8
Displays the video output’s resolution
9
Displays the video output’s resolution
10
Displays the video output’s resolution
11
Displays the video output’s resolution
12
It is displayed when Receiver receive remote control signal.
10
EQUIPMENT CONNECTION
CONNECTION WITH ANTENNA / TV SET / A/V SYSTEM
1. Connect the TV antenna to TV ANT IN.
2. Connect the Video and Audio of TV to the Video and Audio.
Connect Red and White connector to Audio R and Audio L and Yellow into video port
respectively.
3. Connect the Component Video of your TV to Component Video of best quality.
Connect the Y, Pb and Pr of your TV to Y, Pb and Pr respectively.
4. Connect your satellite dish.
* Note : To avoid Slave settop channel’s interference in Master settop channel when
Antenna Loop Through is in use, Please set ‘OFF’ of LNB Power in Installation
setup menu of Slave settop.
* Note : In some receivers TV scart is at the top or bottom of the rear of the receiver.
Please follow the Writing of the TV then connect your scart cable for viewing.
11
OPERATION
GETTING STARTED
Turn your receiver power on and proceed with system setup as follows:
Menu Language Setting
1. Turn on your TV and receiver.
2. The language selection menu will be displayed, select a
language and press the OK button on.
Installation Setup
1. Press the MENU button on the remote to display the main
menu.
2. Use ◀/▶ and ▲/▼ button on the remote to move in the
menu.
3. Select Installation Setup, the Installation Setup menu will
appear.
4. Select each menu you want to edit /change.
- Satellite : Select any satellite by pressing ◀/▶ buttons on
the remote.
- Transponder : Select any transponder by pressing ◀/▶ buttons on the remote.
- LNB Type : Select your LNB Type Single/Universal/Wide/OCS
- LNB Power : Select LNB power ON/OFF/13V/18V/Auto
- 22KHz : Select OFF/ON/Auto of 0/22 KHz
- DiSEqC 1.0 : Select DiSEqC 1.0 Port
- DiSEqC 1.1 : Select DiSEqC 1.1 Port
5. Search : Press Red (
) button on the remote to begin satellite search.
6. Rename : Press Green (
) button on the remote to rename the selected satellite.
7. Auto Navigation : Press Green (
) button on the remote to begin auto navigation.
8. Save : Press Yellow (
) button on the remote to save the selected satellite.
9. Delete : Press Blue (
) button on the remote to de-select the selected satellite.
12
Motorized Setup
1. Press the MENU button on the remote to display the main
menu.
2. Use ◀/▶ and ▲/▼ buttons on the remote to move in the
menu.
3. Select Motorized Setup, the Motorized Setup menu will
appear.
4. Select each menu you want to edit /change
- Satellite : Select any satellite by pressing ◀/▶ buttons
on the remote.
- Transponder : Select the current TP value of the selected satellite.
- DiSEqC Motor : Select DiSEqC Motor type Off/DiSEqC 1.2/USALS
5. Search : Press Red (
) button on the remote to begin satellite search.
6. Auto Navigation : Press Green (
) button on the remote to begin auto navigation.
7. Blind Search : Press Yellow (
) button on the remote to begin Blind search.
DiSEqC 1.2 Setup
1. Select DiSEqC 1.2 on DiSEqC Motor, the DiSEqC 1.2 menu
will appear.
-
Satellite : Select any satellite by pressing ◀/▶ buttons.
Transponder : Displays the current TP value of the selected
satellite.
DiSEqC Motor : Select DiSEqC 1.2
Move : Move the dish position to west/east by pressing ◀/▶
buttons.
Move Fine : Move the dish position 1 step at a time to
west/east by pressing ◀/▶ buttons.
Move Control : Control motor by press OK button on the
remote.
• Step Type : Select step size to move by ◀/▶ buttons.
• Move Steps : Move the dish position to west/east by
setting value of step type.
• Limit Set : Control East Limit/Delete Limit/West
Limit/Reset System by press OK button.
• East Limit : Set current position to east limit by press
OK button.
• West Limit : Set current position to west limit by press
OK button.
• Delete Limit : Delete east/west limit by press OK button.
• Reset System : Reset the position of all saved satellites.
-
Command Type :
• Save position : Save the current setting of DiSEqC 1.2 system
• Go to position : Go to the position of the saved satellite by press OK button.
• Go to Reference : Move the dish to the 0 position by press OK button
• Recalculate : Recalculate the position of all other saved satellites relative to the known
position.
2. Search : Press Red (
) button on the remote to begin satellite search.
3. Auto Navigation : Press Green (
) button on the remote to begin Auto Navigation.
4. Blind Search : Press Yellow (
) button on the remote to begin Blind Search.
13
USALS System Setup
1. Select USALS on DiSEqC Motor, the USALS menu will
appear.
-
-
-
Satellite : Select any satellite by pressing ◀/▶ buttons.
Transponder : Displays the current TP value of the selected
satellite.
DiSEqC Motor : Select DiSEqC Motor USALS.
Position setting : set the current degree of the selected
satellite by press OK button
• Longitude degree : set the longitude degree of user
position.
• Longitude direction : set the longitude direction of user
position.
• Latitude degree : set the latitude degree of user position.
• Latitude direction : set the latitude degree of user
position.
Move Fine : Move the dish position 1 step at a time to
west/east by press ◀/▶ buttons
Move Control : Control motor by press OK button on the
remote.
• Step Type : Select step size to move by ◀/▶ buttons.
• Move Steps : Move the dish position to west/east by
setting value of step type.
• Limit Set : Control East Limit/Delete Limit/West Limit/Reset System by press OK button.
• East Limit : Set current position to east limit by press OK button.
• West Limit : Set current position to west limit by press OK button.
• Delete Limit : Delete east/west limit by press OK button.
• Reset System : Reset the position of all saved satellites.
Command Type :
• Save position : Save the current setting of DiSEqC Motor system.
• Go to position : go the position of the saved satellite by press OK button.
• Go to Reference : Move the dish to the 0 position by press OK button.
• Recalculate : Recalculate the position of all other saved satellites relative to the known
position.
2. Search : Press Red (
) on the remote to begin satellite search.
3. Auto Navigation : Press Green (
) on the remote to begin Auto Navigation.
4. Blind Search : Press Yellow (
) button on the remote to begin Blind Search.
DiSEqC Motor View Control
1. Select DiSEqC 1.2 or USALS in the Motorized Setup menu.
2. In the viewing mode, Press POS button on the remote to
display DiSEqC Motor
-
Move : Move the dish position to west/east by pressing ◀/▶
buttons.
Move Fine : Move the dish position 1 step at a time to
west/east by press ◀/▶ buttons
Command Type :
• Save position : Save the current setting of DiSEqC Motor
system.
• Go to position : go the position of the saved satellite by press OK button.
• Go to Reference : Move the dish to the 0 position by press OK button.
• Recalculate : Recalculate the position of all other saved satellites relative to the known
position.
3. Press ◀/▶ buttons on the remote to move DiSEqC Motor to get the best signal.
14
Auto Navigation
All the available channels/satellites can be searched in this
menu. Select the satellite and save before Auto Search.
1. Press the MENU button on the remote to display the main
menu.
2. Use ◀/▶ and ▲/▼ button on the remote to move in the
menu.
3. Select Auto Navigation, Auto Navigation menu will appear.
4. Select the satellites you want to search by pressing the OK
button on the remote.
You can select more satellites by pressing the ◀/▶ and OK button on the remote.
5. Auto Navigation/Scan : Press Yellow (
) button on the
remote.
-
Search Mode : Select the type of channel search you want
by pressing ◀/▶ buttons on the remote.
• Free + CA : To search Free To Air and scramble
channels.
•
Free Only : To search Free To Air channels only.
•
CA : To search scramble channels only.
-
Radio CH : To search TV channels only or All(TV+Radio)
channels.
•
ON : To search Radio channels and TV channels.
•
OFF: To search TV channels only.
-
Network Search : Select Network Search ON/OFF to find more transponders through NIT
Search.
6. Blind Search : Press Blue (
) button on the remote to begin Blind Search.
Note : Make sure that the signal level of the selected satellites is high by the signal quality bar.
If the signal quality is lower than 50%, go back to Satellite Setup and check LNB, DiSEqC Switching,
etc.
Blind Search
1. Select the satellites you want to search by pressing OK
button on the remote.
2. Use ◀/▶ buttons to go range mode to search.
-
TP : Use OK button to write frequency range.
SR : Choose Fast/Detail for Scan mode.
POL: Choose Polarization ALL/H/V to scan
Mode : Select the type of channel search you want by
pressing ◀/▶ buttons on the remote.
Radio CH : To search TV channels only or All(TV+Radio)
channels
3. Auto Navigation Blind Search : Press RED (
) button on the remote to begin Blind Search of
all ‘Selected’ satellites.
15
Advanced Search
To edit and search channels on newly launched satellites or not
preprogrammed satellites in the list.
1. Press the MENU button to display the main menu.
2. Use ◀/▶ and ▲/▼ buttons to move in the menu.
3. Select Advanced Search, the Advanced Search menu will
appear.
4. Select each menu you want to edit/change.
• Search TPs : Press RED (
) button to search ‘Selected’
TPs.
• Delete TPs : Press GREEN (
) button to delete ‘Selected’ TPs.
• Delete All : Press YELLOW (
) button to delete all TPs of TP List.
• Select TP : Press BLUE (
) button to select TP of current position.
- Satellite : Select a satellite by pressing ◀/▶ button on the
remote.
- Transponder : Select OK button to displays the current
Transponder list of the selected satellite.
- Symbol Rate : Displays the current symbol rate of the
selected transponder.
- Polarization : Display the current polarization H/V of the
selected transponder.
- Scan Mode : Select search type (Free+CA, Free Only, CA
Only)
- Network Scan : Select Network Search On/Off.
5. Search TP : Press RED (
) button to search current TP.
6. Add TP : Press GREEN (
) button to add new TP.
7. Edit TP : Press YELLOW (
) button to modify current TP.
8. Delete TP : Press BLUE (
) button to delete current TP.
Fast Scan
Search channels for some providers quickly.
1. Press the MENU button on the remote to display the main
menu.
2. Use ◀/▶ and ▲/▼ buttons on the remote to move in the
menu.
3. Select Fast Scan, then the Fast Scan menu will be
displayed.
- Provider : Select provider for scanning.
- CHs Renumber : Select On/Off to sort with number of operator.
- Scan : Press Red (
) button to search channels of provider that you select.
Terrestrial Scan
Through this function, the receiver searches for all the available
channels and saves them in memory.
1. Press the MENU button on the remote to display the main
menu.
2. Use ◀/▶ and ▲/▼ buttons on the remote to move in the
menu.
3. Select Terrestrial Scan, then the Terrestrial Scan menu will
be displayed.
16
- Channel : Select Channel Number for scanning.
- Transponder : Display Frequency of selected Channel.
- Bandwidth : Display Bandwidth of selected Channel.
- Scan Mode : Select search type (Free+CA, Free Only, CA Only)
- Network Scan : Select Network Search On/Off.
- Radio CH : Search TV channels only or All(TV+Radio)
channels.
- Antenna Supply 5V : Select external voltage (5V) output.
4. Single Scan : Press RED (
) button to search a current
channel.
5. Auto Scan : Press GREEN (
) button to search
preinstalled all channels.
6. Add : Press YELLOW (
) button to add new channel.
7. Delete : Press BLUE (
) button to delete current channel.
Channel Selection
■ If you know the channel number, enter the channel number by
using numeric buttons on the remote and wait 1 seconds until
the channel changes.
Then if you press OK button, channel will be displayed.
■ If you know the channel name, press OK button on the remote,
then the cannel list will be displayed. Select the channel you
want to watch by using ▲/▼, OK buttons on the remote.
1. In the right side of screen, detailed information of the
selected channel is displayed.
(Satellite Name, TP and CAS and Network name)
2. You can navigate between channels with these buttons.
- ▲/▼ : Moves up/down.
- ◀/▶: Move page up /page down.
- RED (
): Displays all channels/FTA channels/Scramble channels in current satellite.
- GREEN (
): Displays channels sorted by alphabetical order.
- YELLOW (
): Displays channels sorted by transponder.
- BLUE (
): Displays channels sorted by scramble type.
3. You can use SAT button to change satellite list and FAV button to change favorite list.
4. You can use numeric key to move channel that you want quickly.
5. When the selection bar is positioned on the channel you want to see, press OK on the remote.
Other Functions of the Remote Control
■ Volume Control
1. While you are watching a program, press ◀/▶ on the remote to control volume.
2. Press the MUTE button to turn off the sound of the program.
Press MUTE button again to turn the sound On.
■ Channel Information
1. Display the information of a program by pressing INFO button on the remote.
2. For viewing current channel's EPG Information, press INFO button again while display the
Information bar.
■ TV/SAT
You can select between TV mode and Settop mode pressing TV/SAT button.
■ TV/RADIO switching
You can press this key to change from Radio channels to TV channels or vice versa.
■ RECALL
Press to return to the previous channel.
17
■ AUDIO
You can press AUDIO button to select audio language
provided by service provider.
■ TEXT
The Teletext service is a text data service sometimes
available from the Service Provider.
■ SAT
Press the SAT button to select a satellite in the Satellite List.
■ FAV
Press FAV button to select a favorite channel list in the
favorite group.
■ PAUSE
You can press this key to pause to video, Press it again to resume the video.
■ Multi Picture Display
Press the MOSAIC button on the remote to display multi-picture mode.
You can select the numbers of multi-pictures.
Eg. 1x2, 2x2, 2x3, 3x3
■ ZOOM
You can press to zoom in the video.
1. Press the PAUSE button and press ZOOM button. You can zoom in sections of Freezed Video.
2. While watching a program, press. You can zoom in sections of playing video.
3. To cancel the freeze status, please release the zoom status.
■ SUBTITLE
The subtitle service is a subtitle data service sometimes available from the service provider.
You can press to select the subtitle language of current channel.
■ SLEEP
You can set the receiver to turn off after a few minutes.
Press the SLEEP button to set a Sleep Timer.
- To cancel a Sleep timer, press the SLEEP button until you set the time as "--".
(--,10,20,30,40,50,60,90 minutes)
■ V-FORMAT
- HD Mode : You can change the video resolution : 1080i > 720p > 576p > 576i > 480i.
- Screen Mode : You can change TV’s aspect ratio :
4:3 : Pan-Scan or Letter Box or Full-Frame
16:9 : Center-Cut-Off or Pillar Box or Full-Frame
- Audio : You can change STEREO > LEFT > RIGHT
18
■ WIDE
Press the WIDE button to change the TV’s Aspect Ratio directly.
4:3 : Pan-Scan or Letter Box or Full-Frame
16:9 : Center-Cut-Off or Pillar Box or Full-Frame
■ COLOR Adjustment
Press the COLOR button on the remote to select Color
Adjustment menu.
By using the ◀/▶ button on the remote, you can adjust the
brightness, contrast and the color of picture.
■ POS
In case of setting DiSEqC Positioner or USALS, You can use POS button for adjust current motor
position.
SYSTEM SETTINGS
TV SETUP
This submenu arrows you to specify the video/audio output
setting.
- HD Mode : Select the video resolution
: 1080i > 720p > 576p > 576i > 480i.
- SCART Mode: Select SCART output(CVBS / RGB)
- TV Type : Select your TV screen(4:3 / 16:9)
- Screen Mode: Select the TV Aspect ratio
(FF / LB / PS, FF / CCO / PB)
- SPDIF Mode : Select audio output type
(Off / PCM(downmix) / Dolby)
- RF Mode : Select among supported PAL standards(PAL B/G, PAL I, PAL D/K, PAL M, PAL N)
- RF Channel : Set the RF channel to which to display the audio and video signals on your TV
set(21 to 69). If you select 40, they will be displayed at channel 40 on your TV
set.
19
TIME SETUP
This submenu arrows you to set your local time
- Time : Display current date and time.
- GMT-Time: Sat : Display GMT date and time using satellite
stream information.
- GMT-Time: Terrestrial : Display GMT date and time using
terrestrial stream information.
- GMT Usage : If you turn it ON, local time is determined by
adjusting the differences from GMT
(Greenwich Meantime), according to your
location.
- Time Zone : If GMT Usage is ON, The Local time is GMT time +Local Offset.
- DL Save : You can adjust day light time(summer time)
- Set Date : If GMT Usage is OFF, you can modify this by pressing the OK button on the remote.
Local time is determined by adjusting current date and current time.
- Set Time : If GMT Usage is OFF, you can modify this by pressing any NUMERIC button.
TIMER SETUP
This submenu arrows you to set timer1~16 for Sleep/Wake Up
/Duration/PVR Record.
- Index : Select Timer number to save.(Max 16 timers)
- Cycle : Select Timer cycle (Off > one time > every day >
every week)
- Mode : Select Timer mode ( Sleep > Wake Up > Duration >
PVR Rec )
- Date : Set Date for timer
- Time : Set Time for timer
- Duration : set duration time for timer
- Channel : select channel to wake up / duration / PVR Record.
OSD SETUP
This submenu arrows you to set language or OSD.
- Menu : Select the desired language of the menu.
- 1st Audio : Set the default audio language when selecting a
channel.
- 2nd Audio : Set the second audio language when selecting
a channel.
- Subtitle : Set the default subtitle language.
- Transparency : Select OSD transparency of the
menu.(10%~100%)
- OSD Timeout : Select the display duration of the
information banner.(1sec~10sec,On)
- Moving Display MSG : Turn the DiSEqC moving message On/Off.
- Remote Controller : If you need to use two RCU, You can toggle using this item.
Password Setting
This submenu arrows you to change the password option to
access or lock menu entry and to change password.
- Receiver Lock : If you turn it ON, you will be asked to
enter PIN code when power on.
20
- Lock Level : If you select INSTALL, you will be asked to
enter PIN when you go to installation/edit
channels/EDIT button.
If you select MENU, you will be asked to
enter PIN when you go to menu.
- Age Limit : Prevents children or unauthorized people from
watching the specific programs.
(Not use/Every/4/7/13/16/18)
- Old Pin : Enter current password to change password.
- New Pin : Enter the new password you want to change.
- Verify Pin : Enter new password to confirm.
*Note : The default pin is 0000.
Serial Data Transfer
This submenu arrows you to transfer the software of a receiver to another receiver through RS-232.
- Software : Transfer the firmware of a receiver to another receiver.
- Channels : Transfer all channel data of a receiver to another receiver.
- All Data : Transfer all data ( Firmware + Channel Data) to another receiver.
Factory Reset
This sub-menu allows you to restore the factory setting if the
users encounters a problem after changing any settings.
- Delete Radio Channels : Erase all radio channels.
- Delete Scramble Channels : Erase all scramble channels.
- Delete All Channels : Erase all channels.
- Restore Default Channels : If you didn't save ‘Save As
Default Channels’, Factory default channels will be
restored.
If you saved channels as ‘Save As Default Channels’, your
saved channels will be restored.
- Save As Default Channels : Current channels can be
saved as default channels (max 20000 channels).
- Factory Reset : Erase all channels and restore factory
default setting.
21
IP Settings
If the Network supports DHCP, IP settings can be allocated
automatically, If the Network does not support DHCP, the
Addresses must enter manually.(Static IP).
- DHCP Usage : On/Off to receive IP settings automatically.
- IP Address : Here enter the IP address.
- Subnet Mask : Here enter Subnet Mask Number from your
Network.
- Gateway : Here enter IP address of Gateway (e.g. router)
- DNS : Here enter IP address of main DNS Server.
- Mac Address : Mac address display.
*Note : If use DHCP Usage to On state, You should press RED button to receive IP address.
EDIT CHANNELS
Channel Edit
This sub-menu arrows you to skip / lock / delete / move / find
channels.
You can use TV/RADIO and SAT buttons for channel list.
1. Press the MENU button on the remote to display the main
menu.
2. Select Edit Channels, Channel Edit menu will appear.
) : Press Red button to skip channel. You can use
OK button to next skip. Once a channel is
skipped, this channel will be skipped
continuously.
- LOCK(
) : Press Green button to lock channel. You can use OK button to next lock.
Once a channel is locked, You should input pin code to open this channel.
- DELETE(
) : Press Yellow button to delete channel. You can delete OK button to next
delete.
If you delete a channel, you cannot watch this channel until you do a channel
search again.
- MOVE(
) : Press Blue button to move channel.
You can use OK button to select next moving channel.
Use NUMERIC buttons on the remote to move the selected channel.
- FIND(
) : If you know channel name to edit, You can use INFO button for quick finding.
- SKIP(
Favorite Edit
This sub-menu allows you to set up favorite name and favorite
lists.
You can use TV/RADIO and SAT buttons for channel list.
There are 16 favorite groups (One group can have max 512
channels).
1. Press the MENU button on the remote to display the main
menu.
22
2. Select Edit Favorites, Favorite Edit menu will appear.
- EDIT(
) : If you want to edit the favorite name, press Red
button on the remote.
At favorite name menu, press OK button for
virtual keyboard.
- NEXT LIST(
) : Press Green button to toggle Favorite
1~8 / Favorite 9~16 List
- CH CHANGE(
) : If you press Yellow button, You can
change channel using numeric
buttons.
- SELECT FAV(
) : Press Numeric number(
) to make favorite list.
You can use OK button to make same favorite list.
Rename CH/Edit PIDs
This sub-menu allows you to rename the channels and input
user PID.
You can use TV/RADIO and SAT buttons for channel list.
1. Select Rename CH/Edit PIDs, the Rename CH/Edit PIDs
menu will appear.
2. Press the OK button on the channel that you want to edit.
3. Press the OK button on Edit Name to rename a channel. A
virtual keyboard will appear.
Rename a channel by using the ◀/▶, ▲/▼ and OK
buttons on the remote.
Press the EXIT button on the remote to exit.
4. You can edit a PID by using NUMERIC buttons on the
remote.
*Note : The VIDEO PID, AUDIO PID and PCR PID are very important
for optimal satellite signal reception.
Add Channels
Select and save the satellite in the installation setup before add
channels.
This sub-menu allows you to make channel data using only PID
value.
1. Press the MENU button on the remote to display the main
menu.
2. Select Add Channels, Add Channels menu will appear.
- Satellite : Select a satellite to add channel.
- Transponder : Select transponder to add channel.
- Channel Name : If you want to insert channel name, press OK button to use virtual keyboard.
- Channel Type : Select TV / Radio
- Video PID : Insert Video PID.
- Audio PID : Insert Audio PID.
- PCR PID : Insert PCR PID.
23
Front Display Settings
This sub-menu allows you to control front display.
1. Press the MENU button on the remote to display the main
menu.
2. Select Front display settings, Front display settings menu
will appear.
- Text Moving : Turn the text moving On/Off.
- Channel Number : Turn the channel number On/Off
- LED : Turn the blue light On/Off
- VFD : Control VFD Display light 0 / 1 / 2 / 3
- Power Save : Control Power saving mode of standby state.
EPG(ELECTRONIC PROGRAM GUIDE)
EPG(Electronic Program Guide)
This sub-menu allows you to view the electronic program
guide(if available).
1. Press the EPG button on the remote, the menu will appear.
2. Press the ◀/▶ to go to the previous/next EPG.
3. Press ▲/▼ or NUMERIC button to change the channel.
4. Press the TV/Radio button on the remote to view TV/RADIO
channel EPG.
5. Press the OK button to view Extended EPG information.
- DATE- (
) : Display EPG information list for previous
day.
- DATE+ (
) : Display EPG information list for next day.
- DAILY (
) : Display Daily EPG information of current
program.
- RESERVE (
) : Press RESERVE(
) button to do
reservation viewer.
- PVR Rec (
) : Press PVR Rec (
) button to do
reservation recording.(PVR Only)
EPG Timer
This sub-menu allows you to set the program reservation using
EPG time.
If this time and duration is not previous time, Press Save(
)
for timer reservation.
- Index : Display Timer slot.
- Cycle: Display Timer cycle.
- Mode : Display Duration for EPG time slot.
- Date : Display Date for selected EPG.
- Time : Display Start time for selected EPG.
- Duration : Display Time interval between start time to end time of selected EPG.
- Channel : Display Channel name of selected EPG.
24
CAM(COMMON INTERFACE MODULE) Only
CAM Initializing
To watch scrambled channels, you will need a Conditional
Access Module(CAM) and
Smart card which is specific to that CAM from the service
provider (broadcaster).
*Note : Without a CAM and a smart card, you can watch only
Free-to-Air programs.
1. Insert a CAM into a CAM slot in the receiver and a Smart
card into the CAM.
2. The message : CAM In it will appear.
Status of the CAM
1. Go to CI Information. Press OK on the CAM to see further
information of the CAM
2. Proceed with further instructions displayed on the screen,
then you can check further details depending on the CAM in
use.
*Note : Further detailed information is not mentioned in this manual
since the information depends on the type of CAM.
CAS(CONDITIONAL ACCESS SYSTEM)
Card Initializing
To Enjoy CONAX CAS7 scrambled channels, you will need a Smart Card from the service provider
(program distributor). If you are subscribing to services from more than one service provider, you
will need a Smart Card from each one. Since a Smart Card is connected to a single service
provider, a limited range of channels will be available via it.
*Note : Without the Smart Card, you can watch only Free-to-Air programs
1. Insert the Smart Card into the receiver's slot designed for it.
2. The message ‘Smart Card Inserted’ will appear on the screen.
3. After the message ‘Smart Card Inserted’ has disappeared, you will be able to watch the
channels offered by the service provider.
The Status of the Smart Card
1. You can access detailed information about the Smart Card
using ▲/▼ button in the Main Menu.
2. Proceed with further instructions displayed on the screen to
check more detailed information depending on the Smart
Card in use.
*Note : Further detailed information is not mentioned in this manual
since the information depends on the Smart Card in use.
25
System Information
You can check the current information about your receiver, such as the receiver Model name,
Hardware version, Software version, hardware version, Last update, etc.
*Note : This information is necessary when you want to download a new software or you need to repair
the receiver.
USB Menu
This sub-menu allows you to do File & Disk management for internal or external memory device.
Also this allows you to playback MP3(music) and JPEG(picture) files and to download software and
channel list by connecting your USB memory stick (USB flash drive) to the USB part in the receiver.
USB - File Manager
You can manage file list using below step.(Copy, Move, New
folder, Delete, Rename)
1. COPY / MOVE
- Press the SELECT (
) or the SELECT ALL (
) button to
select files.
- Press the MENU button and select function(MOVE/COPY)
- Go to the wanted position(folder or file) for copy or move.
- Press the MENU button and select the PASTE item.
2. DELETE
- Press the SELECT (
) or the SELECT ALL (
) button to
select files.
- Press the MENU button and select the DELETE item
3. RENAME / NEW FOLDER
- Go to position that you want to make a rename and a new folder.
- Press the MENU button and select the RENMAE or the NEW FOLDER item.
USB - Disk Manager
1. Disk Information : Select Hard Disk or USB device.
Press RED(
) button to view the information of the USB
device. (used size, total size, free size)
2. Check Disk : Select Hard Disk or USB device.
Press RED(
) to know HDD or USB device status.
3. Format : Select Hard Disk or USB device.
Press RED(
) to format a selected device.
4. Default Disk : Select a default disk.
USB – Download & Upload
You can download software & channel list from USB to
Receiver using GREEN(
) button.
You can upload channel list from Receiver to USB using
YELLOW(
) button.
* Warining : Do not turn off your receiver whilst downloading.
26
MP3 Menu
1. Use ▲/▼, OK button to select the MP3 file that you want to
listen
2. Use ◀/▶ button to select Icon in the MP3 Player box.
3. Press the OK button to select a file.
- ◀◀ : Previous MP3 file is played.
- PLAY (
) : Current MP3 file is played.
- ▶▶ : Next MP3 file is played.
- PAUSE (
) : Current MP3 file is paused.
- STOP (
) : Current MP3 file is stopped.
- REPEAT : Select One time / Repeat play for one file or
current folder.
- LIST : Open/Close the MP3 file list.
- INFO : Display MP3 file information.
4. Press RED(
) button to select Hard Disk or USB device.
JPEG Menu
1. Use ◀/▶, ▲/▼, OK button to select a picture.
2. Press the OK button to display the picture.
- Slide Interval : Select GREEN (
) to contrast viewing
time.(2/4/6/8/10/20)
- Slide : Select YELLOW (
) to On/Off a slide functionality.
PVR Menu
USB - PVR
▶ File Playback
1. Press the FILELIST button to open the file list. Select the file
you want to playback by using UP/DOWN & OK buttons.
2. Press the OK button, On the right side of screen, detailed
information
about
the
selected
file
will
be
displayed.(Recorded Date/Duration, File Size, Free Size/Free
Time)
27
- DIR MODE/FILE MODE : You can view Dir/File view mode
using this button.
- TIME SORT/NAME SORT : You can sort files with Time or
Name using this button.
- LOOP PLAY/NORMAL PLAY : Use this button to view all file
list one by one.
- For full screen, press OK button once more and then following
time-bar will appear.
▶ Edit Menu
Enter the password. Press the YELLOW button. A popup menu
will appear.
Select the file that you want to edit, and set its parameters as
desired.
1. NORMAL : Press the OK button on file that you want to see
a preview.
2. LOCK : Press the OK button on the file that you want to
lock/unlock.
3. DELETE : Press the OK button on the file that you want to
delete.
4. RENAME : Press the OK button on the file that you want to
rename.
Trick Mode
You can operate the Trick Mode while you are playing the files. This function is available in
Playback mode and Time-shift mode.
▶ PLAYPBACK
This button will display a time-banner. If you want to open the playlist while playing the file, Press
the PLAY button on the remote. In this Mode, press the INFO button to show the trick-operation.
▶ PAUSE
This button will pause the file until you playback again (press the PLAY button or PAUSE button
to resume watching).
▶ ADVANCE
If Time-Shift mode is enabled, press the ADVANCE button to go to the real time live broadcast.
▶ FF (Fast Forward)
When playing the file, press the FF button to forward the program (adjust the playing speed).
- Choose from : x2, x4 and x8
28
▶ RWD(Rewind)
When playing the file, press the RWD button to rewind the program (adjust the playing speed).
- Choose from : x2, x4 and x8
▶ SLOW(1/2x, 1/4x)
When playing the file, press the SLOW button to slow the speed of the playback.
(adjust the playing speed)
▶ Bookmark
To create a bookmark/chapter at a specific time/place of the file.
- BOOKMARK : Press the BOOKMARK button and a red
triangle will appear at that position. If you want to
delete the bookmarked position, press the
BOOKMARK button once more and the red triangle
will disappeared.
- GREEN : Press the GREEN button to go/jump to the
previous bookmark position.
Playback will start from this point.
- YELLOW : Press the YELLOW button to return to the next
bookmark position.
Playback will start from this point.
*Note : The maximum number of bookmarks is 20 for each file.
Instant Recording
You can play one channel recording two channels with same transponder.
1. You can record the current channel you are watching
instantly by using REC button.
If you then press the PLAY button, a time-banner will be
displayed.
2. Press the REC button once more. The following picture
shows that you can select an item when you record the
current channel.
- Channel : Displays the current channel.
- Name : Displays the current recording name.
- Duration : You can change the duration of a recording’s
time by using the LEFT/RIGHT button.
Current recorded time will appear.
* Note : Do not REMOVE the USB device while recording a program.
29
Timer Recording
This function is available when HDD or USB device is
connected. You can choose a channel to record from the EPG
Guide by using the INFO button.
Time Shift
1. To pause and resume live TV channel, press the PAUSE button, The default time for Time-Shift
is 30 minutes.
2. To resume live TV channel, press the PLAY button.
3. The trick-mode operations are available. To return to the live broadcast, press the ADVANCE
button.
30
Explain how to download S/W by USB and how to upload and download channels
by USB
How to download S/W or Channel data by USB.
1. Insert USB Memory Stick to USB Port after opening Front
Cover.(See below drawing)
2. Press MENU Key to go Main menu
3. Select USB Item and Go to USB Download & Upload.
4. Press OK to display USB- Download & Upload menu.
5. Press OK ▲/▼Key to select file for downloading.
6. Press GREEN Key to start download a selected file.
7. Press OK Key at Download Popup menu.
8. Receiver will start to extract a selected file.
You can see progress bar to display extracting process.
9. Receiver will start to write a extracted file.
You can see progress bar to display writing process.
10. If it success to write a selected file, Receiver will start
re-booting.
How to upload channels by USB.
1. Insert USB Memory Stick to USB Port after opening Front
Cover.(See below drawing)
2. Press MENU Key to go Main menu
3. Select USB Item and Go to USB Download & Upload.
4. Press OK to display USB- Download & Upload menu.
5. Press YELLOW Key to upload Channel data.
6. If It success to upload Channels, You can find
channeldata file.( CH_ddmmyear_ttmm.tbn, dd : date,
mm:month, tt : time,mm:minutes)
31
HOW TO DOWNLOAD SOFTWARE FROM PC TO RECEIVER
1. Connect the null model cable to the RS-232C connection
on the back of the receiver and to your PC.
2. Download the latest version of the TM Loader from the
Technomate web site (www.technomate.com)
3. Download the latest software(.TBN) of your receiver.
Ensure that the model number of the software is the same
as the receiver you have.
4. Click on Browse in the TM Loader.
5. Select the file from where you saved it when you
downloaded it from the Technomate web site.
6. Click on Connect on TM Loader.
7. Turn ON the satellite receiver.
8. The downloading status is displayed.
9. Once it displays 100% Finished (wait until it has completed
erasing), the software download has finished.
10. When it completes the writing of the new software,
disconnect the cable between the receiver and the PC.
A Factory Reset is required.
11. Go to System Information on the main menu and make sure that you have correct software
version.
32
Note. How to download/upload Channels
If you want to download /upload Channels, Click on Channels in the TM Loader, then select
Download/upload
* Downloading Channels from PC to TM-8000 Series.
1. Click on Download, and then Click on Browse in the TM Loader.
2. Select the file from where you saved it.
3. Click on Connect in the TM Loader.
4. Turn on the satellite receiver
5. Once it displays 100% finished, the Channel downloading has finished.
* Uploading Channels from TM-8000 Series to PC
1. Click on Upload, and then Click on Browse in the TM Loader.
2. Select the file and folder where you want to save in your PC.
3. Click On Connect in the TM Loader.
4. Press OK button after going to Serial Data Transfer of system setting in Main Menu
5. select Channels and press OK button
6. Once it displays 100% Finished, the Channel uploading has finished.
Questions & Answers
The receiver is on but I cannot get any Menu on the screen?
1) Check if the scart is connected,
2) Check the A/V settings on your television is correct,
3) Scart cable could be faulty therefore replace of in doubt.
I get the message no signal displayed?
1) Check if the LNB cable is inserted into the IF INPUT.
2) Check if the LNB setup menu is correctly set.
3) Your satellite Dish may be out of alignment or your LNB may be is faulty.
4) Go to Easy installation guide and start fresh.
5) Contact your dealer/installer.
I cannot access a particular channel I require?
You need to check the following :
1) Check if you a correct transponder.
Go to advance search, Turn on the Network Search, press red button to tune.
2) Make sure you have correct PID numbers.
If above does not help go to www.lyngsat.com www.kingofsat.net/en/prefs.php
Please contact your Supplier for further assistance.
How can I find out when software version I have?
Press Menu on the remote, Go to system information press ok, Full information is
displayed.
I have lost my personal Lock Code setting, what do I do?
For security reason, please contact your dealer.
33
Trouble Shooting
There may be various reasons for the abnormal operation of the receiver.
Check the receiver according to the procedures shown below.
If the receiver does not work properly after checking it, please contact the dealer.
Don't open the receiver cover. It may cause a dangerous situation.
Symptom
Cause
LED on front
panel doesn't
turn ON
A/C power cord
DISCONNECTED.
Connect power cord properly into the power
socket.
Wrong connection of the
Audio/Video output to TV
input terminal.
Connect power cord properly into the power
socket.
No picture
or sound
Remedy
Wrong connection of satellite
dish/antenna cable.
Satellite dish/antenna is
aimed a the wrong direction.
No signal or weak signal.
Wrong setting of channel
information in MENU screen.
Black-and-white
screen or V-Hold
Check the cable connections, LNB and
other equipment connected between the
LNB and the receiver or adjust the
dish/antenna.
As above. Type the setting value correctly.
Use TV of the same mode.
Your TV mode is different
from satellite broadcasting
mode.
Use the NITSC/PAL converter connected to
a receiver and a TV.
Change the batteries.
Batteries exhausted.
Remote
controller
does not working
Connect the dish/antenna cable correctly.
Fluorescent light interfering
with the remote controller.
Remote controller is
incorrectly aimed.
Switch off the light.
Aim the remote control at the receiver.
Go to password and press 0000 then go to
the bottom of page and change the remote
type to type 1 or type 2.
(Press Front Key LEFT + EXIT 7 times
for changing RCU Type without RCU)
Remote type is not properly
selected.
34
Specifications
System capabilities
Satellite
LNB/Tuner input
Demodulator
TERRESTRIAL
System capabilities
Tuner & Channel
Decoder
System resource
Video decoder
MPEG Audio
Serial data interface
Remote control
SATA
USB
Ethernet
PCMCIA
Smart card
Fully DVB compliant
Connector
Frequency range
Signal level
LNB supply
LNB switch control
DiSEqC
Front end
Symbol rate
IEC 169-24, female
950MHz~2150MHz
-65dBm~-25 dBm
DC 13/18, max 400mA
22KHz
Ver 1.0/1.1/1.2/USALS Compatible
DVB-S/S2 QPSK, 8PSK
DVB-S : 1~45Msps
DVB-S2 : 10~30Msps(QPSK)
10~30Msps(8PSK)
SCPC and MCPC Capable
Spectral inversion
Input connector
Loop-through out
Frequency range
Input impedance
Signal level
Auto conversion
IEC 169-2, Female
IEC 169-2, Male
170~230 MHz, 470~862MHz
75 Ohms Nominal
7/8MHz(-78dBm~-25dBm) switchable by
software
7/8MHz(-3dB) switchable by software
OFDM
2K and 8K hierarchical/non-hierarchical
1/2, 2/3, 3/4, 5/6, 7/8
1/4, 1/8, 1/16, 1/32
32bit processor (266MHz)
128 Mbyte x 2
16 Mbyte
128 Kbit
MPEG-2, MPEG-4, H-264
Up to 15M bits/s
1920x1080i, 1280x720p, 720x576p/i
PAL
4:3, 16:9
IF Bandwidth
Waveform
Carrier Mode
Code Rate
Guard Interval
Processor
DDR SDRAM
FLASH
EEPROM
MPEG 2
Data Rate
Resolution
Video format
Aspec Ratio
MPEG 1 layer 1 & 2
Type
Mono, Stereo, Joint Stereo
Sampling rates
32,44.1 and 48 KHz
Connector
9pin D-sub male, Max 115 K bps
Code
NEC-IR
Operating condition
Up to 7 Meter
E-SATA
Internal SATA
USB Supply(Front/Rear)
DC 5V Max 500mA
10 Base-T/100Base-Tx
2 slot(type I or type II)
DVB Common Interface Standard
(Viaccess, Nagravision, Conax, Cryptoworks, Irdeto)
2 slot
ISO 7816, GSM11.11 and EMV(Payment systems) Compatibility
35
RF Modulator
RF-Connector
Frequency
Output Channel
TV Standard
Audio Output
Preset Channel
75ohm IEC169-2, Male/Female
470MHz to 860MHz
CH 21-69 for the Demodulator
PAL B/G/I/D/K Selectable by Menu Setting
Mono with Volume Control
CH 40, Software changeable by Menu screen
Power Supply
Input Voltage
Type
Power Consumption
Protection
Physical Specification
Size (WxHxD)
Weight
AC90 to 240V, 50Hz/60Hz
SMPS
Max. 37W
Separate Internal Fuse
The input shall have the lightning protection
340x58x240mm
Excluding the foot. Foot height is 10mm.
3Kg
TV SCART
Rear Panel
connector
CVBS, RGB Video output
Audio Output(L, R)
Video Output (CVBS)
Video Input (CVBS, RGB)
Audio Output(L, R)
1 x RCA cinch
2 x RCA cinch
3 x RCA cinch
9 pin D-sub
IEC 169-24 F Type
IEC 169-24 F Type
IEC 169-2 Female
IEC 169-2 male
Fiber Optic
Mini_DIN
1xHDMI
USB A-type
External SATA
IEC 169-2 male
IEC 169-2 Female
RJ-45
VCR SCART
Video
Audio L/R
Component(Y/Pb/Pr)
Serial data
Digital tuner input
Loop-through Digital tuner
Terrestrial ant input
Terrestrial ant output
S/PDIF
S-VIDEO
HDMI
USB
SATA
RF Output UHF
TV ANTENNA Input
LAN(Ethernet)
36
Glossary of Terms
C band
3.7 ~ 4.2 GHz Frequency.
Ku band
11 ~ 18GHz Frequency.
DiSEqC
Digital Satellite Equipment Control.
LNB (Low-Noise Block converter)
The LNB is an electronic unit mounted on the satellite dish. It receives the signals reflected by the
dish and converts them to signals that can be used by Satellite receiver.
PID
Package Identifier.
PIN Code
Personal Identification Number. Afour-digit code that is used for locking/unlocking. e.g. with the
parental control feature.
Polarization
Polarization allows several program to be fitted into the same frequency band. The signals from a
satellite are transmitted either with linear(vertical or horizontal) polarization or circular(right or left)
polarization.
RS232
Serial data port.
Instruction about the WEEE Symbol
This product should not be disposed with other household wastes at the end of its working
life. Please separate this from other types of wastes and recycle it responsibly to promote
the sustainable reuse of material resources. This will prevent possible harm to the
environment or human health from uncontrolled waste disposal.
37