1
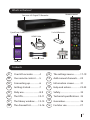
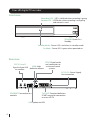
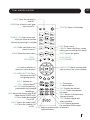
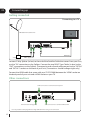
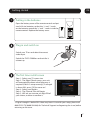
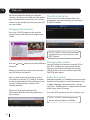
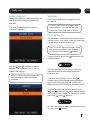
FREEVIEW SATELLITE HARD DRIVE RECORDER
MODEL: S2000
ENHANCE
YOUR TV
CONTROL
WHAT YOU WATCH
YOUR USER MANUAL
Welcome
Thank you for choosing this ZYGO HDD Satellite TV Recorder.
Not only can it receive over 15 subscription free channels, but you
can record two channels at a time. You can also pause and rewind
live TV and play it back at a time that suits you.
It’s really simple to use; it’s all done using the clear, easy to understand on screen menus
which are operated from the remote control. It even has a reminder function so that you
won’t miss your favourite programmes.
This product is capable of receiving and
decoding Dolby Digital Plus.
Manufactured under license from Dolby
Laboratories. Dolby and the double-D
symbol are trademarks of Dolby
Laboratories.
A Freeview Satellite Set Top Box gives
you access to over 15 freeview channels,
covering the best of TV and more.
For more information on Freeview,
please visit www.freeviewnz.tv
This unit has an HDMI connector so you
can watch high definition TV via an HDMI
lead when connected to a HD Ready TV.
HDMI, the HDMI logo and High-Definition
Multimedia Interface are trademarks or
registered trademarks of HDMI Licensing
LLC.
The illustrations and screen shots shown in this instruction manual are for reference and
instruction purposes only, and may not exactly match the product.
Freeview and the Freeview logo are registered trademarks and the Freeview logo is copyright of
Freeview TV NZ.
2
What’s in the box?
Remote control
Your new HD Digital TV Recorder
2 x AAA Batteries
Quick Start Guide
HDMI Cable
2-Way Splitter
2x Short F Lead
Manual
Contents
01
Your HD recorder.............4
09
The settings menu.............17-19
02
Your remote control........5
10
Add manual channels...... 20
03
Connecting up.................. 6
11
Information screen........... 21
04
Getting started..................7
12
Help and advice................. 22-23
05
Daily use..............................8-9
13
Safety..................................... 24
06
The EPG..............................10-11
14
Technical specifications. 25
07
The library window........12-14
15
Guarantee............................ 26
08
The channel list...............15-16
16
For later use......................... 27
3
01
Your HD digital TV recorder
Front view
Recording LED - LED is solid red when recording is going.
Remote LED - LED flashes when recording is not going
and remote is used.
STANDBY Power On /
Standby.
Standby Mode - Power LED is red when in standby mode.
On Mode - Power LED is green when powered on.
Rear view
SAT IN 1 and 2
Signal In from LNB
on satellite.
SPDIF Digital audio
out (connection to
HDMI High
a surround sound
definition output.
system).
DC12V-2A Power Supply
Unit connection.
ETHERNET Connection to a
network.
TV SCART Standard definition
SCART output for connection
to a non HD TV.
USB Update via USB.
4
02
Your remote control
MUTE Turns the volume On
and Off.
HOME Exits all menus and goes
back to live TV.
STANDBY Power On/Standby.
NUMBER PAD Enter values and
select the channel number
directly by entering it’s number.
BACK Takes you back to the
previous menu.
MENU Opens the main menu.
STOP
FAST REWIND
OK Confirm selection in
menu/on screen displays.
EXIT Closes menu.
LIBRARY Opens the library screen
where your recordings are stored.
GUIDE Opens the guide.
PLAY / PAUSE
FAST FORWARD
NAVIGATION Move up/down/left/
right in menus/on screen displays
COLOURED BUTTONS For
interactive use and
navigating menus.
VOL + Volume up.
VOL - Volume down.
RECORD Used to record a
programme and schedule
recordings.
WIDE Adjust the aspect ratio of the
video output (SCART only).
AD Turns audio description
On or Off.
AUDIO Opens the audio menu.
SUB Turns the subtitles On
or Off.
SYNC Adjusts picture/audio
synchronisation.
P+ Channel up.
P- Channel down
INFO Display the Info bar.
CH LIST Opens the channel
list menu.
SWAP Return to the previous
selected channel.
TEXT Displays digital text
when available.
HDMI Switches between
the available HDMI output
resolutions.
5
03
Connecting up
Getting connected
Connecting to a TV
RG6 Cable from Satellite Dish
HDMI Cable
2-Way Splitter
RG6 F Type Cable
Connect 2-Way Splitter (in box) to the end of the Satellite Cable that comes from your Dish,
use the “IN” connection on the Splitter. Connect the two RG6 F Type Cables (in box) to the
“OUT” connections on the Splitter. The opposite ends of each cable connect to the ‘SAT IN1’
and ‘SAT IN 2’ sockets on the back of your unit. (Connections should be finger tight only)
Connect the HDMI cable that came with your ZYGO S2000 between the ‘HDMI’ socket on
the back panel of your unit and a HDMI socket on your TV.
Other connections
SPDIF connection to a surround sound system
USB connection for upgrades
Scart connection to a standard definition TV*
* It is not possible to view programmes in high definition when using a scart connection.
6
04
Getting started
1
Putting in the batteries
Open the battery cover of the remote control and put
two AAA size batteries so that the ‘+’ and ‘-’ marks
on the batteries match the ‘+’ and ‘-’ marks inside the
remote control. Replace the battery cover.
Plug in and switch on
Switch your TV on and select the correct
video input.
Switch the ZYGO S2000 on and wait for it
to boot up.
The first time install screen
Step 1 - Select your TV screen size.
Step 2 - The Signal Check screen, your unit
will automatically detect what frequency is
required (if dish is setup correctly), if strength
is above 50%, press [OK] to move on*.
Step 3 - Select your Region,
Step 4 - The Channel Scan will begin.
Step 5 - Will ask you to enter a 4-digit PIN of
your choice, re-enter to confirm it.
*If signal strength is below 50% there may be an issue with your setup, please call
0800 ZYGO TV (0800 994 688) for Technical Support in diagnosing the issue, before
returning to the store.
7
05
Daily use
We have divided this book into separate
The information bar
sections, so that you can find the information If you want to see information about the
you are looking for more easily. This section
programme you are watching, you can press
covers the day to day functions that you will the [INFO] button.
use most often.
Changing the channel
Press the [GUIDE] button on the remote
control to open the Electronic Programme
Guide.
DON’T FORGET! If you want to record
a programme, you can just press the
[REC] button.
Changing the volume
Use the [ ] and [ ] buttons to select different You can change the volume using the [VOL+]
channels.
and [VOL-] buttons on the remote control.
You can turn off the audio by pressing the
When you have chosen your channel, press
[MUTE] button, to turn it back on press the
the [OK] button to watch it.
[MUTE] button again.
You can also select the channel you want
to watch by using the [P+] and [P-] buttons
on the remote control. Alternatively you can
use the number buttons to key in the
channel number.
When you change the channel the
information banner will be displayed for a
few seconds.
Audio description
Audio description is an additional narration that
describes all significant visual information such
as body language, facial expression, scenery,
costumes - anything that is important to the plot
of the story, event or image.
Press the [AD] button to use this setting or not.
DON’T FORGET! Not all programmes
have audio description available.
This shows the details of the current show.
8
05
Daily use
Audio channel
Sometimes different audio languages are
available with certain programmes or
channels.
Press the [Audio] button to see the
available languages.
Subtitles
Press the [SUB] button to toggle subtitles
on and off.
DON’T FORGET! Not all programmes
have subtitles. You can use the Info
bar to see if the ‘SUB’ icon is shown.
Pausing live TV
This function is sometimes referred to as time
shifting, and is very useful if you are watching
a programme and the phone rings.
DON’T FORGET! You can rewind a show
that you are recording/ time shifting at
any time by pressing the [ ] button.
To pause live TV, press the [
remote control.
Use the [ ] and [ ] buttons to select a
different audio channel. Press [OK] to
confirm the setting.
DON’T FORGET! Not all programmes
have additional audio languages
available.
] button on the
-0 min
The time counter will start, and shows the
amount of time that the programme has
been paused.
To continue watching TV, press the [ ]
button again and the programme will begin
again from where you left off. It will count
down the time left before you resume Live TV.
You can fast forward and fast rewind using
[ ] and [ ] buttons. The speed and direction
are shown on the screen. To change the speed
press the [ ] and [ ] buttons.
X4
-8 mins
To stop time shifting mode and go back to Live
TV, press the [ ] button.
9
06
The EPG
Navigation
You can open the guide window by pressing
the [GUIDE] button on the remote control.
The guide shows you all of the programmes
and channels available for the next 8 days.
Start a recording from the
EPG.
View whats on a week from
today.
Use the [ ] and [ ] buttons to select different
channels. Use the [ ] and [ ] buttons to select
each programme. You can use the [P+] and
[P-] keys to move a page at a time.
View whats on the Next
Day at the same time.
With the S2000 it’s easy to record just select
the programme and press the [RED] button.
The [YELLOW] button will allow you to jump
ahead to Next Week (7 days forward) to view
what’s on. Similarly the [BLUE] button shifts
to the Next Day (24 hours forward).
Change channel you are
viewing.
When you have chosen your channel press
the [OK] button to watch it, and the EPG will
disappear shifting you to that channel
selected.
10
Guide icons
Move up and down the list
of programmes.
OK
GUIDE
Watch TV, you will go to
channel you have chosen.
What’s on Now/Next list
for all channels.
06
The EPG
Setting a recording
You can record two programmes at the same
time using this Digital TV Recorder.
Select a programme that you want to record
and then press the [RED] button to set the
recording. When a recording has been set
the record icon is shown after the
programme name.
DON’T FORGET! You can change the
channel and watch another programme
or recording when the unit has only a
single recording going.
Recording clashes
If you try to record more than two
programmes at the same time, you will see
a message screen, stating it will attempt to
record at an alternate time. An example
screen is shown below...
If no alternate time is available message
screen you get will be slightly different.
Example below...
You will be able to cancel recordings, stop
recordings or even schedule the recording
for a different time if the programme is
being broadcast again at a later time or
date.
Use the [ ] and [ ] buttons to select an
option.
Press the [OK] button to confirm.
11
07
The library window
Navigation
You can open the recordings library window by
pressing the [LIBRARY] button on the remote.
This shows you all of your recorded and
scheduled recordings.
Library icons
This will delete recorded
programmes.
Protects or unprotects a
saved recording.
Use the [ ] and [ ] buttons to select each
programme. You can use the [P+] and [P-]
buttons to move a page at a time.
Watching a recording
Programmes that have finished recording are
marked as ‘Recorded’.
The recording is protected
and will not be deleted.
R
OK
Use the [ ] and [ ] buttons to select a
programme that you want to watch.
Starts a preview, of selected
recording in top left.
DON’T FORGET! You can start to watch
a programme that is recording from the
beginning without waiting for it to finish.
You can preview a recorded programme in the
preview window in the recordings library. The
status will show as ‘Playing’.
12
Select a recording group
or Watch a recording.
Stops a recording or a
preview.
Press the [OK] button to start playback.
Previewing a recording
Currently recording.
This recording is part of a
series.
AD)))
This recording has audio
description.
SUB
This recording has
subtitles.
07
The library window
Series Link
A series link will record all programmes in a
series. For example if you set it to record
Border Security on a Monday and series link
was set, then each new episode of Border
Security will be recorded automatically.
Protecting a recording
You can protect a recording from being
accidentally deleted by protecting it.
Use the [ ] and [ ] buttons to select a recording
that you want to protect.
To set a series link, choose the programme to Press the [BLUE] button to protect.
be recorded in the guide and press the record
button [REC].
DON’T FORGET! Recording will not be
overwritten/deleted when protected.
Press the [LIBRARY] button and go across into
“Schedule” and choose the scheduled
To unprotect a recording, highlight the protected
programme using the [ ] and [ ] buttons.
recording using the [ ] and [ ] buttons and then
press the [BLUE] button again.
Press the [GREEN] button “ADD LINK” to set
the series link.
Deleting a recording
DON’T FORGET! Not all programmes
are part of a series.
Use the [ ] and [ ] buttons to select a recording
that you want to delete. Press the [RED] button
to delete.
DON’T FORGET! To delete a protected
recording, you need to unprotect it first.
See the section above about ‘Protecting
a recording.’
13
07
The library window
The Library - Schedule shows a list of all programmes
you have scheduled for recording. To get there, just
press the [ ] button from the initial Library screen.
Schedule icons
This will delete a scheduled
recording.
Removes or adds a series
link to recording.
You will be able to see if it is booked for a single
one off recording or series recording via the ‘series’
icon shown after the programme details.
A manual recording will show under the heading,
‘Manual Recording’ and won’t show any programme
name heading.
Enter a manual recording
to the schedule.
R
SUB
Delete scheduled recording.
This recording has
subtitles.
This recording is part of a
series.
AD)))
Press the [YELLOW] button in the Library - Schedule
to bring up the Manual Recording options. You can
choose Channel Number, Date, Start Time, Length
of the recording (Duration) and how often you want
to repeat the recording.
14
This recording has audio
description.
08
The channel List
You can open the channel list window by
pressing the [CH LIST] button on the remote
control or from the main menu.
Channel list icons
OK
Watch TV, you will go to
channel you have chosen.
GUIDE
Closes Channel List and
opens the Guide window.
This will permanently
delete the current channel.
Adds Parental Lock to the
selected channel.
This channel list allows you to hide, and delete
channels, set up a favourites channel list, and
view the list of free to air channels that you
have added.
DON’T FORGET! For further Info, see
page 20 on how to add free to air
channels.
Add/ remove the channel
from your Favorites List.
SWAP
Switch from ‘Channel List’
to ‘Favorites List’
Channel added to Favorites
List.
Use the [ ] or [ ] buttons to switch from
‘TV Channels’ to ‘Radio Channels’.
15
08
The channel list
Parental locking a channel
Use the [ ] and [ ] buttons to select the
channel that you want to lock. Press the
[GREEN] button to lock it. You will now
require a PIN number to access the channel.
To add additional channels to your favourites
list press the [ ] and [ ] buttons to select
another channel in the list to add it.
When a channel is LOCKED, a padlock icon
will be shown next to it. To unlock a channel,
select the locked channel using the [ ] and
[ ] buttons and press the [GREEN] button
again, you will be asked for your PIN number
to unlock it.
DON’T FORGET! Locked channels need
your PIN number to view them.
To switch between your Freeview TV
Channels list and your Favorites List, press
the [SWAP] button on your remote control.
Deleting a channel
Use the [ ] and [ ] buttons to select a
channel that you want to delete. Press the
[RED] button to delete it.
DON’T FORGET! It is not possible to
un-delete a channel. You will have to
do the First Time Installation again,
see page 19 for info.
Radio channels
Favourites
The favourites function lets you keep your
favourite channels in a separate list.
Use the [ ] and [ ] buttons to select a
channel and press the [BLUE] button
to add it to your favorites list.
16
The ‘Freeview Radio Channels’ list shows you
all Radio channels available through the
Freeview broadcast.
09
09
The settings menu
To open the settings press the [MENU]
button on the remote control and then
select ‘Settings’. Press the [OK] button to
confirm.
Subtitles - Using this setting you can
toggle subtitles on or off.
DON’T FORGET! You can toggle your
subtitles by pressing the [SUB] button
on the remote control
Picture
Changing the settings
HDMI Output - You can change this setting
between 576i, 576p, 720p, 1080i and 1080p.
Which ever best suits your HD ready TV.
Use the [
] or [
] to navigate through
each setting and each sub-menu.
If you want to change the setting, press
the [OK] button to toggle between the
available options on the selected setting.
If you want to view a different settings
category press the [ ] or [ ] buttons.
To close any of the settings screens, press
the [EXIT] button.
General
Auto Standby - This will put the unit into
standby if there has been no user activity
for four hours, a two minute countdown will
show to allow user time to cancel.
Sleep Timer - Choose between a 15, 30, 45,
60, 90 and 120 minute period for your unit
to go to sleep in.
Screen Type - You will have already set this
up as part of the installation process, but you
can change the format of the screen size
without having to setup your Digital Satellite
Recorder again. You can choose between
‘16:9 Widescreen’ or ‘4:3 Traditional’.
Display Mode - “Display Mode” is dependent on
“Screen Type” you have selected. Giving you
option of Automatic, 4:3 Centre Cut Out and
4:3 Letter Box if 4:3 Traditional was chosen, or
Automatic, Widescreen and Pillarbox if 16:9
Widescreen.
DON’T FORGET! Not all programmes
are broadcast in widescreen format
which may result in a black border
around the programme. This setting
can be useful to remove or minimise
the border.
SCART Output - This setting allows you to select
the video output from the SCART sockets, you
can choose between Composite or RGB.
17
09
09
The settings menu
Sound
Record
Audio Language - This setting is your
preferred default audio language. The
options are English or Maori.
Default Recording Mode - This setting is used
to set the default recording mode. You can set
the unit to always record in high definition or
standard definition.
DON’T FORGET! Not all programmes
have these settings available. If Maori
is not available, English will be used
instead.
Audio Description - This is an additional
narration that describes all significant
visual information such as body language,
facial expression, scenery, costumes anything that is important to the plot of the
story, event or image. You can turn audio
description on or off here.
DON’T FORGET! You can toggle audio
description on/ off by pressing [AD] on
the remote control.
Dolby Digital - This is an additional setting
that will give you 5.1 AC3 audio when
available.
Lip-Sync Delay - With this setting you will
be able to adjust the length of audio delay.
DON’T FORGET! You can only record in
high definition when the programme
is being broadcast in high definition.
Add to Start of Recording - This changes the
amount of time that is added before a recording
starts.
Add to End of Recording - This changes the
amount of time that is added at the end of a
recording.
Live Pause Length - This sets the amount of time
that is used for back ground recording of Live TV.
The options are 60 minutes or 120 minutes.
Auto Disk Management - This will allow the oldest
recordings that have been viewed to be overwritten
if the Satellite Recorder is short of space.
DON’T FORGET! If you don’t want a
recording to be overwritten you can
protect it.
Format Hard Disk - This will reformat your hard
disk drive.
18
09
09
The settings menu
System
First Time Installation - This setting allows
you to perform a first time installation again.
follow the on-screen instructions to setup
your unit.
DON’T FORGET! A first time installation
will reset all settings and reset your
Parental Pin. Library content is not
affected.
Add Manual Channels - From here you can
set all the necessary parameters i.e, Symbol
Rate, Frequency, LNB Polarisation; to scan
for additional channels.
DON’T FORGET! For further Info to add
channels manually, see page 20.
Parental Rating - This setting allows you
to lock programmes rated above a specific
Parental rating. You can choose between
G, PGR, AO and None. For example, if G is
chosen and you try to watch a programme
rated PGR you will be required to enter the
PIN to watch it.
Change Parental PIN - This lets you change
your PIN number.
Software Update via OAD - This option
relates to if an Over The Air software update
is being broadcast. Turning it ON, your unit
will start up at 4am each morning to search
for a new software upgrade.
Check for Update - This will let your unit do
a manual search for an OAD software update,
if an OAD is currently being broadcast.
Restore Factory Default - This will reset all
settings back to factory, deleting all channel
and user settings. You will need to go through
the initial installation again and set up any
bookings you had selected again.
Parental Guidance - This enables or disables
the Parental Rating system.
DON’T FORGET! You will need to enter
your PIN before accessing anything in
this Menu.
19
10
09
Add Manual Channels
You can manually tune in any free to air
channels on your Digital TV Recorder,
if you have the frequency in MHz, the
symbol rate and the LNB polarisation.
To view the non-freeview channels press
the [CH LIST] button, and press the [ ] or
[ ] buttons to highlight Manual Channels.
DON’T FORGET! Adding free to air
channels will not affect the stored
Freeview channels. Details of channel
frequencies are generally available
online, and are subject to change.
Open ‘Add Manual Channels’ from the
settings menu.
Use the [ ] and [ ] buttons to select a channel
and press the [OK] button to watch it.
Use the [ ] and [ ] buttons to select each
option.
If you want to change the setting press the
[ ] or [ ] buttons, or key in the setting using
the number buttons.
Press the [GREEN] button to search for
additional channels.
Once the search is complete, any new channels
will be available from the channel list.
DON’T FORGET! NonFreeview channels
are only available from the Channel
List and are not shown in the Electronic
Programme Guide (EPG).
20
09
09
Information screen
The Information Screen - Signal,
shows you details about each of
the Satellite Signal feeds coming
through each tuner. From Signal
Strength/ Quality to LNB Freq...
The Information Screen - General, shows you several key pieces of information about your
unit. From Manufacturer/ Model Number/ Helpline/ Website/ Software Version/ Free Space.
The Information Screen - Network,
shows you details about the IP
Address/ MAC Address etc...
21
12
Help and advice
Frequently asked questions
What you can do
Can I connect more than one digital
box to my satellite dish?
Yes you can. You will need an LNB (the box on
your satellite dish) fitted that has more than
one connection or a splitter in line (splitter in
box). This unit uses two connections, so that
you can use both tuners to view/ record.
Can I connect this Digital TV Recorder
to my normal roof aerial?
No. This box must be connected to a satellite
dish for it to work.
The Digital TV Recorder will not switch Check the mains power cable and make sure it
on. What should I do?
is plugged into a suitable power outlet. Check
that the mains supply is switched On. Connect
the power cable to a different power outlet.
22
My Digital TV Recorder can’t find the
‘Network ID’ and ‘Transport ID’ what
should I do?
Make sure that your satellite dish is positioned
correctly, and check the cables and connections
again.
How do I do a first-time installation
again?
You can do a first-time installation again using
the settings menu. See page 21 for more info.
I’m not getting a picture on the TV.
What should I do?
•Make sure that the Digital TV Recorder is On.
(Press the STANDBY button, wait for Green LED)
•Make sure that the HDMI or SCART cable is
firmly connected to the TV.
•Check the correct input is selected on your TV.
Can I change the audio language for
the programme I am watching?
Yes. Some channels broadcast other audio
languages. Press the [AUDIO] button when you
are watching a programme to see if other
languages are available.
Can I record one programme whilst
watching another?
Yes you can, but you will need two cables from
the satellite dish connected to your ZYGO unit.
Can I record an entire series?
Yes. Set the first programme to record, then set
the series link option in the library.
Do I have to set both parts to record
on a programme? in a case where it is
broken into two parts.
This is known as a split recording. Your ZYGO
recorder will automatically record both parts if
the first part is set to record.
Can I pause live TV?
Yes, you can pause live TV for up to 2 hours by
pressing the pause button on your remote.
12
Help and advice
Frequently asked questions
Can I rewind live TV?
What you can do
Yes. You can rewind “live” TV when you are
moving through a time shift recording. Time
shift records the channel you are watching in
the background from when you press pause,
operating in a 60 or 120 minute window.
Do I have to retune my Digital TV
No. Your Digital TV Recorder will automatically
Recorder when new freeview channels add new channels for you, and display them in
are added?
the programme guide and channel list.
Can I add ‘FTA (Free To Air)’ channels to Yes. You can add these using the ‘Add Manual
my Digital TV Recorder?
Channels’ menu. See page 20 for more info.
I have been asked to enter a lock code. Your default code is 0000. You can change this
What is it?
to something else in ‘Parental Settings’.
Why can’t I see my non-freeview
channels in the guide?
Non-freeview channels are not shown in the
Electronic Programme Guide (EPG). All the
channels are shown in the Channel List. Press
the ‘CH LIST’ to see them.
How can I find out system information
about my Digital TV Recorder?
Press the ‘MENU’ button and then select
‘Information’.
My picture and sound quality is poor.
What should I do?
•Check the signal levels using the system info
screen. The signal level may be affected by
weather conditions. If the LNB is covered with
snow or there is heavy rain, the sound and
picture quality may be poor temporarily.
•Make sure there are no mobile phones, DECT
phones, wireless routers or microwave ovens
near the receiver.
•Keep the power and the satellite cable apart
from each other.
Can I use my ZYGO recorder with only
one LNB connection?
Yes, but you will only be able to record the
programme you are watching and will not be
able to use all features of your unit.
Can I record/ receive programmes in
high definition?
Yes, your ZYGO unit is capable of recording/
receiving HD content when broadcast.
How many programmes can I record
on my ZYGO recorder?
There isn’t a limit on the amount of
programmes, but you can record a maximum
of 312 hours of SD with a 500GB hard drive.
23
13
Safety
General Safety
This equipment has been designed and
manufactured to meet New Zealand safety
standards, but like any electrical equipment,
care must be taken if you are to obtain the
best results and safety is to be assured.
Do read these operating instructions before
you attempt to use the equipment.
Do ensure that all electrical connections
(including the mains plug, extension leads
and interconnections between pieces of
equipment) are properly made in accordance
with the manufacturer’s instructions.
Switch off and remove the mains plug when
making or changing any connections.
Do consult your dealer if you are ever in
doubt about the installation, operation or
safety of your equipment.
Don’t leave the equipment switched On
when it is unattended for long periods of
time, unless it is specifically stated that it
is designed for unattended operation or
has a standby mode.
Make sure that other people in your
household are conversant with the
equipment.
Don’t obstruct the ventilation vents on the
equipment, for example with curtains or
soft furnishings.
Overheating will cause damage and
shorten the life of the product. It is
recommended the unit is placed on a
shelf directly, not on top of other electrical
devices like a TV or DVD player to help
prevent this.
Don’t allow electrical equipment to be
exposed to rain or moisture.
Don’t continue to operate the equipment if
you are ever in doubt about it working
normally, or if it is damaged in any way.
Switch it off remove the plug from the mains
and consult your dealer.
Don’t remove any fixed covers as this may
expose you to dangerous voltages.
Need extra information or help setting up?
24
You may find the information you are
looking for on our web site.
If you still need help or information you
can phone our call centre on:
www.zygo.co.nz
0800 994 688
14
Technical Specifications
General Information:
Model Number
S2000
Dimensions DxLxH
280 x 190 x 50mm
Weight
700g
Hard Drive Capacity
500 GB
Number of Tuners
Two DVB S2
Features:
Access all Freeview Satellite Channels and Radio Stations.
Upscaling of standard definition TV when using the HDMI connection.
8 Day Electronic programme guide.
Live pause and rewind.
Series and split programme recording.
Audio description capable (broadcast mix).
Digital Text (MHEG5).
HDMI connection.
SCART Socket.
25
15
Guarantee
The ZYGO Freeview Satellite Hard Drive Recorder Recorder (S2000) is guaranteed
for twelve months from the date of original purchase. In the unlikely event that
any defect due to faulty materials or workmanship arises, please contact the ZYGO
Helpline (0800 994 688). Have your receipt of purchase available for reference.
This warranty does not cover damage from misuse or neglect, accidental damage,
vermin infestation, eccessive voltages (ie. lightning or power surges) or any
alteration that affects the performance or reliability of the product.
The guarantee is subject to the following provisions:
• It is only valid within the boundaries of the country of purchase.
• The product must be correctly installed and operated in accordance with the
instructions contained in this instruction manual.
• The ZYGO Freeview Satellite Hard Drive Recorder Recorder (S2000) must be used
solely for domestic purposes.
• The guarantee will be rendered invalid if the ZYGO Freeview Satellite Hard Drive
Recorder Recorder (S2000) is re-sold or has been damaged by inexpert repair.
• The manufacturer disclaims any liability for incidental or consequential damages.
• The guarantee is in addition to, and does not diminish, your statutory or legal
rights.
26
13
16
For later use...
27
FREEVIEW SATELLITE HARD DRIVE RECORDER
MODEL: S2000
For help with installation or using your new
ZYGO Freeview Satellite Hard Drive Recorder
box, or just to find out more
Visit: www.zygo.co.nz
Email: [email protected]
Call: 0800 ZYGO TV (0800 994 688).