1
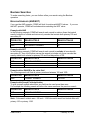
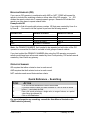
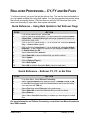
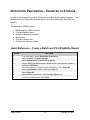
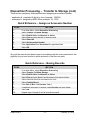
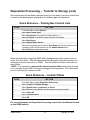
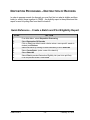
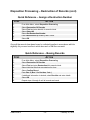
SEARCHING FOR RECORDS - ADVANCED Searching is a powerful tool in CRMS. Once you learn how to set up the searches, you will find that working with a smaller set of records rather than the whole database, increases the speed of your tasks, and enables you to see only the records you want. There are a number of special symbols you may need to perform your searches, but the most important key to effective searching is determining what criteria are common to all the records you want, and yet different from the rest of the records in the database Quick Reference – Search Symbols SYMBOL % Wildcard > Greater Than < Less Than : Range Blank EXAMPLE (VALUE FOR PRIMARY FIELD) %100 = all ending with 100 (eg 100, 7100, 13100, etc) 100% = all beginning with 100 (eg 100, 1000, 1006, etc) %100% = all with 100 in them (eg 8100, 81003, etc) Records greater than >100 = 101 to end Records less than <6450 = 6449 to 100 Records in between 100:199 = 100 to 199 Exact match 100 = 100 When searching the description field use the Wildcard Symbol (%) on both ends of the Search Value Default Search Fields There are several default fields on the Search Parameters screen. To customize your search, select different search fields using the list of values button (…). Keyword Org Unit ID Primary Number Secondary Number Series Code Series Code Name Series Sub Code CRMS Level II Series Sub Code Name Disposition Status Active Retention Semi Active Retention Final Disposition -1- Final Disp Date Volume Disposition Status Enclosure Disposition Status Volume Description February 10, 2010 Boolean Searches To make searching faster, you can further refine your search using the Boolean operators BOOLEAN SEARCHES (AND/NOT) If you use the AND operator, CRMS will look for entries with BOTH values. If you use the NOT operator, CRMS will exclude entries matching the NOT value. Example with AND In the following example, CRMS will search each record to retrieve those that match exactly both sets of criteria and return only records that contain both primary 100 and secondary 20. OPERATOR SEARCH FIELD SEARCH VALUE AND AND PRIMARY NUMBER SECONDARY NUMBER 100 20 Example with NOT In the following example, CRMS will search each record to exclude all records with secondary 01; then it will further narrow the search to include only those records that exactly match both criteria for primary 100 and final disposition of DE. OPERATOR SEARCH FIELD SEARCH VALUE AND NOT AND PRIMARY NUMBER SECONDARY NUMBER FINAL DISPOSITION 100 01 DE Example with a RANGE in the value field The following search will find all primary numbers between 100 and 1050. OPERATOR SEARCH FIELD SEARCH VALUE AND PRIMARY NUMBER 100:1050 Example with Search Field duplication To give yourself multiple selections, any field can be used more than once. For example the following search will return the same results as the previous search OPERATOR SEARCH FIELD SEARCH VALUE AND AND PRIMARY NUMBER PRIMARY NUMBER >99 <1051 Note: if the search criteria was >100 and < 1050 the results would not include files with primary 100 or primary 1050. CRMS Level II -2- February 10, 2010 BOOLEAN SEARCHES (OR) If you use an OR operator in combination with AND or NOT, CRMS will expand its search to include files matching criteria on either side of the OR operator . i.e., OR divides the search criteria into 2 separate search groups. Because OR divides the search you often have to repeat search fields. Example with OR If you wish to find all records with primary number 100 that were created by User A or by User B. You need to tell the system to perform the following search: OPERATOR SEARCH FIELD SEARCH VALUE AND AND OR AND CREATE USER PRIMARY NUMBER CREATE USER PRIMARY NUMBER User A 100 User B 100 Note: the PRIMARY NUMBER field needed to be repeated on both sides of the OR operator to ensure that this field is included in both groups of search criteria. If you had omitted the PRIMARY NUMBER after using the OR operator your search results would have been all records created by User A with primary 100 and all records created by User B with any primary. OPERATOR SUMMARY OR requires that either criteria be true in each record. AND requires that both criteria be true in each record. NOT excludes each record that matches criteria. Quick Reference – Searching STEP 1. 2. 3. 4. ACTION From the Record Maintenance Screen select Find If you don’t see the Fields you wish to search in, Click on a list of values button (...) and select the field Enter your search criteria as a single value, a range of values, or a partial value using the wildcard (%) Click on the Find button For more information on searching, consult the User Manual located on the CRMS website [intranet] CRMS Level II -3- February 10, 2010 CHARGE OUT/IN RECORDS User removes a file volume from its usual volume location and assigns it to a temporary volume location. CRMS documents action and records temporary location until file volume(s) are returned (charged in). Quick Reference – Charge Out Records STEP 1. 2. 3. 4. 5. 6. 7. 8. 9. 10. 11. ACTION From Main Menu, select Record Maintenance At the prompt to have the records ordered, select Yes if you want the records to display sorted in numeric order, or select No to display in random order Select Find and set search criteria for specific or all files Click the button to the left of the first record to return to RMF screen Select Charge Out Select individual records or Select All Select a new location from the Charge Out list (click on down arrow to right of empty box at the bottom of screen). Select the Charge Out button Click OK in dialogue box Repeat steps 4 to 7 for charge outs to other locations Select Exit to return to RMF screen Processes Charge in when files are returned to their usual location. Changes location information in CRMS Volume Screen. Quick Reference – Charge In Records STEP 1. 2. 3. 4. 5. 6. 7. ACTION From Main Menu, select Record Maintenance At the prompt to have the records ordered, select Yes if you want the records to display sorted in numeric order, or select No to display in random order Select Charge In Select record(s) for charge in Select the Charge In button at the bottom of the screen Click OK in dialogue box Select Exit to return to the RMF screen For more information on Charge In/ Charge Out, consult the User Manual located on the CRMS website. CRMS Level II -4- February 10, 2010 ROLLOVER PROCESSING – CY, FY AND 6M FILES To rollover a record, you must first set the rollover flag. This can be done individually or you can update multiple files using bulk update. You can then process the records using the rollover processing feature. Rollover does not work for SO files since their close date is set manually by user rather than system calculated. Quick Reference – Using Bulk Update to Set Rollover Flags STEP 1. 2. ACTION From Record Maintenance, select Find Click on the list of values button (...) in an unused row, and select Rmfile Closed Date. In Search Value type date range (separated by colon) e.g. 2003-01-01:2003-12-31 Click on the list of values button (...) in an unused row, and select Rollover Flag. In Search Value type N. Click on the list of values button (...) in an unused row, and select Active Retention. In the OPERATOR column on left change the AND to a NOT. In Search Value type SO. Select Find then select Retrieve Select Select All or select individual files you wish to rollover 3. 4. 5. 6. 7. 8. 9. 10. Select Update Click in Rollover Flag box Select Bulk Update Select OK to confirm, then select Exit to return to main menu Quick Reference – Rollover CY, FY, or 6m Files STEP 1. 2. 3. 4. 5. 6. 7. ACTION From Main Menu, select Rollover Processing Select Type Of Rollover from selection menu – Calendar, Fiscal, or 6M. In the Year field type the year of the closed date of the file you are rolling over and press the TAB key Select Find, then select Find again in the next screen Select Select All or select the individual files you wish to rollover Select Rollover Select Yes or Yes to all depending on whether you have single or multiple files For more information on Rollover Processing, consult the User Manual located on the CRMS website. CRMS Level II -5- February 10, 2010 DISPOSITION PROCESSING – TRANSFER TO STORAGE In order to store records on-site or off-site the records must be batched together. An eligibility report is then printed and this report is used for pulling files from their file location. The process in CRMS involves: Batch together eligible records Print an eligibility report Assign an accession number Box records Print box content lists Confirm the collection offsite Quick Reference – Create a Batch and Print Eligibility Report STEP 1. 2. 3. 4. 5. 6. 7. 8. 9. CRMS Level II ACTION From Main Menu, select Disposition Processing Select Transfer To Offsite Storage Select End Of Active, In Advance, or Active Click on Find (use default search criteria unless a more specific search is desired) and Retrieve Select files either by clicking on them individually or click Select All Select Create Batch (make a note of the batch #) Select Select All Select Print to preview the Offsite Storage Eligibility List From the preview screen, select Print -6- February 10, 2010 Disposition Processing – Transfer to Storage (cont) Periodically records that show on the eligibility report cannot be located at the time of boxing or are required further. You may need to remove files from a batch and return them to active status. Quick Reference – Remove Records From a Batch STEP 1. 2. 3. ACTION From Main Menu, select Disposition Processing Select Transfer To Offsite Storage Select End Of Active, In Advance, or Active Select Find and enter batch # as search criteria (you can refine the search if needed) Select the files you wish to remove (note the list will be in numeric order) Select Remove From Batch Observe confirmation and confirm OK 4. 5. 6. 7. Perhaps you have additional files you would like to add to an existing batch. Quick Reference – Add Records to an Existing Batch STEP 1. 2. 3. 4. 5. 6. 7. 8. CRMS Level II ACTION From Main Menu, select Disposition Processing Select Transfer To Offsite Storage Select End Of Active, In Advance, or Active Select Find and enter search criteria for the file(s) you wish to add Select the files you wish to add by clicking on their selection box(es) Select Add To Batch Click OK on the warning box, and select the Batch # from the dropdown list Select OK -7- February 10, 2010 Disposition Processing – Transfer to Storage (cont) There are two mandatory fields required when assigning an accession number: - application # - preprinted 6 digit # on form (example: 789654) - accession # - assigned by MRO Office (example: 91-1234) Quick Reference – Assign an Accession Number STEP 1. 2. 3. 4. 5. 6. 7. 8. ACTION From Main Menu, select Disposition Processing Select Transfer To Offsite Storage Select End Of Active, In Advance, or Active Select Find and enter batch # for search criteria Select Select All Select Get Accession Number Enter Application # and Accession # in applicable fields Select OK Once all the records have been boxed in accordance with the order prescribed in the eligibility list you must confirm in which box each of the files now exist. Quick Reference – Boxing Records STEP 1. 2. 3. 4. 5. 6. 7. 8. 9. 10. CRMS Level II ACTION From Main Menu, select Disposition Processing Select Transfer To Offsite Storage Select End Of Active, In Advance, or Active Select Find and enter Batch # and Accession # for search criteria Select individual files that are contained in a box Select Confirm Boxed Enter Box # (Box 1 for first box, 2 etc. ) If additional information is desired, select Box Info and enter details Select OK Repeat steps 5 through 9 until all records are boxed -8- February 10, 2010 Disposition Processing – Transfer to Storage (cont) Once all the records have been confirmed boxed you are ready to print box content lists to attach to the applications in preparation for obtaining approval signatures. Quick Reference – Printing Box Content Lists STEP 1. 2. 3. 4. 5. 6. 7. 8. ACTION From Main Menu, select Reports Select Box Content Lists Select Accession # using the list of values button (...) Select the Box # , or leave % to print all boxes in the batch Select Run Report Select Report Status Screen Select the completed report and click View Report (If the report status is not completed, wait a minute and click on the Update Status button) Select Print from the preview screen When the application is signed by MRO Office arrangements will be made to pick up boxes from your office. After the boxes have been physically removed to storage it is necessary to confirm this action in CRMS. This will update the status of the record to show Offsite. NOTE – It is important to wait until the boxes leave the office before doing this task, as it is possible that the MRO will request changes to the application. This is best done prior to confirming the collection offsite. Quick Reference – Confirm Offsite STEP 1. 2. 3. 4. 5. 6. 7. ACTION From Main Menu, select Disposition Processing Select Transfer To Offsite Storage Select End Of Active, In Advance, or Active Select Find and enter Batch # and Accession # for search criteria Select Select All Select Confirm Offsite Select OK For more information on Disposition Processing, consult the User Manual located on the CRMS website CRMS Level II -9- February 10, 2010 DISPOSITION PROCESSING – DESTRUCTION OF RECORDS In order to prepare records for disposal you must first find out what is eligible and then batch (or collect) these together in CRMS. An eligibility report is then printed and this report is used for pulling files from their file location. Quick Reference – Create a Batch and Print Eligibility Report STEP 1. 2. 3. 4. 5. 6. 7. 8. CRMS Level II ACTION From Main Menu, select Disposition Processing Select Destruction Of Records Click on Find (use default search criteria unless a more specific search is desired) and Retrieve Select files either by clicking on them individually or click Select All Select Create Batch (make a note of the batch #) Select Select All Select Print to preview Destruction Eligibility List (use list to pull files) From the preview screen, select Print - 10 - February 10, 2010 Disposition Processing – Destruction of Records (cont) Periodically records that show on the eligibility report cannot be located at the time of boxing or are required further. You may need to remove files from a batch and return them to active status. Quick Reference – Remove Records From a Batch STEP 1. 2. From Main Menu, select Disposition Processing Select Destruction Of Records Select Find and enter batch # as search criteria (you can refine the search if needed) 3. 4. 5. 6. ACTION Select the files you wish to remove (note the list will be in numeric order) Select Remove From Batch Observe confirmation and confirm OK Perhaps you have additional files you would like to add to an existing batch. Quick Reference – Add Records to an Existing Batch STEP 1. 2. 3. 4. 5. 6. CRMS Level II ACTION From Main Menu, select Disposition Processing Select Destruction Of Records Select Find and enter search criteria for the file(s) you wish to add Select the files you wish to add by clicking on their selection box(es) Select Add To Batch Select Batch # from list-- confirm OK - 11 - February 10, 2010 Disposition Processing – Destruction of Records (cont) Quick Reference – Assign a Destruction Number STEP 1. 2. 3. 4. 5. 6. 7. ACTION From Main Menu, select Disposition Processing Select Destruction Of Records Select Find and enter batch # for search criteria Select Select All Select Get Destruction Number Enter Destruction # provided by MRO Office Select OK Once all the records have been boxed or collected together in accordance with the eligibility list you must confirm in which box each of the files now exist. Quick Reference – Boxing Records STEP 1. 2. 3. 4. 5. 6. 7. 8. 9. CRMS Level II ACTION From Main Menu, select Disposition Processing Select Destruction Of Records Select Find and enter Destruction # for search criteria Select individual files that are contained in a box Select Confirm Boxed Enter Box # (Box 1 for first box, 2 etc. ) If additional information is desired, select Box Info and enter details Select OK Repeat steps 4 through 8 until all records are boxed - 12 - February 10, 2010 Disposition Processing – Destruction of Records (cont) Once all the records have been confirmed boxed you are ready to print box content lists to attach to the applications in preparation for obtaining approval signatures. Quick Reference – Printing Box Content Lists STEP ACTION 9. 10. 11. 12. 13. 14. 15. From Main Menu, select Reports Select Box Content Lists Select Destruction # using the list of values button (...) 16. Select Print from the preview screen Select the Box # , or leave % to print all boxes in the batch Select Run Report Select Report Status Screen Select the completed report and click View Report (If the report status is not completed, wait a minute and click on the Update Status button) When the application is signed by MRO Office destruction can be carried out. After the boxes have been physically destroyed it is necessary to confirm this action in CRMS. This will update the status of the record to show destroyed. NOTE – This must not be done until MRO has provided approval and the physical records have been disposed Quick Reference – Confirm Destroyed STEP 1. 2. 3. 4. 5. 6. 7. 8. ACTION From Main Menu, select Disposition Processing Select Destruction Of Records Select Find and enter Batch # and Accession # for search criteria Select Select All Select Confirm Destroy Enter Destruction Date and any required notes related to methodology used Select OK Observe confirmation that status has been updated, select OK For more information on Disposition Processing, consult the User Manual located on the CRMS website CRMS Level II - 13 - February 10, 2010 REPORTS This is a list of reports available from the Reports menu. Box Description List – lists the accession number, box number, box note, date boxed, and final disposition Box Content List – lists boxed records, including classification and description – by accession and box number Outstanding Destruction Batches – lists the org unit with outstanding destruction batches Outstanding Off-Site Disposition Batches – lists the organization units with outstanding off-site disposition batches Disposition Batch List – lists the destruction batch and its final disposition date, org unit, schedule, and classification information Volume Location – lists the location of all volumes by org unit and includes file name, date opened, volume number, file location, and charge out information Secondary OPR/NOPR Designation – lists the secondaries that are locked for a specific Org Unit Retention Changes Updates in Retention Schedule – lists records sorted by Org Unit, that would be impacted by changes to the Retention Schedule Batch Conflict Report – lists batches that will be impacted by changes to the Retention Schedule Invalid Volume Report – lists volumes that will be impacted by changes to the Retention Schedule Condensed File List – gives a condensed listing of files that match your search criteria Standard File List – lists files that match your search criteria Note – the file lists can also be accessed from within Record Maintenance. See Level I Handout for instructions on this. CRMS Level II - 14 - February 10, 2010 PRINTING REPORTS In addition to printing reports on the fly, you can choose to schedule reports to run on a daily, weekly or monthly basis, and have the reports emailed to you. Quick Reference – REPORTS STEP ACTION 1. 2. 3. 4. 5. 6. From the Main Menu, select Reports Select desired Report If necessary set criteria for your report Select Run Report 7. Select Print from the preview screen Select Report Status Screen Select the completed report and click View Report (If the report status is not completed, wait a minute and click on the Update Status button) For more information on Reports, consult the User Manual located on the CRMS website CRMS Level II - 15 - February 10, 2010