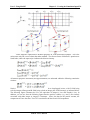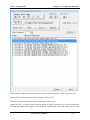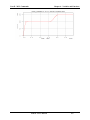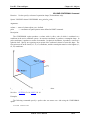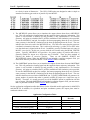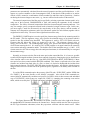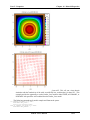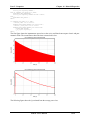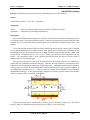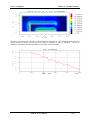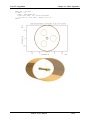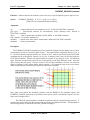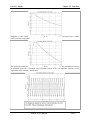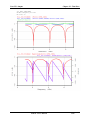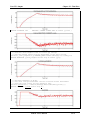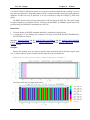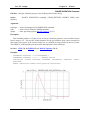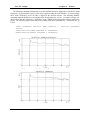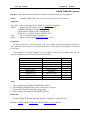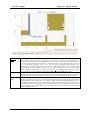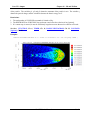
1
Magic User's Manual Cover Sheet MAGIC 3.2.0 Help MANUAL Technical Report Date: October 2011 Author(s): Dr. Larry Ludeking Mr. Andrew Woods Mr. Lester Cavey Alliant Techsystems (ATK) National Capital Region 8560 Cinderbed Road, Suite 700 Newington, Virginia 22122 MAGIC User’s Manual Part 0 - Magic User's Manual Overview Part 0. Magic User's Manual Overview Command Index Table of Contents Preface Export Compliance System Requirements Website and Email links Hardware Keys Upgrade Hardware License Key MAGIC User’s Manual 0-1 Part 0 - Magic User's Manual Overview Command Index Command Index Quick links: A, B, C, D, E, F, G, H, I, J, K, L, M, N, O, P, Q, R, S, T, U, V, W, X, Y, Z $namelist$ GAS_CONDUCTIVITY PARALLEL_GRID ! GRAPHICS PARAMETER GRID origin PHASESPACE AREA GRID explicit PHOTON ASSIGN GRID uniform POINT AUTOGRID GRID quadractic POISSON AUTOMARK / MARK GRID pade POLARIZER BLOCK / ENDBLOCK GRID reserve_size POPULATE PORT CABLE HEADER PRESET CAPACITOR CALL / RETURN IF / ELSEIF / ELSE / ENDIF RANGE [options] CHARACTER IMPORT RANGE field CIRCUIT INDUCTOR RANGE field_integral COILS INTEGER RANGE field_power COMMAND IONIZATION RANGE histogram COMMENT / C / Z / ! RANGE ionization CONDUCTANCE JOIN RANGE particle CONDUCTOR KEYBOARD RANGE tramline CONTINUITY REAL CONTOUR [options] LINE RESISTOR CONTOUR field LIST RESOLUTION CONTOUR histogram LOOKBACK RESONANT_PORT CONTROL LORENTZ COURANT SHIM CPML MARK / AUTOMARK SPECIES CURRENT_SOURCE MATCH START / STOP MATERIAL STATISTICS DAMPER MAXWELL centered SURFACE_LOSS DIELECTRIC MAXWELL fixed SYMMETRY DELIMITER MAXWELL quasi_neutral SYSTEM DISPLAY MAXWELL quasi_static DO / ENDDO MAXWELL high_q TABLE field DRIVER MAXWELL biased TABLE particles DUMP MCLDIALOG TAGGING DURATION MODE TERMINATE TIME_STEP ECHO / NOECHO OBSERVE [options] TIMER EIGENMODE OBSERVE interval TRAMLINE ELSE, ELSEIF, ENDIF OBSERVE circuit EMISSION [options] OBSERVE collected VECTOR EMISSION beam OBSERVE emitted VIEWER EMISSION explosive OBSERVE field VOID EMISSION gyro OBSERVE field_energy VOLUME EMISSION high_field OBSERVE field_integral VOLUME annular EMISSION photoelectric OBSERVE field_power VOLUME annular_section EMISSION secondary OBSERVE file VOLUME cone EMISSION thermionic OBSERVE impedance VOLUME conformal EMIT OBSERVE inductor VOLUME cylindrical MAGIC User’s Manual 0-2 Part 0 - Magic User's Manual Overview EXPORT FILM FOIL FREESPACE FUNCTION OBSERVE interval OBSERVE ionization OBSERVE particle_statistics OBSERVE resistor OBSERVE resonant_port OBSERVE r_over_q OBSERVE secondary OBSERVE smatrix OBSERVE space_harmonic OBSERVE tramline OBSERVE transform Command Index VOLUME extruded VOLUME functional VOLUME helical VOLUME lathe VOLUME parallelepipedal VOLUME pryamid VOLUME rhombus VOLUME rotate VOLUME spherical VOLUME tetrahedron VOLUME toroidal VOLUME wedge VOLTAGE Z MAGIC User’s Manual 0-3 Part 0 - Magic User's Manual Overview Table of Contents Table of Contents Part 0. Magic User's Manual Overview Command Index Table of Contents Preface Export Compliance System Requirements Website and Email links Hardware Keys Upgrade Hardware License Key Part 1. Using MAGIC Chapter 1- Introduction Chapter 2- Creating the Simulation Input File Chapter 3- Executing the Simulation Chapter 4- Magic Command Language Chapter 5-Interpreting Command Syntax Part 2. MCL Commands Chapter 6-Variables and Functions Chapter 7-Control Statements Chapter 8-I/O Utilities Chapter 9-Execution Control Part 3. Time and Space Chapter 10-Objects Chapter 11-Grids Part 4. Spatial Extensions Chapter 12-Outer Boundaries Chapter 13-Transmission Lines Part 5. Properties Chapter 14-Material Properties Chapter 15-Unique Geometry Chapter 16-Emission Processes Part 6. Algorithms Chapter 17-Electromagnetic Fields Chapter 18-Charged Particles Chapter 19-Other Algorithms MAGIC User’s Manual 0-4 Part 0 - Magic User's Manual Overview Table of Contents Part 7. Output Chapter 20-Output Control Chapter 21-Text Output Chapter 22-Time Plots Chapter 23-1D Plots Chapter 24-2D and 3D Plots MAGIC User’s Manual 0-5 Part 0 - Magic User's Manual Overview Preface Preface This User's Manual documents the 2011 MAGIC 3.2.0 version of MAGIC2D and MAGIC3D. MAGIC2D is a two-dimensional code and MAGIC3D is its three-dimensional counterpart. The same Manual applies to both. You will encounter references to “2D simulations,” which are performed with MAGIC2D, and to “3D simulations,” which currently are performed with MAGIC3D. With this manual, we continue toward the goal of unification of the two codes. Virtually all the algorithms and material models are available in both MAGIC2D and MAGIC3D. While some features are currently available in only one of the codes, our goal is to make all features universal. The User’s Manual has been rewritten to reflect various command changes, new models and algorithms. The MAGIC Tool Suite Manager is the browser for viewing the electronic MAGIC User’s Manual. It allows the user to examine the manual by part or by individual command. In addition, it includes a set of example files that can be exercised directly from the Tool Suite Manager. The Tool Suite Manager will start MAGIC2D or MAGIC3D for the particular example selected. In addition, it allows the user to browse through the MAGIC tutorials that are also supplied in electronic form. What’s new in Magic? Version 3.2.0 – New algorithm, bug fixes, user help and convenience, upgrades New/Revised Commands • • • • • AUTOMARK – The AUTOMARK command is used to enable/disable (default=off) the automatic marking of the volume objects (MAGIC3D) and area objects (MAGIC2D). AUTOMARK is used in conjunction with the RESOLUTION command to specify the grid resolution along each ordinate axis. Multiple AUTOMARK and RESOLUTION commands may be used to generate graduated grid mesh. RESOLUTION – The RESOLUTION command is used to set the mesh resolution along the coordinate axes. You may set the local cell sizes, δi, or the number of cell divisions, Ni, along an axis. The resolution may be reset multiple times to allow generation of graduated grids. Setting the δi’s takes precedence over the Ni’s. COURANT – Use of the COURANT command allows the user to user adjust the electromagnetic time step to a specific fraction of the Courant stability limit. OBSERVE R_OVER_Q – Specifies evaluation R/Q the circuit shunt impedance for a resonant circuit or structure in a time domain simulation. EMISSION [options] .. TAGGING – Allows the user to select tagging based on particular emission commands. May be used in conjunction with generation of TRAJECTORY type plots. Algorithm additions MAGIC User’s Manual 0-6 Part 0 - Magic User's Manual Overview • • • • Preface The LORENTZ command has been updated to include an implicit particle kinematics algorithm with increased stability and accuracy in dense plasma simulations. 1. 2D/3D barrier discharges, POS 2. Plasma Actuators 3. Cold plasmas Review post-processor capability to overlay results from multiple calculations. New filter and analysis capabilities in Review post processor. Parallel eigenmode for rapid analysis of complex devices. Bug fixes • CPML repaired for overlapping regions in all coordinates • Parallel sewing made more robust • PORT boundary repairs • Memory overflow corrected enabling long names for particle species • DAMPER command repaired • EXPORT command repaired for proper file post-processing in parallel execution • Gas conductivity diagnostic case (Keyword F_SIGMA) repaired • Built-in cross sections and stopping power dE/dx repaired User help and convenience additions • • • • • • Added tutorials for several electronic devices to Help menu Added right mouse menu options to InputBuilder for accelerated access New Review postprocessor toolbars giving user increased analysis capabilities including Fourier analysis and added contours Automatic scratch file cleanup at termination of simulation including Linux Version-release, uninstall, current MAGIC manual with links, and Linux-specific manual added to Linux install CDs Increased rigor of quality control process including Linux results reduces/avoids user problems Recent Releases - Versions 2.2.8 and earlier MAGIC Parallel Capability • • • Improved Parallel operation on Windows. Improved MAGIC diagnostics under parallel simulations. Improved Parallel operation on Linux. MAGIC BATCH Helper • Batch run control is greatly improved and allows for generating batch files that can be used on linux as well as on Windows. Enhanced Graphic Control • • • Right and Left mouse clicks on Inputbuilder provide shortcuts to more user actions. Plot labeling may be captured to clipboard for pasting into other documents. User assignable buttons on Inputbuilder for additional user applications. MAGIC User’s Manual 0-7 Part 0 - Magic User's Manual Overview Preface Enhanced surface loss model • • Allows removal of DC magnetic field component Applies to Klystrons, TWTs, SWSs and beam problems in general. Multiple batch run generation tool • • Convenient setup of multiple cases for all computations Applies to all multiple cases Selectable MPICH2 memory model • • Accelerated performance of all 3D parallel multi-process computations Applies to all multi-process computations Updated/enhanced gas conductivity modeling for plasma applications: • • 2D/3D barrier discharges, POS Plasma Actuators Updated/enhanced parallel processing allows multiple Courant time steps for Lorentz particle push • • Accelerated performance of all 3D parallel multi-process computations Klystrons, Magnetrons, TWTs Repaired symmetry of MAGIC2D fields with diagonal grids • • Magnetrons under magnetic field reversal EMP reflector dishes Improved ionization, gas conductivity and materials modeling for plasma applications: • 2D and 3D barrier discharges including high field-low pressure regimes • Micro-hollow cathodes • Discharge chambers using both using both particle-only and hybrid particle-fluid models • Plasma actuators • Cold plasmas MAGIC is now native 64-bit: • Allows a virtually unlimited number of cells • Particle numbers as high as 6M • Runs on both AMD64 and Intel EM64T chipsets on Windows and Linux • Establishes Linux as the MAGIC execution speed leader Improved Outer Boundary Treatments: • Unwanted reflected power reduced dramatically • Enables modeling wave guide and electron gun terminations • Both Matched Phase Velocity (MPV) and CPML methods implemented • MPV boundary effectiveness preserved under penetration by charged particles Additional Plasma Emission Sources: MAGIC User’s Manual 0-8 Part 0 - Magic User's Manual Overview • • • Preface Explosive emission outgas plasma formation, including dielectric breakdown Models electron and ion plasma particle emission Enhances modeling of high field devices such as relativistic magnetrons, spark gaps, plasma actuators, and klystrons DETAILS OF MAJOR DEVELOPMENTS Version 3.2.0 – New algorithm MAGIC has been modified to include an implicit particle-in-cell (PIC) update scheme (particle “pusher”) for increased time steps and stability in beam-plasma simulations. The adjustable damping implicit update method of Friedman allows selectable attenuation of modes in a plasma. The new algorithm, available in MAGIC version 3.2.0, will enable users to select damping of high-frequency modes thus concentrating on plasma fundamental frequencies of interest. This additional user tool can prevent plasma instabilities resulting from ionization growth beyond the time step limit for explicit particles, for example. See the LORENTZ command for a full description. Recent Releases - Versions 2.2.8 and earlier 1. The IONIZATION, GAS_CONDUCTIVITY and MATERIAL commands. Air ionization caused by the impact of primary and secondary emission electrons is now modeled both in 2D and 3D using both particle-only and hybrid particle-fluid models. Energetic primary electrons and low energy secondary ionization products which are also capable of ionizing neutrals are treated. Processes of electron attachment to neutral species, recombination with ions, and neutralization of ions are included. A substantial database for ionization properties of background gases has been added to the material specification coding. Extensive particle number controls have been added making the utilization of the particle-only treatment, which is superior for high field- low pressure situations, to be economically practical for barrier discharges, micro-hollow cathodes, discharge chambers, and plasma actuators, for example. Representations of cold plasma can also be made. 2. The PORT command. An improved Matched Phase Velocity (MPV) method outer boundary condition based on the one-dimensional advection equation for bounding the calculation domain has been added to the MAGIC FDTD Particle-in-Cell (PIC) EM code. Unwanted reflected power from the grid terminations is reduced dramatically compared to the conventional port treatment. A major FDTD- PIC-friendly improvement over several other advanced boundary recipes, including CPML which has also been added to MAGIC3D during the present contract period, is that the boundary effectiveness is preserved under penetration by charged particles. 3. The EMISSION EXPLOSIVE, CONDUCTOR and TEMPERATURE commands. Explosive emission out-gas plasma formation (typically of gas ions) from material surfaces exposed to large voltages is modeled empirically. Electric field enhancement at microscopic protrusions can cause significant high-field emission (quantum-mechanical tunneling overcoming the work function). Subsequently, any protruding whiskers may dissipate due to Joule heating, resulting in the formation of plasma on the material surface. This surface plasma will typically “emit” under the influence of the ambient electric field, with the species extracted from the plasma being determined by the sign of the MAGIC User’s Manual 0-9 Part 0 - Magic User's Manual Overview Preface field. This electron and ion plasma particle emission, based upon Child’s law, is essential in accurate modeling of high field, relativistic magnetrons, for example. 4. The POPULATE command for MAGIC3D. The POPULATE command, which creates an initial particle distribution, has been extended to 3D. A particle is completely specified by its species, its charge, its coordinates (x1, x2, x3) and its momenta (p1, p2, p3). The user has control over the initial distribution including its shape (using arbitrary functions), and its neutrality or lack thereof (lack of neutrality requires initial static fields also calculable from the distributions). 5. An IMPORT … SPOTS command has been added to MAGIC3D. This command creates a port-like outer boundary at which multiple beams of particles are injected (imported) and particle consistent transverse electric fields are introduced at the simulation edge. Options allow importation from gun codes, or generation of a synthetic beam with specified current and energy features. Multibeam klystrons (MBKs) can be treated in 2D or 3D with this capability, as an example of its utility. 6. The InputBuilder application. InputBuilder is the MAGIC workbench environment application which provides enhanced input file building capabilities through new and improved user-prompting dialog boxes. It enables input file editing and offers access to the User’s Manual, sample problems, and the Magic executables. InputBuilder differs from its predecessor, MUGMAN, particularly in that it loads the outline view (alias tree) of the input file more quickly and colors text faster. 7. Release of Native 64-bit MAGIC applications. Native 64 bit MAGIC allows a virtually unlimited number of cells (32 bit has a built-in <10M cells due to addressing limitations, even with 3 GB memory). Particle numbers are artificially limited to ~6M in the code pending assistance to researchers on an individual basis. Native 64-bit versions are available for AMD64 and Intel EM64T chipsets on Windows and Linux systems. Extensive testing on different platforms during this contract period has identified optimal Windows systems including parallel processing settings, and also quantified the faster Linux performance. 8. Improved graphics control, CONTOUR COLOR SCALE, Single Click GRAPHICS marking for the RANGE, OBSERVE and CONTOUR commands. The contour color scale option enables beautified, increased resolution 2D contours of EM field and particle distribution quantities. Graphics marking has been improved to allow single click selection of options making the MAGIC experience more controlled and less frustrating. Known Issues/Problems Summary (Release 3.2.0): Users may see significant differences from previous versions in gas conductivity cases due to code improvements this release. MPICH parallel memory model “shm” does not work across multiple PCs and is not currently supported by ATK. MAGIC User’s Manual 0-10 Part 0 - Magic User's Manual Overview Preface Known Issues/Problems (Recent Releases): IONIZATION Command background gas. Option CHECK_LOCAL_CELL does not cause expected ionization of Several cases require double precision, including eigenmode and some gas conductivity applications. Model differences in MAGIC3D and MAGIC2D for gas conductivity are known to give modest result variations. For example, small differences (few %) are found in the EM field energy between 2D and 3D gas conductivity. In addition, the differences can be seen at low pressure (0.001 Atm and below). Noticeable (few %) differences in explosive emission MAGIC2D and MAGIC3D models. BUG FIXES AND NEW AND REVISED COMMANDS (RECENT RELEASES): • • • • • • • • • • • • • • • • • • • Repaired particle average fields for MAGIC2D adjacent to diagonal cells. Sharp corners now properly treated in the particle force update. Corrected issue with the LORENTZ command when running in parallel with a particle push larger than the field push. Corrected MAGIC3D EMISSION BEAM model for RANDOM_TIMING so that only generates a fraction of the particles rather than all of the particle on each time step. Corrects the excess current that otherwise occurs. Changed CONTOUR and FIELD axis limits to default to global size of zone. Fixes an issue that occurs when used in a parallel simulation of not allow contours properly being reconstructed at the end of the simulation. Changed CONTOUR formal dialog axis limits from spinners to standard data entry. Repaired MARKs for AREA shape SINUSOIDAL. Generated excessive duplicated grid mark. Repaired algorithm checking failure with random license keys. MAGIC2D repaired a failure in particle average fields for some surface diagonals orientations. MAGIC2D fixed a CONDUCTANCE issue. MAGIC3D fixed OBSERVE parallel sew when obtaining COLLECTED or EMITTED statistics when not along the z axis. MAGIC3D fixed RANGE parallel sew failure in the Power diagnostic E.J when not along Z axis. Gas conductivity: multiple repairs/enhancements to agree with 2D versus 3D and verification data for fluid plasma model with primary electron particle ionization. Parallel sewing improved. Allows for particle time stepping as a multiple of the electromagnetic time step. Diagonal grid particle force fields for MAGIC2D made symmetric near sharp corners. Added POPULATE for 3d to allow initialization of a particle distribution. Revision to the format of the IONIZATION command. See manual page for details. A new option has been added to OBSERVE FIELD. This is a SEARCH option that allows you to find the maximum or minimum of a field within a spatial zone and tracked as a function of time. The EMISSION EXPLOSIVE command has been given an additional current option based on the wall temperature. This can be used to create an “outgas” ion current when the wall heats from electron capture. The CONTOUR FIELD command has been given an OVERLAY option that allows you to superimpose contours and phase space displays. Redisplay of overlays with REVIEW is not available. MAGIC User’s Manual 0-11 Part 0 - Magic User's Manual Overview • • • • • • • • • • • • • • • • • • • • • Preface A new option has been added to the CONTOUR command. This is the COLOR_SCALE selection. This allows you to select a particular color scale for display of shaded contours. This may also be accessed from the contour menu button, when a contour plot is displayed. See the CONTOUR [OPTIONS] for additional details. Port boundary has been modified to allow for either 1st or 2nd order centered advection equation solution to the boundary for incident and exiting wave as well as the original port model. This boundary modification greatly reduces reflections from the Port. For additional information see the revisions to the PORT command. Major revisions to the GAS_CONDUCTIVTY and MATERIAL commands have been included. These will also impact the use of the IONIZATION command. The graphics marking has been improved to allow single click selection of options. Particularly impacts user marking of geometry, contour, range, and observe figures. 64 Bit Version of MAGIC. Available for AMD64 and Intel EM64T chipsets. Parallel Magic3d is available for Windows XP and Windows XP64 OS. (Also available for Linux OS.) Added a new application, InputBuilder. This is an alternative to Mugman. Automatic creation of movie avi files with Magic commands. Automatic file names when extracting bitmaps or data from a graphic image. Interactive editing of the graphics images. Revision of graphics scaling and scientific notation display. PML absorbing boundary added as option to the FREESPACE command. FOIL command modified to mimic a fine grid wire grid. DIELECTRIC command modified to allow particle emission, capture or transparency. SURFACE_LOSS command modified to allow exclusion zones and dynamic frequency evaluation. PRESET command additional modified, additional options added for magnetostatic fields. OBSERVE SMATRIX diagnostic added. IMPORT command – additional beam injection features added. OBSERVE IMPEDANCE … MATCHED_FILTER option, uses new functions SWEEP_CHIRP, etc. Added new FUNCTIONs for measuring dynamic impedance and return loss, SWEEP_CHIRP, etc. OBSERVE … XTRANSFORM option allows mapping of the time axis to another variable or scale. BUG FIXES AND NEW AND REVISED COMMANDS (REVISION JULY 9, 2009). • • • • • • Memory leak in Magic3d for large problems has been corrected. A MAGIC2D bug has been remedied. When the same AREA name was used for DIELECTRIC and CONDUCTANCE the DIELECTRIC insertion of non unity εr failed. The visuals did not capture this failure. The work around for earlier editions of MAGIC2D is to create two duplicate AREAs with unique names. Use one for DIELECTRIC and the other for CONDUCTANCE. Failure with MAGIC3D Parallel to sew TABLE output diagnostics when the parallel blocked is along either the x1 or x2 axis. This has been fixed. The SPECIES command has a SIZE option, which allows you to increase the size of the particles displayed in the phasespace commands. Correction for Explosive Emission Surfaces when severed by a Parallel simulation. Corrects local surface fields and local cell charge density. Added to IMPORT .. OMNITRAK option (MAGIC3D only). Allows data file from the OMNITRAK program to be imported into Magic3D. MAGIC User’s Manual 0-12 Part 0 - Magic User's Manual Overview • • • • • • • • • • • • • • • • • • • • • • • • • • Preface The CONTOUR command now allows the use of a timer with the INTEGRATE option. This allows you to display temporally smoothed fields. Added to IMPORT .. SPOTS options (MAGIC3D only). This is make it easier to inject multiple beam spots at an import plane. Added MOVIE option + timing controls to OBSERVE. Also, added CODEC control for MOVIES that are converted to AVI. The default CODEC was changed to MSVIDEO1. Added default EXTRACT and SAVE names for diagnostics. Added beam axis direction to FOIL command. This relaxes the restriction on foils being 1 cell thick and conformal. Change is not backward compatible; users will need to make adjustments to earlier simulation files. Corrected a problem that occurred when OBSERVE INTERVAL n>1. The diagnostic Q_OF_SIGNAL would fail if the user examined the diagnostic prior to the end of the simulation. Corrected a problem in Magic3d, for EMISSION BEAM .. TIMING ktime. When ktime was greater than 1, the model was creating ktime*current. Particles were created on each time step. Add NOKILL option to CONDUCTORS (MAGIC3D only). This allows particles to stream ballistically through a thin conductor. This should only be used as an internal conductor option. Altered FOIL command so that it now requires specification of the beam transit axis. This then permits any volume shape to be used in defining a FOIL. Added MOVIE_NAME option to CONTOUR, RANGE, PHASESPACE, and VECTOR. Mugman modified to allow remote update of parallel cluster cpu’s to use the identical version of MAGIC. Added TWO_PORT option to SMATRIX. This is used only for cold tests to get the complete Smatrix. Assumes that there are two ports at which incoming waves may be injected. Repaired IMPORT failure to trap the error that occurred when the beam energy was not defined. Repaired BEAM emission shape profile problem. Added additional data options for OBSERVE SMATRIX. These are: S11_REAL_IMAGINARY, S11_MAGNITUDE_PHASE, S21_REAL_IMAGINARY, and S21_MAGNITUDE_PHASE. Extract data option now decimates extracted data according to the selected interval. Thus if you extract with data interval ‘n’, you get every nth datum into the extract file. Most useful for OBSERVE. Fixed MAGIC2D - intermittent emission with secondary emission. Fixed a problem with MAXWELL Quasi_Static, resulted in inproper evaluation of functions with the time argument. Fixed MAGIC2D and MAGIC3D EMISSION SECONDARY, the default secondary electron energy distribution was poorly resolved. The repair increased the sampling resolution of the distribution. Fixed parallel sew of VECTOR and CONTOUR plots in MAGIC3D. Fixed problem with PORT normalization in MAGIC3D. Did not properly check to ensure Voltage measurement of V/m measurement lay within the Port area. Only caused problems if normalization was outside of PORT area Added volume type ROTATE to MAGIC3D. Designed for use in Cartesian coordinates. Command looks like: “Volume name ROTATE area_stencil Point0_axis_of_rotation Point1_axis_of_rotation;” Added to MAGIC3D PRESET command the magnetic field type “MAGNUMBNEW”, (new data format for Magnum code. Fix problem with IMPORT when used with parallel processing in MAGIC3D. Merged the table and species features. This allows the 3d particle viewer to be used in Review 3d viewer. Added a NORMALIZATION options to the VECTOR command. This allows a fixed scaling to be applied to all the vector plots. MAGIC User’s Manual 0-13 Part 0 - Magic User's Manual Overview • • • • • • • • • • • • • • • • • • • • • • • Preface Corrected a problem with MAGIC3D phasespace interactive selection. Shows only the selected plots and only on kinematics time steps. Corrected a problem with the PHASESPACE … WINDOW option. The choices of windows for Q, KE, and GAMMA were not available. Added automatic processing of movie bitmap files into an avi file. Corrected a problem in MAGIC2D, where PRESET with ADD option replaces rather than superimposes the fields. Corrected a problem with the TABLE command for column style output. Corrected a problem with the TEMPERATURE option of EMISSION EXPLOSIVE for MAGIC2D. Corrected a problem in MAGIC2D for OUTGOING that causes a failure if the boundary exceeds 199 cells in length. Added an OBSERVE SMATRIX diagnostic for cold tests. Corrected an intermittent problem with Magic2D, associated with PORTS ands SYMMETRY PERIODIC boundaries for large numbers of grid mesh. Corrected a problem with IMPORT FILE in Magic3D. When timestep of the FILE data is different from the mesh generated time step, the current scaling of Contour plots was incorrect. Revised MUGMAN so that uses a local copy of a MAGIC executable in the input file folder, rather than the copy in the MAGIC Tools folder. Added option to AUTOGRID, allowing you to EXTEND a grid partially generated with the GRID command, and then completed with the AUTOGRID command. Corrected an error in RANGE … FFT. Changes the display so that is uses wave-number rather than inverse wavelength. Added another option to IONIZATION … EMPIRICAL_BETA_MIN. Corrected a problem with the PRINT screen option. Secondary emission failing when the primary charge is too small in Magic2d. This problem has been repaired. Symptom was no secondary particles. Fixed bug in CONTOUR HISTOGRAM for MAGIC3D Added GAS_CONDUCTIVITY model for MAGIC2D An EMISSION [option] has been added [FIXED_CHARGE_SIZE q]. Please note that this version uses a NEW set of registry entries, that are not compatible with version 7.00 and earlier. Uninstall earlier versions of MAGIC prior to installing this one. Piecemeal update of the executables is not available for this version. Added Emission Temperature for Explosive emission. Added MUGMAN new features. Includes a tree view rendering of the input file, also colored text format option to identify commands and keywords. Acknowledgements We would like to acknowledge our users, from whom we receive many requests and ultimately for whom we do this work, both for their support in beta testing and for their patience in giving us time to fix problems when they occur. Despite the invaluable assistance of all these persons and many others, we, the authors are responsible for any omissions, errors, and inaccuracies that still remain. Continuing feedback from our users is an essential and invaluable resource and is greatly appreciated, both for the challenges they present and for the opportunities they provide to improve upon what we have already achieved. Thanks again to you all! MAGIC User’s Manual 0-14 Part 0 - Magic User's Manual Overview Preface Dr. Lars Ludeking ATK National Capital Region 8560 Cinderbed Rd., Suite 700 Newington, VA 22122 Phone: 703-254-2454 Fax: 703-339-6953 Email: [email protected] MAGIC User’s Manual 0-15 Part 0 - Magic User's Manual Overview Export Compliance Information Export Compliance Information Export Compliance Information and this Product Warning: This information may be controlled for export by the Arms Export Control Act (Title 22, U.S.C., App. 2751 et seq.) or the Export Administration Act of 1979, as amended, Title 50, U.S.C., App. 2401 et seq. Export of this information to a foreign person inside or outside the United States must be in accordance with the International Traffic in Arms Regulation (ITAR) or Export Administration Regulations (EAR). MAGIC User’s Manual 0-16 Part 0 - Magic User's Manual Overview System Requirements System Requirements: OS Linux Windows XP and later, Windows Server 2003 and later, Redhat RAM 1GB minimum LICENSE KEY USB port for the Hardware Key PARALLEL Networked cluster of computers with fast Ethernet (preferred), with at least 1GB Ethernet connections. Dual and Quad core will run parallel, however, performance is generally poor compared to a cluster configuration due to shared memory bandwidth and bus considerations. Magic uses MPICH2 for parallel communications. Installation on Windows includes the necessary pieces in the standard installation package. MAGIC User’s Manual 0-17 Part 0 - Magic User's Manual Overview Website and Email links Web Site / Help Desk / Email http://www.magictoolsuite.com Website: HelpDesk: http://www.magictoolsuite.com/helpdesk.html Email: [email protected] 1988-2011 Alliant Techsystems (ATK) Address: MAGIC Help Alliant Techsystems (ATK) National Capital Region 8560 Cinderbed Rd., Suite700 Newington, VA 22122 Telephone: 703-254-2454 MAGIC User’s Manual 0-18 Part 0 - Magic User's Manual Overview The MAGIC USB Hardware License Key The MAGIC USB Hardware License Key The Sentinel System USB Driver provides a communication path between the MAGIC software and the MAGIC USB Hardware License Key. It is necessary to install the driver if and only if you have been supplied a hardware key with the Magic Tool Suite purchase. For evaluation of the Magic Tool Suite you need not install the driver. Note! When exercising the Magic software in evaluation mode, the software is restricted to running small problems. For full size simulations, you must license the software to obtain a hardware key. Installation Procedure for The Sentinel System Driver for the MAGIC USB Hardware Key 1. Unplug the USB Hardware Key. 2. Uninstall Sentinel Protection Installer x.x.x. "Control Panel -> Programs -> Programs and Features -> Uninstall or change a program". 3. Restart your computer. MAGIC User’s Manual 0-19 Part 0 - Magic User's Manual Overview The MAGIC USB Hardware License Key 4. Insert the MAGIC CD. If the Magic Tool Suite Installation Manager does not launch automatically, double-click InstallManager.exe on the CD. 5. Select "Safenet Sentinel Protection", and then press "Install". 6. In the Sentinel Protection Installer - InstallShield Wizard "Setup Type" dialog, choose "Custom" (to do a Custom Install), and then press "Next". Only the Sentinel USB System Driver will be needed. MAGIC User’s Manual 0-20 Part 0 - Magic User's Manual Overview The MAGIC USB Hardware License Key 7. In the "Custom Setup", only check the Sentinel USB System Driver feature. Uncheck all other features (uncheck even the Sentinel Servers). Then, press "Next", and give the Installer time to install the Driver. MAGIC User’s Manual 0-21 Part 0 - Magic User's Manual Overview The MAGIC USB Hardware License Key 8. Plug in the USB Hardware Key. If the license key does not light up, then reinstall the latest Sentinel driver. 9. You can verify that the Sentinel USB Driver is present, by examining the "Control Panel -> Hardware and Sound" Device Manager window. If you open the "Universal Serial Bus controllers" category, it should contain the item "SafeNet Sentinel Hardware Key". 10. Another way, to verify that the Sentinel USB Driver is present, is by launching MAGIC on some input file (eg 3dfoil.m3d). The MAGIC window Title should NOT indicate "[Evaluation Mode]", if the Driver is present, and if the MAGIC USB Hardware Key has not expired. MAGIC User’s Manual 0-22 Part 0 - Magic User's Manual Overview MAGIC User’s Manual The MAGIC USB Hardware License Key 0-23 Part 0 - Magic User's Manual Overview Upgrade Hardware License Key How to Upgrade/Renew a Magic Hardware Key Process Procedure for Upgrade/Renewal of Hardware License Key (User) Generate Request file with SecureUpdateUtility.exe. Request File: (*.req) (User) Run HardwareKeyID.exe for each license key. ID Files: (*.txt) (User) Attach Request File and ID File(s) to your Help Desk project Magic Users (Commercial) or AFOSR Issue, and save Issue twice. Informational Note! Project Magic Users is linked to email address: [email protected]. (Commercial Users) Project AFOSR is linked to email address: [email protected]. (AFOSR Users) (Magic Support) Receive and Acknowledge User Request. Verify attachment of Request File and ID File(s). (Magic Support) Generate Upgrade File(s) using Request File and ID File(s). Upgrade File: (*.upw) (Magic Support) Open Help Desk Issue and attach Upgrade File. Save Issue Twice. (User) Receive email from Support, or Reopen Help Desk Issue. Download Upgrade File(s). (User) Update Hardware Key with SecureUpdateUtility.exe using the Upgrade File(s). 1) Navigate to the Magic Tool Suite bin (or bin64) folder. Windows 32 bit OS path "C:\Program Files\Magic Tool Suite\bin". Windows 64 bit OS path "C:\Program Files\Magic Tool Suite\bin64". linux OS path "/usr/local/magictools/bin", (or where installed.) 2) Run HardwareKeyID.exe (64-bit OS machines run HardwareKeyID64.exe). This will write the key tag number and key internal ID to a file. HardwareKeyID<tag number>-<A or C><internal ID>.txt e.g. - HardwareKeyID103800-C0157.txt This text file will be located in the Magic User Configuration directory e.g. "C:\Magic Tool Suite\Config", or "/usr/local/magictools/config". 3) Open the HardwareKeyID<tag number>-<A or C><internal ID>.txt file. e.g. HardwareKeyID103800-C0157.txt), and make a note of the last characters, starting with the tag number, in the ID string. For example, if the ID string is "ATK-Virginia-AA23-U0-999-20080827-103800-C0157", make a note of "103800-C0157". 4) Close the HardwareKeyID<tag number>-<A or C><internal ID>.txt file. MAGIC User’s Manual 0-24 Part 0 - Magic User's Manual Overview Upgrade Hardware License Key 5) Generate an update request file. Use all the key ID string last characters, starting with the tag number, when naming the request file (e.g. "103800-C0157.req"). For Windows users of Magic, you will navigate to the Magic Tool Suite bin, and run the SecureUpdateUtility.exe. For Windows customers, the request file will be saved in your "...\Documents" (Windows Vista) or "...\My Documents" (Windows XP) For linux users, open a terminal, and run the command "./SecureUpdateUtility -r <request file>" (e.g. "./SecureUpdateUtility -r 103800-C0157.req"). The request file will be saved in your magictools bin (linux) directory. 6) Log onto the MAGIC Help Desk (http://www.mrcwdc.com/magic/helpdesk.html), create or open your project Magic Users (for Commercial customers) or AFOSR Issue. a) Attach the request file (e.g. "103800-C0157.req") b) Attach the ID file HardwareKeyID<tag number>-<A or C><internal ID>.txt (e.g. HardwareKeyID103800-C0157.txt). c) Save the Issue twice, which will notify the MAGIC Support Team. d) Logout of the Help Desk session by pressing the bottom left Logout button. PROCEDURAL NOTES: In the Help Desk upper-right Project menu, choose "AFOSR" (AFOSR customers) or "Magic Users" (Commercial customers). If the Issue is open in Details Mode, switch to Edit Mode by pressing the Edit (pencil-on-pad icon) button. Also, make sure your Web Browser is set to always allow pop-ups for this Help Desk website. INFORMATIONAL NOTE: Help Desk Issues are linked to email messages. That is, project Magic Users is linked to email address [email protected] (Commercial Users), and project AFOSR is linked to email address [email protected] (AFOSR Users). 7) After receiving an email response from ATK, save the attached upgrade file (eg "103800C0157.upw") to your "...\Documents" (Windows Vista) or "...\My Documents" (Windows XP) or magictools bin (linux) directory. 8) Update the key, by using the saved upgrade file (eg "103800-C0157.upw"). A Windows customer SecureUpdateUtility.exe. will navigate to the Magic Tool Suite bin, and A linux customer will open a terminal, and run the command "./SecureUpdateUtility -u <update file>" (eg "./SecureUpdateUtility -u 103800-C0157.upw") from the magictools bin. MAGIC User’s Manual 0-25 run Part I - Using MAGIC Part I. Using MAGIC Chapter 1. Chapter 2. Chapter 3. Chapter 4. Chapter 5. Introduction Creating the Simulation Input File Executing the Simulation Magic Command Language Interpreting Command Syntax MAGIC User’s Manual I-1 Part I - Using MAGIC Chapter 1 - Introduction 1. INTRODUCTION 1.1 MANUAL OBJECTIVE This Manual documents the most recent release of the MAGIC2D and MAGIC3D codes. The codes and Manual are usually released annually. Updates and bugs fixes are released during the year as they become available, typically quarterly. The version (month and year of release) is imprinted on the cover of this document and on virtually all output from the code. Interim versions of the code may be released without documentation to correct errors, to permit use of new algorithms, and to allow beta testing. Users who encounter errors in the code or Manual are encouraged to communicate these to ATK National Capital Region by fax at (703) 339-6953 or e-mail at [email protected]. Insofar as it is possible, the code is designed to be backwards compatible with the Manual. This means that features in previous Manuals will probably work in the latest version of the code. Backwards compatibility is the reason that old input files can continue to run, even though many of the commands are technically obsolete and have been dropped from the Manual. The Manual reflects the future, while the code is a mixture of old and new features. The Manual assumes that the reader may have no prior experience with the code, but that he is acquainted with computational physics methods in general and electromagnetic, particle-in-cell methods in particular. There is little attempt to motivate or even to justify the conventions and algorithms offered. Instead, the focus is upon how to use the code, and the user having previous experience with the code may wish to proceed to Part 2 after reviewing material in Chapter 2, which gives an overview of old and new diagnostic fields that are available in Magic for a variety of models. 1.2 MANUAL ORGANIZATION This Manual consists of seven Parts, and it is further subdivided into 24 Chapters. Part 1 (Using the Code) is intended primarily for new users. It focuses on “how to” and is relatively devoid of theory and derivations. • Chapter 1 is the introduction. • Chapter 2 describes how to create a simulation. It presents most of the important choices that go into a simulation and includes cross-references to actual commands. It also presents the most important conventions and the most common user errors. • Chapter 3 describes how to execute the simulation, how to recognize errors, and how to continue the simulation further in time. • Chapter 4 offers an abridged discussion of the MAGIC Command Language (MCL), which includes the use of constants, variables, and functions, and provides a basis for advanced data processing methods. • Chapter 5 discusses the rules of syntax, or how to interpret arguments in the Manual to write commands that work. Parts 2 through 7 contain the command descriptions. The Parts and Chapters are organized by function, thus making it easy to compare the alternatives available. Each command description includes the command_name, function, syntax, arguments ( and definitions), description, restrictions, see also (crossreferences), references (to literature), and examples. The Parts are as follows: • Part 2 (MCL commands) — variables, functions, do-loops, etc. • Part 3 (time and space) — spatial objects (points, lines, areas, volumes) and grids • Part 4 (spatial extensions) — outer boundaries and transmission lines • Part 5 (properties) — conductors, dielectrics, resistive properties, emission processes • Part 6 (algorithms) — electromagnetic, current-density, and particle kinematics • Part 7 (output) — an extensive selection of simulation output types and methods MAGIC User’s Manual 1-1 Part I - Using MAGIC Chapter 1 - Introduction 1.3 SOFTWARE DESCRIPTION MAGIC 1 is an electromagnetic particle-in-cell code, i.e., a finite-difference, time-domain code for simulating plasma physics processes, i.e., those processes that involve interactions between space charge and electromagnetic fields. Beginning from a specified initial state, the code simulates a physical process as it evolves in time. The full set of Maxwell’s time-dependent equations is solved to obtain electromagnetic fields. Similarly, the complete Lorentz force equation is solved to obtain relativistic particle trajectories, and the continuity equation is solved to provide current and charge densities for Maxwell's equations. This approach, commonly referred to as electromagnetic particle-in-cell (PIC), provides self-consistence, i.e., interaction between charged particles and electromagnetic fields. In addition, the code has been provided with powerful algorithms to represent structural geometries, material properties, incoming and outgoing waves, particle emission processes, and so forth. As a result, the code is applicable to broad classes of plasma physics problems. The MAGIC tool suite includes MAGIC2D, a two- and one-half dimensional code (2D fields and 3D particle kinematics), MAGIC3D, a fully three-dimensional counterpart to MAGIC2D, Preview (beta release), a 3D Geometry viewer, and Review2, a general-purpose post-processor. It reads from the MAGIC standard database format. It can redisplay simulation graphics after a simulation is complete. All codes in the MAGIC tool suite are built on an application independent software library. This includes the command language interpreter from which the user interface for each code is built and the DUMP utility which provides communication between the codes and the database. The use of this library speeds code development, but more importantly, it helps integrate the system and makes the codes similar to learn and use. The MAGIC Tool Suite for Windows consists of several software applications. The principle ones are: Magic Tool Suite Applications This application offers access to the User’s Manual and the Magic InputBuilder executables, and to the input file, which can then be edited. It contains a browser for the electronic copy of the MAGIC User’s Manual. It also allows the user to access MAGIC2D and MAGIC3D, as well as REVIEW. Input files may be edited using InputBuilder and new ones constructed, saved, and run with the appropriate application. The single precision version of MAGIC2D. MAGIC2D_SNG MAGIC2D_DBL The double precision version of MAGIC2D. MAGIC2D_64 The 64 bit version of MAGIC2D. MAGIC3D_SNG The single precision versions of MAGIC3D. MAGIC3D_DBL The double precision versions of MAGIC3D. MAGIC3D_64 The 64 bit version of MAGIC3D. PREVIEW_DBL and PREVIEW_64 The 32 bit and 64 bit versions of PREVIEW. 1 B. Goplen, L. Ludeking, D. Smithe, and G. Warren, “User-Configurable MAGIC Code for Electromagnetic PIC Calculations,” Computer Physics Communications, Vol. 87, Nos. 1 & 2, May 1995, pp. 54-86. 2 L. Ludeking, Gary Warren, and Bruce Goplen, “POSTER User’s Manual,” Mission Research Corporation Report, MRC/WDC-R-245, August 1993. MAGIC User’s Manual 1-2 Part I - Using MAGIC REVIEW_SNG REVIEW_DBL REVIEW_64 Chapter 1 - Introduction The single precision versions of Review, the interactive postprocessor for the MAGIC database format. The double precision versions of Review, the interactive postprocessor for the MAGIC database format. The 64 bit version of REVIEW. 1.4 INPUT BUILDER InputBuilder is a MAGIC workbench environment application which provides enhanced input file building capabilities. It also offers access to the User’s Manual, sample problems, and the Magic executables. It contains a browser for the electronic copy of the user’s manual, and enables input file editing, saving, and running with the appropriate application. InputBuilder loads the outline view (alias tree) of the input file quickly and its text editor uses coloring. The text editor handles text as is, except that it replaces tabs with spaces. Also, an exclamation mark should not be used within a character string (that is, not between a pair of double quotes). InputBuilder is provided with Windows MAGIC only. It is not available for Linux MAGIC. Launch InputBuilder by clicking on its icon on the desktop, or as follows: • Begin with the Windows START menu button, • • • Select the All Programs menu, Select the Magic Tool Suite menu, Click on “InputBuilder”. The figure to the right illustrates what this will look like on your monitor. Once InputBuilder starts, it displays a window similar to the following. Displayed is the 64-bit InputBuilder, which has a slightly different toolbar from the 32-bit InputBuilder. MAGIC User’s Manual 1-3 Part I - Using MAGIC Chapter 1 - Introduction The text editor (right-side window) in InputBuilder only allows you to edit one file at a time. Doubleclicking a text line will open a corresponding command dialog. The outline view (tree in left-side window) lists all the commands in the file. Clicking the plus sign to the left of a command in the outline view opens branches to all lines using that command. Clicking a branch in the outline view (tree) moves the text editor cursor to the corresponding command line. Double-clicking a branch opens the corresponding command dialog. The command category tabs (Variables, Control, etc.), located directly below the toolbar, display buttons (e.g. ASSIGN, REAL, etc.), located to the left directly below the tabs, for the commands in the category of the selected tab. Pushing the button for one particular command opens a command dialog, from which you can add a new command line to the text editor. Each time you exit InputBuilder, it remembers the name of the file you are currently working on, as well as other settings you have made, and automatically reopens this file the next time. The name and location of the current file is displayed in the title bar at the top of the window. The File and Edit menus provide the standard commands found in most text editors. These commands will be explained in the Menus section below. The View menu allows you to hide or show the outline view. The Format menu allows you to change the appearance of the text in the editor. The Options menu allows you to change behavior of InputBuilder. The Tools menu allows you to run MAGIC2D, MAGIC3D, or Review, for the current input file. It also allows you to launch the MagicBatchRuns application, which allows you to create a batch of consecutive Magic runs on different input files. It also allows you to set up personal applications, and then run them from the menu. The Help menu provides access to the Magic Manual, an extensive help manual that contains beginner’s information, a full list of the Magic commands and their arguments, and explanations of certain algorithms used in Magic. The Help menu also links to Magic input file examples, and to the Magic Help Desk. MAGIC User’s Manual 1-4 Part I - Using MAGIC Chapter 1 - Introduction If Remote Desktop is going to be used to access a local machine desktop that already has InputBuilder open, then first close InputBuilder on the local machine. This is recommended because some InputBuilder controls do not respond if the session with InputBuilder open is re-accessed. If the desktop session is re-accessed with InputBuilder already open, then close the InputBuilder application and re-open InputBuilder. That should ensure that all the InputBuilder controls function properly. 1.4.1 The InputBuilder Toolbar The InputBuilder Toolbar, located directly underneath the menu, contains buttons that perform the most commonly used editor functions in InputBuilder, as well as buttons to launch Magic and Review. The 32-bit InputBuilder Toolbar has 6 Magic and Review buttons (3 for single precision, and 3 for double precision), while the 64-bit Toolbar only has 3 Magic and Review buttons (equivalent to 32-bit double precision). The 32-bit InputBuilder Toolbar looks like the following. The 64-bit InputBuilder Toolbar looks like the following. The table below shows each button’s function. Toolbar Button Functions and Descriptions Button Name Action Open MAGIC Opens the Magic Users Manual in a separate window. Pressing Help Manual this button is the same as selecting Help menu item Magic Help Manual or pressing function key F1. Open File Open a Magic input file. InputBuilder can only edit one file at a time, so you will be prompted to save changes before the current file is closed. Pressing this button is the same as selecting File menu item Open. Save File Save the currently open file. If the file is unsaved, a dialog will prompt you to select a location and filename. Pressing this button is the same as selecting File menu item Save. Rightclicking this button is the same as selecting File menu item Save As. Invoke Open a command dialog related to the current text command, to Command assist in replacing the current command line (the text editor Dialog cursor must lie somewhere within the command line). Do not use this button for commands BLOCK, MCLDIALOG, or $namelist, as those command lines must be typed into the text editor window by hand. Pressing this button is the same as selecting Edit menu item Invoke Command Dialog or pressing F2. Refresh and Refresh the outline view and the editor text coloring, and save save the input file. When a command dialog is used to replace/delete or add a command line, the outline view and the editor text automatically refresh. So, this refresh button only has to be used if text was typed/pasted into the text editor window by hand. Pressing this button is the same as selecting File menu item Refresh and save or pressing F4. Right-clicking this button toggles between colored text and black-and-white text. Hide Tree and Hide/Show the outline view and the Command Buttons. If the Command outline view and Command Buttons are visible, then hide them. MAGIC User’s Manual 1-5 Part I - Using MAGIC Chapter 1 - Introduction Buttons Open Parallel Processing dialog box Run Magic 2D Single Run Magic 3D Single Run Preview 3D Run Review Single Run Magic 2D Double Run Magic 3D Double Run Review Double Run Magic2D If the outline view and Command Buttons are not visible, then show them. Pressing this button is the same as selecting View menu item Hide Tree and Command Buttons. Open a dialog box that allows you to choose which computers in your network will be used for a parallel run of your MAGIC3D file. All of the computers on your network must have been previously listed by selecting Tools menu item “Configure Parallel Cluster …”. Right-clicking this button is the same as selecting Tools menu item Batch Runs. This button starts 32-bit MAGIC2D single precision. If the open file in InputBuilder is a .m2d file, it will be used as the input file. Pressing this button is the same as selecting Tools menu item Magic2D- Single. Right-clicking this button also invokes the Magic run, but it runs without pausing. This button starts 32-bit MAGIC3D single precision. If the open file in InputBuilder is a .m3d file, it will be used as the input file. Pressing this button is the same as selecting Tools menu item Magic3D- Single. Right-clicking this button also invokes the Magic run, but it runs without pausing. This button starts Preview 3D. If the open file in InputBuilder is a .m3d file, it will be used as the input file. Pressing this button is the same as selecting Tools menu item Preview3D. This button starts 32-bit Review single precision. If the open file in InputBuilder is a .toc file, it will be used as the input file. If the open file is a .m2d file or a .m3d file, then its corresponding .toc file will be used as the input file for Review. Pressing this button is the same as selecting Tools menu item Review- Single. This button starts 32-bit MAGIC2D double precision. If the open file in InputBuilder is a .m2d file, it will be used as the input file. Pressing this button is the same as selecting Tools menu item Magic2D- Double. Right-clicking this button also invokes the Magic run, but it runs without pausing. This button starts 32-bit MAGIC3D double precision. If the open file in InputBuilder is a .m3d file, it will be used as the input file. Pressing this button is the same as selecting Tools menu item Magic3D- Double. Right-clicking this button also invokes the Magic run, but it runs without pausing. This button starts 32-bit Review double precision. If the open file in InputBuilder is a .toc file, it will be used as the input file. If the open file is a .m2d file or a .m3d file, then its corresponding .toc file will be used as the input file for Review. Pressing this button is the same as selecting Tools menu item Review- Double. This button starts 64-bit MAGIC2D. If the open file in InputBuilder is a .m2d file, it will be used as the input file. Pressing this button is the same as selecting Tools menu item Magic2D. Right-clicking this button also invokes the Magic run, but it runs without pausing. MAGIC User’s Manual 1-6 Part I - Using MAGIC Chapter 1 - Introduction Run Magic3D Run Review Open Log File Find Pattern Print Play Movie File Delete Files Run <User Application 1> Run <User Application 2> Run <User Application 3> Run <User Application 4> Run <User Application 5> This button starts 64-bit MAGIC3D. If the open file in InputBuilder is a .m3d file, it will be used as the input file. Pressing this button is the same as selecting Tools menu item Magic3D. Right-clicking this button also invokes the Magic run, but it runs without pausing. This button starts 64-bit Review double precision. If the open file in InputBuilder is a .toc file, it will be used as the input file. If the open file is a .m2d file or a .m3d file, then its corresponding .toc file will be used as the input file for Review. Pressing this button is the same as selecting Tools menu item Review. Open the log file, that resulted from running the MAGIC2D or MAGIC3D input file currently residing in the text editor, with the External Text Editor application (e.g. wordpad). Pressing this button is the same as selecting File menu item Open Log. Right-clicking this button opens a copy of the current text file with the External Text Editor application. This button is used to search the text for a specific word or phrase. Pressing this button is the same as selecting Edit menu item Find… . Right-clicking this button is the same as selecting Edit menu item Replace... . This button opens a print dialog that allows you to set printer options and print the currently open file in InputBuilder. Pressing this button is the same as selecting File menu item Print. This opens a list of movie files (*.avi and *.mpg) in the current folder, and plays the selected file. Pressing this button is the same as selecting Tools menu item Play Movie File… . This opens a check-list of files in the current folder, and deletes the user-selected files. Pressing this button is the same as selecting File menu item Delete Files… . Right-clicking this button opens a "Clean Folder and All Subfolders" dialog that allows you to choose the file extensions of files that you want deleted from the current folder and its subfolders. This runs the first user-specified application. Pressing this button is the same as selecting Tools menu item <User Application 1>. This runs the second user-specified application. Pressing this button is the same as selecting Tools menu item <User Application 2>. This runs the third user-specified application. Pressing this button is the same as selecting Tools menu item <User Application 3>. This runs the fourth user-specified application. Pressing this button is the same as selecting Tools menu item <User Application 4>. This runs the fifth user-specified application. Pressing this button is the same as selecting Tools menu item <User Application 5>. MAGIC User’s Manual 1-7 Part I - Using MAGIC Chapter 1 - Introduction Run <User Application 6> Color/No Color This runs the sixth user-specified application. Pressing this button is the same as selecting Tools menu item <User Application 6>. This toggles between showing the input file text in black-andwhite or in color. 1.4.2 INPUTBUILDER Menu Commands The InputBuilder main menu contains seven different groups of commands- File, Edit, View, Format, Options, Tools, and Help. File Menu New: This will create a new, blank document. Since InputBuilder can only edit one file at a time, InputBuilder will close the currently open document before the new document is created. If any changes have been made to the current document, the user will be asked if they wish to save their changes before closing the file. Open: This will open a file browser to select a new file to open. If you are looking for a particular type of MAGIC input or output file, you can select the type in the browser. Open Log: Open the log file, that resulted from running the MAGIC2D or MAGIC3D input file currently residing in the text editor, with the External Text Editor application (e.g. wordpad). Refresh and save (or function key F4): Updates the outline view (tree) to match the current commands in the text editor, updates the text coloring, and saves the current input file. Save: This will save any changes to the currently open file. If the file is unsaved, a file browser will prompt you to select a location and enter a filename. Save As: This will open a file browser for the user to select a location and filename. If the filename already exists, you will be asked to confirm before replacing the file. Print: This will print out the text editor contents on the default printer. Print Setup: This will open a print dialog that allows you to print the current document, setup the page layout, or select a different printer. Delete Files…: Opens a dialog which lists the files in the current input file directory. The user can then select a set of files from the list, and request that they be deleted. History: Points to the names of the last 10 input files opened by InputBuilder. Exit: Quit InputBuilder. If changes have been made to the currently open file, you will be asked if you wish to save your changes before quitting. Edit Menu The Edit Menu contains the standard commands available in any text editor. The editor supports multilevel undo, which allows you to undo changes made to a file one step at a time. Text can also be cut, copied, or pasted to or from other programs You can also search/replace a text string in the currently open file, from the current position in the file. You can search either up or down from the current position, specify an exact or case insensitive match, or search only for a whole word match. You can also go to a specific line. You can also select all of the text. The Edit Menu can also be accessed by rightclicking in the text editor. Invoke Command Dialog (or function key F2): This non-standard command is also included in the Edit menu, to open a command dialog related to the current text command, to assist in replacing the current command line (the text editor cursor must lie somewhere within the command line). Do not use this button for commands BLOCK, MCLDIALOG, or $namelist, as those command lines must be typed into the text editor window by hand. View Menu MAGIC User’s Manual 1-8 Part I - Using MAGIC Chapter 1 - Introduction Hide Tree and Command Buttons: Hide/Show the outline view and the Command Buttons. If the outline view and Command Buttons are visible, then hide them. If the outline view and Command Buttons are not visible, then show them. Format Menu Set Undo Levels…: Set the number of text editor changes you would like to be remembered. Then, “Edit -> Undo” can be used to retrieve the text that was previously in the editor, starting with the text before your most recent editing change. Text is stored in the undo buffers before a backspace, carriage return, space, or command line dialog add/replace/delete. So, if you set undo levels to 25, you can retrieve your text before your first most recent change, or your second most recent change, …, or as far back as your 25th most recent change. Set Tab Spaces…: Opens a dialog that allows the user to set the number of spaces that tab characters will be replaced by. InputBuilder does not allow tabs in the text editor. Indent Tab Spaces: Performs the same function as the previous Format menu item "Set Tab Spaces…", but it points to a submenu of integer choices. Selecting an integer sets the number of spaces, that tab characters will be replaced by, to that integer value. InputBuilder does not allow tabs in the text editor. Indent Selected Lines: Indents the selected text editor lines by the number of spaces that equal a tab character (see Format menu item "Set Tab Spaces…" or "Indent Tab Spaces"). Unindent Selected Lines: Unindents the selected text editor lines by the number of spaces that equal a tab character (see Format menu item "Set Tab Spaces…" or "Indent Tab Spaces"). Indent/Unindent…: Opens a dialog that allows the user to set the number of spaces to indent/unindent this one particular instance of selected lines in the text editor. This function is completely independent of the previous four Format menu items ("Set Tab Spaces…", "Indent Tab Spaces", "Indent Selected Lines", and "Unindent Selected Lines"). Font and Size…: Opens a dialog that allows the user to set the text editor font name and font size. Text Colors and Styles…: Opens a dialog that allows the user to set the colors and styles (bold, italic, underline) for each different type of word in the command lines. For example, commands could be colored red while command options could be colored violet. The user can also set the background color of the text editor. The user can also press "No Color" for all black-and-white text. Options Menu The Options Menu allows choices for turning on or off (checking or unchecking) behavior related to the InputBuilder components (e.g. Command Buttons, tree, text editor). Show Only Filename In Title, Without Full Path: If this option has been turned on (is checked), the InputBuilder window title will only show the Magic input file name, without preceding the name with the directory path that the file is located in. Automatic Refresh and save: If this option has been turned on (is checked), anytime the text editor text is manually changed (e.g. the user types in some characters, or selects Undo), the tree view will automatically be updated, the text editor coloring will automatically be updated, and the input file will automatically be saved. If this option has been turned off (is unchecked), anytime the text editor text is manually changed, the "Refresh and save" (red-captioned button located directly above the tree view) will become visible, and the user will have to manually press that button to perform all those functions. Reduce Text Flicker: If this option has been turned on (is checked), anytime the user types in some characters, the text editor coloring will be inaccurate for the words that the user types in. However, the previously colored words on the current line will not flicker as much as when this option is turned off. The user can update the text coloring by pressing "Refresh and save" (red-captioned button located directly above the tree view). If this option has been turned off (is unchecked), anytime the user types in some characters, the text editor coloring will be more accurate for the words that the user types in, but the previously colored words on the current line will flicker more. MAGIC User’s Manual 1-9 Part I - Using MAGIC Chapter 1 - Introduction Do Not Ask To Set Tab Spaces: If this option has been turned on (is checked), the "Set Tab Spaces" dialog will not be displayed whenever a different input file, containing a tab character, is opened, or whenever the user keys in a tab character (^I) for the first time. Do Not Show Nonstandard Character Warning: If this option has been turned on (is checked), the "Nonstandard Character Warning" dialog will not be displayed whenever an input file, containing a nonstandard character, is opened, or whenever the user keys in a nonstandard character (e.g. a vertical tab, ^K) for the first time. New Line Per Command Option: If this option has been turned on (is checked), the text editor will start a new line for each major option in a command. Allow Command Dialog Invocation on Text Double-click: If this option has been turned on (is checked), double-clicking within a text editor command line will invoke (display) the command dialog related to that command line. If this option has been turned off (is unchecked), double-clicking within the text editor will simply select whatever word was double-clicked (just like a regular editor would do), and no command dialog will appear. Check For Previous Results: If this option has been turned on (is checked), and the user tries to select a different input file, InputBuilder will first warn the user if data is still present from a previous run of that input file. If so, the user will be prompted as to whether or not to continue loading the input file anyway. If this option has been turned off (is unchecked), and the user selects a different input file, that input file will be immediately loaded. In either case, anytime a Magic run is then done on an input file, any previous data files in that input file directory are overwritten. Tools Menu The Tools Menu lets you select the Magic executable to run, or create a batch file of consecutive Magic runs, or configure a file naming the computers in your parallel network, or play a movie file (*.avi or *.mpg), or declare and run your own applications. Batch Runs…: Opens a dialog for listing the set of input files, along with flags (such as "-nopause"), that will be run consecutively by Magic once the dialog "Run" button is pressed. Configure Parallel Cluster…: Opens a dialog for listing the parallel computer network. Magic2D- Single (32-bit machines only): Runs single precision Magic 2D (2-dimensional) on the current input file. Magic3D- Single (32-bit machines only): Runs single precision Magic 3D (3-dimensional) on the current input file. Preview3D: Runs Preview 3D (3-dimensional) on the current input file. Review- Single (32-bit machines only): Runs a single precision graphical Review of the data resulting from the most recent Magic run of the current input file. Magic2D- Double (32-bit machines only): Runs double precision Magic 2D (2-dimensional) on the current input file. Magic3D- Double (32-bit machines only): Runs double precision Magic 3D (3-dimensional) on the current input file. Review- Double (32-bit machines only): Runs a double precision graphical Review of the data resulting from the most recent Magic run of the current input file. Magic2D (64-bit machines only): Runs Magic 2D (2-dimensional) on the current input file. Magic3D (64-bit machines only): Runs Magic 3D (3-dimensional) on the current input file. Review (64-bit machines only): Runs a graphical Review of the data resulting from the most recent Magic run of the current input file. Set External Text Editor…: This allows browsing to, and then selecting, a preferred text editor application (e.g. wordpad). That preferred External Text Editor is launched from toolbar button "Open Log File". MAGIC User’s Manual 1-10 Part I - Using MAGIC Chapter 1 - Introduction Set External Movie Player…: This allows browsing to, and then selecting, a preferred movie player application (e.g. Windows Media Player). That preferred External Movie Player is launched from toolbar button "Play Movie File". Play Movie File…: This opens a list of movie files (*.avi and *.mpg) in the current folder, and plays the selected file. Set Applications…: Opens a dialog that allows the user to name an application, assign an executable and bitmap to the application, and assign the file extensions that the application can use when launched (run). The menu items following this item (item <User Application 1> through item <User Application 6>), can then be selected to run the particular user-defined applications. <User Application 1>: This runs the first user-specified application. <User Application 2>: This runs the second user-specified application. <User Application 3>: This runs the third user-specified application. <User Application 4>: This runs the fourth user-specified application. <User Application 5>: This runs the fifth user-specified application. <User Application 6>: This runs the sixth user-specified application. Help Menu Magic Help (chm) (or function key F1): This opens to the Command Index page of the Magic User’s Manual. Magic Manual (pdf): This opens the pdf version of the Magic User’s Manual. Do not expect the links on the pdf pages to work. However, the left-side Bookmarks pane can be used to navigate through the rightside pdf document. Parallel Wizard Manual (chm): This opens the Help Manual explaining the use of the Parallel Wizard. Browse the Magic 2D Examples: This takes you to the 2D Example folders. From there, select the folder of the example you want and open the input file. Browse the Magic 3D Examples: This takes you to the 3D Example folders. From there, select the folder of the example you want and open the input file. Browse the Parallel Examples: This takes you to the Parallel Example folders. From there, select the folder of the example you want and open the input file. Use Tools menu item "Configure Parallel Cluster…" to name your parallel network computers, set up your example-specific parallel configuration file, and run that configuration file. Browse the Tutorials: This takes you to the Tutorials folder. From there, select the Word document or PowerPoint presentation tutorial you want and open the file. Magic Home Page: This links you to the Magic website Home Page. Magic Help Desk: This links you to the Magic website Help Desk, where you can register as a Magic User, browse the Knowledge Base (accessed from the left panel of a Help Desk project page), and create and track your own Issues. [email protected]: This opens your email New Message window, so that you can send a query to the Magic Support staff. Or, you can use the previous menu item (Magic Help Desk) to create a formal Help Desk Issue that will also be reviewed by the Magic Support staff. InputBuilder Help: This opens the Introduction page of the Magic User’s Manual, which includes an explanation of the InputBuilder user components. About InputBuilder: This provides Magic contact information. 1.5 MAGIC BATCH RUNS MagicBatchRuns supports the user in constructing lists of MAGIC input file names, which are written to a batch runs file (*.bat), and which can then be run in consecutive order as a batch run. The batch runs MAGIC User’s Manual 1-11 Part I - Using MAGIC Chapter 1 - Introduction list can include single-mode input files (*.m2d, *.m3d) and/or parallel-mode input files (*.cfg). A linux operating system batch runs file can also run input files simultaneously, by adding the "&" flag to the end of the flags string. MagicBatchRuns is available with both Windows and Linux MAGIC. Alternatively, MagicBatchRuns can be used on Windows to produce a batch runs file that has Linux as its Target operating system. That is, the batch runs file can be copied from the Windows development machine to a Linux machine, and then run on the Linux machine. MagicBatchRuns can be launched either by double-clicking the application name (MagicBatchRuns.exe) in a Windows Explorer folder view of the MAGIC bin, or by selecting InputBuilder Tools menu item "Batch Runs...". or Once MagicBatchRuns starts, it displays a dialog form similar to the following. MAGIC User’s Manual 1-12 Part I - Using MAGIC Chapter 1 - Introduction The MagicBatchRuns application contains a grid for listing the MAGIC input files. It also contains controls for the Target OS (Operating System), the number of Linux Processes, the Command Line Flags, the Executable Path, the Working Directory, the grid, and the Batch File Functions. The Target OS control allows you to choose the Operating System (Windows or Linux) that the batch runs file will be run on. The Command Line Flags controls allow you to include MAGIC-recognizable flags. The Executable Path control allows you to change the executable path of the executable that will run an added input file. The Working Directory controls allow you to select if the input file names are absolute or relative. Also, you can set the Working Directory path name that all the input file names will be relative to. The grid controls allow you to add, delete, and change the order of, file names in the grid list. The Batch File Functions controls allow you to open, save, delete, and run, a batch runs file. 1.5.1 The Target OS Control Click radio button Windows or radio button Linux, to indicate which Operating System the batch runs file will be run on. If your Target System is Linux, you can edit the "Linux proc.s" Integer Field, if you are planning to start each batch runs file line with "mpiexec -n <n>", where <n> is the number of parallel linux processes. Since this field is used for parallel, the number of processes must be greater than one, and the "-parallel" flag checkbox must be checked. For example, if you set "Linux proc.s" to 3, and your input file name is "/usr/local/magictools/ExamplesParallel/CircbeamZ/CirBeamZ.m3d" then your batch runs file line would be something like the following: MAGIC User’s Manual 1-13 Part I - Using MAGIC Chapter 1 - Introduction mpiexec -n 3 "/usr/local/magictools/bin64/magic3d_64" "/usr/local/magictools/ExamplesParallel/CircbeamZ/CirBeamZ.m3d" -parallel >errs 2>&1 1.5.2 The Command Line Flags Controls Check a checkbox if you wish that flag (argument) to be used when the batch runs file command lines are run. For example, checking nopause will cause MAGIC to run all input files without pausing (e.g. it ignores any "GRAPHICS PAUSE;" MAGIC command lines in input files). If the Target Operating System is Linux, then checking parallel will result in substring "-parallel >errs 2>&1". The substring for parallel will be placed after all other flag substrings. The edit box, located below the checkboxes, allows you to type in flag entries. 1.5.3 The Executable Path Control Press button Set Path to browse to the path that will be used as the executable path for running any input files that will get added to the grid list. This does not change the executable path of any input files that are already listed in the grid. 1.5.4 The Working Directory Controls Click radio button Absolute if the input file name will include an absolute path, or click radio button Relative if the input file will contain a relative path. The relative path will be relative to the working directory. Press button Set Dir to browse to the working directory that all input files (whether they are already listed or will be added) will be named relative to (if the Relative radio button is on). Keep in mind, that after you have added all the input files, and before you run the batch file, you should make sure the Working Directory is the path which you want the batch file saved in. That is, you may have to press the Set Dir button, and navigate to the batch file Working Directory that you want to save it in, and then press the Save button to save it. 1.5.5 The Grid Controls The Grid Controls box lists the input files, the executable to be used and the executable path to be used in the batch file in the order in which execution is to occur. The Grid column Input File lists the input files (*.m2d, *.m3d, or *.cfg) that will be used in the batch run. MAGIC User’s Manual 1-14 Part I - Using MAGIC Chapter 1 - Introduction Grid column Executable lists the executable that will be used to run a particular input file. MagicBatchRuns automatically selects the most likely executable for a given input file (non-parallel magic... for *.m2d and *.m3d, parallel mpiexec for *.cfg). However, column Executable also contains a drop-down menu if you would like to change to a different executable name for a particular input file row in the grid. Alternately, you can select a group of rows, and then press button Match Row 1 Exe, to change the executable names of all the selected rows to the row 1 executable name. Grid column Executable Path indicates the executable path that will be used to indicate the location of the Executable. When an input file name is added to a row in the grid, MagicBatchRuns automatically gets the executable path name from the Executable Path field (refer to The Executable Path Control section above), and places that path name in the grid row's Executable Path column. If you wish to change that entry, simply type in your change into that row's Executable Path column. Grid row selection is performed by clicking the row label (the row number shown in the left-most column), which will highlight that row. To select a group of consecutive rows, click the first row in the group, hold down the Shift key, and then click the last row in the group. To select all rows, click any column label. To de-select all rows, click any column in any row except the left-most column (which is the row labels) or the top-most row (which is the column labels). The table below shows each grid control button’s function. Grid Control Button Functions and Descriptions Button Name Action Add Adds the browsed-to input file name to the grid bottom, or inserts the name at the first selected row position. Also, changes the Working Directory to the path of the added input file name. Shortcut is Alt-A. Add 1st Adds all MAGIC input files (*.cfg, *.m2d and *.m3d) from the Level Working Directory first-level subfolders. Shortcut is Alt-F. Subfolders Add All Adds all MAGIC input files (*.cfg, *.m2d and *.m3d) from the Subfolder subfolder levels of the current Working Directory. Shortcut is Altfiles L. Delete Deletes the selected row(s). Shortcut is Alt-D. Move Up Move Down Moves the selected row(s) up one position. Shortcut is Alt-U. Moves the selected row(s) down one position. Shortcut is Alt-M. Help Provides the version of MagicBatchRuns, and help on the MagicBatchRuns controls. Shortcut is Alt-H. Preferences Allows setting of application preferences. You can choose to automatically save your batch runs files, instead of waiting for a dialog that asks if you wish to save an edited batch runs file. You can choose to be asked if you want to save an edited batch file, before running that file, and before exiting MagicBatchRuns. You can choose to be warned before a file is saved, if that file will be saved in a Working Directory path that is different from the path that the file was originally loaded from. You can choose to automatically load the last batch file when MagicBatchRuns is launched. All of these preferences are initially turned off when Magic is installed. Shortcut is Alt-P. MAGIC User’s Manual 1-15 Part I - Using MAGIC Chapter 1 - Introduction Match Row 1 Exe Match Row 1 Exe Path Matches the Executable for the selected row(s) to the Row 1 Executable. Shortcut is Alt-c. Matches the Executable Path for the selected row(s) to the Row 1 Executable Path. Shortcut is Alt-w. 1.5.6 The Batch File Functions Controls The Batch File Functions are- New, Open, Save, Save As..., Delete Batch File, Run Batch File, and Exit. The functions are accessed through their corresponding button controls. New (Alt-N): This will create a new batch runs file. The grid input files list will be empty. Open (Alt-O): This will open a file browser to select a new batch runs file (*.bat) to open. Save (Alt-S): This will save any changes to the currently open file. The file will be saved in the current Working Directory path, which may be different from the path when the file was initially loaded (opened). Save As... (Alt-v): This will open a file browser for the user to select a location and filename. If the filename already exists, you will be asked to confirm before replacing the file. Delete Batch File (Alt-B): Delete the currently open batch runs file. Run Batch File (Alt-R): Run the currently open batch runs file. A DOS Command Prompt window, showing the full command lines that were run, will remain open until the user presses any key when the file is done. Or, close the DOS Command window anytime while the batch runs is in progress, to terminate the batch runs file early. Exit (Alt-E): Quit MagicBatchRuns. If changes have been made to the currently open file, you will be asked if you wish to save your changes before quitting. MAGIC User’s Manual 1-16 Part I - Using MAGIC Chapter 2 - Creating the Simulation Input File 2. CREATING THE SIMULATION INPUT FILE This Chapter explains how to create a simulation-input file. It includes a basic description of electromagnetic PIC, a command checklist, the most important conventions, and finally, the most common errors. Command names and keywords will be written in upper case to allow easy identification. 2.1 BASIC CONCEPTS MAGIC simulates the interaction between charged particles and electromagnetic fields as they evolve in time and space from some defined initial configuration. The numerical calculation uses the finite-difference method. Time and three-dimensional space are divided into finite grids. From some known initial state, time is advanced by adding a single time step. At each new value of time, Maxwell’s equations are solved throughout space to advance the electromagnetic fields in time. Using these new fields, the Lorentz equation is solved to advance the momenta and coordinates of all charged particles in the simulation. The continuity equation is solved to map charge and current densities onto the grid, which are then used as sources for Maxwell’s equations on the next time step. This provides self-consistent interaction between the fields and particles. Within this basic framework, MAGIC offers a selection of coordinate systems, grids, spatial objects, outer boundaries, material properties, emission processes, numerical algorithms, output, etc. This selection exists for two reasons, first, to cover a wide range of physical phenomena and second, to provide a high level of simulation fidelity. There are important attributes associated with the choices. For example, one electromagnetic algorithm may have superior stability, while another is more accurate. No single selection is best for all applications, and creating a simulation becomes largely a matter of defining the best tradeoffs between the choices. Defaults simplify selections for the novice. The serious user will encounter cost limitations in his quest for simulation fidelity. A reasonable objective might be to achieve the highest quality consistent with time and cost constraints. To aid in this, a cost algorithm is essential. This algorithm, which can be developed for any platform, is best arrived at by empirical fits to actual simulation cost data. It is simply an equation which expresses time (or money) costs as a linear function of simulation parameters such as cell number, average particle number, and time steps. This cost algorithm will assist the user in making the tradeoffs essential to the necessary compromise. 2.2 BASICS OF FINITE DIFFERENCE MAXWELL Finite-difference Maxwell solvers are based on a discrete formulation of the conventional equations. One choice for this discrete foundation begins with the “Yee Cell”. The essential properties of the “Yee Cell” formulation is that the full-grid and half-grid placement of field elements, results in perfect curl-grad = 0 and div-curl=0, in the finite difference representation. All derivatives, both “∇x” and “∂t,” become matrices of 0,±1. The figure illustrates the full grid and half grid assignments and the “Yee Cell” for both the full grid and half grid. MAGIC User’s Manual 2-1 Part I - Using MAGIC Chapter 2 - Creating the Simulation Input File Vector difference equations have identical properties to vector differential equations. This is the main reason why FD is more robust than other methods. The discrete forms of Maxwell’s equations are listed below, where the superscript n indicates the discrete timestep. All material properties and details (and approximations) are subsumed within the following constitutive relations: Notice from the equations above that the E and B fields are leapfrogged in time, with E fields being solved at integer timesteps and B fields being solved on integer plus a half timesteps, as indicated below. The following figures illustrates the Yee cell equivalent of Ampere’s Law and Faraday’s Law. In addition, you can see from the following figures that the particle variables (x, p and J) are similarly associated with either integer or integer+1/2 timesteps. (Note, also that for the particle currents, the components of J have the same “Yee Cell” association as do the electric field components. MAGIC User’s Manual 2-2 Part I - Using MAGIC Chapter 2 - Creating the Simulation Input File MAGIC User’s Manual 2-3 Part I - Using MAGIC Chapter 2 - Creating the Simulation Input File Finally, you can see from the expressions above that various fields (electric, magnetic, currents, etc), are realized as finite difference quantities on a mixture of full-grid location, half-grid locations, fulltimesteps, and half-timesteps. For example, the electric fields are generated at full-timesteps, and the magnetic fields are generated at half-timesteps. In addition, the electric and magnetic forces used in the Lorentz pusher (not shown in the above figure) are both realized on full timesteps. The table (Table of Field Quantities Used in Diagnostics) in section 2.4 below lists the (F) Full or (H) Half grid and timestep associated with the diagnostic fields. 2.3 COMMAND CHECKLIST This checklist covers commands roughly in the order found in Parts 2 – 7. You will typically need commands from all six Parts, and it is good practice to enter the commands in the order listed below. There are other common-sense order requirements; e.g., a function must be defined before it can be used, and so forth. 1. Identification — You may provide background information to uniquely identify the simulation (HEADER, Ch. 20). This background information will be reproduced on virtually all simulation output. The default is blank. 2. Coordinate system — You must select a coordinate system (SYSTEM, Ch.10). The choices are Cartesian, cylindrical, polar, and spherical. The selection will fix the identification of generalized coordinates (e.g., x1, x2, x3) with physical (e.g., x, y, z) coordinates. (See Important Conventions, which follows.) 3. Variables — You may use variables as data entries anywhere in place of constants. However, you must assign values to such variables before they are used (ASSIGN, Ch. 6). 4. Spatial objects — You may create arbitrary spatial objects consisting of points, lines, areas, and volumes of diverse shapes (POINT, LINE, AREA, VOLUME, Ch. 10). The only attribute of spatial objects is geometric. You must use other commands to assign physical properties to such objects or to use them for some other purpose. 5. Spatial grid — You must construct a grid in two or three spatial coordinates, using either automatic or manual gridding (AUTOGRID or GRID, Ch. 11). To use automatic gridding, you must mark at least some of the spatial objects (MARK, Ch. 11). To use manual gridding, you must specify the grid origin (GRID ORIGIN, Ch. 11) followed by arbitrary regions of grid. The spatial grid is the primary determinant of accuracy (the time step is generally unimportant to accuracy), and all spatial phenomena of interest must be appropriately resolved. 6. Time — You must specify the time period to be covered by the simulation (DURATION, Ch. 11). 7. Field algorithm — You may replace the default electromagnetic field algorithm (MAXWELL, Ch. 17) and specify the time step (TIME_STEP, Ch. 17). The default field algorithms are suitable for mildly relativistic particle simulations, e.g., γ up to 1.5. The time step, spatial grid, and algorithm are the primary determinants of numerical stability. If the time step exceeds the Courant criterion, unambiguous catastrophic failure results. Highly relativistic particle simulations produce more noise, and numerical damping of this noise is another important property which depends on the choice of electromagnetic algorithm. MAGIC User’s Manual 2-4 Part I - Using MAGIC Chapter 2 - Creating the Simulation Input File 8. Physical properties — You may assign physical properties to spatial objects. Physical properties such as infinite conductivity, permittivity, etc. (CONDUCTOR, DIELECTRIC, etc., Ch. 14) can be assigned only to spatial areas (2D simulations) or volumes (3D simulations). Unique (fine-scale) structural properties, such as the inductive strut, can be assigned only to spatial lines (INDUCTOR, etc., Ch. 15). You cannot assign a physical property to a point. 9. Outer boundaries — You may assign outer boundary properties to spatial objects on the simulation perimeter. The perimeter shape and location is arbitrary (see Important Conventions, below). Most outer boundaries (SYMMETRY, PORT, OUTGOING, etc., Ch. 12) can be applied only to spatial lines (2D simulations) or areas (3D simulations). One exception (FREESPACE, Ch. 12) applies only to spatial areas (2D) or volumes (3D). 10. Initial conditions — Most simulations start from trivial initial conditions without fields or particles. However, you can supply non-trivial initial conditions explicitly by creating initial fields (PRESET, Ch. 19) and particles (POPULATE, Ch. 19). 11. Emission Processes — You may assign particle emission processes to spatial objects (EMIT, Ch. 16). However, you must first specify the process and parameters (EMISSION THERMIONIC, etc., Ch. 16). 12. Particle algorithms — You can alter the kinematics time step in the Lorentz algorithm (LORENTZ, Ch. 18) to help save time in non-relativistic simulations. You can also enter the manner in which the continuity equation is enforced in order to combat the growth of noise in high-density simulations (CONTINUITY, Ch. 19). 13. Output — You must explicitly specify any output required (various commands, Ch. 20–25). A timer is used to trigger output at different times during the simulation (TIMER, Ch. 11). 14. Finally — You must terminate the input file to execute the simulation (START, Ch. 9) or to stop processing (STOP, Ch. 9). 2.4 CRITICAL CONVENTIONS Generalized coordinates — The choice of coordinate system determines not only the system, but also the identification with generalized coordinates (x1, x2, x3), as shown in the following table. This identification is important, because the command syntax uses the generalized coordinate notation. Table of Coordinate Systems System Cartesian Cylindrical Polar (x1, x2, x3) ( x, y, z ) ( z, ρ, φ ) (ρ, φ, z ) MAGIC User’s Manual 2-5 Part I - Using MAGIC Chapter 2 - Creating the Simulation Input File Units — Input and output for MAGIC uses the MKSA system of units. The only exception is generalized particle momentum, which omits rest mass from the definition. The correct physical units are stated in the command argument definitions and in printed and plotted output. You may enter constants using other units (ASSIGN, Ch. 6) and they will automatically be converted to MKSA values as they are processed. The following table indicates the standard physical units associated with the code variable and the definitions. Table of Physical Units Variable Definition Units E Electric field V/m B Magnetic field tesla J Current density A/m2 ρ Charge density C/m3 φ Scalar potential V σE Electrical conductivity mhos/m σB Magnetic conductivity ohms/m I Transmission line current, or inductor current A V Transmission line current, or inductor voltage V q Generalized coordinate m or radian p Generalized momentum m/sec t Time sec θ Azimuthal coordinate radian r Radial coordinate m x, y, z Cartesian coordinates M uE Energy density J/m3 duE/dt Power density W/m3 Momentum impulse density (kg-m/s)/m3 In 2D simulations, the third coordinate (x3) is ignorable. This has several important ramifications. First, the three coordinate systems are unique in 2D, while in 3D the cylindrical and polar systems simply have a different mapping to (x1, x2, x3). In 2D it is not necessary to supply the third coordinate (GRID, Ch. 11). Two (not three) values are sufficient to define a point in (x1, x2) space (POINT, Ch. 10). It is unacceptable to use the VOLUME command in 2D, since the depth coordinate is ignored. In 3D simulations, no coordinate is ignorable. Thus, spatial grids are required for all three coordinates, and it takes three values (not two) to define a point. In addition to points, lines and areas (all of which exist in 2D simulations) also require proper 3D assignments. In addition, we also have objects with depth called volumes (VOLUMES, Ch. 10). Notice that the cylindrical and polar systems are identical (in 3D) except for the order MAGIC User’s Manual 2-6 Part I - Using MAGIC Chapter 2 - Creating the Simulation Input File of the coordinates. Therefore, the cylindrical and polar systems are redundant in 3D, and the choice is a matter of convenience. MAGIC uses a particular convention to refer to the various variable fields that can be accessed by the diagnostic and graphical output. The following table list the alphanumeric labels used to reference the various field quantities. Table of Maxwell Field Quantities Used in Diagnostics Label Symbol Cell x1x2x3 Time Definition E1 E1 HFF F x1 component of electric field E2 E2 FHF F x2 component of electric field E3 E3 FFH F x3 component of electric field |E| |E| HHH F Magnitude of electric field B1 B1 FHH H x1 component of magnetic field B2 B2 HFH H x2 component of magnetic field B3 B3 HHF H x3 component of magnetic field |B| |B| HHH H Magnitude of magnetic field Table of Particle Field Quantities Used in Diagnostics J1 J1 HFF H x1 component of total current density field J2 J2 FHF H x2 component of total current density field J3 J3 FFH H x3 component of total current density field |J| |J| HHH H Magnitude of total current density Q0 Q0 FFF F Charge density J1_‘speciesname’* J1speciesname HFF H x1 component of current density for particle species * J2 speciesname FHF H x2 component of current density for particle species * J3_‘speciesname’ J3 speciesname FFH H x3 component of current density for particle species |J_‘speciesname’|* |J speciesname | HHH H Magnitude of current density for particle species Q0_‘speciesname’* Q0 speciesname FFF F Charge density for the specified particle species QWALL Qwall HHH F Accumulated charge deposition on conductors WWALL Wwall HHH F Accumulated energy deposition on conductors J2_‘speciesname’ * The value for ‘speciesname’ must be substituted from a defined particle species. MAGIC User’s Manual 2-7 Part I - Using MAGIC Chapter 2 - Creating the Simulation Input File Table of Electro-static Fields Used in Diagnostics of the POISSON Solution in MAGIC2D E1ST E1st HFF F x1 component of electro-static field E2ST E2st FHF F x2 component of electro-static field PHST PHst FFF F Scalar Potential field The electro-static solution fields are generally normalized from the potential, PHST. These may then be applied with the CIRCUIT command (MAGIC2D only) to enforce a specific relative potential difference between electrodes. The use of the POISSON and CIRCUIT command are recommend only in cases where the 2d geometry prohibits the injection of the potential fields through the use of a port boundary. The mixture of PORT boundaries with the POISSON and CIRCUIT command is discouraged, but not prohibited. Careful consideration should be given to the implications of mixing these two typed of field insertion. Table of Particle Force Fields Used in Diagnostics B1ST B1st FFF F x1 component of static magnetic field B2ST B2st FFF F x2 component of static magnetic field B3ST B3st FFF F x3 component of static magnetic field |BST| |Bst| FFF F Magnitude of static magnetic field E1AV E1av FFF F x1 component of the electric field used in Lorentz E2AV E2av FFF F x2 component of the electric field used in Lorentz E3AV E3av FFF F x3 component of the electric field used in Lorentz |EAV| |Eav| FFF F Magnitude of the electric field used in Lorentz B1AV B1av FFF F x1 component of the magnetic field used in Lorentz B2AV B2av FFF F x2 component of the magnetic field used in Lorentz B3AV B3av FFF F x3 component of the magnetic field used in Lorentz |BAV| |Bav| FFF F Magnitude of the magnetic field used in Lorentz DIELECTRIC Table of Fields Used in Diagnostics of Property Values. εr HHH F Relative Permittivity Magic3d DIELECTRIC1 εr1 HHH F Relative Permittivity x1 Magic2d DIELECTRIC2 εr2 HHH F Relative Permittivity x2 Magic2d DIELECTRIC3 εr3 HHH F Relative Permittivity x3 Magic2d IDIELECTRIC1 1/εr1 HFF F Inverse Relative Permittivity x1 Magic2d IDIELECTRIC2 1/εr2 FFH F Inverse Relative Permittivity x2 Magic2d IDIELECTRIC3 1/εr3 FHH F Inverse Relative Permittivity x3 Magic2d SIGMAE σE HHH F Electrical conductivity Both SIGMAB σB HHH F Magnetic conductivity Both Table of Fields Used in Diagnostics of Gas Conductivity Model. MAGIC User’s Manual 2-8 Part I - Using MAGIC Chapter 2 - Creating the Simulation Input File Q_IONIZATION Q HHH F ionization rate for gas conductivity model B_AVALANCHE α HHH F avalanche coefficient for gas conductivity model B_ATTACHMENT β HHH F electron attachment coefficient for gas conductivity ELECTRON_MOBILITY µe HHH F electron mobility for gas conductivity RHO_ELECTRON ne HHH F electron number density for gas conductivity RHO_NEGATIVE_ION nn HHH F negative ion number density gas conductivity RHO_POSITIVE_ION np HHH F positive ion number density gas conductivity σgas HHH F conductivity for gas conductivity model SIGMA_GAS Table of Fields Used in Diagnostics of Ionization model. ENERGY_NEUTRALGAS uE HHH F Energy deposited/cell in neutral gas by particles. POWER_ NEUTRALGAS duE/dt HHH F Power deposition/cell in neutral gas by particles P1_NEUTRALGAS FHH F Total accumulated momentum impulse transferred/cell to neutral gas by electrons and ions. P2_NEUTRALGAS HFH F Total accumulated momentum impulse transferred/cell to neutral gas by electrons and ions. P3_NEUTRALGAS HHF F Total accumulated momentum impulse transferred/cell to neutral gas by electrons and ions. Magic commands (such as CONDUCTOR, DIELECTRIC, CONDUCTANCE, FOIL, and FILM) that pertain to structural elements of the device may be assigned specific colors. This is purely a cosmetic assignment, but allows the user to distinguish between different components. The following table lists the color names that may be used in such assignments Table of Color Names used for structural appearance Color Name Color Name Color Name Color Name ALUMINUM DIMGRAY MEDIUMGOLDENROD RED_BRICK AMETHYST DKGREENCOPPER MEDIUMORCHID RICHBLUE AQUAMARINE DUSTYROSE MEDIUMSEAGREEN RUBY BAKERSCHOC EMERALD MEDIUMSLATEBLUE SALMON BLACK FIREBRICK MEDIUMTURQUOISE SEAGREEN BLUE FLESH MEDIUMVIOLETRED SEMISWEETCHOC BLUEVIOLET FORESTGREEN MEDIUMWOOD SIENNA BLUE_WIRE GOLD MIDNIGHTBLUE SKYBLUE BRASS GOLDENROD MOLY SLATEBLUE MAGIC User’s Manual 2-9 Part I - Using MAGIC Chapter 2 - Creating the Simulation Input File BRICK GRAPHITE MONEL SILVER BRIGHTGOLD GRAY NAVY SOLDER BRONZE GREENYELLOW NAVYBLUE SPICYPINK BROWN GREEN_GLASS NEONBLUE SPRINGGREEN CADETBLUE GREY NEONPINK STAINLESS COPPER HUNTERSGREEN NEWMIDNIGHTBLUE STEEL CORAL INDIANRED NEWTAN SUMMERSKY CORNFLOWERBLUE IRON NICHROME THISTLE CYAN KHAKI NICKEL TUNGSTON DARKBROWN LIGHTBLUE ORANGE TURQUOISE DARKGREEN LIGHTGRAY OLDGOLD VERYDARKBROWN DARKORCHID LIGHTGREY OLDTAN VIOLET DARKSLATEGRAY LIGHTWOOD ORANGERED VIOLET_GLASS DARKSLATEGREY LIMEGREEN ORCHID VIOLETRED DARKTAN MAGENTA PALEGREEN WHITE DARKTURQUOISE MANDARINORANGE PINK WHEAT DARKOLIVEGREEN MAROON PLATINUM YELLOW DARKPURPLE MEDIUMAQUAMARINE PLUM YELLOW_LIGHT DARKSLATEBLUE MEDIUMBLUE RED YELLOWGREEN DARKWOOD MEDIUMFORESTGREEN REDGOLD Magic has a default set of colors used to represent different particle species. The colors may be reassigned in the species command. Table of Color Names used for particle species Color Name Active Species No. Color Name 1 RED 9 PURPLE 2 LIGHTPURPLE 10 DARKYELLOW 3 ORANGE 11 GREY 4 DARKGRAY 12 DARKBLUE 5 BLUE 13 DARKGREEN 6 GREEN 14 LIGHTCYAN 7 CYAN 15 DARKPURPLE 8 DARKRED Active Species No. 2.5 IMPORTANT BOUNDARY REQUIREMENT Contiguous perimeter — The outer perimeter of the simulation must be contiguous, i.e., it must be completely enclosed. The perimeter must consist only of objects with assigned properties as conductors or MAGIC User’s Manual 2-10 Part I - Using MAGIC Chapter 2 - Creating the Simulation Input File outer boundaries (such as symmetries, etc.). However, it can use any combination of these, and it can be of any shape; i.e., it does not need to follow the extremes of the grid. The critical issue is that the simulation perimeter can not contain any “holes.” Additional information about the construction of a contiguous boundary for MAGIC simulations can be found at the beginning of Chapters 12 (Outer Boundaries) and Chapter 14 (Material Properties.) 2.6 COMMON ERRORS Some of the most commonly experienced errors are listed below. The severity of the result can vary substantially. Some errors (e.g., stability) result in catastrophic failure and are easy to recognize, while others simply diminish accuracy and are hard to recognize. 1. Failure to read the LOG file — Execution of MAGIC always results in a LOG file which lists any error messages (flagged with ***). Since not all errors terminate execution, searching the LOG file for errors is essential to assure simulation integrity. 2. Keyword duplication — Variable names which duplicate command names or previously defined function names can cause serious errors. In assigning variables, it is best to choose unusual variable names to minimize the possibility of duplication. 3. Contiguous perimeter violation — The outer perimeter of the active simulation region must be contiguous, i.e., the simulation must be completely enclosed by suitable boundaries. The critical issue is that the perimeter not contain any “holes,” which could give wholly invalid results without necessarily producing an error signature. The code does not check this perimeter; it is entirely the responsibility of the user. However, in 2D simulations, you can use the DISPLAY PERIMETER command to inspect the perimeter visually (DISPLAY, Ch. 24). 4. Courant violations — There are several limitations on the size of the time step. The electromagnetic (Maxwell) algorithm fails catastrophically at 100% of Courant. You will know if this happens, since the exponential growth usually causes a system overflow. In certain coordinate systems and grids, failure may occur as low as 82% of Courant. Also, particles which travel more than one cell size in one time step will decouple in particle integer and coordinate space. This can result in a non-physical acceleration and even disappearance, and you may not notice it. In some outer boundaries (PORT and OUTGOING, Ch. 12), the time step must be less than the cell width divided by the phase velocity. These violations are more common where the choice of an implicit electromagnetic algorithm allows a larger time step. Some violations (but not all) are detected by the code and produce error messages. 5. Resolution errors — Inaccuracy can result if the cell-to-cell variation in any axis exceeds 25%, or the aspect ratio of the unit cell exceeds five to one. In addition, physical phenomena of interest must be adequately resolved by the time step and the spatial grid. 6. Outer boundary location errors — Placing an outer boundary too near a structural singularity, e.g., a corner or protrusion, can result in artificial scattering and even instability. Generally, outer boundaries expect the outgoing wave to be well behaved, and they do not handle fringe fields well. The best approach is to place the outer boundary at the end of a uniform channel of some length, and to avoid abrupt discontinuities in structure near the boundary. Waves propagating in the radial direction through a boundary are particularly troublesome and should generally be avoided. 7. Failure to test — This error results from the construction of an extremely large or complicated simulation without testing any of the models and features employed. Because of nonlinearity, it is MAGIC User’s Manual 2-11 Part I - Using MAGIC Chapter 2 - Creating the Simulation Input File difficult to recognize even the most basic errors in a complex simulation. Therefore, it is good practice to test elements of the simulation under idealized conditions. MAGIC User’s Manual 2-12 Part I - Using MAGIC Chapter 3 - Executing the Simulation 3. EXECUTING THE SIMULATION MAGIC is designed for serial execution of an input file. First, create an input file using INPUTBUILDER or, alternatively, a text editor. The MAGIC software automatically recognizes certain file extensions as belonging to MAGIC2D, MAGIC3D or REVIEW. For MAGIC2D, we recommend using “.m2d,” for MAGIC3D, we recommend that you use “.m3d,” and for REVIEW, we recommend that you use “.toc”. More information on file extensions is presented later. This Chapter describes how to start and interact with the simulation during execution, what to do with the output files, how to interpret error messages, and how to review the simulation results. 3.1 STARTING A MAGIC TOOL You can launch the applications in the MAGIC Tool Suite for Windows in the following manner: Begin with the Windows START menu button. Select the PROGRAMS menu, Select the Magic Tool Suite menu, Click on the desired tool – MAGIC2D, MAGIC3D, or REVIEW. The following figure illustrates what this will look like on your video screen. MAGIC User’s Manual 3-1 Part I - Using MAGIC Chapter 3 - Executing the Simulation When the MAGIC tool starts, it will display a file requestor dialog window that looks like the illustration that follows. Use this dialog box to navigate to the desired folder that contains your input file. For INPUTBUILDER (shown in the figure) the default file extensions that are automatically displayed are M2D, M3D and TOC. For MAGIC2D the default file extensions that are automatically displayed are M2D, MGC, and .MVY. For MAGIC3D the default file extensions that are automatically displayed are M3D, MGC, and .MVY. For REVIEW the default file extensions is TOC, however, all files in the directory are displayed. Using your mouse you may select the desired file and then click on the Open button. MAGIC User’s Manual 3-2 Part I - Using MAGIC Chapter 3 - Executing the Simulation The next display will be a 2D geometry view such as the following. The blue bar at the top and the menu items appear with a blank window below when the MAGIC Tool starts to process the selected input file. The icon and name on the left end of the bar indicate which of the MAGIC Tools is being employed, and displays the name of the input file. Once the input file has been processed, the MAGIC Tool will display the window filled in with the 2D view. After the first plot frame is displayed, the MAGIC Tool will pause (if enabled) before displaying any subsequent plot. Processing continues as soon as you press the green arrow or the Return on your keyboard. Clicking the green arrow at the upper left brings up additional views of the geometry including the 3-D viewer as shown below. The picture was obtained by clicking the green arrow until execution started as indicated by the counter at the bottom of the figure, then clicking the 3-D viewer icon. and rotating the resulting geometric figure. MAGIC User’s Manual 3-3 Part I - Using MAGIC Chapter 3 - Executing the Simulation A 3D viewer picture obtained for the smooth bore magnetron during execution is shown below. The simulation was halted as the 3-D viewer icon was selected. Notice the status and progress indicators called out at the bottom of the figure. MAGIC User’s Manual 3-4 Part I - Using MAGIC Chapter 3 - Executing the Simulation CPU estimator -- elapsed wall clock time/estimated total time for completion. Indicates current simulation time. Counter indicating current time step/total number of time steps. Running/Waiting status indicator. Graphics pause on/off status indicator. MAGIC User’s Manual 3-5 Part I - Using MAGIC Chapter 3 - Executing the Simulation The MAGIC Main Toolbar The MAGIC Main Toolbar provides shortcuts to commonly used MAGIC menu options, especially those used while viewing data plots. When MAGIC is run, the toolbar will appear underneath on the MAGIC Main Menu. Toolbar Button Functions: Continue Fast Forward Pause Button Save Image Print Image Copy Image to Clipboard Copy Image without legend to Clipboard Annotate Graph with Text Click to Zoom in on Plot Bell Button Select Plots Contour Clicking this button when a run is paused is equivalent to selecting return, or using the FileClose {Observe, Display, …} menu item. The run will stop waiting for user commands and either display the next plot, if one exists, or continue running the simulation. This button will skip any remaining plots of the same type you are currently viewing. For example, if you chose to view all available Observe plots, using the OutputObserveAll menu item, or by pressing F5, clicking the Fast Forward button after the first plot would skip the remaining Observe plots. The Pause Button on the toolbar will indicate if Pause on or off. If the button is down, the simulation will pause after each plot display. If the button is up, the simulation will not. Clicking the Pause Button will toggle Pause on and off, the same way the OutputPause Output menu item would, or pressing the F3 and F4 function keys. Notice the “Pause: on” or “Pause: off” indicator at the lower left of the main window. Clicking this button at any time during the simulation run will save a bitmap image of the currently visible MAGIC plot. After clicking the Save Image button, a dialog will prompt you to choose a filename and image format. This button is identical to the FileSave Output menu option. Clicking the Print Image button at any time during the simulation run will print the currently visible MAGIC plot. After clicking the Print Image button, a dialog will allow you to modify page settings or chose a different printer. This button is identical to the FilePrint Output menu option. Clicking this button at any time during the simulation run will save a bitmap image of the currently visible image in the main window (underlying any 3D viewer pictures) to the clipboard. In pause mode, the button will save the uppermost window (for example, the 3D viewer). Clicking this button at any time during the simulation run will save a bitmap image of the currently visible image (without the legend) in the main window (underlying any 3D viewer pictures) to the clipboard. In pause mode, the button will save the uppermost window (for example, the 3D viewer). Clicking this button allows you to add text to the currently visible MAGIC plot, in the rectangular area that you define by dragging the left mouse button. Clicking this button while plots are displayed, then clicking in the plot window enables zooming in. The Bell Button on the toolbar will indicate if the Bell is on or off. If the button is down, the simulation will ring a bell each time it pauses. Clicking the Bell Button will toggle the bell on or off, the same way pressing the F2 function key will. Clicking this button has the same effect as the OutputContourSelect menu item. A dialog will appear listing all available Contour Plots. Select the plots to view by clicking on them, and then click the OK button. If no contour plots are available, the button will be grayed out. MAGIC User’s Manual 3-6 Part I - Using MAGIC Select Plots Observe Select Phasespace Plots Select Plots Range Select Plots Vector Display Geometry 3-D Viewer Legend Button 1 to 1 Aspect Ratio Grid Button Show Marks Format Graphics Display Reset Graph Format Graphics Display MAGIC Manual Chapter 3 - Executing the Simulation Clicking this button has the same effect as the OutputObserveSelect menu item. A dialog will appear listing all available Observe Plots. Select the plots to view by clicking on them, and then click the OK button. If no observe plots are available, the button will be grayed out. Clicking this button has the same effect as the OutputPhasespaceSelect menu item. A dialog will appear listing all available Phasespace plots. Select the plots to view by clicking on them, and then click the OK button. If no Phasespace plots are available, the button will be grayed out. Clicking this button has the same effect as the OutputRangeSelect menu item. A dialog will appear listing all available Range Plots. Select the plots to view by clicking on them, and then click the OK button. If no range plots are available, the button will be grayed out. Clicking this button has the same effect as the OutputVectorSelect menu item. A dialog will appear listing all available Vector Plots. Select the plots to view by clicking on them, and then click the OK button. If no vector plots are available, the button will be grayed out. Clicking this button will display the simulation geometry, which is shown once at the beginning of the simulation. This can be done at any time during the simulation, and allows for easy reviewing of the grid and geometry structure. This button is identical to the OutputDisplay menu option. Clicking this button at any time during the simulation brings up the 3-D geometry display, which is shown at the beginning of MAGIC3D simulations, and is used to display 3 dimensional views of the geometry and particles. This button is identical to the OutputViewer button. Clicking the Legend button will toggle the display of Legend information at the bottom of MAGIC plots on or off. This button only works on the current plot, when the simulation is paused. The 1:1 Aspect Ratio option is available for all plots that contain views of the simulation geometry. When enabled, the length of the X and Y axes are proportional to the size of the window. For example, when 1:1 Aspect Ratio is enabled, a simulation with a circular tube will look always look like a circle, not an oval. If 1:1 Aspect Ratio is not available for the current plot, the button will be grayed out. Clicking the Grid button will toggle the grid display on and off. For geometry plots, the grid is composed of solid gray lines that show the cell edges. For all other plot types, this button may be grayed out or disabled. When viewing Display plots, any MARKED locations that were used to generate the grid will be indicated along the X and Y axes with red triangles. The display of these mark locations can be toggled on and off by clicking the Show Marks button. For all other plot types, this button will be grayed out. When viewing Display plots, axes can be resized and relabeled, etc. Press to reset graph to the default size and labels when viewing Display plots. When viewing Display plots, the number of data points on the graph can be controlled by selecting every nth point. Clicking this button at any time during the simulation will open the MAGIC Electronic Manual. The MAGIC Auxiliary Toolbars The MAGIC Auxiliary Toolbars provide shortcuts to commonly used graph plot functions, such as copy/extract/save plot image, hide/show graph exterior areas, and reset plot. The Toolbars also provide post-processing controls that are specific to a particular graph type. When MAGIC is run, the toolbar will normally appear on the left side of the MAGIC Main Window. MAGIC User’s Manual 3-7 Part I - Using MAGIC • • • • • • Chapter 3 - Executing the Simulation Contour Toolbar Display Toolbar Observe Toolbar Phasespace Toolbar Range Toolbar Vector Toolbar 3.2 CONTROL KEYS During execution, you may interact with the simulation through the keyboard (KEYBOARD, Ch. 9). For example, you can press the f6-key to send graphical output to the EPS graphics file (printer mode). (The output mode can also be set by commands (GRAPHICS SCREEN and GRAPHICS PRINTER, Ch. 20).) Pressing other designated keys will override a command time-trigger (TIMER, Ch. 11) and create output precisely at the current time step. This allows you to examine results from a simulation in progress, rather than waiting for completion. The designated control keys and their functions are as follows: Esc — writes all time history plots and terminates simulation being executed f3 — turns PAUSE ON for graphics (screen mode only) f4 — turns PAUSE OFF for graphics (screen mode only) f5 — displays all time history plots up to current time step f6 — creates a bit-map image file of the current plot display to the EPS graphics file f8 — displays all phase-space plots f9 — displays all contour plots f11 — displays all range plots f12 — displays all vector plots In addition to the designated control keys, you can use an intrinsic function named LASTKEY in commands to provide customized interactive capability (FUNCTION, Ch. 6). 3.3 OUTPUT FILES Depending upon the commands in the file, a single execution may produce as many as nine output files: file_name.LOG — “log” of processed commands, errors, and printed output data. file_name.SUM — “summary” of designated simulation variables and final values. file_name.EPS — “Postscript” printer file. file_name.CGM — “CGM” graphics metafile. file_name.TOC — “table-of-contents” to post-process FLD, GRD, and PAR files. file_name.FLD — “field” data for post-processing. file_name.GRD — “grid” and miscellaneous data for post-processing. file_name.PAR — “particle” data for post-processing. file_name.MVY — “movie contents” to play the movie files. Each execution always produces a LOG file and a SUM file. The LOG file contains all processed commands; each data entry is written and interpreted on a separate line. Error messages are flagged with ***, to allow a quick search for errors. PRINT options in various commands may also write output to this file as the simulation progresses (STATISTICS, TABLE, etc., Ch. 21). Finally, basic simulation parameters, such as the number of cells, etc., are recorded. The SUM file records the final values of any simulation variables which have been specifically designated as simulation parameters (PARAMETER, Ch. 21). MAGIC User’s Manual 3-8 Part I - Using MAGIC Chapter 3 - Executing the Simulation The other files are produced only if triggered by certain commands in the input file. The EPS printer file or CGM metafile is produced if a graphical output command is executed (various output commands, Ch. 22– 24) while the system is in printer mode (see Control Keys, above). The type of printer file depends on the operating system. The PC generates Postscript commands, and the file has the extension, EPS. On UNIX workstations the file has the extension, CGM. Workstations typically provide a post-processor (e.g., ctrans or gplot) which allows the user to view plots or to route them to a printer. The TOC, FLD, GRD, and PAR files are produced only if post-processing is anticipated (DUMP, Ch. 25). Basically, any data that can be plotted directly can also be routed to one of these files. After the simulation, the files can be read into REVIEW for processing and display. The MVY file is produced whenever the MOVIE option is included in an output command. 3.4 ERROR MESSAGES The code tests individual commands as well as simulation consistency. When individual commands are read from the input file, the following errors can be detected. Invalid command_name — misspelling or abbreviating the command_name Invalid key words — misspelling (abbreviations are allowed within the command) Overused commands — exceeding the maximum number of command repetitions Incorrect number of data entries — providing too few or too many data entries Incorrect data type — entering character data for integer or real data, or vice versa Out-of-range number — exceeding the platform word accuracy Undefined variable — trying to use a variable before assigning it a value Undefined function — trying to use a function before defining it If no command errors are detected, the results are tested for the following errors: Spatial grid arrays (number of 1-D cells) exceeded Field arrays (number of 3D cells) exceeded Courant stability criterion (time step) in electromagnetic algorithm exceeded Courant stability criterion (time step) in boundary condition exceeded If errors of any type are found, they will be flagged with *** in the LOG file, and the simulation will be terminated. You may also specify other error-related conditions for termination (TERMINATE, Ch. 9) e.g., TERMINATE ERROR is recommended for novice users. However, the code does not detect all errors. There are many desirable but unanticipated uses which are not safe, because they have never been tested. There are also common errors that are easy to warn against but difficult to test for. Chapter 2 includes a list of some of these. For now, the primary responsibility for error detection must rest with the user. Most realistic simulations contain compelling physical processes and nonlinear interactions and are so complex that it is often difficult to recognize errors. Therefore, we recommend that you build a simulation in parts and test each part extensively under idealized conditions. 3.5 REVIEWING THE SIMULATION GRAPHICS ON-SCREEN The simplest way to review the simulation results, if the simulation has been run in GRAPHICS FILE (Ch. 20) mode, is to send the EPS or CGM file to a printer. It is also possible to locate free or inexpensive shareware programs, e.g., ghostview (http://www.cs.wisc.edu/∼ghost/), which will display the contents of these files on a computer screen, instead of on a printer. There are considerable advantages to running a simulation in GRAPHICS WINDOW mode, though. It offers the ability to view the state of the simulation as it is running, permitting one to abandon MAGIC User’s Manual 3-9 Part I - Using MAGIC Chapter 3 - Executing the Simulation the run if some aspect of the simulation is not as desired, or if a steady-state condition has been reached. When a simulation has been run in GRAPHICS WINDOW mode, there is no graphics file, which presents an apparent problem, when it becomes necessary to review the output after the simulation has completed. In this circumstance the DUMP (Ch. 25) command should be invoked. This will result in a TOC file being created, which is actually an input file for the REVIEW program. Running the TOC file in REVIEW will replay all of the graphics from the simulation on-screen. For reasons discussed in the next section, it is recommended that DUMP be used in virtually all simulations, including even those using GRAPHICS FILE, unless hindered by lack of file space. 3.6 MOVING GRAPHICS INTO OTHER PROGRAMS (Windows — PC) The most straightforward way of moving graphics into other programs such as word processors and presentation managers is to utilize the DUMP capabilities and the TOC file. Simply replay the simulation graphics by running the TOC file in REVIEW, and stop when the desired graphic is on screen. Press the Alt-Print Screen keys on the keyboard; this will place a bitmap image of the window to the clipboard. Then you use Alt-Tab to another program window and paste. It is often convenient to paste the bitmap into the Paint program first, in order to trim off undesired headers, modify colors, add labels, etc., before pasting the graphic into a third program in its final form. It is also sometimes convenient to edit the TOC file and comment out lines corresponding to unwanted graphics, so that they will not appear on the screen when REVIEW is run. All users should eventually become familiar with the TOC file and how to use and edit it. 3.7 MOVING RAW DATA INTO OTHER PROGRAMS There are times when a bitmap image of the simulation graphic is not acceptable. Examples include the need to display several curves in the same figure and the need to manipulate the data in some way before displaying it. This occurs most often for RANGE (Ch 23) and OBSERVE (Ch. 22) output. It is possible to move the raw data for these outputs into another program, typically a spreadsheet. Again, the key is to use the DUMP command, with ASCII format, and the TOC file. Each graphic output from MAGIC adds a line to the TOC file indicating the type of data, e.g., RANGE or OBSERVE, and the data’s unique time and title identifiers. The GRD file contains the actual data for RANGE and OBSERVE, and a search of the GRD file for the desired title identifier will locate the data of interest, which appears in the form of two parallel columns. These columns of data can then be copied and pasted into another program, where they can be manipulated as suits the user. 3.8 VIEWING MOVIES (Windows — PC) MAGIC offers simple movie capability, even for novice users. Viewing a simulation dynamically in movie format always improves the understanding of complex behavior so common in Maxwell-Lorentz physics; we strongly encourage all users to take advantage of this capability. Addition of the MOVIE keyword to any timer-based output command will activate the movie creation feature. The MVY file is actually an input file for MAGIC2D and MAGIC3D, in exactly the same way that the TOC file is an input file for REVIEW. Running the MVY file in MAGIC2D or MAGIC3D shows a succession of movie clips, one for each command with a MOVIE keyword. As with the TOC file, the MVY file can be edited to remove undesired clips. 3.9 The REVIEW Postprocessor This section covers the following: Opening MAGIC REVIEW List MAGIC User’s Manual 3-10 Part I - Using MAGIC Chapter 3 - Executing the Simulation Menus MAGIC REVIEW allows you to review files that have already been run, from their toc file. Opening REVIEW: To run REVIEW, first open the toc file with the file dialog in INPUTBUILDER, then click on Run Review Single, or Run Review Double. (note: the file must have already been run in MAGIC 3D Single or Double to have a toc file and be reviewed. For example, suppose your input file is “chargetest.m3d” or “chargetest.m2d”, then the output file for REVIEW will be “chargetest.toc”.) List: The dialog box that will appear after opening REVIEW contains the list of graphics results. This list contains all the graphs and images you can review, for the graph type selected in "Select Data Type". Simply click on the list to make a selection. In order to select more than one item in series you click on the first item and then shift-click on the last. To select multiple non-series items click on the first and then control click on any other file to view. MAGIC User’s Manual 3-11 Part I - Using MAGIC Chapter 3 - Executing the Simulation The two buttons under Geometry allow you to view the 2d geometry planes, or the 3d geometry view. Button AVI File allows you to browse to and play a movie avi file. The New File button allows you to select a different toc file to review. Button “2nd File” is currently under beta development. It generally allows the user to select a second file from the next window which appears. Click the button, “open 2nd file”, then click “Select All (1)” on the MAGIC User’s Manual 3-12 Part I - Using MAGIC Chapter 3 - Executing the Simulation left and “Select All and Compare” on the right. The time histories in the left and right boxes are then overlayed in different colors. The filenames can be varied (previously in the MAGIC runs) to distinguish the legend. The Select All button selects all items currently on the list for display. The Show button causes the first selected figure to be displayed. All other selected figures will be displayed in sequence. To advance to the next figure press enter. After all the figures have been displayed REVIEW will return you to the dialog box. The Print button sends the selected list items to the default printer. The Extract button stores a text equivalent of the graph data for the selected list item. The *.txt file will be stored in a subfolder (eg "C:\Magic Tool Suite\Examples3d\3DFoil\Obs_Extract_Data\Obs().txt"). The Overlay button allows you to overlay two or more list items onto the same graph. The list items can be at most two different types (eg Current and Voltage). The following is an example of using Overlay: MAGIC User’s Manual 3-13 Part I - Using MAGIC Chapter 3 - Executing the Simulation The Exit button quits Magic Review. The Cancel button closes the dialog box. To return select the output menu and in one of the submenus click on ‘select’. 3.10 The PREVIEW 3D Geometry Viewer (beta release) The PREVIEW 3D Geometry Viewer can be used anytime during the development of the Magic input file. Preview shows 4 split-window Geometry views- 2D XY orientation, 2D XZ orientation, 2D YZ orientation, and 3D. To launch Preview, browse to and doubleclick "C:\Program Files\Magic Tool Suite\bin\Preview_dbl.exe" (32-bit) or "C:\Program Files\Magic Tool Suite\bin64\Preview_64.exe" (64-bit). Preview will prompt MAGIC User’s Manual 3-14 Part I - Using MAGIC Chapter 3 - Executing the Simulation you to choose an input file (eg "C:\Magic Tool Suite\Examples3d\3DFoil\3dfoil.m3d"). Or, you can launch Preview from the InputBuilder toolbar "Run Preview3D" button, or the InputBuilder menu item "Tools -> Preview3D", if InputBuilder contains a *.m3d file in its text editor. The resulting application should look something like the following: To activate one of the three 2D subwindows (XY, YZ, or XZ), mouse click anywhere below the subwindow title bar. To activate the 3D subwindow, mouse click anywhere below the subwindow toolbar. Mouse clicking in a subwindow title bar does NOT activate that subwindow, it merely highlights the title bar. Once a 2D subwindow is activated, the mouse can perform certain functions. A right button drag Zooms the geometry plot in/out. A drag of both buttons (left and right) together Pans (moves) the plot. A left button click snaps to a geometry point, and displays the Label Point floating menu. A left button drag, and then up, measures the distance between two points, and then displays the Label Distance floating menu. The Label Point and Label Distance floating menus provide features to display the label on the plot, copy the label to the clipboard, delete labels, and set length units. MAGIC User’s Manual 3-15 Part I - Using MAGIC Chapter 3 - Executing the Simulation Help menus Help2D and Help3D items display the Magic Help Manual, or a dialog that explains the keyboard and mouse controls, or a dialog that lists Magic version and contact information. Auxiliary toolbar (left-side) button "Move Plane..." is used for the 3 2D subwindows only (XY, XZ, and YZ). It opens a dialog containing a slider which moves the active subwindow cross-section view up or down, along the third axis. Sliding left moves the cross-section down, and sliding right moves it up. Log file file_name.PRV.LOG is a “log” of processed commands, and errors. MAGIC User’s Manual 3-16 Part I - Using MAGIC Chapter 4 - Magic Command Language 4. MAGIC COMMAND LANGUAGE Input data for the code is based upon the MAGIC Command Language (MCL). MCL is a sophisticated scripting language with many powerful features. This Chapter presents an abridged description of these features, which will be sufficient for the vast majority of applications. It emphasizes the importance of variables in creating input data. Users who require or desire to explore the more advanced features of MCL are advised to contact the authors. A typical command in an input file consists of the command_name followed by arguments specific to that command, and the command is terminated with a semi-colon, as follows: command_name argument argument... ; This Chapter describes the capabilities of MCL to read data. Most of these capabilities can be exercised using commands found in Chapter 6 (Variables and Functions). 4.1 CHARACTER SET The character set which MCL can read is based upon FORTRAN. In general, individual data entries may contain upper- and lower-case letters (MCL is case-insensitive), A B C D E F G ... Z a b c d e f g ... z digits, 0123456789 and the eighteen special characters, . % & < > ? _ ~ ` @ # ^ \ | { } [ ] The other special characters are reserved and have special meaning within MCL. For example, the following seven characters are reserved for mathematical expression operations (the asterisk is also used for “wild-card” operations). = variable assignment and function definition + addition - subtraction * multiplication (*) or exponentiation (**) / division ( ) mathematical and dummy argument grouping (always in pairs) The rest of the special characters are reserved for use as delimiters. For example, the command illustrated at the beginning of this Chapter is terminated (delimited) with a semi-colon, and the individual data entries are separated (delimited) with blanks (commas are equivalent). A complete list of the MCL delimiters follows. ; command termination delimiter blank data entry delimiter (interchangeable with comma) , data entry delimiter (interchangeable with blank) “” character string delimiters (always in pairs) MAGIC User’s Manual 4-1 Part I - Using MAGIC ‘’ : ! $ Chapter 4 - Magic Command Language variable substitution delimiters (always in pairs) format delimiter (when used inside variable substitution delimiters) comment delimiter namelist delimiter It is possible to re-define some, but not all, of the delimiter characters. For example, if an existing namelist file uses & as a delimiter instead of $, the MCL delimiter can simply be re-defined in order to read the data (Ch. 8). 4.2 CONSTANTS MCL reads constants (literal data) of the following type: integer, real, and character string. The resulting word length and accuracy are platform-dependent. An integer constant consists of one or more digits preceded by an optional sign (+ or -). If a real constant is entered for an integer, it will be truncated to integer value. Some integer constant examples are +100 100 -9999 A real constant contains one or more digits with a decimal point located anywhere. The digits may be preceded by a sign (+ or -) and followed by an exponent letter (e or E) and more digits representing an exponent (which may also be signed). In addition, a real constant may be appended with an optional metric prefix (pico, nano, etc.) and a physical unit (inch, foot, etc.). (The constant, metric prefix, and physical unit may be separated by underscore (_) characters, if desired.) Table 4.1 lists all metric prefixes and physical units which are recognized by MCL, and the internal conversion factors. Upon reading appended units, MCL automatically converts the constant to the proper MKSA value. Some examples of identical real constants are 0.000001 1.0e-6 1micron 1_micro_meter 1micrometer 1e-3millim Each of these data entries will be converted to 10-6 (meters) as it is read by MCL. (They are all equal.) Note that only those prefixes and units listed in Table 4.1 will be recognized by MCL. A character string consists of a number of character constants (including embedded blanks and special characters) delimited by double quotation marks. The allowable length of a character string is platform-dependent. The string may contain any of the special characters (including delimiters and expression operators) except for the string delimiter itself. The case of any letters within the string will be preserved. If it contains a variable substitution delimiter, then the indicated substitution (see Variable Substitution, below) will be performed as the string is read. Strings should not contain the special character “!”, as it is reserved, and the parser ignors input following an “!” mark on an input line. Typical uses of character strings include file names, titles, and axis labels. An example of a character string is “Double-gap klystron design #07” 4.3 VARIABLES Variables may be used in place of constants wherever a data entry is required. We advocate use of variables for a number of reasons. First, it allows input data to be self documenting. Although MCL supports an extensive commenting capability, variables provide meaning to the data directly. Second, fundamental constants and parameters can be defined once and used many places in an input file. It is much simpler (and safer) to define pi = 3.14159... and to use pi wherever it is needed than it is to repeat a MAGIC User’s Manual 4-2 Part I - Using MAGIC Chapter 4 - Magic Command Language long string of digits. Third, the practice results in input files which are re-usable. By defining basic parameters (lengths, frequencies, etc.) as variables, one can quickly change data and run a new case without searching the entire file for constants. MCL can read integer, real, and character variables. The type can be determined implicitly by the variable name itself. If the variable begins with the letters i – n, it is an integer variable. Otherwise, it is real. To circumvent this convention, or to define character variables, one simply uses explicit typedeclaration commands (see Chapter 6). Examples of integer, real, and character variables are Index = 999 ; pi = 3.14158 ; character alfa ; alfa = “bravo” ; Note that the variable alfa has been explicitly declared type character prior to its assignment; otherwise, “bravo” would be read as a real variable. In addition to user-defined variables, MCL supports a number of system variables which are internally defined but can be accessed and used in the input file. System variables all contain the prefix ISYS$ (for integer variables) or SYS$ (for real variables). 4.4 VARIABLE SUBSTITUTION Variable substitution is a very powerful MCL feature which provides a capability similar to that of arrays. The default delimiter for variable substitution is the single quotation mark. When MCL encounters these delimiters, it substitutes the current value of the enclosed variable. The following commands, DO i = 1, 3 ; x’i’ = i ; ENDDO ; will produce three real variables named x1, x2, and x3, with associated real values, 1, 2, and 3, respectively. Although this example uses an integer variable (i), real and character variables can also be substituted. It is also possible to specify the substitution format. The formats available for the three data types are type integer - In.m type real - Fn.m, En.m, and Gn.m type character - An.m The standard FORTRAN rules apply for integer and real variables. For character variables, n is the number of characters to substitute, and m is the position in the existing character. As a simple example, if the statement in the block above is changed to read x’i:I2.2’ = i ; then the resulting variable names would be x01, x02, and x03. Variable substitution is also the only means of performing character string concatenation. In the following example, a substring is extracted and used to create a new character variable. CHARACTER FULLNAME LASTNAME ; FULLNAME = “David Jones” ; MAGIC User’s Manual 4-3 Part I - Using MAGIC Chapter 4 - Magic Command Language LASTNAME = “‘FULLNAME:A5.7’” ; The character variable LASTNAME will contain “Jones.” 4.5 FUNCTIONS Many commands require specification of a function. MCL can read a general mathematical expression (using dummy arguments). The name of the function can then be entered into the command which requires the function. MCL supports the standard FORTRAN intrinsic mathematical functions. These, and any previously user-defined constants, variables, and functions can be included in the expression. An example of a function command is FUNCTION V(t) = SIN ( omega * t ) ; where omega has previously been defined as a real variable. Once this function has been entered, it can be applied wherever required simply with the data entry, V Note that this data entry does not include the parentheses or the dummy argument(s). 4.6 MATHEMATICAL EXPRESSIONS Variables can be assigned values using complicated mathematical expressions in the FORTRAN syntax, including function references and variable substitution. The following example assigns a value to the variable “dt” using the MAX and SQRT functions and the system variable, SYS$DTIME. dt = MAX( SYS$DTIME, SQRT(1_meter**2/vsqr) ) ; 4.7 IN-LINE MATHEMATICAL EXPRESSIONS or EMBEDDED EXPRESSIONS MCL commands accept in-line mathematical expressions, or embedded expressions, in place of variables or constants. This is primarily intended as a convenience, in order to prevent the profusion of needless variables for one-time use. There are tight restrictions on the use of in-line expressions, though. The following rules must be adhered to: 1. 2. 3. 4. 5. An in-line expression must start with either the “+” or “ ─” signs. An in-line expression must not exceed 32 characters in length. An in-line expression must not contain any blanks. An in-line expression must not be used inside a do-loop. Variable substitution is not permitted in an in-line expression. The following example uses two in-line expressions to create a line along the Y-axis from “y-dy” to “y+dy”. Here “y” and “dy” are two previously assigned variables. Note the use of the “+” sign to indicate the start of an in-line expression. LINE line_name CONFORMAL 0.,+y-dy 0.,+y+dy ; 4.8 GEOMETRY, MODEL, AND SPECIES NAMES Many MCL commands define or use the names of geometry, the names of electromagnetic models, or the names of user-defined particle species. These names may be composed of the standard letters, MAGIC User’s Manual 4-4 Part I - Using MAGIC Chapter 4 - Magic Command Language digits, and 18 special characters. They cannot contain blanks. Their interpretation is case-insensitive. In this fashion they behave exactly as variables do. The following example creates a geometric point whose name is “origin” and creates a diagnostic to observe the E1 field at this point. Note the arbitrary case. POINT Origin 0.,0.,0. ; OBSERVE FIELD E1 ORIGIN ; 4.9 FILENAMES Some MCL commands require filenames. The difficulty with filenames is that some platforms have case-sensitive file systems (UNIX) and some do not (DOS, Windows). In addition, some systems allow blanks in the filename, while others do not. The MAGIC programs recognizes case-sensitivity of filenames and blanks whenever a file name is entered as a character string constant between double quotes. MAGIC also accepts filenames without quotes, if the name does not contain blanks. However, the case of the filename will be indeterminate, and MAGIC may or may not find an existing file of the specified name, depending on the operating system. In the first example below, data produced by running the Pandira magnetic field solver is saved in a file called “outSF7” and is used to preset the static magnetic field, B1ST, in MAGIC. The filename is enclosed in quotes to insure that the operating system searches for and opens the file with exactly the same case as specified. In the second example, MAGIC is being told to name the graphics printer file “Plot.ps,” without regard to case. PRESET B1ST PANDIRA “outSF7” ; GRAPHICS PRINTER Plots.ps ; 4.10 KEYWORDS AND OPTIONS Many MCL commands require keywords in addition to requiring constants, variables, functions, mathematical expressions, and various names as arguments. The use of keywords is case-insensitive. Keywords may also be abbreviated. The use of keywords and options is discussed in more detail in Section 5. 4.11 PREFIXES AND UNITS WITH CONVERSION FACTORS MCL allows variable definitions to include unit designation. Internally the MAGIC software converts units to the MKSA value. The addition of a unit suffix (and prefixes) allows the command script to be self documenting of the types of values and what the various parameters mean. Several examples illustrating this are listed following the tables Table of Prefixes Prefix Factor Prefix Factor atto 10-18 kilo 10+3 -15 femto 10 mega 10+6 -12 pico 10 giga 10+9 nano 10-9 tera 10+12 -6 micro 10 peta 10+15 -3 milli 10 exa 10+18 centi 10-2 deci 10-1 The use of the prefixes allows you to express the units more conventionally and make the command script more readable. In the following example, all results are the same. Note the use of the prefix “kilo” and the unit “volts”. MAGIC User’s Manual 4-5 Part I - Using MAGIC Chapter 4 - Magic Command Language APPLYVOLTAGE APPLYVOLTAGE APPLYVOLTAGE APPLYVOLTAGE = = = = 1.5kilovolts ; 1.5E3 ; 1500_VOLTS ; 0.0015_MEGAVOLTS ; Table of Pressure Unit (N/m2) Conversion Factors Unit Factor Unit Factor Atmosphere 101325. pascal 1 torr 133.322 Unit sec second c rad Table of Physical Constant Conversion Factors Factor Unit Factor 1 radian 1 1 pi 3.14159265359 299792458 deg pi/180 1 degree pi/180 Unit mil mils inch foot feet Table of Length Unit Conversion Factors Factor Unit Factor 2.54x10⁻⁵ micron 10-6 -5 2.54x10 mm 10-3 2.54x10⁻² cm 10-2 .0254x12 m 1 .0254x12 meter 1 km 10+3 Units of length may be used interchangeably in MAGIC with the caveat that all lengths are internally converted to meters. (Please recall that MAGIC is case-insensitive, so using mm is equivalent to using MM). Use case in the command script to maintain readability and conform to standard scientific conventions. Radius1 = 1 inch; Radius2 = 33 micron ; Radius2 = 33 MILLIMM ; Xlength1 = 4.4 foot ; Xlength1 = 4.4 feet ; Xlength2 Xlength2 Xlength2 Xlength2 = = = = 1.33 meter ; 133 cm ; 1330 mm ; 133.0 Cm ; Notice that there are multiple ways to specify the same length. Unit hertz Hz Table of Frequency Units Conversion Factors Factor Unit Factor 1 MHz 1x10+6 1 GHz 1x10+9 MAGIC User’s Manual 4-6 Part I - Using MAGIC kHz Chapter 4 - Magic Command Language 1x10+3 THz 1x10+12 Units of frequency are converted to Hertz. RFreq1 = 12000 Hertz ; RFreq1 = 12.000 KiloHertz ; RFreq1 = 12.000 KHZ ; ! Case insensitive. Unit A amp volt kV tesla gauss ohm mho Table of Electromagnetic Unit Conversion Factors Factor Unit Factor 1 henry 1 1 farad 1 1 coulomb 1 1x10+3 V 1 1 T 1 -4 1x10 H 1 1 F 1 1 Unit eV keV MeV Table of Energy Units Conversion Factors Factor Unit Factor 1.6021892x10⁻¹⁹ GeV 1.6021892x10⁻¹⁰ 1.6021892x10⁻¹⁶ joule 1 -13 1.6021892x10 watt 1 A note of caution is in order. Some care must be employed to distinguish between and energy of 1 MeV and an energy of 1 Megavolt. The first is in units of joules, whereas the seconds is either voltage or an energy in electron volts. In most applications in Magic we specify in volts. Individual commands and diagnostics will indicate which is appropriate. MAGIC User’s Manual 4-7 Part I - Using MAGIC Chapter 5 - Interpreting Command Syntax 5. INTERPRETING COMMAND SYNTAX This Manual describes commands which use the following form of syntax: COMMAND_NAME argument argument ... ; This Chapter will explain how to interpret the syntax to write commands successfully. The basic rules are very simple. • • • • • • • • • Wherever the command syntax contains an argument, you should replace the argument with a data entry. (Conceptually, this is equivalent to assigning a value to the argument.) Upper-case arguments indicate keywords, and the data entry should duplicate the argument exactly. (The command name is the pre-eminent example of a keyword.) Lower-case arguments should be replaced with data entries of your choice, using integer, real, or character data, which may be either constant or variable. Double quotation marks “ ” enclosing an argument require that a character string be entered. (The quotation marks must be included in the input data.) Parentheses ( ) embedded within an argument require that the name of a previously defined function be entered. (The parentheses and dummy arguments used to define the function are not entered.) Brackets [ ] enclose optional arguments. (The brackets themselves are not entered.) Braces { } enclose a list of arguments requiring selection; only one data entry is made in response. (The braces themselves are not entered.) An argument containing an asterisk * permits an asterisk “wild card” entry, which allows several options to be selected with a single data entry. Ellipsis ... indicate that more data of the preceding type may be entered. For most users, adherence to these basic rules will suffice, and you may wish to skip the rest of this Chapter. Naturally, there are variations on the basic rules which allow greater flexibility in creating input data. The remainder of the Chapter will discuss some of these variations and present some examples. 5.1 UPPER-CASE ARGUMENTS Any argument in upper case represents a keyword. This requires that the data entry duplicate the spelling of the argument exactly. Since MCL is case-insensitive, lower-case input data is acceptable, so long as the spelling is correct. All command names must be written out in full (not truncated). For example, if the command syntax reads STOP ; then Stop ; or any similar variation will be acceptable, but the name must be written out in full because STOP is a command name (the first argument in a command). MAGIC User’s Manual 5-1 Part I - Using MAGIC Chapter 5 - Interpreting Command Syntax For upper-case arguments offering options or selection within the command, truncation of the data entry is acceptable. However, the data entry must duplicate enough of one argument to differentiate it from the other possibilities. For example, if the command syntax contains the arguments, { YES, NO } then you can select YES by entering Y because it can be differentiated from the other possibility (N or NO) . 5.2 LOWER-CASE ARGUMENTS A lower-case argument usually requires a specific type of input data. Generally, the type (integer, real, or character) will be indicated by the first letter of the argument or by the meaning which it conveys. (Functions and strings will be discussed separately.) If the first letter of an argument is i – n, then an integer is usually required. (The integer can be either an integer constant or an integer variable.) For example, if the command syntax contains the argument, index_limit where both first letter and meaning suggest an integer, then a legal data entry would be the integer constant, 1000 Or, you can first place an implicit ASSIGN command (see Chapter 6) in the input file to create an integer variable, LIMIT = 1000 ; Then you can enter the integer variable (LIMIT) instead of the integer constant (1000). Note that a variable must be assigned a value before it can be used, i. e., the ASSIGN command must come first in the input file. If the first letter of the argument is not i – n, then real data is usually required. (Again, real data can be either a constant or a variable.) For example, if the command syntax contains the argument, angle suggesting a real value, then the real constant, 3.14159 would provide a legal response. Equivalently, you can define a real variable and enter the variable instead of the constant. The argument context may indicate that character data is required. (Again, the character data can be either a constant or a variable.) For example, if the command syntax contains the argument, MAGIC User’s Manual 5-2 Part I - Using MAGIC Chapter 5 - Interpreting Command Syntax object_name then it is clear that character (rather than real) input data is required. A legal response is the character constant, Line_A Equivalently, you can define a character variable to be equal to Line_A and then enter the character variable as input data. 5.3 STRING ARGUMENTS Double quotation marks “ ” enclosing an argument require that a character string be entered. The entry must include the quotation marks as delimiters. An example is the HEADER command which encloses the argument, remarks, in double quotes, HEADER REMARKS “remarks” ; This is clearly a requirement for a character string which will provide background information on the simulation. A legal response would be HEADER REMARKS “TWT - 1099, Mk II, 3/1/96” ; Note that the double quotation marks must be included as part of the data entry. This character string with embedded blanks and special characters will be preserved exactly as it appears in the command. Other applications requiring character strings include the COMMENT command and certain file specifications. 5.4 FUNCTION ARGUMENTS Parentheses ( ) embedded within an argument indicate that the name of a function be entered. Before you can enter this name, you must first create the function by placing a FUNCTION command (see Variables and Functions Chapter) in the input data file. For example, if the command syntax contains the argument, voltage(time) the embedded parentheses indicate that a function is needed. (From the argument itself, you might surmise that you are being asked for a voltage as a function of time.) Let us assume that you choose a sinusoidal dependence with an amplitude of 100 V and a frequency of 10 GHz. You place in the input file a FUNCTION command, FUNCTION V(t) = 100. * SIN ( 2 * 3.14159 * 1E10 * t ) ; (A function expression will accept constants, variables, mathematical operators, intrinsic functions, and even functions defined in previous commands.) Now, you can simply enter the name of the function (V) in the original command. Note that the data entry is V and not V(t); the dummy argument and parentheses are not entered. For certain arguments which call for a function, it may be acceptable to enter a constant or a variable instead of a function. (This is equivalent to defining a function equal to a constant, but more convenient.) Those cases where constant data is acceptable will be explicitly identified in the argument description. MAGIC User’s Manual 5-3 Part I - Using MAGIC Chapter 5 - Interpreting Command Syntax 5.5 OPTIONAL ARGUMENTS Brackets [ ] are used to enclose optional argument(s). For example, if the command syntax contains the argument, [ FFT ] then legal data entries include either FFT or nothing (blank). If the brackets enclose a number of arguments, the same number of data entries (or none) must be entered. Note that the brackets themselves are not entered in the input data. 5.6 ARGUMENT SELECTION Braces { } are used to enclose a list of arguments and to mandate a selection. In response, you must make one (and only one) data entry. For example, if the command syntax contains the arguments, { A, B, C } then legal responses include only A, B, or C. No other (e. g., a blank) response is allowed, because you must select from the enclosed list. The braces themselves are not entered. 5.7 “WILD-CARD” ARGUMENTS A “wild-card” argument (*) allows you to select more than one option with a single data entry. During processing, the asterisk is replaced with all possible variations allowed in the selection. If an argument within the bracket or braces contains an asterisk (*), then wild-card entry is allowed. For example, if a command syntax includes { TE, TM, * } then legal entries include TE, TM, or *. The * entry provides the means to select both TE and TM. Note that wild-card entry is supported only where explicitly stated in the syntax. 5.8 REPEATED ARGUMENTS Ellipsis ... indicate that more data of the type suggested by the preceding argument(s) may be entered. For example, if the command syntax contains index ... then several integers (but at least one) should be entered. In general, the argument grouping which precedes the ellipsis defines the scope of the data which is to be repeated. For example, if the command syntax contains the arguments, x, y ... then it is clear that one or more pairs of data should be entered. MAGIC User’s Manual 5-4 Part II - MCL Commands Part II-MCL Commands. This section contains the commands and descriptions of the command for the basic MCL elements. This includes assignment of variables and functions. How to generate control statements. And certain I/O utilities and execution control. Details will be found in the individual chapters. Chapter 6-Variables and Functions Chapter 7-Control Statements Chapter 8-I/O Utilities Chapter 9-Execution Control MAGIC User’s Manual II-1 Part II - MCL Commands Chapter 6 - Variables and Functions 6. VARIABLES AND FUNCTIONS This Chapter covers the following commands: ASSIGN CHARACTER CONTROL INTEGER FUNCTION MCLDIALOG REAL You use these commands to create variables and functions. Once created, a variable may be used as a data entry anywhere in place of a constant. A function may be referenced simply by entering its name. Variables are of type integer, real, or character, and the first occurrence of a variable in the input file irrevocably determines its type. You can declare it explicitly using a type declaration command (INTEGER, REAL, or CHARACTER), or it will be declared implicitly the first time that you assign a value to the variable. Either way, once the type has been declared, it cannot be altered by any subsequent command. Trying to change the type explicitly will produce an error. Trying to change it implicitly may alter the assigned value or produce an error. The ASSIGN command is used to assign a value to a variable (variable = value). The value may be changed at will, consistent with the original type declaration. ASSIGN provides implicit type declaration. If the variable name begins with i – n, it is type integer. Otherwise, it is type real. But if the assigned value is enclosed in double quotation marks, then the variable is type character. The ASSIGN command also supports pseudo-array (multi-variable) capabilities and the optional specification of physical units. The CONTROL command generates variables which are added to the CONTROL menu when MAGIC is run. You may interact with these variable during the course of a simulation and change their values. By careful definition of FUNCTIONs with these variables, you can alter various simulation run parameters. The FUNCTION command is used to create functions out of mathematical expressions or numerical data. Virtually any expression which is legal in FORTRAN can be entered with this command. In addition to constants, variables, and intrinsic mathematical functions, this command will accept any function previously entered in the input file. It will even accept time-history data and user instructions during the simulation, thus providing feedback loop capability. The FUNCTION command also supports true vector (multi-value) capability. The MCLDIALOG command is used to create dialog boxes for controlling a simulation. These are user defined and sit within the magic input file. You may use these dialog boxes to alter parameters and to select different run configurations. MAGIC User’s Manual 6-1 Part II - MCL Commands Chapter 6 - Variables and Functions ASSIGN Command Function: Assigns a value to a variable. Syntax: [ASSIGN] variable = expression, ... ; [ASSIGN] variable = “string”, ... ; [ASSIGN] variable, ... ; Arguments: Variable — name of integer, real, or character variable. Expression — arithmetic expression in the FORTRAN style containing constants, variables, intrinsic functions, user-specified functions, the mathematical operators add (+), subtract (-), multiply (*), divide (/), and exponentiation (**), and the Boolean operators (.GT.,.LT., .LE., .GE., .EQ., and .NE.). String — a character string (with double-quotes), or the name of a previously defined character variable (without quotes). Description: The ASSIGN command assigns a constant value to a variable. It can also be used to display the present value of a previously assigned numeric variable. As indicated by the syntax brackets, entry of the keyword, ASSIGN, is optional. If it is omitted, we refer to this as an “implicit” ASSIGN command. The ASSIGN command can be used with integer, real, and character variables. Unless the type is declared explicitly in a type declaration command, it is declared implicitly in the first ASSIGN command. The implicit rules involve the variable name and the assigned value. The first character in the variable name must be a letter. If the letter is i – n, the variable is type integer. If the letter is a – h or o – z, the variable is type real. But if the assigned value is enclosed by double quotes, the variable is type character. To override these rules, you must use one of the type declaration commands. Once the variable type is declared, it can never be changed. However, the value assigned to the variable can be changed at will, using more ASSIGN commands. An integer or real variable is assigned the value resulting from evaluation of an expression. The expression may include constants, previously assigned variables, basic FORTRAN and Boolean operators, intrinsic mathematical functions, and user-defined functions (see FUNCTION command). The ASSIGN command converts the resulting value from real to integer and vice versa, as appropriate for the variable type. ASSIGN also allows specification of physical units, which may be appended directly onto the value or separated from it by an underscore character. (When physical units are included in any data entry, the numerical value will automatically be converted to the equivalent MKSA value.) For a character variable, double quotes around a string are required to preserve letter case, blanks, and other special characters in the string. If the value (string) is another character variable, then the double quotes are not used; however, both variables must be previously declared to be type character. The length of the string is the total number of characters between the quotes, including blanks. The maximum allowable length is 132 characters. The ASSIGN command also supports a pseudo-array (multi-variable) capability. As the syntax indicates, it is possible to enter more than one expression, but using only one variable name. What happens in this event is that MCL automatically creates additional variables by appending an underscore and increasing integers to the variable name (see Examples, below). Note that this is not a true array, since the variables all have different names. The pseudo-array capability is available for all variable MAGIC User’s Manual 6-2 Part II - MCL Commands Chapter 6 - Variables and Functions types. Commas are required to separate the multiple data entries (spaces cannot be used as delimiters in this command). Once a variable has been assigned a value, the variable can be used as a data entry anywhere in place of a constant. There are some restrictions. For example, if the selected variable name duplicates a keyword, then it will be used in place of the keyword, usually with disastrous results. (FORTRAN behaves in a similar manner; e.g., if you define a variable named SIN, it replaces the intrinsic trigonometric function.) Also, real and integer variables should never be used as data entries where a character string is expected, and vice versa. Restrictions: 1. A variable must be assigned a value before it is used. 2. Type declaration is implicit in an ASSIGN command, and it is explicit in type declaration commands. Type declaration (implicit or explicit) occurs wherever the variable name first appears in the input file. 3. The variable name should not duplicate any keyword in the input file. For example, DATA cannot be used for a variable name if the DATA option if a FUNCTION command is used. 4. There is no string concatenation operator; instead, variable substitution is used to assemble strings (see Examples, below). 5. The maximum number of elements in a pseudo-array assignment is 50. See Also: CHARACTER, Ch. 6, INTEGER, Ch. 6, REAL, Ch. 6, FUNCTION, Ch. 6, PARAMETER, Ch. 21. Examples: 1. The following two ASSIGN commands are equivalent. ASSIGN c = 2.993e8; ! This is an explicit ASSIGN command. c = 2.993e8; ! This is an implicit ASSIGN command. 2. The following two commands with appended physical units are also equivalent. Both data entries will be converted to 0.1 (meters) as they are read. x = 10cm ; x = 10_cm ; 3. The following sequence of commands computes the relativistic momentum of an electron with a velocity of 106 m/sec. V = 1.E6 ; C = 2.998e8; RM = 9.1E-31; ! Speed of light, rest mass. Gamma = (1 - (V/C)**2) ** (-.5) ; P = Gamma * RM * V ; 4. The following commands illustrate the pseudo-array (multi-variable) capability. command, MAGIC User’s Manual The single 6-3 Part II - MCL Commands Chapter 6 - Variables and Functions x = 1.0, 4.0, 9.0 ; produces precisely the same results as the following six commands. INTEGER x_dim ; x_dim = 3 ; x = 1.0 ; x_1 = 1.0 ; x_2 = 4.0 ; x_3 = 9.0 ; That is, both produce the same five variables and values. The integer variable x_dim is automatically created to record the number of subscripted variables created. Note that the base variable x (without underscore or integer) is also created and assigned the value of the first data entry. The same variables and assignments could also be produced explicitly using variable substitution, for example, x = 1.0 ; DO i = 1, 3 ; x_’i’ = i ** 2 ; ENDDO ; 5. The following example demonstrates type declaration and assignment for character variables. Alfa = “Design # 4993”; ! Quotes implicitly declare type character. CHARACTER Beta ; ! Type explicitly declares character. Beta = Alfa ; ! Quotes are not required on Alfa. Note that Alfa and Beta must both be declared type character before the ASSIGN command. 6. In the following example, concatenation of character strings is used to produce a file name for a CALL command. CHARACTER FILENAME, PATH, FULLPATH ; FILENAME = “Input.mgc” ; PATH = “C:\Inputdir\” ; FULLPATH = “‘PATH’‘FILENAME’” ; CALL FULLPATH ; 7. The ASSIGN command can also be used to display the present value of a previously assigned numeric variable. For example, the command x_3 ; MAGIC User’s Manual 6-4 Part II - MCL Commands Chapter 6 - Variables and Functions CHARACTER Command Function: Declares a variable to be type character. Syntax: CHARACTER variable, ... ; Arguments: variable — name of a variable. Description: The CHARACTER command explicitly declares a variable to be type character. In an implicit declaration (see ASSIGN command), a character variable is declared by double quotes enclosing the value. Hence, the real purpose of the CHARACTER command is to allow character variables to be assigned other character variables. In this case, the double quotes are not entered. Any number of character variables may be declared in a single command. If explicit declaration is used, it must precede the variable assignment and use. Once declared (implicitly or explicitly), the variable type can never be changed, but new values may be assigned to the variable, as convenient. The character variable can be used in place of a character constant wherever one is required as a data entry. See Also: ASSIGN, Ch. 6, INTEGER, Ch. 6, REAL, Ch. 6 Examples: This example illustrates some simple character variable operations. CHARACTER alfa,beta; ! alfa is explicitly character. alfa = "This is a string."; ! Quotes are still necessary. beta = alfa; ! Both are character variables, no quotes. MAGIC User’s Manual 6-5 Part II - MCL Commands Chapter 6 - Variables and Functions CONTROL Command Function: Creates a CONTROL variable and a CONTROL function, assigns the final value, and adds it to the CONTROL menu. You can then update the values during a simulation. Syntax: CONTROL variable_name final_value [relaxation_time] [ "description string" ] ; Arguments: variable_name name of control variable. final_value final value of control function and control variable. relaxation_time relaxation time over which the control function alters value from the initial to final value. description_string a character string describing how the control variable is used. Description: The CONTROL command generates a special control function and assigns a constant value to a special control variable. You can use the control function directly in place of any strictly temporal function used in other commands, or use the control variables to define a response function explicitly. The unique feature of the control items is that you may interactively update their values during the course of a simulation. An automatic function is generated with the following form: • FUN$variable_name(t)= Start_Value + (Final_Value-Start_Value)*Smooth_Ramp((tTIME$variable_name)/RELAX$variable_name) In addition, the following control variables are assigned immediately: • • • • CONTROL0$variable_name = Start_Value at change of definition time. Obtained by evaluating the function at the update time, prior to the update. That is, Start_Value = FUN$variablename(at t=user changes the definition). The first value is equal to 0. CONTROL$variable_name = Final_Value. RELAX$variable_name = relaxation_time, default value is 1.e-28sec. TIME$variable_name = - time at which defined or altered during the course of a simulation, takes on the value of the current simulation time. Restrictions: See Also: ASSIGN, Ch. 6, CHARACTER, Ch. 6, INTEGER, Ch. 6, REAL, Ch. 6, FUNCTION, Ch. 6 Examples: The following example is a simple smooth bore magnetron. This example demonstrates the use of the CONTROL variables and function to dynamically alter the applied voltage on the magnetron. The following figure shows the geometry. We introduce a PORT for the left side and measure the voltage trace with the OBSERVE command. MAGIC User’s Manual 6-6 Part II - MCL Commands Chapter 6 - Variables and Functions VOLTAGE_MAX = 100_KILOVOLTS ; ! Applied voltage in volts. Control VoltageMax Voltage_MAx 0.5e-9 "This control allows you to alter the maximum incident voltage" ; This set of commands uses the CONTROL function in the PORT command. FUNCTION GX1(R,PHI,Z) = 1/R ; FUNCTION GX2(R,PHI,Z) = .0 ; PORT XINLET.LEFT POSITIVE INCOMING Fun$VoltageMax FUNCTION E1 GX1 E2 GX2 NORMALIZATION VOLTAGE XINLET.VOLTAGE.LEFT; OBSERVE FIELD_INTEGRAL E.DL XINLET.VOLTAGE.LEFT ; This figure shows the menu item used to interact with the CONTROL variables and functions. You first click on the menu item Control and then select the item Variables. Note at the bottom of the figure that we have suspended the simulation at the time of 1.405 ns. When we make changes to the control variables, this will become the new value of CHANGE$VoltageMax. MAGIC User’s Manual 6-7 Part II - MCL Commands Chapter 6 - Variables and Functions Next we see displayed the Control Variables dialog box. In the following figure you can see we have specified a new value for CONTROL$VOLTAGEMAX of 150,000 volts, (changing it from the initial value of 100,000 volts.) And we have entered a ramp time of 0.5ns. This will provide a smooth transition from the initial value to the new value. Next we see displayed an OBSERVE measurement of the voltage at the port. Notice the smooth ramp and transition from 100 kV to 150 kV. The transition takes as we expect about 0.5ns. Because there is a signal from both ends of the magnetron there is a lag in the application voltage reaching full value. MAGIC User’s Manual 6-8 Part II - MCL Commands Chapter 6 - Variables and Functions MAGIC User’s Manual 6-9 Part II - MCL Commands Chapter 6 - Variables and Functions INTEGER Command Function: Declares a variable to be type integer. Syntax: INTEGER variable, ... ; Arguments: variable — name of a variable. Description: The INTEGER command explicitly declares a variable to be type integer. In an implicit declaration (see ASSIGN command), an integer variable must begin with a letter, i – n. Hence, the real purpose of the INTEGER command is to allow variables that begin with other letters to be type integer. Any number of integer variables may be declared in a single command. If explicit declaration is used, it must precede the variable assignment and use. Once declared (implicitly or explicitly), the variable type can never be changed, but new values may be assigned to the variable, as convenient. The integer variable can be used in place of an integer constant wherever one is required as a data entry. See Also: ASSIGN, Ch. 6, CHARACTER, Ch. 6, REAL, Ch. 6 Examples: In this example, the variable X is declared to be type integer. In the absence of this explicit declaration, the variable would be real, and the integer constant (1) would be converted to a real constant (1.0). INTEGER X ; X = 1 ; MAGIC User’s Manual 6-10 Part II - MCL Commands Chapter 6 - Variables and Functions FUNCTION Command Function: Creates functions for use by other commands. Syntax: FUNCTION function(x,...) = expression, ... ; (Or) FUNCTION function DATA pairs x,y ... ; Aguments: function name, user-defined. first independent variable, etc., user-defined. Expression arithmetic expression in the FORTRAN style containing constants, variables, intrinsic functions, user specified functions, the mathematical operators add (+), subtract (-), multiply (*), divide (/), and exponentiate (**), and the Boolean operators (.GT., .LT., .LE., .GE., .EQ., and .NE.). pairs number of data pairs (integer). (The maximum number of data pairs for a single data function is 500.) x,y independent and dependent values of data pair (real). function x, ... Description: The FUNCTION command is used to create a function and to give it a unique function name. The function can then be used in other commands simply by entering the name. Only the function name, and not the parentheses or independent variables, is entered. (The function name must be unique, and a previously-created function will be replaced by a new function if they have the same function name.) The two syntactical forms allow use of either expressions or tabular data. An expression may contain up to ten independent variables. They must be enclosed by parentheses and separated by commas within the function name. Expressions are entered as strings in FORTRAN style. The equals sign shown in the command syntax must be entered. As the syntax indicates, it is possible to associate more than one expression with a single function name. In this event, MCL creates a vector (multi-value) function. This capability can be used very effectively with the pseudo-array (multi-variable) capability described in the ASSIGN command (also see Examples, below). Mathematical and Boolean operators have the same relative priority as in FORTRAN. The Boolean operators (.GT., .LT., .LE., .GE., .EQ., and .NE.) can be used to construct logical functions (see Examples, below). The result of a logical expression using Boolean operators is 1 if the expression is true and 0 if the expression is false. Two pre-defined system variables, SYS$TRUE (=1.0) and SYS$FALSE (=0.0), exist to facilitate Boolean operations. The expression may contain various other existing functions, which include: • user-specified functions (previously created in other FUNCTION commands), • intrinsic mathematical functions (see Tables), • grid mesh and index functions (see Tables), and • feedback-loop functions (see Tables). Any user-specified function (one previously created in a FUNCTION command) can be included in another FUNCTION command. MAGIC User’s Manual 6-11 Part II - MCL Commands Chapter 6 - Variables and Functions The Tables below list all of the available in-line functions. The intrinsic mathematical functions include all of the standard trigonometric, transcendental, hyperbolic, numeric, and cylindrical Bessel functions. The grid mesh functions include coordinates as a function of indices and indices as functions of coordinates. The Tables also include the feedback functions, OBS$name. Time-history data (see OBSERVE command) from the simulation itself may be entered as a function, thus providing a simulation feedback loop. Observer values are referenced as OBS$name, where “name” is set in the OBSERVE command. The value of OBS$name when the function is computed is the value of the observer at the end of the previous time step. An example using the OBS$name for a feedback loops is given below. For the DATA option, a set of (x,y) data pairs is entered in order of increasing x. This produces a function of a single independent variable, or y = function(x). When the function is evaluated for a value of x which falls between data values, y will be computed via linear interpolation. When it is evaluated for a value outside the data range, the nearest end-point value is used; i.e., extrapolation is never performed. Trigonometric Functions Function Typ Argumen Definition e t SIN(x) real real Sine (x), argument in radians. COS(x) real real Cosine (x), argument in radians. TAN(x) real real Tangent (x), argument in radians. ASIN(x) real real Arcsine (x), result in radians. ACOS(x) real real Arccosine (x), result in radians. ATAN(x) real real Arctan (x), result in radians, (-π/2≤ result ≤ π/2.) ATAN2(y,x) real Real, real Arctan(y/x), result in radians, (-π< result ≤ π.) Transcendental Functions Function Type Argument Definition SQRT(x) real Real Square Root: x1/2 ELLIPTIC1(x) real Real Complete elliptic integral of first kind: K(x) ELLIPTIC2(x) real Real Complete elliptic integral of second kind: E(x) EXP(x) real Real Exponential: ex 1 real Real IELLIPTIC1(φ,k) Incomplete elliptic integral of first kind: F(φ\α) 1 real Real IELLIPTIC2(φ,k)1 Incomplete elliptic integral of second kind: E(φ\α) 1 Real IELLIPTIC3(φ,k,n) real Incomplete elliptic integral of third kind: Π(n;φ\α) 1 1 LOG(x) LOG10(x) real Real Natural Logarithm: ln (x) real Real Common Logarithm: log10 (x) 1. For the incomplete elliptic integrals, k=sin(α), such that 0 o < α < 90o. Numeric Functions Function Type Argument Definition ABS(x) real real Absolute Value: |x| INT(x) integer real Truncated Integer: x = I + r, r < 1 MAX(x,y) real Real, real Largest Value of x or y MIN(x,y) real Real, real Smallest Value of x or y MOD(x,y) real Real, real Remaindering: x-INT(x/y)*y NINT(x) integer real Nearest Int: INT(x+.5),x>0INT(x-.5),x<0 SIGN(x) real real Sign of x; -1 (x<0), +1 (x>0) GAUSSIAN(x,y) real Real, real Gaussian Random No: exp(-(r-x)2/2y) RANDOM real none Uniform Random No; 0<r<1 MAGIC User’s Manual 6-12 Part II - MCL Commands STEP(x,y) THETA(x) RAMP(x) SMOOTH_RAMP(x) Function PING(x) BAND_PING (x,δ, xrise,xend) CHIRP (x,δ, xrise,xend) Ty pe rea l rea l rea l Chapter 6 - Variables and Functions real real real real Real, real Step Function: 1 (x>y), 1/2 (x=y), 0 (x<y) real Step Function: 1 (x>0), 0 otherwise real Max(0,min(1,x)) real Sin(π/2*ramp(x))2 RF excitation signal Functions. Argum Definition ent real =0, (for x<-1/2, x>1/2), =1/2, (for x=-1/2, x=1/2), =1, (for -1/2<x<1/2). real Smooth_ramp(x/ xrise) Smooth_ramp((xend-x)/xrise) 2Sin(2πδ(x-0.5*xend))cos(2π(x-0.5*xend))/(2π(x-0.5*xend)). real For a temporal signal with frequencies between flo and fhi, let fc=0.5*(flo+fhi) and set x=fc*t, central frequency, δ =(fhi-flo)/fc, band width, xrise=fc*trise, where trise is signal rise time, xend=fc*tend, where tend is signal end time. See Example. Smooth_ramp(x/ xrise) Smooth_ramp((xend-x)/xrise) Sin(2πx(1+0.5*δ(xend-x/xend)). For a temporal signal with frequencies between flo and fhi, let fc=0.5*(flo+fhi) and set x=fc*t, central frequency, δ =(fhi-flo)/fc, band width, xrise=fc*trise, where trise is signal rise time, xend=fc*tend, where tend is signal end time. See Example. The sweep functions are designed to provide all the components needed for an RF Chirp that runs linearly from one frequency to another uniformly in time. Typically the sin and cos elements correspond to functions that are used to heterodyne the signal response. See Examples. SWEEP_PHASE (t,t1,t2,f1,f2) rea l real Phase function φ of a linear RF Chirp signal. The argument t represents time in sec. The arguments t1 and t2 are time (sec) and the arguments f1 and f2 are frequency in Hz. The phase is given by the following: φ(t) = 2π( fc*(t-t1) +.5*δf*(t-t1)- .5*(δf/δt)*(t-t1)2. SWEEP_FREQ (t,t1,t2,f1,f2) rea l real Where fc=0.5*(f1+f2), δf=f2-f1, δt= t2-t1, and t2 > t1. The instantaneous frequency of a linear RF Chirp signal. Same arguments as SWEEP_PHASE. f(t) = 1/2π (dφ(t)/dt) = fc +.5*δf- (δf/δt)*(t-t1) SWEEP_SIN (t,t1,t2,f1,f2) rea l real Where f(t1) = f1 and f(t2) = f2. The sin phase reference signal for a linear RF Chirp. Same arguments as SWEEP_PHASE. = Sin(φ(t)). Where f(t) is defined in SWEEP_FREQ. SWEEP_COS rea real The cos phase reference signal for a linear RF Chirp. Same MAGIC User’s Manual 6-13 Part II - MCL Commands (t,t1,t2,f1,f2) Chapter 6 - Variables and Functions l arguments as SWEEP_PHASE. = Cos(φ(t)). SWEEP_CHIRP (t,t1,t2,f1,f2,tr) rea l real Where f(t) is defined in SWEEP_FREQ. The RF Chirp function with an envelope modulation. Same arguments as the other SWEEP functions. And the argument tr is the rise and fall time of the modulation envelope. =Sin(φ(t))*Smooth_Ramp(t/tr)*Smooth_ramp((te- t)/tr). Where te = t1 + t2 is the time at which the modulation envelope becomes zero. Special RF excitation signal functions with simulation time implicit. Function Ty Argum Definition pe ent SIN_WAVE rea real, = Sine(2π f td + φ), where td is the simulation time. This l real (f,φ) function does not suffer single precision round off error. Special Space Charge Functions. Function Ty Argum Definition pe ent ChildLangmuir rea real Child-Langmuir current density (I/m2) for parallel plates. (gap,voltage) l LangmuirBlodgett rea real Langmuir-Blodgett current density (I/m) for concentric (rcathode,ranode,voltag l cylinders. Here rcathode is the radius of cathode, ranode is the e) radius of the anode, and voltage is the voltage between the cylinders Feedback Loop Function Function Type Argument Definition OBS$name real none Time-history data from simulation. (See example.) Hyperbolic Functions. Function Typ Argumen Definition e t SINH(x) real Real Hyperbolic Sine: sinh (x) COSH(x) real Real Hyperbolic Cosine: cosh (x) TANH(x) real Real Hyperbolic Tangent: tanh (x) Cylindrical Bessel Functions Function Type Argument Definition BESSELJ0(x) real real J0(a) BESSELJ1(x) real real J1(a) BESSELY0(x) real real Y0(a) BESSELY1(x) real real Y1(a) BESSELI0(x) real real I0(a) BESSELI1(x) real real I1(a) BESSELK0(x) real real K0(a) BESSELK1(x) real real K1(a) BESSELJN(n,x) real Integer, Jn(x) real BESSELJP(n,x) real Integer, J'n(x) real MAGIC User’s Manual 6-14 Part II - MCL Commands BESSELYN(n,x) real BESSELYP(n,x) real BESSELJNZ(n,s) real BESSELJPZ(n,s) real BESSELYNZ(n,s ) BESSELYPZ(n,s ) real real Chapter 6 - Variables and Functions Integer, real Integer, real Integer, integer Integer, integer Integer, integer Integer, integer Yn(x) Y'n(x) Zeros of Bessel Function, jn,s Zeros of Derivative, j'n,s Zeros of Bessel Function, yn,s Zeros of Derivative, y'n,s Grid Mesh Functions. Function X1FG(i) X2FG(i) X3FG(i) X1HG(i) X2HG(i) X3HG(i) X1GR(x) X2GR(x) X3GR(x) Typ e real real real real real real real real real Argument Definition Integer Integer Integer Integer Integer Integer Real Real Real Nearest x1 full-grid point vs. grid index Nearest x2 full-grid point vs. grid index Nearest x3 full-grid point vs. grid index Nearest x1 half-grid point vs. grid index Nearest x2 half-grid point vs. grid index Nearest x3 half-grid point vs. grid index X1 coordinate vs. real (continuous) grid index X2 coordinate vs. real (continuous) grid index X3 coordinate vs. real (continuous) grid index Grid Index Functions. Argument Definition real Grid index vs. nearest x1 full-grid point real Grid index vs. nearest x2 full-grid point real Grid index vs. nearest x3 full-grid point real Grid index vs. nearest x1 half-grid point real Grid index vs. nearest x2 half-grid point real Grid index vs. nearest x3 half-grid point real Grid index of cell containing x in x1 real Grid index of cell containing x in x2 real Grid index of cell containing x in x3 Function Type I1FG(x) integer I2FG(x) integer I3FG(x) integer I1HG(x) integer I2HG(x) integer I3HG(x) integer I1CL(x) integer I2CL(x) integer I3CL(x) integer Restrictions: 1. A function must be defined before it is referenced by other commands. 2. A function may not reference itself. 3. A function whose name duplicates an intrinsic function will replace the intrinsic function. 4. Function names must not duplicate variable names. 5. The number of data pairs per function is limited to 500. Also if you have multiple such function, the maximum of different data functions is such that the total storage is about 5000 data pairs. Thus number of functions is the number of data points per function into the total storage. In addition, the more conventional functions also take up data slots, albeit only a few per instance as they are generated on demand. See Also: ASSIGN, Ch. 6, OBSERVE, Ch. 22 Examples: MAGIC User’s Manual 6-15 Part II - MCL Commands Chapter 6 - Variables and Functions 1. Obs$variable function example. The OBS$name function provides simulation feedback loop capability. We wish to use the dynamic voltage measured at Port_B to modify the incoming voltage applied at Port_A using a PORT command. The following commands could be employed. OBSERVE FIELD E2 Port_B SUFFIX VOUT ; FUNCTION VINC(T) = CONST - OBS$VOUT ; PORT Port_A POSITIVE INCOMING VINC FUNCTION E1 g ; 2. Product function example. The following commands create two functions. The first function, named ALFA, is a sine wave function of retarded time. The second function, named BETA, includes the first, modifying it with the addition of some noise. C = 2.998E8 ; FUNCTION ALFA(X,T) = 10. * SIN (4E9 * (X/C+T) ) ; FUNCTION BETA(X,T) = ALFA(X,T) * (1 + GAUSSIAN(0,.05)); 3. Data function example. A command syntax contains the symbol, f(t,x), indicating a requirement for two independent variables. However, the desired input is linear in t and independent of x. This can be entered as an expression or even by using the DATA option. FUNCTION PULSE(T,X)= T / 1.0E-8 ; FUNCTION PULSE DATA 2 0.0,0.0 1.0E-8,1.0 ; Within the range (0<t<1e-8), these functions will give the same result. MCL ignores the unused independent variable from the first command. In the second command, MCL interprets the data as a function of the first independent variable (in this case, t) and performs linear interpolation between the data points. (The data option cannot be used with more than one independent variable.) 4. Multi-value function example. A vector (multi-value) function is created by entering multiple expressions in the same FUNCTION command. In the following example, a vector function having different linear rates is created, and the values evaluated at t = 1.0 are assigned to a (multi-variable) pseudo-array. FUNCTION Pulse(t) = 1*t, 2*t, 3*t ; X = Pulse(1.0); These two commands create the variables and values equivalent to those produced in the following commands: INTEGER X_DIM ; X_DIM = 3 ; X = 1.0 ; X_1 = 1.0 ; X_2 = 2.0 ; X_3 = 3.0 ; 5. Band_Ping function example. FREQ = 50_MHZ ; DFREQ = 40_MHZ ; TRISE = 50_NANOSECONDS ; TEND = 8_MICROSECONDS ; FUNCTION SIGNAL(Y,T) = band_ping(FREQ*T,DFREQ/FREQ,FREQ*TRISE,FREQ*TEND) ; OBSERVE TRANSFORM SIGNAL FFT MAGNITUDE WINDOW FREQUENCY 0.0 200_MHZ DB_SCALE 6 ; The following figures show the incident signal as measured by the preceding OBSERVE command and the figure on the right is the FFT of the AM Chirp function. Notice, that is has a flat frequency response in the band. The “goodness” of this response depends upon having a sufficient number of mean rf cycles. MAGIC User’s Manual 6-16 Part II - MCL Commands Chapter 6 - Variables and Functions 6. Chirp function example. FREQ = 50_MHZ ; DFREQ = 40_MHZ ; TRISE = 50_NANOSECONDS ; TEND = 8_MICROSECONDS ; FUNCTION SIGNAL(Y,T) = CHIRP(FREQ*T,DFREQ/FREQ,FREQ*TRISE,FREQ*TEND) ; OBSERVE TRANSFORM SIGNAL FFT MAGNITUDE WINDOW FREQUENCY 0.0 200_MHZ DB_SCALE 6 ; The following figures show the incident signal as measured by the preceding OBSERVE command and the figure on the right is the FFT of the Chirp function. Notice, that is has a flat frequency response in the band. The “goodness” of this response depends upon having a sufficient number of rf cycles. 7. SWEEP_functions example. This example illustrates the use of the SWEEP_FREQ, SWEEP_SIN, and SWEEP_COS functions. Notice that the frequency sweep begins at high frequency and sweeps downward for a positive value of deltaf. A negative value would sweep from low frequency to high frequency. F2 = 2.7 GHZ ; F1 = 3.4 GHZ ; FREQMD = 0.5*(F1+F2) ; T1 = 0.0 ; T2 = 20/FREQMD ; FUNCTION FM_SIGNALFREQ(Y,T) = SWEEP_FREQ(t,t1,t2,f1,f2); FUNCTION FM_SIGNALSIN(Y,T) = SWEEP_SIN(t,t1,t2,f1,f2); FUNCTION FM_SIGNALCOS(Y,T) = SWEEP_COS(t,t1,t2,f1,f2); OBSERVE TRANSFORM FM_SIGNALFREQ ; OBSERVE TRANSFORM FM_SIGNALSIN ; OBSERVE TRANSFORM FM_SIGNALCOS ; MAGIC User’s Manual 6-17 Part II - MCL Commands Chapter 6 - Variables and Functions MAGIC User’s Manual 6-18 Part II - MCL Commands Chapter 6 - Variables and Functions MCLDIALOG Command Function: Creates a dialog menu for interacting with the simulation directly and controlling setup parameters and type of simulation to be performed. Syntax: MCLDIALOG CASES TITLE “title text for cases dialog box” DEFAULT_SELECTION item_number CASE_NAME case_name CASE “case description 1” id_case_1 [CASE “case description 2” id_case_2 … CASE “case description n” id_case_n ] HELP “description of case items. [NEWLINE] For a line feed in the description text use [NEWLINE] case 1 is …[NEWLINE] … case n is …” ; MCLDIALOG PARAMETERS TITLE “title text for parameters dialog box” DEFAULT_SELECTION item_number PARAMETER variable_name_1 “unit_1” “description_1” [PARAMETER variable_name_2 “unit_2” “description_2” … PARAMETER variable_name_n “unit_n” “description_n”] ; Arguments: “title…” title displayed in dialog box. item_number item which the dialog displays as initial selection. case_name name of integer variable used to store the result of the case selection. “case description i” short text string indicating specific case (<=32 characters). id_case_i user specified id number, must be unique for this case list. Maximum cases is 100. “description of case items..” text description of the various cases. Use [NEWLINE] in the text to force a carriage return. variable_name_i the name of previously defined variable (REAL or INTEGER). Maximum number is 10. “unit_i” text for valid units. “description_i” short text string defining parameter use (<=32 characters). Description: The MCLDIALOG command generates dialog boxes, which allow you to specify parameter variations (PARAMETERS option) or simulation cases (CASES option). In particular these dialog boxes allow you to specify an interactive frontend for specifying the simulation setup and the selection of the type of simulation to run. These are built directly into the input file, and are exercised as the commands are parsed. MAGIC User’s Manual 6-19 Part II - MCL Commands Chapter 6 - Variables and Functions The CASES option may be used to select between a variety of simulation types. These mioght normally be characterized as either EIGENMODE, COLDTEST, HOTTEST, and so forth. This would be used in conjunction with a set of IF .. ELSEIF … commands to alter the simulation. An example is presented below to illustrate this. While you can have as many as 100 cases in a single dialog, we recomment that you keep the number down to a more manageable set. The PARAMETERS option is used to alter the default values of previously defined variables. A maximum of 10 parameters may be entered in a single dialog box. It may also be useful to use the BLOCK .. ENDBLOCK construction to writeout to separate file the parameter variations that are introduced. Multiple instances of the dialog boxes may be defined. Each will be used and discarded after the cases or parameters are entered. Restrictions: 1. The maximum number of cases in a CASES dialog box is 100. 2. The maximum number of parameters in a PARAMETERS dialog box is 10. 3. Variables used in a PARAMETERS dialog box must be assigned values before being referenced as a PARAMETER. See Also: ASSIGN, Ch. 6, INTEGER, Ch 6, REAL, Ch 6, PARAMETER, Ch. 21 Examples: MCLDIALOG command used to specify simulation case and parameters. BLOCK WRITE used to record parameter changes in a text file. This example uses a simple strapped magnetron as the test vehicle. The first set of commands illustrate how to specify parameters and uses the PARAMETERS dialog to allow the user to alter the default settings. The BLOCK WRITE command is used to record the altered parameters to a text file. Parameter Parameter Parameter Parameter Parameter MaxVANES BackWall.IR Anode.radius Anode.Height Vane.width = = = = = 6 ; 1.75 inches ; 0.6125 inches ; 0.700 inches ; 40DEGREES ; MCLDIALOG PARAMETERS TITLE "Enter parameters for magnetron geometry." DEFAULT 1 PARAMETER MAXVANES none "Maximum number of vanes" PARAMETER BACKWall.ir inches "Backwall inner radius" PARAMETER Anode.radius inches "Anode bore radius" PARAMETER Anode.height inches "Anode height " PARAMETER Vane.Width degrees "Vane width " ; The MCLDIALOG PARAMETERS box for this command will look like the following. Use the DEFAULT button to reset the values is you have changed them and wish to undo the changes. Use OK to accept the changes and proceed. Use the CANCEL button to decline the changes and proceed. MAGIC User’s Manual 6-20 Part II - MCL Commands Chapter 6 - Variables and Functions The BLOCK WRITE command can be used to record the altered values of the parameters in a text file. In the following command you will see that we convert the MKSA values of the parameters to the desired “display” units used in the original definition and in the PARAMETER dialog. If the MKSA values are acceptable then proceed without this conversion. Please note that the name of the output text file is arbitrary, if you include path information, enter the name and path in double quotes, e.g. “C:\parameters.txt”. ! Convert parameters to desired units from MKSA. BackWall.irIn = BackWall.ir/1_inch ; Anode.radiusIn = Anode.radius/1_inches ; Anode.HeightIn = Anode.Height/1_inches ; Vane.widthDEG = Vane.width/1_DEGREES ; Block Write DesignParameters.txt APPEND ; ! Modified values of parameters. Parameter MaxVanes = 'MaxVanes' ; Parameter BackWall.ir = 'BackWall.irIn:F8.4' Inches ; Parameter Anode.radius = 'Anode.radiusIn:F8.4' Inches ; Parameter Anode.Height = 'Anode.HeightIn:F8.4' Inches ; Parameter Vane.width = 'Vane.widthDEG:F8.2' Inches ; EndBLOCK ; The next command illustrates the use of the MCLDIALOG CASES dialog box. In this case we define a set of “cases”, that are of interest after we have set the parameters. ShowGeometryOnly piMODE_TESTON Impulse_TESTON M1MODE_TESTON M2MODE_TESTON TWOpiMODE_TESTON MeasureQ_TestOn TestDCVoltageOn EmissionOn = = = = = = = = = Off ; OFF ; off; off ; off ; off ; off ; Off ; Off ; MCLDIALOG CASES TITLE "Set type of simulation " DEFAULT_SELECTION 2 CASE_NAME IRUNTYPE CASE "SHOW GEOMETRY only" 0 CASE "PI MODE TEST" 1 CASE "M1 MODE TEST" 3 CASE "M2_MODE_TEST" 4 MAGIC User’s Manual 6-21 Part II - MCL Commands CASE CASE CASE CASE CASE HELP Chapter 6 - Variables and Functions "TWOPI MODE TEST" 5 "IMPULSE TEST" 2 "Q TEST" 6 "VOLTAGE TEST" 7 "HOT TEST" 8 "SELECT CASE [NEWLINE] [NEWLINE] 1. Show geometry only [NEWLINE] 2. Solve for Pi eigenmode [NEWLINE] 3. Solve for M-1 eigenmode [NEWLINE] 4. Solve for M-2 eigenmode [NEWLINE] 5. Solve for 2Pi eigenmode [NEWLINE] 6. Impulse excitation, FFT all modes. [NEWLINE] 7. Find Q of cavity [NEWLINE] 8. Run voltage cold test. [NEWLINE] 9. Run hot test. "; The MCLDIALOG CASES box for this command will look like the following. Use OK to accept the case selection and proceed. Use the CANCEL button to decline the selection and proceed with the default selection. After the MCLDIALOG CASES box is processed the variable IRUNTYPE will be set to one of selected values. Then the following IF … ENDIF set of commands will set the appropriate variable to “on”. And then the remainder of the simulation input will be processed using these simulation parameters and settings. IF (IRUNTYPE.EQ.0) THEN ; ShowGeometryOnly = On ; ELSEIF (IRUNTYPE.EQ.1) THEN; piMODE_TESTON = On ; ELSEIF (IRUNTYPE.EQ.3) THEN; M1MODE_TESTON = on ; MAGIC User’s Manual 6-22 Part II - MCL Commands Chapter 6 - Variables and Functions ELSEIF (IRUNTYPE.EQ.4) THEN; M2MODE_TESTON = on ; ELSEIF (IRUNTYPE.EQ.5) THEN; TWOpiMODE_TESTON = on ; ELSEIF (IRUNTYPE.EQ.2) THEN; Impulse_TESTON = on; ELSEIF (IRUNTYPE.EQ.6) THEN; MeasureQ_TestOn = on ; ELSEIF (IRUNTYPE.EQ.7) THEN; TestDCVoltageOn = On ; ELSEIF (IRUNTYPE.EQ.8) THEN; EmissionOn = On ; ENDIF; MAGIC User’s Manual 6-23 Part II - MCL Commands Chapter 6 - Variables and Functions REAL Command Function: Declares a variable to be type real. Syntax: REAL variable, ... ; Arguments: variable — name of a variable. Description: The REAL command explicitly declares a variable to be type real. In an implicit declaration (see ASSIGN command), a real variable must begin with a letter, a – h or o – z. Hence, the real purpose of the REAL command is to allow variables that begin with other letters to be type real. Any number of real variables may be declared in a single command. If explicit declaration is used, it must precede the variable assignment and use. Once declared (implicitly or explicitly), the variable type can never be changed, but new values may be assigned to the variable, as convenient. The real variable can be used in place of a real constant wherever one is required as a data entry. See Also: ASSIGN, Ch. 6, CHARACTER, Ch. 6, INTEGER, Ch. 6, Examples: In this example, the variable I is explicitly declared to be type real. In the absence of this declaration, the variable type would be integer, and the real constant (1.345) would be truncated to an integer constant (1). REAL I ; I = 1.345 ; MAGIC User’s Manual 6-24 Part II - MCL Commands Chapter 7 - Control Statements 7. CONTROL STATEMENTS This Chapter covers the following commands: DO / ENDDO IF / ELSEIF / ELSE / ENDIF CALL / RETURN $namelist$ You can use these commands to control the flow of commands to be processed. The DO / ENDDO commands provide the capability to loop repeatedly over the same block of commands. They function in a manner similar to their FORTRAN counterparts. The counter variable and the increment can be real as well as integer, and the counter increment can be negative as well as positive. Unlike FORTRAN, the counter can be reset within the loop to provide an exit. The logical IF commands allow decision making and branching within the input file. These commands also follow the FORTRAN convention. Any number of ELSEIF commands can be used within the IF / ENDIF pair; however, only one ELSE command is allowed. The CALL / RETURN construct provides a pseudo-subroutine capability that allows a single, large input file to be broken up into smaller, more convenient files. This allows better organization of the input data by function. It also avoids unnecessary duplication of input data, since any data which repeats can simply be placed in a separate file and called repeatedly. The input data contained in one file is available to all the other files (there is no hidden input data). Finally, the $namelist$ command provides a facility to process existing namelist files without altering them. This allows input data produced for other applications to be read directly. MAGIC User’s Manual 7-1 Part II - MCL Commands Chapter 7 - Control Statements DO / ENDDO Commands Function: Repeats execution of a block of commands. Syntax: DO variable = expression_initial, expression_final [ , expression_step ]; [ block of commands ] ENDDO ; Arguments: variable — do-loop counter variable of type integer or real. expression_initial — scalar expression of type integer or real is the initial value of the variable. expression_final — scalar expression of type integer or real is the final value of the variable. expression_step — scalar expression of type integer or real is the increment (default = 1). block of commands— a sequence of executable commands. Description: The DO / ENDDO construct allows repetition of a blocked set of commands. The block must be placed between the DO and ENDDO commands. The variable is the do-loop counter, which may be real or integer. Its initial, final, and increment values are evaluated from the three expressions. If the third expression is not entered, then the increment is given a default value of unity. The block is repeated until the variable passes the final value (the increment can be negative with the variable decreasing). DO / ENDDO constructs can be nested. One do-loop can lie within another, as long as the range of the inner loop lies completely within the range of the outer DO loop. Each of the nested loops should have a unique variable. The value of the do-loop counter variable can be changed within the loop, which provides a useful means for exiting the loop. This is typically associated with a logical IF test on some variable calculated within the loop. To cause an exit, simply set the variable to a value beyond the final value. Restrictions: 1. Do-loop nesting is limited to a depth of eight. Examples: Do-loops can be used for many different purposes. This example demonstrates the creation and unique labeling of ten repeating area “islands” which might be used to construct ridges in a waveguide. Given the island width w, spacing d, and height h, we have Xa = - d Ya = 0 ; Yb = Ya + h ; Nislands = 10 ; DO I = 1, Nislands Xa = Xa + d ; ; ; MAGIC User’s Manual 7-2 Part II - MCL Commands Xb = Xa + w AREA Island’I’ ENDDO ; Chapter 7 - Control Statements ; RECTANGULAR Xa,Ya Xb,Yb ; The resulting areas are named “Island1, Island2, ... Island10.” This example inverts a transcendental equation using Newton’s method. It uses do-loop variable reassignment to terminate the loop when convergence is achieved. ! Problem: solve f(x) = x exp(x) = 10 for x. FUNCTION f(x) = x * exp (x) ; y = 10. ; x_guess = 1.0 ; dx = 0.001 * x_guess ; tolerance = 0.0001 * x_guess ; ! four decimal points accuracy. DO iter = 1, 1000 ; x_solution = x_guess - ( f(x_guess) - y ) * dx / (f(x_guess + dx) f(x_guess) ) ; IF ( ABS (x_solution - x_guess) .LT. tolerance ) THEN ; iter = 1001 ; ENDIF ; x_guess = x_solution ; ENDDO ; ! Returns with x_solution = 1.7455. MAGIC User’s Manual 7-3 Part II - MCL Commands Chapter 7 - Control Statements IF / ELSEIF / ELSE /ENDIF Commands Function: Provides conditional execution of commands. Syntax: IF ( expression ) THEN ; [block of commands] [ ELSEIF ( expression ) THEN ; ] [block of commands] [ ELSE ; block ] [block of commands] ENDIF ; Arguments: Expression — logical expression. block of commands — sequence of executable commands. Description: The IF command works together with ELSE, ELSEIF, and ENDIF commands to provide conditional execution of other commands. As the syntax indicates, the ELSE and ELSEIF branches are optional. Multiple ELSEIF branches can be entered between the IF and ENDIF commands, but no more than one ELSE branch can be used. In writing a logical expression, mathematical and Boolean operators have the same relative priority as in FORTRAN. The Boolean operators, .GT., .LT., .LE., .GE., .EQ., and .NE. can be used to construct logical expressions. The result of a logical expression is 1 if the expression is true and 0 if the expression is false. Two pre-defined system variables, SYS$TRUE (=1.0) and SYS$FALSE (=0.0), exist to facilitate Boolean operations. Examples: In the following example, the number of time steps, Kmax, is calculated from variables Kcycle and Ncycles, which have been entered previously in the input data. (The variable Kcycle is the number of time steps in an RF cycle, and Ncycles is the number of RF cycles.) IF ( Ncycles .EQ. 0 ) THEN ; Kmax = 1 ; ELSE IF ( Ncycles .GT. 0 ) THEN ; Kmax = Ncycles * Kcycle ; ENDIF ; Notice that a negative value of Ncycles will result in Kmax being undefined unless it is assigned elsewhere. MAGIC User’s Manual 7-4 Part II - MCL Commands Chapter 7 - Control Statements CALL / RETURN Commands Function: Opens, processes, and exits a command file. Syntax: CALL new_file ; (in the first file) RETURN ; (at the end of new_file) Arguments: new_file — name of a second command file. Description: The CALL / RETURN commands provide pseudo-subroutine capability. It allows a single input file to be broken up into a number of smaller files, which can be organized according to function. For example, it may be desirable to separate design parameter data from simulation commands. Also, commands which would be repeated many times in an input file are clearly candidates for this treatment. A CALL command in one file transfers control to “new_file”. (All of the constants, variables etc., from either file are accessed by the other, so there is no list of arguments to be transferred between files.) The new_file can contain any commands which could be used in the original file. It can also contain logical IF commands which lead to one or more RETURN commands. The last command in new_file should be a RETURN command. If no RETURN is encountered in new_file, an automatic return will be generated when the end of the file is encountered. When any RETURN command is encountered, new_file will be closed, and commands after the CALL in the original file will be processed. CALL commands may be nested up to six levels deep. Thus, new_file may also contain CALL commands to other files, etc. Restrictions: 1. CALL commands are not allowed within do-loops. 2. CALL commands cannot be nested more than six levels deep. 3. Any file which is accessed with a CALL command should be terminated with a RETURN command. See Also: $namelist$, Ch. 7 Examples: In developing a template for simulation of a generic device, one might wish to isolate the actual input data for a specific design from the generic simulation (algorithm, output, etc.) commands. Thus, at the point in the template where design data is required, the command CALL design.mgc ; could be inserted. This file, design.mgc, would then contain the design-specific data (and be terminated with a RETURN command). The advantage of this approach is that the same simulation methodology can be applied to many different designs which are isolated and identified in individual files. MAGIC User’s Manual 7-5 Part II - MCL Commands Chapter 7 - Control Statements $namelist$ Command Function: Processes FORTRAN-style namelists. Syntax: $group_name [ block ] $[end] Arguments: group_name — symbolic name of namelist. block — block of variable = value assignments. end — terminator on some namelists (ignored by MCL). Description: The $namelist$ command is provided to facilitate data entry from FORTRAN-style namelists. (Use of this command for any other purpose is discouraged.) It allows a namelist file to be read simply by using the CALL command to access the file. It should not be necessary to alter the namelist file itself. A namelist file may contain more than one namelist. In each namelist, the block between $group_name and $end should consist of the usual FORTRAN-style assignments, i.e., variable = value. Assignments should be separated by commas. Array and character assignments are permitted. MCL initially treats each namelist as a single MCL command. The command begins and ends with the namelist delimiter ($). (The DELIMITER command can be used to change the default delimiter ($) to accommodate an unusual namelist convention.) Everything to the right of the second delimiter is ignored by MCL. Hence the “end” in $end is ignored. (Thus, it is not necessary to add a RETURN command to a namelist file, even though it is accessed by a CALL command.) MCL accommodates multiple occurrences of the same namelist in a file by using a pseudo-array capability for group_name variables. It will also create a variable named group_name_INSTANCES to record the number of such occurrences. It will treat any namelist arrays which it encounters in a similar manner. (The user is encouraged to become familiar with the variable-naming convention in order to be able to use the namelist data effectively in other MCL commands (See Examples)). See Also: CALL, Ch. 7, DELIMITER, Ch. 8 Examples: A popular 1D helix-TWT program requires input from a namelist file. This file, named HELIX.NML, includes the following lines: $helix name=“input helix”, radius=1., pitch=.300,.315 $end $helix name=“output helix”, radius=1., pitch=.315,.295,.285 $end The MCL input file contains a single command to read this namelist file: MAGIC User’s Manual 7-6 Part II - MCL Commands Chapter 7 - Control Statements CALL HELIX.NML ; The processing of this namelist file will produce variables and values equivalent to those that would be obtained by executing the following commands: INTEGER HELIX_INSTANCES ; HELIX_INSTANCES = 2 ; HELIX_1.NAME = “input helix” ; HELIX_1.RADIUS = 1. ; INTEGER HELIX_1.PITCH_DIM ; HELIX_1.PITCH_DIM = 2 ; HELIX_1.PITCH = .300 ; HELIX_1.PITCH_1 = .300 ; HELIX_1.PITCH_2 = .315 ; HELIX_2.NAME = “output helix” ; HELIX_2.RADIUS = 1. ; INTEGER HELIX_2.PITCH_DIM ; HELIX_2.PITCH_DIM = 3 ; HELIX_2.PITCH = .315 ; HELIX_2.PITCH_1 = .315 ; HELIX_2.PITCH_2 = .295 ; HELIX_2.PITCH_3 = .285 ; MAGIC User’s Manual 7-7 Part II - MCL Commands Chapter 8 - I/O Utilities 8. I/O UTILITIES This Chapter covers the following commands: BLOCK / ENDBLOCK COMMENT / C / Z / ! DELIMITER ECHO / NOECHO You can use these commands to modify the input file and to control disposition of the processed commands. The BLOCK / ENDBLOCK commands allow the transfer of blocks of text from the input file to any other file. It can provide substantial automation for simulations which involve more than one code. For example, the input file for a simulation can automatically create the input file required for postprocessing. It can even submit the post-processing run automatically. The BLOCK / ENDBLOCK commands can also be used to wrapper codes. MCL supports extensive commenting capability with the COMMENT commands. Combined with the use of (self-documenting) variables, input files can easily be fully documented. In addition, you can use this capability to disable commands temporarily without actually removing them from the input file. You can use the DELIMITER command to redefine any of the delimiter characters. For example, if an existing namelist file contains a non-standard delimiter, you can simply re-define the MCL delimiter, whereas changing the file itself might render it unreadable in its original application. Another convenient use of this command is to redefine the command delimiter (default ;) as a carriage return. This would potentially allow actual FORTRAN to be processed. The ECHO / NOECHO commands provide control over what goes into the output (LOG) file to prevent the huge output files which would result from processing commands within a do-loop, for example. The JOURNAL command can be used to record commands entered interactively. Thus, a file can be developed interactively and saved for subsequent runs in the batch mode. MAGIC User’s Manual 8-1 Part II - MCL Commands Chapter 8 - I/O Utilities BLOCK / ENDBLOCK Commands Function: Copies blocks of text from the input file to some other file. Syntax: BLOCK { COMMENT, WRITE file [ write_mode [ carriage_control ] ] } [ block ] ENDBLOCK ; Arguments: file write_mode carriage_control block — name of the other file. — file write mode (NEW(default), OVERWRITE, or APPEND). — carriage control for file (FORTRAN (default) or LIST). — arbitrary text. Description: The primary use of the BLOCK / ENDBLOCK command is to copy a block of text from the input file to some other file. It provides a convenient means of creating other input files for post-processing, etc. Text is copied verbatim, with one exception; any designated variable substitution is performed before the text is copied (see Examples, below). Following the BLOCK keyword, you must select either COMMENT or WRITE. The COMMENT keyword copies only to the output (LOG) file, while the WRITE keyword copies to any user-specified file name. In the latter case, write_mode specifies what will happen if the file already exists. If you enter NEW (the default), the system tries to open a new file. It will not overwrite or destroy an existing file; instead, the BLOCK command returns with an error message. Entering OVERWRITE will destroy an existing file. Entering APPEND adds to the existing file and is useful for constructing files a bit at a time. The carriage_control provides carriage control in the new file. If you enter FORTRAN, a blank character will be placed at the beginning of each line (required for certain FORTRAN programs), whereas LIST will cause each line to start in column one. Any variable substitution (designated by appropriate delimiters, see ASSIGN command) will be performed before the text is copied. The block of text itself is delimited by the ENDBLOCK command. The BLOCK commands can provide substantial automation. For example, an input file for one code, e.g., MAGIC, can also write an input file for post-processing in another code, e.g., POSTER. It can even submit the post-processing job. Variable substitution allows important data, e.g., a beam voltage or an antenna current, to be passed from the MAGIC run to the subsequent post-processing run. Ultimately, the combination of the BLOCK command, variable substitution, and the COMMAND command give MCL very powerful wrappering capability, not just for the MAGIC family of codes, but for any set of codes. See Also: ASSIGN, Ch. 6, COMMAND, Ch. 9 Examples: MAGIC User’s Manual 8-2 Part II - MCL Commands Chapter 8 - I/O Utilities The following example writes an input file for one of the POISSON magnet design codes. It also writes a DOS batch file to run the POISSON code. Finally, it submits a DOS command to run the batch file. (The variables, TITLE, IRUN, DX, RMAX, and ZMAX have been previously defined.) ! === write AUTOMESH input file === BLOCK WRITE "'‘IRUN’.DAT" OVERWRITE ; 'TITLE' $REG NREG=1, DX='DX', XMAX='RMAX', YMAX='ZMAX', NPOINT=5, ITRI=2 $ $PO X=0.0 , Y=0.0 $ $PO X=0.0 , Y='ZMAX' $ $PO X='RMAX' , Y='ZMAX' $ $PO X='RMAX' , Y=0.0 $ $PO X=0.0 , Y=0.0 $ ENDBLOCK ; ! === DOS batch file to run AUTOMESH === BLOCK WRITE "'‘IRUN’'.BAT" OVERWRITE ; AUTOMESH < ‘IRUN’.DAT >> AUTOMESH.LOG COPY OUTAUT 'IRUN’.AUT COPY TAPE73 'IRUN’.T73 DEL OUTAUT DEL TAPE73 ENDBLOCK ; ! === Run batch file === MAGIC User’s Manual 8-3 Part II - MCL Commands Chapter 8 - I/O Utilities COMMENT / C / Z / ! Commands Function: Provides for comments in the input and/or the output files. Syntax: COMMENT "comment" ; C [ command ] ; Z [ command ] ; [ command ] ! [ comment ] Arguments: comment - user-defined character string. command - command name plus data entries. Description: MCL allows comments to be entered in the input file in a variety of ways. Some, but not all, are echoed in the LOG file. The COMMENT command is intended to enter general comments in the input file which are echoed in the LOG file. The presence of a COMMENT command cannot affect the behavior of the simulation. The comment must be enclosed by double quotes. Thus, any character except double quotes is permitted within the comment. For example, a semicolon is permitted within the comment. Text is copied verbatim, with one exception; any designated variable substitution is performed before the text is copied. (Also, see BLOCK COMMENT command, which does not require double quotes.) The C command is typically used to preserve another command in the input file without executing it. Because the original command is now ignored, the simulation results may change. The C command can extend over many lines and is terminated by the command delimiter. Simply adding the character C to the beginning of an existing command typically creates it. The Z command is also used to preserve a command in the input file without executing it. Thus, it too can affect the behavior of the simulation. It can extend over many lines and is terminated by the command delimiter. (The only difference between the C and Z commands is that the Z writes the message "Command Ignored" in the LOG file, whereas C writes nothing.) The “!” command is typically used to enter short comments following another command on a single line of the input file. The comment is not echoed in the output file. Thus, ! is similar to C. They differ in that C may extend over many lines (before the command delimiter), while ! applies only to the remainder of a single line (and has no delimiter). Note that an executable command may extend over many lines, and any or all of the lines may contain a ! comment. See Also: ASSIGN, Ch. 6, BLOCK, Ch. 8 Examples: MAGIC User’s Manual 8-4 Part II - MCL Commands Chapter 8 - I/O Utilities The commands below depict various uses of the comment commands. COMMENT "The C command below preserves the ASSIGN command in the input file, but no information will be written to the output file. (By contrast, Z would write, Command Ignored.) In either case, the command will be ignored (not processed). Note that, as written, the command below extends over two lines." ; C ALFA = 100; ! ! ! ! ! ! This comment extends only to the end of the line. Every line needs a new ! command. No delimiter or echo in output. You can comment out another command if it is all on one line. An example is: TITLE "This is a title" ; (This TITLE command will not be processed.) However, the ASSIGN command below will be processed. ALFA 100. = 100. ! This comment might explain why ALFA is set to ! Note that a command with ! comments may be spread over many lines, ! e.g., FUNCTION Big_wave(x,t) = SIN (k*x - w*t) ; ! ! ! This line has the function name. This line has the expression. The following COMMENT command illustrates variable substitution. A = 5. ; COMMENT " The value of A is ‘A’ " MAGIC User’s Manual ; 8-5 Part II - MCL Commands Chapter 8 - I/O Utilities DELIMITER Command Function: Allows you to redefine the default MCL delimiters. Syntax: DELIMITER [ type ] character ; Arguments: type — type of delimiter (list below). COMMAND (default), default character is semicolon (;) SUBSTITUTION, default character is single quote (‘) STRING, default character is double quote (“ ) NAMELIST, default character is dollar sign ($) FORMAT, default character is colon (:) character — ASCII character (RETURN, or select from character set). Description: The DELIMITER command is used to change MCL delimiters. The new delimiter will take effect on the following command. Delimiters may be changed as often as desired. “Type” specifies which delimiter to change. A delimiter can be changed to virtually any other single character. If more than one character is entered, then the first character is used, and the remaining characters are ignored. The single exception to this rule occurs for the COMMAND delimiter, which may be set to a carriage return as described below. The default value for the COMMAND delimiter is a semicolon (;). You can change this to a carriage return by entering the character constant, RETURN. With this delimiter, command continuation is provided with an (&) at the end of each line. (Alternatively, a long mathematical expression can be entered without continuation characters by enclosing the expression in double quotes.) The semicolon delimiter for commands remains active in addition to any new delimiter specified. Restrictions: 1. Delimiters should not be set to a comma or to a period. Examples: The COMMAND delimiter can be set to a slash (/) to allow use of older MCL input decks, written when the default delimiter was a slash. DELIMITER COMMAND / ; C Then the following old commands don’t need to be changed. / TITLE "TEST CASE 1" / ... C Reset the delimiter again / DELIMITER RETURN ; MAGIC User’s Manual 8-6 Part II - MCL Commands Chapter 8 - I/O Utilities C This allows entering a command without using a delimiter; however, & must precede continuation lines The following commands illustrate how to create and use character variables to redefine the symbol substitution delimiter and the character string delimiter. First, character variables are assigned, and then the default SUBSTITUTION delimiter is replaced with the character %, and the default STRING delimiter is replaced with the character &. Next, the character variable SINGLEQUOTE is defined to be the character of the same name, as is the character variable DOUBLEQUOTE. Finally, the delimiters are returned to their original default values. CHARACTER CHARACTER DELIMITER DELIMITER SINGLEQUOTE DOUBLEQUOTE DELIMITER DELIMITER SINGLEQUOTE ; DOUBLEQUOTE ; SUBSTITUTION % ; STRING & ; = &’& ; = &"& ; STRING %DOUBLEQUOTE% ; SUBSTITUTION %SINGLEQUOTE% ; The FORMAT delimiter is used for variable substitution with a specific format. The example below uses both the SUBSTITUTION and FORMAT delimiters. BEAM_VOLT = 130.354Kilovolts ; VOLTS = BEAM_VOLT/1.kilovolt ; ASTRING = "Beam voltage is ‘VOLTS:F4.0’ kilovolts." ; The character variable ASTRING will have the value “Beam voltage is 130 kilovolts.” Another example is given below in which a file name is created which includes a run number padded with zeros. IRUN = 2 ; AFILE = "RUN’IRUN:I2.2’" ; In this case, the character variable AFILE will have the value “RUN02”. MAGIC User’s Manual 8-7 Part II - MCL Commands Chapter 8 - I/O Utilities ECHO / NOECHO Commands Function: Turns on/off echoing of processed commands to the LOG file. Syntax: NOECHO ; [ commands ] ECHO ; Arguments: commands — arbitrary commands. Description: The ECHO command enables echoing output of processed commands to the LOG file. This is the default condition. The NOECHO command disables echoing of the processed commands to the LOG file. Examples: This input demonstrates the use of ECHO and NOECHO. Within the do-loop, NOECHO and ECHO are used to suppress output from certain commands as unnecessary. For the commands between the NOECHO and the ECHO, output of the processed commands will only occur if there is an error in a command. DO I = 1, 100 ; NOECHO ; [first block of commands] ! Output is suppressed. ECHO ; [second block of commands] ! Output is on. ENDDO ; MAGIC User’s Manual 8-8 Part II - MCL Commands Chapter 9 - Execution Control 9. EXECUTION CONTROL This Chapter covers the following commands: START / STOP TERMINATE COMMAND KEYBOARD You can use these commands to control execution of the input file. The most commonly used commands are START, which initiates the simulation after all input data has been entered, and STOP, which terminates the application. You can use the TERMINATE command to specify circumstances under which you want the simulation to stop. The options range from none to errors of decreasing severity. Novice users often benefit by resetting the termination to ERROR level, instead of to the default ABORT level. The COMMAND command allows you to send a command to the operating system while your MCL application is still running. It can be used to start other applications from your MCL application. The KEYBOARD commands also allow you to interact with the simulation during execution. MAGIC User’s Manual 9-1 Part II - MCL Commands Chapter 9 - Execution Control START / STOP Commands Function: Interrupts the processing of input and initiates / terminates the simulation. Syntax: START ; STOP ; Arguments: None. Description: The START command initiates execution of the simulation immediately after processing this command. If there are errors in any of the prior commands, the simulation will be terminated. The STOP command terminates execution immediately after processing this command. commands that follow the STOP command will be ignored. MAGIC User’s Manual 9-2 Any Part II - MCL Commands Chapter 9 - Execution Control TERMINATE Command Function: Terminates execution on errors of specified severity. Syntax: TERMINATE {NONE, ABORT, ERROR, WARNING} ; Argument: (error severity level.) NONE — do not terminate. ABORT — terminate on abort (default). ERROR — terminate on abort or error. WARNING — terminate on abort, error, or warning. Description: This command allows the user to control termination on errors of different levels of severity. Specifying severity causes termination for all errors of that and all greater severity. Termination occurs as soon as the error condition is encountered. No further input processing takes place. Error conditions are listed below in order of increasing severity, as follows: • • • • NONE — this level attempts to ignore all errors and continue the simulation. ABORT — conditions are generally due to code errors. ERROR — conditions are usually caused by user input errors that result in failure. WARNING — conditions are caused by user input that is legal, but in violation of the intended usage. Novice users can benefit the most by setting the termination level to TERMINATE ERROR. This usually causes a termination very near to where a problem is. More advanced users who wish to detect more than one error per run will probably wish to use the default ABORT level termination. Restrictions: 1. Not all errors are categorized by severity level. These errors will not be captured by this command. Examples: If a variable is not defined prior to being used, an error is generated. In the following example, the variable, VOLTMAX, has been misspelled as VLTMAX. Thus, this variable is undefined in the function, VOLTIME, and an error occurs when the function is used in the next line. TERMINATE ERROR ; VOLTMAX = 50E3 ; WOMEGA = 10.7E10 ; FUNCTION VOLTIME(T) = VLTMAX * SIN ( WOMEGA*T ) ; V10 = VOLTIME(10_nanoseconds) ; MAGIC User’s Manual 9-3 Part II - MCL Commands Chapter 9 - Execution Control COMMAND Command Function: Issues a command to the operating system. Syntax: COMMAND “system command” Arguments: system command — operating system command in double quotes. Description: The COMMAND command sends a command to the operating system for immediate processing while the MCL application is still running. This allows other applications to be started from MAGIC. Examples: A template contains some design variables which the user needs to set before they are processed. These variables are in a file named DESIGN.MGC. The following commands bring up the file in the DOS editor, forcing the user to edit and save the file before it is processed by the CALL command. COMMAND “edit design.mgc” ; ! CALL design.mgc ; ! Forces user to edit file. Processes the file MAGIC User’s Manual 9-4 Part II - MCL Commands Chapter 9 - Execution Control KEYBOARD Commands Function: Allows control key interaction with simulation during execution. Syntax: N. A. Arguments: N. A. Description: You may interact with a simulation during execution by pressing certain designated control keys or using a mouse to interact with menu selections. These actions allow you to examine intermediate results while the simulation is still in progress. There are two graphical output modes: window and file. The system is always in one mode or the other, and the mode selected determines whether graphical output appears on the monitor (window mode) or whether it is set to the PS graphics metafile (file mode). (See the GRAPHICS Command in Chapter 20). The designated control keys and their functions are as follows: • • • • • • • • • • • • • Esc — F1 — F2 — F3 — F4 — F5 — F6 — F7 — F8 — F9 — F10 — F11 — F12 — terminates simulation being executed. help key. Toggle the bell for pause in graphics. turns PAUSE ON for graphics. turns PAUSE OFF for graphics. displays all OBSERVE plots. no function, not assigned. saves a bitmap of the current plot. displays all PHASESPACE plots. displays all CONTOUR plots. no function, not assigned. displays all RANGE plots. displays all VECTOR plots. In addition to the designated control keys, you can use an intrinsic function named LASTKEY in commands to provide customized interactive capability (FUNCTION, Ch. 6). Restrictions: 1. 2. See Also: KEYBOARD commands are available only for the PC. Plots that require an accumulation of data over several time steps will not be displayed unless the interrupt time matches that of the timer. TIMER, Ch. 11, GRAPHICS, Ch. 20 MAGIC User’s Manual 9-5 Part III - Time and Space Part III-Time and Space This Part deals with the definition of spatial objects, the marking of selected objects for purposes of grid generation, and the methods of generating a numerical mesh. The temporal discretization is generated automatically from the most confining spatial discretization. Additional commands allow you to temper this to some degree. Chapter 10-Objects Chapter 11-Grids MAGIC User’s Manual III-1 Part III - Time and Space Chapter 10 - Objects 10. OBJECTS This Section covers the following commands: SYSTEM POINT LINE AREA VOLUME LIST You can use these commands to choose a coordinate system, to create spatial objects, to delete objects created previously, and to list objects for inspection. The choice of coordinate system determines not only the system, but also the identification with generalized coordinates, as shown in the following table. This identification is important, because the command syntax uses the generalized coordinate notation. System cartesian cylindrical polar (x1, x2, x3) ( x, y, z ) ( z, r, φ ) ( r, φ, z ) In 2D simulations, the third coordinate (x3) is ignorable. This has several important ramifications. First, the three systems are unique (in 2D); hence, all three are available in 2D simulations. Also, the third (ignorable) coordinate can, for the most part, be ignored. For example, it is not necessary to create a spatial grid in the third coordinate (GRID, Ch. 11). Two (not three) values are sufficient to define a point in x1, x2 space (POINT, Ch. 10). While we also have lines (LINE, Ch. 10), the most complicated spatial object in x1, x2 space is the area (AREA, Ch. 10). Spatial objects which have depth are not required; indeed, volume objects are not accepted in 2D simulations. In 3D simulations, no coordinate is ignorable. Thus, spatial grids are required for all three coordinates, and it requries three values (not two) to define a point. In addition to points, lines, and areas (all of which can exist in 2D simulations), we also have objects with depth called volumes (VOLUME, Ch. 10). By inspection of the table above, you will note that the cylindrical and polar systems are identical (in 3D) except for the order of the coordinates. Therefore, the cylindrical and polar systems are redundant in 3D, and the choice is a matter of convenience. As described above, there are four general types of spatial objects: points, lines, areas, and volumes. In addition, each type may include different shape options. For example, lines may be either straight or conformal (with a coordinate). Areas may be rectangular, conformal, or functional. (The conformal option is especially useful to create curved lines and areas in non-Cartesian coordinate systems.) Similarly, volumes may be created in a variety of standard geometrical shapes, e.g., spheres, cylinders, etc. Whenever you create a spatial object, you must give it a name. This allows the object to be referenced in other commands. For example, you can use a VOLUME command to create and name an object, and then use the name to specify the object permittivity (DIELECTRIC, Ch. 14). Generally, the name should be a unique alphanumeric label which has meaning to you. If two or more objects are given the same name, an error message will result. MAGIC User’s Manual 10-1 Part III - Time and Space Chapter 10 - Objects You can LIST the existing objects. On loading, MAGIC automatically generates a system variable that indicates whether you are using the 2d or the 3d code, specifically, ISYS$CODE=2 for MAGIC2D and ISYS$CODE=3 for MAGIC3D. You may use these variables with conditionals to provide different processing paths for your input file. MAGIC2D creates a system-generated area named OSYS$AREA that spans the mesh. This area object is created when the grid is generated. The area represented is the simulation area in the active coordinate system. It is updated each time the grid is modified. MAGIC3D creates three systemgenerated areas named OSYS$MIDPLANE1, OSYS$MIDPLANE2, and OSYS$MIDPLANE3. Each area spans the midplane of the x1, x2, and x3 coordinates respectively. In addition, MAGIC3D creates a system-generated volume named OSYS$VOLUME, which spans the defined grid. In all cases, the system-generated areas and volumes are of the type CONFORMAL. These defined areas and volumes may be used exactly, as a user defined area or volume. Just note that these are generated after the grid has been defined and are updated to maintain a match to the edges of the mesh definition. MAGIC User’s Manual 10-2 Part III - Time and Space Chapter 10 - Objects SYSTEM Command Function: Specifies the coordinate system. Syntax: SYSTEM {CARTESIAN, CYLINDRICAL, POLAR}; Description: The choice of coordinate system determines not only the system, but also the identification with generalized coordinates, as shown in the following table. This identification is important, because the command syntax uses the generalized coordinate notation. System cartesian cylindrical polar (x1, x2, x3) ( x, y, z ) ( z, r, φ ) ( r, φ, z ) In 2D simulations, the third coordinate (x3) is ignorable. This has several important ramifications. First, the four systems are unique (in 2D); hence, all four are available in 2D simulations. The third (ignorable) coordinate can, for the most part, be ignored. For example, it is not necessary to create a spatial grid in the third coordinate (GRID, Ch. 11). Two (not three) values are sufficient to define a point in x1, x2 space (POINT, Ch. 10). While we also have lines (LINE, Ch. 10), the most complicated spatial object in x1, x2 space is the area (AREA, Ch. 10). Spatial objects that have depth are not required; indeed, volume objects are not accepted in 2D simulations. In 3D simulations, no coordinate is ignorable. Thus, spatial grids are required for all three coordinates, and it takes three values (not two) to define a point. In addition to points, lines, and areas (all of which can exist in 2D simulations), we also have objects with depth called volumes (VOLUME, Ch. 10). By inspection of the above table, you will note that the cylindrical and polar systems are identical (in 3D) except for the order of the coordinates. Thus, the cylindrical and polar systems are redundant in 3D, and the choice is a matter of convenience. MAGIC User’s Manual 10-3 Part III - Time and Space Chapter 10 - Objects POINT Command Function: Specifies a point in space. Syntax: POINT point x1, x2 [, x3] ; Arguments: point — name of spatial object, user-defined. x1, x2, x3— spatial coordinates (m or rad). Description: The POINT command is used to specify the location of a point in space. The point name provides a unique label for the point. In other commands which require a point, you can enter either raw coordinate values or the name of a point previously defined in a POINT command. If a point name is duplicated in another POINT command, the original point data will be lost. If desired, variable substitution may be used to “subscript” similar spatial points (see Section 4.4). In general, 2D simulations require two real coordinates (x1, x2) to define a point in space completely, while 3D simulations require three real coordinates (x1, x2, x3). This is indicated in the syntax by the option, [,x3], which means that a third coordinate is required for 3D simulations. Restrictions: No two points can have the same point name; if a point name is duplicated, the original spatial data will be lost, and an error message will be produced. A 2D simulation requires only two coordinates to be entered for each point. A 3D simulation requires three coordinates to be entered for each point. See Also: SYSTEM, Ch. 10, LINE, Ch. 10, AREA, Ch. 10, VOLUME, Ch. 10, LIST, Ch. 10 Examples: In the examples which follow, it is assumed that the Cartesian coordinate system is active unless otherwise noted. To enter a spatial point named “origin” at the origin of a 2D Cartesian coordinate system, the command is POINT origin 0,0 ; In a 3D simulation, the command would be POINT origin 0,0,0 ; Note that this does not define the coordinate system or the origin of a coordinate system. It is just a point named “origin.” MAGIC User’s Manual 10-4 Part III - Time and Space Chapter 10 - Objects To enter the two end-points named “a” and “b” defining the axis of symmetry (running from 0 to Zmax in z) in a polar (r,φ,z) coordinate system, some possible commands are: SYSTEM POLAR ; POINT a 0,0,0 ; POINT b 0,0,Zmax ; Again, these are just points with names. To create symmetry we require another command, (SYMMETRY, Ch. 12). To enter a series of 100 points starting at z_start and spaced equally every dz along the z-axis, consider using variable substitution within a do-loop, as illustrated in the following commands. z = z_start - dz ; DO i = 1, 100 ; z = z + dz ; POINT a’i’ x,y,z ; ENDDO ; POINT b 0,0,Zmax ; The result will be a series of points labeled a1, a2, a3, etc., each at a different axial location. MAGIC User’s Manual 10-5 Part III - Time and Space Chapter 10 - Objects LINE Command Function: Syntax: Allows you to specify a line in space. LINE line {CONFORMAL point1 point2... , OBLIQUE point1 point2... , CIRCULAR point1 point2 point3 , ELLIPTICAL point x_radius y_radius start_angle end_angle } ; Arguments: line point x_radius y_radius start_angle end_angle — name of spatial line, user-defined. — spatial coordinates or name of spatial point defined in POINT command. — radius in x-axis (m). — radius in y-axis (m). —end-point angle (rad). —end-point angle (rad). Description: The LINE command is used to specify the locations of lines in space. Lines are created by entering the names of spatial points defined in POINT commands or by entering point coordinates. In other commands that require a line, you can enter the name of any line previously defined in a LINE command. The shape options are: CONFORMAL, OBLIQUE, CIRCULAR, and ELLIPTICAL. (The CIRCULAR and ELLIPTICAL shapes are restricted to 2D simulations.) See the following figure for the shapes. All line shapes may be described by a metric, “m” of the parametric path length s. xi = xiinitial + mi(s) s, where 0 < s < 1. For many applications, it is desirable for the lines to “bend” to conform to the local coordinates. This is easily accomplished using the CONFORMAL option. If more than two points are entered, then more line segments will be added in a “connect-the-dots” manner. Thus, three end points will produce two line segments, etc., and the segments will be joined end-to-end, continuously. For example, a pie-shaped outline can easily be traced out in polar coordinates using this option. Each line segment must be conformal. Together, they comprise a single line identified by the line name. MAGIC User’s Manual 10-6 Part III - Time and Space Chapter 10 - Objects The simplest shape option is CONFORMAL, which requires only the specification of the end points. The metric for a conformal line segment requires that one of the mi’s is a nonzero constant, and that the remaining mi’s are identically zero. The OBLIQUE shape option requires only the specification of two end points. This will produce a single oblique line, irrespective of the coordinate system (which serves only to define the points). The metric for an oblique line segment requires only that the metric coefficients be constants and that at least one of them is nonzero. The CIRCULAR option (2D simulations only) will produce a circular arc, irrespective of the coordinate system. The points required are first, point1, which locates the center of the circle, followed by the arc end-point locations. The convention is that the arc is always drawn counterclockwise, from point2 to point3. This option requires that the user maintain the correct radius to within a reasonable approximation. The ELLIPTICAL option (2D simulations only) will produce an elliptical arc, irrespective of the coordinate system specified. The point required is the center point, which locates the center of the ellipse. Next, the magnitudes of the axes, x_radius and y_radius, are entered. (Note that the orientation of the ellipse is limited to coincide with the major axes.) Finally, two angles specify the end-points of the arc. The convention is that the arc is always drawn counterclockwise, from the start_angle to the end_angle. (The angles are measured counter-clockwise from the x-axis.) Restrictions: 1. No two lines can have the same line name; if a line name is duplicated, the original spatial data will be lost, and an error message will be produced. 2. Conformal lines must be conformal in one coordinate for 2D and in two coordinates for 3D. For example, in 3D polar coordinates, an arc at constant radius and constant axial location is allowed, whereas tracing a helical path is not, since a helix is conformal only in radius. 3. The CIRCULAR and ELLIPTICAL shapes are restricted to 2D simulations. See Also: SYSTEM, Ch. 10, POINT, Ch. 10, AREA, Ch. 10, VOLUME, Ch. 10, LIST Ch. 10. Examples: In the examples which follow, it is assumed that the cartesian coordinate system is active unless otherwise noted. 1. To enter a line representing the axis of symmetry (running from 0 to Zmax in z) in a threedimensional polar (r,φ,z) coordinate system, some possible commands follow. Note that we could have selected the shape, CONFORMAL, and obtained the same line. SYSTEM POLAR ; POINT a 0,0,0 ; POINT b 0,0,Zmax ; LINE axis OBLIQUE a,b ; 2. To create the outline of a box of width, W, and height, H, at constant z = 0 with a single LINE command, use the continuation convention with the commands, MAGIC User’s Manual 10-7 Part III - Time and Space Chapter 10 - Objects POINT a 0,0,0 ; POINT b W,0,0 ; POINT c W,H,0 ; POINT d 0,H,0 ; LINE outline OBLIQUE a,b,c,d,a ; The result will be four line segments with common end-points. The four segments are part of a single line called “outline.” Note that this is a line with multiple segments, and not an AREA. 3. This example uses DO / ENDDO commands to create ten lines at uniformly-spaced axial locations at constant angle, Phi, between a cathode at radius, Rc, and an anode at radius, Ra. Using variable substitution, the individual lines are given the line names, line1, line2, ..., line10. Z = Z0 - dZ; DO I 1, 10 ; Z = Z + dZ ; POINT a’i’ Rc,Phi,Z ; POINT b’i’ Ra,Phi,Z ; LINE line’i’ OBLIQUE a’i’ b’i’ ; ENDDO ; These lines could be used to measure cathode-anode voltages along a coaxial cable, for example. Note that all points and lines have been given unique names, as required. 4. The following commands create a circular arc of radius, R, subtending half of a circle between 0 and pi using the CONFORMAL option. SYSTEM POLAR ; POINT a R,0,Z ; POINT b R,Pi,Z ; LINE arc CONFORMAL a b ; MAGIC User’s Manual 10-8 Part III - Time and Space Chapter 10 - Objects AREA Command Function: Specifies an area in space. Syntax: AREA name { CONFORMAL point1 point2 , RECTANGULAR point1 point2 , FUNCTIONAL f(x1,x2,x3) , POLYGONAL point point point..., FILLET point1 point2 radius start_angle end_angle [2D only] QUARTERROUND iquadrant point radius [2D only] SINUSOID {X1,X2} point1 point2 point3 }; [2D only] Arguments: name — name of area object, user-defined. point — spatial coordinates or name of spatial point defined in POINT command. f(x1,x2,x3) — function of spatial coordinates, defined in FUNCTION command. radius — radius of surface (m). angle — angle in degrees. iquadrant — quadrant specification, (1, 2, 3, or 4.) Description: The AREA command is used to specify the location of an area in space. The area name provides a unique label for the area. If an area name is duplicated in another AREA command, the original area data will be lost and an error message will be produced. If desired, variable substitution may be used to “subscript” similar spatial areas (see Section 4.4). The surface associated with the area must be conformal with one coordinate. That is, areas of completely arbitrary orientation are not allowed. The shape options are: CONFORMAL, RECTANGULAR, FUNCTIONAL, POLYGONAL, FILLET, QUARTERROUND, and SINUSOID. For many applications, it is desirable for an area to “bend” so that the outline conforms with one of the coordinates. This is easily accomplished using the CONFORMAL option which requires only the specification of two opposing corner points. This option works in exactly the same way as the RECTANGULAR option, except that the shape will be distorted to match the specified coordinate system. It will produce rectangular shapes in cartesian coordinates and is ideal for entering a pie-shaped area or the outer surface of a cylinder in polar coordinates, for example. The simplest option is RECTANGULAR, which requires only the specification of two opposing corner points. The RECTANGULAR option is restricted to cartesian coordinates. The FUNCTIONAL option can be used to create an area of arbitrary shape in a plane which is conformal with one coordinate. To utilize it, you enter the name of a function which you have previously specified in a FUNCTION command. The shape of the area is determined by the sign of the function, evaluated throughout the spatial coordinates. The area is defined wherever the sign is negative, but does MAGIC User’s Manual 10-9 Part III - Time and Space Chapter 10 - Objects not exist wherever the function is positive or vanishing (zero). Repeating, or periodic, structures are particularly simple to create with this option. The POLYGONAL option can be used to create an area bounded by straight lines connecting the corner points. Simply enter the names of the corner points, in order. Lines are not allowed to intersect (cross), the perimeter must be continuous, and the first and last corner point must be the same to provide closure. Figure illustrating the arguments associated with the FILLET area shape. The FILLET option can be used to create an area in a bounding rectangle. The bounding rectangle is always conformal to the x1 and x2 coordinate directions. For the fillet definition, the first argument, point 1 is the center point, as can be seen in the following figure. The second point, point 2 is the extremum of the bounding rectangle. The relative locations of these points determine the quadrent placement of the fillet area. The argument, radius, determines the circular cut in the rectangular region. The angles, θi , and θf, are the starting and ending angles in degrees measured from the positive direction x1-coordinate. To obtain a good match between the grid and the fillet area you MARK the FILLET area, specifying only a size parameter. The marking algorithm will simulataneously mark both the x1 and x2 coordinates in order to maintain the best match with the area. Figure illustrating the arguments associated with the QUARTERROUND shape. The QUARTERROUND option can be used to create a pie-shaped area that is 1/4 of a circle. This command would typically be used in Cartesian or cylindrical coordinates. The radial edges of the pie shape are always conformal to the x1 and x2 coordinate directions. The first argument denotes the relative quadrant (with respect to the center point, in which the quarterround area is to be placed. The second argument, point 1, is the center point, as can be seen in the following figure. The argument, radius, determines the circular arc radius. To obtain a good match between the grid and the fillet area, MAGIC User’s Manual 10-10 Part III - Time and Space Chapter 10 - Objects MARK the area, specifying only a size parameter. The marking algorithm will simultaneously mark both the x1 and x2 coordinates in order to maintain the best match with the area. Figure illustrating arguments associated with the SINUSOIDAL shape. The SINUSOIDAL option can be used to create an area with one of the surfaces having a sinusoidal ripple. The bounding rectangle is always conformal to the x1 and x2 coordinate directions. The area is defined by three points and a direction alignment (x1 or x2) which indicates the coordinate axis along which the wavelength is defined. The arguments, point 1, point 2, and point, are located as indicated in the following figure. The first two points determine the depth and wavelength of the sinusoidal surface variation. The third point, point 3, is the extremum of the bounding rectangle. The relative locations of these points determine the quadrant placement of the fillet area. To obtain a good match between the grid and the fillet area, MARK the area, specifying only a size parameter. The marking algorithm will simultaneously mark both the x1 and x2 coordinates in order to maintain the best match with the area. The grid along the wavelength direction will be uniform. Restrictions: 1. 2. 3. 4. 5. No two areas can have the same area name; if an area name is duplicated, the original spatial data will be lost, and an error message will be produced. All areas are required to have surfaces conformal with one coordinate (x3 in 2D simulations). The RECTANGULAR option is available only in cartesian coordinates. In the POLYGONAL option, lines are not allowed to intersect (touch or cross), the perimeter must be continuous, and the first and last corner point must be the same to provide closure. The area shapes QUARTERROUND, FILLET, and SINUSOIDAL are only available in 2D. See Also: SYSTEM Ch. 10, POINT Ch. 10, LINE Ch. 10, VOLUME Ch. 10, LIST Ch. 10 Examples: In the examples that follow, it is assumed that the Cartesian coordinate system is active unless otherwise noted. MAGIC User’s Manual 10-11 Part III - Time and Space 1. Chapter 10 - Objects To create a rectangular area of width, W, and height, H, conformal with z and with one corner at the origin, you can use the following commands: POINT a 0,0,0 ; POINT b W,H,0 ; AREA BOX RECTANGULAR a,b ; An equivalent alternative (in Cartesian coordinates) is the following command. AREA BOX CONFORMAL a,b ; 2. To create an area in polar coordinates between radii Ra and Rb which subtends angle zero to pi at constant z, you can use the following commands. SYSTEM POLAR ; POINT a Ra,0,z ; POINT b Rb,Pi,z ; AREA Pie_Shape CONFORMAL 3. a,b ; This example uses the FUNCTIONAL option to create a circular area of radius, R, about the origin at constant z in Cartesian coordinates. FUNCTION alfa(x,y,z)=(+x*x+y*y-R*R)*STEP(z,0)*STEP(0,z); AREA beta FUNCTIONAL alfa ; The function called alfa is clearly negative only within a circle of radius, R. The created area will be named “beta.” 4. The following commands create and mark a QUARTERROUND area in the first quadrant. SYSTEM CARTESIAN ; AREA QUAD1 QUARTERROUND 1 -1 -1 50CM ; MARK QUAD1 SIZE 3CM ; 5. The following commands create and mark a FILLET area symmetrically placed around the origin. One fillet object is generated in each quadrant orientation. AREA MARK AREA MARK AREA MARK AREA MARK QUAD1 QUAD1 QUAD2 QUAD2 QUAD3 QUAD3 QUAD4 QUAD4 FILLET -1 -1 -25CM -25CM 50CM 0 90 ; SIZE 3CM ; FILLET +1 -1 25CM -25CM 50CM 90 180 ; SIZE 3CM ; FILLET 1 1 25CM 25CM 50CM 180 270; SIZE 3CM ; FILLET -1 +1 -25CM 25CM 50CM 270 360 ; SIZE 3CM ; MAGIC User’s Manual 10-12 Part III - Time and Space Chapter 10 - Objects VOLUME Command Function: Used to specify a volume of a particular shape (3D simulations only). Syntax: VOLUME name shape arguments; Arguments: name — name of volume object, user—defined. shape — defined volumetric shapes. ANNULAR, ANNULAR_SECTION, CONE, CONFORMAL, CYLINDRICAL, EXTRUDED, FUNCTIONAL, HELICAL, LATHE, PARALLELEPIPEDAL, PYRAMID, RHOMBUS, ROTATE, SPHERICAL, TERRAINFILE, TETRAHEDRON, TOROIDAL_SECTION, and WEDGE. Description: The VOLUME command is used to specify the location of a volume in space. It is used for 3D simulations only. The volume name provides a unique label for the volume. If desired, variable substitution may be used to “subscript” similar spatial volumes (see Section 4.4). Restrictions: 1. No two volumes or objects can have the same name; if a volume name is duplicated in another VOLUME command or object type, the original data will be lost, and an error message will be produced. 2. All six surfaces of a conformal volume will be conformal. 3. For the EXTRUDED option, the surface associated with the specified area must be conformal with one coordinate. The line of extrusion cannot be parallel to this surface. See Also: SYSTEM, Ch. 10, POINT, Ch. 10, FUNCTION, Ch 6, LINE, Ch. 10, AREA, Ch. 10, LIST, Ch. 10. MAGIC User’s Manual 10-13 Part III - Time and Space Chapter 10 - Objects VOLUME ANNULAR Command Function: Specifies an annular volume in space (3D simulations only). Syntax: VOLUME name ANNULAR point1 point2 radius_inner radius_outer; Arguments: name — point — radius_inner radius_outer name of volume object, user—defined. coordinates of spatial point or name defined in POINT command. — inner radius of annulus (m). — outer radius of annulus (m). Description: The ANNULAR option produces a hollow cylinder. Specify the two end points of the cylinder axis, followed by two radii (inner and outer). Figure illustrating ANNULAR volume and argument definition. See Also: SYSTEM, Ch. 10, POINT, Ch. 10 MAGIC User’s Manual 10-14 Part III - Time and Space Chapter 10 - Objects VOLUME ANNULAR_SECTION Command Function: Used to specify a volume of a particular shape (3D simulations only). Syntax: point4; VOLUME volume ANNULAR_SECTION point1 point2 radius_inner radius_outer point3 Arguments: volume — name of volume object, user—defined. point — coordinates of spatial point or name defined in POINT command. radius_inner — inner radius of annular section (m). radius_outer — outer radius of annular section (m). Description: The ANNULAR_SECTION option will produce an arc section of an annulus of rectangular cross section. Specify the two end points of the annular axis, Point1 and Point2, followed by the two radii (inner radius and outer radius), followed by the starting point of the annular arc section (Point3) and ending with the ending point of the arc section (Point4). Notice that the starting and ending points of the section arc must be defined in a positive right—hand rule sense. (Note! that in polar or cylindrical coordinates this can mean that the starting point (Point3) and ending point (Point4) can define an arc which crosses the reentrancy boundary. This condition is handled automatically by MAGIC.) Figure illustrating ANNULAR_SECTION volume and argument definition. See Also: SYSTEM, Ch. 10, POINT, Ch. 10 Examples: The following commands generate an annular section of rectangular cross section. The arc subtended is 270 degrees. Notice that we are using the cylindrical coordinate system, and have defined an enclosing MAGIC User’s Manual 10-15 Part III - Time and Space Chapter 10 - Objects annulus which is marked for the generation of the grid. The height of the annular section is 5cm. The inner radius is 10cm and the outer radius is 14cm. The two figures following the input illustrate the display_3d cross section of the TOROIDAL section defined and a VIEW_3D rendering of the object. System CYLINDRICAL ; Rinner = 10cm ; Router = 14cm ; Height = 5cm ; ThetaArc = 270degrees ; dr = 1CM ; PhiSize = 2PI ; dPhi = PhiSize/60 ; dz = .5cm ; Point Base —0.5*Height 0.0 0.0; Point Top +0.5*Height 0.0 0.0; Volume Simulation annular Base Top Rinner Router; Mark Simulation x1 size dz ; Mark Simulation x2 size dr ; Mark Simulation x3 size dphi ; Point Pstart —0.5*Height Rinner —180degree; Point Pend —0.5*Height Rinner +90degree; Volume Arc annular_section Base Top Rinner Router Pstart Pend; Autogrid; Conductor Arc; Display_3d; View_3d; MAGIC User’s Manual 10-16 Part III - Time and Space Chapter 10 - Objects VOLUME CONE Command Function: Used to specify a volume of a particular shape (3D simulations only). Syntax: VOLUME volume CONE basepoint toppoint baseradius topradius ; Arguments: volume — name of volume object, user—defined. Basepoint — coordinates of spatial point, or name defined in POINT command for the center of the base of the CONE. toppoint — coordinates of spatial point, or name defined in POINT command for the center of the top of the CONE. baseradius — the radius of the base of the cone (m). topradius — the radius of the top of the cone (m). Description: The CONE option produces a cone—shaped volume with an arbitrary orientation, irrespective of the coordinate system selected. Specify the two end points of the axis of rotation followed by the radii for the top and the base of the cone. Figure illustrating CONE volume and argument definition. See Also: SYSTEM, Ch. 10, POINT, Ch. 10 Examples: The following example specifies a cone volume. MAGIC User’s Manual 10-17 Part III - Time and Space Chapter 10 - Objects SYSTEM CARTESIAN; xmin = 0.0; xmax = 10.0; dx1 = 0.10; ymin = 0.0; ymax = 10.0; dx2 = 0.10; zmin = 0.0; zmax = 10.0; dx3 = 0.10; zminCone = 0.0; zmaxCone = 10.0; rBase = 3.5; rTop = 1.0; POINT maxPt xmax, ymax, zmax; POINT minPt xmin, ymin, zmin; POINT coneBase 5.0, 5.0, zminCone; POINT coneTop 5.0, 5.0, zmaxCone; VOLUME cone1 CONE coneBase coneTop rBase, rTop; MARK coneBase X1 SIZE dx1; MARK coneBase X2 SIZE dx2; MARK coneBase X3 SIZE dx3; MARK coneTop X1 SIZE dx1; MARK coneTop X2 SIZE dx2; MARK coneTop X3 SIZE dx3; MARK maxPt X1 SIZE dx1; MARK maxPt X2 SIZE dx2; MARK maxPt X3 SIZE dx3; MARK minPt X1 SIZE dx1; MARK minPt X2 SIZE dx2; MARK minPt X3 SIZE dx3; AUTOGRID; VOLUME entire CONFORMAL minPt maxPt; CONDUCTOR cone1; VIEW_3D; DISPLAY_3D; MAGIC User’s Manual 10-18 Part III - Time and Space Function: Chapter 10 - Objects VOLUME CONFORMAL Command Used to specify a volume of a particular shape (3D simulations only). Syntax: VOLUME volume CONFORMAL near_point far_point ; Arguments: volume — name of volume object, user—defined. point — coordinates of spatial point or name defined in POINT command. Description: The CONFORMAL option produces a volume with six sides, each of which is conformal to a coordinate in the active coordinate system. In cartesian coordinates, it produces a rectangular shape. In polar coordinates, it produces a section of an annulus. In spherical coordinates, it produces a section of a spherical shell. Specify two opposing corner points of the conformal volume to create this shape. The first point must be at the lowest (x1, x2, x3) coordinates, and the second point must be at the highest (x1, x2, x3) coordinates. Figure illustrating CONFORMAL volume and argument definition. See Also: SYSTEM, Ch. 10, POINT, Ch. 10 Examples: The following commands specify a perfect cube two meters on a side using the CONFORMAL option. SYSTEM CARTESIAN MAGIC User’s Manual 10-19 Part III - Time and Space Chapter 10 - Objects POINT a 2,5,10 ; POINT b 4,7,12 ; VOLUME cubeA CONFORMAL a,b ; VOLUME cubeB CONFORMAL 2,5,10,4,7,12 ; MAGIC User’s Manual 10-20 Part III - Time and Space Function: Chapter 10 - Objects VOLUME CYLINDRICAL Command Used to specify a volume of a particular shape (3D simulations only). Syntax: VOLUME volume CYLINDRICAL point1 point2 radius ; Arguments: volume — name of volume object, user—defined. point — coordinates of spatial point or name defined in POINT command. radius — radius of cylinder or sphere (m). Description: The CYLINDRICAL option produces a cylindrical shape of arbitrary orientation, irrespective of the coordinate system selected. Specify the two end points of the cylinder axis, followed by the cylinder radius. Figure illustrating CYLINDRICAL volume and argument definition. See Also: SYSTEM, Ch. 10, POINT, Ch. 10 Examples: The following commands specify a cylindrical volume with base point at (2,2,2), top point at (4,5,6), and radius of 8. POINT a 2,2,2 ; POINT b 4,5,6 ; VOLUME post CYLINDER a,b 8 ; MAGIC User’s Manual 10-21 Part III - Time and Space Function: Chapter 10 - Objects VOLUME EXTRUDED Command Used to specify a volume of a particular shape (3D simulations only). Syntax: VOLUME volume EXTRUDED area line ; Arguments: volume — name of volume object, user—defined. area — name of area object, defined in AREA command. line — name of line object, defined in LINE command. Description: The EXTRUDED option is used to generate a shape of uniform cross section by extruding an area over a path defined by a line. The area in this option must be conformal in one of the three coordinates. In addition, the only area shapes allowed are CONFORMAL and POLYGONAL. The extrude line must have a component perpendicular to the plane of the area and may be of the shape type CONFORMAL or STRAIGHT. A good method of using the EXTRUDED option is to have the first point of the area definition match the starting point of the extrude line. Figure illustrating the EXTRUDED volume and argument definition. See Also: SYSTEM, Ch. 10, LINE, Ch. 10, AREA, Ch. 10 Examples: The following commands generate an extruded shape named “Extrusion.” The cross section is a three—sided, polygonal area named “Wedge,” with corner—points labeled A, B, and C. (Note that point A must repeat to enclose the area.) The extruded length is defined by the line named “Path,” that runs from point A to point D. MAGIC User’s Manual 10-22 Part III - Time and Space Chapter 10 - Objects AREA Wedge POLYGONAL A B C A ; LINE Path CONFORMAL A D ; VOLUME EXTRUDED Wedge Path ; MAGIC User’s Manual 10-23 Part III - Time and Space Function: Chapter 10 - Objects VOLUME FUNCTIONAL Command Used to specify a volume of a particular shape (3D simulations only). Syntax: VOLUME volume FUNCTIONAL f(x1,x2,x3) [ point1 point2 ] ; Arguments: volume — name of volume object, user—defined. point — coordinates of spatial point or name defined in POINT command. f — signed function of spatial coordinates, defined in FUNCTION command. Description: The FUNCTIONAL option is used to create an arbitrarily shape, making use of a volume function, f. Points for which the value of f is less than zero lie within the volume. Points for which the value of f is greater than or equal to zero lie outside the volume. You may also specify a clip box with the arguments point1 and point2. These points denote a conformal volume (see the definition of volume conformal). When the clip box is specified, only points within the clip box volume may be included within the volume. Figure illustrating the FUNCTIONAL volume and argument definition. See Also: SYSTEM, Ch. 10, POINT, Ch. 10, FUNCTION, Ch. 6 MAGIC User’s Manual 10-24 Part III - Time and Space Function: Chapter 10 - Objects VOLUME HELICAL Command Used to specify a volume of a particular shape (3D simulations only). Syntax: VOLUME volume HELICAL base_point top_point inner_radius outer_radius start_point pitch width ; Arguments: volume — name of volume object, user—defined. point — coordinates of spatial point or name defined in POINT command. inner_radius — inner radius (m). outer_radius — outer radius (m). pitch — helix pitch (m). width — helix radial width (m). Description: The HELICAL option is used to create a helical object. The points, base_point and top_point, determine the axis of the helix. The point, start_point, lies in the plane normal to the axis line that passes through the base_point. The values, inner_radius and outer_radius, specify the inner and outer radii of the helix. Figure illustrating the HELICAL volume and argument definition. See Also: SYSTEM, Ch. 10, POINT, Ch. 10, FUNCTION, Ch. 6 Examples: The following commands generate a helical section making 4 turns along its axial extant. Notice that we are using the cartesian coordinate system. The base point of the helix is at (0,0,—6cm) and the top point is at (0,0,+6cm). The helical axis is aligned with the x3—coordinate. The inner radius is 3.5 cm and the outer radius is 4.0 cm. The starting point of the arc section is at (0,—4cm,—6cm). The thickness of MAGIC User’s Manual 10-25 Part III - Time and Space Chapter 10 - Objects the helical winding is 0.50 cm. The figure following the input illustrate the VIEW_3D rendering of the object. Helix.ri = 0.3955_INCHES ; Helix.ro = 0.4155_INCHES ; Height = 2.5 INCHES; Pitch = 1_INCH/4.5 ; Width = 0.0750_INCHES ; POINT AxisBasePt 0.0,0.0,—0.5*Height; POINT AxisTopPt 0.0,0.0,+0.5*Height; POINT BeginHelixPt Helix.ri,1.pi,—0.5*Height; VOLUME HELIX HELICAL AxisBasePt AxisTopPt Helix.Ri Helix.Ro BeginHelixPt PITCH WIDTH ; MAGIC User’s Manual 10-26 Part III - Time and Space Chapter 10 - Objects VOLUME LATHE Command Function: Used to specify a volume of a particular shape (3D simulations only). Syntax: VOLUME volume LATHE basepoint toppoint fradius_outer(s) [fradius_inner(s)]; Arguments: volume — name of volume object, user—defined. basepoint — coordinates of spatial point, or name defined in POINT command for the center of the base of the lathe. toppoint — coordinates of spatial point, or name defined in POINT command for the center of the top of the lathe. fradius_outer(s)— the outer radius about the line from the basepoint to the toppoint as a function of the distance from the basepoint (m). fradius_inner(s)— the inner radius about the line from the basepoint to the toppoint as a function of the distance from the basepoint (m). Description: The LATHE option will produce a volume constructed from the rotation of one or two arbitrary functions about an axis of arbitrary orientation, irrespective of the coordinate system selected. Specify the two end points of the axis of rotation followed by the function(s) for the radius about the axis. The first function specifies the outer radius of rotation. The second function, if used, specifies the inner radius of rotation. When the second the function is not specified, it is assumes to have a value of 0. When both radius functions are specified, then a shell is generated between the two radii. If the second radius is greater than the first radius, the region will be excluded. Figure illustrating LATHE volume and argument definition. See Also: SYSTEM, Ch. 10, POINT, Ch. 10 MAGIC User’s Manual 10-27 Part III - Time and Space Chapter 10 - Objects Examples: SYSTEM CARTESIAN; XMIN = 0.0; XMAX = 10.0; DX1 = 0.10; YMIN = 0.0; YMAX = 10.0; DX2 = 0.10; ZMIN = 0.0; ZMAX = 10.0; DX3 = 0.10; ZMINCONE = 0.0; ZMAXCONE = 10.0; RBASE = 3.5; RTOP = 1.0; POINT MAXPT XMAX, YMAX, ZMAX; POINT MINPT XMIN, YMIN, ZMIN; POINT CONEBASE 5.0, 5.0, ZMINCONE; POINT CONETOP 5.0, 5.0, ZMAXCONE; RDIFF = (RBASE — RTOP); FUNCTION RCONE(S) = RBASE — S * RDIFF / (ZMAXCONE — ZMINCONE) + 0.2 * RDIFF * SIN(4.0 * S); VOLUME CONE1 LATHE CONEBASE CONETOP RCONE; MARK CONEBASE X1 SIZE DX1; MARK CONEBASE X2 SIZE DX2; MARK CONEBASE X3 SIZE DX3; MARK CONETOP X1 SIZE DX1; MARK CONETOP X2 SIZE DX2; MARK CONETOP X3 SIZE DX3; MARK MAXPT X1 SIZE DX1; MARK MAXPT X2 SIZE DX2; MARK MAXPT X3 SIZE DX3; MARK MINPT X1 SIZE DX1; MARK MINPT X2 SIZE DX2; MARK MINPT X3 SIZE DX3; AUTOGRID; CONDUCTOR CONE1; VIEW_3D; DISPLAY_3D; MAGIC User’s Manual 10-28 Part III - Time and Space Function: Chapter 10 - Objects VOLUME PARALLELEPIPEDAL Command Used to specify a volume of a particular shape (3D simulations only). Syntax: VOLUME volume PARALLELEPIPEDAL point0 point1 point2 point3 ; Arguments: volume — name of volume object, user—defined. point — coordinates of spatial point or name defined in POINT command. Description: The PARALLELEPIPEDAL option will produce a parallelepiped of arbitrary orientation and with flat surfaces, irrespective of the coordinate system. Enter any one corner point (labeled 0), followed by the only three corner points which are immediately adjacent to the first. Figure illustrating PARALLELEPIPEDAL volume and argument definition. See Also: SYSTEM, Ch. 10, POINT, Ch. 10 MAGIC User’s Manual 10-29 Part III - Time and Space Function: Chapter 10 - Objects VOLUME PYRAMID Command Used to specify a volume of a particular shape (3D simulations only). Syntax: VOLUME volume PYRAMID point1 point2 point3 point4 point5 ; Arguments: volume — name of volume object, user—defined. point — coordinates of spatial point or name defined in POINT command. Description: The PRYAMID option will produce a PYRAMID of arbitrary orientation and with flat surfaces, irrespective of the coordinate system. Enter the four corner points that specify the vertices of the base and then enter the point that specifies the peak of the pyramid. Figure illustrating a PYRAMID volume and argument definition. See Also: SYSTEM, Ch. 10, POINT, Ch. 10 MAGIC User’s Manual 10-30 Part III - Time and Space Function: Chapter 10 - Objects VOLUME RHOMBUS Command Used to specify a volume of a particular shape (3D simulations only). Syntax: VOLUME volume RHOMBUS point1 point2 point3 point4 point5 point6 point7 point8; Arguments: volume — name of volume object, user—defined. point — coordinates of spatial point or name defined in POINT command. Description: The RHOMBUS option will produce a RHOMBUS of arbitrary orientation and with flat surfaces, irrespective of the coordinate system. Facing the rhombus from any direction, enter the four corner points in counterclockwise fashion to specify the front face. Similarly enter the next four points in counterclockwise fashion to specify the back face. Note! that if the order in which the points is entered varies from this specification the result will be a twisted rhombus with holes. If this occurs, please recheck the point definitions and order. Figure illustrating a RHOMBUS volume and argument definition. See Also: SYSTEM, Ch. 10, POINT, Ch. 10 MAGIC User’s Manual 10-31 Part III - Time and Space Function: symmetry. Chapter 10 - Objects VOLUME ROTATE Command Used to specify a volume generated by rotation of a stencil around a specified axis of Syntax: VOLUME volume ROTATE axis_base_point axis_top_point area ; Arguments: Volume — name of volume object, user—defined. axis_base_point— coordinates of spatial point or name defined in POINT command. axis_top_point — coordinates of spatial point or name defined in POINT command. area — name of area object, defined in AREA command. Must be of type CONFORMAL or POLYGONAL. Description: The ROTATE option is used to create an object by rotation of a stencil (area outline) around an axis of symmetry. The points, axis_base_point and axis_top_point, determine the axis of rotation. In general, you must define the area and the axis of symmetry to lie in the same plane. And you must ensure that the area does not cross the axis of symmetry. Restrictions: The area stencil must be of type CONFORMAL or type POLYGONAL. See Also: AREA, Ch.10, SYSTEM, Ch. 10, POINT, Ch. 10, FUNCTION, Ch. 6 Examples: The following commands generate a simulation volume 2m x 2m x 2m on edge and then generate a volume by rotation of the area stencil POLYXY. system cartesian ; Volume simspace Conformal -1 -1 -1 +1 +1 +1 ; AREA POLYXY POLYGONAL -0.8,-0.6,0, -0.8,-0.6,0, -0.2,-0.1,0, -0.8,-0.4,0 -0.8,-0.6,0 ; POINT START1 0,0,0 ; POINT END1 1,-1,1 ; VOLUME RIT ROTATE START1 END1 POLYXY ; Mark Simspace X1 Size 4cm ; Mark Simspace X2 Size 4cm ; Mark Simspace X3 Size 4cm ; autogrid ; MAGIC User’s Manual 10-32 Part III - Time and Space Chapter 10 - Objects Conductor RIT ; Figure illustrating the ROTATE volume. MAGIC User’s Manual 10-33 Part III - Time and Space Function: Chapter 10 - Objects VOLUME SPHERICAL Command Used to specify a volume of a particular shape (3D simulations only). Syntax: VOLUME volume SPHERICAL point radius; Arguments: volume — name of volume object, user—defined. point — coordinates of spatial point or name defined in POINT command. radius — radius of cylinder or sphere (m). Description: The SPHERICAL option will produce a spherical shape, irrespective of the coordinate system selected. Specify the center point of the sphere and the sphere radius. Figure illustrating SPHERICAL volume and argument definition. See Also: SYSTEM, Ch. 10, POINT, Ch. 10 Examples: The following commands specify a spherical volume. The center of the sphere is at (1,2,3), and the radius of the sphere is four meters. POINT center 1,2,3 ; VOLUME ball1 SPHERICAL center 4 ; MAGIC User’s Manual 10-34 Part III - Time and Space Chapter 10 - Objects VOLUME TERRAINFILE Command Function: Used to specify a volume with a specific surface from a list of terrain elevations (3D simulations only). Syntax: VOLUME volume TERRAINFILE basearea terrainfilename {METER, CM, MM, MICRON, INCHES} [near_point far_point] ; Arguments: volume — name of volume object, user—defined. basearea — name of area object defined in AREA command and CONFORMAL in type. terrainfilename — name of text file with list of data points (x1i, x2i, x3i) representing elevation of surface above the base area. near_point — near point of conformal confining volume. far_point — far point of conformal confining volume. Description: The TERRAINFILE option produces a volume whose base is a plane determined by the basearea definition and whose “upper” surface is determined by the data in the terrain file. The elevation direction is inferred as the direction normal to the base area. Thus if x3 is fixed, the elevation direction is from the base value to the surface value. The terrainfile must be a text file with a single set of (x1i, x2i, x3i) per line. Two of the coordinates must span a regular grid of uniform mesh, with the third ordinate representing the elevation above the base plane. The included volume will be all magic grid locations between the elevation value and the base plane value. The arguments, near_point and far_point, are used to limit the test volume in MAGIC, in addition, these may be used to restrict the generated volume to within the limits of the conformal volume delimited by the near and far points. Terrain Points Far Point Near Point Base Area MAGIC User’s Manual 10-35 Part III - Time and Space Chapter 10 - Objects Figure illustrating TERRAINFILE volume and argument definition. See Also: SYSTEM, Ch. 10, AREA, Ch. 10 Examples: In the following example a set of points in file calls “SinCloud.txt” are used to generate two intersecting volumes. The near point and far point are used to clip one of the shapes. You will note that the points in the terrain file lie above and below the base area. See the generated figure. System cartesian ; DX = .125CM ; DY = .125CM ; DZ = .125CM ; Volume Box Conformal -10.5cm,-10.5cm,10.5cm,+10.5cm,+10.5cm,+10.5cm ; MARK BOX X size Dx ; MARK BOX Y size Dy ; MARK BOX Z size Dz ; Point Clip1 POINT Clip2 -11cm,-7cm,-11cm; +6cm,6cm,8cm ; AREA BASESin Conformal -11cm,-11cm,-0cm,+11cm,+11cm,-0cm; VOLUME SinShape TERRAINFILE BASESin SinCloud.txt CM Clip1 Clip2 ; VOLUME SinShape2 TERRAINFILE BASESin SinCloud.txt CM ; autogrid ; conductor sinShape ; dielectric sinshape2 4 ; display ; MAGIC User’s Manual 10-36 Part III - Time and Space Chapter 10 - Objects MAGIC User’s Manual 10-37 Part III - Time and Space Function: Chapter 10 - Objects VOLUME TETRAHEDRON Command Used to specify a volume of a particular shape (3D simulations only). Syntax: VOLUME volume TETRAHEDRON point1 point2 point3 point4 ; Arguments: volume — name of volume object, user-defined. point — coordinates of spatial point or name defined in POINT command. Description: The TETRAHEDRON option will produce a tetrahedron of arbitrary orientation and with flat surfaces, irrespective of the coordinate system. Enter the four corner points that specify the vertices. Figure illustrating a TETRAHEDRON volume and argument definition. See Also: SYSTEM, Ch. 10, POINT, Ch. 10 MAGIC User’s Manual 10-38 Part III - Time and Space Chapter 10 - Objects VOLUME TOROIDAL_SECTION Command Function: Used to specifies a volume in space of a particular shape (3D simulations only). Syntax: VOLUME volume TOROIDAL_SECTION point1 point2 radius radius point3 point4; Arguments: volume — name of volume object, user-defined. point — coordinates of spatial point or name defined in POINT command. radius — radius of cylinder or sphere (m). Description: The TOROIDAL_SECTION option will produce an arc section of a toroid of circular cross section. First specify the center of the toroid, (Point1), and then specify the axis of symmetry (Point2). Next specify the minor and major radii of the toroiad. Finally, specify the arc subtended by the toriod, indicate the starting point of the toroidal arc section (Point3) and the ending point of the arc section (Point4). Notice that the starting and ending points of the section arc must be defined in a positive right—hand rule sense. (Note! that in polar or cylindrical coordinates this can mean that the starting point (Point3) and ending point (Point4) can define an arc which crosses the 2π reentrancy boundary. This condition is handled automatically by MAGIC.) See example 6 below for a sample of the this shape. Figure illustrating TOROIDAL_SECTION volume and argument definition. See Also: SYSTEM, Ch. 10, POINT, Ch. 10 Examples: The following commands generate a toroid section spanning 270 degrees. Notice that we are using the cartesian coordinate system and have generated the grid explicitly, rather than with the autogrid command. The center point of the toroid is at (0,0,0). The symmetry axis is aligned with the negative MAGIC User’s Manual 10-39 Part III - Time and Space Chapter 10 - Objects x3—coordinate. The minor radius is 1.5 cm and the major radius is 6.0 cm. The starting point of the arc section is set to the negative x2—coordinate axis. The ending point of the arc section is 270 degrees in right—hand rotation, and thus ends up aligned along the positive x1—coordinate axis. The two figures following the input illustrate the display_3d cross section of the TOROIDAL section defined and a VIEW_3D rendering of the object. SYSTEM CARTESIAN ; Rminor = 1.5cm ; Rmajor = 6.0cm ; POINT Porigin 0.0,0.0,0.0 ; POINT Paxis 0.0,0.0,—10cm; POINT Pstart 0.0,—6cm,0cm ; POINT Pend 6cm,0.0cm,0.0cm; VOLUME TORC TOROIDAL Porigin Paxis Rminor Rmajor Pstart Pend; GRID ORIGIN X1 —10CM; GRID UNIFORM X1 DISTANCE 20CM CELLS 40 ; GRID ORIGIN X2 —10CM; GRID UNIFORM X2 DISTANCE 20CM CELLS 40 ; GRID ORIGIN X3 —10CM; GRID UNIFORM X3 DISTANCE 20CM CELLS 40 ; CONDUCTOR TORC ; DISPLAY_3D; VIEW_3D ; MAGIC User’s Manual 10-40 Part III - Time and Space Function: Chapter 10 - Objects VOLUME WEDGE Command Used to specify a volume of a particular shape (3D simulations only). Syntax: VOLUME volume WEDGE point1 point2 point3 point4 point5 point6 ; Arguments: volume — name of volume object, user-defined. point — coordinates of spatial point or name defined in POINT command. Description: The WEDGE option will produce a WEDGE of arbitrary orientation and with flat surfaces, irrespective of the coordinate system. Enter the four corner points that specify the vertices of the base and then enter the two points that specify the ridge of the WEDGE. Figure illustrating a WEDGE volume and argument definition. See Also: SYSTEM, Ch. 10, POINT, Ch. 10 MAGIC User’s Manual 10-41 Part III - Time and Space Chapter 10 - Objects LIST Command Function: Lists previously entered spatial objects and markers. Syntax: LIST [ { object, POINT, LINE, AREA, VOLUME } ] ; Arguments: object - name of spatial object, user-defined in POINT, LINE, AREA, or VOLUME commands. Description: The LIST command is used to list specified objects or types of objects (POINT, etc.) and associated markers from an input file. Typically, this file is read in or created in the interactive mode. Use of a specific object name or object type restricts the list to specific objects or types of objects; otherwise, all objects and markers will be listed. See Also: POINT, Ch. 10, LINE, Ch. 10, AREA, Ch. 10, VOLUME, Ch. 10, MARK, Ch. 11. Examples: (1) We shall create two points, labeled a and b, and then list all and create c. POINT a Xa,Ya,Za POINT b Xb,Yb,Zb LIST ; POINT c Xc,Yc,Zc ; ; ; The list will contain the two points labeled a and b, but not c. (2) We next mark point c and list. MARK c ; LIST c ; Marker locations will be listed for point c, but not for points a and b, which were not marked. MAGIC User’s Manual 10-42 Part III - Time and Space Chapter 11 - Grids 11. GRIDS This Section covers the following commands: DURATION TIMER AUTOMARK / MARK AUTOGRID GRID RESERVE_SIZE GRID ORIGIN GRID EXPLICIT GRID UNIFORM GRID QUADRATIC GRID PADE PARALLEL_GRID RESOLUTION You can use these commands to create grids in time and space. The DURATION command is used to specify the time span covered by the simulation. The TIMER command is used to specify trigger times for use by other commands, e.g., to specify when certain measurements are to be made. To construct a spatial grid in any of the three coordinates (x1, x2, or x3), you have two choices: the AUTOGRID command (automatic), and the GRID commands (manual). The AUTOGRID command is used in conjunction with the AUTOMARK / MARK commands to generate the grid automatically. The MARK command sets markers and cell sizes at key locations on spatial objects (see Ch. 10). The AUTOMARK command requires the use of the RESOLUTION command to set the grid resolution parameters. The AUTOGRID command uses this data to generate the grid. If you use the MARK and AUTOGRID commands, no other commands are necessary to construct a spatial grid. You can also construct a spatial grid manually using GRID commands. The GRID ORIGIN command fixes the value of the coordinate at the origin. As an option, you may also enter the cell size at the origin. Use the other GRID commands to construct consecutive sections of the grid. The different options (EXPLICIT, UNIFORM, QUADRATIC, etc.) allow different functional variations for the cell size within each section. You can use any number and combination of GRID commands. The first command builds the first section, beginning from the origin. Each subsequent GRID command extends the grid by adding a new section of grid that is appended to the previous section. In 2D simulations, the spatial grid index extends over the range : 2 < i < ixmax, and in 3D the range is : 1 <i <ixmax. Usually, ixmax is chosen to meet the resolution requirements (subject to code limitations). To facilitate grid extension, the code automatically generates and updates a system variable, ISYS$InMX (n = 1, 2, 3), containing the current number of defined grid points. This variable may be referenced in other commands. Other system variables generated by the AUTOGRID and GRID commands include SYS$XnMN and SYS$XnMX, the initial and final full-grid points. The PARALLEL_GRID is used to specify where to sever the grid when using multiple cpu’s. This gives you additional control when using Magic3D with parallel decomposition. MAGIC User’s Manual 11-1 Part III - Time and Space Chapter 11 - Grids DURATION Command Function: Specifies the time span for a time-dependent simulation. Syntax: DURATION time_span ; Arguments: time_span — simulation time span (sec.). Description: The DURATION command is used to specify the time_span for a time-dependent simulation. Two system variables are produced when this command is entered. The variable, SYS$RUNTIME, is set equal to time_span. The other variable, ISYS$KMAX, representing the total number of electromagnetic time steps in time_span, is calculated. Both of these system variables can be used in subsequent commands. See Also: MAXWELL, Ch. 17 MAGIC User’s Manual 11-2 Part III - Time and Space Chapter 11 - Grids TIMER Command Function: Defines a time trigger. Syntax: TIMER timer PERIODIC { INTEGER, REAL } start_time [ stop_time [ time_increment ] ] [ INTEGRATE time_interval ] ; (or) TIMER timer DISCRETE { INTEGER, REAL } trigger_time1 [ trigger_time2, ... ][ INTEGRATE time_interval ] ; Arguments: timer — timer name, user-defined. start_time — do-loop start time or time index. stop_time — do-loop stop time or time index (default = infinity). time_increment — do-loop time or time index increment (default = MAX(1,start_time) ). trigger_time1 — discrete values of time or time indices. time_interval — time or time-index interval for integration. Defaults: In addition to any timers which you create explicitly, there are several timers created by the system for various purposes, all of which are available for your use. System timers used in time-dependent simulations include the following: • • • • • TSYS$FIRST TSYS$LAST TSYS$IMPORT TSYS$LORENTZ TSYS$OBSERVE — triggers at the beginning of the simulation — triggers at the completion of the simulation — triggers to import particles and fields — triggers for particle kinematics (see LORENTZ TIMING option) — triggers to observe variables (see OBSERVE INTERVAL option) Since there is no “time” variable for EIGENMODE calculations, these timers trigger when certain events occur: • • • TSYS$EIGENMODE — triggers when converged eigenmode is found TSYS$EIGEN — triggers periodically during convergence process TSYS$EIGFIRST — triggers on initiating new eigenmode search Description: Many commands require instruction as to when they are to be exercised, or “triggered.” A simple example is the RANGE command, which produces a plot only when it is exercised. The TIMER command defines a time trigger, which is just a sequence of times. Once it is defined, a time trigger can be applied to any command requiring one (such as RANGE), simply by entering the timer name. MAGIC User’s Manual 11-3 Part III - Time and Space Chapter 11 - Grids There are two options, PERIODIC to enter a periodic trigger, and DISCRETE to enter an irregular trigger. With either one, you can specify REAL to enter times in seconds or INTEGER to enter time indices. (Time indices are used with the time_step (TIME_STEP, Ch. 17) to compute times in seconds.) The PERIODIC option causes a do-loop to calculate trigger_times. A data entry is always required for start_time (which must be positive), but the data entries for stop_time and time_increment are optional. If data is not entered, then stop_time is set to infinity, and time_increment is set to unity or start_time, whichever is greater. The DISCRETE option allows the trigger_times to be entered explicitly. This option is useful when the trigger_times are few or irregularly spaced. The trigger_times must be entered in increasing order. Many commands which require timers make physical measurements of fields, currents, etc. In such applications, the INTEGRATE option in TIMER will cause integration to be performed over a time_interval before the trigger_time. When a measurement is initiated (at the trigger_time time_interval), it will be made continuously (every time step) for the period of time_interval. Upon completion (trigger_time), the measurements cease, and the average value is calculated and output (see Examples, below). Restrictions: 1. A single TIMER command with the DISCRETE option allows up to ten trigger_times to be entered. 2. In using the INTEGRATION option, you cannot allow measurements initiated by two trigger_times to overlap. In other words, the time_interval must not exceed the difference between the trigger_times. 3. The TIMER command should not be used when employing the EIGENMODE command. Use the predefined timers instead. See Also: TIME_STEP, Ch. 17, EIGENMODE, Ch. 19, LORENTZ, Ch. 18, OBSERVE, Ch. 22, RANGE, Ch. 23, and other output commands which require timers. Examples: 1. The following example requests TABLE output of fields E1, B2, and B3 in an area named “Area” every 20 time steps, starting on time index 10 and continuing through time index 90. (Printout will occur on time indices 10, 30, 50, 70, and 90. Printout will not occur on time index 100.) TIMER TABLE TABLE TABLE P_timer E1 Area B2 Area B3 Area PERIODIC INTEGER 10,100,20 ; P_timer ; P_timer ; P_timer ; 2. The following example illustrates use of the INTEGRATE option. The measurement involves time-averaged gain as a function of axial position in an RF amplifier. This complex diagnostic is obtained using only three commands: TIMER Gain_timer PERIODIC INTEGER K_plot, Infinity, K_plot INTEGRATE K_period ; FUNCTION Gain(P_Poynting) = 10.0 * LOG10 (P_Poynting / P_input ) ; RANGE FIELD_POWER S.DA X1 Input_port Gain_timer TRANSVERSE_INTEGRAL path TRANSFORM Gain ; MAGIC User’s Manual 11-4 Part III - Time and Space Chapter 11 - Grids Here, P_input is the input power, K_plot is the time_increment (time between plots), and K_period is the time_interval for integration (number of time steps in an RF period). Note that time_interval must be less than, or equal to, time_increment to prevent the integration measurements from overlapping and producing an error. MAGIC User’s Manual 11-5 Part III - Time and Space Chapter 11 - Grids AUTOMARK / MARK Command Function: Allows you to mark specific locations at which full grid lines must occur, thus ensuring that the edges of material objects are physically correct. You may specify coordinate locations based on spatial objects or on variables. The marks allow the automatic generation of the finite difference mesh with the AUTOGRID command. Syntax: AUTOMARK {ON, OFF}; or MARK {variable, object} [{ ordinate } [MINIMUM] [MIDPOINT] [MAXIMUM] [SIZE cell_size]] ; Arguments: variable object ordinate cell_size — name of integer or real variable defined in the ASSIGN command. — name of spatial object, defined in POINT, LINE, AREA, or VOLUME command. — (X1, X2, X3) for generalized coordinates, (X, Y, Z) for a Cartesian coordinate system, (Z, RHO, PHI) for cylindrical coordinates, or (RHO, PHI, or Z) for polar coordinates. — cell size at marked location (m or radian). Description: The AUTOMARK command is used to enable/disable (default=off) the automatic marking of the volume objects (MAGIC3D) and area objects (MAGIC2D). AUTOMARK is used in conjunction with the RESOLUTION command to specify the grid resolution along each ordinate axis. Multiple AUTOMARK and RESOLUTION commands may be used to generate graduated grid mesh. The MARK command is used to specify coordinate positions that fixed as full grid locations and with a specified local cell size. You may use either previously defined spatial objects or assigned variables to generate marked positions on one or more of the coordinate axes. Spatial objects may be created either before or after the spatial grid is generated. However, there is an advantage in defining the objects first, because this information can be used to generate the grid automatically. To do this, use the MARK command to mark key locations on a spatial object. The AUTOGRID command will then generate grid lines which conform to the object at the marked locations. Everywhere else, the (unmarked) spatial objects will be slightly distorted and/or shifted to conform to the grid. Thus, the MARK command can be used to preserve the exact size and shape of critical geometric features, such as a gap width, a conducting surface, a voltage integral, etc. All types of spatial object (points, lines, areas, and volumes) may be marked using this command, but specific shapes may not be markable. Variables are a convenient method for specifying coordinate fixed positions without first generating spatial objects. (This is particularly useful, since some objects are awkward or impossible to mark appropriately. Difficult shapes to mark include items such as FUNCTIONAL and EXTRUDED.) The arguments and options are as follows. The object name must be previously defined in a POINT, LINE, AREA, or VOLUME command. When you simply mark a spatial object (with no options), the result is two marked locations in each coordinate, which represent the extremes in the selected coordinate system. Thus, the number of (non-redundant) markers obtained with this option depends upon the spatial object and the number of coordinates, as indicated in the following table. Spatial Object 2D Simulations MAGIC User’s Manual 3D Simulations 11-6 Part III - Time and Space point line area volume Chapter 11 - Grids 2 4 4 N. A. 3 6 5 (conformal) 6 You can refine this by using the optional arguments. First, select the ordinate name. Next, you may identify critical locations, with the choices being MINIMUM, MIDPOINT, and MAXIMUM (or just MIN, MID, and MAX.) MINIMUM and MAXIMUM refer to the extremes of the object, and MIDPOINT is the mid-point value). You may choose none (blank) or any or all of these. If you do not specify, only the extremes will be marked. Finally, you may also specify the cell_size, which will be applied to all locations marked with that command. For very complex structures, you can always define spatial points at critical locations and mark those. Note that, under certain circumstances, marked locations may be merged, shifted, or even eliminated. This can occur when two or more marked locations are very close together (compared with the cell_size). When the AUTOGRID command is processed, all marked locations are ranked in order, and a complex algorithm operates to resolve any problems resulting from under- or over-specification. For example, any exact duplicates are eliminated, since they would produce a cell of zero width. Other, more complicated tests ensure that the actual spatial grid does not fall below the minimum cell_size, which would adversely impact simulation run time due to the Courant stability criterion. It is good practice to display the spatial grid and to compare positions of the actual grid lines with the original marked locations, shown by arrowheads (DISPLAY, Ch. 24). Restrictions: 1. 2. 3. 4. 5. A spatial object must be created before it can be marked. MARK commands must precede the (grid generation) AUTOGRID command. Marked locations may be merged, shifted, or even eliminated by the AUTOGRID algorithm. Do not mark the third coordinate in a 2D simulation. Objects created using the FUNCTIONAL option cannot be marked directly. Instead, create points at critical locations on the surface and mark those. See Also: ASSIGN, Ch. 6, SYSTEM, Ch. 10, POINT, Ch. 10, LINE, Ch. 10, AREA, Ch. 10, VOLUME, Ch. 10, LIST, Ch. 10, AUTOGRID, Ch. 11, RESOLUTION, Ch. 11, DISPLAY, Ch. 24. Examples: (1) To mark a point named “a” in all coordinates, the command is simply: MARK a; (2) To mark the minimum x2 location of an object named “anode,” the command is MARK anode X2 MINIMUM; (3) If we wanted to mark the minimum and maximum in x1 and to specify a cell_size of 0.0005 meters at both locations, the command could read MARK anode X1 MIN MAX SIZE 0.0005; MARK anode X1 SIZE 0.0005; (4) To delete all marked locations on the anode, use the command DELETE MARK anode; (5) To list all of the marked locations, enter the command LIST; MAGIC User’s Manual 11-7 Part III - Time and Space Chapter 11 - Grids MAGIC User’s Manual 11-8 Part III - Time and Space Chapter 11 - Grids AUTOGRID Command Function: Generates the spatial grid automatically from spatial markers. You may select autogrid for a specific ordinate or for all ordinates. Syntax: AUTOGRID [ordinate [REPLACE, EXTEND]] ; Or for Parallel processing operations only. AUTOGRID ordinate {PARALLEL_PROCESS, PARALLEL_EDGES n xedge1, xedge2 ,,, xedgen} ; Arguments: n — number additional break points to enter. ordinate— is (X1, X2, or X3) for generic coordinate system, ordinate— is (X, Y, or Z) for a Cartesian coordinate system, ordinate— is (Z, RHO, or PHI) for cylindrical coordinates, and ordinate— is (RHO, PHI, or Z) for polar coordinates. xedgei — full grid location in meters of break point. Description: The AUTOGRID command is used to generate the spatial grid automatically. It makes use of previously-defined spatial markers (see MARK, Ch. 11). If the AUTOGRID and MARK commands are used, no other gridding commands are needed. There are few options in AUTOGRID, since the spatial markers control most of the gridding logic. You may choose to grid one coordinate automatically (e.g., AUTOGRID X1) and the other(s) manually with GRID commands. Finally, if the spatial marker data is sparse, you may wish to enter the desired number of total_cells in that coordinate. For PARALLEL processing operations, the grid must be severed at numprocs-1 locations, where numprocs is the number of parallel operation processes into which the simulation is divided. The code will automatically sever the grid at uniform index splits along the designated axis when using the PARALLEL_PROCESS option. If you have entered sever locations with the PARALLEL_GRID command, the code use as many of the sever locations as it needs to break the grid into the specified number of process sections. Another method is to give the list of sever edges using the PARALLEL_EDGES option. Excess number of sever locations will be ignored. Insufficient break points for severing will generate errors. The options REPLACE and EXTEND may be used to mix the use of the GRID and AUTOGRID commands. In particular, suppose that you generate a portion of the grid explicitly with the GRID ORIGIN and GRID UNIFORM commands. The subsequent use of the REPLACE (default) option on AUTOGRID will cause the code to delete the pre-existing grid, and to regenerate the entire grid from the exisitng MARK’s. The use of the EXTEND option will allow you to generate a section explicitly, and then extend the grid with the AUTOGRID command making use of the MARKS that are beyond the existing grid. The AUTOGRID algorithm may merge, shift, or even eliminate some marked locations to resolve problems of over-specification. However, the algorithm always places grid lines precisely on all of the remaining markers. Between two adjacent markers, the cell size always obeys a Pade equation (see GRID MAGIC User’s Manual 11-9 Part III - Time and Space Chapter 11 - Grids PADE, Ch. 11). In general, the cell sizes will vary. Under certain circumstances, a uniform grid can result. The algorithm logic depends upon the data that is available to it. To grid a region between two markers, the Pade prescription requires exactly three parameters, e.g., the distance between markers and the cell size at each marker. The algorithm calculates the distances between markers, and it uses the following approach to obtain cell sizes. If the MARK commands have specified cell sizes at all of the markers, no more is required. If an interior marker cell size is missing, it will be calculated from available cell sizes by linear interpolation. If an exterior marker cell size is missing, it will be set equal to the nearest cell size (no extrapolation). If no cell sizes have been entered, then the total_cells and the total distance will be used to calculate the marker cell sizes. Once all marker cell sizes have been calculated, they are adjusted to ensure an integer number of cells between markers. Finally, the grid itself is computed from Pade equations. Restrictions: 1. There is an upper limit to the number of spatial grid points in each coordinate. 2. There is a separate upper limit to the product in all coordinates, i.e., the total number of cells. 3. No grid should be entered for the third coordinate (X3) in a 2D simulation. See Also: MARK, Ch. 11, GRID RESERVE_SIZE, Ch. 11, GRID ORIGIN, Ch. 11, GRID EXPLICIT, Ch.11, GRID PADE, Ch. 11, GRID QUADRATIC, Ch.11, GRID UNIFORM, Ch. 11, PARALLEL_GRID, Ch. 11, RESOLUTION, Ch. 11. MAGIC User’s Manual 11-10 Part III - Time and Space Chapter 11 - Grids GRID RESERVE_SIZE Command Function: Allows you set to reset the largest array dimension for a particular ordinate. Syntax: GRID RESERVE_SIZE ordinate igmax ; Arguments: ordinate ordinate ordinate ordinate igmax — is (X1, X2, X3) for generalized coordinates, or — is (X, Y, or Z) for a Cartesian coordinate system, or — is (Z, RHO, or PHI) for cylindrical coordinates, or — is (RHO, PHI, or Z) for polar coordinates. — maximum number of array elements for specified ordinate, (default 16382). Description: The GRID RESERVE_SIZE command is used to enlarge the maximum number of grid mesh points. The default limit is 16382. See Also: GRID ORIGIN, Ch. 11, GRID EXPLICIT, Ch. 11, GRID UNIFORM, Ch. 11, GRID QUADRATIC, Ch. 11, GRID PADE, Ch. 11 Examples: MAGIC User’s Manual 11-11 Part III - Time and Space Chapter 11 - Grids GRID ORIGIN Command Function: Sets the origin position for the specified coordinate axis. Syntax: GRID ORIGIN ordinate axis_origin [ cell_size [ grid_index ] ] ; Arguments: ordinate ordinate ordinate ordinate axis_origin cell_size grid_index — is (X1, X2, X3) for generalized coordinates, or — is (X, Y, or Z) for a Cartesian coordinate system, or — is (Z, RHO, or PHI) for cylindrical coordinates, or — is (RHO, PHI, or Z) for polar coordinates. — coordinate value in meters or radians (default = 0.0). — cell size at axis_origin in meters or radians. — optional grid index at axis_origin, integer, default = 1 (3D) or 2 (2D). Description: The GRID ORIGIN command is used to specify the origin in one of the coordinate axes. It should be set before any of the other GRID options are used to build sections of the grid. If the axis_origin is not specified in a GRID command, the lowest value spatial marker is used. If there are no spatial markers, a value of zero will be used. The cell_size at the axis_origin can also be specified. If so, it may be used in building the first section of grid. The optional specification of grid_index provides control over the simulation position in index space; normally, it is not needed. Restrictions: No grid should be entered for the third coordinate (X3) in a 2D simulation. See Also: GRID RESERVE_SIZE, Ch. 11, GRID EXPLICIT, Ch. 11, GRID UNIFORM, Ch. 11, GRID QUADRATIC, Ch. 11, GRID PADE, Ch. 11. Examples: A simulation of a coaxial cable in polar coordinates requires a grid between the inner and outer radii (R_inner and R_outer), but there is no reason to grid the region between the center axis and R_inner, since it is not used. Therefore, we can set the radial axis origin to R_inner with the command GRID ORIGIN X2 R_inner ; or GRID ORIGIN RHO R_inner ; MAGIC User’s Manual 11-12 Part III - Time and Space Chapter 11 - Grids MAGIC User’s Manual 11-13 Part III - Time and Space Chapter 11 - Grids GRID EXPLICIT Command Function: Creates an arbitrarily varying grid in a region. Syntax: GRID EXPLICIT ordinate { SIZE δ1 δ2 δ3 δ4 … δn, } ; or GRID EXPLICIT ordinate { POSITION ξ1 ξ2 ξ3 ξ4 … ξn }; Arguments: ordinate— is (X1, X2, X3) for generalized coordinates, or ordinate— is (X, Y, or Z) for a Cartesian coordinate system, or ordinate— is (Z, RHO, or PHI) for cylindrical coordinates, or ordinate— is (RHO, PHI, or Z) for polar coordinates. δI — cell size in meters or radians. ξn — full grid location in meters or radians. Description: The EXPLICIT option allows you to enter an explicit sequence of data to create an arbitrary grid. You must first select the coordinate axis by selecting one of the axes keywords, (ordinate). Then the grid may be generated by using either the CELLS or POSITION options. The CELLS option allows you to enter the cell size, and MAGIC will automatically increment the grid by each cell size added. (Note! it is generally advisable to use the GRID ORIGIN command to specify the first grid position.) The alternative approach using the POSITION option is to specify the exact full grid positions in monotonically ascending order. In addition, you can use multiple commands to generate the grid section-by-section. Restrictions: 1. The POSITION option requires all coordinates to entered in monotonically ascending order. 2. No grid should be entered for the third coordinate (X3) in a 2D simulation. See Also: GRID RESERVE_SIZE, Ch. 11, GRID ORIGIN, Ch. 11, GRID UNIFORM, Ch. 11, GRID QUADRATIC, Ch. 11, GRID PADE. Example: The following commands provide an example of explicit grid generation. NCELLS = 12 ; X.0 = 0 ; DELTA.X1 = 1CM ; DELTADELTA.X1 = .1CM ; DO I=1,NCELLS; J=I-1; X.'I' = X.'J' + DELTA.X1 + DELTADELTA.X1*I ; MAGIC User’s Manual 11-14 Part III - Time and Space Chapter 11 - Grids ENDDO ; GRID ORIGIN X1 X1.0 .5CM 2; or GRID ORIGIN X X1.0 .5CM 2; GRID EXPLICIT X1 POSITION X.1 X.2 X.3 X.4 X.5 X.6 X.7 X.8 X.9 X.10; or GRID Y.0 Y.3 DY.6 DY.9 EXPLICIT = -5.0CM = -2.2CM = 0.7CM = 1.1CM X ; ; ; ; POSITION X.1 X.2 X.3 X.4 X.5 X.6 X.7 X.8 X.9 X.10; Y.1 = -4.0CM ; Y.2 = -3.1CM ; Y.4 = -1.3CM ; Y.5 = -0.5CM ; DY.7 = 0.8CM ; DY.8 = 0.9CM ; DY.10 = 1.4CM ; DY.11 = 1.4CM ; GRID ORIGIN X2 Y.0 .5CM 2; GRID EXPLICIT X2 POSITION Y.1 Y.2 Y.3 Y.4 Y.5 ; GRID EXPLICIT X2 SIZE DY.6 DY.7 DY.8 DY.9 DY.10 DY.11; or GRID ORIGIN Y Y.0 .5CM 2; GRID EXPLICIT Y POSITION Y.1 Y.2 Y.3 Y.4 Y.5 ; GRID EXPLICIT Y SIZE DY.6 DY.7 DY.8 DY.9 DY.10 DY.11; MAGIC User’s Manual 11-15 Part III - Time and Space Chapter 11 - Grids GRID UNIFORM Command Function: Creates a uniform grid in a region. Syntax: GRID UNIFORM ordinate [ DISTANCE region_size ] [ FIRST { MATCH, cell_size } ] [ CELLS ncells ] ; Arguments: ordinate ordinate ordinate ordinate region_size cell_size ncells — is (X1, X2, X3) for generalized coordinates, or — is (X, Y, or Z) for a Cartesian coordinate system, or — is (Z, RHO, or PHI) for cylindrical coordinates, or — is (RHO, PHI, or Z) for polar coordinates. — length of the region in meters or radians. — cell size of region in meters or radians. — number of cells in the region. Description: The UNIFORM option results in equally-spaced full-grid points given by xif = x1f + (i-1) cell_size where cell_size can be entered directly or will be calculated from other parameters. Although a uniform grid can also be achieved using all of the other options, the UNIFORM option is the simplest way, and it reduces round-off errors in grid spacing. The UNIFORM algorithm requires only two parameters to specify the grid completely. As indicated in the syntax, there are three options, and you must select two. If the parameters are either underspecified or over-specified, an error condition will result. The options are DISTANCE, FIRST, and CELLS. (The FIRST option refers to the first cell. If MATCH is entered, the algorithm will attempt to obtain the cell_size from the ORIGIN command or from the last cell in the preceding region. Otherwise, cell_size should be entered.) If DISTANCE is one of the options specified, cell_size will be normalized to provide an exact integral number of cells, thus ensuring that grid lines fall precisely on the ends of the region_size. Restrictions: 1. There is an upper limit to the number of spatial grid points in each coordinate. 2. There is a separate upper limit to the product in all coordinates, i.e., the total number of cells. 3. No grid should be entered for the third coordinate (X3) in a 2D simulation. See Also: GRID ORIGIN, Ch. 11, PADE, Ch. 11. GRID EXPLICIT, Ch. 11, GRID QUADRATIC, Ch. 11, GRID MAGIC User’s Manual 11-16 Part III - Time and Space Chapter 11 - Grids Examples: A simulation of a coaxial cable in cylindrical coordinates requires a grid between the inner and outer radii (R_inner and R_outer). We can set the radial origin to R_inner and divide the gap into 20 uniform cells with the commands GRID ORIGIN X2 R_inner ; gap = R_outer - R_inner ; Ncells = 20 ; dR = gap / Ncells ; GRID X2 UNIFORM DISTANCE gap FIRST dR ; Note that the DISTANCE and FIRST options are used to satisfy the requirement for two parameters. MAGIC User’s Manual 11-17 Part III - Time and Space Chapter 11 - Grids GRID QUADRATIC Command Function: Creates a quadratic function grid in a region. Syntax: GRID QUADRATIC { ordinate } {[ DISTANCE region_size ] [ FIRST { MATCH, cell_size } ] [ LAST cell_size ] [ CELLS cells ]} ; Arguments: ordinate ordinate ordinate ordinate region_size cell_size cells — is (X1, X2, X3) for generalized coordinates, or — is (X, Y, or Z) for a Cartesian coordinate system, or — is (Z, RHO, or PHI) for cylindrical coordinates, or — is (RHO, PHI, or Z) for polar coordinates. — length of the region in meters or radians. — cell size in meters or radians. — number of cells in the region. Description: xif, The QUADRATIC option results in a quadratically-spaced grid over a region. The ith full-grid point, in a particular region is given by the formula where d = the region_size, I = cells, and dx1f = cell_size for the last cell. This means that the cell_size is allowed to increase or decrease uniformly by a constant amount where The QUADRATIC algorithm requires three parameters to specify the grid completely. As indicated in the syntax, there are four options, and you must select three. If the parameters are either underspecified or over-specified, an error condition will result. The options are DISTANCE, FIRST, LAST, and CELLS. (The FIRST option refers to the first cell. If MATCH is entered, the algorithm will attempt to obtain the cell_size from the ORIGIN command or from the last cell in the preceding region. Otherwise, cell_size should be entered.) If DISTANCE is one of the options specified, cell_size MAGIC User’s Manual 11-18 Part III - Time and Space Chapter 11 - Grids will be normalized to provide an exact integral number of cells, thus ensuring that grid lines fall precisely on the ends of the region_size. In addition, there is a constraint on these parameters. The equation d < I2δ x < (2I - 1) d must be satisfied for the grid to be monotonic. Only choosing extremely non-uniform parameters can violate this constraint. An error message will result. Restrictions: 1. 2. 3. 4. There is an upper limit to the number of spatial grid points in each coordinate. There is a separate upper limit to the product in all coordinates, i.e., the total number of cells. The grid must be monotonic: the parameter constraint described above must be satisfied. No grid should be entered for the third coordinate (X3) in a 2D simulation. See Also: GRID RESERVE_SIZE, Ch. 11, GRID ORIGIN, Ch. 11, GRID EXPLICIT, Ch. 11, GRID UNIFORM, Ch. 11, GRID PADE, Ch. 11. Examples: A simulation of a coaxial cable in cylindrical coordinates requires a grid between the inner and outer radii (R_inner and R_outer). We can shift the radial origin to R_inner and divide the gap into 20 quadratically varying cells, where the last cell is three times as large as the first cell, with the commands, GRID ORIGIN RHO R_inner ; gap = R_outer - R_inner ; Ncells = 20 ; dR_ave = gap / Ncells ; dR_first = 0.5 * dR_ave ; ! dR_first + dR_last = 2 dR_ave. dR_last = 2 * dR_ave ; GRID QUADRATIC RHO DISTANCE gap FIRST dR_first CELLS Ncells ; or GRID QUADRATIC RHO DISTANCE gap FIRST dR_first LAST dr_last ; or GRID QUADRATIC RHO DISTANCE gap LAST dR_flast CELLS Ncells ; MAGIC User’s Manual 11-19 Part III - Time and Space Chapter 11 - Grids GRID PADE Command Function: Creates a Pade function grid in a region. Syntax: GRID PADE ordinate { [ DISTANCE region_size ] [ FIRST { MATCH, cell_size } ] [ LAST cell_size ] [ CELLS cells ] } ; Arguments: ordinate ordinate ordinate ordinate region_size cell_size cells — is (X1, X2, X3) for generalized coordinates, or — is (X, Y, or Z) for a Cartesian coordinate system, or — is (Z, RHO, or PHI) for cylindrical coordinates, or — is (RHO, PHI, or Z) for polar coordinates. — length of the region in meters or radians. — cell size in meters or radians. — number of cells in the region. Description: The PADE option results in a Pade function-spaced grid over a region. The ith full-grid point, xif, in a particular region is given by the formula The use of the Pade functional prescription is recommended for a region requiring rapid variation in the cell_size. The PADE algorithm requires only three parameters to specify the grid completely. As indicated in the syntax, there are four options, and you must select three. If the parameters are either under-specified or over-specified, an error condition will result. The options are DISTANCE, FIRST, LAST, and CELLS. (The FIRST option refers to the first cell. If MATCH is entered, the algorithm will attempt to obtain the cell_size from the ORIGIN command or from the last cell in the preceding region. Otherwise, cell_size should be entered.) If DISTANCE is one of the options specified, cell_size will be normalized to provide an exact integral number of cells, thus ensuring that grid lines fall precisely on the ends of the region_size. (In the Pade prescription, the cell_size refers to the cell half-grid, whereas in all other options, it refers to fullgrid.) Restrictions: 1. There is an upper limit to the number of spatial grid points in each coordinate. 2. There is a separate upper limit to the product in all coordinates, i.e., the total number of cells. MAGIC User’s Manual 11-20 Part III - Time and Space Chapter 11 - Grids 3. No grid should be entered for the third coordinate (X3) in a 2D simulation. See Also: GRID RESERVE_SIZE, Ch. 11, GRID ORIGIN, Ch. 11, GRID EXPLICIT, Ch. 11, GRID UNIFORM, Ch. 11, GRID QUADRATIC, Ch. 11 Examples: A simulation of a coaxial cable in cylindrical coordinates requires a grid between the inner and outer radii (R_inner and R_outer). We can shift the radial origin to R_inner and divide the gap into 20 Pade function cells, where the last cell is three times as large as the first cell, with the commands GRID ORIGIN RHO R_inner ; gap = R_outer - R_inner ; Ncells = 20 ; dR_ave = gap / Ncells ; ! dR_first + dR_last = 2 dR_ave. dR_first = 0.5 * dR_ave ; GRID PADE RHO DISTANCE gap FIRST dR_first CELLS Ncells ; or GRID PADE RHO DISTANCE gap LAST dR_last CELLS Ncells ; MAGIC User’s Manual 11-21 Part III - Time and Space Chapter 11 - Grids PARALLEL_GRID Command Function: Creates user specified sever positions for use with a parallel run. Syntax: PARALLEL_GRID “ordinate”_SEVER_AT Sever ; Or PARALLEL_GRID RECOMMEND_“ordinate” [nprocesses]; Or PARALLEL_GRID LIST_“ordinate” ; Arguments: ordinate — is (X1, X2, X3) for generalized coordinates, or ordinate — is (X, Y, or Z) for a Cartesian coordinate system, or ordinate — is (Z, RHO, or PHI) for cylindrical coordinates, or ordinate — is (RHO, PHI, or Z) for polar coordinates. sever — full grid location in meters or radians. nprocesses — number of processes for sever recommendation. Description: The PARALLEL_GRID option allows you to enter or check the locations for severing the grid between parallel process blocks. In a standard, single process run the sever positions have no effect on the simulation. The Xn_SEVER options allow you to enter the axis ordinates at which you wish the parallel block to be severed. You may enter the sever locations in any order. Currently, parallel decomposition is allowed along one ordinate, although it may be along x, y, or z in Cartesian coordinates. In polar and cylindrical coordinates, only the z-axis decomposition is supported. Severs must be entered before the AUTOGRID command is used. You must use the AUTOGRID Xn for a parallel decomposition along the Xn-axis. The remaining ordinate axes may be generated by any of the AUTOGRID/GRID commands. The RECOMMEND_Xn options are used prior to a parallel run to determine the roughly equal number of active cells present in each block. This means that you use it in a short single process test simulation. This command cause the software to write “recommended” values for the sever locations into the log file, based on approximately equal weights of active cells within each block. It does not however take into about any information about the presence or absence of particles in the active cells zones. If the argument nprocesses is ignored or 0, then it will make recommendations for 2, 3, 4,.. or 10 processes, otherwise it generate sever locations for nprocesses. (See Example below.) These will be written near the end of the log file. You may then cut and paste these values into the run file. The LIST_’ordinate’ options tell the code to list in monotonically ascending order the values of the various severs. See Also: GRID RESERVE_SIZE, Ch. 11, GRID ORIGIN, Ch. 11, GRID UNIFORM, Ch. 11, GRID QUADRATIC, Ch. 11, GRID PADE. MAGIC User’s Manual 11-22 Part III - Time and Space Chapter 11 - Grids Example: In this example, the PARALLEL_GRID option is used to find the equal weight severs needed for a two cavity klystron simulation using 3 processes. This will require 2 sever locations. The following figure shows the basic geometry. The commands used are: Parallel_Grid Recommend_Z 3 ; … autogrid X ; autogrid Y ; autogrid Z PARALLEL; The following is lines are then written into the log file. The variable sys$n_process is automatically generated by Magic as denotes the number of processes for the Magic simulation that was requested. You will note that MAGIC writes out an “if block” that contains the sever variable. There is generally one less sever variable than there are processes. In addition, the needed commands are written into the logfile for insertion into your input file to generate the desired severs. IF (SYS$N_PROCESS.EQ.3) THEN; X3_PROCESS_003_Sever_001 = 0.900000E-02; PARALLEL_GRID X3_SEVER_AT X3_PROCESS_003_Sever_001; X3_PROCESS_003_Sever_002 = 0.239015E-01 ; PARALLEL_GRID X3_SEVER_AT X3_PROCESS_003_Sever_002 ; ENDIF ; MAGIC User’s Manual 11-23 Part III - Time and Space Chapter 11 - Grids RESOLUTION Command Function: Used to specify the grid resolution for auto-marking (see AUTOMARK) of subsequently defined volume objects (MAGIC3D) and area objects (MAGIC2D). Resolution may be specified as number divisions or grid deltas. Syntax: RESOLUTION {ordinatei} INTEGER Ni ; RESOLUTION {ordinate_i} REAL δi ; RESOLUTION INTEGER N1 N2 N3 ; RESOLUTION REAL δ1 δ2 δ3 ; RESOLUTION AXIAL δrho ; Arguments: ordinatei Ni δi, δrho — (X1, X2, or X3) for generic coordinate system, (X, Y, or Z) for a Cartesian coordinate system, (Z, RHO, or PHI) for cylindrical coordinates, and (RHO, PHI, or Z) for polar coordinates. — number cell divisions along each ordinate axis. — cell resolution (m or radian) to use in auto-marking. Description: The RESOLUTION command is used to set the mesh resolution along the coordinate axes. You may set the local cell sizes, δi, or the number of cell divisions along an axis. The resolution may be reset multiple times to allow generation of graduated grids. Setting the δi’s takes precedence over the Ni’s. The RESOLUTION command is used in conjunction with the AUTOMARK and AUTOGRID commands. Restrictions: 1. 2. 3. 4. 5. A spatial object must be created before it can be marked. MARK commands must precede the (grid generation) AUTOGRID command. Marked locations may be merged, shifted, or even eliminated by the AUTOGRID algorithm. Do not mark the third coordinate in a 2D simulation. Objects created using the FUNCTIONAL option cannot be marked directly. Instead, create points at critical locations on the surface and mark those. See Also: AUTOMARK, Ch. 11, MARK, Ch. 11, ASSIGN, Ch. 6, SYSTEM, Ch. 10, POINT, Ch. 10, LINE, Ch. 10, AREA, Ch. 10, VOLUME, Ch. 10, LIST, Ch. 10, AUTOGRID, Ch. 11, DISPLAY, Ch. 24. Examples: MAGIC User’s Manual 11-24 Part IV - Spatial Extensions Part IV-Spatial Extensions This part deals with the commands that deal with termination of the simulation space. These constitute the outer edge properties and extensions. Chapter 12-Outer Boundries Chapter 13-Transmission Lines MAGIC User’s Manual IV-1 Part IV - Spatial Extensions Chapter 12 - Outer Boundaries 12. OUTER BOUNDARIES This Chapter covers the following commands: SYMMETRY PORT RESONANT_PORT CPML (3D simulations only) FREESPACE MATCH IMPORT You can use these commands (along with conducting objects) to define the outer boundaries of the simulation. To use them effectively requires knowledge of a few simple conventions: 1. These commands may be used only after the grid has been generated. 2. In general, outer boundaries are applied on surfaces (spatial lines in 2D simulations and spatial areas in 3D simulations) which are conformal with one of the coordinate axes. However, the CPML and the FREESPACE command are applied only in a volume (area in 2D simulations), and the downstream surface of this volume is part of the outer boundary perimeter. 3. The outer boundary perimeter must completely enclose the simulation volume. The perimeter can have any shape and be made up of any combination of outer boundaries and conductors, but it must not contain any “holes.” Holes can cause serious errors which may not be readily observable. 4. Most outer boundaries require an alignment or sense of direction, as indicated by the syntax arguments, {POSITIVE, NEGATIVE}. The alignment is always from outside the perimeter to inside. If this is in the positive direction (increasing coordinate), enter POSITIVE; otherwise, enter NEGATIVE. Negative Positive Xi The SYMMETRY commands provide axial, mirror, and periodic symmetry boundaries. You must apply all such boundaries explicitly, since none are assumed. Axial symmetry is required in polar coordinates if, and only if, the simulation area extends to zero radius (3D simulations only). Mirror symmetry can be used to cut simulation costs in half, and periodic symmetry is used to study a limited region of a repetitive or re-entrant device. Other boundaries allow outgoing waves to exit the simulation and, simultaneously, incoming waves to enter. The PORT command provides a good, general-purpose boundary and is used extensively. Its main drawback is the need to specify the phase velocity precisely. The CPML and FREESPACE commands only treat outgoing waves. These models apply a special (non-physical) conductivity within a spatial volume in 3D simulations (or spatial area in 2D simulations). The advantage is that that they are broadband and will handle a spectrum of phase velocities MAGIC User’s Manual 12-1 Part IV - Spatial Extensions Chapter 12 - Outer Boundaries simultaneously. The disadvantages are sensitivity to space charge and a possible need to tune the conductivity parameters. There are also special-purpose boundaries. If external impedances (outside the perimeter) are important, you can use the MATCH command to match a transmission line to the simulation. (Transmission lines are discussed in the next Chapter.) The spatial line at which the match is made is considered part of the simulation perimeter. The IMPORT command can be used to introduce particles and fields from another simulation (EXPORT, Ch. 20). MAGIC User’s Manual 12-2 Part IV - Spatial Extensions Chapter 12 - Outer Boundaries SYMMETRY Command Function: Applies outer boundaries for axial, mirror, and periodic symmetry. Syntax: SYMMETRY AXIAL { line, area } POSITIVE; SYMMETRY MIRROR { line, area } {POSITIVE, NEGATIVE} ; SYMMETRY PERIODIC { line, area } {POSITIVE, NEGATIVE} { line, area } {POSITIVE, NEGATIVE} ; Arguments: line area — name of a spatial line, defined in LINE command (2D simulations only). — name of a spatial area, defined in AREA command (3D simulations only). Description: The SYMMETRY commands apply symmetry conditions on conformal surfaces which thereby become part of the simulation perimeter. In 2D simulations, the surfaces are represented by lines; in 3D simulations, they are represented by areas. The symmetry boundaries can be applied in various combinations. They affect particle transformations as well as the electromagnetic fields. The options available are AXIAL, MIRROR, and PERIODIC. The AXIAL is needed if (and only if) the coordinate system is non-cartesian and contains the region of zero radius (or θ = 0 or π in spherical coordinates). (In 3D simulations, the axis of symmetry must be represented by an area which includes the full range of the azimuthal angle.) MAGIC2D will automatically generate this command when the coordinate system is CYLINDRICAL and the r-grid begins at r=0, if it has not been explicitly entered by the user. MAGIC3D will automatically generate this command when the coordinate system is CYLINDRICAL or POLAR and the r-grid begins at r=0, if it has not been explicitly entered by the user. MIRROR, as the name suggests, replicates bilateral symmetry, which means simply that whatever occurs in the simulation space also occurs simultaneously in the virtual space opposite the boundary. PERIODIC is used to create a repetitive structure or to close polar coordinates when the full range of polar angle (2π) is required. Note that PERIODIC requires two distinct spatial areas (which may be spatially coincident). MAGIC2D automatically generates this command when the coordinate system is POLAR and the range of the φ-grid spans 2π, if it has not been explicitly entered by the user. MAGIC3D automatically generates this command when the coordinate system is CYLINDRICAL or POLAR and the φ-grid spans 2π, if it has not been explicitly entered by the user. In specifying a symmetry boundary you must use either a conformal line in 2D simulations or a conformal area in 3D simulations. The boundary provides closure of the simulation perimeter over the region to which it is applied. In addition, you must also enter the alignment of the surface, which is always from outside the perimeter to inside. If this is in the positive direction (increasing coordinate), enter POSITIVE. Otherwise, you must enter NEGATIVE. Restrictions: MAGIC User’s Manual 12-3 Part IV - Spatial Extensions Chapter 12 - Outer Boundaries 1. The surface where the boundary condition is applied must be conformal in one coordinate. 2. The symmetry boundaries must be compatible with the models used in the simulation to retain physical fidelity. For example, the axial boundary must be used only at zero radius in polar coordinates (or θ = 0 or π in spherical coordinates), the mirror and periodic boundaries should only be used on flat (never curved) surfaces, the periodic boundaries must appear on opposite sides, and so on. 3. The algorithm logic assumes conventional use of these boundaries, e.g., mirror symmetry near the edge (not the middle) of the simulation, axial symmetry at zero radius, etc. If you attempt unconventional uses, please be aware that the algorithm logic may thwart your intent. 4. Axial symmetry is available in spherical coordinates, but may not contain the origin. 5. SYMMETRY AXIAL results in a modified Courant condition, in which the first radial cell appears to be smaller than it actually is. The effective size is See Also: SYSTEM, Ch. 10 References: B. Goplen, R. S. Coats, and J. R. Freeman, "Three-Dimensional Simulation of the PROTO-II Convolution," Mission Research Corporation Report, MRC/WDC-R-055, presented at the 4th IEEE Pulsed Power Conference, June 6-8, 1983. Examples: MAGIC User’s Manual 12-4 Part IV - Spatial Extensions Chapter 12 - Outer Boundaries PORT Command Function: The PORT command applies an outer boundary that permits outgoing (and incoming) waves to exit (and enter) the interior of the simulation. Syntax: (Passive absorbing wave port boundary) PORT { line, area } { POSITIVE, NEGATIVE } [ {PHASE_VELOCITY,TM,TE} phase_velocity ] [ ABC_1, ABC_2, ABC_0 ] ; Or (Active injecting wave and absorbing wave port boundary) PORT { line, area } { POSITIVE, NEGATIVE } [ {PHASE_VELOCITY,TM,TE} phase_velocity ] [ ABC_1, ABC_2, ABC_0 ] [ EXPANSION scale ] [ INCOMING f(t) { FUNCTION {E1,E2,E3} g(x1,x2,x3) [ {E1,E2,E3} g(x1,x2,x3) ] , FILE file {E1,E2,E3} record [ {E1,E2,E3} record ], LAPLACIAN objects object,voltage ... [ ITERATIONS iterations ] [ OMEGA omega ] [ INITIALIZATION { X1, X2, X3, potential(x1,x2,x3) } ] } [ NORMALIZATION { PEAK_FIELD {E1,E2,E3} point , VOLTAGE line } [CIRCUIT time_constant desired(t) obs$name] ] ; Arguments: line — name of a spatial line, defined in LINE command (2D simulations only). area — name of a spatial area, defined in AREA command (3D simulations only). phase_velocity— relative phase velocity, v/c (unitless). scale — geometric scaling factor (unitless, default is unity) f(t) — temporal function for incoming wave (V or V/m), defined in FUNCTION command. g(x1,x2,x3) — spatial—profile function for incoming wave (arbitrary units), defined in FUNCTION command. file — name of file containing spatial-profile data record — name of record containing data for specified field component. objects — number of independent conducting objects at the boundary. object — name of a spatial object, defined in AREA (2D) or VOLUME (3D) command. voltage — conductor voltage for Laplacian solution (V). iterations — number of relaxation iterations (default = 10,000). omega — over-relaxation constant (default = 1.0). potential — initial guess for potential distribution, defined in FUNCTION command. point — name of a spatial point, defined in POINT command. time_constant— circuit time constant (sec). desired — desired value of the observe measurement. obs$name — observe measurement name reference. MAGIC User’s Manual 12-5 Part IV - Spatial Extensions Chapter 12 - Outer Boundaries Description: The PORT command specifies a boundary that allows outgoing waves and particles to escape and incoming waves to enter. It can only be applied on a conformal surface. The conformal area or line is then part of the simulation perimeter that ensures that there is an interior zone and an exterior zone. Holes in the conductor structure may be irregular in shape.The only requirements for the boundary port to be appropriate are that (1) it must be conformal, i.e. rectangular in two ordinates with a fixed third ordinate, and (2) it must not leave any gaps between the port edge and a conductor, and (3) ports may abut, but may not overlap. The following figure illustrates (1) the conformal nature of the port area, (b) bad boundary when the port area does not cover the aperture, and (3) good port that covers the aperture. You will notice that it can extend into the conductor and into the outside of the object region. The typical simulation produces outgoing waves due to scattering from geometric irregularities and plasma interactions within the simulation perimeter. You may also define arbitrary incoming waves. Thus, incoming waves, outgoing waves, and charged particles may be incident upon the boundary. First, you specify where the port boundary is to be applied, using either a conformal line in Magic2D simulations or a conformal area in Magic3D simulations. The PORT boundary provides closure of the simulation perimeter over the region to which it is applied. In addition, you must also enter the alignment of the boundary surface, which is always from outside the perimeter to inside. If this is in the positive direction (increasing coordinate), enter POSITIVE. Otherwise, you must enter NEGATIVE. See the following figure for an illustration of the POSITIVE versus NEGATIVE alignment. Positive Negative Xi The algorithm uses the specified PHASE_VELOCITY to allow outgoing fields to exit and to separate the incoming and outgoing fields. The default of unity is suitable only for TEM waves in vacuum (TEM is a MAGIC User’s Manual 12-6 Part IV - Spatial Extensions Chapter 12 - Outer Boundaries special case of TM). The performance of this algorithm depends critically on matching the actual phase velocities. For example, the reflection coefficient for an outgoing wave with phase velocity, v, is which gives perfect transmission only if the velocities match. If multiple phase velocities are present in a single electromagnetic mode, inaccuracy is unavoidable. The ABC_1 (new default) and ABC_2 options allow you to use a centered advection equation3,4 to solve the boundary matching, where ABC_1 is 1st order and ABC_2 is 2nd order. The original standard port model also uses a one sided wave equation, but is not centered in time or space; it is denoted as option, ABC_0. For poor resolution, this method has substantially increased reflection. E.g., if δx ~ λ/6, then normal incidence waves have a reflection of the order -12db with respect to the incident wave. For ABC_1, this drops to -22db, and for ABC_2 to 39 dB. For well resolved waves, say δx ~ λ/35, we find the reflection for these three cases is of order (-29 dB, -48 dB and -51 db). These boundaries require that there must be a smooth transition to the interior of the simulation for several cells prior to introducing any discontinuity. Current tests indicate that all perform in the presence of particles, and particles may exit the simulation through such boundaries. The EXPANSION option is used in special cases in which the cross-sectional area in the direction of propagation grows (or shrinks), e.g., radial propagation in a conical coax. In most applications, e.g., axial propagation in a cylindrical coax, the area does not change with distance. However, if the area does change, the fields must change also. Scale multiplies fields at the boundary (x) to produce the correct magnitude one cell inside the perimeter (x-dx). For example, for a radially outgoing boundary in polar coordinates, scale would be set to R/(R-dR), since the fields inside the boundary are compressed. This accounts for changing area but not changing impedance. Thus, it works well for radial propagation in spherical coordinates (a conical coax) but not in cylindrical or polar, where continuous scattering occurs. We recommend avoiding such applications if possible. Sometimes, a “dog-leg” section can be added so that the PORT boundary is applied in a region of constant impedance. If this is not possible, scale can sometimes be varied in an ad hoc manner to achieve acceptable results. The INCOMING keyword provides the option to specify incoming waves, i.e., waves incident on the boundary from outside the perimeter. In this case, the total field in the boundary is the sum of the incoming and outgoing fields, which we write in the form, For the incoming wave, you must specify the temporal function, f(t), and the spatial profile function, g(x), where x is the coordinate transverse to the direction of propagation (parallel to the boundary). (Under NORMALIZATION, if you enter VOLTAGE, g(x) will be re-normalized so its integral over the boundary gives unity. Then f(t) will carry units of volts.) In general, discontinuities in f and its first derivative should be avoided. For example, to launch a sinusoidal wave, we recommend multiplying the sine wave by an envelope which goes to unity in a few cycles (see Examples, below). The built in functions, RAMP and SMOOTH_RAMP provide a simple method of enforcing this type of envelope behavior. In 2D simulations, you specify one transverse field component and its spatial profile; in 3D simulations, you must specify two. The spatial profile function, g, for a TEM wave may be simple, e.g., 1/r for axial MAGIC User’s Manual 12-7 Part IV - Spatial Extensions Chapter 12 - Outer Boundaries propagation in a co-axial geometry. For more complex geometries or non-TEM waves, g(x) is generally more complex; e.g., Bessel functions for cylindrical waveguide modes. Therefore, the spatial shape of the wave may be entered in three different ways: by supplying a function, by reading a record from a file, or by solving the LAPLACIAN equation numerically (3D simulations only). The FUNCTION option is most useful when the spatial shape is a well-known function, as is the case for most standard waveguide modes. You enter one component and its shape (2D) or two components and their shapes (3D). The FILE option can be used if you have previously simulated the port geometry specifically to obtain the profile. The file from the previous simulation would be created using a DUMP command or option (DUMP, Ch. 25), and the record names would be available in the TOC file. The LAPLACIAN option (3D simulations only) computes the solution to the LAPLACIAN in the specified area, which is the correct spatial profile for a TEM wave. You must supply the number of conducting objects and a list of their names and voltages. The voltages are relative and none should exceed a value of unity. The algorithm iterates to converge to a solution. You may supply the number of iterations, an over-relaxation coefficient, omega, and a guess for the potential to start the relaxation process. The INITIALIZATION option allows you to specify either an axis for a linear gradient or a function as the initial guess. The NORMALIZATION option allows you to re-normalize the amplitude of the incoming wave. With PEAK_FIELD, you specify a field component and a point. Both spatial profiles will be scaled equally to provide the specified field with an amplitude of unity at this point. The VOLTAGE option scales the spatial profiles to give a voltage of unity through the specified line. Thus, the temporal function, f(t), carries the units of the incoming wave (V/m or V). The CIRCUIT option introduces a feedback loop which rescales the driving function, f. It causes the total (incoming plus outgoing) field to equal the specified incoming field. As the equation above shows, they normally differ by the outgoing component. It compares the desired value with the measurement specified by the obs$name variable. The adjustment to the rescaling function is mediated by the time_constant according to: , where δt is the time step. Most geometries have a practical lower limit on the time_constant, which is typically a round-trip transit time, or perhaps a couple periods of an oscillation. The user must determine this practical limit using a combination of physical intuition, common sense, experience, and trial-anderror. Attempting to set the time_constant below the practical limit will result in dramatic overshoot of the desired behavior, oscillation, and possibily even instability. A typical use for the CIRCUIT option would be to specify a source of a particular desired power, rather than voltage. In such a case, the obs$name measurement would come from an OBSERVE FIELD_POWER S.DA command. Frequently the voltage source is oscillatory so that the feedback adjusts the amplitude in such a manner as to arrive at some desired cycle-averaged quantity, such as power. In such a case, it is necessary to use the FILTER option in the OBSERVE command to arrive at an appropriate cycle-averaged measurement. The PORT command can easily be used to produce the so-called “port approximation,” which can be useful in linear beam and other applications. If you set the phase_velocity to zero, the outgoing wave will be forced to vanish at the boundary. Then, the total field in the boundary will be just the incoming field, or f(t) times g(x1,x2,x3). In employing this approximation, it is good practice to obtain the spatial profile MAGIC User’s Manual 12-8 Part IV - Spatial Extensions Chapter 12 - Outer Boundaries from a separate simulation using the same geometry (assuming it is unknown). It may also be sensible to modulate the temporal function, f(t), as described above. Restrictions: 1. The port surface definition must be either a conformal line in 2D simulations or a conformal area in 3D simulations. 2. The electromagnetic time step must be less than the cell size (in the direction of propagation) divided by phase_velocity times c for Courant stability, . 3. The value of f(t) and its first derivative at t = 0 should vanish. (Before t = 0, the effective value of f(t) is zero, regardless of the function’s value.) 4. The spatial profile function, g(x1,x2,x3), must be correct for the geometry and the specified incoming wave. Artificial scattering will occur at the boundary if g is incorrect. 5. The FILE and LAPLACIAN options are available only in 3D simulations. 6. The CIRCUIT option can be used to maintain a specified constant amplitude following a transient rise, but never to obtain a continuously varying amplitude. 7. Avoid close proximity to structural singularities, e.g., corners, which produce fringe fields in all direction as this may lead to instabilities. 8. Avoid close proximity to particles, which can distort phase velocities and cause artificial field reflections. Avoid using emission surfaces adjacent to port surfaces. 9. Avoid applications involving impedance change. The pre-eminent example is the radially outgoing wave in cylindrical coordinates. We would recommend building an elbow and letting the wave out axially. If this is not possible, then use scale, but test the results! 10. The phase velocity options TM and TE may only be used in MAGIC2D. 11. The maximum number of PORTS is 200. In MAGIC2D, the superposition of a TM wave port and a TE wave port constitutes 2 PORTS. See Also: MAXWELL, Ch. 17, OUTGOING, Ch. 12, FUNCTION, Ch. 6. References: 1. 2. 3. 4. B. Goplen, “Boundary Conditions for MAGIC,” Mission Research Corporation Report, MRC/WDC-R-019, 23rd Annual Meeting, APS Division of Plasma Physics, 12–16 October, 1981. B. Goplen, R. S. Coats, and J. R. Freeman “Three-Dimensional Simulation of the PROTO-II Convolution,” Mission Research Corporation Report, MRC/WDC-R-055, 4th IEEE Pulsed Power Conference, June 6–8, 1983. Advection Equation Approach. EE 417/517. Lecture notes by John Schneider. Larry D. Ludeking and Andrew J. Woods, “Effective Electromagnetic Media in FDTD-PIC”, PIERS 2009, March 23-27, 2009. Examples: 1. In this 3D simulation, the incoming wave is a sinusoidally varying, one-volt, TEM wave, applied to the “inlet” at the left end of a coaxial cable with radii, R_cathode and R_anode. Note the modulation envelope applied to the sinusoidal function to ensure that the derivative of f(t) vanishes at t = 0. LINE gap CONFORMAL R_cathode,0,Z R_anode,0,Z ; AREA inlet CONFORMAL R_cathode,0,Z R_anode,TwoPi,Z ; FUNCTION g1(x1,x2,x3) = 1 / x1 ; FUNCTION g2(x1,x2,x3) = 0 ; FUNCTION f(t) = SIN (omega*t ) * (1.0 - EXP( - omega*t/25 )) ; MAGIC User’s Manual 12-9 Part IV - Spatial Extensions Chapter 12 - Outer Boundaries PORT inlet POSITIVE INCOMING f FUNCTION E1 g1 E2 g2 NORMALIZATION VOLTAGE gap ; 2. In this example, we use the LAPLACIAN option to determine the shape of input port fields in a Cartesian representation of a coaxial line. In addition, we are using the PORT .. CIRCUIT option to provide feedback to force the voltage pulse to the desired net value. Note that this approach damps the ringing that is normally experienced. Typically, ringing occurs when the impulse is activated very rapidly and shocks the system. The following figures shows the geometry. FUNCTION JAPPLY(T) = 1-EXP(-T/TRISE) ; FUNCTION FVOLTAGE(T) = VMAX*JAPPLY(T) ; PORT INLET POSITIVE PHASE_VELOCITY 1.0 INCOMING FVOLTAGE LAPLACIAN 2 CATHODE 0.0 ANODE 1.0 ITERATIONS 100000 NORMALIZATION VOLTAGE INLETPC CIRCUIT 0.2E-9 FVOLTAGE OBS$INLET; PORT OUTLET NEGATIVE; 3. In this example, a simple coax with an ohmic insert uses a PORT at the left to introduce an RF wave and a PORT on the right which lets out the wave that reaches it. We use the CIRCUIT option to control either the desired average voltage, average current, or average power. Note that incident voltage pulse contains both DC and AC components. We have the option of selecting VOLTAGE, CURRENT, or POWER as the controlling CIRCUIT measurement quantity. MAGIC User’s Manual 12-10 Part IV - Spatial Extensions Chapter 12 - Outer Boundaries We use PORT with the CIRCUIT option to specify a desired amount of average input CURRENT. Note the sign on the current function, FCURRENT. This is necessary because of the positive FTEMPORAL applied and the direction of the current integral in the H.DLOOP measurement. When in doubt, first use the VOLTAGE option and check the sign of the current in the measurement and then use the same sign in the desired current function. AVERAGE_CURRENT = 2AMPS ; FUNCTION FTEMPORAL(T)=VOLTAGE_MAX*RAMP(T/TRISE)*(1+0.25*Sin(Omega*T)); FUNCTION GX1(R,T,Z) = 1/R ; FUNCTION GX2(R,T,Z) = .0 ; FUNCTION FCURRENT(T) = -CURRENT_MAX*RAMP(T/Trise) ; PORT INCIDENT_WAVE POSITIVE INCOMING FTEMPORAL FUNCTION E2 GX2 E1 GX1 NORMALIZATION VOLTAGE INCIDENT_VOLT CIRCUIT TCIRCUIT ENVELOPE FCURRENT OBS$INPUT.MEANCURRENT ; PORT EXITING_WAVE NEGATIVE ; OBSERVE FIELD_INTEGRAL H.DLOOP INCIDENTLOOP FILTER STEP PERIOD SUFFIX INPUT.MEANCURRENT; OBSERVE FIELD_INTEGRAL H.DLOOP INCIDENTLOOP SUFFIX INPUT.CURRENT; MAGIC User’s Manual 12-11 Part IV - Spatial Extensions Chapter 12 - Outer Boundaries RESONANT_PORT Command Function: Applies an outer boundary that models the effect of a resonant cavity or lumped circuit. Syntax: RESONANT_PORT { line, area } { POSITIVE, NEGATIVE } frequency IMPEDANCE voltage_line Rshunt_to_Q Q freq_offset kappa_C kappa_L GAP_FIELDS {gap_area, gap_volume } { FUNCTION el(x1,x2,x3) e2(x1,x2,x3) e3(x1,x2,x3), READ file format e1_record e2_record e3_record [ SHIFT x1_shift x2_shift x3_shift] } [ EXTERNAL Q_external [ INPUT power [ PHASE degrees ] ] ] [ RELAXATION n_cycles ] [ ALGORITHM { BEAM_CURRENT, GAP_CURRENT, DIAGNOSTIC } ] ; or RESONANT_PORT { line, area } { POSITIVE, NEGATIVE } JOIN resonant_port ; Arguments: line name of a spatial line, defined in LINE command (2D only). area name of spatial area defined in AREA command for (3D only). frequency applied oscillation frequency in simulation, in Hz. voltage_line name of voltage normalization line, defined in LINE command. Rshunt_to_Q energy impedance, in ohms, consistent with the voltage_line. Q loss parameter, unitless. freq_offset applied frequency minus cavity resonant frequency, in Hz. kappa_C fraction of capacitance treated by boundary, 0 ≤ kappa_C ≤ 1. kappa_L fraction of inductance treated by boundary, 0 ≤ kappa_L ≤ 1. gap_area name of the gap area, defined in AREA command (2D only). gap_volume name of the gap volume, defined in VOLUME command (3D only). e1, e2, e3 the oscillation’s electric fields, defined in FUNCTON commands. file name of a file from which to read the oscillation’s electric fields. format format of the file (ASCII or BINARY). e1_record name of oscillation’s electric field records in the file. x1_shift coordinate shift applied to read-in electric fields. Q_external additional external loss parameter, unitless. power input power, in watts. degrees phase of input signal, in degrees. n_cycles number of cycles for relaxation of the boundary field; default is 1. resonant_port name of previously-defined RESONANT_PORT line/area with which to join. Description: The RESONANT_PORT command provides an outer boundary condition with very special properties that mimic the behavior of a cavity or lumped-circuit, without actually having to create the geometry of the cavity or lumped-circuit in the simulation. The use of this boundary condition, in lieu of the actual geometry, obviously introduces simplification and approximation to a simulation, and the user must be alert to the possibility of an associated loss in fidelity. Keeping this in mind, careful use of the boundary MAGIC User’s Manual 12-12 Part IV - Spatial Extensions Chapter 12 - Outer Boundaries condition can result in significant reduction in simulation size and run time, by reducing the total volume of the simulation, and shortening the time required to achieve cavity saturation. Typically, the RESONANT_PORT boundary is placed in the open gap between the noses of a re-entrant cavity structure, as illustrated in the following figure. For klystron type devices, RESONANT_PORT can successfully substitute for the input and initial buncher cavities. The lumped-circuit approximation is less accurate as the beam current modulation increases, so the boundary condition should not be used as a substitute for the penultimate or output cavity. Experience with the boundary condition also indicates that failure occurs earlier when the drive and cavity frequencies are separated near the limit of the cavity bandwidth, as occurs in wide-band applications of the klystron concept. The RESONANT_PORT boundary condition continues to undergo development in order to improve its range of applicability. The boundary mimics a very simple parallel RLC circuit. The voltage across this parallel circuit, Vgap, is used to apply the electric field boundary condition on the RESONANT_PORT line or area, and this voltage is arrived at from a simple impedance relationship to either an induced beam current or an effective gap current. You must specify a voltage_line that ties the circuit voltage, Vgap, to the geometry of the simulation. In addition, you must specify the IMPEDANCE parameters in the form of the energy impedance, Rshunt/Q=(L/C)1/2, the loss parameter, Q, and the resonant frequency, f0=(LC)-1/2/2π. In a 2D simulation, the voltage_line may be the same as the RESONANT_PORT line, or it may be some other line, e.g., the cylindrical axis. Note that the stored energy of the circuit is defined as U=1/2Vgap2/(Rshunt/Q), so different voltage_lines will have slightly different values of Rshunt/Q in order to preserve the stored energy of the circuit. You must insure that your value of Rshunt/Q is consistent with your voltage_line. In addition to these circuit parameters, the user must also specify the fractions of the circuit capacitance and inductance, κC and κL, which are treated by the boundary. Non-unity fractions occur, because the resonator’s volume invariably encompasses part of the simulation volume adjacent to the boundary, and the field energy within this region is already treated self-consistently in the simulation and should not be treated by the boundary condition. This split is illustrated in the following figure, where the inductance and capacitance have been split into two parts, that treated by the boundary condition and that treated selfconsistently by the simulation. The fractions correspond quite precisely to the fraction of electric and magnetic energy outside the surface of the RESONANT_PORT boundary in an actual cavity. A good way to determine these fractions is to OBSERVE the stored energy in an actual cavity having the same Rshunt/Q, Q, and f0 as the RESONANT_PORT boundary. For a typical cavity geometry, κC will be in the 0.5–0.75 range, e.g., half to three-quarters of the capacitance is treated by the boundary, and κL will be very close to unity, e.g., nearly all the inductance is treated by the boundary. It is especially important to MAGIC User’s Manual 12-13 Part IV - Spatial Extensions Chapter 12 - Outer Boundaries have accurate values for these fractions when the GAP_CURRENT algorithm is being used; by contrast, the BEAM_CURRENT algorithm is insensitive to these fractions. You must also specify the electric field pattern of the resonator oscillation in the gap region. These GAP_FIELDS provide the electric field profile at the boundary and are also needed to compute the induced current. The normalization of the field patterns is not important. You first specify the gap_area (2D) or gap_volume (3D) over which the fields are significantly non-zero. There are two possible ways to input the GAP_FIELDS. The first is to provide three analytic FUNCTIONs of the fields; the second is to READ three records from a file containing the field information. Any such file must be a FLD-type dump-file in either ASCII or binary format and would typically be produced from a simulation of an actual cavity, using the TABLE command to output the field patterns over the desired gap_area or gap_volume. The record names for the field patterns would be found in the TOC file from the same simulation. (The actual cavity simulation can also be used to provide the κC and κL values via OBSERVE FIELD_ENERGY commands.) The user might alternately wish to use existing field patterns from some other source, in which case, it would be necessary to convert the existing data into the FLD-type dumpfile format. If the coordinate systems of the field patterns in the file and simulation do not have the same origin, the SHIFT option can be used to add a fixed translation vector to the coordinates in the file. It is essential to have complete and accurate gap fields in the entire gap region for the BEAM_CURRENT algorithm; by contrast the GAP_CURRENT algorithm is largely insensitive to the gap fields. The internal circuit quantities of a RESONANT_PORT can be diagnosed with the OBSERVE RESONANT_PORT command. By default, there is no additional external load or input power in the circuit model of the boundary. An EXTERNAL option allows the user to add the external circuit elements shown below, e.g., a load with loss parameter Qexternal=Rexternal/(Rshunt/Q), and an optional ideal current source whose input power (=1/2VgapIinput*) is relaxed to the user-specified value. The total Q of the circuit is then given by 1/Qtotal=1/Q+1/Qexternal. In situations involving multiple-input cavities, the relative PHASE between the input signals can also be set as an option. MAGIC User’s Manual 12-14 Part IV - Spatial Extensions Chapter 12 - Outer Boundaries The RESONANT_PORT boundary condition must perform significant relaxation operations. The default time scale for these operations is one cycle of the oscillation, but this may result in an unacceptable level of noise or startup jitter, and the user has the option of setting the RELAXATION time scale to a larger number of cycles. In addition, the RESONANT_PORT boundary contains two different ALGORITHMs for driving the circuit, e.g., the BEAM_CURRENT and the GAP_CURRENT algorithms. The requirements, advantages, and disadvantages of the two methods have been previously highlighted and are discussed in detail below. A third AGLORITHM option allows RESONANT_PORT to be placed in an actual cavity simulation as a DIAGNOSTIC, rather than as an outer boundary condition, for the express purpose of observing the two drive terms and comparing them with the actual cavity signals. The gap impedance as derived from the above circuit diagrams is: , where . When the BEAM_CURRENT algorithm is used, an induced beam current, Ibeam, is computed from the particle current, J(r), following Ramo’s theorem, e.g., Ibeam ≡ ∫gap_regiond3r J(r)⋅Emode(r) , where Emode(r) is the resonator oscillation fields normalized for unit voltage across volt_line. The BEAM_CURRENT algorithm drives the boundary directly from Ibeam, which is transformed to Igap, as illustrated in the circuit diagram (equivalent to setting Igap= Ibeam and taking κC=κL=1). The BEAM_CURRENT has the advantage of driving the circuit to saturation in very few cycles, thereby saving considerable run-time. This algorithm is, however, susceptible to inconsistency because of the physical separation of the driving term, e.g., the beam and the boundary. Evidence of inconsistency usually consists of particle energy loss or gain that is significantly different from that reported from the circuit. The primary cause of inconsistency is beam space-charge effects, which become important when the frequency offset is not zero or when the gap voltage is significant compared to the beam voltage. Inconsistency is increased when GAP_FIELDS are not representative of actual fields in the resonator. MAGIC User’s Manual 12-15 Part IV - Spatial Extensions Chapter 12 - Outer Boundaries When the GAP_CURRENT algorithm is used, the gap current, Igap, is computed from the magnetic field, H(r), along the RESONANT_PORT boundary according to Igap ≡ . The energy into both the circuit and the simulation boundary are identically given by 1/2VgapIinput*, so that there is no danger of inconsistency. An additional advantage of the GAP_CURRENT algorithm is that it can be driven from coupling to nearby cavities, or any other source of RF, while the BEAM_CURRENT is driven solely by particle current within the area/volume of the GAP_FIELDS. The primary disadvantage of the GAP_CURRENT method is the requirement for accurate estimates of ΚC and ΚL, and the fact that resonator saturation is not speeded up. There may be situations in which a cavity gap cannot be bridged by a single line or area, especially in 3D cartesian simulations. It is possible to join together multiple RESONANT_PORT boundaries and drive them all from the same circuit and GAP_FIELDS. The procedure for doing this is to create the first RESONANT_PORT boundary in the usual fashion. For the remainder of the multiple boundaries, the alternate RESONANT_PORT syntax involving the JOIN keyword should be used. See Also: TABLE, Ch. 21, OBSERVE, Ch. 22. Restrictions: 1. There can be at most 20 RESONANT_PORT commands in a simulaltion. 2. The GAP_CURRENT algorithm is unstable for inaccurate values of the κC and κL user inputs. Examples: In the following example, a beam with density modulation excites a buncher cavity, which in turn imparts velocity modulation to the beam. The simulation is then rerun with the cavity removed and replaced with a RESONANT_PORT boundary. The following lines show the commands necessary to create the RESONANT_PORT boundary condition. RF_DRIVE_FREQ = 4.8272 GHZ ; PORT_FREQ = 4.8272 GHZ ; ! ... get this value from cold test of actual cavity PORT_Q = 47.6 ; ! ... get this value from cold test of actual cavity PORT_RSHUNTAQ = 96.50 OHMS ; ! ... get this value from cold test of actual cavity PORT_KAPPAC = 0.70 ; ! ... get this value from cold test of actual cavity PORT_KAPPAL = 0.99 ; ! ... get this value from cold test of actual cavity PORT_DFREQ = RF_DRIVE_FREQ - PORT_FREQ ; LINE GAP CONFORMAL ZBGN_GAP,R_PORT ZEND_GAP,R_PORT ; AREA GAP_REGION CONFORMAL ZBGN_FLD,0. ZEND_FLD,RBGN_CAV ; RESONANT_PORT GAP NEGATIVE RF_DRIVE_FREQ IMPEDANCE GAP PORT_RSHUNTAQ PORT_Q PORT_DFREQ PORT_KAPPAC PORT_KAPPAL GAP_FIELDS GAP_REGION READ EIGENMODE.FLD ASCII EZ ERHO EPHI ; MAGIC User’s Manual 12-16 Part IV - Spatial Extensions OBSERVE OBSERVE OBSERVE OBSERVE OBSERVE RESONANT_PORT RESONANT_PORT RESONANT_PORT RESONANT_PORT RESONANT_PORT Chapter 12 - Outer Boundaries GAP GAP GAP GAP GAP V_GAP ; I_BEAM ; I_GAP ; R_CAVITY_POWER ; GAP_POWER ; The figures below compare snapshots of magnetic field contours and electron phase space and the time history of the gap voltage. The gap voltage is identical for the actual cavity and for the RESONANT_PORT; however, note how the gap voltage saturates much more quickly for the RESONANT_PORT than for the actual cavity. Simulation with Actual Cavity MAGIC User’s Manual Simulation with RESONANT_PORT 12-17 Part IV - Spatial Extensions Chapter 12 - Outer Boundaries CPML Command Function: The CPML command is used to apply an outer boundary for attenuation of outgoing waves using the Convolutional Perfectly Matched Layer method. It can only be used for MAGIC3D Cartesian simulations. Syntax: CPML volume { POSITIVE, NEGATIVE } { X1, X2,X3 } [ CONDUCTIVITY f(s) ] [ ELECTRIC_CONDUCTIVITY fE(s) ] [ MAGNETIC_CONDUCTIVITY fB(s) ] [ SURFACE_CONDUCTIVITY a(s) ] [ ATTENUATION_AMPLIFIER k(s) ] [ POLYNOMIAL_GROWTH_RATE m(s) ] [ POLYNOMIAL_FALLOFF_RATE ma(s) ] ; Arguments: volume — name of volume, defined in VOLUME command. f(x) — name of conductivity function (mhos/m), defined in a FUNCTION command. fE(s) — name of electric conductivity function (mhos/m), defined in a FUNCTION command. a(s) — name of surface conductivity function (ohms/m), defined in a FUNCTION command. k(s) — name of attenuation amplifier function (dimensionless), defined in a FUNCTION command. m(s) — name of polynomial growth rate function for conductivity and k above (dimensionless), defined in a FUNCTION command. ma(s) — name of polynomial falloff rate function for a(x) above (dimensionless), defined in a FUNCTION command. Description: The CPML command introduces an absorbing boundary region which allows outgoing waves to escape from the simulation. It is similar in purpose to the FREESPACE command, but has in principal the ability to attenuate waves to a greater degree (especially evanescent cases). CPML is applied over a finite region (volume in 3D simulations). The downstream conformal surface of this region is part of the simulation perimeter. First, specify where the boundary is applied in a conformal volume in 3D simulations. In addition, you must also enter the alignment of the absorbing volume, which is always from outside the perimeter to the inside, along a specific attenuation axis. If this is in the positive direction (increasing coordinate), enter POSITIVE; otherwise, enter NEGATIVE. The argument (X1, X2, or X3) specifies the axis along which attenuation is applied. MAGIC User’s Manual 12-18 Part IV - Spatial Extensions Chapter 12 - Outer Boundaries The CPML algorithm applies a spatially-varying conductivity to both electric and magnetic components of the field equations. This reduces the phase shift between components as both are attenuated, thus minimizing reflection. The CONDUCTIVITY function increases as a power law with distance in the direction of the outgoing wave, or σ (xn) = σm xnm, where the spatial coordinate, xn = x/d, is normalized to a total length of unity over the distance d of the layer in the direction of propagation, and m is the scaling order. The proper "zero" location, orientation, and spatial scaling are accounted for automatically by the code, so that the minimum value of conductivity (zero) will be applied at the upstream edge of the region, and the maximum conductivity (σm ) will be applied at the downstream edge, which is part of the simulation perimeter. In the default configuration, field components of E and B lying on the perimeter plane are forced to vanish. The default value for the maximum electrical conductivity, σEm , is determined from the equation, σEm = 0.8*(m+1)/(377.0*dyav) where dyav is the average spatial cell dimension in the (assumed y-normal here) layer. (It is assumed that the model will be employed over a spatial distance equal to about half the wavelength.) The corresponding default value for the maximum magnetic conductivity, σΒm, is given by σBm = σEm (Zfree)2, where Zfree = 377 ohms is the vacuum impedance. This has the same default profile as the electrical conductivity. The surface conductivity a falls off as m a = amax (1 - sn) a where ma is the scaling order. MAGIC User’s Manual 12-19 Part IV - Spatial Extensions Chapter 12 - Outer Boundaries The default attenuation amplifier function k varies from 1 at the surface to a maximum of kmax at xn = 1. k = 1 + (kmax-1) snm, where kmax is chosen empirically by the user. Only values of unity are presently fully implemented in the code. Default CPML parameter values in Magic3d are m=3, a=0.2 mho/m, ma=1, and kmax =1, and 1.0*σEm. The best results obtained to date for the waveguide test configuration used during the development of the method for Magic3d have employed these defaults. CPML parameter values of m=3, a=0.2 mho/m, ma=1, and kmax =15 have been reported as close to optimal for 3 geometries in reference 1. UPML representation is accomplished with a = 0 and kmax =1. You can override the default functions and enter your own functions by using the various conductivity options. You explicitly define the profile and amplitude of the electric and magnetic conductivity of the CPML region with these options. • • • Using CONDUCTIVITY, you enter the function for f(x). In this case, fE(s)= f(s) and fB(s) = f(s)Zfree2. Using ELECTRIC_CONDUCTIVITY, you enter the function for fE(s). Using MAGNETIC_CONDUCTIVITY, you enter the function for fB(s). The default configuration option corresponds to TERMINATE_WITH_SHORT in the FREESPACE command. This ensures that the final plane of the CPML zone is terminated with a shorting plane. That is the fields lying on the final application plane are set to zero. This is the only option available at present for CPML. Restrictions: 1. The maximum number of CPML commands is fifty (50). 2. The boundary should encompass at least half a wavelength in distance and at least ten (but no more than 100) cells in the spatial grid. See Also: FREESPACE , This Chapter, CONDUCTANCE, Ch 14, FUNCTION, Ch. 6, PORT, Ch. 12. Examples: A y-directed waveguide with zone spacing dy is excited by an incident voltage pulse at the inlet. The EM wave is absorbed at the outlet end of the guide. The default cubic conductivity is employed. 100% of the (Ref. 1) book recommended optimum sigma is specified. The surface conductivity has a maximum value of 0.2 mhos/m and falls off linearly to zero at the back of the layer. The kappa or k term is constant at unity in the layer. This is illustrated in the following commands: ! UPML or CPML(k=1) (Unaxial PML) msigEH = 3 ; ! polynomial growth rate for sigma,k (scaling order, p297) sigMult = 1.0 ; ! fraction of optimum sigma (p3160 Function fsigmaEsurf(x) = 0.2 ; ! Max “surface conductivity” Function FkmaxEH(x) = 1.0 ; ! Max attenuation amplifier kmax Function FmsigEH(x) = msigEH ; ! polynomial growth rate for σ, k MAGIC User’s Manual 12-20 Part IV - Spatial Extensions Function FmaEH(x) conductivity” = Chapter 12 - Outer Boundaries 1.0 ; ! polynomial falloff rate for “surface Function FsigmaE(x) =SigmaMaxE*(x**msigEH) ; Function FsigmaB(x) =SigmaMaxB*(x**msigEH) ; out2inFS = "Negative" ; SigmaMaxE = sigMult*0.8*(msigEH+1)/(377.0*dy) ; Volume FreeSigma Conformal Vg.xi Vg.yi Vg.zi Fg.xf Vg.yf Vg.zf ; CPML FreeSigma out2inFS x2 Electric_CONDUCTIVITY fsigmaE Magnetic_CONDUCTIVITY fsigmaB algorithm falgorithm SURFACE_CONDUCTIVITY fsigmaEsurf ATTENUATION_AMPLIFIER FkmaxEH POLYNOMIAL_GROWTH_RATE FmsigEH POLYNOMIAL_FALLOFF_RATE FmaEH ; For this example with parameters corresponding to all the default values, the same CPML region can be obtained with: CPML FreeSigma out2inFS x2 ; In this example, the free space boundary is applied everywhere within volume “FreeSigma” which is “oriented” negatively (at the high end of the y coordinate). Note that the normalized spatial variable “x” in the conductivity function will vary from zero to one over the longitudinal length of this volume, irrespective of its actual physical length. Implementation Details: The Convolutional Perfectly Matched Layer (CPML) method is implemented in Magic3D Cartesian coordinates following the method described in reference 1. The method solves the Maxwell’s equations in the CPML layers with zero conductivities specified in the host medium, but with psi terms calculated using conductivities as described above added in from the auxiliary differential equation (ADE): psi_exy1(i1,IFR,i3,nf)=be_y(IFR,nf)*psi_exy1(i1,IFR,i3,nf)+ce_y(IFR,nf)* & !Psicalc (B3(i1,i2,i3)-B3(i1,i2-1,i3))/xmu0*DH2I(i2) FnoPsi=cb_x(IFR,nf)*E1(I1,I2,I3) dFPsi=cb_x(IFR,nf)*(dtime/eps0*psi_exy1(i1,IFR,i3,nf)) ! E1 (cond(x2) E1(I1,I2,I3)=FnoPsi+dFPsi Where The medium is assumed normal to the y axis in this example, The index IFR runs over the number of zone centers within the layer, The index NF is the number of the PML layer (1 in this example with only a y-normal layer), DH2I(i2) is the inverse of dy, the normal zone size from cell center-to-center in the layer, FnoPsi is the result of the regular Maxwell update, MAGIC User’s Manual 12-21 Part IV - Spatial Extensions Chapter 12 - Outer Boundaries dFPsi is the psi convolution correction for the current time step, be_y=exp(-sigep_tan*Dteps/ke_tan) and ce_y=dbgC*(be_y-1.0)*sige_tan/(sigep_tan*ke_tan) are the ADE coefficients. sige_tan is the electric conductivity at the y-zone edges sigep_tan=sige_tan+ke_tan*ae_tan is the surface conductivity and kmodified zone conductivity The updates for Ez are: psi_ezy1(i1,IFR,i3,nf)=be_y(IFR,nf)*psi_ezy1(i1,IFR,i3,nf)+ce_y(IFR,nf)* & !Psicalc (B1(i1,i2,i3)-B1(i1,i2-1,i3))/xmu0*DH2I(i2) FnoPsi=cb_z(IFR,nf)*E3(I1,I2,I3) dFPsi=cb_z(IFR,nf)*(-dtime/eps0*psi_ezy1(i1,IFR,i3,nf)) ! E3 (cond(x2) E3(I1,I2,I3)=FnoPsi+dFPsi The equations for B are very similar resulting in psi values which differ approximately by the waveguide impedance of the mode (vphZ0 where vph is the phase velocity and Z0 is the free space impedance (~377 ohms). References: 1) S. Gedney, “Perfectly Matched Layer Absorbing Boundary Conditions”, Ch. 7 in Taflove, Li, and Hagness, Computational Electrodynamics, 2005. MAGIC User’s Manual 12-22 Part IV - Spatial Extensions Chapter 12 - Outer Boundaries FREESPACE Command Function: The FREESPACE command is used to apply an outer boundary for attenuation of outgoing waves. An alternative use is to use it as interior load factor. Syntax: FREESPACE { area, volume } { POSITIVE, NEGATIVE } { X1, X2,X3 } { TRANSVERSE, ALL, E1, E2, ..., B3 } [ CONDUCTIVITY f(x) ] [ ELECTRIC_CONDUCTIVITY fE(x) ] (MAGIC3D only) [ MAGNETIC_CONDUCTIVITY fB(x) ] (MAGIC3D only) [{TERMINATE_WITH_SHORT, NO_TERMINATE_WITH_SHORT}] ; Arguments: area — name of area, defined in AREA command (2D simulations only). volume — name of volume, defined in VOLUME command (3D simulations only). f(x) — name of conductivity function (mhos/m), defined in a FUNCTION command. fE(x) — name of electric conductivity function (mhos/m), defined in a FUNCTION command. fB(x) — name of magnetic conductivity function (ohms/m), defined in a FUNCTION command. Description: The FREESPACE command allows outgoing waves to escape from the simulation. It is similar in purpose to the PORT command. However, whereas PORT is applied along a conformal surface, FREESPACE is applied over a finite region (area in 2D simulations and volume in 3D simulations). The downstream conformal surface of this region is part of the simulation perimeter. First, specify where the boundary is applied, using an area in 2D simulations and a volume in 3D simulations. You must also enter the sense, which is always from outside the perimeter to inside, along a specified axis. If this is in the positive direction (increasing coordinate), enter POSITIVE; otherwise, enter NEGATIVE. The axis (X1, X2, or X3) specifies the axis along which propagation occurs. The FREESPACE algorithm applies a spatially-varying conductivity to both electric and magnetic components in the field equations. This reduces the phase shift between components as both are degraded, minimizing reflection. You must specify the field components to which conductivity will be applied. The normal application involves only the transverse (propagating) field components (both electric and magnetic fields). However, in special applications, you may also enter ALL or even MAGIC User’s Manual 12-23 Part IV - Spatial Extensions Chapter 12 - Outer Boundaries individual field components (E1, E2, ..., B3). In this case, a separate FREESPACE command must be given for each desired component, and care must be exercised to avoid duplication (e.g., issuing commands for ALL and E1 fields). One reason to allow multiple FREESPACE commands on the same spatial region is to be able to use different conductivity functions on different field components. For example, a special treatment of the longitudinal electric field may be used to relax space-charge fields if particles penetrate the boundary area. The default CONDUCTIVITY function increases quadratically with distance in the direction of the outgoing wave, or f(s) = σm s2, where the spatial coordinate, s, is normalized to a total length of unity over distance in the direction of propagation. s =(xn- xbegin)/ (xend - xbegin). Here, xn refers to the coordinate along the axis of propagation and attenuation, i.e. X1, X2, or X3. And xbegin refers to the interior edge of the freespace attenuation zone, and x end is the far end of the freespace attenuation zone. Thus the proper "zero" location, orientation, and spatial scaling is accounted for automatically by the code, so that the minimum value of conductivity (zero) is applied at the upstream edge of the FREESPACE region, and the maximum conductivity (σm ) is applied at the downstream edge, which is part of the simulation perimeter. (Fields actually in the perimeter will vanish.) The default value for the maximum electrical conductivity, σm, is determined from the equation, σEm = 4πcεo/λ = 4πεof = 2εoω, where λ is estimated from the distance. (It is assumed that the model will be employed over a spatial distance equal to about half the wavelength.) The corresponding default value for the maximum magnetic conductivity, σΒm, is given by σBm = σEm (Zfree)2, where Zfree = 377 ohms is the vacuum impedance. This has the same default profile as the electrical conductivity. The FREESPACE algorithm has a very broad bandwidth, and results are usually insensitive to the detail of the conductivity function. However, you can override the default functions and enter your own functions by using the various conductivitity options. You explicitly define the profile and amplitude of the electruc and magnetic conductivity of the freespace region with these options. • Using CONDUCTIVITY, you enter the function for f(x). In this case, fE(x)= f(x) and fB(x) = f(x)Zfree2. • Using ELECTRIC_CONDUCTIVITY, you enter the function for fE(x). • Using MAGNETIC_CONDUCTIVITY, you enter the function for fB(x). The default configuration option, TERMINATE_WITH_SHORT, is for the final plane of the FREESPACE zone to be terminated with a shorting plane. That is the fields lying on the final application plane are set to zero. This is essential if FREESPACE is to be used as an outer boundary termination. You may select the configuration option NO_TERMINATE_WITH_SHORT as an alternative. However, you must in this case provide an alternative termination boundary if this leaves a hole in the outer perimeter. You may wish to use this feature if you want an interior load that applies both an electric and magnetic conductivity factor in the interior region of a simulation. This might be useful if MAGIC User’s Manual 12-24 Part IV - Spatial Extensions Chapter 12 - Outer Boundaries you are lining a region with material that is to mimic the absorbing properties of material in an anechoic chamber. Restrictions: 1. The maximum number of FREESPACE commands is fifty (50). 2. The boundary should encompass at least half a wavelength in distance and at least ten (but no more than 100) cells in the spatial grid. See Also: CONDUCTANCE, Ch 14, FUNCTION, Ch. 6, PORT, Ch. 12. Examples: We wish to absorb the outgoing wave at the outlet end of a coaxial cable which is subjected to an incident voltage pulse at the inlet. For the sake of illustration, the default (quadratic) conductivity will be replaced by a linear conductivity having a maximum value of 10-3 mhos/m. This is illustrated in the following commands: FUNCTION SIGMA(X) = 1.0E-3 * X ; FREESPACE Volume_Free NEGATIVE X1 TRANSVERSE CONDUCTIVITY SIGMA ; In this example, the freespace boundary is applied everywhere within Volume_Free. Note that the normalized spatial variable in the conductivity function will vary from zero to one over the axial length of this volume, irrespective of its actual physical length. MAGIC User’s Manual 12-25 Part IV - Spatial Extensions Chapter 12 - Outer Boundaries MATCH Command Function: Matches an outer boundary in a 2D/3D simulation to a transmission line. Syntax: MATCH { apply_line, apply_area } { POSITIVE, NEGATIVE } PROFILE {FUNCTION {E1 gs1(x1,x2,x3), E2 gs2(x1,x2,x3), E3 gs3(x1,x2,x3)} {E1 gs1(x1,x2,x3), E2 gs2(x1,x2,x3), E3 gs3(x1,x2,x3)}, FILE file_name {E1, E2, E3} record_name {E1, E2, E3} record_name LAPLACIAN n_conductor conductor_name conductor_voltage … [ITERATIONS iterations] [OMEGA omega] [INITIALIZATION {X1,X2,X3, potential(x1,x2,x3)}]} VOLTAGE_INTEGRAL voltage_line CURRENT_INTEGRAL {current_point, current_line,current_loop} TRAMLINE transmission_line point { POSITIVE, NEGATIVE }; Arguments: apply_line — name of spatial line for the match, defined in LINE command (MAGIC 2D simulations only. apply_area — name of spatial area for the match, defined in AREA command (MAGIC 3D simulations only. gns(x1,x2,x3) — spatial profile function for field component (arbitrary units), defined in FUNCTION command. file_name — name of dump file containing data for field profiles. record_name — name of record containing data for field component profile. n_conductor — number of conducting objects touching matching boundary patch. conductor_name— name of conductor (assigned in CONDUCTOR command.) conductor_voltage— relative conductor voltage used for the Laplacian solution (V). iterations — maximum number of relaxation iterations (default = 10,000). omega — over-relaxation constant (default = 1.0). potential — intial quess for the potential distribution, defined in FUNCTION command. voltage_line — conformal line object for voltage normalization. current_point — conformal point object for current measurement (2D, TEM wave only). current_line — conformal line object for current measurement (3D). current_area — conformal area object for current loop measurement (3D). apply_area — name of spatial area for the match, defined in AREA command (MAGIC 3D simulations only. transmission_line — name of a transmission line, defined in TRAMLINE command. point — transmission line point for voltage match. Description: The MATCH command connects a transmission line to the simulation. Specifically, the transmission line current and voltage are coupled with the TEM fields of the simulation in 2D, and the TEM, TE, or TM fields in 3D (determination is based on the profile function and voltage and current integrals). The spatial convention for the linear match is illustrated in the figure that follows. First, enter a spatial line describing the integral path for voltage. You must also enter the direction from outside the perimeter to inside. If this is in the positive direction (increasing coordinate), enter POSITIVE; otherwise, enter NEGATIVE. The point_name determines the type of match between the transmission line current and the MAGIC User’s Manual 12-26 Part IV - Spatial Extensions Chapter 12 - Outer Boundaries magnetic field. If you enter NULL, an average of the magnetic field will automatically be performed over a path adjacent to the voltage integral. Alternatively, you may use the magnetic field at a single point by entering a point_name. You must also identify the transmission line and specify its end point and its direction from outside to inside, as either POSITIVE or NEGATIVE. The cell size of the transmission line and the perpendicular cell size of the simulation should be the same at the match. Matching to a Transmission Line Restrictions: 1. All transmission lines must be specified using TRAMLINE commands. 2. Primary and secondary cell sizes must be identical at the match point (in the direction of propagation). See Also: TRAMLINE, Ch. 13, JOIN, Ch. 13, GRID, Ch. 11. Examples: The following example has two upstream tramlines, a 2d simulation section with a discontinuity matched with a resistor, and two downstream tramlines. A 9 volt signal is introduced at first of the upstream transmission lines. ! *** TRANSMISSION LINES AT UPSTREAM END. **** TL1.RI = CATHODE1.RO ; TL1.RO = ANODE1.RI ; TL1.L = 6CM ; TL1.ZL = COAXIAL_IMPEDANCE1 ; TL1.EL = EPS1; TRAMLINE TL0 IMPEDANCE TL1.ZL TL1.EL UNIFORM DISTANCE TL1.L FIRST DELTA_Z ; TRAMLINE TL1 IMPEDANCE TL1.ZL TL1.EL UNIFORM DISTANCE TL1.L FIRST DELTA_Z ; ! *** TRANSMISSION LINES AT DOWNSTREAM END. **** MAGIC User’s Manual 12-27 Part IV - Spatial Extensions Chapter 12 - Outer Boundaries TL2.RI = CATHODE2.RO ; TL2.RO = ANODE2.RI ; TL2.L = 3CM ; TL2.ZL = COAXIAL_IMPEDANCE2 ; TL2.EL = EPS2; TL2_MATCH_s = 0.0 ; TL2_Term_s = TL2.l ; TRAMLINE TL2 IMPEDANCE TL2.ZL TL2.EL UNIFORM DISTANCE TL2.L FIRST DELTA_Z ; TRAMLINE TL3 IMPEDANCE TL2.ZL TL2.EL UNIFORM DISTANCE TL2.L FIRST DELTA_Z ; ! Introduce Voltage at Upstream Tramline. VOLTAGE TL0 0.0 POSITIVE FTEMPORAL ; ! Join first upstream tramlines. JOIN TL1 0.0 POSITIVE TL0 TL1.L NEGATIVE ; ! Match upstream Tramline and left side of 2d simulation. MATCH PORT1 POSITIVE PROFILE FUNCTION E2 GX2 E3 GX3 VOLTAGE_INTEGRAL PORT1 CURRENT_INTEGRAL PORT1B TRAMLINE TL1 TL1.L NEGATIVE ; ! Match downstream Tramline and right side of 2d simulation. MATCH PORT2 NEGATIVE PROFILE FUNCTION E2 GX2 E3 GX3 VOLTAGE_INTEGRAL PORT2 CURRENT_INTEGRAL PORT2B TRAMLINE TL2 TL2_MATCH_s POSITIVE ; ! Join two downstream tramlines. JOIN TL2 TL2.L NEGATIVE TL3 0.0 POSITIVE ; ! Terminate final downstream tramline with Lookback boundary. ! This is equivalent to an open port boundary. LOOKBACK TL3 TL2.L NEGATIVE ; MAGIC User’s Manual 12-28 Part IV - Spatial Extensions Chapter 12 - Outer Boundaries MAGIC User’s Manual 12-29 Part IV - Spatial Extensions Chapter 12 - Outer Boundaries MAGIC User’s Manual 12-30 Part IV - Spatial Extensions Chapter 12 - Outer Boundaries IMPORT Command Function: This command is used create a port-like outer boundary at which particles are injected (imported) and particle consistent transverse electric fields are introduced at the simulation edge. Some of the options allow you to import from various gun codes, others allow you to generate a synthetic beam with specified current and energy features. Syntax: IMPORT {line, area} { POSITIVE, NEGATIVE } (MAGIC2D options) { LAMINAR_BEAM current energy radius guide_field [GAMMA_SCALE gscale(t)] [NUMBER npcell], SHAPED_BEAM current_density(r) energy radius guide_field [GAMMA_SCALE gscale(t)] [NUMBER npcell], FILE file_prefix {ASCII,BINARY} [SPECIES species_name], EGUN datafile_from_egun [CONDENSE ncondense] } (MAGIC3D options) { BEAM current current_density(x1,x2,x3) energy radius guide_field beam_area [GAMMA_SCALE gscale(t)], LAMINAR_BEAM current energy radius guide_field [GAMMA_SCALE gscale(t)] [NUMBER npcell], SHAPED_BEAM current_density(x1,x2,x3) energy radius guide_field [GAMMA_SCALE gscale(t)], SPOTS current energy guide_field nspots {nringsi weighti radiusi x1i x2i x3i }i=1,nspots [GAMMA_SCALE gscale(t)], FILE file_prefix {ASCII,BINARY} [ SPECIES species_name], (MAGIC3D gun code options) EGUN datafile_from_egun [CONDENSE ncondense], DEMEOS datafile_from_demeos {MM,CM, INCH,METER} [CONDENSE ncondense], GUN_CODE datafile_from_guncode {MM,CM, INCH,METER} {GAMMAV,VELOCITY} [DATA_AXIS {X, Y, Z}] [WCONDENSE nx ny nz] MICHELLE datafile_from_michelle [SUBSET sfraction] [WCONDENSE nx ny nz], MAGIC User’s Manual 12-31 Part IV - Spatial Extensions Chapter 12 - Outer Boundaries [DATA_AXIS {XYZ, XZY, YZX, YXZ, ZXY, ZYX}] OMNITRAK datafile_omnitrak [DATA_AXIS {X, Y, Z}] } (Optional arguments) [ SCALE scale(t) ] [ PHASE_VELOCITY beta] [{TIMING, RANDOM_TIMING} step_multiple ] [ BEAM_CENTER bc_point ] (MAGIC3D only) [ SAMPLE fraction ] (MAGIC3D only) [ REWIND_AT_EOF cycles, TERMINATE_AT_EOF ] [ SPECIES species_name] [ RADIAL_SPECIES species_name xrmin xrmax]; (MAGIC2D only) Arguments: name of spatial line, defined in LINE command (2D simulations only). name of spatial area, defined in AREA command (3D simulations only). prefix of file name. file format (ASCII or BINARY). beam current in amps. beam current density function in amps/m2, defined in a FUNCTION command. beam energy in electron volts. beam radius in m. beam magnetic guide field in tesla. beam confinement area, name of spatial area, defined in AREA command. name of data file containing particle information. energy gamma scaling factor, defined in FUNCTION command. number of rays to condense into 1 weighted ray. number of particle weights in each ordinate for WCONDENSE. number of particle per cell, default=2 in MAGIC2D. (Only available in MAGIC2D) phase_velocity for waves escaping at import. field and charge scaling factor, real or defined in FUNCTION command. LORENTZ time-step multiplier (integer), number of Lorentz time_steps / emission time step, default=1. bc_point name of point, defined in POINT command (3D simulations only). fraction fraction of particles to import, 0<fraction≤1, default is 1 (3D simulations only). cycles number of times to rewind file (integer). species_name name of a particle species used in an import file, and defined in SPECIES command. xrmin,xrmax range of transverse coordinate for import beam, (meters). nspots number of spot beams to import. nringsi number of rings of particles in each spot. radiusi radius of beam spot i. weighti relative current weight of beam spot i. x1i x2i x3i center of beam spot i. sfraction subset fraction of particles in import file to use, 0<fraction≤1, default is 1 (3D simulations only). line area file_prefix file_format current current_density energy radius guide_field beam_area datafile gscale ncondense nx, ny, nz npcell beta scale step_multiple MAGIC User’s Manual 12-32 Part IV - Spatial Extensions Chapter 12 - Outer Boundaries Description: The IMPORT command defines an outer boundary for introducing incoming fields and particles. These may be particle and field records that were produced by an EXPORT command in a previous simulation, (i.e., output from EXPORT provides input for IMPORT.) Alternatively, you may import particle records generated by a gun_code, or generate a synthetic beam with specific characteristics. There are several options for specifying an imported particle beam. These are: Magic to Magic using the Export and Import commands 1. The FILE option allows you to read in particles and fields created from an earlier EXPORT run of MAGIC, or you may create a synthetic particle beam using the same data format used by EXPORT. In the case of FILE, you can specify the particle import species by the names used in the creation run. For example, if you have two electron species, you may IMPORT these as distinct species provided you use the SPECIES command to define them, and in addition, use the SPECIES option in IMPORT to tell MAGIC that these species may be found in the imported particle data. Synthetic beam into Magic using a variety of beam configuration options 2. The BEAM option allows you to create an ideal beam with a specified current, current density profile, J(r), and beam voltage, Eb, and beam radius, Rb. You supply a confining beam confinement area, which must lie within the import application area. The guiding magnetic field strength, Bg, for the beam to be given the proper rotation must be supplied and should be consistent with the magnetic field applied via the PRESET BnST command for the active simulation region. 3. The LAMINAR_BEAM option allows you to create an ideal laminar flow beam with a specific current, I, and beam voltage, Eb, and beam radius, Rb. You must supply the guiding magnetic field strength,Bg, at the import plane for the beam to be given the proper rotation and provide the desired magnetic field in a PRESET BnST command for the active simulation region. 4. The SHAPED_BEAM option allows you to create an ideal beam with a specified current density profile, J(r), and beam voltage, Eb, and beam radius, Rb. You must supply the guiding magnetic field strength, Bg, for the beam to be given the proper rotation and provide the desired magnetic field in a PRESET BnST command for the active simulation region. 5. The SPOTS option allows you to easily introduce multiple beam spots in an injection plane. This is designed particularly to allow for multi-beam injection. All beamlets are assumed to be injected with the same energy. Individual beamlets may carry different relative weights, and may contain different numbers of particles. The argument ‘nrings’ determines the number of particle rings to be generated in the spot, (spots are assumed to be of circular cross section.). The first ring will have 4 particles symmetrically placed around the spot center in the injection plane. Each successive ring has 4 more particles than the preceding ring. The ring radius is uniformly created from the ‘radius’ argument. For nrings=3, there are 4 + 8 + 12 = 24 particles injected at the spot plane. Injection of gun code particles beam into Magic from a variety of electron gun codes MAGIC User’s Manual 12-33 Part IV - Spatial Extensions Chapter 12 - Outer Boundaries 6. The EGUN option allows you to introduce the output electron beam from an EGUN run. This will generate the electron beam from the supplied electron trajectory information. By default it will condense the number of rays to approximately 2 per radial cell. Otherwise use the CONDENSE option to specify the number of rays to condense into 1 MAGIC macro-particle. The translation from EGUN rays to MAGIC macro-particles is designed to give an approximately smooth charge density by only collecting adjacent rays into a larger ray. The procedure attempts to give a relatively uniform distribution of particles, but assumes that the radial mesh that the beam spans in only moderately non-uniform. In the event that the mesh is drastically nonuniform, the default condensation of rays may not give a smooth profile. In this case reduce the number of particles per condensed macro-particle. When the EGUN run included a confining magnetic field, you must ensure that it is provided to MAGIC via the PRESET BnST command. 7. The DEMEOS option allows you to introduce the output electron beam from an DEMEOS run. You are required to supply the argument “MM”, “CM”, “INCH” or “METER” to indicate the units of the position coordinates in the demeos file. Magic will generate the electron beam from the supplied electron trajectory information. By default it will condense the number of rays to approximately 2 per radial cell. Otherwise use the CONDENSE option to specify the number of rays to condense into 1 MAGIC macro-particle. The translation from DEMEOS rays to MAGIC macro-particles is designed to give an approximately smooth charge density by only collecting adjacent rays into a larger ray. The procedure attempts to give a relatively uniform distribution of particles, but assumes that the radial mesh that the beam spans in only moderately non-uniform. In the event that the mesh is drastically non-uniform, the default condensation of rays may not give a smooth profile. In this case reduce the number of particles per condensed macro-particle. When the DEMEOS run included a confining magnetic field, you must ensure that it is provided to MAGIC via the PRESET BnST command. 8. The GUN_CODE option allows you to introduce the output electron beam from an arbirtray gun code, provided the data is recorded in a particular fashion. You are required to supply the argument “MM”, “CM”, “INCH” or “METER” to indicate the units of the position coordinates in the data file, and the argument “GAMMAV” or “VELOCITY” to indicate the momentum type. In general it is better to supply data in the “GAMMAV” format, as this carries better precision for relativistic beams. Magic will automatically scale the position and momentum values appropriately. In addition, you must indicate if the momentum type by supplying one of the two keywords “GAMMAV” or “VELOCITY”. This option is only available in MAGIC3D, and presently is only implemented in 3D Cartesian geometry. An option to switch the DATA_AXIS to match that of the simulation is also provided, for example in the case that the gun code data consists of a beam propagating down the X-axis, while the same geometry in the MAGIC simulation has the beam propagating down the Z-axis. The user indicates the beam axis used in the gun code data. Typically, gun codes generate a far greater number of particles than is generally suitable for import on a single time step in MAGIC. Therefore, it may be necessary to use the SAMPLE option in conjunction with this type of import. When the data from the gun code included a confining magnetic field, you must ensure that it is provided to MAGIC via the PRESET BnST command. The GUN_CODE option assumes that the data is in a text file and consists of 7 columns of data. Data is delimited by one or more spaces. You may have several lines of descriptive text preceding the columns of data and you may have additional descriptive lines following the particle data. The descriptive text is ignored by MAGIC. MAGIC determines the number of particles/rays by counting the numbers lines that have 7 numerical data elements. The number of lines of particle trajectories is arbitrary, as is the format and spacing. The first column of numbers is always assumed to be the current in amps for the particle rays, the next three numbers are assuming to be the Cartesian position, and the final 3 numbers are the momenta MAGIC User’s Manual 12-34 Part IV - Spatial Extensions Chapter 12 - Outer Boundaries or velocity in units of distance/sec. The GUN_CODE option was designed to make it simple to introduce an arbitrary gun code set of particle rays into MAGIC. 9. The MICHELLE option allows you to introduce the output electron beam from a MICHELLE run. This will generate the electron beam from the supplied electron trajectory information. This option is only available in MAGIC3D, and presently is only implemented in 3D Cartesian geometry. An option to switch the DATA_AXIS to match that of the simulation is also provided, in case the MICHELLE run had, for example, the beam propagating down the X-axis, while the same geometry in the MAGIC simulation has the beam propagating down the Z-axis. The user indicates the beam axis used in the MICHELLE run. You must also ensure that the transverse coordinate’s orientation is the same. This is achieved by selecting, e.g. either XYZ or XZY in the case that the beam is aligned with the X axis. In addition, you may find that beam axis center in MAGIC is not (0,0,0). In this case you may shift the axis location using the BEAM_CENTER option. Typically, MICHELLE will generate a far greater number of particles than what is generally suitable for import on a single time step in MAGIC. There are three methods of reducing the burden of excessive particles. These are the SAMPLE, SUBSET and WCONDENSE options. When the MICHELLE run included a confining magnetic field, you must ensure that it is provided to MAGIC via the PRESET BnST command. 10. The OMNITRAK option allows you to introduce the output electron beam from an OMNITRAK run. This will generate the electron beam from the supplied electron trajectory information. This option is only available in MAGIC3D, and presently is only implemented in 3D Cartesian geometry. An option to switch the DATA_AXIS to match that of the simulation is also provided, in case the OMNITRAK run had, for example, the beam propagating down the X-axis, while the same geometry in the MAGIC simulation has the beam propagating down the Z-axis. The user indicates the beam axis used in the OMNITRAK run. Typically, OMNITRAK will generate a far greater number of particles than what is generally suitable for import on a single time step in MAGIC. Therefore, it is usually necessary to use the SAMPLE option in conjunction with this type of import. When the OMNITRAK run included a confining magnetic field, you must ensure that it is provided to MAGIC via the PRESET BnST command. See the application configuration table that follows for the allowable models application for MAGIC2D and MAGIC3D. In addition, for cylindrical and polar coordinate systems, the import plane must be conformal with the z-axis. Data Source/Model Application Configuration Table: Import Data Into Simulation FILE, 2D EXPORT (cylindrical) FILE, 2D EXPORT (cylindrical) FILE, 3D EXPORT (cylindrical) FILE, 3D EXPORT (polar) 2D (cylindrical) 3D (cylindrical, polar, Cartesian) 3D (cylindrical) 3D (polar) MAGIC User’s Manual Number of Time Records N N N N 12-35 Part IV - Spatial Extensions Chapter 12 - Outer Boundaries FILE, 3D EXPORT (Cartesian) BEAM LAMINAR_BEAM LAMINAR_BEAM SHAPED_BEAM SHAPED_BEAM SPOTS EGUN data file (cylindrical) EGUN data file (cylindrical) DEMEOS data file (cylindrical) MICHELLE (Cartesian) OMNITRAK (Cartesian) GUN_CODE (Cartesion) 3D (Cartesian) 3D (cylindrical, polar, Cartesian) 2D (cylindrical) 3D (cylindrical, polar, Cartesian) 2D (cylindrical) 3D (cylindrical, polar, Cartesian) 3D (cylindrical, polar, Cartesian) 2D (cylindrical) 3D (cylindrical, polar, Cartesian) 3D (cylindrical, polar, Cartesian) 3D (cartesian) 3D (cartesian) 3D (cylindrical, polar, Cartesian) N 1 1 1 1 1 1 1 1 1 1 1 1 The EXPORT/IMPORT technique can be effectively used when it is desirable (and reasonable) to break a simulation into two or more parts, which can be performed more efficiently. We will use the klystron to illustrate. This technique is desirable in klystrons, because we would like to design cavity N+1 separately, without having to include all of the preceding N cavities in the simulation. It is reasonable, because the waveguides connecting klystron cavities are typically cut off, thus minimizing the backward wave, and because particles in the waveguides all move downstream. Therefore, we would EXPORT a single RF cycle at the outlet of cavity N and IMPORT this cycle over and over again at the inlet of cavity N+1. The location of the surface would be near the midpoint of the drift tube joining the cavities. (Note that EXPORT is not an outer boundary; its presence has no effect on the simulation. The actual outer boundary in the EXPORT simulation might be slightly downstream from the EXPORT surface. By contrast, IMPORT is an outer boundary and therefore part of the simulation perimeter.) What EXPORT does is to write a time record of fields and particles to file(s). You control only the details of when during the simulation the information is output (e.g., for one full RF cycle after cavity N saturates), but the file contents are determined by the MAGIC. In general, it will contain two transverse (in the surface plane) electric field components, but in 2D TM or TE simulations, there will be only one. Only particles crossing the surface in the specified (downstream) direction will be recorded; counterflowing particles are omitted from the file. The particle coordinates recorded will be relative to the surface, not the coordinate system. Depending on the Lorentz step_multiple, particle records may be written less frequently than field records. What IMPORT does is to read the field and particle data files and apply the fields and particles as an outer boundary. You control the details of when during the simulation the import data is introduced (e.g., repeating one full RF cycle over and over again). If possible, it is good practice to make the spatial grid near the surface and the electromagnetic time_step, and the Lorentz step_multiple the same in the EXPORT and IMPORT simulations. If they are not the same, the IMPORT simulation will redefine the Lorentz time step to match EXPORT and then reset the electromagnetic time_step to provide an integer Lorentz step_multiple (see Restrictions, below). Thus, the particles will always be the same, but the fields may be interpolated in time as well as transverse space. The IMPORT surface must be conformal with one of the axes and part of the simulation perimeter. In 2D simulations, the surface is represented by a line; in 3D simulations, it is represented by an area, which must be conformal with the X3 coordinate. The sense of the surface is always from outside the perimeter to inside. (This is also the direction of the incoming particles and wave.) There are five MAGIC User’s Manual 12-36 Part IV - Spatial Extensions Chapter 12 - Outer Boundaries methods of importing field and particle data. These are selected using the FILE, LAMINAR_BEAM, SHAPED_BEAM, DEMEOS or EGUN keywords and are described the following paragraphs. The DEMEOS, EGUN, GUN_CODE, MICHELLE, OMNITRAK, LAMINAR_BEAM, SHAPED_BEAM, and BEAM options are used to introduce well-behaved electron beams. For all options, a particle distribution is generated by MAGIC that is injected into the simulation at the import plane. From the particle distribution, MAGIC generates the charge density at the import plane. Using a POISSON solver, MAGIC then generates the static electric fields associated with this distribution and the assumption that the confining walls are a zero potential. This gives the space charge depression of the beam, which is then used by the LAMINAR_BEAM SHAPED_BEAM, and BEAM options with the specified magnetic field to generate the transverse beam momentum. For the EGUN and DEMEOS options MAGIC generates particle information from the particle ray file. For the MICHELLE and OMNITRAK options MAGIC generates particle information from the MICHELLE/OMNITRAK datafile of particle dumps. For the LAMINAR_BEAM, the argument, current, is the total current in amps of the beam, and for the SHAPED_BEAM option the argument, current_density, is the radial current density profile function and must be predefined in a FUNCTION command. For the BEAM option the total current is specified by the current argument and the unnormalized current_density is used to determine the distribution. The beam_area argument is used by the code to restrict its application of the current density to the selected CONFORMAL shaded area. You use this argument to reduce the number of injected particles. In all of these options, MAGIC attempts to create a smooth beam by finding the number of enclosed cells and ensuring that the distribution of injected particles is about 1 per cell. The total number is determined from the IMPORT area and then reduced if the beam_area argument encloses a smaller region. The argument, energy, is the beam energy in volts. The argument, radius, is the beam radius at the import plane. The argument, guide_field is the desired magnetic confinement field in tesla. These arguments are used to create a smooth beam of particles. The particles are given a rotation based on the supplied guide_field strength and the radial electric field of the beam space charge. You must supply the confining magnetic field using the PRESET command. It is your responsibility to ensure that the guide field strength used in the IMPORT command matches that in the PRESET command. The option GAMMA_SCALE's argument, gscale, is used to scale the beam energy via relativistic gamma factor. The option PHASE_VELOCITY's argument, beta, is used to set the relative phase velocity for waves escaping through the import boundary. See the example below. The FILE keyword is used to introduce particle and field data created using the EXPORT command from a previous simulation. The file_prefix uniquely identifies field and particle files, i.e., ‘file_prefixFLD’ and ‘file_prefixPAR’. The default file_prefix is the name of the input file. The file_format is either ASCII or BINARY. The SCALE option can be used to apply a temporal scale (multiplicative factor) to the imported fields and particle charge. This can be used to introduce a full-scale result more gently into the empty simulation. (In the klystron example above, abruptly introducing the full RF cycle input would shock the cavity, creating high-frequency noise.) The default for scale is unity. The scaling function is internally trapped so that it has a minimum value of 0.0 and a maximum value of unity. The GAMMA_SCALE option can be used to apply a temporal scale (multiplicative factor) to the particle energy. Assume that the beam particles have a base energy of Energy0, such that gamma has a value of γ0. Then to scale the energy to a value of Energy(t), where the gamma is γ(t), use the function defined by gscale(t) = γ(t)/ γ0. MAGIC User’s Manual 12-37 Part IV - Spatial Extensions Chapter 12 - Outer Boundaries The options TIMING and RANDOM_TIMING allow you to set the particle importation interval. The creation interval is expressed as an integer, step_multiple, which is an integer multiple of the LORENTZ (not the MAXWELL) time step. The default value is unity, e.g. every LORENTZ time step, (the default LORENTZ time step is every MAXWELL time step). The TIMING option provides for a uniform interval. Thus for example if you specify “TIMING 5”, then particles will have a weight factor of 5 (to give the proper time averaged current) and will be generated every 5th particle LORENTZ time step. The RANDOM_TIMING option provides for a statistically random creation interval with a probability that is the inverse of the creation time step. Thus for example, if you specify “RANDOM_TIMING 5”, then particles will be generated with a weight factor of 5 (to give the proper time averaged current), and approximately 1/5th of the possible particles will be generated on each particle LORENTZ time step. In addition, the exact current is preserved with both RANDOM_TIMING and TIMING. The advantage of RANDOM_TIMING is that it does not generate an artificial current signal having a period, “step_multiple*dtparticle”; however, it does so by introducing greater statistical noise. For MAGIC3D problems the statistical noise added to the current is much reduced from that in MAGIC2D due to the generally much larger number of emission sites. For problems, such as cross-field amplifiers and oscillators, use of RANDOM_TIMING can provide significant reduction in the number of particles. In other problems, such as multiple particle species, the heavy ions can be emitted with the RANDOM_TIMING, to provide a better representation of the continuous nature of the emission. The BEAM_CENTER option is used with the LAMINAR_BEAM and SHAPED_BEAM options in certain coordinate-system circumstances where the beam axis is not obvious. The SAMPLE option is used to reduce the number of particles that are imported. At the same time, the charge on all particles which actually are imported is increased by 1/fraction, in order to maintain the same time-averaged imported current. Note! That this approach increases the noise associated with the beam injection. The WCONDENSE option is used to reduce the number of particles introduced from the results of a gun code simulation file. In this approach, the particles rays are used to synthesize a weighted set of particles. The physical region spanned by the beam file is first determined by finding the enclosing volume, xmin, xmax, …and zmax. This is then uniformly zoned to an array dimensioned (nx,ny,nz). Then the following statistical sums are found for each “subcell”. Q(i,j,k) = ∑qm, where m includes all particles insize the (i,j,k) subcell. X(i,j,k) = (∑xmqm)/Q(i,j,k) Y(i,j,k) = (∑ymqm)/Q(i,j,k) Z(i,j,k) = (∑zmqm)/Q(i,j,k) PX(i,j,k) = (∑pxmqm)/Q(i,j,k) PY(i,j,k) = (∑pymqm)/Q(i,j,k) PZ(i,j,k) = (∑pzmqm)/Q(i,j,k) These weighted aggregates of the gun code particles are then used in the injection of particles into MAGIC through the IMPORT boundary. Please note, that the total current (charge) is conserved and the resulting beam particles have weighted values of position and momenta. We recommend that the values of nx, ny, nz be selected so that as a minimum the weighted condensed particle set spans the physical mesh of the IMPORT boundary with a minimum of 1 particle/cell in the transverse cross section of the boundary. The RADIAL_SPECIES option allows you to specify the imported particle species by the coordinate transverse to the import plane. For example, you may specify different particle species for different radial bands, by using this option. For each radial band, you must specify the species and the inner and outer MAGIC User’s Manual 12-38 Part IV - Spatial Extensions Chapter 12 - Outer Boundaries radial window. A particular species may only be used once in the radial determination. Particles lying in a radial band not specified as assigned to a particular species will be assigned by the code to one of the active species. The keywords, REWIND_AT_EOF and TERMINATE_AT_-EOF, control the action taken when an end-of-file is encountered. REWIND_AT_EOF is used to repeat the file cycle times. TERMINATE_AT_EOF is used to terminate the simulation when the import data has been exhausted. Restrictions: 1. 2. 3. 4. 5. 6. 7. 8. 9. 10. Only one IMPORT command is allowed in a simulation. IMPORT must follow the specification of the DURATION command. IMPORT is an outer boundary and part of the simulation perimeter. The IMPORT surface geometry should be consistent with the EXPORT surface geometry. The spatial grids do not have to match, although it is a good idea. You are responsible for making sure that the axial locations of the IMPORT and EXPORT surfaces are the same. (EXPORT data is recorded relative to the surface, not the simulation coordinates.) You must not superimpose on an IMPORT boundary any other boundary, such as PORT, MIRROR, FREESPACE, or OUTGOING. The Lorentz (particle kinematics) time step must be the same in the EXPORT and IMPORT simulations. (The electromagnetic time steps need not match. They are subject, however, to the usual integer step_multiple restriction relating Maxwell and Lorentz time steps.) For physical validity, the EXPORT/IMPORT technique works best if there is no backward wave present. (It is typically employed in cut-off geometries, etc.) RADIAL_SPECIES option is only available in MAGIC2D. All particles species must be first specified in a SPECIES command (except for ELECTRON). A particular species can be only used once. The “NUMBER npcell” option is only available in MAGIC2D, and only for the LAMINAR_BEAM and SHAPED_BEAM options. The default value of npcell is 2. See Also: DURATION, Ch. 11, MAXWELL, Ch. 17, LORENTZ, Ch. 18, DUMP, Ch. 20, EXPORT, Ch. 20 Examples: 1. In this 2D simulation, an IMPORT command is used to read both TM and TE components of the electric field as well as particles moving in the positive z-direction from an ASCII file named EXP’icase’ and apply them at a line named “inlet.” IMPORT inlet POSITIVE EXP'icase' ASCII ; 2. In this cylindrically symmetric 2D simulation, an IMPORT command is used to introduce a mildly relativistic beam ( 400 kV ) in a drift tube of radius .2125 inches. The beam current is 275 amps. The beam fills 60% of the drift tube, and the magnetic guiding field is 0.16 tesla. The beam is introduced in the positive direction at the import plane boundary denoted by IMPORTAT. The confining magnetic field is set using the PRESET command to fix Baxial. cyl_radius = 0.2125 inches ; radius = 0.60 * cyl_radius ; MAGIC User’s Manual 12-39 Part IV - Spatial Extensions Chapter 12 - Outer Boundaries current = 275 amps ; energy = 400 kilovolts ; guidefield = .16 tesla ; IMPORT IMPORTAT POSITIVE LAMINAR_BEAM current, energy, radius, guidefield; FUNCTION B_axial(z,r) = guidefield ; PRESET B1ST FUNCTION B_axial ; 3. In this cylindrically symmetric 2D simulation, an IMPORT command is used to introduce a mildly relativistic beam ( 490 kV ) in a drift tube of radius .2125 inches. The beam current is 275 amps. The beam fills 60% of the drift tube, and a magnetic guide field strength of 0.14 tesla is used for the import command to create the proper beam rotation. The beam is introduced in the positive direction at the import plane boundary denoted by IMPORTAT. The confining magnetic field is set using the PRESET command. Note that the first time this is run, a PPM field from PANDIRA was used to set the confining field. The field is shifted in preset to properly align with the magnetic field used to set the rotation. PRESET with PANDIRA creates the two files PANDRA01.fld and PARDRA02.fld. In subsequent simulations these may be used in place of the PRESET .. PANDIRA file. Vb=490kV ; Ib=275A; B0=0.14Tesla ; rdrift=.2125inch; ff=0.6; remit=rdrift*ff ; IF (pandira_new.eq.true) then ; PRESET B1ST PANDIRA OUTSF7 SHIFT -.541 0.; PRESET B2ST PANDIRA OUTSF7 SHIFT -.541 0. ; ENDIF ; IMPORT IMPORTLINE POSITIVE LAMINAR_BEAM Ib, Vb ,remit B0; IF (pandira_new.ne.true) then ; PRESET B1ST READ PANDRA01.fld SURFACE B1st ascii SHIFT .541 0.; PRESET B2ST READ PANDRA02.fld SURFACE B2st ascii SHIFT -.541 0. ; ENDIF MAGIC User’s Manual 12-40 Part IV - Spatial Extensions Chapter 12 - Outer Boundaries These two figures show the contours of the axial magnetic field for a PPM stack and the particle phase space for the electron beam immersed in the PPM field. 4. In this cylindrically symmetric 2D simulation, an IMPORT command is used to introduce a beam generated by EGUN. We use the CONDENSE option to reduce the number of beamlets. And we specify different species for different radial positions. The beam is in a PPM fields as in example 3. The following figures show the phasespace of the beam. SR0 = 0 ; SR1 = 0.333*BEAM_RADIUS ; SR2 = 0.666*BEAM_RADIUS ; SR3 = 1.333*BEAM_RADIUS ; SPECIES RED_ELECTRON CHARGE -1 MASS 1 ELECTRON COLOR RED ; SPECIES BLUE_ELECTRON CHARGE -1 MASS 1 ELECTRON COLOR BLUE ; SPECIES GREEN_ELECTRON CHARGE -1 MASS 1 ELECTRON COLOR GREEN ; Tramp = 100*sys$dtime ; Function RampOn(t) =Smooth_Ramp(T/Tramp) ; IMPORT IMPORTLINE POSITIVE EGUN dfm_3.in Condense 20 scale rampon phase_velocity 1.00 RADIAL_SPECIES RED_ELECTRON SR0,SR1 RADIAL_SPECIES BLUE_ELECTRON SR1,SR2 RADIAL_SPECIES GREEN_ELECTRON SR2,SR3; MAGIC User’s Manual 12-41 Part IV - Spatial Extensions Chapter 12 - Outer Boundaries MAGIC User’s Manual 12-42 Part IV - Spatial Extensions Chapter 13 - Transmission Lines 13. TRANSMISSION LINES This Chapter covers the following commands: TRAMLINE (2D simulations only) JOIN (2D simulations only) LOOKBACK (2D simulations only) VOLTAGE (2D simulations only) You can use these commands to create one—dimensional transmission lines, to join them together, to allow outgoing waves to escape, and to allow incoming waves to enter. These commands are presently available only in 2D simulations. The TRAMLINE command is used to create a transmission line. There are various options available to specify the properties of the line, which may be functions of distance; but variations in time are not allowed, nor are plasma processes. The spatial grid options duplicate the multi—dimensional options (GRID, Ch. 11). You can use the JOIN command to connect different transmission lines together to form linear, series, and parallel circuits. The LOOKBACK command is used to allow outgoing waves to escape at a specified boundary of a transmission line. The VOLTAGE command is used to allow a specified incoming wave to enter (and outgoing waves to escape) through a specified boundary. Although transmission lines can be modeled separately, their most important use is to extend the multi—dimensional simulation into a plasma—free region of space. (The MATCH command, which connects them, is described in Chapter 12.) The solution algorithm and time step for the transmission line will automatically match those of the multi—dimensional simulation. MAGIC User’s Manual 13-1 Part IV - Spatial Extensions Chapter 13 - Transmission Lines TRAMLINE Command Function: Specifies transmission—line parameters in 2D simulations. Syntax: TRAMLINE transmission_line (Specify impedance and capacitive properties.) { RADII r_outer(x) r_inner(x) [resistance(x)] , IMPEDANCE impedance(x) permittivity(x) [resistance(x)] , CAPACITANCE capacitance(x) inductance(x) [resistance(x)] } (Specify meshing for transmission line.) { EXPLICIT CELLS ncells [ SIZE cell_size, ... ] [ GRID full_grid, ... ] , UNIFORM [ CELLS ncells ] [ DISTANCE region_size ] [ FIRST { MATCH, cell_size }] QUADRATIC [ CELLS cells ] [DISTANCE region_size ] [ FIRST { MATCH, cell_size } ] [ LAST cell_size ] } (Optional initialization of the voltage and current in the transmission line.) [ INITIALIZE voltage(x) current(x) ] ; Arguments: transmission_line — transmission line (alpha). r_outer — outer radius of vacuum coax (m), constant or defined in FUNCTION command. r_inner — inner radius of vacuum coax (m), constant or defined in FUNCTION command. resistance — resistance per unit length (ohms/m), constant or defined in FUNCTION command. impedance — impedance for arbitrary geometry (ohms), constant or defined in FUNCTION command. permittivity— relative dielectric constant (unitless), constant or defined in FUNCTION command. capacitance — capacitance per unit length (f/m), constant or defined in FUNCTION command. inductance — inductance per unit length (h/m), constant or defined in FUNCTION command. cells — number of cells in the region. cell_size — cell size in meters. region_size— length of the region in meters. full_grid — grid values in meters or radians. voltage — initial voltage distribution in volts, constant or defined in FUNCTION command. current — initial current distribution in Amperes, constant or defined in FUNCTION command. Description: The TRAMLINE command specifies parameters for transmission line models. The assumption is that regions so represented are devoid of plasma, so that impedance properties may be specified precisely. It is possible to match transmission lines to the multi—dimensional simulation. In addition, it is possible to join transmission lines to form linear, parallel, and series circuits. Boundary conditions may be applied to transmission lines using the LOOKBACK and VOLTAGE commands. MAGIC User’s Manual 13-2 Part IV - Spatial Extensions Chapter 13 - Transmission Lines The TRAMLINE command specifies parameters defining the transmission line length, spatial resolution, and basic physical properties. The transmission_line is an arbitrary name which is used to reference the transmission line in other commands. The first set of options specifies the impedance. Choose one of these. Any required functions are functions of position along the transmission line measured in meters. For the RADII option, the arguments are r_outer and r_inner of a vacuum coaxial cable. For the IMPEDANCE option, the arguments are impedance and permittivity. For the CAPACITANCE option, the arguments are capacitance and inductance (per unit length). If resistance is required, it can also be entered under any of the options. The second set of options is used to specify the spatial grid. Choose one of these. The algorithms are identical with those for the multi—dimensional simulation (Part 2: GRID) and will not be discussed here. The entire grid must be specified using only one option. It is not possible to append grid onto a transmission line. All lines have a spatial origin of zero. The final option provides the capability for non—zero initialization of the transmission line. arguments are voltage and current functions. The The transmission line model calculates several variables of interest. These variables can be monitored by using the OBSERVE TRAMLINE and RANGE TRAMLINE commands. The following table lists the keywords and physical definitions associated with each variable. Keyword CURRENT POWER VOLTAGE CAPACITANCE INDUCTANCE IMPEDANCE ENERGY—CAP ENERGY—IND ENERGY—TOT 1. 2. 3. 4. Definition current power voltage capacitance/length inductance/length impedance capacitive energy inductive energy total energy Notes 1 1 1 2,3 2,3 2,4 Only accessible with the RANGE TRAMLINE command. For OBSERVE TRAMLINE this requires a finite range, not a point. For RANGE TRAMLINE this returns energy/length. Not accessible with the RANGE TRAMLINE command. Restrictions: 1. The maximum number of transmission lines that can be defined is ten. 2. The maximum number of total grid points that can be defined is 1000. 3. This command is available only in 2D simulations. See Also: SYSTEM, Ch. 10, GRID, Ch. 11, MATCH, Ch. 12, LOOKBACK, Ch. 13, VOLTAGE, Ch. 13, MAXWELL, Ch. 17, OBSERVE TRAMLINE , Ch. 22, RANGE TRAMLINE, Ch. 23. Examples: MAGIC User’s Manual 13-3 Part IV - Spatial Extensions Chapter 13 - Transmission Lines Consider a coaxial, six—vane magnetron with a transmission line connected to the bottom of one vane slot. The impedance of the transmission line is matched to the characteristic impedance at the bottom of the vane slot. The end of transmission line LOAD is terminated with a VOLTAGE command. In this example, no reflection from the end of the transmission line is desired; therefore the voltage function is set to zero applied voltage. TRAMLINE LOAD IMPEDANCE 4.034 1.0 UNIFORM DISTANCE 1.0 CELLS 11 ; MATCH vane_slot NEGATIVE NULL LOAD 0.0 0.05 ; FUNCTION REFLECTED(X)= 0.0 ; VOLTAGE LOAD 1.0 NEGATIVE REFLECTED ; MAGIC User’s Manual 13-4 Part IV - Spatial Extensions Chapter 13 - Transmission Lines JOIN Command Function: Joins two transmission lines together. Syntax: JOIN primary_line point { POSITIVE, NEGATIVE, SERIES, PARALLEL } secondary_line point { POSITIVE, NEGATIVE } [CROSSOVER] ; Arguments: primary_line — name of primary transmission line, defined in TRAMLINE command. secondary_line — name of secondary transmission line, defined in TRAMLINE command. point — spatial coordinate (m). Description: The JOIN command is used to connect two transmission lines. The two lines can either be joined at their ends, or the end of one line (the secondary line) can be joined to an interior point of another line (the primary line) to produce parallel or series circuits. Both transmission lines should have the same cell size at their joining points. The two transmission lines can have different properties at the joint, however. For example, JOIN can be used with two transmission lines of different capacitance and inductance to model impedance mismatch effects. You must specify whether the line lies in the POSITIVE or NEGATIVE direction from the endpoint along the transmission line coordinates when the joining point is the end of the transmission line. (This is always the case for the secondary line.) You must specify whether the circuit connection is made in SERIES or in PARALLEL when the joining point is an interior point of primary line. In general, series joints tend to form a voltage divider, while parallel joints tend to form a current divider. Note that if impedance mismatch is to be avoided at series and parallel joints, it is necessary to have a step discontinuity in the impedance function of the primary transmission line. Figure 13—1(a) illustrates the eight possible circuit configurations for end—to—end, series and parallel joints. For illustration simplicity, the transmission lines are depicted as being of the parallel—plate variety. Eight additional circuit configurations are possible by reversing the voltage polarity of the secondary line with respect to the primary line, as shown in Figure 13—1(b). This is illustrated as a crossover between the top and bottom plates of parallel—plate transmission lines immediately before the joint. These additional eight circuit configurations are invoked with the CROSSOVER option. Restrictions: 1. 2. 3. 4. 5. All transmission lines must be specified using TRAMLINE commands. SERIES and PARALLEL joins can only be made to an interior point on the primary line. The secondary line can only be joined at one of its endpoints. For linear and parallel circuits, the line cell sizes must be identical at the joint. The maximum number of JOIN commands is ten. See Also: MATCH, Ch. 12, TRAMLINE, Ch. 13. Reference: MAGIC User’s Manual 13-5 Part IV - Spatial Extensions Chapter 13 - Transmission Lines B. Goplen, J. Brandenburg, and T. Fitzpatrick, "Transmission Line Matching in MAGIC," Mission Research Corporation Report, MRC/WDC—R—102, September 1985. Figure 13—1(a). Default circuit configurations of JOIN with two parallel—plate transmission lines. The sign of the voltage (bottom—plate to top—plate) is preserved between primary and secondary transmission lines. Figure 13—1(b). CROSSOVER circuit configurations of JOIN with two parallel—plate transmission lines. The sign of the voltage (bottom—plate to top—plate) is reversed between primary and secondary transmission lines. MAGIC User’s Manual 13-6 Part IV - Spatial Extensions Chapter 13 - Transmission Lines MAGIC User’s Manual 13-7 Part IV - Spatial Extensions Chapter 13 - Transmission Lines LOOKBACK Command Function: Specifies a termination boundary for a transmission line. Syntax: LOOKBACK transmission_line point {POSITIVE, NEGATIVE } [ OPEN_CIRCUIT, SHORT_CIRCUIT, RESISTOR resistance] ; Arguments: transmission_line— name of line, defined in TRAMLINE command. point — spatial coordinate (m). resistance — resistance (ohms). Description: The LOOKBACK command specifies an outlet or termination boundary condition for a transmission line. The default is a matched impedance boundary which absorbs any outgoing waves from a specified point on the transmission_line. The direction sense is always from outside the line to the inside. If this is in the direction of increasing coordinate, enter POSITIVE; otherwise, enter NEGATIVE. Three additional termination options are allowed. These are: 1. OPEN_CIRCUIT boundary condition in which the current at the termination is zero. 2. SHORT_CIRCUIT boundary condition in which the voltage at the termination is zero. 3. RESISTOR boundary condition in which the line is termindated with a resistor of specfied ohms. Restrictions: 1. The total number of LOOKBACK commands in a simulation is limited to 50. 2. A Courant criterion limits the time step. See Also: VOLTAGE, Ch. 13. References: B. Goplen, "Boundary Conditions for MAGIC," Mission Research Corporation Report, MRC/WDC-R-019, presented at the Twenty-third Annual Meeting APS Division of Plasma Physics, 12-16 October 1981. MAGIC User’s Manual 13-8 Part IV - Spatial Extensions Chapter 13 - Transmission Lines VOLTAGE Command Function: Specifies a transmission-line boundary for outgoing (and incoming) waves. Syntax: VOLTAGE transmission_line point { POSITIVE, NEGATIVE } f(t) ; Arguments: transmission_line— name of line, defined in TRAMLINE command. Point — spatial coordinate (m). f(t) — voltage function, defined in FUNCTION command. Description: The VOLTAGE command specifies a voltage function, f(t), which is incoming to a specified point on the transmission_line. The sense is always from outside the line to inside. If this is in the direction of increasing coordinate, enter POSITIVE; otherwise, enter NEGATIVE. See Also: FUNCTION , Ch. 6, LOOKBACK, Ch. 13, TRAMLINE, Ch13. Restrictions: 1. The total number of VOLTAGE commands in a simulation is limited to five. 2. A FIELDS command must precede any VOLTAGE commands. 3. A Courant criterion limits the time step. MAGIC User’s Manual 13-9 Part V - Properties Part V-Properties Chapter 14-Material Properties Chapter 15-Unique Geometry Chapter 16-Emission Processes MAGIC User’s Manual V-1 Part V - Properties Chapter 14 - Material Properties 14. MATERIAL PROPERTIES This chapter covers the following commands: CONDUCTANCE CONDUCTOR DIELECTRIC FILM FOIL GAS_CONDUCTIVITY MATERIAL SURFACE_LOSS VOID You can use these commands to assign material properties to spatial objects. (Material properties can be assigned only to areas in 2D simulations and to volumes in 3D simulations.) Material properties can affect both electromagnetic fields and charged particles. In general, particles which enter any spatial object which has been assigned a material property will be destroyed (absorbed on the surface). The commands which provide explicit material-property effects are CONDUCTANCE, CONDUCTOR, DIELECTRIC, FILM, FOIL and GAS_CONDUCTIVITY. The MATERIAL command provides a list of materials and their properties which can be used by other commands which require the specification of particular material properties (e.g., atomic number, atomic mass, conductivity, density, permittivity, etc). The VOID command is used to create a void, or vacuum, in a perfectly conducting material. In particular, this command is used in 3D in conjunction with the CONDUCTOR command to build and shape the desired geometry. The conducting elements of the geometry are constructed by assigning to volumes the property of being a CONDUCTOR or a VOID. The operation is performed in the sequence in which the commands appear in the input file. For example, you might start by assigning a large rectangular volume the property of being a CONDUCTOR and then “hollow” out an interior cavity by assigning a cylindrical volume (interior to the rectangular volume) the property of VOID. Thus, by first defining the desired volume’s regions of various shapes and then sequentially assigning one of the properties of CONDUCTOR or VOID, you can assemble complicated structures. The FOIL command is used to insert special thin CONDUCTORs whose physical width is smaller than the cell resolution and allow for the scattering of particles through the foil material. The foil is treated as a perfect conductor electromagnetically, and charged particles which penetrate the foil can undergo multiple scattering with resulting energy loss and even absorption. Particles may be transmitted through the foil or may back scatter out of the incident side of the foil. The rules regarding material assignment of properties to volumes in MAGIC3D (and to areas in MAGIC2D) are the following: 0. The order in which a VOID, CONDUCTOR, DIELECTRIC, or CONDUCTANCE is applied determines the resultant material assignment. 1. A VOID removes CONDUCTOR, DIELECTRIC, and CONDUCTANCE in the specified volume. 2. A CONDUCTOR replaces other CONDUCTORS, DIELECTRIC, and CONDUCTANCE in the specified volume. 3. A DIELECTRIC replaces VOID cells and other DIELECTRICS; it does not replace a CONDUCTOR in a volume. MAGIC User’s Manual 14-1 Part V - Properties Chapter 14 - Material Properties 4. A DIELECTRIC can be superimposed on CONDUCTANCE volumes. 5. A CONDUCTANCE replaces VOID cells and other CONDUCTANCES; it does not replace a CONDUCTOR in a volume. 6. A CONDUCTANCE can be superimposed on DIELECTRIC volumes. 7. For replacement purposes FOIL is identical to CONDUCTOR. 8. For replacement purposes FILM is identical to a superimposed DIELECTRIC and CONDUCTANCE. 9. A CONDUCTOR supercedes any port. 10. A PORT is applied only in a vacuum cell, or one with the DIELECTRIC/CONDUCTANCE property. 11. INDUCTORS and RESISTORS cannot be embedded in CONDUCTORS. MAGIC starts with the entire space being assigned as a vacuum, in other words, VOID. In adding DIELECTRIC or CONDUCTANCE, only regions which are otherwise vacuum can be assigned these properties. Resistivity is also the material property provided by the CONDUCTANCE command; however, in this case, the resistivity is assumed to be known in advance and must be specified as a function of time and space. The CONDUCTOR command provides the extreme case of zero resistivity, or perfect conductivity. It is commonly used to represent metallic components. All electromagnetic fields within the specified volume will vanish identically. Finally, the DIELECTRIC command provides a way to modify the relative permittivity within an area. Where not otherwise specified, the vacuum permittivity of unity will be in effect. By superimposing CONDUCTANCE and DIELECTRIC commands, a lossy dielectric can be simulated. GAS_CONDUCTIVITY has the same position properties as does CONDUCTANCE. You may superimpose these properties but that is not recommended. MAGIC User’s Manual 14-2 Part V - Properties Chapter 14 - Material Properties CONDUCTANCE Command Function: Applies finite conductivity property to a spatial object. Syntax: CONDUCTANCE { area, volume } { material, sigmaE(x1,x2,x3) } [ MAGNETIC_CONDUCTIVTY sigmaB(x1,x2,x3)] [ FIELD_EFFECT sigmaFE(|E|,σ(t-dt),t) [ SCALE scale_factor(t) ] [THERMAL_DEPTH tdepth ] (Appearance options for the Viewer used with MAGIC3D) [ COLOR color ] [{ VISIBLE, NOT_VISIBLE}] [{ NOT_WIREFRAME, WIREFRAME}] [ TRANSPARENCY percent] ; Arguments: area — name of spatial area defined in AREA command for 2D simulation. volume — name of spatial volume defined in VOLUME command for 3D simulation. material — name of material, defined in MATERIAL command. sigmaE — electrical conductivity (mhos/m), constant or spatial function defined in a FUNCTION command. sigmaB — magnetic conductivity (ohms/m), constant or spatial function defined in a FUNCTION command. sigmaFE — electrical conductivity (mhos/m), constant or spatial function defined in a FUNCTION command. scale_factor — conductivity scale factor, temporal function defined in a FUNCTION command. frequency — center frequency for resonant or skin effect conductivity in Hz. gamma — resonance width for resonant conductivity, in 1/sec. tdepth thermal depth (m). color color used to display the conductors in MAGIC3D. See Color Table for a list of colors. percent percent transparency for the VIEWER visual display. Description: The CONDUCTANCE command specifies a finite conductivity (mhos/m) within an object. It must be an area in a 2D simulation and a volume in a 3D simulation. The conductance may be entered either by specifying a material or by entering conductance as a function of the spatial coordinates. Conductivity will be applied only within the specified spatial object and will result in an additional current as specified by Ohm’ Law, J = σ E, which is applied to Ampere’s Law as an additional current source. An artificial MAGNETIC_CONDUCTIVITY defined to resemble Ohm’s Law is given by JB = σB H and is applied to Faraday’s Law. The magnetic conductance, σB, is given in ohms/m. The attenuation of the magnetic field energy at the same rate as the electric field energy is given when σB = σE Zf2, where Zf (= (µο/εο)1/2= 377 ohms) is the vacuum impedance. MAGIC User’s Manual 14-3 Part V - Properties Chapter 14 - Material Properties The FIELD_EFFECT option provides for a conductivity which varies with the local electric field strength. In addition, you may make it a function of the earlier values of conductivity and explicit variation with time. The initial values of sigma are always those supplied by the initial sigmaE function. This option applies only to electrical conductivity. The SCALE option multiplies the specified conductance by a time-dependent scale_factor. The conductance field can be output in the same manner as the electromagnetic fields, using the field name SIGMA. The output consists only of the input quantity sigma and does not include the timedependent scale factor or resonant or skin effects. The ohmic power lost to the conductance material, e.g., the heat generated, can be output by looking at the OHMIC_LOSSES variable with the OBSERVE FIELD_POWER command. You can use the CONTOUR and RANGE commands to view the value of the electrical conductivity, stored in SIGMAE or the magnetic conductivity stored in SIGMAB. The THERMAL_DEPTH option allows you to specify a depth in meters for the surface heating of dielectric due to the collection of charged particles. The default value for the thermal depth is 1micron. Magic uses a starting ambient temperature of 293oK. Local wall temperatures are evaluated using the following expression. Temperature(x1,x2,x3) = AmbientTemperature + ∆WJ / (∆vol fvol ρ ) / CQ. • • • • Where ∆WJ(x1,x2,x3) is the energy in Joules deposited/extracted in a conducting cell by charged particles collected/emitted from the cell surface. ∆vol(x1,x2,x3) is the volume of the cell and fvol(x1,x2,x3) is the volume reduction factor, for a foil this is thickfoil / ∆xcell. ρ(x1,x2,x3) is material density of the wall cell in kq/m3. CQ is the specific heat of the conductor in J/kg-oK. Restrictions: 1. The conductance property can be applied only to areas in 2D simulations and volumes in 3D. See Also: FUNCTION, Ch. 6, FIELD_POWER, Ch. 22. MATERIAL, Ch. 14, MAXWELL, Ch. 17, OBSERVE Reference: Classical Electrodynamics, Second Edition, J. D. Jackson, Wiley, New York, 1975, Section 7.5. MAGIC User’s Manual 14-4 Part V - Properties Chapter 14 - Material Properties CONDUCTOR Command Function: Assigns perfect (infinite) conductivity property to a spatial object. It may also be used to assign the property of electron elastic and inelastic backscattering. In addition, the material appearance may be specified, although this has no effect upon the actual properties of the conductor. Syntax: CONDUCTOR [name] { area, volume } [ MATERIAL material ] [KILL, NOKILL] (Electron elastic and inelastic scattering option) [BACKSCATTER {symbol, ALLOY name density nelements symbol fraction, symbol fraction, GAS name density ratio nelements symbol fraction, symbol fraction, …} [ENERGY_LIMITS energy_min energy_max ] [EXIT_SPECIES species] [{RECORD, RECORD_INCIDENT, RECORD_EXIT} timer [{BINARY, ASCII}]]] [THERMAL_DEPTH tdepth ] (Appearance options for the Viewer used with MAGIC3D) [ COLOR color ] [{ VISIBLE, NOT_VISIBLE}] [{ NOT_WIREFRAME, WIREFRAME}] [ TRANSPARENCY percent] ; Arguments: name name for conductor. area name of spatial application area, used for MAGIC2D. volume name of spatial application volume defined, used for MAGIC3D. material name of a material, from table or defined in MATERIAL command. symbol 1- or 2-letter atomic symbol of an element, e.g., Al, Fe, Cu, Ni, etc. name name of alloy, arbitrary density alloy mass density (kg/m3) ratio ratio of density to STP. nelements number of elements in alloy. fraction fraction of the element (by weight) in alloy. energy_min lowest allowable electron energy (MeV), the minimum is 0.001 MeV. energy_max maximum anticipated electron energy (MeV). tdepth thermal depth (m). species species of electron after exiting the foil, defined in SPECIES command. color color used to display the conductors in MAGIC3D. See Color Table for colors. percent percent transparency for the VIEWER visual display. MAGIC User’s Manual 14-5 Part V - Properties Chapter 14 - Material Properties Description: The CONDUCTOR command applies perfect (infinite) conductivity everywhere within the spatial object, which must be an area in a 2D simulation and a volume in a 3D simulation. The CONDUCTOR property is the most basic and most common of the material properties. All electromagnetic fields within perfectly conducting objects vanish. All particles which enter such objects are destroyed on the surface. In addition, objects which have been assigned this material property may emit primary particles (see EMISSION and EMIT, Ch. 16), or may have the additional property of allowing for elastic and inelastic backscattered electron (of sufficient energy). The BACKSCATTER property uses the same cross section tables as does the FOIL command and makes use of the same ITS algorithm, (the MATERIAL option is use to specify the element or alloy composition of the conductor) . You may also use the appearance flags to alter the visual display of the conductors in MAGIC3D. These flags are purely cosmetic in utility. The name of a conductor is, by default, the same as that of the object (area or volume) which is being assigned the property of being a conductor. In many cases, however, it is desirable to use a single name for a conductor that may be constructed from multiple pieces. By using the name argument, you may do just that. The MATERIAL option allows you to specify the conductivity and element properties of a conductor. These properties are normally ignored by all of the Maxwell field algorithms (MAXWELL, Ch. 17) which by default assume that the conductivity is infinite. In order to enable finite conductivity use the SURFACE_LOSS command, which provides for wall losses. The material option is also used in MAGIC3D by the eigenmode algorithm (EIGENMODE, Ch. 19) to estimate wall loss Q parameter. By default, all conductors are assumed to trap and collect charged particles that impinge upon their volume. In some circumstances you may wish to specify specific conductors which do not share this property, but in fact allow charged particles to travel ballistically through the material. In this case you may use the keyword NOKILL to indicate that the particular conductor is transparent to charged particles. The default setting is always KILL. Objects assigned the conducting property are always resolved into conformal segments. The treatment of non-conformal surfaces is different in 2D simulations than in 3D simulations. In 2D simulations, the surface can run diagonally (corner-to-corner) through a cell. (The SHIM model also allows a more accurate treatment of arbitrary surfaces in 2D.) In 3D simulations, the shape is approximated in a stair-step fashion. Once an object has been given the conducting property, portions of the object can be voided (VOID, Ch. 14). In 2D, the CONDUCTOR command may be used to build the simulation geometry, by adding regions of perfect conductivity. In 3D the CONDUCTOR and VOID commands are used to add and remove regions of perfect conductivity respectively. When the BACKSCATTER option is employed, any particle with the electron charge-to-mass ratio, which penetrates the conductor, experiences elastic and inelastic scattering, energy loss, and possibly deposition within the conductor. This complicated process is modeled by routines from the Integrated TIGER Series of codes (ITS 3.0). The scattering parameters are automatically calculated from the material properties. Particles not having the electron charge-to-mass ratio, e.g., ions are collected on the surface of the conductor. MAGIC User’s Manual 14-6 Part V - Properties Chapter 14 - Material Properties The material composition of the conductor may be specified by selecting a particular element symbol, or by using one of the keywords, ALLOY, or GAS, and entering the arguments for the elemental composition. The choice of material composition affects the electron transport scattering attributes. You may, for example, specify an alloy material such as stainless steel, instead of a single element or a composite gas. In this case, you must supply a name for the alloy, the mass density of the alloy, density, and the number of elements in its composition, nelements, and a list of the atomic symbol for each element, together with its weight fraction in the alloy. The sum of the weight fractions must be unity. The ENERGY_LIMITS option is used to specify the electron energy limits for the scattering model in the ITS model. The first argument, energy_min, specifies the minimum energy of an electron which is tracked in the foil without being absorbed. This argument is used by ITS’s CYLTRAN code unit. Electrons that fall below this energy are destroyed in the foil. The default value of the minimum energy has a minimum value of 1 keV. The second argument, energy_max, specifies the maxium anticipated energy of an electron entering the conductor. It is used by ITS’s XGEN program as an upper bound for the scattering cross-section and energy attenuation tables. The default value of the maximum energy is 1 MeV. If an electron enters the foil with an energy above the anticipated maximum, it will automatically be reassigned the maximum energy. Normally, an electron exits the foil as the same species that entered the foil. It is, however, possible to artificially distinguish incident electrons from scattered electrons by changing the species identification of the electron when it exits the conductor, e.g., from RED_ELECTRONS to BLUE_ELECTRONS, if those two species have been created with the SPECIES command. The EXIT_SPECIES option invokes this feature. All particles with the electron charge-to-mass ratio will exit the foil as the specified species, regardless of its identity when incident on the foil. For each BACKSCATTER option, use of one of the RECORD options creates two files that contain information about the particles that are incident on the conductor and those particles that exit from the conductor. The default file format is ASCII. The names of the files have the form name_record_in.dat and name_record_exit.dat, where name is the name of the area or volume object specified in the command. Each of the record files begins with the simulation time step, SYS$DTIME, and a table for the species, followed by particle identification information. This contains the species id, name, the charge/mass ratio, and the particle mass. A new line is added for each particle species that is active in the simulation. There are no headers or titles in the files. The files only contain the actual particle data. A particle data record begins with the timestep, the species id, the macroparticle charge, the position (x1,x2,x3) and the momentum (p1,p2,p3) of the particles. (Momentum is p= γv.) The data structure of the file is as follows: SYS$DTIME numSpecies iSpecies species_name q_over_m m_species iSpecies species_name q_over_m m_species ... iSpecies species_name q_over_m m_species iTimeStep iSpecies charge x1 x2 x3 p1 p2 p3 iTimeStep iSpecies charge x1 x2 x3 p1 p2 p3 iTimeStep iSpecies charge x1 x2 x3 p1 p2 p3 ... MAGIC User’s Manual 14-7 Part V - Properties Chapter 14 - Material Properties iTimeStep iSpecies charge x1 x2 x3 p1 p2 p3 For the ASCII data option, the Fortran-style formats are: Sys$dtime: (e13.6,g24.14) NumSpecies: (i4) species table: (i4,1x,a,1x,e13.6,1x,e13.6) particle table: (i9,1x,i4,7(1x,e13.6)) For BINARY, all values are four bytes long except the species_name, which is a character value with a length of 32 bytes. The THERMAL_DEPTH option allows you to specify a depth in meters for the surface heating of conductors due to the collection of charged particles. The default value for the thermal depth is 1micron. Magic uses a starting ambient temperature of 293oK. Local wall temperatures are evaluated using the following expression. Temperature(x1,x2,x3) = AmbientTemperature + ∆WJ / (∆vol fvol ρ ) / CQ. • • • • Where ∆WJ(x1,x2,x3) is the energy in Joules deposited/extracted in a conducting cell by charged particles collected/emitted from the cell surface. ∆vol(x1,x2,x3) is the volume of the cell and fvol(x1,x2,x3) is the volume reduction factor, for a foil this is thickfoil / ∆xcell. ρ(x1,x2,x3) is material density of the wall cell in kq/m3. CQ is the specific heat of the conductor in J/kg-oK. References: “ITS Version 3.0: The Integrated TIGER Series of Coupled Electron/Photon Monte Carlo Transport Codes,” by J. A. Halbleib, R. P. Kensek, T. A. Mehlhorn, G. D. Valdez, S. M. Seltzer, and M. J. Berger, SAND91-1634 (March 1992). Also Oak Ridge National Laboratory document CCC-467. Incorporation of ITS features within MAGIC are as follows. A MAGIC specific equivalent of the XGEN program is used to generate scattering cross section and energy attenuation tables for the foil material. A MAGIC equivalent of the CYTRAN code unit is used to evaluate the transport of electrons through the foil. ATK/Mission Research Corporation expresses its appreciation to the Radiation Shielding Information Center (RSIC) at Oak Ridge National Laboratory and the ITS development team for granting permissions to use XGEN and CYLTRAN in this manner. See Also: AREA, Ch. 10, VOLUME, Ch. 10, FOIL, Ch. 14, VOID, Ch. 14, MATERIAL, Ch. 14, SHIM, Ch. 15, EMIT, Ch. 16, SPECIES, Ch. 18, SURFACE_LOSS, Ch 14. Restrictions: 1. The conductor property can be applied only to areas in 2D simulations and volumes in 3D simulations. Examples: MAGIC User’s Manual 14-8 Part V - Properties Chapter 14 - Material Properties 1. In a simulation of a magnetron the anode and cathode are constructed of several pieces. Here the cathode is constructed from three objects: cathode, endcap.left, and endcap.right. The anode is constructed from the objects named: anodeshell and vane.1 vane.2 … CONDUCTOR CATHODE ; CONDUCTOR CATHODE ENDCAP.LEFT ; CONDUCTOR CATHODE ENDCAP.RIGHT; CONDUCTOR ANODE ANODESHELL ; DO I=1,N.VANES; CONDUCTOR ANODE VANE.'I' ; ENDDO; 2. In 2D the shape of a collector is created using the AREA command with POLYGONAL shape option. The area is assigned the perfectly conducting property with the CONDUCTOR command, and the resulting assignment may be displayed using the DISPLAY_2D command. The following figure shows the resulting collector. AREA COLLECTOR POLY 5.09E-01 0.00E+00 5.09E-01 5.59E-02 2.13E-01 5.59E-02 1.96E-01 3.81E-02 1.96E-01 3.56E-02 2.03E-01 3.56E-02 2.08E-01 4.06E-02 4.30E-01 4.06E-02 4.86E-01 2.54E-03 4.86E-01 0.00E+00 5.09E-01 0.00E+00 ; CONDUCTOR COLLECTOR ; DISPLAY_2D COLLECTOR MAXWELL ; MAGIC User’s Manual 14-9 Part V - Properties Chapter 14 - Material Properties DIELECTRIC Command Function: Assigns dielectric permittivity property to a spatial object. Syntax: DIELECTRIC { area, volume } { material, permittivity(x1,x2,x3) } [ { EPS1, EPS2, EPS3 } ] [KILL, NOKILL] [NAME name] [THERMAL_DEPTH tdepth ] (Appearance options for the Viewer used with MAGIC3D) [ COLOR color ] [{ VISIBLE, NOT_VISIBLE}] [{ NOT_WIREFRAME, WIREFRAME}] [ TRANSPARENCY percent] ; Arguments: area volume material permittivity command. name tdepth color percent name of spatial area defined in AREA command for 2D simulation. name of spatial volume defined in VOLUME command for 3D simulation. name of material, defined in MATERIAL command. relative permittivity (eps/eps0), constant or spatial function defined in a FUNCTION name assigned to dielectric material for use in diagnostics. thermal depth (m). color used to display the conductors in MAGIC3D. See Color Table for a list of colors. percent transparency for the VIEWER visual display. Defaults: The default permittivity distribution is isotropic; that is, a single scalar permittivity affects all field components equally. To create an anisotropic distribution, you must specify each component of permittivity (EPS1, EPS2, EPS3) independently using separate DIELECTRIC commands (2D simulations only). The default permittivity for unspecified components is unity. The default name is the same as the object names (either an AREA name in 2D or a VOLUME name in 3D. By default particles are “killed”, i.e. collected on a dielectric object. Description: The DIELECTRIC command applies dielectric permittivity everywhere within the spatial object, which must be an area in a 2D simulation and a volume in a 3D simulation. The permittivity (relative permittivity, also known as the dielectric constant, may be entered either by specifying a material or by entering permittivity as a function of the spatial coordinates. To enter an isotropic dielectric, a single command is sufficient, and no permittivity component is entered. (By default, the permittivity entered will be applied to all three components.) To make the dielectric anisotropic in a 2D simulation, enter MAGIC User’s Manual 14-10 Part V - Properties Chapter 14 - Material Properties separate commands to specify each permittivity component (EPS1, EPS2 and EPS3) independently. As many as three commands may be required, depending on the application. This feature is not available in 3D simulations. In 3D only isotropic dielectrics are permitted. The NAME option allows you to specify a single name to be associated with a collection of DIELECTRIC commands. This name can then be used in various diagnostics. For example, if you generate a ladder circuit with a sequence of dielectric supports, you might wish to obtain the total current collected by these supports. By assigning a single name for the collection, you need only reference this name. By default, all dielectrics are assumed to trap and collect charged particles that impinge upon their volume. In some circumstances you may wish to specify specific dielectrics which do not share this property, but in fact allow charged particles to travel freely through the material. In this case you may use the keyword NOKILL to indicate that the particular dielectric is transparent to charged particles. The default setting is always KILL. The vacuum value of permittivity is used everywhere else (outside of the spatial object) in the simulation. A particle which strikes the object is destroyed, and its charge is deposited permanently on the surface. If lossy dielectrics are required, conductance can also be applied to the object (CONDUCTANCE, Ch. 14). If the object contains or contacts an outer boundary (e.g., PORT, Ch. 12), then any phase velocity information required in the outer boundary command must account for the dielectric property. (Failure to consider this may result in artificial scattering from the outer boundary.) The displacement fields (D1, D2 and D3) can be output in the same manner as any other fields. The relative permittivity components can also be output using the field names, EPS1, EPS2 and EPS3 in 2D, and using the name DIELECTRIC in 3D. To display the values of permittivity you use the CONTOUR FIELD command with the argument DIELECTRIC (Magic3d), DIELECTRIC1 (Magic2d), DIELECTRIC2 (Magic2d) or DIELECTRIC3 (Magic2d). In Magic2d, the permittivity can non-isotropic. The THERMAL_DEPTH option allows you to specify a depth in meters for the surface heating of dielectric due to the collection of charged particles. The default value for the thermal depth is 1micron. Magic uses a starting ambient temperature of 293oK. Local wall temperatures are evaluated using the following expression. Temperature(x1,x2,x3) = AmbientTemperature + ∆WJ / (∆vol fvol ρ ) / CQ. • • • • Where ∆WJ(x1,x2,x3) is the energy in Joules deposited/extracted in a conducting cell by charged particles collected/emitted from the cell surface. ∆vol(x1,x2,x3) is the volume of the cell and fvol(x1,x2,x3) is the volume reduction factor, for a foil this is thickfoil / ∆xcell. ρ(x1,x2,x3) is material density of the wall cell in kq/m3. CQ is the specific heat of the conductor in J/kg-oK. Restrictions: 1. The dielectric property can be applied only to areas in 2D simulations and volumes in 3D simulations. MAGIC User’s Manual 14-11 Part V - Properties 2. 3. Chapter 14 - Material Properties Anisotropic dielectrics require one or more DIELECTRIC commands to be entered. This feature is available only in 2D simulations. The use of a DIELECTRIC command may alter the phase velocity and thus affect input requirements such as phase velocity for outer boundary commands. See Also: PORT, Ch. 12, MATERIAL, Ch. 14, CONDUCTANCE, Ch. 14. Examples: 1. Coax with two different permittivity inserts. Eps1 = 4 ; Eps2 = 2 ; Dielectric Block1 Eps1 ; Dielectric Block2 Eps2 ; CONTOUR FIELD DIELECTRIC2 Osys$area Tsys$first Shade NODISPLAY DIELECTRIC ; Dielectric Permittivity Field MAGIC User’s Manual 14-12 Part V - Properties Chapter 14 - Material Properties FILM Command Function: Assigns the thin film property to a conformal spatial object. The thin film property assigns finite permittivity (DIELECTRIC) and and finite conductivity (CONDUCTANCE) and electron transport through the thin film object. Electron transport is achieved by using the ITS model for electron scattering dynamics in materials. This includes forward and backward scattering and absorption of electrons. Syntax: FILM {area, volume} thickness permittivity sigma { symbol, COMPOSITION name density nelements symbol fraction, symbol fraction, , GAS name density ratio nelements symbol fraction, symbol fraction, …} [ENERGY_LIMITS energy_min energy_max ] [EXIT_SPECIES species] [{RECORD, RECORD_INCIDENT, RECORD_EXIT} timer [{BINARY, ASCII}]]; Arguments: area volume thickness permittivity sigma symbol name density ratio nelements fraction energy_min energy_max species start stop name of conformal object, defined in AREA command (MAGIC2D). name of conformal object, defined in VOLUME command (MAGIC3D). thickness of foil (meters). relative permittivity of material. conductance (mhos/m). 1- or 2-letter atomic symbol of an element, e.g., Al, Fe, Cu, Ni, Au, etc. name of alloy, arbitrary alloy mass density (kg/m3) ratio of density to STP. number of elements in alloy. fraction of the element (by weight) in alloy. lowest allowable electron energy in the foil (MeV), the minimum is of 0.001 MeV. maximum anticipated electron energy (MeV). species of electron after exiting the foil, may be different from incident to distinguish incident and exiting electrons, defined in species command. the time to start recording particle data (seconds). the time to stop recording particle data (seconds Description: This command is used to simulate a thin sheet (FILM) of material and the transport of electrons as they pass through it. The simulation area or volume must be exactly one cell thick in the direction of beam transit. The actual physical thickness may be much smaller than a cell width and is input as a separate command argument. Any particle with the electron charge-to-mass ratio, which penetrates the foil, will experience scattering, energy loss, and possible back scattering or deposition within the material. This complicated process is modeled by subroutines from the Integrated TIGER Series of codes (ITS 3.0). The scattering MAGIC User’s Manual 14-13 Part V - Properties Chapter 14 - Material Properties parameters are automatically calculated from the material properties and the specified thickness. A foil appears as a perfect conductor to the electromagnetic fields, so that electric fields parallel to its surface vanish. A film is treated as a combination of finite conductivity and finite relative permittivity. Particles not having the electron charge-to-mass ratio, e.g., ions are collected on the surface of the material. The material composition of the film may be specified by selecting a particular element symbol, or by using one of the keywords, COMPOSITION or GAS, and entering the arguments for the elemental composition. The choice of material composition affects the electron transport scattering attributes. You may, for example, specify a composite material such as instead of a single element or a gas. In this case, you must supply a name for the material, the mass density of the alloy, density, and the number of elements in its composition, nelements, and a list of the atomic symbol for each element, together with its weight fraction in the alloy. The sum of the weight fractions must be unity. The ENERGY_LIMITS option is used to specify the electron energy limits for the scattering model in the ITS model. The first argument, energy_min, specifies the minimum energy of an electron which is tracked in the film without being absorbed. This argument is used by ITS’s CYLTRAN code unit. Electrons that fall below this energy are destroyed in the foil. The minimum allowed value of energy_min is 0.001 MeV. The second argument, energy_max, specifies the maxium anticipated energy of an electron entering the foil. It is used by ITS’s XGEN program as an upper bound for the scattering cross-section and energy attenuation tables. The default value of the maximum energy is 1 MeV. If an electron enters the foil with an energy above the anticipated maximum, it will automatically be reassigned the maximum energy. Normally, an electron exits the film as the same species that entered the film. It is, however, possible to artificially distinguish incident electrons from scattered electrons by changing the species identification of the electron when it exits the film, e.g., from RED_ELECTRONS to BLUE_ELECTRONS, if those two species have been created with the SPECIES command. This feature is expected to be of use when electrons are incident from both sides of a film, or when it is desired to distinguish the incident from back-scattered electrons. The EXIT_SPECIES option invokes this feature. All particles with the electron charge-to-mass ratio will exit the film as the specified species, regardless of its identity when incident on the film. Use of the FILM command requires the presence of the ITS code, “XGEN.EXE”, and the XGEN data file “FORT.9” in the same directory as the MAGIC executable. After all the FOIL commands are entered, MAGIC automatically constructs an input file for XGEN, which it then executes and embedded copy of XGEN.EXE, which creates an “output file, FORT.11, containing the scattering cross-section tables, which are used by the CYLTRAN subroutines embedded in MAGIC. This figure illustrates electron kinematics for FILMs. Particles to the left or right of the film use the standard MAGIC kinematics based on the Lorentz force. Particles which enter the film are passed to the ITS Tiger kinematics subroutines, where they experience collisions with the atomic nuclei. When MAGIC User’s Manual 14-14 Part V - Properties Chapter 14 - Material Properties films are range-thick a significant reduction in the electron energy can occur, and in some cases the electrons can be deposited in the film rather than exiting as either scattered or back-scattered electrons. For each FILM command, use of one of the RECORD options creates two files that contain information about the particles that are incident on the film and those particles that exit from the film/foil. The default file format is ASCII. The names of the files have the form name_record_in.dat and name_record_exit.dat, where name is the name of the area or volume object specified in the command. Each of the record files begins with the simulation time step, SYS$DTIME, and a table for the species, followed by the particle information. A new line is added for each particle that is incident on the foil or exits from the foil. There are no headers or titles in the files. The files only contain the actual particle data. The data structure of the file is as follows: SYS$DTIME numSpecies iSpecies species_name q_over_m m_species iSpecies species_name q_over_m m_species ... iSpecies species_name q_over_m m_species iTimeStep iSpecies charge x1 x2 x3 p1 p2 iTimeStep iSpecies charge x1 x2 x3 p1 p2 iTimeStep iSpecies charge x1 x2 x3 p1 p2 ... iTimeStep iSpecies charge x1 x2 x3 p1 p2 p3 p3 p3 p3 For the ASCII data option, the Fortran-style formats are: Sys$dtime: (e13.6,g24.14) NumSpecies: (i4) species table: (i4,1x,a,1x,e13.6,1x,e13.6) particle table: (i9,1x,i4,7(1x,e13.6)) For BINARY, all values are four bytes long except the species_name, which is a character value with a length of 32 bytes. References: “ITS Version 3.0: The Integrated TIGER Series of Coupled Electron/Photon Monte Carlo Transport Codes,” by J. A. Halbleib, R. P. Kensek, T. A. Mehlhorn, G. D. Valdez, S. M. Seltzer, and M. J. Berger, SAND91-1634 (March 1992). Also Oak Ridge National Laboratory document CCC-467. Incorporation of ITS with MAGIC is as follows. The XGEN program is used to generate scattering cross section and energy attenuation tables for the foil material. A subset of the CYTRAN code unit is linked with the MAGIC executable, and is used to evaluate the transport of electrons through the foil. Mission Research Corporation expresses its appreciation to the Radiation Shielding Information Center (RSIC) at Oak Ridge National Laboratory and the ITS development team for granting permissions to use XGEN and CYLTRAN in this manner. Restrictions: 1. The area or volume must be conformal. MAGIC User’s Manual 14-15 Part V - Properties Chapter 14 - Material Properties 2. The maximum number of films/foils is 127. 3. The FORT.9 data file must be in the same directory as the MAGIC executable. See Also: CONDUCTOR, Ch. 14, FOIL, Ch 14, SPECIES, Ch. 18. Examples: The following example illustrates the scattering of an electron beam by a gold foil and by a thin carbon film. A thin annular beam is incident from the left and a larger annulus beam is incident from the right. Both incident beams are comprised of electrons. The scattered electrons are designated a new species, REDELECTRON. EMISSION BEAM FbeamJ vbeam SURFACE_SPACING Random MODEL emitc1; EMIT emitc1 emittorLeft ; EMIT emitc1 emittorRight ; SPECIES REDELECTRON CHARGE -1 MASS 1 ELECTRON ; FOIL AU_Foil fThk GOLD Energy_limits 0.005 1.0 exit_specie REDELECTRON ; FILM C_Film fThk Epr_Carbon Sigma_Carbon CARBON Energy_limits 0.005 1. Exit_specie REDELECTRON; Energetic electron beam scattered by a thin gold foil and by a thin carbon film MAGIC User’s Manual 14-16 Part V - Properties Chapter 14 - Material Properties FOIL Command Function: Assigns the thin foil property to a conformal spatial object. The thin foil property assigns perfect conductivity (CONDUCTOR) and of electron transport through the thin foil object. Electron transport is achieved by using the ITS model for electron scattering dynamics in materials. This includes forward and backward scattering and absorption of electrons. Syntax: FOIL object {X1 ,X2 , X3} thickness {symbol, ALLOY name density nelements symbol fraction, symbol fraction, … , GAS name density ratio nelements symbol fraction, symbol fraction, …} [ENERGY_LIMITS energy_min energy_max ] [EXIT_SPECIES species] [{RECORD, RECORD_INCIDENT, RECORD_EXIT} timer [{BINARY, ASCII}]] [TRANSMISSION {FRACTION tfraction, GRID start_point pitch width [pitch width]}] ; Arguments: area name of conformal object, defined in AREA command (MAGIC2D). volume name of conformal object, defined in VOLUME command (MAGIC3D). {X1 ,X2, X3} direction of beam transit through the foil. You may use either the generalized coordinates, or the coordinate name. thickness thickness of foil (meters). symbol 1- or 2-letter atomic symbol of an element, e.g., Al, Fe, Cu, Ni, Au, etc. name name of alloy, arbitrary density alloy mass density (kg/m3) ratio ratio of density to STP. nelements number of elements in alloy. fraction fraction of the element (by weight) in alloy. energy_min lowest allowable electron energy in the foil (MeV), the minimum is of 0.001 MeV. energy_max maximum anticipated electron energy (MeV). species species of electron after exiting the foil, may be different from incident to distinguish incident and exiting electrons, defined in species command. start the time to start recording particle data (seconds). stop the time to stop recording particle data (seconds). tfraction the undeflected particle transmission fraction (or transparency) of the foil. start_point the starting position for pseudo-grid embedded in the foil. pitch the pitch of the wire pseudo-grid (m or radian). width the width of the wire pseudo-grid 9m or radian). Description: This command is used to simulate a thin sheet (Foil) of material and the transport of electrons as they pass through it. The simulation area or volume must be exactly one cell thick in the direction of beam transit. The actual physical thickness may be much smaller than a cell width and is input as a separate MAGIC User’s Manual 14-17 Part V - Properties Chapter 14 - Material Properties command argument. The argument, X1 ,X2, or X3, indicate the direction of beam transit through the foil. This the direction of beam alignment. You may use either the generalized coordinates, or the coordinate name. For example, in the Cartesian coordinate system, X1 ,X2, and X3 may be replaced with X, Y, and Z, respectively. The TRANSMISSION option is used when the foil has a physical transparency that is unresolved with your mesh. Any particle with the electron charge-to-mass ratio, which penetrates the foil, will experience scattering, energy loss, and possible back scattering or deposition within the material. This complicated process is modeled by subroutines from the Integrated TIGER Series of codes (ITS 3.0). The scattering parameters are automatically calculated from the material properties and the specified thickness. A foil appears as a perfect conductor to the electromagnetic fields, so that electric fields parallel to its surface vanish. A film is treated as a combination of finite conductivity and finite relative permittivity. Particles not having the electron charge-to-mass ratio, e.g., ions are collected on the surface of the material. The material composition of the foil may be specified by selecting a particular element symbol, or by using one of the keywords, ALLOY or GAS, and entering the arguments for the elemental composition. The choice of material composition affects the electron transport scattering attributes. You may, for example, specify an alloy material such as stainless steel, instead of a single element or a composite gas. In this case, you must supply a name for the alloy, the mass density of the alloy, density, and the number of elements in its composition, nelements, and a list of the atomic symbol for each element, together with its weight fraction in the alloy. The sum of the weight fractions must be unity. The ENERGY_LIMITS option is used to specify the electron energy limits for the scattering model in the ITS model. The first argument, energy_min, specifies the minimum energy of an electron which is tracked in the film without being absorbed. This argument is used by ITS’s CYLTRAN code unit. Electrons that fall below this energy are destroyed in the foil. The minimum allowed value of energy_min is 0.001 MeV. The second argument, energy_max, specifies the maxium anticipated energy of an electron entering the foil. It is used by ITS’s XGEN program as an upper bound for the scattering cross-section and energy attenuation tables. The default value of the maximum energy is 1 MeV. If an electron enters the foil with an energy above the anticipated maximum, it will automatically be reassigned the maximum energy. Normally, an electron exits the foil as the same species that entered the foil. It is, however, possible to artificially distinguish incident electrons from scattered electrons by changing the species identification of the electron when it exits the foil, e.g., from RED_ELECTRONS to BLUE_ELECTRONS, if those two species have been created with the SPECIES command. This feature is expected to be of use when electrons are incident from both sides of a foil, or when it is desired to distinguish the incident from backscattered electrons. The EXIT_SPECIES option invokes this feature. All particles with the electron charge-to-mass ratio will exit the foil as the specified species, regardless of its identity when incident on the foil. Use of the FOIL command requires the presence of the ITS code, “XGEN.EXE”, and the XGEN data file “FORT.9” in the same directory as the MAGIC executable. After all the FOIL commands are entered, MAGIC automatically constructs an input file for XGEN, which it then executes and embedded copy of XGEN.EXE, which creates an “output file, FORT.11, containing the scattering cross-section tables, which are used by the CYLTRAN subroutines embedded in MAGIC. MAGIC User’s Manual 14-18 Part V - Properties Chapter 14 - Material Properties This figure illustrates electron kinematics for FOILs. Particles to the left or right of the foil use the standard MAGIC kinematics based on the Lorentz force. Particles which enter the foil are passed to the ITS Tiger kinematics subroutines, where they experience collisions with the atomic nuclei. When foils are range-thick a significant reduction in the electron energy can occur, and in some cases the electrons can be deposited in the foil rather than exiting as either scattered or back-scattered electrons. For each FILM/FOIL command, use of one of the RECORD options creates two files that contain information about the particles that are incident on the film/foil and those particles that exit from the film/foil. The default file format is ASCII. The names of the files have the form name_record_in.dat and name_record_exit.dat, where name is the name of the area or volume object specified in the command. Each of the record files begins with the simulation time step, SYS$DTIME, and a table for the species, followed by the particle information. A new line is added for each particle that is incident on the foil or exits from the foil. There are no headers or titles in the files. The files only contain the actual particle data. The data structure of the file is as follows: SYS$DTIME numSpecies iSpecies species_name q_over_m m_species iSpecies species_name q_over_m m_species ... iSpecies species_name q_over_m m_species iTimeStep iSpecies charge x1 x2 x3 p1 p2 iTimeStep iSpecies charge x1 x2 x3 p1 p2 iTimeStep iSpecies charge x1 x2 x3 p1 p2 ... iTimeStep iSpecies charge x1 x2 x3 p1 p2 p3 p3 p3 p3 For the ASCII data option, the Fortran-style formats are: Sys$dtime: (e13.6,g24.14) NumSpecies: (i4) species table: (i4,1x,a,1x,e13.6,1x,e13.6) particle table: (i9,1x,i4,7(1x,e13.6)) For BINARY, all values are four bytes long except the species_name, which is a character value with a length of 32 bytes. MAGIC User’s Manual 14-19 Part V - Properties Chapter 14 - Material Properties The TRANSMISSION option is used to select one of the transparency models. Particle that are undeflected by the foil in the TRANSMISSION mode retain their initial species identity. Those particles that are intercepted and experience scattering are converted to the exit_species type. The simplest model is the FRACTION model. In this case, you merely indicate the fraction of particles that pass through the foil un-deflected. This is meant to represent the condition in which the foil represents a fine wire mesh, with a size well below that of the grid resolution. The mesh may be characterized by its thickness (as in the FOIL thickness) and the transparency (which is the fraction of the cross section which is optically transparent to ballistic particles.) The second model, the GRID model, may be used when you wish to specify the wire mesh pitch and wire width. See the following figure for the meaning of the arguments. The starting point can lie at any of the wire mesh intersections. It is defined as the center of the wire intersection. The pitch is the wire to wire separation. The width is the wire width (or possibly diameter). For Magic3d you must supply a pitch and with for both transverse ordinates. The mesh is assumed to be conformal in the two ordinates, transverse to the beam propagation direction. In polar coordinate this may lead to tapered wire elements along a radial ordinate. In Magic2d you need only supply one set of pitch and width values. See the example below. References: “ITS Version 3.0: The Integrated TIGER Series of Coupled Electron/Photon Monte Carlo Transport Codes,” by J. A. Halbleib, R. P. Kensek, T. A. Mehlhorn, G. D. Valdez, S. M. Seltzer, and M. J. Berger, SAND91-1634 (March 1992). Also Oak Ridge National Laboratory document CCC-467. Incorporation of ITS with MAGIC is as follows. The XGEN program is used to generate scattering cross section and energy attenuation tables for the foil material. A subset of the CYTRAN code MAGIC User’s Manual 14-20 Part V - Properties Chapter 14 - Material Properties unit is linked with the MAGIC executable, and is used to evaluate the transport of electrons through the foil. Mission Research Corporation expresses its appreciation to the Radiation Shielding Information Center (RSIC) at Oak Ridge National Laboratory and the ITS development team for granting permissions to use XGEN and CYLTRAN in this manner. Restrictions: 3. The area or volume must be conformal. 4. The maximum number of films/foils is 127. 4. The FORT.9 data file must be in the same directory as the MAGIC executable. See Also: CONDUCTOR, Ch. 14, FILM, Ch 14, SPECIES, Ch. 18. Examples: The following example illustrates the scattering of an electron beam by a gold foil and by a thin carbon film. A thin annular beam is incident from the left and a larger annulus beam is incident from the right. Both incident beams are comprised of electrons. The scattered electrons are designated a new species, REDELECTRON. EMISSION BEAM FbeamJ vbeam SURFACE_SPACING Random MODEL emitc1; EMIT emitc1 emittorLeft ; EMIT emitc1 emittorRight ; SPECIES REDELECTRON CHARGE -1 MASS 1 ELECTRON ; FOIL AU_Foil X1 fThk GOLD Energy_limits 0.005 1.0 exit_specie REDELECTRON ; FILM C_Film X1 fThk Epr_Carbon Sigma_Carbon CARBON Energy_limits 0.005 1. Exit_specie REDELECTRON; The following example from Examples3d\3dFoil\Foil_as_Grid.m3d shows the shadowing effect of the TRANSMISSION option on the particles. Notice that some additional shadowing occurs in the J profile, provided that the resolution is fine enough to illustrate that effect. in this example a 100 kV beam of electrons is launched through a simple foil in which we use the TRANSMISSION GRID model. The dx and dy resolution used is 5cm. The figures following the input example, illustrate the shadowing effect of the TRANSMISSION GRID model on the particles, the Jz above the FOIL plane, and the wall energy deposition density on the upper electrode. Particle emission is random in position. And the MAGIC User’s Manual 14-21 Part V - Properties Chapter 14 - Material Properties interception portion of FOIL generates additional randomness in the down stream portions of the electron beam. Point Foil_Starts 0,0,0 ; Xwidth = 2cm ; YWidth = 2cm ; XPitch = 15cm ; Ypitch = 15cm ; Thk = 10 Microns ; FOIL CenterPlate Z Thk GOLD energy 0.005 1.0 Transmission GRID Foil_Starts XPitch Xwidth YPitch Ywidth ; MAGIC User’s Manual 14-22 Part V - Properties Chapter 14 - Material Properties GAS_CONDUCTIVITY Command Function: Applies the gas conductivity model in a simulation. Syntax: GAS_CONDUCTIVITY {area, volume} neutralgas pressure temperature ! Cross section and stopping power [{CROSS_SECTION σion(Ei,β,γ), STOPPING_POWER dedx(Ei,β,γ)}] ; ! Initialize number densities of electrons and negative ions, infer positive density [INITIALIZE nelectron(x1,x2,x3) nnegative_ion(x1,x2,x3)] ! Ambient source charge rate model [SOURCE {KINETIC_IONIZATION, (default model) CURRENT_DENSITY, FUNCTION qdot(t, x1,x2,x3)}] ! Energy range for averaging cross section of Current Density [ENERGY_RANGE beam_energy_lo beam_energy_hi] ! Avalanche model evaluation [AVALANCHE {COEFFICIENTS A1 A2 A3, FUNCTION avalanche(|E|,p), AIR fion wion}] ! Attachment model evaluation [ATTACHMENT {COEFFICIENTS B1 B2 B3 B4 B5, FUNCTION attachment(|E|,p), AIR }] ! Electron - positive ion recombination rate [RECOMBINATION {COEFFICIENTS Re}] ! Negative ion + positive ion neutralization rate [NEUTRALIZATION {COEFFICIENTS Ni}] ! Mobility models [ELECTRON_MOBILITY {COEFFICIENTS M1 M2 M3, FUNCTION µelectron(|E|,p,ne), AIR}] [POSITIVE_MOBILITY {COEFFICIENTS Mp, FUNCTION µpositive_ion(|E|,p,np)}] [NEGATIVE_MOBILITY {COEFFICIENTS Mn, FUNCTION µnegative_ion(|E|,p,nn)}] MAGIC User’s Manual 14-23 Part V - Properties Chapter 14 - Material Properties [BEAM_DRAG {OFF, ON}] ; Arguments: area name of spatial application area, used for MAGIC2D. volume name of spatial application volume defined, used for MAGIC3D. neutralgas — name of neutral gas as defined in the MATERIAL table. pressure — neutral gas pressure in pascals. temperature — neutral gas temperature in oK. beam_energy_lo— minimum kinetic electron beam energy (eV). beam_energy_hi— maximum kinetic electron beam energy (eV). σion(Ei,β,γ) — function defining the gas cross section in units of unit atomic cross section as a function of Ei (incident kinetic energy in eV), β = v/c and γ (the relativistic factor,. dedx(Ei,β,γ) — function defining the electron stopping power as a function of incident kinetic energy (Ei) in eV, and of β and γ in units of eV/m. nelectron(x1,x2,x3) — function to initialize the number density of the electrons (#/m3). nnegative_ion(x1,x2,x3) — function to initialize the number density of the negative ions (#/m3). qdot(t, x1,x2,x3) — function defining electron fluid source term (#/s/m3 ). A1, A2, A3 — constants for the avalanche coefficient, α, (1/sec). avalanche(|E|,p) — function for avalanche rate, (where |E| ~ V/m, and p ~ torr), α, (1/sec). B1, B2, B3, B4, B5 — constants for electron-neutral attachment coefficient, β, (1/sec). attachment(|E|,p) — function for attachment rate, (where |E| ~ V/m, and p ~ torr), β, (1/sec). Re — constant for the electron-ion recombination coefficient, αe, (m3/sec). Ni — constant for ion neutralization coefficient, αi, (m3/sec). M1, M2, M3 — constants for electron mobility function, µe, (m2/volt-sec). Mp — constant for positive ion mobility function, µp, (m2/volt-sec). Mn — constant for negative ion mobility function, µn, (m2/volt-sec). Description: The GAS_CONDUCTIVITY command specifies the algorithms and parameters for the gas conductivity model, in which a gas of finite conductivity fills the simulation space. The default constants are for air in the pressure regime between 0.05 atmospheres and 1.0 atmosphere at standard temperature. The approach described below is based on the concept of mobility. Energetic electrons (primaries) are considered to be the dominant source term in the density equations. The existing PIC algorithms in MAGIC treat the primaries; however, in traversing a gaseous medium, the primaries ionize the gas, producing low energy (i.e. eV) electrons (secondaries) and ions. We assume that the collision frequency of the electrons is high (i.e. the mean free path is short.) Then the secondary electrons and ions respond to the ambient electric field by an effective drift. The net velocity of each species is proportional to the electric field; that factor of proportionality is the mobility. We neglect all secondary electron and ion transport from cell-to-cell including that associated with the mobility. The ionized fluid species are assumed immobile. The gas conductivity (σgas) results from gas ionization leading to background densities of electrons (ne), positive ions (np), and negative ions (nn). The densities of these background species evolve according to the following equations: dne /dt = Qt +(αt −βt) ne − αte ne np, dnn /dt = βtne − αti nn np, MAGIC User’s Manual 14-24 Part V - Properties Chapter 14 - Material Properties dnp /dt = Qt + αt ne − αte ne np − αti nn np, n e = np - nn We define Qt αt βt αte αti = ionization rate for target species “t”. = Avalanche coefficient. = electron-neutral attachement coefficient. = electron-ion recombination coefficient, and = positive-negative ion neutralization coefficient. Many of the gas conductivity quantities are functions of the electric field and air pressure. The electric field is computed dynamically; the user enters the gas pressure. The ionization rate, Q, may be computed from Q = αtq |J|, where |J| is the absolute current density, or directly from the kinetic electrons as in the IONIZATION command. The constant of proportionality, the ionization rate coefficient, αtq, is internally evaluated by averaging the cross section over the assumed energy range. The current density term, |J|, is computed by the code from the particle motion. Users are cautioned that the net current density is used, and hence situations involving back streaming electrons and/or significant ion current may not be treated properly. Details of these models are provided below and the default coefficients for air. For other gases the user must supply the appropriate values. The value of the source term, Qt, may be generated by one of three methods. The simplest approach, (the default method), which is suitable for high energy beams with modest current density is the CURRENT_DENSITY option. In this case we set the source term to Qt = αtq |J|, and where |J| = absolute value of current density. αtq = <σion> ngas/e is the ionization rate coefficient, and <σion> = energy averaged ionization cross section. The evaluation of <σion> is done from the cross section of the target gas over the energy range specified by the command arguments beam_energy_lo and beam_energy_hi. Use the ENERGY_RANGE option to specify the energy average integral. The default range for the evaluation is 1eV to 106 eV. For the option KINETIC_IONIZATION we set the source term to Qt = Σincσion(vinc) nt [qinc/evinc]/cell_volume, nt = number density of the target gas, evaluated from the pressure and temperature. The term in the brackets is incident kinetic electron flux and is evaluated from the ambient kinetic electrons on each time step. The energy averaged value of the ionization cross section of the gas, <σion>, is obtained by averaging over the cross section. It may also be noted that the ionization model automatically invoke the gas conductivity model when using certain model features that require the fluid electron and fluid ions. See also the IONIZATION command in chapter 16. Both the ionization and gas conductivity models use exactly the pressure and gas specifications. Cross Section and Stopping Power For gases not in the materials tables, you may wish to specify the impact cross section using the CROSS_SECTION keyword and providing a function σion(Ei,β,γ), where the cross section is in units of unit atomic cross section (πao2), and Ei in units of eV. (The unit atomic cross section, πao2 = 0.88e-20 m2). Alternatively you may use the STOPPING_POWER keyword and provide a function for dE/dx(Ei,β,γ), from which the cross section will be obtained using the expression MAGIC User’s Manual 14-25 Part V - Properties Chapter 14 - Material Properties σion = dE/dx / (NWgas). Here N is the # density of the neutral gas, and Wgas is the energy needed per created electron-ion pair. For air this value is typically around 34.0 eV. The default method is to evaluate the stopping power, dE/dx(Ei,β,γ), from the Bethe equation: dE/dx = 2πao2 Me N Zgas Zeff /β2 [ ln(0.5γ2β2(γ−1)/Ir2 )−(2−1/γ)ln(2)/γ + (1/γ)2+0.25(1−1/γ)2] Me = (mec2/e) is the electron rest mass in eV. Zgas is the number of bound electrons per gas molecule. Zeff =1. The ratio Ir = Ip/ Me, where Ip is the average electron ionization potential for the gas. Values of Ip may be obtained from the literature, or approximated from the following expression using Z, the atomic number. Ip/Z = 12 + 7/Z for Z< 13 Ip/Z = 9.76 + 58.8 Z-1.19 for Z> 13 In the evaluation of the stopping power below about 300 eV, MAGIC uses an internal table of cross section values for a few gases, and then matches the stopping power prediction with the table, renormalizing data above 300 eV. The default range for the evaluation is 1eV to 106 eV. Use the ENERGY_RANGE option to increase the upper end of the range. Internal tables exist only for the following gases, AIR, NITROGEN_GAS, HYDROGEN_GAS, and OXYGEN_GAS. The AIR gas model is a composite model of the properties of N2 and O2. The gas-conductivity (mhos/m) is obtained from the equation: σgas = e(µe ne + µtp ntp + µtn ntn), e = electron charge µe = electron mobility µtp = positive ion mobility µtn = negative ion mobility Electron Temperature Model for air The electron temperature as function of electric field intensity (V/m) and the pressure (pascal) may be approximated by the following expression. Te(φ) = a1(1+a2φ (1+a3φ (1+a4φ (1-a5φ (1-a6φ(1-a7φ(1-a8 φ))))))) φ < 0.716 Te = b1 (1+b2 φ) φ > 0.716 5 1/2 φ= (10 |E|/p/511.0) And the constants are: a1 = 0.155, a2 = 8.6277, a3 = 14.944, a4 = 18.948, a5 = 5.6968, a6 = 2.1216, a7 = 0.92303, a8 = 0.33829, b1 = 0.505 and b2 = 35.4. Avalanche Model The default definition of the avalanche coefficient, α(|E|,p), is taken from the Longmire-Longley model. In this model, p is the ratio of the gas density to 1 atmosphere; |E| is the absolute value of the local electric field in V/m. The values of the coefficients, A1, A2 and A3, have been determined empirically for air. The avalanche coefficient, α(|E|,p), is evaluated with the following expression. MAGIC User’s Manual 14-26 Part V - Properties Chapter 14 - Material Properties α(|E|,p)= A1 p (|E|/p/A2 )5/ ( 1+ A3 (|E|/p/A2)2.5 ), A1 = 5.7x10⁸, A2 = 3.0x10⁶, and A3 = 0.30. An alternative model of the avalanche coefficient is available for AIR. In this case we use the following expression. α(|E|,P) = 100c fion c1 φ6 /(1+c2 φ2+c3 φ4+c4 φ6)/(1.0+Te(φ))/(4.0 Wion)) E is the magnitude of the electric field in V/m. The constants are c1 = 7.84 x10⁴, c2 = 26.67, c3 = 2242.0, c4 = 691.6 and fion ~ 1.0 is the un-ionized molecule fraction. Wion is the first ionization energy in eV. For air this value is taken to be about 15 eV. Attachment Model The default definition of the attachment coefficient, β, is calculated from the Longmire-Longley model. In this model, p is the ratio of the gas density to 1 atmosphere; |E| is the absolute value of the local electric field in V/m. The values of the coefficients, B1, B2 B3, B4 and B5 have been determined empirically for air. The attachment coefficient is evaluated with the following expression. β(|E|, p) = (B1 p2)/(|E|/p/B3 + B4)1/2 + (B2 p) exp(-B5 p/(1+|E|/p/3)), Where the constants are: B1 = 6.3x10⁷, B2 = 1.3x10⁸, B3 = 3.0x10⁴, B4 = 0.10 and B5 = 1.0x10⁶. An alternative model of electron-neutral attachement for air is given by the following expression β(|E|, p) = 100cp ( at1/Te(φ) exp( at2/Te(φ) ) + at3) Here c is the speed of light, p is in atmospheres, and the electron temperature, Te(φ) in eV, is defined above. And the attachment model parameters are at1= 3.56x10⁻², at2= -0.052 and at3= 9.17x10⁻². Recombination Model The recombination rate, αe, of electrons to positive ions (m3/s) is treated as a constant. αe(p) = Re, where the default value is Re = 1.0x10⁻¹². An alternative model of recombination for air is given by the following expression. αe(|E|,P) = 4.0x10-6*4.3x10-8Te-0.39 Neutralization Model The neutralization rate, αi, of positive and negative ions (m3/s) is treated as a constant. αI = Mi, where the default value is Mi = 2.3x10⁻¹². Mobility Model The definition of the electron mobility, µe, (in units of m2/V-s) is calculated from the Baum model. In this model, p is the ratio of the gas density to 1 atmosphere; |E| is the absolute value of the local electric field in V/m. The values of the coefficients, M1, M2 and M3, have been determined empirically for air. The attachment coefficient is evaluated with the following expression. µe(|E|, p) = M1/p ( |E|/p+M2 )/( |E|/p+M3 ))1/2, Where the constants are: M1 = 4.21x10⁻², M2 = 1.2 x10⁶, and M3 = 8.81 x10². MAGIC User’s Manual 14-27 Part V - Properties Chapter 14 - Material Properties An alternative model for the electron mobility in air is given below. µe(|E|, P, ne) = e/(100meνc). ν = νen (|E|, P) + νei (|E|, ne) Here, ν, is the electron collision rate with neutrals, (νen), and ions, (νei). And ne is the secondary electron number density (#/m3). νen (|E|, P) = aen0 P (Te)1/2 for Te >= 4.0 νen (|E|, P) = P ( aen1 + Te ( aen2 + Te (aen3 + aen4 Te))) for Te < 4.0 νei (|E|, ne) = aei1 fe (10-6 ne) (Te)-1.5 log( aei2 + aei3 Te3/(10-6 ne)) Here fe = MAX(1.,0.5 ne / N) is the fractional ionization and the factor of 1/2 is for diatomic molecules. The parameters for this model have the following default values: aen0 = 64.0, aen1 = 4.98733, aen2 = 82.3167, aen3 = -20.7957, aen4 = 1.97517, aei1 = 4.86x10⁻¹⁷, aei2 = 1.0 and aei3 = 2.39x10²⁰. In addition the positive and negative ion mobility are given by µp(|E|, p) = Mp/p, where the default value of Mp = 2.4 x10⁻⁴. µn(|E|, p) = Mn/p, where the default value of Mn = 2.4 x10⁻⁴. Initialization Use the INITIALIZE keyword to initialize the electron number density and the negative ion number density fields to non-zero values. This is accomplished by supplying the functions nelectron(x1,x2,x3) and nnegative_ion(x1,x2,x3). These functions are evaluated at the beginning of the simulation, and the positive number density is calculated from the resultant to ensure initial net charge neutrality. Diagnostic Fields for the Gas Conductivity Model The gas conductivity model calculates a number of fields which vary in time and space. These fields can be output in the same manner as the electromagnetic fields. The definitions of the fields are given in the following table. Keyword Q_IONIZATION B_AVALANCHE B_ATTACHMENT ELECTRON_MOBILITY RHO_ELECTRON RHO_NEGATIVE_ION RHO_POSITIVE_ION SIGMA_GAS • • Symbol Q α β µe ne nn np σgas Definition ionization rate avalanche coefficient electron attachment coefficient electron mobility electron number density negative ion number density positive ion number density conductivity Diagnostics for the GAS_CONDUCTIVITY model include: CONTOUR FIELD gas_conductivity_field. See preceding table for allowed quantities. RANGE FIELD gas_conductivity_field. See preceding table. MAGIC User’s Manual 14-28 Part V - Properties • • • • • • • Chapter 14 - Material Properties OBSERVE FIELD gas_conductivity_field. See preceding table and the OBSERVE FIELD command. OBSERVE FIELD_INTEGRAL RHO_ELECTRON.DV area ... measures the electron charge associated with the gas_conductivity in the area. You can measure the current, dq/dt by using the DIFFERENTIATE option. OBSERVE FIELD_INTEGRAL RHO_POSITIVE.DV area ... measures the positive ion charge associated with the gas_conductivity in the area. You can measure the current, dq/dt by using the DIFFERENTIATE option. OBSERVE FIELD_INTEGRAL RHO_NEGATIVE.DV area ... measures the negative ion charge associated with the gas_conductivity in the area. You can measure the current, dq/dt by using the DIFFERENTIATE option. OBSERVE FIELD_ENERGY DW_GAS_CONDUCTIVITY … measures instantaneous energy deposition. OBSERVE FIELD_ENERGY WSUM_GAS_CONDUCTIVITY … measures comulative energy deposition. OBSERVE FIELD_POWER E.J_GAS_CONDUCTIVITY.DV area … measures power flow. Restrictions: 1. The gas conductivity algorithm is known to be applicable in the pressure regime, 0.05 atm ≤ P ≤ 1 atm. 2. Validation of the cross sections and stopping power for arbitrary energy ranges is left to the user. See Also: AREA, ch. 10, VOLUME, Ch. 10, TIME_STEP, Ch. 17, CONTOUR FIELD, Ch. 24, IONIZATION, Ch. 16, OBSERVE FIELD_ENERGY, Ch. 24, OBSERVE FIELD, Ch. 22, OBSERVE FIELD_INTEGRAL, Ch. 22, OBSERVE FIELD_POWER, Ch. 22, RANGE FIELD, Ch 23. References: B. Goplen, "An Air Chemistry Algorithm for SOS," Mission Research Corporation Report, MRC/WDC-R-043, September 1983. K. Wahlstrand, R. Worl, K. Nguyen, and B. Goplen, "AURORA Drift Tube Simulations," Mission Research Corporation Report, MRC/WDC-R-163, April 1988. National Institute of Standards and Technology, Physics, Physical Reference Data, February 2009 (http://physics.nist.gov/PhysRefData/Ionization/intro.html and http://physics.nist.gov/PhysRefData/Star/Text/method.html). Andrew J. Woods and Lars D. Ludeking, “MAGIC Electromagnetic FDTD-PIC Code Dense Plasma Model Comparison with Lsp”, paper prepared for the 36th International Conference on Plasma Science, May 31 – June 5, 2009, San Diego, California (http://cer.ucsd.edu/icopssofe09/) MAGIC User’s Manual 14-29 Part V - Properties Chapter 14 - Material Properties MATERIAL Command Function: Specifies material properties. Syntax: MATERIAL material [ ATOMIC_NUMBER atomic_number ] [ ATOMIC_MASS mass_number ] [ MOLECULAR_CHARGE charge_number ] [ MOLECULAR_MASS mass_number ] [ CONDUCTIVITY sigma ] [ MASS_DENSITY density ] [ PERMITTIVITY epsilon ] [ IONIZATION_PARAMETERS m2 c ] [AVE_IONIZATION_POTENTIAL Ip] [SPECIFIC_HEAT cq] [ENERGY_PAIR_CREATION wgas] [IONIZATION_POTENTIAL_1ST w1st]] [LIST] ; Arguments: material material name, user-defined. atomic_number atomic number, Z. atomic_mass_number mass number, A, (amu). charge_number molecular charge number, (Zgas = Σi Zi). molecular_mass_number mass number, (Agas = Σi wiAi), (amu). density density (kg/m3). sigma conductivity (1/ohm-m). epsilon relative dielectric constant (unitless). m2, c constants used in ionization cross-section calculation (unitless). Ip average ionization potential, (eV). cq specific heat, (J/goK). wgas energy needed for pair creation during ionization, (eV). w1st first ionization potential, (eV). Defaults: Some material properties have already been entered and are ready for use. However, any other properties that are required must be entered explicitly. Description: An internal material table contains the properties of materials that may be used in the simulation. You can add other material properties or change existing properties using MATERIAL commands. The CONDUCTIVITY property is used when the CONDUCTOR ... MATERIAL option is used. The PERMITTIVITY property can be used with the DIELECTRIC command. The ATOMIC_MASS, ATOMIC_NUMBER and MASS_DENSITY properties are used when the FOIL command is used. There are no predefined materials for FOIL. MAGIC User’s Manual 14-30 Part V - Properties Chapter 14 - Material Properties The MATERIAL command associates a set of physical properties with an arbitrary material name. Commands that require values for these properties may reference the name specified in the MATERIAL command. The options, which specify particular material properties, are: • • • • • • • • • • • • ATOMIC_NUMBER, Z ATOMIC_MASS, A MOLECULAR_CHARGE, Zgas MOLECULAR_MASS, CONDUCTIVITY, MASS_DENSITY, PERMITTIVITY, IONIZATION_PARAMETERS, AVE_IONIZATION_POTENTIAL Ip, SPECIFIC_HEAT cq, ENERGY_PAIR_CREATION wgas, IONIZATION_POTENTIAL_1ST w1st. You can use these options to enter a physical value into the table, or you can list all of the properties of a specified material using the LIST option. (If you specify ALL instead of a material name, the entire table will be printed.) The default material values of CONDUCTIVITY and PERMITTIVITY for several materials are shown in the following tables. Material ALUMINUM BRASS COPPER GOLD GRAPHITE IRON MOLY MONEL Material Conductivity Material σ (mhos/m) 3.72E+07 NICHROME 1.56E+07 NICKEL 5.99E+07 PLATINUM 4.10E+07 SILVER 71400 SOLDER 1.03E+07 STAINLESS 1.75E+07 TUNGSTON 2.38E+06 VACUUM σ (mhos/m) 1.00E+06 1.45E+07 9.52E+06 6.17E+07 7.04E+06 1.38E+06 1.82E+07 0 Material Permittivity Material AIR BAKELITE CERAMIC_ALSIMAG_393 ETHYL_ALCOHOL GLASS_CORNING_707 ICE NEOPRENE NYLON κ (ε/ε0) 1 4.8 4.95 25 4 4.2 3.4 4 MAGIC User’s Manual Material QUARTZ_FUSED RUBBER RUBY_MICA SANDS SILICA_FUSED SODIUMCHLORIDE STYROFOAM TEFLON κ (ε/ε0) 3.8 3.2 5.4 4 3.8 5.9 1.03 2.1 14-31 Part V - Properties Chapter 14 - Material Properties PAPER PLEXIGLASS POLYETHYLENE POLYSTYRENE PORCELAIN 3 2.9 2.25 2.55 6 TIO2 DISTILLED_WATER SEA_WATER VACUUM WATER 100 80 20 1 80 Ionization constants and potentials are given for several gases in the following table. Please note that values in () are estimates and you may wish to insert your own values into the table. The values in this table are used for evaluation of ionization cross sections and stopping power. These are used in the IONIZATION and GAS_CONDUCTIVITY models. Ionization Constants Material Z Zgas HYDROGEN 1 2 HELIUM 2 2 FLOURINE 9 9 NEON 10 10 NITROGEN 7 14 AIR 7.22 15 OXYGEN 8 16 ARGON 18 18 CARBON_DIOXIDE 7.33 22 KRYPTON 36 36 XENON 54 54 MERCURY 80 80 SF6 72 72 A Agas Ip Wgas W1st M2 C 1 2.0026 34.0 13.598 0.695 8.12 4 4.0026 39 36.5 24.587 .77 7.7 18.9984 18.9984 107 (39.5) 17.422 20.18 20.18 131 36.5 21.56 2.0 18.2 14.0067 28.01 (32.94) 14.534 3.74 34.8 14.48 28.971 80 34 15. 15.9994 32 (30.87) 13.618 4.2 38.8 39.948 39.948 188 26 15.759 4.2 37.9 14.67 44 (21.8) 12.832 5.75 57.9 83.8 83.8 352 24 13.999 6.1 52.4 131.3 131.3 440 (20.6) 12.13 8.0 72.4 200.59 200.59 (17.74) 10.437 5.7 64 154 154 - See Also: CONDUCTANCE, Ch. 14, CONDUCTOR, Ch. 14, DIELECTRIC, Ch. 14, FILM, Ch. 14, FOIL, Ch. 14, IONIZATION, Ch. 16. Restrictions: 1. The maximum number of entries in the material table is five hundred. MAGIC User’s Manual 14-32 Part V - Properties Chapter 14 - Material Properties SURFACE_LOSS Command Function: Turns on the model to compute surface skin depth losses for conductors. Syntax: SURFACE_LOSS frequency [FIXED, SCALE fscale(t), DYNAMIC, EXCLUDE nzones AZONE1,.. AZONEnzones ] [NO_REMOVE_DC, REMOVE_DC ]; Arguments: frequency the reference frequency for evaluating the skin depth, in Hz. fscale(t) frequency temporal scaling function, unitless, defined with FUNCTION command. nzones number of exclude zones. AZONEi name of a CONFORMAL volume in which no surface loss is applied, defined in VOLUME command. Description: The SURFACE_LOSS command specifies that the simulation will include the effects of conductor losses due to surface currents. Evaluation of the surface losses requires the computation of the skin depth, which in turn, requires both the frequency and material conductivity of the surface. There are three models for the surface loss: • FIXED monochromatic frequency response at the reference frequency. This is the simplest model, and is suitable in cavities and circuits, in which the frequency is relatively constant. • SCALE in this model the user supplies a reference frequency and scaling function, such that the actual dominant frequency, is given by f(t) = fref erence* fscale(t). This is suitable in the case in which a frequency sweep is applied to a circuit. In general, the sweep must be relatively slow, and the user should be aware that the results will have a propagation delay as the signal transits the circuit. • DYNAMIC in this model the reference frequency is again supplied, however, the the software evaluates the local frequency in each surface cell on each time step, and applies a dynamic correction to the reference frequency and skin depth. In this model, each magnetic field component is treated separately for purposes of the frequency evaluation. This model is somewhat more expensive computationally than are the FIXED or SCALE models. The EXCLUDE option is used to remove some conductor surfaces from surface loss effects. The surfaces touching or within the exclude volumes are removed and no loss occurs. This is useful in the case of beam transport. In the case of beam transport, the beam carries a large electrostatic field and dc current. It does not necessarily carry frequency information. Thus both the FIXED and SCALE models will result in unphysical losses in the beam transport guide. In order to prevent this unphysical effect, which will manifest as a synthetic space charge accumulation in the beam guide, use the EXCLUDE option to prevent these losses. An alternative, is to use the DYNAMIC option. It should be noted that this option will suffer from the same effect, but at a much smaller level. In any case, the user is urged to MAGIC User’s Manual 14-33 Part V - Properties Chapter 14 - Material Properties test a simplified transport problem, when using this model, and verifying that no unacceptable level of synthetic charge is present over the simulation time scales of interest. The NO_REMOVE_DC (default) and REMOVE_DC options allow you specify removal of the DC component of the magnetic field. This is designed for hot test problems in which the beam transport results in a largely DC component of the magnetic field. In this case it is better to use the REMOVE_DC option to get a better estimate of the surface loss. In the case of a resonant cavity without particles, the default configuration best describes the proper model approach. Material conductivity information is based upon the use of the MATERIAL option in the CONDUCTOR command. When a material is not specified in the CONDUCTOR command, the material property for copper is assumed. The user can also use the OBSERVE FIELD_POWER command, with SURFACE_LOSS as the power variable, to display the surface losses within an arbitrary conformal volume of the simulation. The computation of surface losses during time-domain simulation is accomplished by attenuating the B field at the surface at each time step, based on the effective physical equations for skin depth losses. No attempt to model the behavior of the fields within the metal is actually made. Specifically, a surface consisting of a non-ideal metal possesses a non-zero, parallel, electric field which is proportional to the parallel magnetic field. When this non-zero parallel electric field is accounted for in Faraday’s Law, it results in the addition of an effective magnetic conductivity term for the parallel magnetic field at the surface, e.g., ∂tBsurface = −∇×Enormal − ηBsurface , where the factor η contains the skin depth information. The user should be aware that this surface loss model is susceptible to appreciable finite-difference error effects, such that the model’s computed surface losses may depart from true behavior by as much as 15%. See Also: CONDUCTOR, Ch. 14, OBSERVE FIELD_POWER, Ch. 22. Examples: The example may be found in Examples3d\Surface_Loss. In this example a rectangular pillbox is excited by first solving for the base eigenmode. • Run the example file named "Run 1st, RectBox_Eigen.m3d". This will solve the cavity geometry for the root eigenmode. The frequency is near 1.05884GHz. The following figures show the E3 field and vector Bx,By field in a cross section of the pillbox. MAGIC User’s Manual 14-34 Part V - Properties • Chapter 14 - Material Properties Next run the example file named "Run 2nd RectBox_Loss.m3d". This will run a time domain simulation with the conductivity of the walls set artificially low, such that the Q is about 525. This example provides the opportunity to set the Surface_Loss model to either FIXED, or DYNAMIC, or DYNAMIC with part of the wall excluded from the Surface_Loss model. The following commands are from this example and illustrate the syntax. IF (SURFACE_lOSS_Model.eq.1) THEN ; DUMP PREFIX BOX_FIXED. ; Surface_Loss EigenFreq FIXED ; ELSE IF (SURFACE_lOSS_Model.eq.3) THEN ; DUMP PREFIX BOX_DYNAMIC. ; MAGIC User’s Manual 14-35 Part V - Properties Chapter 14 - Material Properties Surface_Loss EigenFreq DYNAMIC ; ELSE IF (SURFACE_lOSS_Model.eq.4) THEN ; DUMP PREFIX BOX_DYNAMICEXL. ; Surface_Loss EigenFreq DYNAMIC Exclude 1 ExBox ; ELSE ; DUMP PREFIX BOX_NOLOSS. ; ENDIF ; IF (SURFACE_lOSS_Model.ne.0) THEN ; ! Measure power loss in surface. OBSERVE FIELD_POWER SURFACE_LOSS OSYS$volume ; ! Measure Q from power loss in surface. OBSERVE FIELD_POWER SURFACE_LOSS OSYS$volume FILTER STEP TFILTER Q_OF_Signal EigenFreq 2; ENDIF ; The first figure shows the instantaneous power loss as the cavity oscillates between pure electric and pure magnetic fields. The second figure shows the time averaged power loss. The following figure shows the Q evaluated from the average power loss. MAGIC User’s Manual 14-36 Part V - Properties Chapter 14 - Material Properties MAGIC User’s Manual 14-37 Part V - Properties Chapter 14 - Material Properties VOID Command Function: Assigns void property to a spatial object. Syntax: VOID { area, volume } ; Arguments: area name of spatial area defined in AREA command for 2D simulation. volume name of spatial volume defined in VOLUME command for 3D simulation. Description: The VOID command applies a voiding operation everywhere within a specified spatial object. It is used only in conjunction with the perfectly conducting property (CONDUCTOR, Ch. 14). Specifically, use a CONDUCTOR command to make an object perfectly conducting and then use a VOID command to remove the conducting effect from some specified portion of the object. Normally, the voided object will overlap some portion of the original conducting object (See Examples, below). This process of assigning conducting and void properties can be continued ad infinitum, making it possible to create a conducting structure of great complexity. See Also: AREA, Ch. 10, VOLUME, Ch. 10, CONDUCTOR, Ch. 14 Restrictions: 1. The VOID property can be applied only to conducting areas in 2D simulations and to conducting volumes in 3D simulations. Examples: In this 2D simulation, we create a perfectly conducting, square object and then cut out the lower left-hand quarter. W2 = W / 2. ; AREA square RECT 0,0 W,W ; AREA hole RECT 0,0 W2,W2 ; CONDUCTOR square ; VOID hole ; MAGIC User’s Manual 14-38 Part V - Properties Chapter 15 - Unique Geometry 15. UNIQUE GEOMETRY This chapter covers the following commands: CABLE CAPACITOR DAMPER INDUCTOR POLARIZER RESISTOR SHIM You can use these commands to assign unique geometry properties to spatial objects. (Points, lines and areas are the only spatial objects which can have a unique geometry property associated with them.) Whereas material properties affect both electromagnetic fields and charged particles, unique geometry properties generally affect only the fields. Particles which cross the spatial object are unaffected, except through the fields (i.e., there is no absorption). The commands listed above invoke different geometry effects. Their unifying feature is that they all represent physical effects that occur on a spatial scale too small to be resolved by any realistic spatial grid. As a class, they have been described as “sub-grid” models. It is because of this small spatial scale that these models are applied only to lines and areas (which have zero thickness). The POLARIZER and SHIM commands are available only in Magic2d simulations. The CABLE, CAPACITOR, and DAMPER, commands are available only in Magic3d simulations. The RESISTOR and INDUCTOR commands are available in both Magic2d and Magic3d simulations. The POLARIZER command approximates a three-dimensional structure, specifically, an infinite array of wires. For example, in two-dimensional cylindrical coordinates, it can effectively represent a three-dimensional helical structure. It is assigned only to a line object in a Magic2d simulation. In nontrivial applications, the model couples transverse magnetic and transverse electric field components which are generally independent in a purely electromagnetic, two-dimensional simulation. For conformal orientations, the model can block either field component while letting the other component pass. The SHIM command produces a very fine-scale geometric variation on the surface of a conductor. It is assigned only to a line object in a Magic2d simulation. (The scale of the variation must be smaller than the surrounding spatial grid.) This model can be used to represent a very gradual slope or a rippled effect on a surface. The CABLE command represents electromagnetic excitation at a conducting surface, such as would be caused by a small-scale cable stub or loop. It is assigned only to a point object in a Magic3d simulation. The cable stub is presumed to penetrate the conducting surface through a co-axial conductor and to terminate in vacuum. It radiates as a dipole antenna. The cable loop is similar, but terminates on the conducting surface. It radiates as a quadrupole antenna. It is applied to a spatial line one cell in length at the conducting surface. The CAPACITOR command represents the capacitive effect of a small-scale gap. It is assigned only to an area object in a 3D simulation. (It is applied to an area one cell deep between two adjacent conductors.) MAGIC User’s Manual 15-1 Part V - Properties Chapter 15 - Unique Geometry The DAMPER command represents the resistive effect of a membrane damper, a very thin resistive sheet used to damp out electric fields in a specified plane in space. (This technique is commonly used in electromagnetic cavities to damp out undesirable electromagnetic modes.) It is assigned only to an area object in a 3D simulation. The DIPOLE command is used to represent the effect of a dipole moment on a conducting surface. Physically, this could result from high-intensity photoemission that creates a space-charge-limited boundary layer. If the e-folding distance associated with the layer cannot be easily resolved by the spatial grid, then this approximation may be applicable. It is assigned only to an area object in a 3D simulation. (It is applied to an area on the conducting surface.) The RESISTOR command represents the resistive properties of a small-scale resistive wire. It is applied to a spatial line in either 2D or 3D simulations, and is presently limited to conformal orientations. The INDUCTOR command represents the inductive, capacitive, and resistive properties of a smallscale wire, or inductive strut. It is applied to a spatial line in either 2D or 3D simulations, but is presently limited to conformal orientations. MAGIC User’s Manual 15-2 Part V - Properties Chapter 15 - Unique Geometry CABLE Command Function: Applies coaxial cable excitation to a spatial point in a 3D simulation. Syntax: CABLE point { X1, X2, X3 } current(t) { STUB stub_length, LOOP loop_area }; Arguments: point spatial coordinates or name of point defined in POINT command. current temporal function for cable current (A), defined in FUNCTION command. stub_length length of antenna stub (m). loop_area area of antenna loop (sq. m). Description: The CABLE command applies electromagnetic excitation at a single spatial point. It represents the effects of a stub or loop antenna on the surface of a conducting object. The STUB option represents a short extension of the center conductor which projects out of a cable embedded in a conducting object. The stub is assumed to be aligned with a coordinate axis (x1, x2, or x3) which is normal to the conducting surface, and the current is applied over the stub_length to excite the electric field at that point. The LOOP option represents a small loop formed by the center conductor which projects out of and bends back into the conducting object, thus forming a loop. The surface normal to the loop area is assumed to be aligned with a coordinate axis (x1, x2, or x3) which is tangential to the conducting surface, and the current is applied over the periphery of the loop_area to excite the magnetic field at that point. Restrictions: 1. The spatial point must be immediately above the conducting surface. 2. Only 100 CABLE commands may be entered. 3. This command is available only in 3D simulations. See Also: POINT, Ch. 10 MAGIC User’s Manual 15-3 Part V - Properties Chapter 15 - Unique Geometry CAPACITOR Command Function: Simulates capacitance between two conducting objects in a 3D simulation. Syntax: CAPACITOR volume { X1, X2, X3 } capacitance ; Arguments: volume name of conformal spatial volume, defined in VOLUME command. capacitance capacitance per unit length (farads/meter). Description: The CAPACITOR command represents a capacitive effect between two adjacent conducting objects (or adjacent sections of the same conducting object). Generally, the dimensions associated with the actual capacitor will be much smaller than the spatial grid; hence, brute-force resolution of the effect is not possible. To use this sub-grid model, the gap between the conducting objects must be exactly one cell in depth. Use of this command, therefore, requires control of the spatial grid, so that the area containing the gap (designated by the area name) must be one cell in depth. The direction associated with this “depth” must be specified as a coordinate axis (X1, X2, or X3). Finally, you must specify the capacitance per unit length — the capacitance effect is in the specified direction (between the objects), and the length is measured transversely (along the gap). The capacitive gap model is based on the notion that the desired gap between two conductors is smaller than the simulation resolution of that gap. And thus the finite difference representation of the capacitance must be adjusted to compensate for the desired gap. Although the details of the capacitance can be general, we assume for the moment that it consists of flat plates having a physical separation of dgap, and that the capacitance/area, CA = εo/dgap. We desire to compute the field quantities in the immediate neighborhood of the gap. In the following figure imagine that capacitive regions extends some distance in the x1 coordinate and in the unseen x3-coordinate. The interesting capacitive E and B fields lie in the x2 and x1-coordinates, respectively. The defined fields, E2 and B1 are related to the physical gap fields, Eg and Bg, by the expressions. MAGIC User’s Manual 15-4 Part V - Properties Chapter 15 - Unique Geometry E2 = dgap/δxf2 Eg, and B1 = dgap/δxf2 Bg1. Restrictions: 1. The spatial area designated by the area name must be exactly one cell in depth; however, the actual length of the cell does not matter to the correct application of the capacitive effect. 2. Only 100 CAPACITOR commands may be entered. 3. This command is available only in 3D simulations. See Also: AREA, Ch. 10, AUTOGRID, Ch. 11, GRID [options], Ch. 11. MAGIC User’s Manual 15-5 Part V - Properties Chapter 15 - Unique Geometry DAMPER Command Function: Applies a membrane damper to an area object in a 3D simulation. Syntax: DAMPER area { material, conductivity } thickness ; Arguments: area name of spatial area, defined in AREA command. material name of material, defined in MATERIAL command. conductivity membrane conductivity (mhos/m). thickness membrane thickness (m). Description: The DAMPER command simulates a thin membrane of electrically conducting material which is applied over the specified spatial area. The area must be conformal. Only components of the electric field which are parallel to and lie within the plane of the area will be attenuated. The membrane conductivity can be specified either by entering the name of a material or by entering conductivity directly. The membrane resistivity is calculated from where σ is the conductivity and t is the thickness. Restrictions: 1. 2. 3. 4. The area object must be conformal. Only 50 DAMPER commands may be entered. This algorithm functions only in time-domain simulations (not EIGENMODE). This command is available only in 3D simulations. See Also: AREA, Ch. 10, MATERIAL, Ch.14. MAGIC User’s Manual 15-6 Part V - Properties Chapter 15 - Unique Geometry INDUCTOR Command Function: Applies an inductive wire strut circuit element in a 2D or 3D simulation. Syntax: INDUCTOR line diameter(x1,x2,x3) [ INDUCTANCE inductance(x1,x2,x3) ] [ { MATERIAL material frequency , RESISTIVITY resistivity(x1,x2,x3) RESISTANCE resistance(x1,x2,x3) } ] [ NUMBER number ] ; (for MAGIC2D only) Arguments: line — name of conformal line, defined in a LINE command. Diameter — wire diameter (m), constant or spatial function defined in a FUNCTION command. inductance — name of forced inductance function (h/m), defined in a FUNCTION command. material — name of material, specified in MATERIAL command. frequency — frequency for the material surface resistivity (hertz). resistivity — name of inductor surface resistivity function (ohms), defined in a FUNCTION command. resistance — name of forced resistance function (ohms/meter), defined in a FUNCTION command. number — number of inductors in third dimension of 2D simulation (inductors/meter in cartesian and polar or inductors around axis in cylindrical and polar). Description: The INDUCTOR command provides a capability to model certain three-dimensional conducting elements in a 2D or 3D simulation. Such elements are generally thin conducting rods or "inductive wire struts" which permit current to flow along them, often connecting one conductor to another. In 2D, the inductors typically are widely spaced in the simulation's ignorable direction, allowing electromagnetic wave energy at all but very low frequencies to pass through; thus, they cannot be represented as a solid conductor, since this would effectively block the passage of all electromagnetic energy. In the simulation, the inductor must lie on a conformal line designated by the line name. The principal physical attribute of the inductor is the generation of strong magnetic fields near its surface, where current flows, leading to a behavior essentially identical to an inductive circuit element. The inductance is determined primarily by the diameter of the rod, which is specified by the function, diameter. In cases where a circular cross section is not sufficient, or when precise control of the inductance is required, the user has the option of directly specifying the inductance per length in henrys/meter with the INDUCTANCE option. If this option is entered, the diameter value is not used. An inductor may also have a resistive component. By default, the resistance of an inductor is zero. There are three means provided to assign resistance to an inductor. The most simple means is with the MATERIAL option, which accepts a material name and a frequency in order to compute the surface resistivity (or "resistance per square," = 1/(conductivity*skin-depth)). A second option, RESISTIVITY, allows you to specify a value of surface resistivity for a material that may not be present in the existing table (MATERIAL, Ch. 14). The resistance of the rod is then calculated from the surface resistivity and the diameter. As with the inductance, you also have the option of specifying the resistance per length directly in ohms/meter with the assistance of the RESISTANCE option. MAGIC User’s Manual 15-7 Part V - Properties Chapter 15 - Unique Geometry In 2D simulations, you must also use the NUMBER option to specify the number in the ignorable (third) dimension. INDUCTOR variables which can be output with the OBSERVE INDUCTOR command are: CURRENT, CHARGE, INDUCTANCE, RESISTANCE, STORED_ENERGY, and OHMIC_LOSS. Restrictions: 1. 2. 3. 4. 5. 6. 7. 8. A maximum of 100 inductors are allowed. The line must be conformal to the grid. The line may not contact an object which has a dielectric permittivity property. Inductors may not terminate on the following dynamic boundaries: PORT, OUTGOING, IMPORT, or RESONANT_PORT. In MAGIC2D inductors may terminate on CONDUCTORS, POLARIZER, SYMMETRY boundaries, or either end of other inductors. In MAGIC3D inductors may only be terminated on CONDUCTORS. Inductors may be used with the EIGENMODE command; however, the resistance of the inductor is ignored. The inductive wire strut model causes an additional Courant-limit constraint on the time step. The exact inductor-affected Courant limit for the time step is currently unknown, so the user may need to use trial and error techniques to find a suitable small time step which does not result in a Courant instability. See Also: CONDUCTOR, Ch. 14, DIELECTRIC, Ch. 14, MATERIAL, Ch. 14, TIME_STEP, Ch. 17, OBSERVE INDUCTOR, Ch. 22, RESISTOR, Ch. 15. Example: The following 2D example illustrates a wide gap cavity with six, 1.5-millimeter-diameter inductors across the gap. The cavity is intended for use with a very intense beam propagating close to the drift tube wall. Without the space charge and return current on the drift tube wall, the beam would space-charge limit and fail to propagate. The inductive property causes them to appear as metal conductors at low frequencies while simultaneously being transparent to high frequencies. Thus, the inductor carries the steady-state beam return current and image charge, so that the beam can propagate across the gap. However it also passes the high-frequency cavity oscillation, allowing the cavity to interact with beam bunching and image charge, so that the beam can propagate across the gap. SYSTEM CYLINDRICAL ; AREA TUBE_AND_CAVITY POLYGON 0.,RTUBE ZBGN_GAP,RTUBE ZBGN_GAP,RIN_CAVITY ZBGN_CAVITY,RIN_CAVITY ZBGN_CAVITY,ROUT_CAVITY ZEND_CAVITY,ROUT_CAVITY ZEND_CAVITY,RIN_CAVITY ZEND_GAP,RIN_CAVITY ZEND_GAP,RTUBE ZEND,RTUBE ; LINE GAP CONFORMAL ZBGN_GAP,RTUBE ZEND_GAP,RTUBE ; INDUCTOR GAP 6 1.5_MM ; MAGIC User’s Manual 15-8 Part V - Properties Chapter 15 - Unique Geometry POLARIZER Command Function: Applies a polarizer geometry in a 2D simulation. Syntax: POLARIZER line pitch_angle(x1,x2) [ algorithm ] ; Arguments: line name of conformal line, defined in LINE command. pitch_angle pitch angle (degrees), constant or function defined in a FUNCTION command. algorithm end-point algorithm (-1, 0, or +1). Description: The POLARIZER command provides a capability to model certain three-dimensional conducting structures in a 2D simulation. In effect, it couples TE and TM electromagnetic fields to reflect the correct conditions for an array of "wires" at an angle to the axis of symmetry. A perfect application is a helical geometry in cylindrical coordinates. In this case, the helix sheath approximation described by Pierce (see References) provides an excellent theoretical discussion. There are other, non-helical applications as well, including wave-splitters, antenna shields, and waveguide screens. The polarizer is applied along a single, conformal line. The pitch_angle (in degrees) describes the orientation of the wires in the array, relative to the X3 (ignorable) axis, measured in the positive direction of the X1 axis or the X2 axis. A functional specification allows the pitch angle to vary with the relevant spatial coordinate. The treatment of the polarizer endpoints can be controlled via the algorithm. In general, the endpoints of the polarizer may simply float in space or they may be terminated on other boundaries, such as a conductor, an antenna, or an outgoing model. The centered algorithm (algorithm=0) does not impose the polarizer conditions at the endpoints so the conditions of any terminating boundary will still be met despite the presence of the polarizer. Two other algorithms apply the polarizer condition at one end, either at the right/upper endpoint (algorithm=+1) or at the left/lower endpoint (algorithm=-1). These two choices have the important property that they are exactly energy conserving for all wavelengths, whereas the centered algorithm can result in a small degree of damping on the shortest wavelengths. In situations where this damping may affect physical results, such as for a coarsely gridded helix, the energy-conserving algorithms should be used; however, for well-resolved wavelengths, there is no appreciable difference between algorithms. Particles pass through a polarizer boundary unscathed. Of course, particle trajectories may be affected by strong electromagnetic fields in the vicinity of the boundary. Restrictions: 1. A maximum of 50 polarizers are allowed. 2. The line must be conformal. 3. The polarizer is intended to be an internal object, and is not suitable for an outer boundary condition. See Also: OUTGOING, Ch. 12, CONDUCTOR, Ch. 14, MODE, Ch. 17, DRIVER, Ch. 19 References: MAGIC User’s Manual 15-9 Part V - Properties Chapter 15 - Unique Geometry J. R. Pierce, Traveling Wave Tubes, Van Nostrand Company, Princeton, NJ, 1950, Appendix 2. D. Smithe, G. Warren, and B. Goplen, “A Helix Polarization Model for 2-D Particle-in-Cell Simulation of Helix Traveling Wave Tubes,” APS Div. of Plasma Physics, Seattle, WA, November 1992. B. Goplen, D. Smithe, K. Nguyen, M. Kodis, and N. Vanderplaats, “MAGIC Simulations and Experimental Measurements from the Emission Gated Amplifier I & II Experiments,” 1992 IEDM, San Francisco, CA, December 1992. Examples: In the following example (cylindrical coordinates), a model of a helix is created between axial coordinates, ZI and ZF, at a radius coordinate, RI. The pitch angle (PSI_DEGREES) is measured from the azimuthal coordinate (φ) toward the axial coordinate (z). The polarizer is given the name "HELIX." LINE HELIX_LINE CONFORMAL ZI RI ZF RI ; POLARIZER HELIX PSI_DEGREES ; MAGIC User’s Manual 15-10 Part V - Properties Chapter 15 - Unique Geometry RESISTOR Command Function: Applies a resistive element between two points in a simulation. Syntax: RESISTOR line resistance [ switch (t) ]; Arguments: line name of conformal line, defined in a LINE command. resistance resistance (ohms). switch(t) temporal scaling function for conductivity, defined in FUNCTION command (unitless). Description: The RESISTOR command provides a capability to model certain three-dimensional resistive elements in a 3D simulation. These elements are thin resistive wires that permit current to flow along them, often connecting one conductor to another. In the simulation, the wires must lie on a conformal line designated by the line name. The principal physical attribute of the resistive wire is the attenuation of the electric field along the wire path. The wire has a total resistance specified in ohms. The optional switch function allows you to use the resistor as a switch. Using the switch(t) function, you can specify when a resistive switch is “open” or “closed”, and the time it takes for it to open or close. See second example below. When the value of the switch is = 0, then conductivity is 0 and resistance is infinite. RESISITOR variables which can be output with the OBSERVE command are CURRENT and OHMIC_LOSS. Restrictions: 1. A maximum of 1000 resistors are allowed. 2. The line must be conformal to the grid. 3. The line may not contact an object which has a dielectric permittivity property. See Also: CONDUCTOR, Ch. 14, DIELECTRIC, Ch. 14, MATERIAL, Ch. 14, TIME_STEP, Ch. 17, OBSERVE, Ch. 22. Example: NRESISTORS = MIN(4,NRESISTORS) ; do iResistor=1,4 ; thetas = thetas + 90degrees ; point s'iResistor' ,zm ,cathode1.ro,thetas; point e'iResistor' ,zm, Anode1.ri,thetas ; RMID=0.5*(CATHODE1.RO+ANODE1.RI); point M'iResistor' zm RMID,thetas ; line Resistor'iResistor' conformal s'iResistor' e'iResistor' ; thi = -1*Delta_T+Thetas; thf = +1*Delta_T+Thetas; Area LoopResistor'iResistor' Conformal -1*Delta_Z+Zm, Rmid,thi, +1*Delta_Z+Zm, Rmid,thf; MAGIC User’s Manual 15-11 Part V - Properties Chapter 15 - Unique Geometry enddo ; DIAMETER_RESISTOR = .5MM; RESISTOR_LENGTH = Anode1.RI-Cathode1.ro ; parameter COAXIAL_IMPEDANCE1 = 60*LOG(ANODE1.ri/CATHODE1.RO) ; parameter COAXIAL_IMPEDANCE2 = 60*LOG(ANODE2.ri/Cathode2.ro) ; parameter ZMATCH_IMPEDANCE = 1./(1/COAXIAL_IMPEDANCE11/COAXIAL_IMPEDANCE2) ; Resistance = (Zmatch_Impedance*NResistors) ; DO I=1,nResistors; Resistor Resistor'i' Resistance ; ENDDO ; OBSERVE FIELD_power S.DA Port1 ; DO I=1,nResistors; OBSERVE FIELD_INTEGRAL E.DL Resistor'i' ; OBSERVE RESISTOR Resistor'i' Ohmic_Loss; ENDDO ; ! Measure Current OBSERVE FIELD_INTEGRAL H.DLOOP LoopPort1 ; DO I=1,nResistors; OBSERVE FIELD_INTEGRAL H.DLOOP LoopResistor'i' ; OBSERVE RESISTOR Resistor'i' CURRENT; ENDDO ; In the following example (MAGIC2D), the POISSON solver and the PRESET command are used to initialize a capacitive discharge system. The resistor is set to close at a particular time, with a short rise time from infinite resistance (zero conductivity) to finite resistance (finite conductivity). CONDUCTOR outer; CONDUCTOR Stalk; DIELECTRIC OilBed 2.2; ! Generate the initial static field POISSON BlumleinCharge 3 outer 0.0 blumlein -6e+6 stalk Initialize x2 TEST 100000 1000 0.000001; PRESET E1 POISSON BlumleinCharge; PRESET E2 POISSON BlumleinCharge; 0 ! Set switch (Resistor) temporal properties. Tstart = 20e-9 ; Trise = 100*sys$dtime ; Function SwitchOnAt(t) = Smooth_Ramp((t-Tstart)/Trise) ; Resistor RSwitch 10000_OHMS SwitchOnAt; ! Monitor switch (Resistor). Observe Field_integral E.dl RSwitch ; Observe Resistor RSwitch Current ; Observe Resistor RSwitch ohmic_loss ; MAGIC User’s Manual 15-12 Part V - Properties Chapter 15 - Unique Geometry The above figure shows the capacitive system charged to 6 MegaVolts. The following figure shows the voltage across the switch. As you can see it begins to discharge at 20ns, as specified. The rate of discharge is proportional to the capacitance of the system and the resistance. MAGIC User’s Manual 15-13 Part V - Properties Chapter 15 - Unique Geometry SHIM Command Function: Applies a thin, perfectly conducting shim in a 2D simulation. Syntax: SHIM CONDUCTOR area THICKNESS thickness(x) WINDOW area ; Arguments: area thickness name of spatial object, defined in AREA command. shim thickness, constant or defined in FUNCTION command. Description: The SHIM command is used to add a small, perfectly-conducting layer, or shim, to a conformal surface of a perfectly conducting object. The thickness of the layer must be smaller than the spatial cell size. Thus, this command provides a means to model a fine-scale variation in a conducting surface without resolving the variation with the spatial grid. The shim is applied to a conformal surface of a conducting area. This spatial object must be defined in an AREA command. Furthermore, the spatial object must also be perfectly conducting (CONDUCTOR, Ch. 14). The thickness must be a fraction of the cell size and may be constant or a function of one of the spatial coordinates. The precise location of the shim is provided by the WINDOW area, which must enclose a segment of one of the conformal surfaces that forms the perimeter of the conducting object. In other words, it selects where on the conducting object the shim is to be applied. The conformal surface where the shim is applied can have a length as short as one spatial cell, or it can be much longer. It is possible to taper or to modulate such an extended surface by means of the thickness function. However, the thickness is not allowed to exceed the height of the cell adjacent to the surface. A Courant violation may occur if this constraint is not observed. Care should also be taken to avoid using the shim in the immediate presence of certain types of outer boundaries. A good practice is to terminate the thickness function at both ends with zero thickness and to stay well removed from port and outgoing wave boundaries. Restrictions: 1. The maximum number of SHIM boundaries that can be specified is fifty (50). 2. The shim model can be applied only to conformal surfaces of perfectly conducting area objects. 3. Non-uniform spacing in the direction normal to the conducting surface is not allowed (the first two cells must be of equal size). 4. The thickness of the shim must not exceed the height of the cell adjacent to the conducting surface. 5. A SHIM should not be used in cells that have DIELECTRIC or CONDUCTANCE properties. These will lead to erroneous measurements of energy and power conservation. See Also: AREA, Ch. 10, CONDUCTOR, Ch. 14, TIME_STEP, Ch. 17, MAXWELL, Ch. 17 Examples: In the following test case, we define a coaxial cable with large radii and known impedance. An incident, semi-infinite wave is introduced and propagates through the cable without reflection. Next, a shim is introduced on the anode (case shown below) and another on the cathode. The thickness varies MAGIC User’s Manual 15-14 Part V - Properties Chapter 15 - Unique Geometry sinusoidally from zero to a maximum value and then to zero. The following figures illustrate the resulting geometry and grid and show the effect of the impedance change in the coax on the axial electric field. XI = 25.0CM ; XIP = XI + 5*DELTA.X1; XF = 75.0CM ; XFP = XF - 5*DELTA.X1; PK = 3.14159/(XF-XI) ; FUNCTION Th(X1) = STEP(X1,XI)*STEP(XF,X1)*DELTA.X2*SIN( (X1-XI)*PK ) ; X1I = XI ; X2I = SYS$X2MN+0.99*DELTA.X2 ; X1F = XF ; X2F = SYS$X2MX-0.99*DELTA.X2 ; AREA CLIP.SHIM CONFORMAL X1I,X2I X1F,X2F ; SHIM CONDUCTOR ANODE THICKNESS Th WINDOW CLIP.SHIM ; SHIM CONDUCTOR CATHODE THICKNESS Th WINDOW CLIP.SHIM ; These figures illustrate the alteration of the coaxial radii by using shims, and the introduction of an axial Ez field near the impedance mismatch. MAGIC User’s Manual 15-15 Part V - Properties Chapter 16 - Emission Processes 16. EMISSION PROCESSES This chapter covers the following commands: EMISSION [options] EMISSION BEAM EMISSION EXPLOSIVE EMISSION GYRO EMISSION HIGH_FIELD EMISSION PHOTOELECTRIC EMISSION SECONDARY EMISSION THERMIONIC EMIT PHOTON IONIZATION You can use these commands to describe the emission of charged particles from the surfaces of an object. Most of the parameters required for the emission models are specified using default values. You can change any of these values using the EMISSION [options] command. You can use the rest of the EMISSION commands to create customized models of the following emission processes: BEAM an arbitrary, prescribed beam. EXPLOSIVE field-extraction from a surface plasma. GYRO a prescribed beam for gyro devices. HIGH_FIELD high-field (Fowler-Nordheim) emission. PHOTOELECTRIC photoelectric emission. SECONDARY secondary emission. THERMIONIC thermionic emission. The first three are “artificial” emission processes (as opposed to fundamental processes that involve the work function). In BEAM emission, the beam properties are assumed to be known a priori and are simply prescribed, without regard for the underlying fundamental processes. For example, it can be used to model a beam that enters a cavity, without including the processes that create the beam in the first place. In EXPLOSIVE emission, one or more species is extracted from an assumed surface plasma, a phenomenon typically encountered in pulsed-power applications. The underlying processes of high-field emission and joule heating, which produce the plasma, are considered only phenomenologically. The surface plasma is assumed, but not actually modeled with particles. Instead, particles are created with charge sufficient to cause the normal electric field at the surface to vanish. This zero, or near-zero, surface field is a distinguishing feature of EXPLOSIVE emission. GYRO emission is really a special case of BEAM emission in which the controls have been adapted specifically for gyro (rotating beamlet) applications. The last four represent fundamental emission processes, in which energy is supplied to overcome a work function. In HIGH_FIELD emission, the energy is supplied by the ambient electric field and results in quantum-mechanical tunneling. The electron yield thus varies with the electric field on the surface according to the Fowler-Nordheim equation. In PHOTOELECTRIC emission, the energy to overcome the work function is supplied by an incident photon. The energy spectrum of the emitted electrons depends on the incident photon spectrum, and a transport code is typically used to compute the electron energy spectrum, which is required input for this emission model. The spatial distribution of the photon MAGIC User’s Manual 16-1 Part V - Properties Chapter 16 - Emission Processes flux is specified with a PHOTON command, used only in conjunction with PHOTOELECTRIC emission. In SECONDARY emission, the energy to overcome the work function is supplied by energetic charged particles that are incident upon a conducting surface. The electron yield varies with the material and the angle and energy of the incident particle. In THERMIONIC emission, the energy to overcome the work function is thermal, and the electron yield varies with the surface temperature, according to the Richardson-Dushman equation. Once an emission model has been created, you can enable emission on a particular object by using the EMIT command. In 3D simulations, the EMIT command can be used only with volume objects (VOLUME, Ch. 10) and not from points, lines, or areas. In 2D simulations, the EMIT command can be used only with area objects (AREA, Ch. 10). In both cases, the spatial objects must be perfectly conducting (CONDUCTOR, Ch. 14). The following table presents some general guidelines on the selection of emission algorithms. Alternatives are best used only with a good understanding of the algorithm and the underlying physics. For example, EXPLOSIVE emission is recommended for Child-Langmuir applications, since the current density is critically dependent upon the surface dynamics (normal electric field and charge density). An attempt to use BEAM emission in such applications will either under-emit, producing a non-zero surface field, or over-emit, causing low-velocity particles to pile up at the surface, which prevents resolution. It is unlikely that the proper Child-Langmuir dynamics will be obtained in either event. General conditions for algorithm selection. EMISSION PROCESS BEAM EXPLOSIVE GYRO Magnetic Insulation Child Langmuir Diodes Fieldemitter Arrays Prescribed Beams Prescribed Gyro-beams Beam Formation HIGH_ PHOTOTHERMFIELD ELECTRIC SECONDARY IONIC X X X X X X X Multi-factor Thermionic Cathodes X X X X X MAGIC User’s Manual 16-2 Part V - Properties Chapter 16 - Emission Processes EMISSION [options] Command Function: These are command options that may be used with the emission commands. Syntax: EMISSION process arguments [MODEL model] [SPECIES species] [NUMBER creation_rate(t,x1,x2,x3)] [FIXED_CHARGE_SIZE fixed_charge] [{TIMING,RANDOM_TIMING} step_multiple] [SURFACE_SPACING {RANDOM, UNIFORM, UNIFORM_X1, UNIFORM_X2, UNIFORM_X3, FIXED}] [OUTWARD_SPACING {RANDOM, FIXED} displacement(t,x1,x2,x3)] [TAGGING fraction(t)] ; Arguments: process emission process (BEAM, EXPLOSIVE, GYRO, HIGH_FIELD, PHOTOELECTRIC, and THERMIONIC). arguments arguments for specific emission processes. model name of emission model, user-defined. species particle species name (ELECTRON, or defined in SPECIES command). creation_rate particle creation rate (particles/cell/time step), constant or defined in FUNCTION command. fixed_charge amount of charge/macro-particle (Coulombs). (Not used by GYRO model.) step_multiple LORENTZ time-step multiple (integer). displacement maximum displacement outward from the surface (m), constant or function defined in FUNCTION command. fraction — fraction of particles tagged (0 < fraction ≤ 1), constant or function defined in a FUNCTION command. Defaults: The following option default values are set. If they are adequate for your requirements, no changes are needed. If you wish to use different values, simply enter the desired keywords and new values when you enter the EMISSION process command. model species creation_rate creation_rate step_multiple displacement set to the name of the process (e.g., BEAM, etc.). ELECTRON. 3 particles / cell / emission time step for MAGIC2D. 1 particles / cell / emission time step for MAGIC3D. 1 Lorentz time_step / emission time step. initial_velocity x step_multiple x SYS$DTIME. The default values for both spacing options (SURFACE_SPACING and OUTWARD_SPACING) are set to RANDOM. (For GYRO emission, the SURFACE_SPACING default is UNIFORM.) MAGIC User’s Manual 16-3 Part V - Properties Chapter 16 - Emission Processes Description: The various emission processes (BEAM, EXPLOSIVE, etc.) have some common control options, all of which are set to default values. These common features are described here, while those features unique to individual emission processes are described in the commands that immediately follow. The emission model name allows you to specify a unique name for each model that you create. This name will be referred to in EMIT commands. The default model name is the same as the process (e.g., BEAM, EXPLOSIVE, etc.). However, if you create more than one model using the same process, then you must give each model an individual, unique model name. The species name can be used to specify ELECTRON, which is permanently stored in the internal species table. If another choice is desired, the desired particle parameters must be specified in a SPECIES command. The default species name is ELECTRON. The NUMBER option is used to adjust the particle creation count. The creation_rate is the number of discrete particles that will be created per cell at each emission time step. Note that this has nothing to do with the amount of charge created, but is strictly a statistical parameter. The data entry can be an integer constant or it can be a function that allows greater control of particle statistics in space and time. The default value is three. The FIXED_CHARGE_SIZE option is used when you wish to enforce an exact amount of charge per macro particle. In order to use it effectively, you must have some idea of the amout of charge generated. Too small a value for the “fixed_charge” will allow the code to generate too many particles to manage. MAGIC checks that the amount of charge to be created in a cell on a time step divided by the fixed_charge is less than or equal to 25. If the number is greater, MAGIC will generate an error and stop. Particle geneartion will be statistically weighted in time to preserve the charge/fixed_charge ratio. Thus if this ratio is less than unity, particles will be emited only on a fractional set of time steps. For example, if the fraction is 0.1, then in the mean, a particle will be generated 1 timestep out of 10. The options TIMING and RANDOM_TIMING allow you to set the particle emission interval. The creation interval is expressed as an integer, step_multiple, which is an integer multiple of the LORENTZ (not the MAXWELL) time step. The default value is unity, e.g. every LORENTZ time step, (the default LORENTZ time step is every MAXWELL time step). The TIMING option provides for a uniform interval. Thus for example if you specify “TIMING 5”, then particles will have a weight factor of 5 (to give the proper time averaged current) and will be generated every 5th particle LORENTZ time step. The RANDOM_TIMING option provides for a statistically random creation interval with a probability that is the inverse of the creation time step. Thus for example, if you specify “RANDOM_TIMING 5”, then particles will be generated with a weight factor of 5 (to give the proper time averaged current), and approximately 1/5th of the possible particles will be generated on each particle LORENTZ time step. The advantage of RANDOM_TIMING is that it does not generate an artificial current signal having a period, “step_multiple*dtparticle”; however, it does so by introducing greater statistical noise. For MAGIC3D problems the statistical noise added to the current is much reduced from that in MAGIC2D due to the generally much larger number of emission sites. For problems, such as cross-field amplifiers and oscillators, use of RANDOM_TIMING can provide significant reduction in the number of particles. In other problems, such as multiple particle species, the heavy ions can be emitted with the RANDOM_TIMING, to provide a better representation of the continuous nature of the emission. The SURFACE_SPACING option allows you to specify precisely how particles will be spaced going along the surface. Its main effect is on the way trajectories appear in plots. The default value is MAGIC User’s Manual 16-4 Part V - Properties Chapter 16 - Emission Processes RANDOM, which provides a physical appearance. As an alternative, the selection of UNIFORM, UNIFORM_X1, UNIFORM_X2 and UNIFORM_X3 produces continuous streams, which may aid in interpreting phase-space output without adversely affecting the physics. For MAGIC3D the use of UNIFORM_Xi results in uniform spacing of the emission streams along that ordinate. Only one ordinate for the UNIFORM option may be selected. The OUTWARD_SPACING option allows you to specify precisely how particles will be spaced going outward (away from the surface). Usually, it is best not to position particles precisely on the surface, but to give them some small, outward displacement. (This option can have an important effect on the solution.) Two choices are available for distributing particles within this displacement. The default is RANDOM, which spaces particles randomly within the displacement distance. This choice generally provides superior charge continuity, making maximum statistical value of the particles. The alternative is FIXED, which positions all particles precisely at the outermost extent of the displacement. The default value for displacement equals the product of the particle velocity, the Lorentz time step, and the emission step_multiple. The TAGGING command specifies the fraction of particles chosen to appear in particle plots. By default, the fraction is 1.0, and particle plots will show all particles in the simulation. However, this default may produce an extremely dense plot and an extremely large plot file. Setting fraction to a value less than unity limits the plots to a randomly chosen fraction of the particles. Note that individual output commands, e.g., PHASESPACE, offer the option to plot either all the particles or only the tagged particles. In the PHASESPACE command, when used with an integration timer, you set the choice to TAG for the command to locate a suitable set of particles. Restrictions: 1. Up to 20 EMISSION commands of all types may be used in a simulation. See Also: FUNCTION, Ch. 6, EMISSION BEAM, Ch. 16, EMISSION EXPLOSIVE, Ch. 16, EMISSION GYRO, Ch. 16, EMISSION HIGH_FIELD, Ch. 16, EMISSION PHOTOELECTRIC, Ch. 16, EMISSION THERMIONIC, Ch. 16, EMIT, Ch. 16, LORENTZ, Ch. 18, SPECIES, Ch. 18. MAGIC User’s Manual 16-5 Part V - Properties Chapter 16 - Emission Processes EMISSION BEAM Command Function: Specifies a beam emission model. Syntax: EMISSION BEAM current_density(t,x1,x2,x3) beam_voltage(t,x1,x2,x3) [ THERMALIZATION fraction(t,x1,x2,x3) ] [ TEMPERATURE temperature(t,x1,x2,x3) ] [ TRANSVERSE_TEMPERATURE temperature(t,x1,x2,x3) ] [ PARALLEL_TEMPERATURE temperature(t,x1,x2,x3) ] [ COSINES x1cos(t,x1,x2,x3) x2cos(t,x1,x2,x3) x3cos(t,x1,x2,x3) ] [ options ] ; Arguments: current_density incident current density (A/sq. m), constant or function defined in FUNCTION command. beam_voltage beam voltage (eV), constant or function defined in FUNCTION command. fraction thermalization fraction, constant or function defined in FUNCTION command. temperature temperature (eV), constant or function defined in a FUNCTION command. x1cos, etc. directional cosines, constant or function defined in a FUNCTION command. options see EMISSION [options] command. Description: The incident current_density for beam emission is described by the equation, , which allows the current density (A/m2) to depend on time, t, and the spatial coordinates. The initial kinetic energy and momentum for each particle are computed relativistically from the beam voltage, . This may be a function of time and the spatial coordinates. In the absence of any the optional arguments, the momentum will be directed outward, normal to the emitting surface. For obvious reasons, no defaults are provided for these two functions. Both current_density and beam_voltage are required values and must be supplied by the user before the EMISSION BEAM model can be used. In addition, there are five momenta options that affect the incident beam direction and distribution. You may select one and only one per EMISSION BEAM command. These options are: • • • COSINES, THERMALIZATION, TEMPERATURE, MAGIC User’s Manual 16-6 Part V - Properties • • Chapter 16 - Emission Processes TRANSVERSE_TEMPERATURE, and PARALLEL_TEMPERATURE. These options provide the possibility of either thermalizing the beam or giving it a direction (which is not directed normally outward) from the surface. The COSINES option requires that you specify the direction cosines for each of the three coordinates x1,x2, and x3. The direction cosines may be constants or functions of time and absolute position coordinate. The COSINES option causes the beam to propagate in a direction not normal to the emitting surface. The directional cosines are applied to the momentum computed from the beam_voltage to obtain the non-normal components. Preservation of the specified beam_voltage is not required; therefore, care should be taken that the directional cosines supplied are a unitary transformation. The THERMALIZATION option allows you to specify a fraction of the beam energy to be distributed randomly in the transverse coordinates. The energy in each coordinate is determined randomly, and the dominant (normal) component is re-normalized to preserve the exact specified beam_voltage. The options, TEMPERATURE, TRANSVERSE_TEMPERATURE, and PARALLEL_TEMPERATURE allow you to specify the beam temperature in eV. This temperature distribution alters the beam energy as it is added to the existing beam momentum. You can select to put a temperature on the entire beam, the transverse beam energy, or the parallel beam direction. The distributions are Maxwellian in shape and will slightly increase the mean beam energy. You may use the OBSERVE PARTICLE_STATISTICS command to measure the beam temperature. Restrictions: 1. In MAGIC2D up to 100 EMISSION commands of all types may be used in a simulation. 2. In MAGIC3D up to 20 EMISSION commands of all types may be used in a simulation. See Also: FUNCTION, Ch. 6, EMISSION [options], Ch. 16, EMIT, Ch. 16, OBSERVE PARTICLE_STATISTICS, Ch 22. References: B. Goplen and R. Worl, "Numerical Simulations of a Monotron Oscillator Cavity Traveling Wave Tube," Mission Research Corporation Report, MRC/WDC-R-098, July 1985. F. Friedlander, A. Karp, B. Gaiser, J. Gaiser, and B. Goplen, "Transient Analysis of Beam Interaction with Antisymmetric Mode in Truncated Periodic Structure Using 3-Dimensional Computer Code SOS," Trans. IEEE, ED-2, Vacuum Electron Devices, November 1986. B. Goplen, R. Worl, W. M. Bollen, and J. Pasour, "Vircator Modulation Study," Mission Research Corporation Report, MRC/WDC-R-139, November 1987. Examples: This 2D example illustrates the use of beam-emission to simulate a gated emission gun. The klystrode amplifier is an axisymmetric power tube that uses a gated emission Pierce gun to supply the electron beam. In this example, a spherical cathode surface is represented using a non-uniform spatial grid. The EMISSION BEAM command is used with a bunch shape function to simulate the emission MAGIC User’s Manual 16-7 Part V - Properties Chapter 16 - Emission Processes properties of the gun. The Pierce gun is controlled with an external RF circuit driven at the desired bunching frequency. Here, the function, SHAPE, is used to modulate the electron beam, which is emitted only during the positive half of the RF cycle. Note that inclusion of the step function in SHAPE limits the beam to a single bunch. ! Define Class B bunch shape function and define beam voltage OMEGA = 2.PI*FREQUENCY ; PEAKJ = 0.968E4 ; ! units are A/m**2 PERIOD = 1.0/FREQUENCY ; FUNCTION Current_SHAPE(T)=PEAKJ*MAX(SIN(OMEGA*T),0.0)*STEP(T,PERIOD) ; BEAM_ENERGY = 71 ; ! corresponds to 5x10⁶ m/sec EMISSION BEAM Current_SHAPE BEAM_ENERGY ; EMIT BEAM CATHODE ; The figures on the following page illustrate creation of the electron bunch using these commands. Once the electrons are created, they are accelerated by an applied voltage pulse applied at the anode-cathode gap (dashed line). This can be seen by examining the top figure which gives the pz versus z phase space. The cathode and focusing electrodes provide the basic beam profile. The figure also illustrates the resonator cavity used for extracting RF from the bunched beam and the collector for capturing the spent beam. These figures are early in the simulation time, prior to the extraction cavity having reached saturation. MAGIC User’s Manual 16-8 Part V - Properties Chapter 16 - Emission Processes MAGIC User’s Manual 16-9 Part V - Properties Chapter 16 - Emission Processes EMISSION EXPLOSIVE Command Function: Specifies the arguments for explosive emission. Syntax: EMISSION EXPLOSIVE [THRESHOLD threshold_field(t,x1,x2,x3)] [RESIDUAL residual_field(t-tb,x1,x2,x3)] [PLASMA formation_rate(t-tb,x1,x2,x3)] [TEMPERATURE temperature(t,x1,x2,x3)] [WALL_TEMPERATURE_J Jout(Temperature,time,x1,x2[,x3,WWALL,QWALL])] [MINIMUM_CHARGE particle_charge(t-tb,x1,x2,x3) ] [options] ; Arguments: threshold_field — breakdown field threshold (V/m), constant or defined in FUNCTION command. residual_field — electric field residual (V/m), constant or defined in FUNCTION command. formation_rate — plasma formation rate (0<f<1), constant or defined in FUNCTION command. temperature temperature (eV), constant or function defined in a FUNCTION command. particle_charge — minimum particle charge (coul), constant or defined in FUNCTION command. Jout — current density (A/m2) function defined in FUNCTION command. options — see EMISSION [options] command. Defaults: In addition to the option defaults, the following additional defaults are employed. threshold_field residual_field formation_rate particle_charge — 2.3X10⁷ V/m. — 0 V/m. — f = t/ (t< ) or 1 (t> ), with — 0 coul = 5x10⁻⁹ sec. If all of the default values are adequate for your requirements, simply enter EMISSION EXPLOSIVE. The EMISSION EXPLOSIVE command must be entered for this model to be used. If values other than the defaults are desired, include the relevant keywords and new values. Description: Explosive emission results from plasma formation on a material surface. Almost any surface exhibits microscopic protrusions, or “whiskers.” When exposed to large voltages, electric field enhancement at the whiskers can cause significant high-field emission (quantum-mechanical tunneling overcoming the work function). Subsequently, the whisker may dissipate due to Joule heating, resulting in the formation of plasma on the material surface. This surface plasma will typically “emit” under the influence of the ambient electric field, with the species extracted from the plasma being determined by the sign of the field. Our model largely ignores the physical details of the plasma formation process, relying instead on a phenomenological description. However, the particle emission itself is based upon Child’s law of physics, specifically, the normal electric field vanishing at the plasma surface. MAGIC User’s Manual 16-10 Part V - Properties Chapter 16 - Emission Processes In our phenomenological treatment of plasma formation, breakdown can occur only if the normally directed field at the half-cell, Ec, exceeds some specified breakdown field_threshold, or |Ec| > Ethreshold. This test is performed continuously for every surface cell on the emitting object. If the field at a particular cell exceeds the threshold, then that cell is said to “break down.” (A single, non-emitting cell between two emitting cells is also allowed to break down, even if the threshold is not exceeded.) The time of breakdown, tb, is recorded for each cell that breaks down. Subsequently, every cell has its own history and is treated independently. Once initiated by breakdown, plasma formation in a cell is assumed irreversible. However, the cell does not become fully effective instantly; instead, plasma formation is assumed to occur gradually, so that the effectiveness of the cell increases from zero to unity according to a user-specified formation_rate. (The default formation_rate is linear with a 5-nsec rise time.) For many applications you may wish to control the plasma fraction. Setting the plasma fraction to f(t) = 1-exp(-(t/trise)2), where trise is ≥ 2 time the voltage rise time equation generally gives good response and emission performance. It is important to realize that we do not actually create a surface plasma using particles (an approach which leads to poor results in many applications). Instead, we use our phenomenological model and Gauss’s law to calculate the charge that would be drawn away from the surface. Thus, a cell that has broken down may “emit” charged particles due to the influence of the ambient electric field. If the field is of one sign, electrons will be emitted; if the other sign, then protons (or positively charged ions) will be emitted. (Note that each species must be enabled in separate EMISSION and EMIT commands.) The calculation is based upon application of Gauss's law to the half-cell, allowing for a small residual field at the surface, dq/dA = εo f(t-tb) (Ec – Er) - ρ, where f is the plasma formation_rate (note the dependence on tb), and ρ is the existing charge density at the surface (which accounts for incoming as well as outgoing particles of all species). Additional restrictions may be placed on the created particles in the form of minimum particle_charge, according to | dq| > Qminimum, and f = dQ/Qminimum, If f>1, then emit charged particle; and if f<1, then emit charged particle of the size Qminimum at a statistically sampled fractional time weight of f. This will prevent generation of fractional electron charge particles, when this option is selected. You may of course, set the threshold value to be smaller or larger than a physical electron. In the case that you use a value smaller than a physical electron, you may want to interpret the emission as a probability density for current emission. All of the explosive emission arguments allow either a constant or a function to be entered. Functions can depend on time, t, in seconds and the spatial coordinates, x1, x2 and x3. Note that only the threshold_field is a function of absolute, or simulation, time. The other four arguments (if functions) are always referenced to the time of cell breakdown, which generally varies with location on the surface. The option TEMPERATURE allows you to specify the emission temperature in eV. This temperature distribution alters the beam energy as it is added to the existing momentum estimated from MAGIC User’s Manual 16-11 Part V - Properties Chapter 16 - Emission Processes the extraction field. The distribution is Maxwellian in shape and will slightly increase the mean beam energy. You may use the OBSERVE PARTICLE_STATISTICS command to measure the temperature. See example below. The WALL_TEMPERATURE_J option, allows you to specify the created current density, Jout as a function of (temperature, time, x1,x2[,x3,WWALL,QWALL). The actual emitted current will not be allowed to exceed the space charge limit associated with the explosive emission model. The thermal current_density function is evaluated using the temperature of the conducting walls. The starting ambient temperature is 293oK. This value increases as charged particles deposit energy in the wall cells or decreases as charged particles are emitted from the wall cells. Magic obtains a value for the mass density and the specific heat from the element table. FOILs are generally considered range thin, thus the energy distribution is considered to be evenly distributed throughout the cell volume. For the non-foil walls, you may use the CONDUCTOR … THERMAL_DEPTH option to give the mean thermal depth of the charged particles. This is needed to evaluate the temperature. Magic does not permit thermal diffusion of the energy. Restrictions: 1. In MAGIC2D up to 100 EMISSION commands of all types may be used in a simulation. 2. In MAGIC3D up to 20 EMISSION commands of all types may be used in a simulation. 3. The initial_velocity and initial_distance SPACING option should never both be set to zero, since this will cause particles to become trapped on the surface. See Also: FUNCTION, Ch. 6, EMISSION [options], Ch. 16, EMIT, Ch. 16 References: R. B. Miller, An Introduction to the Physics of Intense Charged Particle Beams, Plenum Press, 1982. B. Goplen, R. E. Clark, and S. J. Flint, "Geometrical Effects in Magnetically Insulated Power Transmission Lines," Mission Research Corporation Report, MRC/WDC-R-001, April 1979. D. B. Seidel, B. C. Goplen, and J. P. Van Devender, "Simulation of Power Flow in Magnetically Insulated Convolutes for Pulsed Modular Accelerators," presented at the 1990 Fourteenth Pulse Power Modulator Symposium, June 3–5, 1980. B. Goplen and R. Worl, "Pulsed Power Simulation Problems in MAGIC," Mission Research Corporation Report, MRC/WDC-R-124, February 1987. B. Goplen, R. Worl, J. McDonald, and R. Clark, "A Diagonal Emission Algorithm in MAGIC," Mission Research Corporation Report, MRC/WDC-R-152, December 1987. Examples: This 2D example illustrates explosive emission from the Aurora cathode. It uses the default values for all parameters. Thus, the only commands required are, EMISSION EXPLOSIVE ; EMIT EXPLOSIVE CATHODE ; Figure 16-2 illustrates three stages of beam development in the Aurora diode. MAGIC User’s Manual 16-12 Part V - Properties Chapter 16 - Emission Processes Figure 16-2. Explosive emission from the Aurora diode. MAGIC User’s Manual 16-13 Part V - Properties Chapter 16 - Emission Processes EMISSION GYRO Command Function: Specifies a gyro-emission process. Syntax: EMISSION GYRO I(t) Bg PL PT Dgc {X1,X2,X3} PointBC [ options ] ; Arguments: I(t) beam current (A), constant or defined in FUNCTION command. Bg magnetic guide field (T). PL longitudinal momentum (m/sec). PT transverse momentum (m/sec). Dgc displacment of guiding_center radius from beam center, (m). X1, X2, X3 beam direction axis, also axis of magnetic guide field. PointBC point at which beam axis intercepts emission surface. Options see EMISSION [options] command. Defaults: For this process, the creation_rate in 3D depends on the number of cells the annular emission zone crosses. Here, the creation_rate represents the number of particles created at each time step and uniformly distributed on a circle about the guiding_center. All other option defaults are the same. The EMISSION GYRO command must be entered for this model to be used. Description: The gyro-emission algorithm produces a beam of particles gyrating about a beam center axis parallel to the externally applied magnetic field. Particles are emitted from a circle on the surface, which must be conformal with a spatial coordinate. The guiding center and beam axes must be normal to the surface. The radius of the circle is determined from the the magnetic field and momentum components. The gyro-emission arguments begin with the beam_current, I(t). Next you specify the magnetic guide field, Bg, at the emitting surface, and this should be consistent with the externally supplied magnetic field (COILS and PRESET, Ch. 19). The initial beam momentum is specified as two components of the relativistic momentum, gamma times velocity, in units of m/sec. PL is the longitudinal component of momentum, it is parallel to the beam direction axis, (X1, X2, or X3). PT is the transverse momentum component, and it is perpendicular to the beam direction axis. MAGIC User’s Manual 16-14 Part V - Properties Chapter 16 - Emission Processes Dgc, the displacement of the guiding center radius from the center point of the beam, PointBC, to the guiding center, GC, of an individual beamlet, see above figure. (Note, there are a variety of interesting limits. One is the small Larmor radius orbit with a large displacement of the guiding center, in which case we get an annular beam. Another is the case in which the guiding center and beam center occur on the same axis line. In addition, we can have the case where the Larmor radius,RL, and the displacement of the guiding center from the beam axis are the same, this gives a solid beam profile.) The PointBC, the beam center, is the location of the centroid of the entire beam (usually not the guiding center position). Note that only I(t), the beam current is allowed to be a function of time. In 3D simulations the number of particles in the beam annulus is roughly the number of cells around the annular emission zone. MAGIC determines the cell resolution on the emission surface and then creates the number of emission sites that will provide a smooth distribution of density around the annulus of emission. Here, the creation_rate represents the number of particles created at each time step and uniformly distributed on a circle about the guiding_center. All other option defaults are the same. Restrictions: 1. In 2D simulations, gyro-emission is limited to cartesian (x,y) and cylindrical (z,r) coordinate systems. 2. In 3D simulations, the beam axis direction in cylindrical (z,r,φ) and polar (r,φ,z) coordinate systems must be parallel to the z axis, and may lie along any coordinate axis in a Cartesian system. 3. The magnetic guide field specified should be consistent with the external guiding magnetic fields (BnST) that must be supplied using either the COILS and/or PRESET commands. 4. In MAGIC2D up to 100 EMISSION commands of all types may be used in a simulation. 5. In MAGIC3D up to 20 EMISSION commands of all types may be used in a simulation. See Also: FUNCTION, Ch. 6, EMISSION [options], Ch. 16, EMIT, Ch. 16, COILS, Ch. 19, PRESET, Ch. 19. Examples: The electron beam in rectangular gyrotron has a kinetic energy of 800 keV and beam current of 200 A. The guiding magnetic field is set to 0.15 tesla. The beam rotates at the gyro radius, and thus the guiding center radius is zero. The following figure illustrates electron phasespace in the xy and zy cross sections early in the simulation. The commands specifying the gyro emission parameters are: Gcurrent = 200 AMPS ; GC_Displacement = 0.0 ; Bguide = 0.15 TESLA ; Parp = 5.E8 ; Perp = 5.E8 ; POINT Beam_CPt 0.0, 0.0, 0.0 ; MAGIC User’s Manual 16-15 Part V - Properties Chapter 16 - Emission Processes EMISSION GYRO Gcurrent Bguide Parp Perp GC_Displacement X3 Beam_CPt MODEL GYRO.MODEL ; EMIT GYRO.MODEL EMITTORPLATE ; Phase-space plots of gyrotron electrons. MAGIC User’s Manual 16-16 Part V - Properties Chapter 16 - Emission Processes EMISSION HIGH_FIELD Command Function: Specifies a high-field emission process in 2d and 3d simulations. Syntax: EMISSION HIGH_FIELD a b phi(t,x1,x2,x3); [ MINIMUM_CHARGE particle_charge(t-tb,x1,x2,x3) ] [ options ] Arguments: a Fowler-Nordheim constant, A (A/m). b Fowler-Nordheim constant, B (m-1 V-1/2 ). hi work function (eV), constant or defined in FUNCTION command. particle_charge — minimum particle charge (coul), constant or defined in FUNCTION command. options see EMISSION [options] command. Defaults: None, except for the option defaults. The EMISSION HIGH_FIELD command must be entered for this model to be used. Description: The basic HIGH_FIELD emission process is described by the Fowler-Nordheim equation, where A and B are the Fowler-Nordheim constants. The work function, φ, may be either a constant or a function with allowed dependence on time, t, and the spatial coordinates. The remaining variables are computed internally. The normal electric field at the surface, Es, is computed from the application of Gauss's law to the half-cell immediately above the emitting surface, or where Ec is the electric field at the half-grid, Ac and As are the cell areas at half-grid and surface, respectively, and q is the existing charge in the half-cell. The functions t(y) and v(y) are approximated by • • • t(y)2 = 1.1, v(y) = 0.95 – y2, and y = 3.79x10⁻⁵ Es1/2 / φ. Here y is the Schottky lowering of the work function barrier. Additional restrictions may be placed on the created particles in the form of minimum particle_charge, according to MAGIC User’s Manual 16-17 Part V - Properties Chapter 16 - Emission Processes | dq/n| > Qminimum. All of the emission arguments allow either a constant or a function to be entered. Functions can depend on time, t, in seconds and the spatial coordinates, x1, x2 and x3. The four arguments (if functions) are always referenced to the time of cell breakdown, which generally varies with location on the surface. Restrictions: 1. In MAGIC2D up to 100 EMISSION commands of all types may be used in a simulation. 2. In MAGIC3D up to 20 EMISSION commands of all types may be used in a simulation. See Also: FUNCTION, Ch. 6, EMISSION [options], Ch. 16, EMIT, Ch. 16 Examples: This 2D simulation example illustrates HIGH_FIELD (Fowler-Nordheim) emission from a field emitter tip. The geometry is a single field emitter tip shown in the following figure. The tip radius was assumed to be 25 microns. The gate and anode voltages were taken to be 200 and 300 volts, respectively. The emission model for this example creates one particle per cell on every fifth time step. The work function was assumed be five eV. This model, named FEA, is specified using the following commands: A = 1.5414E-6 ; B = 6.8308E+9 ; PHI = 5.0 ; FUNCTION NCREAT(T) = STEP(T,TIMECONST1) ; EMISSION HIGH_FIELD A B PHI SURFACE_SPACING UNIFORM MODEL FEA TIMING 5 NUMBER NCREAT ; EMIT FEA TIP; Trajectories of a Field Emitter tip. The fine grid results in a femtosecond time step; consequently, tens of thousands of electromagnetic time steps are required for the particles to cross from the tip of the anode. MAGIC User’s Manual 16-18 Part V - Properties Chapter 16 - Emission Processes EMISSION PHOTOELECTRIC Command Function: Specifies a photoelectric emission process. Syntax: EMISSION PHOTOELECTRIC photon_source f(e) yield photon_energy [options] ; Arguments: photon_source — name of photon source, defined in PHOTON command. f(e) — electron energy function (electron/kev), defined in FUNCTION command (type DATA only). yield — conversion yield (electrons/photon). photon_energy — average photon energy (keV). options — see EMISSION [options] command. Defaults: None, except for the option defaults. The EMISSION PHOTOELECTRIC command must be entered for this model to be used. Description: The photoelectric emission process is described by the equations, where The definitions of these quantities is listed below: • E — represents the electron energy (keV), • θ — is the polar angle with respect to the surface normal, • η — is the conversion yield (electrons/photon), • χ(r) — is the fluence (cal/cm2), • ε — is the average photon energy (keV), • s(t) — is the photon pulse time history (sec-1), and • f(E) — is the electron energy distribution (electrons/keV). Both the photon time history, s(t), and the fluence, χ(r), must be specified in a PHOTON command. The photon source model must reference the name used in the PHOTON command. The electron energy function, f(E), must be specified using type DATA in a FUNCTION command. The data will consist of pairs representing groups of electron energy (keV) vs. relative group normalization. Only relative normalization is required for the energy distribution; the correct normalization will be automatically supplied. The angular distribution, sinθ cosθ, is built into the algorithm using a ten-group, equal probability representation. The remaining arguments are the conversion yield (electrons/photon) and the average photon_energy (kev), representing η and ε respectively. Restrictions: MAGIC User’s Manual 16-19 Part V - Properties Chapter 16 - Emission Processes 1. In MAGIC2D up to 100 EMISSION commands of all types may be used in a simulation. 2. In MAGIC3D up to 20 EMISSION commands of all types may be used in a simulation. 3. The EMISSION PHOTOELECTRIC command can only be used with the ELECTRON species. See Also: FUNCTION, Ch. 6, EMISSION [options], Ch. 16, EMIT, Ch. 16, PHOTON, Ch. 16. References: A. McIlwain and B. Goplen, "Representation of Photoemission from Blackbody Spectra," Science Applications, Inc. Report, SAI-75-516-AQ, January 1976. B. Goplen, J. Brandenburg, and R. Worl, "Canonical SGEMP Simulation Problems," Mission Research Corporation Report, MRC/WDC-R-109, also, AFWL-TN-86-57, March 1986. Examples: We consider emission from silicon caused by a symmetric, triangular, 10-nsec FWHM pulse of fivekeV blackbody originating at coordinates (0,0) and propagating as a plane wave in the positive x direction. The yield for silicon is 10-3 electrons/photon, and the average photon energy is 13.6 keV. The (crude) electron energy distribution consists of five equally probable groups with midpoint energies of 1, 2, 4, 7, and 10 keV. The model specifies three particles per cell and a creation frequency that matches the electromagnetic time step. Creation is fixed at a distance of 10-5 m from the surface but is random transversely. This model, named STD, is specified in the following commands: ! Define photon time history FUNCTION S DATA 3 0.0,0.0 1.0E-8,1.0E+8 2.0E-8,0.0 ; ! Define electron energy distribution FUNCTION F DATA 5 1.0,0.2 2.0,0.2 4.0,0.2 7.0,0.2 10.0,0.2 ; ! Define photon source PHOTON SOURCE 1.0 S 0.0 PLANE-X1 0.0 0.0 ; ! Specify the photoelectric emission model CONV = 1.0E-3 ; EAVE = 13.6 ; EMISSION PHOTOELECTRIC SOURCE F CONV EAVE OUTWARD_SPACING RANDOM 1E-5; ! Emit from the spatial object labeled silicon EMIT PHOTOELECTRIC SILICON ; MAGIC User’s Manual 16-20 Part V - Properties Chapter 16 - Emission Processes EMISSION SECONDARY Command Function: Specifies a secondary particle emission process. Syntax: EMISSION SECONDARY peak_delta energy_at_peak [SPECIES primary secondary ] [YIELD gamma(EI,cos(θp),t) ] [WEIGHT_FACTOR charge_weight] [ENERGY_DISTRIBUTION f(Es) Esmin Esmax] [ options ] ; Arguments: peak_delta maximum secondary emission coefficient at normal incidence (unitless). energy_at_peak primary particle energy at peak_delta (eV). primary primary particle species (ELECTRON, or defined in SPECIES command). secondary secondary particle species, same as primary unless specified differently. (ELECTRON, or defined in SPECIES command). gamma secondary particle yield function (unitless). Defined in FUNCTION command. charge_weight weight factor for the secondary charge relative to the primary charge. f(Es) probability distribution of secondary energy, Es (eV). Esmin minimum secondary energy in eV. Esmax maximum secondary energy in eV. options see EMISSION [options] command. Defaults: The default primary species is ELECTRON, and the default secondary species is ELECTRON. The EMISSION SECONDARY command must be entered for this model to be used. Description: This command enables secondary electrons to be emitted from the surface of a conducting spatial object when it is impacted by a primary particle. The following figure illustrates the coordinate system. The polar angle of the primary particle, θp, and the secondary electron, θs, are measured with respect to the surface normal. MAGIC User’s Manual 16-21 Part V - Properties Chapter 16 - Emission Processes Coordinate system illustrating primary particle and secondary electron. The secondary emission coefficient is given by the following form, in which the yield depends upon the primary particle energy and angle of incidence, and upon the material-dependent parameters, peak_delta and energy_at_peak. The equation governing secondary emission is written as . Here we assume that the secondary emission coefficient, δ, is a product of two functions, one in the primary polar angle and one in primary energy [Reference: E.W. Thomas in Data Compendium for Plasma-Surface Interactions (IAEA, Vienna, 1984) p. 94], Here, δ0 is the secondary emission coefficient at normal incidence for the primary. The variables, δpeak and Epeak, are represented by the arguments, peak_delta and energy_at_peak, respectively. An artificial cutoff in the polar angle dependence (at 85 degrees) is employed to prevent the coefficient from going to infinity for grazing angles. For the emitted secondary electron, the energy and spherical angle distributions are normalized to unity. The secondary energy distribution is peaked at 7.5 eV with a full-width at half-maximum of 10 eV. The angular distribution is evidently homogeneous, having no preferred direction. Since the default primary and secondary particles are both ELECTRON, cascading can result; i.e., the secondaries can immediately generate more secondaries. To prevent this, you can use the SPECIES MAGIC User’s Manual 16-22 Part V - Properties Chapter 16 - Emission Processes option to re-label the secondary particle species. For example, primary ELECTRON particles can be used to generate secondary particles only. Thus, physical cascading is easily prevented, but important physical effects may be lost. The most important statistical parameter is the creation_rate (EMISSION [options], Ch. 16), which controls the number of macroparticles (as opposed to the amount of charge). The combination of physical cascading with a creation_rate greater than unity can cause numerical cascading (too many numerical particles). To prevent it, you can reduce the creation_rate from its default value to unity. The use of the keyword YIELD allows you to specify your own yield function for the created secondary particles. This may be seen most simply, by examining the following equation. dqs = |dqi| γ(Ei,cos(θp),t), where, |dqi| is charge carried by incident primary particle species; γ is the secondary particle yield coefficient, evalutated from the specified function, and may depend upon the incident energy, Ei, the cosine of the incident angle, and the time. The amount of charge for the secondary particle is assigned the proper charge sign associated with the user specified exit particle. The use of the YIELD option may be of particular interest, for those desiring to model the creation of secondary electrons due to an ion source. The use of the keyword WEIGHT_FACTOR allows you to alter the ejected particle weight relative to the incident charge. . For simulations in which many generations of secondary particles are created, you may wish to use a weight factor larger than unity to reduce the number of secondary particles that are generated. For example, if you are typically creating 2 or 3 times the incident charge, then you might use a charge weight of 2 to increase the ejected charge weight by 2 and reduce the number of secondary macroparticles by a factor of 2 in each generation. You can use the OBSERVE SECONDARY command to obtain the following variables: YIELD, CURRENT, and CHARGE. Restrictions: 1. In MAGIC2D up to 100 EMISSION commands of all types may be used in a simulation. 2. In MAGIC3D up to 20 EMISSION commands of all types may be used in a simulation. See Also: EMISSION [options], Ch. 16, EMIT, Ch. 16, SPECIES, Ch. 18, OBSERVE SECONDARY, Ch 22. Examples: This example illustrates secondary electron emission from a copper conductor named “Stage1” caused by impact of an electron beam. For copper 3, the emitted number coefficient has a peak_delta of 1.3 at a primary energy_at_peak of 500 eV. To control any tendency to cascade artificially, we define a new electron species named “BLUE” and enable emission only from the ELECTRON species (as primary). Each incident macroparticle creates the default number of one secondary particle. SPECIES SECONDARY CHARGE -1 MASS 1 ELECTRON ; EMISSION SECONDARY 1.3 500 SPECIES ELECTRON SECONDARY NUMBER 1; EMIT Stage1 SECONDARY ; 3 E. Sternglass, Westinghouse Res. Sci. Paper 1772 (1954). MAGIC User’s Manual 16-23 Part V - Properties Chapter 16 - Emission Processes EMISSION THERMIONIC Command Function: Use to specify a thermionic emission process in a simulation. Syntax: EMISSION THERMIONIC work_function(t,x1,x2,x3) temperature(t,x1,x2,x3) [ options ] ; Arguments: work_function — work function (eV), constant or defined in FUNCTION command. temperature — temperature (deg K), constant or defined in FUNCTION command. options — see EMISSION [options] command. Description: The thermal emission process is described by the Richardson-Dushman equation, Here k is the Boltzmann constant and A0 is the Dushman parameter (1.204x10⁶ A/m2 Kelvin2). The work function, φw, may be either a constant or a function with allowed dependence on time, t, and the spatial coordinates. The same is true of the temperature. The velocity distribution of emitted particles is Maxwellian in energy, and sin-of-polar angle from the vertical, which produces uniform directionality in 3d. and See Also: FUNCTION, Ch. 6, EMISSION [options], Ch. 16, EMIT, Ch. 16. Examples: In this example, a cathode is set to thermionic emission at 800oK or about 68.9 milli-eV. We anticipate that the peak of the kinetic energy distribution will be at Kpeak = 3/2 kT = 103 milli-ev. FUNCTION CTEMP(t) = 800 ; FUNCTION Emittor_Temperature%eV(xo,t) = CTEMP(t) * BOLTZMN ; OBSERVE TRANSFORM Emittor_Temperature%eV ; FUNCTION JTHERMIONIC(T)= DUSHMAN*(CTEMP(T)**2)*exp(-VPHI/(CTEMP(T)*BOLTZMN)); FUNCTION CTHERMIONIC(T) = JTHERMIONIC(T)*EMITTER_AREA ; FUNCTION FVPHI(T) = VPHI ; EMISSION THERMIONIC FVPHI CTEMP SURFACE_SPACING UNIFORM model THERMALEMIT Timing Kfreq NUMBER 4 ; MAGIC User’s Manual 16-24 Part V - Properties Chapter 16 - Emission Processes EMIT THERMALEMIT EMITTER ; RANGE RANGE RANGE RANGE HISTOGRAM HISTOGRAM HISTOGRAM HISTOGRAM ELECTRON ELECTRON ELECTRON ELECTRON P3 P1 P2 KE 100 100 100 100 0.0 5e5 -5e5 5e5 -5e5 5e5 0.0 .5 PHS PHS PHS PHS MAGIC User’s Manual ; ; ; ; 16-25 Part V - Properties Chapter 16 - Emission Processes EMIT Command Function: Enables emission from the surface of selected spatial objects. Syntax: EMIT model { mobject } [ { EXCLUDE, INCLUDE } { area, volume } ] ... ; Arguments: model — name of emission model, defined in EMISSION command. mobject — name of an object that has been assigned one of the material properties such as CONDUCTOR, DIELECTRIC, FILM, or FOIL. area — name of conformal area in 2D simulation, defined in AREA command. volume — name of conformal volume in 3D simulation, defined in VOLUME command. Description: The EMIT command enables particle emission everywhere on the surface of a material spatial object. In 2D simulations, these objects must be areas; in 3D simulations, the objects must be volumes. By definition a material spatial object is assigned the property of being a CONDUCTOR, DIELECTRIC, FILM or FOIL. Only the first two arguments are required. The first is the model name specified in an EMISSION command, and the second is the name of the material spatial object. Note that emission will be enabled over the entire surface of the specified object. If emission is to be restricted from certain spatial regions on the object, these may be specified using the EXCLUDE / INCLUDE options. EXCLUDE restricts emission from a specified portion of the material object. INCLUDE reverses the effect of EXCLUDE. These options may be applied in any number and order to tailor the emission surface on the spatial object. The objects specified using the EXCLUDE / INCLUDE options must be conformal, but need not be assigned any material property; they may be defined arbitrarily for convenience. However, they must intersect some portion of the conducting object to have any effect. Restrictions: 1. 2. 3. 4. In MAGIC2D up to 100 EMIT commands may be used in a simulation. In MAGIC3D up to 20 EMIT commands may be used in a simulation. Only AREA spatial objects can emit in 2D simulations and VOLUME objects in 3D simulations. The emitting object can have any shape, but must be specified as perfectly conducting in a CONDUCTOR command. 5. Non-emitting regions must be designated with EXCLUDE / INCLUDE options. These objects need not be conducting, but must be conformal in shape. See Also: AREA, Ch. 10, CONDUCTOR, Ch. 14, DIELECTRIC, Ch. 14, FILM, Ch. 14, FOIL, Ch. 14, EMISSION [options], Ch. 16. VOLUME, Ch. 10. Examples: In this example, we first enable the beam-emission model "BEAM1" on a CONDUCTOR named “DISK." Next we exclude the entire surface of DISK. And finally we include for emission, the portion of MAGIC User’s Manual 16-26 Part V - Properties Chapter 16 - Emission Processes DISK that is enclosed in the region "EZONE". In this example, the spatial object DISK has the shape CONFORMAL. CONDUCTOR DISK ; EMISSION BEAM BEAM_CURRENT BEAM_VOLTAGE SURFACE_SPACING RANDOM MODEL BEAM1; EMIT BEAM1 DISK EXCLUDE DISK INCLUDE EZONE ; MAGIC User’s Manual 16-27 Part V - Properties Chapter 16 - Emission Processes PHOTON Command Function: Specifies photon source in time and space. Syntax: PHOTON photon_source chi(r) s(t) advance point ; Arguments: photon_source — name of photon source, user-defined. chi(r) — spatial function, user-defined in FUNCTION command (cal/ sq. cm). s(t) — temporal function, user-defined in FUNCTION command (1/sec). advance — retarded time advancement (m). point — spatial coordinates, or name of point defined in a POINT command. Description: The PHOTON command allows the user to specify one or more photon sources to drive photoelectric emission processes. Each model so specified must be given a unique name. The photon_source name will be referred to by the EMISSION PHOTOELECTRIC command, which specifies the photoelectric emission model. The photoelectric-emission process is described by the equation, where The PHOTON command specifies the spatial function, χ(r), and the temporal function, s(t). The time used in the temporal function is retarded, i.e., reduced by the spatial distance (divided by the speed of light). For both functions, the spatial distance is computed from the photon origin, specified by the spatial point, to a point on the emitting spatial object (EMIT, Ch. 16). Thus, the character of the wave front (spreading) is contained entirely in the spatial function, χ(r). This is sufficient to model simple sources, i.e., plane waves, etc. To model extended but finite photon sources, multiple PHOTON commands could be used. The retarded time advancement should be used initially to position the wave front near the emitting structure. Restrictions: 1. The number of PHOTON commands in a simulation is limited to five. 2. The temporal function must be normalized to unity. See Also: FUNCTION, Ch. 6, EMISSION PHOTOELECTRIC, Ch. 16 MAGIC User’s Manual 16-28 Part V - Properties Chapter 16 - Emission Processes Examples: Consider photoelectric emission caused by a symmetric, triangular, photon pulse of 10 nsec half width, originating at coordinate (0, 0), and propagating as a plane wave in the positive x1 direction. (This photon source model is arbitrarily given the name, Source.) The conversion yield is 10-3 electrons/photon and the average photon energy is 13.6 keV. The resulting electron energy function consists of five equally probable groups at energies of 1, 2, 4, 7, and 10 keV. (This electron energy function is arbitrarily given the name, EFN.) Particle creation is fixed on, and random over, the emitting cell surface. There are three particles per cell created on every time step. This model is specified in the commands, FUNCTION EFN DATA 5 1.0 0.2 2.0 0.2 4.0 0.2 7.0 0.2 10.0 0.2; EMISSION PHOTOELECTRIC Source EFN 1.0E-3 13.6 SURFACE_SPACING RANDOM OUTWARD_SPACING RANDOM 0.0 ; FUNCTION Temporal DATA 3 0.0 0.0 1.0E-8 1.0E8 2.0E-8 0.0 ; . POINT Source_Origin 0., 0. ; PHOTON Source 1. Temporal 0.0 Source_Origin ; MAGIC User’s Manual 16-29 Part V - Properties Chapter 16 - Emission Processes IONIZATION Command Function: The IONIZATION command specifies an electron - neutral_gas model that controls the creation of secondary particles due to electron-neutral collisions. In addition, the model provides for kinetic energy loss, scattering, and straggling of ambient electrons and drag effects on ions. Syntax: IONIZATION neutralgas pressure temperature IMPACT {ELECTRON, species_i} [options]; or IONIZATION neutralgas pressure temperature SOURCE rate(t,x1,x2,x3) {CENTERED, RANDOM} [..]; or IONIZATION neutralgas pressure temperature NO_IONIZATION [..]; (Optional controls for particle creation.) (Specify function for electron-neutral cross section.) [CROSS_SECTION σelectron-neutral(Ei,β,γ)] (Specify electron-ion pair species for ionization.) [SPECIES_OUT {ELECTRON, electron_species} {‘neutralgas’_ION, ion_species, INACTIVE}] (Specify electron-ion creation rate statistics model.) [{DIRECT_CREATION kcreation, INDIRECT_CREATION kcreate_electron kcreate_ion, CHECK_LOCAL_CELL }] [START_TIME starttime] [END_TIME endtime] [PARTICLE_DENSITY number_density, [FLUID_DENSITY fluid_number_density]] (Set level of thermal energy of ions created.) [THERMAL energy] (Optional controls for particle drag.) [ELECTRON_LOSS { NONE, {STOPPING_POWER, DRAG β min ν0 nβ nγ, [SCATTERING ν0 nβ nγ]}}] [ELECTRON_STOPPING_POWER dedxelectron-neutral(Ei,β,γ)] [ION_LOSS { NONE, LOW_ENERGY σion-neutral }] [{EXCLUDE, INCLUDE} {area, volume} ] ; Arguments: neutralgas — pressure — temperature — species_i — name of neutral gas as defined in the MATERIAL table. neutral gas pressure in pascals. neutral gas temperature in oK incident species (typically ELECTRONs) for impact ionization. MAGIC User’s Manual 16-30 Part V - Properties Chapter 16 - Emission Processes — production rate of charged species (number/m3/s), constant or defined in FUNCTION command. σelectron-neutral(Ei,β,γ) — function defining the electron-neutral cross section in units of unit atomic cross section (πao2) as a function of incident kinetic energy, Ei in eV and β and γ, defined in FUNCTION command. rate electron_species— electron mass species, ELECTRON (default) or suitable species defined in SPECIES command. ion_species— ion species name, either ‘neutralgas’_ION (default) or suitable species defined in SPECIES command or INACTIVE. kcreation — particle pair creation rate (LORENTZ time step multiplier factor). kcreate_electron— electron creation rate (LORENTZ time step multiplier factor). kcreate_ion — ion creation rate (LORENTZ time step multiplier factor). starttime — time in seconds at which ionization starts. endtime — time in seconds at which ionization ends. energy — initial thermal energy of ions (eV), constant. dedxelectron-neutral(Ei,β,γ) — function defining the electron neutral stopping power in eV/m, as a function of incident kinetic energy, Ei in eV and β and γ, defined in FUNCTION command. σion-neutral — ion-neutral cross section in units of unit atomic cross section (πao2). ν0 — collision_frequency, 1/seconds. β min — low energy beta limit, unitless. nβ — exponent for beta—factor in collision frequency, unitless. nγ — exponent for gamma—factor in collision frequency, unitless. area, volume— name of spatial area/volume, defined in the AREA/VOLUME command. Description: The IONIZATION command controls the generation of charged particles due to ionization in a background neutral gas. By default, the ionization pair will be the particle species, ELECTRON and ‘neutralgas’_ION. Only one (1) ionization command may be used. The argument, neutralgas, is the name of the background gas. There are several predefined gases available. Their names and properties are defined in the materials tables or you enter your own properties using the MATERIAL command. The required properties are Z, the ATOMIC_NUMBER, or for polyatomic gases, the MOLECULAR_CHARGE, and CROSS_SECTION coefficients. Additionally you must specify the gas pressure, P, and temperature, T. The number density, ngas, is calculated from the ideal gas law, e.g., P=ngaskBT. (For polyatomic gases, specify the molecular number and mass values. Ionization models You must select one of the three ionization models. These are IMPACT (ambient electrons colliding with background gas), SOURCE (arbitrary ionization rate function), or NO_IONIZATION (just uses the electron and ion drag terms). Each model represents different physical processes. Regardless of which ionization model is selected, the background neutral gas allows energy loss to the ambient kinetic particles. SOURCE model The SOURCE model is the most direct ionization model. It contains no built-in physics; the user simply supplies the ionization rate directly. The user-supplied rate function may vary in time and space: dn-/dt = dn+/dt = rate(t,x1,x2,x3). Where: rate = ionization rate function MAGIC User’s Manual 16-31 Part V - Properties n- = n+ = Chapter 16 - Emission Processes negative particle species number density positive particle species number density. IMPACT model The IMPACT model determines the charge creation rate based on the cross section associated with the background neutral gas. The rate equation for the impact model is given by the following equation: dn-/dt = dn+/dt = Σincσelectron-neutral(Ei,β,γ)] nt [(qinc/e) vinc]. Here β is the ratio of the velocity to the speed of light, γ is the relativistic factor, nt is the number density of the neutral gas evaluated from the pressure and temperature, qinc/e is the ratio of the electron macro-particle charge to the electron charge, and vinc is the velocity of the electron macro-particle, and dt is the Lorentz time step. CROSS_SECTION option The user may specify the impact cross section using the CROSS_SECTION keyword and providing a function σelectron-neutral(Ei,β,γ), where the cross section is in units of unit atomic cross section (πao2) ,and Ei in units of eV. (The unit atomic cross section (πao2) is 0.88x10⁻²⁰ m2). SPECIES_OUT option While the command will automatically set the secondary species (ELECTRON and ‘neutralgas’_ION), the user may elect to specify the two ionization product species using the SPECIES_OUT option. The particle species ‘electron_species’ must have the electron mass and qe/me, and the ‘ion_species’ must have proper ion mass and qion/mion, comprising the ionization pair. The user may elect to set the ‘ion_species’ to the value INACTIVE, in which case, these particles only exist as an immobile, infinite mass background charge field. This is useful if the simulation time is comparatively short and the ions have little time to move from their creation locations. DIRECT_CREATION option The DIRECT_CREATION model creates the secondary electron-ion pair immediately at the location of the incident electron in the cell for the IMPACT model. The argument, kcreation, specifies the rate of creation of macroparticles as an integer multiple of the LORENTZ (not the MAXWELL) time step. The amount of charge on the macroparticles is determined by the incident electrons and the cross section and the time interval set by kcreation*dtlorentz. The option PARTICLE_DENSITY has been implemented as part of the DIRECT_CREATION capability in MAGIC2D. When PARTICLE_DENSITY is set, the code emits new particles representing ionization products only when the calculated charge buildup in a zone due to ionization by macroparticles reaches some predetermined electron density (specified by number_density in #e/m3). The transition to the fluid model subsequently occurs in each cell when the same quantity reaches the density specified by fluid_number_density in #e/m3. This transition density can be optionally specified as a multiple of particle_density by setting it to a negative value whose magnitude is the multiplier. The default is effectively infinity (no transition to fluid). Example - PARTICLE_DENSITY qecrit FLUID_DENSITY -1.0e2 . Further explanation of the macro-particle number controls when ionization of neutral species is modeled: the code emits new particles representing ionization products when the calculated charge buildup in a zone due to ionization by macroparticles reaches some predetermined electron density (specified in MAGIC by PARTICLE_DENSITY in #e/m3 in the IONIZATION command). Specifically, a particle is emitted in a cell due to ionization when N ∫ (dn/dE σionv dE d t) > ne , where N is the neutral MAGIC User’s Manual 16-32 Part V - Properties Chapter 16 - Emission Processes number density, dn/dE is the energy spectrum of electrons in each zone, v is their velocity, and σion is the electron-neutral ionization cross section. The emitted electron has a low initial energy (see THERMAL above) and leaves behind an ion which may be stationary or mobile. The value of ne is chosen to optimize code efficiency based on the ability of the generated secondary electrons to modify the response (usually set to ~ Je/(e ve) e-/m3 where Je and ve are the emission current density and velocity). When ionizing a neutral particle, an electron loses ~34 eV, and its velocities are recomputed. When each cell reaches a specified ion # density (FLUID_DENSITY in #e/m3 in the IONIZATION command), further ionization due to macro-particles goes directly into the fluid model. This prevents plasma instabilities resulting from ion density beyond the affordable time step. INDIRECT_CREATION option The INDIRECT_CREATION model creates the secondary electrons and ions from a fluid cell reservoir. The use of the INDIRECT_CREATION triggers the use of the GAS_CONDUCTIVITY model in association with the IMPACT ionization. The primary electrons provide the source term for the gas conductivity model. Consequently, we have both ambient kinetic particles and immobile fluid particles. The fluid species have a separate update model which includes attachment, avalanche and recombination. (See GAS_CONDUCTIVITY). In this hybrid model, the fluid particle density equations include a leakage term which allows transfer from the charged fluid to kinetic particles. The rate of migration for electrons and ions is controlled with the arguments kcreate_electron and kcreate_ion, respectively (see DIRECT_CREATION above). In addition, the presence of the fluid electrons and ions create a gas conductivity which quenches the local ambient electric field. This model also limits the size and amount of ambient kinetic electrons to a value just below that of the plasma frequency to avoid instabilities. CHECK_LOCAL_CELL option The CHECK_LOCAL_CELL option is useful for relatively high pressure applications. In this case, the GAS_CONDUCTIVITY is automatically invoked and the low energy electrons are treated as a fluid, as are the positive ions. With this option, the electron fluid is allowed to leak a few electrons into the kinetic description. These can then migrate from cell to cell triggering additional kinetic ionizations. This option limits the number of kinetic electrons that may be created in a cell to below the plasma density limit. Thus it is very useful in limiting the typical avalanche of kinetic electrons that would otherwise occur with ionization. No electrons will be emitted in a cell that already contains kinetic electrons. START_TIME and END_TIME options The START_TIME, and STOP_TIME options will override the ionization source rate and suppress ionization, even when the rate is nonzero. These may be used to control when the ionization model begins and ends during the simulation, irrespective of the various creation rates. Typically used with the SOURCE model to mimic the effect of an external ionization source pulse generated by an external field. THERMAL option The THERMAL option allows you to specify the ionization kinetic energy distribution. When ionization particles are created, they are given a momentum based on a Maxwellian distribution which assumes a thermal energy in eV. The default thermal energy is equal to kT, where T is the gas temperature. EXCLUDE and INCLUDE options The ionization model can add significantly to the run-time of a simulation. It is, therefore, cost-effective to turn-off the ionization algorithm completely wherever and whenever the source function is known a priori MAGIC User’s Manual 16-33 Part V - Properties Chapter 16 - Emission Processes to be zero, for example, in regions of space such as dielectrics, where ionization is suppressed, or before and after an ionizing laser pulse has traveled through the simulation. The application of the IONIZATION model can be limited to specific regions by using the EXCLUDE / INCLUDE options. These options restrict the active spatial region to which the model is applied. Use the INCLUDE option to add a region and use the EXCLUDE option to remove a region. These two options may be applied in any number and order. ELECTRON_LOSS models You may select among three ELECTRON_LOSS models: NONE, STOPPING_POWER and DRAG. The default electron loss model is the STOPPING_POWER model. In this case the stopping power is evaluated from the cross section table and the adjusted to have the proper Bethe equation high energy tail. In this case the incident electron momentum is decremented by the amount indicated by dE/dx. Each momentum component is proportionally reduced in value. The DRAG model allows you to specify the coefficients for the electron neutral interaction. The effect of drag is modeled according to the following equations: dp/dt = −νdrag p, νdrag = ν0 βnβ γnγ, for β > βmin where ν0, nβ, and nγ are provided in the command line. minimum value. Values of β < βmin are trapped and set to the In addition, the user may elect to also apply an empirical SCATTERING option to either STOPPING_POWER or DRAG. In this case the empirical collision frequency is characterized with an energy dependence based upon the relativistic β and γ, according to the formula: d〈|p⊥|2〉/dt = νscattering p2 = d〈p⊥12〉/dt + d〈p⊥22〉/dt, νscattering = ν0 βnβ γnγ, for β > βmin where p⊥1 and p⊥2 are the momentum components orthogonal to the incident particle motion. Once again you enter values for ν0, nβ and nγ specific to the scattering. Values of β < βmin are trapped and set to the minimum value. For example, setting both nβ and nγ to zero will give a constant collision frequency for all energies. Note that the dominant behavior of the Bethe slowing-down formula results in a collision frequency with nβ = −3.0 and nγ = −1.0. ELECTRON_STOPPING_POWER option By default the electron stopping power is evaluated from the cross section and the Bethe equation. An alternative approach allows you to specify your energy dependant function, dedxelectron-neutral(Ei,β,γ), for the stopping power. This is only used when the ELECTRON_LOSS selection is BETHE. ION_LOSS options You may select among two ION_LOSS models: NONE and LOW_ENERGY. The LOW_ENERGY model allows you to specify the low energy ion-neutral exchange cross section, σion-neutral. In this model, it is assumed that the kinetic ions and the neutral exchange an electron with the result that in effect the ion transfers its momentum to the neutral gas particle. Momentum Impulse The effect of the electron and ion interactions with the neutral gas is to impart a momentum impulse to the neutral gas. The expression for the momentum impulse per volume is given by MAGIC User’s Manual 16-34 Part V - Properties Chapter 16 - Emission Processes Here i=1,2,3 and duE/dx is the energy density loss of charged particles per unit length (see chapter 2). In MAGIC there may be three sources of momentum impulse. These are the kinetic electrons (direct impact), the kinetic ions (also direct impact), and finally the impulse from the fluid ions of the gas conductivity model. The impulse from the kinetic electrons and ions is generated directly from the stopping power as described above in the ELECTRON_STOPPING_POWER, ELECTRON_LOSS and ION_LOSS models. In the following paragraphs we will describe the contribution from the fluid ions. Contribution to Momentum Impulse from Fluid Ions In the fluid ion model the neutral gas momentum impulse is generated primarily from the ion motion directly impacting the neutral gas molecules. A billiard ball model is assumed in MAGIC where collisions with neutrals impart all the ions’ momentum (essentially a charge exchange effect). A highly collisional model is assumed where the momentum transferred per unit volume (kg-m/s/m3) is given by ∆pi = ν0 mion Ji/qion ∆t. Here the ion-neutral collision frequency (s-1) is defined as ν0 = ngas σion-neutral vd. The ion-neutral cross section, σion-neutral, has a default value of 1.5x10⁻¹⁸ m2, although the user may supply his own value using the ION_LOSS option. The ion drift velocity (m/s) is evaluated from the ion mobility and the magnitude of the ambient electric field (V/m) using the following expression, vd = µion |E|. Here µion is the ion mobility (m2/volt-sec) with a default value of 2.4 x10⁻⁴/Patm, where Patm is gas pressure in atmospheres. We note that the fluid ion current density (A/m2) is approximated by the following expression, Ji = σcond Ei, where i=1, 2, or 3. Here the gas conductivity (mho/m) of the gas media is given by the following equation, σcond = nion qion µion. Here nion is the ion number density (#/m3). Thus we can finally write the following expression for the ion current density and momentum impulse. Ji = nion qion µion Ei and ∆pi = (mion nion) (µion Ei) (ν0 ∆t). Then a simple inspection of this expression illustrates that the impulse has the proper units and has a simple physical interpretation as the mass density (mion nion) of the ions times the ion drift velocity vector (µion Ei) times the collision probability over the time period (ν0 ∆t). Finally a cautionary note is in order. This ion-neutral momentum transfer model is valid for geometries and time scales where many ion-neutral collisions occur. For geometries and time scales where few ion-neutral collisions occur, the model will overestimate the impact. Diagnostics for the Momentum Impulse MAGIC User’s Manual 16-35 Part V - Properties Chapter 16 - Emission Processes In MAGIC the time accumulated momentum impulse can be accessed by examination of the P1_NEUTRALGAS, P2_NEUTRALGAS and P3_NEUTRALGAS fields with the standard diagnostics. There are two categories of diagnostics for the IONIZATION model; these are measurements of IONIZATION rates, and NEUTRAL_GAS energy deposition rates. The diagnostics include the following: Diagnostic "OBSERVE IONIZATION neutralgas speciesi CURRENT;" "OBSERVE IONIZATION neutralgas speciesi CHARGE;" "OBSERVE FIELD ENERGY_NEUTRALGAS … ;” "OBSERVE FIELD POWER_ NEUTRALGAS … ;” "OBSERVE FIELD P1_NEUTRAL_ NEUTRALGAS ... ;” "OBSERVE FIELD P2_NEUTRAL_ NEUTRALGAS … ;” "OBSERVE FIELD P3_NEUTRAL_ NEUTRALGAS … ;” "RANGE FIELD ENERGY_ NEUTRALGAS …;" "RANGE FIELD POWER_ NEUTRALGAS …;" "RANGE FIELD P1_NEUTRALGAS ... ;" "RANGE FIELD P2_NEUTRALGAS ... ;" "RANGE FIELD P3_NEUTRALGAS ... ;" "CONTOUR FIELD ENERGY_ NEUTRALGAS …;" "CONTOUR FIELD POWER_ NEUTRALGAS …;" "CONTOUR FIELD P1_NEUTRALGAS ... ;" "CONTOUR FIELD P2_NEUTRALGAS ... ;" "CONTOUR FIELD P3_NEUTRALGAS ... ;" Measurement type current accumulated charge energy loss power loss Momentum impulse Momentum impulse Momentum impulse energy loss power loss Momentum impulse Momentum impulse Momentum impulse energy loss power loss Momentum impulse Momentum impulse Momentum impulse Units amps coulombs joules watts kg-m/s/m3 kg-m/s/m3 kg-m/s/m3 Joules/m3 watts/m3 kg-m/s/m3 kg-m/s/m3 kg-m/s/m3 joules/m3 watts/m3 kg-m/s/m3 kg-m/s/m3 kg-m/s/m3 For short time-scale simulations in which ion motion is negligible, it may be desirable to follow just the electrons; this is accomplished by using the word INACTIVE for the ion species. You must specify a constant background neutral gas density which is assumed to exist within the simulation volume at the beginning of the simulation. During the simulation, this gas is depleted by ionization events, as specified by SOURCE, IMPACT, or AVALANCHE models. If the neutral gas should become fully ionized, then ionization, e.g., particle creation, turns off. For SOURCE creation of ionization particles, the ionized charge is placed at the center of a cell. An option exists to improve the statistical control by increasing the NUMBER of particles created each time step. The increased creation_rate may be a constant or a function of both time and space. The SPACING option allows for either the default cell-CENTERED spacing or RANDOM spacing within the cell. See Also: GAS_CONDUCTIVITY, Ch. 14, MATERIAL, Ch. 14, SPECIES, Ch. 18, POISSON, Ch. 19, POPULATE, Ch. 19, PRESET, Ch. 19, OBSERVE IONIZATION. Ch. 22. Restrictions: 1. The maximum number of IONIZATION commands is one. Examples: Example 1. The following commands enable the ionization model to create ionized nitrogen in a room temperature gas having a pressure of 10.7 millitorr. In this example, ionization sweeps across the confinement chamber at the speed of light. The pulse width of the ionization source is 1/10th of the axial dimension of the chamber. A region called DIEL, corresponding to a dielectric window is excluded from MAGIC User’s Manual 16-36 Part V - Properties Chapter 16 - Emission Processes the gas region. The creation pair is centered in each cell. See example files, SourceIonization.m2d and SourceIonization.m3d. REAL NEUTRAL_DENSITY,ION_ENERGY; NEUTRAL_DENSITY = 10E13; ION_ENERGY = 25; DELTA_TIME = SYS$DTIME ; QUESS_RATE = 0.010*NEUTRAL_DENSITY/DELTA_TIME; PULSE_WIDTH = 1.0*DX; XSTART = SYS$X1MN ; FUNCTION SCANRATE(T,X1,X2) = QUESS_RATE * STEP(XSTART+.95C*T,X1) * STEP(X1,XSTART+.95C*T-PULSE_WIDTH) ; TSTART = 0; TEND = TSTART+(PULSE_WIDTH+SYS$X1MX-SYS$X1MN)/1.C ; KCREATION_RATE = 1; NUMBER_PER_CELL = 1; PRESSURE = 10.7milliTorr; ROOMTEMP = 273; ! DEGREES KELVIN Species ELECTRON Charge -1 Mass 1 ELECTRON COLOR red SIZE 1; Species NITROGEN Charge +1 Mass 14 AMU COLOR BLUE SIZE 1; IONIZATION NITROGEN PRESSURE ROOMTEMP SOURCE SCANRATE CENTERED START_TIME TSTART END_TIME TEND PHASESPACE AXES X1 X2 tS1; OBSERVE IONIZATION NITROGEN electron current Filter Step Tfilter; OBSERVE IONIZATION NITROGEN NITROGEN_ION current Filter Step Tfilter; MAGIC User’s Manual 16-37 Part V - Properties Chapter 16 - Emission Processes Example 2. The following commands specify ionization in oxygen at 0.01 atmospheres at room temperature. A short current pulse of electrons at 500 volts is emitted into a chamber filled with oxygen. The normal cross section for oxygen is superseded by a flat constant response. This allows us to test the production rate at fixed energy with an expected current rate for the secondary electrons and oxygen ions. See example files, ImpactIonization.m2d and ImpactIonization.m3d. These files illustrate both the DIRECT_CREATION and the INDIRECT_CREATION options. PARAMETER PARAM ETER PARAMETER PARAMETER PARAMETER PARAMETER PARAMETER PARAMETER PARAMETER PARAMETER PARAMETER BEAM_VOLTS = 500VOLTS; BETA = SQRT(2*BEAM_VOLTS/511000VOLTS); VZ = BETA*1C ; PRESSURE = .01ATMOSPHERE ; ! TORR ROOMTEMP = 273 ; ! DEGREES KELVIN AK = 1.38E-23 ; ! JOULES/KELVIN TARGETND = PRESSURE/AK/ROOMTEMP ; BEAMI = CURRENT_MAX; UNITATOMICCS = 0.88E-20 ; TARGETCS = 3 RATEI=BEAMI*(TARGETCS*UNITATOMICCS)*TARGETND*VZ*SYS$DTIME ; FUNCTION FJ(T)=CURRENT_MAX/FACEAREA*STEP(1.5*SYS$DTIME,T) ; FUNCTION FV(T)=BEAM_VOLTS; EMISSION BEAM FJ FV ; MAGIC User’s Manual 16-38 Part V - Properties Chapter 16 - Emission Processes EMIT BEAM BOTEMIT ; SPECIES OXYGEN CHARGE +1 MASS 16 AMU; SPECIES LECTRON CHARGE -1 MASS 1 ELECTRON; FUNCTION MYCS(EI) = TARGETCS*STEP(EI,50); IONIZATION OXYGEN PRESSURE ROOMTEMP IMPACT ELECTRON CROSS_SECTION MYCS ELECTRON_LOSS NONE ION_LOSS NONE DIRECT_CREATION KCREATION_RATE ; OBSERVE IONIZATION OXYGEN ELECTRON CURRENT; OBSERVE IONIZATION OXYGEN OXYGEN CURRENT; Example 3. A gas chamber contains Xenon gas at pressure and temperature of 0.05 atm and 300 degrees Kelvin. A 300 kV electron beam is injected into the chamber. Stopping power is included in the model. The following commands were used in this simulation. See also the examples NeutralGasDrag.m2d and NeutralGasDrag.m3d. Both examples include 3 possible configurations that test different loss options. beamvolts = 300_kilovolts ; function currdens = .0001_amps/(1_meter)**2 ; SPECIES ELECTRON CHARGE -1 MASS 1 ELECTRON SIZE 1 ; SPECIES xenon_ion CHARGE +1 MASS 131.1 AMU SIZE 1 Color Blue ; emission beam currdens beamvolts number 5 COSINES fC1 FC2 FC3 ; emit beam emitter ; pressure = .05 atmosphere ; ! pascals temperature = 300 ; ! degrees Kelvin IONIZATION XENON pressure temperature NO_IONIZATION ELECTRON_LOSS STOPPING_POWER; phasespace axes x1 p1 snapshot ; Contour FIELD ENERGY_NEUTRALGAS SIMU tsys$last shade Color_SCALE RED_BLUE; Contour FIELD POWER_NEUTRALGAS SIMU tsys$last shade Color_SCALE ORANGE_BLUE; Contour FIELD P1_NEUTRALGAS SIMU tsys$last shade Color_SCALE RED_BLUE; Contour FIELD P2_NEUTRALGAS SIMU tsys$last shade Color_SCALE ORANGE_BLUE; MAGIC User’s Manual 16-39 Part V - Properties Chapter 16 - Emission Processes MAGIC User’s Manual 16-40 Part VI - Algorithms Part VI-Algorithms Chapter 17-Electromagnetic Fields Chapter 18-Charged Particles Chapter 19-Other Algorithms MAGIC User’s Manual VI-1 Part VI - Algorithms Chapter 17 - Electromagnetic Fields 17. ELECTROMAGNETIC FIELDS This Chapter covers the following commands: COURANT MAXWELL BIASED MAXWELL CENTERED MAXWELL FIXED MAXWELL HIGH_Q MAXWELL QUASI_NEUTRAL MAXWELL QUASI_STATIC MODE (2D simulations only) TIME_STEP The MAXWELL algorithms solve Maxwell’s equations to obtain electromagnetic fields (E1, E2, E3, B1, B2, B3), which vary in time and space. (Other algorithms calculate electrostatic fields and eigenfunctions (POISSON and EIGENMODE, Ch. 19), but only the MAXWELL algorithms calculate time-varying fields.) You can use the MAXWELL commands to select an electromagnetic algorithm and/or parameters and the TIME_STEP command to set the time step. In 2D simulations, you can use the MODE command to select either transverse magnetic mode fields (E1, E2, B3) or transverse electric mode fields (E3, B1, B2). (The MODE command does not apply to 3D simulations, which always include all six field components.) The COURANT command allows the user to set the ratio of the electromagnetic time step to the Courant limiting time step. You may not need to use any of these commands. The default electromagnetic solution uses the following parameters: time step - 80-85% of centered-difference Courant criterion mode - BOTH (both TE and TM) modes, for 2D simulations only algorithm - CENTER (time-centered) This combination provides a very conservative, robust solution for use with non-relativistic particles. It is consistent with the particle algorithm defaults (Ch. 18). If you are unsure of your simulation requirements, this is the recommended configuration. On the other hand, you may elect to use the other electromagnetic algorithms to speed up the simulation, to improve fidelity by matching the algorithm to the physics, or even to suppress certain physical effects to gain insight. Algorithm selection is especially important, and the following table indicates conditions that might favor one algorithm over another. For example, if particles are either absent or non-relativistic, then the CENTERED algorithm generally provides superior speed. General conditions for algorithm selection. MAXWELL ALGORITHM Speed required Long time scales No particles Very slow particles Slow particles Relativistic particles Cavities and particles High particle noise CENTERED X HIGH_Q BIASED QUASI_STATIC QUASI_NEUTRAL X X X X X X X X A brief explanation of the principal factors that impact the electromagnetic field solution follows. MAGIC User’s Manual 17-1 Part VI - Algorithms Chapter 17 - Electromagnetic Fields 1. Field definition — The electromagnetic fields (E1, E2, E3, B1, B2, B3) are defined at discrete locations in space and time. The following figure illustrates the spatial definition in the unit cell. The electrostatic fields (E1ST, E2ST, E3ST) and magnetostatic fields (B1ST, B2ST, B3ST) are coincident with their dynamic counterparts. The current densities (J1, J2, J3) are spatially coincident with the electric fields, and the charge density (Q0) is at the corner of the cell (intersection of the electric field vectors). The fields are also defined at discrete values of time (TIME_STEP, Ch. 17), with the electric and magnetic fields typically separated by half a time step. 2. Cell shape - The 3D cell shown is cubical; however, in practice it will be elongated (GRID, Ch. 11), and the sides will be curved (or non-parallel) in polar and spherical coordinates (SYSTEM, Ch.10). The 2D cell is obtained simply by viewing the 3D cell in the direction of the ignorable coordinate (x3). The fields are the same at all values of x3, which is the coordinate of perfect symmetry in all 2D simulations. 3. Spatial grid — Accuracy in the electromagnetic solution is determined primarily by spatial resolution, i.e., the cell size (GRID and AUTOGRID, Ch. 11) relative to the wavelength. The classic example is that calculated eigenvalues are always downshifted from their physical values, due simply to the discrete representation of fields in space. In addition, there is an upper limit to the frequency that can be supported by the grid. Any wavelength shorter than about six cells will degenerate into noise and be lost from the solution. 4. Time step — All MAXWELL algorithms use a time step to advance the fields in time. The size of the time step has virtually no effect on accuracy, so it is generally advisable to use a large time step to minimize expense. However, a Courant stability criterion limits the size of the time step, and each algorithm has a different limit. Rapid, catastrophic failure results from exceeding this limit. Also, outer boundaries (PORT, Ch. 12) and particle dynamics (LORENTZ, Ch. 18) may effectively limit the size of the electromagnetic time step. 5. Damping — Two of the MAXWELL algorithms (HIGH_Q and BIASED) contain damping designed to reduce high-frequency fields (particularly noise from relativistic particles). However, some damping occurs at all frequencies, including those of physical interest. In other words, each algorithm has an intrinsic, frequency-dependent Q. If the algorithm damping exceeds the actual physical damping, incorrect fields may result with adverse effects on results for saturation, energy balance, efficiency, etc. 6. TE and TM modes — In 2D simulations, both the transverse electric (TE) mode and the transverse magnetic (TM) mode are calculated by default. The TE fields (B1, B2, E3) and the TM fields (E1, E2, B3) may coexist independently, or they may be coupled through particle dynamics and/or unique structures (POLARIZER, Ch. 15). For 2D simulations which require only the TM mode (a common occurrence), eliminating the TE mode will double the speed. (Pure TE mode simulations, which omit all space-charge effects, are also possible but are performed only rarely.) In 3D simulations, all six fields (E1, E2, E3, B1, B2, B3) are always computed, even though individual components may vanish under certain conditions. 7. Particles — All the MAXWELL algorithms may be used with particles (SPECIES, Ch. 18) to produce self-consistent simulations that fully account for field-particle interactions. All account for space charge exactly, i.e., they satisfy Gauss’s law at the cell level, given that the continuity equation is conserving (CONTINUITY, Ch. 18). The MAXWELL algorithms differ in that they accommodate different velocity regimes, ranging from very low to highly relativistic. Plasma simulation can be especially difficult when the Debye length is unresolved spatially or the plasma frequency is unresolved temporally. 8. Materials, etc. — All MAXWELL algorithms are compatible with the full range of outer boundaries (Ch. 12) and material properties (Ch. 14 and 15). However, the number of possible combinations is infinite, and diligence (i.e., testing) is always advised. Spatial Definition of Fields MAGIC User’s Manual 17-2 Part VI - Algorithms Chapter 17 - Electromagnetic Fields MAGIC User’s Manual 17-3 Part VI - Algorithms Chapter 17 - Electromagnetic Fields COURANT Command Function: Set Courant ratio limit for time step. Syntax: COURANT ratio; (default =0.85) Arguments: ratio — courant stability ratio, must lie between 0 and 1. Description: Use of the ratio permits the user to adjust the electromagnetic time step to a specific fraction of the Courant stability limit. The default value of this limit is set internally to 0.85. Thus under default conditions the δtem = 0.85 * δtCourant. This is generally a conservative and safe choice. The various PORT model boundaries have a Courant limits that are generally more restrictive than those for the Maxwell solvers. Thus we recommend use of the default settings. However, in particular applications it may be useful to stretch the time step to a value closer to the limit, such as 0.99. In such cases, testing for stability should be done to ensure that the value chosen does not result in numerical catastrophe. Restrictions: 1. Must be greater than 0 and less than 1. See Also: MAXWELL algorithms, Ch. 17, CONTINUITY, Ch. 18, LORENTZ, Ch. 18. MAGIC User’s Manual 17-4 Part VI - Algorithms Chapter 17 - Electromagnetic Fields MAXWELL BIASED Command Function: Specifies time-biased electromagnetic algorithm. Syntax: MAXWELL BIASED [alpha1 alpha2 alpha3 [iterations [coefficient, ... ] ] ] ; Arguments: alpha1 alpha2 alpha3 iterations coefficient — forward-bias fraction (t+3/2dt). — center-bias fraction (t+1/2dt). — rearward-bias fraction (t-1/2dt). — number of relaxation iterations (and coefficients). — relaxation coefficients (see Table). Defaults: The BIASED algorithm provides defaults (which can be overridden) for all parameters, as described below. Description: The MAXWELL BIASED command specifies a time-biased, iterative solution of the fully timedependent Maxwell’s equations. The time-biased algorithm is an implicit scheme designed to damp highfrequency noise arising from relativistic particles, poor particle statistics, or certain numerical instabilities. The basic idea involves iterating between electric and magnetic field calculations during a single time step. Monotonically decreasing relaxation coefficients are applied to corrections in the electric field solution. Because of the iterations, this algorithm is computationally more expensive than the centereddifference algorithm, even though a larger time step can be used. The bias fractions represent contributions from magnetic field differences at three points in time: t+3/2dt, t+1/2dt, and t-1/2dt. These fractions are subject to the constraints, α1 + α2 + α3 = 1 α1 > α3 α22- 4 α1 α3 ≥ 0. The relaxation coefficients are typically in the range zero to one, with the first coefficient always equal to one. The following table lists various sets of temporal and relaxation coefficients, assuming α3 = 0. The COURANT stability criterion is given by (α22- 4 α1 α3)1/2 χ < 1, where MAGIC User’s Manual 17-5 Part VI - Algorithms Chapter 17 - Electromagnetic Fields χ2 = c2 δt2 ∑i=1,N 1/ (δxi)2 is the Courant ratio squared, δxi is the cell size in meters, and N is the number of dimensions (2 or 3). Some geometries are slightly more restrictive (SYMMETRY, Ch. 12). Since the bias fraction factor is bounded, the allowable time_step is always greater than the centered-difference algorithm, and it can be substantially greater. Common choices using α1 = 1, α2 =1, and α3 = 0 give double the centereddifference result. However, because the time-biased algorithm must iterate, it is always slower than the centered difference algorithm. Also, it may not be possible to take advantage of the larger time_step due to constraints on outer boundaries (PORT, Ch. 12) and particle dynamics (LORENTZ, Ch. 18). In the limit of sufficient iterations, the time-biased damping function is given by F(β2) = (1+4 α1χ2 β2)-1, where β is the frequency, normalized to the highest value that can be supported by the spatial grid. Thus, for reasonable choices of forward-bias fraction and Courant ratio, a high degree of damping of unwanted high frequencies associated with relativistic particles is achieved. However, note that some non-physical damping occurs at all non-zero frequencies. In other words, the algorithm itself has a Q, which is frequency-dependent and must be accounted for in simulations involving saturation or energy balance. The Q is approximately given by the following expression, Qalgorithm ~ 1/(α1 ω δt), provided the spatial grid is not spatially varying. As indicated by the syntax, you may elect to let the code determine all of the optional values. In this case, the default values are α1 = 1/2, α2 = 1/2, α3 = 0, iterations = 4, and coefficients = 1.0, 0.29912, 0.1502, 0.11111. If you want to supply only values for α1, α2, and α3, the code automatically selects the minimum allowed value for iterations and generates the coefficients. You may elect to specify iterations as well; in this case, the code will generate the coefficients. Finally, you may enter all the optional values. See following table for typical values. Coefficients for the time-biased algorithm. α1 0.125 0.25 0.50 0.75 I 2 3 4 2 3 4 4 5 6 8 9 10 11 τ's 1.0, 0.60494 1.0, 0.75385, 0.60494 1.0, 0.83944, 0.68410, 0.60494 1.0, 0.36000 1.0, 0.52941, 0.36000 1.0, 0.65759, 0.44305, 0.36000 1.0, 0.29912, 0.15022, 0.11111 1.0, 0.39559, 0.20000, 0.13383, 0.11111 1.0, 0.48267, 0.25457, 0.16470, 0.12613, 0.11111 1.0, 0.21488, 0.08768, 0.04944, 0.03359, 0.02591, 0.02205, 0.02041 1.0, 0.25676, 0.10712, 0.60001, 0.04000, 0.03000, 0.02459, 0.02169, 0.02041 1.0, 0.29857, 0.12791, 0.07159, 0.04717, 0.03472, 0.02775, 0.02371, 0.02144, 0.02041 1.0, 0.33964, 0.14980, 0.08410, 0.05504, 0.04000, 0.03142, 0.02624, 0.02308, 0.02125, 0.02041 MAGIC User’s Manual 17-6 Part VI - Algorithms 12 16 Chapter 17 - Electromagnetic Fields 1.0, 0.37943, 0.17256, 0.09743, 0.06355, 0.04579, 0.03551, 0.02919, 0.02517, 0.02262, 0.02111, 0.02041 1.0, 0.52021, 0.26799, 0.15728, 0.10308, 0.07336, 0.05556, 0.04418, 0.03654, 0.03125, 0.02750, 0.02481, 0.02291, 0.02161, 0.02080, 0.02041 References: B. B. Godfrey and B. Goplen, "Practical Evaluation of Time-Biased Electromagnetic Field Algorithms for Plasma Simulations," Mission Research Corporation Report, AMRC-N-146, presented at the Twenty-Second Annual Meeting APS Division of Plasma Physics, 10-14 November 1980. Restrictions: 1. This algorithm has an upper limit to the time step used. 2. It is most appropriately used in relativistic particle applications to suppress high levels of numerical noise. 3. Be aware that some damping occurs (the algorithm Q is finite) at all frequencies. Thus, this algorithm is unsuitable for simulations involving resonant cavities with high values of Q, e.g., klystrons, etc. This damping is completely unrelated to physical loss mechanisms such as resistivity or outgoing waves. In effect, the reciprocals of all Qs (including the algorithm Q) add to produce the effective Q. See Also: SYMMETRY, Ch. 12, TIME_STEP, Ch. 17, MODE, Ch. 17, CONTINUITY, Ch. 18, LORENTZ, Ch. 18, COURANT, Ch.17. Examples: A 2D simulation designed for relativistic particles might use a time-biased solution with an aggressive increase in the default time step while suppressing the TE mode. MAXWELL BIASED ; dt = SYS$DTIME * 2.0 ; TIME_STEP dt ; MODE TM ; ! switch from BIASED to BIASED! ! default is 80% of centered maximum ! dt is now 160% of centered maximum ! suppress the TE mode Note that a time step which exceeds the centered-difference maximum may lead to trouble with the particle algorithms (LORENTZ, Ch. 18) and outer boundaries (PORT, Ch. 12). MAGIC User’s Manual 17-7 Part VI - Algorithms Chapter 17 - Electromagnetic Fields MAXWELL CENTERED Command Function: Specifies centered-difference electromagnetic algorithm. Syntax: MAXWELL CENTERED ; Arguments: none. Defaults: Defaults are set for all electromagnetic field algorithm parameters. The default algorithm is CENTERED. You can change this with one of the MAXWELL commands. You can use the TIME_STEP command to specify the time_step. If you do not specify the time_step, a default value equal to 80% of the centered-difference Courant criterion will be used, irrespective of the MAXWELL algorithm selected. Description: The MAXWELL CENTERED command specifies a centered-difference solution of the fully timedependent Maxwell’s equations. This algorithm is the simplest of the time-dependent field algorithms. It is suitable for use without particles or with non-relativistic particles. The centered-difference Courant stability criterion is given by χ < 1, where χ2 = c2 δt2 ∑i=1,N 1/ (δxi)2 is the Courant ratio squared, δxi is the cell size in meters, and N is the number of dimensions (2 or 3). In certain cases (SYMMETRY, Ch. 12), the criterion may be even more restrictive; however, χ < 0.80 is generally safe. Despite the relatively restrictive time step, the centered-difference algorithm is the fastest in terms of covering a given time span. See also the COURANT command. Another characteristic of the centered-difference algorithm is that it provides no damping at any frequency (the algorithm Q is infinite). Thus, while excellent for purely electromagnetic simulations, center-difference is very susceptible to the high-frequency noise typically produced by relativistic particles. In extreme form, this susceptibility appears as field aliasing (alternating signs in the cell fields). Therefore, we recommend use of the centered-difference algorithm only for purely electromagnetic simulations or with non-relativistic particles. Restrictions: 1. This algorithm has an upper limit to the time step used. 2. It should be used only in particle-free or non-relativistic simulations. See Also: SYMMETRY, Ch. 12, TIME_STEP, Ch. 17, MODE, Ch. 17, CONTINUITY, Ch. 18, LORENTZ, Ch. 18, COURANT, Ch.17. MAGIC User’s Manual 17-8 Part VI - Algorithms Chapter 17 - Electromagnetic Fields MAXWELL FIXED Command Function: Specifies the use of fixed electric and magnetic fields. No time advance is applied to the starting values of the fields, which can be initialized with the PRESET command. In addition, you may use it to specify particle ray tracing. Syntax: MAXWELL FIXED [particlefile [SPECIES species_name]]; Arguments: particlefile name of text file with partice ray information. species_name name of a particle species used in an import file, and defined in SPECIES command. Description: The MAXWELL FIXED command specifies time-independent electric and magnetic fields. The electric and magnetic fields may be initialized with the PRESET command and will not change. The particlefile, if used, should contain a list of particle ray starting positions. The file is standard text format, with values separated by blanks. Lines beginning with “!” are informational only and are ignored by MAGIC. Each line with a “particle-ray” begins with “@zdump”, it is followed by seven (7) numbers indicating the starting positions (x1,x2,x3) of the ray, the initial momentum components of the ray (units are γβ), and finally the current carried by each ray filament. Each number must be separated by at least 1 blankspace. MAGIC automatically counts the number of lines beginning with “@zdump” and inserts one particle for each line, provided that the starting position is within the defined simulation space. Particlefile.txt The SPECIES option is used to specify the injected particle species. ELECTRON. The default species is In general, all the standard diagnostics will work. For example, if you examine the current density, J, you get the accumulated value for the particles-rays traversing the simulation. In addition, on the final time step, the 3d viewer, will show the cumulative trajectories of all the rays. The algorithm generates two output files. These are “MagicRayTrace.Out” and “MagicRayTrajectory.Out”. These are text files containing the ray trajectory history. The following figures illustrate the format of the output data for each file. MAGIC User’s Manual 17-9 Part VI - Algorithms Chapter 17 - Electromagnetic Fields MagicRayTrace.Out (Row format, one ray per line at one time step. The time step is indicated by the Iteration column, and the tag indicates a specific ray.) MagicRayTrajectory.Out (Column format for Positions only. Each row contains all the ray positions at that time step.) Restrictions: 1. This algorithm assumes that you will use PRESET to initialize the electric and magnetic fields. 2. This algorithm does not account for space charge effects. 3. The number of rays injected should not be too large, no more than a couple hundred. See Also: SYMMETRY, Ch. 12, TIME_STEP, Ch. 17, MODE, Ch. 17, CONTINUITY, Ch. 18, LORENTZ, Ch. 18, SPECIES, Ch. 18 Examples: This example shows a simple ray trace of electrons in an arbitrarily prescribed electric and magnetic field. MAXWELL FIXED PARTICLERAYS.TXT Species Electron; ! Preset B fields from a MaxwellB data format file. PRESET B1st MaxWellB MaxWellBData.txt ; PRESET B2st MaxWellB MaxWellBData.txt ; PRESET B3st MaxWellB MaxWellBData.txt ; MAGIC User’s Manual 17-10 Part VI - Algorithms Chapter 17 - Electromagnetic Fields ! Preset E fields with an arbitrary function description. pkr = 1pi/Xbox ; PKz = 2pi/Zbox ; Function EzSet(x,y,z) = -1e7 - 3e6*cos(PKR*(X**2+y**2))*Sin(PKZ*Z) ; Function ExSet(x,y,z) = 1e6*sin(PKR*(X**2+y**2))*cos(PKZ*Z)*X/sqrt(X**2+Y**2) ; Function EySet(x,y,z) = 1e6*sin(PKR*(X**2+y**2))*cos(PKZ*Z)*Y/sqrt(X**2+Y**2) ; PRESET E3 Function EzSet ; PRESET E1 Function ExSet ; PRESET E2 Function EySet ; ! Use a VIEWER with timer to watch the progress of the injected particles. ! Note that only the injected bunch will be displayed until the end of the ! simulation. Then the entire ray history will be shown. timer snaps periodic 5 99999 5; Phasespace AXES X3 X2 Snaps Nodump ; viewer Tsys$last ; MAGIC User’s Manual 17-11 Part VI - Algorithms Chapter 17 - Electromagnetic Fields MAXWELL HIGH_Q Command Function: Specifies high-Q electromagnetic algorithm. Syntax: MAXWELL HIGH_Q [ gamma ] ; Arguments: ─ filter factor (0 < gamma < 1). gamma Defaults: The HIGH_Q algorithm provides defaults (which can be overridden) for gamma and courant_ratio, as described below. Description: The MAXWELL HIGH_Q command specifies a high-Q solution of the fully time-dependent Maxwell’s equations. This algorithm artificially damps electromagnetic fields. It damps all frequencies in the same manner as the time-biased algorithm, but damps less at physical low frequencies, hence the name, "high-Q." It is especially suitable for cases involving relativistic particles and cavities. The Courant stability criterion is given by and where χ2 = c2 δt2 ∑i=1,N 1/ (δxi)2 is the Courant ratio squared, δxi is the cell size in meters, and N is the number of dimensions (2 or 3). Certain geometries are slightly more restrictive (SYMMETRY, Ch. 12). In no case can the time_step exceed times the centered-difference stability criterion. Also, it may not be possible to take advantage of the larger time_step due to constraints on outer boundaries (PORT, Ch. 12) and particle dynamics (LORENTZ, Ch. 18). The damping function is given by F(β2) = (1─γ β2)2 (1+ 2γ β2), MAGIC User’s Manual 17-12 Part VI - Algorithms Chapter 17 - Electromagnetic Fields where β is the frequency, normalized to the highest value that can be supported by the spatial grid. In comparison with the time-biased algorithm, high-Q produces much less damping at lower frequencies, as shown in the following figure. However, note that some non-physical damping occurs at all non-zero frequencies. In other words, the algorithm itself has a Q that is frequency-dependent and must be accounted for in simulations involving saturation or energy balance. You may adjust the degree of damping with the filter factor, gamma. A value of zero is equivalent to centered-difference, while a value of one causes maximum damping. The default and recommended value is 0.85. Another situation where you may wish to set the gamma parameter is for waves traveling in a waveguide near the cutoff frequency. A good choice in this case is to set γ = 0.85 (1 ─ fcutoff/f). See also the COURANT command. References: MugShots, Vol. 1, No. 2 (May 1992). Restrictions: 1. This algorithm has an upper limit to the time step used. 2. It is most appropriately used in relativistic particle applications where damping at low and intermediate frequencies would be undesirable, such as high-Q cavities. 3. Be aware that some damping occurs (the algorithm Q is finite) at all frequencies. This damping is completely unrelated to physical loss mechanisms such as resistivity or outgoing waves. In effect, the reciprocals of all Qs (including the algorithm Q) add to produce the effective Q. 4. Damping may be strongly enhanced for waves traveling near cutoff in a waveguide. See Also: SYMMETRY, Ch. 12, TIME_STEP, Ch. 17, MODE, Ch. 17, CONTINUITY, Ch. 18, LORENTZ, Ch. 18, COURANT, Ch.17. Examples: An algorithm designed for relativistic particles in a 2D simulation might use high-Q with a modest increase in the default time step while suppressing the TE mode. MAXWELL HIGH_Q ; dt = SYS$DTIME * 1.5 ; TIME_STEP dt ; MODE TM ; ! ! ! ! switch from BIASED to HIGH_Q default is 80% of centered maximum dt is 120% of centered maximum suppress the TE mode Note that a time step which exceeds the centered-difference maximum may lead to trouble with the particle algorithms (LORENTZ, Ch. 18) and outer boundaries (PORT, Ch. 12). MAGIC User’s Manual 17-13 Part VI - Algorithms Chapter 17 - Electromagnetic Fields MAGIC User’s Manual 17-14 Part VI - Algorithms Chapter 17 - Electromagnetic Fields MAXWELL QUASI_NEUTRAL Command Function: Specifies quasi-neutral electromagnetic algorithm. Syntax: MAXWELL QUASI_NEUTRAL beta ; Arguments: beta ─ plasma frequency and speed-of-light fraction, v/c (0<beta<1). Description: The MAXWELL QUASI_NEUTRAL command specifies a quasi-neutral solution of the fully timedependent Maxwell’s equations. The quasi-neutral algorithm is the same as centered-difference, but artificially reduces particle and displacement currents in Ampere’s Law by a factor of beta squared. The result is a reduction in both the plasma frequency and speed-of-light by a factor of beta, and an increase in the Debye length by 1/beta. This allows the time step to be made larger by a factor of 1/beta, and this increase makes the algorithm suitable for use with very high density plasma situations, which would otherwise be impossible to model because of Courant, plasma-frequency, and Debye-length restrictions on the time step and grid size. The quasi-neutral algorithm is most useful in a restricted class of problems in which magneto-hydrodynamic (MHD) behavior is being investigated. Note that the Alfven velocity, B2/µ0ρm, and collision-less skin-depth, c/ωp, remain unchanged in this approximation, which indicates that ideal MHD behavior is preserved. In general, the quasi-neutral approximation may be used whenever plasma frequency oscillations and displacement current are neglected. The benefit of using QUASI-NEUTRAL is in the larger time step allowed, and the TIME_STEP command (Ch. 17) must be used to reset the time step to its larger value. The user must ensure that the new time step does not exceed any of the following restrictions: • δt < [ ∑i=1,3 (β2c2/δxi2)]-1/2, e.g., Courant condition with c → βc, • δt < 2[βωp]-1 , e.g., plasma frequency restriction with ωp →βωp, and • δt < δxmin / vmax , e.g., particle motion less than a single cell per time step, where δxmin represents the minimum cell size and vmax represents the maximum particle velocity. The third restriction implies that the benefit of using QUASI_NEUTRAL is only possible if particles are nonrelativistic with velocities less than about 20% of the speed of light, which corresponds to electrons below about 10 keV in energy. If electron energies exceed this level, the QUASI_NEUTRAL algorithm should not be used. Suggested values of beta are three to ten times the particle beta (v/c). Restrictions: 1. This algorithm has an upper limit to the time step used. 2. It should be used only in simulations involving low velocity, nearly charge-neutral plasmas. 3. δt < [ ∑i=1,3 (β2c2/δxi2)]-1/2, e.g., Courant condition with c → βc. MAGIC User’s Manual 17-15 Part VI - Algorithms Chapter 17 - Electromagnetic Fields 4. δt < 2[βωp]-1 , e.g., plasma frequency restriction with ωp →βωp. 5. δt < δxmin / vmax , e.g., particle motion less than a single cell per time step. See Also: TIME_STEP, Ch. 17, COURANT, Ch.17. Examples: A simulation of MHD behavior in a 1 keV plasma might use quasi-neutral with a ten-fold increase in the default time step, thus decreasing the run time by a factor of 10. AUTOGRID ; ! generates default SYS$DTIME variable beta = 0.1 ! beta is v/c MAXWELL QUASI_NEUTRAL beta ; ! switch to QUASI_NEUTRAL MAGIC User’s Manual 17-16 Part VI - Algorithms Chapter 17 - Electromagnetic Fields MAXWELL QUASI_STATIC Command Function: Specifies quasi-static electromagnetic algorithm. Syntax: MAXWELL QUASI_STATIC beta ; Arguments: beta ─ speed-of-light fraction, v/c (0<beta<1). Description: The MAXWELL QUASI_STATIC command specifies a quasi-static solution of the fully timedependent Maxwell’s equations. The quasi-static algorithm is the same as centered-difference, but uses a speed-of-light artificially reduced by the factor, beta. This allows the time step to be made larger by a factor of 1/beta, and this increase makes the algorithm suitable for use with very low-velocity particles. The quasi-static algorithm is useful in a restricted class of problems in which steady-state or very low frequency behavior is being investigated. In general, this would apply to simulations of either very lowvelocity particles (v<<c) or very long-wavelength radiation (wavelength much larger than simulation dimensions). Such simulations are normally plagued by the need for excessively small time steps because of the Courant restriction in an electromagnetic simulation. The quasi-static algorithm introduces a factor in Faraday's Law that relaxes the Courant condition by slowing the speed-of-light propagation. Ampere's Law is not altered, so both the electrostatic and magnetostatic physical limits are preserved. However, the transients to the quasi-static limits are much slower in the simulation than in reality, and hence only quasistatic results are meaningful when this algorithm is employed. The Courant stability criterion is given by βχ < 1, where β is beta and where χ2 = c2 δt2 ∑i=1,N 1/ (δxi)2 is the Courant ratio squared, δxi is the cell size in meters, and N is the number of dimensions (2 or 3). Certain geometries are even more restrictive (SYMMETRY, Ch. 12). Since useful values of beta are less than unity, the allowable time_step is larger than the centered-difference time_step by the reciprocal of beta. The damping property of the quasi-static algorithm is the same as that for centered difference (the algorithm Q is infinite); however, the total absence of damping is not a problem for low-velocity particle applications. See also the COURANT command. To use the quasi-static algorithm, set beta to the desired fraction (0<β<1) of the speed-of-light. (Note that β=1 recovers the centered-difference algorithm.) The timestep is automatically increased by a factor of 1/β. Suggested values of beta are three to ten times the particle beta (v/c), or 10 to 30 times the ratio of the simulation dimensions to the wavelength of the radiation. Restrictions: 1. This algorithm has an upper limit to the time step used. 2. It should be used only in simulations involving no particles or very low-velocity particles. MAGIC User’s Manual 17-17 Part VI - Algorithms Chapter 17 - Electromagnetic Fields See Also: SYMMETRY, Ch. 12, TIME_STEP, Ch. 17, MODE, Ch. 17, CONTINUITY, Ch. 18, LORENTZ, Ch. 18, COURANT, Ch.17. Examples: An algorithm designed for very low-velocity particles in a 2D simulation might use quasi-static with a ten-fold increase in the default time step while suppressing the TE mode. Autogrid ; Beta = 0.1 ; ! beta is v/c MAXWELL QUASI_STATIC Beta ; ! switch to QUASI_STATIC MODE TM ; ! suppress the TE mode MAGIC User’s Manual 17-18 Part VI - Algorithms Chapter 17 - Electromagnetic Fields MODE Command Function: Specifies the electromagnetic mode in a 2D simulation. Syntax: MODE { TE, TM, BOTH } ; Defaults: The default mode in a 2D simulation is BOTH. You can use the MODE command to select TE or TM, thus suppressing the other mode. Description: You can use the MODE command to select the electromagnetic mode in a 2D simulation. The modes are transverse electric (TE) with fields B1, B2, and E3 and transverse magnetic (TM) with fields E1, E2, and B3. (Here, TE and TM simply identify which electromagnetic fields will be present. These should not be confused with “waveguide modes.” Also, the transverse electromagnetic (TEM) mode is not a separate mode, but is actually a degenerate case of the TM mode.) The majority of 2D simulations produce only a transverse magnetic (TM) mode. Certain rare cases produce only a transverse electric (TE) mode. If both TE and TM modes are produced, they will co-exist independently unless they are coupled through 3D particle kinematics and/or unique structures such as the polarizer (POLARIZER, Ch. 15). If you can suppress one mode, the electromagnetic solution speed will double. To ascertain whether both modes are required, you must consider the interaction between the field and current density components in the Maxwell and Lorentz equations. If you are unsure, use the default and inspect the results. If all the fields in either mode are zero, then that mode is not required. Even if a mode exists, you may decide to suppress it for speed if it is not relevant to the dynamics. You may wish to suppress a mode to study particular physical effects. E.g., suppressing the TM mode eliminates space charge. Restrictions: 2. The MODE command can be used only in 2D simulations. See Also: MAXWELL algorithms, Ch. 17, CONTINUITY, Ch. 18, LORENTZ, Ch. 18. Examples: You can suppress the TE mode in a 2D simulation with the following command. MODE TM ; MAGIC User’s Manual 17-19 Part VI - Algorithms Chapter 17 - Electromagnetic Fields TIME_STEP Command Function: Specifies the electromagnetic time step. Syntax: TIME_STEP time_step ; Arguments: time_step ─ electromagnetic algorithm time step (sec). Defaults: If you do not specify the time_step, a default value equal to 80% of the centered-difference Courant criterion will be used. Description: You can use the TIME_STEP command to specify the time_step used in the electromagnetic algorithm. If you do not specify the time_step, a default value equal to exactly 80% of the centereddifference Courant criterion will be used, irrespective of the choice of algorithm. (Note that the default algorithm is time-biased.) The centered-difference Courant stability criterion is given by χ < 1, where χ2 = c2 δt2 ∑i=1,N 1/ (δxi)2 is the Courant ratio squared, δxi is the cell size in meters, and N is the number of dimensions (2 or 3). Once the spatial grid is completed, it is automatically searched to find the most restrictive cell. Then the default time_step is calculated using χ = 0.8. This time_step is also entered into the system variable, SYS$DTIME. This system variable is accessible in the input and can then be used to alter the time_step (see Examples, below). The centered-difference criterion is used as the default because it is safe. It is conservative for all electromagnetic algorithms and coordinate systems. It is safe with all outer boundaries that use a time step. It is also safe when used in the particle kinematics. However, there may be circumstances in which you want to alter the time step. For example, you may wish to take advantage of the larger time_step possible with other algorithms, or you may wish to make a minor adjustment of the time_step for periodicity (see Examples, below). In some cases, it may be necessary to reduce the time_step significantly to accommodate particle resolution requirements (LORENTZ, Ch. 18). In 2D or 3D simulations that have symmetry such that they are perfectly one-dimensional, the Courant criterion can be violated with impunity, and a very large multiple can be chosen. Restriction: 1. The centered-difference criterion is used to calculate the default time_step, irrespective of the algorithm actually used. See Also: MAGIC User’s Manual 17-20 Part VI - Algorithms Chapter 17 - Electromagnetic Fields AUTOGRID, Ch. 11, GRID, Ch. 11, MAXWELL algorithms, Ch. 17, CONTINUITY, Ch. 18, LORENTZ, Ch. 18 Examples: 1. Suppose that the default (time-biased) algorithm is satisfactory, but you want to make use of a more aggressive time_step to speed up the calculation. By inspection of the time-biased Courant criterion, you recognize that you can double the time_step. (Note that other factors, such as particle kinematics, etc., might preclude this choice.) Make use of the system variable, SYS$DTIME, which is available once the spatial grid is complete. To double the time_step, the commands are dt = 2.0 * SYS$DTIME ; TIME_STEP dt ; After these commands are processed, SYS$DTIME will contain the value of dt and not the original (default) value. 2. Suppose that the magnitude of the default time_step is satisfactory, but that you want to adjust it very slightly so that an exact (integer) number of time_steps equals some specified period. (This is useful in certain cavity-tuning procedures). You can achieve the desired effect with the following commands, using 10 GHz as an example. frequency = 10 GHz ; period = 1.0 / frequency ; I = period / SYS$DTIME ; dt = period / I ; TIME_STEP dt ; Note that dt differs only slightly from the default time_step. MAGIC User’s Manual 17-21 Part VI - Algorithms Chapter 18 - Charged Particles 18. CHARGED PARTICLES This Chapter covers the following commands: SPECIES LORENTZ CONTINUITY These commands specify the charged-particle algorithms. In 3D simulations, only the SPECIES and LORENTZ commands can be used. The CONTINUITY commands will not be accepted in 3D, since these algorithms are set entirely by default and cannot be altered. By contrast, 2D simulation offers more control over these algorithms. You can use the SPECIES command to create new particle species, if required (electrons and protons are already available). You can use the LORENTZ command to specify how often the particle coordinates (X1, X2, X3) and momenta (P1, P2, P3) are calculated. The kinematics calculation is fully relativistic. You can use the CONTINUITY commands in 2D simulations to select the charge-continuity algorithm that calculates the charge-density field (QO) and the current-density fields (J1, J2, J3) from the particle motion. The charge-density field error (QERR) may also be calculated. You may not need to use any of these commands. In both 2D and 3D simulations, the default charged-particle algorithms use the following parameters: • species available ─ electrons and protons • Lorentz algorithm ─ 3-D relativistic using the electromagnetic time_step • continuity algorithm ─ CONSERVED (satisfies Gauss’s law exactly) This combination provides a very conservative, robust solution for simulations involving both nonrelativistic and highly relativistic particles. It is consistent with the electromagnetic algorithm defaults (Ch. 17). If you are unsure of your simulation requirements, this is the recommended configuration. On the other hand, in a 2D simulation, you may elect to use the other particle algorithms to speed up the simulation, to improve fidelity by a better match of the algorithm to the physics, or even to suppress certain physical effects to gain insight. The following table provides guidance in selecting the continuity algorithm. Conditions for continuity algorithm selection. CONTINUITY Low_T ALGORITHM May Use When Speed required no Low noise required yes Moderate noise acceptable no Extreme noise acceptable no Exact conservation required no Approximate conservation acceptable yes Poor conservation acceptable no Beams and some plasmas no Low-temperature plasmas yes A more detailed explanation of the principal factors that influence the simulation follows. 1. Particle definition — Our “particle” is an artificial entity that typically represents a large number of physical particles. The charge-to-mass ratio for all particles of a given species is fixed and is usually, but not necessarily, identical with a physical species (see SPECIES command). An artificial particle can represent any number of physical particles to meet requirements of the emission processes, which include statistical properties such as creation frequency, particle number, etc. (EMISSION, Ch. 16). It is possible that no two particles will be identical in charge or mass, although the charge-to-mass ratio will be identical. Once created by an emission process, particles move through space under the influence of Lorentz forces (LORENTZ, Ch. 18) and contribute to MAGIC User’s Manual 18-1 Part VI - Algorithms Chapter 18 - Charged Particles charge and current densities (CONTINUITY, Ch. 18) which are used in Maxwell’s equations (MAXWELL, Ch 17). 2. Time step — As with the electromagnetic field algorithms, there are temporal resolution requirements for particles. There is a time-step instability in the Lorentz and continuity algorithms which is analogous to the Courant instability in Maxwell’s equations. To prevent it, particles must not be allowed to transverse more than one cell in a particle time step. By default, the particle time step is equal to the electromagnetic time_step, the default for which is 80% of the centereddifference Courant criterion. If both defaults are used, the particle stability requirement is automatically satisfied. However, if you use a more aggressive electromagnetic time_step and/or a non-unity kinematics multiplier, the stability requirement could be violated for relativistic particles. Other stability constraints which may be encountered include cyclotron frequency resolution, , an orbit resolution problem associated with high applied magnetic fields, and plasma frequency resolution, in catastrophic instability. , a problem associated with high-density plasmas which can result 3. Spatial grid — As with the electromagnetic field solution, accuracy in the particle orbits and current-density fields is determined primarily by the spatial resolution, i.e., the cell size (GRID and AUTOGRID, Ch. 11). For example, if field resolution requirements dictate some maximum cellto-cell longitudinal field variation (say, 25%), then a space-charge-limited boundary layer might be represented well by 30 cells, barely by 10 cells, and not at all by 3. There are also stability constraints which may be encountered such as Debye length resolution, instability is encountered in low-temperature plasmas and results in “self-heating.” . This mild 4. Local charge conservation — All of the continuity algorithms solve the equation to obtain current- and charge-density fields from the particle motion. However, the algorithms differ in the way that they solve this equation and in the degree to which they satisfy Gauss’s law, locally, i.e., in each spatial cell. Unfortunately, the algorithm which provides exact charge conservation (conserved continuity) also produces the greatest particle noise. Nevertheless, because of the importance of satisfying Gauss’s law, this is the recommended and default algorithm. 5. Noise — We typically represent a huge number of small, physical particles with a small number of huge, artificial particles. The motion of these huge particles in the finite spatial grid creates numerical noise in the electromagnetic fields. The magnitude of this noise goes inversely as the square root of the number of particles, so simulation improvement by this means alone can be an expensive proposition. Instead, some algorithms are designed specifically to reduce noise. Certain electromagnetic algorithms (HIGH_Q and BIASED) work directly on the electromagnetic fields by damping, while certain continuity algorithms (CORRECTED and LOW_T) reduce noise by working with the current-density fields. 6. Statistics — The issue is how to represent adequately the required phase space with the fewest particles. The emission processes (EMISSION, Ch. 16) provide statistical controls that allow particular regions of phase space to be emphasized with more particles (of lower charge). For highly correlated phase space (e.g., a charged-particle beam), relatively few particles are required. In such cases, particle methods have great advantage. On the other hand, a thermal plasma might require huge numbers of particles to represent even the simplest physics, and in such cases, fluid methods might be advantageous. MAGIC User’s Manual 18-2 Part VI - Algorithms Chapter 18 - Charged Particles 7. Dimensions — By default, the Lorentz kinematics are relativistic and three-dimensional. This is consistent with the electromagnetic field defaults (time-biased with both electromagnetic modes). However, 2D simulations which require only non-relativistic kinematics (v/c < 0.2) or twodimensional kinematics can offer considerable speed advantage. Determining the relativistic requirement is usually straightforward. The dimensionality required can always be found by analyzing field (including any external fields) and particle momentum components and their interplay between Maxwell’s equations and the Lorentz equation. Note that even if 3D kinematics are required, the component J3 may vanish from symmetry, so that a TE mode does not necessarily result. 8. Materials, etc. — All particle algorithms are compatible with the full range of material properties and outer boundaries. In general, particles may be created and destroyed by bulk property materials (Ch. 14), while they pass through unique structures (Ch. 15) which have infinitesimal thickness. At outer boundaries (Ch. 12), particles may have their coordinates or momenta altered (at symmetries) or they may be destroyed. MAGIC User’s Manual 18-3 Part VI - Algorithms Chapter 18 - Charged Particles SPECIES Command Function: Creates new particle species. Syntax: SPECIES species_name CHARGE charge_multiplier MASS mass_multiplier { ELECTRON, PROTON, AMU } [COLOR { RED, LIGHTPURPLE, ORANGE, DARKGRAY, BLUE, GREEN, CYAN, DARKRED, PURPLE, DARKYELLOW, GREY, DARKBLUE, DARKGREEN, LIGHTCYAN, DARKPURPLE }] [SIZE isize] ; Arguments: species_name name of species, user-defined. charge_multiplier electronic charge unit multiplier (signed and unitless). mass_multiplier mass unit multiplier (unitless). (Color is an optional control that allows you use to specify the color with which a given particle species will be presented.) isize size used for phase space display of particles, (unitless). Default=0=1pixel. Allowed values, 0, 1, 2, 3, 4, 5. Description: The SPECIES command is used to add a new particle species with specific characteristics or modify an existing species. The species table contains the characteristics of all particle species to be used in the simulation. The ELECTRON species resides permanently in the species table. A new particle species may be based upon physical particles (e.g., ELECTRON), but there is no requirement that they be. You are free to create arbitrary particle species to satisfy simulation requirements. This can include nonphysical particles such as heavier electrons. You can also create species with identical physical properties but different names to distinguish them in the output. Once added to the species table, the new species can be used in any of the particle process commands, (see the EMISSION, FILM, FOIL, IMPORT, and CONDUCTOR commands) and initialization processes (see the POPULATE command). A particle species is completely specified by its charge-to-mass ratio. You must give each new species a unique species_name, which will be referred to in other commands. The electronic charge unit has a magnitude of “e” and positive sign. The CHARGE keyword is followed by the charge_multiplier, which is simply the number of units of electronic charge and carries the sign (+ or -). The MASS keyword is followed by the mass_multiplier and the mass units, which may be ELECTRON, PROTON, or AMU. The AMU, or atomic mass unit (defined so that the mass of the carbon atom equals exactly 12 AMU) is more suitable for larger atoms and isotopes. The SIZE keyword allows you to resize the particles in the phasespace display. In general, you would use this only if you have very few particles and it is difficult to see them on the display. None 0 values cost more to display. Restrictions: MAGIC User’s Manual 18-4 Part VI - Algorithms Chapter 18 - Charged Particles 1. The particle species table can contain up to fifteen (15) charged particle species. 2. The ELECTRON species is the only default species present in the species table. All other species must be must be explicitly created. See Also: CONDUCTOR [BACKSCATTER option], Ch 14, EMISSION processes Ch. 16, FILM, Ch 14, FOIL, Ch 14, IMPORT, Ch 12, LORENTZ, Ch. 18, POPULATE, Ch. 19. Examples: 1. Specify four species of electrons. Use with different emission properties. Display with different colors. See following figure. SPECIES SPECIES SPECIES SPECIES Q1ELECTRON Q2ELECTRON q3ELECTRON q4ELECTRON CHARGE CHARGE CHARGE CHARGE -1 +1 -1 +1 MASS MASS MASS MASS 1 10 5 50 ELECTRON ELECTRON ELECTRON ELECTRON COLOR COLOR COLOR COLOR RED; DARKBLUE; DARKGREEN; DARKPURPLE; 2. A carbon isotope species can be quickly created with the command, SPECIES carbon CHARGE +1 MASS 12 AMU ; 3. An electron species named “blue_electron” (to distinguish it from ELECTRON) can be created with the command, SPECIES blue_electron CHARGE -1 MASS 1 ELECTRON ; The "blue_electron" particles are identical with and behave in exactly the same manner as the “ELECTRON” particles. They simply have a different species name that allows them to be readily distinguished in phase-space plots, etc. 4. An artificial, light-weight species named “proton_lite” can be created with the command, SPECIES proton_lite CHARGE +1 MASS 0.1 PROTON ; At one-tenth the mass of physical protons, "proton_lite" particles will be much more responsive to electromagnetic forces. This might enable simulations precluded by a conventional approach, such as proton back-flow in an electron diode. MAGIC User’s Manual 18-5 Part VI - Algorithms Chapter 18 - Charged Particles MAGIC User’s Manual 18-6 Part VI - Algorithms Chapter 18 - Charged Particles LORENTZ Command Function: Specifies Lorentz particle kinematics algorithm options. Syntax: LORENTZ (Specify particle time stepping.) [TIMING {step_multiple, periodic_timer}] (Specify particle kinematic algorithm.) [{BORIS, (default algorithm) IMPLICIT theta {ON, OFF}] Arguments: step_multiple ─ multiple of electromagnetic time_step (integer). periodic_timer ─ name of a periodic timer, defined in the TIMER command. theta ─ damping parameter for Implicit PIC C0 to D1 fraction. (0.0 (=c0 method) to 1.0 (=D1 method)) ON/OFF ─ multi-pass particle velocity update switch. Description: The LORENTZ command is used to specify the particle kinematics time step and update method. The particle time step must be an integer step_multiple of the electromagnetic time_step (TIME_STEP, Ch. 17) to allow efficient simulation of low-velocity particles. The default step_multiple is 1 times the electromagnetic time step. However, the algorithm has a stability criterion on the time step, and you must ensure that no particle is able to move more than one cell in a particle time step. If the default electromagnetic time_step and default step_multiple are used, stability is guaranteed; however, you may be able to improve efficiency with a more aggressive time_step and/or step_multiple. The TIMER option may be used when you want to ensure a time delay before the onset of particle dynamics. In effect, you use a timer with the starting time set to the time at which you desire the particle algorithms to be activated. With a long delay time you may allow electromagnetic fields to be built up over a transient phase and then allow the activation of the standard particle algorithms. The default particle kinematic update method uses the Boris [1,2] split time step explicit scheme. This treatment method requires no additional inputs. The other method, the IMPLCIT is described in the following section. Bold characters indicate vectors, and the nomenclature of the original references has been largely retained in each case. The particle velocity is “v”, acceleration is “a”, the electric and magnetic fields are “E” and “B”, q/m is the electron charge to mass ratio, mc2 is the rest mass, and γ=[1−(v/c)2]−1/2 is the relativistic expansion factor. MKS units are employed here, and the expressions have been modified to include relativistic effects. Implicit Method The implicit method, follows Friedman’s algorithm #1 [3,4] with relativistic quantities and magnetic field terms added. Like the Boris method, it also uses a split time step approach. It uses a damping MAGIC User’s Manual 18-7 Part VI - Algorithms Chapter 18 - Charged Particles parameter theta, θ, to distinguish between the implicit PIC C0 method and the D1 method. The choice of θ=0.0 results in a pure C0 method, and the choice of θ=1.0 results in a pure D1 method. Values of θ between 0 and 1 provide a hybrid of the C0 and D1 treatments. This gives the user additional control over the degree of damping of undesired high frequency modes. Both the C0 and D1 methods are implicit as described in [3,4] and their references. An optional corrector pass feature has been added, which is based on the ABORC SGEMP code treatment [5]. The update sequence starts when the current time step, “n”, is entered with the particle quantities: velocity, (vn-1/2), position, (xn), acceleration, (an-2), relativistic factor gamma, (γn-1/2), magnetic rotation, (Ωn-1 = ½(q/m)∆tBn-1/γn-1/2), and with the electric field, (En), and the magnetic field, (Bn) interpolated to the particle positions. The final push is: 1) 2) 3) 4) 5) 6) 7) 8) 9) an = (q/m)En(xn)/γn-1/2, where En(xn) is interpolated from mesh to particle positions xn. ∆vn-1/2 = ½∆t (an + ∆vn-1/2 x Ωn-1) (a matrix inversion is required here) vn-1/2 = vn-1/2 + ∆vn-1/2 xn = xn + ∆tvn-1/2 An-1 = ½θ an + (1- ½θ) an-2 an-1 = (1-½θ) an + ½θ an-2 Ωn = ½(q/m)∆t Bn(xn) /γn-1/2, where Bn(xn) is interpolated from the mesh to particle positions xn. vn+1/2 = vn-1/2 + (½∆t An-1 + vn-1/2 x Ωn) (a matrix inversion is required here) γn+1/2 = γn-1/2 + [½q/(mc2)∆t] E•( vn+1/2 + vn-1/2) The corrector pass includes these additional steps: v+ = vn+1/2 vn+1/2 = vn-1/2 γn-1/2/γn+1/2 + q/(mγn+1/2)∆t [E + ½ (v+ + vn-1/2) x B] γ++ = γn-1/2 + [q/(mc2)∆t] E•(vn+1/2 + vn-1/2) γn+1/2 = γ++ The update then concludes with the update of the particle positions: 10) xn+1 = xn + ∆t vn+1/2 (the free-streaming pre-push for next step) A matrix inversion is required in steps 2 and 8. The quantities vn+1/2 and xn+1 provide the information needed for the current densities on the grid. Steps 2 and 7 above have been listed as in [4], but in our case, Bn is only supplied for the particle positions xn at the beginning of the step as opposed to xn. We have found that the optional corrector iteration step is effective in reducing artificial particle heating when the electron plasma density is comparatively high. Additional development and testing of the implicit particle update algorithm with MAGIC2D is reported in [6]. The Lorentz algorithm automatically adds magnetic fields from the Maxwell solution to any magnetostatic fields (PRESET, Ch. 19) and uses these to solve the Lorentz force equation to advance particle positions and momenta in time. The particle coordinates (X1, X2, X3) and momenta (P1, P2, P3) may be observed in various output commands (e.g., PHASESPACE, Ch. 24). The units of momentum are m/sec, which includes the relativistic factor, γ, but not the rest mass of the particle. Example: LORENTZ IMPLICIT 1.0 ON; MAGIC User’s Manual 18-8 Part VI - Algorithms Chapter 18 - Charged Particles Restrictions: 1. The step_multiple (and electromagnetic time_step) must be chosen to preclude a particle from moving more than one cell width in a single particle time step. 2. Timers that involve particle output must take the step_multiple into account. For example, PHASESPACE plots will be blank unless they are produced at the actual time of the particle kinematics. See Also: MAXWELL algorithms, Ch. 17, MODE, Ch. 17, PHASESPACE, Ch. 24, PRESET, Ch. 19, TIME_STEP, Ch. 17. References: 1. C. K. Birdsall, A. Bruce Langdon (1985). Plasma Physics via Computer Simulation. McGraw-Hill. ISBN 0-07-005371-5. 2. J.P. Boris, (November 1970). "Relativistic plasma simulation-optimization of a hybrid code". Proceedings of the 4th Conference on Numerical Simulation of Plasmas. Naval Res. Lab., Washington, D.C., pp. 3–67. 3. A. Friedman, “Implicit multiscale PIC and related topics”, Workshop on Multiscale Processes in Fusion Plasmas, UCLA, Jan. 2005 (http://hifweb.lbl.gov/public/slides/). 4. A. Friedman, “A second-order implicit particle mover with adjustable damping”, Journal of Computational Physics, Volume 90, Issue 2, October 1990, Pages 292-312. 5. A. J. Woods and T. N. Delmer, "The Arbitrary Body of Revolution Code (ABORC) for SGEMP/IEMP," DNA-4348-T, July 1976. 6. Andrew J. Woods and Lars D. Ludeking, "MAGIC Implicit Particle Pusher Description and Validation,” paper prepared for 18th IEEE International Pulsed Power Conference, Chicago, IL, June 19-23, 2011, April 2011. MAGIC User’s Manual 18-9 Part VI - Algorithms Chapter 18 - Charged Particles CONTINUITY Command Function: Specifies conserved continuity algorithm. Syntax: CONTINUITY CONSERVED; (Available in MAGIC2D Only. An artificial cooling algorithm.) CONTINUITY LOW_T [debye_ratio]; Arguments: debye_ratio Debye length-to-grid spacing ratio (unitless). Description: The CONTINUITY CONSERVED command specifies a continuity algorithm which conserves charge (Gauss’s law) exactly, but is high in numerical noise. It is suitable for most particle applications. An electromagnetic algorithm which provides damping, such as high_Q or time-biased, can be used to reduce noise if required (MAXWELL, Ch. 17). This algorithm produces current-density fields which conserve Gauss’s law exactly (within roundoff error). The algorithm can be derived from application of Gauss’s law to conformal, rectilinear motion, with the particle orbit being a sum of such rectilinear motions and the order of the rectilinear motions being determined randomly. It requires no correction, since it achieves charge conservation directly. However, in PIC parlance, the algorithm uses “nearest-grid-point” charge allocation, and this is what produces the extreme numerical noise. This algorithm calculates the charge-density field (QO) and the current-density fields (J1, J2, J3). Since no error in Gauss’s law is produced, the charge-density error field (QERR) is not calculated for this algorithm. The CONTINUITY LOW_T option specifies a continuity algorithm which conserves charge (Gauss’s law) approximately and also reduces numerical noise. It is suitable for low-temperature plasma applications, where self-heating occurs due to failure of the spatial grid to resolve the Debye length adequately. The algorithm makes use of the CONSERVED algorithm, which conserves charge (Gauss’s law) exactly. To reduce the numerical noise associated with the standard algorithm, it then applyies a temporal filter to the current-density fields. This process loses exact charge conservation. The algorithm has shown some ability to suppress the grid instability associated with particle self-heating when the Debye length (=thermal speed/plasma frequency) of a group of particles is smaller than the grid spacing. This generally occurs when debye_ratio is near the ratio of Debye length to the grid spacing. λd = νth / ωp. This algorithm calculates the charge-density field (QO) and the current-density fields (J1, J2, J3). The charge-density error field (QERR) is not calculated. It is recommended that you use the MAXWELL BIASED option in conjunction with the LOW_T continuity selection in order to provide even greater cooling capability. I a 2D simulation, you may elect to use the other particle algorithms to speed up the simulation, to improve fidelity by a better match of the algorithm to the physics, or even to suppress certain physical effects to gain insight. The following table provides guidance in selecting the continuity algorithm. Conditions for continuity algorithm selection. MAGIC User’s Manual 18-10 Part VI - Algorithms Chapter 18 - Charged Particles CONTINUITY Low_T ALGORITHM Speed required Low noise required Moderate noise acceptable Extreme noise acceptable Exact conservation required Approximate conservation acceptable Poor conservation acceptable Beams and some plasmas Low-temperature plasmas May Use When no yes no no no yes no no yes Restrictions: 1. The particle Lorentz step_multiple and electromagnetic time_step must be chosen to preclude a particle from moving more than one cell width in a single particle time step. 2. If the CONSERVED algorithm is used with relativistic particles, then an electromagnetic field algorithm which includes damping, such as high-Q or time-biased, is recommended to reduce noise. 3. The CONTINUITY LOW_T command can be used only in 2D simulations. 4. The LOW_T algorithm should be used only in low-temperature plasma applications. See Also: MAXWELL algorithms, Ch. 17, TIME_STEP, Ch. 17, MODE, Ch. 17, LORENTZ, Ch. 18 MAGIC User’s Manual 18-11 Part VI - Algorithms Chapter 19 - Other Algorithms 19. OTHER ALGORITHMS This Chapter covers the following commands: CIRCUIT (2D simulations only) POISSON (2D simulations only) POPULATE COILS CURRENT_SOURCE DRIVER EIGENMODE PRESET The group of commands involves initial conditions, external sources, and electrostatic and eigenvalue fields. The CIRCUIT, and POISSON commands can be used only in 2D simulations, and the rest can be used in either 2D or 3D. You can use the POPULATE command to create an initial charged-particle distribution and the PRESET command to initialize electromagnetic and magnetostatic fields. You can use the COILS command to generate a solenoidal magnetostatic field. You can use the CURRENT_SOURCE and DRIVER commands to apply external current-density sources and the CIRCUIT command to apply external voltage sources between conductors. You can use the POISSON command to compute electrostatic fields and the EIGENMODE command to compute frequency eigenvalues and cyclic field distributions. The following table provides guidance on the physical conditions that bear on the algorithm selection. General conditions for algorithm selection. CONDITION External B External J External V Initial E, B Initial, ρ = 0 Initial , ρ ≠ 0 Electrostatic, ρ=0 Electrostatic, ρ≠0 Eigenvalues Degenerate Modes POPULATE PRESET COILS X X DRIVER or CURRENT_SOURCE CIRCUIT POISSON X X EIGENMODE X X X X X X X X X X X X A brief discussion of the main considerations follows. Initial charged-particle distributions — The POPULATE command can be used in simulations to create an initial charged-particle distribution within a specified spatial region. If the resulting charge distribution is non-neutral, then electromagnetic field initialization is required. Remember that the default initial condition for all fields is that E≡0 and B≡0. This implies that there is no net charge anywhere in space. Thus, if you create a charged particle but do not initialize the fields to account for it, the code implicitly creates a second particle of opposite charge to cancel the one created. In effect, this second charge has infinite mass and remains embedded in the spatial grid for the duration of the simulation. • Initial field distributions — The PRESET command can be used to initialize electromagnetic fields (E1, E2, E3, B1, B2, B3) as well as electrostatic fields (E1ST, E2ST, E3ST, PHST) and magnetostatic MAGIC User’s Manual 19-1 Part VI - Algorithms Chapter 19 - Other Algorithms fields (B1ST, B2ST, B3ST). As the simulation transient progresses, the electromagnetic fields will normally change from their initial values. The electrostatic and magnetostatic fields are presumed to be due to some external source, such as a permanent magnet, and these fields never change. In interpreting output, note that the dynamic electric fields (E1, E2, E3) may be initialized to electrostatic results (E1ST, E2ST, E3ST), but that the dynamic magnetic fields (B1, B2, B3) are never initialized to magnetostatic fields (B1ST, B2ST, B3ST). Instead, the magnetostatic and dynamic magnetic fields are automatically added together whenever particle forces are required for the Lorentz equation. This provides flexibility in the specification of magnetostatic fields. However, care should be taken that initialized electric fields are self consistent, since charge may be present in the initial state of the system. • Magnetostatic fields — the COILS command can be used to generate magnetostatic fields due to coils. These fields are automatically entered in the magnetostatic field arrays (B1ST, B2ST, B3ST) and do not require PRESET. • External current-density sources — The CURRENT_SOURCE and DRIVER commands can be used to specify external current-density sources which may be arbitrary functions of time and space. These sources will be applied directly to the electric field calculation and are not included in output of the current-density fields (J1, J2, J3), which are due solely to charged particles. Therefore, the J associated with these sources may not be observed, except though their effect on electromagnetic fields. • External voltage sources — The CIRCUIT command can be used in 2D simulations to apply an external voltage source between conductors that are otherwise unconnected. This may be used to maintain a specified voltage between conductors, and it is also commonly used to represent the effect of a transverse electromagnetic (TEM) wave propagating in the direction of the ignorable coordinate (x3). (Simulation of a magnetron presents a practical example.) A TEM waveform is always given by solution of the Laplacian, which we can obtain using a POISSON command. Note that the number of solutions required typically equals the number of unconnected conductors, minus one. Electrostatic field solutions — In 2D simulations, there are two circumstances in which the POISSON command can be used to compute the static potential (PHST) and electrostatic fields (E1ST, E2ST). One circumstance application involves computing the initial electric field distribution for a nonneutral initial charge distribution. The charges are created with a POPULATE command, the electrostatic fields are computed with the POISSON command, and the dynamic fields (E1 and E2) are initialized using a PRESET command. The second circumstance involves determining the TEM waveform associated with propagation in the ignorable coordinate. In this case, there are no particles, but the various conductors will have specified potentials. The POISSON command is used simply to obtain a Laplacian solution. The voltages associated with these TEM fields are applied using the CIRCUIT command. • Eigenvalues and eigenfunctions — The EIGENMODE command can be used to obtain frequency eigenvalues and field eigenfunctions from a steady-state solution of Maxwell’s time-dependent equations. No particle distributions may be used. The PRESET command can be used to initialize eigenfunctions in searching for degenerate modes. MAGIC User’s Manual 19-2 Part VI - Algorithms Chapter 19 - Other Algorithms CIRCUIT Command Function: Specifies an external circuit to apply voltage between conductors in a MAGIC2D simulation. Syntax: CIRCUIT v(t) poisson_solution [ MEASURE { MATRIX area, INTEGRAL lines [ line,... ] } ] [ MODEL { STATIC, RESISTIVE z, INDUCTIVE z l } ] ; Arguments: v(t) ─ voltage function, defined in FUNCTION command. poisson_solution ─ Poisson solution name, defined in POISSON command. area ─ name of spatial area, defined in AREA command. lines ─ number of voltage measurements (integer). line ─ name of spatial line, defined in LINE command. z ─ circuit impedance (ohms). l ─ circuit inductance (henrys). Defaults: The defaults are MEASURE MATRIX with the full simulation area and MODEL STATIC. Description: The CIRCUIT command provides a means of applying a time-varying voltage between a set of unconnected conductors in a MAGIC2D simulation. Physically, this can be used to represent a transverse electro-magnetic (TEM) wave traveling in the third (symmetry) spatial dimension. In a magnetron simulation, for example, the dominant field and particle kinematics occur in the (r,θ) plane, but the voltage pulse between anode and cathode propagates in the axial (z) coordinate. This can be approximated using the CIRCUIT command. The electrostatic solution for the TEM wave in the third dimension is computed using the POISSON command, which must be used if the CIRCUIT command is given. The temporal voltage function, v(t), represents the external voltage source which is applied to the circuit connecting two or more conductors. The TEM solution is identified in both commands by the poisson_solution name, defined in the POISSON command. The keyword MEASURE specifies the method of measuring the voltage between pairs of conductors. The MATRIX option specifies the capacitive matrix method to obtain voltages. The dot product of the dynamic electric field and electrostatic field solutions over the area is taken, and voltages are computed dynamically on the basis of energy conservation by solving the coupled capacitance equations. The INTEGRAL option provides line-integral measurements between two conductors to obtain a voltage. The argument line specifies the number of voltage measurements, each consisting of a straight-line integral along each line. The INTEGRAL method is much faster than the MATRIX method, since it depends only on a few line integrals rather than complete volume integrals. MAGIC User’s Manual 19-3 Part VI - Algorithms Chapter 19 - Other Algorithms The keyword MODEL is used to specify one of three circuit models: STATIC, RESISTIVE, and INDUCTIVE. In the STATIC model (zero impedance), the conductor voltage is maintained precisely at the value specified by the external voltage source. In the RESISTIVE model, the source voltage is applied through the finite external impedance specified by z. In the INDUCTIVE model, the source voltage is applied through the finite external impedance and inductance specified by z and l, respectively. The default model is STATIC. For applications in which the applied voltage across different pairs of conductors is varied independently, it is necessary to specify multiple Laplacian solutions and circuits. For example, in a triode consisting of a cathode, grid, and anode, the voltage on the grid may be varied with an RF signal, whereas the anode voltage might be held fixed. In this case, two Laplacian solutions and two circuits are required. The circuit algorithm calculates variables that can be recorded by using OBSERVE commands. The following table lists the variable names and the physical symbol and definition associated with each. Variable DCHARGE CHARGE CURRENT DENERGY ENERGY POWER VOLTAGE DVOLTAGE Symbol δQ Q I δE E P V δV Definition differential charge added by circuit total charge added by circuit current in circuit differential energy added by circuit total energy added by circuit circuit power added applied circuit voltage differential voltage added to system Restrictions: 1. The CIRCUIT command is available only in 2D simulations. 2. The maximum number of CIRCUIT commands is five. 3. All circuits must use the same measurement method. See Also: POISSON, Ch. 19, OBSERVE, Ch. 22 References: L. Ludeking, B. Goplen, W. M. Bollen, "Gated Emission Simulations," Mission Research Corporation Report, MRC/WDC-R-119, August 1986. L. Ludeking, B. Goplen, and N. Vanderplaats, "Simulation of Gated Emission Triodes," Bulletin of the American Physical Society, Vol. 31, p. 1600, November 1986. Example: A typical use of the POISSON and CIRCUIT commands is in introducing the voltage pulse in crossfield devices such as magnetrons. In this example, the circuit algorithm uses the function “VAPPLY” for the external voltage source and applies the Laplacian solution with the name “ESTATIC.” The STATIC circuit model is used by default. The voltage measurements are also made by default using the MATRIX method, with the area being the complete simulation area. Figure (a) below shows the electron MAGIC User’s Manual 19-4 Part VI - Algorithms Chapter 19 - Other Algorithms trajectories resulting when the static field is used to apply a voltage and a guiding axial magnetostatic field is also present. Figure (b) below shows the contours of the radial electric field. POISSON ESTATIC 8 CATHODE 0.0 ANODE.SHELL 1.0 ANODE.VANE1 1.0 ANODE.VANE2 1.0 ANODE.VANE3 ANODE.VANE4 1.0 ANODE.VANE5 1.0 ANODE.VANE6 INITIAL X1 TEST 5000 10 1.E-5 ALGORITHM SCA FUNCTION VAPPLY(T) = AK.VOLT*(1.0-EXP(-T/TRISE)) CIRCUIT VAPPLY ESTATIC ; Figure (a). 1.0 1.0 1 ; ; Figure (b). Figure (a) shows electron trajectories, and Figure (b) shows the radial electric field contours. MAGIC User’s Manual 19-5 Part VI - Algorithms Chapter 19 - Other Algorithms POISSON Command Function: This command specifies the creation of electro-static solution fields in a MAGIC2D simulation. Syntax: POISSON poisson conductors area,voltage ... [ ALGORITHM { SOR omega, SCA radius, ADI i1flag i2flag } ] [ TEST total_iterations test_iterations test_error ] [ INITIALIZE function(x1, x2) ] [ POPULATE scale_factor ] ; Arguments: poisson ─ Poisson solution name. conductors ─ number of unique conductors. area ─ name of object, defined in AREA command. voltage ─ object potential (V). omega ─ over-relaxation coefficient (unitless). radius ─ spectral radius of the Jacobi matrix (unitless). i1flag ─ x1-coordinate ADI iteration flag (= 0, 1, or 2). i2flag ─ x2-coordinate ADI iteration flag (= 0, 1, or 2). total_iterations─ maximum number of iterations (integer). test_iterations─ iterations between convergence tests (integer). test_error ─ convergence criterion (unitless). gradient ─ initial potential function (NULL, READ, X1, X2 or defined in FUNCTION command. scale_factor─ scale factor to apply to initial charge density. Defaults: The POISSON command must be given explicitly with specified voltages to obtain a Poisson solution (there is no default command). For the options, the defaults are gradient = NULL, scale_factor = 1, total_iterations = 10,000, test_iterations = 10, and ALGORITHM SOR with omega = 1. Description: The POISSON command is used to specify a solution of the generalized Poisson equation to obtain an electrostatic field distribution in a 2D simulation. It will produce values for the scalar potential (PHST) as well as the electrostatic field (E1ST, E2ST). This solution may be used to construct an initial condition with space charge (POPULATE, Ch. 19) for a subsequent transient simulation or to represent a TEM wave propagating in the third (symmetry) coordinate (CIRCUIT, Ch. 19). You must specify the Poisson name, since it is possible to have more than one Poisson solution. This is followed by specifying the number of conductors followed by a list of object names and voltages. The numerical solution is obtained by one of three methods: • successive over-relaxation, SOR, • successive over-relaxation with Chebyshev acceleration, SCA, or MAGIC User’s Manual 19-6 Part VI - Algorithms • Chapter 19 - Other Algorithms alternating direction implicit, ADI. The SOR algorithm uses the parameter omega to improve the rate of convergence. When the value of omega is in the range, 1 ≤ omega < 2, the algorithm provides over-relaxation. The default value of omega is 1. For 0 < omega < 1, the algorithm is called under-relaxation. In some problems, under-relaxation may provide superior convergence properties. The SCA algorithm is distinct from the SOR algorithm as it uses a variable over-relaxation coefficient omega. The spectral radius, ρ, is used to calculate the values of omega on each iteration cycle. SCA reduces to SOR (omega=1) for a radius of ρ=0. If the spectral radius is not known, it can be estimated from the expression This equation assumes a rectangular I1MX x I2MX grid, and allows for dx ≠ dy. This expression holds for homogeneous Dirichlet and Neumann boundary conditions. For periodic boundaries, replace π by 2π. For large values of I1MX and I2MX, ρ is usually close to unity, and this can be used as a starting estimate. Chebyshev acceleration always provides improved convergence behavior over the standard SOR algorithm. Generally, the ADI algorithm provides the most rapid convergence. You use the iteration flags, i1flag and i2flag, to specify which ordinate is to be implicit. For entries of 0 and 0, both directions are implicit. Alternatively, entries 1 or 2 describe operations on an ordinate that is not implicit in a given iteration; either a single pass or a double pass (first odd, then even) will be performed. All three methods require iteration, and a convergence test is performed at intervals of test_iteration. The maximum number, total_iterations, will be performed if convergence to test_error does not occur. These parameters may be altered from their default values using the TEST keyword. The keyword INITIALIZE is used to select the type of initialization function to be used. The options here are NULL, for no initialization, or X1 or X2, which specify the coordinate of maximum gradient. (Proper choice of arguments, X1 or X2, will enhance convergence.) Alternatively, a function name can be specified, and in this case, the potential is initialized to a two-dimensional field specified by the function. If READ is specified, then the initialization values are read in through the use of the PRESET PHST READ... command (PHST is the name of the scalar potential). The keyword POPULATE is used to enter the scale_factor to be applied to the initial charge distribution (POPULATE, Ch. 19). Restrictions: 1. The POISSON command can be used only in 2D simulations. 2. The origin is not treated in the polar (r,θ) coordinate system. 3. Conductors specified as unique potential surfaces must be so defined in the CONDUCTOR command. No more than ten conductors can be referenced in the POISSON command. 4. The over-relaxation coefficient omega is convergent only for 0 ≤ omega ≤ 2. If 0 ≤ omega < 1, then under-relaxation is being used. For some problems, under-relaxation provides superior convergence. 5. The Jacobi spectral radius is restricted to values of 0 ≤ radius ≤ 1. 6. The convergence criterion, test_error, should be set to order 10-5 for single precision calculations on a 32-bit machine. MAGIC User’s Manual 19-7 Part VI - Algorithms Chapter 19 - Other Algorithms See Also: AREA, Ch. 10, CIRCUIT, Ch. 19, POPULATE, Ch. 19, PRESET, Ch. 19 References: B. Goplen, W. M. Bollen, J. McDonald, I. Coleman, and R. E. Clark, "Solution of the Generalized Poisson's Equation in MAGIC," Mission Research Corporation Report, MRC/WDC-R-049, February 1983. Example: The following command instructs the code to obtain a Poisson solution labeled PierceGun in a 2D simulation having three conductors, named cathode, focus and anode, in which the anode is at 1 volt with respect to the cathode and focus. The remaining arguments use default values. The following figure displays the equipotential contours. POISSON PierceGun 3 CATHODE 0.0 FOCUS 0.0 ANODE 1.0; This figure shows equipotential contours for a Pierce gun. MAGIC User’s Manual 19-8 Part VI - Algorithms Chapter 19 - Other Algorithms POPULATE Command Function: Creates an initial charged-particle distribution in a simulation. Syntax: (MAGIC2D) POPULATE species area n_x1_sites n_x2_sites { FUNCTION CHARGE q(x1,x2) p1(x1,x2) p2(x1,x2) p3(x1,x2) , FUNCTION DENSITY rho(x1,x2) p1(x1,x2) p2(x1,x2) p3(x1,x2) , READ CHARGE file record_tag q_record p1_record p2_record p3_record , READ DENSITY file record_tag rho_record p1_record p2_record p3_record }; (MAGIC3D) POPULATE species volume n_x1_sites n_x2_sites n_x3_sites { FUNCTION CHARGE q(x1,x2,x3) p1(x1,x2,x3) p2(x1,x2,x3) p3(x1,x2,x3) , FUNCTION DENSITY rho(x1,x2,x3) p1(x1,x2,x3) p2(x1,x2,x3) p3(x1,x2,x3) ; (options) [TAGGING tfrac] Arguments: species ─ name of particle species, defined in SPECIES command. area/volume─ name of a conformal spatial region, defined in AREA /VOLUME command. n_xi_sites ─ number of uniformly-spaced sites in xi (integer), i=1,2,3. q ─ particle charge in Coulombs, spatial function or constant. rho ─ charge density in Coul/m3, spatial function or constant. p1 ─ x1-momentum in m/sec, spatial function or constant. p2 ─ x2-momentum in m/sec, spatial function or constant. p3 ─ x3-momentum in m/sec, spatial function or constant. file ─ name of file containing particle data. record_tag ─ value (usually time) used to select record. q_record ─ name of record containing charge values. rho_record ─ name of record containing charge_density values. p1_record ─ name of record containing x1_momentum values. p2_record ─ name of record containing x2_momentum values. p3_record ─ name of record containing x3_momentum values. tfrac ─ tagging fraction for specified populate command. Description: The POPULATE command creates an initial particle distribution. A particle is completely specified by its species, its charge, its coordinates (x1, x2, x3) and its momenta (p1, p2, p3). Note that the definition of momentum includes the relativistic factor,γ, but not the particle rest mass. The units are meters (or radians) for the coordinates and m/sec for momenta. You must first specify the species and the area/volume in which particles will be created. There will be n_x1_sites for particle creation, uniformly distributed in x1 within the area. Similarly, there will be n_x2_sites uniformly distributed in the second ordinate. Thus, the total number of particles created within a 2D area will be n_x1_sites times n_x2_sites. And for a 3d simulation there will be in addition n_x3_sites MAGIC User’s Manual 19-9 Part VI - Algorithms Chapter 19 - Other Algorithms uniformly distributed in the third ordinate. Thus, the total number of particles created within a 3D volume will be n_x1_sites times n_x2_sites times n_x3_sites. The particle charge and momentum can be specified using one of four options: CHARGE, FUNCTION DENSITY, READ CHARGE, and READ DENSITY. FUNCTION The FUNCTION options offer a very effective means of creating particles. The FUNCTION CHARGE option allows you to specify spatial functions for particle charge and three momentum components. The FUNCTION DENSITY option is exactly the same, except that the first function represents charge density instead of particle charge. Wherever the charge (or charge-density) function vanishes, no particles will be created. Thus, complicated spatial distributions can be created by properly constructing the charge function, making use of intrinsic functions such as STEP, MIN, MAX, RANDOM, and GAUSSIAN. The READ options read particle data from a file. In the READ CHARGE option, you specify the file name and the record_tag followed by the names of records containing particle charge and the three momentum components. (The record_tag usually specifies the record time; if it is set to -1, then the first record will be used.) The READ DENSITY option is exactly the same, except that the first particle record contains density instead of charge data. The TAGGING option may be used to tag some fraction of the particle created by the POPULATE command. By default no particles are tagged. The argument, tfrac, must lie between 0 and 1. The tagging fraction is necessary when using the trajectory feature of the PHASESPACE command. It is a requirement that for trajectories, the displayed trajectories are only those for tagged particles. If the initial charge distribution is non-neutral, then field initialization using the POISSON and PRESET commands is required. Recall that the default initial electric field value is identically zero, which by Gauss’s law implies that there is no net charge anywhere in space. Thus, if you create charged particles but do not initialize the fields to account for them, the code implicitly creates a second group of particles of opposite charge to cancel the ones created. In effect, particles in this second group have infinite mass and remain embedded in the spatial grid for the duration of the simulation. See Also: POISSON, Ch. 19, PRESET, Ch. 19, SPECIES, Ch. 18. Restrictions: 1. The maximum number of POPULATE commands is 50. References: B. Goplen, "Simulations of Self-Colliding Orbit Stability Against Negative Mass Observed in Migma IV Experiment," APS Division of Plasma Physics, Baltimore, MD, 3-7 November 1986. Examples: The following commands create a fifty-by-fifty (2500) array of “electrons,” each with a charge of 10-8 Coulombs and uniformly distributed in an area named “diode.” The particle momenta are outward directed, increasing linearly from the origin. MAGIC User’s Manual 19-10 Part VI - Algorithms FUNCTION FUNCTION FUNCTION POPULATE Chapter 19 - Other Algorithms p1(x1,x2) = 1.e8 * x1 ; p2(x1,x2) = 1.e8 * x2 ; p3(x1,x2) = 0 ; ELECTRON diode 50 50 FUNCTION CHARGE 1.E-8 p1 p2 p3 ; The following commands create a five x five x two (50) array of “electrons,” each with a charge of 10 Coulombs and uniformly distributed in an area named “seed.” The particle momenta are random. A subset of 10% may be tracked with the trajectory feature of PHASESPACE. Notice that the “TAG” keyword in the PHASESPACE command is necessary for these particles to be found. -8 FUNCTION p1(x1,x2) = 1.e6 * random ; FUNCTION p2(x1,x2) = 1.e6 * random ; FUNCTION p3(x1,x2) = 1.e6 * random ; NX = 5 ; Ny = 5 ; Nz = 2 ; POPULATE ELECTRON seed Nx Ny Nz FUNCTION CHARGE 1.E-8 TAGGING 0.1 ; Tshow = 5e-9 ; Tinterval = 0.5e-9 ; TIMING Traject DISCRETE tshow integrate tinterval ; PHASESPACE AXES X1 KE Traject TAG ; MAGIC User’s Manual p1 p2 19-11 p3 Part VI - Algorithms Chapter 19 - Other Algorithms COILS Command Function: Defines solenoidal magnetostatic field coils. Syntax: COILS AXIS { X1, X2, X3, COSINES cos1, cos2, cos3 } coil_center_point coil_radius coil_current wire_radius ; Arguments: cos1,2,3 ─ direction cosines for coil axis alignment. coil_center_point─ position of individual coil center, coordinates or name of point defined in POINT command. coil_radius ─ radius of individual coil (m). coil_current ─ current in individual coil (amps). wire_radius ─ radius of wire, used to avoid singularity (m). Description: The COILS command specifies a set of individual coil loops used to generate a solenoidal magnetic field in a simulation. Note: the axial magnetic field at the center of a coil is given by Bzo = µoI/2R, where I is current and R is the coil radius and µo is the vacuum permeability. For each coil command you must specify the alignment axis with either (X1, X2, X3) or the directions cosines (COSINES cos1 cos2 cos3) of the coil. The coil will lie in a plane perpendicular to the alignment axis. The center of the coil must be supplied with the argument, coil_center_point. In MAGIC3D this may be any physical point (it need no lie inside the simulation space.) In MAGIC2D, the center of the coil in CYLINDRICAL coordinates must lie on the r=0 axis. The wire radius, wire_radius, is used to avoid generation of singular fields. Distances from the wire that are less than the wire radius are trapped, typical values should be no greater than the size of mesh cell. Magnetostatic fields generated by COILS commands are automatically stored in the magnetostatic field arrays (B1ST, B2ST, B3ST) and do not require the use of the PRESET command. They are superimposed on any magnetostatic fields generated with the PRESET command. Note that magnetostatic fields are never used to initialize the dynamic magnetic fields (B1, B2, B3). The magnetostatic and dynamic magnetic fields are automatically added together and stored in the average magnetic field arrays (B1av, B2av, B3av). It is these average magnetic fields (B1av, B2av, B3av) that are used in the Lorentz force equation to evaluate particle kinematics. It is important to remember this distinction when interpreting magnetic field data from these different magnetic field arrays. Restrictions: 1. A maximum of 200 coils may be specified. 2. Coils should not be used in polar coordinates in MAGIC2D. MAGIC User’s Manual 19-12 Part VI - Algorithms Chapter 19 - Other Algorithms 3. Do not place coils in locations where particle trajectories can intersect the coils themselves. The magnetic field within 1 grid cell of a coil is truncated to avoid the singularity. See Also: PRESET, Ch. 19 Examples: By clicking on the Edit links below you can open and edit the entire example file. By clicking on the Run links below you can run the example. 1. Edit / Run Coils Command 3d example. This example uses POLAR coordinates with the coils aligned symmetrically in angle around the z axis and displaced in r. RADIUS_COIL = 2cm ; CoilCenterR = Gap.Center ; CUR = 2*Baxial*Radius_COil/1.2566e-6 ; CUR1 = -cur/2 ; CUR2 = -cur/2 ; Zlo = -1.50inches ; Zhi = -.250inches ; if (icoils.eq.1) then ; DO IPHI=-1,1 ; ANGLE = IPHI*120_DEGREES ; POINT LOOP.A'IPHI' COILCENTERR ANGLE ZLO ; POINT LOOP.B'IPHI' COILCENTERR ANGLE ZHI ; COILS AXIS X3 LOOP.A'IPHI' RADIUS_COIL CUR1 ; COILS AXIS X3 LOOP.B'IPHI' RADIUS_COIL CUR2 ; ENDDO ; bzadjust = 220gauss ; function bzadd(x,y,z) = bzadjust ; preset b3st function bzadd modify add ; MAGIC User’s Manual 19-13 Part VI - Algorithms Chapter 19 - Other Algorithms MAGIC User’s Manual 19-14 Part VI - Algorithms Chapter 19 - Other Algorithms 2. Edit / Run Coils Command 2d example. RADIUS_COIL = 2.0mm ; CUR = 0.25*Bguide*Radius_COil/1.2566e-6 ; NCOILS=19 ; DELTAZ = (SYS$X1MX-SYS$X1MN)/(NCOILS) ; DO I=0,NCOILS ; ZCOIL.'I' = SYS$X1MN + I*DELTAZ ; POINT LOOP.'I' ZCOIL.'I' 0.0 ; COILS AXIS X1 LOOP.'I' RADIUS_COIL CUR ; ENDDO ; MAGIC User’s Manual 19-15 Part VI - Algorithms Chapter 19 - Other Algorithms 2. Edit / Run Coils Command 3d example. Cartesian coordinates with 3 sets of coils aligned with the x, y, and z axes. RADIUS_COIL = 2mm ; ! CUR = 2.*Bguide*Radius_COil/1.2566e-6 ; CUR1 = cur/3 ; CUR2 = cur/3 ; CUR3 = cur/3 ; Slo = SYS$X1mn ; SMID = SYS$X1md ; Shi = SYS$X1mx ; POINT POINT POINT COILS COILS COILS COIL1ST COIL2ND COIL3RD AXIS X1 AXIS X1 AXIS X1 Slo, 0.,0. ; Smid,0.,0. ; Shi, 0.,0. ; COIL1ST RADIUS_COIL cur1 ; COIL2ND RADIUS_COIL cur2 ; COIL3RD RADIUS_COIL cur3 ; RADIUS_COIL = 1.5mm ; ! CUR = 1*Bguide*Radius_COil/1.2566e-6 ; CUR1 = cur/3 ; CUR2 = cur/3 ; CUR3 = cur/3 ; Slo = SYS$X2mn ; SMID = SYS$X2md ; Shi = SYS$X2mx ; POINT POINT POINT COILS COILS COILS COIL4TH COIL5TH COIL6TH AXIS X2 AXIS X2 AXIS X2 0.,Slo, 0. ; 0.,Smid,0. ; 0.,Shi, 0. ; COIL4TH RADIUS_COIL cur1 ; COIL5TH RADIUS_COIL cur2 ; COIL6TH RADIUS_COIL cur3 ; RADIUS_COIL = 0.5mm ; ! CUR = 1*Bguide*Radius_COil/1.2566e-6 ; CUR1 = cur/3 ; CUR2 = cur/3 ; CUR3 = cur/3 ; Slo = SYS$X3mn ; SMID = SYS$X3md ; Shi = SYS$X3mx ; COILS AXIS X3 ; POINT COIL7TH RADIUS_COIL,0,Slo ; MAGIC User’s Manual 19-16 Part VI - Algorithms Chapter 19 - Other Algorithms POINT COIL8TH RADIUS_COIL,0,Smid ; POINT COIL9TH RADIUS_COIL,0,Shi ; COILS AXIS X3 COIL7TH RADIUS_COIL cur1 ; COILS AXIS X3 COIL8TH RADIUS_COIL cur2 ; COILS AXIS X3 Coil9th RADIUS_COIL cur3 ; 3. Edit / Run Coils Command 3d example. Cylindrical coordinates with coils aligned along z axis. RADIUS_COIL = 2cm ; CoilCenterR = Anode.Radius-2*Radius_Coil ; CUR = 2*Baxial*Radius_COil/1.2566e-6 ; Zlo = -.250inches ; Zhi = +.250inches ; if (icoils.eq.1) then ; MPHI = 3 ; MAGIC User’s Manual 19-17 Part VI - Algorithms Chapter 19 - Other Algorithms DELTA_PHI = 2PI/MPHI ; DO NPHI = -1,1 ; ANGLE = NPHI*DELTA_PHI ; POINT LOOP.'NPHI' zlo CoilCenterR,ANGLE; COILS AXIS X1 LOOP.'NPHI' RADIUS_COIL cur ; ENDDO ; MAGIC User’s Manual 19-18 Part VI - Algorithms Chapter 19 - Other Algorithms MAGIC User’s Manual 19-19 Part VI - Algorithms Chapter 19 - Other Algorithms CURRENT_SOURCE Command Function: Adds an external current-density source term over a specified spatial region to Amperes Law. Syntax: CURRENT_SOURCE { J1, J2, J3 } j(t) g(x1,x2,x3) object [CIRCUIT time_constant desired(t) obs$name] ; Arguments: j(t) temporal function for current-density (A/ m2), defined in FUNCTION command. g(x1,x2,x3) spatial-profile function for current-density source (arbitrary units), defined in FUNCTION command. object name of spatial object, defined in LINE, AREA, or VOLUME command. time_constant circuit time constant (sec). desired(t) desired value of the observe measurement, defined in FUNCTION command. obs$name observe measurement. Description: The CURRENT_SOURCE command specifies a prescribed (analytic) current-density source to drive electromagnetic fields in a localized region of space. The current-density component must be J1, J2, or J3. The current density temporal function, j(t), in units of A/m2, must be specified using the FUNCTION command and the spatial-profile function, g(x1,x2,x3), in arbitrary units, must be specified using the FUNCTION command. Thus the current prescription is a product of j(t) and g(x1,x2,x3). The following figure illustrates the application region for the current density on the finite difference mesh. Note! the object volume that you specify is always resolves to full cell grid coordinates, however, the transverse region of influence of the current density always extends ½ cell around the edge of the cross section. When normalizing the current density this half cell zone must be included. Note, when you examine the simulation geometry with the DISPLAY_3D command regions with CURRENT_SOURCE application are presented on the plot as yellow cross-hatched regions. (See the figure in the example below.) The CIRCUIT option introduces a feedback loop that rescales the temporal driving function, j. It compares the desired value with the measurement specified by the obs$name variable. The adjustment to the rescaling function is mediated by the time_constant according to: MAGIC User’s Manual 19-20 Part VI - Algorithms Chapter 19 - Other Algorithms , where δt is the time step. Most simulations have a practical lower limit on the time_constant, τ, which is typically a round-trip transit time, or perhaps a couple periods of an oscillation. The user must determine this practical limit using a combination of physical intuition, common sense, experience, and trial-anderror. Attempting to set the time_constant below the practical limit will result in dramatic overshoot of the desired behavior, oscillation, and possibly even instability. A typical use for the CIRCUIT option would be to specify a current-density source of a particular desired power or particular current in amps, rather than current density. In such a case, the obs$name measurement would come from either: • • the OBSERVE FIELD_POWER E.J_CURRENT_SOURCE.DV command for power (watts), or the OBSERVE FIELD_INTEGRAL J_CURRENT_SOURCE.DA command for current (amps). Typically the current-density source is oscillatory in time so that the feedback mechanism can be used to adjust the amplitude in such a manner as to arrive at the desired cycle-averaged quantity, such as power. In such a case, it is essential to use the FILTER STEP option in the OBSERVE command to arrive at an appropriate cycle-averaged measurement. Restrictions: 1. The spatial object must be conformal. 2. The maximum number of Current_Source commands is six (6). 3. When the CIRCUIT option is used, the OBSERVE command referenced with the obs$name argument must employ the FILTER STEP tperiod option. 4. The current-density source is applied directly to Ampere’s Law, and does not appear in diagnostics of the particle current-density fields J1, J2, and J3. See Also: MAXWELL algorithms, Ch. 17, OBSERVE FIELD_POWER, Ch. 22. DRIVER, Ch. 19, OBSERVE FIELD_INTEGRAL, Ch. 22, Examples: The following commands are taken from a simulation in a coaxial geometry in cylindrical (z,r,phi) coordinates. The CIRCUIT option is used to apply a current density source that provides a specific amount of CW power to the simulation in the region called JUNCTION. Note that the SUFFIX used in the OBSERVE command is referenced in the CIRCUIT option of the CURRENT_SOURCE command. In addition, the OBSERVE command employs the FILTER STEP option. This is required since the CIRCUIT option requires the mean power flow, not the instantaneous power flow. Port Boundary Current Source Port FUNCTION DESIRED_PWR(T) = 10WATTS*RAMP(T/PERIOD2) ; MAGIC User’s Manual 19-21 Part VI - Algorithms Chapter 19 - Other Algorithms FUNCTION JT(T) = COS(T*WFREQ)*RAMP(T/PERIOD2) ; FUNCTION JS(Z,R,PHI) = 1/R; CURRENT_SOURCE J2 JT JS JUNCTION CIRCUIT TPERIOD2 DESIRED_PWR OBS$MEAN_PWR; OBSERVE FIELD_POWER E.J_CURRENT_SOURCE.DV JUNCTION OBSERVE FIELD_POWER E.J_CURRENT_SOURCE.DV JUNCTION FILTER STEP PERIOD2 SUFFIX MEAN_PWR ; Mean power applied by current source. MAGIC User’s Manual ; Instantaneous power applied by current 19-22 Part VI - Algorithms Chapter 19 - Other Algorithms DRIVER Command Function: Adds an external current-density source term over a specified spatial region to Amperes Law. Syntax: DRIVER { J1, J2, J3 } j(t,x1,x2,x3) object [CIRCUIT time_constant desired(t) obs$name] ; Arguments: j ─ name of current-density function, defined in FUNCTION command. object ─ name of spatial object, defined in POINT, LINE, AREA, or VOLUME command. time_constant─ circuit time constant (sec). desired ─ desired value of the observe measurement. obs$name ─ observe measurement. Description: The DRIVER command specifies a prescribed (analytic) current-density source to drive electromagnetic fields in a local region of space. The current-density component is either J1, J2, or J3. The current density function, j(t), in units of A/m2, must be specified using the FUNCTION command. The following figure illustrates the application region for the current density on the finite difference mesh. Note! the object volume that you specify is always resolves to full cell grid coordinates, however, the transverse region of influence of the current density always extends ½ cell around the edge of the cross section. When normalizing the current density this half cell zone must be included. The CIRCUIT option introduces a feedback loop that rescales the driving function, j. It compares the desired value with the measurement specified by the obs$name variable. The adjustment to the rescaling function is mediated by the time_constant according to: , where δt is the time step. Most geometries have a practical lower limit on the time_constant, which is typically a round-trip transit time, or perhaps a couple periods of an oscillation. The user must determine this practical limit using a combination of physical intuition, common sense, experience, and trial-anderror. Attempting to set the time_constant below the practical limit will result in dramatic overshoot of MAGIC User’s Manual 19-23 Part VI - Algorithms Chapter 19 - Other Algorithms the desired behavior, oscillation, and possibily even instability. A typical use for the CIRCUIT option would be to specify a current-density source of a particular desired power, rather than current. In such a case, the obs$name measurement would come from an OBSERVE FIELD_POWER E.J_DRIVER.DV command. Frequently the current-density source is oscillatory so that the feedback adjusts the amplitude in such a manner as to arrive at some desired cycle-averaged quantity, such as power. In such a case, it is essential to use the FILTER STEP option in the OBSERVE command to arrive at an appropriate cycleaveraged measurement. The current-density source is applied directly to Ampere’s Law, and does not appear in diagnostics of the particle current-density fields J1, J2, and J3. • The OBSERVE FIELD_INTEGRAL J_DRIVER.DA command may be used to observe the current. • The OBSERVE FIELD_POWER E.J_DRIVER.DV command may be used to observe the power. Restrictions: 1. The spatial object must be conformal. 2. When the CIRCUIT option is used, the OBSERVE command referenced with the obs$name argument must employ the FILTER STEP tperiod option. See Also: CURRENT_SOURCE, Ch. 19, MAXWELL algorithms, Ch. 17, OBSERVE FIELD_INTEGRAL, Ch. 19, OBSERVE FIELD_POWER, Ch. 19. Examples: 1. To apply the current density source, J3 (t,x1) = 100x1 cos(2π109t) , within an area labeled "source_area" in a 2D simulation, one would use the commands, FUNCTION source(t,x1) = 100 * x1 * COS(6.28E9*t) ; DRIVER J3 source source_area ; 2. To apply a current density source that provides a specific amount of CW power to the simulation in the region called JUNCTION, you use the CIRCUIT option. The following commands are taken from a simulation in a coaxial geometry in cylindrical (z,r,phi) coordinates. Please note that the suffix used in the OBSERVE command is referenced in the CIRCUIT option of the DRIVER command. This is a mandatory structure. Note: the OBSERVE command also employs a FILTER STEP option. This is required since the CIRCUIT option requires the mean power flow, not the instantaneous power flow. FUNCTION RAMP(T) = STEP(T,TPERIOD2)+STEP(TPERIOD2,T)*0.5*(1-COS(T*WFREQ2)); FUNCTION DESIRED_PWR(T) = 10watts*Ramp(t) ; FUNCTION JDRIVER(T,Z,R) = 1/R*COS(T*WFREQ)*RAMP(T) ; DRIVER J2 JDRIVER JUNCTION CIRCUIT TPERIOD2 DESIRED_PWR OBS$DRIVER_PWR ; OBSERVE FIELD_POWER E.J_DRIVER.DV JUNCTION ! Basic observe command. FILTER STEP TPERIOD2 ! Filter option employed. SUFFIX DRIVER_PWR ; ! Suffix name option employed. MAGIC User’s Manual 19-24 Part VI - Algorithms Chapter 19 - Other Algorithms EIGENMODE Command Function: Specifies use of the eigenmode electromagnetic solver to obtain a resonant frequency. Syntax: EIGENMODE [ { SCAN_AT frequency, [SCAN_FROM frequency] SCAN_TO frequency, SCAN_LIST n_scan frequency1, frequency2, ... } ] (Optional controls.) [ WINDOW df(f) ] [ SAFETY_FACTOR safety_factor ] [ ITERATIONS iterations ] [ ENERGY_REGION { area, volume } ] [ FORCE_TO_ZERO {E1,E2,E3,B1,B2,B3} ] [ CLEAN fclean, NOCLEAN ] (The MODE option is only available in MAGIC2D.) [ MODE { TE, TM, BOTH } ] ; (Must follow an EIGENMODE command that solves for frequency.) EIGENMODE R_OVER_Q line ; Arguments: frequency n_scan df(f) area volume safety_factor iterations fclean line ─ center frequency of eigenmode test (Hz). ─ number of discrete frequency scans (integer). ─ width of frequency window (Hz), constant or defined in FUNCTION command. ─ name of spatial area, defined in AREA command (2D simulation). ─ name of spatial volume, defined in VOLUME command (3D simulation). ─ safety factor (unitless, default is 1.15). ─ polynomial applications (integer, default is 30.) ─ energy level at which to force a component field to zero. (Default = 0.00001) ─ spatial object defined in the LINE command for evaluation of E.dl integral. Defaults: The algorithm parameters are completely defined using the following defaults. The SCAN_AT frequency is zero (seeks the lowest mode). The value of df(f) is derived automatically from the simulation dimensions. The area_name is the entire simulation area, the safety_factor is 1.15, and the iterations is 30. The MODE option applies only to 2D simulations; the default mode is BOTH. Description: MAGIC User’s Manual 19-25 Part VI - Algorithms Chapter 19 - Other Algorithms The EIGENMODE command specifies an eigenvalue solution of the fully time-dependent Maxwell’s equations. It can be applied to 2D or 3D simulations and to any geometry consisting of non-lossy elements and models, e.g., conductors, symmetries, polarizers, and dielectrics. Incoming and outgoing wave boundaries and other sources or sinks are not permitted. The EIGENMODE algorithm will find one or several eigenmodes and report the corresponding frequencies. Keep in mind several factors which can alter the frequencies in subtle ways, especially when comparing the results to analytical models. First, if the geometry is not precisely the same, e.g., due to dimensions snapped to the nearest grid, or stair-stepping, the frequency will be altered. The single most important factor for good agreement is maintaining the same net volume within the simulation. Also, frequencies will always be downshifted slightly because of spatial finite-difference effects. This effect cannot be quantified exactly, but can be estimated as fFD = ftrue[1-.04(kδx)2], where k and δx represent typical wave number and grid spacing within the mode. For well resolved wavelengths, e.g., kδx<<1, the effect is small. The EIGENMODE algorithm applies an operator to a given field pattern which grows eigenmodes in the frequency range fo-δf to fo+δf, where fo and δf are the user-specified frequency and frequency window data items, “freq” and “dfreq”. It grows modes as illustrated in the figure below, such that the center frequency, “fo”, grows the fastest. Each time the operator is applied, the center frequency is grown roughly a factor of 3 above the modes not within the growth window. The operator is applied 30 times, which is sufficient to grow a mode within the frequency window from the noise level to near purity. In general, the computational time required to apply the operator increases as the width of the frequency window is made narrower. If there are several eigenmodes within the frequency window, e.g., nearly degenerate modes, then the one closest to the center frequency will dominate. A situation where there are two modes within the frequency window is illustrated above. In this case, the algorithm will converge to the nearly central mode, but may contain some contamination from the nearby mode. Thus, a good rule of thumb for the algorithm is that the frequency window should be no larger than the typical spacing between modes. At the end of the run, a concise report will be written to the summary and log files telling the frequency of the converged mode and its confidence level. A poor confidence level is usually an indicator of contamination from a nearly degenerate mode. The near degeneracy can usually be resolved by repeated runs with smaller frequency windows. It is also possible that no modes occur within the search window. The algorithm contains no inherent preference for the location of the frequency window in the entire spectrum. However, the higher the mode number, the closer together the modes, so that typically df(f) must be made smaller, with the result that more computational time is required. The algorithm will supply a default value for the frequency WINDOW option, based on the overall dimensions of the simulation. This should be satisfactory for most applications, so that typically the WINDOW option need not be used. The exceptions include the presence of a slow-wave structure in the simulation, or when most of the volume of the simulation is metal or outside the region of interest. In such cases, the user will need to supply a more appropriate estimate. MAGIC User’s Manual 19-26 Part VI - Algorithms Chapter 19 - Other Algorithms There are typically four ways in which the algorithm can be used to search for eigenmodes. These are: 1) 2) 3) 4) Search for the lowest mode of a system, Search for a mode near some known frequency, Search for all the modes up to some maximum frequency, and Search for all the modes in some known frequency range. By default, the SCAN_AT frequency is set to zero, which finds the lowest mode of a system. If the frequency WINDOW option needs to be used, df(f) should be set to a conservatively high estimate of what you think the lowest mode is. For a relatively benign geometry, the lowest mode can be found simply by entering the command name, EIGENMODE, with no additional parameters. The EIGENMODE solver initializes the electric fields with a random field pattern. This provides some field strength in any of the possible eigenmodes. In certain cases, (e.g. banded structures, slow_wave structures, extended interaction cavities,) you may wish to seed the field pattern so that only modes having a particular spatial symmetry can be amplified. You initialize the starting electric fields using the PRESET command, so that they have the proper modal structure for which you are searching. The user can choose to search for a mode near some known frequency, instead of the lowest frequency, using the SCAN_AT option. The algorithm will return the single mode closest to this known frequency, or if no modes occur within the search window, it will indicate so in the Eigenmode Report. MAGIC User’s Manual 19-27 Part VI - Algorithms Chapter 19 - Other Algorithms Often times the user wishes to find all of the lowest modes. The SCAN_TO option provides this capability. It essentially repeats the SCAN_AT procedure multiple times, moving the search window further up the frequency spectrum each time. The search window is moved by an amount slightly less than the width of the search window, so that no gaps in the spectrum occur. After each search is performed, the resulting mode, if any, is written to the Eigenmode Report. Note that because of the overlap, it is possible for the same frequency to be reported twice in consecutive search windows. The effectiveness of the SCAN_TO option depends on using a suitably small frequency window. Typically, the scan should result in at least every third or fourth window having no eigenmode present. If the scan is reporting a frequency in every window, then the search window is too large and should be decreased. Generally speaking, it is much simpler to run the code for a longer time with a narrower window than it is to attempt to decipher what is happening when there are contaminating modes within the search window. The user may wish to perform a scan on a restricted part of the spectrum. One common example is a finer detail scan, e.g., one with a smaller window, where two nearly degenerate modes are suspected. The restricted scan is accomplished by using the SCAN_FROM option together with the SCAN_TO option. The algorithm will automatically start out with a random initial field pattern from which the selected range of eigenmodes can be grown. However, the option exists for the user to initialize the field pattern by using the PRESET command to set the electric fields, E1, E2, and E3. This might be desired in rare circumstances where, for example, there are degenerate modes, and the user wishes to exclude one such mode by starting with a field pattern in which that mode is absent. The ENERGY_REGION, SAFETY_FACTOR, and ITERATIONS options control features which are normally under algorithm control; hence these options will rarely be used. The ENERGY_REGION dictates the region of the simulation used to calculate the energy quantities, which lie at the heart of determining the eigenmode frequency of a mode. The default is the entire simulation region. The SAFETY_FACTOR controls the estimate of the highest mode in the system, and it is closely related to the Courant limit. By default it is 1.15, e.g., 15% greater than Courant. The ITERATIONS option controls the number of times the eigenmode windowing operator is applied. The default is 30, which should result in a virtually pure mode when there is only one single mode within a search window. By increasing the number of iterations, it is possible to improve the convergence to the center-most mode when near-degeneracy occurs. However, in this situation, it is recommended that a smaller search window be used rather than increasing the number of iterations, since this ultimately provides greater accuracy in a shorter amount of time. The FORCE_TO_ZERO option permits the user to force the zeroing of some field components. This is useful when looking for a particular TE, TM or TEM mode, in which one or more components of E or B are identically zero. The result is a purer mode content. The CLEAN option allows the algorithm to identically zero a field component. The argument fclean is the fraction of the electric or magnetic field energy below which the field component is considered noise and may safely be zeroed. The default value is 0.00001. (The default energy normalization is 1 Joule.) You may use the argument fclean to set this value to a higher or lower threshold. Values greater than .001 are discouraged. The NOCLEAN option turns off the default setting for clean entirely. The EIGENMODE algorithm also creates three default Timers that allow the user to observe the field patterns as the algorithm converges to a solution. These timers are named TSYS$EIGENMODE, which triggers when an eigenmode has been found, TSYS$EIGEN, which triggers after each of the 30 iterations, permitting the user to observe the progress of the algorithm, and TSYS$EIGFIRST, which triggers when the algorithm begins a new search window. It may be convenient to use the TSYS$EIGFIRST timer with the GRAPHICS PAUSEOFF command. These timers can be used in RANGE, CONTOUR, and other output MAGIC User’s Manual 19-28 Part VI - Algorithms Chapter 19 - Other Algorithms commands in the normal manner. Observing the convergence with TSYS$EIGEN can be both mesmerizing and useful, especially if there are closely spaced, competing modes. In 2D simulations, you can use the MODE option to select the electromagnetic mode, with the choices being TE, TM, or BOTH. The “EIGENMODE R_OVER_Q line ;” command is used after the specification of an eigenmode command that provides the specifications for the eigenmode solver to obtain a frequency or multiple frequencies. Once the solution of a frequency is complete, the eigenmode controller will evaluate the specified line integral as an E.dl voltage integral and infer the “R/Q” associated with the particular solution. The value is reported in the EIGENMODE report. No energy volume is required as the eigenmode solver renormalizes the electric and magnetic fields to exactly 1 Joule each. See example below. Restrictions: 1. The EIGENMODE can be used only in electromagnetic simulations (no particles). 2. No outer boundaries (e.g., PORT) or other possible electromagnetic sources (e.g., DRIVER) or sinks (e.g., CONDUCTANCE) are allowed. 3. To be safe, all regions outside of the simulation region of interest should be made perfectly conducting. (Otherwise, convergence can be adversely affected.) See Also: MAXWELL CENTERED, Ch. 17, MAXWELL FIXED, Ch. 17, MAXWELL QUASI_NEUTRAL, Ch. 17, MAXWELL QUASI_STATIC, Ch. 17, MAXWELL HIGH_Q, Ch. 17, MAXWELL BIASED. Example: SYSTEM CYL ; EIGENMODE SCAN_AT 72GHZ; CONTOUR FIELD E3 zplane TSYS$EIGENMODE NOLEGEND ; CONTOUR FIELD E2 zplane TSYS$EIGENMODE NOLEGEND SHADE; MAGIC User’s Manual 19-29 Part VI - Algorithms Chapter 19 - Other Algorithms EIGENMODE SCAN_LIST 1 28.7GHZ ; EIGENMODE R_OVER_Q CenterLine ; MAGIC User’s Manual 19-30 Part VI - Algorithms Chapter 19 - Other Algorithms PRESET Command Function: Initializes specified electromagnetic, electrostatic, or magnetostatic field. Syntax: PRESET field { FUNCTION function(x1, x2, x3) [optional] ; PRESET field READ file {TABLE, VOLUME} field_name {ASCII, BINARY} [optional]; PRESET field PANDIRA file [optional]; (Available with MAGIC3D only) PRESET field LISTFILE file [optional]; PRESET field {MAGNUMB, MAGNUMBNEW, MAGNUMBNEWA} file {INCH,CM,METER} {CARTESIAN,POLAR,CYLINDRICAL} [optional]; PRESET field MAXWELLB file} [optional]; (Available with MAGIC2D only) PRESET field POISSON poisson [optional]; Optional argument for static magnetic fields, B1st, B2St, and B3St only: [ TIMESCALE tscale(t) ] Optional arguments: [ MODIFY { ADD, REPLACE } ] [ SCALE factor ] [ SHIFT x1 x2 x3 ] ; Arguments: field — field component to be initialized. E1, E2, E3 — dynamic electric fields. B1, B2, B3 — dynamic magnetic fields. M1, M2, M3 — preceding timestep dynamic magnetic fields. E1ST, E2ST,PHST — electrostatic fields and potential, used only in MAGIC2D. B1ST, B2ST,B3ST — static magnetic fields, used for particle kinematics. function — spatial distribution, defined in FUNCTION command. poisson — name of Poisson solution, defined in POISSON command. file — name of the file containing field data. field_name — field component as recorded in the file. factor — field scaling factor, constant. tscale — temporal scaling function for static magnetic fields, defined in FUNCTION command. x1, x2 ,x3 — coordinate shift for field data in file. MAGIC User’s Manual 19-31 Part VI - Algorithms Chapter 19 - Other Algorithms Defaults: The default initialization value for all electromagnetic, electrostatic, and magnetostatic fields is zero. Description: The PRESET command initializes a specified electromagnetic, electrostatic, or magnetostatic field. A separate command is required for each field component. The only fields which can be initialized are: • the electromagnetic fields (E1, E2, E3, B1, B2, B3, M1, M2, M3), • the electrostatic fields (E1ST, E2ST, E3ST, PHST) (in MAGIC2D only) , and • the magnetostatic fields (B1ST, B2ST, B3ST). As the simulation transient progresses, the electromagnetic fields will normally change from their initial values. The electrostatic fields never change during the simulation. They are normally used to initialize (PRESET) the dynamic electric fields or to modify them during the transient (CIRCUIT). The magnetostatic fields are presumed due to some external source, such as a permanent magnet, and these fields never change during the simulation. Unlike the electrostatic fields, the magnetostatic fields should not be used to initialize the dynamic magnetic fields. Instead, the magnetostatic and dynamic magnetic fields are added together only when particle forces are required for the Lorentz equation. This distinction is important to remember in interpreting the dynamic field values. There are no constraints on the distributions that can be used for the magnetostatic fields, although we strongly advise making them divergence-free. Similarly, the electromagnetic field distributions must be selfconsistent, i.e., satisfy Maxwell’s equations. In particular, Gauss’s law must always be satisfied. This is simple in the absence of charge (the default fields vanish) but requires solution of Poisson’s equation (POISSON) to initialize electric fields (PRESET) if a non-neutral charge distribution (POPULATE) is created. The options for initializing fields are: • FUNCTION, • LISTFILE, • MAXWELLB, • MAGNUMB (old data format), MAGNUMBNEW (new data format), MAGNUMBNEWA (newest data format) • PANDIRA, • POISSON, • READ. The FUNCTION method requires that you define a function of the spatial coordinates. This function will be will be evaluated precisely at the field locations to set the initial values. This method can be used to set any field in 2D or 3D simulations. When particles are present in a 2D simulation, the POISSON method can be used to initialize the electric fields E1 and E2. (Note that space charge affects only the TM mode.) You must obtain a Poisson solution (the solution and the poisson name is specified in the POISSON command), which calculates the scalar field PHST and the electrostatic fields E1ST and E2ST. The PRESET command simply transfers the field values, MAGIC User’s Manual 19-32 Part VI - Algorithms Chapter 19 - Other Algorithms e.g., E1ST to E1. (Note that E1ST and E2ST will never change, while E1 and E2 will evolve in time from their initial values.) The READ method reads field values from the specified file and interpolates these values to the spatial grid. The input file must use the DUMP database format. Then data_type specifies the type of output, with the choices being TABLE for MAGIC2D and VOLUME for MAGIC3D. The field_name is the field component recorded in the file, and the format is either ASCII or BINARY. See examples below. The PANDIRA method reads and interpolates static magnetic field data directly from the output of the LANL Poisson Group codes. The input file name is the output file of the SF7 post processor, e.g., OUTSF7 (see Example 4 for more details). The magnetic field information in OUTSF7 is converted to the DUMP database format, and stored in two files, PANDRA01.FLD and PANDRA02.FLD. The first file contains the magnetic field for B1ST, and the second file contains the magnetic field for B2ST. The data type used is SURFACE. These files can be used in subsequent simulations in place of the OUTSF7 file. An OUTSF7 file is generated by the LANL Poisson Goup SF7 post-processor program. It is run after PANDIRA completes its solution. Typically, the OUTSF7 file contains lines similar to the following: This sample data was produced by running AUTOMESH, LATTICE, PANDIRA, and then SF7 with the following input file, IN7. The MAXWELLB method reads and interpolates field data directly from the output of the MAXWELLB field output. This may be magnetic field data, as shown in the following table. It is the responsibility of the user to provide a rectangular list of appropriate 3d data points to the MAXWELLB code that can be interpreted by MAGIC. MAGIC User’s Manual 19-33 Part VI - Algorithms Chapter 19 - Other Algorithms Note! It is assumed that source file is in Cartesian coordinates. However, the target coordinate system may be Cartesian, cylindrical, or polar. The magnetic field information is converted to the DUMP database format, and stored in files, MAXWLB01.FLD, MAXWLB02.FLD, and MAXWLB03.FLD. These files contain the magnetic fields for B1ST, B2ST, and B3ST, respectively. These files can be used in subsequent simulations in place of the MAXWELLB data file. The data format for the MAXWELLB option is shown below and a partial file example as well. To use this format to set magnetic fields (dynamic or static) the titles must be Bx, By, Bz, Bm. To use this format to set the dynamic electric fields, the titles would be Ex, Ey, Ez, and Em. The data list must contain the position and value of the fields at each point. The MAGNUM method reads and interpolates field data directly from the output of the MAGNUM field output. (MAGNUM is copyrighted software, Copyright 1991-2002, Field Precision) This may be magnetic field data, as shown in the following table. It is the responsibility of the user to specify a rectangular set of data points for the MAGNUM code output that can be interpreted by MAGIC. 1. If the Magnum source file is in Cartesian coordinates, the target file may be Cartesian, cylindrical or polar. 2. If the Magnum source file is in cylindrical coordinates the target file must be in cylindrical coordinates. 3. If the Magnum source file is in polar coordinates, then the target file must bin polar coordinates. You must specify the units of the coordinates, as either INCH, CM, or METER. Finally, you must also specify the incoming data coordinate system as either Cartesian (x,y,z), Polar (rho,phi,z), or Cylindrical (z,rho,phi). The magnetic field information is converted to the DUMP database format, and stored in files, MAGNUM01.FLD, MAGNUM02.FLD, and MAGNUM03.FLD. These files contain the magnetic fields for B1ST, B2ST, and B3ST, respectively. These files can be used in subsequent simulations in place of the MAGNUMB data file. A partial data file is shown below which illustrates the data format. To use this format to set magnetic fields (dynamic or static) the titles must be: Cartesian Coordinates: Polar Coordinates: Cylindrical Coordinates: X, Y, Z, Bx, By, Bz, Bm. Rho, Phi, Z, Brho, Bphi, Bz, Bm. Z, Rho, Phi, Bz, Brho, Bphi, Bm. To use this format to set the dynamic electric fields, the titles would be Ex, Ey, Ez, and Em for Cartesian coordinates, and so forth for polar and cylindrical coordinates. The data list must contain the position and MAGIC User’s Manual 19-34 Part VI - Algorithms Chapter 19 - Other Algorithms value of the fields at each point. Please note that line 6 MUST contain the title information and the field data MUST begin on line 8. The information on lines 1 through 5 is purely informational, and line 7 is merely a spacer line. In addition, Magic does not make any use of the data in the 7th column, the Bm data. There are three different Magnum output file formats useable in Magic, as shown below. They are output from the Magnum code depending on the version. The file segments shown below are labeled “Old Data Format”, “New Data Format”, and “Newest Data Format”. All three formats generate the DUMP file discussed above. The “new” and “newest” formats assume a spatially uniform grid was used in the Magnum calculation. Old Data Format Example for Magnum (MAGNUMB descriptor above) New Data Format Example for Magnum (MAGNUMBNEW descriptor above, same data as above example) Newest Data Format Example for Magnum (file type A, MAGNUMBNEWA descriptor above, different data example) MAGIC User’s Manual 19-35 Part VI - Algorithms Chapter 19 - Other Algorithms The LISTFILE method reads and interpolates field data directly from a list style output. It is the responsibility of the user to provide a rectangular list of appropriate 3d data points that can be interpreted by MAGIC. Note, that the list may contain “holes” in the data. The interpreter will attempt to fill in the holes by interpolation. In general, we recommend avoiding supplying data with holes. However, if it is necessary, than it is essential that the input fields be examined after entry to ensure smoothness. MAGIC User’s Manual 19-36 Part VI - Algorithms Chapter 19 - Other Algorithms You can use the MODIFY, SCALE, and SHIFT options to alter the fields being entered with PRESET. The REPLACE option can be used to patch together several contiguous spatial segments. For example, if data is available for three spatial areas, these may be read in and patched together. Use of REPLACE will cause the new field values to replace the previous values. If it is desired to create a superposition of fields, ADD should be used in place of REPLACE. With the ADD option, the fields are added to the existing fields established by earlier PRESET commands. The SCALE option and scale factor are used to alter the magnitude of the entered field. The SHIFT option adjusts the spatial data from the input file, which may have used a different coordinate origin than the simulation. The TIMESCALE option allows the temporal scaling of the static magnetic fields, B1ST, B2ST, and B3ST. Please recall that these fields are used only for particle forces and do not enter the dynamic magnetic fields. The use of the static magnetic fields is meant to be used for modeling the effects of magnets and electromagnet coils and solenoids. It is assumed that the user will supply a static magnetic field that is curl and divergence free. In addition, when using static magnetic fields, you cannot employ mirror symmetry when there is a static magnetic component that is normal to the plane of the mirror. Restrictions: 1. Each field component to be initialized requires a separate PRESET command. 2. In presetting dynamic fields (E1, E2, ...), care must be taken that the preset fields are self-consistent, since charge may be present in the initial state of the system and boundary conditions will be applied. 3. Caution must be used when initializing magnetostatic fields. Certain fields may not make sense geometrically in non-Cartesian coordinate systems, and furthermore, the use of a particular component can break an assumed symmetry chosen for the dynamic field solution. For example, an x1- or x2component of magnetic field could drive the transverse electric (TE) mode due to particle motion in the x3 direction, and substantial error may result if the TE mode is not represented in the simulation. W using MAGIC User’s Manual 19-37 Part VI - Algorithms Chapter 19 - Other Algorithms static magnetic fields, you cannot employ mirror symmetry when there is a static magnetic component that is normal to the plane of the mirror. 4. In interpreting output, recall that dynamic magnetic fields do not include any magnetostatic fields. The latter are included only in the particle force calculation. The dynamic electric fields, by contrast, may have been initialized to electrostatic values or may have electrostatic components being introduced continuously. 5. If an initial particle distribution is used with default initial fields (zero), the algorithms will assume that fixed (immobile) charges are embedded in the grid to neutralize the initial distribution exactly. (The fixed charges remain after the particles begin to move.) The electric fields must be initialized to account for space charge properly. See Also: LORENTZ, Ch. 18, MAXWELL algorithms, Ch. 17, POISSON, Ch. 19 References: James H. Billen and Lloyd M. Young, “POISSON SUPERFISH,” LA-UR-96-1834, Revised January 1997. Examples: 1. MAGIC2D or MAGIC3D example using the FUNCTION option. These commands initialize the B3ST fields to values from the function, “bfield.” FUNCTION bfield(x,y,z) = 0.1 * (x*x + y*y) ; PRESET B3ST FUNCTION bfield ; 2. MAGIC2D example for READ file. Data is generated in simulation 1 and read into simulation 2. The simulations are in Cartesian coordinates. (First simulation is an eigenmode solution. Data is recorded using the TABLE command.) TABLE FIELD E1 Simulation Tsys$Eigenmode ; TABLE FIELD E2 Simulation Tsys$Eigenmode ; (The field_names needed for the second simulation can be determined by examining the “toc” file associated with the first simulation for the TABLE output. Notice that the output names in the data file are Ex and Ey!) DRAW 'AFILE' TABLE 0.2916240400000000E-07 "EX(X,Y)-#1" ; DRAW 'AFILE' TABLE 0.2916240400000000E-07 "EY(X,Y)-#2" ; (Second simulation reads data from first simulation, and sets specified fields! You may use a subset of the field_name string as long as it is unique.) PRESET E1 READ ConformalBox.fld TABLE "EX" ascii ; PRESET E2 READ ConformalBox.fld TABLE "EY" ascii ; 3. MAGIC3D example for READ file. Data is generated in simulation 1 and read into simulation 2. The simulations are in polar coordinates. (First simulation is an eigenmode solution. Data is recorded using the TABLE command.) TABLE FIELD E1 SIMULATION TSYS$EIGENMODE DUMP ; TABLE FIELD E2 SIMULATION TSYS$EIGENMODE DUMP ; TABLE FIELD E3 SIMULATION TSYS$EIGENMODE DUMP ; MAGIC User’s Manual 19-38 Part VI - Algorithms Chapter 19 - Other Algorithms (The field_names needed for the second simulation can be determined by examining the “toc” file associated with the first simulation for the TABLE output. Notice that the output names in the data file are Erho, Ephi, and Ez!) DRAW 'AFILE' VOLUME 0.1470993420000000E-06 "ERHO(RHO,PHI,Z)-#4" ; DRAW 'AFILE' VOLUME 0.1470993420000000E-06 "EPHI(RHO,PHI,Z)-#5" ; DRAW 'AFILE' VOLUME 0.1470993420000000E-06 "EZ(RHO,PHI,Z)-#6" ; (Second simulation reads data from first simulation, and sets specified fields! You may use a subset of the field_name string as long as it is unique.) PRESET E1 READ TableOut.FLD VOLUME ERHO ASCII ; PRESET E2 READ TableOut.FLD VOLUME EPhi ASCII ; PRESET E3 READ TableOut.FLD VOLUME Ez ASCII ; 3. MAGIC2D example for POISSON. The following command is used to initialize the dynamic electric fields (E1 and E2) to values obtained from the Poisson solution, “Quick_Start.” The Poisson solution is obtained for a charge distribution entered with the POPULATE command and with zero voltage on the “anode” and “cathode.” POISSON Quick_Start 2 cathode 0.0 anode 0.0 ; PRESET E1 POISSON Quick_Start ; PRESET E2 POISSON Quick_Start ; 4. MAGIC2D example using option PANDIRA. The following commands will initialize the B1ST and B2ST fields with magnetic field data generated by the LANL Poisson Group PANDIRA code. If the USE_PANDIRA_FILE variable flag is set to 1, then this is the initial simulation, and the magnetic data is read directly from the OUTSF7 file and translated into the MAGIC database format. The results are stored in the two data files PANDRA01.FLD and PANDRA02.FLD. In the event that you have already run this simulation previously, you may set the flag to 0 and read the translated database files directly. In both cases, the SHIFT keyword is used to introduce a translation of the data long the x1-axis. This may be necessary to align the fields properly with the simulation geometry absolute coordinates. USE_PANDIRA_FILE = 1 ; IF (USE_PANDIRA_FILE.EQ.1) THEN ; PRESET B1ST PANDIRA OUTSF7 SHIFT -.541 0.; PRESET B2ST PANDIRA OUTSF7 SHIFT -.541 0.; ELSE ; PRESET B1ST READ PANDRA01.FLD SURFACE B1ST ASCII SHIFT -.541 0.; PRESET B2ST READ PANDRA02.FLD SURFACE B2ST ASCII SHIFT -.541 0. ; ENDIF; 5. MAGIC3D example using option MAXWELLB. The following commands will initialize the B1ST, B2ST and B3ST fields with magnetic field data generated from data in the MAXWELLB format. If the USE_MAXWELLB_FILE variable flag is set to 1, then this is the initial simulation, and the magnetic data is read directly from the “MaxWellBdata.txt” file and translated into the MAGIC database format. The results are stored in the data files MAXWLB01.FLD, MAXWLB02.FLD and MAXWLB03.FLD. In the event that you have already run this simulation previously, you may set the flag to 0 and read the translated database files directly. MAGIC User’s Manual 19-39 Part VI - Algorithms Chapter 19 - Other Algorithms USE_MAXWELLB_FILE = 1; IF (USE_MAXWELLB_FILE) THEN ; ! Generates MAXWLB01.FLD file. PRESET B1st MaxWellB MaxWellBData.txt ; ! Generates MAXWLB02.FLD file. PRESET B2st MaxWellB MaxWellBData.txt ; ! Generates MAXWLB03.FLD file. PRESET B3st MaxWellB MaxWellBData.txt ; ELSE ; PRESET B1ST READ MAXWlB01.FLD VOLUME BX ASCII PRESET B2ST READ MAXWlB02.FLD VOLUME BY ASCII PRESET B3ST READ MAXWlB03.FLD VOLUME BZ ASCII ENDIF ; MAGIC User’s Manual ; ; ; 19-40 Part VII - Output Part VII-Output Chapter 20 – Output Control Chapter 21 – Text Control Chapter 22 – Time Plots Chapter 23 – 1d Plots Chapter 24 – 2d and 3d Plots MAGIC User’s Manual VII-1 Part VII - Output Chapter 20 - Output Control 20. OUTPUT CONTROL This Chapter covers the following commands: GRAPHICS HEADER DUMP The GRAPHICS command is used to dispose output to a video screen or a printer, to enable and disable color, to change the orientation from portrait to landscape, to shift the position of the plot on the screen, and to pause and continue plotting. The HEADER command is used to enter background information, such as your personal identification, your organization, etc., which will be reproduced in all graphical output. You can use the DUMP command to write output data to a file for post-processing. MAGIC User’s Manual 20-1 Part VII - Output Chapter 20 - Output Control GRAPHICS Command Function: Controls graphics disposition and device parameters. Syntax: (Most commonly used options. These control the initial setting of the graphics pause.) GRAPHICS PAUSE [duration]; GRAPHICS NOPAUSE; GRAPHICS {PAUSEON timer, PAUSEOFF timer}; GRAPHICS {FORM, NOFORM}; (Used to select an alternative window size when the MAGIC graphics starts. The default is 640 x 480 pixels, centered.) GRAPHICS WINDOW [width height [xposition yposition]]; (Used to specify a PS or CGM output file.) GRAPHICS {NOFILE, FILE [filename] [{PS, CGM}] [{LANDSCAPE, PORTRAIT}] }; Arguments: filename ─ name of file, user-defined, default = input_file.ps for Postscript and input_file.cgm for CGM. width, height ─ the width and height of the window in pixels. xposition, yposition ─ the position of the top-left corner of the window given as the number of pixels from the top-left corner of the computer screen. duration ─ the duration of the pause between plots (seconds). timer ─ timer name, defined in TIMER command. Defaults: For Windows (98, 98, 2000, NT, XP) GRAPHICS WINDOW 640, 480, -1 -1 ; GRAPHICS NOPAUSE ; GRAPHICS FORM ; GRAPHICS NOFILE ; Description: The GRAPHICS command provides control over the plotting device and process. Graphics output is directed to two output channels. These are a “window,” which provides a run time display of the simulation’s progress, and an output graphics file, which may later be viewed or directed to an output device, such as printer. The PAUSE / NOPAUSE / PAUSEON / PAUSEOFF options are used to enable/disable a pause between plots. If pause is enabled, you must press the ENTER key on the keyboard after every plot to proceed. PAUSE is ignored with FILE-only graphics. When the duration is specified with PAUSE, the MAGIC User’s Manual 20-2 Part VII - Output Chapter 20 - Output Control plotting pauses for duration seconds before proceeding with the next plot and does NOT wait for the ENTER key to be pressed. The NOFILE option disables the recording of graphics output in an output file. The FILE option is used to specify the type and layout of the output file to be created. You may specify the file name with the filename argument. The optional arguments, PS and CGM, allow you to specify either a postscript file (PS) or a CGM metafile (CGM). The optional arguments, LANSCAPE and PORTRAIT, specify the orientation of the graphics in the output file. The GRAPHICS FILE command without further options selects the file type as PS for MS-Windows. If the file name is not specified, MAGIC assigns a name based on the name of the input file and the output file type, either PS or CGM, referring to a postscript or CGM metafile. The WINDOW option is used to control the size and positioning of the screen window opened when using MS-Windows. In general there is little need to use this option, since on startup MAGIC automatically opens and positions a window for graphics output in the center of the screen. In addition, you can reposition and resize the window with the standard mouse controls once your MAGIC simulation has been started. However, if that is not satisfactory, then the argument’s width and height specify the initial window size in pixels. The arguments xposition and yposition specify the top left corner of the window in pixels. The NOWINDOW option disables the display of the output graphics in a window. The FORM and NOFORM options enable and disable, respectively, the blueprint-style information printed at the bottom of each plot. Restrictions: 1. Only one option may be specified with each GRAPHICS command. 2. The CGM files produced by the Windows version of MAGIC are compatible with a limited number of graphics programs. We, therefore, recommend that users use Postscript files with the Windows version of MAGIC. MAGIC User’s Manual 20-3 Part VII - Output Chapter 20 - Output Control HEADER Command Function: Allows you to annotate plot output with information that identifies the simulation. Syntax: HEADER {ORGANIZATION “company” , AUTHOR “name” , DEVICE “model” , RUN “identifier” , REMARKS “remarks” } ; Arguments: company name device identifier remarks ─ ─ ─ ─ ─ company, organization, or group name. name of individual. name of device. run identification. remarks. Description: The HEADER command allows you to annotate the nature of the particular simulation you are exercising. It may include such information as the name of the author, the organization to which you belong, the name of the device which you are simulating, a run number to identify a particular sequence of simulations, and other information as desired. The options are as follows: • ORGANIZATION ─ The ORGANIZATION option allows you to enter the name of your company or organization. • AUTHOR ─ Your own name should be provided under the AUTHOR option. • DEVICE ─ The DEVICE option allows specification of the generic name or model number of the device being simulated. • RUN ─ The RUN option can be used to enter a unique identifier for an individual simulation. • REMARKS ─ Finally, the REMARKS option can be used to record brief comments relevant to the device or study. Information from the HEADER command is supplied to all modes of output. In plotted output, it is arranged in “blueprint” format on each plot. (Blanks will be substituted for all options not entered.) Restrictions: 1. A separate HEADER command is require to enter each option. 2. The quotation marks enclosing the “information strings” are required. 3. Remarks should be brief to avoid truncation in the plotted output. Examples: MAGIC User’s Manual 20-4 Part VII - Output Chapter 20 - Output Control Information from the following HEADER command will be provided in all output. HEADER HEADER HEADER HEADER HEADER ORGANIZATION "Mission Research Corporation"; AUTHOR "B. Goplen"; DEVICE "Cable Exercise"; RUN "1"; REMARKS "Day 2 Seminar"; Figure shows typical header information in plotted output. MAGIC User’s Manual 20-5 Part VII - Output Chapter 20 - Output Control DUMP Command Function: Controls the DUMP output channel settings. Syntax: DUMP { TYPE data_type, PREFIX prefix , SUFFIX suffix , FORMAT { ASCII, BINARY,SINGLE } } , ; Arguments: data_type prefix suffix ─ type of data ( ALL, CONTOUR, OBSERVE, PHASESPACE, RANGE, TABLE, or VECTOR). ─ prefix to GRD, FLD, PAR and TOC file names. ─ suffix to GRD, FLD, PAR and TOC file names. Defaults: The default prefix is the same as the input file prefix, the default suffix is NONE, and the default FORMAT is ASCII. Description: The DUMP output channel writes the results of the output commands in a raw numeric form that can be read by the MAGIC family of codes for post-processing and other simulations. The TYPE option specifies the data_type. Some data_types are connected with other output commands. In such cases, including CONTOUR, OBSERVE, PHASESPACE, etc., data is intercepted as it is about to be plotted. Only raw data is recorded. For example, the CONTOUR data_type includes field values defined in a plane, but not any information about actual contours. By default, plots will also be produced; however, they can be suppressed by entering NOPLOT. All data from each data_type is recorded in one of three files: FLD, PAR, and GRD. (The names indicate only the dominant nature of the data.) These three files are opened when the simulation begins, and any empty file is simply deleted at the end of the simulation. A fourth file, TOC (table-of-contents), is also opened to summarize the contents of the other three files. The contents can be reviewed simply by running TOC as an input file. The TOC file (Table of Contents file) contains a list of the data stored in the DUMP files. When the TOC file is used as the input to a MAGIC program, all of the output data from a simulation which is stored in the DUMP files will be replayed in GRAPHICS SCREEN mode. In addition, it is easy to edit the TOC file in order to replay only certain parts of the simulation output, or to redirect the output into a GRAPHICS PRINTER file You can use the PREFIX and SUFFIX options to create unique names for the four files, as follows: • ‘prefix‘FLD’suffix’ • ‘prefix‘PAR’suffix’ • ‘prefix‘GRD’suffix’ • ‘prefix‘TOC’suffix’ MAGIC User’s Manual 20-6 Part VII - Output Chapter 20 - Output Control The default prefix is the same as the input file prefix. If the mode is interactive, the default prefix is ‘FILE,’ and the default suffix is ‘NONE.’ The file names must conform to requirements of the operating system. On systems using the file extension (such as the PC), a period can be used as the last character of the prefix to make FLD, PAR, GRD, and TOC the file extensions (see Examples, below). The FORMAT option specifies the data format. The ASCII format is useful for transferring data between computers. The BINARY (default) format is compact and saves disk space. The same format will be used in all three data files. When the ASCII format is used, it is also easy to import the numeric information into spreadsheet programs. The SINGLE format records data as ASCII in a single precision data format regardless of whether the source application is 32 bit single or double precision or 64 bit precision. Restrictions: 1. The full file name constructed from the prefix and suffix must be a valid file name for the operating system in use. See Also: AUTOGRID, Ch. 11, CONTOUR, Ch. 24, GRID, Ch. 11, OBSERVE, Ch. 22, PHASESPACE, Ch. 24, RANGE, Ch. 23, VECTOR, Ch. 24 Examples: The following set of DUMP commands will cause files to have the names 201.GRD, 201.FLD, 201.PAR, and 201.TOC, which is useful if simulations are given unique numbers. The data will be in binary format in order to save disk space. DUMP PREFIX "201." ; DUMP FORMAT BINARY ; DUMP TYPE ALL ; MAGIC User’s Manual 20-7 Part VII - Output Chapter 21 - Data Output 21. DATA OUTPUT This Chapter covers the following commands: EXPORT PARAMETER STATISTICS TABLE FIELD TABLE PARTICLES The commands listed above are designed solely to produce data output. However, some output commands designed primarily for graphical output also have print options. Such commands are described in other chapters. The PARAMETER command is used to assign variables which will automatically be recorded in the Summary file. (Otherwise, the variable functions identically to one assigned using an ASSIGN command.) You can use the STATISTICS command to keep track of particle statistics during the simulation. The TABLE command can be used to print tables of electromagnetic field or particle values within a specified spatial object. You can use the EXPORT command to write data for fields and particles which pass through an outer boundary. (This data can be read in subsequently as an outer boundary for another simulation (IMPORT, Ch. 12). MAGIC User’s Manual 21-1 Part VII - Output Chapter 21 - Data Output EXPORT Command Function: Defines data output for of particles and fields passing through a surface. Syntax: EXPORT { line, area } { POSITIVE, NEGATIVE } file_prefix file_format [timer] ; Arguments: line name of spatial line, defined in LINE command (2D simulations only). area name of spatial area, defined in AREA command (3D simulations only). file_prefix prefix of file name. file_format file format (ASCII or BINARY). timer name of timer, defined in TIMER command. Description: The EXPORT command defines a surface for recording fields and particles for use in an IMPORT command in a subsequent simulation. That is, output from EXPORT provides input for IMPORT. The EXPORT/IMPORT technique can be effectively used when it is desirable (and reasonable) to break a simulation into two or more parts which can be performed more efficiently. We will use the klystron to illustrate. This technique is desirable in klystrons, because we would like to design cavity N+1 separately, without having to include all of the preceding N cavities in the simulation. It is reasonable, because the wave guides connecting klystron cavities are typically cut off, thus minimizing the backward wave, and because particles in the wave guides all move downstream. Therefore, we would EXPORT a single RF cycle at the outlet of cavity N and IMPORT this cycle over and over again at the inlet of cavity N+1. The location of the surface would be near the midpoint of the drift tube joining the cavities. (Note that EXPORT is not an outer boundary; its presence has no effect on the simulation. The actual outer boundary in the EXPORT simulation might be slightly downstream from the EXPORT surface. By contrast, IMPORT is an outer boundary and therefore part of the simulation perimeter.) What EXPORT does is write a time record of fields and particles to file(s). You can control only the details of when during the simulation the information is output (e.g., for one full RF cycle after cavity N saturates), but the file contents are determined by the code. In general, it will contain two transverse (in the surface plane) electric field components, but in 2D TM or TE simulations, there will be only one. Only particles crossing the surface in the specified (downstream) direction will be recorded; counterflowing particles are omitted from the file. The particle coordinates recorded will be relative to the surface, not the coordinate system. Depending on the Lorentz step_multiple, particle records may be written less frequently than field records. The EXPORT surface must be conformal with one of the axes. In 2D simulations, the surface is represented by a line; in 3D simulations, it is represented by an area. Only particles traveling in specified direction, either POSITIVE or NEGATIVE, will be exported. The file_prefix uniquely identifies field and particle files, i.e., ‘file_prefixFLD’ and ‘file_prefixPAR’. The default file_prefix is the name of the input file. The file_format is either ASCII or BINARY. The timer specifies the time steps on which the data is exported. If no timer is entered, the default behavior is to export on every time step. If specified, the timer typically will include a contiguous set of time steps. Export will turn on at the end of the first time step indicated in timer. Thus, if timer specifies all time MAGIC User’s Manual 21-2 Part VII - Output Chapter 21 - Data Output steps from 1000 to 1100, data will actually be exported for steps 1001 through 1100. It is also possible to export data periodically, e.g., from 1000 to 1100 every 10 time steps. In this case, export turns on at the end of time step 1000, and particle data is collected for 10 time steps before being recorded. Thus, the first particle record contains data from steps 1001 to 1010; the next contains particles from 1011 to 1020, etc. If EXPORT is used with a non-unity Lorentz step_multiplier, then the beginning time step should have modulus zero, and the ending time step should have modulus zero. Restrictions: 1. 2. 3. 4. Only one EXPORT command is allowed in a simulation. It must follow the DURATION command. EXPORT is not an outer boundary or part of the simulation perimeter (it is an output command). EXPORT data is recorded relative to the surface, not the simulation coordinates. The Lorentz (particle kinematics) time step must be the same in the EXPORT and IMPORT simulations. MAGIC will enforce this by altering it, if necessary. (The electromagnetic time steps need not match. They are subject, however, to the usual integer step_multiple restriction relating Maxwell and Lorentz time steps.) 5. For various reasons, the EXPORT/IMPORT technique works best if there is no backward wave present. (It is typically employed in cut-off geometries, etc.) A backward wave will be trapped in the IMPORT simulation, with possible deleterious results. See Also: MAXWELL, Ch. 17, LORENTZ, Ch. 18, DUMP, Ch. 20, IMPORT, Ch. 12 Examples: In this 2D simulation, an EXPORT command is used to write both TM and TE components of the electric field as well as particles moving in the positive z-direction through a surface named “Output” to an ASCII file named EXP’icase.’ EXPORT Output POSITIVE EXP'icase' ASCII ; MAGIC User’s Manual 21-3 Part VII - Output Chapter 21 - Data Output PARAMETER Command Function: Specifies variables to be listed in the summary “input_file_name.SUM” file. Syntax: PARAMETER variable = expression ; (Using this form allows you to force the parser to echo the variable value in the specified units.) PARAMETER_unit variable = expression ; Arguments: ─ any valid numeric or unit extension, see tables in Chapter 4.10 - KEYWORDS AND OPTIONS. variable ─ character variable. expression ─ arithmetic or string expression. unit Description: The PARAMETER command defines variables in the exact same manner as the ASSIGN command. However, in addition to the variable definition, the PARAMETER command also displays the variable in the summary “input_file_name.SUM” file. The variable type naming conventions and the expression syntax for PARAMETER variables is identical to that for ASSIGN, and the use of PARAMETER variables with other commands is identical to that for ASSIGN commands. See Also: ASSIGN, Ch. 6, KEYWORDS AND OPTIONS, Ch 4. Examples: The following commands are echoed to the summary file. See results below. Parameter_inches BackWall.IR = 1.75 inches ; Parameter_inches Anode.radius = 0.6125 inches ; Parameter_inches Anode.Height = 0.700 inches ; Parameter_inches Vane.width = 40DEGREES ; Parameter_degrees SLOT.ANGLE = 360DEGREES/MAXVANES-VANE.WIDTH ; Parameter NPHI.HALFVANE = 3; Parameter NPHI.VANE = 2*NPHI.HALFVANE ; See results below. Notice that the internal value follows the equal sign is in MKSA units, and the selected units follow that after the ! mark., BACKWALL.IR ANODE.RADIUS ANODE.HEIGHT VANE.WIDTH SLOT.ANGLE NPHI.HALFVANE NPHI.VANE = = = = = = = 0.44450E-01 0.15558E-01 0.17780E-01 0.69813 ; ! 0.34907 ; ! 3 6 MAGIC User’s Manual ; ! ; ! ; ! 1.7500 INCHES 0.61250 INCHES 0.70000 INCHES 27.485 INCHES 20.000 DEGREES ; ; 21-4 Part VII - Output Chapter 21 - Data Output MAGIC User’s Manual 21-5 Part VII - Output Chapter 21 - Data Output STATISTICS Command Function: Specifies times at which particle statistics are printed. Syntax: STATISTICS timer ; Arguments: timer ─ timer name, defined in TIMER command. Description: The STATISTICS command causes particle statistics to be collected and printed during the simulation. Totals and averages are printed in the LOG file at the end of the simulation. The statistics variables can also be plotted at the user’s option (OBSERVE STATISTICS, Ch. 22). Particle statistics are printed at simulation times specified by the timer. The particle statistics printed are: • • • • • number existing at the last measurement, number created since the last measurement, number destroyed since the last measurement, number existing at present, and error in the number of particles. The error reveals any variation between the actual count of existing particles and the difference between creation and destruction counts. A nonzero error is indicative of an internal logic error and associated simulation results would be questionable. At the end of the simulation, several additional statistics are printed: • total number created during the simulation, • total number destroyed during the simulation, • highest number existing during the simulation, and • average number existing during the simulation. Note that these statistics will be zero in the event that the STATISTICS command has been omitted. See Also: TIMER, Ch. 11. MAGIC User’s Manual 21-6 Part VII - Output Chapter 21 - Data Output TABLE FIELD Command Function: Prints a table of values of a specified field in scientific (exponential) notation. Syntax: TABLE FIELD field object timer [ AXES { X1, X2, X3 } { X1, X2, X3 } ] [ TRANSFORM function(field, x1, x2, x3) ] [ DELIMITER { TAB, COMMA, SEMICOLON, COLON } ] [ { NODUMP, DUMP } ] [ { PRINT, NOPRINT } ] [ FILE file ] ; or Pandira type output format, (MAGIC3D only). TABLE FIELD {E1E2, E1E3, E2E1, E2E3, E3E1, E3E2} object timer [ FILE outfile ] ; or column output format, see MAGNUM style format in PRESET, (MAGIC3D only). TABLE COLUMNFORMAT {ELECTRIC, MAGNETIC, MAGNETOSTATIC} object timer FILE file ; Arguments: field ─ field component (E1, E2, ...). object ─ name of object, defined in POINT, LINE, AREA, or VOLUME command. timer ─ timer name, defined in TIMER command. function─ transformation function, defined in FUNCTION command. file ─ name of output file. pfield ─ E1E2, E1E3, E2E1, E2E3, E3E1, or E3E2. outfile ─ name of output text file, default name “OUTSF7’pfield’.TXT” . Defaults: The defaults are listed in the following table. Keyword AXES TRANSFORM DELIMITER { NODUMP, DUMP } { PRINT, NOPRINT } FILE Argument function file Default Value X1, X2 Unity TAB NODUMP PRINT input_file.LOG Description: The TABLE command causes fields associated with the spatial grid to be printed as a table of numbers in scientific notation. The table displays the data more precisely, though less compactly, than a graphical plot. MAGIC User’s Manual 21-7 Part VII - Output Chapter 21 - Data Output The object may be a point, a line, an area, or a volume. Only those fields defined within this spatial region will be printed. The TIMER option lets you specify a timer to trigger output of the table. The AXES option can be used to alter the orientation of the table by specifying which coordinate axis varies horizontally across the printed page and which axis varies vertically. If the spatial_object is threedimensional, then multiple tables will be produced to include values in the third coordinate. If no axes are entered, the default order for table coordinates is X1 (horizontal), X2 (vertical), and X3 (new page). Normally, field values are printed in scientific (exponential) notation to six significant digits. This form of highly accurate output is suitable primarily for debugging. However, the TRANSFORM option allows simple transformations, including scaling and formatting, to be performed on the fields, which provides sufficient versatility for virtually any purpose. The DELIMITER option allows you to specify the delimiter between values printed in the table. The default delimiter is TAB, which results in the appearance of blank spaces between printed values. (This choice allows entire sections of the table to be “copied” from the file and “pasted” into Microsoft Excel for post processing, if desired.) The DUMP option allows table results to be stored as a data record in the FLD file for post processing. The PRINT option allows table results to be stored as a data record in the LOG file. If desired, this record can be diverted from the LOG file to some other file using the FILE option. If you select the Pandira style output format, then the data will resemble the following figure. The data will be arranged in columns. The data will be collocated at the full grid cell nodes. Please note the conversion of the units to cm and MV/m. If you select the COLUMNFORMAT and data, then the data will resemble the following figure. The data will be arranged in columns. The data will be collocated at the full grid cell nodes. You may output the MAGIC User’s Manual 21-8 Part VII - Output Chapter 21 - Data Output ELECTRIC fields, the MAGNETIC fields, or the MAGNETOSTATIC fields. The units will be standard MKSA units. Restrictions: 1. The total number of TABLE commands in a simulation is limited to 100. MAGIC User’s Manual 21-9 Part VII - Output Chapter 21 - Data Output TABLE PARTICLES Command Function: Prints a table of values for particles in scientific (exponential) notation. Syntax: TABLE PARTICLES object timer file [ { ASCII, BINARY} ] [{ SURVIVING, DESTROYED } ] ; Arguments: Object ─ name of object, defined in an AREA command for a 2D simulation and a VOLUME command for a 3D simulation. timer ─ timer name, defined in TIMER command. function─ transformation function, defined in FUNCTION command. file ─ name of output file. Defaults: The default file format is ASCII and the default particle collection is SURVIVING. Description: The TABLE PARTICLES command causes information about the particles inside the specified object to be printed as a table of numbers in scientific notation. The table displays the data more precisely, though less compactly, than a graphical plot. The timer triggers output to the table. Values are printed in scientific (exponential) notation to six significant digits. You select either ASCII or BINARY output file by selecting the corresponding keyword. You select either ambient SURVIVING particles or collected DESTROYED particles by specifying the corresponding keyword. Only particles within the specified volume (which must be conformal in shape) are recorded in the output file. The output file begins with the simulation time step, SYS$DTIME, and a table for the species, followed by the particle information. There are no headers or titles in the files. The files only contain the actual particle data. A new line is added for each particle. The data structure of the file is as follows: SYS$DTIME (SYS$DTIME written twice for ascii, once for binary) numSpecies iSpecies species_name q_over_m m_species iSpecies species_name q_over_m m_species ... iSpecies species_name q_over_m m_species iTimeStep iSpecies charge x1 x2 x3 p1 p2 p3 iTimeStep iSpecies charge x1 x2 x3 p1 p2 p3 iTimeStep iSpecies charge x1 x2 x3 p1 p2 p3 ... iTimeStep iSpecies charge x1 x2 x3 p1 p2 p3 For the ASCII data option, the Fortran-style formats are: Sys$dtime: e13.6,g24.14 NumSpecies: i4 MAGIC User’s Manual 21-10 Part VII - Output Chapter 21 - Data Output species table: (i4,1x,a32,1x,e13.6,1x,e13.6) particle table: (i9,1x,i4,7(1x,e13.6)) For BINARY, all values are four bytes long except the species name, which is a character value with a length of 32 bytes. There are no delimiters in the BINARY format. Restrictions: 1. The object shape (area or volume) must be conformal. 2. Default collection is for SURVIVING or ambient particles. 3. Default file type is ASCII. Examples: ! Define conformal volume for collecting particle data. volume front conformal sys$x1mn,sys$x2mn,sys$x3mn,sys$x1mx,sys$x2mx,sys$x3md; volume back conformal sys$x1mn,sys$x2mn,sys$x3md,sys$x1mx,sys$x2mx,sys$x3mx; Timer savethem periodic 1 99999 1; ! Collect data on the destroyed particles in the specified volumes. TABLE Particles Front SaveThem Front.Txt ASCII DESTROYED ; TABLE Particles Back SaveThem Back.Txt ASCII DESTROYED ; ! Collect data on the surviving particles in the specified volumes. TABLE Particles Front Tsys$last FrontSurvive.Txt ASCII Surviving ; TABLE Particles Back Tsys$last BackSurvive.Txt ASCII Surviving ; ! DEFAULT, This is the same as surviving particles. TABLE Particles Front Tsys$last FrontLast.Txt ASCII TABLE Particles Back Tsys$last BackLast.Txt ASCII ; ; Excerpt from file Back.txt of the destroyed particles. MAGIC User’s Manual 21-11 Part VII - Output Chapter 22 - Time Plots 22. TIME PLOTS This Chapter covers the following commands: OBSERVE [options] OBSERVE FILE OBSERVE INTERVAL (Measurements.) OBSERVE CIRCUIT (2D simulations only) OBSERVE COLLECTED OBSERVE EMITTED OBSERVE FIELD OBSERVE FIELD_ENERGY OBSERVE FIELD_INTEGRAL OBSERVE FIELD_POWER OBSERVE IMPEDANCE OBSERVE INDUCTOR OBSERVE IONIZATION OBSERVE PARTICLE_STATISTICS OBSERVE RESISTOR OBSERVE RESONANT_PORT OBSERVE R_OVER_Q OBSERVE SECONDARY OBSERVE SMATRIX OBSERVE SPACE_HARMONIC OBSERVE TRAMLINE OBSERVE TRANSFORM You use the OBSERVE commands to plot the value of a simulation variable vs. time. There are many processing options which can be applied to the data, and these are described by the OBSERVE [options] command. All of the remaining OBSERVE commands involve plotting a particular variable type, such as FIELD, FIELD_INTEGRAL, FIELD_ENERGY, etc. A few measurement types may apply only to 2D or 3D simulations. MAGIC User’s Manual 22-1 Part VII - Output Chapter 22 - Time Plots OBSERVE [options] Function: Specifies data-processing options for OBSERVE commands. Syntax: OBSERVE [variable_type] [ arguments ] (Processing and analysis options) [TRANSFORM function(y,t) ] [XTRANSFORM {axisfunction(t), observe_suffix_name} "axis_label_units" ] [{ DIFFERENTIATE, INTEGRATE } ] [ FILTER {LO_PASS tfilter, STEP tfilter, FUNCTION_FILTER ftfilter(t) }] [Q_OF_SIGNAL frequency cycles] [SPECTRAL_POWER frequency t_integration impedance MAGNITUDE_AND_POWER, ALL}] [ANALYZE_SIGNAL [ALL, AMPLITUDE_ONLY, FREQUENCY_ONLY, INVERSE_Q_ONLY] frequency cycles ] [FFT { MAGNITUDE, COMPLEX } [DB_SCALE decades] ] [TIME_FREQUENCY {SPECTROGRAM, WIGNER-VILLE, REDUCED_INTERFERENCE} time_aperture npts_time npts_frequency] [WINDOW TIME minimum maximum] [WINDOW TIME_SIGNAL minimum maximum] [WINDOW FREQUENCY minimum maximum] [WINDOW FREQUENCY_SIGNAL minimum maximum] [WRITE_TABLE] {POWER, (Movie options) [MOVIE] [MOVIE_TIMER timer] [{PNG, BMP, PCX }] (bitmap formats) [{AVI, MPEG}] (movie file formats) [MOVIE_SIZE width height ] [MOVIE_NAME dirname] [CODEC acodec ] [FRAMERATE irate ] [WINDOW DELTA_TIME trange ] [WINDOW TIME tminimum tmaximum ] [WINDOW TIME_SIGNAL sminimum smaximum ] (Standard graphics control options) [NOLEGEND, LEGEND], [XAXIS, NOXAXIS], [XLABEL, NOXLABEL], [XSCALE, NOXSCALE] [YAXIS, NOYAXIS], [YLABEL, NOYLABEL], [YSCALE, NOYSCALE] MAGIC User’s Manual 22-2 Part VII - Output Chapter 22 - Time Plots [ZAXIS, NOZAXIS], [ZLABEL, NOZLABEL], [ZSCALE, NOZSCALE] [TITLE, NOTITLE] [FRAME, NOFRAME] [NOGRID, GRID] (Standard output control options) [SUFFIX asuffix] [STATUS ifrequency] [NOEXTRACT, EXTRACT, EXTRACT_DIR extract_dir, EXTRACT_FILE extract_file] [NODUMP, DUMP], [PLOT, NOPLOT] ; Arguments: variable_type— type of simulation variable, see other OBSERVE commands. The types are: CIRCUIT, COLLECTED, EMITTED, FIELD, FIELD_ENERGY, FIELD_INTEGRAL, FIELD_POWER, INDUCTOR, INTERVAL, IONIZATION, NEUTRAL_GAS, PARTICLE_STATISTICS , SECONDARY, SPACE_HARMONIC, RESISTOR, TRAMLINE. Arguments — differs for each variable_type; see other OBSERVE commands. Suffix — name given to associated system function variable, OBS$suffix. Function — transformation function, defined in FUNCTION command. Axisfunction — transformation function for time axis, defined in FUNCTION command. observe_suffix_name — name used in a previously defined OBSERVE command with SUFFIX option. y — dummy argument representing the variable. t — dummy argument representing simulation time. tfilter — filter time constant (sec). ftfilter — filter time constant function (sec), defined in FUNCTION command. frequency — reference frequency for analysis (Hz). t_integration — temporal integration interval for spectral power heterodyne (sec). impedance — reference impedance required to convert a voltage amplitude to power. If the reference signal is current rather than voltage you must supply 1/impedance for this argument. cycles — number of periods for temporal smoothing. decades — number of decades in dB scale of FFT response. minimum, ... — boundaries of FFT integration (sec) and plot (Hz). tminimum, ... — temporal range (sec) of plot. avi_codec — codec compression algorithm. Choices for avi file creation are: UNCOMPRESSED, Full frames, uncompressed. CINEPAK, Cinepak by Supermac. INDEO3.2, Intel Indeo Video 3.2. INDEO5, Intel Indeo Video 5. MSVIDEO1, Microsoft Video 1 (default). RLE, Run Length Encoding. DIVX5, DivX 5. XVID, XviD. 3IVX, 3ivx. mpeg_codec — codec compression algorithm. Choices for mpeg file creation are: MPEG1, MPEG-1 standard. MPEG1.VCD, MPEG-1 with VideoCD extensions. MPEG2, MPEG-2 standard. MPEG2.SVCD, MPEG-2 with Super VideoCD extensions. MAGIC User’s Manual 22-3 Part VII - Output Chapter 22 - Time Plots MPEG2.DVD, MPEG-2 with DVD extensions. — frame rate, number of frames/sec in AVI movie file. — maximum temporal width (sec) of plot, used with the MOVIE option for a sliding time window. time_aperture — the time width over which the time-frequency analyzer operates, select a value which is at least a few periods of the lowest frequency of interest. npts_time — the number of points in the time direction for the time-frequency image, a value of 100 is suitable. npts_frequency— the number of points in the frequency direction for the time-frequency image, a value of 100 is suitable. extract_dir — the name of the output folder that contains the extracted data. extract_file — file name of extracted data, the default name is generated from diagnostic and time stamp. asuffix — the suffix used for access of the current measurement value in a function. ifrequency — integer frequency at which data is recorded in the “*.status” file (linux only). irate. trange Defaults: The default values for the data processing options are listed below. Keyword SUFFIX TRANSFORM XTRANSFORM INTEGRATE DIFFERENTIATE FILTER ANALYZE_SIGNAL Q_OF_SIGNAL WINDOW TIME WINDOW FREQUENCY { PLOT, NOPLOT } { NODUMP, DUMP } { NOPRINT, PRINT } Arguments suffix function function, "label" n.a. n.a. tfilter frequency, cycles frequency, cycles minimum, maximum minimum, maximum n.a. n.a. n.a Default 1, 2, 3, ... unity (no transformation) unity (no transformation) (integration is not performed) (differentiation is not performed) (no filter) (no analysis is performed) (no analysis is performed) entire range entire range PLOT (output is plotted) NODUMP (output is not dumped) NOPRINT (output is not printed) Description: The OBSERVE command provides the capability to output a time plot, i.e., a simulation variable as a function of time. Individual OBSERVE commands are structured for each variable_type (e.g., OBSERVE FIELD for field variables, etc.), since each requires different arguments. Some variable_types apply only to 2D or to 3D, while others apply to both 2D and 3D. The individual OBSERVE commands which describe each variable_type and their unique arguments follow in this Chapter. A special case occurs when no variable_type or arguments are specified. In this case, the TRANSFORM option must be used to calculate and display an analytic function of the time variable, user-defined variables, system variables, or other observe variables. This section, the OBSERVE [options] command, describes the general data processing operations, including the TRANSFORM option, (e.g., FFT) which can be entered in any OBSERVE command. MAGIC User’s Manual 22-4 Part VII - Output Chapter 22 - Time Plots Associated with each OBSERVE command is a system variable, OBS$suffix, where the suffix can be specified with the SUFFIX option. If the SUFFIX option is not employed, then the default suffix will be a number, e.g., OBS$1, OBS$2, OBS$3, etc., corresponding to the order in which the OBSERVE commands are entered. This system variable can be used in the same manner as a variable created using the ASSIGN command. Its value is updated at every observation interval. • OBS$suffix – this yields the temporal value of the current observation (including the effects of the FILTER, INTEGRATE, DIFFERENTIATE, or TRANSFORM options. This is an implicit function of time. Use of this variable in a FUNCTION command can provide feedback to an incoming wave (PORT, Ch. 12), a current-density source (DRIVER, Ch. 19), or a voltage source (CIRCUIT, Ch. 19). Its use in another OBSERVE TRANSFORM function allows a single observation involving multiple variables, e.g., to obtain a time plot of impedance from voltage and current observations. Its use in a PARAMETER command after the simulation, i.e., between the START and STOP commands, can provide a way to spotcheck simulation behavior from the SUM file. In addition to the temporally updated OBS$suffix, there are several additional OBS$suffix that are evaluated at the end of the simulation on the final timestep, when the final data processing occurs. These take the following forms: • • • • OBS$suffix$Q_OF_SIGNAL – this yields the final temporal value of Q, when using the Q_OF_SIGNAL option. OBS$suffix$AMPLITUDE – this yields the final temporal value of the amplitude when using the AMPLITUDE diagnostic. OBS$suffix$FREQUENCY – this yields the final temporal value of the instantaneous frequency when using the AMPLITUDE diagnostic. OBS$suffix$INVERSE_Q – this yields the final temporal value of 1/Q when using the AMPLITUDE diagnostic. These final values may be obtained by adding variable operations after the START command and before the STOP command. See example below. In addition, when using a linux version of MAGIC, you can direct recording of a measurement at intervals of ifrequency in the “*.status” file. This text file will use the name specified by the SUFFIX option to label the value of the measurement. There are several possible data processing operations: TRANSFORM, DIFFERENTIATE, INTEGRATE, FILTER, Q_OF_SIGNAL, ANALYZE_SIGNAL, SPECTRAL_POWER and FFT. (If you specify more than one operation on the data, please be aware that the operations are always performed in this order, and not in the order you place them in the command.) Each operation causes the variable data to be modified in a particular fashion. Except for the FFT operation, the modified data is passed to the OBS$suffix system variable, as described above. The TRANSFORM data process: The TRANSFORM option is used to apply a transformation to the variable. The function has two dummy arguments, y and t. Other variables and functions, including other observed variables, may be referenced by the transformation function in the normal fashion. (See the FUNCTION command for details. Note that when another observed variable is used in a transformation, its value is obtained from the previous time step, and not the current time step.) The name of the transformation function will appear on the y-axis of the plot. MAGIC User’s Manual 22-5 Part VII - Output Chapter 22 - Time Plots The XTRANSFORM data process The XTRANSFORM option is used to transform the time axis prior to the graph being displayed. The transformation allows you specify an alternative time axis label. For example, rather than time on the x-axis of the graph you might wish to plot voltage(t), where the voltage(t) might be an applied voltage function of time, or a measurement recorded with an observe command, in which case you reference its suffix name. An example of the function transformation may be found in Observe Impedance The DIFFERENTIATE data process: The DIFFERENTIATE option is used to differentiate the variable with respect to time. Similarly, the INTEGRATE option integrates the variable with respect to time. These two options are mutually exclusive; you may specify one or the other, but not both. The FILTER data process: The FILTER option is used to apply either a LO_PASS or STEP filter. The LO_PASS filter acts as an RC filter to the variable. It results in a new signal, gn, at time step n, given by the following formula: gn = f sn + (1-f) gn-1, where sn is the original observed variable at time step n, and f is the filter fraction, a number between zero and one. It is assumed that g0 = 0. The above formula is a discrete approximation of the traditional RCtype filter given by: , where the filter time constant controls the time scale over which the filter is applied and corresponds to tfilter = 1/RC of an RC circuit. The FUNCTION_FILTER ftfilter option allows you to specify a time dependant filter period. The application of the filter is identical to that of the LO_PASS filter, with the caveat that the value of f is updated on each time step. This is useful when a frequency chirp is being used to excite a signal response and you wish to approximate the filter time constant as the “instantaneous period” of the excitation signal. The alternate STEP filter provides time averaging of the original observed variable over the time period given by tfilter, as described by the formula . STEP filtering is more effective on signals with known periodic behavior. You should set t_filter to an integer number of periods to get a smooth average over the periodic phenomenon. A common example of the use of a STEP filter is when net Poynting power is desired, since the instantaneous Poynting power, without filtering, contains an undesired oscillation at twice the frequency of a wave. If a LO_PASS filter were used instead of STEP, some visible remnant of the oscillation would still be present after filtering. MAGIC User’s Manual 22-6 Part VII - Output Chapter 22 - Time Plots The Q_OF_SIGNAL data process: The Q_OF_SIGNAL option may be used for measuring the quality factor “Q” of a circuit or resonant system. It is designed to work by measuring the decay of the electromagnetic energy versus time. The frequency and cycles arguments are used to apply a temporal filter and to extract the Q from the decay response. The assumption built into this model is that the frequency content of the temporal signal is mono-chromatic. This option may be used most effectively, when initializing the electric field energy to a single mode (as from an eigenmode solution), or by first pumping a circuit or cavity and then allowing it to decay. If the circuit response is contaminated with other frequency modes with different Q factors the result is ambiguous. You can normally identify this effect because the Q value does not saturate, or it flattens and then as the contaminant mode becomes the dominate energy source, the Q curve rises. It is also acceptable to apply this option to the measurement of a voltage or current as you might if you have several cavities, such as in a klystron. In this case, you may wish to obtain the Q factor of each cavity independently, by measurement of the gap voltage. The Q or quality factor is measure of the “quality” of a resonant circuit or cavity. The quality factor Q of a resonant cavity may be defined as Q = 2π energy stored / energy lost per cycle to the walls. For a specific eigenfrequency or specific normal mode of the system, Q is independent of the amplitude of the mode. The diffenential equation governing this can be written as: dU/dt = (−ωo/Q) U, => U(t) = U(0) exp(−ωot/Q). where ωo is the angular frequency and U is the stored energy. From the time dependance of the stored energy, we infer that the cavity/circuit fields oscillation experiences a damping term that looks like: E(t) = Eo exp(−ωot/2Q) sin((ωo+∆ω)t). Here we have included a frequency shift ∆ω of the resonant frequency. An associated quantity is the linewidth of the response, which is defined as the reciprocal of the quality factor. Resonant circuits respond to frequencies “close” to the natural frequencies more strongly that they respond to other frequencies. The bandwidth of a system is defined as the 3 dB change in voltage level around the central frequency. (Note! this is not equivalent to the notion of the bandwidth as the “full-width at half maximum” or FWHM.) To relate bandwidth and Q we write: Q = fo/(f2-f1) = fo/∆f. Bandwidth BW or ∆f = f2-f1, where f1 is the lower cutoff frequency, and f2 is the upper cutoff frequency. The SPECTRAL_POWER data analysis: The SPECTRAL_POWER option is used to obtain the amplitude of either a voltage or current signal (typically at an RF extraction PORT.) In general it is assumed that the signal is a multi-tone signal and a frequency specific heterodyne is applied to the signal to obtain the temporal envelope of the “voltage” or “current” at the reference frequency. Given the impedance (or 1/impedance for current), the analysis extracts the temporal profile of the power carried at the reference frequency. The basis of analysis requires that the integration interval MAGIC User’s Manual 22-7 Part VII - Output Chapter 22 - Time Plots be an integer multiple of each of the carrier tone periods. E.g. assume f1 =10GHZ and f2=8 GHz, then ∆f = 2GHz and a sufficient integration interval will be n/δf, where n is an integer. In the case of an amplifier with a two-tone signal of f1 and f2 the two interesting inter-modulation products occur at fi1 = min(f1,f2)- ∆f and fi2 = max(f1,f2)+ ∆f. The same integration interval is sufficient to extract the power at the inter-modulation frequencies as well. Another caveat in this analysis is that the measurement of the voltage or current must represent an appropriate output mode and the impedance in the output waveguide or coaxial line must be known. In particular, you must know the relationship between the guide impedance, voltage/current and power. The output controls allow you either power signal or the power and signal amplitude of frequency. The ANALYZE_SIGNAL data process: The ANALYZE_SIGNAL option is used to obtain the amplitude envelope of an oscillating signal, as well as a precise frequency and 1/Q value (associated with loss). The default is to analyze for all three elements. By using one of the optional keywords, ALL, AMPLITUDE_ONLY, FREQUENCY_ONLY, or INVERSE_Q_ONLY you may select to have only one of these elements displayed. The analysis uses a simple peak-finding procedure driven by a regular sample clock, preceded by a digital filter to remove noise. You must specify a reference frequency, and the width of the time window, in cycles, which roughly specifies the impulse response duration of the digital filter. This analysis can be applied to observe data which contains a fairly regular oscillating signal and works best if the specified reference frequency is within 1/cycles times the actual signal frequency. Four plots are generated. These plots are: • • • • the observe data itself, amplitude vs. time, precise frequency vs. time, and -(2/ω)*(d/dt) log(amplitude), e.g., 1/Q, vs. time. The third plot will return the precise frequency of the signal to great precision, typically to 0.001% or better with low-noise signals. This information can be valuable when tuning high-Q cavities, especially when beam or other loading effects modify a cavity’s operating frequency from its ideal eigenmode frequency. The fourth plot shows the exponential decay parameter, 1/Q, based on an assumed amplitude decay going as e-ωt/(2Q). (The inverse of Q is plotted to circumvent the singularity which occurs for an undamped signal where Q goes to infinity.) Zero will be plotted whenever the amplitude is increasing instead of decaying. For low-noise signals, the results are insensitive to the width of the time window, and a value of cycles of 4 is recommended. The primary means of dealing with noisy data is to increase the value of “cycles,” to 8, 16, or even greater values. See the examples at the end of this section for an illustration of the use of this diagnostic, as well as an example showing how to use larger values of “cycles” to filter out unwanted harmonic content or noise. The FFT data process: The FFT option is used to specify a Fourier transform. You can specify a plot of either the magnitude or the complex parts of the FFT. The WINDOW TIME option can be used to specify the time interval, from minimum to maximum, used for the Fourier integration. Similarly, the WINDOW FREQUENCY option can be used to specify the frequency boundaries for plots of the transformed data. The DB_SCALE option is designed to allow you to see the frequency response on a db scale. The actual FFT calculation proceeds as follows. First, the variable between minimum and maximum time is linearly interpolated onto a new set of N uniformly spaced points, such that N=2M is the next largest exact power of two. The exact interpolation times are tj=tlo+(j-1/2)Dt, where Dt=(thi-tlo)/N. MAGIC User’s Manual 22-8 Part VII - Output Chapter 22 - Time Plots The FFT frequencies are fk=kDf, where Df=(thi-tlo)-1, and run from k=0 to k=N/2, e.g., fmax=(2dt)-1. Starting from the N interpolated variable values, Sj, the FFT is given by: , e.g., where =1 for k=0 and =2 otherwise. It is precisely the quantity plots. The inverse formula for this convention is: , e.g., , which is displayed in the FFT . The normal factor of 2 π is absent because the integration is over frequency, f, rather than angular frequency, ω. The additional factor of two in the transform is compensated for by an integration over only positive frequencies in the inverse transform, a common manipulation where pure, real signals are concerned. The TIME_FREQUENCY data process: The TIME_FREQUENCY option analyzes the frequency content of a signal versus time and displays the result in a single image. The TIME_FREQUENCY option displays the time-varying frequency content of the signal over a sliding time window versus time. You must select a time_aperture that is a several periods of the lowest frequency of interest. Failure to provide a broad enough time aperture will result in spurious aliasing of the signal. For the npts_time and npts_frequency values of 100 are suitable. Higher values provide a denser resolution of the images, but are not necessary for data spanning only a few hundred periods. The MOVIE options: The MOVIE option permits you to generate a sequence of bitmaps from a sequence of OBSERFE plots. The timer is required to specify when the plots are generated. In order for this sequence to provide an appealing visual representation of the data, you may also use the WINDOW {DELTA_TIME, TIME, TIME_SIGNAL} options to specify the axis limits. When the MOVIE option is invoked, MAGIC generates a series of bitmaps that are saved in a folder. There is one movie folder per command that uses the MOVIE option. You can post process the files to create an avi-file. You can “play” the movie by using the MOVIE command. Use of the keyword AVI, causes the software to process the frames into an avi-file automatically at the termination of the simulation. The individual frames and the movie folder are deleted after this is complete. The use of the MOVIE option by default enables the NODUMP feature for this particular plot. This prevents an excess number of OBSERVE plots being recorded in the datafiles. In addition, you may use the MOVIE_SIZE option to specify the width and height of a free floating movie window. A maximum of 12 free floating movie windows of all types are allowed. Movie windows may be of different sizes. When WINDOW_SIZE is specified, it also activates the NOLEGEND option. The option, MOVIE_NAME, allows you specify the name of a folder for the movie frames. It must be unique, (i.e. not used with more than one MOVIE option.) If the AVI file type is selected, the name is also used for the avi-movie file. The WRITE_TABLE options: MAGIC User’s Manual 22-9 Part VII - Output Chapter 22 - Time Plots The WRITE_TABLE option is used to cause one or more of the observe data records to be written out to a text file in column format. The columns are delimited with tabs and may be read directly into a spreadsheet program. The file name generated is “Observe_Table.txt”. Each observe which is desired to be exported to the table must have the WRITE_TABLE option explicitly declared. All other observe records will not be included in the table. The following figure illustrates the output. The EXTRACT, PLOT, DUMP, and PRINT options: The EXTRACT, PLOT, DUMP, and PRINT options allow time plot results to be stored and displayed by four different methods: • • • • Extracted to a text file automatically, as a graphical plot in a file or on screen, as a data record in the GRD file, or as printed column data in the LOG file. A graphical plot in a file or on screen is the normal result of an OBSERVE command. Under certain circumstances, it may be desirable to have particular time plots displayed, but not stored, to save disk space, or perhaps stored, but not displayed, for some other reason. The PLOT, NOPLOT, DUMP, and NODUMP options can be applied to individual time plots; i.e., it is not necessary to treat all the time plots in the same way. Alternatively, DUMP TYPE OBSERVE or DUMP TYPE ALL commands can be used to record all time plots in the GRD file (DUMP, Ch. 25). The EXTRACT, EXTRACT_DIR, and EXTRACT_FILE options are used to automatically extract the graphics data to a text file for later use, such as in a spreadsheet or other post analysis tool. The default condtion, is NOEXTRACT. The EXTRACT option enables automatic extraction after a graphic is displayed. Unless the a directory folder is specified the extracted data will be in the working directory. Use of the EXTRACT_DIR option permits you to specify a particular output directory, making it easier to keep the results organized. All graphics output will have a unique automatic name based on the particular diagnostic and the time step of extraction. You may override this using the EXTRACT_FILE name option. MAGIC User’s Manual 22-10 Part VII - Output Chapter 22 - Time Plots Normally, time plot data is stored and displayed only once (after the last time step has been executed). On certain platforms, it is possible to display and store time plot data at any time during the simulation. On the PC, simply depress the F5 key on the keyboard (KEYBOARD, Ch. 9). During a run, the time-plot data is stored in the binary file, “filename.OBS”. In the event of an unexpected program termination or power outage, it is sometimes possible to retrieve this data with the Review program. See Also: ASSIGN, Ch. 6, FUNCTION, Ch. 6, KEYBOARD, Ch. 9, DUMP, Ch. 20, OBSERVE CIRCUIT, Ch. 22, OBSERVE COLLECTED, Ch. 22, OBSERVE EMITTED, Ch. 22, OBSERVE FIELD, Ch. 22, OBSERVE FIELD_ENERGY, Ch. 22, OBSERVE FIELD_INTEGRAL, Ch. 22, OBSERVE FIELD_POWER, Ch. 22, OBSERVE INDUCTOR, Ch. 22, OBSERVE INTERVAL, Ch. 22, OBSERVE IONIZATION, Ch. 22, OBSERVE NEUTRAL_GAS, Ch. 22, OBSERVE PARTICLE_STATISTICS Ch. 22, OBSERVE R_OVER_Q, Ch. 22, OBSERVE SECONDARY, Ch. 22, OBSERVE SPACE_HARMONIC, Ch. 22, OBSERVE RESISTOR, Ch. 22, OBSERVE TRAMLINE, Ch. 22 Examples: The following four figures illustrate the use of the ANALYSIS_SIGNAL diagnostic. The simulation is for a rectangular cavity with resonant frequency of about 1.0 GHz excited by a linear current source from the top to bottom along the midline. (A line was defined, called “ctrline” in order to observe the voltage between the top and bottom walls of the cavity.) The material was specified as dirty copper with a conductivity of σ = 5.99e4 mhos/m. Thus for a frequency of 1GHz, the Q of TM010 mode is given as = Height/Skin_depth/(1+Height/(Width/2)) = 527. The cavity height is 5cm and the cavity width (square cross section) is 10cm; The drive signal was turned on and off smoothly. DrivePeriod = 1/DriveFreq ; OmegaDrive = 2pi*DriveFreq ; Tramp = 5.5*DrivePeriod ; TendSignal = 50*DrivePeriod + Tramp ; Function Fsignal(t) = Smooth_Ramp(T/Tramp)*Smooth_Ramp((TendSignal- MAGIC User’s Manual 22-11 Part VII - Output Chapter 22 - Time Plots T)/Tramp)*Sin(OmegaDrive*t) ; Function EzShape(x,y,z) = 1 ; DRIVER J3 Fsignal CtrDrive ; The following observe command measures the signal at the drive location. OBSERVE FIELD_INTEGRAL E.DL Ctrdrive ANALYZE_SIGNAL DriveFreq 2 Q_OF_SIGNAL DriveFreq 2 ; The figure below shows the signal from the cavity. The amplitude increases while the drive is on and then begins to decay quickly because of the high losses from the wall material. Cavity voltage along midline versus time. The amplitude of the signal shown in the figure above begins to decay after the drive signal is turned off. The figure below shows the plot for amplitude versus time produced by the diagnostic. This is essentially the positive envelope of the signal. Note that the amplitude displayed is constant below about 2 nanoseconds. This initial delay in the display is deliberate and is intended to prevent misinterpretation of possibly inaccurate early-time data due to the initial response time of the digital filter. MAGIC User’s Manual 22-12 Part VII - Output Chapter 22 - Time Plots . Amplitude envelope of the signal in the preceding figure. The following figure shows the frequency vs. time. The frequency of the drive is 1.05971 GHz, so that the cavity resonates at 1.05971 GHz while the drive is on. (This is the mean value of the drive frequency and cavity resonant frequency, which is the expected early-time frequency of a driven resonant oscillator with damping.) The slight stair stepping or “digital ripple” in the frequency plot after turning off the drive has rms amplitude of less than 0.0001%. Frequency traces for clean signals are often this accurate and round-off error can cause a “digital ripple” in the plot that is simply fluctuation of the least significant bits. This frequency estimator works by starting with the frequency specified by the user as the initial estimate. This initial frequency estimate is then used to set the digital filter center frequency and the rate of a digital phase locked loop (DPLL), which used in conjunction with a level crossing detector, provides the real-time frequency data. The DPLL further reduces jitter in the frequency vs. time estimate, and the user-supplied value of “cycles” is also used to set the DPLL time constant. After the drive signal is 0, (around 61 ns), the cavity begins to free oscillate at its native frequency, which in this case is at 1.05974GHz. Real-time frequency display. The following figure shows the 1/Q analysis. When the signal is not decaying (while the drive is on), zero is plotted for 1/Q rather than negative values. As the signal begins to decay, the 1/Q value settles to about 1.902E-3, thus implying a value of Q of about 526. MAGIC User’s Manual 22-13 Part VII - Output Chapter 22 - Time Plots Real-time 1/Q display. The following figure illustrates the value of Q yielded from the Q_of_Signal Diagnostic. This gives a value of about 521. Q of Signal Result. Example 2: The following figures illustrate an advanced use of the AMPLITUDE diagnostic to determine the frequency and Q of a coupled-cavity klystron output section to high accuracy. The problem that occurs with coupled cavities is that the main spectral line is modulated by a small interfering component very close to the main frequency line. This modulation is both AM (amplitude modulation) and FM (frequency modulation), and this leads to a fluctuating frequency estimate, amplitude estimate, and 1/Q estimate. The output section shown is first excited with a smooth pulse with center frequency at freq=9.25 GHz. The resulting frequency and 1/Q estimates are shown for two different values of “cycles.” N1=5; N2=50; OBSERVE FIELD_INTEGRAL E.DL vgap1 AMPLITUDE freq n1 SUFFIX VGAP1 ; MAGIC User’s Manual 22-14 Part VII - Output Chapter 22 - Time Plots OBSERVE FIELD_INTEGRAL E.DL vgap1 AMPLITUDE freq n2 SUFFIX VGAP2 ; … START ; ! These values will be written to the log file at the end of the simulation. Final_Amplitude_Vgap1 = OBS$VGAP1$Amplitude ; Final_Frequency_Vgap1 = OBS$VGAP1$Frequency ; Final_INV_Q_Vgap1 = OBS$VGAP1$INVERSE_Q ; Final_Amplitude_Vgap2 = Final_Frequency_Vgap2 = Final_INV_Q_Vgap2 = OBS$VGAP2$Amplitude ; OBS$VGAP2$Frequency ; OBS$VGAP2$INVERSE_Q ; STOP ; The only difference between the two input lines is the value of “cycles,” which sets the filter period. The 50% amplitude points on the filter passband are at about ±frequency/cycles, so by increasing the value of “cycles,” we are narrowing the filter to reject the interfering component. The figure below shows the geometry of the coupled−cavity system. The conductance used for damping the oscillation is shown inside the right cavity as the cross-hatched region, and the line current sources appear across the gaps. The effect of the two coupled cavities is to cause fluctuations in the observe plots shown on the following page. The use of larger values of “cycles” causes a larger delay in the output of the frequency estimate because early-time filter response can cause spikes in the output and limit the resolution on the plot. The voltage signal across VGAP1 ramps up slowly and then decays because of the damping introduced by the conductance. MAGIC User’s Manual 22-15 Part VII - Output Chapter 22 - Time Plots Amplitude vs. time estimate for cycles=5. The ripple caused by the interfering frequency line is clearly visible in the decaying signal. The amplitude estimate for cycles=50 exhibits greatly diminished ripple. A longer smoothing time causes the amplitude plot to be a smoothed (time-averaged) version of the real amplitude response, but the exponential decay constant is not affected. MAGIC User’s Manual 22-16 Part VII - Output Chapter 22 - Time Plots The frequency estimate for cycles=50 fluctuates by only about 0.004 GHz, which is an accuracy of 0.04 percent. The response time is delayed due to the increased filter integration time. The 1/Q estimate for cycles=5 fluctuates by more than 50 %, making the exact Q value difficult to determine. The 1/Q estimate is greatly improved by increasing “cycles” to 50, and the Q value is easily determined. MAGIC User’s Manual 22-17 Part VII - Output Chapter 22 - Time Plots Example 3: The following example illustrates the use of the TIME_FREQUENCY option. This sample is a 2D simulation of the A6 relativistic magnetron. Measurements of the slot voltage is made between adjacent vanes. The commands that follow show the use of the TIME_FREQUENCY option vs. the FFT option. OBSERVE FIELD_INTEGRAL E.DL SLOT1 FFT MAGNITUDE WINDOW FREQUENCY 0GHZ 10GHZ; OBSERVE FIELD_INTEGRAL E.DL SLOT1 WINDOW FREQUENCY 0GHZ 10GHZ TIME_FREQUENCY SPECTROGRAM 2E-9 100 100 ; MAGIC User’s Manual 22-18 Part VII - Output Chapter 22 - Time Plots The preceding two figures show the temporal response of the slot voltage and the FFT. Notice that the FFT indicates the presence of two competing frequencies. Note that the lowest frequency is near 2GHz. The time aperture in the TIME_FREQUENCY analysis is set to 2ns or about 4 periods. In the following figure which show the SPECTROGRAM we can identify both of the two distinct frequencies seen in the FFT. We can also see the relative strength and the time at which these frequencies “turn on” in the time signal. OBSERVE PLOTS MAGIC User’s Manual 22-19 Part VII - Output Chapter 22 - Time Plots RANGE and OBSERVE commands use identical controls and format to display the requested signal data. If PAUSE is OFF when an observe or range command is executed only the requested signal is displayed. If PAUSE is ON, or if a plot is chosen from the MAGIC main menu using • • • • Output Output Output Output Range All, Range Select, Observe All, or Observe Select. The simulation will wait, and the user can take advantage of the Observe commands to study the graph more closely. Some of the more commonly used features of Observe include: • • • • Zoom In/out on a portion of the graph Save an image of the graph Examine signal value at an individual data point Extract signal data to an ASCII text file Observe handles three different types of MAGIC plots: • OBSERVE, • RANGE, and • RANGE HISTOGRAM plots. To make it easier for the user to know which kind of plot is being displayed, a different default line color is used for the three cases. • OBSERVE Plots are shown in RED, • RANGE plots are drawn in BLUE, and • RANGE HISTOGRAM plots are PURPLE. MAGIC User’s Manual 22-20 Part VII - Output Chapter 22 - Time Plots Figure 1: FFT Observe Plot from 6VaneMagnetron.m2d Example Input File OBSERVE MENU COMMANDS File Save Observe: File Observe: Extract File Print Observe: Edit Copy Output: Output Pause Output: Observe Reset: Observe Clear: Observe Legend: Observe Interval: Help Observe Help: This option will save an image of the currently visible line plot, including the legend, title, and axis information, if it is present. When selected, a dialog box will appear and ask for a filename and type of filename to save the image as. The available image formats are BMP, PCX, and PNG. Use this command to create a tab delimited ASCII text file of the X and Y values of each point in the line graph. When selected, a dialog box will appear and ask for a filename, and the information will be extracted to Filename.txt. The file will contain the title of the plot, the number of data points extracted, and two columns of data containing the X and Y values for each point, in ascending order versus X. Use this command to print the currently visible plot. A dialog box will appear that allows the user to select the printer, page size, orientation, and the margins. Selecting this option will send the currently visible plot to PAINT, an application that comes standard with all versions of Windows. A limitation of the graphics package MAGIC uses prevents image copying directly to the clipboard for pasting into other applications. Once the image has been loaded in PAINT, the user can use the edit select all, edit copy commands in PAINT to copy the image to the clipboard, and then the image can be pasted into other applications, such as Microsoft Word. The user must exit PAINT before returning to the MAGIC simulation. This menu option is checked if PAUSE is currently ON. Uncheck this menu option to turn pause off from this point on. This command will reset the plot to the original settings. Any changes such as zooming in, changing line colors, hiding the legend, etc, will be reversed. Blanks the display screen. The graph legend, shown in Figure 2, gives information about the simulation and the plot, and is shown by default at the bottom of the screen. Uncheck this option to hide the legend. The Graph Legend gives information about the plot and the simulation. The interval option is most commonly used when plots with a large amount of data are displayed. When an interval value n is selected, Observe will only display every nth point. If the Observe Interval Auto option is checked, Observe will set the interval automatically based on the number of points in the plot. The default interval setting is always 1, which displays every point available. Selecting this option will give a brief description of the mouse and keyboard commands available in Observe. These commands are described in the next section. OBSERVE AUXILIARY TOOLBAR BUTTON COMMANDS Apply FFT to Signal.: This command is the same as the menu "File -> Extract Observe" command. Use this command to create a tab delimited ASCII text file of the X and Y values of each point in the line graph. When selected, a dialog box will appear and ask for a filename, and the information will be extracted to Filename.txt. The file will contain the title of the plot, the number of data points extracted, and two columns of data containing the X and Y values for each point, in ascending order versus X. This command is the same as the menu "File -> Save Observe" command. This command will save an image of the currently visible line plot, including the legend, title, and axis information, if it is present. When selected, a dialog box will appear and ask for a filename and type of filename to save the image as. The available image formats are BMP, PCX, and PNG. This post-processing command displays an FFT dialog. After FFT entries are made in the dialog, and the dialog Apply button is pressed, the FFT settings are applied to the current plot signal. Apply temporal filter to Signal.: This post-processing command displays a Filter dialog. After Filter entries are made in the dialog, and the dialog Apply button is pressed, the Filter settings are applied to the current plot signal. Extract data to file...: Save image as bitmap...: MAGIC User’s Manual 22-21 Part VII - Output Chapter 22 - Time Plots Analyze Signal for f, 1/Q and amplitude.: Apply Spectral Power Heterodyne.: Get Q of Signal.: This post-processing command displays an Analyze Signal dialog. After Analyze Signal entries are made in the dialog, and the dialog Apply button is pressed, the Analyze Signal settings are applied to the current plot signal. This post-processing command displays a Spectral Power dialog. After Spectral Power entries are made in the dialog, and the dialog Apply button is pressed, the Spectral Power settings are applied to the current plot signal. This post-processing command displays a Q dialog. After Q entries are made in the dialog, and the dialog Apply button is pressed, the Q settings are applied to the current plot signal. Time-Frequency spectrogram.: Show/Hide axes and labels: This post-processing command displays a Time Frequency Spectrogram dialog. After Time Frequency Spectrogram entries are made in the dialog, and the dialog Apply button is pressed, the Time Frequency Spectrogram settings are applied to the current plot signal. This command is the same as the menu "Observe -> Axes labels" toggle command. It toggles between showing and hiding the graph x axis/labels, y axis/labels, and legend. Show/Hide Title: This command is the same as the menu "Observe -> Title" toggle command. It toggles between showing and hiding the graph title. Show/Hide X_AXIS: This command is the same as the menu "Observe -> x-Axis and labels" toggle command. It toggles between showing and hiding the graph x axis/labels. Show/Hide Y_AXIS: This command is the same as the menu "Observe -> y-Axis and labels" toggle command. It toggles between showing and hiding the graph y axis/labels. Show/Hide Legend: This command is the same as the menu "Observe -> Legend" toggle command. It toggles between showing and hiding the legend. Show/Hide Frame: This command is the same as the menu "Observe -> Show graph frame" toggle command. It toggles between showing and hiding the graph frame. Reset Graph: This command is the same as the menu "Observe -> Reset" command. This command will reset the plot to the original settings. Any changes such as zooming in, changing line colors, hiding the legend, etc, will be reversed. OBSERVE MOUSE/KEYBOARD COMMANDS Current Mouse Position: Mouse Zoom: In Observe, whenever the mouse cursor is inside the plot area, the x, y location of the mouse cursor is shown in the status bar of the MAGIC window. Figure 3 shows the status bar of the MAGIC window. When the mouse is positioned at the blue arrow, the location of the cursor is shown in the status bar. MAGIC Status Bar shows Current Mouse Position To zoom in on the display using the mouse, hold down the right mouse button while moving the mouse vertically on the screen. Moving towards the top of the screen will zoom in on the graph, moving towards MAGIC User’s Manual 22-22 Part VII - Output Keyboard Zoom: Panning: Snap to a Point: Line Width: Line Color: Chapter 22 - Time Plots the bottom will zoom out. Figure x.3 shows a zoom in on the first frequency peak of the same Observe plot shown in Figure x.1. The keyboard offers more flexibility for zooming in and out. To change only the scale of the x (horizontal) axis, use uppercase “X” to zoom in, or lowercase “x” to zoom out. “Y” and “y” can be used to zoom in or out along the y (vertical) axis. The Keypad can also be used to zoom in on the plot. When NumLock is on, “4” and “6“ will expand the X axis in the –X or +X directions, and “2” and “8” will expand the Y axis in the –Y or +Y directions, respectively. The “+” and “–“ keys will zoom in and out on both axes equally. Panning changes the point at which the graph is centered. To pan using the mouse, hold down both the right and left mouse buttons, and move the mouse in any direction. The plot will shift with the movement of the mouse until one or both of the buttons are released. To pan using the keyboard, use the arrow keys. As explained in Current Mouse Position, the user can see the current location of the mouse cursor on the graph in the status bar. The user can also snap to the closest point in the line graph by single clicking the left mouse button anywhere inside the display area. When the user clicks the left mouse button, a red dot marks the nearest point, and a pop-up window will appear that gives the exact location of the point. Observe will only snap to visible points, and will not snap to a point that is not being displayed because the ObserveInterval option is set to a value other than 1. (See help on ObserveInterval) An example is shown in Figure x.4. Also note the Line Color and Line Width menu options, which will be explained below. Left-Click inside the plot area to find the closest point or modify the appearance of the line. Select the Line Width menu option from the pop-up window shown in Figure x.4 to change the thickness of line. The default thickness of one pixel is shown in Figure 4. Select the Line Color menu option from the pop-up window shown in Figure x.4 to change the color of vector lines. A dialog box will appear that allows the user to select any 24 bit RBG color. MAGIC User’s Manual 22-23 Part VII - Output Chapter 22 - Time Plots OBSERVE CIRCUIT Command Function: Syntax: Specifies circuit variable to be plotted vs. time in a 2D simulation. OBSERVE CIRCUIT poisson variable [options] ; Arguments: name of Poisson solution, defined in POISSON command. circuit variable (see CIRCUIT, Ch. 19). CHARGE, CURRENT, VOLTAGE, ENERGY, POWER, DCHARGE, DVOLTAGE, DENERGY. processing options (see OBSERVE [options], Ch. 22). poisson variable options Description: The command, OBSERVE CIRCUIT, is used to specify a circuit model variable to plot vs. time. The poisson name specifies the circuit. (See CIRCUIT, Ch. 19 a list of the valid observable variables.) See Also: CIRCUIT, Ch. 19, POISSON, Ch. 19, OBSERVE [options], Ch. 22 Restrictions: 1. This command is available only in 2D simulations. Examples: The following commands instruct the code to observe and record the circuit variables, CURRENT and VOLTAGE. At the end of the simulation, plots of the time histories of these variables are produced. The observe variables are recorded every time step, since the step_multiple is left at its default value. OBSERVE CIRCUIT MYTEST CURRENT ; OBSERVE CIRCUIT MYTEST VOLTAGE ; MAGIC User’s Manual 22-24 Part VII - Output Chapter 22 - Time Plots OBSERVE COLLECTED Command Function: Specifies particle collection variable to be plotted versus time. Syntax: OBSERVE COLLECTED {object, ALL} {species, ALL} {CHARGE, CURRENT, ENERGY, POWER, VOLTAGE} [options] ; Arguments: object name of CONDUCTOR, DIELECTRIC, FOIL, or PORT. species name of particle species (ELECTRON, or defined in SPECIES command). options data processing options (see OBSERVE [options], Ch. 22). Description: The OBSERVE COLLECTED command is used to specify a particle collection variable to be plotted as a function of time. You must specify the name of a particle-collecting object. These are any boundary object that removes particles from the simulation. Such objects include by name all CONDUCTORs, FOILs, DIELECTRICs and PORTS. Next, enter the particle species, use ALL if all species are to be included. Finally, select the particle measurable variable as listed above. Use CHARGE to measure the cumulative charge (Coulombs). Use CURRENT to measure the instantaneous current (amps). Use ENERGY to measure the cumulative energy (joules). Use POWER to measure the instantaneous power (watts). Use VOLTAGE is to measure the particle power/current (eV). Measurements of instantaneous CURRENT, POWER, or VOLTAGE benefit from using the "FILTER STEP t_filter" option, which provides a temporal averaging that reduces the statistical noise associated with particles. See Also: VOLUME, Ch. 10, CONDUCTOR, Ch. 14, DIELECTRIC, Ch. 14, FOIL, Ch. 14, IMPORT, Ch. 12, OBSERVE [options], Ch. 22 Examples: OBSERVE COLLECTED CATHODE ELECTRON CURRENT; MAGIC User’s Manual 22-25 Part VII - Output Chapter 22 - Time Plots OBSERVE EMITTED Command Function: Specifies particle emission variable to be plotted vs. time. Syntax: OBSERVE EMITTED {object, ALL} {species, ALL} {CHARGE, CURRENT, ENERGY, POWER, VOLTAGE} [options] ; Arguments: object species options name of CONDUCTOR, DIELECTRIC, FOIL, or IMPORT. name of particle species (ELECTRON, or defined in SPECIES command). data processing options (see OBSERVE [options], Ch. 22). Description: The OBSERVE EMITTED command is used to specify a particle emission variable to be plotted as a function of time. You must specify a particle generating object. These objects include by name all CONDUCTORs, DIELECTRICs, FOILs, and IMPORTs. Next, enter the particle species, use ALL if all species are to be included. Finally, select the particle measurable variable as listed above. Use CHARGE to measure cumulative charge (Coulombs). Use CURRENT to measure the instantaneous current (amps). Use ENERGY to measure the cumulative energy (joules). Use POWER to measure the instantaneous power (watts). Use VOLTAGE is to measure the particle power/current (eV). Measurements of instantaneous CURRENT, POWER, or VOLTAGE benefit from using the "FILTER STEP t_filter" option, which provides a temporal averaging that reduces the statistical noise associated with particles. Restrictions: 1. The spatial object must be assigned the property CONDUCTOR, FOIL, or IMPORT. See Also: VOLUME, Ch. 10, CONDUCTOR, Ch. 14, DIELECTRIC, Ch. 14, FOIL, Ch. 14, IMPORT, Ch. 12, OBSERVE [options], Ch. 22 Examples: OBSERVE EMITTED CATHODE ELECTRON CURRENT; MAGIC User’s Manual 22-26 Part VII - Output Chapter 22 - Time Plots OBSERVE FIELD Command Function: Select an electromagnetic field variable to be plotted versus time. Syntax: OBSERVE FIELD field object [SEARCH {MINIMUM, MAXIMUM} {NULL, ftran(fld,x1,x2,x3)}] [options] ; Arguments: field object ftrans options field component. name of spatial object, defined in POINT, LINE, AREA, or VOLUME command. transformation function. data-processing options (OBSERVE [options], Ch. 22). Description: The OBSERVE FIELD command is used to specify a field at a spatial object to be plotted vs. time. If the specified object is a point, the field at that location will be measured. For any spatial object other than a point, an average value of the field over the object is calculated. For example, if the object is a volume, then the field will be integrated over the volume, and for Maxwell fields the result will be divided by the total volume to give the average value of the field, for density fields it will typically give the volume integral. The SEARCH option is used to search the object spatial zone for the minimum or maximum value. You may select a transformation of the field value by defining a function, ftran(fld,x1,x2,x3), that is applied point by point to the local field value, and is followed by locating the maximum or minimum value. Use the NULL argument if you need the minimum or maximum of the raw field. See Also: MAXWELL algorithms, Ch. 17, OBSERVE [options], Ch. 22 Examples: Measure the time history of J3 and find the maximum or minimum in a volume. POINT BeamGapPt 4cm,1pi,8cm ; VOLUME beamGap conformal 0cm,0pi,6cm,Anode.Radius.Inner,2pi,Anode.Length ; FUNCTION JABS(Fld) = ABS(FLD) ; OBSERVE FIELD J3 BeamGapPt ; OBSERVE FIELD J3 BeamGap Search Minimum NULL ; OBSERVE FIELD J3 BeamGap Search Maximum JABS ; MAGIC User’s Manual 22-27 Part VII - Output Chapter 22 - Time Plots This figure shows a time history of Jz at the point BEAMGAPPT. This figure shows a time history of the Minimum of Jz in the volume BEAMGAP. This figure shows a time history of the Maximum of Jabs(Jz) in the volume BEAMGAP. MAGIC User’s Manual 22-28 Part VII - Output Chapter 22 - Time Plots OBSERVE FIELD_ENERGY Command Function: Syntax: Specifies electromagnetic field-energy variable to be plotted vs. time. OBSERVE FIELD_ENERGY variable object [options] ; Arguments: variable energy variable, possible values are: E1, E2, E3, B1, B2, B3, EM, ELECTRIC, MAGNETIC, TM, TE (2D only), DW_GAS_CONDUCTIVITY, WSUM_GAS_CONDUCTIVITY. object name of spatial object, defined in AREA command (2D) or VOLUME command (3D). options data processing options (see OBSERVE [options], Ch. 22). Description: The OBSERVE FIELD_ENERGY command is used to specify an electromagnetic field-energy variable to be plotted vs. time. The variable specification allows various combinations of fields to be included. For example, the contribution from any individual field component can be isolated by specifying E1, E2, E3, B1, B2, or B3. The total electromagnetic field energy is obtained by entering EM, while the electric and magnetic components are obtained using ELECTRIC and MAGNETIC. For 2D simulations only, entering TM yields the total electromagnetic energy in the TM mode (E1, E2, B3). Similarly, entering TE yields the total electromagnetic energy in the TE mode (B1, B2, E3). The spatial object is used to define boundaries which limit the spatial extent of the energy calculation. Normally, the object will include the entire simulation, but you may wish to restrict the measurement to some local region. The options DW_GAS_CONDUCTIVITY and WSUM_GAS_CONDUCTIVITY measure instantaneous and cumulative energy deposition in the gas conductivity model. See Also: GAS_CONDUCTIVTY, Ch.14, OBSERVE [options], Ch. 22 Restrictions: 1. The spatial object must be an area for 2D simulations and a volume for 3D simulations. Example: In a 3D simulation of a coaxial MITL, we can obtain the electric field energy using the following command line. OBSERVE FIELD_ENERGY ELECTRIC OBS$VOLUME; MAGIC User’s Manual 22-29 Part VII - Output Chapter 22 - Time Plots This figure shows the time history of the electric field energy in the simulation volume OSYS$VOLUME. MAGIC User’s Manual 22-30 Part VII - Output Chapter 22 - Time Plots OBSERVE FIELD_INTEGRAL Command Function: Specifies electromagnetic field integral to be plotted versus time. Syntax: OBSERVE FIELD_INTEGRAL {E.DL, -E.DL} object [options] ; OBSERVE FIELD_INTEGRAL {H.DL, -H.DL} object [options] ; OBSERVE FIELD_INTEGRAL {H.DLOOP,-H.DLOOP} object [options]; (MAGIC3D Only) OBSERVE FIELD_INTEGRAL DEL.D.DV object [options]; OBSERVE FIELD_INTEGRAL DEL.E.DV object [options]; OBSERVE FIELD_INTEGRAL J.DA object [options]; OBSERVE FIELD_INTEGRAL J_species_name.DA object [options]; OBSERVE FIELD_INTEGRAL J_CURRENT_SOURCE.DA object [options]; OBSERVE FIELD_INTEGRAL J_DRIVER.DA object [options]; OBSERVE FIELD_INTEGRAL Q.DV object [options]; OBSERVE FIELD_INTEGRAL Q_species_name.DV object [options]; OBSERVE FIELD_INTEGRAL RHO_ELECTRON.DV object [options]; OBSERVE FIELD_INTEGRAL RHO_POSITIVE_ION.DV object [options]; OBSERVE FIELD_INTEGRAL RHO_NEGATIVE_ION.DV object [options]; Arguments: object ─ spatial object defined in the POINT, LINE, AREA, or VOLUME commands. For J_CURRENT_SOURCE.DA must be used in the CURRENT_SOURCE command. For J_DIRVER.DA must be used in the DRIVER command. options ─ data-processing options (OBSERVE [options], Ch. 22). Description: The OBSERVE FIELD_INTEGRAL command is used to specify a field integral over a spatial object to be plotted vs. time. The integral will carry the combined units of the field and the spatial differential, DL (meters), DA (meters squared), or DV (meters cubed). Measurements with the RHO_.. are available only when the GAS_CONDUCTIVITY model is used. The object specified must be consistent with the type of integral that is specified. • Measurements of E.DL and –E.DL have units of volts. Measurements of E.DL require LINE objects of type CONFORMAL. Using –E.DL reverses the polarity of the E.DL measurement. • Measurements H.DL, -H.DL and H.DLOOP and ─H.DLOOP have units of amps. Note! that ─H.DLOOP and –H.DL have reversed polarity from that of H.DLOOP and H.DL. Measurements of H.DL require a POINT object or a LINE object of type CONFORMAL in 2D and a LINE objects of type CONFORMAL in 3D. Measurements of H.DLOOP and─H.DLOOP require an AREA object of type CONFORMAL. The "object" used for the H.DLOOP and -H.DLOOP measurements should be a conformal area whose perimeter forms the loop integral path. When measuring current on a wire in this way, the area should at least match the wire cross-section, or encompass all of it, if not a conformal shape. In general, the area should not intersect any other metal structure outside that wire, or the integration loop will be incomplete. • Measurements DEL.D.DV and DEL.E.DV have units of coulombs. Measurements require an AREA in 2D and a VOLUME in 3D. MAGIC User’s Manual 22-31 Part VII - Output Chapter 22 - Time Plots • Measurements J.DA, J_species_name.DA, J_CURRENT_SOURCE.DA and J_DRIVER.DA have units of amps. Measurements of J.DA and J_species_name.DA require either an AREA or a LINE in 2D and an AREA in 3D. Objects must be of type CONFORMAL. Measurements of J_CURRENT_SOURCE.DA require the object name supplied in the CURRENT_SOURCE command. Measurements of J_DRIVER.DA require the object name supplied in the DRIVER command. • Measurements Q.DV and Q_species_name.DV have units of coulombs. Measurements of Q.DV and Q_species_name.DV require an AREA in 2D and a VOLUME in 3D. • Measurements RHO_....DV have units of coulombs, not particle number. Measurements of RHO_...DV require an AREA in 2D. If desired, the integral result can be transformed using OBSERVE [options] (See Examples, below). See Also: CURRENT_SOURCE, Ch. 19, DRIVER, Ch. 19, GAS_CONDUCTIVITY, Ch. 14, MAXWELL algorithms, Ch. 17, OBSERVE [options], Ch. 22 Restriction: 1. All objects must be of type conformal. Examples: To obtain the voltage over a line name, “INLET_VOLTAGE,” use the following commands. OBSERVE FIELD_INTEGRAL E.DL INLET_VOLTAGE ; This figure illustrates a time history of the voltage at the location INLET_VOLTAGE. MAGIC User’s Manual 22-32 Part VII - Output Chapter 22 - Time Plots OBSERVE FIELD_POWER Command Function: Specifies electromagnetic or particle power variable to be plotted vs. time. Syntax: OBSERVE FIELD_POWER S.DA object [options]; OBSERVE FIELD_POWER E.J_CURRENT_SOURCE.DV object [options]; OBSERVE FIELD_POWER E.J_DRIVER.DV object [options]; OBSERVE FIELD_POWER E.J_GAS_CONDUCTIVITY.DV object [options]; OBSERVE FIELD_POWER E.J_OHMIC.DV object [options]; OBSERVE FIELD_POWER B.J_OHMIC.DV object [options]; OBSERVE FIELD_POWER EB.J_OHMIC.DV object [options]; OBSERVE FIELD_POWER E.J_PARTICLE.DV object [options]; OBSERVE FIELD_POWER E.J_species_name.DV object [options]; OBSERVE FIELD_POWER E.J_FREESPACE.DV object [options]; OBSERVE FIELD_POWER SURFACE_LOSS object [options]; Arguments: object ─ spatial object defined in the POINT, LINE, AREA, or VOLUME commands. And in the CURRENT_SOURCE command and the DRIVER command. For restrictions on object types see the Description section below. options ─ data-processing options (OBSERVE [options], Ch. 22). Description: The OBSERVE FIELD_POWER command is used to specify a power measurement variable to be plotted vs. time. The net power is nominally integrated over the specified LINE, AREA, or VOLUME. Results have the units of watts. • Use S.DA to integrate the Poynting flux through an area or surface. The object must be defined as type CONFORMAL in the LINE, AREA, or VOLUME commands. In 2d, the area may be a line or area specification. In 3d the specification can be an area, in which case you get the power flux through the area, or a volume, which gives the net flux through the surface faces of the conformal volume. • Use E.J_CURRENT_SOURCE.DV to measure the instantaneous power supplied by a CURRENT_SOURCE command; the object name must correspond to an object that has been assigned properties with the CURRENT_SOURCE command. • Use E.J_DRIVER.DV to measure the instantaneous power supplied by a DRIVER command; the object name must correspond to an object that has been assigned properties with the DRIVER command. • Use E.J_GAS_CONDUCTIVITY.DV to measure the instantaneous power absorbed in a region of GAS_CONDUCTIVITY. The object must be defined as type CONFORMAL in the AREA or VOLUME commands. • Use E.J_OHMIC.DV to measure the rate of energy attenuation in the electric field via the bulk conductivity specified by the CONDUCTANCE command; the spatial object must correspond to an object assigned the conductivity property in a CONDUCTANCE command. MAGIC User’s Manual 22-33 Part VII - Output Chapter 22 - Time Plots • Use B.J_OHMIC.DV to measure the rate of energy attenuation in the magnetic filed via the bulk magnetic conductivity specified by the CONDUCTANCE command; the spatial object must correspond to an object assigned the conductivity property in a CONDUCTANCE command. • Use EB.J_OHMIC.DV to measure the rate of energy attenuation in the electric and magnetic fields via the bulk conductivity and the magnetic conductivity specified by the CONDUCTANCE command; the spatial object must correspond to an object assigned the conductivity property in a CONDUCTANCE command. • Use E.J_PARTICLE.DV to measure the instantaneous power gained or lost by particles from the electric field in the spatial volume specified by the object. The object must be defined as type CONFORMAL in the AREA or VOLUME commands. • Use E.J_species_name.DV to measure the instantaneous power gained or lost by particles from the electric field in the spatial volume specified by the object. The object must be defined as type CONFORMAL in the AREA or VOLUME commands. • Use E.J_FREESPACE.DV to measure the power removed from the simulation through the bulk conductivity of the FREESPACE command. The object must correspond to an object assigned the freespace property in a FREESPACE command • Use SURFACE_LOSS to measure the power loss from surface currents of conductors. This power variable requires that the user invoke the SURFACE_LOSS command to activate the model. The object must be defined as type CONFORMAL in the AREA or VOLUME commands. See Also: OBSERVE [options], Ch. 22, CONDUCTANCE, Ch. 14, CURRENT_SOURCE, Ch. 19, DRIVER, Ch. 19, FREESPACE, Ch. 12, GAS_CONDUCTIVITY, Ch. 14, SURFACE_LOSS, Ch .14. Example: To obtain the power flow at a PORT boundary assigned the object AREA name EXITING_WAVE, you can use the following command. The figure below illustrates a typical sort of output from a 3D simulation. AREA EXITING_WAVE CONFORMAL,ZEND, CATHODE_RADIUS_O, 0.0 ,ZEND, ANODE_RADIUS_I, 2PI; OBSERVE FIELD_POWER S.DA EXITING_WAVE ; MAGIC User’s Manual 22-34 Part VII - Output Chapter 22 - Time Plots This figure illustrates the time history of the power flow through the area EXITING_WAVE. MAGIC User’s Manual 22-35 Part VII - Output Chapter 22 - Time Plots OBSERVE FILE Command Function: Specifies retention or deletion of the observe data binary scratch file. Syntax: OBSERVE FILE {DELETE, SAVE}; Description: The OBSERVE FILE command allows you to save the observe data binary scratch file. The default configuration is to delete these files, if the simulation terminates in a normal fashion. You may, however, ensure that they are retained by explicitly specifying the FILE SAVE option. In MAGIC2D these files will have the name of the input with the extension “.OBS”. In MAGIC3D, there are two files associated with observe binary data. Their extensions are: “.OBR” and “.OBI”. For most observe diagnostics the “.OBI” file will have values of zero. Currently, only the OBSERVE SPACE_HARMONIC diagnostic makes use of both files to record “real” and “imaginary” signal components. See Also: OBSERVE [options], Ch. 22 MAGIC User’s Manual 22-36 Part VII - Output Chapter 22 - Time Plots OBSERVE IMPEDANCE Command Function: Specifies evaluation of impedance as a function of frequency. Syntax: OBSERVE IMPEDANCE voltage_measurement current_measurement [SMITH_CHART] [MAGNITUDE_PHASE] [REFERENCE_Z0 Z0] [S11] [WINDOW FREQUENCY f_minimum f_maximum] [WINDOW TIME t_minimum t_maximum] [options] ; Or OBSERVE IMPEDANCE voltage_measurement current_measurement MATCHED_FILTER fsignal_sin(t) fsignal_cos(t) fsignal_freq(t) naverage [options] ; Arguments: voltage_measurement name of suffix associated with an “OBSERVE ..” voltage measurement. current_measurement name of suffix associated with an “OBSERVE ..” current measurement. f_minimum, f_maximum— frequency limits for results (Hz). t_minimum, t_maximum — temporal limits of FFT integration (sec). Z0 — reference impedance for S11 evaluation (ohms), default value of 50 ohms. fsignal_sin(t) — name of sin phase signal function used to excite the circuit. The function must be of unit amplitude. fsignal_cos(t) — name of cos phase signal function, corresponding to the sin phase function. The function must be of unit amplitude. fsignal_freq(t) — name of instantaneous frequency function. Function corresponding to the sin phase signal function. naverage — number of filter averaging periods, typically between 1 and 5. options — see OBSERVE [options], Ch. 22. Description: The OBSERVE IMPEDANCE allows you to measure the impedance of a circuit over some frequency range. This diagnostic requires that you first specify two standard OBSERVE diagnostics, one for the voltage and one for the current. Each of these diagnostics must be give a name (i.e. a suffix) by which it can be referenced. There are two methods of measuring the IMPEDANCE. In the first method, the complex impedance is evaluated by taking the ratio of the FFT of the voltage signal and the FFT of the current signal. The default processing options provides you a plot of the impedance as resistance and reactance. • • • The option, MAGNITUDE_PHASE, gives a plot of the magnitude and phase of impedance. The option, REFERENCE_Z0, allows you specify the matching or reference impedance, Z0, that may be used in the S11 or SMITHCHART options. The option, SMITH_CHART, provides an interactive display of the impedance on a smith chart. MAGIC User’s Manual 22-37 Part VII - Output • Chapter 22 - Time Plots The option, S11, provides you with the magnitude and phase of S11, for the computed impedance, Z, based upon the specified reference impedance, Z0, according to S11 = (Z-Z0) / (Z+Z0). See Example 1 below for illustrations of these display choices. The second method of evaluating the dynamic impedance is the MATCHED_FILTER method. This uses a homodyne signal corresponding to the sin and cos phases of the circuit excitation function. This method is designed only for use when the excitation signal is monotonically sweeping the frequency over some bandwidth. A zero bandwidth will cause this method to fail. In general this is designed to work using the SWEEP functions, SWEEP_SIN, SWEEP_COS, and SWEEP_FREQ. It is assumed that the excitation signal of the circuit is done with SWEEP_CHIRP. See Example 2 below for the use of the Matched_Filter options. Restrictions: 1. 2. 3. The voltage and current measurements must be in ratio of volts to amps. The measurements should also correspond to appropriate spatial measurements. Use of the SUFFIX option for the OBSERVE IMPEDANCE is not recommended. You may not use an observe variable based on OBSERVE IMPEDANCE. The impedance evaluation is done at the end of the simulation, and ongoing values are not available. See Also: OBSERVE [options], Ch. 22 Example: Example 1.Coaxial line with dielectric inserts, such that the impedance at the ports is 50 ohms and is 100 ohms in the vacuum region of the coaxial line. The cavity section is resonant at 2.0 GHz. Launch a broadband rf chirp at the lefthand port. Measure the incident signal and its FFT. Measure the voltage and current at the entrance of the coaxial line. Obtain the impedance and S11 response over the bandwidth of the chirp. FUNCTION INPUT_SIGNAL(t)= CHIRP(FREQMD*T,DFREQ/FREQMD,FREQMD*TRISE,FREQMD*TEND_SIGNAL) ; FUNCTION GX2(Z,R,PHI) = 1/R ; ! RADIAL TEM ELECTRIC FIELD PROFILE IN COAX MAGIC User’s Manual 22-38 Part VII - Output Chapter 22 - Time Plots FUNCTION GX3(Z,R,PHI) = .0 ; PORT CoaxPortINA POSITIVE Phase_Velocity VphsCoaxI INCOMING INPUT_SIGNAL FUNCTION E2 GX2 E3 GX3 NORMALIZATION VOLTAGE CoaxPortIN ; ! Look at incident signal form. Function Finput_signal(x,t) = Input_signal(t) ; OBSERVE Transform Finput_Signal FFT Magnitude Window Frequency FreqMn FreqMx DB_SCALE 6; ! Measure Voltage at left input port. OBSERVE Field_integral e.dl CoaxPortIn Suffix VoltageIn ; Plot of Voltage at Input Port. MAGIC User’s Manual 22-39 Part VII - Output Chapter 22 - Time Plots ! Measure Current at left input port. OBSERVE Field_Integral H.dl CoaxPortInLoop Suffix CurrentIn ; Plot of current at input side of Port. ! Measure Impedance at left input port. OBSERVE Impedance VoltageIn CurrentIn Reference_z0 50ohms magnitude_phase smith_chart S11 Window Frequency FREQMn FREQMx ! ! ! ! ! ; Gives complex impedance Reference Z0 Gives plot of magnitude and phase Smith Chart of complex impedance Plot of S11 based on Z0 Plot of Complex Impedance. MAGIC User’s Manual 22-40 Part VII - Output Chapter 22 - Time Plots Smith Chart of Complex Impedance. Plot of Impedance Magnitude and Phase. MAGIC User’s Manual 22-41 Part VII - Output Chapter 22 - Time Plots Plot of S11 for reference Impedance of 50 ohms. Example 2. Consider the case of a simple waveguide which is excited with a TE01 mode with a frequency swept signal going from 3.4 GHz to 2.7GHZ. The geometry is illustrated in the following contour plot figures. Wave Guide Geometry. Plot of TE01 mode, Ez contours in mid plane of waveguide. MAGIC User’s Manual 22-42 Part VII - Output Chapter 22 - Time Plots Plot of TE01 mode, Ez contours along wave guide. ! Define frequency sweep parameters. FREQLO = 2.7ghz ; ! lower limit of band FREQHI = 3.4ghz ; ! upper limit of band FREQmd = 0.5*(FREQLO+FREQHI); TRISE = 5/FREQMD ; TEND_SIGNAL = 100/FREQMD ; T1 = 1.5*Trise ; T2 = TEND_SIGNAL - Time1 ; F1 = FreqHi; F2 = FreqLo; TEND = Tend_Signal + 2*Trise; ! Define FUNCTION FUNCTION FUNCTION FUNCTION functions. RF_SIN(t)= SWEEP_Sin(T,T1,T2,F1,F2); RF_COS(t)= SWEEP_Cos(T,T1,T2,Freq1,F2); RF_FREQ(t)= SWEEP_Freq(T,T1,T2,F1,F2); RF_SIGNAL(t)= SWEEP_Chirp(T,T1,T2,F1,F2,Trise); MAGIC User’s Manual 22-43 Part VII - Output Chapter 22 - Time Plots Function SignalFreq(xo,t) = RF_FREQ(t) ; ! Wave Guide Cutoff Frequency. FC1 = 0.5*1C/Max(WG.B,WG.A) ; ! Wave Guide Phase velocity Function RF_Beta(t) = 1/SQRT(1-(FC1/RF_FREQ(t))**2) ; Function Signal_PHASE_VELOCITY(xo,t) = RF_Beta(t) ; OBSERVE TRANSFORM Signal_PHASE_VELOCITY XTRANSFORM RF_FREQ "Frequency (Hz)"; Plot of phase velocity at the input port plotted versus instantaneous frequency. ! Define DELAY0 = FUNCTION FUNCTION FUNCTION Function Function dynamic Phase velocity delay to reach end of guide. WG.x/1.C ; DELAY1(T) = DELAY0/RF_BETA(T) ; DELAY2(T) = DELAY0/RF_BETA(T-DELAY1(T)) ; DELAY3(T) = DELAY0/RF_BETA(T-DELAY2(T)) ; BetaInput(t) = RF_Beta(t) ; BetaOutput(t) = RF_Beta(t-DELAY3(t)) ; ! Define Shape function for Te01 mode. Py = 1pi/(VG.yf-VG.yi) ; Function GS_Ez(x,y,z)= sin((y-VG.yi)*Py ) ; Function GS_Ey(x,y,z) = 0.0 ; Port input.port Positive PHASE_VELOCITY BetaInput Incoming RF_CHIRP Function e2 gs_ey e3 gs_ez normalization voltage input.port.volt ; Port output.port negative PHASE_VELOCITY BetaOutput ABC_2; OBSERVE Field_integral e.dl Inside.port.volt SUFFIX INVOLT; Plot of voltage measurement at input port. MAGIC User’s Manual 22-44 Part VII - Output Chapter 22 - Time Plots Plot of current measurement at input port. Plot of FFT of current measurement at left side port. Notice the bandwidth characteristics. OBSERVE IMPEDANCE INVOLT INCURRENT MAGIC User’s Manual 22-45 Part VII - Output Chapter 22 - Time Plots MATCHED_FILTER Rf_SIN RF_COS RF_FREQ 2 WINDOW FREQUENCY FREQLO FREQHI; Plot of impedance versus frequency – Matched_Filter method. OBSERVE IMPEDANCE INVOLT INCURRENT WINDOW FREQUENCY FREQLO FREQHI MAGNITUDE_PHASE S11 REFERENCE_Z0 ZIMP_O1 DB_SCALE 6 ; Plot of impedance versus frequency – Fourier Transform method. Function SignalPeriod(t) = 1/RF_FREQ(t) ; OBSERVE FIELD_POWER S.DA INPUT.PORT FILTER FUNCTION_FILTER SIGNALPERIOD SUFFIX PINA NOPLOT; FUNCTION MEAN_POWERA_IN(X,T) = OBS$PINA ; OBSERVE TRANSFORM MEAN_POWERA_IN FILTER LO_PASS RF.PERIOD XTRANSFORM RF_FREQ "FREQ (Hz)"; Average Input Power with well matched port impedance. MAGIC User’s Manual 22-46 Part VII - Output Chapter 22 - Time Plots MAGIC User’s Manual 22-47 Part VII - Output Chapter 22 - Time Plots OBSERVE INDUCTOR Command Function: Specifies measurement of an INDUCTOR variable as function of time. Syntax: OBSERVE INDUCTOR object {CHARGE, CURRENT, INDUCTANCE, RESISTANCE, STORED_ENERGY, OHMIC_LOSS} measurement_object [options] ; Arguments: object name of line object assigned to the INDUCTOR command. options data processing options (see OBSERVE [options], Ch. 22). measurement_object name of line object assigned to the INDUCTOR command, or subsection that lies on the same line. Description: The OBSERVE INDUCTOR allows you to measure dynamic and static variables associated with an inductive circuit element Restrictions: 1. The spatial object must be assigned the property INDUCTOR. See Also: LINE, Ch. 10,INDUCTOR, Ch. 15, OBSERVE [options], Ch. 22 MAGIC User’s Manual 22-48 Part VII - Output Chapter 22 - Time Plots OBSERVE INTERVAL Command Function: Specifies observe data record interval. Syntax: OBSERVE INTERVAL interval ; Arguments: interval integer interval for recording time history data. Description: The OBSERVE INTERVAL command allows you to alter the recording interval of time history data. This is useful in simulation where the frequency content is highly resolved, because of locally very small cells. Then the frequency period may be over-resolved with a several hundred points per period. In this case, you can degrade the data recording interval. The default interval is unity (1). To ensure smooth behavior when filters are used or with obs$variables, the time history data measurements are taken each time step, regardless of the recording interval. See Also: OBSERVE [options], Ch. 22 Examples: OBSERVE INTERVAL 50; MAGIC User’s Manual 22-49 Part VII - Output Chapter 22 - Time Plots OBSERVE IONIZATION Command Function: Specifies particle ionization variable to be plotted versus time. Syntax: OBSERVE IONIZATION neutralgas species {CHARGE, CURRENT} [options]; Arguments: neutralgas — name of neutralgas used in IONIZATION command. species — name of either ionization species used in IONIZATION command. options — data processing options (see OBSERVE [options], Ch. 22). Description: The OBSERVE IONIZATION command is used to specify a particle creation variable to be plotted as a function of time. First specify the name of the neutralgas entered in the IONIZATION command. Next, enter the particle species; select either of the two ionization product species. Finally, select the particle measurable variable as listed above. Use CHARGE to measure cumulative charges (Coulombs). Use CURRENT to measure the instantaneous current (amps). Restrictions: 1. The neutralgas name must be one used in the IONIZATION command. 2. The species must be one of the two specified in the IONIZATION command. See Also: VOLUME, Ch. 10, CONDUCTOR, Ch. 14, OBSERVE [options], Ch. 22 Examples: IONIZATION ARGON PRESSURE ROOMTEMP ELECTRON ARGONPLUS IMPACT ELECTRON; OBSERVE IONIZATION ARGON ELECTRON CURRENT FILTER STEP TF; MAGIC User’s Manual 22-50 Part VII - Output Chapter 22 - Time Plots OBSERVE PARTICLE_STATISTICS Command Function: Specifies a particle statistical variable to be plotted vs. time. Syntax: OBSERVE PARTICLE_STATISTICS variable species object [ DEFINITION {GEOMETRIC, NORMALIZED } ] [ NOTAG, TAG ] [options] ; Arguments: variable object species options particle statistics variable (see list below). CHARGE, ENERGY, TEMPERATURE, T_PERPENDICULAR, T_PARALLEL, MEAN_X, MEAN_Y, MEAN_Z, SIGMA_X, SIGMA_Y, SIGMA_Z, RADIUS, ELLIPTICITY, MEAN_PX, MEAN_PY, MEAN_PZ, SIGMA_PX, SIGMA_PY, SIGMA_PZ, ROTATION_X, ROTATION_Y, ROTATION_Z, MEAN_XPRIME, MEAN_YPRIME, MEAN_ZPRIME, SIGMA_XPRIME, SIGMA_YPRIME, SIGMA_ZPRIME, EMITTANCE_X, EMITTANCE_Y, EMITTANCE_Z, EMITTANCE_RADIAL, EMITTANCE_ANGULAR, EMITTANCE_AXIAL, EMITTANCE_YZ, EMITTANCE_ZX, or EMITTANCE_XY. name of spatial object, defined in an AREA command in MAGIC2D, or a VOLUME command in MAGIC3D. name of particle species (ALL, ELECTRON or defined in SPECIES command). data processing options (see OBSERVE [options], Ch. 22). Description: The OBSERVE PARTICLE_STATISTICS command is used to specify a particle statistical variable to be plotted vs. time. The statistical quantity will be computed from all particles within the specified AREA (2D) or VOLUME (3D). This area or volume can encompass the entire collection of particles or it might just encompass a narrow slice of a continuous beam. Further restrictions can be made with the species and tag specifications. For example, in the case of a continuous beam interacting with RF of a known frequency, it might be desirable to invoke TAGGING (Ch. 24) on a single period to observe its evolution with time. To insure that all particles are used, the species should be set to ALL, and the NOTAG specification should be used. However, generally speaking, species of different charge-to-mass ratios should not be mixed. The variable, CHARGE, computes the total charge within the volume, e.g., CHARGE = , and the variable, ENERGY, computes the average energy of particles within the volume, MAGIC User’s Manual 22-51 Part VII - Output Chapter 22 - Time Plots ENERGY = , where q and m are the physical particle’s charge and mass, γ is the particle’s relativistic parameter, and N is the number of physical particles within each macroparticle. All other variables similarly refer to statistical moments of sums and products of the particles’ position and momentum variables in Cartesian coordinates, regardless of the coordinate system used for the simulation. These statistical quantities are re-normalized to the total number of physical particles. For example, the variable MEAN_X, designated as 〈x〉, is based upon the statistical moment of the particle’s X coordinate: MEAN_X = 〈x〉 = . Many of the variables find the “statistical spread” in position or momentum. For example, using the 〈…〉 and “σ” notation, the variable SIGMA_X gives the x-coordinate spread of the particles in the usual manner: SIGMA_X = σx = 〈 ( x − 〈x〉 )2 〉1/2 = ( 〈x2〉 − 〈x〉2 )1/2 , and the temperature variable is TEMPERATURE = . The temperature of a classical 1-D maxwellian distribution is, of course, given by variables are . The rotation ROTATION_Z = 〈x py〉 − 〈y px〉 , and similarly for the x and y rotations. For a rigid rotating beam centered on the z-axis, this z-rotation is equal to Ω〈r2〉, where Ω is the angular rotation frequency and 〈r2〉 is the mean square radius. Some variables, such as radius or geometric emittance, assume that the collection of particles within the specified volume constitutes part or all of a beam, with the beam momentum, pbeam, and unit direction vector, , computed from the statistical moment of the particle momenta, pbeam = 〈p〉 . For these quantities to be computed, the actual particle distributions must be consistent with the assumption of a beam, e.g., 〈px2〉 + 〈py2〉 + 〈pz2〉 >> + + . If this criterion is not met, then a value of zero will be displayed for the beam’s statistical variable. The beam direction, compute the RMS radius, given in tensor form by RADIUS = 〈r2〉1/2 = 〈 (x−〈x〉) ⋅ [1- , is needed to ] ⋅ (x−〈x〉) 〉1/2 . MAGIC User’s Manual 22-52 Part VII - Output Chapter 22 - Time Plots Ellipticity indicates how much a beam diverges from a round shape. For a beam centered on the z-axis, ellipticity has units of length, and is defined here as ELLIPTICITY = 31/2 ( ( 〈x2〉 − 〈y2〉 )2 + 4〈xy〉2 )1/4 . This quantity is invariant to rotation in the x-y plane. The diagnostic uses the equivalent tensor invariant, generalized for arbitrary beam axis. Beam temperature can also be separated into T_PERPENDICULAR and T_PARALLEL parts. The beam direction, , is also employed in the “prime-momenta” used for geometric emittance calculation, e.g., a particle’s XPRIME momentum is defined as: x′ = px / ⋅p , and similarly for y′ and z′. Physically, the primed momenta represents the tangent of the angle that a particle trajectory makes with the beam axis. The standard RMS emittance formula is (εxx/4)2 = 〈x2〉 〈x′2〉 − 〈xx′〉2 and is based upon an assumption of a beam centered on the z-axis, e.g., satisfying 〈x〉=0 and 〈x′〉=0. For arbitrary axis location and direction, where 〈x〉≠0 and/or 〈x′〉≠0, the RMS emittance formula is generalized here to be: EMITTANCE_X = εxx = 4 ( 〈(x−〈x〉)2〉 〈(x′−〈x′〉)2〉 − 〈(x−〈x〉) (x′−〈x′〉)〉2 )1/2 , and similarly for εyy and εzz. Normalized emittance uses the speed-of-light to re-normalize the momentum, rather than the quantity, ⋅p. The DEFINITION option allows the user to specify whether emittance is to be computed with the GEOMTRIC or NORMALIZED formula. The default is GEOMETRIC. Note that for a beam direction along the z-axis, the above definition results in εzz=0, trivially, for geometric emittance. Thus, the user should use the NORMALIZED emittance option in the direction of the beam axis. For an oblique beam axis the emittance is a symmetric tensor, and additional cross-term emittances become important, EMITTANCE_XY = εxy = εyx = 4(〈(x−〈x〉)(y−〈y〉)〉 〈(x′−〈x′〉)(y′−〈y′〉)〉 − 〈(x−〈x〉)(y′−〈y′〉)〉 〈(x′− 〈x′〉)(y−〈y〉)〉 )1/2 , and similarly for εyz′, and εzx′. An additional variable, EMITTANCE_AXIAL variable provides a convenient means of specifying the emittance in the beam direction, even for oblique beam axes. Care must be taken when interpreting emittance of a rotating beam. This situation occurs naturally when the beam is immersed in a magnetic field along the beam axis. Notice that for a beam centered on the z-axis, the geometric emittance takes on an approximate value εxx= ½〈r2〉Ω/pbeam, where Ω is the angular rotation frequency. However, if the rotation is due to immersion in a magnetic field, then it is not true emittance, because it is possible to remove it by including the vector potential in the momentum. For this reason, additional cylindrical-beam emittance variables are provided, since the suitable definition of angular emittance provides for zero emittance contribution from systematic rigid-rotation motion EMITTANCE_RADIAL = 23/2 ( 〈(r2〉 〈(r′2〉 − 〈r r′〉2 )1/2 , EMITTANCE_ANGULAR = 23/2 ( 〈(r2〉 〈(θ′2〉 − 〈r θ′〉2 )1/2 . MAGIC User’s Manual 22-53 Part VII - Output Chapter 22 - Time Plots See Also: OBSERVE [options], Ch. 22 Example: An electron bunch is emitted at full energy from the left wall of a long drift region. It is desired to determine the space-charge-induced growth in radius and emittance of the bunch. A 3D simulation in cylindrical coordinates is performed, and the output is shown below. At 14 nanoseconds, the bunch is midway through the drift region, as indicated in the final PHASESPACE plot. An R-R′ PHASESPACE plot, in the upper right, shows the traditional emittance phase space and is produced with the help of the user-defined functional phase-space variable, R_Prime. An eyeball estimate from this plot of the total area occupied by the particles suggests an actual emittance value around 8.5 micro-radian-meters. The initial bunch has uniform density, out to a radius of 1 cm; hence, the initial RMS radius is 0.707 cm. After 20 nanoseconds, the RMS radius has grown to 1.05 cm. The initial RMS x-emittance of the fully formed bunch is about 1.0 micro-radian-meters. After 20 nanoseconds, the RMS x-emittance has grown to about 4.6 micro-radian-meters. At 14 nanoseconds, the RMS x-emittance is about 3.7 micro-radianmeters, which can be compared to our eyeball estimate of 8.5 micro-radian-meters actual emittance, the difference being accounted for by a factor of 0.707 going from R-R′ to X-X′ phase space, and additional reduction to go from actual to RMS value. The following commands were used to produce the four plots. FUNCTION R_Prime(Z,R,THETA,PZ,PR,PTHETA) = PR/PZ ; PHASESPACE AXES X1 X2 timerPhase; PHASESPACE AXES X2 R_Prime timerPhase; OBSERVE PARTICLE_STATISTICS RADIUS ELECTRON beamArea NOTAG; OBSERVE PARTICLE_STATISTICS EMITTANCE_X ELECTRON beamArea NOTAG; This PHASESPACE figure shows a single electron bunch midway through the drift space . This figure shows the traditional r′-r PHASESPACE associated with emittance. MAGIC User’s Manual 22-54 Part VII - Output Chapter 22 - Time Plots This figure shows the expansion of the electron beam radius as a function of time. This figure shows the growth of the emittance of an electron bunch as it travels through the drift region. MAGIC User’s Manual 22-55 Part VII - Output Chapter 22 - Time Plots OBSERVE RESISTOR Command Function: Specifies measurement of a RESISTOR variable as a function of time. Syntax: OBSERVE RESISTOR object {CURRENT, OHMIC_LOSS} [options] ; Arguments: object options name of line object assigned to the RESISTOR command. data processing options (see OBSERVE [options], Ch. 22). Description: The OBSERVE RESISTOR allows you to measure dynamic and static variables associated with an inductive circuit element Restrictions: 1. The spatial object must be assigned the property of RESISTOR. See Also: LINE, Ch. 10, RESISTOR, Ch. 15, OBSERVE [options], Ch. 22 MAGIC User’s Manual 22-56 Part VII - Output Chapter 22 - Time Plots OBSERVE RESONANT_PORT Command Function: Specifies resonant_port variable to be plotted versus time. Syntax: OBSERVE RESONANT_PORT resonant_port variable [options] ; Arguments: resonant_port resonant_port line (2-D) or area (3-D), used in RESONANT_PORT command. variable resonant_port variable, e.g., V_LINE, V_LINE_REAL, V_LINE_IMAG, V_LINE_PHASE, V_GAP, V_GAP_REAL, V_GAP_IMAG, V_GAP_PHASE, I_BEAM, I_BEAM_REAL, I_BEAM_IMAG, I_BEAM_PHASE, I_GAP, I_GAP_REAL, I_GAP_IMAG, I_GAP_PHASE, N*I_IN, N*I_IN_REAL, N*I_IN_IMAG, N*I_IN_PHASE, BEAM_POWER, BEAM_POWER_CYCLING, GAP_POWER, GAP_POWER_CYCLING, INPUT_POWER, INPUT_POWER_CYCLING, R_CAVITY_POWER, INDUCTIVE_POWER_CYCLING, CAPACITIVE_POWER_CYCLING, R_EXTERNAL_POWER, options processing options (see OBSERVE [options]). Description: The command, OBSERVE RESONANT_PORT, is used to specify a resonant_port variable to be plotted vs. time. The resonant_port line or area is the same as what is used in a RESONANT_PORT command. The variable specifies the resonant_port variable to be observed. Many of resonant_port’s internal quantities are actually complex numbers, having both real and imaginary parts, or alternatively magnitude and phase. These complex quantities are observed by one of four different variables, giving magnitude, real-part, imaginary-part, or complex phase. Included in this class of variables are, V_LINE, the voltage across the voltage_line, V_GAP, the voltage across the resonant_port boundary, I_BEAM, the beam current, I_GAP, the gap current used in the alternative model, and N*I_IN, the ideal external current: V_LINE, V_GAP, I_BEAM, I_GAP, N*I_IN, V_LINE_REAL, V_GAP_REAL, I_BEAM_REAL, I_GAP_REAL, N*I_IN_REAL, V_LINE_IMAG, V_GAP_IMAG, I_BEAM_IMAG, I_GAP_IMAG, N*I_IN_IMAG, V_LINE_PHASE, V_GAP_PHASE, I_BEAM_PHASE, I_GAP_PHASE, N*I_IN_PHASE. A second class of variables provides the power and energy within the circuit modeled by a resonant port. These quantities are also complex; however, the real power indicates actual power, while the imaginary part indicates ω*U, where ω is the 2π times the frequency and U represents the energy which is cycled into and out of the energy source within one period. This class of variables includes the BEAM_POWER = ½ Ibeam*Vgap, the GAP_POWER = ½ Igap*Vgap, and the INPUT_POWER = ½ nIin*Vgap: BEAM_POWER, GAP_POWER, BEAM_POWER_CYCLING, GAP_POWER_CYCLING, MAGIC User’s Manual 22-57 Part VII - Output INPUT_POWER, Chapter 22 - Time Plots INPUT_POWER_CYCLING. The last class of variables represents additional power and energy variables that are either pure real or pure imaginary. These are: R_CAVITY_POWER INDUCTIVE_POWER_CYCLING CAPACITIVE_POWER_CYCLING R_EXTERNAL_POWER See Also: = ½ |Vgap|2 / R, = ½ |Vgap|2 / (iωL), = ½ |Vgap|2 (iωC), = ½ |Vgap|2 / Rexternal: PORT, Ch. 12, RESONANT_PORT, Ch. 12, OBSERVE [options], Ch. 22 MAGIC User’s Manual 22-58 Part VII - Output Chapter 22 - Time Plots OBSERVE R_OVER_Q Command Function: Specifies evaluation R/Q the circuit shunt impedance for a resonant circuit or structure in a time domain simulation. Syntax: OBSERVE R_OVER_Q voltage_measurement energy_measurement frequency ncycles ; [options] ; Arguments: voltage_measurement name of suffix associated with an “OBSERVE ..” voltage measurement. energy_measurement name of suffix associated with an “OBSERVE ..” energy measurement. Frequency — heterodyne frequency for voltage and energy averaging (Hz). ncycles — number of filter averaging periods, typically between 1 and 5. options — see OBSERVE [options], Ch. 22. Description: The OBSERVE R_OVER_Q allows you to measure the impedance of a circuit. This diagnostic requires that you first specify two standard OBSERVE diagnostics, one for the voltage and one for the energy. Each of these diagnostics must be give a name (i.e. a suffix) by which it can be referenced. You must specify the homodyne frequency for the analysis. This will typically be the resonant frequency of the circuit or cavity being analyzed. Typically the energy measurement is done in the cavity section of a circuit and the voltage is measured either along the beam axis or alternatively at the gap entrance to the cavity. In the case of TWT or Ladder circuit, the resultant measurement may need to be normalized by the number of periods, if the energy measurement spans more than a single period. R/Q, the shunt impedance is the figure of merit used to assess the coupling of the beam and the circuit. At resonance the cavity impedance of the circuit is resistive as the capacitive and inductive reactances cancel. The R/Q is a function only of the geometry. While Q is a function of frequency and wall loss, R/Q is not. However, the method of extracting R/Q assumes that the circuit is being driven at a single frequency. This frequency is used to remove the temporal and transient response from the signals used in the analysis. Restrictions: 1. 2. 3. The voltage and energy measurements must be in volts and joules. The measurements should also correspond to appropriate spatial measurements. Use of the SUFFIX option for the OBSERVE R_OVER_Q is not recommended. You may not use an observe variable based on R_OVER_Q. The evaluation is done at the end of the simulation, and ongoing values are not available. See Also: OBSERVE [options], Ch. 22 Example: Example 1. A single cavity klystron is excited with a current driver at the interaction gap into the resonant cavity section. The cavity section is resonant at 3.95 GHz. MAGIC User’s Manual 22-59 Part VII - Output Chapter 22 - Time Plots Determine the Q and R/Q of the cavity by measurement of the wall loss power, the cavity energy and the gap voltage. SURFACE_LOSS RFFREQ ; OBSERVE FIELD_POWER SURFACE_LOSS osys$volume Filter Step RFperiod ; OBSERVE FIELD_POWER SURFACE_LOSS osys$volume Q_of_Signal RFfreq ncycles ; MAGIC User’s Manual 22-60 Part VII - Output Chapter 22 - Time Plots OBSERVE FIELD_INTEGRAL E.DL GAP SUFFIX Gap_Volt; OBSERVE FIELD_ENERGY EM Cavity SUFFIX Cavity_ENERGY; MAGIC User’s Manual 22-61 Part VII - Output Chapter 22 - Time Plots OBSERVE R_OVER_Q Gap_Volt Cavity_energy RFFREQ 1 ; MAGIC User’s Manual 22-62 Part VII - Output Chapter 22 - Time Plots OBSERVE SECONDARY Command Function: Specifies particle creation variable to be plotted vs. time. Syntax: OBSERVE SECONDARY {object, ALL} {species, ALL} {CHARGE, CURRENT, YIELD} [options] ; Arguments: object — name of spatial object (ALL, or specific object defined in AREA/VOLUME command). Must have been assigned the property CONDUCTOR, DIELETRIC, FILM or FOIL. species — name of particle species (ALL, ELECTRON, or defined in SPECIES command). options — data processing options (see OBSERVE [options], Ch. 22). Description: The OBSERVE CREATED command is used to specify a particle creation variable to be plotted as a function of time. First specify a CONDUCTOR or DIELECTRIC object. Include all secondary emitting objects by entering ALL. Next, enter the particle species, use ALL if all species are to be included. Finally, select the particle measurable variable as listed above. Use CHARGE to measure cumulative charges (Coulombs). Use CURRENT to measure the instantaneous current (amps). Use YIELD the ratio of incident charge to secondary charge created. Restrictions: 1. The spatial object must be assigned the property CONDUCTOR, DIELECTRIC, FILM, or FOIL. See Also: VOLUME, Ch. 10, CONDUCTOR, Ch. 14, DIELETRIC, Ch. 14, FILM, Ch 14, FOIL, Ch 14, OBSERVE [options], Ch. 22 MAGIC User’s Manual 22-63 Part VII - Output Chapter 22 - Time Plots OBSERVE SMATRIX Command Function: Specifies evaluation of frequency response in reflection and transmission s-matrix coefficients assuming two ports. Syntax: OBSERVE SMATRIX voltage1 current1 voltage2 current2 [TWO_PORT port1_name port2_name {CHIRP, BAND_PING} flo fhi [REFERENCE_Z01 Z01] [REFERENCE_Z02 Z02] [{S11_MAGNITUDE_PHASE, S11_REAL_IMAGINARY}] [{S21_MAGNITUDE_PHASE, S21_REAL_IMAGINARY}] [WINDOW FREQUENCY f_minimum f_maximum] [WINDOW TIME t_minimum t_maximum] [DB_SCALE decades] [options] ; Arguments: voltage1 name of suffix associated with an “OBSERVE ..” voltage measurement for Port 1. current1 name of suffix associated with an “OBSERVE ..” current measurement for Port 1. voltage2 name of suffix associated with an “OBSERVE ..” voltage measurement for Port 2. current2 name of suffix associated with an “OBSERVE ..” current measurement for Port 2. Z01 — reference impedance for port 1 (ohms), default value of 50 ohms. Z02 — reference impedance for port 2 (ohms), default value of 50 ohms. f_minimum, f_maximum— frequency limits for results (Hz). t_ minimum, t_maximum — temporal limits of FFT integration (sec). options — see OBSERVE [options], Ch. 22. Description: The OBSERVE SMATRIX allows you to measure the S11 and S21 coefficients (reflection and transmission) of a two port circuit over some frequency range. This diagnostic requires that you first specify four standard OBSERVE diagnostics, one for the voltage at Port 1, one for the current at Port 1, one for the voltage at Port 2, and one for the current at Port 2. Each of these diagnostics must be give a name (i.e. a suffix) by which it can be referenced in its own OBSERVE command. It is assumed that the Port 1 measurements represent the location where the incident signal is introduced. This is a requirement. Caution must be used in the definitions of the voltage and current polarity. Inversion of the polarity of the current with respect to the voltage for Port 1will give results with S11 and S21 having values greater than unity. Inversion of the polarity of the current with respect to the voltage for Port 2 will give results with S21 such that the sum of the squares of S11 and S21 is not unity in the case of a loss-less circuit. See the examples below which illustrate methods to change the polarity of the measurements. In addition, values of the resultant S11 and S21 outside the bandwidth of the incident signal are prone to large errors. You must always window the frequency to the signal bandwidth. The options, REFERENCE_Z01 and REFERENCE_Z01, allow you specify the matching or reference impedances, Z01 and Z02, associated with ports 1 and 2. The default plotting option is to plot |S11|, |S21| and [S11·S11†+ S21·S21†] versus frequency. In addition, you may select to plot the complex values of S11 and S21 by selecting from the options: MAGIC User’s Manual 22-64 Part VII - Output • • • • Chapter 22 - Time Plots S11_MAGNITUDE_PHASE or S11_REAL_IMAGINARY, and S21_MAGNITUDE_PHASE or S21_REAL_IMAGINARY. When displaying the REAL and IMAGINARY components, the DB_SCALE option is ignored. Restrictions: 1. The voltage and current measurements must be in ratio of volts to amps. 2. You must always window the frequency to the signal bandwidth. See Also: OBSERVE [options], Ch. 22 Example: Coaxial line with dielectric inserts, such that the impedance at Port1 (left side) is 50 ohms, the impedance at Port 2 (right side) is 50 ohms, and in the vacuum region the impedance is 100 ohms. The cavity section is resonant at 2.0 GHz. Launch a broadband rf chirp at the lefthand port. Measure the incident signal and its FFT. Measure the voltage and current at the entrance of the coaxial line. Obtain the impedance and S11 and S21 response over the bandwidth of the chirp. FUNCTION INPUT_SIGNAL(t)= CHIRP(FREQMD*T,DFREQ/FREQMD,FREQMD*TRISE,FREQMD*TEND_SIGNAL) ; FUNCTION GX2(Z,R,T) = 1/R ; ! RADIAL TEM ELECTRIC FIELD PROFILE IN COAX FUNCTION GX3(Z,R,T) = .0 ; PORT CoaxPortINA POSITIVE Phase_Velocity VphsCoaxI INCOMING INPUT_SIGNAL FUNCTION E2 GX2 E3 GX3 NORMALIZATION VOLTAGE CoaxPortIN ; MAGIC User’s Manual 22-65 Part VII - Output Chapter 22 - Time Plots Measure the voltage at ports 1 and 2. OBSERVE FIELD_INTEGRAL E.DL PORT1V Suffix Vin; OBSERVE FIELD_INTEGRAL E.DL PORT2V Suffix Vout; Measure the current at port 1 several different ways. Measure OBSERVE OBSERVE OBSERVE OBSERVE OBSERVE the current at Field_integral Field_integral Field_integral Field_integral Field_integral ports 1 H.dl PORT1Loop Suffix IIn ; H.dl PORT2Loop Suffix Iout; H.dl PORT2Loop2 Suffix Ioutm ; H.dloop PORT1LoopA Suffix IInA ; -H.dloop PORT1LoopA Suffix IInB ; ! Correct Polarity ! Incorrect Polarity ! Correct Polarity Measure the current at port 2 with both polarities. OBSERVE Field_integral H.dloop PORT2LoopA Suffix IoutA; OBSERVE Field_integral -H.dloop PORT2LoopA Suffix IoutB; ! Correct Polarity ! Incorrect Polarity Measure the impedance and S11 at Port 1. OBSERVE Impedance VIn IIn S11 Window Frequency Flo Fhi DB_Scale 6; Measure the impedance at Port 2. Notice in the following figure that impedance at PORT 2 is 50 ohms as specifie. OBSERVE Impedance VOut IOut Window Frequency Flo Fhi DB_Scale 6; Measure S11 and S21 using the proper impedance at Port1 (input side) and Port2 (output side). OBSERVE SMATRIX Vin Iin Vout IoutA reference_z01 50 reference_z02 25 s11_MAGNITUDE_PHASE MAGIC User’s Manual 22-66 Part VII - Output Chapter 22 - Time Plots s21_REAL_IMAGINARY Window Frequency Flo Fhi DB_Scale 6; MAGIC User’s Manual 22-67 Part VII - Output Chapter 22 - Time Plots Measure S11 and S21 using the proper impedance at Port1 (input side) and the wrong impedance at Port2 (output side). Notice that S21 in dB takes on values greater than 0. This is indicative of an error in port 2 impedance. OBSERVE SMATRIX Vin Iin Vout IoutA reference_z01 50 reference_z02 50 Window Frequency Flo Fhi DB_Scale 6; Measure S11 and S21 using the proper impedance at Port1 (input side) and the proper impedance at Port2 (output side), but using the incorrect polarity of the port 2 current with respect to the port 2 voltage . Notice the effect on the S21 measurement. MAGIC User’s Manual 22-68 Part VII - Output Chapter 22 - Time Plots OBSERVE SMATRIX Vin Iin Vout IoutB reference_z01 50 reference_z02 25 Window Frequency Flo Fhi DB_Scale 6; Measure S11 and S21 using the proper impedance at Port1 (input side) and the proper impedance at Port2 (output side), but using the incorrect polarity of the port 1 current with respect to the port 1 voltage . Notice the effect on the S11 and the S21 measurements. ! Inversion of current polarity at Port1 side. OBSERVE SMATRIX Vin IinA Vout IoutA reference_z01 50 reference_z02 25 Window Frequency Flo Fhi DB_Scale 6; MAGIC User’s Manual 22-69 Part VII - Output Chapter 22 - Time Plots MAGIC User’s Manual 22-70 Part VII - Output Chapter 22 - Time Plots OBSERVE SPACE_HARMONIC Command Function: Specifies evaluation of a space harmonic component of an electromagnetic field to be plotted versus time. Syntax: OBSERVE SPACE_HARMONIC iharmonic field line [options] ; Arguments: iharmonic space harmonic mode, (positive integer). field field component (see list below). E1, E2, E3, B1, B2, B3, J1, J2, J3, or Q0. line name of conformal line, defined in a LINE command. options data-processing options (OBSERVE [options], Ch. 22). Description: The OBSERVE SPACE_HARMONIC command is used to specify the space harmonic component of a field along a conformal line to be plotted vs. time. The space harmonic temporal history has a real and imaginary component corresponding to the cos and sin integrals of the field component along the selected line. These components are specified by the following equations. kn= 2πn/∆xi, an(t) = 1/∆xi ∫ f(xi,t,) cos(kn xi) dxi, and bn(t) = 1/∆xi ∫ f(xi,t,) sin(kn xi) dxi. Here ∆xi is the displacement along the selected line, n is the harmonic mode number, and thus kn is the associated wavenumber. The quantities, an and bn correspond to the real and imaginary components of the discrete spatial transformation of f(xi,t), where f(xi,t) is spatial value of the selected electromagnetic field component at the time, t. The frequency content of the a particular mode can be obtained by taking the temporal FFT of an and bn. The temporal Fourier transform is defined by Fn(ω) = An(ω) + iBn(ω) = 1/∆T ∫ an(t)+ibn(t)) eiωt dt. The phase velocity of the frequency spectrum of Fn(ω) is defined by the expression vn(ω) = ω/kn. Notice that for traveling waves the frequency spectrum will contain both plus and minus values of frequency, indicating respectively, the forward and backward traveling wave components. See Also: MAXWELL algorithms, Ch. 17, OBSERVE [options], Ch. 22 MAGIC User’s Manual 22-71 Part VII - Output Chapter 22 - Time Plots OBSERVE TRAMLINE Command Function: Specifies a transmission-line variable to be plotted vs. time in a 2D simulation. Syntax: OBSERVE TRAMLINE tline_name variable point [options] ; Arguments: tline_name variable point options transmission-line name, defined in TRAMLINE command. transmission-line variable (see TRAMLINE, Ch. 13), VOLTAGE, CURRENT, POWER, CAPACITANCE, INDUCTANCE, IMPEDANCE, ENERGY-CAP, ENERGY-IND, or ENERGY-TOT. name of spatial point on transmission line coordinate, defined in POINT command. processing options (see OBSERVE [options], Ch. 22). Description: The OBSERVE TRAMLINE command is used to specify a transmission-line variable to be plotted vs. time. The tline_name specifies the transmission line and the point specifies the coordinate location. The variable specifies the transmission line variable to be observed. See Also: TRAMLINE, Ch. 13 OBSERVE [options], Ch. 22 Restrictions: 1. This command is available only in 2D simulations. MAGIC User’s Manual 22-72 Part VII - Output Chapter 22 - Time Plots OBSERVE TRANSFORM Command Function: Syntax: User specified transformation of observe data to be plotted versus time. OBSERVE TRANSFORM function(y,t) [options] ; Arguments: function options — transformation function, defined in FUNCTION command. — processing options (see OBSERVE [options], Ch. 22). Description: The OBSERVE TRANSFORM command is used display the temporal behavior of a function. The function has two dummy arguments, y and t. The argument y refers to the dependant measurement value from the observe command. The argument t refers to the independent variable of time. Other variables and functions, including other observed variables, may be referenced by the transformation function in the normal fashion. (See the FUNCTION command for details. Note that when another observed variable is used in a transformation, its value is obtained from the previous time step, and not the current time step.) The name of the transformation function will appear on the y-axis of the plot. See Also: OBSERVE [options], Ch. 22 Examples: In this example, we look at the actual space charge limited current emitted from a cylindrical face diode compared with the the Child-Langmuir current limit for an area equal to the cylindrical face. The voltage is 50 kV. We use the OBSERVE transform option and the suffix options to directly evaluate the ratio. TIMER PHS PERIODIC REAL 1NANOS 10NANOS 1NANOS ; PHASESPACE AXES X1 X2 PHS ; EPS0 = 8.8544E-12 ; EBYM = 1.7588E+11 ; ECHG = 1.6021E-19 ; CJCONST = 4/9*EPS0*SQRT(2*EBYM) ; OBSERVE FIELD_INTEGRAL E.DL VOLTAGE.AXIAL Filter Step TS suffix Vgap; MAGIC User’s Manual 22-73 Part VII - Output OBSERVE COLLECTED Chapter 22 - Time Plots ALL ELECTRON CURRENT FILTER STEP TS Suffix I_actual ; ! *** Evaluate child langmuir limit for actual gap voltage. ! *** Use the observe values from the measurement of the axial voltage. Function I_Child_langmuir(x,y)=EMITTER_AREA*CJCONST*(OBS$Vgap**(3/2)/GAP_Z**2; OBSERVE TRANSFORM I_Child_langmuir Filter Step TS Suffix I_gap ; ! *** Evaluate impedance of diode. ! *** Use axial voltage measurement and the collected current measurement ! *** Trap the large values and trap divide by zero. Function Z_Diode(xo,t) = MIN(200,OBS$Vgap/Max(10,ABS(OBS$I_Actual))) ; OBSERVE Transform Z_Diode Filter Step TS ; MAGIC User’s Manual 22-74 Part VII - Output Chapter 22 - Time Plots MAGIC User’s Manual 22-75 Part VII –Output Chapter 23 – 1D Plots 23. 1D PLOTS This Chapter covers the following commands: RANGE [options] RANGE FIELD RANGE FIELD_INTEGRAL RANGE FIELD_POWER RANGE HISTOGRAM RANGE IONIZATION RANGE PARTICLE RANGE TRAMLINE You can use the RANGE commands to plot the value of a simulation variable vs. a spatial dimension. Typically, the spatial dimension will be one of the spatial coordinates (x1, x2, or x3) or perhaps a limited portion of a coordinate. In other cases, it may represent an arbitrary path in space (such as the inner surface of a particle collector). There are many data-processing operations that can be applied to RANGE data, and these are described in the RANGE [options] command. Defaults are set for many of these options. All of the other RANGE commands involve plotting a particular measurement_type, such as FIELD, etc. Some measurement_types may apply only to 2D or 3D simulations. All RANGE and OBSERVE commands use LineGraph to display the requested signal data. (See Chapter 22 for complete description of LineGraph.) If PAUSE is OFF when an OBSERVE or RANGE command is executed LineGraph will display the requested signal and continues without a pause. If PAUSE is ON, or if a plot is chosen from the MAGIC main menu using OutputRangeAll, OutputRangeSelect, OutputObserveAll, or OutputObserveSelect, Then the simulation will pause, and the user can take advantage of the LineGraph commands to study the graph more closely. Some of the more commonly used features of LineGraph include: • • • • Zoom In/Out on a portion of the graph Save an image of the graph Examine signal value at an individual data point Extract signal data to an ASCII text file MAGIC User’s Manual 23- 1 Part VII –Output Chapter 23 – 1D Plots RANGE [options] Command Function: Specifies data-processing options for RANGE commands. Syntax: RANGE {FIELD, FIELD_INTEGRAL, FIELD_POWER, HISTOGRAM, IONIZATION, PARTICLE, TRAMLINE } [ arguments ] timer [ AXIS { X, Y } minimum maximum [ step ] ] [ PRETRANSFORM function(x,y,t) ] [ TRANSFORM function(x,y) ] [ POSTTRANSFORM function(x,y) ] [ INTEGRATE { POSITIVE, NEGATIVE} ] [ FFT { MAGNITUDE, COMPLEX } [FFT_AXIS scale “label”] ] [ FREQUENCY_COMPONENT frequency [MAGNITUDE, COMPLEX [PIERCE_IMPEDANCE period phaseshift power] ] ] [ STANDING_WAVE_RATIO ffrequency(t)] movie options [ MOVIE ] [{PNG, BMP, PCX }] (bitmap formats) [{AVI, MPEG}] (movie file formats) [ MOVIE_SIZE width height ] [ MOVIE_NAME dirname] [ CODEC [avi_codec, mpeg_codec ] [ FRAMERATE irate ] standard graphics control options [ NOLEGEND, LEGEND ] [ XAXIS, NOXAXIS] [ YAXIS, NOYAXIS] [ ZAXIS, NOZAXIS ] [ XLABEL, NOXLABEL ] [ YLABEL, NOYLABEL ] [ ZLABEL, NOZLABEL ] [ XSCALE, NOXSCALE ] [ YSCALE, NOYSCALE ] [ ZSCALE, NOZSCALE ] [ CLEGEND, NOCLEGEN ] [ TITLE, NOTITLE ] [ FRAME, NOFRAME ] [ ASPECT, NOASPECT ] [ NOGRID, GRID ] standard output control options [ NOEXTRACT, EXTRACT, EXTRACT_DIR extract_dir, EXTRACT_FILE extract_file ] [ NOPRINT, PRINT ] [ NODUMP, DUMP ] [ PLOT, NOPLOT ] ; Arguments: arguments differs for each variable_type, see other RANGE commands. timer timer name, defined in TIMER command. minimum, ... plot boundaries for position axis (X) or variable axis (Y). step plot subdivisions for position axis (X) or variable axis (Y). function transformation function, defined in FUNCTION command. frequency frequency of frequency component whose amplitude is to be plotted. ffrequency name of frequency function, defined in FUNCTION command or constant. MAGIC User’s Manual 23- 2 Part VII –Output Chapter 23 – 1D Plots scale scale factor for FFT. “label” axis label for FFT when scaled. x dummy argument representing position. y dummy argument representing the variable. t dummy argument representing simulation time. width width of movie window in pixels. height height of movie window in pixels. dirname folder name for movie frames, and used for avi movie name. avi_codec — codec compression algorithm. Choices for avi file creation are: UNCOMPRESSED, Full frames, uncompressed. CINEPAK, Cinepak by Supermac. INDEO3.2, Intel Indeo Video 3.2. INDEO5, Intel Indeo Video 5. MSVIDEO1, Microsoft Video 1 (default). RLE, Run Length Encoding. DIVX5, DivX 5. XVID, XviD. 3IVX, 3ivx. mpeg_codec— codec compression algorithm. Choices for mpeg file creation are: MPEG1, MPEG-1 standard. MPEG1.VCD, MPEG-1 with VideoCD extensions. MPEG2, MPEG-2 standard. MPEG2.SVCD, MPEG-2 with Super VideoCD extensions. MPEG2.DVD, MPEG-2 with DVD extensions. irate. — frame rate, number of frames/sec in AVI movie file. extract_dir — the name of output folder that contains the extracted data. extract_fille — file name of extracted data, default name is generated from uniquely from diagnostic and time stamp. period — length of circuit period (m). phaseshift — phase shift/period (radians) at drive frequency. Power — power applied to circuit (watts). Defaults: The default values for the data processing options are listed in the table below. Default operations are automatically applied to RANGE commands, even if the specific operation is not explicitly entered in the command. For example, if you reset the FFT index default from 1 to 2, all subsequent RANGE commands will automatically trigger an FFT operation, even if FFT is not entered in those commands. Keyword AXIS X AXIS Y PRETRANSFORM TRANSFORM POSTTRANSFORM INTEGRATE EXTRACT, NOEXTRACT Argument Minimum, maximum, step Minimum, maximum, step Function Function Function {POSTIVE, NEGATIVE} MAGIC User’s Manual Default (entire simulation coordinate) (determined by variable range) unity (no transformation) unity (no transformation) unity (no transformation) unity (no integration) NOEXTRACT 23- 3 Part VII –Output { PLOT, NOPLOT } { NODUMP, DUMP } { NOPRINT, PRINT } Chapter 23 – 1D Plots (none) (none) (none) (none) PLOT (output is plotted) NODUMP (output is not dumped) NOPRINT (output is not printed) Description: The RANGE command provides the capability to output a 1D plot, i.e., a plot of a simulation variable vs. spatial position at times specified by a timer. The spatial position will usually be measured along one of the simulation axes but may, in certain circumstances, contain multiple segments and bends. (For example, to plot energy deposition on a curved surface, the spatial distance would be measured along the perimeter of the surface.) Separate RANGE commands are structured for each variable_type (e.g., RANGE FIELD for field variables, etc.), since each variable_type may have unique arguments. Some variable_types may apply only to 2D or 3D simulations. The RANGE commands describing each variable_type and its unique arguments follow later in this Chapter. The present RANGE [options] command describes the general data-processing operations (e.g., FFT) which are common to all RANGE commands. Movie options The MOVIE option permits you to generate a sequence of bitmaps (in PNG, BMP, or PCX format) from a sequence of RANGE plots. In order for this sequence to provide an appealing visual representation of the data, you should also use the AXIS option to enforce limits. When the MOVIE option is invoked, MAGIC generates a series of bitmaps that are saved in a folder. There is one movie folder per command that uses the MOVIE option. You can post process the files to create an avi-file. You can “play” the movie by using the MOVIE command. Use of the keyword AVI or MPEG, causes the software to process the frames into an avi-file/mpeg-file automatically at the termination of the simulation. The individual frames and the movie folder are deleted after this is complete. Use of the keyword CODEC allows you select among a number of compression schemes. In addition, you may use the MOVIE_SIZE option to specify the width and height of a free floating movie window. A maximum of 12 free floating movie windows of all types are allowed. Movie windows may be of different sizes. When WINDOW_SIZE is specified, it also activates the NOLEGEND option. The option, MOVIE_NAME, allows you specify the name of a folder for the movie frames. It must be unique, (i.e. not used with more than one MOVIE option.) If the AVI file type is selected, the name is also used for the avi-movie file. Axis Options The AXIS option allows refinement of the actual plot boundaries, both in extent (minimum and maximum) and in the size of plot subdivisions (step). The arguments, AXIS X, refer to the independent spatial dimension, which is always plotted horizontally as the x-axis in meters. The arguments, AXIS Y, refer to the dependent simulation variable, which is always plotted vertically as the y-axis. The units of the variable axis depend upon the variable as well as any data-processing options selected. Data Processing Options There are several, optional, data-processing operations. These options are normally performed in the same order as the following list. MAGIC User’s Manual 23- 4 Part VII –Output • • • • • • • Chapter 23 – 1D Plots PRETRANSFORM, FREQUENCY_COMPONENT, STANDING_WAVE_RATIO, TRANSFORM, INTEGRATE, (spatial integration) POSTTRANSFORM and FFT. When you specify more than one operation, please be aware that the operations will be performed in a particular order, and not necessarily in the order you place them in the command. Each operation causes the variable data to be modified in a particular fashion. Note that you may specify either FREQUENCY_COMPONENT or STANDING_WAVE_RATIO, however you should not specify both on the same measurement operation. As an adjunct to these three operations, you can also use the INTEGRATE option in a TIMER command to perform temporal averaging or integration over an interval prior to the time at which output occurs. (A common use of this option is to average particle or FIELD_POWER data over a full RF period to get cycle-averaged quantities.) When this option is used, the integration will be performed after the PRETRANSFORM operation and before the TRANSFORM operation (if either is specified). The PRETRANSFORM option causes a transformation of the variable before it is temporally averaged. (Normally, this option would be used only if you intend to perform temporal averaging with the TIMER command.) The function has three dummy arguments: x. y, and t. (A common use of pretransformation is to multiply the variable by a sinusoidal time function to extract harmonic information.) The name of the pretransformation function will appear on the y-axis of the plot. The TRANSFORM option causes a transformation of the variable after temporal averaging (if any). Thus, this function has only two arguments: x and variable. The name of the transformation function will appear on the y-axis of the plot. The INTEGRATE option performs a simple integration along the axis of measurement. The starting value is always assumed to be 0. You may select to integrate in the POSTIVE or NEGATIVE sense of the axis of measurement, by specifying the appropriate keyword. The POSTTRANSFORM option causes a transformation of the variable after temporal averaging (if any) and after the INTEGRATE option is applied. Thus, this function has only two arguments: x and variable. The name of the posttransformation function will appear on the y-axis of the plot. Fast Fourier Transform (FFT) The FFT option is used to specify a Fourier transform. The default is NOFFT. You can specify a plot of either the magnitude or the complex parts of the FFT. The default is MAGNITUDE. There is no ability to control the boundaries of the FFT plots. The actual FFT calculation proceeds as follows: . For reference, the inverse FFT is: MAGIC User’s Manual 23- 5 Part VII –Output Chapter 23 – 1D Plots . The conventional factor of 2π is missing because of the use of inverse wavelength, λ, instead of wave number. The extra factor of two in the transform is compensated for in the inverse by integrating over only positive inverse wavelengths, a common manipulation where pure real data is concerned. In displaying the data, we convert to use of the wave number, k. The FFT_AXIS option is used to apply a scaling transformation to the fft data. The horizontal axis is scaled by “scale” and the vertical axis is scaled by “1/scale”. This preserves the integrated area. In addition, you may supply a new axis “label” string for the horizontal axis. Frequency Analysis and Pierce Impedance The FREQUENCY_COMPONENT option is used to obtain a range plot of the amplitude of a physical quantity at a single frequency. The default is NOFREQUENCY_COMPONENT. The only argument is “frequency,” but an integrating timer must be used and set to integrate over at least one period of the rf signal of interest. Thus, if the “frequency” option used is rf_frequency, the timer integration duration must be N/rf_frequency, where N is an integer. The resulting range plot will contain the peak amplitude of the Fourier component at the specified frequency. This option is useful, for example, in obtaining the rf current amplitude in an electron beam at all locations along the beam axis. (See RANGE FIELD_INTEGRAL, Ch. 23, for an example.) Note that the amplitude thus displayed is peak amplitude at the specified frequency, not rms. You may use the option MAGNITUDE (default) or COMPLEX to specify the resultant representation. For example, if the line measurement is that of J.dA, you may obtain the RF amplification or current bunching at a specific frequency as function of beam distance along the circuit. In the case of periodic structures you may also obtain the PIERCE impedance, by selecting COMPLEX PIERCE_IMPEDANCE and supplying the circuit ‘period’, the phase shift/period (βo) at the drive frequency and the drive power. The line length must be greater than or equal to period for a proper spatial integration. In this you would normally be measuring the axial electric field, say Ez on axis. The axial electric field of a traveling wave in a periodic structure may be written as Ez(z,r,t) = ∑n Ezn(r) exp(i(βnz-ωnt)). Here, βn = βo + 2π n/p, and p is the axial structure (circuit) period and βo = βo(ωo) depends on the frequency. Integration of the field, Ez(z,r,t), over one temporal period at the drive frequency, fn, yields the complex spatial profile. Ezn(z,r) = Ezn(r) exp(iβnz) = 1/T ∫ Ez(z,r,t) exp(+iωnt) dt. Once we have the complex spatial profile we then perform the spatial integration over a length, Lo=period, Ezo(r) = 1/ Lo ∫ Ezo(z,r) exp(-iβoz) dz, for n=0. The Pierce impedance is defined as MAGIC User’s Manual 23- 6 Part VII –Output Chapter 23 – 1D Plots K(r) = |Ezo(r)|2/ 2βo2P where P is the power flowing in the structure. It is recommended that the measurement of the Pierce impedance be made in cold test and after sufficient time that circuit transients are minimal and that the average forward power is well known. This may be confirmed by an OBSERVE FIELD_POWER S.DA at the circuit output or load. Standing Wave Ratio (SWR) The STANDING_WAVE_RATIO option is used to obtain the standing wave ration of a selected measurement. You must specify ffrequency, a function or constant, which indicates the desired frequency as a function of time. The standard timer is used to indicate when the measurement is to be plotted. The frequency function is used to determine the integration interval of the measurement. , where the integral is over T=1 period. S = Max(<y(x)>)/ Min(<y(x)>), and |S11| =(S-1)/(S+1). The measurement_type should be either a FIELD or FIELD_INTEGRAL, and must extend at least ¼ wavelength along the measurement axis. The values of the frequency, SWR, S11, and dB will be printed in the *.SUM file, as well as on the individual plot. The RANGE plot itself will show <y(x)>. The integrity of the measurement will depend upon the purity of the frequency and locating the measurement some distance from structural features that would result in evanescent field contamination. See example below. Output Options The EXTRACT, PLOT, DUMP, and PRINT options allow 1D plot results to be displayed and/or stored by four different methods: • • • • Extracted to a text file automatically, as a graphical plot in a file or on screen, as a data record in the GRD file, or as printed column data in the LOG file. A 1D plot on metafile or on screen is the normal result of the RANGE command. Under certain circumstances, it may be desirable to have particular plots displayed, but not stored to save disk space, or perhaps stored, but not displayed, for some other reason. The PLOT, NOPLOT, DUMP, and NODUMP options can be applied to individual 1D plots; i.e., it is not necessary to treat all the plots in the same way. Alternatively, DUMP TYPE RANGE or DUMP TYPE ALL commands can be used to record all 1D plots in the GRD file (DUMP, Ch. 25). The EXTRACT, EXTRACT_DIR, and EXTRACT_FILE options are used to automatically extract the graphics data to a text file for later use, such as in a spreadsheet or other post analysis tool. The default condition is NOEXTRACT. The EXTRACT option enables automatic extraction after a graphic is displayed. Unless a directory folder is specified the extracted data will be in the working directory. MAGIC User’s Manual 23- 7 Part VII –Output Chapter 23 – 1D Plots Use of the EXTRACT_DIR option permits you to specify a particular output directory, making it easier to keep the results organized. All graphics output will have a unique automatic name based on the particular diagnostic and the time step of extraction. You may override this using the EXTRACT_FILE name option. The PRINT option can be used to generate tables of 1D plot data in the LOG file. This option cannot be applied separately to individual 1D plots. Therefore, the last PRINT or NOPRINT option entered will govern printing for all RANGE commands to the LOG file. Restrictions: 1. The total number of RANGE commands defined in a simulation is limited to fifty. 2. A maximum of 12 free floating movie windows of all types (CONTOUR, RANGE, PHASESPACE, and VECTOR) are allowed. See Also: RANGE FIELD, Ch. 23, RANGE FIELD_INTEGRAL, Ch. 23, RANGE FIELD_POWER, Ch. 23, RANGE HISTOGRAM, Ch. 23, RANGE PARTICLE, Ch. 23, RANGE TRAMLINE, Ch. 23, TIMER, Ch. 11. Examples: Measure the standing wave ratio between parallel plates terminated with an absorption region at the left. A mono-frequency signal is introduced at the right side of the simulation box. RANGE FIELD E2 RANGE_LINE TSYS$LAST STANDING_WAVE_RATIO FREQUENCY ; This figure shows the wave between the plates. MAGIC User’s Manual 23- 8 Part VII –Output Chapter 23 – 1D Plots This figure shows the time averaged standing wave amplitude between the plates as a function of position. Notice that the measurement does not extend within the absorption region at the left, and does not include the launching element at the right. Note, also that the value S11 is given on the legend of the figure. RANGE PLOTS: RANGE and OBSERVE commands uses identical graphical controls to display the requested signal data. If PAUSE is OFF when an OBSERVE or RANGE command is executed Range will only display the requested signal and continue. If PAUSE is ON, or if a plot is chosen from the MAGIC main menu using OutputRangeAll, OutputRangeSelect, OutputObserveAll, or OutputObserveSelect, the simulation will wait, and the user can take advantage of the Range commands to study the graph more closely. Some of the more commonly used features of Range include: • Zoom In/Out on a portion of the graph • Save an image of the graph • Examine signal value at an individual data point • Extract signal data to an ASCII text file To make it easier for the user to know which kind of plot is being displayed, a different default line color is used for the three cases. OBSERVE Plots are shown in RED, RANGE plots are drawn in BLUE, and RANGE HISTOGRAM plots are PURPLE. MAGIC User’s Manual 23- 9 Part VII –Output Chapter 23 – 1D Plots FFT Observe Plot from 6VaneMagnetron.m2d Example Input File RANGE MENU COMMANDS File Save Range: File Range: Extract File Print Range: Edit Copy Output: Output Pause Output: RangeReset: RangeClear: RangeLegend: This option will save an image of the currently visible line plot, including the legend, title, and axis information, if it is present. When selected, a dialog box will appear and ask for a filename and type of filename to save the image as. The available image formats are BMP, PCX, and PNG. Use this command to create a tab delimited ASCII text file of the X and Y values of each point in the line graph. When selected, a dialog box will appear and ask for a filename, and the information will be extracted to Filename.txt. The file will contain the title of the plot, the number of data points extracted, and two columns of data containing the X and Y values for each point, in ascending order versus X. Use this command to print the currently visible plot. A dialog box will appear that allows the user to select the printer, page size, orientation, and the margins. Selecting this option will send the currently visible plot to PAINT, an application that comes standard with all versions of Windows. A limitation of the graphics package MAGIC uses prevents image copying directly to the clipboard for pasting into other applications. Once the image has been loaded in PAINT, the user can use the edit select all, edit copy commands in PAINT to copy the image to the clipboard, and then the image can be pasted into other applications, such as Microsoft Word. The user must exit PAINT before returning to the MAGIC simulation. This menu option is checked if PAUSE is currently ON. Uncheck this menu option to turn pause off from this point on. This command will reset the plot to the original settings. Any changes such as zooming in, changing line colors, hiding the legend, etc, will be reversed. Blanks the display screen. The graph legend, shown in Figure 2, gives information about the simulation and the plot, and is shown by default at the bottom of the screen. Uncheck this option to hide the legend. MAGIC User’s Manual 23- 10 Part VII –Output RangeInterval: HelpRange Help: Chapter 23 – 1D Plots The Graph Legend gives information about the plot and the simulation. The interval option is most commonly used when plots with a large amount of data are displayed. When an interval value n is selected, Range will only display every nth point. If the RangeIntervalAuto option is checked, Range will set the interval automatically based on the number of points in the plot. The default interval setting is always 1, which displays every point available. Selecting this option will give a brief description of the mouse and keyboard commands available in Range. These commands are described in the next section. RANGE AUXILIARY TOOLBAR BUTTON COMMANDS Extract data to file...: Save image as bitmap...: Show/Hide axes and labels: Show/Hide Title: This command is the same as the menu "File -> Extract Range Plot" command. Use this command to create a tab delimited ASCII text file of the X and Y values of each point in the line graph. When selected, a dialog box will appear and ask for a filename, and the information will be extracted to Filename.txt. The file will contain the title of the plot, the number of data points extracted, and two columns of data containing the X and Y values for each point, in ascending order versus X. This command is the same as the menu "File -> Save Range Plot" command. This command will save an image of the currently visible line plot, including the legend, title, and axis information, if it is present. When selected, a dialog box will appear and ask for a filename and type of filename to save the image as. The available image formats are BMP, PCX, and PNG. This command is the same as the menu "Range -> Axes labels" toggle command. It toggles between showing and hiding the graph x axis/labels, y axis/labels, and legend. This command is the same as the menu "Range -> Title" toggle command. It toggles between showing and hiding the graph title. Show/Hide X_AXIS: This command is the same as the menu "Range -> x-Axis and labels" toggle command. It toggles between showing and hiding the graph x axis/labels. Show/Hide Y_AXIS: This command is the same as the menu "Range -> y-Axis and labels" toggle command. It toggles between showing and hiding the graph y axis/labels. Show/Hide Legend: This command is the same as the menu "Range -> Legend" toggle command. It toggles between showing and hiding the legend. Show/Hide Frame: This command is the same as the menu "Range -> Show graph frame" toggle command. It toggles between showing and hiding the graph frame. Reset Graph: This command is the same as the menu "Range -> Reset" command. This command will reset the plot to the original settings. Any changes such as zooming in, changing line colors, hiding the legend, etc, will be reversed. RANGE MOUSE/KEYBOARD COMMANDS Current Mouse Position: In Range, whenever the mouse cursor is inside the plot area, the x, y location of the mouse cursor is shown in the status bar of the MAGIC window. Figure 3 shows the status bar of the MAGIC window. When the mouse is positioned at the blue arrow, the location of the cursor is shown in the status bar. MAGIC User’s Manual 23- 11 Part VII –Output Chapter 23 – 1D Plots Figure 3: MAGIC Status Bar shows Current Mouse Position Mouse Zoom: To zoom in on the display using the mouse, hold down the right mouse button while moving the mouse vertically on the screen. Moving towards the top of the screen will zoom in on the graph, moving towards the bottom will zoom out. Figure x.3 shows a zoom in on the first frequency peak of the same Observe plot shown in Figure x.1. Keyboard Zoom: The keyboard offers more flexibility for zooming in and out. To change only the scale of the x (horizontal) axis, use uppercase “X” to zoom in, or lowercase “x” to zoom out. “Y” and “y” can be used to zoom in or out along the y (vertical) axis. The Keypad can also be used to zoom in on the plot. When NumLock is on, “4” and “6“ will expand the X axis in the –X or +X directions, and “2” and “8” will expand the Y axis in the –Y or +Y directions, respectively. The “+” and “–“ keys will zoom in and out on both axes equally. Panning: Panning changes the point at which the graph is centered. To pan using the mouse, hold down both the right and left mouse buttons, and move the mouse in any direction. The plot will shift with the movement of the mouse until one or both of the buttons are released. To pan using the keyboard, use the arrow keys. Snap to a Point: As explained in Current Mouse Position, the user can see the current location of the mouse cursor on the graph in the status bar. The user can also snap to the closest point in the line graph by single clicking the left mouse button anywhere inside the display area. When the user clicks the left mouse button, a red dot marks the nearest point, and a pop-up window will appear that gives the exact location of the point. Range will only snap to visible points, and will not snap to a point that is not being displayed because the RangeInterval option is set to a value other than 1. (See help on MAGIC User’s Manual 23- 12 Part VII –Output Chapter 23 – 1D Plots RangeInterval) An example is shown in Figure x.4. Also note the Line Color and Line Width menu options, which will be explained below. Figure 4: Left-Click inside the plot area to find the closest point or modify the appearance of the line. Line Width: Select the Line Width menu option from the pop-up window shown in Figure x.4 to change the thickness of line. The default thickness of one pixel is shown in Figure 4. Line Color: Select the Line Color menu option from the pop-up window shown in Figure x.4 to change the color of vector lines. A dialog box will appear that allows the user to select any 24 bit RBG color. MAGIC User’s Manual 23- 13 Part VII –Output Chapter 23 – 1D Plots RANGE FIELD Command Function: Plots field variable vs. spatial position. Syntax: RANGE FIELD field line timer [ options ] ; Arguments: field field variable (see list below). line name of conformal line, defined in LINE command. timer name of timer, defined in TIMER command. options processing options (RANGE [options], Ch. 23). Description: This command produces a 1D plot of a field variable along a specified spatial line. The field variable may be any of those specified above. Note that some fields are available only in 2D simulations. The spatial line must be conformal. Restrictions: 1. Some fields are defined only in 2D simulations and are not available in 3D. 2. The spatial line must be conformal. 3. The total number of RANGE commands is limited to fifty. See Also: LINE, Ch. 10, TIMER, Ch. 11, RANGE [options], Ch. 23 Examples: The following commands illustrate the use of the RANGE options in diagnosing a cylindrical CARM simulation. A gyro-magnetic beam with a current of 2.5 kA is introduced at the left end of a hollow, confining chamber. A confining magnetic field of 2.024 tesla is applied along the axial direction. A current-density driver with a frequency of 103.29 GHz is applied at the emission surface. The RANGE command is used to measure the magnitude of the azimuthal electric field at a fixed value of r versus z and performs an FFT on the data. The following figures show the results at a simulation time of 0.29 ns. TIMER end_of_run DISCRETE REAL .494nanosec; LINE GC_axis CONFORMAL 0.0, Radius_Center SYS$X1MX, Radius_Center ; RANGE FIELD E3 GC_axis end_of_run FFT MAGNITUDE ; MAGIC User’s Manual 23- 14 Part VII –Output Chapter 23 – 1D Plots Range plot of Ephi electric field showing the periodic variation in field intensity and the amplification of the signal with increasing axial coordinate. Spatial FFT of the Ephi electric field. Note that only one strong spatial component is evident in the spectrum. MAGIC User’s Manual 23- 15 Part VII –Output Chapter 23 – 1D Plots RANGE FIELD_INTEGRAL Command Function: Specifies electromagnetic field integral to be plotted vs. position. Syntax: [options]; RANGE FIELD_INTEGRAL {E.DL, H.DL, J.DA} {ordinate} {area,volume} timer Arguments: area,volume conformal area/volume enclosing the measurement region, for E.DL define using the AREA command in 2D and 3D, for H.DL define using the AREA command in 2D and 3D, for J.DA define using the AREA command in 2D and for J.DA define using the VOLUME command in 3D. ordinate — is (X1, X2, X3) for generalized coordinates, or (X, Y, or Z) for a Cartesian coordinate system, or (Z, RHO, or PHI) for cylindrical coordinates, or (RHO, PHI, or Z) for polar coordinates. timer name of timer, defined in TIMER command. options data-processing options (RANGE [options], Ch. 23). Description: The RANGE FIELD_INTEGRAL command plots an electromagnetic field integral variable versus spatial position. Presently, only voltage and current are treated. The user must specify the direction, (ordinate), over which to plot the field integral variable. The area/volume specifies the spatial region of interest. For the E.DL and H.DL variables, the direction of integration is the direction in the plane of the specified area that is transverse to the plotting direction. For the J.DA variable, the normal to the area of integration is in the plotting direction. The integral will carry the combined units of the field and the spatial differential, DL (m), DA (m2). The E.DL integration has units of volts, the H.DL integration has units of amps and the J.DA integration has units of amps. The value given for E.DL has the correct sign for a voltage measurement; i.e, it is actually the negative of the E.DL integral. Restrictions: 1. The total number of RANGE commands defined in a simulation is limited to fifty. See Also: TIMER, Ch. 11, RANGE [options], Ch. 23 Examples: To measure the axial current for a cylindrical simulation within the spatial object “coaxialCavity” intervals of 100 time steps, use the following commands, TIMER currentTimer PERIODIC 100 9999 100; RANGE FIELD_INTEGRAL J.DA X1 coaxialCavity currentTimer; or RANGE FIELD_INTEGRAL J.DA Z coaxialCavity currentTimer; MAGIC User’s Manual 23- 16 Part VII –Output Chapter 23 – 1D Plots To measure and display the peak rf current (cylindrical simulation) in an electron beam drift tube (spatial object “driftTube”) along the beam axis at frequency “rf_frequency,” use the following input lines: TIMER T4rf PERIODIC INTEGER 2000,999999,2000 INTEGRATE 1768; RANGE FIELD_INTEGRAL J.DA X1 driftTube T4rf FREQUENCY_COMPONENT rf_frequency; The timer must be set to INTEGRATE, and the integration interval must be an integral number of periods of the frequency for optimal results. In this example, one rf period is 442 time steps, so that the integrating timer T4rf integrates over four periods of the rf signal. See RANGE [options], Chapter 23 for more information on the SPECTRALINE option. This option is now only available for the RANGE FIELD_INTEGRAL command. MAGIC User’s Manual 23- 17 Part VII –Output Chapter 23 – 1D Plots RANGE FIELD_POWER Command Function: Specifies electromagnetic power variable to be plotted vs. position. Syntax: RANGE FIELD_POWER E.J_PARTICLE {ordinate} {area,volume} timer [ options ] ; or RANGE FIELD_POWER S.DA {X1, X2, X3, ordinate } {area,volume} timer [ FREQUENCY nf f1 f2 ... fnf ] [ PHASE_VELOCITY { velocity(x,f), SECTIONS ns x1 x2 ... xns [SMOOTH] } ] [ options ] ; Arguments: ordinate — is (x1,x2,x3) for generalized coordinates, or (X, Y, or Z) for a Cartesian coordinate system, or (Z, RHO, or PHI) for cylindrical coordinates, or (RHO, PHI, or Z) for polar coordinates. area — conformal area enclosing the measurement region, defined in the AREA command for 2D simulations. volume — conformal volume enclosing the measurement region, defined in the VOLUME command for 3D simulations. timer — name of timer, defined in TIMER command. nf — number of frequencies in list (integer). f1 f2 ... fnf — list of frequencies (Hz). velocity — phase velocity (m/sec), constant or defined in FUNCTION command. ns — number of section breaks for computed phase velocity (integer). x1 x2 ... xns— section breaks for computed phase velocity (unitless). options — data-processing options (RANGE [options], Ch. 23). Description: The RANGE FIELD_POWER command plots an electromagnetic power variable vs. spatial position. Currently, only the Poynting flux power variable is treated. The user must specify the direction, (ordinate), over which to plot the power variable. The area/volume specifies the spatial region of interest, with the power variable being integrated over this area/volume in the direction transverse to the plotting direction. It is possible to divide the power variable into its constituent frequency components, using the FREQUENCY option (2D only). This additional analysis is based upon Parseval’s identity, and uses the Fourier transforms of the individual electromagnetic fields comprising the power variable. To perform its function properly, the FREQUENCY option requires data over several (at least two) oscillation periods of the smallest frequency of interest. This means that the TIMER... INTEGRATE option must be used, with an integration interval of several such periods. The user must supply the frequencies of interest by listing the frequencies in order from smallest to largest. A value of zero for f1 is allowed. For purposes of determining the length of the timer integration interval, the smallest frequency of interest is the smaller of either the lowest non-zero frequency or the minimum spacing between frequencies, if more than one frequency is requested. When the FREQUENCY option is used, more than one plot is produced, the first being the total power, and the subsequent plots being the power in each frequency, one plot per specified frequency. MAGIC User’s Manual 23- 18 Part VII –Output Chapter 23 – 1D Plots The FREQUENCY analysis requires that the entire time history of the fields be stored to a file on disk before the analysis can be performed, resulting in a sizable scratch file. For this reason, the maximum amount of information in terms of frequency content should be derived from the fewest number of RANGE FIELD_POWER ... FREQUENCY commands possible. For the Poynting flux power variable only, an additional division into positive power flow and negative power flow directions is done whenever timer integration is performed (2D only). This directional analysis is performed on each non-zero frequency component individually if the FREQUENCY option is also specified. The Poynting power flux before directional division may be of either sign. The directional division is pure, that is, positive power is always positive in sign and negative power is always negative in sign; however, RANGE reverses the sign of the negative power on the plot to facilitate reading of the data. The result of the directional analysis is three additional plots for each nonzero frequency, one showing positive power, another showing negative power, and a third showing the phase velocity used. For example, if five non-zero frequencies are requested, then 16 (=1+4x5) range plots will result. The directional analysis requires that an estimate of the phase velocity be made. The default internal algorithm used to estimate the phase velocity is based upon a minimum standing-wave principle which is of unknown robustness. Hence, if the phase velocity of the system can be established a priori, then it is advisable to use the PHASE_VELOCITY option to supply this quantity directly. Note that the phase velocity is, in general, a function of frequency and position along the data range. Even when the phase velocity is not known a priori, the user must assist the internal algorithm in cases where the phase velocity is known to vary spatially by breaking up the spatial range into sections. The SECTIONS option requires the user to specify ns positions, x1 ... xns, where section breaks occur. By default, the phase velocity is assumed to be constant between the section breaks. If, instead, a smooth tapering in phase velocity is more appropriate, then the SMOOTH option can be invoked. When the PHASE_VELOCITY option is not employed, the entire spatial range is assumed to have a constant phase velocity by default. Restrictions: 1. The total number of RANGE commands defined in a simulation is limited to fifty. 2. The FREQUENCY analysis currently works only for the S.DA variable in 2D simulations. See Also: TIMER, Ch. 11, RANGE [options], Ch. 23 Examples: In this example, a RANGE FIELD_POWER command is used to display the power flow in a coaxial transmission line which has an obstruction halfway down its length. A 100-watt, 1 GHz signal is introduced at the left port of the coaxial line. At the obstruction, approximately 59% of the power is reflected, while the remaining 41% is transmitted and continues to propagate towards the PORT boundary on the right. The net power, Figure 23-2a, throughout the transmission line is therefore 41 watts; however, the directional analysis, Figures 23-2b and c, properly shows that, to the left of the obstruction, the power consists of 100-watt forward power and 59-watt backward power. It also shows that the power to the right of the obstruction is all forward power. The TIMER command is also shown below, because the directional analysis requires that the timer INTEGRATE option be used. Here the time integration is performed over a single oscillation period. RFP2=2.*RF.PERIOD ; TIMER CHECK.PWR PERIODIC REAL TSTART SYS$RUNTIME RFP2 INTEGRATE RFP2 ; FLO = RF.FREQUENCY ; MAGIC User’s Manual 23- 19 Part VII –Output Chapter 23 – 1D Plots FHI = 2*RF.FREQUENCY ; RANGE FIELD_POWER S.DA X1 INTERIOR CHECK.PWR FREQUENCY 2 0 FLO ; Range plot of the RF-cycle averaged net power in a coaxial cable with an obstacle in the line that causes signal reflections. Note that the mean net power is about 41 watts. Range plot of the RF-cycle averaged forward power in a coaxial cable with an obstacle in the line that causes signal reflections. Notice that the mean supplied power at the left side is 100 watts, and the mean power that makes it to the end of the coaxial line is 41 watts. MAGIC User’s Manual 23- 20 Part VII –Output Chapter 23 – 1D Plots Range plot of the RF-cycle averaged backward power in a coaxial cable with an obstacle in the line that causes signal reflections. Note that the mean return power is about 59 watts. MAGIC User’s Manual 23- 21 Part VII –Output Chapter 23 – 1D Plots RANGE HISTOGRAM Command Function: Specifies histogram of particle distribution versus one phase space variable. Syntax: RANGE HISTOGRAM species coordinate nbins bin_lo bin_hi timer [WINDOW coordinate minimum maximum] [{SURVIVING, DESTROYED}] [options ] ; Arguments: species — particle species (ELECTRON, PROTON, or defined in SPECIES command). coordinate — particle phase space variable (X1, X2, X3, P1, P2, P3, KE, or VELOCITY, or f(x1,x2,x3,p1,p2,p3,q,ke), a function defined in a FUNCTION command). nbins — number of bins for histogram bin_lo — lower end of histogram. bin_hi — lower end of histogram. minimum — lower end of sampling window. maximum — upper end of sampling window. timer — timer name, defined in TIMER command options — data—processing options (RANGE [options], Ch. 23). Description: The RANGE HISTOGRAM command produces a histogram of the particle distribution function versus one of the particle phase space coordinates at times specified by the timer. The timer must specify times which take into account the kinematics step_multiple (LORENTZ, Ch. 18). By default, only the "surviving", i.e. active macro-particles are sampled in the histogram. If you wish to look at the particle collected on various conductors or otherwise removed from the simulation use the DESTROYED keyword argument after specifying the timer (or windowing parameters.) Note! The DESTROYED or SURVIVING keyword must come before the selection of any [options]. The argument, coordinate, specifies a phase-space variable. The standard variables that may be specified are X1, X2, X3, P1, P2, or P3. These are the physical coordinates and momenta of the particles. In addition, the arguments, KE, and VELOCITY may be used to select the kinetic energy per physical particle (eV) and the magnitude of the velocity (m/s). Other variables can be selected by using a function name for the argument, coordinate. The function implicitly refers to eight particle variables: x1, x2, x3, p1, p2, p3, q, and ke. The variables x1, x2, and x3 denote the physical coordinates of the particle. The variables p1, p2, and p3 denote the momenta of the particle in m/s. The variable q denotes the particle charge, and the variable ke denotes the kinetic energy in eV. The keyword, WINDOW, can be used to select the acceptance window in any of these variables: x1, x2, x3, p1, p2, p3, ke, and v. Only particles falling within the variable limits, minimum and maximum, are included in the histogram sample space. Note that the window coordinates allow you to specify the sample space of your simulation. Restriction: 1. The DESTROYED or SURVIVING keyword must come before the selection of any [options]. MAGIC User’s Manual 23- 22 Part VII –Output Chapter 23 – 1D Plots See Also: TIMER, Ch. 11, RANGE [options], Ch. 23, CONTOUR HISTOGRAM, Ch. 24 Examples: The following commands illustrate the use of the RANGE HISTOGRAM command to sample a particle distribution in a simulation of a 3-MVolt diode. The WINDOW option is used to restrict the sample to the region of the device that is physically located downstream from the accelerating electrode. The first RANGE command examines the velocity spread of the beam electrons. The plot will include the average velocity of the sampled electrons as well as the RMS value. The second RANGE command is used to examine the kinetic energy of the sampled electrons. The third RANGE command is used to sample the axial momentum component of the electrons, and the final RANGE command is used to examine the radial profile of the sample electrons. In each case, the average value and the RMS value of the sampled variable is evaluated and printed as part of the plot informative text. RANGE HISTOGRAM ELECTRON VELOCITY 100 2.9e8 3E8 CHKIT WINDOW X1 ZMAX_ANODEELECTRODE ZMAX_ENDPLATE RANGE HISTOGRAM ELECTRON KE 100 2E6 4E6 CHKIT WINDOW X1 ZMAX_ANODEELECTRODE ZMAX_ENDPLATE RANGE HISTOGRAM ELECTRON P1 100 1E9 3E9 CHKIT WINDOW X1 ZMAX_ANODEELECTRODE ZMAX_ENDPLATE RANGE HISTOGRAM ELECTRON X2 100 0.0 RADIUS CHKIT WINDOW X1 ZMAX_ANODEELECTRODE ZMAX_ENDPLATE ; ; ; ; Range histogram of the electron beam kinetic energy distribution in a 3-MeV diode. MAGIC User’s Manual 23- 23 Part VII –Output Chapter 23 – 1D Plots RANGE IONIZATION Command Function: Plots gas ionization property versus incident particle kinetic energy. Syntax: [options]; RANGE IONIZATION neutralgas {CROSS_SECTION, ENERGY_LOSS} timer Arguments: neutralgas — name of neutralgas used in IONIZATION command. timer — name of timer, defined in TIMER command. options — data –processing options (RANGE [options], Ch. 23). Description: This command produces a 1D plot of one of the gas ionization properties versus incident electron kinetic energy in eV. The possible variable quantities are the gas ionization cross section, measured in unit atomic cross section, or the electron energy loss as a function of energy (dE/dx) in units of eV/mm. The ENERGY_LOSS depends upon the pressure and temperature of the neutral gas. See Also: LINE, Ch. 10, TIMER, Ch. 11, RANGE [options], Ch. 23 Examples: PARAMETER PRESSURE = 0.01ATMOSPHERE ; PARAMETER ROOMTEMP = 273 ; ! DEGREES KELVIN IONIZATION OXYGEN PRESSURE ROOMTEMP OXYGENIONS ELECTRON; RANGE IONIZATION OXYGEN CROSS_SECTION TSYS$FIRST; MAGIC User’s Manual ELECTRON IMPACT 23- 24 Part VII –Output Chapter 23 – 1D Plots RANGE PARTICLE Command Function: Plots particle variable vs. spatial position. Syntax: timer RANGE PARTICLE {CURRENT, POWER, ENERGY} {species, ALL} {ordinate} [ WEIGHTING { POSITIVE_FLUX,NEGATIVE_FLUX, DENSITY } ] [ options ] Arguments: species ordinate timer function x ke options — particle species name, ELECTRON or name defined in SPECIES command. — is (X1, X2, X3) for generalized coordinates, or (X, Y, or Z) for a Cartesian coordinate system, or (Z, RHO, or PHI) for cylindrical coordinates, or (RHO, PHI, or Z) for polar coordinates. — name of timer, defined in TIMER command. — function to convert energy to efficiency, defined in FUNCTION command. — dummy argument representing position. — dummy argument representing kinetic energy. — data –processing options (RANGE [options], Ch. 23). Description: This command produces a 1D plot of a particle variable along a specified coordinate axis. The particle variable may be current, power, or energy. The EFFICIENCY option requires a function which will be used to convert energy/particle to efficiency. The function has two arguments: x (the axis coordinate) and ke (the value of the energy at x). For example, if the beam has 60 keV of energy prior to the output circuit and the collector, the conversion function could be defined as f(x,ke) = 1 – w/60. The WEIGHTING option can be used to compute energy per particle by either of two methods. FLUX weighting (the default) derives energy per particle as a ratio of current flux to power flux. In addition, the FLUX method requires specification of either POSITIVE_FLUX or NEGATIVE_FLUX in order to properly distinguish between the two directions of particle streaming. The default weighting is POSITIVE_FLUX. DENSITY weighting derives energy per particle as a ration of energy density to charge density. The two methods may produce subtle differences when the beam is not steady-state or CW. In addition, in the case of counter-streaming particles the use of both POSITIVE_FLUX and NEGATIVE_FLUX allows you to obtain the POWER and CURRENT flow in the POSITIVE and NEGATIVE directions. Restriction: 1. The total number of RANGE commands is limited to fifty. See Also: LINE, Ch. 10, TIMER, Ch. 11, RANGE [options], Ch. 23 Examples: MAGIC User’s Manual 23- 25 Part VII –Output Chapter 23 – 1D Plots The following commands illustrate the use of the RANGE options in diagnosing a cylindrical CARM simulation. A gyro-magnetic field of 2.204 tesla is applied along the axial direction. A current-density driver with a frequency of 103.29 GHz is applied at the emission surface. The following RANGE commands measure the transverse averaged particle energy and power versus z. A temporal average over one period of the drive frequency is applied by using a TMER with an integration interval equal to the period. The following figures show the plots resulting from these commands for a simulation time of 0.29 ns. TIMER TAVERAGED PERIODIC REAL PERIOD10 1 PERIOD; RANGE PARTICLE POWER ELECTRON X1 TAVERAGED; RANGE PARTICLE ENERGY ELECTRON Z TAVERAGED; PERIOD10 INTEGRATE Range plot of time-averaged particle energy in eV versus axial coordinate. MAGIC User’s Manual 23- 26 Part VII –Output Chapter 23 – 1D Plots Range plot of time-averaged electron beam power as a function of axial position. Note the loss of power in the electron with increasing z. This power is delivered up to the electric field. MAGIC User’s Manual 23- 27 Part VII –Output Chapter 23 – 1D Plots RANGE TRAMLINE Command Function: Plots transmission line variable as a function of spatial position in a 2D simulation. Syntax: RANGE TRAMLINE tline_name variable point, point timer [ options ] ; Arguments: tline_name — name of transmission line, defined in TRAMLINE command. variable — transmission line variable (see TRAMLINE command). CURRENT, POWER, VOLTAGE, CAPACITANCE, INDUCTANCE, IMPEDANCE, ENERGY-CAP, ENERGY-IND, or ENERGY-TOT. point — value of transmission line coordinate (m). options — data-processing options (RANGE [options], Ch. 23). Description: The transmission line is specified by tline_name. The variable specifies the particular transmission line variable that can be observed as a function of position, and the range of spatial position is specified by line_name. The transmission line model calculates several variables of interest. The following table lists the keywords and physical definitions associated with each variable. Keyword CURRENT POWER VOLTAGE CAPACITANCE INDUCTANCE IMPEDANCE ENERGY-CAP ENERGY-IND ENERGY-TOT Definition current power voltage capacitance/length inductance/length impedance capacitive energy inductive energy total energy Notes 1 1 1 2,3 2,3 2,4 Notes: 1. 2. 3. 4. Only accessible with the RANGE TRAMLINE command. For OBSERVE TRAMLINE this requires a finite range, not a point. For RANGE TRAMLINE this returns energy/length. Not accessible with the RANGE TRAMLINE command. Restriction: 1. The total number of RANGE commands defined in a simulation is limited to fifty. See Also: TIMER, Ch. 11, TRAMLINE, Ch. 13, RANGE [options], Ch. 23 MAGIC User’s Manual 23- 28 Part VII –Output Chapter 23 – 1D Plots MAGIC User’s Manual 23- 29 Part VII –Output Chapter 24 – 2D and 3D Plots 24. 2D and 3D PLOTS This Chapter covers the following commands: DISPLAY CONTOUR [OPTIONS] CONTOUR FIELD CONTOUR HISTOGRAM VECTOR PHASESPACE TAGGING VIEWER These commands allow you to visualize some selected feature of the simulation over a specified two-dimensional spatial area. The feature might be simulation geometry, a field variable, a particle trajectory, etc. In many commands, the two-dimensional area is specified using an AREA command. In 2D simulations, this area is a portion of the two-dimensional space. In 3D simulations, the area is a portion of a plane; the position and orientation are arbitrary, but the plane must be conformal in one of the coordinates. You can use DISPLAY command to plot the simulation spatial objects and/or spatial grid. Field variables can be output as CONTOUR FIELD plots showing "equipotentials," or they can be output as VECTOR plots showing magnitude and direction. You can use the PHASESPACE commands to produce plots of any pair of canonically conjugate momenta. Particle positions are plotted as (un-weighted) points in the two-dimensional space. You can also use those commands to obtain trajectory plots, which follow the motion of selected particles as a function of time, and you can select the particles with the TAGGING command. The VIEWER command is used to specify the display of 3-dimensional view at specific times during the simulation. MAGIC User’s Manual 24- 1 Part VII –Output Chapter 24 – 2D and 3D Plots DISPLAY Command Function: Displays simulation features in a cross-section of the simulation. Syntax: DISPLAY [area] ; Arguments: area — name of a conformal spatial area, defined in AREA command. Description: The DISPLAY command provides a visual interpretation of simulation features in a cross-section of the simulation. The conformal area is used simply to identify a cross-section or slice through the entire simulation space; a cross-section of the entire simulation is always displayed, irrespective of the actual size of the area. DISPLAY All DISPLAY commands (MAGIC2D and MAGIC3D) use Display to display information about the simulation’s geometry. If PAUSE is OFF when a DISPLAY command is executed, Display will only display the requested geometry plane and continue. When PAUSE is ON the simulation will wait and the user may take advantage of the Display commands to study the geometry more closely. Some of the more commonly used features of Display include: • • • • • Zoom In/Out on a portion of the geometry Save an image of the geometry plane Hide/Show grid lines Check the location of a grid point Measure the distance between two grid points. MAGIC User’s Manual 24- 2 Part VII –Output Chapter 24 – 2D and 3D Plots Geometry Plane from StrappedMagnetron.m3d Example Input File DISPLAY MENU COMMANDS File Save Output: File Extract Output: File Print Output: Use Edit Copy Output: OutputPause Output: Display1:1 Aspect This option will save an image of the currently visible grid display, including the legend, title, and axis information, if it is present. When selected, a dialog box will appear and ask for a filename and type of filename to save the image as. The available image formats are BMP, PCX, and PNG. Use this command to create a tab delimited ASCII text file of the full grid points for the currently displayed geometry plane. When selected, a dialog box will appear and ask for a filename, and the grid will be extracted to Filename.txt. The grid will be written to full simulation precision, either 9 decimal places for a single precision run, or 16 for a double precision run. The file will contain the title of the geometry display, the names of the two axes that have been extracted, the number of grid points for each axis, and two columns of data, representing the grid locations for the two axes in ascending order. this command to print the currently visible plot. A dialog box will appear that allows the user to select the printer, page size, orientation, and the margins. Selecting this option will send the currently visible plot to PAINT, an application that comes standard with all versions of Windows. A limitation of the Display package MAGIC uses prevents image copying directly to the clipboard for pasting into other applications. Once the image has been loaded in PAINT, the user can use the edit->select all, edit->copy commands in PAINT to copy the image to the clipboard, and then the image can be pasted into other applications, such as Microsoft Word. The user must exit PAINT before returning to the MAGIC simulation. This menu option is checked if PAUSE is currently ON. Uncheck this menu option to turn pause off from this point on. When enabled, 1:1 Aspect Ratio scales the screen image so that it is proportional to the actual size MAGIC User’s Manual 24- 3 Part VII –Output Ratio: DisplayReset: DisplayClear: DisplayLegend: DisplayShowX Axis: DisplayShowY Axis: DisplayShowTitle: DisplayShowGrid: DisplayShowMarks: HelpDisplay Help: Chapter 24 – 2D and 3D Plots of the geometry. For example, if measuring one inch vertically on the screen was a distance of 10cm along the vertical axis of the Grid Display, then measuring one inch horizontally would also cover 10cm. Figures 2a and 2b show the same geometry with and without 1:1 Aspect Ratio. MAGIC enables 1:1 Aspect Ratio by default whenever one axis dimension is not excessively large compared to the other. This command will reset the plot to the original settings. Any changes such as zooming in, turning off Aspect Ratio, hiding the legend, etc, will be reversed. Blanks the display screen. The Display legend, shown in Figure 3, gives information about the simulation and the plot, and is shown by default at the bottom of the screen. Uncheck this option to hide the legend. The Display Legend provides additional information about the plot and the simulation. Visible by default. Uncheck this option to hide the x (horizontal) axis information, including the scale, title, and tick marks. Visible by default. Uncheck this option to hide the y (vertical) axis information, including the scale, title, and tick marks. Visible by default. Uncheck this option to hide the Title at the top of the screen. When enabled, Grid Lines will be drawn in gray overtop the geometry, showing the full grid locations of the two axes. Depending on the options specified in the DISPLAY, DISPLAY_2D, or DISPLAY_3D command that called Display, the grid may be on or off by default. Check or Uncheck this option to Show/Hide the grid. Before AUTOGRID is called, the user can MARK specific points of the geometry to ensure that they are well resolved by the AUTOGRID command. Marks affect the location and spacing of grid points. If checked, Display shows the location of all the marks used on the two visible axes. Marks are shown as red triangles on the top and right-hand sides of the plot. Marks are only visible if the horizontal and/or vertical axes are MAGIC axes. For example, in a Polar MAGIC3D run, the three axes are (R,Phi,Z). If a DISPLAY Plot of the R,Phi plane (X1,X2) is shown, the horizontal axis is actually R*Cos(Phi), and the vertical axis is R*Sin(Phi). Since these axes are not the primary MAGIC axes (R,Phi,Z) no marks will be shown. If the user wanted to examine the marks on the R or Phi axes, they would be visible in a DISPLAY of the R, Z plane or Phi, Z plane, respectively. Selecting this option will give a brief description of the mouse and keyboard commands available in Display. These commands are described in the next section. DISPLAY AUXILIARY TOOLBAR BUTTON COMMANDS Extract data to file...: Save image as bitmap...: Copy image to clipboard: This command is the same as the menu "File -> Extract Output..." command. Use this command to create a tab delimited ASCII text file of the full grid points for the currently displayed geometry plane. When selected, a dialog box will appear and ask for a filename, and the grid will be extracted to Filename.txt. The grid will be written to full simulation precision, either 9 decimal places for a single precision run, or 16 for a double precision run. The file will contain the title of the geometry display, the names of the two axes that have been extracted, the number of grid points for each axis, and two columns of data, representing the grid locations for the two axes in ascending order. This command is the same as the menu "File -> Save Output..." command. This option will save an image of the currently visible grid display, including the legend, title, and axis information, if it is present. When selected, a dialog box will appear and ask for a filename and type of filename to save the image as. The available image formats are BMP, PCX, and PNG. This command is the same as the menu "Edit -> Copy Output" command. Selecting this option will send the currently visible plot to PAINT, an application that comes standard with all versions of Windows. A limitation of the Display package MAGIC uses prevents image copying directly to the clipboard for pasting into other applications. Once the image has been loaded in PAINT, MAGIC User’s Manual 24- 4 Part VII –Output Show/Hide axes and labels: Chapter 24 – 2D and 3D Plots the user can use the edit->select all, edit->copy commands in PAINT to copy the image to the clipboard, and then the image can be pasted into other applications, such as Microsoft Word. The user must exit PAINT before returning to the MAGIC simulation. This command is the same as the menu "Display -> Axes labels" toggle command. It toggles between showing and hiding the graph x axis/labels, y axis/labels, and legend. Show/Hide Title: This command is the same as the menu "Display -> Title" toggle command. It toggles between showing and hiding the graph title. Show/Hide X_AXIS: This command is the same as the menu "Display -> x-Axis and labels" toggle command. It toggles between showing and hiding the graph x axis/labels. Show/Hide Y_AXIS: This command is the same as the menu "Display -> y-Axis and labels" toggle command. It toggles between showing and hiding the graph y axis/labels. Show/Hide Legend: This command is the same as the menu "Display -> Legend" toggle command. It toggles between showing and hiding the graph legend. Show/Hide Frame: This command is the same as the menu "Display -> Show graph frame" toggle command. It toggles between showing and hiding the graph frame. Move Plane...: This command is the same as the "Change Cross-Section Level (M3D Only)" command that uses keys z (Down) and Z (Up). Pressing the "Move Plane..." button opens a dialog with a slider. Moving the slider left causes the cross-section view to move down the third axis. Moving the slider right causes the cross-section view to move up the third axis. This command is the same as the menu "Display -> Reset" command. This command will reset the plot to the original settings. Any changes such as zooming in, changing line colors, hiding the legend, etc, will be reversed. Reset Graph: DISPLAY MOUSE/KEYBOARD COMMANDS Current Mouse Position: Mouse Zoom: In Display, whenever the mouse cursor is inside the plot area, the x,y location of the mouse cursor is shown in the status bar of the MAGIC window. Figure 4 shows the status bar of the MAGIC window. When the mouse is positioned at the blue arrow, the location of the cursor is shown in the status bar. To zoom in on the display using the mouse, hold down the right mouse button while moving the mouse vertically on the screen. Moving towards the top of the screen will zoom in on the geometry, moving towards the bottom will zoom out. Aspect Ratio will be preserved if 1:1 Aspect Ratio is enabled. MAGIC User’s Manual 24- 5 Part VII –Output Chapter 24 – 2D and 3D Plots Figure 4: The MAGIC Status Bar shows Current Mouse Position coordinates. Keyboard Zoom: Panning: Snap to a Grid Point: The keyboard offers more flexibility for zooming in and out. To change only the scale of the x (horizontal) axis, use uppercase “X” to zoom in, or lowercase “x” to zoom out. “Y” and “y” can be used to zoom in or out along the y (vertical) axis. The Keypad can also be used to zoom in on the plot. When NumLock is on, “4” and “6“ will expand the X axis in the –X or +X directions, and “2” and “8” will expand the Y axis in the –Y or +Y directions, respectively. The “+” and “–“ keys will zoom in and out on both axes equally. If 1:1 Aspect Ratio is enabled, the scale of one axis cannot be changed without effecting the scale of the other. Because of this, if a command that zooms in on the x or y axis is used, such as “X” or “Y” both axes will zoom in equally, much like when “+” is used. The same is true for commands that expand only one of the axes. Aspect Ratio can be disabled by unchecking the Display1:1 Aspect Ratio menu option. Panning changes the point at which the Display is centered. To pan using the mouse, hold down both the right and left mouse buttons, and move the mouse in any direction. The plot will shift with the movement of the mouse until one or both of the buttons are released. To pan using the keyboard, use the arrow keys. As explained in Current Mouse Position, the user can see the current location of the mouse cursor on the Display in the status bar. The user can also find the closest full grid point by single clicking the left mouse button anywhere inside the display area. For example, in Figure 4, the mouse is positioned near the corner of the magnetron wall (shown in purple). If the user then clicks the left mouse button, a red dot shows the nearest full grid location, and a pop-up window will appear that gives the exact location of the wall corner, as shown in Figure 5. The window also gives the grid indices of the point. Also note the measure feature, which is explained below. MAGIC User’s Manual 24- 6 Part VII –Output Chapter 24 – 2D and 3D Plots Figure 5: Left-Click inside the plot area to find the closest full grid point. Figure 6: Measuring between two points inside the display. Measure: The user can measure the distance between two full grid locations two different ways. As explained in Snap to a Grid Point, and shown in Figure 5, left-clicking the mouse inside the Display area will snap to the closest full grid point, and bring up a pop-up menu. If the Measure option is selected, a black “+” will be drawn at this point. A second “+” follows the current mouse location, snapping to the closest grid point, and a red line is drawn between the two points. The status bar will show the total distance between these two points, as well as dx and dy, the horizontal and vertical components of the distance between the two points. If the grid plane displayed is a R,Phi plot, dR and dPhi will be given instead of dx and dy. This continues until the user clicks the left mouse button again, and then a pop-up window appears with information about both points and the distance between them, as shown in Figure 6. The other way to measure between two points is to click and hold the left mouse button at the first point, and release the button at the second point. Either approach gives the exact same information. MAGIC User’s Manual 24- 7 Part VII –Output Chapter 24 – 2D and 3D Plots Left mouse click near a mark to get information regarding it. Marks: Changing Grid Planes: Marks are points provided by the user that are used by AUTOGRID to help grid up the simulation. The location and size of marks can effect exactly how the gridding is done, so it is important to be able to see where marks are. (See Marks for more information on marking.) If any marks are present, they are shown as red triangles along the Top and Right sides of the Display area. To see the location and spacing of a mark, left click near the mark of interest. The mouse cursor must be outside the plot area to get information about a mark, since clicking inside the plot area snaps to the closest grid point. Figure 7 shows what information about a mark is given. The DX value would be set by the SIZE argument to the MARK command, or determined by MAGIC is no size was provided or if two marks had to be combined. (Again, see help on MARKS for more information about how MAGIC handles marks.) Display displays the geometry located perpendicular to one of the three MAGIC axes. In MAGIC2D, the display is always perpendicular to the third “dummy” axis. In MAGIC3D, the grid display actually shows the geometry plane perpendicular to X1, X2, or X3, at some half grid point along this third axis. For example, the geometry shown in Figure 8a shows the R, Phi plane of a Strapped Magnetron, at a point Z=847.9µm, the center of the Magnetron along the Z axis. By pressing “Z” or “z”, the user can view the grid plane directly above (+Z direction) or directly below (-Z direction) the current plane. The MAGIC3D simulation of this Magnetron has 57 cells along the Z axis, so there are 57 different grid planes that can be viewed. As the user moves between cross-sections, the Display title and the “Surface at” values will show where along the geometry the current cross-section is located. Figure 8b shows the same magnetron at the plane Z=2.756 cm. The mouse can also be used to change between planes. If a middle (third) mouse button is present, hold down the middle mouse button and move the mouse up or down to move through the grid planes. If no third button is present, holding down the control key and the right mouse button will also work. MAGIC User’s Manual 24- 8 Part VII –Output Chapter 24 – 2D and 3D Plots a) Strapped magnetron geometry at z=-847.9 um. b) Strapped magnetron geometry at z=-2.746 cm. Restrictions: 1. Geometry is plotted in true (Cartesian) space rather than curvilinear coordinate space. 2. The area specified must be conformal and will be used only to identify the plane; the entire simulation cross section is always displayed, irrespective of the actual size of the area. MAGIC User’s Manual 24- 9 Part VII –Output Chapter 24 – 2D and 3D Plots MAGIC User’s Manual 24- 10 Part VII –Output Chapter 24 – 2D and 3D Plots CONTOUR [Options] Command Function: Specifies data processing options for CONTOUR commands. Syntax: CONTOUR {FIELD, HISTOGRAM} [arguments] timer [ AXIS {X, Y, Z} minimum maximum [ step ] ] [ LEVELS n_contours ] [ TRANSFORM f(x,y,z) ] [ INTEGRATION_ORDINATE { X,Y,Z,RHO,PHI } {POSITIVE, NEGATIVE} ] [ INTEGRATE { X, Y } {POSITIVE, NEGATIVE} ] (obsolete) [ COLOR_SCALE {BLUE_RED, BLUE_ORANGE, GREEN_RED, GREEN_ORANGE, GREEN_PURPLE,RED_BLUE,RED_GREEN,ORANGE_BLUE,ORANGE_GREEN,PURPLE_ GREEN, CONTRAST_COLOR} ] [ LINEAR_SCALE, LOG10_SCALE, DB_SCALE floorvalue ] [ ORIENTATION {XYZ, XZY, YXZ, YZX, ZXY, ZYX, Z_RHO_PHI, RHO_ Z_PHI, RHO_PHI_Z, PHI _RHO_ Z, PHI _Z_ RHO, Z_PHI _RHO}] [{NOSHADE, SHADE, BLOCKSHADE} ] movie options [ MOVIE ] [{PNG, BMP, PCX }] (bitmap formats) [{AVI, MPEG}] (movie file formats) [ MOVIE_NAME dirname] [ MOVIE_SIZE width height ] [ CODEC acodec ] [ FRAMERATE irate ] standard graphics control options [{NOLEGEND, LEGEND } ] [{DISPLAY,NODISPLAY } {CONDUCTOR, CONDUCTANCE, DIELECTRIC, DRIVER, PORT} ] [ XAXIS, NOXAXIS ] [ YAXIS, NOYAXIS ] [ ZAXIS, NOZAXIS ] [ XLABEL, NOXLABEL ] [ YLABEL, NOYLABEL ] [ ZLABEL, NOZLABEL ] [ XSCALE, NOXSCALE ] [ YSCALE, NOYSCALE ] [ ZSCALE, NOZSCALE ] [ CLEGEND, NOCLEGEN ] [ TITLE, NOTITLE ] [ ASPECT, NOASPECT ] [NOGRID, GRID ] standard output control options [ NOEXTRACT, EXTRACT, EXTRACT_DIR extract_dir, EXTRACT_FILE extract_file ] [ NODUMP, DUMP ] [ PLOT, NOPLOT ] ; Arguments: arguments differs for each variable_type, see specific CONTOUR commands. timer name of timer, defined in TIMER command. You may use timers that are DISCRETE, or PERIODIC, and that make use of the INTEGRATE option. species particle species (ELECTRON, or defined in SPECIES command). coordinate1,2 particle phase space variable (X1, X2, X3, P1, P2, P3, KE, or VELOCITY. MAGIC User’s Manual 24- 11 Part VII –Output Chapter 24 – 2D and 3D Plots nbins1,2 number of bins for histogram bin_lo1,2 lower end of histogram. bin_hi1,2 upper end of histogram. wminimum lower end of sampling window. wmaximum upper end of sampling window. minimum,... axis boundaries (real). step axis sub-division size (real). n_contours number of contour levels. f transformation function, defined in FUNCTION command. floorvalue minimum value of field. x,y dummy arguments representing spatial coordinates. z dummy argument representing the field variable. width width of movie window in pixels. height height of movie window in pixels. dirname folder name for movie frames, and used for avi movie name. avi_codec — codec compression algorithm. Choices for avi file creation are: UNCOMPRESSED, Full frames, uncompressed. CINEPAK, Cinepak by Supermac. INDEO3.2, Intel Indeo Video 3.2. INDEO5, Intel Indeo Video 5. MSVIDEO1, Microsoft Video 1 (default). RLE, Run Length Encoding. DIVX5, DivX 5. XVID, XviD. 3IVX, 3ivx. mpeg_codec— codec compression algorithm. Choices for mpeg file creation are: MPEG1, MPEG-1 standard. MPEG1.VCD, MPEG-1 with VideoCD extensions. MPEG2, MPEG-2 standard. MPEG2.SVCD, MPEG-2 with Super VideoCD extensions. MPEG2.DVD, MPEG-2 with DVD extensions. irate. — frame rate, number of frames/sec in AVI movie file. extract_dir — the name of the output folder that contains the extracted data. extract_file — file name of extracted data, default name is generated from uniquely from diagnostic and time stamp. Defaults: Keyword AXIS { NOSHADE, SHADE,BLOCKSHADE } { NOLEGEND, LEGEND } { NODUMP, DUMP } { PLOT, NOPLOT } { DISPLAY, NODISPLAY} Arguments min, max, step all choices Default Value code-calculated, ten contours NOSHADE NOLEGEND NODUMP PLOT DISPLAY Description: MAGIC User’s Manual 24- 12 Part VII –Output Chapter 24 – 2D and 3D Plots The AXIS option can be used to re-define the plot limits both in the spatial axes (X and Y) and in the field variable axis (Z). (By default, the spatial axis boundaries depend on the specified area, and the spatial grid and the field axis boundaries depend on the extrema; values are printed only at the endpoints of the axes.) The minimum and maximum specify axis boundaries, and the optional step determines axis sub-divisions and printed values. Since non-Cartesian results are converted to present, true, physical perspective, the units for X and Y are always meters. Use AXIS Z to enter maximum and minimum contour values and the step size between contours. The LEVELS option may be used to set the number of contour levels that will be displayed. The default setting is 15. The TRANSFORM and INTEGRATION_ORDINATE options are the two data-processing operations which can be applied to the contour data; by using the TRANSFORM option, contours of the function (f) will be plotted instead of the field variable (z). By using the INTEGRATION_ORDINATE option, the integral of the contour data can be taken along one of the two ordinates in the display plane in either the POSITIVE or NEGATIVE direction. This option is useful in certain cases for illustrating quasi-static electric or magnetic potentials. The COLOR_SCALE allows you to select color for the shaded fill contours. There are 6 choices. The default choice is the BLUE_RED color scale. This means positive values use blue shading and negative levels use red shading. The other color scales follow a similar pattern. You can interactively select a color scale from the contour menu button when a contour plot is displayed. The LOG10_SCALE converts the data after all other processing, before the contours are displayed, using the following expression. Log 10 of H(x,y) = LOG10(ABS(H(x,y) ) ) for H(x,y).ne.0.0, otherwise = 0. The DB_SCALE option converts the data after all other processing, before the contours are displayed, using the following expression. The argument "floorvalue" is used for normalization and to prevent singularities, and it provides the zero-dB level. Note that only values of magnitude greater than floorvalue, e.g., having positive dB, are displayed by the contour levels. And note that the sign of the field is then applied to this positive dB level, such that negative plot values indicate a negative field value, rather than negative dB. This allows for accurate tracking of field nulls and sign reversals, while at the same time giving an accurate dB measure. Db_of_H(x,y) = 20*LOG10( MAX(1, ABS( H(x,y) / floorvalue ) ) ) * SIGN(H(x,y)) The SHADE option can be used to shade areas between the contours. The LEGEND option can be used to create a legend box on the right-hand side of the contour plot, which lists the values represented by the color-coded contours. The BLOCKSHADE option selects cell shading, in which each cell is shaded by its mean value. The ORIENTATION keyword allows you to transpose the horizontal and vertical axes. Normally, the longer axis limits specified by the area object are used for the horizontal axis and the short length is used for the vertical axis. Thus if the area of interest lies in the xy-plane, you may use XYZ or YXZ to set the plot orientation. In the case of cylindrical or polar coordinates, you may select the desired combination of Z, RHO, and PHI for the horizontal and vertical axes. It is best to use the ordinate selections that are consistent with the coordinate system that has been imposed on the geometry. MAGIC User’s Manual 24- 13 Part VII –Output Chapter 24 – 2D and 3D Plots The MOVIE option permits you to generate a sequence of bitmaps (in PNG, BMP, or PCX format) from a sequence of CONTOUR plots. The default format is PNG, by using the option keywords PNG, BMP, or PCX, you may select a specific type. Please note, that PNG are the most compressed format, and that BMP are uncompressed. In order for this sequence to provide an appealing visual representation of the data, you should also use the AXIS option to enforce limits. When the MOVIE option is invoked, MAGIC generates a series of bitmaps that are saved in a folder. There is one movie folder per command that uses the MOVIE option. You can post process the files to create an avi-file. You can “play” the movie by using the MOVIE command. . Use of the keyword AVI or MPEG, causes the software to process the frames into an avi-file/mpeg-file automatically at the termination of the simulation. The individual frames and the movie folder are deleted after this is complete. Use of the keyword CODEC allows you select among a number of compression schemes. In addition, you may use the MOVIE_SIZE option to specify the width and height of a free floating movie window. A maximum of 12 free floating movie windows of all types (CONTOUR, RANGE, PHASESPACE, and VECTOR) are allowed. Movie windows may be of different sizes. When WINDOW_SIZE is specified, it also activates the NOLEGEND option. The option, MOVIE_NAME, allows you specify the name of a folder for the movie frames. It must be unique, (i.e. not used with more than one MOVIE option.) If the AVI file type is selected, the name is also used for the avi-movie file. The DISPLAY, NODISPLAY option allow you to enable or disable the display of various model or boundary objects in the contour display. The default is to display all available features. • The option CONDUCTOR includes the objects assigned properties by the CONDUCTOR, INDUCTOR, SHIM, or FOIL commands. • The option CONDUCTANCE includes objects assigned properties by the CONDUCTANCE and FREESPACE commands. • The option DRIVER includes objects assigned properties by the DRIVER command. • The option PORT includes all objects assigned properties by the PORT, OUTGOING, or RESONANT_PORT commands. The EXTRACT, PLOT, DUMP, and PRINT options: The EXTRACT, PLOT, DUMP, and PRINT options allows contour plot data to be stored/displayed by four different methods: • • • • Extracted to a text file automatically, as a graphical plot in a file or on screen, as a data record in the FLD file, or as printed column data in the LOG file. The EXTRACT, EXTRACT_DIR, and EXTRACT_FILE options are used to automatically extract the graphics data to a text file for later use, such as in a spreadsheet or other post analysis tool. The default condition is NOEXTRACT. The EXTRACT option enables automatic extraction after a graphic is displayed. Unless a directory folder is specified the extracted data will be in the working directory. Use of the EXTRACT_DIR option permits you to specify a particular output directory, making it easier to keep the results organized. All graphics output will have a unique automatic name based on the particular diagnostic and the time step of extraction. You may override this using the EXTRACT_FILE name option. MAGIC User’s Manual 24- 14 Part VII –Output Chapter 24 – 2D and 3D Plots The PRINT option can be used to generate a table of time plot data in the LOG file after the last time step has executed. This option cannot be applied separately to individual time plots. Therefore, the last PRINT or NOPRINT option entered will govern printing to the LOG file. Contour Plots: All CONTOUR commands display information about the requested field’s value over a grid plane. The same format is used by OBSERVE TIME_FREQUENCY and 2D Histogram plots to display data. If PAUSE is OFF when a CONTOUR command is executed only the requested contour plot is displayed. If PAUSE is ON, or if a contour plot is chosen from the MAGIC main menu using OutputContourAll or OutputContourSelect, the simulation will wait, and the user can take advantage of the Contour commands to study the graph more closely. Some of the more commonly used features of Contour include: • • • • Zoom In/Out on a portion of the graph Save an image of the graph Change between Line and Solid (SHADE) Contours Add, Remove, or Adjust Contour Level values Figure 1: Contour Plot from EigenMode.m2d Example Input File Contour Menu Commands: File Save Contour: File Extract Contour: This option will save an image of the currently visible contour plot, including the legend, title, and axis information, if it is present. When selected, a dialog box will appear and ask for a filename and type of filename to save the image as. The available image formats are BMP, PCX, and PNG. Use this command to create a tab delimited ASCII text file of the contour data. When selected, a dialog box will appear and ask for a filename, and the information will be extracted to Filename.txt. Title and axis information will be written to the file, along with the number of data points in the X and MAGIC User’s Manual 24- 15 Part VII –Output File Print Contour: Edit Copy Contour: Output Pause Output: Contour 1:1 Aspect Ratio: ContourReset: ContourClear: ContourLegend: ContourChange to Line Contour: ContourChange to Filled Contour: HelpContour Help: Chapter 24 – 2D and 3D Plots Y direction. The first row of data will be the x grid locations, and the first column will be the y grid locations. The remaining rows and columns will be filled with the contour level data for the plot. Use this command to print the currently visible plot. A dialog box will appear that allows the user to select the printer, page size, orientation, and the margins. Selecting this option will send the currently visible plot to PAINT, an application that comes standard with all versions of Windows. A limitation of the graphics package MAGIC uses prevents image copying directly to the clipboard for pasting into other applications. Once the image has been loaded in PAINT, the user can use the edit select all, edit copy commands in PAINT to copy the image to the clipboard, and then the image can be pasted into other applications, such as Microsoft Word. The user must exit PAINT before returning to the MAGIC simulation. This menu option is checked if PAUSE is currently ON. Uncheck this menu option to turn pause off from this point on. When enabled, 1:1 Aspect Ratio scales the screen image so that it is proportional to the actual size of the geometry. For example, if measuring one inch vertically on the screen was a distance of 10cm along the vertical axis of the contour graph, then measuring one inch horizontally would also cover 10cm. MAGIC automatically enables 1:1 Aspect Ratio by default whenever geometry is present and one axis dimension is not excessively large compared to the other. This command will reset the plot to the original settings. Any changes such as zooming in, turning off Aspect Ratio, hiding the legend, etc, will be reversed. Blanks the display screen. The graph legend, shown in Figure 3, gives information about the simulation and the plot, and is shown by default at the bottom of the screen. Uncheck this option to hide the legend. The Graph Legend gives information about the plot and the simulation. Select this option to change from a filled contour to a line contour. Select this option to change from a line contour to a line contour. Filled contour plots are shown in Figures x.1 and x.2. An example of a line contour is shown in Figure 4. Selecting this option will give a brief description of the mouse and keyboard commands available in Contour. These commands are described in the next section. Contour Auxiliary Toolbar Button Commands: Extract data to file...: Save image as bitmap...: Copy image to clipboard: This command is the same as the menu "File -> Extract Contour..." command. Use this command to create a tab delimited ASCII text file of the contour data. When selected, a dialog box will appear and ask for a filename, and the information will be extracted to Filename.txt. Title and axis information will be written to the file, along with the number of data points in the X and Y direction. The first row of data will be the x grid locations, and the first column will be the y grid locations. The remaining rows and columns will be filled with the contour level data for the plot. This command is the same as the menu "File -> Save Contour..." command. This command will save an image of the currently visible contour plot, including the legend, title, and axis information, if it is present. When selected, a dialog box will appear and ask for a filename and type of filename to save the image as. The available image formats are BMP, PCX, and PNG. This command is the same as the menu "Edit -> Copy Contour" command. Selecting this option will send the currently visible plot to PAINT, an application that comes standard with all versions of Windows. A limitation of the graphics package MAGIC uses prevents image copying directly to the clipboard for pasting into other applications. Once the image has been loaded in PAINT, the user can use the edit->select all, edit->copy commands in PAINT to copy the image to the clipboard, and then the image can be pasted into other applications, such as Microsoft Word. The user must exit PAINT before returning to the MAGIC simulation. MAGIC User’s Manual 24- 16 Part VII –Output Chapter 24 – 2D and 3D Plots Expand Z axis by 2 steps: This command is the same as pressing the uppercase "M" key. It increases the Z axis upper range by one step, and decreases the lower range by one step. Shrink Z axis by 2 steps: This command is the same as pressing the lowercase "m" key. It decreases the Z axis upper range by one step, and increases the lower range by one step. Add a Contour Level: This command is the same as pressing the uppercase "C" key. This command will increase the number of contour levels by 1. The maximum number of contour levels allowed is 40. Remove a Contour Level: This command is the same as pressing the lowercase "c" key. This command will decrease the number of contour levels by 1. The minimum number of contour levels allowed is 2. Show/Hide axes and labels: This command is the same as the menu "Contour -> Axes labels" toggle command. It toggles between showing and hiding the graph x axis/labels, y axis/labels, and legend. Show/Hide Title: This command is the same as the menu "Contour -> Title" toggle command. It toggles between showing and hiding the graph title. Show/Hide X_AXIS: This command is the same as the menu "Contour -> x-Axis and labels" toggle command. It toggles between showing and hiding the graph x axis/labels. Show/Hide Y_AXIS: This command is the same as the menu "Contour -> y-Axis and labels" toggle command. It toggles between showing and hiding the graph y axis/labels. Show/Hide Y2_AXIS: This command is the same as the menu "Contour -> y2-Axis and labels" toggle command. It toggles between showing and hiding the graph y2 axis/labels. Show/Hide Legend: This command is the same as the menu "Contour -> Legend" toggle command. It toggles between showing and hiding the graph legend. Show/Hide Frame: This command is the same as the menu "Contour -> Show graph frame" toggle command. It toggles between showing and hiding the graph frame. Reset Graph: This command is the same as the menu "Contour -> Reset" command. This command will reset the plot to the original settings. Any changes such as zooming in, changing line colors, hiding the legend, etc, will be reversed. Contour Mouse/Keyboard Commands: MAGIC User’s Manual 24- 17 Part VII –Output Chapter 24 – 2D and 3D Plots MAGIC Status Bar shows Current Mouse Position Current Mouse Position: Mouse Zoom: Keyboard Zoom: Panning: In Contour, whenever the mouse cursor is inside the plot area, the x, y location of the mouse cursor is shown in the status bar of the MAGIC window, along with the closest z contour value. Figure 5 shows the status bar of the MAGIC window. When the mouse is positioned at the white arrow, the location of the cursor is shown in the status bar. To zoom in on the display using the mouse, hold down the right mouse button while moving the mouse vertically on the screen. Moving towards the top of the screen will zoom in on the graph, moving towards the bottom will zoom out. Aspect Ratio will be preserved if 1:1 Aspect Ratio is enabled. Figure 5 shows a zoom in on the bottom right corner of the same contour plot shown in Figure 1. The keyboard offers more flexibility for zooming in and out. To change only the scale of the x (horizontal) axis, use uppercase “X” to zoom in, or lowercase “x” to zoom out. “Y” and “y” can be used to zoom in or out along the y (vertical) axis. The Keypad can also be used to zoom in on the plot. When NumLock is on, “4” and “6“ will expand the X axis in the –X or +X directions, and “2” and “8” will expand the Y axis in the –Y or +Y directions, respectively. The “+” and “–“ keys will zoom in and out on both axes equally. If 1:1 Aspect Ratio is enabled, the scale of one axis cannot be changed without effecting the scale of the other. Because of this, if a command that zooms in on the x or y axis is used, such as “X” or “Y” both axes will zoom in equally, much like when “+” is used. The same is true for commands that expand only one of the axes. Aspect Ratio can be disabled by un-checking the Contour 1:1 Aspect Ratio menu option. Panning changes the point at which the graph is centered. To pan using the mouse, hold down both the right and left mouse buttons, and move the mouse in any direction. The plot will shift with the movement of the mouse until one or both of the buttons are released. To pan using the keyboard, use the arrow keys. MAGIC User’s Manual 24- 18 Part VII –Output Chapter 24 – 2D and 3D Plots Left-Click inside the plot area to find the closest Contour data point or to add or remove contour levels. Snap to a Point: Remove a Contour Level: Edit Contour Color: Edit Contour Value: As explained in Current Mouse Position, the user can see the current location of the mouse cursor on the graph in the status bar. The user can also snap to the closest contour data point by single clicking the left mouse button anywhere inside the display area. When the user clicks the left mouse button, a white dot with a black + marks the closest data point, and a pop-up window will appear that gives the exact location of the point and it’s magnitude, as shown in the Figure above. Also note the Add a Contour Level and Remove a Contour Level menu options, which will be explained below. Add a Contour Level: Selecting this menu option will increase the number of contour levels by 1. The maximum number of contour levels allowed is 40. A faster way to add contour levels is by pressing “C” (uppercase) at any time in Contour. Selecting this menu option will decrease the number of contour levels by 1. The minimum number of contour levels allowed is 2. A faster way to remove contour levels is by pressing “c” (lowercase) at any time in Contour. To change the color of a single contour level, left click on the colored box in the contour legend for the contour level to be modified. The contour legend is located on the right side of the contour plot. A dialog box will appear that allows the user to select any 24 bit RBG color. To change the threshold value for a contour level, right click inside the colored box for that contour level in the contour legend. A dialog box will appear that shows the current contour level value. An error will occur if the new contour value is identical to another contour level. Restrictions: 1. The total number of CONTOUR commands is limited to fifty. 2. A maximum of 12 free floating movie windows of all types (CONTOUR, RANGE, PHASESPACE, and VECTOR) are allowed. See Also: FUNCTION, Ch. 6, TIMER, Ch. 11, CONTOUR FIELD, Ch. 24, CONTOUR HISTOGRAM, Ch. 24, CONTOUR NEUTRAL_GAS, Ch. 24, RANGE HISTOGRAM, Ch. 23 Examples: MAGIC User’s Manual 24- 19 Part VII –Output Chapter 24 – 2D and 3D Plots CONTOUR FIELD Command Function: Specifies contour plot variables. Syntax: CONTOUR FIELD field area timer (Option for overlay of particles on contour plot.) [OVERLAY {STANDARD_COLORS, DARK_COLORS, LIGHT_COLORS} isize] (Select final processing options.) [options ] ; Arguments: field area timer isize field variable (E1, E2, ...). name of spatial area, defined in AREA command. name of timer, defined in TIMER command. particle marker size for overlay (Values from 0 to 5). Description: The CONTOUR command is used to plot contours of an electromagnetic field variable over a specified two-dimensional spatial area. Each contour curve shows locations where the field has the same magnitude. Positive-valued contours are drawn with solid lines, and negative-valued contours are drawn with dotted lines. Plots are produced when specified by the timer. You may use timers that are DISCRETE, PERIODIC, and that make use of the INTEGRATE option. The OVERLAY option allows you to overlay the appropriate particle phase space on a contour plot. You may select the overlay to use the standard particle color palette, STANDARD_COLORS, or either a darker or lighter palette with the appropriate keyword. In addition, you must specify particle marker size. In general, the display uses the value of 0, to represent a particle as a single pixel. Values may range from 0 to 5. Please note that currently the REVIEW facility cannot replay the overlay. It is designed for instant capture of the figure or use with movies. Restrictions: 1. The total number of CONTOUR commands is limited to fifty. 2. If a contour step is entered, it must be sufficiently large that no more than twelve contours will result. See Also: FUNCTION, Ch. 6, TIMER, Ch. 11, RANGE HISTOGRAM, Ch. 23, CONTOUR [Options], Ch. 24. Examples: In this example, the eigenmode solutions of a cylindrical pillbox of width = 0.39315 cm and radius of 0.400 cm are desired. Contours are requested in the mid-plane of the pillbox, and the SHADE option is used. CONTOUR FIELD E1AV ZPLANE TSYS$EIGENMODE SHADE COLOR_SCALE Green_purple; CONTOUR FIELD E2AV ZPLANE TSYS$EIGENMODE SHADE COLOR_SCALE BLUE_RED; MAGIC User’s Manual 24- 20 Part VII –Output Chapter 24 – 2D and 3D Plots MAGIC User’s Manual 24- 21 Part VII –Output Chapter 24 – 2D and 3D Plots The upper figure shows the Er field for an n=4 mode, and the lower figure shows the Eφ component for this same mode. Notice that the simulation frequency is 52.477 GHz. Contour field e2 osys$area Tsys$last Shade OVERLAY LIGHT_COLORS 2; Contour field e2 osys$area Tsys$last Shade OVERLAY STANDARD_COLORS 2; MAGIC User’s Manual 24- 22 Part VII –Output Chapter 24 – 2D and 3D Plots MAGIC User’s Manual 24- 23 Part VII –Output Chapter 24 – 2D and 3D Plots MAGIC User’s Manual 24- 24 Part VII –Output Chapter 24 – 2D and 3D Plots CONTOUR HISTOGRAM Command Function: Specifies contour plot of particle histogram of two phase space variables. Syntax: CONTOUR HISTOGRAM species coordinate1 nbins1 bin_lo1 bin_hi1 coordinate2 nbins2 bin_lo2 bin_hi2 timer (Optional windowing control of the particles selected for the shaded histogram) [WINDOW coordinate wminimum wmaximum ] (Select either active surviving particles, or particles destroyed in the current time instance.) [SURVIVING, DESTROYED] (Select final processing options.) [options]; Arguments: species coordinate1,2 nbins1,2 bin_lo1,2 bin_hi1,2 timer wminimum wmaximum particle species (ELECTRON, or defined in SPECIES command). particle phase space variable (X1, X2, X3, P1, P2, P3, KE, or VELOCITY, or f(x1,x2,x3,p1,p2,p3,q,ke), a function defined in a FUNCTION command). number of bins for histogram lower end of histogram. upper end of histogram. name of timer, defined in TIMER command. lower end of sampling window. upper end of sampling window. Description: The CONTOUR HISTOGRAM command is used to plot contours of a particle histogram over a specified two-dimensional particle phase space area. Each contour curve shows locations where the histogram has the same magnitude. Positive-valued contours are drawn with solid lines, and negativevalued contours are drawn with dotted lines. Plots are produced when specified by the timer. By default in the HISTOGRAM, only the "surviving", i.e. active macro-particles are sampled in the histogram. If you wish to look at the particle collected on various conductors or otherwise removed from the simulation use the DESTROYED keyword argument after the timer argument, or after entering windowing parameters. Note that the DESTROYED or SURVIVING keyword must come before the selection of any [options]. The arguments coordinate1 and coordinate2 specify phase-space variables. The standard variables that may be specified are X1, X2 and X3, P1, P2, or P3. These are the physical coordinates and momenta of the particles. In addition, the arguments, KE, and VELOCITY may be used to select the kinetic energy per physical particle (eV) and the magnitude of the velocity (m/s). Other variables can be selected by using a function name for the argument, coordinate. The function implicitly refers to eight particle variables: x1, x2, x3, p1, p2, p3, q, and ke. The variables x1, x2, and x3 denote the physical coordinates MAGIC User’s Manual 24- 25 Part VII –Output Chapter 24 – 2D and 3D Plots of the particle. The variables p1, p2, and p3 denote the momenta of the particle in m/s. The variable q denotes the particle charge, and the variable ke denotes the kinetic energy in eV. Restrictions: 1. The total number of CONTOUR commands is limited to fifty. 2. The DESTROYED or SURVIVING keyword must come before the selection of any [options]. 3. If a contour step is entered, it must be sufficiently large that no more than twelve contours will result. See Also: FUNCTION, Ch. 6, TIMER, Ch. 11, RANGE HISTOGRAM, Ch. 23, CONTOUR [Options], Ch. 24. Examples: CONTOUR HISTOGRAM ELECTRON X3 70 -ZSIZE +0.20*ZSIZE P2 100 -1e8 1e8 pdump SHADE ; MAGIC User’s Manual 24- 26 Part VII –Output Chapter 24 – 2D and 3D Plots VECTOR Command Function: Specifies vector plot of electric, magnetic, or current-density field vectors. Syntax: VECTOR FIELD field, field area timer [ AXIS {X, Y} minimum maximum [ step ] [ DENSITY x_vectors y_vectors ] [ NORMALIZATION amplitude ] [ {LINEAR, LOGARITHMIC [ decades ]} ] movie options [ MOVIE ] [{PNG, BMP, PCX }] (bitmap formats) [{AVI, MPEG}] (movie file formats) [ MOVIE_NAME dirname] [ MOVIE_SIZE width height ] [ CODEC acodec ] [ FRAMERATE irate ] standard graphics control options [ NOLEGEND, LEGEND ] [ XAXIS, NOXAXIS] [ YAXIS, NOYAXIS] [ ZAXIS, NOZAXIS ] [ XLABEL, NOXLABEL ] [ YLABEL, NOYLABEL ] [ ZLABEL, NOZLABEL ] [ XSCALE, NOXSCALE ] [ YSCALE, NOYSCALE ] [ ZSCALE, NOZSCALE ] [ CLEGEND, NOCLEGEN ] [ TITLE, NOTITLE ] [ FRAME, NOFRAME ] [ ASPECT, NOASPECT ] [NOGRID, GRID ] standard output control options [ NOEXTRACT, EXTRACT, EXTRACT_DIR extract_dir, EXTRACT_FILE extract_file ] [ NOPRINT, PRINT ] [ NODUMP, DUMP ] [ PLOT, NOPLOT ] ; Arguments: field, field — field variables for x and y components of vector (E1, E2, ...). area — name of spatial area, defined in AREA command. timer — name of timer, defined in TIMER command. minimum,... — axis boundaries (m). step — axis sub-division size (m). x_vectors — number of vectors along x axes (integer). y_vectors — number of vectors along y axes (integer). amplitude — normalization amplitude. decades — number of decades in logarithmic scaling (integer). width width of movie window in pixels. height height of movie window in pixels. dirname folder name for movie frames, and used for avi movie name. avi_codec — specify codec compression algorithm. Choices for avi file creation are: MAGIC User’s Manual 24- 27 Part VII –Output Chapter 24 – 2D and 3D Plots UNCOMPRESSED, full frames, uncompressed. CINEPAK, Cinepak by Supermac. INDEO3.2, Intel Indeo Video 3.2. INDEO5, Intel Indeo Video 5. MSVIDEO1, Microsoft Video 1 (default). RLE, Run Length Encoding. DIVX5, DivX 5. XVID, XviD. 3IVX, 3ivx. mpeg_codec— codec compression algorithm. Choices for mpeg file creation are: MPEG1, MPEG-1 standard. MPEG1.VCD, MPEG-1 with VideoCD extensions. MPEG2, MPEG-2 standard. MPEG2.SVCD, MPEG-2 with Super VideoCD extensions. MPEG2.DVD, MPEG-2 with DVD extensions. irate. — frame rate, number of frames/sec in AVI movie file. extract_dir — the name of the output folder that contains the extracted data. extract_file — file name of extracted data, default name is generated from uniquely from diagnostic and time stamp. Defaults: The following table lists the default values used for unspecified arguments. Keyword AXIS DENSITY NORMALIZATION {LINEAR, LOGARITHMIC} Argument minimum, maximum, step x_vectors, y_vectors amplitude - Default Value code-calculated 30, 30 automatic LINEAR Description: The VECTOR command is used to plot a set of arrows which represent electromagnetic field vectors over a specified two-dimensional spatial area. Each arrow shows the relative magnitude and direction of the field vector at that location in space. Two field variables (e.g., E1 and E2) must be entered to completely define the field vector. The choices are limited to electric fields, magnetic fields, or current-density fields. They cannot be co-mingled (e.g., E1, J3 is not legal). Furthermore, the vectors are plotted over a specified spatial area, and the vectors must lie in the plane of the area. Thus, the vector components also define the spatial axes. For example, if the area is a plane in X1, X2 coordinates (conformal in X3), then you can plot E1 and E2, but not E1 and E3. If the simulation is performed in a non-Cartesian coordinate system (SYSTEM, Ch. 10), the results will automatically be transformed to provide true, physical perspective. Plots are produced when specified by the timer. The AXIS option can be used to re-define the plot limits in the spatial axes (X and Y). The minimum and maximum specify axis boundaries, and the optional step determines axis subdivisions and printed values. Since non-cartesian results are converted to present, true, physical perspective, the units for X and Y are always meters. (By default, the spatial axis boundaries depend on the area and the spatial grid; only the axis end points have values printed.) MAGIC User’s Manual 24- 28 Part VII –Output Chapter 24 – 2D and 3D Plots The DENSITY option is used to select the number of vectors to plot along each axis. The NORMALIZATION option is used to fix the vector scaling amplitude so that the vector length represents fixed amplitude from time step to time step. Note! That is the amplitude is too small the vectors will be large and overrun each other, and if the amplitude is too big the vectors will be very small. The other scaling options are used to select either a LINEAR or LOGARITHMIC scaling of the vectors. With logarithmic scaling, the length of the arrows will be proportional to the logarithm of the field magnitude, rather than the magnitude itself. The decades are basically a cutoff to avoid plotting low-magnitude vectors. A particularly useful choice is LOGARITHMIC 100. Since most field magnitudes are only a few decades below maximum, all plotted vectors will have nearly the same maximum length, producing a vector plot displaying only direction. The MOVIE option permits you to generate a sequence of bitmaps (in PNG format) from a sequence of VECTOR plots. In order for this sequence to provide an appealing visual representation of the data, you should also use the AXIS option to enforce limits. When the MOVIE option is invoked, MAGIC generates a series of bitmaps that are saved in a folder. There is one movie folder per command that uses the MOVIE option. You can “play” the movie by using the MOVIE command. Alternatively, you can post process the files to create an AVI file. By adding the keyword PNG, PCX or BMP you may select any of these output formats for the movies frames. Please note that PNG is the most highly compressed format, and BMP is an uncompressed format. Use of the keyword AVI or MPEG, causes the software to process the frames into an avi-file/mpeg-file automatically at the termination of the simulation. The individual frames and the movie folder are deleted after this is complete. Use of the keyword CODEC allows you select among a number of compression schemes. In addition, you may use the MOVIE_SIZE option to specify the width and height of a free floating movie window. A maximum of 12 free floating movie windows of all types (CONTOUR, PHASESPACE, RANGE, VECTOR) are allowed. Movie windows may be of different sizes. When WINDOW_SIZE is specified, it also activates the NOLEGEND option. The option, MOVIE_NAME, allows you specify the name of a folder for the movie frames. It must be unique, (i.e. not used with more than one MOVIE option.) If the AVI file type is selected, the name is also used for the avi-movie file. The EXTRACT, EXTRACT_DIR, and EXTRACT_FILE options are used to automatically extract the graphics data to a text file for later use, such as in a spreadsheet or other post analysis tool. The default condition is NOEXTRACT. The EXTRACT option enables automatic extraction after a graphic is displayed. Unless a directory folder is specified the extracted data will be in the working directory. Use of the EXTRACT_DIR option permits you to specify a particular output directory, making it easier to keep the results organized. All graphics output will have a unique automatic name based on the particular diagnostic and the time step of extraction. You may override this using the EXTRACT_FILE name option. Restrictions: 1. The total number of VECTOR commands is limited to fifty. 2. The vectors must be electric fields, magnetic fields, magneto-static, or current-density fields. They cannot be co-mingled. 3. The area must be conformal in one coordinate, and the field vectors must lie in the conformal plane. 4. A maximum of 12 free floating movie windows of all types (CONTOUR, PHASESPACE, RANGE, VECTOR) are allowed. MAGIC User’s Manual 24- 29 Part VII –Output See Also: Chapter 24 – 2D and 3D Plots SYSTEM, Ch. 10, TIMER, Ch. 11 Examples: The following figures comes from a 3D eigenmode simulation of a pillbox cavity. VECTOR FIELD E2 E3 ZPLANE TSYS$EIGENMODE ; VECTOR Plots: All VECTOR commands use Vector to display information about the requested field’s magnitude and direction. If PAUSE is OFF when a VECTOR command is executed Vector will only display the requested vector plot and continue. If PAUSE is ON, or if a vector plot is chosen from the MAGIC main menu using OutputVectorAll or OutputVectorSelect, the simulation will wait, and the user can take advantage of the Vector commands to study the graph more closely. Some of the more commonly used features of Vector include: • • • • Zoom In/Out on a portion of the graph Save an image of the graph Examine magnitude and direction, and location of individual vectors Extract Vector data to an ASCII text file Vector Plot from PillBoxCavityCyl.m3d Example Input File VECTOR Menu Items: MAGIC User’s Manual 24- 30 Part VII –Output File Save Vector: File Extract Vector: File Print Vector: Edit Copy Output: Output Pause Output: Vector 1:1 Aspect Ratio: VectorReset: VectorClear: VectorLegend: HelpVector Help: Chapter 24 – 2D and 3D Plots This option will save an image of the currently visible vector plot, including the legend, title, and axis information, if it is present. When selected, a dialog box will appear and ask for a filename and type of filename to save the image as. The available image formats are BMP, PCX, and PNG. Use this command to create a tab delimited ASCII text file of the X and Y components of each Vector. When selected, a dialog box will appear and ask for a filename, and the information will be extracted to Filename.txt. Two blocks of data will be written to the file, the first containing the magnitude component of the Vector in the direction of the X (Horizontal) axis, and the second containing the Y (vertical) axis component. The first row and column of each block of data contains the X and Y location of the vector. Each block of data is preceded by the title and location of the plot, and the axis label for the component (X or Y) that is contained in the following data block. Use this command to print the currently visible plot. A dialog box will appear that allows the user to select the printer, page size, orientation, and the margins. Selecting this option will send the currently visible plot to PAINT, an application that comes standard with all versions of Windows. A limitation of the graphics package MAGIC uses prevents image copying directly to the clipboard for pasting into other applications. Once the image has been loaded in PAINT, the user can use the edit select all, edit copy commands in PAINT to copy the image to the clipboard, and then the image can be pasted into other applications, such as Microsoft Word. The user must exit PAINT before returning to the MAGIC simulation. This menu option is checked if PAUSE is currently ON. Uncheck this menu option to turn pause off from this point on. When enabled, 1:1 Aspect Ratio scales the screen image so that it is proportional to the actual size of the geometry. For example, if measuring one inch vertically on the screen was a distance of 10cm along the vertical axis of the vector graph, then measuring one inch horizontally would also cover 10cm. Figures x.2a and x.2b show the same geometry with and without 1:1 Aspect Ratio. MAGIC enables 1:1 Aspect Ratio by default whenever one axis dimension is not excessively large compared to the other. This command will reset the plot to the original settings. Any changes such as zooming in, turning off Aspect Ratio, hiding the legend, etc, will be reversed. Blanks the display screen. The graph legend, shown in Figure 3, gives information about the simulation and the plot, and is shown by default at the bottom of the screen. Uncheck this option to hide the legend. The Graph Legend gives information about the plot and the simulation. Selecting this option will give a brief description of the mouse and keyboard commands available in Vector. These commands are described in the next section. Vector Auxiliary Toolbar Button Commands: Extract data to file...: Save image as bitmap...: Copy image to clipboard: This command is the same as the menu "File -> Extract Vector..." command. Use this command to create a tab delimited ASCII text file of the X and Y components of each Vector. When selected, a dialog box will appear and ask for a filename, and the information will be extracted to Filename.txt. Two blocks of data will be written to the file, the first containing the magnitude component of the Vector in the direction of the X (Horizontal) axis, and the second containing the Y (vertical) axis component. The first row and column of each block of data contains the X and Y location of the vector. Each block of data is preceded by the title and location of the plot, and the axis label for the component (X or Y) that is contained in the following data block. This command is the same as the menu "File -> Save Vector..." command. This command will save an image of the currently visible vector plot, including the legend, title, and axis information, if it is present. When selected, a dialog box will appear and ask for a filename and type of filename to save the image as. The available image formats are BMP, PCX, and PNG. This command is the same as the menu "Edit -> Copy Vector" command. This command will send the currently visible plot to PAINT, an application that comes standard with all versions of Windows. A limitation of the graphics package MAGIC uses prevents image copying directly to the clipboard for pasting into other applications. Once the image has been loaded in PAINT, the MAGIC User’s Manual 24- 31 Part VII –Output Stretch Vector: Chapter 24 – 2D and 3D Plots user can use the edit->select all, edit->copy commands in PAINT to copy the image to the clipboard, and then the image can be pasted into other applications, such as Microsoft Word. The user must exit PAINT before returning to the MAGIC simulation. This command is the same as pressing the uppercase "V" key. This command will stretch the vector arrow length. Shrink Vector: This command is the same as pressing the lowercase "v" key. This command will shrink the vector arrow length. Show/Hide axes and labels: This command is the same as the menu "Vector -> Axes labels" toggle command. It toggles between showing and hiding the graph x axis/labels, y axis/labels, and legend. Show/Hide Title: This command is the same as the menu "Vector -> Title" toggle command. It toggles between showing and hiding the graph title. Show/Hide X_AXIS: This command is the same as the menu "Vector -> x-Axis and labels" toggle command. It toggles between showing and hiding the graph x axis/labels. Show/Hide Y_AXIS: This command is the same as the menu "Vector -> y-Axis and labels" toggle command. It toggles between showing and hiding the graph y axis/labels. Show/Hide Legend: This command is the same as the menu "Vector -> Legend" toggle command. It toggles between showing and hiding the graph legend. Show/Hide Frame: This command is the same as the menu "Vector -> Show graph frame" toggle command. It toggles between showing and hiding the graph frame. Reset Graph: This command is the same as the menu "Vector -> Reset" command. This command will reset the plot to the original settings. Any changes such as zooming in, changing line colors, hiding the legend, etc, will be reversed. Vector Mouse/Keyboard Controls Current Mouse Position: Mouse Zoom: Keyboard Zoom: In Vector, whenever the mouse cursor is inside the plot area, the x,y location of the mouse cursor is shown in the status bar of the MAGIC window. Figure 4 shows the status bar of the MAGIC window. When the mouse is positioned at the blue arrow, the location of the cursor is shown in the status bar. MAGIC Status Bar shows Current Mouse Position To zoom in on the display using the mouse, hold down the right mouse button while moving the mouse vertically on the screen. Moving towards the top of the screen will zoom in on the graph, moving towards the bottom will zoom out. Aspect Ratio will be preserved if 1:1 Aspect Ratio is enabled. Figure 4 shows a zoom in on the bottom right corner of the same vector plot shown in Figure 1. The keyboard offers more flexibility for zooming in and out. To change only the scale of the x (horizontal) axis, use uppercase “X” to zoom in, or lowercase “x” to zoom out. “Y” and “y” can be used to zoom in or out along the y (vertical) axis. The Keypad can also be used to zoom in on the plot. When NumLock is on, “4” and “6“ will expand the X axis in the –X or +X directions, and “2” and “8” will expand the Y axis in the –Y or +Y directions, respectively. The “+” and “–“ keys will zoom in and out on both axes equally. If 1:1 Aspect Ratio is enabled, the scale of one axis cannot be changed without effecting the scale of the other. Because of this, if a command that zooms in on the x or y axis is used, such as “X” or “Y” both axes will zoom in equally, much like when “+” is used. The same is true for commands that expand only one of the axes. Aspect Ratio can be disabled by un-checking the Vector 1:1 Aspect Ratio menu option. MAGIC User’s Manual 24- 32 Part VII –Output Panning: Snap to a Vector: Line Width: Line Color: Chapter 24 – 2D and 3D Plots Panning changes the point at which the graph is centered. To pan using the mouse, hold down both the right and left mouse buttons, and move the mouse in any direction. The plot will shift with the movement of the mouse until one or both of the buttons are released. To pan using the keyboard, use the arrow keys. As explained in Current Mouse Position, the user can see the current location of the mouse cursor on the graph in the status bar. The user can also snap to the closest vector by single clicking the left mouse button anywhere inside the display area. When the user clicks the left mouse button, a red dot marks the tail of the closest vector, and a pop-up window will appear that gives the exact location of the vector and it’s magnitude, as shown in Figure 5. Also note the Line Color and Line Width menu options, which will be explained below. Left-Click inside the plot area to find the closest Vector or modify the appearance of the vectors. Select the Line Width menu option from the pop-up window shown in Figure 5 to change the thickness of vector lines. The default thickness of one pixel is shown in Figure 5. Select the Line Color menu option from the pop-up window shown in Figure 5 to change the color of vector lines. A dialog box will appear that allows the user to select any 24 bit RBG color. MAGIC User’s Manual 24- 33 Part VII –Output Chapter 24 – 2D and 3D Plots PHASESPACE Command Function: Plots particle phase space. Syntax: PHASESPACE AXES x_axis y_axis timer [ AXIS {X, Y} minimum maximum [ step ] ] [ WINDOW coordinate minimum maximum ] [ SPECIES species ] [ CROSS_SECTION at_xn ] [ NOTAG, TAG ] movie options [ MOVIE ] [{PNG, BMP, PCX }] (bitmap formats) [{AVI, MPEG}] (movie file formats) [ MOVIE_NAME dirname] [ MOVIE_SIZE width height ] [ CODEC acodec ] [ FRAMERATE irate ] standard graphics control options [ NOLEGEND, LEGEND ] [ XAXIS, NOXAXIS] [ YAXIS, NOYAXIS] [ ZAXIS, NOZAXIS ] [ XLABEL, NOXLABEL ] [ YLABEL, NOYLABEL ] [ ZLABEL, NOZLABEL ] [ XSCALE, NOXSCALE ] [ YSCALE, NOYSCALE ] [ ZSCALE, NOZSCALE ] [ CLEGEND, NOCLEGEN ] [ TITLE, NOTITLE ] [ FRAME, NOFRAME ] [ ASPECT, NOASPECT ] [NOGRID, GRID ] standard output control options [ NOEXTRACT, EXTRACT, EXTRACT_DIR extract_dir, EXTRACT_FILE extract_file ] [ NOPRINT, PRINT ] [ NODUMP, DUMP ] [ PLOT, NOPLOT ] ; Arguments: x_axis, y_axis — coordinates for the X and Y axes and the optional windows (X1, X2, X3, P1, P2, P3, Q, KE, GAMMA, or f(x1,x2,x3,p1,p2,p3,q,ke), a function defined in a FUNCTION command). timer — timer name, defined in TIMER command. species — particle species (ALL, ELECTRON, PROTON, or defined in SPECIES command). at_xn — position coordinate in the transverse coordinate for which the geometric structure is displayed. Used only when axes are both position coordinates. width width of movie window in pixels. height height of movie window in pixels. dirname folder name for movie frames, and used for avi movie name. avi_codec — codec compression algorithm. Choices for avi file creation are: UNCOMPRESSED, Full frames, uncompressed. MAGIC User’s Manual 24- 34 Part VII –Output Chapter 24 – 2D and 3D Plots CINEPAK, Cinepak by Supermac. INDEO3.2, Intel Indeo Video 3.2. INDEO5, Intel Indeo Video 5. MSVIDEO1, Microsoft Video 1 (default). RLE, Run Length Encoding. DIVX5, DivX 5. XVID, XviD. 3IVX, 3ivx. mpeg_codec— codec compression algorithm. Choices for mpeg file creation are: MPEG1, MPEG-1 standard. MPEG1.VCD, MPEG-1 with VideoCD extensions. MPEG2, MPEG-2 standard. MPEG2.SVCD, MPEG-2 with Super VideoCD extensions. MPEG2.DVD, MPEG-2 with DVD extensions. irate. — frame rate, number of frames/sec in AVI movie file. extract_dir — the name of the output folder that contains the extracted data. extract_file — file name of extracted data, default name is generated from uniquely from diagnostic and time stamp. Defaults: The default values for the optional arguments are listed in the Table. Keyword AXIS WINDOW SPECIES CROSS_SECTION { NOTAG, TAG } Argument minimum, maximum, step variable Species At_xn N.A. Default Value (see Description, below) (infinite window) ALL sys$xnmd NOTAG Description: The PHASESPACE command produces plots of particle phase space at times specified by the timer. The timer must specify times which take into account the kinematics step_multiple (LORENTZ, Ch. 18). To obtain trajectory plots (phase-space with a time duration), use the INTEGRATE option in the timer (trajectory plots automatically use only tagged particles). The coordinates specify the phase-space variables. The standard variables that may be specified are X1, X2, X3, P1, P2 and P3. These are the physical coordinates and momenta of the particles. In addition, the arguments, Q, KE, and GAMMA may be used to select the charge per macro-particle (coulombs), kinetic energy per physical particle (eV), and relativistic factor (unitless). Other variables can be selected for the axes by using a function name for the arguments, x-axis and y_axis. The function implicitly refers to seven particle variables: x1, x2, x3, p1, p2, p3, q, and ke. The variables x1, x2, and x3 denote the physical coordinates of the particle. The variables p1, p2, and p3 denote the momenta of the particle in m/s. The variable q denotes the particle charge, and the variable ke denotes the kinetic energy in eV. The keywords, AXIS, WINDOW, and SPECIES are used to set optional parameters. These can be entered in any order after the AXES keyword and parameters are specified. MAGIC User’s Manual 24- 35 Part VII –Output Chapter 24 – 2D and 3D Plots The keyword, AXIS, is used to establish the plot axes limits. The arguments, rmin and rmax, specify the axis extrema. The argument, rstep, specifies the step size used in labeling the plot axis. A value of zero for rstep causes only the end points of the axis to be labeled. Not entering a value has the same effect. The keyword CROSS_SECTION is used to specify the coordinate plane used for the structural display, when the axes are both position coordinates. E.g. by default if the axes are x3 and x1, then the default argument for CROSS_SECTION is sys$x2md. You may specify any plane in the x2-coordinate with this argument. The keyword, WINDOW, can be used to specify an acceptance window in any of these variables: x1, x2, p1, p2 and p3. Only particles falling within the variable limits, wmin and wmax, will be plotted. Note that the window variable does not have to be one of the plotted variables; it simply offers a mechanism to discriminate plotted particles. The keyword, SPECIES, is used to select the particle species to be included in the plot. The argument, ALL, will produce a plot with all species on one plot. Plots of individual species may be created by specifying the particular species name, e.g., ELECTRON, PROTON, etc. The default for species is ALL. The NOTAG, TAG option allows you to select all particles or tagged particles only (TAGGING, Ch. 24). The default is NOTAG (all particles). The DUMP option can be used to divert contour plot data to the FLD file for post-processing. In this event, NOPLOT will prevent plotting this data at the end of the simulation. The MOVIE option permits you to generate a sequence of bitmaps (in PNG format) from a sequence of PHASESPACE plots. In order for this sequence to provide an appealing visual representation of the data, you should also use the AXIS option to enforce limits. When the MOVIE option is invoked, MAGIC generates a series of bitmaps that are saved in a folder. There is one movie folder per command that uses the MOVIE option. You can “play” the movie by using the MOVIE command. By adding the keyword PNG, PCX or BMP you may select any of these output formats for the movies frames. Please note that PNG is the most highly compressed format, and BMP is an uncompressed format. Use of the keyword AVI or MPEG, causes the software to process the frames into an avi-file/mpeg-file automatically at the termination of the simulation. The individual frames and the movie folder are deleted after this is complete. Use of the keyword CODEC allows you select among a number of compression schemes. In addition, you may use the MOVIE_SIZE option to specify the width and height of a free floating movie window. A maximum of 12 free floating movie windows of all types (CONTOUR, PHASESPACE, RANGE, VECTOR) are allowed. Movie windows may be of different sizes. When WINDOW_SIZE is specified, it also activates the NOLEGEND option. The option, MOVIE_NAME, allows you specify the name of a folder for the movie frames. It must be unique, (i.e. not used with more than one MOVIE option.) If the AVI file type is selected, the name is also used for the avi-movie file. The EXTRACT, EXTRACT_DIR, and EXTRACT_FILE options are used to automatically extract the graphics data to a text file for later use, such as in a spreadsheet or other post analysis tool. The default condtion, is NOEXTRACT. The EXTRACT option enables automatic extraction after a graphic is displayed. Unless the a directory folder is specified the extracted data will be in the working directory. Use of the EXTRACT_DIR option permits you to specify a particular output directory, making it easier to keep the results organized. All graphics output will have a unique automatic name based on the particular MAGIC User’s Manual 24- 36 Part VII –Output Chapter 24 – 2D and 3D Plots diagnostic and the time step of extraction. You may override this using the EXTRACT_FILE name option. Restrictions: 1. The total number of PHASESPACE commands is limited to 20. 2. A maximum of 12 free floating movie windows of all types (CONTOUR, PHASESPACE, RANGE, VECTOR) are allowed. See Also: TIMER, Ch. 11, SPECIES, Ch. 18, TAGGING, Ch. 24 Examples: 1. The following commands produce phase-space plots at time step 600. The first plot will be of the position (z,r) phase space, and the second plot will be a trajectory plot of the tagged particles spanning 50 time steps. TIMER For_Phase PERIODIC INTEGER 600 99999 500 ; TIMER For_Traj PERIODIC INTEGER 600 99999 500 INTEG 50; PHASESPACE AXES X3 X2 For_Phase ; TAGGING 0.05 ; PHASESPACE AXES X3 X2 For_Traj ; Phasespace Plots: All PHASESPACE commands use the pointgraph utility to display the requested particle information. If PAUSE is OFF when a PHASESPACE command is executed pointgraph will only display the requested information and continue. If PAUSE is ON, or if a PHASESPACE plot is chosen from the MAGIC main menu using OutputPhasespaceAll or OutputPhasespaceSelect, the simulation MAGIC User’s Manual 24- 37 Part VII –Output Chapter 24 – 2D and 3D Plots will wait, and the user can take advantage of the PHASESPACE commands to study the graph more closely. Some of the more commonly used features of PHASESPACE include: • • • • Zoom In/Out on a portion of the graph Save an image of the graph Examine the location of individual points or particles Extract particle data to an ASCII text file As shown in Figure 1a, if a PHASESPACE command contains more than one particle species, each species will be a different color. The color of each species can be selected from a list of available colors in the EMISSION command. The PHASESPACE command can also generates plots of particle trajectories. An example of a trajectory plot is shown in Figure 1b. a) Multiple Species PHASESPACE Plot MAGIC User’s Manual 24- 38 Part VII –Output Chapter 24 – 2D and 3D Plots b) Trajectory Plot from Mitl.m2d Example File PHASESPACE Menu Items: File Save Phasespace: File Extract Phasespace: File Print Phasespace: Edit Copy Phasespace: Output Pause Output: Phasespace 1:1 Aspect Ratio: PhasespaceReset: This option will save an image of the currently visible phasespace plot, including the legend, title, and axis information, if it is present. When selected, a dialog box will appear and ask for a filename and type of filename to save the image as. The available image formats are BMP, PCX, and PNG. Use this command to create a tab delimited ASCII text file of the X and Y values of each point in the phasespace plot. When selected, a dialog box will appear and ask for a filename, and the information will be extracted to Filename.txt. The file will contain the title of the plot and the axis labels for the x and y axes. If more than one species is present, the particles will be sorted based on species, and two columns of data for each species will be written to the file. The Active Species number and the number of particles for that species will be written at the top of each column. If a Trajectory plot is extracted, every two pairs of data points represent the trajectory of a single particle in a single time step. Trajectory information is sorted by timestep, not by particle, so the first 10 data points in a species column are the trajectories of five different particles during the first time step, not the first particle for the first five timesteps. Use this command to print the currently visible plot. A dialog box will appear that allows the user to select the printer, page size, orientation, and the margins. Selecting this option will send the currently visible plot to PAINT, an application that comes standard with all versions of Windows. A limitation of the graphics package MAGIC uses prevents image copying directly to the clipboard for pasting into other applications. Once the image has been loaded in PAINT, the user can use the edit select all, edit copy commands in PAINT to copy the image to the clipboard, and then the image can be pasted into other applications, such as Microsoft Word. The user must exit PAINT before returning to the MAGIC simulation. This menu option is checked if PAUSE is currently ON. Uncheck this menu option to turn pause off from this point on. When enabled, 1:1 Aspect Ratio scales the screen image so that it is proportional to the actual size of the geometry. For example, if measuring one inch vertically on the screen was a distance of 10cm along the vertical axis of the point graph, then measuring one inch horizontally would also cover 10cm. Figures x.2a and x.2b show the same geometry with and without 1:1 Aspect Ratio. MAGIC enables 1:1 Aspect Ratio by default if geometry is displayed and one axis dimension is not excessively large compared to the other. This command will reset the plot to the original settings. Any changes such as zooming in, turning off MAGIC User’s Manual 24- 39 Part VII –Output PhasespaceClear: PhasespaceLegen d: PhasespaceInterv al: HelpPhasespace Help: Chapter 24 – 2D and 3D Plots Aspect Ratio, hiding the legend, etc, will be reversed. Blanks the display screen. The graph legend, shown in Figure 3, gives information about the simulation and the plot, and is shown by default at the bottom of the screen. Uncheck this option to hide the legend. The Graph Legend gives information about the plot and the simulation. The interval option is most commonly used when plots with a large number of points are displayed. When an interval value n is selected, Phasespace will only display every nth point. This can be useful in simulations with so many particles that individual particles are difficult to see in the plot. If the PhasespaceIntervalAuto option is checked, PointGrapher will set the interval automatically based on the number of points in the plot. The default interval setting is always 1, which displays every point available. Selecting this option will give a brief description of the mouse and keyboard commands available in Phasespace. These commands are described in the next section. PHASESPACE Auxiliary Toolbar Button Commands: Show/Hide axes and labels: This command is the same as the menu "File -> Extract Phasespace..." command. Use this command to create a tab delimited ASCII text file of the X and Y values of each point in the phasespace plot. When selected, a dialog box will appear and ask for a filename, and the information will be extracted to Filename.txt. The file will contain the title of the plot and the axis labels for the x and y axes. If more than one species is present, the particles will be sorted based on species, and two columns of data for each species will be written to the file. The Active Species number and the number of particles for that species will be written at the top of each column. If a Trajectory plot is extracted, every two pairs of data points represent the trajectory of a single particle in a single time step. Trajectory information is sorted by timestep, not by particle, so the first 10 data points in a species column are the trajectories of five different particles during the first time step, not the first particle for the first five timesteps. This command is the same as the menu "File -> Save Phasespace..." command. This command will save an image of the currently visible phasespace plot, including the legend, title, and axis information, if it is present. When selected, a dialog box will appear and ask for a filename and type of filename to save the image as. The available image formats are BMP, PCX, and PNG. This command is the same as the menu "Edit -> Copy Phasespace" command. This command will send the currently visible plot to PAINT, an application that comes standard with all versions of Windows. A limitation of the graphics package MAGIC uses prevents image copying directly to the clipboard for pasting into other applications. Once the image has been loaded in PAINT, the user can use the edit->select all, edit->copy commands in PAINT to copy the image to the clipboard, and then the image can be pasted into other applications, such as Microsoft Word. The user must exit PAINT before returning to the MAGIC simulation. This command is almost the same as pressing the uppercase "M" key. This command will increase the size of the markers used ONLY for the selected species. Using the keyboard command shift+M (uppercase) when no point is selected changes the size of all markers. This button will be grayed out if the markers are already at their maximum size. This command is almost the same as pressing the lowercase "m" key. This command will decrease the size of the markers used ONLY for the selected species. Using the keyboard command m (lowercase) when no point is selected changes the size of all markers. This button will be grayed out if the markers are already at their minimum size. At the minimum size, the markers are so small that there is no difference between the three marker types. This command is the same as the menu "Phasespace -> Axes labels" toggle command. It toggles between showing and hiding the graph x axis/labels, y axis/labels, and legend. Show/Hide Title: This command is the same as the menu "Phasespace -> Title" toggle command. It toggles between showing and hiding the graph title. Extract data to file...: Save image as bitmap...: Copy image to clipboard: Increase Marker Size: Decrease Marker Size: MAGIC User’s Manual 24- 40 Part VII –Output Chapter 24 – 2D and 3D Plots Show/Hide X_AXIS: This command is the same as the menu "Phasespace -> x-Axis and labels" toggle command. It toggles between showing and hiding the graph x axis/labels. Show/Hide Y_AXIS: This command is the same as the menu "Phasespace -> y-Axis and labels" toggle command. It toggles between showing and hiding the graph y axis/labels. Show/Hide Legend: This command is the same as the menu "Phasespace -> Legend" toggle command. It toggles between showing and hiding the graph legend. Show/Hide Frame: This command is the same as the menu "Phasespace -> Show graph frame" toggle command. It toggles between showing and hiding the graph frame. Reset Graph: This command is the same as the menu "Phasespace -> Reset" command. This command will reset the plot to the original settings. Any changes such as zooming in, changing line colors, hiding the legend, etc, will be reversed. 23.1 PHASESPACE Mouse/Keyboard Controls: Current Mouse Position: Mouse Zoom: Keyboard Zoom: Panning: Snap to a In Phasespace whenever the mouse cursor is inside the plot area, the x,y location of the mouse cursor is shown in the status bar of the MAGIC window. Figure 4 shows the status bar of the MAGIC window. When the mouse is positioned at the blue arrow, the location of the cursor is shown in the status bar. MAGIC Status Bar shows Current Mouse Position To zoom in on the display using the mouse, hold down the right mouse button while moving the mouse vertically on the screen. Moving towards the top of the screen will zoom in on the graph, moving towards the bottom will zoom out. Aspect Ratio will be preserved if 1:1 Aspect Ratio is enabled. Figure 4 shows a zoom in on the right-middle vane of the same magnetron and phasespace plot shown in Figure 2. The keyboard offers more flexibility for zooming in and out. To change only the scale of the x (horizontal) axis, use uppercase “X” to zoom in, or lowercase “x” to zoom out. “Y” and “y” can be used to zoom in or out along the y (vertical) axis. The Keypad can also be used to zoom in on the plot. When NumLock is on, “4” and “6“ will expand the X axis in the –X or +X directions, and “2” and “8” will expand the Y axis in the –Y or +Y directions, respectively. The “+” and “–“ keys will zoom in and out on both axes equally. If 1:1 Aspect Ratio is enabled, the scale of one axis cannot be changed without effecting the scale of the other. Because of this, if a command that zooms in on the x or y axis is used, such as “X” or “Y” both axes will zoom in equally, much like when “+” is used. The same is true for commands that expand only one of the axes. To disable Aspect Ratio, uncheck the Phasespace 1:1 Aspect Ratio menu option. Panning changes the point at which the graph is centered. To pan using the mouse, hold down both the right and left mouse buttons, and move the mouse in any direction. The plot will shift with the movement of the mouse until one or both of the buttons are released. To pan using the keyboard, use the arrow keys. As explained in Current Mouse Position, the user can see the current location of the mouse cursor on the MAGIC User’s Manual 24- 41 Part VII –Output Point: Marker Color: Marker Type: Increase Marker Size: Decrease Marker Size: Chapter 24 – 2D and 3D Plots graph in the status bar. The user can also snap to the closest point by single clicking the left mouse button anywhere inside the display area. When the user clicks the left mouse button, a dot the same color as the species point marks the nearest point, and a pop-up window will appear that gives the exact location of the point, as shown in Figure 5. Also note the Marker Color, Marker Type, and Marker Size options, which will be explained below. Left-Click inside the plot area to find the closest Point or modify the appearance of the points. Select the Marker Color menu option from the pop-up window shown in Figure 5 to change the color of the selected species. A dialog box will appear that allows the user to select any 24 bit RBG color. Selecting the Marker Type menu option from the pop-up window shown in Figure 5 to change the shape of the marker used for the selected species. The three available choices are square, circle, and triangle. Selecting this option from the pop-up menu will increase the size of the markers used ONLY for the selected species. Using the keyboard command shift+M (uppercase) when no point is selected changes the size of all markers. This menu option will be grayed out if the markers are already at their maximum size. Selecting this option from the pop-up menu will decrease the size of the markers used ONLY for the selected species. Using the keyboard command m (lowercase) when no point is selected changes the size of all markers. This menu option will be grayed out if the markers are already at their minimum size. At the minimum size, the markers are so small that there is no difference between the three marker types. MAGIC User’s Manual 24- 42 Part VII –Output Chapter 24 – 2D and 3D Plots TAGGING Command Function: Reduces number of particles plotted. Syntax: TAGGING fraction (t) ; Arguments: fraction — fraction of particles tagged (0 < fraction ≤ 1), constant or function defined in a FUNCTION command. Default: The default tagging fraction is unity. Description: The TAGGING command specifies the fraction of particles chosen to appear in particle plots. By default, the fraction is 1.0, and particle plots will show all particles in the simulation. However, this default may produce an extremely dense plot and an extremely large plot file. Setting fraction to a value less than unity limits the plots to a randomly chosen fraction of the particles. Note that individual output commands, e.g., PHASESPACE, may offer an option to plot either all the particles or the tagged particles only. Restrictions: 1. Tagging affects particles of all species. See Also: PHASESPACE, Ch. 24 Examples: The following example illustrates the use of TAGGING in conjunction with DUMP and PHASESPACE to create a data file which can be post processed to make a movie. The TAGGING fraction is set to .25 to prevent the data file from becoming too large. The DUMP command is used to store the phase-space data in the data file. The TIMER command is used to specify the rate at which the phase-space data is dumped, and the PHASESPACE command is used to select the specific phase-space data. The commands are: TAGGING 0.25 ; DUMP TYPE PHASESPACE NOPLOT ; TIMER For_Movie PERIODIC INTEGER 1 99999 8 ; PHASESPACE AXES X1 X2 For_Movie TAG ; MAGIC User’s Manual 24- 43 Part VII –Output Chapter 24 – 2D and 3D Plots VIEWER Command Function: Displays three-dimensional perspective of selected features in a 3D simulation. Syntax: VIEWER timer [ MOVIE] [ MOVIE_TIMER timer] [{PNG, BMP, PCX }] (bitmap formats) [{AVI, MPEG}] (movie file formats) [ MOVIE_SIZE width height ] [ MOVIE_NAME dirname] [ CODEC acodec ] [ FRAMERATE irate ] ; Arguments: timer name of timer, defined in TIMER command. dirname name of folder in which the movie frames will be stored. avi_codec — codec compression algorithm. Choices for avi file creation are: UNCOMPRESSED, Full frames, uncompressed. CINEPAK, Cinepak by Supermac. INDEO3.2, Intel Indeo Video 3.2. INDEO5, Intel Indeo Video 5. MSVIDEO1, Microsoft Video 1 (default). RLE, Run Length Encoding. DIVX5, DivX 5. XVID, XviD. 3IVX, 3ivx. mpeg_codec — codec compression algorithm. Choices for mpeg file creation are: MPEG1, MPEG-1 standard. MPEG1.VCD, MPEG-1 with VideoCD extensions. MPEG2, MPEG-2 standard. MPEG2.SVCD, MPEG-2 with Super VideoCD extensions. MPEG2.DVD, MPEG-2 with DVD extensions. irate. — frame rate, number of frames/sec in AVI movie file. width width of movie window in pixels (NOT USED). height height of movie window in pixels (NOT USED). Description: The VIEWER command provides a three-dimensional perspective plot of specified simulation features. The default orientation and display options for the geometry are set by using the interactive viewer button on the Magic toolbar. The timer argument allows you to automate when a 3-dimension view is displayed. In addition, by using the MOVIE or the AVIMOVIE option, you can specify that the frame bitmaps will be recorded and stored in a folder within the working directory. Use of the AVIMOVIE causes the generation of an avi-file from the recorded frames at the completion of the simulation with the individual frames subsequently deleted. See Also: TIMER, Ch. 11, Description: MAGIC User’s Manual 24- 44 Part VII –Output Chapter 24 – 2D and 3D Plots In this example the VIEWER command is used in conjunction with the CONDUCTOR command and the NOT_VISIBLE option to provide a view of the internal particle dynamics during a simulation. timer frames2 periodic 10 10000 10 ; VIEWER frames2 movie PHSMOVIE ; Interface for VIEWER: This section covers the following topics: Opening 3-D Viewer Menus Mouse Controls Keyboard Controls Appearance Dialog Box 3-D Particle View Dialog Box The 3-D Viewer allows you to interact with the plot in several ways. You can use the menus to set the view, appearance, and settings of the object viewed. You can use the mouse or keyboard to manipulate the image. Opening 3-D Viewer: To display the 3-D Viewer, select the Viewer item in the Output menu. Simulations with active particles present will be displayed in the image. The Viewer automatically appears at the beginning of a simulation if ‘GRAPHICS PAUSE’ has been enabled. MAGIC User’s Manual 24- 45 Part VII –Output Chapter 24 – 2D and 3D Plots Menus: The File Menu contains the following items: • • • • • The Save View option will allow for the current image to be saved as a bmp, pcx, or png file. The Print View option allows for the image to be printed on a local printer using the standard print dialog box. The Save Movie option, is by default set to off. This feature will export a bmp or pxc file for every frame as the image moves. Using Video Mach (shareware provided on the CD) these files can then be assembled into a movie. The Close Viewer option will close the viewer. The Exit option will exit the entire Magic3D program. The Edit Menu MAGIC User’s Manual 24- 46 Part VII –Output • Chapter 24 – 2D and 3D Plots The Copy Viewer option copies the current image in Viewer into the clipboard. You may then paste it into other documents. The Viewer Menu • • • • • • The Reset option returns the image to its original position and size. If the Axes option is checked then the x, y, and z-axes will be displayed as lines. To remove the axes simply deselect this option. The Mouse Settings submenu allows for the mouse interaction to be customized. Select the Mouse Settings submenu, then select which button setting to change, and select the desired action for that mouse button. (See also Mouse Controls) The Appearance option will bring up the appearance dialog box. (See also Appearance Dialog Box) The 3-D Particle View option allows for you to edit the number of particles shown. In addition, it also allows for the user to change what the axes and color represent. (See also 3-D Particle View Dialog Box) The Animation option is by default set to continuous. This option allows you to ‘throw’ the image such that it performs continuous rotation. To do this click on the image and flick the mouse. The image will continue to move in the same manner as last commanded. This works for rotating, spinning, zooming, and panning. This option can be turned off to prevent excessively loading the CPU on slower systems. It can also be set to once around. In this case, the 'throw' action discontinues after one full rotation. The Window Menu: MAGIC User’s Manual 24- 47 Part VII –Output • Chapter 24 – 2D and 3D Plots Use to select between open windows in the usual manner. The Help Menu • • The Viewer Key Equivalents option displays a quickreference dialog box for the keyboard controls. The About Magic option brings up a dialog box with information about copyright and contact information for Mission Research Corporation. Mouse Controls: There are three mouse button combinations used by the 3-D viewer. They are Left Mouse Button only, Right Mouse Button only, and Both Mouse Buttons. By default these are set to rotate, spin/zoom, and pan respectively. To change these settings select the Mouse Settings submenu in the Viewer menu, and select the desired settings for each mouse button. It may take some practice to learn how the mouse movements manipulate the object. Rotate Spin and Zoom Pan Rotate is by default set to the left mouse button. Clicking on the image and dragging will rotate image about the x, y, and z-axes. Spin and Zoom is by default set to the right mouse button. Clicking on the image and dragging to the right will spin the image clockwise, and dragging to the left will spin the image counter-clockwise. Clicking on the image and dragging down and up will zoom the image out and in respectively. Pan is by default set to both mouse buttons. Clicking on the image and dragging will pan the image in the corresponding direction. Keyboard Controls: The object manipulation capabilities are also available through keyboard commands. Rotation on the keyboard is controlled by the number pad as shown in the following diagram. The number pad also controls the spin. The number 5 rotates the image clockwise, and the number 0 rotates the image counter clockwise. The + and – on the number pad zoom the image in and out. The arrow keys pan the image. Axis Distortion: The 3-D viewer allows for any of the axis to be stretched or shrunk. To shrink an axis simply press the x, y, or z key. To stretch an axis you press shift+X, shift+Y, or shift+Z key. MAGIC User’s Manual 24- 48 Part VII –Output Chapter 24 – 2D and 3D Plots Appearance Dialog Box: This dialog box shows a list of objects in the plot image. To edit any of the parts select one or more from this list by clicking to select one, shift clicking to select a series from the list, or control clicking to select separate parts. This list also gives you a description of the current settings for each part. This description includes what the object is, the current color of the object, whether it is visible or hidden, its level of transparency, and whether it is displayed as a solid or wire-frame. On the left side of the dialog box just below the list of objects is a check box labeled ‘Visible’. If this box is checked then the selected parts will be visible. The pull-down list just below the ‘Visible’ checkbox allows the user to select the color for an object. The pull-down list labeled ‘Transparency’ allows the user to select what percent transparent the selected parts will be. A transparency between 30% and 90% is often useful to see glimpses of hidden lines that render a pleasing 3-D effect to the image. The radio buttons labeled ‘Solid’ and ‘Wireframe’ determine whether the selected parts will appear as solid or wire-frame. The ‘Set appearance to all objects’ box allows you to set some characteristics to all objects on the list without having to select them. The ‘Default’ button returns all objects to their original state (color, transparency, visible/hidden, solid/wire-frame) MAGIC User’s Manual 24- 49 Part VII –Output Chapter 24 – 2D and 3D Plots ‘No Transparency’ button sets the transparency for all objects to 0%. Selecting the ‘All Solid’ or ‘All Wireframe’ radio button will set all the objects to be seen as either solid or wire-frame. 3-D Particle View Dialog Box The Particle Increment number field allows you to choose the number of particles displayed. Selecting one will cause every particle to be displayed. Selecting ‘n’ will cause one in every n-th particles to be displayed. Advanced Axes Selection allows you to change what the x-axis, y-axis, z-axis, and color represent. Any plot axis can represent any one of the normal particle phasespace coordinates, momentum, or other quantities (e.g.: x, y, z, r (spherical), phi, rho (cylindrical), theta, px, py, pz, pr (spherical), p phi, p roe (cylindrical), p theta, kinetic energy, gamma, macro-particle charge, species, function, or none). MAGIC User’s Manual 24- 50