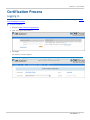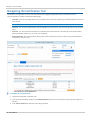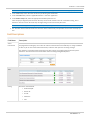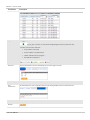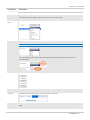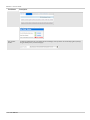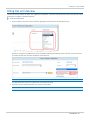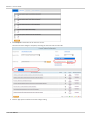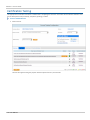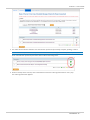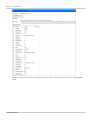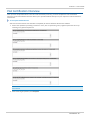
1
AutoCert + Access Guide
User Manual
12/14/2015
Disclaimer
Futures trading is not suitable for all investors, and involves the risk of loss. Futures are a leveraged investment, and because
only a percentage of a contract’s value is required to trade, it is possible to lose more than the amount of money deposited for
a futures position. Therefore, traders should only use funds that they can afford to lose without affecting their lifestyles. And
only a portion of those funds should be devoted to any one trade because they cannot expect to profit on every trade.
All references to options refer to options on futures.
CME Group is a trademark of CME Group Inc. The Globe Logo, CME, Chicago Mercantile Exchange, Globex, iLink, E-mini, CME
EOS Trader, FirmSoft, CME DataSuite, and CME DataMine are trademarks of Chicago Mercantile Exchange Inc. New York
Mercantile Exchange, NYMEX, miNY, and ClearPort are registered trademarks of the New York Mercantile Exchange, Inc.
COMEX is a trademark of Commodity Exchange, Inc.
FIX™ and FAST™ are trademarks of FIX Protocol Limited. FIX/FASTsm is a service mark of FIX Protocol Limited.
Dow Jonessm, Dow Jones AIG Commodity Indexsm, The Dow sm, Dow Jones Industrial Averagesm, and DJIAsm are service
marks of Dow Jones & Company, Inc. and American International Group, Inc. (AIG) and have been licensed for use for certain
purposes by the Board of Trade of the City of Chicago, Inc (CBOT®). CBOT futures and options on futures contracts based on the
Dow Jones Industrial Averagesm are not sponsored, endorsed, sold or promoted by Dow Jonessm, and Dow Jonessm makes no
representation regarding the advisability of trading such product(s).
BM&FBOVESPA™ is a trademark of BM&FBOVESPA, KRX™ is a trademark of Korea Exchange, DME™ is a trademark of Dubai
Mercantile Exchange, BMD™ is a trademark of Bursa Malaysia, BMV™ is a trademark of Bolsa Mexicana De Valores.
All other trademarks are the property of their respective owners.
The information within this document has been compiled by CME Group for general purposes only. CME Group assumes no
responsibility for any errors or omissions. Additionally, all examples in this brochure are hypothetical situations, used for
explanation purposes only, and should not be considered investment advice or the results of actual market experience.
All matters pertaining to rules and specifications herein are made subject to and are superseded by official CME, CBOT, and
NYMEX rules. Current rules should be consulted in all cases concerning contract specifications.
Copyright © 2015 CME Group Inc. All rights reserved.
Table of Contents
Table of Contents
Getting Started
Obtaining Access to AutoCert+
Subscribing to Test Environment Notifications
Additional Resources
What's New
Certification Process
Logging In
Navigating the Certification Tool
Field Descriptions
Filling Out an Interview
Certification Dedicated Instruments
Certification Testing
Post Certification Interview
4
4
4
5
6
7
7
8
9
13
15
16
19
User Manual - 3 -
AutoCert + Access Guide
Please submit user experience feedback about the CME AutoCert+ Access guide.
Getting Started
Welcome to the AutoCert+ Access online help system.
CME Group requires that all client systems transacting on CME Globex via iLink order routing or processing CME Group market
data are certified by AutoCert+, an automated testing tool for validating client system functionality. CME Group offers two
customer testing environments, Certification and New Release, for system validation prior to connecting to and transacting on
CME Group platforms. Certification ensures messaging and processing reliability and the capability to gracefully recover during
abnormal message processing events.
Obtaining Access to AutoCert+
1. Contact your Global Account Management (GAM) to obtain access to the AutoCert+ application. When the account is
created, CME Group sends a welcome email containing login information.
2. Use the ID and password to Login to AutoCert+.
Subscribing to Test Environment Notifications
The email containing your ID and password to AutoCert+ also contains a link to the CME Group Subscription Center, which
allows you to subscribe or unsubscribe to test environment notifications, including New Release and Certification.
CAUTION: Please note that the unsubscribe link unsubscribes you from ALL CME Group subscription-based
notifications. To manage your subscription profile, visit http://cmegroup.com/subscribe.
To access the CME Group Subscription Center:
1. Navigate to http://cmegroup.com/subscribe.
2. Enter your email address and click Submit.
- 4 - User Manual
AutoCert + Access Guide
3. Select the Test Environments check box to subscribe to these email notifications, or deselect the Test Environments
check box to unsubscribe from these email notifications.
4. Click Submit.
Additional Resources
l
l
l
Client Systems Wiki - for more information on certification environments, system requirements, and network connectivity.
Navigating AutoCert+ - learn more about general navigation for the application.
Certification Overview Video
User Manual - 5 -
AutoCert + Access Guide
What's New
The list below illustrates the updates made to the AutoCert+ Access Help system.
Date
Author Topic
Description
12/14/15
DT
Getting Started
Removed mention of VPN in step 1 under "Obtaining Access
to AutoCert+."
Logging In
Added step 1 with AutoCert+ URL.
10/5/15
Getting Started
New Users can subscribe and unsubscribe to notifications
regarding the test environment.
10/15/14
Getting Started
Added link to ACP Access video. Added Feedback button to
toolbar.
3/28/14
Streamlined Help system, and moved sections to the Client
Systems Wiki.
9/21/12
Streamlined Help system.
7/7/12
Getting Started, Navigating the
Certification Tool, Completing the
Certification Process, Logging In
9/26/11
3/15/11
Added navigation instructions, updated login and getting
started procedures, updated post-cert interview info, and
formatted according to new ACP Help system standards.
Updated for ACP 4.0 and developed WebHelp system.
Customer Support Updated CSET email address.
5/26/09
Updated Overview section and Performance Test Mode
Message.
4/23/09
Add a warning note to the Introduction about tag 60.
2/9/09
Separate Sender’s CompID Per
Environment
Update Separate Sender’s CompID Per Environment section,
removing a sentence about the SenderCompID.
1/13/09
Update references to cmegroup.com.
11/14/08
Updates include:
l
l
l
9/4/08
- 6 - User Manual
Addition discussion of iLink 2.x capability in
AutoCert+.
Renaming of New Release Certification Environment
to New Release Environment.
Remove references to FX MarketSpace, Cabinet
Orders and FXMS Position Limits.
Update screen captures and re-brand CME Group. Also,
updated content with correct location of XML configuration
file.
AutoCert + Access Guide
Certification Process
Logging In
You must log into the AutoCert+ application to begin certification testing. Obtain access to AutoCert+ by contacting your Global
Account Management (GAM).
To log into AutoCert+:
1. Navigate to https://autocert.cmegroup.com/.
2. Enter your Login ID and password.
3. Click Login.
The AutoCert+ Interface appears.
Note: If you are logging in for the first time, the system prompts you to change your password.
User Manual - 7 -
AutoCert + Access Guide
Navigating the Certification Tool
The AutoCert+ tool provides an easy-to-use web interface for navigating through CME Group certification scenarios.
The main AutoCert+ window includes the following tabs:
l
Interview - The Interview tab provides a pre-certification test in which the responses provided help define the test and
test's success
Note: Completion of the Interview is mandatory for all AutoCert+ test suites.
l
l
l
Test Suite - The Test Suite tab illustrates all of the available test cases with the suite, and provides links to each of those
cases.
Test Case - The Test Case tab list the steps for certification test selected from the Test Suite tab, and includes a Status
field that indicates whether our not a case was completed.
Post Certification - The Post Certification tab provides a post-certification interview in which users provide feedback
related to the AutoCert+ test.
To navigate the certification tool:
1. Log into the automated certification tool.
2. From the main certification window, In the Company Name field, enter the name of the company performing the certification.
3. In the System Profile field, select the system being certified.
- 8 - User Manual
AutoCert + Access Guide
Note:The list of System Profile options is created and maintained by your Global Account Manager (GAM).
4. In the Tester field, eneter the name of the user performing the certification.
5. In the Test Suite field, select the applicable AutoCert + test suite application.
6. In the Sender Comp field, select the appropriate SendComp from the list.
Each company is assigned a pool of session IDs. Only one ID can be used at a time for certification testing, as the
AutoCert+ tool uses session IDs to identify messages being sent and received by the tester.
Note: Users can unassign and re-assign a SenderCompID by clicking the button that accompanies the SenderCompID.
7. The Test Suite Status section illustrates the Interview and Test Suite status, and provides access to the test's Help system.
Field Descriptions
Field/Name
Description
Active
Instruments
Allows users to view information about instruments that are actively used by the clients. Clients must view
this page before sending any new orders to make sure that the instrument that they are using is available.
If client try to use one of the locked instruments, AutoCert+ will reject the incoming message.
The AutoCert+ tool will lock the instruments only when clients are certifying their front-end systems.
AutoCert+ will not lock the instruments while clients are doing testing/development.
Certification
Tests
List of certification tests for a particular test suite.
Config
Shows the session details.
l
SenderCompID
l
Session ID
l
FirmID
l
Hostname
l
Port
User Manual - 9 -
AutoCert + Access Guide
Field/Name
Description
Flag
A gray, green, yellow, or red indicator designating the status of a particular test.
Describes each test status indicator:
l
Gray indicates not tested
l
Green indicates a completed test
l
Yellow indicates a test in progress
l
Red indicates a failed test
Interview
The pre-certification interview tab displays upon entering the test suite.
Online Help
Click the link to access the online help.
Post
Certification
Tab that displays the post certification interview providing feedback on the certification test.
Profile
Shows the customer’s profile information.
Refresh
- 10 - User Manual
AutoCert + Access Guide
Field/Name
Description
Allows you to refresh the screen.
Retest
Appears in each row of a certification test after it has been attempted. Allows you to retest a particular
certification test. Choosing this option overwrites the current test results.
Select a Test
Suite
Drop-down menu of test suites available.
SenderCompID
Assigned value used to identify firm sending message.
Note: When a session is unassigned, the user selects a SenderCompID from a drop-down list.
Users can unassign and re-assign a SenderCompID by clicking the button that accompanies the
SenderCompID.
Status
Status includes: Completed, Not Tested, Pending, and Failed.
Start Test
Press to Start or Retest. Do not press this button if a test is running.
Test Case
Tab that displays the test's steps, purpose, description, and status.
Test Suite
Tab that displays the test cases that make up the test. Shows the customer’s current testing configuration
page.
User Manual - 11 -
AutoCert + Access Guide
Field/Name
Description
Test Suite Status
Displays the status for the pre and post-certification interview and the test suite.
Your System
Profile
Created and maintained by your Global Account Manager. A drop-down menu identifying the system(s)
being certified (name, version and type).
- 12 - User Manual
AutoCert + Access Guide
Filling Out an Interview
Use the interview procedure to define your application’s capabilities. The interview determines the test scripts that you will be
prompted to run against a particular interface.
To fill out an interview:
1. On the AutoCert+ Interface screen, select the appropriate Test Suite from the drop-down menu.
AutoCert+ recognizes incomplete interviews immediately following the selection of the test suite. You cannot access
test suites and test cases until the completion of the interview.
Note: The Test Suite Status Box contains the current status of the pre-certification interview and test suite.
The appropriate interview screen appears for the selected Test Suite.
2. Select the answers that best describe your system's functionality.
Note: All questions must be answered for the test suite and test cases to be available.
User Manual - 13 -
AutoCert + Access Guide
3. Click Complete at the bottom of the Interview screen.
The test suite status changes to Complete, activating the Test Suite and Test Case tabs.
4. Click the appropriate certification test link to begin testing.
- 14 - User Manual
AutoCert + Access Guide
Certification Dedicated Instruments
The AutoCert+ Market Data Platform and iLink 2.X Order Entry processes use “Dummy Contracts” or “Certification Dedicated
Instruments” during the certification process. When the user accesses the actual test case, AutoCert+ requires that you select
from a drop-list a set of instruments used in certification testing.
The instrument sets presented in the drop list are based on the answers that you provided in the interview. Once selected,
these instruments are locked and cannot be used by other users. The following illustration displays the Contracts drop-down
list.
These instruments are certification-dedicated contracts that are not present in production but have all characteristics of
production instruments with the exception of their security description and their symbol. Each set of instruments is associated
with a Market Data Platform channel dedicated to certification. It is strongly recommended to “listen” only to the channel of
the instrument set that you selected. This allows, by isolating the market data messages from the rest of the environment,
AutoCert+ to reproduce specific scenarios and validate that your system properly process all events of these scenarios.
Note: After a specified period of time without activity on AutoCert+, the tool will release the certification-dedicated
instruments. If you want to continue testing and certifying Market Data Platform or iLink 2.X on AutoCert+, you will have to go
through the same process mentioned above and select a new set of instruments which may be different that the previously
selected set.
Note that for the recovery tests, additional certification-dedicated instruments may be introduced by AutoCert+ on the channel
to which you are listening.
User Manual - 15 -
AutoCert + Access Guide
Certification Testing
The appropriate certification test links are available after completing the interview. The Status column indicates whether a test
has not been performed (not tested), completed, pending, or failed.
To run a certification test:
1. Click a test link.
The test case appears listing the purpose and description of the test, and its status.
- 16 - User Manual
AutoCert + Access Guide
2. The status column indicates whether a test has not been performed (not tested), complete, pending, or failed.
Note: You can now perform the test in your certification environment using the session ID you were provided.
Once a test has been performed, the status column reflects the testing status.
3. Next to each step in the test case, click a status button to view the order log information for every step.
The order log information appears.
User Manual - 17 -
AutoCert + Access Guide
When certification tests have been completed, you have the option of retesting a particular test case using the Retest
button.
- 18 - User Manual
AutoCert + Access Guide
Post Certification Interview
Once you have completed AutoCert+ interview and certification processes, you must complete the Post-Certification
Interview. The Post-Certification Interview allows you to provide feedback and input on your experience with the AutoCert+
environment.
To run a post-certification test:
After the test suite and test cases have been completed, the Post Certification tab becomes available.
1. Answer the questions by selecting a value from 1 to 5, with 1 representing a very negative experience and 5 representing a very positive experience.
Note: The Post Certification entries will not be saved until all questions are answered and the Complete button has
been clicked.
2. After answering all questions, click Complete.
User Manual - 19 -