1
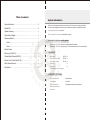
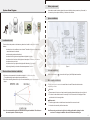
究
翻 拷 必
有
新
群 電 子 股 份
有
USER MANUAL
所
You
ly
e
v
r lo
ly
i
m
fa
權
限 公
版
司
● For details, please refer the instruction manual.
Table of contents
System Introduction……….……….……….……………........………………2
Standard Kit ..……………….……..………..……...…………........…………2
Optional Accessory ………………..……………………...….…........………2
System Alarm Diagram ………………...…………..…………………….......3
Prepare installation ……………………………....……………….......………3
Notice ………………………...…………………………….....……........3
Menu ...............…………...……………………………………..……….4
Product Feature
Main console (WS-010)………….……………………………………………6
Wireless Motion Detector(WS-001)..…….………….……………………… 8
Remote Control Controller(WS-129)....…………….……………….……… 9
Other Wireless Detector ..……………………..…………….………………10
Specification…………….……..……….……………………………………..10
System Introduction
Thank you for purchasing our wireless home security system! The system is not only easy installed,
but it also can be integrated with security system for better safety protection. In addition, this system
can be applied for elderly care application.
Please read carefully this instruction manual before operation.
Advantages to wireless security system
Cost saving:No complicated process or cables required for installation.
Extensibility:The system can support up to 63 units of wireless detectors for a better protection.
Standard Kit
Main console
WS-E10
Wireless infrared detector
WS-001
Remote control handset
WS-129
DC adaptor
Accessory kit
(Including screws*2 and antenna*1)
×1
×1
×1
×1
×1
ACCESSORY (OPTIONAL)
Panic watch transmitter
Range extender
Smoke detector
Wired siren
Door/Window detector
Rechargeable battery (for range extender)
Wireless keypad detector
Gas detector
Battery replacement
System Alarm Diagram
When detector sends low battery signal, main console will bring out beep sound every 10 seconds, in
the meantime, please replace the battery of wireless motion detector.
System installation
Locations to avoid
To ensure the normal operation to the detectors, please do not install the detectors in following
locations.
● Location close to air conditioner, stove or heater. The sudden temperature change might
cause false alarm to the detector.
● Avoid exposing under sunshine directly.
● Locations close to big electronic equipment and high radio frequency.
● Locations close to furniture, which might cause interruption to infrared ray from detector.
● Locations close to pet’s door.
● Locations close to any objects which might reflect infrared ray from detector.
● Expose high humidity or location with extreme temperature fluctuation.
Figure 1
Wireless infrared detector installation
Antenna installation
● The detector is recommended to be installed at a height of 1∼1.2m from the floor.
(The installation height can be adjusted upon installation site.)
● The effective detecting distance can be up to 10m and the detecting angle is approximately 36
degree.
Please fix the antenna in 11 (please refer to the figure 1) with Philips head screwdriver.
Main console installation
The main console can be mounted or can be fixed on the wall. Please refer the instructions
respectively as follows:
Wall-fixed :
1.Please remove the front cover of main console by pressing downward with a pen tip or any flat tool.
2.Fix the unit on the wall with screws*2 in accessory kit. One of screw hole is in the upper left side
and the other is in the lower right side.
Wall-mounted :
1. Decide a proper location to install the main console and fix a screw on the wall.
2. Mount the main console by the fixed screw then.
Note: It is recommended to register the detectors before system installation. This will ensure
the normal operation of the whole system.
3
Note:Please make sure the tenon is right in the middle position while replacing the front
cover back. The improper installation will result LED indicator switching on.
4
How to register the wireless detectors
Press “register” button 1 and stay for 2 seconds while the main console is in “register mode”. The red
LED indicator starts blinking.
1. Insert the battery in wireless motion detector and set the power switch from OFF to C position.
The red LED indicator to the detector will switch on for one second. (It will send signal for one
second to the main console)
2. Or you can make any movement in front of the detector to trigger an alarm. When the main console
receives the alarm signal from detector, it will bring out a long beep sound. Then the detector has
been successfully registered to the system.
Product Features
Main Console WS-E10
Main console can receive signal from wireless motion detector and trigger alarm. The system can
support up to 63 units of wireless detectors.
How to register the remote control handset
Press “register” button 1 and stay for 2 seconds while the main console is in “register” mode. The red
LED indicator starts blinking.
Press
button of remote control handset for 1 second and the red LED indicator to the detector will
switch on for one second. (It will send signal for one second to the main console)
When the main console receives the alarm signal from remote control handset, it will bring out a long
beep sound. Then remote control handset has been successfully registered to the system.
Main feature
● The system can support up to 63 units of wireless detectors and various wireless detectors can be
applied to this wireless system, such as door/window detector, IR detector, panic watch transmitter,
smoke detector, gas detector and so on.
● Hopping code: Data encryption with hopping code technology for a better safety assurance.
● The detectors (Including door/window and IR detector) will send alarm signal in “warning arming”
mode while being triggered.
● The detectors (Including “red” panic button of panic watch transmitter. smoke/gas detector and
remote control handset) will send alarm signal while being triggered in any status.
● Door detector is with doorbell function. (This function is used when system is in disarming mode)
● NO/NC relay output is available to trigger external device.
● Home/Away warning mode setting: Wireless detector signal will not be processed in “Home” mode
5
6
Controls and displays
1 Register button:
“Register” detectors:Press “register” button 1 and stay for 2 seconds while the main console
is in “register” mode. The red LED indicator starts blinking. When the main console receives the
alarm signal from detector, it will bring out a long beep sound. Then the detector has been
successfully registered to the system.Press “register” button again, the LED indicator off and exit
to “register” mode.
2 “Clear” detectors:Press “register” button 1 and stay for 2 seconds while the main console is in
“register” mode. The red LED indicator starts blinking. Then press again the button for 5 seconds.
When main console brings out one beep sound, the detector of registered data has been cleared.
3 Tenon: Using any flat tool to press the tenon to open the upper cover.
AC power adaptor LED indicator: AC power is applied. When power on the unit, the green LED
indicator is on。
Wireless infrared Detector WS-001
Wireless infrared detector are applied for motion detection and send signal to main console. Main
console will activate alarm and trigger related devices to prevent the intrusion. The effective detecting
distance can be up to 10m and the detecting angle is approximately 36 degree.
4 Watning status LED indicator:“Away warning”
5
6
7
8
9
10
red LED indicator is on; “Home arming”
red LED indicator is blinking.
Back-up battery: Back-up battery can be applied for power supply when power black-out.
Audio selection: Buzzer/off /Music selection (Doorbell function).
DC adaptor: insert hole of DC adaptor.
Spring to the register button: Please make sure the spring has to be aligned to the tenon while
replacing the front cover back. The improper installation will result LED indicator switching on.
Volume adjustment : Rotate and adjust volume level.
Speaker:Siren speaker.
Buttons and accessories
1. Operation indicator
(LED indicator)
- When wireless infrared detector detects any movement, the red indicator
will be switched on for one second and then sends the signal to main
console.
- When low battery, the red indicator will be switched on for one second
and sends signal to main console.
2. C / OFF / W
C
“Continuous”: Once the detector detects any movement, the next
detection will be activated in five seconds.
OFF
“Switch off power”
W
“Wait”: Once the detector detects any movement, the next detection
will be activated in 2~3 minutes.
3. Sensitivity selection
- Three levels can be selected- Low/Medium/High.
4. Battery replacement
- Open the battery compartment cover and insert 9V alkaline battery.
11 Antenna socket: Antenna socket.
12 Output connector : NC、C、NO 、+12V、GND、 NO、 C、NC。
Output terminal connection
NC/C/NO : The dry contact status will change while power black-out.
+12V
: Auxiliary power (Note: voltage is 16V when no load; while it is about 12V when load current
is 600mA.)
GND
: Ground.
NO
: Normal open. When alarm is triggered, it will be activated after 8 seconds later. The dry
contact will change from NO to NC and will be back to NO after 15 seconds.
C
: NO/NC dry contact.
NC
: Normal close. When alarm is triggered, it will be activated after 8 seconds later. The dry
contact will change from NC to NO and will be back to NC after 15 seconds.
7
Main console arming mode
1. “Away” arming mode: When system is setting as “Away” arming mode, it will have a 30-second
delay time to provide you enough time to exit the protected area before your system is armed. After
arming is done and detect any movement, it will be activated to main console in 15 seconds later.
2. “Home” arming mode: When system is set as “Home” arming mode, the main console will not
process alarm signal from IR detector.
8
Remote Control Handset WS-129
Before using, remote control handset has to be registered to main console. You can use it for
arming/disarming system.
How to register other wireless detectors
1. Door/Window sensor:
Insert battery, keep Door/Window sensor in alarm status and stay until the LED indicator switch on
for 1 second.
2. Panic watch transmitter:
Insert battery, press Panic button on panic watch transmitter and stay until the LED indicator
switch on for 1 second.
3. Smoke Detector:
Insert battery, press register button and stay until the LED indicator switch on for 1 second.
4. Gas Sensor:
Power on the unit, press register button and stay until the LED indicator switch on for 1 second.
SPECIFICATION
Power Source
Power Consumption
Back-up battery (Optional)
Frequency
System Coding
Entry/Exit/Alarm time
Transmission Distance
Low Battery warning
Working Temperature
Dimension(mm)
Weight
1. LED indicator – When any function is activated, LED indicator will be switched on.
2. Disarm
– Press this button to disarm the system.。
3. Away warning
– Press this button to set「Away warning」mode.
4. Home warning
– Press this button to set「Home warning」mode.
5. Panic
– Press this button to activate panic alarm.
6. Battery compartment – Insert 12V alkaline battery.
AC 120V/DC 12V adaptor
7W
When the power black cut, back-up battery (9.6V/300mA) will
not process alarm signal for 24 hours
433.92 MHz
Hopping Code
15 / 30 /180 seconds programmable,only used for door
detector/IR motion detector
50(±10)m in open space
When main console receives low battery signal , it will bring
out Beep sound every 10 seconds
0 ~ 40 ℃
Mainconsole:120mm(L) X105mm(W) X 30mm(H)
Wireless detector:155mm(L) X99mm(W) X 72mm(D)
Main console:150g
Wireless detector : 205g (including battery)
● For details, please refer the instruction manual.
Distributor / Retailer
● Away warning mode: Set「Away warning」mode and red LED indicator on main console will
switch on.
● Home warning mode: Set「Stay arming」mode and red LED indicator on main console will blink.
● Panic: Activate panic alarm.
● Disarm: Press the disarm button to disarm system or to clear alarm.
Shincluster Electronics Co.,Ltd
[email protected]
Copyright (c) 2010,All Rights Reserved
9
Made in Taiwan
10