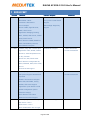
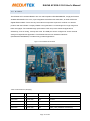
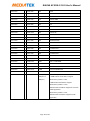
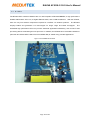
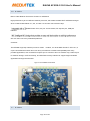
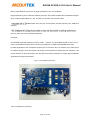
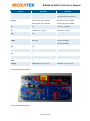
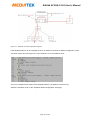
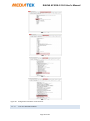
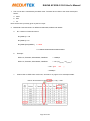
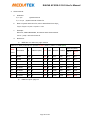
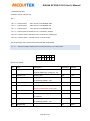
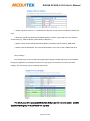
1
RALINK AP SDK 4.1.0.0 User’s Manual MediaTek Inc. RALINK AP SDK 4.2.0.0 USER’s MANUAL Copyright © 2012 MediaTek Inc. All Rights Reserved. This document is property of Ralink Technology Corporation Transmittal, receipt, or possession of this document does not express, license, or imply any rights to use, sell, design, or manufacture from this information or the software documented herein. No reproduction, publication, or disclosure of this information, in whole or in part, shall be allowed, unless the prior written consent of Ralink Technology Corporation is obtained. NOTE: THIS DOCUMENT CONTAINS SENSITIVE INFORMATION AND HAS RESTRICTED DISTRIBUTION. RALINK AP SDK 4.2.0.0 User’s Manual Proprietary Notice and Liability Disclaimer The confidential Information, technology or any Intellectual Property embodied therein, including without limitation, specifications, product features, data, source code, object code, computer programs, drawings, schematics, know-how, notes, models, reports, contracts, schedules and samples, constitute the Proprietary Information of Ralink (hereinafter "Proprietary Information") All the Proprietary Information is provided "AS IS". No Warranty of any kind, whether express or implied, is given hereunder with regards to any Proprietary Information or the use, performance or function thereof. Ralink hereby disclaims any warranties, including but not limited warranties of non-infringement, merchantability, completeness, accuracy, fitness for any particular purpose, functionality and any warranty related to course of performance or dealing of Proprietary Information. In no event shall Ralink be liable for any special, indirect or consequential damages associated with or arising from use of the Proprietary Information in any way, including any loss of use, data or profits. Ralink retains all right, title or interest in any Proprietary Information or any Intellectual Property embodied therein. The Proprietary Information shall not in whole or in part be reversed, decompiled or disassembled, nor reproduced or sublicensed or disclosed to any third party without Ralink's prior written consent. Ralink reserves the right, at its own discretion, to update or revise the Proprietary Information from time to time, of which Ralink is not obligated to inform or send notice. Please check back if you have any question. Information or items marked as "not yet supported" shall not be relied on, nor taken as any warranty or permission of use. MediaTek Inc. (Taiwan) 5F, No.5, Tai-Yuen 1st Street, ChuPei City HsinChu Hsien 302, Taiwan, ROC Tel +886-3-560-0868 Fax +886-3-560-0818 Sales Taiwan: [email protected] Technical Support Taiwan: [email protected] http://www.ralinktech.com/ Page 2 of 158 RALINK AP SDK 4.2.0.0 User’s Manual TABLE OF CONTENTS 1 SDK History ................................................................................................................................... 8 2 Version History............................................................................................................................ 12 3 Overview of the Ralink AP Demo Board ................................................................................. 13 3.1 RT2880 ................................................................................................................................... 13 3.2 RT3052 ................................................................................................................................... 17 3.3 RT3883 ................................................................................................................................... 19 3.4 RT3352 ................................................................................................................................... 22 3.5 RT5350 ................................................................................................................................... 24 3.6 RT6855 ................................................................................................................................... 26 3.7 RT6856 ................................................................................................................................... 26 3.8 MT7620 ................................................................................................................................... 28 3.9 MT7621 ................................................................................................................................... 31 4 AP SDK source code overview ................................................................................................ 35 5 Tool-chain .................................................................................................................................... 35 5.1 Install toolchain ...................................................................................................................... 35 5.2 Install LZMA Utility................................................................................................................. 36 5.3 Install mksquashfs utility ....................................................................................................... 36 6 Boot loader .................................................................................................................................. 37 6.1 Uboot Configuration .............................................................................................................. 37 6.2 Build the uboot Image ........................................................................................................... 38 6.3 Burn the uboot image ........................................................................................................... 39 7 User Library ................................................................................................................................. 40 Page 3 of 158 RALINK AP SDK 4.2.0.0 User’s Manual 7.1 Library Configuration............................................................................................................. 40 7.2 Library Porting........................................................................................................................ 40 7.3 Build user library .................................................................................................................... 41 8 User Application.......................................................................................................................... 42 8.1 Ralink Proprietary Applications ........................................................................................... 42 8.2 goahead .................................................................................................................................. 48 8.3 lighttpd..................................................................................................................................... 48 8.4 nvram library .......................................................................................................................... 48 8.5 wsc_upnp ................................................................................................................................ 48 8.6 iptables .................................................................................................................................... 49 8.7 ntpclient ................................................................................................................................... 49 8.8 mtd-utils .................................................................................................................................. 49 8.9 ppp-2.4.2 ................................................................................................................................. 49 8.10 bridge-utils .............................................................................................................................. 49 8.11 wireless_tools ......................................................................................................................... 50 8.12 inadyn ...................................................................................................................................... 50 8.13 zebra-0.95a_ripd .................................................................................................................... 50 8.14 wpa_supplicant-0.5.7 ............................................................................................................ 50 8.15 totd-1.5 .................................................................................................................................... 50 8.16 samba-3.0.2/samba-3.0.37/samba-3.6.6 ........................................................................... 50 8.17 radvd-1.0 ................................................................................................................................. 51 8.18 pptp-client ............................................................................................................................... 51 8.19 rp-l2tp-0.4 ............................................................................................................................... 51 Page 4 of 158 RALINK AP SDK 4.2.0.0 User’s Manual 8.20 ctorrent-dnh3.2 ...................................................................................................................... 51 8.21 dhcp6....................................................................................................................................... 51 8.22 dnsmasq-2.40 ........................................................................................................................ 51 8.23 igmpproxy ............................................................................................................................... 52 8.24 matrixssl-1.8.3........................................................................................................................ 52 8.25 rp-pppoe-3.8 ........................................................................................................................... 52 8.26 usb_modeswitch-0.9.5 .......................................................................................................... 52 8.27 Port new user application ..................................................................................................... 52 9 Linux Kernel ................................................................................................................................ 55 9.1 Linux configuration ................................................................................................................ 55 9.2 Change Flash/DRAM Size ................................................................................................... 57 9.3 Change Switch Controller in RT2880 Platform ................................................................. 57 9.4 Update User/Kernel default settings ................................................................................... 58 9.5 Compile Linux image ............................................................................................................ 59 9.6 Port new Linux kernel module ............................................................................................. 59 9.7 Execute commands at boot up time ................................................................................... 61 9.8 Add new files in RootFs ........................................................................................................ 61 9.9 Image DownSize ................................................................................................................... 61 10 Flash Layout and Firmware Upgrade ...................................................................................... 65 10.1 Flash Layout ........................................................................................................................... 65 10.2 Firmware Upgrade................................................................................................................. 66 11 FAQ .............................................................................................................................................. 69 11.1 RT2880 Default password/UART/networking setting ...................................................... 69 Page 5 of 158 RALINK AP SDK 4.2.0.0 User’s Manual 11.2 System requirements for the host platform........................................................................ 69 11.3 How to add new default parameter in flash ....................................................................... 69 11.4 Enable Ethernet Converter Feature .................................................................................... 71 11.5 Change RF chip from RT2820 to RT2850 on the RT2880 platform .............................. 73 11.6 How to change the Ethernet MAC address ....................................................................... 73 11.7 How to configure GPIO ports ............................................................................................... 74 11.8 Use GPIO to turn on LED ..................................................................................................... 75 11.9 Use LED firmware to turn on LED ...................................................................................... 79 11.10 How to start the telnet server ............................................................................................... 82 11.11 11n bit rate derivation ........................................................................................................... 83 11.12 How to build a single image for the flash programmer .................................................... 86 11.13 How to power down the RT3x5x build-in 10/100 PHYs ................................................... 88 11.14 How to power down the RT6855/RT6856 build-in 10/100 PHYs ................................... 89 11.15 How to enable NFS client ..................................................................................................... 90 11.16 How to add a new language to the web UI ........................................................................ 91 11.17 How to enable watchdog ...................................................................................................... 92 11.18 How to enable USB storage on the RT305x platform ...................................................... 93 11.19 How to enable USB automount on the RT305x platform ................................................ 94 11.20 How to enable software QoS ............................................................................................... 95 11.21 Software QoS information .................................................................................................... 98 11.22 How to enable USB Ethernet (example for ASIX AX88XXX) ....................................... 103 11.23 How to build a single image for the RT2880 8M flash platform .................................... 104 11.24 How to start a printer server (example for HP officejet 4355) ....................................... 105 Page 6 of 158 RALINK AP SDK 4.2.0.0 User’s Manual 11.25 How to force the RT3052 link speed ................................................................................ 107 11.26 How to verify IGMP snooping function ............................................................................. 109 11.27 EHCI/OHCI USB Power Saving ........................................................................................ 111 11.28 Auto-frequency and Power Saving ................................................................................... 112 11.29 Concurrent AP porting Guide ............................................................................................ 116 11.30 SuperDMZ usage guide ..................................................................................................... 125 11.31 How to support IPv6 Ready Logo ..................................................................................... 126 11.32 How to enable iPerf tool ..................................................................................................... 128 11.33 How to enable ebtables ...................................................................................................... 129 11.34 How to enable IPv6 Rapid Deployment (6rd) .................................................................. 129 11.35 How to enable IPv6 DS-Lite ............................................................................................... 133 11.36 How to modify flash layout ................................................................................................. 137 11.37 How to reduce Linux FW size. ........................................................................................... 140 11.38 How to change internal GSW PHY Base Address. ........................................................ 141 11.39 How to support new USB 3G dongle ................................................................................ 141 11.40 How to enable USB 3G dongle function .......................................................................... 142 11.41 How to enable Port Trigger function ................................................................................. 146 11.42 Port Trigger information ...................................................................................................... 146 11.43 How to enable ALSA support? .......................................................................................... 148 11.44 How to enable I2S+Codec support ................................................................................... 153 Page 7 of 158 RALINK AP SDK 4.2.0.0 User’s Manual 1 SDK HISTORY Release Features Platform Support 1.2 SDK OS: Linux 2.4.30 RT2880 Shuttle Support Bootloader: Uboot IC+ 5 ports 10/100 Switch Toolchain: GNU based Support cross-compiler Marvall Giga Single Phy Driver: UART, Giga Ethernet, Support Schedule Formal: 2007/03/20 Flash, Wi-Fi Driver Application: Bridging, Routing, NAT, PPPoE, Web server, DHCP client, DHCP server Wi-Fi features: WMM, WMM-PS, WEP, WPA/WPA2 personal, WPA/WPA2 Enterprise 1.3 SDK Feature parity with 1.2 SDK plus: RT2880 MP Support Application: NTP, DDNS, WebUI Beta: 2007/04/30 Formal: 2007/05/25 enhance, Vista RG (Native IPv6, LLTD), Firewall Driver: I2C, SPI, GPIO driver Wi-Fi features: Intergraded QA, WPS, mBSSID, WDS, STA mode, 802.1x Concurrent AP support 2.0 SDK Feature parity with 1.3 SDK plus: None File system support ramdisk and Beta: 2007/07/06 Formal: 2007/07/20 squashfs WebUI: save/restore configure. WPS PIN, WPS PBC, factory default, STA mode support Application: push button to load default configuration (GPIO reference design) Wi-Fi features: AP-Client Ethernet Converter Support 2.2 SDK Feature parity with 2.0 SDK plus: Vitesse Switch Support AP version 1.6.0.0 STA version 1.4.0.0 Wi-Fi Certification: 802.11 b/g/n, Page 8 of 158 Formal: 2007/11/08 RALINK AP SDK 4.2.0.0 User’s Manual WPA2, WMM, WMM-PS, WPS Operation Mode reorganization to "Bridge", "Gateway", and "Ethernet Converter" support iNIC driver Support Squash with LZMA file system 2.3 SDK Feature parity with 2.2 SDK plus: IC+ 100Phy iNIC v1.1.6.1 Realtek 100Phy Formal: 2008/01/16 RT2561 driver v1.1.2.0 Spansion Flash Support RT2860 AP driver v1.7 RT2860 STA driver v1.5 RT2561 WebUI Multi-Language WebUI support 2.4 SDK Feature parity with 2.3 SDK plus: Mii iNIC Formal: 2008/04/07 iNIC v1.1.7.1 RT2860 AP driver v1.8.1.0 RT2860 STA driver v1.6.0.0 Static/Dynamic Routing Content Filtering 3.0 SDK Feature parity with 2.4 SDK plus: RT3052 Support Formal: 2008/06/06 OS: Linux 2.6.21 (Linux2.4 for RT2880, Linux-2.6 for RT3052) 8MB Flash Support – S29GL064N/MX29LV640 Storage Application – FTP/Samba 3.1 SDK Feature parity with 3.0 SDK plus: Formal: 2008/07/30 RT2860 AP driver v1.9.0.0 RT2880 platforms RT2860 STA driver v1.7.0.0 RT3052 platforms [RT3052] 16MB/32MB NOR flash support [RT3052] Boot from 0xbf00.0000(MA14=1) [RT3052] Boot from 0xbfc0.0000(MA14=0) 3.2 SDK Feature parity with 3.1 SDK plus: RT2880 platforms RT2860 AP driver v2.0.0.0 RT3050 platforms Page 9 of 158 Formal: 2008/10/06 RALINK AP SDK 4.2.0.0 User’s Manual RT2860 STA driver v1.8.0.0 RT3052 platforms GreenAP support Busybox 1.12.1 MTD-Based Flash API 3.3 SDK 3.4 SDK Feature parity with 3.2 SDK plus: RT2880 platforms RT2860 AP driver v2.2.0.0 RT3050 platforms RT2860 STA driver v2.1.0.0 RT3052 platforms Feature parity with 3.3 SDK plus: RT2880 platforms Ralink Flow Classifier RT3050 platforms Linux-based Watchdog driver RT3052 platforms More 3G data card support RT3883 platforms Video Flow Classification RT3662 platforms Formal: 2009/04/27 Formal: 2010/02/12 Command User space watchdog daemon 3.5 SDK Feature parity with 3.4 SDK plus: RT2880 platforms support NAND/SPI/NOR in the RT3050 platforms same firmware RT3052 platforms support Hardware NAT on RT3883 platforms RT3052/RT3883/RT3352 RT3662 platforms support Software QoS RT3352 platforms super dmz support RT5350 platforms Formal: 2010/08/06 support kernel mode pptp/l2tp to improve throughput significantly 3.6 SDK Feature parity with 3.5 SDK plus: RT2880 platforms Support IPv6 Ready logo RT3050 platforms Support IPv6 MLD multicast RT3052 platforms proxy/snooping RT3883 platforms Support skb recycling mechanism RT3662 platforms Support switch packet count RT3352 platforms debug RT5350 platforms Formal: 2011/07/15 Support phy register dump Supprot user and kernel mode watchdog module Support kernel mode nvram Support iPerf Support ebtables 4.0 SDK Feature parity with 3.6 SDK RT2880 platforms support IPv6 Rapid Deployment RT3050 platforms Page 10 of 158 Formal: 2012/02/22 RALINK AP SDK 4.2.0.0 User’s Manual support IPv6 DS-Lite RT3052 platforms support two giga phy port RT3883 platforms display AP Client site_survey RT3662 platforms RT3352 platforms RT5350 platforms RT6855 platforms RT6856 platforms 4.1 SDK Feature parity with 4.0 SDK plus: RT2880 platforms RT3050 platforms RT3052 platforms RT3883 platforms RT3662 platforms RT3352 platforms RT5350 platforms RT6855 platforms RT6856 platforms MT7620 platforms 4.2 SDK Feature parity with 4.1 SDK plus: RT2880 platforms RT3050 platforms GCC 4.6.3 compiler. RT3052 platforms uClibc 0.9.33 RT3883 platforms Samba 3.6.6 RT3662 platforms Support software QoS for linux RT3352 platforms 2.6.36 RT5350 platforms Add SFQ schedule for SW QoS RT6855 platforms Shrink memory requirement RT6856 platforms Support ethtool for linux 2.6.36 MT7620 platforms Support PPTP/L2TP accelerator MT7621 platforms Support lighthttpd web server (BSD licensed) Support port trigger Support NFC MT6605 Page 11 of 158 Formal:2013/10/31 RALINK AP SDK 4.2.0.0 User’s Manual 2 VERSION HISTORY Release Features Date Author 1.2 Initial release Steven Liu 1.3 WebUI – NTP/DDNS, iNIC Steven Liu I2C, SPI, GPIO Linux driver 2.0 Squashfs tools installation Steven Liu WebUI - save/restore configure. WPS , factory default WebUI – STA, Ethernet Converter mode 2.2 WebUI - Operation Mode reorganization Steven Liu How to downsize image 2.3 How to control GPIO and LED Steven Liu Install mksquashfs Utility Describes Uboot configuration file Add new parameter in default setting 2.4 WebUI – How to save the configurations to the flash Winfred Lu 3.0 Updated for RT3052 Steven Liu Chapter Re-organization 3.1 Update default parameter for LED firmware Steven Liu Update GPIO definition for RT3052 platform Update FAQ 3.2 Reorganize user manual Steven Liu / Update FAQ Winfred -How to enable NFS Client -How to add new language to webUI - How to Power down rt305x Ethernet ports - How to enable USB storage in RT305x platform -How to enable USB automount in RT305x platform 3.3 Update FAQ Steven -How to enable software QoS - How to enable USB Ethernet - How to build a single image for the RT2880 8M flash platform - How to start printer server -How to force link speed 3.4 - How to burn SPI Uboot firmware Steven -How to enable new watchdog -How to verify IGMP snooping 3.5 - Update “How to enable Software QoS” Page 12 of 158 YY RALINK AP SDK 4.2.0.0 User’s Manual 3.6 - Update “NVRAM” Red - Update “How to enable watchdog” - EHCI/OHCI USB Power Saving - Auto-frequency and Power Saving - Concurrent AP porting Guide - SuperDMZ usage guide - How to support IPv6 Ready Logo - How to enable iPerf tool - How to enable ebtables 4.0 - Update concurrent AP porting Guide Roger/Steven/Red - How to enable 6RD - How to enable DS-Lite 4.1 - Update APSoC chip support 4.2 - Update MT7621 Parts 3 3.1 Red Steven OVERVIEW OF THE RALINK AP DEMO BOARD RT2880 The RT2880 SOC combines Ralink’s 802.11n draft compliant 2T3R MAC/BBP, a high performance 266-MHz MIPS4KEc CPU core, a Gigabit Ethernet MAC and a PCI host/device, to enable a multitude of high performance, cost-effective 802.11n applications. The RT2880 has two RF companion chips: The RT2820, for 2.4G-band operation; and the RT2850, for dual band 2.4G or 5G operations. In addition to traditional AP/router applications, the chipset can be implemented as a WLAN “intelligent” NIC, drastically reducing the load on the host SOC, such as DSL/Cable or Multimedia Applications processors. Users can treat the WLAN iNIC as a simple Ethernet device for easy porting and guaranteed 802.11n WLAN performance without the need to upgrade to an expensive host SOC. Figure 1 The RT2880 Demo Board Page 13 of 158 RALINK AP SDK 4.2.0.0 User’s Manual Page 14 of 158 RALINK AP SDK 4.2.0.0 User’s Manual Table 1 RT2880 Memory Mapping Address Range (hex) Size Block Name 0000.0000 - 001F.FFFF 2M Reserved 0020.0000 - 0020.1FFF 8K Reserved 0020.2000 - 0020.3FFF 8K Reserved 0020.2000 - 0020.5FFF 8K Reserved 0020.6000 - 002F.FFFF 1024K Reserved 0030.0000 - 0030.00FF 256 System Control 0030.0100 - 0030.01FF 256 Timer 0030.0200 - 0030.02FF 256 Interrupt Controller 0030.0300 - 0030.03FF 256 Memory Controller 0030.0400 - 0030.04FF 256 Reserved 0030.0500 - 0030.05FF 256 UART 0030.0600 - 0030.06FF 256 Programmable I/O 0030.0700 - 0030.07FF 256 Reserved 0030.0800 - 0030.08FF 256 Reserved 0030.0900 - 0030.09FF 256 I2C 0030.0A00 - 0030.0AFF 256 Reserved 0030.0B00 - 0030.0BFF 256 SPI 0030.0C00 - 0030.0CFF 256 UART Lite 0030.0D00 - 0030.0DFF 256 Reserved 0030.0F00 - 0030.0FFF 256 Reserved 0030.1000 - 0030.FFFF 1020K Reserved 0040.0000 - 0040.FFFF 64K Frame Engine 0041.0000 - 0041.FFFF 64K Embedded 16KB ROM (wrap-around in the 64KB space) 0042.0000 - 0042.FFFF 64K PCM Controller 0043.0000 - 0043.FFFF 64K Reserved 0044.0000 - 0047.FFFF 256K PCI Host/Device Controller 0048.0000 - 004B.FFFF 256K 802.11n MAC/BBP 004C.0000 - 004F.FFFF 256K Reserved 0050.0000 - 0053.FFFF 256K Reserved 0054.0000 - 007F.FFFF 2816K Reserved 0080.0000 - 0080.7FFF 32K Reserved 0080.8000 - 0080.FFFF 32K Reserved 0081.0000 - 0081.FFFF 64K Reserved 0082.0000 - 0082.FFFF 64K Reserved Page 15 of 158 RALINK AP SDK 4.2.0.0 User’s Manual 0083.0000 - 0083.FFFF 64K Reserved 0084.0000 - 0088.FFFF 256K Reserved 0100.0000 - 01FF.FFFF 16M External SRAM 0800.0000 - 0BFF.FFFF 64M SDRAM 0C00.0000 - 0FFF.FFFF 64M SDRAM 1000.0000 - 1003.FFFF 256K Reserved 1004.0000 - 1007.FFFF 256K Reserved 1008.0000 - 100B.FFFF 256K Reserved 100C.0000 - 100F.FFFF 256K Reserved 1010.0000 - 1BFF.FFFF 192M Reserved 1C00.0000 - 1FFF.FFFF 64M External Flash 2000.0000 - 2FFF.FFFF 256M PCI Memory Space 3000.0000 - FFFF.FFFF 3.25G Reserved Page 16 of 158 RALINK AP SDK 4.2.0.0 User’s Manual 3.2 RT3052 The RT3052 SOC combines Ralink’s 802.11n draft compliant 2T2R MAC/BBP/RF, a high performance 384MHz MIPS24KEc CPU core, 5-port integrated 10/100 Ethernet switch/PHY, an USB OTG and a Gigabit Ethernet MAC. There are very few external components required for 2.4GHz 11n wireless products with the RT3052. It employs Ralink’s 2nd generation 11n technologies for longer range and better throughput. The embedded high performance CPU can process advanced applications effortlessly, such as routing, security and VOIP. The USB port can be configured to access external storage for Digital Home applications. The RT3052 also has rich hardware interfaces (SPI/I2S/I2C/UART/GMAC) to enable many possible applications. Figure 2 The RT3052 Demo Board Table 2 RT3052 Memory Mapping 0000.0000 - 03FF.FFFF 64M SDRAM 0400.0000 - 0FFF.FFFF 1000.0000 - 1000.00FF 256 SYSCTL 1000.0100 - 1000.01FF 256 TIMER 1000.0200 - 1000.02FF 256 INTCTL 1000.0300 - 1000.03FF 256 MEM_CTRL (SDRAM & Flash/SRAM) <<Reserved>> Page 17 of 158 RALINK AP SDK 4.2.0.0 User’s Manual 1000.0400 - 1000.04FF 256 PCM 1000.0500 - 1000.05FF 256 UART 1000.0600 - 1000.06FF 256 PIO 1000.0700 - 1000.07FF 256 Generic DMA 1000.0800 - 1000.08FF 256 NAND Flash Controller 1000.0900 - 1000.09FF 256 I2C 1000.0A00 - 1000.0AFF 256 I2S 1000.0B00 - 1000.0BFF 256 SPI 1000.0C00 - 1000.0CFF 256 UARTLITE 1000.0D00 - 100F.FFFF 1010.0000 - 1010.FFFF 64K Frame Engine 1011.0000 - 1011.7FFF 32K Ethernet Switch 1011.8000 1011.9FFF 8K ROM 1011_a000 1011_FFFF 1012.0000 - 1012.8000 <<Reserved>> <<Reserved>> 1012.7FFF 32K <<Reserved>> 1012.FFFF 32K <<Reserved>> 1013.0000 - 1013.7FFF 32K <<Reserved>> 1013.8000 - 1013.FFFF 32K <<Reserved>> 1014.0000 - 1017.FFFF 256K <<Reserved>> 1018.0000 - 101B.FFFF 256K 802.11n MAC/BBP 101C.0000 - 101F.FFFF 256K USB OTG 1020.0000 - 1AFF.FFFF 1B00.0000 - 1BFF.FFFF 1C00.0000 - 1EFF.FFFF 1F00.0000 - 1FFF.FFFF <<Reserved>> 16MB External SRAM/Flash <<Reserved>> 16MB(flash) or When BOOT_FROM = 2’b00, 4KB(ram) or <16MB external 16-bit flash is mapped. 8KB(rom) When BOOT_FROM = 2’b01, <8MB external 8-bit flash is mapped. When BOOT_FROM = 2’b10, 4KB internal boot RAM is mapped for boot from NAND application. When BOOT_FROM = 2’b11, 8KB internal boot ROM is mapped for iNIC application. Page 18 of 158 RALINK AP SDK 4.2.0.0 User’s Manual 3.3 RT3883 The RT3883 SOC combines Ralink’s 802.11n draft compliant 3T3R MAC/BBP/RF, a high performance 500MHz MIPS74Kec CPU core, a Gigabit Ethernet MAC, and a USB Host/Device. With the RT3883, there are very few external components required for 2.4/5GHz 11n wireless products. The RT3883 employs Ralink 2nd generation 11n technologies for longer range and better throughput. The embedded high performance CPU can process advanced applications effortlessly, such as WI-FI data processing without overloading the host processor. In addition, the RT3883 has rich hardware interfaces (SPI/ I2S/ I2C/ PCM/ UART/ USB/ PCI/ PCIe/ RGMII/ MII) to enable many possible applications. Figure 3 The RT3883 Demo Board Page 19 of 158 RALINK AP SDK 4.2.0.0 User’s Manual Table 3 RT3883 Memory Mapping Start End Size Description 0000.0000 - 0FFF.FFFF 256 M DDR2 256MB/SDRAM 128MB 1000.0000 - 1000.00FF 256 SYSCTL 1000.0100 - 1000.01FF 256 TIMER 1000.0200 - 1000.02FF 256 INTCTL 1000.0300 - 1000.03FF 256 MEM_CTRL (SDR/DDR) 1000.0400 - 1000.04FF 256 <<Reserved>> 1000.0500 - 1000.05FF 256 UART 1000.0600 - 1000.06FF 256 PIO 1000.0700 - 1000.07FF 256 Flash Controller (NOR/SRAM) 1000.0800 - 1000.08FF 256 NAND Controller 1000.0900 - 1000.09FF 256 I2C 1000.0A00 - 1000.0AFF 256 I2S 1000.0B00 - 1000.0BFF 256 SPI 1000.0C00 - 1000.0CFF 256 UARTLITE 1000.0D00 - 1000.0DFF 1000.2000 - 1000.27FF 2K PCM (up to 16 channel) 1000.2800 - 1000.2FFF 2K Generic DMA (up to 64 channel) 1000.3000 - 1000.37FF 2K CODEC 1 1000.3800 - 1000.3FFF 2K CODEC 2 1000.4000 - 100F.FFFF 1010.0000 - 1010.FFFF 64 K Frame Engine 1011.0000 - 1011.7FFF 32 K <<Reserved>> 1011.BFFF 16 K ROM 1011.8000 <<Reserved>> <<Reserved>> 1011.C000 - 1011.FFFF 16 K <<Reserved>> 1012.0000 - 1012.7FFF 16 K USB Device 1012.8000 - 1012.FFFF 16 K <<Reserved>> 1013.0000 - 1013.7FFF 32 K <<Reserved>> 1013.8000 - 1013.FFFF 32 K <<Reserved>> 1014.0000 - 1017.FFFF 256 K PCI/ PCI Express 1018.0000 - 101B.FFFF 256 K 802.11n MAC/BBP 101C.0000 - 101F.FFFF 256 K USB Host 1020.0000 - 1023.FFFF 256 K <<Reserved>> 1024.0000 - 1027.FFFF 256 K <<Reserved>> 1028.0000 - 1BFF.FFFF <<Reserved>> Page 20 of 158 RALINK AP SDK 4.2.0.0 User’s Manual When BOOT_FROM = 3’b000, 16KB ROM up-to 32MB external 16-bit flash is mapped. or 1C00.0000 - 1DFF.FFFF 32MB 16-bit When BOOT_FROM = 3’b001, Flash up-to 16MB external 8-bit flash is mapped. or 1E00.0000 - 1FFF.FFFF 2000.0000 - 2FFF.FFFF 16MB 8-bit When BOOT_FROM = 3’b010/3’b011/3’b100, Flash 16KB internal boot ROM is mapped. External SRAM/Flash 256 M PCI/PCIe Memory Space Page 21 of 158 RALINK AP SDK 4.2.0.0 User’s Manual 3.4 RT3352 The RT3352 SOC combines Ralink’s 802.11n draft compliant 2T2R MAC/BBP/PA/RF, a high performance 400MHz MIPS24KEc CPU core, a Gigabit Ethernet MAC, 5-pors integrated 10/100 Ethernet Swtich/PHY and an USB Host/Device. With the RT3352, there are very few external components required for 2.4GHz 11n wireless products. The RT3352 employs Ralink 2nd generation 11n technologies for longer range and better throughput. The embedded high performance CPU can process advanced applications effortlessly, such as WIFI data processing without overloading the host processor. In addition, the RT3352 has rich hardware interfaces (SPI/ I2S/ I2C/ PCM/ UART/ USB/ GMAC) to enable many possible applications. Figure 4 The RT3352 Demo Board Table 4 RT3352 Memory Mapping Start End Size Description 0000.0000 - 0FFF.FFFF 256 M DDR2 256MB/SDRAM 128MB 1000.0000 - 1000.00FF 256 SYSCTL 1000.0100 - 1000.01FF 256 TIMER 1000.0200 - 1000.02FF 256 INTCTL 1000.0300 - 1000.03FF 256 MEM_CTRL (SDR/DDR) 1000.0400 - 1000.04FF 256 <<Reserved>> 1000.0500 - 1000.05FF 256 UART 1000.0600 - 1000.06FF 256 PIO Page 22 of 158 RALINK AP SDK 4.2.0.0 User’s Manual 1000.0700 - 1000.07FF 256 <<Reserved>> 1000.0800 - 1000.08FF 256 <<Reserved>> 1000.0900 - 1000.09FF 256 I2C 1000.0A00 - 1000.0AFF 256 I2S 1000.0B00 - 1000.0BFF 256 SPI 1000.0C00 - 1000.0CFF 256 UARTLITE 1000.0D00 - 1000.0DFF 256 MIPS CNT 1000.2000 - 1000.27FF 2K PCM (up to 16 channel) 1000.2800 - 1000.2FFF 2K Generic DMA (up to 64 channel) 1000.3000 - 1000.37FF 2K <<Reserved>> 1000.3800 - 1000.3FFF 2K <<Reserved>> 1000.4000 - 100F.FFFF 1010.0000 - 1010.FFFF 64 K Frame Engine 1011.0000 - 1011.7FFF 32 K Ethernet Swtich 1011.BFFF 16 K ROM 1011.8000 <<Reserved>> 1011.C000 - 1011.FFFF 16 K <<Reserved>> 1012.0000 - 1012.7FFF 16 K USB Device 1012.8000 - 1012.FFFF 16 K <<Reserved>> 1013.0000 - 1013.7FFF 32 K <<Reserved>> 1013.8000 - 1013.FFFF 32 K <<Reserved>> 1014.0000 - 1017.FFFF 256 K <<Reserved>> 1018.0000 - 101B.FFFF 256 K 802.11n MAC/BBP 101C.0000 - 101F.FFFF 256 K USB Host 1020.0000 - 1023.FFFF 256 K <<Reserved>> 1024.0000 - 1027.FFFF 256 K <<Reserved>> 1028.0000 - 1BFF.FFFF 1C00.0000 - 1C00.3FFF <<Reserved>> 16KB ROM When system is power on, 16KB internal boot ROM is mapped. Page 23 of 158 RALINK AP SDK 4.2.0.0 User’s Manual 3.5 RT5350 The RT5350 SOC combines Ralink’s 802.11n draft compliant 1T1R MAC/BBP/PA/RF, a high performance 360MHz MIPS24KEc CPU core, 5-ports integrated 10/100 Ethernet Swtich/PHY and an USB Host/Device. With the RT5350, there are very few external components required for 2.4GHz 11n wireless products. The RT5350 employs Ralink 2nd generation 11n technologies for longer range and better throughput. The embedded high performance CPU can process advanced applications effortlessly, such as WIFI data processing without overloading the host processor. In addition, the RT5350 has rich hardware interfaces (SPI/ I2S/ I2C/ PCM/ UART/ USB) to enable many possible applications. Figure 5 The RT5350 Demo Board Table 5 RT5350 Memory Mapping Start End Size Description Page 24 of 158 RALINK AP SDK 4.2.0.0 User’s Manual 0000.0000 0400.0000 1000.0000 1000.0100 1000.0200 1000.0300 1000.0400 1000.0500 1000.0600 1000.0700 1000.0800 1000.0900 1000.0A00 1000.0B00 1000.0C00 1000.0D00 1000.2000 1000.2800 1000.3000 1000.3800 1000.4000 1010.0000 1011.0000 1011.8000 1011.C000 1012.0000 1012.8000 1013.0000 1013.8000 1014.0000 1018.0000 101C.0000 1020.0000 1024.0000 1028.0000 1C00.0000 - 03FF.FFFF 0FFF.FFFF 1000.00FF 1000.01FF 1000.02FF 1000.03FF 1000.04FF 1000.05FF 1000.06FF 1000.07FF 1000.08FF 1000.09FF 1000.0AFF 1000.0BFF 1000.0CFF 1000.0DFF 1000.27FF 1000.2FFF 1000.37FF 1000.3FFF 100F.FFFF 1010.FFFF 1011.7FFF 1011.BFFF 1011.FFFF 1012.7FFF 1012.FFFF 1013.7FFF 1013.FFFF 1017.FFFF 101B.FFFF 101F.FFFF 1023.FFFF 1027.FFFF 1BFF.FFFF 1C00.3FFF 64 M 192M 256 256 256 256 256 256 256 256 256 256 256 256 256 256 2K 2K 2K 2K 64 K 32 K 16 K 16 K 16 K 16 K 32 K 32 K 256 K 256 K 256 K 256 K 256 K 16KB ROM SDRAM 64MB Reserved SYSCTL TIMER INTCTL MEM_CTRL (SDR) <<Reserved>> UART PIO Reserved>> Reserved>> I2C I2S SPI UARTLITE MIPS CNT PCM (up to 16 channel) Generic DMA (up to 64 channel) Reserved>> Reserved>> <<Reserved>> Frame Engine Ethernet Swtich ROM <<Reserved>> USB Device <<Reserved>> <<Reserved>> <<Reserved>> Reserved>> 802.11n MAC/BBP USB Host <<Reserved>> <<Reserved>> <<Reserved>> When system is power on, 16KB internal boot ROM is mapped. Page 25 of 158 RALINK AP SDK 4.2.0.0 User’s Manual 3.6 RT6855 Best in Class Network Processors for 802.11n AP/Router High performance yet cost-effective network processor, that enable scalable Wi-Fi AP/Router designs when combined with Ralink 1x1, 2x2, 3x3 802.11n and 802.11ac wireless chips. -bit MIPS 34Kc CPU, a 5-port 10/100 switch, PCI express port, USB port interface 802.11n/ 802.11ac to any embedded platforms. Overview: The RT6855 single chip network processor series contains , an 32-bit MIPS ® 34Kc™ CPU core, a 5-port 10/100 Ethernet switch and a rich array of interfaces to enable interoperability with many possible applications, such as dual PCI express port to connect to 802.11n wireless chip, USB 2.0 port for network storage, 3/4G connectivity, and SPI Flash memory interface to support large bandwidth applications through the AP/router. Figure 6 The RT6855 Demo Board 3.7 RT6856 Page 26 of 158 RALINK AP SDK 4.2.0.0 User’s Manual Best in Class Network Processors for High Performance 802.11n AP/Router High performance yet cost-effective network processor, that enable scalable Wi-Fi AP/Router designs when combined with Ralink 1x1, 2x2, 3x3 802.11n and 802.11ac wireless chips. -bit MIPS 34Kc CPU, a 5-port 10/100 switch, dual PCI express ports, USB ports interface 802.11n/ 802.11ac to any embedded platforms. Overview: The RT6855 single chip network processor series contains , an 32-bit MIPS ® 34Kc™ CPU core, a 5-port 10/100 Ethernet switch and a rich array of interfaces to enable interoperability with many possible applications, such as dual PCI express port to connect to 802.11n wireless chip, USB 2.0 port for network storage, 3/4G connectivity and printing, PCM interface for analog and VoIP telephony, and an I2S interface for audio streaming, and dual SPI Flash memory interface to support large bandwidth applications through the AP/router. Figure 7 The RT6856 Demo Board Table 6 RT6856 Memory Mapping Page 27 of 158 RALINK AP SDK 4.2.0.0 User’s Manual Module PCIe RC IO PCIe RC Memory Physical Memory Map 0x1F60_0000 ~ 0x1F60_FFFF 0x1F70_0000 ~ 0x1F8F_FFFF 0x2000_0000 ~ 0x2FFF_FFFF 0x1FB0_0000 ~ 0x1FB0_FFFF 0x1FB1_0000 ~ 0x1FB1_FFFF 0x1FB2_0000 ~ 0x1FB2_FFFF 0x1FB3_0000 ~ 0x1FB3_FFFF 0x1FB4_0000 ~ 0x1FB4_FFFF 0x1FB5_0000 ~ 0x1FB5_7FFF 0x1FB5_8000 ~ 0x1FB5_FFFF 0x1FB6_0000 ~ 0x1FB6_FFFF 0x1FB7_0000 ~ 0x1FB7_FFFF 0x1FB8_0020 0x1FB8_0024 0x1FBC_0000 ~ 0x1FBC_FFFF 0x1FBD_0000 ~ 0x1FBD_FFFF 0x1FBE_0000 ~ 0x1FBE_FFFF 0x1FBF_0000 ~ 0x1FBF_00FF 0x1FBF_0100 ~ 0x1FBF_01FF 0x1FBF_0200 ~ 0x1FBF_02FF 0x1FBF_0300 ~ 0x1FBF_03FF System control unit SMC DMC GDMA Interrupt controller Frame Engine Switch ATM SAR Crypto Engine PCIe RC configuration address PCIe RC configuration data SPI master controller PCM NFC UART Timers GPIO UART2 3.8 MT7620 The MT7620 router-on-a-chip includes an 802.11n MAC and baseband, a 2.4 GHz radio and FEM, a 580 MHz MIPS® 24K™ CPU core, a 5-port 10/100 switch and two RGMII. The MT7620 includes everything needed to build an AP router from a single chip. The embedded high performance CPU can process advanced applications effortlessly, such as routing, security and VoIP. The MT7620 also includes a selection of interfaces to support a variety of applications, such as a USB port for accessing external storage. The following table covers the main features offered by the MT7620N and MT7620A. Overall, the MT7620N supports the requirements of an entry-level AP/router, while the more advanced MT7620A supports a number of interfaces together with a large maximum RAM capacity. Features MT7620N (580 MHz) MT7620A CPU MIPS24KEc MIPS24KEc (580 MHz) Total DMIPs 580 x 1.6 DMIPs 580 x 1.6 DMIPs I-Cache, D-Cache 64 KB, 32 KB 64 KB, 32 KB L2 Cache n/a n/a HNAT/HQoS HNAT HNAT 2 Gbps forwarding DRAM Controller 16 b 16 b SDRAM 512 Mb, 120 MHz 512 Mb, 120 MHz DDR1 512 Mb, 193 MHz 1 Gb, 193 MHz DDR2 n/a 2 Gb, 193 MHz Memory Page 28 of 158 RALINK AP SDK 4.2.0.0 User’s Manual Features NAND MT7620N n/a MT7620A Small page 512Byte (max 512M bit) Large page 2Kbyte (max 8G bit) SPI Flash 3B addr mode (max 128Mbit) 3B addr mode (max 128Mbit) 4B addr mode (max 512Mbit) 4B addr mode (max 512Mbit) SD n/a SD-HC class 10 (32GB) RF 2T2R 802.11n 2.4 GHz 2T2R 802.11n 2.4 GHz PCIe n/a 1 USB 2.0 1 1 Switch 5p FE SW 5p FE SW + RGMII(1) 4p FE SW + RGMII(2) I2S n/a 1 PCM n/a 1 I2C 1 1 UART 1 (Lite) 2 (Lite/Full) JTAG 1 1 Package DRQFN148- 12 mm x 12 mm TFBGA265- 11 mm x 11 mm Figure 8 MT7620N Demo Board Figure 9 MT7620A Demo Board Page 29 of 158 RALINK AP SDK 4.2.0.0 User’s Manual Table 7 MT7620 Memory Mapping Start End Size Description 0000.0000 - 0FFF.FFFF 256 MBytes DDR2 256 MB/ DDR1 256 MB/SDRAM 128 MB 1000.0000 - 1000.00FF 256 Bytes SYSCTL 1000.0100 - 1000.01FF 256 Bytes TIMER 1000.0200 - 1000.02FF 256 Bytes INTCTL 1000.0300 - 1000.03FF 256 Bytes MEM_CTRL (SDR/DDR) 1000.0400 - 1000.04FF 256 Bytes Rbus Matrix CTRL 1000.0500 - 1000.05FF 256 Bytes UART 1000.0600 - 1000.06FF 256 Bytes PIO 1000.0700 - 1000.07FF 256 Bytes <<Reserved>> 1000.0800 - 1000.08FF 256 Bytes NAND Controller 1000.0900 - 1000.09FF 256 Bytes I2C 1000.0A00 - 1000.0AFF 256 Bytes I2S 1000.0B00 - 1000.0BFF 256 Bytes SPI 1000.0C00 - 1000.0CFF 256 Bytes UARTLITE 1000.0D00 - 1000.0DFF 256 Bytes MIPS CNT 1000.2000 - 1000.27FF 2 KBytes PCM (up to 16 channels) 1000.2800 - 1000.2FFF 2 KBytes Generic DMA (up to 64 channels) 1000.3000 - 1000.37FF 2 KBytes <<Reserved>> Page 30 of 158 RALINK AP SDK 4.2.0.0 User’s Manual Start End Size Description 2 KBytes <<Reserved>> 1000.3800 - 1000.3FFF 1000.4000 - 100F.FFFF 1010.0000 - 1010.FFFF 64 KBytes Frame Engine 1011.0000 - 1011.7FFF 32 KBytes Ethernet Swtich 1011.FFFF 32 KBytes ROM 1011.8000 <<Reserved>> 1012.0000 - 1012.7FFF 32 KBytes USB Device Control 1012.8000 - 1012.FFFF 32 KBytes <<Reserved>> 1013.0000 - 1013.3FFF 16 KBytes SDHC 1013.4000 - 1013.FFFF 48 KBytes <<Reserved>> 1014.0000 - 1017.FFFF 256 KBytes PCI Express 1018.0000 - 101B.FFFF 256 KBytes WLAN BBP/MAC 101C.0000 - 101F.FFFF 256 KBytes USB Host 1020.0000 - 1023.FFFF 256 KBytes <<Reserved>> 1024.0000 - 1027.FFFF 256 KBytes <<Reserved>> 1028.0000 - 1BFF.FFFF 1C00.0000 - 1C00.7FFF <<Reserved>> 32 KB ROM When the system is powered on, a 24 KB internal boot ROM is mapped. 3.9 MT7621 The MT7621 SoC includes a high performance 880 MHz MIPS1004Kc CPU core and high speed USB3.0/PCIe/SDXC interfaces, which is designed to enable a multitude of high performance, cost-effective IEEE 802.11n/ac applications with a MediaTek (Ralink) WiFi client card. There are several masters (MIPS 1004KEc, USB, PCI Express, SDXC, FE) in the MT7621 SoC on a high performance, low latency Rbus, (Ralink Bus). In addition, the MT7621 SoC supports lower speed peripherals such as UART Lite, GPIO, NFI and SPI via a low speed peripheral bus (Pbus). The DDR2/DDR3 controller is the only bus slave on the Rbus. It includes an Advanced Memory Scheduler to arbitrate the requests from bus masters, enhancing the performance of memory access intensive tasks. Page 31 of 158 RALINK AP SDK 4.2.0.0 User’s Manual Figure 10 MT7621A Demo Board Table 8 MT7621 Memory Mapping Page 32 of 158 RALINK AP SDK 4.2.0.0 User’s Manual Page 33 of 158 RALINK AP SDK 4.2.0.0 User’s Manual Page 34 of 158 RALINK AP SDK 4.2.0.0 User’s Manual 4 AP SDK SOURCE CODE OVERVIEW The subsequent command is used in the development environment. It makes a directory equivalent to "/home/${user}/RT288x_SDK". #tar jxvf RT288x_SDK_{version}_{date}.tar.bz2 5 The RT288x_SDK package contains the subsequent directories. o toolchain : mips toolchain o source : Linux kernel source o tools :useful script The source directory contains the subsequent directories. o config : auto-configuration files o images : Linux image o lib : uClibc 0.9.28 o linux-2.4.x : Linux kernel source for RT2880 o linux-2.6.21.x : Linux kernel source for RT3052/RT3883/RT3352/RT3883 o linux-2.6.36MT.x o linux-2.6.36.x o rootfs o tools : useful script to generate rootfs o user : user applications o vendor : init scripts of target platform (inittab, rcS...etc) : Linux kernel source for RT6855/RT6856 : Linux kernel source for MT7620/MT7621 : root file system (uncompressed) TOOL-CHAIN The Ralink AP SDK uses buildroot to make the Linux kernel image. Buildroot is a set of Makefiles and patches. It is easy to make a cross-compilation toolchain and root file system for the target Linux system. Use the uClibc C library. 5.1 Install toolchain #cp RT288x_SDK/toolchain/buildroot-gcc342.tar.bz2 /opt # tar jxvf buildroot-gcc342.tar.bz2 The extract procedure makes a directory equivalent to "/opt/buildroot-gdb" For MT7621, Page 35 of 158 RALINK AP SDK 4.2.0.0 User’s Manual 5.2 ▪ Decompress buildroot-gcc463.tar.bz2 to /opt (64bits) ▪ Decompress mips-2012.03.tar.bz2 to /opt (64bits) Install LZMA Utility lzma is necessary to make the compressed kernel image. The Ralink RT2880 SDK uses lzma to compress the kernel image. #cd RT288x_SDK/toolchain/lzma-4.32.0beta3 #./configure #make #make install (install lzma to /usr/local/bin) Use gzip or lzma to compress the kernel image. Make changes to RT288x_SDK/source/vendors/Ralink/{Platform}/Makefile COMP = gzip Use gzip to compress the Linux kernel image. COMP = lzma Use lzma to compress the Linux kernel image. 5.3 Install mksquashfs utility mksquashfs-lzma is necessary to make the compressed rootfs. The Ralink AP SDK uses mksquashfs with lzma to compress the root filesystem. Linux-2.4.x Kernel Version #cd RT288x_SDK/toolchain/mksquash_lzma-3.0 #make #make install (install mksquashfs-lzma to /opt/buildroot-gcc342/bin/mksquashfs_lzma-3.0) Linux-2.6.21.x Kernel Version #cd RT288x_SDK/toolchain/mksquash_lzma-3.2 #make #make install (copy mksquashfs to /opt/buildroot-gcc342/bin/mksquashfs_lzma-3.2 & lzma_alone to /opt/buildroot-gcc342/bin/) Page 36 of 158 RALINK AP SDK 4.2.0.0 User’s Manual Linux-2.6.36.x Kernel Version #tar jxvf squashfs4.2.tar.bz2 #cd squashfs4.2/squashfs-tools$ #make #cp mksquashfs /opt/buildroot-gcc342/bin/mksquashfs_lzma-4.2 LZMA_ALONE IS NECESSARY TO MAKE YOUR OWN RAMDISK IMAGE, IF YOU TURN ON “COMPRESS RAMDISK BY LZMA” ON LINUX 2.4/2.6.21 KERNEL. Linux-2.4.x /Linux-2.6.21.x Kernel Version #make menuconfig Kernel/Library/Defaults Selection ---> Machine selection ---> [*] Compress ramdisk by lzma instead of gzip Linux-2.6.36.x Kernel Version #make menuconfig Kernel/Library/Defaults Selection ---> General setup [*] 6 6.1 ---> Support initial ramdisks compressed using LZMA BOOT LOADER Uboot Configuration # tar jxvf Uboot_{version}_{BETA/FINAL}_{date}.tar.bz2 #cd Uboot #make menuconfig 1. Set the DRAM Size DRAM Component: Row Column 64Mb 12 8 128Mb 12 9 256Mb 13 9 Page 37 of 158 RALINK AP SDK 4.2.0.0 User’s Manual DRAM Bus: 16bits / 32bits Example: W9825G6EH: 4Mx4Banksx16bits SDRAM: o Row Address: A0-A12, Column address: A0-A8 o DRAM Component=256Mb o DRAM Bus =16bits W981216DH/W9812G6DH: 2Mx4Banksx16bits SDRAM: o Row Address: A0-A11, Column address: A0-A8 o DRAM Component=128Mb o DRAM Bus =16bits IS42S32800B: 2Mx4Banksx32bits SDRAM: o Row Address: A0-A11, Column address: A0-A8 o DRAM Component=128Mb o DRAM Bus =32bits 2. LAN/WAN Partition The switch automatically operates in dump switch mode when the board turns on. Clients on the LAN get the dynamic IP address from the remote DHCP server connected to the WAN port. Set the LAN/WAN partition to prevent the Client’s DHCP request being sent to the WAN side. 6.2 Build the uboot Image # make ............. 1. RT2880/RT3052/RT3883/RT3352/RT5350: NOR Flash: uboot.bin is located in Uboot/. # cp uboot.bin /tftpboot SPI Flash: uboot.img is located in Uboot/ # cp uboot.img /tftpboot NAND Flash: uboot.img is located in Uboot/ # cp uboot.img /tftpboot 2. RT6855/RT6856/MT7620/MT7621: SPI Flash: uboot.bin is located in Uboot/. # cp uboot.bin /tftpboot Page 38 of 158 RALINK AP SDK 4.2.0.0 User’s Manual NAND Flash: uboot.img is located in Uboot/ # cp uboot.img /tftpboot 6.3 Burn the uboot image Press '9' on the Uboot menuconfig, to open the invisible menu. Set the operation: 1: Load system code to SDRAM via TFTP 2: Load system code then write to Flash via TFTP 3: Boot system code via Flash (default) 4: Enter boot command line interface 5: Load ucos code to SDRAM via TFTP You chose 9 9: System Load Boot Loader then write to Flash via TFTP. Warning! Erase Boot Loader in Flash then burn new one. Are you sure? (Y/N) Please Input new ones /or Ctrl-C to discard Input device IP (10.10.10.123) ==: Input server IP (10.10.10.3) ==: Input Uboot filename (uboot.bin) ==: Page 39 of 158 RALINK AP SDK 4.2.0.0 User’s Manual 7 USER LIBRARY 7.1 Library Configuration RT288x_SDK uses ulibc 0.9.28 for user applications. The subsequent instructions show how to change the default library setting. # make menuconfig Kernel/Library/Defaults Selection ---> [ *] Customize uClibc Settings Figure 8 uClib configurations Menu 7.2 Library Porting The subsequent instructions show how to add a new library to the RT288x_SDK. Example: Port libtest to RT288x_SDK 1. #/ cp -r libtest to RT288x_SDK/source/lib 2. modify RT288x_SDK/source/lib/libtest/Makefile [you can reference to libnvram/Makefile] 3. modify RT288x_SDK/source/lib/Makefile ifeq ($(CONFIG_LIB_LIBTEST_FORCE),y) DIRS += libtest endif Page 40 of 158 RALINK AP SDK 4.2.0.0 User’s Manual ifeq ($(CONFIG_LIB_LIBTEST_FORCE),y) @$(MAKE) -C libtest shared endif 4. modify RT288x_SDK/source/config/config.in bool 'Build libtest' CONFIG_LIB_LIBTEST_FORCE #/ make menuconfig You can see the “Build libtest” on the menu. Figure 9 User Library Configure Menu 5. Compile your new library #make dep #make lib_only 7.3 Build user library # cd RT288x_SDK/source # make lib_only # make romfs ............. The shared libraries are shown in RT288x_SDK /source/romfs/lib Page 41 of 158 RALINK AP SDK 4.2.0.0 User’s Manual 8 USER APPLICATION Many useful network applications (e.g. wan protocol, http server, debugging tools, etc.) are supplied with the RT288x_SDK to make porting easier. 8.1 Ralink Proprietary Applications 8.1.1 ATED Description: for rt2860 v1.4 ATE test program Usage: ate Note: Execute ate on the demo board Connect directly from the LAN port to the PC Execute QA on the PC (wait 30 seconds) 8.1.2 REG Description: register the read/write test program Usage: reg [r/w/s] [offset] [value] Note: To use system register: reg s 0 To use wireless register: reg s 1 To use other base address offset: reg s [offset] The rt_rdm module must be put in first Example: / # reg s b0000000 / # reg r 18 /* read b0000018 */ / # reg w 18 12345678 /* write 0x12345678 to b0000018 */ 8.1.3 FLASH Description: flash read/write test program Usage: a. read: flash -r [offset(hex)] -c [num of bytes] Page 42 of 158 RALINK AP SDK 4.2.0.0 User’s Manual b. write: flash -w [offset(hex)] -o [value(hex)] -c [num of bytes] c. erase: flash -f [first sector_num] -l [last sector_num Example: a. read: flash -r 370000 -c 4 b. write: flash -w 370000 -o 1234 -c 4 c. erase: flash -f 60 -l 61 8.1.4 ETH_MAC Description: flash read/write program to update Ethernet MAC address (RT6856&MT7621) Usage: a. read: eth_mac r <lan|wan> b. write: eth_mac w <lan|wan> <MACADDR[0]> <MACADDR[1]> Example: a. read: eth_mac r lan b. write: eth_mac w lan 00 0c 43 76 21 01 8.1.5 GPIO Description: GPIO test program Usage: GPIO [r/w/i/l] The name of the GPIO testing user application is “gpio”. gpio w: writing test (output) gpio r: reading test (input) gpio i (<gpio>): interrupt test for GPIO number gpio l <gpio> <on> <off> <blinks> <rests> <times>: set led on <gpio>(0~24) on/off interval, no. of blinking/resting cycles, blinking time Pin sharing scheme It is important to know what normal function pins are shared with the GPIO pins. Only one normal function and GPIO can operate at the same time. GPIOMODE: GPIO purpose select) Configure the pins to use as GPIO. Page 43 of 158 RALINK AP SDK 4.2.0.0 User’s Manual PIODIR: programmed I/O direction Configure the direction of all GPIO pins to use as GPIO. an output is set as ‘1’, and an input pin is set as ‘0’. PIODATA: programmed I/O data Write data for output GPIO pins, and read data for input GPIO pins. PIOSET, PIORESET, PIOTOG are also used for adjusting GPIO data bits. PIOINT, PIOEDGE, PIORENA, and PIOFMASK should be set when using GPIO pins for input that causes an interruption. 8.1.6 MII_MGR Description: mii register read/write test program Usage: a. get: mii_mgr -g -p [phy number] -r [register number] b. set: mii_mgr -s -p [phy number] -r [register number] -v [0xvalue] Example: a. get: mii_mgr -g -p 3 -r 4 b. set: mii_mgr -s -p 4 -r 1 -v 0xff11 Kernel Module: $SDK/source/$LINUX/drivers/net/raeth/mii_mgr.c $SDK/source/$LINUX/drivers/net/raeth/ra_ioctl.h IOCTL Commands o RAETH_MII_READ o RAETH_MII_WRITE Get phy register via the mdc/mdio interface. Set phy register via the mdc/mdio interface. IOCTL interface typedef struct ralink_mii_ioctl_data { __u32 phy_id; __u32 reg_num;; __u32 val_in; Page 44 of 158 RALINK AP SDK 4.2.0.0 User’s Manual __u32 val_out; }; o phy_id: Address of PHY device o reg_num: Register addresses within PHY device o val_ine: o GET: the phy register data that is read from phy SET: the current register data after MDIO setting Val_out: the phy register data that wants to be set o User applications run mii_mgr commands through the ioctl interface to the raeth driver. 8.1.7 MTD Description: MTD writing program for firmware update Usage: mtd_write -r write [file] [device] Example: mtd_write -r write image.bin mtd4 8.1.8 NVRAM Description: a. get value in NVRAM for RT2860 or INIC platform b. set value in NVRAM for RT2860 or INIC platform c. display all configurations in NVRAM, or generate .dat files nvram_daemon is a daemon and register for NVRAM settings, or setting NVRAM values referring to a given file. It receives interruptions from GPIO pin 0. If SIGUSR1 is received (user one-clicked GPIO pin 0 button), nvram_daemon tells the GoAhead web server to start the WPS PBC procedure by sending it SIGUSR1. If SIGUSR2 is received (user pressed GPIO pin 0 button for several seconds), nvram_daemon will restore the system configuration to the default values. Usage: a. get: nvram_get [<2860/inic>] <field> b. set: nvram_set [<2860/inic>] <field> c. init: ralink_init <command> [<platform>] [<file>] Commands: rt2860_nvram_show (display rt2860 values in nvram) Page 45 of 158 RALINK AP SDK 4.2.0.0 User’s Manual inic_nvram_show (display inic values in nvram) show (display values in nvram for <platform>) gen (generate config file from nvram for <platform>) renew (replace nvram values for <platform> with <file>) Platform: 2860 - rt2860 station inic - intelligent nic File: File name for renew command daemon: nvram_daemon Example: a. nvram_get 2860 SSID /* get the SSID */ b. nvram_set 2860 SSID ralink /* set the SSID to ralink */ c. ralink_init gen 2860 d. ralink_init show inic /* generate the RT2860 .dat file from NVRAM */ /* display the INIC configurations in NVRAM */ e. ralink_init renew 2860 ra.dat /* set NVRAM values for RT2860 platform according to ra.dat file */ f. nvram_daemon /* start the nvram_daemon */ To avoid accessing NVRAM inconsistently, sdk also supports Kernel mode NVRAM. $ make menuconfig [*] Customize Kernel Settings Machine selection ---> Page 46 of 158 RALINK AP SDK 4.2.0.0 User’s Manual 8.1.9 SPICMD Description: SPI Toolkit for SPI EEPROM Read/Write Program... Usage: spicmd read/write parameters Note: spicmd read the address spicmd writes the size address value size is 1, 2, 4 bytes 8.1.10 I2CCMD Description: I2C Toolkit for EEPROM Read/Write via I2C Interface... Usage: i2ccmd read/write parameters Note: i2ccmd read the address i2ccmd write the size address value size is 1, 2, 4 bytes 8.1.11 I2SCMD Description: I2S Toolkit for raw playback/record via I2S Interface... Usage: i2scmd [cmd] [srate] [vol] < playback files Note: - cmd = 0|1 - i2s raw playback|record - srate = 8000|16000|32000|44100|48000 Hz playback sampling rate - vol = -10~2 db playback volumn Example: i2scmd 0 48000 2 </etc_ro/test_sound.snd 8.1.12 SPDIFCMD Description: SPDIF Toolkit for raw playback via SPDIF Interface... Usage: Page 47 of 158 RALINK AP SDK 4.2.0.0 User’s Manual [fmt=0] [srate] [wordlen] [pathname] [fmt=1] [srate] [rawtype] [pathname] fmt = 0|1 - spdif pcm| raw data srate = 22050| 24000| 32000|44100|48000|88200|96000|176400|192000 Hz sampling frequency rawtype = for raw data (fmt = 1) -- (0: Null data;) 1: AC3 data; (3: Pause) wordlen = 16| 24 bits per sample downsample = 1: no down sample; 2: 2x down sample; 4: 4x down sample [fmt=2] [pathname] Example: (for PCM data, 16 bit) spdifcmd 0 48000 16 </etc_ro/test_sound.snd 8.1.13 Script Description: WebUI configuration script. Usage: Refer to the script help message. 8.2 goahead Source code: RT288x_SDK/source/user/goahead/ Description: Old WebUI reference design of the AP/Router Solution. 8.3 lighttpd Source code: RT288x_SDK/source/user/ lighttpd-1.4.20/ Description: New WebUI reference design of the AP/Router Solution. 8.4 nvram library Source code: RT288x_SDK/source/lib/libnvram Description: Library for nvram_get, nvram_set and ralink_init. 8.5 wsc_upnp Page 48 of 158 RALINK AP SDK 4.2.0.0 User’s Manual Source code: RT288x_SDK/source/user/WSC_UPNP Description: Ralink WPS (Wi-Fi Protected Setup) UPNP Daemon Required library: libupnp, pthread 8.6 iptables Source code: RT288x_SDK/source/user/iptables # for Linux-2.4 RT288x_SDK/source/user/ iptables-1.4.0rc1 #for Linux-2.6.21 RT288x_SDK/source/user/ iptables-1.4.10 #for Linux-2.6.36 Description: Administration tool for IPv4 packet filtering and NAT. 8.7 ntpclient Source code: RT288x_SDK/source/user/ntpclient Description: ntpclient is an NTP (RFC-1305) client for Unix-like computers. Its functionality is a small subset of xntpd, but it appears to perform better (or at least has the ability to function better) within that limited scope. It is much smaller than xntpd and is more applicable to embedded computers. 8.8 mtd-utils Source code: RT288x_SDK/source/user/ mtd-utils Description: for jffs2 file system support erase/format…etc. example: mkfs.jffs2, erase, eraseall 8.9 ppp-2.4.2 Source code: RT288x_SDK/source/user/ ppp-2.4.2 Description: a package which uses the Point-to-Point Protocol (PPP) to supply Internet connections over serial lines. 8.10 bridge-utils Source code: RT288x_SDK/source/user/ bridge-utils Description: brctl is used to set up, maintain, and inspect the Ethernet bridge configuration in the Linux kernel. An Ethernet bridge is a device commonly used to connect different networks of the Ethernet together, so that the Ethernets will appear as one Ethernet to the participants. Each of the Ethernets being connected corresponds to one physical interface in the bridge. These individual Ethernets are Page 49 of 158 RALINK AP SDK 4.2.0.0 User’s Manual bundled into one bigger (’logical’) Ethernet. This bigger Ethernet corresponds to the bridge network interface. 8.11 wireless_tools Source code: RT288x_SDK/source/user/ wireless_tools Description: This package contains the Wireless tools. The wireless tools are used to control the Wireless Extensions. The Wireless Extensions is an interface that lets you set the Wireless LAN specific parameters and get the specific stats. 8.12 inadyn Source code: RT288x_SDK/source/user/ inadyn Description: INADYN is a dynamic DNS client. It maintains the IP address of a host name. It periodically checks if the IP address stored by the DNS server is the real current address of the machine that is running INADYN 8.13 zebra-0.95a_ripd Source code: RT288x_SDK/source/user/ zebra-0.95a_ripd Description: GNU Zebra is free software that manages various IPv4 and IPv6 routing protocols. Currently GNU Zebra supports BGP4, BGP4+, OSPFv2, OSPFv3, RIPv1, RIPv2, and RIPng. 8.14 wpa_supplicant-0.5.7 Source code: RT288x_SDK/source/user/ wpa_supplicant-0.5.7 Description: WPA Supplicant (Supported WPA/IEEE 802.11i) 8.15 totd-1.5 Source code: RT288x_SDK/source/user/ totd-1.5 Description: Totd is a small DNS proxy nameserver that supports IPv6 only hosts/networks that communicate with the IPv4 world using some translation mechanism. 8.16 samba-3.0.2/samba-3.0.37/samba-3.6.6 Source code: RT288x_SDK/source/user/ samba-3.0.2 Description: Samba is an Open Source/Free Software suite that has, since 1992, provided file and Page 50 of 158 RALINK AP SDK 4.2.0.0 User’s Manual print services to all manner of SMB/CIFS clients, including the numerous versions of Microsoft Windows operating systems. Samba is freely available under the GNU General Public License. 8.17 radvd-1.0 Source code: RT288x_SDK/source/user/ radvd-1.0 Description: The router advertisement daemon (radvd) is run by Linux or BSD systems acting as IPv6 routers. It sends Router Advertisement messages, specified by RFC 2461, to a local Ethernet LAN periodically and when requested by a node sending a Router Solicitation message. These messages are required for IPv6 stateless auto configuration. 8.18 pptp-client Source code: RT288x_SDK/source/user/ pptp-client Description: pptp is an implementation of the PPTP protocol for Linux and other Unix systems. 8.19 rp-l2tp-0.4 Source code: RT288x_SDK/source/user/ rp-l2tp-0.4 Description: This is a user-space implementation of L2TP (RFC 2661) for Linux 8.20 ctorrent-dnh3.2 Source code: RT288x_SDK/source/user/ ctorrent-dnh3.2 Description: CTorrent is a BitTorrent Client program written in C/C++ for FreeBSD and Linux. CTorrent is fast and small. 8.21 dhcp6 Source code: RT288x_SDK/source/user/ dhcp6 Description: DHCPv6 is a stateful address auto-configuration protocol for IPv6, a counterpart to IPv6 stateless address auto-configuration protocol. It can be used independently or coexist with its counterpart protocol. This protocol uses client/server mode of operation but also provides support through a Relay Agent. It is currently being defined by IETF DHC WG. The specification is still in the draft form. 8.22 dnsmasq-2.40 Page 51 of 158 RALINK AP SDK 4.2.0.0 User’s Manual Source code: RT288x_SDK/source/user/ dnsmasq-2.40 Description: Dnsmasq is a lightweight, easy to configure DNS forwarder and DHCP server. It is designed to provide DNS and, optionally, DHCP, to a small network. It can serve the names of local machines which are not in the global DNS. The DHCP server integrates with the DNS server and allows machines with DHCP-allocated addresses to appear in the DNS with names configured either in each host or in a central configuration file. Dnsmasq supports static and dynamic DHCP leases and BOOTP/TFTP for network booting of diskless machines. 8.23 igmpproxy Source code: RT288x_SDK/source/user/ igmpproxy Description: IGMPproxy is a simple mulitcast router for Linux that only uses the IGMP protocol. 8.24 matrixssl-1.8.3 Source code: RT288x_SDK/source/user/ matrixssl-1.8.3 Description: MatrixSSL is an embedded SSL implementation designed for small footprint applications and devices. It is an open-source software package available under the GNU license. It consists of a single library file with a simple API set that an application writer can use to secure their application. 8.25 rp-pppoe-3.8 Source code: RT288x_SDK/source/user/ rp-pppoe-3.8 Description: pppoe is a user-space redirector which permits the use of PPPoE (Point-to-Point Over Ethernet) with Linux. PPPoE is used by many DSL service providers. 8.26 usb_modeswitch-0.9.5 Source code: RT288x_SDK/source/user/ usb_modeswitch-0.9.5 Description: USB_ModeSwitch is (surprise!) a small mode switching tool for controlling "flip flop" (multiple device) USB gear. Several new USB devices (especially high-speed WAN stuff, they're expensive anyway) have their MS Windows drivers onboard; when plugged in for the first time they act like a flash storage and start installing the driver from there. After that (and on every consecutive plugging) this driver switches the mode internally, the storage device vanishes (in most cases), and a new device (like an USB modem) shows up. Some call that feature "ZeroCD". 8.27 Port new user application Page 52 of 158 RALINK AP SDK 4.2.0.0 User’s Manual Example: Add hello application to /bin (a)Create hello directory in RT288x_SDK/source/user #mkdir RT288x_SDK/source/use/hello (b) Add Makefile to RT288x_SDK/source/user/hello EXEC = hello OBJS = hello.o CFLAGS += all: $(EXEC) $(EXEC): $(OBJS) $(CC) $(LDFLAGS) -o $@ $(OBJS) romfs: $(ROMFSINST) /bin/$(EXEC) clean: -rm -f $(EXEC) *.elf *.gdb *.o (c) Add hello.c to RT288x_SDK/source/user/hello main() { printf("hello world\n"); } (d) Edit RT288x_SDK/source/config/config.in mainmenu_option next_comment comment 'XXX Add-on Applications' bool 'hello_world' CONFIG_USER_HELLO_WORLD endmenu (e) Edit RT288x_SDK/source/user/Makefile dir_$(CONFIG_USER_HELLO_WORLD) += hello Page 53 of 158 RALINK AP SDK 4.2.0.0 User’s Manual (f) Turn on hello application #make menuconfig [*] hello_world (NEW) (g) Build new image #make dep #make (h) Check file is correct #cd RT288x_SDK/source/romfs/bin #file hello #hello: ELF 32-bit LSB executable, MIPS, MIPS-II version 1 (SYSV), dynamically linked (uses shared libs), stripped (i) Testing BusyBox v1.4.2 (2007-05-04 11:15:35 CST) Built-in shell (ash) Enter 'help' for a list of built-in commands. /# / # hello hello world /# Page 54 of 158 RALINK AP SDK 4.2.0.0 User’s Manual 9 LINUX KERNEL 9.1 Linux configuration # cd RT288x_SDK/source # make menuconfig (a) (b) (c) (d) 1. Use 'Select the Product you wish to target' to set the target platform. 2. Use the ‘Flash/SDRAM Size’ 2M/16M: 2M Flash and 16M DRAM for pure AP solution (pass Vista basic logo and Wi-Fi certification b/g/n logo) 4M/16M: 4M Flash and 16M DRAM for complete AP solution, including AP, STA mode) 8M/32M: 8M Flash and 32M DRAM for complete AP/NAS solution, including USB applications) Note: 1. Choose the target platform type (RT2880 or RT3052 or RT3883.) 2. Modify the User/Kernel Configuration or Load/Save User/Kernel Default setting. 3. Load the target platform setting from a file. 4. Save the target platform setting to a file. Use 'Kernel/Library/Defaults Selection' to open the configuration menu. Use 'Default all settings'. 3. Go out of the configuration menu and save the new kernel configuration. Page 55 of 158 RALINK AP SDK 4.2.0.0 User’s Manual The script gets all user/kernel default settings back. The subsequent message is shown after getting the default settings back. *** End of Linux kernel configuration. *** Check the top-level Makefile for additional configuration. *** Next, you must run 'make dep'. Note: The default configuration file is stored in a different file, referring to the ‘Flash/DRAM size’ settings. Go to RT288x_SDK/source/vendors/Ralink/{RT2880/RT3052/RT3883}/config to see all the default setting files. a. Busybox default configuration files 2M_16M_config.busybox-2.4.x/2M_16M_config.busybox-2.6.21.x 4M_16M_config.busybox-2.4.x/4M_16M_config.busybox-2.6.21.x 8M_16M_config.busybox-2.4.x/8M_16M_config.busybox-2.6.21.x b. User application default configure file c. 2M_16M_config.vendor-2.4.x/2M_16M_config.vendor-2.6.21.x 4M_16M_config.vendor-2.4.x/4M_16M_config.vendor-2.6.21.x 8M_16M_config.vendor-2.4.x/8M_16M_config.vendor-2.6.21.x uClibc default configure file 4M_16M_config.uclibc-2.4.x/4M_16M_config.uclibc-2.6.21.x 2M_16M_config.uclibc-2.4.x/2M_16M_config.uclibc-2.6.21.x 8M_16M_config.uclibc-2.4.x8M_16M_config.uclibc-2.6.21.x d. Linux kernel 2.4/2.6.21/2.6.36 default configure file 2M_16M_config.linux-2.4.x/2M_16M_config.linux-2.6.21.x/2M_16M_config.linux-2.6.36.x 4M_16M_config.linux-2.4.x/4M_16M_config.linux-2.6.21.x/4M_16M_config.linux-2.6.36.x 8M_16M_config.linux-2.4.x/8M_16M_config.linux-2.6.21.x/8M_16M_config.linux-2.6.36.x Page 56 of 158 RALINK AP SDK 4.2.0.0 User’s Manual 9.2 Change Flash/DRAM Size Change the DRAM size setting using “make menuconfig” if you increase or decrease the size of DRAM. #make menuconfig Kernel/Library/Defaults Selection ---> [*] Customize Kernel Settings (NEW) Machine selection ---> Linux 2.4 (RT2880-ASIC) RT2880 Chip Type (32M) DRAM Size (4M) Flash Size Linux 2.6 System type (Ralink RT3052 board) ---> Soc Hardware Type (RT3052-ASIC) ---> DRAM Size (32M) ---> Root File System Type (RootFS_in_RAM) ---> 9.3 Change Switch Controller in RT2880 Platform The RT288x_SDK supports the IC+ 175C/D switch controller on the RT2880 platform at this time. You can use ‘make menuconfig’ to adjust the switch controller settings. #make menuconfig Kernel/Library/Defaults Selection ---> [*] Customize Kernel Settings Network device support ---> Ralink Driver ---> Page 57 of 158 RALINK AP SDK 4.2.0.0 User’s Manual W/LLLL in the LAN/WAN Partition item means P0 is a WAN port, and LLLL/W means P4 is WAN Port. The switch is configured by the script, not the Ethernet driver. Please see config-vlan.sh in RT288x_SDK/source/user/rt2880_app/ scripts. Figure 10 9.4 IC+ 10/100 Switch Operation Diagram Update User/Kernel default settings Modify the default setting if necessary. Select the 'Kernel/Library/Defaults Selection' item to enter the kernel/application configuration menu. After entering the menu, select the 'Update Default Vendor Settings' item to update the User/Kernel default settings. (Note: the new default setting will be saved in RT288x_SDK/source/vendors/Ralink/{RT2880/RT3052/RT3883}/config) Select “Exit” to leave the configuration menu. Select “Yes” to save the new kernel configuration. Page 58 of 158 RALINK AP SDK 4.2.0.0 User’s Manual The script updates the User/Kernel default settings. 9.5 Compile Linux image #make dep #make The following files in RT288x_SDK/images, and ${user}_uImage will be copied to /tftpboot by default. a. ramdisk.gz - root file system b. ${user}_uImage - Linux image (Linux kernel+rootfs) c. zImage.{gz/lzma} - compressed Linux kernel Note: What kinds of "make" can be used? a. make Linux image if you modify kernel source files b. make modules romfs Linux image if you modify the kernel module source files c. make user_only romfs Linux image if you modify application source files d. You can execute "make" to generate a new image (make = make lib_only user_only modules romfs Linux image) 9.6 Port new Linux kernel module Example: Port the hello networking module to the RT2880 platform 1. Add the source code to the rt2880 directory # mkdir RT288x_SDK/source/linux-2.4.x/drivers/net/hello #vi RT288x_SDK/source/linux-2.4.x/drivers/net/hello/Makefile O_TARGET := hello.o obj-y obj-m := main.o := $(O_TARGET) include $(TOPDIR)/Rules.make #vi RT288x_SDK/source/linux-2.4.x/drivers/net/hello/main.c Page 59 of 158 RALINK AP SDK 4.2.0.0 User’s Manual #include <linux/init.h> #include <linux/module.h> static int hello_init(void) { printk("hello world\n"); return 0; } static void hello_exit(void) { printk("goodbye\n"); } module_init(hello_init); module_exit(hello_exit); MODULE_LICENSE("GPL"); ~ 2. Modify RT288x_SDK/source/linux-2.4.x/drivers/net/Makefile subdir-$(CONFIG_RT2880_HELLO) += hello 3. Modify Config.in tristate ' Ralink hello module' CONFIG_RT2880_HELLO 4. Turn on the hello module #make menuconfig <M> Ralink hello module 5. Compile the source code #make dep #make 6. Test Page 60 of 158 RALINK AP SDK 4.2.0.0 User’s Manual / # insmod hello hello world /# 9.7 Execute commands at boot up time Edit RT288x_SDK/source/vendors/Ralink/RT2880/rcS #!/bin/sh mount –a goahead& <-- add new command here 9.8 Add new files in RootFs If you execute the "make clean" script, it will delete RT288x_SDK/source/romfs directory. You cannot copy the file to RT288x_SDK/source/romfs manually because it will disappear after executing "make clean". Example: add xxx.bin to rootfs a. copy xxx.bin to RT288x_SDK/source/vendors/Ralink/{RT2880/RT3052/RT3883/RT3352/RT5350} b. edit RT288x_SDK/source/vendors/Ralink/{RT2880/RT3052/RT3883/RT3352/RT5350}/Makefile romfs: $(ROMFSINST) /etc_ro/xxx.bin The script will copy xxx.bin to RT288x_SDK/source/romfs/etc_ro after executing "make romfs" 9.9 Image DownSize The MTD partitions are subsequently shown. RootFS in RAM Mode mtd 0 uboot Page 61 of 158 0x0 RALINK AP SDK 4.2.0.0 User’s Manual mtd 1 config 0x30000 mtd 2 RF 0x40000 0x50000 mtd 3 Kernel/RootFS 0x400000 RootFS in Flash Mode mtd 0 Uboot mtd 1 Config mtd 2 RF Kernel 0x0 0x30000 0x40000 0x50000 mtd 3 Padding mtd 4 <menuconfig> Root FS 0x400000 Page 62 of 158 RALINK AP SDK 4.2.0.0 User’s Manual In RootFS in Flash mode, the image builder will add a padding bit to the end of kernel image if the kernel image size is smaller than the size of mtd3. The size of mtd3 must be adjusted to save flash memory. Step1: Check the original kernel image size (ex: 446603) #make image ....... #===========<SquashFS Info>================= # Original Kernel Image Size 576110 /home/steven/RT288x_SDK/source/images/zImage.lzma # Padded Kernel Image Size 786368 /home/steven/RT288x_SDK/source/images/zImage.lzma # Original RootFs Size 4329746 /home/steven/RT288x_SDK/source/romfs # Compressed RootFs Size 1069056 /home/steven/RT288x_SDK/source/images/ramdisk # Padded Kernel Image + Compressed Rootfs Size 1855424 /home/steven/RT288x_SDK/source/images/zImage.lzma #=========================================== ...... Step2: Change mtdblock size 576110=0x8CA6E -> 0x90000 (multiple of 0x10000 because the flash sector size=64KB) mtd 0 Uboot Page 63 of 158 0x0 RALINK AP SDK 4.2.0.0 User’s Manual mtd 1 Config mtd 2 RF Kernel 0x30000 0x40000 0x50000 mtd 3 Padding mtd 4 Root FS 0xE0000 0x400000 host:$ make menuconfig Hit 'Kernel/Library/Defaults Selection' to enter configuration menu. Leave configuration menu and save new kernel configuration. Page 64 of 158 RALINK AP SDK 4.2.0.0 User’s Manual 10 FLASH LAYOUT AND FIRMWARE UPGRADE 10.1 Flash Layout Offset 0 (192K) bootloader Offset 0x30000 (64K) 0 (4KB) Uboot parameter 0x1000 User config Switch parameter (4KB) Reserved 0x40000 (64K) RF parameter(512B) 0x2000 (16KB) 0x50000 Linux image (2M) Other applications (DMA, storage) (sdram ?M), flash ?M) Cost effective ap (sdram 8M, flash 2M) General gateway (including voip) (sdram 16M, flash 4M) Fully gateway (including vpn, ipsec, voip) (sdram 32M, flash 4M)) (1.6875M) (8KB) (8KB) WLAN0 Configuration (Build-in 2860) WLAN1 (for concurrent AP) 0x6000 0x8000 STA Cert 0xa000 (20KB) 0x200000 WAPI Cert 0xf000 (4KB) Reserve 0x10000 0x400000 Figure 11 Ralink SDK Flash Layout (4MB) In the ‘user configure switch parameter’ partition, the WLAN0 configuration is for built-in first wifi interface parameters, the WLAN1 configuration is for second wifi interface parameters, and the STA cert configuration is stored certificate for station, and the WAPI cert configuration is stored certificate Page 65 of 158 RALINK AP SDK 4.2.0.0 User’s Manual for WAPI. Beside Uboot and WLAN0 blocks, you may use the free space to save your own parameters. Another, RT6855 and RT6856 are standalone solutions without WiFi. So, their LAN/WAN MAC address is stored in 0xE000-0xE00b in RF Parameter block of flash. 0x40000 RF 1 parameter 0x40200 0x48000 0x48200 0x4E000 0x50000 Figure 12 RF 2 parameter Standalone parameter RF parameter block of Ralink SDK Flash Layout 10.2 Firmware Upgrade 10.2.1 By Uboot Page 66 of 158 LAN MAC Byte5 0x0 LAN MAC Byte4 0x1 LAN MAC Byte0 WAN MAC Byte5 0x5 0x6 WAN MAC Byte0 0xb RALINK AP SDK 4.2.0.0 User’s Manual 1. Select option 2 on the UBoot menu to burn the Linux image from 0x50000 to 0x400000. 2. Select option 9 on the Uboot menu to update your uboot from 0x0 to 0x30000. 10.2.2 By WebUI You can use WebUI to upgrade the Linux image. Figure 13 WebUI Firmware Upgrade CGI uses the mtd_write command to burn a Linux image. Page 67 of 158 RALINK AP SDK 4.2.0.0 User’s Manual File system in RAM - Burn Linux image to mtdblock3 (Kernel) File system in Flash - Burn first x bytes to mtdblock3, and others to mtdblock4 (ps. X byes = MTTD kernel partition size in “make menuconfig” Page 68 of 158 RALINK AP SDK 4.2.0.0 User’s Manual 11 FAQ 11.1 RT2880 Default password/UART/networking setting Table 4 Networking Setting LAN WAN IP Address 10.10.10.254 Subnet 255.255.255.0 IP Address DHCP Table 5 UART Setting Item Value Baud Rate 57600 Data bits 8 Parity None Stop Bit 1 Flow Control None Table 6 Web Setting Item Default Value User Name: admin Password: admin 11.2 System requirements for the host platform RT2880 SDK uses Fedora 6 Host to build the image. Change your Linux distribution if you cannot successfully build the image. Table 7 Requirements of Host Platform Item Value Linux Distribution Fedora 6 Kernel version 2.6.18-1.2798.fc6 RAM 512MB HD 40G 11.3 How to add new default parameter in flash Page 69 of 158 RALINK AP SDK 4.2.0.0 User’s Manual There are four default settings In RT288x_SDK/source/vendors/Ralink/RT2880, based on different platforms. RT2860_default_vlan: IC+ ( gateway mode)/Vitesse Platform RT2860_default_novlan: IC+ (bridge mode)/Marvell 1000 Phy platform RT2860_default_oneport: IC+ 100 Phy platform RT2561_default: RT2561 PCI NIC (RT2860+RT2561 concurrent) 11.3.1 Example 1 Add a new default parameter - WHOAMI for IC+ platform 1. Edit RT288x_SDK/source/vendors/Ralink/RT2880/ RT2860_default_vlan, and add the following line. WHOAMI=steven 2. Push “wps/load_default” button or execute the following commands #ralink_init clear 2860 #reboot 3. Use nvram_get to retrieve WHOAMI parameter in script file (RT288x_SDK/source/user/rt2880_app/scripts), or nvram_bufset, nvram_bufget, nvram_commit in your CGI(RT288x_SDK/source/user/goahead/src) to use your feature. 11.3.2 Example 2 Save the RADIO ON/OFF button in WebUI to flash: 1. Add a line to RT288x_SDK/source/vendors/Ralink/RT2880/ RT2860_default_vlan for the default value: RadioOn=1 2. Modify RT288x_SDK/source/user/goahead/src/wireless.c, function wirelessBasic() to save the radio on/off value to flash: radio = websGetVar(wp, T("radiohiddenButton"), T("2")); Page 70 of 158 RALINK AP SDK 4.2.0.0 User’s Manual if (!strncmp(radio, "0", 2)) { nvram_bufset(RT2860_NVRAM, "RadioOn", radio); doSystem("ifconfig ra0 down"); websRedirect(wp, "wireless/basic.asp"); return; } else if (!strncmp(radio, "1", 2)) { nvram_bufset(RT2860_NVRAM, "RadioOn", radio); doSystem("ifconfig ra0 up"); websRedirect(wp, "wireless/basic.asp"); return; } 3. Modify the RT288x_SDK/source/user/rt2880_app/scripts/internet.sh script not to bring ra0 up if RadioOn value stored in flash is not 1. Change “ifconfig ra0 0.0.0.0” to… radio=`nvram_get 2860 RadioOn` if [ "$radio" = "1" ] ifconfig ra0 0.0.0.0 up else ifconfig ra0 0.0.0.0 down fi 11.4 Enable Ethernet Converter Feature The Wi-Fi Interface on the RT2880 platform should be configured for STA mode. All PCs under the RT2880 GMAC port connect to the AP via the RT2880 platform. Page 71 of 158 RALINK AP SDK 4.2.0.0 User’s Manual Figure 14 Ethernet Converter Operation Diagram If the RT2880 platform can be operated as an AP or Ethernet converter by WebUI Configuration, make sure STA support and AP support as a Linux module is on in the rt2860v2 driver. Turn on the rt2860v2 STA support if the RT2880 platform is an Ethernet converter only. Select the operation mode on the “Operation Mode Configuration” web page. Page 72 of 158 RALINK AP SDK 4.2.0.0 User’s Manual rt2860v2_sta.o Figure 15 WebUI - STA Mode Setting 11.5 Change RF chip from RT2820 to RT2850 on the RT2880 platform The QA program can burn an RT2850 EEPROM binary file. Click the “Load File” button and choose your own EEPROM binary file. The QA program will immediately burn the binary file to flash. Figure 16 QA – Burn your own EEPROM binary file 11.6 How to change the Ethernet MAC address The Ralink Ethernet driver uses GMAC0_ADDR to save its LAN/WAN mac address. If GMAC0_ADDR is empty, it will generate a random mac address instead. #define GMAC0_ADDR (RT_EEPROM_BASE + 0x28) #define GMAC1_ADDR (RT_EEPROM_BASE + 0x2E) Page 73 of 158 RALINK AP SDK 4.2.0.0 User’s Manual Note: If you need the LAN/WAN Ports to have different MAC addresses, adjust the Ethernet driver to get GMAC0_ADDR for LAN, and GMAC1_ADDR for WAN. Use the QA program to modify your flash content. Figure 17 QA – Modify GMAC Mac address 11.7 How to configure GPIO ports $SDK/source/linux-2.4.x/drivers/char/ralink_gpio.c $SDK/source/linux-2.4.x/drivers/char/ralink_gpio.h RALINK_GPIO_SET_DIR - Configure the direction of the GPIO pins using bitmaps. Bit 1 is for output, and bit 0 is for input. For example, value 0x5 is for configuring GPIO pin 0 and 2 as output pins, and the other pins as input pins. RALINK_GPIO_SET_DIR_IN - Configure one or several GPIO pins as input pins using bitmaps. For example, value 0x5 is for configuring GPIO pin 0 and 2 as input pins, and other pins are ignored. RALINK_GPIO_SET_DIR_OUT - Configure one or several GPIO pins as output pins using bitmaps. For example, value 0x5 is for configuring GPIO pin 0 and 2 as output pins, and other pins are ignored. RALINK_GPIO_READ - Read the value from the GPIO data. RALINK_GPIO_WRITE - Write a value to the GPIO data. RALINK_GPIO_SET - Set a value with corresponding bits on to the GPIO data. For example, value 0x5 means GPIO data bit 0 and 2 will be set to 1, and the other bits will be ignored. Page 74 of 158 RALINK AP SDK 4.2.0.0 User’s Manual RALINK_GPIO_CLEAR - Clear a value with corresponding bits off the GPIO data. For example, value 0x5 means GPIO data bit 0 and 2 will clear to 0, and other bits will be ignored. RALINK_GPIO_READ_BIT - Read the corresponding bit from the GPIO data. For example, bit 2 means read the third bit from GPIO data. RALINK_GPIO_WRITE_BIT - Write a corresponding bit to the GPIO data. For example, bit 2 and value 1 mean to write value 1 to the third bit of GPIO data. RALINK_GPIO_READ_BYTE - Read the corresponding byte from the GPIO data. For example, byte 2 means to read the third byte from GPIO data. RALINK_GPIO_WRITE_BYTE - Write a corresponding byte to the GPIO data. For example, byte 2 and value 0x33 mean to write value 0x33 to the third byte of the GPIO data. RALINK_GPIO_READ_INT - Same as RALINK_GPIO_READ. RALINK_GPIO_WRITE_INT - Same as RALINK_GPIO_WRITE. RALINK_GPIO_SET_INT - Same as RALINK_GPIO_SET. RALINK_GPIO_CLEAR_INT - Same as RALINK_GPIO_CLEAR. RALINK_GPIO_ENABLE_INTP - Enable GPIO input interrupt. RALINK_GPIO_DISABLE_INT - Disable GPIO input interrupt. RALINK_GPIO_REG_IRQ - Register to receive an interruption from a GPIO pin. When the GPIO pin is interrupted, a signal SIGUSR1 or SIGUSR2 will be sent to the registered user process id. SIGUSR1 is sent when the GPIO pin has been clicked once, and SIGUSR2 is send when the GPIO pin has been pressed for several seconds. 11.8 Use GPIO to turn on LED The following tables show the current GPIO definition for RT2880/RT3052/RT3883/RT3352/RT5350. Page 75 of 158 RALINK AP SDK 4.2.0.0 User’s Manual Table 6 GPIO Usage of RT2880 Table 7 GPIO Usage of RT3052 Page 76 of 158 RALINK AP SDK 4.2.0.0 User’s Manual Table 8 GPIO Usage of RT3883/RT3662 RT3883/RT3662 Ball name Function K9 GPIO0 WPS LED K8 GPIO1 GPHYRST_N L9 GPIO2 Band selection L8 GPIO3 WPS_PB G14 GPIO4 SWRST_N_PB Factory Default Push Button. H14 GPIO5 Boot Strapping Boot Strapping H12 GPIO6 Boot Strapping Boot Strapping H13 GPIO7 Boot Strapping Boot Strapping G12 GPIO8 Ball # NC Description Use for WPS LED on Reference board. Use for Giga Switch reset on Reference board. RF 2.4GHz/5GHz Band selection. WPS Push Button. Reserved for internal use. The Ralink SDK GPIO driver gives an interface to set the frequency of the LEDs connected to the GPIOs. Define RALINK_GPIO_LED_LOW_ACT to 1 at $SDK/linux-2.4.x/drivers/char/ralink_gpio.h if the LEDs are inactive. Otherwise, define it as 0. #make menuconfig Kernel/Library/Defaults Selection ---> [*] Customize Kernel Settings (NEW) Character devices ---> [*] Ralink RT2880 GPIO Support [*] Ralink GPIO LED Support The LED can be set to blink in different ways if RALINK_GPIO_LED has been built enabled. The argument for RALINK_GPIO_LED_SET is ralink_gpio_led_info structure: Page 77 of 158 RALINK AP SDK 4.2.0.0 User’s Manual typedef struct { int gpio unsigned int on unsigned int off unsigned int blinks unsigned int rests; unsigned int times; } ralink_gpio_led_info; Write the application to set the LED frequency through the ioctl interface of the GPIO device. Use the example application, gpio. #make menuconfig Kernel/Library/Defaults Selection ---> [*] Customize Vendor/User Settings Ralink RT288x Application ---> [ ] RT2880 GPIO Test Usage: gpio l <gpio> <on> <off> <blinks> <rests> <times> gpio: GPIO number of the board on: number of ticks that the LED will be bright off: number of ticks that the LED will be dark blinks: number of on-offs that the LED will blink rests: times: number of blinks before the LED stops number of on-offs that the LED will rest Note: 1 tick is equal to 100ms. The maximum number is 4000 at this time. Page 78 of 158 RALINK AP SDK 4.2.0.0 User’s Manual Figure 18 LED Definition of WPS Specification Using the WPS PBC status LED as an example, the configurations would be: InProgress: gpio l <gpio> 2 1 4000 0 4000 (i.e. 2 ticks bright, 1 tick dark, blinking forever.) Error: gpio l <gpio> 1 1 4000 0 4000 (i.e. 1 tick bright, 1 tick dark, blinking forever.) Session Overlap Detected: gpio l <gpio> 1 1 10 5 4000 (i.e. 1 tick bright, 1 tick dark, blinking for 10 on-offs, resting for 5 on-offs, and never stops.) Success: gpio l <gpio> 3000 1 1 1 1 (i.e. 3000 ticks bright, 1 tick dark, blinking for one on-offs and one time.) To turn the LED on and keep it on: gpio l <gpio> 4000 0 1 0 4000 To turn the LED off and keep it off: gpio l <gpio> 0 4000 0 1 4000 11.9 Use LED firmware to turn on LED 1. enable LED firmware #make menuconfig Kernel/Library/Defaults Selection ---> [*] Customize Kernel Settings Network device support Ralink Driver ---> ---> Page 79 of 158 RALINK AP SDK 4.2.0.0 User’s Manual 2. Fill out flash content to control the LED behavior because the LED firmware will read the configuration from flash. Table 18 RT2880 LED Parameters in Flash Page 80 of 158 RALINK AP SDK 4.2.0.0 User’s Manual The current Ralink default flash hex values are subsequently shown. RT2880 Flash Base Address=0x40000 4003B: 1 controlled by firmware 4003C: 55 LED A/G don’t care 4003D: 77 LED A/G don’t care Page 81 of 158 RALINK AP SDK 4.2.0.0 User’s Manual 4003E: A8 LED ACT radio off = solid on/off 4003F: AA LED ACT blink when transmitting data & management packet 40040: 8C LED Act positive polarity when radio off -> solid off 40041: 88 LED Act negative polarity when link to A/G -> blink 11.10 How to start the telnet server Check RT288x_SDK/source/user/busybox/.config 11.10.1 busybox setting CONFIG_FEATURE_DEVPTS=y General Configuration CONFIG_FEATURE_SUID=y General Configuration CONFIG_LOGIN=y Login/Password Management Utilities CONFIG_TELNETD=y Networking utilities CONFIG_FEATURE_TELNETD_STANDALONE=y Check RT288x_SDK/source/linux-2.4.x/.config 11.10.2 Linux setting CONFIG_UNIX98_PTYS=y Character devices CONFIG_UNIX98_PTY_COUNT=256 CONFIG_DEVPTS_FS=y File systems Page 82 of 158 RALINK AP SDK 4.2.0.0 User’s Manual Figure 20 Configuration Procedure of Telnet Server 11.11 11n bit rate derivation Page 83 of 158 RALINK AP SDK 4.2.0.0 User’s Manual 1. The 11n bit rate is calculated by the MAC driver. The MAC driver refers to the three subsequent factors. a. MCS b. BW c. GI Note: the bit rate is primarily given by the PHY layer. 2. Bandwidth: Data subcarriers on different bandwidths, 20MHz and 40MHz. a. NSD: Number of data subcarriers. NSD[40Mhz] = 108 NSD[20Mhz] = 52 NSD[40Mhz]/NSD[20MHz] = 108/52 = 2.0769230769230769230769230769231 b. Example: MCS=15, GI=800ns, BW=20MHz, DataRate = 130Mbps MCS=15, GI=800ns, BW=40MHz, DataRate = 130 * [Nsd(40Mhz) / Nsd(20Mhz) ] = 130 * [108 / 52 ] = 270Mbps c. Please refer to “IEEE P802.11n/D2.04, June 2007” on page 314 for subsequent table. Page 84 of 158 RALINK AP SDK 4.2.0.0 User’s Manual 3. Guard Interval: a. Definition: Tsym: 4s ;Symbol Interval Tsyms: 3.6s ;Symbol interval of Short GI. b. Ratio of symbol interval on GI, refer to below EWC PHY Sepc. Tsym / Tsyms = 4sec / 3.6sec = 10/9 c. Example: MCS=15, 40MHz Bandwidth, and 400ns Short Guard Interval. 270.0 * (10/9) = 300.0 for Short GI. d. Reference: 1) IEEE 802.11n draft 2.04, page 316 and Table 211—MCS parameters for optional 40 MHz, NSS = 2, NES = 1, EQM (#665) MCS Index Data rate (Mb/s) Modulation R NBPSCS(iSS) NSD NSP NCBPS NDBPS 800 ns 400 ns GI GI 8 BPSK 1/2 1 108 6 216 108 27.0 30.0 9 QPSK 1/2 2 108 6 432 216 54.0 60.0 10 QPSK 3/4 2 108 6 432 324 81.0 90.0 11 16-QAM 1/2 4 108 6 864 432 108.0 120.0 12 16-QAM 3/4 4 108 6 864 648 162.0 180.0 13 64-QAM 2/3 6 108 6 1296 864 216.0 240.0 14 64-QAM 3/4 6 108 6 1296 972 243.0 270.0 15 64-QAM 5/6 6 108 6 1296 1080 270.0 300.0 2) EWC PHY spec. page 13. Page 85 of 158 RALINK AP SDK 4.2.0.0 User’s Manual 3) 11.12 EWC PHY spec. page 13. How to build a single image for the flash programmer Example: Make a 4M single image for the rt2880 platform (the Uboot partition is 192K, user configuration partition is 64K, and RF partition is 64K) # RT288x_SDK/tools/single_img #vi Makefile.4M # # Change uboot/kernel size if necessary # UBOOT_SIZE = 0x50000 KERNEL_SIZE = 0x3B0000 #----------------------------------------------- Page 86 of 158 RALINK AP SDK 4.2.0.0 User’s Manual USER_NAME = $(shell whoami) # # Uboot Image Information # UBOOT_DIR = . UBOOT_IMAGE = uboot.bin # # Linux Kernel Image Information # KERNEL_DIR = . KERNEL_IMAGE = steven_uImage # # Single Image Information # PACKED_DIR = . PACKED_IMAGE = steven_uImage.img #cp /tftpboot/uboot.bin . #cp /tftpboot/steven_uImage . #make –f Makefile.4M Flash layout: +-----------+--------+--------+-----------------------------+ | Uboot | UsrCfg | RF | Linux Kernel Image | +-----------+--------+--------+-----------------------------+ |<--------0x50000-------->|<-------0x3B0000------>| -Original Uboot Image Size 149372 ./uboot.bin - Original Kernel Image Size 2779348 ./steven_uImage Page 87 of 158 RALINK AP SDK 4.2.0.0 User’s Manual - Packed Image Size 4194304 ./steven_uImage.img #ls –l -rw-r--r-- 1 steven users 3831 Jun 24 19:00 Makefile.16M -rw-r--r-- 1 steven users 2865 Jun 27 13:27 Makefile.4M -rw-r--r-- 1 steven users 3744 Jun 24 19:00 Makefile.8M -rw-r--r-- 1 steven users 2779348 Jun 27 13:34 steven_uImage -rwxr-xr-x 1 steven users 4194304 Jun 27 13:36 steven_uImage.img* -rwxr-xr-x 1 steven users 149372 Jun 27 13:34 uboot.bin* The single image can now be burned using the flash programmer. 11.13 How to power down the RT3x5x build-in 10/100 PHYs Port 0 1 2 3 4 Map W L L L L MII control register Bit Name Description Read/Write Default 15 mr_main_reset 1=Reset: 0=Normal, R/ W; SC 1’h0 reset all digital logic, except phy_reg 14 loopback_mii Mii loop back R/W 1’h0 13 force_speed 1 = 100Mbps: 0=10Mbps, when R/W 1’h1 mr_autoneg_enable = 1’b0 12 mr_autoneg_enable 1= Enabled: 0=Normal R/W 1’h1 11 powerDown phy into power down (power down R/W 1’h0 RO 1’h0 R/W; SC 1’h0 R/W;PC 1’h1 RO 8h00 analog TX analog RX, analog AD) 10 reserved 9 mr_restart_negotiation 1 = Restart Auto-Negotiation: 0 = Normal 8 force_duplex 1 = Full Duplex: 0 = Half Duplex, when mr_autoneg_enable = 1’b0 7:0 RESERVED Page 88 of 158 RALINK AP SDK 4.2.0.0 User’s Manual User Space: # mii_mgr -s -p 0 -r 0 -v 0x3900 //set port 0 register0 bit11 Set: phy[0].reg[0] = 3900 # mii_mgr -s -p 1 -r 0 -v 0x3900 //set port 1 register0 bit11 Set: phy[1].reg[0] = 3900 # mii_mgr -s -p 2 -r 0 -v 0x3900 //set port 2 register0 bit11 Set: phy[2].reg[0] = 3900 # mii_mgr -s -p 3 -r 0 -v 0x3900 //set port 3 register0 bit11 Set: phy[3].reg[0] = 3900 # mii_mgr -s -p 4 -r 0 -v 0x3900 //set port 4 register0 bit11 Set: phy[4].reg[0] = 3900 Kernel Space: extern u32 mii_mgr_read( unsigned int , unsigned int, unsigned int *); extern u32 mii_mgr_write( unsigned int, unsigned int, unsigned int); mii_mgr_write( 0, 0, 0x3900) //set port 0 register0 bit11 mii_mgr_write( 1, 0, 0x3900) //set port 1 register0 bit11 mii_mgr_write( 2, 0, 0x3900) //set port 2 register0 bit11 mii_mgr_write( 3, 0, 0x3900) //set port 3 register0 bit11 mii_mgr_write( 4, 0, 0x3900) //set port 4 register0 bit11 You also need to set POC[27:23] to disable Phy port. RT288x_SDK/source/linux-2.6.21.x/drivers/net/raeth/rather.c) *(unsigned long *)(0xb0110090) = 0x0??07f7f; 11.14 How to power down the RT6855/RT6856 build-in 10/100 PHYs Please modify GPC1[29:24] to disable PHY ports. Page 89 of 158 RALINK AP SDK 4.2.0.0 User’s Manual 11.15 How to enable NFS client #make menuconfig Kernel/Library/Defaults Selection---> Networking options ---> [*] IP: kernel level autoconfiguration File systems ---> Network File Systems ---> Linux 2.4: <*> NFS file system support [*] Provide NFSv3 client support [*] Allow direct I/O on NFS files (EXPERIMENTAL) [*] Root file system on NFS Linux 2.6 <*> NFS file system support [*] Provide NFSv3 client support [*] Provide client support for the NFSv3 ACL protocol extension [*] Provide NFSv4 client support (EXPERIMENTAL) [*] Allow direct I/O on NFS files Kernel/Library/Defaults Selection---> [*] Customize Kernel Settings (NEW) [*] Customize Busybox Settings Linux System Utilities---> [*] mount [ ] Support mount helpers [*] Support mounting NFS file systems Example: Page 90 of 158 RALINK AP SDK 4.2.0.0 User’s Manual # mount -o nolock 192.168.18.21:/tftpboot /mnt # mount ………………………. /dev/sda1 on /media/sda1 type vfat (rw,fmask=0000,dmask=0000,codepage=cp437,iocharset=iso8859-1) 192.168.18.21:/tftpboot on /mnt type nfs (rw,vers=3,rsize=32768,wsize=32768,hard,nolock,proto=udp,timeo=7,retrans=3,sec=sys,addr=192.16 8.18.21) 11.16 How to add a new language to the web UI The following instructions are an example and show how to add the Korean language to the web UI. 1. Copy all the xml files under RT288x_SDK/source/user/goahead/web/lang/en to RT288x_SDK/source/user/goahead/web/lang/kr and translate the “msgstr” part in those files. (Note: the translation should be UTF-8 encoded) 2. Add an entry to RT288x_SDK/source/config/config.in: dep_bool ' language pack - Korean' CONFIG_USER_GOAHEAD_LANG_KR $CONFIG_USER_GOAHEAD_HTTPD 3. Add an entry toRT288x_SDK/source/user/goahead/Makefile: ifneq ("$(CONFIG_USER_GOAHEAD_LANG_KR)", "y") rm -rf $(ROMFSDIR)/$(ROOT_DIRECTORY)/lang/kr endif 4. RT288x_SDK/source/user/goahead/src/utils.c: Add to ‘getLangBuilt’ function: else if (!strncmp(lang, "kr", 5)) #ifdef CONFIG_USER_GOAHEAD_LANG_KR return websWrite(wp, T("1")); #else return websWrite(wp, T("0")); #endif 5. RT288x_SDK/source/user/goahead/web/overview.asp Add to ‘initValue’ function: var lang_kr = "<% getLangBuilt("kr"); %>"; Page 91 of 158 RALINK AP SDK 4.2.0.0 User’s Manual if (lang_kr == "1") lang_element.options[lang_element.length] = new Option('Korean', 'kr'); 6. RT288x_SDK/source/user/goahead/web/adm/management.asp Add to ‘initValue’ function: var lang_kr = "<% getLangBuilt("kr"); %>"; if (lang_kr == "1") lang_element.options[lang_element.length] = new Option('Korean', 'kr'); 7. RT288x_SDK/source/user/goahead/web/home.asp Fix ‘initLanguage’ function 8. make menuconfig Customize Vendor/User Settings ---> Network Applications ---> select Korean language pack 11.17 How to enable watchdog User mode Watchdog: $ make menuconfig Kernel/Library/Defaults Selection ---> [*] Customize Kernel Settings Device Drivers ---> Character devices Watchdog Cards ---> ---> [*] Customize Vendor/User Settings Miscellaneous Applications ---> Finally, Enable watchdog in WebUI. Page 92 of 158 RALINK AP SDK 4.2.0.0 User’s Manual Kernel mode Watchdog: $ make menuconfig Kernel/Library/Defaults Selection ---> [*] Customize Kernel Settings Machine selection 11.18 ---> How to enable USB storage on the RT305x platform #make menuconfig Kernel/Library/Defaults Selection ---> [*] Customize Kernel Settings (NEW) Device Drivers ---> SCSI device support ---> <*> SCSI device support <*> SCSI disk support USB support ---> <*> Support for Host-side USB [*] [*] USB verbose debug messages USB device filesystem <*> USB Mass Storage support [*] USB Mass Storage verbose debug File systems ---> <*> Filesystem in Userspace support Page 93 of 158 RALINK AP SDK 4.2.0.0 User’s Manual DOS/FAT/NT Filesystems ---> <*> VFAT (Windows-95) fs support (437) Default codepage for FAT (NEW) (iso8859-1) Default iocharset for FAT (NEW) Partition Types ---> [*] Advanced partition selection [*] PC BIOS (MSDOS partition tables) support (NEW) Native Language Support ---> (iso8859-1) Default NLS Option <*> Codepage 437 (United States, Canada) <*> Traditional Chinese charset (Big5) <*> NLS ISO 8859-1 <*> NLS UTF-8 Ralink Module (Latin 1; Western European Languages) ---> <M> RALINK DWC_OTG support [] enable debug mode [*] HOST ONLY MODE [] DEVICE ONLY MODE CAUTION: THE KERNEL SIZE CANNOT BE BIGGER THAN THE MTD KERNEL PARTITION SIZE IN ROOTFS IN FLASH MODE. #============================================================= # Original Kernel Image Size 1033369 /home/steven/rt3052/RT288x_SDK/source/images/zImage.lzma # Padded Kernel Image Size 1048512 /home/steven/rt3052/RT288x_SDK/source/images/zImage.lzma # Original RootFs Size ……………. 11.19 How to enable USB automount on the RT305x platform #make menuconfig Kernel/Library/Defaults Selection ---> Page 94 of 158 RALINK AP SDK 4.2.0.0 User’s Manual [*] Customize Busybox Settings Linux System Utilities ---> [*] mdev [*] Support /etc/mdev.conf [] Support subdirs/symlinks (NEW) [*] Support command execution at device addition/removal [*] Customize Vendor/User Settings Miscellaneous Applications ---> [*] ntfs-3g 11.20 How to enable software QoS To support the Ralink SW QoS, many menuconfig options in Ralink SDK must be enabled, including in kernel and application configs. Kernel IMQ config: Since the Intermediate Queueing (IMQ) pseudo device are used to support Ralink SW QoS, it must be enabled first, or some needed options in Netfilter configs won’t show up due to dependency. Networking ---> Device Drivers ---> Network device support ---> <*> IMQ (intermediate queueing device) support IMQ behavior (PRE/POSTROUTING) (IMQ AB) (2) Number of IMQ devices Kernel Netfilter configs: In order to support Ralink SW QoS, several necessary Netfilter modules are used, including Netfilter match and target modules. These modules must be enabled to let Ralink SW QoS work correctly. But first of all, a proprietary Ralink option in Netfilter has to be enabled. To completely fit the requirement of Ralink SW QoS some changes are made in Linux Netfilter architecture. For this changes, a Ralink proprietary Netfilter option Netfilter Ralink SWQoS support is Page 95 of 158 RALINK AP SDK 4.2.0.0 User’s Manual introduced. This Ralink proprietary Netfilter option must be enabled to support Ralink SW QoS, or the classification of IP address may not work properly. If the Ralink SW QoS is not required, of course, it is recommended to leave this option blank to keep the Linux Netfilter architecture unchanged and expected. -> Networking -> Networking support (NET [=y]) -> Networking options -> Network packet filtering framework (Netfilter) (NETFILTER [=y] -> Core Netfilter Configuration [*] Netfilter Ralink SWQoS support(Marking after NAT) Then please enable the following necessary netfilter and iptables modules to support Ralink SW QoS: -> Networking -> Networking support (NET [=y]) -> Networking options -> Network packet filtering framework (Netfilter) (NETFILTER [=y] -> Core Netfilter Configuration <*> Netfilter connection tracking support <*> "conntrack" connection tracking match support <*> "DSCP" target support <*> "MARK" target support <*> "DSCP" match support <*> "helper" match support <*> "length" match support <*> "mac" address match support Page 96 of 158 RALINK AP SDK 4.2.0.0 User’s Manual <*> "state" match support <*> "layer7" match support <*> "Ethernet port for incoming packets" match support And, -> Networking -> Networking support (NET [=y]) -> Networking options -> Network packet filtering framework (Netfilter) (NETFILTER [=y] ->IP: Netfilter Configuration ---> <*> IP tables support (required for filtering/masq/NAT) <*> Packet mangling <*> IMQ target support Application configs: Besides kernel configs, there are also several application menuconfigs which has to be enabled to support Ralink SW QoS. [*] Customize Vendor/User Settings Library Configuration ---> [*] Build libresolv Network Applications ---> [*] iptables [*] iproute2 [*] tc Ralink Proprietary Application ---> [*] Software QoS Page 97 of 158 RALINK AP SDK 4.2.0.0 User’s Manual 11.21 Software QoS information 11.21.1 Software QoS – Preface The Ralink SoC SW QoS supports many different types of classification, rate limitation, and DSCP remarking. Ralink SoC SW QoS is based on the Linux Qdiscs, TC, and iptables. Ralink SoC SW QoS supports download and upload stream on a WAN interface. 11.21.2 QoS – Concept The Ralink SoC SW QoS architecture is shown in the subsequent figure. The Classifier module classifies incoming packets into the Shaper module. The Shaper module has 4 queues (groups) to do rate limitation, and then the Remark module rewrites the DSCP field of the packet if it is necessary. SW QoS packets Classifier packets Shaper Remark 11.21.3 Software QoS – Usage Conceptually, there are three main settings in Ralink SW QoS have to be specified : Global settings, Group settings, and Rule settings. Global settings: Page 98 of 158 RALINK AP SDK 4.2.0.0 User’s Manual 1. Select ”upload to Internet “ or “download from Internet” on the web UI to enable the Ralink SW QoS. 2. Enter the upload and download bandwidth details to make a good fit with the user’s network environment (e.g. ADSL 512k/64k, Cable Modem 10M/10M….) 3. Select a QoS model: DRR (Deficit Round Robin), SPQ(Strict Priority Queue), DRR+SPQ. 4. Select reserved bandwidth. The reserved bandwidth is out of the control of Ralink SW QoS. Group settings: Four QoS groups are shown after specifying Global settings in Ralink SW QoS. Now all packets through this gateway are classified into these four QoS groups according to the user’s QoS rules settings. The four QoS groups are subsequently shown. The default group is the group named Default(the third group), that means the packet classified into this group if it doesn’t match with any rules. Page 99 of 158 would be RALINK AP SDK 4.2.0.0 User’s Manual In each QoS group there are two attributes Rate and Ceil as shown in the subsequent figure. a. Rate: Set the guaranteed minimum bandwidth that this group can use. b. Ceil: Set the maximum bandwidth that this group can use. The first group named Highest has the highest priority. The next group named High has the second priority. The third group named Default is the default group. The last group named Low has the lowest priority. Highest priority means the left available bandwidth will serve the group first, but settings for guaranteed rate and ceil in every group are still met strictly. For example, people often hope VoIP traffic is classified as the highest priority group for short latency and good quality, and P2P traffic to be classified as the lowest priority and background traffic. Rules settings: Page 100 of 158 RALINK AP SDK 4.2.0.0 User’s Manual The QoS rules are made to do classification, and remarking. One QoS rules are made of 3 parts: attributes, classifiers, and remaker. 1) Rule attribute: a) Name: specifies this rules name b) Group: specifies which group this rule is belongs to. 2) Rule classifiers: Ralink SW QoS supports these classifiers currently: a) SRC/DSP IP address (with netmask) b) Packet length c) DSCP field d) ICMP, TCP/UDP port range Page 101 of 158 RALINK AP SDK 4.2.0.0 User’s Manual e) Layer 7 (content inspection) 3) Rule Remarker: This argument specifies what DSCP value would be added to the packet as a remark which matches the rule. 11.21.4 Hardware QoS – Usage The Ralink SoC HW QoS architecture is shown in the subsequent figure. Page 102 of 158 RALINK AP SDK 4.2.0.0 User’s Manual Menuconfig 11.22 How to enable USB Ethernet (example for ASIX AX88XXX) Kernel/Library/Defaults Selection ---> [*] Customize Kernel Settings Device Drivers ---> USB support ---> USB Network Adapters ---> <M> Multi-purpose USB Networking Framework <M> ASIX AX88xxx Based USB 2.0 Ethernet Adapters <M> CDC Ethernet support (smart devices such as cable modems) CONFIG_USB_RTL8150=m # insmod usbnet # insmod cdc_ether usbcore: registered new interface driver cdc_ether # insmod asix.ko usbcore: registered new interface driver asix # usb 1-1: new high speed USB device using dwc_otg and address 2 usb 1-1: Product: USB2.0 usb 1-1: Manufacturer: ASIX Elec. Corp. usb 1-1: SerialNumber: 01 usb 1-1: configuration #1 chosen from 1 choice eth0: register 'asix' at usb-lm0-1, ASIX AX8817x USB 2.0 Ethernet, 00:0e:2e:41:72:9e # brctl addif br0 eth0 device eth0 entered promiscuous mode # brctl show br0 bridge name bridge id STP enabled Page 103 of 158 interfaces RALINK AP SDK 4.2.0.0 User’s Manual br0 8000.000c43414367 no ra0 eth2.1 eth0 # ifconfig eth0 up ADDRCONF(NETDEV_CHANGE): eth0: link becomes ready br0: port 3(eth0) entering learning state eth0: link up, 100Mbps, full-duplex, lpa 0xC5E1 br0: topology change detected, propagating br0: port 3(eth0) entering forwarding state # ping 10.10.10.3 PING 10.10.10.3 (10.10.10.3): 56 data bytes 64 bytes from 10.10.10.3: seq=0 ttl=128 time=3.381 ms 64 bytes from 10.10.10.3: seq=1 ttl=128 time=1.038 ms 64 bytes from 10.10.10.3: seq=2 ttl=128 time=1.067 ms 64 bytes from 10.10.10.3: seq=3 ttl=128 time=1.069 ms 11.23 How to build a single image for the RT2880 8M flash platform #cd Uboot #make menuconfig (128Mb) DRAM Component (32bits) DRAM Bus (8M) Flash Size #cd RT288x_SDK/source #make menuconfig Kernel/Library/Defaults Selection ---> [*] Customize Kernel Settings Machine selection ---> (8M) Flash Size #cd RT288x_SDK/tools/single_img/RT2880 #vi Makefile.8M UBOOT_IMAGE = rt2880_100phy_128Mbx16_8Mflash.uboot Page 104 of 158 RALINK AP SDK 4.2.0.0 User’s Manual KERNEL_IMAGE = rt2880_100phy_128Mbx16_8Mflash.linux PACKED_IMAGE = rt2880_100phy_128Mbx16_8Mflash.uboot #make –f Makefile.8M Flash layout: +-----------------------+---------+---------+----+--------------------------------+ | KERNEL PartII | Uboot |UsrCfg| RF| Kernel PartI | +-----------------------+-------+------+---+--------------------------------------+ |<----0x400000-->|<----0x50000->|---------0x3B0000 11.24 --------->| How to start a printer server (example for HP officejet 4355) Step1: SDK Configuration #make menuconfig Kernel/Library/Defaults Selection ---> [*] Customize Kernel Settings Device Drivers ---> USB support ---> <*> USB Printer support [*] Customize Vendor/User Settings Network Applications ---> [*] p910nd (small printer daemon) Step2: Plug in USB Printer # usb 1-1: new full speed USB device using dwc_otg and address 2 usb 1-1: Product: Officejet 4300 series usb 1-1: Manufacturer: HP usb 1-1: SerialNumber: CN864GZ1S004GR usb 1-1: configuration #1 chosen from 1 choice Page 105 of 158 RALINK AP SDK 4.2.0.0 User’s Manual drivers/usb/class/usblp.c: usblp0: USB Bidirectional printer dev 2 if 1 alt 0 proto 2 vid 0x03F0 pid 0x5411 Step3: run the printer daemon # p910nd -f /dev/lp0 Step4: Setup the printer in Windows -> -> -> -> -> Page 106 of 158 RALINK AP SDK 4.2.0.0 User’s Manual -> -> -> -> -> -> 11.25 -> => How to force the RT3052 link speed There are two kinds of force mode that refer to the configuration of the remote peer. Page 107 of 158 RALINK AP SDK 4.2.0.0 User’s Manual 1. Force Mode (Both RT305x and remote peer disable auto negotiation algorithm) 10MB/Full: Set bit13=0, bit12=0,bit8=1 (reg_addr=0) 10MB/Half:Set bit13=0,bit12=0,bit8=0 (reg_addr=0) 100MB/Full:Set bit13=1,bit12=0,bit8=1 (reg_addr=0) 100MB/Half:Set bit13=1,bit12=0,bit8=0 (reg_addr=0) 2. Auto negotiation (Both RT305x and remote peer enable auto negotiation algorithm) 10MB/Full: Set bit6=1 (reg_addr=4) 10MB/Half: Set bit5=1 (reg_addr=4) 100MB/Full: Set bit8=1 (reg_addr=4) 100MB/Half: Set bit7=1 (reg_addr=4) Page 108 of 158 RALINK AP SDK 4.2.0.0 User’s Manual User Mode: # mii_mgr -s -p [port_no] -r [reg_addr] -v [Value] Kernel Space: extern u32 mii_mgr_write( unsigned int, unsigned int, unsigned int); mii_mgr_write( [port_no], [reg_addr], [value]) NOTES: IF BOTH RT305X SWITCH AND REMOTE PEER DO NOT USE THE SAME CONFIGURATION (I.E. AUTO-NEGOTIATION OR FORCE MODE) IT CAN CAUSE A PROBLEM. 11.26 How to verify IGMP snooping functi on Step1: Compiling IGMP proxy application. #make menuconfig Kernel/Library/Defaults Selection ---> [*] Customize Vendor/User Settings (NEW) Network Applications ---> [*] igmp proxy (RFC4605) Step2: Enable IGMP Proxy in WebUI. Page 109 of 158 RALINK AP SDK 4.2.0.0 User’s Manual Step3: Install windows server 2003 resource kit tools in your PCs. You can get the test application from the following link or Ralink SDK. - HTTP://WWW.MICROSOFT.COM/DOWNLOADS/DETAILS.ASPX?FAMILYID=9D467A69-57FF4AE7-96EE-B18C4790CFFD&DISPLAYLANG=EN - RT288x_SDK/source/user/igmpproxy/tools/rktools.exe. Step4: Start Multicast test Mcast server: C:\>mcast /GRPS:239.1.1.1 /SRCS:10.10.10.3 /NUMPKTS:1000 /INTVL:50 /SEND (Please use "/intf" argument to specify an interface to receive or send if you have multiple network interfaces.) Now, you can see the multicast packets will be generated by Mcast Server. Page 110 of 158 RALINK AP SDK 4.2.0.0 User’s Manual Mcast Client1: C:\>mcast /GRPS:239.1.1.1 /RECV Step5: Starting network sniffer on Client1 and Client2. The right behavior is only Client1 can receive multicast packets. 11.27 EHCI/OHCI USB Power Saving A potential issue may happen if user chooses a mixed version pair of SDK Linux and Uboot. A confirmed pair is RT3883/RT3662 SDK3.5 Uboot + SDK 3.4 Linux, this pair may cause system to freeze during boot up. To reduce power consumption and lower the working temperature, SDK3.5 and later versions disable the USB power and clock gating during the boot-loader initialization stage. The advantage is more power-saving. The detail is SDK 3.5 Uboot would disable the USB HW module by default. And then the SDK 3.5 EHCI/OHCI Linux driver have to re-enable USB HW module before accessing USB related registers. However, if user chooses an unexpected pair, ex. SDK3.5 Uboot + SDK 3.4 Linux, the system may freeze at OHCI initialization during boot up as following log. This is because the SDK 3.5(or later) Uboot would disable the USB HW module to save power, but then the older SDK Linux(SDK 3.4 ) EHCI/OHCI driver does not re-enable the USB HW module before accessing USB function. Page 111 of 158 RALINK AP SDK 4.2.0.0 User’s Manual … rt3xxx-ohci rt3xxx-ohci: RT3xxx OHCI Controller rt3xxx-ohci rt3xxx-ohci: new USB bus registered, assigned bus number 2 rt3xxx-ohci rt3xxx-ohci: irq 18, io mem 0x101c1000 <<<<< freeze at here To solve the issue(freeze at OHCI init), please disable the USB(EHCI/OHCI) power saving feature in SDK 3.5(and later) Uboot as following: In Uboot/lib_mips/board.c void board_init_r (gd_t *id, ulong dest_addr) { … //void config_usb_ehciohci(void); //config_usb_ehciohci(); … } And then rebuild Uboot. 11.28 Auto-frequency and Power Saving The RT3352/RT5350 SOC has the capability of auto-frequency and power saving. CPU Auto-Frequency (RT3352/RT5350) SDR Power Pre-charge Power Down (RT3352/RT5350) DDR self Refresh Power Save (RT3352) Ethernet Power Down (RT3352/RT5350) USB Power Down (RT3352/RT5350) WIFI Power Down (RT3352/RT5350) Notice: Those new features are supported by SDK 3.5.2.0 and later version. 1. Setup Page 112 of 158 RALINK AP SDK 4.2.0.0 User’s Manual How to turn on CPU Auto-Frequnecy For RT3352/RT5350, We can turn on CPU auto frequency function by: Modifying config.mk in Uboot and rebuild uboot firmware … RALINK_DDR_CONTROLLER_OPTIMIZATION = OFF RALINK_CPU_AUTO_FREQUENCY = ON RALINK_SDR_PRECHARGE_POWER_DOWN = OFF RALINK_DDR_SELF_REFRESH_POWER_SAVE_MODE = OFF … $make Set Linux Kernel Configuration and then rebuild linux firmware $make menuconfig ---> Machine selection ---> [*] Ralink External Timer ……………………………………………………………………………………… $make dep; make How to turn on SDR Pre-charge Power Down For RT3352/RT5350, We can turn on SDR power save by: Modifying config.mk in Uboot and rebuild uboot firmware … RALINK_DDR_CONTROLLER_OPTIMIZATION = OFF RALINK_CPU_AUTO_FREQUENCY = OFF RALINK_SDR_PRECHARGE_POWER_DOWN = ON Page 113 of 158 RALINK AP SDK 4.2.0.0 User’s Manual RALINK_DDR_SELF_REFRESH_POWER_SAVE_MODE = OFF … $make How to turn on DDR Self Refresh Power Save For RT3352 , We can turn on DDR power save by: Modifying config.mk in Uboot and rebuild uboot firmware … RALINK_DDR_CONTROLLER_OPTIMIZATION = OFF RALINK_CPU_AUTO_FREQUENCY = OFF RALINK_SDR_PRECHARGE_POWER_DOWN = OFF RALINK_DDR_SELF_REFRESH_POWER_SAVE_MODE = ON … $make 2. Setup in script … /sbin/config-powersave.sh cpu 1 - enable CPU autofrequency /sbin/config-powersave.sh cpu 0 - disable CPU autofrequency /sbin/config-powersave.sh sdr 1 - enable SDR precharge powersave /sbin/config-powersave.sh sdr 0 - disable SDR precharge powersave /sbin/config-powersave.sh ddr 1 - enable DDR self auto refresh /sbin/config-powersave.sh ddr 0 - disable DDR self auto refresh /sbin/config-powersave.sh ethernet 1 [port] - enable Ralink ESW PHY powerdown /sbin/config-powersave.sh ethernet 0 [port] - disable Ralink ESW PHY powerdown /sbin/config-powersave.sh usb 1 - enable usb powerdown Page 114 of 158 RALINK AP SDK 4.2.0.0 User’s Manual /sbin/config-powersave.sh usb 0 - disable usb powerdown /sbin/config-powersave.sh wireless 1 - enable wireless powerdown /sbin/config-powersave.sh wireless 0 - disable wireless powerdown … How to turn on CPU Auto-Frequency For RT3352/RT5350, We can turn on CPU auto frequency function by: #config-powersave.sh cpu 1 How to turn on SDR Pre-charge Power Down For RT3352/RT5350, We can turn on SDR power save by: #config-powersave.sh sdr 1 How to turn on DDR Self Refresh Power Save For RT3352 , We can turn on DDR power save by: #config-powersave.sh ddr 1 How to turn on Ethernet Power Down For RT3352 /RT5350, We can turn on Ethernet port#3 power down by: #config-powersave.sh ethernet 1 3 How to turn on USB Power Down For RT3352 /RT5350, We can turn on USB power down by: #config-powersave.sh usb 1 How to turn on WIFI Power Down For RT3352 /RT5350, We can turn on WIFI power down by #config-powersave.sh wifi 1 3. Check Function CPU Auto-Frequency Turn off: Page 115 of 158 RALINK AP SDK 4.2.0.0 User’s Manual Turn on: SDR Pre-charge Power Save Turn off: Turn on: DDR Self Refresh Power Save Turn off: Turn on: 11.29 Concurrent AP porting Guide Page 116 of 158 RALINK AP SDK 4.2.0.0 User’s Manual The APSOC has the capability of working 1st wireless interface and 2nd wireless interfaces concurrently. A. The interface1 (ra0) B. The interface 2 (rai0) Station can associate and execute WPS connection for any wireless interface. Moreover, user can configure the settings of any wireless interface by Web GUI. You can refer to Ralink_AP_SDK_User's_Manual for the Detail information. 1. Setup: If your SDK does not include RT309x/RT539x/RT3572/RT5572/RT5592/RT3593 support, please refer the following steps to install it. Requirement: RT288x_SDK RT3090/RT5392/RT3572/RT5572/RT5592/RT3593 WiFi driver RT3090/RT5392/RT3572/RT5572/RT5592/RT3593 EEPROM binary files Procedure: (RT383+RT3090 as example) Step1. Please copy RT309x WiFi driver to RT288x_SDK/linux-2.6.xx.x/drivers/net/wireless ex: $cp RT3090_ap RT288x_SDK/linux-2.6.xx.x/drivers/net/wireless Step2. Please modify RT288x_SDK/linux-2.6.xx.x/drivers/net/wireless/Makefile ex: … ifneq ($(CONFIG_RT2860V2_AP),) obj-$(CONFIG_RT2860V2_AP) += rt2860v2_ap/ endif ifneq ($(CONFIG_RT2860V2_STA),) obj-$(CONFIG_RT2860V2_STA) += rt2860v2_sta/ endif ifneq ($(CONFIG_RT3090_AP),) obj-$(CONFIG_RT3090_AP) += RT3090_ap/ endif … Page 117 of 158 RALINK AP SDK 4.2.0.0 User’s Manual Step3. Please modify RT288x_SDK/linux-2.6.xx.x/ralink/Kconfig ex: … #source "drivers/net/wireless/rt2860v2_sta/Kconfig" #source "drivers/net/wireless/rt2860v2_apsta/Kconfig" source "drivers/net/wireless/RT3090_ap/Kconfig" config RT3090_AP_RF_OFFSET depends on RT3090_AP hex default 0x48000 … Step4. If wifi driver support FLASH_SUPPORT, please copy EEPROM binary file to RT288x_SDK/source/vendors/Ralink/RT3883 ex: $cp RT3092_PCIe_LNA_2T2R_ALC_V1_2.bin RT288x_SDK/source/vendors/Ralink/{RT3883/RT3352/RT5350} Step5. Please modify RT288x_SDK/source/vendors/Ralink/RT3883/Makefile ex: … $(ROMFSINST) -e CONFIG_RALINK_RT3883_3T3R RT2860_default_novlan_3s /etc_ro/Wireless/RT2860AP/RT2860_default_novlan $(ROMFSINST) -e CONFIG_RALINK_RT3883_3T3R RT2860_default_vlan_3s /etc_ro/Wireless/RT2860AP/RT2860_default_vlan $(ROMFSINST) -e CONFIG_RALINK_RT3662_2T2R /etc_ro/Wireless/RT2860AP/RT2860_default_novlan $(ROMFSINST) -e CONFIG_RALINK_RT3662_2T2R /etc_ro/Wireless/RT2860AP/RT2860_default_vlan $(ROMFSINST) -e CONFIG_RT3090_AP /etc_ro/Wireless/iNIC/RT2860AP.dat $(ROMFSINST) -e CONFIG_RT3090_AP /etc_ro/Wireless/RT2860AP/RT3092_PCIe_LNA_2T2R_ALC_V1_2.bin … Step6. Page 118 of 158 RALINK AP SDK 4.2.0.0 User’s Manual Please modify RT288x_SDK/source/user/rt2880_app/scripts/internet.sh ex: … ifRaxWdsxDown if [ "$CONFIG_RTDEV" != "" -o "$CONFIG_RT2561_AP" != "" ]; then ifRaixWdsxDown fi if [ "$CONFIG_RT2860V2_AP" != "" ]; then rmmod rt2860v2_ap_net rmmod rt2860v2_ap rmmod rt2860v2_ap_util fi if [ "$CONFIG_RT2860V2_STA" != "" ]; then rmmod rt2860v2_sta_net rmmod rt2860v2_sta rmmod rt2860v2_sta_util fi if [ "$RT2880v2_INIC_PCI" != "" ]; then rmmod iNIC_pci fi if [ "$CONFIG_RT3090_AP" != "" ]; then rmmod RT3090_ap_net rmmod RT3090_ap rmmod RT3090_ap_util fi … # RTDEV_PCI support if [ "$RT2880v2_INIC_PCI" != "" ]; then insmod -q iNIC_pci fi if [ "$CONFIG_RT3090_AP" != "" ]; then insmod -q RT3090_ap_util insmod -q RT3090_ap insmod -q RT3090_ap_net fi … Step7. You must switch directory to RT2888x_SDK/source and execute “make menuconfig,” like below: Page 119 of 158 RALINK AP SDK 4.2.0.0 User’s Manual Please choose “Select the Product you wish to target” option to configure the main settings of your target platform. <<Please select 4M/32M or 8M/64M Flash/SDRAM size>> And then, please exit “Select the Product you wish to target” option and enter “Kernel/Library/Defaults Selection” option. Page 120 of 158 RALINK AP SDK 4.2.0.0 User’s Manual You must select “Default all settings” option to load default configuration first and select “Customize Kernel Settings” options to turn on 2nd interface. Exit ---> yes. Step8. After load default, you can enter kernel configured main menu. If 2nd wireless uses PCIE interface: Please enter “Machine selection” and choice” RT3883 PCI architecture” to “PCIE RC ONLY” mode. Leave “Machine selection” option. Page 121 of 158 RALINK AP SDK 4.2.0.0 User’s Manual Please enter “Bus options (PCI, PCMCIA, EISA, ISA, TC)” option and check whether PCI/PCIE support or not, like below: Leave “Bus options (PCI, PCMCIA, EISA, ISA, TC)” option. Please enter “Ralink Module” option You must enter “WiFi Driver Support” and select RT3090 moudule to to act 2nd WiFi interface, but one of them could be selected. Page 122 of 158 RALINK AP SDK 4.2.0.0 User’s Manual Leave “Ralink Module” option and then exit “Linux Kernel Configuration”. Exit ---> yes Step9. Final, you can execute “make dep” and “make” to build image under the RT288x_SDK/source. $make dep $make 2. Usage: Page 123 of 158 RALINK AP SDK 4.2.0.0 User’s Manual If the firmware is built successfully, you can upgrade it into your RT3052/RT3883/RT3352/RT5350/RT6855/RT6856 reference board by TFTP Server or Web GUI. After firmware upgrade, you can use Web GUI or command line to to check if two wifi interfaces are successfully inserted and brought up or not. Web GUI Command line: 1st WiFi interface name: ra0 2nd WiFi interface name: rai0 ra0’s profile is located on /etc/Wireless/RT2860/RT2860.dat and rai0’s profile is located on /etc/Wireless/iNIC/iNIC_ap.dat. To change rai0’s wireless settings, you can edit its profile and re-bring up it, like ra0. Certainly, ra0 and rai0 are shown their detail information or configured settings by iwpriv command, for example: ra0: Page 124 of 158 RALINK AP SDK 4.2.0.0 User’s Manual #iwprive ra0 set SSID=RT3883AP #iwprive ra0 stat … rai0: #iwprive rai0 set SSID=RTDEV_AP #iwprive rai0 stat … 11.30 SuperDMZ usage guide Usage: super_dmz [-f] [-l lan_ifname] [-w wan_ifname] [-t tcp_port] [-t tcp_port1:tcp_port2] [-u udp_port] [-u udp_port1:udp_port2] -f : flush & clear super_dmz functions from system. -l lan_ifname: Explicitly assign the LAN interface name, ex. “br0” or “eth2.2”. In Ralink SDK this argument is assigned automatically based on the current operation mode if it is not assigned explicitly. -w wan_ifname: Explicitly assign the WAN interface name, ex “eth2.2” or “ppp0”. In Ralink SDK this argument is assigned automatically based on the current WAN mode if it is not assigned explicitly. -t tcp_port: TCP port tcp_port is the exception of DMZ forwarding, ex “80” or “23”. The most case here is “80” for AP web remote access. -t tcp_port1:tcp_port2 : TCP port from tcp_port1 to tcp_port2 is the exception of DMZ forwarding. -u udp_port: UDP port udp_port is the exception of DMZ forwarding. -u udp_port1:udp_port2 : UDP port from udp_port1 to udp_port2 is the exception of DMZ forwarding. Example: Page 125 of 158 RALINK AP SDK 4.2.0.0 User’s Manual 1) # super_dmz -f Clear Super DMZ function from system. 2) # super_dmz Enable Super DMZ function. 3) # super_dmz -l eth0 -t 80 Enable Super DMZ function. Assign “eth0” as LAN interface. Avoid tcp port 80 is forwarding.(To make web server on router reachable from WAN side) 4) # super_dmz -w eth2 -t 45:123 -t 3128 -u 10000 -u 500:600 Enable Super DMZ function. Assign “eth2” as WAN interface. Avoid tcp port 45 to 123, tcp port 3128, udp port 10000, and udp port 500 to 600 are forwarding. Implementation note: 1. When 1) system boot up 2) WAN IP is acquired or changed (Ex. PPPoE or DHCP on WAN) 3) Virtual Server(Port forwarding) settings change the super_dmz have to re-run: # super_dmz –f # super_dmz 11.31 How to support IPv6 Ready Logo The IPv6 Forum (http://www.ipv6forum.com) IPv6 Ready Logo Program is a conformance and interoperability testing program intended to increase user confidence by demonstrating that IPv6 is available now and is ready to be used. To pass Ipv6 Ready Logo (Phase-2), please enable additional three applicantions: Page 126 of 158 RALINK AP SDK 4.2.0.0 User’s Manual ecmh Easy Cast du Multi Hub (ecmh) is a networking daemon that acts as a full IPv6 MLDv1 and MLDv2 Multicast "Router". $ make menuconfig [*] Customize Vendor/User Settings Miscellaneous Applications ---> Exit ---> Yes ip command in iproute2 to flush neighbor cache during running test log $ make menuconfig [*] Customize Vendor/User Settings Network Applications ---> Exit ---> Yes radvd radvd, the Router Advertisement Daemon, is an open-source software product that implements link-local advertisements of IPv6 router addresses and IPv6 routing prefixes using the Neighbor Discovery Protocol (NDP) as specified in RFC 2461.[2] The Router Advertisement Daemon is Page 127 of 158 RALINK AP SDK 4.2.0.0 User’s Manual used by system administrators in stateless autoconfiguration methods of network hosts on Internet Protocol version 6 networks. $ make menuconfig [*] Customize Vendor/User Settings Network Applications ---> Exit ---> Yes 11.32 How to enable iPerf tool iPerf was developed by NLANR/DAST as a modern alternative for measuring maximum TCP and UDP bandwidth performance. iPerf allows the tuning of various parameters and UDP characteristics. iPerf reports bandwidth, delay jitter, datagram loss. $ make menuconfig [*] Customize Vendor/User Settings Miscellaneous Applications ---> Exit ---> Yes Uasage: Server sied: iperf -s Client side: iperf -c [server’s ip] –w 128k –t 30 –i 10 Page 128 of 158 RALINK AP SDK 4.2.0.0 User’s Manual 11.33 How to enable ebtables The ebtables program is a filtering tool for a Linux-based bridging firewall. It enables transparent filtering of network traffic passing through a Linux bridge. $ make menuconfig [*] Customize Vendor/User Settings Network Applications ---> Exit ---> Yes Usage: If router would like to block all packets of a host from intranet to internet: # ebtables -A FORWARD -s [host’ MAC address] –j DROP Or # ebtables -A FORWARD -p IPv4 --ip-src [host’ IP address] –j DROP 11.34 How to enable IPv6 Rapid Deployment (6rd) To enable IPv6 Rapid Deployment (6rd), please include ipv6 6rd feature support in the kernel: # make menuconfig [*] Customize Kernel Settings Page 129 of 158 RALINK AP SDK 4.2.0.0 User’s Manual In the kernel settings, find “The IPv6 protocol” by select the following options: [*] Networking support ---> Networking options <*> ---> The IPv6 protocol <*> [*] ---> IPv6: IPv6-in-IPv4 tunnel (SIT driver) IPv6: IPv6 Rapid Deployment (6RD) (EXPERIMENTAL) Please check both “IPv6: IPv6-in-IPv4 tunnel (SIT driver)” and “IPv6: IPv6 Rapid Deployment (6RD) (EXPERIMENTAL)”. To enable Ipv6 6rd, the firmware should also support iproute2 utility: [*] Customize Vendor/User Settings Network Applications ---> [*] iproute2 [*] ip After compile and download the firmware, please use iproute2’s ip command to configure the IPv6 6rd function: Page 130 of 158 RALINK AP SDK 4.2.0.0 User’s Manual ip tunnel add <6rd if name> mode sit local <WAN ipv4 address> ttl <ttl> ip tunnel 6rd dev <6rd if name> 6rd-prefix <ISP’s 6rd prefix> ip addr add <6rd ipv6 address> dev <6rd if name> ip link set <6rd if name> up ip route add ::/0 via ::<ISP’s 6rd border router ipv4 address> dev <6rd if name> Note: the <6rd ipv6 address> should be generated from <ISP’s 6rd prefix> and <WAN IPv4 address>, for example, if ISP’s prefix is 2001:aaaa/32, and WAN ipv4 address is 100.1.1.1, then the 6rd address could be 2001:aaaa:6401:101::1/32 to add LAN ipv6 address, you can use the following command: ip addr add <LAN ipv6 addr> dev <LAN if name> Note: the LAN ipv6 address should be same as 6rd’s ipv6 address, except address mask, for example, in above case, the LAN ipv6 address will be 2001:aaaa:6401:101::1/64 to enable ipv6 forwarding, please use this command: echo "1" > /proc/sys/net/ipv6/conf/all/forwarding The following figure shows an example that configures IPv6 6rd: Page 131 of 158 RALINK AP SDK 4.2.0.0 User’s Manual This example has a WAN IPv4 address=111.80.78.220 and 6rd-prefix=2001:e41::/32, and ISP’s border server ipv4 address is 61.211.224.125 User also configures IPv6 RD settings via Web GUI: Page 132 of 158 RALINK AP SDK 4.2.0.0 User’s Manual 11.35 How to enable IPv6 DS-Lite To enable IPv6 DS-Lite, please include ipv6 6rd feature support in the kernel: # make menuconfig [*] Customize Kernel Settings In the kernel settings, find “The IPv6 protocol” by select the following options: [*] Networking support ---> Networking options <*> ---> The IPv6 protocol <*> ---> IPv6: IP-in-IPv6 tunnel (RFC2473) Please check “IPv6: IPv6: IP-in-IPv6 tunnel (RFC2473)”. To enable Ipv6 DS-Lite, the firmware should also support iproute2 utility: [*] Customize Vendor/User Settings Network Applications ---> [*] iproute2 [*] ip After compiling and downloading the firmware, please use iproute2’s ip command to configure the IPv6 DS-Lite function: Page 133 of 158 RALINK AP SDK 4.2.0.0 User’s Manual Configuration on B4 Element #IPv6 Address ip -6 addr add 2001:db8::254/32 dev eth2.2 #IPv6 Routing echo 1 > /proc/sys/net/ipv6/conf/all/forwarding #Create DS-Lite Interface ip -6 tunnel add dsltun mode ipip6 remote 2001:db8::1 local 2001:db8::254 dev eth2.2 ip link set dev dsltun up # adds the IPv4 default route to the server to forward all IPv4 packets to the ds-lite interface dsltun ip route add default dev dsltun #IPv6 Default Route ip -6 route add default dev eth2.2 #Static IPv6 Route ip -6 route add 2001:db8::1/128 via 2003:db8::1 Configuration on AFTR (http://www.isc.org/software/aftr) Page 134 of 158 RALINK AP SDK 4.2.0.0 User’s Manual #IPv6 Address & Routing ip -6 addr add 2003:db8::1/32 dev eth4 echo 1 > /proc/sys/net/ipv6/conf/all/forwarding echo 1 > /proc/sys/net/ipv4/ip_forward #Tunnel Interface Configuration (aftr.conf) ip addr add 192.0.0.1 peer 192.0.0.2 dev tun0 ip route add 192.0.2.128/25 dev tun0 ip -6 addr add fe80::1 dev tun0 ip -6 route add 2001:db8::1 dev tun0 #Routing to B4 Element ip -6 route add 2001:db8::254/128 dev eth4 #NAT iptables -t nat -A POSTROUTING -o eth0 -j SNAT --to-source 192.168.43.79 iptables -t nat -A PREROUTING -i eth0 -j DNAT --to-dest 192.0.2.1 aftr.conf default tunnel mss on defmtu 1450 address endpoint 2001:db8::1 address icmp 198.18.200.10 pool 192.0.2.128 acl6 ::0/0 aftr-script Page 135 of 158 RALINK AP SDK 4.2.0.0 User’s Manual aftr_start() { set –x ip link set tun0 up ip addr add 192.0.0.1 peer 192.0.0.2 dev tun0 ip route add 192.0.2.128/25 dev tun0 ip -6 addr add fe80::1 dev tun0 ip -6 route add 2001:db8::1 dev tun0 } aftr_stop() { set -x ip link set tun0 down } Another, user could use Web GUI to set DS-Lite: Page 136 of 158 RALINK AP SDK 4.2.0.0 User’s Manual 11.36 How to modify flash layout Basically, you can make uboot and RF parameters use same flash sector t and it can save up to 3 flash sector compared to original design. Default Flash layout: Offset 0 (192K) bootloader Offset 0x30000 (64K) 0 (4KB) Uboot parameter 0x1000 User config Switch parameter (4KB) Reserved (16KB) WLAN0 Configuration (Build-in 2860) 0x40000 (64K) RF parameter(512B) 0x2000 0x50000 Linux image (2M) Other applications (DMA, storage) (sdram ?M), flash ?M) Cost effective ap (sdram 8M, flash 2M) General gateway (including voip) (sdram 16M, flash 4M) Fully gateway (including vpn, ipsec, voip) (sdram 32M, flash 4M)) (1.6875M) (8KB) (8KB) WLAN1 (for concurrent AP) 0x6000 0x8000 STA Cert 0xa000 0x200000 (20KB) WAPI Cert (4KB) Reserve 0xf000 0x10000 0x400000 Page 137 of 158 RALINK AP SDK 4.2.0.0 User’s Manual New flash layout: 1.modify rt2860v2/ os/linux/rt_linux.c to set flash partition name. ra_mtd_read_nm("Bootloader", a&0xFFFF, (size_t) b, p); 2. Modify rt2860v2/include/iface/rtmp_rbs.h to set the offset of RF parameter. #define RF_OFFSET 0x1FC00 //last 1Kbyte in flash sector 1 3. Modify raeth/raether.c i = ra_mtd_read_nm("Bootloader", GMAC0_OFFSET, 6, addr.sa_data); i = ra_mtd_read_nm("Bootloader", GMAC2_OFFSET, 6, addr.sa_data); 4. Modify raeth/raether.h #define GMAC2_OFFSET 0x1FC22 #if ! defined (CONFIG_RALINK_RT6855A) #define GMAC0_OFFSET 0x1FC28 #else #define GMAC0_OFFSET 0x1FC00 Page 138 of 158 RALINK AP SDK 4.2.0.0 User’s Manual #endif #define GMAC1_OFFSET 0x1FC2E 5. Modify lib/libnvram/flash_api.c int flash_read_mac(char *buf) { int fd, ret; if (!buf) return -1; fd = mtd_open("Bootloader", O_RDONLY); if (fd < 0) { fprintf(stderr, "Could not open mtd device\n"); return -1; } #if ! defined (NO_WIFI_SOC) lseek(fd, 0x1FC2E, SEEK_SET); #else lseek(fd, 0x1FC06, SEEK_SET); #endif ret = read(fd, buf, 6); close(fd); return ret; } 6. Modify drivers/mtd/maps/ralink-flash.h #define MTD_BOOT_PART_SIZE 0x20000 #define MTD_CONFIG_PART_SIZE 0x10000 #define MTD_FACTORY_PART_SIZE 0x00000 7. Modify drivers/mtd/ralink/ralink_spi.c , drivers/mtd/maps/ralink-flash.c, drivers/mtd/ralink/ralink_nand.c, or drivers/mtdralink/ralink_nand_rt3052.c which depended on your flash type. #if 0 }, { name: "Factory", size: MTD_FACTORY_PART_SIZE, offset: MTDPART_OFS_APPEND #endif 8. Modify Uboot/ include/configs/rt2880.h Page 139 of 158 RALINK AP SDK 4.2.0.0 User’s Manual #define CFG_BOOTLOADER_SIZE 0x20000 #define CFG_FACTORY_SIZE 0x000 11.37 How to reduce Linux FW size. 1. Modify vendors/config/mips/config.arch CFLAGS := $(if $(LOPT),$(LOPT),-Os) -fomit-frame-pointer CFLAGS := $(if $(UOPT),$(UOPT),-Os) -fomit-frame-pointer 2.Modify Kernel configuration to save Linux FW size. General setup ---> [*] Optimize for size (Look out for broken compilers!) --- Configure standard kernel features (for small systems) [] ---> Enable printk function in the kernel 3. Use miniupnpd instead of linux-igd & wscd. [ ] Customize Vendor/User Settings (NEW) Network Applications ---> [*] miniupnpd [ ] linux-igd [ ] wscd (WSC/WPS) 4.Modify user/rt2880_app/switch/switch.c or gsw_switch.c Change all keyword from CONFIG_RT2860V2_AP_MEMORY_OPTIMIZATION to CONFIG_CC_OPTIMIZE_FOR_SIZE 5.Modify user/rt2880_app/nvram/ralink_init.c Change all keyword from CONFIG_RT2860V2_AP_MEMORY_OPTIMIZATION to CONFIG_CC_OPTIMIZE_FOR_SIZE 6. Modify user/wireless_tools/Makefile BUILD_STATIC = y BUILD_WE_ESSENTIAL = y Page 140 of 158 RALINK AP SDK 4.2.0.0 User’s Manual 11.38 How to change internal GSW PHY Base Address. 1. Please change internal PHY base address to > 5 RT6855/6: set 0xbfb5f014 = 0x10000c RT7620: set 0xb0117014= 0x10000c GPC: GIGA Port Control (offset: 0x7014) 2. Reset PHY RT6855/6: set 0xbfb00834[24]=1 then set 0xbfb00834[24]=0 RT7620: set 0xb0000034[24]=1 then set 0xb0000034[24]=0 RSTCTRL2 (offset:0x834) Write 1 to this bit will reset Ethernet PHY block 24 RW 0x0 EPHY_RST Write 0 to de-assert reset. 11.39 How to support new USB 3G dongle Step1: Switch USB 3G dongle mode In the general case, the 3G dongle will be recognized as a USB mass storage device when you plug it into USB port. You need to switch it to modem mode and then you can start 3G dial up. SDK uses open source application “usb_modeswitch” to accomplish this work. “usb_modeswitch” needs a configuration file for each 3G dongle. So, what you need to do is add a configuration file into SDK for the new 3G dongle. “usb_modeswitch” keeps updating its configuration file datebase Page 141 of 158 RALINK AP SDK 4.2.0.0 User’s Manual to support more new 3G dongle. You can download the latest “usb_modeswitch” vesrion and find corresponded configuration file. Example: Support Huawei E169u 3G dongle 1. Download usb_modeswith database “usb-modeswitch-data” 2. Get the vendor ID and product ID of the new 3G dongle # cat /proc/bus/usb/devices 11.40 How to enable USB 3G dongle function The RT288x_SDK supports USB 3G dongle to work as WAN interface. This requires Kernel drivers to support USB stack and dongle device, and also user-space application to establish 3G PPP connection. Configuration: Step1: User-space applications configuration #cd RT288x_SDK/source #make menuconfig Kernel/Library/Defaults Selection ---> [*]Customize Vendor/User Settings Network Applications ---> [*] 3G connection #cd RT288x_SDK/source #make menuconfig Kernel/Library/Defaults Selection ---> [*] Customize Busybox Settings Page 142 of 158 RALINK AP SDK 4.2.0.0 User’s Manual Linux System Utilities ---> [*] mdev [*] Support /etc/mdev.conf [*] Support subdirs/symlinks [*] Support regular expressions substitutions when renaming device [*] Support command execution at device addition/removal Step2: Kernel configuration USB Host driver: #cd RT288x_SDK/source #make menuconfig Kernel/Library/Defaults Selection ---> [*] Customize Kernel Settings Device Drivers [*] USB support ---> ---> <*> Support for Host-side USB [*] USB device filesystem <*> EHCI HCD (USB 2.0) support [*] Ralink EHCI HCD support <*> OHCI HCD support [*] Ralink OHCI HCD support USB 3G dongle driver: Page 143 of 158 RALINK AP SDK 4.2.0.0 User’s Manual #cd RT288x_SDK/source #make menuconfig Kernel/Library/Defaults Selection ---> [*] Customize Kernel Settings Device Drivers ---> [*] USB support ---> [*] USB Serial Converter support ---> [*] USB driver for GSM and CDMA modems PPP driver: #cd RT288x_SDK/source #make menuconfig Kernel/Library/Defaults Selection ---> [*] Customize Kernel Settings Device Drivers ---> [*] Network device support [*] ---> PPP (point-to-point protocol) support [*] PPP support for async serial ports Device hot plugging : #cd RT288x_SDK/source #make menuconfig Kernel/Library/Defaults Selection ---> [*] Customize Kernel Settings General setup ---> [*] Configure standard kernel features (for small systems) Page 144 of 158 ---> RALINK AP SDK 4.2.0.0 User’s Manual [*] Support for hot-pluggable devices Sysfs filesystem : #cd RT288x_SDK/source #make menuconfig Kernel/Library/Defaults Selection ---> [*] Customize Kernel Settings File systems ---> Pseudo filesystems ---> [*] sysfs file system support Start 3G dial up You can start 3G dial up through Web GUI or comman line. Some parameters such like APN, Dial number are needed for connection establishment. These parameters should be provided by the ISP. Web GUI: Note: 3G Web GUI page doesn’t exist in 2M/16M Default Configuration File. Page 145 of 158 RALINK AP SDK 4.2.0.0 User’s Manual Command line: Usage: 3g.sh [3G_dongle_model] Example: #/ 3g.sh HUAWEI-E169 3G dongle model supported by current SDK are “HUAWEI-E169”, "BandLuxe-C270", "MobilePeak-Titan", and "DATANG-M5731". 11.41 How to enable Port Trigger function To support the Port Trigger function, the menuconfig options in SDK must be enabled. Networking Support Networking Options Network packet filtering framework (Netfilter) IP:Netfilter configuration <*> TRIGGER target support 11.42 Port Trigger information 11.42.1 Port Trigger Concept Port trigger concept is shown in the subsequent figure. Port triggering is a way to trigger port forwarding in which outbound traffic on predefined ports ('called trigger port') causes inbound traffic to specific incoming ports to be dynamically forwarded to the initiating host in a limited period of time. Page 146 of 158 RALINK AP SDK 4.2.0.0 User’s Manual 11.42.2 Port Trigger Usage WEB UI : Page 147 of 158 RALINK AP SDK 4.2.0.0 User’s Manual 11.43 How to enable ALSA support? 11.43.1 ALSA Concept ALSA (Advanced Linux Sound Architecture) provides audio and MIDI functionality to the Linux operating system. It also supports SMP and thread-thread design. User could program or control it via user space library. 11.43.2 How to enable ALSA in Kernel 1. Uncompress SDK, under source directory, Enter “make menuconfig” Page 148 of 158 RALINK AP SDK 4.2.0.0 User’s Manual 2. Choose Kernel/Library/Default Selection, and Select “Customize Kernel Setting” 3. Save and Exit. Then it will auto-enter in Kernel menuconfig. 4. Please enable I2S support firstly. It could be selected in Device drivers. 5. Enter Device Drivers and select” Sound card support” Page 149 of 158 RALINK AP SDK 4.2.0.0 User’s Manual 6. Enter Sound card support, enable “Advanced Linux Sound Architecture” 7. MediaTek Sound System will be selected by default to be one of SoC Audio Support in ALSA. 8. Now ALSA have been supported in Linux Kernel. Note: It supported Kernel 2.6.36 version and MT7620/7621 SoC only. 11.43.3 How to enable ALSA Libs/Utility Page 150 of 158 RALINK AP SDK 4.2.0.0 User’s Manual 1. Under source directory, type “make menuconfig” and Enter “Kernel/Library/Defaults Selection” to choose “customize Vendor/User Settings” 11.43.4 Pause/Resume/Stop function demo ALSA Utils implemented pause/resume and stop function. You could use aplay under /sbin to demo these functions. Pause/resume: Press space during playing sounds via aplay. Stop: Press “s” before sound playing stop. Page 151 of 158 RALINK AP SDK 4.2.0.0 User’s Manual 2. Enter “Miscellaneous Applications” and select “ALSA Util” 3. Save and exit. After compiling SDK, it will own the ALSA capability over MTK platform. 11.43.5 How to demo ALSA ? We ported ALSA utility , named “aplay” and “arecord” under /sbin, which based on ALSA Lib to be communicated with ALSA in kernel. After booting up system, Enter the following command to playback or capture sound: 1. playback “aplay <playback file location> 2. -v -f cd -c 2” capture “arecord -v -f cd -c 2 -d 10 <capture file names>” Page 152 of 158 RALINK AP SDK 4.2.0.0 User’s Manual ALSA Util is a standard application. Other usage could be find out in help menu. It will be shown if enter “aplay” or “arecord” only. 11.44 How to enable I2S+Codec support 11.44.1 I2S concept I2S is an Audio interface. It can provide “PLAYBACK” and “RECORD” function with proper codec. This SDK support I2S+WM8960 codec. I2S is in slave mode while WM8960 codec is in master mode. This SDK also provide internal REFCLK to codec as its MCLK. 11.44.2 How to enable I2S+WM8960 codec 1. Enter menuconfig. Choose “Kernel/Library/Defaults Selection” and select “Customize Kernel Settings” 2. Enter “Device Drivers” Page 153 of 158 RALINK AP SDK 4.2.0.0 User’s Manual 3. Enter “Character devices” 4. Choose “Ralink I2S Support” Page 154 of 158 RALINK AP SDK 4.2.0.0 User’s Manual 5. After choosing “Ralink I2S Support”, you can see “Audio Selection”. The default setting is “Select WM8960”. And you can also see “Use Internal REFCLK AS MCLK Source” is chosen as default config 6. If you want to use external Xtal to provide MCLK to codec, you can un-choose “Use Internal REFCLK AS MCLK Source” as the following figure. And you can see “Selection For MCLK (Select 12MHz External Xtal)” Page 155 of 158 RALINK AP SDK 4.2.0.0 User’s Manual 7. If you want to use 12.288MHz External Xtal, you can enter “Selection For MCLK (Select 12MHz External Xtal)” as the following figure 11.44.3 How to enable I2S command in user space application 1. Enter menuconfig. Choose “Kernel/Library/Defaults Selection” and select “Customize Vendor/User Settings” Page 156 of 158 RALINK AP SDK 4.2.0.0 User’s Manual 2. Enter “Proprietary Application” 3. Choose I2S command Page 157 of 158 RALINK AP SDK 4.2.0.0 User’s Manual 11.44.4 I2S user command for “PLAYBACK” and “RECORD” 1. Command of “PLAYBACK” function Example: i2scmd 0 48000 100 </etc_ro/test_sound.snd 2. Command of “RECORD” function Example: i2scmd 1 48000 100 5000000 Page 158 of 158