1
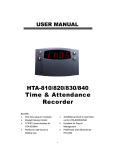
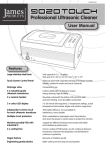
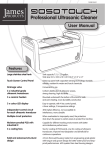
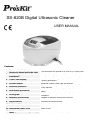
SS-820B Digital Ultrasonic Cleaner
USER MANUAL
Features:
1.
2.
More evenly distributed
ultrasonic waves inside the tank:
Industrial grade ultrasonic
transducer:
The dimensions are optimal for a 2000 ml (2.1 quart) tank.
Stronger cleaning, higher durability
3.
2-color LED display:
1 to 30-minute full range timer, suitable for many different
cleaning applications
4.
Ceramic heater:
Advanced ceramic heater, safe and efficient
5.
Overheat protector:
6.
Dual heater protection:
7.
Cooling fan:
8.
Moisture-proofed PCB:
Capable for different working environments
9.
Degas feature:
Dissolves the solution quickly
Prevents overheating and effectively prolongs the life span
of the machine
Heater automatically shuts off after 45 minutes to ensure
safety
Improves heat dissipation and beneficial for continuous
operations
10. Industrial IC:
Better anti-interference performance
11. Detachable power cord:
Easier to use
12. Housing made from engineering
resin:
Better water-proof and drop-proof properties
INTRODUCTION
Use tap water. Chemical solutions are unnecessary in most cases.
Principles of ultrasonic cleaning:
Millions of tiny air bubbles are generated inside the liquid by high frequency vibration.
The air bubbles bust inside the liquid and shake off the debris to achieve the cleaning effect.
Purified water or distilled water has the same cleaning effect as regular tap water
for ultrasonic cleaning. Therefore using tap water is sufficient.
When cleaning silver or copper items where oxidation has darkened the items,
special solutions need to be added to the water to remove the oxidation.
Main Features
Tank size: 18.3 x 15.3 x 7.7 cm / 7.2” x 6.0” x 3.0”. Longest item than can fit is
20.4 cm / 8.0”. Tank volume 2000 ml (2.1 quart).
Uniformly distributed ultrasonic waves (70 W). Ceramic heater (80 W).
2-color LED display. 1 to 30-minute full range timer. Degas feature.
Industrial grade IC. Multiple circuit protections. Moisture-proofed PCB. Cooling fan.
Improved product durability.
Read the Manual First
The manual should be carefully reviewed before starting to use the device.
Warnings should be observed carefully. Please follow the manual for operations.
TABLE OF CONTENTS
Safety Precautions----------------------------------------------------------------1,2
Items Not Suitable for Ultrasonic Cleaning -------------------------------------2
Applications -----------------------------------------------------------------------3,4
Sample Applications ---------------------------------------------------------------5
Product Structure and Accessories ----------------------------------------------6
Control Panel and Operations --------------------------------------------------6,7
Common Cleaning Methods -----------------------------------------------------8,9
Operation Guidelines ----------------------------------------------------------10,11
Care and Maintenance ------------------------------------------------------------11
Specifications -----------------------------------------------------------------------12
SAFETY PRECAUTIONS
Keep it away from children!
This device is not intended for use by individuals with restricted physical,
sensory or metal capacities or those with a lack of experience and / or
knowledge, including children, unless they are supervised by an individual who
is responsible for their safety or have received training in operating the device.
Please store the ultrasonic cleaner where it is not reachable by children.
Danger to children! Danger for death through suffocation! Keep the packaging material
away from children.
To prevent life-threatening electrical shock, please
observe the following:
Danger of electrical shock! Do not use while bathing. Never immerse the
device or the power cord in water or other liquid.
Danger of electrical shock! Never touch the power plug with wet hands, especially
when inserting or removing the plug.
Danger of electrical shock! If the unit has fallen into water during operation, do not
touch the unit. Remove the power plug from the socket first.
Danger of electrical shock! Do not spray water or liquid over the device.
Never operate the device unattended.
Follow the manual to operate the device.
Do not use components unapproved by the manufacturer.
When removing the power cord from the socket, grab the power plug not the cord.
To protect the power cord from damage, do not cause it to get caught by things such as
a cupboard door or a chair leg; do not drag across a hot surface.
If there is damage to the power plug, cord, housing or other parts of the device, do not
use the device.
Do not disassemble the device, except by professionals.
If the unit is damaged, non-operational or has fallen into water, take it to a qualified
service provider.
Remove the power plug from the socket
-if malfunction occurs
-before cleaning the device
-if the device is not going to be used for prolonged period
-after each use (recommended)
The installation of an earth leakage circuit breaker with a rated tripping current of no
more than 30 mA provides further protection against an electrical shock. The installation
should only be carried out by a trained electrician.
The device may come with a polarized plug (one blade is wider than the other) for certain
countries. As a safety feature, this plug will fit into a polarized outlet only one way.
If the plug does not fit fully in an outlet, reverse the plug. If it still does not fit, contact a
qualified electrician.
1
SAFETY PRECAUTIONS
To prevent fire hazards, please observe the following:
Never block the vents on the device. Keep the vents free from lint, hair and other
materials.
Do not place the device on a soft surface, such as a bed or a couch, where the vents
could be blocked.
Observe the other warnings in the previous section.
Other observations:
Do not operate the product without filling the tank with water. Running dry will damage
the unit.
Do not plug in the power cord before adding water to the tank. Do not fill the tank above
the Max line to avoid overspill.
Do not use solution containing abrasive substances or strong corrosive chemical solution
not recommended by the manufacturer or the supplier.
Place the device on a dry and flat surface for operation.
When the device is subjected to severe electromagnetic interference, it may malfunction,
stop operating or lose control functions. If this happens, unplug the power cord then
reinsert it to restart the device.
Items Not Suitable For Ultrasonic Cleaning
2
Soft Jewelry:
Pearls, emerald, ivory, coral, agate,
sea turtle shells, etc
These items are not hard, so scratches may occur
during cleaning.
Welded, Plated and Glued Items:
Welded or plated metal items, glued
items
Ultrasonic cleaning may increase the gaps inside
the welded joints, plated coating or glued items
and may cause separation.
Watches:
Except diver's watches with depth
rating over 50 m (150 ft) .
Because the strong penetration capability of the
ultrasonic waves, water may get into the watches
if they are not truly waterproof. Use the watch
stand we supply as a precaution.
Others:
Glass, ceramic, camera filters with
preexisting cracks.
Ultrasonic cleaning may increase the cracks
pre-existed in the coating on the glasses, ceramic,
and glass. If the items have no pre-existing cracks,
then it is okay.
APPLICATIONS
Jewelry Stores, Jewelry Makers:
Jewelry stores can use ultrasonic cleaners to expand services.
Jewelry such as necklaces, diamond rings, rings, earrings can
be cleaned with tap water to recover the shine.
Jewelry makers can use ultrasonic cleaners to remove debris or
abrasive powder from work-in-process items
addition to debris. Turning on the heater will raise the water
Jewelry made with investment casting often has wax layer in
temperature, melt the wax and improve the cleaning.
Optical Stores and Labs:
Optical stores can use ultrasonic cleaners to provide valuable
services. Use ultrasonic cleaner and tap water to remove the
debris between the rim and the lenses so the eyewear gets
professional cleaning and care.
Biology / Chemical Laboratories:
Labs can use ultrasonic cleaners to clean test tubes, glass or
metal containers to remove residual chemicals and materials
that can affect the accuracy of the lab tests.
Dental Clinics:
Dental clinics can use ultrasonic cleaners to clean dental
instruments, to remove blood and small particles left on the
instruments before disinfection.
Homes:
Children and baby items: Debris left in small holes and
crevices are difficult to clean by regular means. Bacteria and
mold can develop at these locations. Ultrasonic cleaners can
remove the debris and be combined with disinfection to
achieve true cleaning.
Silverware and silver, copper, or brass decorations: Debris in the grooves and patterns are difficult to
remove by regular cleaning methods. Greasy stains can be removed by ultrasonic cleaners with a
small amount (around 20 ml or 1 tablespoon) of dish washing liquid. For silver, copper or brass items
with oxidation that has darkened the items, add a small amount of the special solution that can
remove oxidation. Shininess will reappear after cleaning with ultrasonic cleaners.
Eyewear, watch bands, shavers, razors and other household items: Ultrasonic cleaners can be used to
clean the debris between the rim and the lenses on eyewear, between razor blades, and on the metal
mesh of shavers to keep the blades sharp.
3
Shooting Clubs
To reuse brass cartridges: Adding special acid-based solution
can make fired brass useable and like new again.
Gun cleaning and care: Cleaning guns after shooting is time
consuming. Adding special solution in the water and using
ultrasonic cleaners can complete the cleaning better, quicker
and easier than traditional methods.
Mobile Phone and Electronics Service Shops
PCB renewal: Non-operational electronics, after falling into
water, or non-operational key pads can be cleaned with
ultrasonic cleaners and pure alcohol to recover the functions.
Watch Service Shops
Precision parts cleaning: Put small parts in a beaker made of
stainless steel or glass filled with lubricant oil, then place the
beaker inside the cleaning tank and add water. Ultrasonic
waves will penetrate the beaker and act on the parts to make
them clean
Printing Shops
Unblocking dried printer heads or ink cartridges:
Large printers and inkjet printers often have dried printer
heads or ink cartridges ports. Replacing them with new ones
is very costly. Adding acetone or special cleaning solution and
using an ultrasonic cleaner with a couple of minutes of
cleaning will remove the blockage and make them usable again.
Avoid acetone from contacting the plastic housing to prevent
corrosion. Use Indirect Cleaning explained later and a glass or
metal container for acetone.
Automotive Shops
To clean precision parts: Add 50 ml (3 tablespoons) of
dishwashing liquid in the water, turn the heater on to clean
precision parts such as valves, injectors, gears and bearings.
Ultrasonic cleaners clean debris in tiny holes and crevices
effectively, saving time and effort compared to traditional
soaking and brushing methods.
4
SAMPLE APPLICATIONS
Jewelry
Necklaces, rings, earrings,
bracelets, etc.
Precision Parts
Bearings, gears, valves,
fuel injectors, etc.
Lab Items
Test tubes, beakers,
flasks, etc.
Personal Items
Eyeglasses, sunglasses, shaver
heads, watch bands, diver’s
watches, dentures, etc.
Dental Instruments
Pliers, handpieces, etc.
Silverware, Silver,
Copper or Brass Decorations
Children and Baby Items
Silverware, silver, copper
or brass decorations, etc.
Toys, baby items, etc.
Brass, Gun Parts
Reusable brass, gun parts, etc.
PCB, Inkjet Cartridges
PCBs from mobile phones
and MP4, ink cartridges,
etc.
5
PRODUCT STRUCTURE AND ACCESSORIES
A
B
D
E
F
G
A. Lid
B. Stainless Steel Tank
H
C. Water Pouring Recess
D. Control Panel
E. Housing
F. Basket
G. Power Socket
H. Power Cord
CONTROL PANEL AND OPERATIONS
6
C
1. Indicator Light - Working Status
Green - Normal working status, ready to use.
Red - Under overheat protection. 15 minutes of waiting time is needed for the light to
change from red to green. Work can resume afterwards.
2. On/Off Key - On/Off Switch for the Unit
After powering on, the LED displays
with normal working status.
which is the default time and the unit is ready
Press On/Off button once and the cleaning starts. The cleaning stops when the timer count
. If the unit needs to be stopped before the timer runs up, press On/Off
down to
button.
3. Function Button - Functions (Degas/Normal)
illuminates, indicating Degas function is selected. Press On/Off
Press Function button,
will flash for about 90 seconds, then the unit will return to normal
button to start degas.
cleaning function. Pressing Function button before it ends will stop degassing. If additional
degassing is needed after it ends, press Function button again.
Degas
When cleaning heavily soiled or greasy items, silver, copper or brass items, chemical solutions
need to be added into the water. The solution may form many small droplets and take a long
time to dissolve in the water. Newly added water may generate many air bubbles on the tank
walls. These will reduce the cleaning effect in the beginning phase of ultrasonic cleaning.
Turning on the degas function will dissipate the droplets and the air bubbles, usually in 90
seconds, and improve cleaning efficiency.
4.
5.
— Degas Status
— Illuminated, the degas function is selected.
— Flashing, degassing is underway.
— Normal Cleaning Status
— Illuminated, normal cleaning is underway.
6.
— Heater Status
Press TC button, flashes, indicating the heater is turned on. Press TC button again,
dims, indicating the heater is turned off.
7.
Digital LED display of working time. It counts down after work being started.
8. SET Button — Timer quick set button. Press SET button, LED display shows
.
Pressing it again to set it to
. Each pressing makes it to increase by 5 minutes.
9.
Button — Timer decreasing button. Each pressing reduces the timer by 1 minute.
10. TC Button — Heater button. Pressing TC button,
flashes,indicating the heater is
turned on. To cancel heating, press TC,
dims, indicating the heater is turned off.
When the water temperature reaches 60ºC (140ºF), the heater will turn off automatically.
7
COMMON CLEANING METHODS
1
REGULAR CLEANING
Only tap water is needed.
Suitable Locations: jewelry stores, optical
stores, chemical labs, dental clinics, homes.
Cleaning Method:
1. Add water to the cleaning tank to the level
between “MIN” and “MAX” lines and above the
area to be cleaned.
2. Put the items to be cleaned inside the basket
or directly in the cleaning tank.
3. Press SET button to set the timer 5 to 10
minutes. Press On/Off button to start cleaning.
Notes on using the basket:
1. The basket reduces the friction between the items
and the tank but it absorbs about 30% of ultrasonic
energy and reduces the cleaning effect.
2. When the items are relatively large and with
greasy debris, they can be put in the tank directly.
During cleaning, debris will come off the items like “smoke”. Water will become murky.
Cleaning is done when smoke is no longer visible. Replace the water to wash other items.
2
INDIRECT CLEANING
Put the items in a separate container. Use ultrasonic
waves to penetrate the container to do the cleaning.
Suitable Locations: watch service shops,
printing shops, mobile phone and electronics
service shops, homes.
Different industries use different fluids to be
used inside the containers:
1. Watch service shops - Watch oil (to prevent rust)
2. Printing shops – Acetone are often used
(to dissolve ink)
3. Mobile phone and electronic service shops - Pure
alcohol (to evaporate quickly)
4. Homes - Rubbing alcohol (to remove odor, to
clean and to disinfect at the same time)
Avoid acetone from contacting the plastic housing
to prevent corrosion. Use Indirect Cleaning and a
glass or metal container for acetone.
Cleaning Method:
1. Put the item inside a container. Add proper fluid to submerge the area to be cleaned.
2. Place the container inside the basket, then put them in the tank. Add water to a level between
MIN and MAX, not over the container.
3. Press SET button to set the timer to 10 minutes. Press On/Off button to start cleaning.
Ultrasonic waves will penetrate the container and clean the item.
Selection of container:
1. Plastic containers – Plastics are soft and will absorb about 30% of ultrasound energy and
reduce the cleaning effect.
2. Aluminum containers – Absorbs about 20% of ultrasonic energy.
3. Stainless steel containers – Absorbs about 8% of ultrasonic energy.
8
ENHANCED CLEANING
Debris accumulated over long time, greasy or
heavily soiled.
Suitable Locations: jewelry makers, homes,
automotive repair shops.
Cleaning Method:
1. Put the items in the cleaning tank directly.
Do not put the items on top of each other to
avoid rubbing during cleaning.
2. Add water to level between MIN and MAX and
above the area to be cleaned.
3. Add 20 ml (1 tablespoon) of dishwashing liquid.
4. Press TC to turn on the heater,
flashes.
Press TC again to cancel the heating when the
water temperature reaches 40ºC (104ºF) after
about 20 minutes.
Warm water and dishwashing liquid can soften
grease and improve cleaning efficiency.
5. Press SET button to set the timer to 10 minutes.
Press On/Off button to start cleaning. Grease
will dissipate and appear to be like black smoke
in the water.
6. Change water and wash the items for another 3 minutes to remove the residual debris and
the detergent.
3
4
SPECIAL CLEANING
Silver, copper or brass items with oxidation will
need special cleaning.
Suitable Locations: jewelry stores, home,
shooting clubs.
Cleaning Method:
1. Put the items in the basket and then in the tank,
add water to a level between MIN and MAX and
above the area to be cleaned.
2. Add special solution that can remove silver or
copper oxidation according to the ratio
recommended (typically 1:10). Use special
solutions according to the instructions for bass
cartridges.
3.
Press TC to turn on the heater,
flashes. Press
TC to cancel heating when the water temperature will reach 50ºC (122ºF) after 30 minutes.
(
dims after the set temperature is reached.)
When the water temperature reaches 60ºC (140ºF),
the heater will turn off automatically. To ensure
safety, the heater will also be turned off automatically
after being turned on for 45 minutes.
4. Press SET button to set the timer to 15 minutes.
5. Press Function button to select Degas function.
button illuminates. Press On/Off to start
degassing. After 90 seconds, it changes over to normal cleaning.
6. When cleaning is done, remove the basket and the items. If there are large quantities of
items and some debris remains, add 5 minutes and repeat the cleaning.
7. Change water and wash the items for 3 minutes to remove the residual chemicals.
During cleaning, debris will come off the items like “smoke”. Water will become murky.
This method will remove silver or copper oxidation and debris in the decorating patterns
and crevices and make the items like new again.
9
OPERATION GUIDELINES
1
Remove the lid, put the items in the basket then put
them in the cleaning tank. Add water to a level between
MIN and MAX and above the area to be cleaned.
If the unit is turned on without water, ultrasonic
energy will not be absorbed. Once over 30 seconds,
it may damage the unit or severely reduce the life
of the unit.
2
Connect the power cord to an outlet.
LED display shows
.
This is the most common
timer setting and working state.
If the timer needs to be adjusted, press SET button and
button. The timer can be set between 1 to 30 minutes.
Common cleaning times are 5, 10 or 15 minutes.
Prolonged cleaning time may result in:
a. Loosening of the screws if used.
b. Increasing the pre-existing cracks.
c. Peeling of coating which was already separated.
3
Press On/Off button to start cleaning.
During cleaning, buzzing sound can be heard from the
cleaning tank, indicating the cleaning is underway.
Closing the lid will reduce the noise level.
LED display will count down to show the remaining
cleaning time. When it displays 00:00, the cleaning is done.
To stop cleaning at any time, press On/Off button.
The unit is designed with overheating protection to avoid
extended and continuous operation for too long.
When the red light is on, the unit will not turn on even it
is forced to. The unit will idle for about 20 minutes and
can be restarted after the green light comes on.
4
Select one of the four cleaning methods recommended earlier.
a. When the heater is needed, press TC button, flashes,
indicating the heater is turned on.
When water temperature reaches 60ºC (140ºF) the heater
will be turned off automatically.
To ensure safety, the unit is designed with dual protections.
The heater will be turned off automatically if it has been
running for 45 minutes.
b. To speed up the mixing when solution is used, degas
function can be used. Press SET button to set the timer.
Press Function button, illuminates. Press On/Off to
start degassing. It changes over to normal cleaning after
90 seconds.
C. When debris “smoke” is no longer visible, cleaning is done.
If additional cleaning is needed, press SET button to reset
the timer and repeat the steps above.
10
5
When cleaning is completed, unplug the power cord,
remove the lid and retrieve the items. Pour the water
out through the pouring recess. Clean and wipe the
tank.
CARE AND MAINTENANCE
1
Do not turn on the unit without water in the tank.
Even though the unit is designed with multiple protections, if it is
turned on for over 30 seconds without water in the tank, it may
damage the unit or severely reduce the life of the unit.
Do not run the unit for extended time or continuously.
The unit is designed with overheat protection. If the unit has been
running for 45 minutes, it is recommended to stop the unit for
about 20 minutes to prolong the life of the unit.
Do not keep water in the cleaning tank for a long time.
After cleaning is completed, unplug the power cord then pour the
water out through the pouring recess. Avoid getting the water
inside the housing through the vents and causing damage.
Do not spray water over the housing.
Use a towel to wipe the tank and the housing.
Do not expose the unit under direct sun shine for a long.
Keep the unit in a dry, cool and ventilated area.
11
SPECIFICATIONS
Description
Model No.
Digital Ultrasonic Cleaner
SS-820B
Plug Type
Power Supply
Tank Size
Tank Capacity
18.3 x 15.3 x 7.7 cm / 7.2” x 6.0” x 3.0”
2000 ml /2.1 quart (US)
Tank Max. water line
Max.1700 ml / 1.8 quart (US)
Tank Min. water line
Min.550 ml / 0.6 quart (US)
Longest Item Fits
inside Tank
20.4 cm / 8.0”
Digital Timer Settings
1 to 30-minute full range timer
Ultrasonic Frequency
35,000 Hz
Tank Material
Housing Material
Stainless Steel SUS304
ABS
Net Weight
2.2 kg / 4.9 lb
Gross Weight
2.9 kg / 6.4 lb
Unit Size
26.5 x 23.0 x 18.0 cm / 10.4” x 9.1” x 7.1”
Inner Carton Size
30.0 x 26.5 x 22.0 cm / 11.8” x 10.4” x 8.7”
Qty per Master Carton
Master Carton Size
12
160W (AC 220-240V 50Hz)
4 pcs.
55.0 x 31.0 x 46.0 cm / 21.7” x 12.2” x 18.1”