1
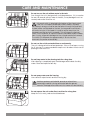
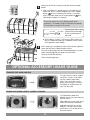
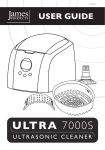
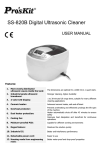
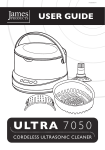
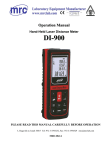
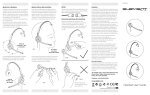
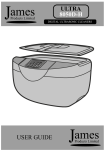
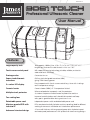
15/05/112-V1
Professional Ultrasonic Cleaner
User Manual
Features
Large capacity tank Tank capacity: 3000ml; Size: 25.0 x 17.4 x 7.8 cm / 9.8” x 6.9” x 3.1”.
Longest item that can fit inside the tank is 26.6 cm / 10.5”
Touch screen control panel
With capacitive sensing technology, durable, reliable, resistant to
water and harsh chemicals Drainage valve
Convenient to use
Super-sized ultrasonic
transducer
Ø45mm industrial grade transducer (80W),
giving 170W cleaning power
3 x colour LED display
Easy to operate with 4 touch screen control keys, timer with 6 settings
and 3 temperature settings
Ceramic heater
Ceramic heater (100W), 65°C temperature limited
Multiple circuit protectors
When overloaded or improperly used, the protectors
shut down the power to certain areas to protect the machine
Two cooling fans
Improves heat dissipation and is beneficial to protect and keep
every part in good condition during continuous use
Detachable power cord
Independent power switch and detachable power cord
Moisture-proofed PCB with
industrial IC
PCBs are placed vertically for better moisture-proofing. Ideal for different
working environments with better anti-interference performance
Advanced structural design
4.5mm wall thickness with tongue and groove joints for better impact
and water-proof performances. 60% quieter than steel housing designs
SPECIFICATIONS
Model Description
8061 TOUCH Professional Ultrasonic Cleaner
Tank Capacity
3000ml (Max. 2500ml - Min. 1500ml)
Tank Size
25.0 x 17.4 x 7.8 cm / 9.8” x 6.9” x 3.1”
Longest Item Fits inside Tank
26.6 cm / 10.5”
Power Supply
170 W (AC 220~240V 50/60Hz)
Digital Timer Settings
5 to 30-minute full range timer
Drainage
Drainage valve
Ultrasonic Frequency
35,000 Hz
Tank Material
Stainless Steel SUS304
Housing MaterialABS
Net Weight
5.1 kg / 11.3 lb
Gross Weight
6.1 kg / 13.4 lb
Unit Size
45.5 x 27.5 x 21.0 cm / 17.9” x 10.8” x 8.3”
Use tap water. Special solutions are not necessary in most cases.
Principles of ultrasonic cleaning:
Millions of tiny air bubbles are generated within liquid by high frequency vibration. The air bubbles burst when
in contact with any object and dislodge the debris to achieve the cleaning effect.
• Using tap water is sufficient. Purified water or distilled water has the same cleaning effect as
regular tap water for ultrasonic cleaning.
• When cleaning silver or copper items where oxidation has darkened the items, special solutions
such as SeaClean2, need to be added to the water to remove the oxidation.
Read the Manual First
The manual should be carefully reviewed before starting to use the device.
Warnings should be observed carefully. Please follow the manual for operations.
TABLE OF CONTENTS
Care and Maintenance ------------------------------------------------------------------------------------------------- 1
Safety Precautions ----------------------------------------------------------------------------------------------------- 2, 3
Items Not Suitable for Ultrasonic Cleaning ---------------------------------------------------------------------------- 3
Product Detail ------------------------------------------------------------------------------------------------------------ 4
Control Panel and Operations ------------------------------------------------------------------------------------------ 5
Sample Applications ----------------------------------------------------------------------------------------------------- 6
Applications ---------------------------------------------------------------------------------------------------------- 7,8,9
Common Cleaning Methods --------------------------------------------------------------------------------------- 10, 11
Operating Guidelines ----------------------------------------------------------------------------------------------- 12, 13
CARE AND MAINTENANCE
Do not turn on the unit without water in the tank.
Even though the unit is designed with multiple protections, if it is turned on
for over 30 seconds without water in the tank, it may damage the unit or
severely reduce the life of the unit.
A thermal switch is attached to the bottom of the cleaning tank.
If the unit is turned on accidentally without water in the tank,
the ultrasonic energy will not be transferred out through the liquid and
instead will be concentrated on the tank, the temperature of the tank
will continue to rise. If the heater is turned on at the same time, the
temperature of the tank will rise rapidly. This will trigger the thermal
switch, to cut off power, to stop the ultrasonic transducer and the heater
from running, to prevent damages to the unit and avoid a fire hazzard.
The switch cuts off power for approximately 6-10 minutes then
reconnects the power automatically.
Do not run the unit for extended time or continuously.
The unit is designed with overheat protection. If the unit has been running
for 45 minutes, it is recommended to stop the unit for about 20 minutes to
prolong the life of the unit.
Do not keep water in the cleaning tank for a long time.
After cleaning is completed, open the drainage valve to drain the dirty
water. Clean and wipe the tank dry.
Do not spray water over the housing.
Use a towel to wipe the tank and the housing dry.
Avoid any acetone, acid, alcohol, amonia or solvents from
contacting the plastic housing and control panel to prevent
corrosion. Damage to the machine in this manor will void warranty.
Do not expose the unit under direct sunshine for a long time.
Keep the unit in a dry, cool and ventilated area.
1
SAFETY PRECAUTIONS
Keep it away from children!
This appliance can be used by children aged from 8 years and above if they have been given
supervision or instruction concerning use of the appliance in a safe way and if they understand
the hazards involved. Cleaning and user maintenance shall not be made by children unless they
are aged 8 years and above and supervised. Keep the appliance and its cord out of reach of
children aged less than 8 years.
• Please store the ultrasonic cleaner where it is inaccessible by children.
• Danger to children! Danger for death through suffocation! Keep packaging material away from children.
• This appliance should not be used by children. Keep the appliance and its cord out of reach of children.
To prevent life-threatening electrical shock, please observe the following:
Danger of electrical shock! Do not use while
bathing. Never immerse the device or the power
cord in water or other liquid.
•If the unit is damaged, non-operational or has fallen into
water, take it to a qualified service provider.
•Remove the power plug from the socket:
Danger of electrical shock! Never touch the power
plug with wet hands, especially when inserting or
removing the plug.
Danger of electrical shock! If the unit has fallen into
water during operation, do not touch the unit. Remove
the power plug from the socket first.
-if malfunction occurs
-before cleaning the device
-if the device is not being used for prolonged period
-after each use (recommended)
•The installation of an earth leakage circuit breaker
with a rated tripping current of no more than 30 mA
provides further protection against an electrical shock.
The installation should only be carried out by a trained
electrician.
Danger of electrical shock! Do not spray water or
liquid over the device.
•Never operate the device unattended.
•Follow the manual to operate the device.
•Do not use components unapproved by the
manufacturer.
•When removing the power cord from the socket, grab
the power plug not the cord.
•To protect the power cord from damage, do not cause it
to get caught by things such as cupboard door or a chair
leg; do not drag across a hot surface.
•If there is damage to the power plug, cord, housing, or
other parts of the device, do not use the device.
•Do not disassemble the device, except by professionals.
To prevent fire hazards, please observe the
following:
•Never block the vents on the device. Keep the vents
free from lint, hair and other materials.
•Do not place the device on a soft surface, such as a bed
or a couch, where the vents could be blocked.
•Observe the warnings in all sections.
•If the supply cord is damaged, it must be replaced
by the manufacturer or its service agent or a similarly
qualified person in order to avoid a hazard.
CAUTION
Risk of fire and explosion!
•Never use flammable liquids or solvents directly in the
ultrasonic cleaning bath. Alcohol, acids and solvents
should be used in an In-direct tank.
•Ultrasonic activity increases the vaporisation of liquids
and creates a very fine mist which can catch fire.
Risk of damage to the ultrasonic tank!
•Do not use any acid cleaning agents (pH value < 7)
directly in the stainless steel tank if the cleaning items
or the contamination of the cleaning items contain
halogenides (fluorides, chlorides or bromides). The
same applies to NaCl solutions.
•The stainless steel tank can be destroyed by crevice
corrosion in a very short time. Substances that cause
crevice corrosion can be contained in household
cleaners.
Caution!
•Avoid any acetone, acid, alcohol, amonia or solvents
from contacting the plastic housing and control panel
to prevent corrosion. Use Indirect Cleaning and a
glass or metal container for using such solutions.
2
SAFETY PRECAUTIONS
Other observations:
• Do not operate the product without filling the tank with water. Running dry will damage the unit.
• Do not plug in the power cord before adding water to the tank. To avoid overspill, do not fill the tank above
the ‘Max’ line.
• Do not use solution containing abrasive substances or strong corrosive chemical solution not
recommended by the manufacturer or the supplier.
• Place the device on a dry and flat surface for operation.
• When the device is subjected to severe electromagnetic interference, it may malfunction, stop operating or
lose control functions. If this happens, unplug the power cord then re-insert it to restart the device.
IMPORTANT SAFETY INSTRUCTIONS
When using electric appliances, basic precautions should always be followed, including the
following :
• Read all the instructions before using the appliance.
• To reduce the risk of injury, close supervision is necessary when an appliance is used near children.
• Only use attachments recommended or sold by the manufacturer.
• Do not use outdoors.
• To disconnect, turn all controls to the off (O) position, then remove plug from outlet. Do not unplug by pulling
on cord. To unplug, grasp the plug, not the cord. Unplug from outlet when not in use and before servicing
or cleaning.
• To reduce the risk of electrical shock, do not put the appliance in water or other liquid. Do not place or store
appliance where it can fall or be pulled into a tub or sink.
• All servicing of this product, including transducer replacement, is to be conducted by qualified service
personnel.
• Do not operate any appliance with a damaged cord or plug, or after the appliance malfunctions or is
dropped or damaged in any manner.
• Return appliance to the nearest authorized service facility for examination, repair, or electrical or
mechanical adjustment.
Items Not Suitable for Ultrasonic Cleaning
Soft Jewellery:
Pearls, emerald, ivory, coral, agate,
sea turtle shells, etc
These items are not hard, so scratches may occur during cleaning.
Welded, Plated and Glued Items:
Welded or plated metal items, glued items
Ultrasonic cleaning may enlarge the gaps inside the welded joints,
plated coating or glued items and may cause separation.
Watches:
Except diver’s watches with depth
rating over 50 m (150 ft)
Because the strong penetration capability of the ultrasonic waves,
water may get into the watches if they are not truly waterproof. Use a
watch stand (available as optional extra) as a precaution if not sure.
Others:
Wood; coated glass, ceramic, camera
filters with pre-existing cracks.
Ultrasonic cleaning may enlarge the cracks pre-existed in the
coating on the glasses, ceramic, and glass. If the items have no
pre-existing cracks, then it is okay.
3
PRODUCT DETAIL
A
B
F
C
H I
J
G
D
E
A. Top cover
F. Control panel
B. Stainless steel tank
G.Handles
C.Housing
H. Power socket
D. Drainage pipe fitting
I. Power switch
E. Drainage valve handle
J. Cover holder
INCLUDED ACCESSORIES
Power Cord
Drainage Hose
OPTIONAL ACCESSORIES
Stainless steel rack and tray
Beaker and beaker holder
4
Plastic Basket
CONTROL PANEL AND OPERATIONS
1.
2.
3.
– Working Time Display. It counts down after work has started.
– Multistage Thermometer.
Solid green light indicates that the water temperature is
0-30% of the set temperature.
Solid orange light indicates that the water temperature is 30-60%
of the set temperature.
Solid red light indicates that the water temperature is 60-90% of the set
temperature. Flashing red light indicates that the water temperature is close to the set temperature.
All lights on, indicate that the water temperature is at the set temperature (90-100%).
– Set Temperature Display. Press Temp button to select one of the 3 set temperatures.
50°C or 122°F 55°C or 131°F 60°C or 140°F
4.
– °C or °F Indicator.
°C - Set temperature in °C. – ° F - Set temperature in °F.
5.
– Overheat protection warning light. If the unit is working improperly or has been running for too
long, the red warning light
will illuminate, indicating that the unit is in overheat protection mode.
The unit can not be operated until it has been left to stand (~15 to 20 mins) to cool down. The warning light
then turns off and the operation can be resumed.
6.
– Heater Status. Press Heater button,
flashes, indicating the heater is turned on. Press Heater
button again,
dims, indicating the heater is turned off.
7.
8.
– Normal Cleaning Status.
– Illuminated, normal cleaning is underway.
Heater Button. Pressing heater button,
flashes, indicating that the heater is turned on.
To cancel heating, press heater button twice again,
dims, indicating the heater is turned off.
To prevent accidentally turning on or off the heater, the Heater button needs to be touched twice
within 6 seconds to turn it on or off.
flashes, indicating the heater is on.
When the water reaches the set temperature, the heater will turn off automatically.
9.
Temperature Set Button. 3 set temperatures (°C/°F) can be selected. Press Temp button to select one of
the 3 set temperatures.
50°C or 122°F 55°C or 131°F 60°C or 140°F
10. Function Button. After powering on, the LED displays
which is the default time (as
shown), and the unit is ready for normal working status. Press On/Off button twice and the
cleaning starts. The cleaning stops when the timer counts down to
. If the unit needs to
be stopped before the timer runs out, press On/Off button twice.
To prevent accidentally turning the unit on or off, the On/Off button needs to be touched twice
within 6 seconds to turn it on or off.
flashes, indicaes that the unit is running in Normal Cleaning mode.
11.
Timer Quick Set Button. Press Timer button, LED display shows
time by 5 minutes.
5
. Each pressing increases the
SAMPLE APPLICATIONS
JEWELLERY
PERSONAL ITEMS
MEDICAL / DENTAL
Necklaces, rings,
earrings, bracelets, etc.
Eyeglasses, sunglasses,
shaver heads, watch bands,
diver’s watches, dentures, etc.
Surgical instruments,
pliers, handpieces, etc.
PRECISION PARTS
SILVER, COPPER OR BRASS
BABY ITEMS
Bearings, gears, valves,
tools, fuel injectors, etc.
Silverware, silver, copper or
brass decorations, etc.
Toys, baby items,
speech therapy tools, etc.
LAB ITEMS
BRASS, GUN PARTS
PCB, INKJET CARTRIDGES
Test tubes, beakers,
flasks, etc.
Reusable brass, gun parts, etc.
PCBs from mobile phones
and MP4, ink cartridges, etc.
GOLF CLUBS
ELECTRICAL PARTS
LENSES, CRYSTALS
Golf clubs and golf balls
Terminals for relays
and contactors
Lenses, crystals
6
APPLICATIONS
1. Metal Processing Manufacturers and Jewellery Makers:
- Ultrasonic cleaning can remove grease or abrasive powder from
work-in-process metal items and keep them clean.
- Jewellery made with investment casting often has a wax layer in addition to
debris. Turning on the heater will raise the water temperature, melt the wax
and improve the cleaning.
2.Optical Labs:
During edging and polishing, debris and abrasives can scratch lenses.
Ultrasonic cleaning can effectively protect the lenses. Debris exists in the
crevices of the frames during processing and polishing. Using an ultrasonic
cleaner and tap water can easily remove the debris.
3.Biology, Chemical Laboratories:
Labs can use ultrasonic cleaners to clean test tubes and other glass or metal
containers to remove residual chemicals and debris that can affect the
accuracy of the test results.
4.Medical Instrument Disinfection Rooms:
Non-disposable medical instruments may have blood or organic tissues left
after use. This matter needs to be removed with an ultrasonic cleaner before
disinfection.
5.Dental Clinics:
Dental clinics can use ultrasonic cleaners to clean dental instruments and to
remove blood and small particles left on the instruments before disinfection.
6.Electrical Component Manufacturers:
Terminals on AC contactors and relays need to be kept clean to prevent
sparking and non-contact. Ultrasonic cleaning is the most effective method to
keep these parts clean.
7
APPLICATIONS
7. Watch and Precision Metal Part Manufacturers:
Machined watch components and other precision metal parts often have
coolant and debris left on the surfaces. Ultrasonic cleaning can remove the
debris and keep the parts clean.
8. Shooting Clubs
To reuse brass cartridges: Adding special solution such as SeaClean2
solution can make fired brass casings useable and like new again.
Gun cleaning and care: Cleaning guns after shooting is time consuming.
Using SeaClean2 solution in the water and using ultrasonic cleaners can
complete the cleaning better, quicker and easier than traditional methods.
9. Special Education Institutes / Kindergartens:
Speech therapy tools or small toys that are reused need to be cleaned to
prevent the growth and spread of bacteria. Ultrasonic cleaning can perform
thorough cleaning by removing debris hidden inside small holes and
crevices before disinfection.
10.Golf Clubs:
Cleaning the heads of golf clubs is a time consuming job. Using
ultrasonic cleaning with the Enhanced Cleaning method can improve the
effectiveness and efficiency.
11. Mobile Phone and Electronics Service Shops
PCB renewal: Non-operational electronics, after falling into water, or
non-operational key pads can be cleaned with ultrasonic cleaners and
pure alcohol to recover the functions. Use the Indirect Cleaning method for
small-sized PCBs.
12.Printing Shops
Unblocking dried printer heads or ink cartridges: Large printers and inkjet
printers often have dried printer heads or ink cartridge ports. Replacing
them with new ones is very costly. Adding acetone or SeaClean2 and using
an ultrasonic cleaner with a couple of minutes of cleaning will remove the
blockage and make them usable again.
Avoid acetone from contacting the plastic housing to prevent corrosion.
Use Indirect Cleaning explained later and a glass or metal container for
acetone.
8
APPLICATIONS
13.Homes:
Silverware, silver, copper or brass decorations: It’s difficult to clean debris
hidden in the patterns with regular methods. Ultrasonic cleaning with
50ml (3 tablespoons) of dish soap will clean the debris quickly. For silver,
copper or brass items with oxidation which has darkened the items, adding
small amount of SeaClean2 solution helps to remove oxidation and using
ultrasonic cleaning will restore the shine.
Children or baby items: Debris left in the small holes and crevices are
difficult to clean. Bacteria and molds can grow. Using an ultrasonic cleaner
will deep clean the items before disinfection.
Crystal glasses and decorations, chandeliers: Ultrasonic cleaning can bring
back the sparkles and make them look like new again.
Jewellery, eyewear, watch bands, shavers or razors: Ultrasonic cleaning
can clean the debris in the crevices. It is quick and convenient.
This model has a large tank. When cleaning small items, the Indirect
Cleaning method can be used with satisfactory results. Smaller
ultrasonic cleaners can also do the job.
14.Automotive Repair Shops:
The Enhanced Cleaning method can be used to clean precision parts such
as valves, injectors, gears and bearings. It cleans out debris in tiny holes
and crevices effectively.
DOUBLE STRENGTH CONCENTRATE
Made from a unique formula containing natural products, mixing carefully balanced quantities of seaweed,
coconut oils and fruit extracts to create a powerful cleaning solution.
SeaClean2 will expertly clean tarnished items and assist in the removal of carbon, rust and dirt from most
solid metals*, precious stones* and inkjet cartridges to return them to a shiny condition.
Available in 500ml, 1L, 5L and 25L bottles.
9
* Please refer to our website for exclusions.
COMMON CLEANING METHODS
REGULAR CLEANING
Only tap water is needed.
Suitable Locations:
Jewellery makers, optical labs, biology / chemical labs,
homes, speech therapy clinics, dental clinics.
Cleaning Method:
1. Put the items to be cleaned inside the basket and put the
basket inside the tank.
2. Add water to the cleaning tank to a level between
“MIN” and “MAX” lines and above the area to be cleaned.
3. Turn the power switch on. Press Time button to set the
timer to 5 - 10 minutes. Press On/Off button to start cleaning.
Notes on using the basket:
1. The basket reduces the friction between the items and the tank. Stainless steel tray absorbs
approximately 8% of ultrasonic energy and a plastic basket absorbs about 35% of ultrasonic energy.
This significantly reduces the cleaning effectiveness.
2. During cleaning, dirt will come off like smoke and the water will become murky over time.
When “smoke” stops coming, the cleaning is basically done.
INDIRECT CLEANING
Put the items in a separate container. Use ultrasonic waves
to penetrate the container to do the cleaning.
Suitable Locations: medical instrument sterilization rooms,
watch and precision parts manufacturers, mobile phone
and electronics service shops, large printing shops.
Different industries use different fluids inside the container:
1. Watch service shops - Watch oil (to prevent rust)
2. Medical instrument sterilization - Enzymatic solution
(cleaning prior to sterilization)
3. Precision electrical parts - Hexane (to dissolve grease, to
evaporate quickly)
4. Mobile phone and electronic service shops - Pure alcohol
(to evaporate quickly).
5. Printing shops – Acetone is often used (to dissolve ink)
Avoid any acetone, acid, alcohol, amonia or solvents from contacting the plastic housing and control
panel to prevent corrosion. Use Indirect Cleaning and a glass or metal container for using such solutions.
Cleaning Method:
1. Put the item inside a container. Add proper fluid to submerge the area to be cleaned.
2. Place the container in the tank directly. Add water to a level between “MIN” and “MAX”, do not overflow.
3. Turn the power switch on. Press Time button to set the timer to 10 minutes. Press On/Off button to start
cleaning. Ultrasonic waves will penetrate the container and clean the items.
Selection of container: (Adding a container to the tank will reduce the cleaning effect by the following)
Container Type:
Plastic
Aluminium
Glass
Stainless Steel
Ultrasonic energy absorption: 30-40%20% 15% 8%
10
ENHANCED CLEANING
Debris accumulated over a long period of time, greasy or
heavily soiled.
Suitable Locations: metal processing and jewellery makers,
hardware manufacturers, shooting clubs, homes, automotive
repair shops.
Cleaning Method:
1. Large items can be put in the tank directly. Small items can
be put in the basket, then put in the tank. To avoid rubbing
during cleaning, do not put the items on top of each other.
2. Add water to a level between “MIN” and “MAX” and above
the area to be cleaned.
3. Add 50 ml (3 tablespoons) of washing up liquid.
4. Turn the power switch on. Press Temp button tto set the
water temperature to 55°C (131°F). Press Heater button to turn on the heater,
flashes. Close the lid.
LED
lights up. When water reaches the set temperature,
dims, indicating the heater is turned off.
Warm water and dishwashing liquid can soften grease and improve cleaning efficiency.
5. Press Time button to set the timer to 15 minutes. Press On/Off button to start cleaning. Grease will dissipate
and appear to be like black smoke in the water.
6. When it stops, open the drainage valve to release the dirty water. Close the valve afterwards.
7. Clean the tank and add fresh water. Wash the items for another 3 minutes to remove the residual debris
and any detergent.
SPECAL CLEANING WITH SEACLEAN2
Silver, copper or brass items with oxidation which has
darkened the items will need special cleaning.
Suitable Locations: silver, copper or brass product
manufacturers, homes, shooting clubs.
Cleaning Method: 1. Put the items in the basket and then in
the tank, add water to a level between “MIN” and ”MAX” and
above the area to be cleaned.
2. Add special solution (SeaClean2) that can remove silver
or copper oxidation according to the ratio recommended
(typically 1:10), Use special solutions according to the
instructions for brass cartridges.
3. Turn the power switch on. Press Temp button to set the
water temperature to 50°C (122°F). Press Heater button to turn
on the heater,
flashes. Close the lid. LED
lights up
indicating the percentage range of the set temperature being
reached. when the water reaches the set temperature,
dims, indicating the heater is turned off.
The heater has dual protection. To ensure safety, the heater will turn off automatically after 50 minutes.
4. Press Time button to set the timer to 15 minutes.
5. When cleaning is done, remove the basket and the items. Rinse the items with tap water or follow steps 6
and 7 in the Enhanced Cleaning section.
During cleaning, debris will come off the items like “smoke”. Water will become murky. This method will
remove silver or copper oxidation and debris in the decorating patterns and crevices and make the
items like new again.
11
OPERATING GUIDELINES
1
Remove the cover and put it on the cover holder vertically.
Put the items in the basket then put them in the cleaning
tank. Add water to a level between “MIN” and “MAX” and
above the area to be cleaned.
If the unit is turned on without water, ultrasonic
energy will not be absorbed. This model has high
power and once on for over 15 seconds, it may
damage the unit or severely reduce the life of the unit.
2
Connect the power cord to an outlet and turn the
switch on. LED display shows
. This is the
most common timer setting. If the timer needs to
be adjusted, press Time button. Select desired
timesetting by pressing Time button:
10min - 15min - 20min - 25min - 30 min - 5 min
Prolonged cleaning time may result in:
a. Loosening of the screws if used.
b. If items are plated and have existing cracks, the
cracks may become more pronounced.
c. Coatings with pre-existing damages may experience
more peeling.
3
Press On/Off button to start cleaning.
During cleaning, buzzing sound can be heard from the
cleaning tank, indicating that the cleaning is underway.
Closing the lid will reduce the noise level.
The digital timer will count down to show the remaining
cleaning time. When it displays
, the cleaning is done.
To stop cleaning at any time, press On/Off button.
The unit is designed with overheating protection.
If the unit has been running for too long, the red warning
light ‘ ’ will illuminate, indicating the unit is in overheat
protection mode. The unit can not be operated until it has
cooled down (~15 to 20 minutes). The ‘ ’ turns off and the
operation can be resumed
12
4
Select one of the four cleaning methods recommended
earlier.
1. When the heater is needed, press the Temp button to
select one of the 3 preset temperatures. Press Heater
button,
flashes, indicating the heater is turned on.
When the water reaches the set temperature,
dims,
indicating the heater is turned off.
To ensure safety, the unit is designed with dual
protection. The heater will be turned off automatically
if it has been running for 50 minutes.
30~60%
0~30%
Thermometer lights up to
90~100% indicate the percentage
60~90%
of the set temperature
reached.
2.When debris “smoke” is no longer visible, cleaning is
done. If additional cleaning is needed, reset the timer
and repeat the steps above.
5
When cleaning is completed, switch off the power, open the
cover and retrieve the basket and the items.
Connect the drainage hose to the drainage pipe as shown.
Open the drainage valve to drain the dirty water.
Clean and wipe the tank dry.
Close the drainage valve.
OPTIONAL ACCESSORY USAGE GUIDE
STAINLESS STEEL RACK AND TRAY
The rack can be used to support
cassettes. 2 layers of cassettes
can be used on top of each
other. The tray can be used in
place of the cassette. The tray is
stackable so multiple layers of
trays can be used.
BEAKER AND BEAKER HOLDER - INDIRECT CLEANING
Put the beaker holder and
beaker across the main cleaning
tank as shown.
Add water to the main tank so the
water level reaches the beaker.
Add required solution into the
beaker. It can be used to clean
small items such as dental burs,
files and nozzles.
13
GUARANTEE
Your Ultrasonic Cleaner has been carefully manufactured and 100% tested using high quality assured
components. It is guaranteed against faulty workmanship and materials for a period of 12 months
from the date of purchase. In the unlikely event that a failure should occur, the unit will be repaired
or replaced* free of charge when returned, postage paid, to the address below within the guarantee
period. This guarantee DOES NOT include damage or failure resulting from misuse, damage in transit or
failure by the user to comply with the Dos and Don’ts (this list is not exhaustive).
Your statutory rights under common law are in no way affected by this guarantee.
James Products Ltd,
Unit 1, Church Close Business Park,Todber, Sturminster Newton,Dorset DT10 1JH, England
Tel: +44 (0)1258 820100 Fax: +44 (0)1258 820550 E-mail: [email protected]
When returning your unit please call our Returns Department on +44 (0)1258 820100 for a RMA (Returns
Materials Authorisation) number. Please return your unit in its original packaging along with a covering
letter stating when and where you purchased the unit and a description of the problem encountered.
If the unit is within the guarantee period please enclose proof of purchase.
LIMITED WARRANTY
Consequential and incidental damages, including without limitation, loss of property and those arising
from breach of any express or implied warranty, are not the responsibility of James Products Limited and
to the extent permitted by law, are excluded.
In accordance with its policy of progressive product design, James Products Ltd reserves the right to
change product specifications without prior notice.
*Repair or replacement is at the discretion of the manufacturer.
www.jamesproducts.co.uk
Registered in England No. 5250754
Registered Office: James Products Ltd, Unit 1, Church Close Business Park, Todber, Sturminster Newton, Dorset DT10 1JH, England