1
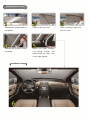
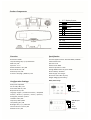
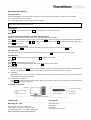
User’s Manual
Routing the power cable
Connect the power cable to
the device.
Open up the sun visor.
Remove the A-pillar to hide
Route the cable through
the cable.
top ceiling, A-pillar and
underneath the floor mat
to the cigar lighter.
【Installation Image】
Loop the power cable over
the sun visor.
Product Components
1.
2.
3.
4.
5.
6.
7.
8.
9.
10.
11.
12.
13.
2.7" Display Screen
Power : Power / Mode
Reset
MENU : Menu
◄ : Up
► : Down
REC : Record / Stop / OK
Lens
Speaker
Clip
AV Out Jack
USB Port
Memory Card Slot
Function
Specification
Resolution: 1080P
Loop Recording: Off / 3 / 5/ 10 Minutes
WDR: On / Off
Exposure: +2~-2
Motion Detection: On / Off
Record Audio: On / Off
Date Stamp: On / Off
G-Sensor: Off / High / Medium / Low
Processor/Optical Sensor: Novatek 96650 / AR0330
Field of View: 120º
Aperture: F1.8
Video Format: MOV
Video Compression: H.264
Storage Media: Micro SD (up to 32GB)
Built-in Battery: Available
Power Supply: Car Charger
Dimension: 303 x 80 x 12 (mm)
Weight: 280g (approximately)
Configuration Settings
Date/Time Setup
Date/Time: Adjustable
Car No: Off / ABC / 123
Auto Power-Off: On / Off
Beep Sound: On / Off
Language: English / Traditional Chinese / Simplified
Chinese / Russian / Japanese / French / Spanish /
Portuguese / Deutsch / Italian
TV Mode: NTSC / PAL
Frequency: 50Hz / 60Hz
Lamp Setting: On / Off
Backlight: Off / 1 / 3 / 5 Minutes
Format: SD Card > Cancel / OK
Default: Cancel / OK
REC
◄
►
: Next
: Up
: Down
Year / Month / Day
Power
REC
◄
►
: Shift ABC /123
: Next
: Up
: Down
(Up to 9 Digits)
Operation Instructions
Charging the device
With a rechargeable Li-ion battery built in the device, you have two power options to charge the car camcorder:
(1)
Connect with a 12V car charger.
(2)
Using USB cable to connect computer and the device.
Note: Use the dedicated charger for the device. Only use power supply with 5V output. Using the output voltage
higher than 5V may damage the device.
Power On/Off
Press Power to turn on the device; hold Power pressed down for 3 seconds to turn off.
Settings
Operation Preference: Video Mode / Still Mode / Play Back Mode
The device has 3 operation modes: Video Mode, Still Mode and Play Back Mode.
Press Power to switch modes looping circularly. Then press Menu to enter into the menu of options to set your operation
preference for each mode. Press ◄ or ► to move cursor to the options. Press REC to confirm any change. After setup,
press Menu twice to exit.
Configuration Preference: Setup
In any mode, press Menu twice to enter into the [Setup] menu. After setup, once again press Menu to exit.
Video Recording
The device will enter into default video mode when turned on. Press REC directly to start/stop the recording.
Photo Shooting
Press Power to switch to the still mode; then press REC to capture a still image.
Play Back
Press Power to switch to the play back mode.
Press ◄ or ► to select the previewed file; then press REC to play/pause the video.
File Protection
(1) In play back mode, press Menu to enter into the [Play Back] menu to lock/unlock the previewed file. A key indication
shows on the display for protected files. Any locked file will not be overwritten until it is unlocked.
(2) G SENSOR
When detecting an impact or collision, it automatically starts to record prior and after the event. The recording file
will be locked and saved automatically.
(3) SOS Manual File Protection
Press Power to protect the file while recording. When a key indication appears on the display, this indicates that the
recording video has been protected.
Connecting to a computer
USB Cable
Mess Storage
As a memory card reader
PC Camera
As a Web Cam
Power Charging
USB charging
Options shown on the display
Contact Info
Accessories
Kae-Terng Co., Ltd.
User's Manual x 1
UBS Cable x 1
AV Cable x 1
Car Charger (12V to 5V) x 1
4F., No. 31, Ln. 74, Sec. 2, Ziqiang Rd.
Sanchong Dist., New Taipei City 241, Taiwan
Tel: +886-2-2987-5967 Fax: +886-2-2980-7582
http://www.transitions-tech.com.tw/