1
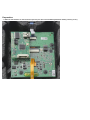
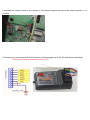
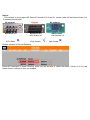
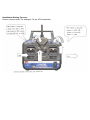
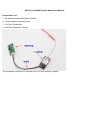
AR.Drone2.0 Modification Board User Manual
Accessories List:
1. AR Remote Control Modification Board
2. Control board connecting cable
3. 2.4G 6ch Transmitter
4. 2.4G 6ch Transmitter receiver
The transmitter and receiver must be a set, you can equip by yourself.
Preparation:
1.Take off the bottom of AR.Drone2.0(Don't pull all of the bubble,pressure slowly forcely is ok)
2.Inserting the control board to the bottom of AR.Drone2.0,please aiming at the empty position of 10
needles.
3.Connect the control board with 2.4G receiver as follow(support all 2.4G 6ch and above transmitter)
Three lines of yellow, black and red are 6,7,8
4.Fix the receiver to external of AR
Notice:
This version is only support AR.Drone2.0 Aircraft of 2.0 and 2.1 version.(take off the bottom board ,it is
10 needles female jack)
No support
Support
No support
AR.Drone 1.0
8 Pin Male
×
AR.Drone 2.0
HW Version 2.1
10 pin female
AR.Drone2.0
HW Version 2.2
√
6pin female
×
Display Version of Control Software:
Enter AR.Freeflight2->Control->Setting, enter into the last one to check the status .If there is 2.2 in red
frame shows in picture,it does not support.
Installation /Setting Process:
How to connect wires .For example: Fly sky 6CH transmitter
I. Basic Configuration
SWB is used for switching LAND/FM
SWA is used for switching FM1/FM2
II. Starting Up Step
1.Connect the hardware;
2. Push all the sticks to the center position. Turn VR(B) to LAND position(smallest position),the smallest
position of VR(A) is FM1,the biggest position is FM2.Turn SWA and SWB to the back of transmitter;
3. Turn on the power of transmitter and AR Drone;
4. Start up NANO as follow:
1) Turn on red light of drone and start up(boots);
2) LED of Arduino flash 1,2,3or 4 times each second.
1 flash: none or void RX (receiver) signal;
2 flash: flight mode is not LAND (change it to LAND is ok )
3 flash: Waiting for starting up of drone
4 flash: Waiting for ‘quiet’ time on interface
3) Turn off red light of drone and change to green light
4) LED of Arduino is flashing rapidly,means it is uploading and push out “at2so”
5) “at2so” make the LED of drone flash orange(1 time 1 second)
6)”rx2atp” turn off LED and send configuration commands to “at2so”.Once the “at2so” finished
commands,the LED of drone flash green 1 second, to tell the rx2atp keep on.
5. Nano indication light flash rapidly(12.5Hz frequency),means drone get ready to fly.
6. Check your emergency STOP RESET/Restoration, make a ftrim before you start up,and enjoy fun.