1
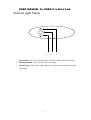
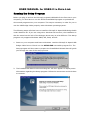
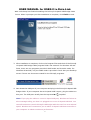
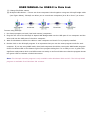
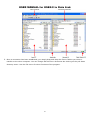
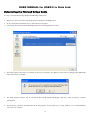
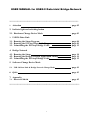
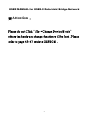
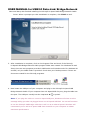
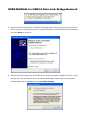
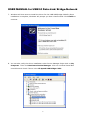
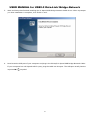
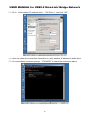
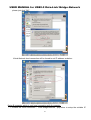
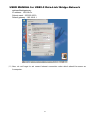
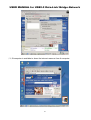
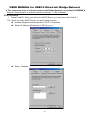
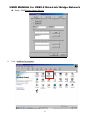
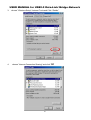
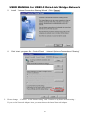
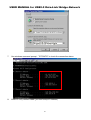
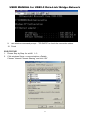
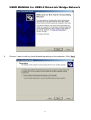
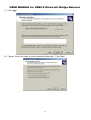
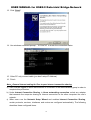
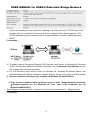
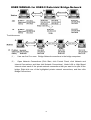
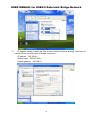
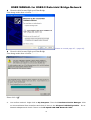
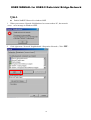
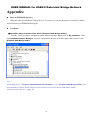
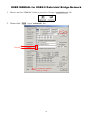
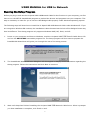
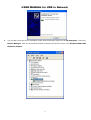
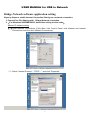
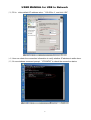
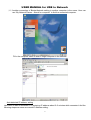
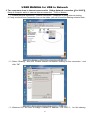
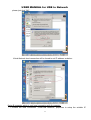
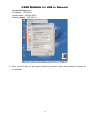
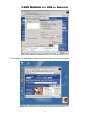
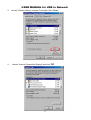
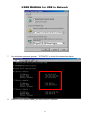
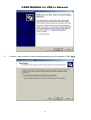
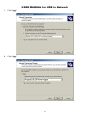
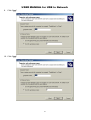
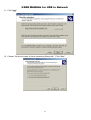
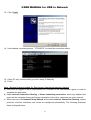
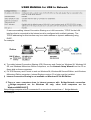
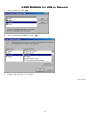
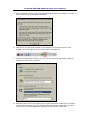
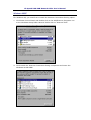
USER MANUAL for USB2.0 to Data Link
USB2.0 Data Link Cable
Introduction
Congratulations on your purchase of PCLinq2 Hi-Speed USB Bridge Cable! PCLinq2 is your
Hi-Speed USB 2.0 solution to peer-to-peer network file sharing via the USB port. The PCLinq2 cable
provides true plug-n-play capability while transferring files at greater speed than traditional USB or
other legacy port file transfer products. Hi-Speed USB 2.0 solutions offer up to 40 times the speed
compared to normal full-speed USB 1.1 products.
PCLinq2 also provides a File Transfer program that is similar to Windows Program Manager so
you can easily drag-and-drop files or create folders in your local computer or in the linked remote PC.
Just plug in the cable, run the PCLinq2 program and instantly transfer or copy files at high speed.
The PCLinq2 Hi-Speed USB Bridge Cable is highly suitable for mobile computer use and SOHO
environment.
Features & Specifications
Easy File Sharing and Data Transfer between 2 or 3 PCs via USB port
Suitable for Mobile PC and SOHO environment
Single chip ASIC Hi-Speed USB host to host communication
Dual data buffer supports two-way data transfer
Hi-Speed Performance with data transfer rate of over 15Mbytes/sec
Full Compliance with the Universal Serial Bus Specification v1.1 and v2.0
Bus Powered from either USB port– no separate power required
Advanced Power Management Mechanism includes Suspend-Resume and Remote Wake-up
Functions
System Requirements
Windows 98SE, ME, 2000, XP or above
Intel Pentium 133MHz or better based computer
One standard USB 1.1 or USB 2.0 (recommended) port
PCLinq2 Hi-Speed USB Bridge Cable Setup Program
*********************************************************************************
USB2.0 Data-Link
Indicate light
Running the Setup Program
Running the PCLinq2 Data-Link Program
Uninstalling the PCLinq2 Bridge Cable
– page 02
– page 03
– page 08
– page 11
**********************************************************************
1
USER MANUAL for USB2.0 to Data Link
Indicate light Status
1
2
3
1. Power Light : Show Green Light. When you Link Cable ,as Power ON/OFF
2. Switching Button : None function ,none switching .
3. Action Light : Flash Yellow light .When It’s working as data linking or bridge
networking .
2
USER MANUAL for USB2.0 to Data Link
Running the Setup Program
Before you plug-in and use the PCLinq2 Hi-Speed USB Cable for the first time in your
computer, you first have to run the SETUP InstallShield program to preload the
drivers and programs into your computer. This step is necessary in order for you to
use the USB Bridge Cable properly under Windows operating system.
The following steps will show how to install the PCLinq2 Hi-Speed USB Bridge Cable
under Windows XP. If you are using other Windows OS versions, the installation is
also the same but the look of the dialogue boxes may be a bit different. This Setup
program only supports Windows 98SE, ME, 2000, and XP.
1. Power on your computer and boot to Windows. Load the PCLinq2 Hi-Speed USB
Bridge Cable Driver CD and run the SETUP.EXE executable program file. The
Setup program will then start to prepare the InstallShield Wizard that will guide
you through the rest of the setup process.
2. The InstallShield Wizard welcome dialog box will then appear to display some
information regarding the Setup program. Follow the instructions and click Next
to continue.
3
USER MANUAL for USB2.0 to Data Link
Wait until Setup has finished installing the PCLinq2 Hi-Speed USB Bridge Cable
Driver. When it prompts you that installation is complete, click Finish to end.
3. After installation is complete, click on the Program Files and check if the PCLinq2
Hi-Speed USB Bridge Cable program folder was created. For Windows XP and
2000, there are two programs provided: ANSI mode and Unicode mode. For
Windows 98 and ME, only the ANSI mode is provided. Check also your Desktop
screen if there are shortcuts created for the PCLinq2 programs.
4. Now locate the USB port of your computer and plug in the PCLinq2 Hi-Speed USB
Bridge Cable. If your computer has a Hi-Speed USB 2.0 port, plug the cable into
this port. The USB port usually has the imprinted
symbol.
Note: If you plug the cable on a non-Hi-Speed USB port, Windows will show an
alert message telling you that it is plugged into a non-Hi-Speed USB hub. You
can still continue to use the PCLinq2 USB bridge cable but it will run at a reduced
speed. Windows will recommend you to add a Hi-Speed USB host controller to
your computer to obtain maximum performance.
4
USER MANUAL for USB2.0 to Data Link
5. Wait till Windows detects the Hi-Speed USB Bridge Cable and prompts you for
the device driver location. If prompted, select to install the software
automatically (Recommended) and click Next to continue.
5
USER MANUAL for USB2.0 to Data Link
6. Windows will then detect the preloaded driver. Before Windows installs the
driver, it may prompt you that this device driver (Hi-Speed USB Bridge Cable)
has not yet passed Windows XP Logo compatibility. Click Continue Anyway.
7. Windows will then start to install the driver for the USB-USB Bridge Cable2.0
Once installation is complete, Windows will prompt you that it has finished. Click
Finish to continue.
6
USER MANUAL for USB2.0 to Data Link
8. You can also verify the driver installation under Device Manager. Right-click on
My Computer. Then click Hardware-Device Manager. Click on Universal
Serial Bus controllers and check if there is the Hi-Speed USB Bridge Cable.
7
USER MANUAL for USB2.0 to Data Link
Running the PCLinq2 Program
The PCLinq2 Hi-Speed USB Bridge Cable allows you to easily link two computers by plugging each
end of the cable into the USB port of both computers. Before you can start using the PCLinq2 program,
you need first to run Setup program on both computers and install the bridge cable as mentioned in
the previous section.
PCLinq2 is the application program used to control the file sharing and data transfer of the linked computers
(also known as the local PC and the remote PC). After you have successfully completed the Setup program
and installed the PCLinq2 bridge cable, you simply double-click on the PCLinq2 shortcut found on your
desktop screen. The PCLinq2 File Transfer program will appear as follows:
With PCLinq2, you can control both the local and remote PCs and do the following:
(1) Display files/folders
(2) Open files/folders
(3) Create files/folders
(4) Delete files/folders
(5) Copy files/folders
(6) Move files/folders
8
USER MANUAL for USB2.0 to Data Link
(7) Change file/folder names
(8) Multiple Cable Select – if there are three computers linked together using two PCLinq2 bridge cable
(see Figure below). PCLinq2 can allow you to control two computers (A-to-B or B-to-C) at a time.
To start using PCLinq2:
1. Run Setup program on both (local and remote) computers.
2. Plug the one end of the PCLinq2 Hi-Speed USB Bridge cable into the USB port of one computer and the
other end into the USB port of the other computer.
3. Wait for Windows to detect the cable on each computer and check if it is properly installed.
4. Double-click on the PCLinq2 program. It is important that you use the same program mode for each
computer. If you are using ANSI mode, then both computers should be running the ANSI mode program.
Check the Status LED on the bottom right of the program dialog box if it is ready or not. A green LED
signifies a ready status while a red LED means not ready or not found. Make sure that the program shows
two green LEDs to indicate a linked connection.
Note: The PCLinq2 Unicode program is only available under Windows 2000 and XP. The PCLinq2 ANSI
program is available for all Windows OS versions.
9
USER MANUAL for USB2.0 to Data Link
5. Once a connection has been established, you simply drag-and-drop the files or folders you want to
transfer to the other computer. You can change disk drives or directories but clicking on the pull-down
directory menu. Use the File menu for other functions of the program.
10
USER MANUAL for USB2.0 to Data Link
Uninstalling the PCLinq2 Bridge Cable
It is easy to uninstall the PCLinq2 Hi-Speed USB Bridge Cable driver.
1.
Make sure to first close all PCLinq2 programs and unplug the USB Bridge cable.
2.
Go to Control Panel and double-click on Add or Remove Programs.
3.
Look for the PCLinq2 Hi-Speed USB Bridge Cable and click Change/Remove button.
4.
The Setup program will prompt you whether you are sure to uninstall or not. Make sure that you have unplugged the USB Bridge
cable and click Yes to continue.
5.
The Setup program will then start to uninstall the PCLinq2 Hi-Speed USB Bridge Cable driver. Wait for Setup to complete
uninstallation.
6.
After Setup has completely uninstalled the driver and programs, it will prompt you to restart Windows. It is recommended that
you restart your computer.
11
USER MANUAL for USB2.0 to Data Link
Disclaimer
All the information in this document is subject to change without prior notice. The manufacturer does
not make any representations or any warranties (implied or otherwise) regarding the accuracy and
completeness of this document and shall in no event be liable for any loss of profit or any other
commercial damage, including but not limited to special, incidental, consequential, or other damages.
No part of this document may be reproduced or transmitted in any form by any means without the express
written permission of the manufacturer.
All brand names and product names used in this document are trademarks or registered trademarks
of their respective holders.
Ver:0.1.0.0
12
USER MANUAL for USB2.0 Data-Link/ Bridge-Network
****************************************************************************
1.
Attention
– page 02
2. Indicate light and switching button
2.1. Hardware Change Device Mode
3.
– page 03
USB2.0 Data-Link
3.1. Running the Setup Program
3.2. Running the PCLinq2 Data-Link Program
3.3. Uninstalling the PCLinq2 Bridge Cable
– page 04
– page 09
– page 12
4. Bridge-Network
4.1. Running the Setup
4.2. Running the Bridge-Network Application setting
4.3. Uninstalling the PCLinq2 Bridge Cable
– page 14
– page 19
– page 12
5. Software Change Device Mode
5.1. USB 2.0 Date-Link & Bridge-Network Change Mode
– page 41
6. Q&A
– page 43
7. Appendix
– page 45
7.1. Burn-in EEPROM
*****************************************************************************
1
USER MANUAL for USB2.0 Data-Link/ Bridge-Network
※Attention :
Please do not Click “file→Change Device Mode”
otherwise hardware change function will be lost . Please
refer to page 45~47 retrieve EEPROM.
2
USER MANUAL for USB2.0 Data-Link/ Bridge-Network
Indicate light and switching button
1
1. Power Light : Show Green Light .
When
2
3
you Link Cable ,as Power ON/OFF
2. Switching Button Mode : Press Down is USB2.0 Data-Link function mode
UP is Bridge-Network function mode
3. Action Light : Flash Yellow light .When It’s working as data linking or bridge networking .
Hardware Change Device Mode
1. From your computer plug out the PCLinq2 Hi-Speed USB Bridge-Data/Network Cable.
( it’s the status of the disconnect.)
2. Hardware button Press Down is USB2.0 Data-Link function mode
UP is Bridge-Network function mode .
3. Now locate the USB port of your computer and plug in the PCLinq2 Hi-Speed USB
Bridge-Data/Network Cable.
3
USER MANUAL for USB2.0 Data-Link/ Bridge-Network
USB2.0 Data Link
Introduction
Congratulations on your purchase of PCLinq2 Hi-Speed USB Bridge Cable! PCLinq2 is
your Hi-Speed USB 2.0 solution to peer-to-peer network file sharing via the USB port. The
PCLinq2 cable provides true plug-n-play capability while transferring files at greater speed
than traditional USB or other legacy port file transfer products. Hi-Speed USB 2.0 solutions
offer up to 40 times the speed compared to normal full-speed USB 1.1 products.
PCLinq2 also provides a File Transfer program that is similar to Windows Program
Manager so you can easily drag-and-drop files or create folders in your local computer or in
the linked remote PC. Just plug in the cable, run the PCLinq2 program and instantly transfer
or copy files at high speed.
The PCLinq2 Hi-Speed USB Bridge Cable is highly suitable for mobile computer use and
SOHO environment.
Features & Specifications
Easy File Sharing and Data Transfer between 2 or 3 PCs via USB port
Suitable for Mobile PC and SOHO environment
Single chip ASIC Hi-Speed USB host to host communication
Dual data buffer supports two-way data transfer
Hi-Speed Performance with data transfer rate of over 15Mbytes/sec
Full Compliance with the Universal Serial Bus Specification v1.1 and v2.0
Bus Powered from either USB port– no separate power required
Advanced Power Management Mechanism includes Suspend-Resume and Remote
Wake-up Functions
System Requirements
Windows 98SE, ME, 2000, XP or above
Intel Pentium 133MHz or better based computer
One standard USB 1.1 or USB 2.0 (recommended) port
PCLinq2 Hi-Speed USB Bridge-Network Cable
PCLinq2 Hi-Speed USB Bridge-Network Cable Setup Program
4
USER MANUAL for USB2.0 Data-Link/ Bridge-Network
Running the Setup Program
Before you plug-in and use the PCLinq2 Hi-Speed USB Cable for the first time in your
computer, you first have to run the SETUP InstallShield program to preload the drivers and
programs into your computer. This step is necessary in order for you to use the USB Bridge
Cable properly under Windows operating system.
The following steps will show how to install the PCLinq2 Hi-Speed USB Bridge Cable under
Windows XP. If you are using other Windows OS versions, the installation is also the same
but the look of the dialogue boxes may be a bit different. This Setup program only supports
Windows 98SE, ME, 2000, and XP.
1. Power on your computer and boot to Windows. Load Driver CD and run the SETUP.EXE
executable program file. The Setup program will then start to prepare the InstallShield
Wizard that will guide you through the rest of the setup process.
2. The InstallShield Wizard welcome dialog box will then appear to display some information
regarding the Setup program. Follow the instructions and click Next to continue.
5
USER MANUAL for USB2.0 Data-Link/ Bridge-Network
Wait until Setup has finished installing the PCLinq2 Hi-Speed USB Bridge-Network Cable
Driver. When it prompts you that installation is complete, click Finish to end.
3. After installation is complete, click on the Program Files and check if the PCLinq2
Hi-Speed USB Bridge-Network Cable program folder was created. For Windows XP and
2000, there are two programs provided: ANSI mode and Unicode mode. For Windows 98
and ME, only the ANSI mode is provided. Check also your Desktop screen if there are
shortcuts created for the PCLinq2 programs.
4. Now locate the USB port of your computer and plug in the PCLinq2 Hi-Speed USB
Bridge-Network Cable. If your computer has a Hi-Speed USB 2.0 port, plug the cable into
this port. The USB port usually has the imprinted
symbol.
Note: If you plug the cable on a non-Hi-Speed USB port, Windows will show an alert
message telling you that it is plugged into a non-Hi-Speed USB hub. You can still continue
to use the PCLinq2 USB bridge cable but it will run at a reduced speed. Windows will
recommend you to add a Hi-Speed USB host controller to your computer to obtain
maximum performance.
6
USER MANUAL for USB2.0 Data-Link/ Bridge-Network
5. Wait till Windows detects the Hi-Speed USB Bridge Cable and prompts you for the device
driver location. If prompted, select to install the software automatically (Recommended)
and click Next to continue.
6. Windows will then detect the preloaded driver. Before Windows installs the driver, it may
prompt you that this device driver (Hi-Speed USB Bridge Cable) has not yet passed
Windows XP Logo compatibility. Click Continue Anyway.
7
USER MANUAL for USB2.0 Data-Link/ Bridge-Network
7. Windows will then start to install the driver for the USB-USB Bridge Cable2.0 Once
installation is complete, Windows will prompt you that it has finished. Click Finish to
continue.
8. You can also verify the driver installation under Device Manager. Right-click on My
Computer. Then click Hardware-Device Manager. Click on Universal Serial Bus
controllers and check if there is the Hi-Speed USB Bridge Cable.
8
USER MANUAL for USB2.0 Data-Link/ Bridge-Network
Running the PCLinq2 Program
The PCLinq2 Hi-Speed USB Bridge Cable allows you to easily link two computers by
plugging each end of the cable into the USB port of both computers. Before you can start
using the PCLinq2 program, you need first to run Setup program on both computers
and install the bridge cable as mentioned in the previous section.
PCLinq2 is the application program used to control the file sharing and data transfer of the
linked computers (also known as the local PC and the remote PC). After you have successfully
completed the Setup program and installed the PCLinq2 bridge cable, you simply double-click
on the PCLinq2 shortcut found on your desktop screen. The PCLinq2 File Transfer program will
appear as follows:
With PCLinq2, you can control both the local and remote PCs and do the following:
(1) Display files/folders
(2) Open files/folders
(3) Create files/folders
(4) Delete files/folders
9
USER MANUAL for USB2.0 Data-Link/ Bridge-Network
(5) Copy files/folders
(6) Move files/folders
(7) Change file/folder names
(8) Multiple Cable Select – if there are three computers linked together using two PCLinq2
bridge cable (see Figure below). PCLinq2 can allow you to control two computers
(A-to-B or B-to-C) at a time.
To start using PCLinq2:
1. Run Setup program on both (local and remote) computers.
2. Plug the one end of the PCLinq2 Hi-Speed USB Bridge cable into the USB port of one
computer and the other end into the USB port of the other computer.
3. Wait for Windows to detect the cable on each computer and check if it is properly installed.
4. Double-click on the PCLinq2 program. It is important that you use the same program mode
for each computer. If you are using ANSI mode, then both computers should be running
the ANSI mode program. Check the Status LED on the bottom right of the program dialog
box if it is ready or not. A green LED signifies a ready status while a red LED means not
ready or not found. Make sure that the program shows two green LEDs to indicate a linked
connection.
Note: The PCLinq2 Unicode program is only available under Windows 2000 and XP. The
PCLinq2 ANSI program is available for all Windows OS versions.
10
USER MANUAL for USB2.0 Data-Link/ Bridge-Network
5. Once a connection has been established, you simply drag-and-drop the files or folders you
want to transfer to the other computer. You can change disk drives or directories but
clicking on the pull-down directory menu. Use the File menu for other functions of the
program.
11
USER MANUAL for USB2.0 Data-Link/ Bridge-Network
Uninstalling the PCLinq2 Bridge Cable
It is easy to uninstall the PCLinq2 Hi-Speed USB Bridge Cable driver.
1.
Make sure to first close all PCLinq2 programs and unplug the USB Bridge cable.
2.
Go to Control Panel and double-click on Add or Remove Programs.
3.
Look for the PCLinq2 Hi-Speed USB Bridge Cable and click Change/Remove button.
4.
The Setup program will prompt you whether you are sure to uninstall or not. Make sure that you have
unplugged the USB Bridge cable and click Yes to continue.
5.
The Setup program will then start to uninstall the PCLinq2 Hi-Speed USB Bridge Cable driver. Wait for Setup
to complete uninstallation.
6.
After Setup has completely uninstalled the driver and programs, it will prompt you to restart Windows. It is
recommended that you restart your computer.
12
USER MANUAL for USB2.0 Data-Link/ Bridge-Network
Disclaimer
All the information in this document is subject to change without prior notice. The
manufacturer does not make any representations or any warranties (implied or
otherwise) regarding the accuracy and completeness of this document and shall in no
event be liable for any loss of profit or any other commercial damage, including but not
limited to special, incidental, consequential, or other damages.
No part of this document may be reproduced or transmitted in any form by any means without
the express written permission of the manufacturer.
All brand names and product names used in this document are trademarks or
registered trademarks of their respective holders.
13
USER MANUAL for USB2.0 Data-Link/ Bridge-Network
Bridge-Network Cable
Overview
The USB Networking Cable provides a quick and easy solution to network up to 17 USB computers via hot Plug & Play technology
without adding any network interface cards. It is suitable for small offices, home offices, mobile users, and network gamers. With the
USB Network Bridge Cable, users can play multi-player games, share files, printers, peripheral equipment, and more.
Features
USB host to host communication
Single cable solution for network communication
Standard Windows Explorer user interface
Maximum Data transfer rate: Over 5 Mbps
Construct USB Network up to 17 PCs
Sharing resources, such as Printers, CD-ROMs, Modems, Scanners, etc.
Support TCP/IP, NetBEUI, IPX/SPX protocols
Full NDIS driver implementation
No external power needed
Compliant with USB specification version 1.1&2.0
USB full and High speed connection
Hot PnP for easy use
Suitable for SOHO and mobile network environment
System Requirements
Windows 98SE/2000/ME/XP
14
USER MANUAL for USB2.0 Data-Link/ Bridge-Network
Running the Setup Program
Before you plug-in and use the Hi-Speed USB Bridge-Network Cable for the first time in your computer, you
first have to run the SETUP InstallShield program to preload the drivers and programs into your computer.
This step is necessary in order for you to use the USB Bridge Cable properly under Windows operating
system.
The following steps will show how to install the Hi-Speed USB Bridge-Network Cable under Windows XP. If
you are using other Windows OS versions, the installation is also the same but the look of the dialogue boxes
may be a bit different. This Setup program only supports Windows 98SE, ME, 2000, and XP.
1.
Power on your computer and boot to Windows. Load
Driver CD and run the SETUP.EXE executable
program file. The Setup program will then start to prepare the InstallShield Wizard that will guide you
through the rest of the setup process.
2.
The InstallShield Wizard welcome dialog box will then appear to display some information regarding the
Setup program. Follow the instructions and click Next to continue.
15
USER MANUAL for USB2.0 Data-Link/ Bridge-Network
3.
Wait until Setup has finished installing the Hi-Speed USB Bridge-Network Cable Driver. When it prompts
you that installation is complete, click Finish to end.
4.
Now locate the USB port of your computer and plug in the PCLinq2 Hi-Speed USB Bridge-Network Cable.
If your computer has a Hi-Speed USB 2.0 port, plug the cable into this port. The USB port usually has the
imprinted
symbol.
16
USER MANUAL for USB2.0 Data-Link/ Bridge-Network
5.
Wait till Windows detects the Hi-Speed USB Bridge-Network Cable and prompts you for the device driver
location. If prompted, select to install the software automatically (Recommended) and click Next to
continue.
6.
Windows will then detect the preloaded driver. Before Windows installs the driver, it may prompt you that
this device driver (Hi-Speed USB-USB Network Adapter) has not yet passed Windows XP Logo
compatibility. Click Continue Anyway.
17
USER MANUAL for USB2.0 Data-Link/ Bridge-Network
7.
Windows will then start to install the driver for the Hi-Speed USB-USB Network Adapter Once
installation is complete, Windows will prompt you that it has finished. Click Finish to continue.
8.
You can also verify the driver installation under Device Manager. Right-click on My Computer. Then click
Device Manager. Click on Network adapters and check if there is the Hi-Speed USB-USB Network
Adapter.
18
USER MANUAL for USB2.0 Data-Link/ Bridge-Network
Bridge-Network software application setting
Steps by Steps to enable Internet Connection Sharing on a network connection:
1. Peer-to-Peer File-Sharing with Bridge-Network connection.
2. (For Windows 98/ME/2K/XP, both sides setting are the same)
Manual IP address setting.
(1)Open Network Connections (Click Start, click Control Panel, click Network and Internet
Connections, and then click Network Connections).
(2)Select “Internet Protocol(TCP/IP)”, and click “Properties”.
19
USER MANUAL for USB2.0 Data-Link/ Bridge-Network
(3)Fill in driver default IP address value:”169.254.x.x”, and click “OK”.
(4)User can check the connection information to verify whether IP address is settle done.
(5)Or use windows command prompt:”IPCONFIG” to check the connection status.
20
USER MANUAL for USB2.0 Data-Link/ Bridge-Network
(6)Another connection of Bridge-Network setting in another computer is the same. User can
use “My Network Places:search for computer” to find the connected computer.
Fill in the computer name to search target computer in the network.
Auto-detected IP address setting
User have to wait for windows O.S. assigning IP address about 2~3 minutes while connected. And the
following steps are same as manual IP address setting.
21
USER MANUAL for USB2.0 Data-Link/ Bridge-Network
3. Two computers share in internet resource with Bridge-Network connection,(For 2K/XP),
Setup A-computer which is external internet connection.(LAN or Modem)
(1)Enable the local connection(internet connection)properties to setup internet sharing.
※If only one local Area Connection Icon on the folder, you can’t found the Sharing selection item..
(2)Select “Sharing”, and click “Enable Internet Connection Sharing for this connection “ and
click “OK”
(3)Windows O.S. will force to assign a default IP address(192.168.0.1) for this sharing,
22
USER MANUAL for USB2.0 Data-Link/ Bridge-Network
please just click “OK”.
Virtual-Network local connection will be forced to set IP address as below:
Setup B-computer which is only local connection with A-computer.
(1)Enable the local connection( USB Bridge-Network)properties to setup the suitable IP
23
USER MANUAL for USB2.0 Data-Link/ Bridge-Network
address/Mask/gateway:
IP address:192.168.0.x
Subnet mask:255.255.255.0
Default gateway:192.168.0.1
(2)Also, do not forget to set correct Internet connection value which should be same as
A-computer.
24
USER MANUAL for USB2.0 Data-Link/ Bridge-Network
(3)B-computer is available to share the internet resource from A-computer.
25
USER MANUAL for USB2.0 Data-Link/ Bridge-Network
4. Two computers share in internet resource with Bridge-Network connection(For98SE/ME),
Setup A-computer which is external internet connection.(LAN or Modem)
FOR WIN98SE
1. Setup Fixed IP ( When you don’t have DHCP Server, you only have one Fixed IP )
PS . When you have DHCP Server, you don’t setup anymore.
Network Neighborhood>Properties>TCP/IP > Properties
Setup :IP Address (Please key-in ISP give you )
Setup : Gateway
26
USER MANUAL for USB2.0 Data-Link/ Bridge-Network
Setup : DNS(Domain Name Server)
2.
Click “Add/Remove programs”
27
USER MANUAL for USB2.0 Data-Link/ Bridge-Network
3.
4.
choose ”Windows Setup”>Internet Tools and Click “Details”
choose ”Internet Connection Sharing” and click “OK”
28
USER MANUAL for USB2.0 Data-Link/ Bridge-Network
1.
5.
Install
“Internet Connection Sharing Wizard “,Click “Cancel “
6.
Click “start→program file→Control Panel →Internet Options>Connections>”Sharing”
Please change “Connect to the Internet using” and “Connect to my home network using “
If you see lot Network Adapter item ,you must choose the latest Network Adapter
29
USER MANUAL for USB2.0 Data-Link/ Bridge-Network
7.
Use windows command prompt:”IPCONFIG” to check the connection status.
8.
Other PC only connect cable (you don’t setup IP Address)
30
USER MANUAL for USB2.0 Data-Link/ Bridge-Network
9.
use windows command prompt:”IPCONFIG” to check the connection status.
10. Finish
FOR WINME
1.
2.
Please Step by Step: for win98 1~3
Click windows Setup > communications >Details
Choose ”Internet Connect Sharing” and click “OK”
31
USER MANUAL for USB2.0 Data-Link/ Bridge-Network
3.
Choose Next or Cancel , Click “Cancel”
4.
Click “start→programs →Accessories →connections →”Home Networking Wizard”
5.
Click “Next” to continue
32
USER MANUAL for USB2.0 Data-Link/ Bridge-Network
6.
Choose “I want to edit my Home Networking setting on this computer .Click “Next”
33
USER MANUAL for USB2.0 Data-Link/ Bridge-Network
7.
Click “Next”
8.
Click “Next”
34
USER MANUAL for USB2.0 Data-Link/ Bridge-Network
9.
Click “Next”
10. Click “Next”
35
USER MANUAL for USB2.0 Data-Link/ Bridge-Network
11. Click “Next”
12. Choose ”No,do not create a Home networking Setup disk.” ,Click “Next”
36
USER MANUAL for USB2.0 Data-Link/ Bridge-Network
13. Click “Finish”
14. Use windows command prompt:”IPCONFIG” to check the connection status.
15. Other PC only connect cable (you don’t setup IP Address)
16. Finish
Note:General Internet setting for Peer-to-peer internet connection sharing
a) User must be logged on as an administrator or a member of the Administrators group in order to
complete this procedure.
b) Under Internet Connection Sharing, in Home networking connection, select any adapter
that connects the computer sharing its Internet connection to the other computers on user’s
network.
c) When user runs the Network Setup Wizard and enables Internet Connection Sharing,
certain protocols, services, interfaces, and routes are configured automatically. The following
describes these configured items.
37
USER MANUAL for USB2.0 Data-Link/ Bridge-Network
If users are enabling Internet Connection Sharing on a LAN connection, TCP/IP for the LAN
interface that is connected to the Internet must be configured with a default gateway. The
TCP/IP addressing for this interface may be a static address or dynamic addressing using
DHCP.
For example:
Bridge-Network
d) To enable Internet Connection Sharing (ICS) Discovery and Control on Windows 98, Windows
98 SE, and Windows Millennium Edition computers, run the Network Setup Wizard from the
CD or floppy disk on these computers.
e) For ICS Discovery and Control to work on Windows 98, Windows 98 Second Edition, and
Windows Millennium Edition computers, Internet Explorer version 5.0 or later must be installed.
f) Internet Connection Sharing is not available on Windows XP 64-Bit Edition.
5. Three or more computers share in internet resource with Bridge-Network connection.
( Bridge-computers are for Windows XP only, other local computers are for
Windows98/ME/2K/XP)
Setup Bridge-computer which is connected 2 or more local connections of
For example:
38
Bridge-Network.
USER MANUAL for USB2.0 Data-Link/ Bridge-Network
Bridge Network
Bridge-Network
To stride across
Bridge -Network
Bridge -Network
(1)
User can find 2 or more
Bridge -Network
Bridge-Network connections in the bridge computers.
(2) Open Network Connections (Click Start, click Control Panel, click Network and
Internet Connections, and then click Network Connections). Under LAN or High-Speed
Internet select each of the private network connections that you want to be part of the
bridge. Right-click one of the highlighted private network connections, and then click
Bridge Connections.
39
USER MANUAL for USB2.0 Data-Link/ Bridge-Network
(3) IP address setting is same as Peer-to-peer Internet resource sharing. User have to
manual fill into correctly value of bridge connection:
IP address:192.168.0.x
Subnet mask:255.255.255.x
Default gateway:192.168.0.1
40
USER MANUAL for USB2.0 Data-Link/ Bridge-Network
Software Change Device Mode
(The cable don’t plug-out, it’s the status of the connect)
Attention :
When you like to use software change , Hardware change function will be lost.
1.
Executable program : Click “PClnq2(ANSI)” or “PClnq2(Unicode)”
2.
Click “file→” Change Device Mode”
3.
You can select Cable and Mode option function .
41
USER MANUAL for USB2.0 Data-Link/ Bridge-Network
Network cable become High speed Data Bridge
First change mode show as below ………..
(Please to consult page 07 ~ page 08)
Network cable become High speed Data Bridge
First change mode show as below ………..
Please click “OK”
4.
You confirm method . Right-click on My Computer. Then click Hardware-Device Manager. Click
on Universal Serial Bus controllers and check if there is the Hi-Speed USB Bridge Cable.
Network adapters and check if there is the Hi-Speed USB-USB Network Cable.
42
Or on
USER MANUAL for USB2.0 Data-Link/ Bridge-Network
Q&A
Enable NetBUEI Protocol in windows 98SE
1. When you want use Network Neighborhood to connect others PC, but network
occur error message in Windows 98SE.
2.
Click right moue “Network Neighborhood >Properties>Network , Click “Add” .
43
USER MANUAL for USB2.0 Data-Link/ Bridge-Network
3.
Select “Protocol” click Add.
4.
Select “Microsoft>NetBEUI” click
5.
Finish , other PC step “2~5” again.
OK.
44
USER MANUAL for USB2.0 Data-Link/ Bridge-Network
Appendix:
Burn-in EEPROM objective﹕
When the cable used Software Change Device . You hope you can use Hardware Switch device Mode .
You must write your EEPROM Data again.
Condition :
※The cable must uses Data-Link driver (Hi-Speed USB Bridge Cable)
You can
verify the driver installation under Device Manager. Right-click on My Computer. Then
click Hardware-Device Manager. Click on Universal Serial Bus controllers and check if there is the
Hi-Speed USB Bridge Cable.
Note :
If the cable shows
Hi-Speed USB-USB Network Adapter .it isn’t Hi-Speed USB Bridge Cable. You
must Software Change Device Mode became Data-Link driver(Hi-Speed USB Bridge Cable)
(Please consult page 41 ~ page 42)
45
USER MANUAL for USB2.0 Data-Link/ Bridge-Network
1. Browse and find “EEPROM” Folder in your driver CD open ”eeprom2501.exe” file.
2. Please click “Load “(open ”default.sdt” file.)
To mark
You must to confirm
status is “ready” .
46
USER MANUAL for USB2.0 Data-Link/ Bridge-Network
3. You can Change Serial Number(It’s Device ID, It must is one and only number .)
Then click “Write”
4. Please select ”Quit” before click “save “(Save Serial Number )
5. Finish
Ver:0.1.0.0
47
USER MANUAL for USB to Bridge-Network
Bridge-Network Cable
Overview
The USB Networking Cable provides a quick and easy solution to network up to 17 USB computers via
hot Plug & Play technology without adding any network interface cards. It is suitable for small offices,
home offices, mobile users, and network gamers. With the USB Network Bridge Cable, users can play
multi-player games, share files, printers, peripheral equipment, and more.
Features
USB host to host communication
Single cable solution for network communication
Standard Windows Explorer user interface
Maximum Data transfer rate: Over 5 Mbps
Construct USB Network up to 17 PCs
Sharing resources, such as Printers, CD-ROMs, Modems, Scanners, etc.
Support TCP/IP, NetBEUI, IPX/SPX protocols
Full NDIS driver implementation
No external power needed
Compliant with USB specification version 1.1&2.0
USB full and High speed connection
Hot PnP for easy use
Suitable for SOHO and mobile network environment
System Requirements
Windows 98SE/2000/ME/XP
*********************************************************************************
Bridge-Network
Indicate light
Running the Setup
Bridge-Network software Application setting
Uninstalling the PCLinq2 Bridge Cable
–page 02
–page 03
–page 07
–page 29
–page 31
Q&A
*********************************************************************************
1
USER MANUAL for USB to Network
Indicate light Status
1
3
2
1. Power Light : Show Green Light. When you Link Cable ,as Power ON/OFF
2. Switching Button : None function ,none switching .
3. Action Light : Flash Yellow light .When It’s working as data linking or bridge
networking .
2
USER MANUAL for USB to Network
Running the Setup Program
Before you plug-in and use the Hi-Speed USB-USB Network Cable for the first time in your computer, you first
have to run the SETUP InstallShield program to preload the drivers and programs into your computer. This
step is necessary in order for you to use the USB Bridge Cable properly under Windows operating system.
The following steps will show how to install the Hi-Speed USB-USB Network Cable under Windows XP. If you
are using other Windows OS versions, the installation is also the same but the look of the dialogue boxes may
be a bit different. This Setup program only supports Windows 98SE, ME, 2000, and XP.
1.
Power on your computer and boot to Windows. Load the Hi-Speed USB-USB Network Cable Driver CD
and run the SETUP.EXE executable program file. The Setup program will then start to prepare the
InstallShield Wizard that will guide you through the rest of the setup process.
2.
The InstallShield Wizard welcome dialog box will then appear to display some information regarding the
Setup program. Follow the instructions and click Next to continue.
3.
Wait until Setup has finished installing the Hi-Speed USB-USB Network Cable Driver. When it prompts
you that installation is complete, click Finish to end.
3
USER MANUAL for USB to Network
4.
Now locate the USB port of your computer and plug in the PCLinq2 Hi-Speed USB-USB Network Cable.
If your computer has a Hi-Speed USB 2.0 port, plug the cable into this port. The USB port usually has the
imprinted
5.
symbol.
Wait till Windows detects the Hi-Speed USB-USB Network Cable and prompts you for the device driver
location. If prompted, select to install the software automatically (Recommended) and click Next to
continue.
4
USER MANUAL for USB to Network
6.
Windows will then detect the preloaded driver. Before Windows installs the driver, it may prompt you that
this device driver (Hi-Speed USB-USB Network Adapter) has not yet passed Windows XP Logo
compatibility. Click Continue Anyway.
7.
Windows will then start to install the driver for the Hi-Speed USB-USB Network Adapter Once
installation is complete, Windows will prompt you that it has finished. Click Finish to continue.
5
USER MANUAL for USB to Network
8.
You can also verify the driver installation under Device Manager. Right-click on My Computer. Then click
Device Manager. Click on Universal Serial Bus controllers and check if there is the Hi-Speed USB-USB
Network Adapter.
6
USER MANUAL for USB to Network
Bridge-Network software application setting
Steps by Steps to enable Internet Connection Sharing on a network connection:
1. Peer-to-Peer File-Sharing with Bridge-Network connection.
2. (For Windows 98SE/ME/2K/XP, both sides setting are the same)
Manual IP address setting.
(1)Open Network Connections (Click Start, click Control Panel, click Network and Internet
Connections, and then click Network Connections).
(2)Select “Internet Protocol(TCP/IP)”, and click “Properties”.
7
USER MANUAL for USB to Network
(3)Fill in driver default IP address value:”169.254.x.x”, and click “OK”.
(4)User can check the connection information to verify whether IP address is settle done.
(5)Or use windows command prompt:”IPCONFIG” to check the connection status.
8
USER MANUAL for USB to Network
(6)Another connection of Bridge-Network setting in another computer is the same. User can
use “My Network Places:search for computer” to find the connected computer.
Fill in the computer name to search target computer in the network.
Auto-detected IP address setting
User have to wait for windows O.S. assigning IP address about 2~3 minutes while connected. And the
following steps are same as manual IP address setting.
9
USER MANUAL for USB to Network
3. Two computers share in internet resource with Bridge-Network connection,(For 2K/XP),
Setup A-computer which is external internet connection.(LAN or Modem)
(1)Enable the local connection(internet connection)properties to setup internet sharing.
※If only one local Area Connection Icon on the folder, you can’t found the Sharing selection item..
(2)Select “Sharing”, and click “Enable Internet Connection Sharing for this connection “ and
click “OK”
(3)Windows O.S. will force to assign a default IP address(192.168.0.1) for this sharing,
10
USER MANUAL for USB to Network
please just click “OK”.
Virtual-Network local connection will be forced to set IP address as below:
Setup B-computer which is only local connection with A-computer.
(1)Enable the local connection(USB-USB Network)properties to setup the suitable IP
11
USER MANUAL for USB to Network
address/Mask/gateway:
IP address:192.168.0.x
Subnet mask:255.255.255.0
Default gateway:192.168.0.1
(2)Also, do not forget to set correct Internet connection value which should be same as
A-computer.
12
USER MANUAL for USB to Network
(3)B-computer is available to share the internet resource from A-computer.
13
USER MANUAL for USB to Network
4. Two computers share in internet resource with Bridge-Network connection(For98SE/ME),
Setup A-computer which is external internet connection.(LAN or Modem)
FOR WIN98SE
1. Setup Fixed IP ( When you don’t have DHCP Server, you only have one Fixed IP )
PS . When you have DHCP Server, you don’t setup anymore.
Network Neighborhood>Properties>TCP/IP > Properties
Setup :IP Address (Please key-in ISP give you )
Setup : Gateway
14
USER MANUAL for USB to Network
Setup : DNS(Domain Name Server)
2.
Click “Add/Remove programs”
15
USER MANUAL for USB to Network
3.
4.
choose ”Windows Setup”>Internet Tools and Click “Details”
choose ”Internet Connection Sharing” and click “OK”
16
USER MANUAL for USB to Network
1.
5.
Install
“Internet Connection Sharing Wizard “,Click “Cancel “
6.
Click “start→program file→Control Panel →Internet Options>Connections>”Sharing”
Please change “Connect to the Internet using” and “Connect to my home network using “
If you see lot Network Adapter item ,you must choose the latest Network Adapter
17
USER MANUAL for USB to Network
7.
Use windows command prompt:”IPCONFIG” to check the connection status.
8.
Other PC only connect cable (you don’t setup IP Address)
18
USER MANUAL for USB to Network
9.
use windows command prompt:”IPCONFIG” to check the connection status.
10. Finish
FOR WINME
1.
2.
Please Step by Step: for win98 1~3
Click windows Setup > communications >Details
Choose ”Internet Connect Sharing” and click “OK”
19
USER MANUAL for USB to Network
3.
Choose Next or Cancel , Click “Cancel”
4.
Click “start→programs →Accessories →connections →”Home Networking Wizard”
5.
Click “Next” to continue
20
USER MANUAL for USB to Network
6.
Choose “I want to edit my Home Networking setting on this computer .Click “Next”
21
USER MANUAL for USB to Network
7.
Click “Next”
8.
Click “Next”
22
USER MANUAL for USB to Network
9.
Click “Next”
10. Click “Next”
23
USER MANUAL for USB to Network
11. Click “Next”
12. Choose ”No,do not create a Home networking Setup disk.” ,Click “Next”
24
USER MANUAL for USB to Network
13. Click “Finish”
14. Use windows command prompt:”IPCONFIG” to check the connection status.
15. Other PC only connect cable (you don’t setup IP Address)
16. Finish
Note:General Internet setting for Peer-to-peer internet connection sharing
a) User must be logged on as an administrator or a member of the Administrators group in order to
complete this procedure.
b) Under Internet Connection Sharing, in Home networking connection, select any adapter that
connects the computer sharing its Internet connection to the other computers on user’s network.
c) When user runs the Network Setup Wizard and enables Internet Connection Sharing, certain
protocols, services, interfaces, and routes are configured automatically. The following describes
these configured items.
25
USER MANUAL for USB to Network
If users are enabling Internet Connection Sharing on a LAN connection, TCP/IP for the LAN
interface that is connected to the Internet must be configured with a default gateway. The
TCP/IP addressing for this interface may be a static address or dynamic addressing using
DHCP.
For example:
Bridge-Network
d) To enable Internet Connection Sharing (ICS) Discovery and Control on Windows 98, Windows 98
SE, and Windows Millennium Edition computers, run the Network Setup Wizard from the CD or
floppy disk on these computers.
e) For ICS Discovery and Control to work on Windows 98, Windows 98 Second Edition, and Windows
Millennium Edition computers, Internet Explorer version 5.0 or later must be installed.
f) Internet Connection Sharing is not available on Windows XP 64-Bit Edition.
5. Three or more computers share in internet resource with Bridge-Network connection.
( Bridge-computers are for Windows XP only, other local computers are for
Windows98/ME/2K/XP)
Setup Bridge-computer which is connected 2 or more local connections of
For example:
26
Bridge-Network.
USER MANUAL for USB to Network
Bridge Network
Bridge-Network
To stride across
Bridge -Network
(1)
User can find 2 or more
Bridge -Network
Bridge -Network
Bridge-Network connections in the bridge computers.
(2) Open Network Connections (Click Start, click Control Panel, click Network and Internet
Connections, and then click Network Connections). Under LAN or High-Speed Internet
select each of the private network connections that you want to be part of the bridge.
Right-click one of the highlighted private network connections, and then click Bridge
Connections.
27
USER MANUAL for USB to Network
(3) IP address setting is same as Peer-to-peer Internet resource sharing. User have to
manual fill into correctly value of bridge connection:
IP address:192.168.0.x
Subnet mask:255.255.255.x
Default gateway:192.168.0.1
28
USER MANUAL for USB to Network
Uninstalling the PCLinq2 Bridge-Network Cable
It is easy to uninstall the PCLinq2 Hi-Speed USB Bridge Cable driver.
1.
Make sure to first close all PCLinq2 programs and unplug the USB Bridge cable.
2.
Go to Control Panel and double-click on Add or Remove Programs.
3.
Look for the PCLinq2 Hi-Speed USB Bridge Cable and click Change/Remove button.
4.
The Setup program will prompt you whether you are sure to uninstall or not. Make sure that you have unplugged the USB Bridge
cable and click Yes to continue.
5.
The Setup program will then start to uninstall the PCLinq2 Hi-Speed USB Bridge Cable driver. Wait for Setup to complete
uninstallation.
6.
After Setup has completely uninstalled the driver and programs, it will prompt you to restart Windows. It is recommended that
you restart your computer.
29
USER MANUAL for USB to Network
Disclaimer
All the information in this document is subject to change without prior notice. The manufacturer does
not make any representations or any warranties (implied or otherwise) regarding the accuracy and
completeness of this document and shall in no event be liable for any loss of profit or any other
commercial damage, including but not limited to special, incidental, consequential, or other damages.
No part of this document may be reproduced or transmitted in any form by any means without the express
written permission of the manufacturer.
All brand names and product names used in this document are trademarks or registered trademarks
of their respective holders.
30
USER MANUAL for USB to Network
Q&A
Enable NetBUEI Protocol in windows 98SE
1. When you want use Network Neighborhood to connect others PC, but network
occur error message in Windows 98SE.
2.
Click right moue “Network Neighborhood >Properties>Network , Click “Add” .
31
USER MANUAL for USB to Network
3.
Select “Protocol” click Add.
4.
Select “Microsoft>NetBEUI” click
5.
Finish , other PC step “2~5” again.
OK.
Ver:0.1.0.0
32
Hi-Speed USB-USB Network Cable
Quick Network Setup Guide
For Windows 98/ME/2000/XP
Congratulations!
Congratulations for installing the Hi-Speed USB-USB Network Cable. This Quick
Network Setup guide is for explaining the network device mode installation of the
cable.
Driver Installation
1. Run the Hi-Speed USB-USB Network Cable Setup program.
2. When Setup is complete, plug in the USB-USB Network cable to the USB port
of your computer.
3. The New Hardware Wizard will detect the “Hi-Speed USB-USB Network
Adapter” device and will prompt you to install the software. Click “Install the
software automatically” and Next button to continue.
4. Windows will detect that the software you are installing has not yet passed
Windows Logo testing. Click “Continue Anyway”.
5. Wait until the New Hardware Wizard finishes installing the software. Click the
Finish button if installation is complete.
Hi-Speed USB-USB Network Cable User’s Manual
Internet Connection Sharing
In order to allow network and Internet access to the remote client PC (without
built-in network adapter), you need to first setup the Windows Internet
Connection Sharing in your host computer (with built-in network adapter).
Note: You only need to do this additional setup for the computer with the built-in
network access. After you finished and restarted Windows, you can plug
the other end of the cable to the remote client computer.
Windows XP/2000
1. After you have finished installing the software, you now need to setup the
Internet Connection Sharing for the computer with the built-in network access.
Click Start-Control Panel-Network Connections.
2. You will find two network devices – one is the Hi-Speed USB-USB Network
Adapter and the other one is your built-in network adapter. Right-click the
built-in network adapter and click Properties.
3. Inside the Properties window, click the Advanced folder tab. On the Internet
Connection Sharing section, click or enable to allow other network users to
connect through this computer’s Internet connection. Click OK when done.
Hi-Speed USB-USB Network Cable User’s Manual
4. Check afterwards if your built-in network adapter is already shared.
5. Reboot Windows to activate the settings. After Windows has started properly,
plug the other end of the USB Bridge-Network cable to the remote computer.
Make sure you have run the Setup program on the remote computer as well.
Note that you don’t need to do the above additional settings for the remote
computer.
6. Check the remote client computer if the host computer is detected and if the
network and Internet access if functioning.
Windows ME
1. Click Start-Control Panel and double-click on the Internet Options.
2. Go to the Connections folder tab of Internet Properties and click on the
Sharing button.
Hi-Speed USB-USB Network Cable User’s Manual
3. The Home Networking Wizard will then appear to start the network sharing.
Click Next to continue.
1. The Home Networking Wizard will then prompt you if you use the Internet on
your host computer. Click Yes and select the built-in network adapter that has
a direct connection to Internet.
2. The Home Networking Wizard will then prompt you if you want other
computers to use the Internet connection on your host computer. Click Yes
and select the “Hi-Speed USB-USB Network Adapter” that connects your host
computer to the remote computer. Click Next to continue.
3. Follow the instructions on the succeeding dialog boxes to complete the setup.
When asked if you want to create a network setup disk, you can skip that
option. Click Finish when the Home Networking Wizard is complete.
4. After you have completed the Internet Connection Sharing, Windows will
prompt you to restart your computer. Click Yes to restart.
Hi-Speed USB-USB Network Cable User’s Manual
5. After Windows restarts, the Home Networking Wizard will prompt you that you
have successfully completed installation.
6. Check also the Windows taskbar if the Internet Connection Sharing icon
appears. You can right-click on the icon and click Options.
7. Inside the Properties window, you can see the Internet Connection Sharing
settings of your host computer.
8. Plug the other end of the cable to the remote computer. Make sure you have
run the Setup program on the remote computer as well. Note that you don’t
need to do the above additional settings for the remote computer.
Hi-Speed USB-USB Network Cable User’s Manual
Windows 98SE
For Windows 98, you need first to install the Internet Connection Sharing option.
1. Click Start-Control Panel and double-click on the Add/Remove Programs. Go
to the Windows Setup folder tab and double-click on Internet Tools.
2. Click to add the Internet Connection Sharing component and insert the
Windows 98 CD-ROM.
Hi-Speed USB-USB Network Cable User’s Manual
3. After you have installed the Internet Connection Sharing component, the
Wizard dialog box will appear to start setup.
4. Next, select the built-in network adapter that physically connects the host
computer to the Internet.
5. Follow the instructions on the succeeding dialog boxes to complete the setup.
When asked if you want to create a configuration disk, you can skip that
option. Click Finish when the Wizard is complete. After you have completed
the Internet Connection Sharing, Windows will prompt you to restart your
computer. Click Yes to restart.
6. To enable the Internet Connection Sharing icon on the Windows taskbar, go to
the Internet Properties and click the Sharing button.
7. Click on the Show Icon in Taskbar.