1
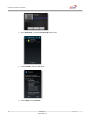
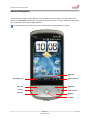
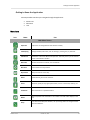
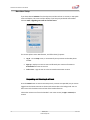
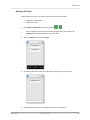
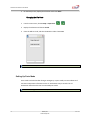
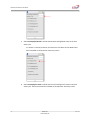
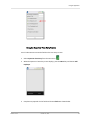
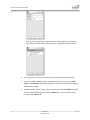
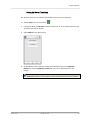
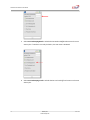
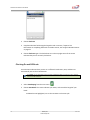
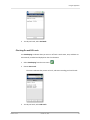
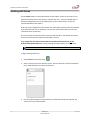
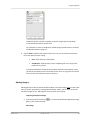
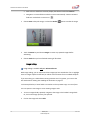
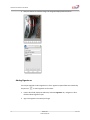
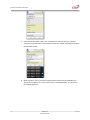
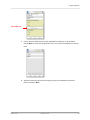
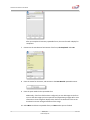
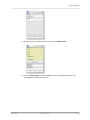
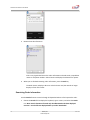
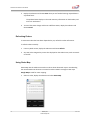
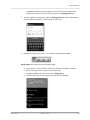
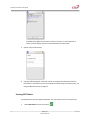
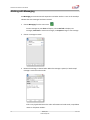
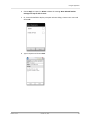
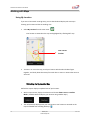
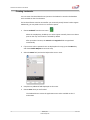
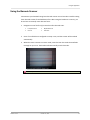
mComet for Android
User Guide
™
for Release 1.0.4.4
™
Introduction
About mComet
About mComet
Actsoft mComet User Guide
October 12, 2012 ©2012 Actsoft, Inc. All rights reserved.
Actsoft Confidential and Proprietary
This document contains proprietary information subject to a non-disclosure agreement and is not to
be released without prior written authorization from Actsoft, Inc. mComet, Comet Tracker (CT) and
the Comet Tracker logo are trademarks of Actsoft, Inc.
Android and related trademarks, names and logos are the property of Google and are registered
and/or used in the U.S. and countries around the world.
Sprint and the Sprint logo are registered trademarks of Sprint.
Copyright Notice
Copyright laws of the United States and other countries protect the material contained in this
document. It may not be reproduced, distributed, or altered in any fashion by any entity without the
express written permission of Actsoft, Inc.
Statement of Accuracy
Every effort has been made to ensure that the information in this document is complete and
accurate at the time of printing. However, the information in this document is subject to change
without notice.
Supported Devices
Handsets
mComet for Android™ Release 1.0.4.4 should be used with the following Android devices:
Galaxy Tab HTC Hero
Motorola Atrix 2
Motorola Droid 2
Samsung Gem
Release 1.0.4.4
HTC View 4G
Motorola Admiral
Motorola Droid X
Samsung Mesmerize
October 12, 2012
Motorola Droid A855
Motorola Backflip
Sanyo Zio
Dell Streak 5
Motorola i1 Opus One
Motorola XOOM
Samsung Captivate
i
mComet™ for Android™ User Guide
Peripherals
mComet for Android Release 1.0.4.4 can be used with the following hardware peripheral(s):
Pens – HTC Scribe Pen
Handset Functionality
Instructions in this document are intended to be independent of any particular handset brand, make
or model. As such, only the software interface will be shown in most instances. In this release, the
HTC Hero is used for illustrations. Please see the user manual for your handset for specific
instructions on button placement and features.
Document Ordering
To order a copy of this or any other document in the Actsoft documentation suite, contact your sales
representative. Documentation will be supplied to clients of Actsoft, Inc. only.
Technical Support and Training
For technical support, contact Actsoft at:
Email:
mailto:[email protected]
Phone:
813.936.1511
Fax:
813.600.4539
Mail:
Actsoft, Inc.
10006 N. Dale Mabry Hwy., Ste. 100
Tampa, FL 33618
For training on the Actsoft product suite, contact:
Scheduling:
813.936.2331; then select menu option 3
Using mComet
The mComet handset application used with the Comet Tracker workstation application allows
workers in the field to communicate efficiently with the home office. Use mComet to clock in and
out of work shifts, enter information about jobs, and receive updated forms while in the field.
ii
Actsoft, Inc.
www.actsoft.com
Rev. 3.0
Introduction
About mComet
mComet uses built-in GPS tracking function to gather location information at specified time intervals
and transmit the resulting data to the hosted server.
Purpose and Audience
This document is intended for users and administrators of the mComet cellular application. It
provides the following information:
•
•
•
•
•
Installation and setup
Configuration modification
Navigation
Working with customized forms and orders
Working with maps and getting directions
Detailed information on the Comet Tracker software is not provided in this document.
Application Requirements
•
•
•
•
•
•
SD Card (required for downloading mComet and image/signature capture)
Web browser installed on the Android device
Operating system: Minimum - 2.1
ZXing Team Barcode scanner software installed on the device (required for scanning)
Unlimited Data Service Plan
Management application (either of the following):
o Comet Tracker installed on a workstation
o Comet EZ
Please contact Actsoft Technical Support about additional requirements for your handset software
version and/or handset model.
Release 1.0.4.4
October 12, 2012
iii
mComet™ for Android™ User Guide
What’s New in this Guide
mComet Release 1.0.4.4 features the following enhancement(s):
Form Preview/Review –
Users can now preview their Regular/Advanced Forms, Orders, Worker Statuses and Timekeeping
forms data before submission. A form review screen is also available from the History screen to
review previously-submitted forms.
Save and Send –
Submit the form you are working with and simultaneously save a copy to the handset with the Save
and Send function. Save and Send eliminates the need to recreate a single form – users can simply
navigate to the saved form in the Archived area, and begin using.
Archive Form Rename –
Rename an archived form’s name when you save it to the Archived area. Under the Options menu,
you can set the application to prompt for the name whenever the user saves a form. You can also
long press a form entry onscreen to open the Save As dialog.
Revision History
Version
Date
Comments
1.0
January 1, 2009
Manual redesign
2.0
April 21, 2009
Manual redesign
3.0
February 22, 2010
Manual restructure
Symbols Used Frequently in this Document
Type
What it Means:
Important Note
Warning – action may adversely affect application or
handset performance
iv
Actsoft, Inc.
www.actsoft.com
Rev. 3.0
Introduction
Contents
Contents
About mComet ...........................................................................................................................................................i
Installing mComet.....................................................................................................................................................7
Enabling the Scribe Pen .............................................................................................................................................................. 11
Uninstalling mComet ..................................................................................................................................................... 11
Handset Navigation ............................................................................................................................................... 12
Getting to Know the Application ................................................................................................................................... 15
Menu Icons ................................................................................................................................................................................. 15
Required Fields and Lists ............................................................................................................................................................ 16
Setting Up mComet ............................................................................................................................................... 17
New User Setup ............................................................................................................................................................. 18
Suspending and Returning to mComet ....................................................................................................................................... 18
Setting a Pin Code ......................................................................................................................................................... 19
Changing the Pin Code................................................................................................................................................................ 20
Setting Up Panic Mode .................................................................................................................................................. 20
Activating Panic Mode ................................................................................................................................................................ 21
Using the Application ............................................................................................................................................ 23
Worker Status ............................................................................................................................................................... 23
Using Repeat Timer Alerts with Worker Statuses ....................................................................................................................... 24
History ........................................................................................................................................................................... 24
Filtering Records ......................................................................................................................................................................... 25
Working with Time Entry ...................................................................................................................................... 27
Setting Up Supervisor Time Entry ............................................................................................................................................... 27
Using the Supervisor Time Entry Feature ................................................................................................................................... 29
Setting Up Worker Time Entry .................................................................................................................................................... 31
Using Time Punch ....................................................................................................................................................................... 33
Clocking In ..................................................................................................................................................................... 34
Clocking Out .................................................................................................................................................................. 35
Clocking On and Off Break ............................................................................................................................................. 36
Clocking On and Off Lunch ............................................................................................................................................. 37
Working with Forms .............................................................................................................................................. 38
Adding Images ............................................................................................................................................................... 39
Release 1.0.4.4
October 12, 2012
v
mComet™ for Android™ User Guide
Image Editing .............................................................................................................................................................................. 40
Adding Signatures ......................................................................................................................................................... 42
Creating Child Forms ..................................................................................................................................................... 43
Advanced Forms ............................................................................................................................................................ 45
Screen Elements and Field Behavior........................................................................................................................................... 45
Sample Service Call Workflow .................................................................................................................................................... 48
Form Preview .............................................................................................................................................................................. 54
Working with Orders ............................................................................................................................................. 55
Order Alerts ................................................................................................................................................................................ 55
Reading Orders .............................................................................................................................................................. 55
Searching Order Information ......................................................................................................................................... 56
Updating Order Status ................................................................................................................................................... 57
Refreshing Orders.......................................................................................................................................................... 58
Using Route Map ........................................................................................................................................................... 58
Using Forms with Orders ............................................................................................................................................... 61
Viewing GPS Status........................................................................................................................................................ 62
Working with Messaging ...................................................................................................................................... 64
Working with Maps ................................................................................................................................................ 66
Using My Location ......................................................................................................................................................... 66
Refreshing the My Location Map ............................................................................................................................................... 66
Getting Directions ....................................................................................................................................................................... 67
Map Submenu Options ............................................................................................................................................................... 71
Creating Landmarks ....................................................................................................................................................... 72
Using the Barcode Scanner .................................................................................................................................. 73
Index ....................................................................................................................................................................... 75
Glossary ................................................................................................................................................................. 77
vi
Actsoft, Inc.
www.actsoft.com
Rev. 3.0
Installing/Uninstalling mComet
Installing mComet
Install the application on your handset before using mComet. If you are installing an upgrade to an
existing version of mComet, you must first uninstall the existing version. Contact Actsoft Technical
Support for assistance with all uninstalls.
Allow Location Access
You must first allow the handset to receive signals from any location. Note that menu
names/designations may appear differently on different handsets:
1. Press the Menu key.
2. Choose Settings.
3. Choose Location Services.
4. Choose My Location, and ensure that the following are checked:
•
•
•
Use Wireless Networks
Use GPS Satellites
Use [Carrier]’s location services
5. Confirm your choices on the dialog that follows.
6. Press the Home key to return to the home screen.
Now, install mComet in one of two ways:
•
via the Play Store (formerly Android Market)
•
via ZXing Team barcode (See Via ZXing Team barcode scan on page 9)
mComet Installation Via Play Store
1. From the home screen, choose Play Store.
2. Enter Actsoft in the search field.
3. Select Install on the Actsoft Comet Tracker information screen.
Release 1.0.4.4
October 12, 2012
7
mComet™ for Android™ User Guide
4. Choose Install to confirm mComet application access permissions.
5. Choose Done to return to the Home screen, or Open to run mComet now. If you press Done,
you can return to the Home screen and open mComet later. An icon for mComet is also added to
the Applications screen.
8
Actsoft, Inc.
www.actsoft.com
Rev. 3.0
Introduction
Installing/Uninstalling mComet
Installing mComet Via ZXing Team barcode scan
1. From the home screen, press Applications, and then choose Barcode Scanner
.
The handset screen orientation will change to horizontal, and display a red laser.
2. Center the mComet barcode below inside the viewfinder’s laser rectangle.
3. When the scan is successful, choose Open browser.
Release 1.0.4.4
October 12, 2012
9
mComet™ for Android™ User Guide
4. Go to Downloads, and choose mComet.apk from the list.
5. Choose Install to start the download.
6. Choose Open to start mComet.
10
Actsoft, Inc.
www.actsoft.com
Rev. 3.0
Introduction
Installing/Uninstalling mComet
Enabling the Scribe Pen
If you have an HTC Scribe Pen, you can configure the handset to use the stylus after you have set up
mComet:
1. From the mComet Setup screen, choose Menu.
2.
Choose Devices.
3. Choose the HTC Pen device.
4. Choose Done.
Uninstalling mComet
Uninstall mComet before installing a new version of the application. Contact Actsoft Technical
Support at 813-936-1511 for assistance with all uninstalls.
Release 1.0.4.4
October 12, 2012
11
mComet™ for Android™ User Guide
Handset Navigation
mComet uses the navigation tools available on your handset to move through screens and menus. In this
document, the HTC Hero, shown below, is used for all illustrations. If you are using a different handset model,
keys, screens and menus may be slightly different.
For detailed information on how to use your handset model, see your handset user guide.
Phone key
All Programs key
Add to Home key
Menu key
Search key
Call key
End/Power key
Home key
Back key
Trackball
HTC Hero
12
Actsoft, Inc.
www.actsoft.com
Rev. 3.0
Navigating mComet
Add to Home key
Touch Add to Home to add shortcuts, widgets and folders on the home
screen.
All Programs key
Touch to display the All Programs screen. This screen displays all
applications loaded on the handset.
Back key
To return to a previous screen, close a dialog box or close the onscreen
keyboard, press the Back key.
Call key
To make or receive calls, answer Call Waiting, use 3-Way Calling, or activate
Automatic Speech recognition, press the Call key.
End/Power key
To end a call or to power the handset on or off, press the End/Power key.
Additionally, you can press the End/Power key to return to the home menu
when you are not on a call.
Home key
To return to the Home screen, press the Home key. You can also press and
hold the Home key to open the recently-used applications window.
Phone key
Touch Phone to answer an incoming call.
Menu key
To access submenus within mComet, press the Menu key. Or, press the
Menu key to access the handset menu.
Search key
To search information in the current screen or application, press the Search
key.
Trackball
To select or highlight items onscreen, press the Trackball. The Trackball also
flashes when you receive an incoming call.
Release 1.0.4.4
October 12, 2012
13
Getting to Know the Application
Getting to Know the Application
mComet provides several ways to navigate through the application:
•
•
•
Menu Icons
Submenus
Lists
Menu Icons
Icon
Name
Use
Main Menu Screen
Release 1.0.4.4
Supervisor
Supervisors can change worker time statuses remotely.
Timekeeping
Manage workday time events, such as clocking in, clocking out, on /off break.
Time Punch
Manage your own time events, and other worker’s, if you know the necessary
credentials. Time Punch differs from Supervisor Time Entry in that you do not have
access to all clocked-in workers.
GPS Status
Monitor the locations of assets, such as handsets.
Directions
Access directions to any location.
My Location
View your location on the map.
Status
Update worker, job or form resources.
Forms
Add forms, (tasks) for any type of job function, such as a service call, delivery, etc.
Landmarks
Add a landmark for a specified location.
Orders
View and update order information. The number of unread orders displays on the
icon.
Setup
Enter Account Number/User Number, set up scanning devices or configure worker
time event behavior.
October 12, 2012
15
mComet™ for Android™ User Guide
Messaging
Send and receive messages from the home office. New messages are indicated by
an asterisk on the envelope.
History
View and search records for all transmissions, including order/form updates, time
entry records and landmarks.
Clock In
Displays in upper right corner of screen to show clocked in status.
Clock Out
Displays in upper right corner of screen to show clocked in status.
Panic Mode
Displays in upper right corner when Panic mode is activated.
Asterisk
Displays next to a form field that must be completed.
Camera
Displays next to a camera-activated form field.
Pen
Displays next to a signature-required/enabled field.
Submenu options change depending on your place in the application. Select Menu to display
the submenu for the current screen.
Required Fields and Lists
Use lists to select specific values in fields. For example, in Timekeeping, you may have to
choose from set values on clock in, such as Vehicle Number. You may also be able to enter
unique data in required fields. Required fields and list fields are designated by asterisks and
drop-down arrows, as shown on the custom form below.
16
Actsoft, Inc.
www.actsoft.com
Rev. 3.0
mComet Setup
Setting Up mComet
On installation, mComet will perform an automatic setup using your PTN (Personal
Telephone Number) if it has been configured in Comet Tracker. If your PTN has not been
configured, enter your Account Number and User Number manually on the setup screen.
Complete the setup process while you are in network coverage.
Your account and user number are stored on the handset. Choose Setup to change this
information.
All archived forms on the handset will be deleted if the handset setup is modified.
1. On the handset’s main menu, choose the mComet icon
to start the application.
The mComet icon will display on the main menu only if you have set it to display
there. See Setting Application Options on page 11 for more information on this
setting.
The mComet Setup screen displays.
2. Enter your company’s Account Number (provided by Actsoft) and User Number. You
only need to complete this information the first time you run mComet.
3. Choose Done to save the setup information.
mComet sends the account and user information and downloads the handset
settings from the server. The mComet menu displays. User setup is now complete.
Menu options are determined by your Comet Tracker administrator.
Release 1.0.4.4
October 12, 2012
17
mComet™ for Android™ User Guide
New User Setup
If you have selected mComet from the Play Store and do not have an account, a new splash
screen will display. This screen will also display if you have just purchased and installed
mComet. Note: Upgrading users will not see this screen.
This screen explains some AWF features, and offers three (3) options:
•
Log In – Go to Setup screen, or automatically set up mComet via handset phone
number
•
Sign Up – Displays a screen to enter and forward your contact information to
Actsoft Sales to create an account
•
Take a Tour – Logs the user in to the mComet demonstration account
Suspending and Returning to mComet
Press the Home button to exit mComet temporarily. mComet is suspended, but you remain
logged in and mComet continues to obtain and transmit data in the background. You can
then return to the handset menu and use all the handset features.
Choose the mComet icon from the handset’s main menu screen (or Apps > mComet) to
resume.
18
Actsoft, Inc.
www.actsoft.com
Rev. 3.0
mComet Setup
Setting a Pin Code
mComet allows you to set a pin code in two (2) areas to restrict access to:
•
•
Application setup screens
Supervisor screens
1. Select Setup or Supervisor from the main menu.
Note: If Supervisor Time Entry has not been configured for your handset, the
Supervisor icon will not display on your main menu.
2. Touch the Menu key and choose Set Pin.
3. On the Pin Code screen, enter up to 30 numeric characters for your pin code.
4. Choose OK. The pin code is recorded and the Setup screen displays.
Release 1.0.4.4
October 12, 2012
19
mComet™ for Android™ User Guide
5. On the Setup screen, display the submenu and choose Done.
Changing the Pin Code
1. From the main menu, choose Setup or Supervisor.
2. Display the submenu and choose Set Pin.
3. Enter the Old Pin Code, and then the New Pin Code. Choose OK.
To delete the Pin Code, enter the old Pin Code, and leave the Enter New Pin Code field blank.
Setting Up Panic Mode
Panic mode tracks the handset during an emergency. In panic mode, mComet obtains and
transmits new position information to the CT workstation every 5 seconds. The CT
workstation shows that the user has activated panic mode.
Order and message icons are hidden when panic mode is active.
20
Actsoft, Inc.
www.actsoft.com
Rev. 3.0
mComet Setup
Panic Resume Timeout
Use Panic Resume Timeout to set the number of minutes that pass before mComet will be
resumed if suspended. This allows you to quickly access mComet and press the appropriate
button or key to alert the office to an emergency. Panic Resume Timeout is set at zero (0), or
Off, by default.
When mComet is resumed, mComet will sound a notification, vibrate the handset and
display in the status bar of the screen. Click Ok to resume mComet.
Panic mode is set up to work using the volume keys on either side of the handset.
Activating Panic Mode
1. Press the Volume Up or Down key on the left side of the handset for 5 seconds.
The handset vibrates briefly and the panic icon
of the screen.
displays in the upper right corner
2. Deactivate panic mode by again pressing the up or down volume key for 5 seconds.
Release 1.0.4.4
October 12, 2012
21
Using the Application
Using the Application
Worker Status
Use Worker Status to communicate your availability to the office. Before you choose a
status, ‘No Status’ displays on the title bar. After you choose a status, the updated status will
display on the handset and the CT workstation.
Administrators can link statuses to forms for additional information. For example, an
Available or Unavailable status can be linked to a From Time/To Time form that must be
completed before the status is accepted.
1. Select Worker Status from the main menu.
2. Select a status from those listed onscreen. Statuses with accompanying forms will
display an icon on the right.
3. Complete any forms linked to the status you have chosen, if necessary.
4. Choose Send. The new status will display on the title bar.
Now, your login is associated with your selected status until you change it. If you
choose an incorrect status, repeat the process.
Release 1.0.4.4
October 12, 2012
23
mComet™ for Android™ User Guide
Using Repeat Timer Alerts with Worker Statuses
Repeat timer alerts can be linked to worker statuses to provide ongoing updates. With
repeat timers, a time interval is associated with a status.
For example, a 15-minute timer can be associated with the 'Started Route' status to
estimate how long it takes a worker to reach a destination. This information can help
administrators to assign jobs and manage workloads more efficiently.
When repeat timer alerts are set up for your handset in CT, the handset will:
•
•
•
•
resume mComet for validation, if mComet has been suspended
display a repeat timer message
sound an audible alert
vibrate the handset
When the repeat timer alert sounds, the handset will display the following message
onscreen: ‘This status <name> requires a check in every <n> minutes’.
Choose Ok to confirm your status. The repeat timer continues to time your activity or status
in the background.
Each time the message is cleared, the updated status is sent to the CT workstation.
To change the status when you have completed the conditions of the timer alert, return to
the Worker Status icon on the main menu and change the status. See Worker Status on
page 23 for more information.
History
Select the History icon
to verify the sent status of completed or updated landmarks,
forms, orders, worker statuses, timekeeping records, etc. As data is transmitted, an entry is
added to the History screen with’ time added’ and ‘time sent’ timestamps. If the
transmission is successful, a green circle displays on the record. If the device is unable to
send the data, the Sent timestamp is blank and a yellow circle displays next to the record.
24
Actsoft, Inc.
www.actsoft.com
Rev. 3.0
Using the Application
As connectivity returns, timestamps for the unsent records are added and the yellow circle
changes to green, indicating a successful transmission.
You can also use the Search field to search records using any criteria, such as date, record
type or time.
Filtering Records
You can set a filter to display only specific record types, determine the maximum number of
records to display on the screen, or to hide the feature completely.
1. From the History screen, press the Menu key to display the Options screen.
2. Choose your desired settings for the fields displayed onscreen.
Release 1.0.4.4
October 12, 2012
25
mComet™ for Android™ User Guide
3. Select Ok. If you opt to hide history records, they continue to be stored and are
available when History is re-enabled.
26
Actsoft, Inc.
www.actsoft.com
Rev. 3.0
Using the Application
Working with Time Entry
Supervisor time entry and worker time entry allow supervisors and workers to change time
cycle statuses. The time entry records are also available on the CT workstation and can be
modified as necessary.
Supervisor time entry or Worker time entry must be activated for your account by Actsoft
Comet Tracker Support. Note: Supervisor time entry and worker time entry will not display
together on your handset – if you have one, you will not have the other.
Setting Up Supervisor Time Entry
1.
Choose Setup from the main menu.
2. If prompted, enter the Pin Code on the Pin Code screen. If no pin code has been set, the
Pin Code screen will not display.
3. Select Options on the Setup screen.
4. On the Options screen, enter the number of the field that contains the Employee
Number in Comet Tracker into the Employee # Field field. See your Comet Tracker
administrator for this number.
You cannot enter a value greater than the number of available Clock In fields. The Employee
Number field defaults to 1 if setup data has not been downloaded before this field is specified.
Release 1.0.4.4
October 12, 2012
27
mComet™ for Android™ User Guide
5. Select Use Employee Break to include the On Break and Off Break events in the time
status cycle.
If a worker is currently clocked in, the next event is On Break. The On Break event
will be available on the Supervisor Time Entry screen.
6. Select Use Employee Lunch to include the On Lunch and Off Lunch events in the time
status cycle. The lunch event will be available on the Supervisor Time Entry screen.
28
Actsoft, Inc.
www.actsoft.com
Rev. 3.0
Using the Application
Using the Supervisor Time Entry Feature
Your CT administrator creates the fields on the time entry screens.
1. Select Supervisor Time Entry from the main menu.
2. When the Supervisor Time Entry screen displays, press the Menu key and choose Add
Employee.
3. Complete any required clock in fields and choose Clock In as shown below.
Release 1.0.4.4
October 12, 2012
29
mComet™ for Android™ User Guide
After you have entered and completed data for multiple workers, the Supervisor
Time Entry screen will display a listing of worker- or supervisor-entered records.
4. To record the next event for one worker, select the worker and choose an event.
5. To advance multiple worker statuses, check All and choose an event, such as Clock
In/Out or Lunch On/Off. mComet will perform the action on only the statuses logically
affected by the change.
6. To delete a record, choose a worker, display the submenu and select Delete. To delete
all records, display the submenu and choose Delete All. Or, press and hold a single
record and select Delete All.
30
Actsoft, Inc.
www.actsoft.com
Rev. 3.0
Using the Application
Setting Up Worker Time Entry
Set up worker time entry to advance other workers to the next time cycle event.
1. Choose Setup from the main menu.
2. If prompted, enter the Pin Code on the Pin Code screen. If no pin code has been set, the
Pin Code screen will not display.
3. Select Options on the Setup screen.
4. On the Options screen, enter the number of the field that contains the Employee
Number in CT into the Employee # Field field. See your CT administrator for this
number.
You cannot enter a value greater than the number of available Clock In fields. The Employee
Number field defaults to 1 if setup data has not been downloaded before this field is specified.
Release 1.0.4.4
October 12, 2012
31
mComet™ for Android™ User Guide
5. Select Use Timekeeping Break to include the On Break and Off Break events in the time
status cycle. If a worker is currently clocked in, the next event is On Break.
6. Select Use Timekeeping Lunch to include the On Lunch and Off Lunch events in the time
status cycle.
32
Actsoft, Inc.
www.actsoft.com
Rev. 3.0
Using the Application
Using Time Punch
Use Time Punch (worker time entry) to clock other workers in/out, on/off lunch, or on/off
break. If the Time Punch icon displays on the main menu, the Supervisor Time Entry icon
will not display.
1. Select Time Punch from the main menu.
The Time Punch screen displays. Note that fields on the screen may vary.
2. Complete any required fields and select a time status.
3. Choose Ok to confirm the status change.
The worker’s changed time status will not display onscreen.
Release 1.0.4.4
October 12, 2012
33
mComet™ for Android™ User Guide
Clocking In
Clock in when you are ready to begin work for the day. The time and date are recorded and
displayed on the CT workstation. The icon in the top right corner of the screen shows your
clock in or clock out status.
Clocked out
1.
Clocked in
Select Timekeeping from the main menu.
The Timekeeping screen displays with your status of ‘Currently Clocked Out’.
2. Choose Clock In. You may have to complete additional form fields on the Clock In
screen, as shown.
34
Actsoft, Inc.
www.actsoft.com
Rev. 3.0
Using the Application
Clock In screen fields are specified by your CT administrator. For information on
completing Clock In fields using a barcode scanner, see Using the Barcode Scanner
on page 73.
3. Choose Clock In again.
The mComet main menu displays with the options available to you. The clocked in
icon displays in the upper right portion of the screen.
The Forms and GPS Status options are available only if they have been set up by your system
administrator. The Landmarks option must be enabled by Actsoft Technical Support.
Clocking Out
Clock out when you have completed your work shift. The time and date are recorded and
displayed on the CT workstation. Clock Out data fields are created by your CT administrator.
Administrators can also set automatic clock out. Do not clock out if your handset is set to
clock out automatically.
1.
Select Timekeeping from the main menu.
The Timekeeping screen displays with your status of ‘Currently Clocked In’.
Release 1.0.4.4
October 12, 2012
35
mComet™ for Android™ User Guide
2. Choose Clock Out.
3. Complete Clock Out fields using the keypad or with a scanner, if required. For
information on completing fields with a barcode scanner, see Using the Barcode Scanner
on page 73.
4. Choose Clock Out again. The clocked out icon in the top right corner of the screen
indicates that you are currently clocked out.
Clocking On and Off Break
Use mComet to indicate when you are on or off break. Break status, time, and date are
automatically sent to the CT workstation.
You cannot use any mComet functions outside Timekeeping while on break. You may, however,
use the handset functions.
1. Select Timekeeping from the main menu.
2. Choose Start Break. The screen indicates your status, and records the length of your
break.
End Break is now highlighted, as it is the next status in the time cycle.
36
Actsoft, Inc.
www.actsoft.com
Rev. 3.0
Using the Application
3. To end your break, select End Break.
Clocking On and Off Lunch
Use Timekeeping to indicate when you are on or off lunch. Lunch status, time, and date are
automatically recorded and displayed on the CT workstation.
1. Select Timekeeping from the main menu.
2. Choose Start Lunch.
The screen indicates that you are on lunch, and starts recording your lunch break.
3. To end your lunch, select End Lunch.
Release 1.0.4.4
October 12, 2012
37
mComet™ for Android™ User Guide
Working with Forms
Use the Forms feature to record information on the handset. A form can be set up for any
type of job function (service call, delivery, customer visit, etc.). Forms is available only if it
has been configured by your system administrator. Your CT administrator creates the
customized fields for data capture.
When you send completed form information from the handset, Comet Tracker automatically
records the date and time of completion. You can also create child records to enter more
information about a main form.
You can also enter and save form data, retrieve it later and edit it. The number of archived
forms that can be stored is limited to the handset’s memory.
If you change the user and account number on a handset with stored forms, all the
archived forms will be deleted. A warning message will display before you can proceed.
Forms cannot be archived when combined with Orders.
To begin working with forms:
1. Select Forms from the main menu.
2. Select a form from the Form Selection screen. The Form Selection screen lists advanced
forms, blank (default) forms and archived forms.
3. Use the handset keypad to complete the form. Fields with asterisks are required. The
Service Call screen is shown below.
38
Actsoft, Inc.
www.actsoft.com
Rev. 3.0
Using the Application
Fields with camera icons will invoke the camera for image capture. Drop-down
arrow fields feature data to choose from.
For information on how to complete form fields using a barcode scanner, see Using
the Barcode Scanner on page 73.
4. Choose Send to send the information to the server. Or, you can choose to archive the
form. Two options exist for saving:
•
Save – Save the form to the handset
•
Save & Send – Send the form you are completing, but save a copy on the
handset to re-use later
If you have selected the Prompt for Archive Name checkbox on the Options screen,
you will be prompted to enter a form name at each save. Or, long press an archived
form from the Form Selection screen to rename it.
Adding Images
Add images to form data to include illustrative detail. Forms with images must include a data
value. If you are using a device running mComet Release 4.0.0.7, you can insert an SD card
and select images for use. Add images to forms in either of these ways:
Importing from Device Storage
•
Press and hold the camera icon
gallery. Then choose an image.
in a camera-activated field to display the image
New Image
Release 1.0.4.4
October 12, 2012
39
mComet™ for Android™ User Guide
•
With a form or child form onscreen, display the submenu and select Camera.
•
Navigate to a camera field to invoke the camera automatically. Camera-activated
fields are marked with a camera icon.
1. Choose Done to keep the image, or select the Retake
option to retake the image.
2. Touch the Menu key and choose Images to review any captured images before
submitting.
3. Choose Send when you have finished entering all form data.
Image Editing
Image editing is available only with Advanced Forms.
With image editing, you can capture and alter images you have attached to a form. Highlight
areas on images captured in the field, or outline areas of interest from a standard template.
If you are working on a Tablet device running mComet 4.0.0.7 or greater, you can use the
HTC Scribe Pen for editing. See Enabling the Scribe Pen on page 11.
In the example below, a home health care worker can show patient injury or areas of pain.
You can capture a new image or use an existing image to edit.
1. To use an image already captured, navigate to the image in the handset’s image bank.
Or, click on the image you have just captured.
2. Click on the image and choose Edit.
40
Actsoft, Inc.
www.actsoft.com
Rev. 3.0
Using the Application
3. Choose Color, and select a color from the color wheel.
4. Choose Size to select a line weight.
Release 1.0.4.4
October 12, 2012
41
mComet™ for Android™ User Guide
5. Now, use the line to mark the image. The image will display within the form.
Adding Signatures
You may be required to add a signature to a form. Signature capture fields are indicated by
the pen icon
. To add a signature to form data:
1. Inside a form field, display the submenu, and select Signature. Or, navigate to a form
field that allows signature input.
2. Sign in the signature area with your finger.
42
Actsoft, Inc.
www.actsoft.com
Rev. 3.0
Using the Application
3. Choose Done.
4. If necessary, display the submenu and choose Images to review signatures before
submitting.
5. Choose Send when you are finished.
Creating Child Forms
Create a child form to enter additional information for a main form.
1. From a Form screen, display the submenu and select More, and then choose Child
Form.
The Child Fields screen displays. The title bar shows the number of the current
record and the total number of child records created. Fields with cameras on the
ends activate the handset camera.
Release 1.0.4.4
October 12, 2012
43
mComet™ for Android™ User Guide
2. Complete the fields, entering up to 30 characters in each field. Use the arrow keys to
page through the forms. For information on how to complete fields using an optional
barcode scanner, see Using the Barcode Scanner on page 73.
3. To add another child form, select More, or display the submenu for more child form
command options.
4. Choose Done when you are finished with the Child Form, and Done again when you are
finished with the main form.
5. Choose Send when you are finished with both forms.
44
Actsoft, Inc.
www.actsoft.com
Rev. 3.0
Using the Application
Advanced Forms
Advanced forms are an mComet additional feature. Check your company’s software agreement
to see if you have access to advanced forms.
Advanced forms allow companies to customize new forms, or recreate paper forms for
completion on the handset. You can also save or archive forms on the handset to edit later.
The handset’s memory determines how many forms you can archive. All archived forms will
be deleted if you change the user and account number on a handset with stored forms. A
warning message will display before you can continue.
Anatomy of an Advanced Form
In Forms Designer, your administrator creates forms that include various screen elements,
such as buttons, drop-down lists and checkboxes. A main form is created, and then decision
field sections are added based on the data to be gathered. Repeatable forms are also
created to list multiple items of the same type.
Screen Elements and Field Behavior
Drop-down lists – Arrows next to a field indicate available data choices. If
configured, you can select multiple values, or add unique values, or search values.
Decision fields – Fields requiring you to make a decision after you enter data are
shaded.
Drop-down list searching – Enter search criteria in the text field at the top of the
drop-down list to search list values. If the field is editable, you can add a unique
value to the list, and choose (+) when you are finished. Added values stay at the top
Release 1.0.4.4
October 12, 2012
45
mComet™ for Android™ User Guide
of the list unless deleted, changed in the Forms Designer or if the account/user
numbers are changed.
Calculation fields - Calculation fields are based on formulas that calculate data input
into an advanced form. Using them can save time and increase the accuracy of
simple or complex operations.
Perform calculations such as addition, subtraction, multiplication and division.
Calculations can only be performed using currency and numeric fields.
Repeatable fields – Repeatable fields
are used to list multiple items of the same
type, or repeating information. They can be used also for calculations such as count,
sum and averaging.
Asterisks and Icons –Fields with asterisks are required, and camera-activated fields
display a camera icon.
46
Actsoft, Inc.
www.actsoft.com
Rev. 3.0
Using the Application
Multi-select drop-downs – If it is configured in the Forms Designer, you can choose
multiple values in a field. To delete a drop-down list value, press and hold the value,
and then confirm the action.
Email field – Search and select one or more email addresses from the handset
contact list. You can also enter a unique email address. As you enter a new address,
the text will be red until it conforms to normal email protocol. The address will
change to green when it is acceptable. Click the plus (+) to add the address to the
contact list.
The following scenario illustrates how advanced forms can be used:
Release 1.0.4.4
October 12, 2012
47
mComet™ for Android™ User Guide
Below is the process flow of the preceding scenario.
Sample Service Call Workflow
The following pages illustrate the handset screens and steps that correspond to the
preceding service call flow and scenario.
48
Actsoft, Inc.
www.actsoft.com
Rev. 3.0
Using the Application
1. Select a form type from the Form Selection screen.
2. Begin the form, entering any required information.
Drop-down arrows indicate that there are data choices for a field. Fields with
asterisks are required, and camera-activated fields display a camera icon. Decision
field sections are shaded – note that additional information will display based on
the choice you make for ‘Estimate Performed’.
On the form below, the ‘Estimate Performed’ section is complete. When you
choose Yes, another section displays in which you can describe the work to be
performed.
Release 1.0.4.4
October 12, 2012
49
mComet™ for Android™ User Guide
3. Enter the estimate dollar value in the ‘Estimated Cost’ field and select an answer to
‘Customer Accept Estimate’. Note that both sections are shaded, indicating that they are
decision field sections.
4. When you select ‘Yes’ to Customer Accept Estimate, the Parts Used repeatable form
displays for completion. The ‘Parts Used’ section is a repeatable form, as indicated by
the multiple page icon.
50
Actsoft, Inc.
www.actsoft.com
Rev. 3.0
Using the Application
Repeatable form
5. Click on the Parts Used section and the repeatable form displays, as shown below.
Choose More to create and complete this form as many times as needed to list all parts
used.
6. Add more information about the part type(s) used on the repeatable screens that
follow, and choose Done.
Release 1.0.4.4
October 12, 2012
51
mComet™ for Android™ User Guide
After you complete all necessary repeatable forms, the main form will redisplay for
completion.
7. Continue to the next decision field section of the form, Job Completed. Select No.
8. Enter the reason for the status, and continue to the Parts Needed repeatable section.
9. Enter the parts needed in the repeatable form.
Additionally, if the form field has been configured, you can add images to the form.
You can also edit images you have captured. See Image Editing on page 40 for more
information. These images will display within the form as thumbnails. Click on the
thumbnail to view an enlarged resolution of the image.
10. Select More to add more repeatable forms, and Done when you are finished.
52
Actsoft, Inc.
www.actsoft.com
Rev. 3.0
Using the Application
11. On the main form, continue with the next portion, the Return Date.
12. Enter the Contact Phone, and choose Send. You can also display the submenu and
choose Save to complete the form later.
Release 1.0.4.4
October 12, 2012
53
mComet™ for Android™ User Guide
13. Confirm the action on the dialog screen.
Form Preview
You can also display the submenu and then choose Preview to review your completed form
before sending:
54
Actsoft, Inc.
www.actsoft.com
Rev. 3.0
Using the Application
Working with Orders
Orders works with the CT and Comet Mobile Worker applications. With Orders, workers use
the handset more for updating, delivering and confirming orders. Contact your system
administrator to find out if you should use the Orders function.
Order Alerts
You may receive an alert on your handset to inform you when a new order has been
dispatched or if an order has changed. New order alerts will display on the handset’s status
bar.
You must be within the network coverage area to receive new order alerts. When an order
alert message displays, click on the alert from the status bar to refresh the order
information.
Reading Orders
With Orders, you can receive, view and update information about orders dispatched to the
handset. You can also enter additional information and update order status.
Up to 200 orders at a time can be displayed on the handset. When you reach 200, you must
purge viewed orders to receive new orders. Additionally, on tablet devices, a notification will
display when CT has deleted an order.
If there are no orders assigned to you, ‘No Orders’ displays at the top of the screen. Unread
orders are preceded by an asterisk. Additionally, you can sort the orders in ascending or
descending order, according to time and date received.
If an order you have chosen has been deleted by your system administrator, an error dialog
will display.
1. Choose Orders from the main menu. The number of orders will display on the icon.
2. On the Orders screen, select an order to view OR display the submenu, and choose Read
Order.
Release 1.0.4.4
October 12, 2012
55
mComet™ for Android™ User Guide
3. Review the order information.
Click on any hyperlinked text in the order information and send emails, map address
routes or dial phone numbers. Select the text and display the submenu for options.
4. When you are finished reviewing order information, press the Back key.
The Order Screen redisplays. When an order has been read, the asterisk no longer
displays in front of the order.
Searching Order Information
Use the Search function to search through all dispatched orders to find a particular order.
1. Choose the Search field to display the keyboard, type in criteria, and select the Search
icon. Note: Search function will search only the abbreviated order data displayed
onscreen – not the full text displayed when you select ‘Read Order’.
56
Actsoft, Inc.
www.actsoft.com
Rev. 3.0
Using the Application
2. All orders meeting the search criteria will display, or a message of ‘No Orders’, if none
are found.
Updating Order Status
You must be clocked in to use the Status option with orders. Order status updates are also
displayed on the CT workstation. Your CT administrator creates the order statuses available.
Your CT administrator may set statuses so that they must be selected in a certain order. If
you choose a status that is out of order, mComet will display an error message, and you will
have to choose another.
1. On the Orders screen, choose an order, display the submenu, and choose Change
Status.
2. Select a status, and choose Done. Any forms linked to your chosen status will display.
Release 1.0.4.4
October 12, 2012
57
mComet™ for Android™ User Guide
3. Display the submenu and choose Done when you are finished entering required data in
any linked forms.
The updated status displays in the order summary information on the handset, and
on the CT workstation.
4. To cancel the status change and choose a different status, display the submenu and
choose Cancel.
Refreshing Orders
To view new orders that have been dispatched to you, refresh the order information.
To refresh orders manually:
1. From any Order screen, display the submenu and choose Refresh.
2. Any new orders assigned to you are then displayed on the Order Screen, with an asterisk
on the left.
Using Route Map
Route Map uses the address sent with an order to show directional maps or text detailing
the route between two locations. You must be within network coverage to view maps.
Google Maps is used for route mapping.
1. Select an order, display the submenu and select Route Map.
58
Actsoft, Inc.
www.actsoft.com
Rev. 3.0
Using the Application
The default location for the starting point is your current location. mComet will
pinpoint your location and insert it (‘My Location’) in the Starting point field.
2. To enter a different starting point, select the Starting point field, and use the keyboard
to enter a different address, or choose a point on the screen.
3. Choose the transportation mode – car, bus, bike or walking, and select Go.
Google maps returns with the route information page:
•
•
•
•
Release 1.0.4.4
Search Results – Current location, Destination, Number of miles/Est. travel time
Show on map (select this to see the route on the map)
Navigate (available only if you have access to Google maps)
Directions (turn-by-turn text directions from the location specified)
October 12, 2012
59
mComet™ for Android™ User Guide
4. Choose Show on Map to view a summary map, as shown below.
The directional icons on the map are as follows:
Table 1 – Map Icons
Icon
Definition
Starting point
Turn markers
Highlighted route
Ending point
Directional indicator
Page icon – touch to view text directions
Segment review arrows – touch to review each segment of your directions
Resolution adjust tool – zoom in or out
5. Use the forward and backward arrows to review each segment of your destination.
Additionally, you can use the page icon to convert to text directions. Use the plus
and minus magnifying icons to zoom in or out on the map.
Due to handset memory restrictions, the entire set of maps may be unavailable for long routes.
6. Touch Navigate to view a navigation-style display on the handset screen. Note: You
must have access to Google Maps to access the Navigate option.
60
Actsoft, Inc.
www.actsoft.com
Rev. 3.0
Using the Application
7. Choose the Page icon to view route directions in text format.
displays with text directions for the entire route.
The Directions screen
8. Touch each segment of the directions to view the segment in map format.
9. When you are finished viewing the directions, press the Back key.
10. To view your progress along the route, press the Back key and continue to press the
forward arrow at the bottom of the screen.
A new route summary map displays showing your current location along the original
route. The turn-by-turn maps and the directions will begin from your current
location on the original route.
11. To exit the route map screen and return to the directions summary menu, press the
Back key.
12. When you finish viewing direction screens, continue to press the Back key until you are
at the main menu.
Using Forms with Orders
Workers can use Orders along with Forms to record additional information for an order.
Form fields can be linked to an order status to allow workers to complete information that is
relevant to the order’s status.
1. On the Order screen, select an order and display the submenu.
2. Choose Form.
Release 1.0.4.4
October 12, 2012
61
mComet™ for Android™ User Guide
Available forms depend on the order’s status. If no forms are associated with a
status, mComet displays ‘No form is associated with this order status’.
3. Choose a form for data entry.
4. Use the handset keyboard or barcode scanner to complete the information for each
form field. For information on how to complete form fields using a barcode scanner, see
Using the Barcode Scanner on page 73.
Viewing GPS Status
Use GPS Status to view your GPS location data. You may need to clock in to mComet first.
1.
62
Select GPS Status from the main menu.
Actsoft, Inc.
www.actsoft.com
Rev. 3.0
Using the Application
If GPS is unavailable, an error message will display: ‘GPS failed – Please try again in
a clear view of the sky.’
2. Review the information.
3. Choose Update to update the data, or choose the Back key to return.
Table 2 – GPS Tracking Status Screen Data
Data
Release 1.0.4.4
Definition
Last Position
Last position obtained by the handset.
Time
Time the last position was obtained, displayed in Universal Time Coordinated.
Type
The source used to determine the last position. GPS indicates GPS satellites and
None indicates that the GPS is invalid.
Sats
The number of satellites used to determine the last GPS position.
Lat
The latitude of the last position.
Lon
The longitude of the last position.
Stored
The number of GPS positions currently stored on the handset.
LCL
The current local time, per the handset clock.
UTC
Universal Time Coordinated.
October 12, 2012
63
mComet™ for Android™ User Guide
Working with Messaging
Use Messaging to communicate with supervisors and other workers. A star on the envelope
indicates that new messages have been received.
1. Choose Messaging from the main menu.
Current messages in your Inbox will display. Choose Refresh to display new
messages, Sent Items to view sent messages, or Compose to begin a new message.
2. Choose a message to review.
3. Review the message, as shown below. When the message is opened, a ‘Read receipt’
message is sent back to the sender.
Click on any hyperlinked text in the order information and send emails, map address
routes or dial phone numbers.
64
Actsoft, Inc.
www.actsoft.com
Rev. 3.0
Using the Application
4. Choose Reply to respond, or Delete to delete the message. Note: Deleted handset
messages are kept on the CT server.
5. Or, choose the To field to display a recipient selection dialog. Choose one or more and
choose Ok.
6. Type a response and choose Send.
Release 1.0.4.4
October 12, 2012
65
mComet™ for Android™ User Guide
Working with Maps
Using My Location
If you are in the network coverage area, you can download and display real-time maps
showing your location and the surrounding area.
1. Select My Location from the main menu.
Your location is centered on the map and highlighted by a flashing bull’s-eye.
Your current
location
2. To zoom in or out on the map, touch your location with thumb and index fingers
together, and slowly draw them away from each other to zoom in. Reverse the action to
zoom out.
Refreshing the My Location Map
Refresh the map to display an updated view of your location.
1. With a map onscreen, display the submenu and choose Show Current or Satellite
Mode. (Satellite Mode will display your location using satellite maps.)
2. The refreshed map displays with your new location. Your location is centered on the
map and labeled with a flashing bulls-eye
66
Actsoft, Inc.
www.actsoft.com
.
Rev. 3.0
Using the Application
3. To exit the map, press the Back key.
Getting Directions
Use Directions to get driving directions. You must be within network coverage to view maps.
Additionally, Directions must be enabled by Actsoft Technical Support.
1. Select Get Directions from the main menu.
2. Choose My Location to enter another location as the starting point. Your current
location is the default value in this field. Select from a bookmarked location, or use the
keyboard to enter an address.
3. Select Ending point to enter an address or select from a list of bookmarked addresses.
4. Choose the mode of transportation – car, bus, bike or walking, and select Go.
mComet returns with the Search Results summary page:
•
•
•
•
Release 1.0.4.4
Search Results
o Current location, Destination, Number of miles/Estimated travel time
Show on map (select this to see the route on the map)
Navigate (available only if you have access to Google maps)
Directions (turn-by-turn text directions from the location specified)
October 12, 2012
67
mComet™ for Android™ User Guide
5. Choose Show on Map to view a summary map, as shown below.
68
Actsoft, Inc.
www.actsoft.com
Rev. 3.0
Using the Application
The map icons are as follows:
Table 3 – Map Icons
Icon
Definition
Starting point
Turn markers
Highlighted route
Ending point
Directional indicator
Page icon – touch to view text directions
Segment review arrows – touch to review each segment of your directions
Resolution adjust tool – zoom in or out
6. Use the forward and backward arrows to review each segment of your destination.
Use the plus and minus magnifying icons to zoom in or out on the map.
Additionally, you can use the page icon
to view text directions.
Due to handset memory restrictions, the entire set of maps may be unavailable for long routes.
7. Choose Navigate to view a navigation-style display on the handset screen. Note: You
must have access to Google maps to access the Navigate option.
Underneath Navigate, the Directions section of the screen shows route directions in
text format.
Release 1.0.4.4
October 12, 2012
69
mComet™ for Android™ User Guide
8. You may also choose each segment of the directions to view the segment in map
format.
9. When you are finished viewing the text directions, press the Back key.
10. To view your progress along the route, press the forward arrow at the bottom of the
map screen.
A new route summary map displays showing your current location along the original
route. The turn-by-turn maps and the directions will begin from your current
location on the original route.
11. Press the Back key to exit the route map screen and return to the directions summary
menu.
12. If you are finished with the directions screens, continue to press the Back key until you
are at the main menu.
70
Actsoft, Inc.
www.actsoft.com
Rev. 3.0
Using the Application
Map Submenu Options
Additionally, maps will display varied submenu options based on which map sequence you
are viewing. Below are the options shown in the map submenus:
Table 4 – Map Submenu Options
Option
Release 1.0.4.4
Action
Found on:
Search maps for a specific location
Directions screen/Map screen
View text directions
Map screen
View layers of geographical information, such
as transit, business locations, etc.
Map screen
View more map options, such as Clear Map,
Help, About, etc.
Map screen
Allow sharing of your location with Google
and friends that you select
Map screen
Highlights your currnt location with a flashing
blue arrow
Map screen
Work with maps in satellite mode (using
satellite maps)
Map screen
Work with maps in the default mode
Map screen
Show the map that corresponds to the text
directions
Directions screen
Reverse the starting and ending points
Directions screen/Map screen
Refresh your directions based on your current
location
Directions screen
Refresh the directions to avoid highways
and/or tolls
Directions screen
Report on road conditions and incidents
Directions screen
October 12, 2012
71
mComet™ for Android™ User Guide
Creating Landmarks
You can create a landmark based on any location. The landmark is stored in the database
and is available on the CT workstation.
The landmark feature must be activated for your account by Actsoft Comet Tracker Support.
Additionally, you may need to clock in to access this option.
1. Choose Landmark from the main menu.
When the map displays, double-tap it to select a point manually. Zoom in to select a
point on the map. Your location is selected by default.
After you select a location, the Latitude and Longitude fields are populated
automatically.
2. If you want to select a position that is not displayed on the map, press the Menu key
and choose Enable Map Pan to move the map.
3. Select the Name field, and use the keyboard to enter a name.
4. Complete any additional fields displayed on the screen.
5. Choose Done when you are finished.
The landmark data is sent to the application server and is available on the CT
workstation.
72
Actsoft, Inc.
www.actsoft.com
Rev. 3.0
Using the Application
Using the Barcode Scanner
mComet uses your handset’s ZXing Team barcode scanner to scan barcodes. Install the ZXing
Team barcode scanner for Android devices first. When using the handset as a scanner, you
do not have to manually enter data into forms.
1. Navigate to one of the four (4) screens that allow barcode scans:
•
Form/Child form
•
Repeatable Form
•
Clock In
•
Clock Out
2. Go to a form field that is configured to accept a scan, and the scanner will be invoked
automatically.
3. When the screen converts to scanner mode, center the laser line inside the viewfinder
rectangle on your scan. The handset will automatically scan the barcode.
Scans may be unsuccessful if the data conflicts with form field constraints.
Release 1.0.4.4
October 12, 2012
73
Index
Index
Adding images to forms, 39
Adding signatures to forms, 42
Advanced forms, 45
field behavior, 45
screen elements, 45
Advancing multiple time statuses, 30
Alerts
repeat timer, 24
Application
requirements, iii
Auto-link
messages, 65
orders, 57
Barcode scanner, 74
Changing
pin code, 20
Clocking in
icon, 34
Clocking in, 34
Clocking on and off break, 36
Clocking on and off lunch, 37
Clocking out, 35
Convenience keys, 12
Creating child forms, 43
Delete
Pin code, 20
Deleting time records, 30
Directions, 68
Employee number
field on Options screen, 27, 31
Enabling the Scribe Pen, 11
Filtering
messages, 25
records, 25
Form icons
asterisk, 16
camera, 16
pen, 16
Form preview, 54
Forms
adding signatures, 42
advanced, 45
archived, 38, 45
child, 43
child field, 38
feature, 38
Getting directions, 68
GPS Status, 63
Handset
requirements, iii
History
filtering, 24
viewing, 24
History screen, 24
Images, 39
Installation
via Play Store, 7
Release 1.0.4.4
via ZXing QR code, 9
Installing mComet, 7
Landmarks
creating, 73
option, 73
Lists, 16
Map Icons, 61, 70
Map submenu options, 72
Maps
refreshing my location, 67
mComet
installation, 7
setup, 17
mComet menu
Supervisor option, 29
Menu icons
clock in, 16
clock out, 16
Directions, 15
Forms, 15
GPS Status, 15
landmarks, 15
main menu screen, 15
Messaging, 16
My Location, 15
orders, 15
setup, 15
Status, 15
Supervisor, 15
Time Punch, 15
Timekeeping, 15
Messages
auto-link, 65
filtering, 25
sending and receiving, 65
Messaging, 65
Mode
panic, 20
My Location, 67
setting zoom, 67
Navigating
mComet, 12
New user setup, 18
Order alerts, 56
Orders, 15, 56
auto-link, 57
refreshing, 59
searching, 57
Panic mode
activating/deactivating, 21
icon, 20, 21
setup, 20
Panic resume timeout, 21
Pin code, 31
changing, 19
delete, 20
for supervisor time entry setup, 27
October 12, 2012
75
mComet™ for Android™ User Guide
setting, 19
Previewing forms, 54
Reading orders, 56
Refreshing
orders, 59
Refreshing maps, 67
Required fields, 16
Returning from suspended status, 18
Route map, 59
Screen elements
asterisks and icons, 46
calculation fields, 46
decision fields, 45
deleting a drop-down list value, 47
drop-down lists, 45
repeatable fields, 46
searching a drop-down list, 45
Scribe Pen, 11
Searching
orders, 57
Setting up Panic mode, 20
Settings
pin code, 19
Setup, 17
new user, 18
supervisor time entry, 27
worker time entry, 31
Signatures, 42
Status
GPS, 63
updating orders, 58
worker, 23
Supervisor
time entry, 27, 28, 29
Supervisor time entry
setup, 27
Supported devices, i
barcode scanners, ii
76
handsets, i, ii
Suspending mComet, 18
Technical support and training, ii
Time entry
supervisor, 27, 28, 29
worker, 27, 32, 33
Time punch, 33
Time records
deleting, 30
Time status
advancing multiple, 30
Tracking status
Last Position, 64
latitude, 64
LCL, 64
longitude, 64
Sats, 64
screen elements, 64
stored, 64
Time, 64
Type, 64
UTC, 64
Uninstall mComet, 11
Updating
order status, 58
Use employee break, 28
Use employee lunch, 28
Use timekeeping break, 32
Use timekeeping lunch, 32
Using time punch, 33
Worker status, 23
Worker time entry, 27, 32, 33
setup, 31
Working with forms, 38
Working with messages, 65
Working with orders, 56
ZXing barcode scanner, 74
Actsoft, Inc.
www.actsoft.com
Rev. 3.0
Glossary
Glossary
Account number
Asset
Barcode scanner
Child form
Comet Tracker (CT)
Decision field section
Form
GSM
GPS
Release 1.0.4.4
An Actsoft-issued number used to access mComet on
the handset.
Any object owned by a company that can be tracked,
such as equipment.
A device used to scan barcodes from objects into the
handset.
A subform that provides additional information about
the main (or parent) form.
The suite of applications used to configure GPS
monitoring and the mComet application on the
handset. There are four (4) versions of Comet Tracker:
• Comet EZ (Web version)
• Comet Tracker
• Comet Mobile Worker
• Comet Tracker Lite (handset tracking only – no
desktop application required)
A shaded area of a handset form that contains data that
the user must respond to. Depending on the user’s
response, additional sections may display for
completion.
An mComet feature used to record and store data on
the handset. A form can be set up for any type of job
function (service call, delivery, customer visit, etc.).
Forms is available only if it has been configured by your
system administrator. Your system administrator
creates the customized fields for data capture.
Global System for Mobile communications. GSM is a
digital mobile telephony system that is widely used in
Europe and other parts of the world. It uses a variation
of time division multiple access (TDMA) and is the most
widely used of the three digital wireless telephony
technologies (TDMA, GSM, and CDMA).
GSM digitizes and compresses data, then sends it down
a channel with two other streams of user data, each in
its own time slot. It operates at either the 900 MHz or
1800 MHz frequency band.
A satellite-based radio navigation system that consists
of three segments – the satellite constellation, ground
control network, and user equipment. People use GPS
on their mobile devices for navigation software
applications.
October 12, 2012
77
mComet™ for Android™ User Guide
GPS Status
Landmark
Lat
LCL
Lon
mComet
Panic mode
Pin code
PTN
Repeatable form
ROV
78
A collection of handset user positional data that
consists of:
• Last position
• Time
• Type
• Sats
• Lat
• Lon
• Stored
• LCL
• UTC
A geographical location that users can mark and store
in the handset for retrieval, such as an address on a
delivery route.
The latitude of the handset as recorded by the
satellite(s). Found on the GPS Status screen.
The current local time. Found on the GPS Status screen.
The longitudinal GPS position of the handset as
recorded by the satellite(s). Found on the GPS Status
screen.
The handset application used with the CT workstation
application that allows workers in the field to
communicate with the home office.
mComet uses built-in GPS tracking function to gather
location information at specified time intervals and
transmit the resulting data to the hosted server. Use it
to clock in and out of work shifts, enter information
about jobs, and receive updated forms while in the
field.
An mComet mode that tracks handset users in an
emergency. mComet tracks and submits handset
position information to the server at 5-second intervals.
The handset will vibrate briefly when panic mode is
activated.
A user-defined, 30-character-limit numerical field that
is used as a password for access to certain options. You
do not have to set a pin code to use mComet.
Personal Telephone Number. When your PTN is
configured in Comet Tracker, mComet will
automatically log you on upon initial installation.
A form used multiple times to enter related data. For
example, multiple parts used on a service call can be
entered into separate repeatable forms.
Remotely-Operated Vehicle.
Actsoft, Inc.
www.actsoft.com
Rev. 3.0
Glossary
Sats
SMS
Form
Time status cycle
Type
User number
UTC
ZXing
Release 1.0.4.4
The number of satellites used for pinpointing the
handset location. Found on the Tracking Status screen.
A communication service standardized in the GSM
mobile communication system, using standardized
communications protocols allowing the interchange of
short text messages between mobile telephone
devices.
A user-defined event or item added into the Form area
of mComet.
A linear set of user work statuses (Clocked In, Clocked
Out, On Break, Off Break, On Lunch, Off Lunch) used to
advance workers through their workday.
The source type(s) used for the latitude and longitude.
Found on the GPS Status screen.
An Actsoft-issued number used for access to the
mComet on the handset.
Universal Time Coordinated. Found on the GPS Status
screen.
(Pronounced zebra crossing) ZXing is the barcode image
processing application developed for Android devices.
October 12, 2012
79
©2012 Actsoft, Inc. All rights reserved. mComet, Comet Tracker and the Comet Tracker logo are trademarks of Actsoft, Inc. Android and related trademarks, names and logos
are the property of Google and are registered and/or used in the U.S. and countries around the world. Sprint and the Sprint logo are registered trademarks of Sprint. Android
and related trademarks, names, and logos are the property of Google and are registered and/or used in the U.S. and countries around the world.