1
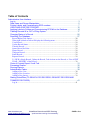
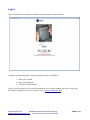
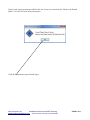
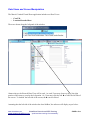
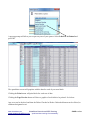
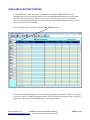
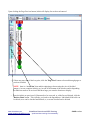
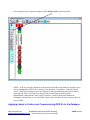
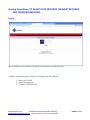
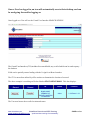
Administrative User Interface
VirtualDoxx User Manual
Prepared for:
Morris County Criminal
Manual Version Number
Date
1
08/15/13
www.virtualdoxx.com
VirtualDoxx Barcode and RFID Tracking
“optimized item tracking & accountability”
www.weaponstracking.com
PAGE 1 of 44
Table of Contents
Administrative User Interface .................................................................................................... 1
Log In:...............................................................................................................................3
Data Views and Screen Manipulation ...............................................................................5
Printing Labels, and Commissioning RFID numbers ........................................................7
VIEW LABELS BEFORE PRINTING ..............................................................................12
Applying Labels to Folders and Commissioning RFID #'s to the Database ....................14
Tracking Records IN or OUT of Filing System ................................................................17
Changing Status of a Record..........................................................................................26
Searching The Database: ...............................................................................................27
Record Right-Click Option:.................................................................................................. 28
When right-clicked records will display the following menu: ............................................. 29
View Record: ........................................................................................................................ 29
Update Record Status: .......................................................................................................... 29
Transfer Record: ................................................................................................................... 29
Queue Record for Print: ........................................................................................................ 29
Queue Record: ...................................................................................................................... 29
UnQueue Record: ................................................................................................................. 29
Email Record: ....................................................................................................................... 29
Request Record: .................................................................................................................... 29
To VIEW a Single Record, Update the Record, Take Actions on the Record, or View AUDIT
TRAIL / HISTORY of the Record ....................................................................................... 30
Chain-of-Custody Report / Audit Trail .............................................................................31
Processing Queues ........................................................................................................32
Running Reports: ............................................................................................................36
Administrative Tasks:......................................................................................................38
Adding a New User: ............................................................................................................. 38
Adding a New Location:....................................................................................................... 39
Adding a New Queue: .......................................................................................................... 39
Starting VirtualDoxx (TO SEARCH FOR RECORDS, REQUEST RECORDS AND
TRANSFER RECORDS): ...............................................................................................41
Log In: .................................................................................................................................. 41
www.virtualdoxx.com
VirtualDoxx Barcode and RFID Tracking
“optimized item tracking & accountability”
www.weaponstracking.com
PAGE 2 of 44
Log In:
After VirtualDoxx has launched you should see the logon screen shown below.
Complete the following steps to login to and begin using VirtualDoxx:
1. Enter your UserID.
2. Enter your Password.
3. Click the LOGON button.
Once a User has logged in, an icon will automatically save to their desktop, and can be used going
forward for logging on (so they do not have to go to www.virtualdoxx.com).
www.virtualdoxx.com
VirtualDoxx Barcode and RFID Tracking
“optimized item tracking & accountability”
www.weaponstracking.com
PAGE 3 of 44
Upon Logon, a pop-up message will alert the user of any new records in the “Labels to be Printed
Queue”, as well as records in any other queue.
Click the OK button to proceed with logon.
www.virtualdoxx.com
VirtualDoxx Barcode and RFID Tracking
“optimized item tracking & accountability”
www.weaponstracking.com
PAGE 4 of 44
Data Views and Screen Manipulation
The Morris Criminal Virtual Doxx application includes two Data Views:
− Case File
− Location Barcode Sheet
These are shown along the left panel of the window.
Almost always, the Records Data View will be used. As such, Users may choose to 'drag' the right
portion of the screen to overlay the left portion. Or, Users may click the left ◄ to 'hide' the left side of
the screen. To 'unhide' the left side of the screen, the ► can be clicked.
Assuming that the left side of the window has been 'hidden', the software will display as per below:
www.virtualdoxx.com
VirtualDoxx Barcode and RFID Tracking
“optimized item tracking & accountability”
www.weaponstracking.com
PAGE 5 of 44
www.virtualdoxx.com
VirtualDoxx Barcode and RFID Tracking
“optimized item tracking & accountability”
www.weaponstracking.com
PAGE 6 of 44
Printing Labels, and Commissioning RFID numbers
There are two ways to print new labels in the VirtualDoxx application once an indictment has been
filed and a record becomes active: the single print method, and the queue print method.
First, select the Search Database tab at the top of the screen. Use any of the fields on the left side of
the screen to search for a record or multiple records.
Please Note: You can perform universal searches or partial searches by using a “%”. To perform a
universal database search, simply type a “%” in any of the data fields and click search. To perform a
partial search, type in part of a value into a search field and use the “%” either at the beginning or end
of the value.
Example: “%E” will return all records that end in “E”. “MRS%” will return all case numbers that begin
with MRS.
www.virtualdoxx.com
VirtualDoxx Barcode and RFID Tracking
“optimized item tracking & accountability”
www.weaponstracking.com
PAGE 7 of 44
Single Print Method
If you only want to print one record at a time, you can double-click on any search result and the record
detail screen will pop-up.
To print the label for that record, simply click Print on the left side of the record detail view.
www.virtualdoxx.com
VirtualDoxx Barcode and RFID Tracking
“optimized item tracking & accountability”
www.weaponstracking.com
PAGE 8 of 44
Multiple Print Method
If you want to print labels for multiple new records, locate each record using the search screen. Each
time you find one of the records for which you want to print a label, right click on it, and select Queue
Record for Print.
This will send each record you select to the Labels to be Printed queue – a list of records that you will
be printing shortly.
www.virtualdoxx.com
VirtualDoxx Barcode and RFID Tracking
“optimized item tracking & accountability”
www.weaponstracking.com
PAGE 9 of 44
After you have queued all of the labels that you wish to print, they can be printed from the
Spreadsheet tab at the top of the VirtualDoxx screen.
First, open the “Labels to be Printed Queue” by selecting Open Queue from the menu on the left side
of the screen.
www.virtualdoxx.com
VirtualDoxx Barcode and RFID Tracking
“optimized item tracking & accountability”
www.weaponstracking.com
PAGE 10 of 44
A pop-up prompt will allow you to open any one of your queues. Select Labels to be Printed and
press OK.
The spreadsheet screen will populate with the data for each of your new labels.
Clicking the Print button will print labels for each row of data.
Clicking the Page Preview button will show a graphic of each label to be printed. See below.
Any rows can be checked, and then the Delete Checked or Delete Unchecked button can be clicked, to
eliminate designated rows.
www.virtualdoxx.com
VirtualDoxx Barcode and RFID Tracking
“optimized item tracking & accountability”
www.weaponstracking.com
PAGE 11 of 44
VIEW LABELS BEFORE PRINTING
− as described above, when data entry is completed, clicking the PRINTER ICON will
automatically save each record entered to the records management database, and, will print a
label for each record entered. However, you can see what is about to print, as a final QC
process, to ensure that the labels have the correct text fields/spelling/digits/characters, correct
bar code and correct color-coding
− to see the labels prior to printing, click the Page Preview button
− the sheets of labels will display (or sheets of labels, depending on quantity). There are 4 labels
per sheet, so any # of labels to print more than 4 will be shown on subsequent pages, so that all
pages can be previewed, as described below in document narrative:
www.virtualdoxx.com
VirtualDoxx Barcode and RFID Tracking
“optimized item tracking & accountability”
www.weaponstracking.com
PAGE 12 of 44
Upon clicking the Page Preview button, labels will display for each record entered
− if there are more than 4 labels to print, click the 'Page Next' button to forward through pages to
preview all labels
NOTE: there is a 'scroll bar' that enables enlarging or descreasing the size of the label
image(s), in case complete label(s) get 'cut off' at the bottom of the window and/or depending
on what text needs to be reviewed and how large you want the font/text to display
− once the labels are previewed, if data needs to be corrected, or a label/record deleted, click the
'Back to Data' button. This will take you back to the Spreadsheet. Individual fields/cells can
be edited, rows can be checked and deleted, or, rows not checked can be deleted
www.virtualdoxx.com
VirtualDoxx Barcode and RFID Tracking
“optimized item tracking & accountability”
www.weaponstracking.com
PAGE 13 of 44
− If no editing of data is required, simply click the Printer icon to print the labels:
− NOTE: if the any record(s) that have been entered are already in the database, then the row(s)
will be highlighted in YELLOW to alert the User that there is a problem. Using the Search
screen. If the software did not check for duplicates, and prevent printing labels and creating
more than one label / file folder for a data record, then the filing system would be
fundamentally compromised, and STAFF could have a folder in their hand without all
documents, because there is a second folder for the same case that they may not know about or
have 'in hand’.
Applying Labels to Folders and Commissioning RFID #'s to the Database
www.virtualdoxx.com
VirtualDoxx Barcode and RFID Tracking
“optimized item tracking & accountability”
www.weaponstracking.com
PAGE 14 of 44
If RFID #'s are not being commissioned to the database, ignore the below steps, and simply apply
labels to folders. Take care to place the labels on the folders in the same vertical position on each
folder, so that color bars align properly 'on the shelf'.
− Move label(s) AWAY FROM THE RFID SCANNER! After applying the label(s), you will
commission the RFID # to the database, and ALL OTHER LABELS or LABELED
FOLDERS MUST NOT BE IN PROXIMITY!!!! Otherwise, the wrong RFID # could be
added to the database in error!!! This is just a cautionary note: the Scanner is designed to read
the closest RFID tag, however, care should still be taken to ensure that other RFID labels or
labeled folders are not in proximity when scanning/commissioning.
− Remove the label from the label sheet. Place the left side of the label over the front of the folder
tab so that the black tick marks at the center of the label are aligned with the edge of the folder.
Press firmly on the label to stick the first half of the label to the folder.
− Fold the right half of the label over to the back side of the folder. Press firmly to stick the right
side of the label on to the folder.
− Your folder is now properly labeled and ready for commissioning
The above graphic is block reader used for commissioning. The clear section on the top of the reader is
the light sensor. When a file is passed over the sensor, the reader will activate and read the RFID tag of
the file that is being passed over the sensor.
Please Note: Keep the label sheet away from the Reader (see graphic below). This reader sends out
radio waves, so when you use it, do not point it towards the file cabinets, and make sure that no other
labels/folders are in proximity! Also note that walls etc. can reflect the radio waves, so best use is
pointing away from file cabinets and desk and towards the floor
Once the folder has been labeled and BEFORE commissioning the RFID # to the database, go to the
Tracking Screen. Click the 'Commission' “circle”
www.virtualdoxx.com
VirtualDoxx Barcode and RFID Tracking
“optimized item tracking & accountability”
www.weaponstracking.com
PAGE 15 of 44
− place cursor in first Barcode cell
− Use your USB Barcode Scanner to scan the barcode of the record that you want to commission
first. This will transmit the bar code # to the cell, and, will advance the cursor to the 'RFID' cell
to the immediate right of the bar code cell / #
− now pass the file over the RFID block reader, making sure to pass over the light sensor, and the
RFID # will display in RFID cell, and the cursor will advance to the next, below bar code cell
− once RFID # displays, MOVE THE FOLDER away from the scanner!
− if you are only doing one folder, then click the 'Finished Scanning' button, and the data will
save to database. This allows you to track and find the folder with RFID! If you have
additional folders to label and commission, then repeat the above process for each folder, and
then click 'Finished Scanning'.
www.virtualdoxx.com
VirtualDoxx Barcode and RFID Tracking
“optimized item tracking & accountability”
www.weaponstracking.com
PAGE 16 of 44
− NOTE: The Reports system includes a report for 'Records without RFID #'s' and a report for
'Records with Duplicate RFID #'s'. As such, you can always run either or both reports to ensure
that the data in the database is correct.
Expunging a Record
www.virtualdoxx.com
VirtualDoxx Barcode and RFID Tracking
“optimized item tracking & accountability”
www.weaponstracking.com
PAGE 17 of 44
To expunge a record, search for the desired record using the Search Database tab. Double-click the
record to view the record detail. Then select DELETE.
A prompt will ask you to enter a reason for the expungement. Enter a reason and select “OK”.
Expunged records will have all identifying information deleted. The remaining record will only note
that a non-specific criminal record once existed, but absolutely no information about that previous
record will exist anywhere in the database.
www.virtualdoxx.com
VirtualDoxx Barcode and RFID Tracking
“optimized item tracking & accountability”
www.weaponstracking.com
PAGE 18 of 44
Tracking Records IN or OUT of Filing System
− go to the Tracking Screen
− if you are going to check multiple records to the filing system or to a specific destination, select
the destination from the 'Default Destination' list. This is common when checking folders
INTO the filing system. If checking records out to one destination, also use Default destination.
If you are going to check OUT to multiple people/destinations do not use Default destination.
When you select the drop down arrow for Destinations, they will display in alphabetic order
Tracking Screen
www.virtualdoxx.com
Default Destinations
VirtualDoxx Barcode and RFID Tracking
“optimized item tracking & accountability”
www.weaponstracking.com
PAGE 19 of 44
Shown below is the drop-down list that displays showing the destinations (people / places) to which
files can be transferred (either IN to fileroom or OUT to a destination).
− if you are transferring multiple records to a single destination, use the Default Destination.
Select this from drop down list or by scanning the Location destination list with bar code
feature of scanner.
NOTE: You can printout the destination list as bar codes, and keep the sheets in proximity to
computer/scanner. When transferring a batch of records, you can do one at a time with bar coding,
which ensures accuracy, or, you can pull RFID trigger to scan a stack all at once. However, the only
way that you will know if the records showing up on the screen exactly match the folders being
transferred, is an eyeball-to-computer screen validation.
www.virtualdoxx.com
VirtualDoxx Barcode and RFID Tracking
“optimized item tracking & accountability”
www.weaponstracking.com
PAGE 20 of 44
− to print out destination bar codes, open the left window view and click the 'Locations' layout
and then click the Printer icon
For each Location/Destination listed, as shown above, a bar code and a location description will print,
once the Printer icon is clicked.
www.virtualdoxx.com
VirtualDoxx Barcode and RFID Tracking
“optimized item tracking & accountability”
www.weaponstracking.com
PAGE 21 of 44
Note: You may print the Page Preview button to see the bar codes that will print, prior to printing, if
desired, as shown below.
www.virtualdoxx.com
VirtualDoxx Barcode and RFID Tracking
“optimized item tracking & accountability”
www.weaponstracking.com
PAGE 22 of 44
When record(s) are scanned, descriptive data about the record(s) scanned will display beneath the bar
code / RFID cells in GREEN TEXT. The current Location will display under the Destination cell. The
current Status will display under the Status cell.
www.virtualdoxx.com
VirtualDoxx Barcode and RFID Tracking
“optimized item tracking & accountability”
www.weaponstracking.com
PAGE 23 of 44
When all records being transferred have been scanned, click the 'Finished Scanning' button, and the
transaction will be completed. A message will display confirming the success of the transaction, along
with a transaction summary.
Click OK.
www.virtualdoxx.com
VirtualDoxx Barcode and RFID Tracking
“optimized item tracking & accountability”
www.weaponstracking.com
PAGE 24 of 44
− if you are going to transfer records to multiple destinations, then scan a bar code on the folder
and then a bar code representing a destination, or, select destination from the drop down list, for
each record being transferred. Once a record is scanned, the cursor will advance to the
next/below bar code cell. Scan all records to be transferred, and select or scan a destination for
each.
− once finished scanning, click the Finished Scanning button to complete the event
Cursor in First Bar Code Cell
Select Destination for each Folder
Click Finished Scanning
Note: When using the Tracking Screen for record transfers, make sure that the Tracking circle is
selected, and not the Commissioning circle. The cursor advances differently for Tracking versus
Commissioning. When Tracking, upon scanning, the cursor will advance to the next row/cell below for
scanning the next record. When Commissioning, the cursor will advance from the bar code cell to the
RFID cell.
www.virtualdoxx.com
VirtualDoxx Barcode and RFID Tracking
“optimized item tracking & accountability”
www.weaponstracking.com
PAGE 25 of 44
Changing Status of a Record
If the status of a record needs to be changed, scan the bar code on the folder, or, enter the bar code #,
and select from the Status drop down list. Then click 'Finished Scanning' to complete the transaction.
Status values that can be applied to any record include (additional Statuses can be easily added, such as
'lost', 'open', 'closed', etc.:
Active
Inactive
Closed
Archived
Destroyed
Duplicate
Deleted
Sealed
Transferred
Expunged
Status change can be a default for all records being updated, or, can be different for each record, as
described above (as to selecting default or discreet values or destinations).
Scan Bar Code or Enter Bar Code
www.virtualdoxx.com
Select Status Value
Click Finished Scanning
VirtualDoxx Barcode and RFID Tracking
“optimized item tracking & accountability”
www.weaponstracking.com
PAGE 26 of 44
Searching the Database:
To search the database for records, complete the following instructions:
1. Navigate to the "Search Database" tab.
2. Enter your search criteria in the correct fields, meta-data fields or any combination thereof
3. Searches can include start date, end date or date range
3. Click the “Search” button.
NOTE: Use % for wildcard searches. For example, if you are searching based on 'customer last name',
a col% will return all records that start with the entered chatacters (such as “col”), a %col will return all
records that end in “col”, %col% will return all records containing “col” any where in the selected
field.
The search screen is shown below:
The above Search was for all active records, 121 records matched the search criteria. Additional data
could have been selected, such as Docket Number, Filing Date, Defendant Name, etc. to drill down to
the exact record desired.
Data about each record are displayed in columns, for quick access to data elements about the record.
Like a spreadsheet, column widths can be 'dragged' to expand or reduce the column width.
www.virtualdoxx.com
VirtualDoxx Barcode and RFID Tracking
“optimized item tracking & accountability”
www.weaponstracking.com
PAGE 27 of 44
Record Right-Click Option:
Records can be highlighted, selected, and right-clicked from the search results to perform quick tasks
as needed.
− search using desired criteria and row(s) of data will display
− left click to select one record
− to select multiple records not all grouped together, hold down 'control' button on keyboard and
then left click on all records that you wish to select
− to select multiple records all grouped together, left click the top row and then hold down the
'shift' key on the keyboard and then left click on the bottom row
The above actions will highlight in RED one or multiple records. Now right click anywhere within the
RED rows, to display the 'action list' for the record or records selected.
www.virtualdoxx.com
VirtualDoxx Barcode and RFID Tracking
“optimized item tracking & accountability”
www.weaponstracking.com
PAGE 28 of 44
When right-clicked records will display the following menu:
View Record:
This is a text view of data and meta-data. However, double-clicking the record provides a more
expansive data view, so View Record is not often used.
Update Record Status:
Displays status values and enables record status updates. However, this task is most commonly
performed using the Tracking screen.
Transfer Record:
Displays destination values and enables a single record to be transferred. However, this function is
most commonly performed using the Tracking screen.
Queue Record for Print:
Will automatically place the record in the print file folder label queue. This is only used if records are
added to the database without a label being printed, and file room staff need to print a label for the
record.
Queue Record:
This is the most common use of the 'Right Click'. A list of available Queues displays, and the desired
Queue can be selected. The record will be placed in the selected Queue for subsequent processing.
UnQueue Record:
This deletes a record from a Queue. However, this is more commonly performed on the spreadsheet
screen or the project summary panel (discussed subsequently).
Email Record:
Enables entry of one or more email addresses to email a text view of data and meta-data elements.
Request Record:
Places record in Request Queue and triggers appropriate email notifications. However, record requests
are normally performed by office workers using the Casual User Interface (discussed subsequently).
The most common 'action' is to put records into a Queue. Selecting the 'Queue Record' option will
display a list of available Queues. The desired Q can be selected from drop-down list, and all records
highlighted in Red will be added to the Queue selected. The Q selected can be opened from the
Spreadsheet screen and any column can be left clicked to sort the rows by the column field clicked.
For example, clicking on a column = bar code #, the rows of data will be in sequence in ascending
order; clicking the column heading again will reverse the order.
www.virtualdoxx.com
VirtualDoxx Barcode and RFID Tracking
“optimized item tracking & accountability”
www.weaponstracking.com
PAGE 29 of 44
To VIEW a Single Record, Update the Record, Take Actions on the Record, or
View AUDIT TRAIL / HISTORY of the Record
− once you have searched using the Search screen and row(s) of data have been returned (for
Records meeting the Search Criteria), you may double click a Record to view all of its Data and
Meta-Data. Once you have viewed a Record, you can go back to the Search results to double
click any other rows(s) that you wish to view
− you may click the Unlock button (if you have administrative rights to do so) and you may
update any data or data fields, such as name change, status, location, box # and/or you can
update the date(s) that a record is due for Archiving and/or Destruction, etc.
- when you have completed the Record Update, click the 'Update' Button
Unlock To Update Fields Update Data & Meta-Data/Fields Update to Save Changes
www.virtualdoxx.com
VirtualDoxx Barcode and RFID Tracking
“optimized item tracking & accountability”
www.weaponstracking.com
PAGE 30 of 44
− click on Calendar Icon and/or use Keyboard to enter Archive and/or Destruction dates to
manually apply retention scheduling
Chain-of-Custody Report / Audit Trail
Once a record has been double-clicked, as shown above, the Audit Trail button can be clicked to
display a complete history of the record, including:
− each time the record has been viewed
− each time the record has been updated
− each time the record has moved (been transferred)
Example Audit Trail:
The Audit Trail can be filtered to see only views and/or udpates and/or transfers. The audit trail can be
printed.
The audit log can be printed, and will display the signature, if a signature exists for the row of data.
www.virtualdoxx.com
VirtualDoxx Barcode and RFID Tracking
“optimized item tracking & accountability”
www.weaponstracking.com
PAGE 31 of 44
Processing Queues
Queues are a 'placeholder' for records that require action or processing. The Queues
established for Morris County include:
−
−
−
−
−
−
−
−
−
−
Complaint
Conference Pending
Hearing Pending
Labels to be Printed
Post-Indictment
Pre-Indictment
Records Due for Archiving
Records Due for Destruction
Request Q
Requested for Court
www.virtualdoxx.com
VirtualDoxx Barcode and RFID Tracking
“optimized item tracking & accountability”
www.weaponstracking.com
PAGE 32 of 44
Queues can be opened using the Spreadsheet screen. Click the Open Queue button, and
all records in the Queue will display. Clicking on any single column heading will sort
the list; clicking the column heading a second time will reverse the sequencing of rows.
Clicking the Print Data button will print whatever is displayed in the Spreadsheet.
Clicking 'Delete Queue' and selecting a Queue from the drop-down list, will delete a Queue.
Opening Queues using the Project Summary Panel enables more Queue functionality, including:
− ability to view a record (row) within the Queue
− ability to delete rows from the Queue
− ability to predefine 'sorting' routine of the rows, typically to print the Queue in file folder
sequence (when printing the Request Queue)
− ability to print the Queue as rows of data and/or
− ability to print a customized 'cover page' for each row in the Queue
www.virtualdoxx.com
VirtualDoxx Barcode and RFID Tracking
“optimized item tracking & accountability”
www.weaponstracking.com
PAGE 33 of 44
Clicking on a Queue will display rows for all records in the Queue. These actions are available:
The buttons along the top of the window enable printing the rows of data and/or cover sheets for each
row. As well, if records in the Queue are being routed to destination(s), the rows can be sorted by
destinations.
www.virtualdoxx.com
VirtualDoxx Barcode and RFID Tracking
“optimized item tracking & accountability”
www.weaponstracking.com
PAGE 34 of 44
Queue processing buttons, as described:
www.virtualdoxx.com
VirtualDoxx Barcode and RFID Tracking
“optimized item tracking & accountability”
www.weaponstracking.com
PAGE 35 of 44
Running Reports:
Reports can be accessed and used by following the below instructions:
1. Navigate to the "Reports" tab.
2. Select a report to run from the drop-down menu.
3. Click "Run Report"
www.virtualdoxx.com
VirtualDoxx Barcode and RFID Tracking
“optimized item tracking & accountability”
www.weaponstracking.com
PAGE 36 of 44
Reports can be viewed in rows of data in .csv or .html format. If the computer opening the report has
Microsoft Excel, the report can be right-clicked to export to Excel.
www.virtualdoxx.com
VirtualDoxx Barcode and RFID Tracking
“optimized item tracking & accountability”
www.weaponstracking.com
PAGE 37 of 44
Administrative Tasks:
If you are an administrator you may complete the following tasks, but first navigate to the “Project
Summary” tab:
Adding a New User:
Please Note: New users are automatically created via Active Directory Logins on Morris County host
system. This section is for informational purposes only.
1. From the Project Summary tab, click "Add User".
2. Enter a new UserID, name, password, and email.
3. Select the users role.
4. Select the users Layout access.
5. OPTIONALLY make user a location at the same time.
The Add User window can be see below:
www.virtualdoxx.com
VirtualDoxx Barcode and RFID Tracking
“optimized item tracking & accountability”
www.weaponstracking.com
PAGE 38 of 44
Adding a New Location:
1. From the Project Summary tab, click "Add Location".
2. Enter the location's barcode and description.
3. If the location is a Home Location, such as the File Room, check the check box.
4. OPTIONALLY make location a user at the same time.
The Add Location window can be see below:
Adding a New Queue:
1. From the Project Summary tab, click "Add Queue".
2. Enter the Queue's ID, E-Form, type, and description.
3. Click "OK"
The Add Queue window can be see below:
www.virtualdoxx.com
VirtualDoxx Barcode and RFID Tracking
“optimized item tracking & accountability”
www.weaponstracking.com
PAGE 39 of 44
Casual User Interface Users Manual
Prepared for:
Morris County Criminal
Manual Version Number
Date
1.0
08/15/13
www.virtualdoxx.com
VirtualDoxx Barcode and RFID Tracking
“optimized item tracking & accountability”
www.weaponstracking.com
PAGE 40 of 44
Starting VirtualDoxx (TO SEARCH FOR RECORDS, REQUEST RECORDS
AND TRANSFER RECORDS):
Log In:
After VirtualDoxx has launched you should see the logon screen shown below.
Complete the following steps to login to and begin using VirtualDoxx:
2. Enter your UserID.
4. Enter your Password.
5. Click the LOGON button.
www.virtualdoxx.com
VirtualDoxx Barcode and RFID Tracking
“optimized item tracking & accountability”
www.weaponstracking.com
PAGE 41 of 44
Once a User has logged in, an icon will automatically save to their desktop, and can
be used going forward for logging on.
Once logged on a User will see the Casual User Interface SEARCH SCREEN
The Casual User Interface (CUI) includes five search fields, any or all of which can be used to query
the database.
Fields can be partially entered ending with the % sign for wildcard searches.
The CUI is most often utilized by office workers to determine the location of a record.
The above example is searching on Docket Number FD-13-002242-2000-B. This data displays:
Request this
Record
Transfer this
Record
ID
Status
Location
FD-13-002242-2000B+WILLIAMS
VERNON VS
BRADLEY NAKESHA
Y+2000/06/23
Active
L-33-Room L-33
The User now knows the record's location and status.
www.virtualdoxx.com
VirtualDoxx Barcode and RFID Tracking
“optimized item tracking & accountability”
www.weaponstracking.com
PAGE 42 of 44
If the User clicks the Request button, the Record will be placed in the Request Queue with themselves
shown as the person Requesting the Record. If desired, the reason for the request can be selected from
the drop-down list.
If the Record is being requested for another person or place, that destination can be selected from the
drop-down list.
For any Request, a note can be added.
All record requests:
− place record in Request Queue
− send email(s) to designated file room staff
− can also send email to the person that currently has the record
www.virtualdoxx.com
VirtualDoxx Barcode and RFID Tracking
“optimized item tracking & accountability”
www.weaponstracking.com
PAGE 43 of 44
Virtual Doxx Helpdesk
[email protected]
877-280-7343 (RFID) ext 3
www.virtualdoxx.com
VirtualDoxx Barcode and RFID Tracking
“optimized item tracking & accountability”
www.weaponstracking.com
PAGE 44 of 44