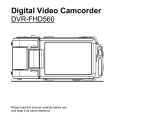
1
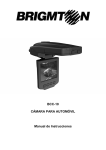
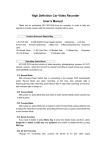
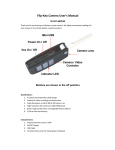
Road Safety Guard
Instruction Manual
Thank you for purchasing Portable DVR from our company. In
order to help you operate it correctly, please read this instruction carefully
before using.
Product Picture and Function
1. SD/MMC Card Slot
9. Mode Button
2. Working (Green) indicator
10. USB Slot
Charging (Red) indicator
11. TV-OUT
3. Microphone
12. Lens
4. REC / Snap
13. Speaker
5. Menu
14. Reset hole
6. ON/OFF Power Switch
15. Mount hole
7. Up /Down
16. 2.4 inch LCD
8. Night Lights
Attached Accessories
●Manual
●Mount
●USB Cable
●Car Charger (Include the adaptor 12V/24V transfers to 5V)
Operate
Two Power options:
A) Use built-in Li-ion battery
DVR can be activated after it has been placed on the vehicle by pressing the
Power Switch ⑥ for 1 second and turn off by pressing it for 2 seconds.
Charging: connect with USB cable or car charger.
B) Connect with Car Charger
DVR will record automatically when the car starts, turn off and save the last
file when the car stops.
Recording
DVR will enter into defaulted recording mode when turn it on, the work indicator
blinkers and indicates it is recording. The recording file is saved in the SD/MMC
Card. To stop, press Recording Button ④ or ending when car stops , the work
indicator won`t blinker.
Camera mode
Turn on the DVR and press Mode Button ⑨ to enter into Camera mode. To take
photo by pressing Snap Button ④.
Manual Focus Function
In Camera or Recording mode ,press UP/DOWN Button the screen will show focus
icon them press UP/DOWN button to choose need focus, you can choose (1x~8x)
Night Vision Function
Press Menu button then choose Night vision , DVR will enter Night vision
status ,if you want to exit choose off
Preview and Delete
Turn on the DVR and press Mode Button ⑨ twice to enter into Preview Mode.
Press Up or Down to select the previewed file. If it is video file, it can play or
pause by pressing REC Button, and stop by pressing Mode Button. If you want to
delete it, press Menu Button to enter into delete mode, and then, select Single, All
by Menu Button and Up/Down and confirm to delete the file by Menu Button.
Also select Slide show, Protect file, Thumbnail mode and volume (from 1 to 8)
under the Preview Mode.
Setting the functions:
Turn on the DVR and Press Menu Button under Video mode or Camera mode to
enter into setting interface. Confirm by Menu Button and Select by Up/Down for
the following setting. Press REC Button to exit.
A. Video mode
1. Size: Select VGA, QVGA, SXGA.
2. EV: -2.0, -5/3, -4/3, -1.0, -2/3, -1/3, +0.0, +1/3, +2/3, +1.0, +4/3, +5/3, +2.0
3. White Balance: Auto/Daylight/Cloudy/Tungsten/Fluorescent
4. Time Stamp: Off/Data Only/Data &Time
5. Motion Detect: Off/On
6. Video Time: 3Min/5Min/10Min/15Min
7. Audio: On/Off
8. Flip Screen: Off/On
9. Night Mode: Off/On
B. Camera mode:
1. Size: VGA/1.3M/2M/3M/5M/8M/12M
2. Quality: Fine/Standard/Economy
3. Scene Mode: Auto/Sport/Night/Portrait/Landscape/Backlight
4. EV: -2.0, -5/3, -4/3, -1.0, -2/3, -1/3, +0.0, +1/3, +2/3, +1.0, +4/3, +5/3, +2.0
5. White Balance: Auto/Daylight/Cloudy/Tungsten/Fluorescent
6. ISO: Auto/100/200
7. Color: Standard/Vivid/Sepia/Monochrome
8. Saturation: High/Normal/Low
9. Sharpness: Hard/Normal/Soft
10. Preview: On/Off
11. Time Stamp: Off/Data Only/Data &Time
12. Burst: Off/On
C. Setting Mode
Whether under idle Mode, Press Menu Button and then press Mode Button to
enter into Setup interface.
1. Format: Select it if you want to format the SD card.
2. Beep: Off/On
3. Language: Select[English/ French/ Deutsch/Italian/Spanish/Portuguese / TChinese/ S-Chinese/ Russian/ Turkish/Korean]
4. Auto Off: 1Min/3Min/5Min/Off
5. System Reset: select [Cancel or Execute system] reset.
6. Light Frequency: 50Hz/60Hz
7. TV Output: NTSC/PAL
8. Data Input: Set correct recording data and time.
9. USB: PC Cam/Disk Drive
10. Version:Check software information
Preview on the TV
Connect the AV link of DVR with the TV, and enter into the preview mode
automatically. The operating steps are same as preview on the screen.
USB Mode
Connect DVR with computer by USB cable, [My computer] will occur removable
disk, the file id stored at Removable Disk/DCIM/100DSCIM. At the moment, the
file of the DVR can be downloaded to the computer.
Note:
1) Please insert the SD/MMC card before recording.
2) This DVR Records in cycle if you choose 3/5/10/15 minutes as storage time.
When the storage medium is full, it will record from the beginning again and
erase over the previously recorded material automatically. It will have 3
seconds pause time, and namely the contents in the 3 seconds will not record.
3) Because the DVR is DC5Vinput, please use the attached car charger. It has
adaptor 12V/24V transfers to 5V already.
Technical Specifications
1) Recording resolution: 1280*960/640*480/320*240 pixels
2) Video format: AVI
3) Repeat storage by section: 3/5/10/15 minutes
4) Power source: Built-in rechargeable battery or 5V Car Charger
5) Supports SD/MMC card(From 256MB up to 32GB)
6) Microphone: can record sound
Small Tip to Save You Big Headache
A DVR is in a way very similar to a computer. If the DVR hangs itself during
operation, please follow the procedures below and most likely the DVR can be reactivated.
DVR will restart after press Restart Hole gently by diameter less then 1mm column.