1
Developer Manual
Plug-in Development Guide
Release Neon-20140301
Julien Signoles with Loïc Correnson, Matthieu Lemerre and Virgile Prevosto
CEA LIST, Software Reliability Laboratory, Saclay,F-91191
©2009-2013
CEA LIST
This work has been supported by the ANR project CAT (ANR-05-RNTL-00301) and the
ANR project U3CAT (08-SEGI-02101).
Contents
Foreword
9
1 Introduction
11
1.1
About this document . . . . . . . . . . . . . . . . . . . . . . . . . . . . . . . .
11
1.2
Outline
12
. . . . . . . . . . . . . . . . . . . . . . . . . . . . . . . . . . . . . . .
2 Tutorial
13
2.1
What a Plug-in Looks Like? . . . . . . . . . . . . . . . . . . . . . . . . . . . .
13
2.2
The Hello plug-in . . . . . . . . . . . . . . . . . . . . . . . . . . . . . . . . . .
13
2.2.1
A Simple Script . . . . . . . . . . . . . . . . . . . . . . . . . . . . . . .
14
2.2.2
Registering a Script as a Plug-in
. . . . . . . . . . . . . . . . . . . . .
15
2.2.3
Displaying Messages
. . . . . . . . . . . . . . . . . . . . . . . . . . . .
15
2.2.4
Writing a Makele
. . . . . . . . . . . . . . . . . . . . . . . . . . . . .
16
2.2.5
Adding Command Line Options . . . . . . . . . . . . . . . . . . . . . .
17
2.2.6
Testing your Plug-in . . . . . . . . . . . . . . . . . . . . . . . . . . . .
19
2.2.7
Documenting your Source Code . . . . . . . . . . . . . . . . . . . . . .
19
The CFG plug-in . . . . . . . . . . . . . . . . . . . . . . . . . . . . . . . . . .
19
2.3.1
Visiting the AST . . . . . . . . . . . . . . . . . . . . . . . . . . . . . .
19
2.3.2
Interfacing with a kernel-integrated plug-in
. . . . . . . . . . . . . . .
22
2.3.3
Extending the Frama-C GUI
. . . . . . . . . . . . . . . . . . . . . . .
23
2.3.4
Plug-In registration and command line options
2.3.5
Splitting les and writing a Makele
2.3
. . . . . . . . . . . . .
24
. . . . . . . . . . . . . . . . . . .
25
2.3.6
Getting your Plug-in Usable by Others . . . . . . . . . . . . . . . . . .
28
2.3.7
Writing your Plug-in into the Journal
. . . . . . . . . . . . . . . . . .
28
2.3.8
Writing a Congure Script . . . . . . . . . . . . . . . . . . . . . . . . .
28
2.3.9
Getting your plug-in Usable in a Multi Projects Setting
28
. . . . . . . .
3 Software Architecture
33
3.1
General Description
. . . . . . . . . . . . . . . . . . . . . . . . . . . . . . . .
3.2
Cil: C Intermediate Language
. . . . . . . . . . . . . . . . . . . . . . . . . . .
5
33
35
CONTENTS
3.3
Kernel . . . . . . . . . . . . . . . . . . . . . . . . . . . . . . . . . . . . . . . .
35
3.4
Plug-ins
36
. . . . . . . . . . . . . . . . . . . . . . . . . . . . . . . . . . . . . . .
4 Advanced Plug-in Development
39
4.1
File Tree Overview . . . . . . . . . . . . . . . . . . . . . . . . . . . . . . . . .
39
4.2
Frama-C Congure.in . . . . . . . . . . . . . . . . . . . . . . . . . . . . . . . .
40
4.2.1
Principle . . . . . . . . . . . . . . . . . . . . . . . . . . . . . . . . . . .
40
4.2.2
Addition of a Simple Plug-in
41
4.2.3
Conguration of New Libraries or Tools
. . . . . . . . . . . . . . . . .
41
4.2.4
Addition of Library/Tool Dependencies
. . . . . . . . . . . . . . . . .
42
4.2.5
Addition of Plug-in Dependencies . . . . . . . . . . . . . . . . . . . . .
43
4.3
Plug-in Specic Congure.in . . . . . . . . . . . . . . . . . . . . . . . . . . . .
43
4.4
Frama-C Makele . . . . . . . . . . . . . . . . . . . . . . . . . . . . . . . . . .
44
4.5
Plug-in Specic Makele . . . . . . . . . . . . . . . . . . . . . . . . . . . . . .
45
4.6
Makefile.dynamic
. . . . . . . . . . . . . . . . . . . . . . .
4.5.1
Using
. . . . . . . . . . . . . . . . . . . . . . . . .
45
4.5.2
Compiling Frama-C and external plug-ins at the same time . . . . . . .
46
Testing . . . . . . . . . . . . . . . . . . . . . . . . . . . . . . . . . . . . . . . .
46
4.6.1
Using ptests . . . . . . . . . . . . . . . . . . . . . . . . . . . . . . . . .
47
4.6.2
Conguration . . . . . . . . . . . . . . . . . . . . . . . . . . . . . . . .
48
4.6.3
Alternative Testing . . . . . . . . . . . . . . . . . . . . . . . . . . . . .
49
4.6.4
Detailed options
50
4.6.5
Detailed directives
. . . . . . . . . . . . . . . . . . . . . . . . . . . . . .
. . . . . . . . . . . . . . . . . . . . . . . . . . . . .
50
4.7
Plug-in General Services . . . . . . . . . . . . . . . . . . . . . . . . . . . . . .
53
4.8
Logging Services
53
4.9
. . . . . . . . . . . . . . . . . . . . . . . . . . . . . . . . . .
printf
From
. . . . . . . . . . . . . . . . . . . . . . . . . . . .
54
4.8.2
Log Quick Reference . . . . . . . . . . . . . . . . . . . . . . . . . . . .
54
4.8.3
Logging Routine Options
. . . . . . . . . . . . . . . . . . . . . . . . .
55
4.8.4
Advanced Logging Services
. . . . . . . . . . . . . . . . . . . . . . . .
57
library: Type Values and Datatypes . . . . . . . . . . . . . . . . . .
59
The
Type
4.9.1
Type Value
4.9.2
Datatype
to
Log
4.8.1
. . . . . . . . . . . . . . . . . . . . . . . . . . . . . . . . .
59
. . . . . . . . . . . . . . . . . . . . . . . . . . . . . . . . . .
60
4.10 Plug-in Registration and Access . . . . . . . . . . . . . . . . . . . . . . . . . .
63
4.10.1 Registration through a
.mli
File
. . . . . . . . . . . . . . . . . . . . .
63
4.10.2 Kernel-integrated Registration and Access . . . . . . . . . . . . . . . .
64
4.10.3 Dynamic Registration and Access . . . . . . . . . . . . . . . . . . . . .
65
4.11 Journalization . . . . . . . . . . . . . . . . . . . . . . . . . . . . . . . . . . . .
67
4.12 Project Management System
68
. . . . . . . . . . . . . . . . . . . . . . . . . . .
4.12.1 Overview and Key Notions
. . . . . . . . . . . . . . . . . . . . . . . .
6
68
CONTENTS
4.12.2 State: Principle . . . . . . . . . . . . . . . . . . . . . . . . . . . . . . .
68
4.12.3 Registering a New State . . . . . . . . . . . . . . . . . . . . . . . . . .
70
4.12.4 Direct Use of Low-level Functor
. . . . . . .
72
. . . . . . . . . . . . . . . . . . . . . . . . . . . . . . .
74
. . . . . . . . . . . . . . . . . . . . . . . . . . . . . . . . . .
75
4.12.5 Using Projects
4.12.6 Selections
State_builder.Register
4.13 Command Line Options
. . . . . . . . . . . . . . . . . . . . . . . . . . . . . .
75
4.13.1 Denition . . . . . . . . . . . . . . . . . . . . . . . . . . . . . . . . . .
76
4.13.2 Tuning . . . . . . . . . . . . . . . . . . . . . . . . . . . . . . . . . . . .
77
4.14 Initialization Steps
. . . . . . . . . . . . . . . . . . . . . . . . . . . . . . . . .
78
4.15 Customizing the AST creation . . . . . . . . . . . . . . . . . . . . . . . . . . .
80
4.16 Visitors
81
. . . . . . . . . . . . . . . . . . . . . . . . . . . . . . . . . . . . . . .
4.16.1 Entry Points
. . . . . . . . . . . . . . . . . . . . . . . . . . . . . . . .
81
4.16.2 Methods . . . . . . . . . . . . . . . . . . . . . . . . . . . . . . . . . . .
82
4.16.3 Action Performed . . . . . . . . . . . . . . . . . . . . . . . . . . . . . .
82
4.16.4 Visitors and Projects . . . . . . . . . . . . . . . . . . . . . . . . . . . .
83
4.16.5 In-place and Copy Visitors . . . . . . . . . . . . . . . . . . . . . . . . .
83
4.16.6 Dierences Between the Cil and Frama-C Visitors . . . . . . . . . . . .
84
4.16.7 Example . . . . . . . . . . . . . . . . . . . . . . . . . . . . . . . . . . .
84
4.17 Logical Annotations
. . . . . . . . . . . . . . . . . . . . . . . . . . . . . . . .
85
. . . . . . . . . . . . . . . . . . . . . . . . . . . . . . . . . . . . . .
86
4.18.1 Representations . . . . . . . . . . . . . . . . . . . . . . . . . . . . . . .
86
4.18.2 Map Indexed by Locations . . . . . . . . . . . . . . . . . . . . . . . . .
87
4.18 Locations
4.19 GUI Extension
. . . . . . . . . . . . . . . . . . . . . . . . . . . . . . . . . . .
87
4.20 Documentation
. . . . . . . . . . . . . . . . . . . . . . . . . . . . . . . . . . .
87
4.20.1 General Overview . . . . . . . . . . . . . . . . . . . . . . . . . . . . . .
88
4.20.2 Source Documentation . . . . . . . . . . . . . . . . . . . . . . . . . . .
88
4.20.3 Website
. . . . . . . . . . . . . . . . . . . . . . . . . . . . . . . . . . .
89
4.21 License Policy . . . . . . . . . . . . . . . . . . . . . . . . . . . . . . . . . . . .
89
5 Reference Manual
5.1
91
File Tree . . . . . . . . . . . . . . . . . . . . . . . . . . . . . . . . . . . . . . .
91
5.1.1
The
cil
directory
. . . . . . . . . . . . . . . . . . . . . . . . . . . . .
92
5.1.2
The
src
directory
. . . . . . . . . . . . . . . . . . . . . . . . . . . . .
93
5.2
Congure.in . . . . . . . . . . . . . . . . . . . . . . . . . . . . . . . . . . . . .
95
5.3
Makeles
96
5.3.1
5.3.2
. . . . . . . . . . . . . . . . . . . . . . . . . . . . . . . . . . . . . .
Overview
. . . . . . . . . . . . . . . . . . . . . . . . . . . . . . . . . .
Sections of Makefile, Makefile.config.in, Makefile.common
Makefile.generic . . . . . . . . . . . . . . . . . . . . . . . . . .
7
96
and
. . .
98
CONTENTS
5.4
Makefile.dynamic
5.3.3
Variables of
5.3.4
Makefile.dynamic
Ptests
5.4.1
and
Makefile.plugin
. . . . . . . . .
102
. . . . . . . . . . . . . . . . . . . . . . . . . . . . .
105
. . . . . . . . . . . . . . . . . . . . . . . . . . . . . . . . . . . . . . . .
105
Pre-dened macros for tests commands . . . . . . . . . . . . . . . . . .
105
A Changes
107
Bibliography
113
List of Figures
115
Index
117
8
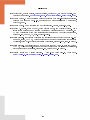
Foreword
This is the documentation of the Frama-C implementation
1 which aims to help developers
integrate new plug-ins inside this platform. It started as a deliverable of the task 2.3 of the
2
ANR RNTL project CAT .
The content of this document corresponds to the version Neon-20140301 (March 3, 2014) of
Frama-C. However the development of Frama-C is still ongoing: features described here may
still evolve in the future.
Acknowledgements
We gratefully thank all the people who contributed to this document: Patrick Baudin, Richard
Bonichon, Pascal Cuoq, Zaynah Dargaye, Florent Garnier, Pierre-Loïc Garoche, Philippe
Herrmann, Boris Hollas, Nikolaï Kosmatov, Benjamin Monate, Yannick Moy, Anne Pacalet,
Armand Puccetti, Muriel Roger and Boris Yakobowski. We also thank Johannes Kanig for
3
his Mlpost support , the tool used for making gures of this document.
1
http://frama-c.com
http://www.rntl.org/projet/resume2005/cat.htm
3
http://mlpost.lri.fr
2
9
Chapter 1
Introduction
Frama-C (Framework for Modular Analyses of C) is a software platform which helps the
development of static analysis tools for C programs thanks to a plug-ins mechanism.
This guide aims at helping developers program within the Frama-C platform, in particular for
developing a new analysis or a new source-to-source transformation through a new plug-in.
For this purpose, it provides a step-by-step tutorial, a general presentation of the Frama-C
software architecture, a set of Frama-C-specic programming rules and an overview of the
API of the Frama-C kernel.
However it does not provide a complete documentation of the
Frama-C API and, in particular, it does not describe the API of existing Frama-C plug-ins.
This API is documented in the html source code generated by
make doc
(see Section 4.20.1
for additional details about this documentation).
This guide introduces neither the use of Frama-C which is the purpose of the user manual [4]
and of the reference article [8], nor the use of plug-ins which are documented in separated and
dedicated manuals [2, 5, 10, 13, 20]. We assume that the reader of this guide already read
the Frama-C user manual and knows the main Frama-C concepts.
The reader of this guide may be either a Frama-C beginner who just nished reading the user
manual and wishes to develop his/her own analysis with the help of Frama-C, an intermediatelevel plug-in developer who would like to have a better understanding of one particular aspect
of the framework, or a Frama-C expert who wants to remember details about one specic
point of the Frama-C development.
Frama-C is fully developed within the OCaml programming language [14]. Motivations for this
choice are given in a Frama-C experience report [9]. However this guide does not provide any
introduction to this programming language: the World Wide Web already contains plenty
resources for OCaml developers (see for instance
index.en.html).
http://caml.inria.fr/resources/doc/
1.1 About this document
To ease reading, section heads may state the category of readers they are intended for and a
set of prerequisites.
Appendix A references all the changes made to this document between successive Frama-C
releases.
In the index, page numbers written in bold italics (e.g.
1 ) reference the dening sections
for the corresponding entries while other numbers (e.g.
1) are less important references.
11
CHAPTER 1. INTRODUCTION
Furthermore, the name of each OCaml value in the index corresponds to an actual FramaC value. In the Frama-C source code, the ocamldoc documentation of such a value contains
the special tag
API, the note @plugin development guide while, in the html documentation of the Frama-C
Consult the Plugin Development Guide for additional details is attached
the value name.
The most important paragraphs are displayed inside gray boxes like this one. A plug-in
developer
must follow them very carefully.
There are numerous code snippets in this document. Beware that copy/pasting them from
the PDF to your favorite text editor may prevent your code from compiling, because the
PDF text can contain non-ASCII characters.
1.2 Outline
This guide is organised in four parts.
Chapter 2
is a step-by-step tutorial for developing a new plug-in within the Frama-C plat-
form. At the end of this tutorial, a developer should be able to extend Frama-C with a
simple analysis available as a Frama-C plug-in.
Chapter 3
presents the Frama-C software architecture.
Chapter 4
details how to use all the services provided by Frama-C in order to develop a fully
integrated plug-in.
Chapter 5
is a reference manual with complete documentation for some particular points of
the Frama-C platform.
12
Chapter 2
Tutorial
Target readers:
beginners.
This chapter aims at helping a developer to write his rst Frama-C plug-in. At the end of the
tutorial, any developer should be able to extend Frama-C with a simple analysis available as
a Frama-C plug-in. This chapter was written as a step-by-step explanation on how to proceed
towards this goal. It will get you started but does not tell the whole story. You will get it
with your own experiment, and by reading the other chapters of this guide on need.
First Section 2.1 shows what a plug-in looks like.
Then Section 2.2 explains the basis for
writing a standard Frama-C plug-in, while Section 2.3 details how to interact with Frama-C
and others plug-ins to implement analyzers of C programs.
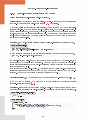
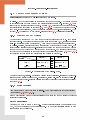
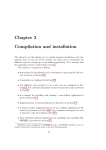
2.1 What a Plug-in Looks Like?
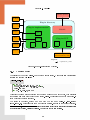
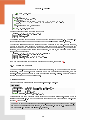
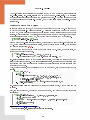
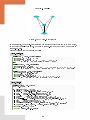
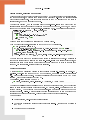
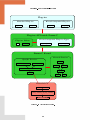
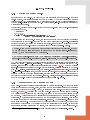
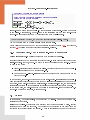
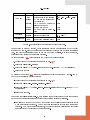
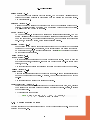
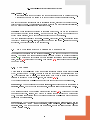
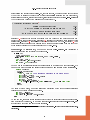
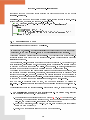
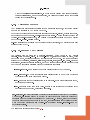
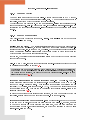
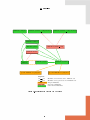
Figure 2.1 shows how a plug-in can integrate with the Frama-C platform. This tutorial focuses
on specic parts of this gure.
The implementation of the plug-in is provided inside a specic directory. The plug-in registers
with the Frama-C platform through kernel-provided registration points. These registrations
are performed through hooks (by applying a function or a functor). For instance, the next
section shows how to:
extend the Frama-C entry point thanks to the function
Db.Main.extend
if you want to
run plug-in specic code whenever Frama-C is executed;
use specic plug-in services provided by the module
Plugin,
such as adding a new
Frama-C option.
2.2 The Hello plug-in
This simple plug-in explain how to make your plug-in interact basically with several aspects
of the Frama-C framework: registration, getting command-line options, compilation and installation, console output, testing, and interaction between APIs.
13
CHAPTER 2. TUTORIAL
Makefile.dynamic
Db.Main
Plug-in directory
Dynamic
Plug-in implementation
Plugin
Makefile
Register
Type
Plug-in GUI?
Options
...
...
Journal
Pro ject
Design
(GUI extension point)
Caption:
registration points
Figure 2.1: Plug-in Integration Overview.
2.2.1 A Simple Script
The easiest way to extend Frama-C is to write a simple script. A simple 'Hello World' script
consists of a single OCaml le:
File
hello_world.ml1
l e t run () =
l e t chan = open_out " hello . out " i n
P r i n t f . f p r i n t f chan " Hello , world !\ n";
c l o s e _ o u t chan
l e t () = Db.Main. extend run
This script denes a simple function that writes a message to an output le, then registers
the function
run as an entry point for the script.
Frama-C will call it among the other plug-in
entry points if the script is loaded.
The
script
is
compiled,
hello_world.ml.
1
loaded
and
run
with
the
Executing this command creates a
command
hello.out
frama-c -load-script
le in the current directory.
To be complete, this code (and some others in this tutorial) should handle exceptions potentially raised
by le operations (opening, writing and closing). We omit them for the sake of clarity.
14
2.2. THE HELLO PLUG-IN
2.2.2 Registering a Script as a Plug-in
To make this script better integrated into Frama-C, its code must register itself as a plug-in.
Such a registration provides general services, such as outputing on the Frama-C console, or
extending Frama-C with new command-line options.
Registering a plug-in is achieved through the use of the
File
Plugin.Register
functor:
hello_world.ml
l e t help_msg = " output a warm welcome message to the user "
module S e l f = P l u g i n . R e g i s t e r
( struct
l e t name = " hello world "
l e t shortname = " hello "
l e t h e l p = help_msg
end )
l e t run () =
l e t chan = open_out " hello . out " i n
P r i n t f . f p r i n t f chan " Hello , world !\ n";
c l o s e _ o u t chan
l e t () = Db.Main. extend run
The argument for this functor is a module with three values:
name
is an arbitrary, non-empty string containing the full name of the module.
shortname
is a small string containing the short name of the module, usually used as a
prex for plug-in options. No space is allowed in that string.
help
is a string containing free-form text, containing a description of the module.
Visible results of the registration include:
hello world
default options for the plug-in work, including the inline help (available with
appears in the list of available plug-ins (consultable with
-load-script hello_world.ml -help);
-load-script hello_world.ml -hello-help).
frama-c
frama-c
2.2.3 Displaying Messages
The
signature
of
General_services.
the
module
Self
obtained
by
applying
one should never attempt to write messages directly to
2
stderr
or
services instead .
File
hello_world.ml
l e t help_msg = " output a warm welcome message to the user "
module S e l f = P l u g i n . R e g i s t e r
( struct
l e t name = " hello world "
l e t shortname = " hello "
2
Plugin.Register
is
One of these general services is logging, i.e. message display. In Frama-C,
However writing to a new le using standard OCaml primitives is OK.
15
stdout:
use the general
CHAPTER 2. TUTORIAL
l e t h e l p = help_msg
end )
l e t run () =
S e l f . r e s u l t " Hello , world !";
l e t product =
S e l f . f e e d b a c k ∼ l e v e l :2 " Computing the product of 11 and 5... ";
11 * 5
in
S e l f . r e s u l t " 11 * 5 = %d" p r o d u c t
l e t () = Db.Main. extend run
Running this script yields the following output:
$ frama -c - load - script hello_world . ml
[ hello ] Hello , world !
[ hello ] 11 * 5 = 55
result
The
routine is the function to use to output results of your plug-in.
output routines takes the same arguments than the OCaml function
The function
feedback
The Frama-C
Format.printf.
outputs messages that show progress to the user. In this example,
we gave to feedback a log level of 2, because we estimated that in most case the user is not
interested in seeing the progress of a fast operation (simple multiplication). The default log
level is 1, so by default this message is not displayed. To see it, the verbosity of the
hello
plug-in must be increased:
$ frama -c - load - script hello . ml - hello - v e r b o s e 2
[ hello ] Hello , world !
[ hello ] Computing the product of 11 and 5...
[ hello ] 11 * 5 = 55
For a comprehensive list of the logging routines and options, see Section 4.8.
2.2.4 Writing a Makele
The use of
load-script
extensions.
is ideal for small experimentations, or when writing very specic
When a plug-in becomes larger and must be split into several les, or more
general-purpose, it is a good idea to build and install it properly. Frama-C provides means to
simplify this through the use of
Makefiles.
A simple Makele
We rst write a simple
File
Makefile
for our
hello_world.ml
plug-in:
Makele
FRAMAC_SHARE
:= $( shell frama -c. byte - print - path )
FRAMAC_LIBDIR
:= $ ( shell frama -c. byte - print - libpath )
PLUGIN_NAME
= Hello
PLUGIN_CMO
= hello_world
i n c l u d e $( FRAMAC_SHARE )/ Makefile . dynamic
This
Makefile
set some variables before including the generic
Makefile.dynamic
which is
installed within Frama-C. It may be customized in several ways to help building a plug-in (see
Section 4.5 for details).
hello_world)
The name of each compilation unit (here
name set by the
Makefile
(here
Hello),
must be dierent of the plug-in
of any other plug-in names (e.g.
any other Frama-C kernel OCaml les (e.g.
plugin).
16
value)
and of
2.2. THE HELLO PLUG-IN
Run make to compile it.
-load-module ./Hello.
You can then load and execute the module using
make install to install the
$(FRAMAC_LIBDIR)/plugins directory).
Then run
Just launch
frama-c
frama-c
plug-in (you need to have write access to the
(without any option): the
Hello
plug-in is now always loaded, without
the need to pass other options to the command line.
Splitting your source les
Here is a slightly more complex example where the plug-in has been splitten into several les.
Usually plug-in registration through
Plugin.Register
should be done at the bottom of the
module hierarchy, while registration of the run function through
the top, as in the following example. The
PLUGIN_CMO
Db.Main.extend
should at
variable must contain the list of le
names, in the correct OCaml build order.
File
Makele
FRAMAC_SHARE := $ ( shell frama -c - print - path )
FRAMAC_LIBDIR := $( shell frama - c - print - libpath )
PLUGIN_NAME = Hello
PLUGIN_CMO = hello_options hello_print hello_run
i n c l u d e $( FRAMAC_SHARE )/ Makefile . dynamic
File
hello_options.ml
l e t help_msg = " output a warm welcome message to the user "
module S e l f = P l u g i n . R e g i s t e r
( struct
l e t name = " hello world "
l e t shortname = " hello "
l e t h e l p = help_msg
end )
File
hello_print.ml
l e t p r i n t _ h e l l o () = H e l l o _ r e g i s t e r . S e l f . r e s u l t " Hello , World "
File
hello_run.ml
l e t run () = H e l l o _ p r i n t . p r i n t _ h e l l o ()
l e t () = Db.Main. extend run
2.2.5 Adding Command Line Options
We now extend the
hello world
If the plug-in is installed (with
invocation of
frama-c,
plug-in with new options.
make install),
it will be loaded and executed on every
which is surely not what you want. To avoid this behavior, we add a
boolean option, set by default to false, that conditionally enables the execution of the main
function of the plug-in (the usual convention for the name of the option is to take the short
name of the module with no sux, i.e.
We also add another option,
-hello
-hello-output,
in our case).
that takes a string argument. When set, the
hello message is displayed in the le given as argument.
17
CHAPTER 2. TUTORIAL
File
hello_world.ml
l e t help_msg = " output a warm welcome message to the user "
module S e l f = P l u g i n . R e g i s t e r
( struct
l e t name = " hello world "
l e t shortname = " hello "
l e t h e l p = help_msg
end )
module Enabled = S e l f . F a l s e
( struct
l e t option_name = " - hello "
l e t h e l p = " when on ( off by default ), " ^ help_msg
end )
module O u t p u t _ f i l e = S e l f . S t r i n g
( struct
l e t option_name = " - hello - output "
l e t d e f a u l t = " -"
l e t arg_name = " output - file "
l e t help =
" file where the message is output ( default : output to the console )"
end )
l e t run () =
i f Enabled . g e t () t h e n
l e t f i l e n a m e = O u t p u t _ f i l e . g e t () i n
l e t output_fun =
i f O u t p u t _ f i l e . i s _ d e f a u l t () t h e n
S e l f . r e s u l t "%s"
else
l e t chan = open_out f i l e n a m e i n
P r i n t f . f p r i n t f chan "%s\ n" ;
c l o s e _ o u t chan
in
output_fun " Hello , world !"
l e t () = Db.Main. extend run
Registering these new options is done by calling the
Self.False
and
Self.String
functors,
which respectively creates a new boolean option whose default value is false and a new string
"-").
Output_file.get ().
option with a user-dened default value (here
via
Enabled.get ()
and
The values of these options are obtained
With this change, the hello message is displayed only if Frama-C is executed with the
option.
$ frama -c
$ frama -c - hello
[ hello ] Hello , world !
$ frama -c - hello - hello - output hello . out
$ l s hello . out
hello . out
These new options also appear in the inline help for the hello plug-in:
$ frama -c - hello - help
...
***** LIST OF AVAILABLE OPTIONS :
- hello
when on ( off by default ), output a warm welcome message
to the user ( opposite option is -no - hello )
- hello - output < output - file > file where the message is output ( default :
output to the console )
...
18
-hello
2.3. THE CFG PLUG-IN
2.2.6 Testing your Plug-in
Not written yet: please report as feature request on
http: // bts. frama-c. com
if you
http: // bts. frama-c. com
if you
really need this section.
2.2.7 Documenting your Source Code
Not written yet: please report as feature request on
really need this section.
2.3 The CFG plug-in
In this section, we create a new CFG plug-in that computes the control ow graph of a
function and outputs it in the dot format. Through its implementation, we explain some of
the APIs of Frama-C.
2.3.1 Visiting the AST
Writing an analysis for C programs is the primary purpose of a Frama-C plug-in. That usually
requires to visit the AST to compute information for some C constructs.
There are two
dierent ways of doing that in Frama-C:
through a direct recursive descent; or
by using the Frama-C visitor.
The rst case is usually best if you have to compute information for most C constructs, while
the latter is best if only few C constructs are interesting or if you have to write a program
transformation. Of course, it is also possible to combine both ways.
Pretty-printing with direct recursive descent
Frama-C already has a function to pretty-print statements (namely
Printer.pp_stmt),
but
it is not suitable for us, as it will recursively print substatements of compound statements
(blocks, if, while, ...), while we only want to label the node representing the current statement:
substatements will be represented by other nodes.
Thus we will use the following small
function:
open C i l _ t y p e s
let
|
|
|
|
|
|
|
|
|
|
|
print_stmt out = f u n c t i o n
I n s t r i → P r i n t e r . p p_ i n s tr out i
Return _ → Format. p p _ p r i n t _ s t r i n g out "<return>"
Goto _ → Format. p p _ p r i n t _ s t r i n g out "<goto>"
Break _ → Format. p p _ p r i n t _ s t r i n g out "<break>"
Continue _ → Format. p p _ p r i n t _ s t r i n g out "<continue>"
I f ( e ,_,_,_) → Format. f p r i n t f out " if %a" P r i n t e r .pp_exp e
Switch ( e ,_,_,_) → Format. f p r i n t f out " switch %a" P r i n t e r .pp_exp e
Loop _ → Format. f p r i n t f out "<loop>"
Block _ → Format. f p r i n t f out "<block>"
U n s p e c i f i e d S e q u e n c e _ → Format. f p r i n t f out "<unspecified sequence>"
T r y F i n a l l y _ | TryExcept _ → Format. f p r i n t f out "<try>"
19
CHAPTER 2. TUTORIAL
Cil_types module contains the denition
Cil_types.Instr, Cil_types.Return and so
The
of the AST of a C program, like constructors
on of type
Cil_types.stmt.
module contains functions that prints the dierent Cil types.
3
module is available on the Frama-C website , or by typing
The
Printer
The documentation of these
make doc
in the Frama-C source
distribution.
Creating the graphs with a visitor
In order to create our output, we must make a pass through the whole AST. An easy way to
do that is to use Frama-C visitor mechanism. A visitor is a class with one method per type
of the AST, whose default behavior is to just call the method corresponding to each of its
children. By inheriting from the visitor, and redening some of the methods, one can perform
actions on selected parts of the AST, without the need to traverse the AST explicitly.
c l a s s p r i n t _ c f g out = o b j e c t
i n h e r i t V i s i t o r . frama_c_inplace
Here we used the so-called in place visitor, which should be used for read-only access to the
AST. When performing code transformations, a copy visitor should be used, that creates a
new project (see section 4.16.4).
There are three kinds of nodes where we have something to do. First, at the le level, we
create the whole graph structure.
method v f i l e _ =
Format. f p r i n t f out "@[<hov 2>digraph cfg {@ " ;
C i l . DoChildrenPost ( f u n f → Format. f p r i n t f out "}@ ]@."; f )
Cil.DoChildrenPost
visitAction, that tells the visitor what to do
With DoChildrenPost func, the func argument is called once
is one of the possible
after the function is executed.
the children have been executed: here we close the parenthesis once that all functions have
been printed in the le.
Then, for each function, we encapsulate the CFG in a subgraph, and do nothing for the other
globals.
method vglob_aux g =
match g w i t h
| GFun( f ,_) →
Format. f p r i n t f out "@[<hov 2>subgraph cluster_ %a {@ \
@[<hv 2>graph@ [ label =\"% a \"]; @]@ "
P r i n t e r . pp_varinfo f . s v a r
P r i n t e r . pp_varinfo f . s v a r ;
C i l . DoChildrenPost ( f u n g → Format. f p r i n t f out "}@ ]@ "; g)
| _ → Cil . SkipChildren
Cil.SkipChildren
4
tells the visitor not to visit the children nodes, which makes it more
ecient .
Last, for each statement, we create a node in the graph, and create the edges toward its
successors:
method vstmt_aux s =
Format. f p r i n t f out "@[<hov 2>s% d@ [[ label =\"% a \"] @ ]; @ "
s . s i d print_stmt s . s k i n d ;
List . iter
( f u n s u c c → Format. f p r i n t f out "@[ s%d → s%d ;@]@ " s . s i d s u c c . s i d )
s. succs ;
Format. f p r i n t f out "@] ";
C i l . DoChildren
3
4
From
http://frama-c.com/download.html.
Cil.JustCopy should have
In a copying visitor,
been used instead.
20
2.3. THE CFG PLUG-IN
DoChildren by SkipChildren
Instr, and avoid visiting the ex-
This code could be optimized, for instance by replacing the nal
for statements that cannot contain other statements, like
pressions.
Finally we close the
object
denition:
end
Hooking into Frama-C
It just remains to hook this script into Frama-C.
l e t run () =
l e t chan = open_out " cfg . out " i n
l e t fmt = Format. formatter_of_out_channel chan i n
V i s i t o r . v i s i t F r a m a c F i l e S a m e G l o b a l s (new p r i n t _ c f g fmt ) ( Ast . g e t ());
c l o s e _ o u t chan
l e t () = Db.Main. extend run
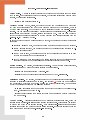
Assuming the script is called
cfg_print.ml,
it can then be run with:
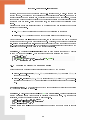
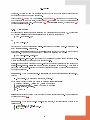
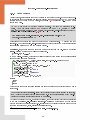
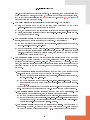
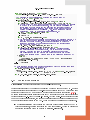
frama -c -load - script cfg_print . ml [ other_options ] file .c [ file2 .c]
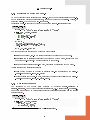
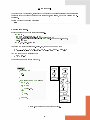
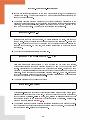
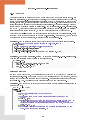
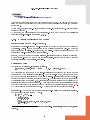
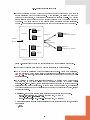
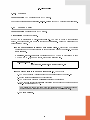
And the graph can be visualized with
dotty cfg . out
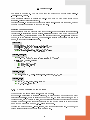
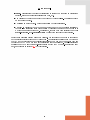
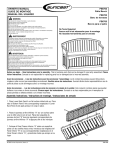
This produces a graph like in Figure 2.2
f
File
test.c
v o i d f ( i n t g)
{
g ++;
g - -;
}
main
g ++;
i = 3;
g --;
if i > 0
<return>
i n t main( i n t argc , c h a r ** argv )
{
i n t i = 3;
<loop>
i --;
i f ( i > 0)
{
w h i l e (-- i );
}
else
{
f (3);
}
}
f(3);
if i
<break>
__retres = 0;
r e t u r n 0;
<return>
Figure 2.2: Control ow graph for le test.c.
21
CHAPTER 2. TUTORIAL
Further improvements
There are many possible enhancements to this code:
There
The script could be transformed into a regular plug-in, by registering into Frama-C, and
is
a
bug
when
trying
to
print
statements
that
contain
strings
(such
as
printf("Hello\n") such statements must be protected using the "%S" Format directive;
taking options from the command line; for instance to compute the control ow graph
of a single function given as an argument;
The graphs could be fancier, in particular by distinguishing between branching nodes
and plain ones, or showing exit of blocks as well as their beginning; or linking a call
with the called function.
We will concentrate on another extension, which is to reuse the analysis of the
value Frama-C
plug-in to color unreachable nodes.
2.3.2 Interfacing with a kernel-integrated plug-in
We will rst integrate with the
value plug-in.
There are two ways to integrate a plug-in with
value plug-in
Db module of the
The value plug-in
Frama-C: standard plug-ins, like the cfg plug-in, are loaded dynamically. The
is kernel-integrated, which means that it is registered statically through the
Frama-C kernel which is the entry point for all kernel-integrated plug-ins.
is accessible through the
Db.Value
module.
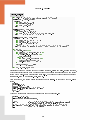
The code modication we propose is to color in pink the nodes guaranteed to be unreachable
by the value analysis. For this purpose, we change the
vstmt_aux
method in the visitor:
method vstmt_aux s =
let color =
i f Db. Value . is_computed () t h e n
l e t s t a t e = Db. Value . get_stmt_state s i n
l e t r e a c h a b l e = Db. Value . i s _ r e a c h a b l e s t a t e i n
i f r e a c h a b l e t h e n "@[ fillcolor =\"# c c f f c c \" style = filled@ ] "
e l s e "@[ fillcolor = pink style = filled@ ]"
e l s e ""
in
Format. f p r i n t f out "@[ s% d@ [[ label =\"% a \" %s] @ ]; @ "
s . s i d print_stmt s . s k i n d c o l o r ;
List . iter
( f u n s u c c → Format. f p r i n t f out "@[ s%d → s%d ;@]@ " s . s i d s u c c . s i d )
s. succs ;
C i l . DoChildren
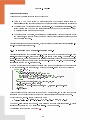
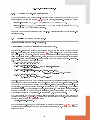
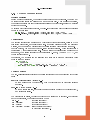
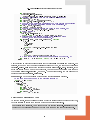
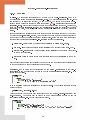
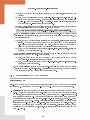
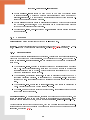
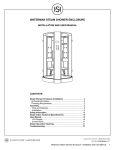
This code lls the nodes with green if the node may be reachable, and in pink if the node is
guaranteed not to be reachable; but only if the value analysis was previously computed.
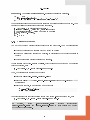
To test this code, frama-c should be launched with:
frama -c test .c - val - t h e n -load - script cfg_print . ml
The use of
-then
&& dotty cfg . out
ensures that Frama-C rst performs the value analysis on
loading and executing the CFG script (see Frama-C User Manual [4]).
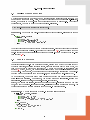
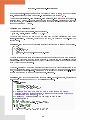
The resulting graph is shown on Figure 2.3.
22
test.c,
before
2.3. THE CFG PLUG-IN
f
File
test.c
v o i d f ( i n t g)
{
g ++;
g - -;
}
main
g ++;
i = 3;
g --;
if i > 0
<return>
i n t main( i n t argc , c h a r ** argv )
{
i n t i = 3;
i --;
i f ( i > 0)
{
w h i l e (-- i );
}
else
{
f (3);
}
}
<loop>
f(3);
if i
<break>
__retres = 0;
r e t u r n 0;
<return>
Figure 2.3: Control ow graph colored with reachability information.
2.3.3 Extending the Frama-C GUI
In this section, we will extend the script so that the control ow graph can be displayed
interactively. For that, we will extend the Frama-C GUI so that when you right-click on a
function in the code, a new Show CFG item appears, that displays the control ow graph of
the function in a dialog box. This is achieved just by appending the following pieces of code
at the end of the
cfg_print.ml
le.
Currently, we used a visitor that outputs a dot le with the CFG of all functions of all les.
We use
dump_function
to outputs the CFG of a single function instead.
l e t dump_function f u n d e c fmt =
Format. f p r i n t f fmt "@[<hov 2>digraph cfg {@ " ;
i g n o r e ( V i s i t o r . v i s i t F r a m a c F u n c t i o n (new p r i n t _ c f g fmt ) f u n d e c );
Format. f p r i n t f fmt "}@ ]@\n"
print_cfg visitor, but we selected a dierent starting point. The argument
fundec gets type Cil_types.fundec, which is the CIL type representing a function denition.
We reused the
Now we write the GUI extension code:
l et cfg_selector
( popup_factory :GMenu.menu GMenu. f a c t o r y ) main_ui
match l o c a l i z a b l e w i t h
( * Matchs g l o b a l
declarations
that
are
functions .
∼ button :_
*)
| P r e t t y _ s o u r c e .PVDecl(_, ({ vtype = TFun(_,_,_,_)} a s v i )) →
l e t c a l l b a c k () =
l e t kf = Globals . Functions . get vi i n
l e t fundec = Kernel_function . g e t _ d e f i n i t i o n kf i n
l e t window:GWindow.window = main_ui #main_window i n
Gtk_helper . graph_window_through_dot
∼ p a r e n t :window ∼ t i t l e :" Control flow graph "
( dump_function f u n d e c )
23
localizable =
CHAPTER 2. TUTORIAL
in
i g n o r e ( popup_factory # add_item " Show _CFG "
| _ → ()
∼callback )
l e t main_gui main_ui = main_ui # r e g i s t e r _ s o u r c e _ s e l e c t o r c f g _ s e l e c t o r
l e t () = Design . r e g i s t e r _ e x t e n s i o n main_gui
Let us explain this code from the end.
Design.register_extension is the entry point for ex-
tending the GUI. Its argument is a function which takes as argument an object corresponding
to the main window of the Frama-C GUI. This object provides accesses to the main widgets
of the window, and several extension points.
Here we have implemented a single extension, the source selector, that allows to add entries
to menu obtained when right-clicking on the source. This is implemented by the
cfg_selector
function.
This function takes a
localizable argument, which gives information on where the user clicks
on the source. Here we do something only if the user clicks on the declaration of a variable
whose type is a function (i.e. when the user clicked on a function declaration or denition).
In that case, we add an item to the popup menu, that calls the
callback
function if clicked.
callback function calls a Frama-C GUI function that displays a graph from dot printing
It uses several important Frama-C APIs: Globals and Kernel_function which
The
functions.
contains several functions for manipulating globals and functions.
A script is not an ideal environment for extending the GUI. In particular, the GUI OCaml
modules are available only when the script is loaded with
with
frama-c.
frama-c-gui, and not when loaded
When the user wants to view CFG from the GUI, then outputing the CFG
of all functions in
cfg.out
is useless. We will now see how to cope with these problems, by
promoting the script into a true plug-in.
2.3.4 Plug-In registration and command line options
We already saw how to register functions in the previous Hello tutorial. We now apply these
principles to the CFG plug-in.
module S e l f = P l u g i n . R e g i s t e r ( s t r u c t
l e t name = " control flow graph "
l e t shortname = " cfg "
l e t h e l p = " control flow graph computation and display "
end )
module Enabled = S e l f . F a l s e ( s t r u c t
l e t option_name = " - cfg "
l e t h e l p = " when on ( off by default ), computes the CFG graph of all functions . "
end )
module O u t p u t F i l e = S e l f . S t r i n g ( s t r u c t
let
let
let
let
end )
option_name = " -cfg - output "
d e f a u l t = " cfg . dot "
arg_name = " output - file "
h e l p = " file where the graph is output , in dot format ."
l e t run () =
i f Enabled . g e t () t h e n
l e t f i l e n a m e = O u t p u t F i l e . g e t () i n
l e t chan = open_out f i l e n a m e i n
l e t fmt = Format. formatter_of_out_channel chan i n
V i s i t o r . v i s i t F r a m a c F i l e S a m e G l o b a l s (new p r i n t _ c f g fmt ) ( Ast . g e t ());
c l o s e _ o u t chan
24
2.3. THE CFG PLUG-IN
l e t () = Db.Main. extend run
We have added two options,
-cfg
to compute the CFG conditionnaly, and
-cfg-output
to
choose the output le.
An interesting addition would be to add a
-cfg-target option, which would take a set of les
Self.StringSet functor. Depending
or functions whose CFG would be computed, using the
on the targets, visiting the AST would have dierent starting points. This is left as an exercise
for the reader.
Another interesting exercise is to solve the following problem. Currently, the complete CFG
frama-c test.c
-cfg -then -report would compute the CFG twice. Indeed, the -cfg option sets Enabled to
true, and the run function is executed once per task. To solve this problem, one has to create
a boolean state to remember that the plug-in has been already executed. The apply_once
function in the State_builder module helps dealing with this issue (reading the section 2.3.9
for the whole application is computed for each Frama-C step, i.e. executing
of this tutorial and section 4.12 of this manual should help you understand the underlying
notion of states).
2.3.5 Splitting les and writing a Makele
The Frama-C plug-in development environment allows to split GUI-related and non-GUI related modules, so that GUI-related modules are loaded and run only if Frama-C is executed
frama-c-gui.
with
This requires splitting the module into several les. We choose the fol-
lowing architecture:
cfg_options.ml
cfg_core.ml
implements plug-in registration and conguration options;
implements the main functions for computating the CFG;
cfg_register.ml
implements global computation of the CFG using the
-cfg
option,
and hooking into the Frama-C main loop;
cfg_gui.ml
implements GUI registration.
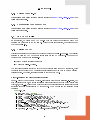
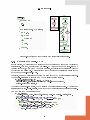
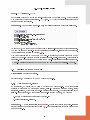
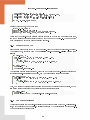
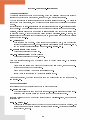
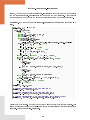
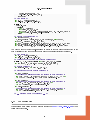
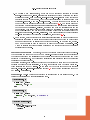
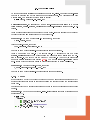
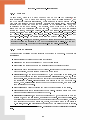
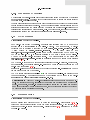
5 is presented on Figure 2.4.
Dependencies between the modules
To break recursive dependencies between OCaml modules, it is typical that plug-in registration
run function is at the
Makefile requires that normal
is done at the bottom of the module hierarchy, while denition of the
top. The GUI is also at the top of the hierarchy: the Frama-C
plug-in modules do not depend on GUI modules. Note that currently, the dependency from
Cfg_core
and
Cfg_gui
to
Cfg_register
is articial, but in future evolutions the GUI could
depend on conguration options.
File
Makele
FRAMAC_SHARE := $ ( shell frama -c - print - path )
FRAMAC_LIBDIR := $( shell frama - c - print - libpath )
PLUGIN_NAME = Cfg
PLUGIN_CMO = cfg_options cfg_core cfg_register
PLUGIN_GUI_CMO = cfg_gui
i n c l u d e $( FRAMAC_SHARE )/ Makefile . dynamic
5
This graphic is generated in le
doc/code/modules.dot
25
after running
make doc.
CHAPTER 2. TUTORIAL
Cfg_register
Cfg_gui
Cfg_core
Cfg_options
Figure 2.4: CFG plug-in architecture
In the
Makefile,
the
PLUGIN_CMO
variable must contain the list of le names of the ml les,
in the correct OCaml build order. Modules in
PLUGIN_GUI_CMO.
PLUGIN_CMO
must not depend on modules in
Here is the listing for the dierent modules:
File
cfg_options.ml
module S e l f = P l u g i n . R e g i s t e r ( s t r u c t
l e t name = " control flow graph "
l e t shortname = " cfg "
l e t h e l p = " control flow graph computation and display "
end )
module Enabled = S e l f . F a l s e ( s t r u c t
l e t option_name = " - cfg "
l e t h e l p = " when on ( off by default ), computes the CFG graph of all functions . "
end )
module O u t p u t F i l e = S e l f . S t r i n g ( s t r u c t
let
let
let
let
end )
File
option_name = " -cfg - output "
d e f a u l t = " cfg . dot "
arg_name = " output - file "
h e l p = " file where the graph is output , in dot format ."
cfg_core.ml
module Options = Cfg_options
open C i l _ t y p e s
let
|
|
|
|
|
|
|
|
|
|
|
print_stmt out = f u n c t i o n
I n s t r i → P r i n t e r . p p_ i n s tr out i
Return _ → Format. p p _ p r i n t _ s t r i n g out "<return>"
Goto _ → Format. p p _ p r i n t _ s t r i n g out "<goto>"
Break _ → Format. p p _ p r i n t _ s t r i n g out "<break>"
Continue _ → Format. p p _ p r i n t _ s t r i n g out "<continue>"
I f ( e ,_,_,_) → Format. f p r i n t f out " if %a" P r i n t e r .pp_exp e
Switch ( e ,_,_,_) → Format. f p r i n t f out " switch %a" P r i n t e r .pp_exp e
Loop _ → Format. f p r i n t f out "<loop>"
Block _ → Format. f p r i n t f out "<block>"
U n s p e c i f i e d S e q u e n c e _ → Format. f p r i n t f out "<unspecified sequence>"
T r y F i n a l l y _ | TryExcept _ → Format. f p r i n t f out "<try>"
c l a s s p r i n t _ c f g out = o b j e c t
i n h e r i t V i s i t o r . frama_c_inplace
26
2.3. THE CFG PLUG-IN
method v f i l e _ =
Format. f p r i n t f out "@[<hov 2>digraph cfg {@ " ;
C i l . DoChildrenPost ( f u n f → Format. f p r i n t f out "}@ ]@."; f )
method vglob_aux g =
match g w i t h
| GFun( f ,_) →
Format. f p r i n t f out "@[<hov 2>subgraph cluster_ %a {@ \
@[<hv 2>graph@ [ label =\"% a \"]; @]@ "
P r i n t e r . pp_varinfo f . s v a r
P r i n t e r . pp_varinfo f . s v a r ;
C i l . DoChildrenPost ( f u n g → Format. f p r i n t f out "}@ ]@ "; g)
| _ → Cil . SkipChildren
method vstmt_aux s =
let color =
i f Db. Value . is_computed () t h e n
l e t s t a t e = Db. Value . get_stmt_state s i n
l e t r e a c h a b l e = Db. Value . i s _ r e a c h a b l e s t a t e i n
i f r e a c h a b l e t h e n "@[ fillcolor =\"# c c f f c c \" style = filled@ ] "
e l s e "@[ fillcolor = pink style = filled@ ]"
e l s e ""
in
Format. f p r i n t f out "@[ s% d@ [[ label =\"% a \" %s] @ ]; @ "
s . s i d print_stmt s . s k i n d c o l o r ;
List . iter
( f u n s u c c → Format. f p r i n t f out "@[ s%d → s%d; @]@ " s . s i d s u c c . s i d )
s. succs ;
C i l . DoChildren
end
l e t dump_function f u n d e c fmt =
Format. f p r i n t f fmt "@[<hov 2>digraph cfg {@ " ;
i g n o r e ( V i s i t o r . v i s i t F r a m a c F u n c t i o n (new p r i n t _ c f g fmt ) f u n d e c );
Format. f p r i n t f fmt "}@ ]@\n"
File
cfg_register.ml
open Cfg_options
open Cfg_core
l e t run () =
i f Enabled . g e t () t h e n
l e t f i l e n a m e = O u t p u t F i l e . g e t () i n
l e t chan = open_out f i l e n a m e i n
l e t fmt = Format. formatter_of_out_channel chan i n
V i s i t o r . v i s i t F r a m a c F i l e S a m e G l o b a l s (new p r i n t _ c f g fmt ) ( Ast . g e t ());
c l o s e _ o u t chan
l e t () = Db.Main. extend run
File
cfg_gui.ml
open C i l _ t y p e s
open Cfg_core
module Options = Cfg_options
l et cfg_selector
( popup_factory :GMenu.menu GMenu. f a c t o r y ) main_ui
match l o c a l i z a b l e w i t h
( * Matchs g l o b a l
declarations
that
are
functions .
∼ button :_
*)
| P r e t t y _ s o u r c e .PVDecl(_, ({ vtype = TFun(_,_,_,_)} a s v i )) →
l e t c a l l b a c k () =
l e t kf = Globals . Functions . get vi i n
l e t fundec = Kernel_function . g e t _ d e f i n i t i o n kf i n
l e t window:GWindow.window = main_ui #main_window i n
27
localizable =
CHAPTER 2. TUTORIAL
Gtk_helper . graph_window_through_dot
∼ p a r e n t :window ∼ t i t l e :" Control flow graph "
( dump_function f u n d e c )
in
i g n o r e ( popup_factory # add_item " Show _CFG "
| _ → ()
∼callback )
l e t main_gui main_ui = main_ui # r e g i s t e r _ s o u r c e _ s e l e c t o r c f g _ s e l e c t o r
l e t () = Design . r e g i s t e r _ e x t e n s i o n main_gui
2.3.6 Getting your Plug-in Usable by Others
Not written yet: please report as feature request on
http: // bts. frama-c. com
if you
http: // bts. frama-c. com
if you
http: // bts. frama-c. com
if you
really need this section.
2.3.7 Writing your Plug-in into the Journal
Not written yet: please report as feature request on
really need this section.
2.3.8 Writing a Congure Script
Not written yet: please report as feature request on
really need this section.
2.3.9 Getting your plug-in Usable in a Multi Projects Setting
Registering and using state
In this section, we will learn how to register state into Frama-C. A state is a piece of information
kept by a plug-in.
For instance, the
value
plug-in computes, for each statement, a table
associating to each AST's variable a set of values the program may have at runtime: this
association table is a state.
State registration provides several features:
It allows the state to be saved and reloaded with the rest of the session, for instance
when using
frama-c -save/frama-c -load;
It helps maintaining consistency between the AST and the results and parameters of
the analysis of the dierent plug-ins.
In this tutorial, we will store the le representing the dot output of the control ow graph
of a function (as needed by
to
string.
dump_function)
as a string, by using a hashtable from
fundec
Storing this string will allow us to memoize [16] our computation: the string is
computed the rst time the CFG of a function is displayed, while the following requests will
reuse the result of the computation. Registering the hashtable as a Frama-C state is mandatory
to ensure Frama-C consistency: for instance, by using a standard OCaml hashtable, a user that
would have loaded several session through the GUI could observe the CFG of function of a
previous session instead of the one he wants to observe.
Registering a state is done by a functor application:
28
2.3. THE CFG PLUG-IN
module Cfg_graph_state = S t a t e _ b u i l d e r . Hashtbl
( Cil_datatype . Fundec . Hashtbl )
( Datatype . S t r i n g )
( struct
l e t name = " Data_for_cfg . Cfg_graph_state "
l e t d e p e n d e n c i e s = [ Ast . s e l f ; Db. Value . s e l f ]
l e t s i z e = 17
end );;
State_builder module provides several functors that help registering states.
State_builder.Hashtbl allows the developer to create a hashtable. It is parameterized by a
The
module describing the hashtable and its key, a module describing the data associated to keys,
and other informations.
The
Datatype and Cil_datatype modules describe the hashtable and its associated data, and
explain for instance how the datatype should be copied, printed, or marshalled to the disk.
They are part of the
Type library [19], described in Section 4.9. Datatype provides descriptions
Cil_datatype for the CIL types (in the Cil_types module).
for standard OCaml types, and
The last module argument describes the initial size of the hashtable, a name (mainly used
for internal debugging), and a list of dependencies.
depends on the Ast and the results of the
Here we expressed that our hashtable
Value plug-in.
For instance, whenever the Frama-C
kernel updates one of these states, it will automatically reset our hashtable.
This ensures
consistency of the analysis: if the Ast of a function changes, or the value analysis is executed
with a dierent entry point, this potentially aects the display of the control ow graph, that
we must recompute.
Once the module has been declared, it is fairly easy to use it.
l e t dump_to_string f u n d e c =
S e l f . f e e d b a c k " Computing CFG for function %s" ( f u n d e c . s v a r . vorig_name );
ignore
( V i s i t o r . v i s i t F r a m a c F u n c t i o n (new p r i n t _ c f g Format. s t r _ f o r m a t t e r ) f u n d e c );
Format. f l u s h _ s t r _ f o r m a t t e r ()
l e t dump_to_string_memoized = Cfg_graph_state .memo dump_to_string
l e t dump_function f u n d e c fmt =
Format. f p r i n t f fmt "@[ digraph cfg {% s }@]@\ n"
( dump_to_string_memoized f u n d e c )
dump_function
now takes two steps: rst the CFG is printed to a string, then the string
fmt argument. This allows the dump_to_string part to be memoized, i.e.
dump_to_string are saved so that later calls to dump_function with the same
is printed to the
the results of
fundec
argument reuse that result.
If you launch
frama-c-gui
with the above code, click on functions to view their CFG, and
inspect the console, you will observe that the string Computing CFG for function ...
is
displayed only once per function.
One can see the eects of the dependency on the
analysis, inspecting the CFG for the
Value
plug-in by rst launching the value
f function, then chaning the entry point to f in the CFG
CFG have been recomputed.
and re-running the value analysis. The console indicates that the
Indeed the state of the
Value
plug-in, and of its dependencies, was resetted when the entry
point was changed.
Another way to observe how Frama-C automatically handles states is to display a CFG, save
the session, close and restart Frama-C, and then reload the session: the control ow graph is
not recomputed, which means that Frama-C has automatically saved the
with the rest of the session.
Cfg_graph_state
Everything should also work properly when loading several
sessions.
29
CHAPTER 2. TUTORIAL
Clearing states, selection and projects
Value analysis,
the Value analysis
There is one caveat though: if the user computes the CFG before running the
and then runs
Value,
he will not see a colored graph (unless he re-launch
with dierent parameters). This is because the state of the CFG is reset when the state of
Value
is reset, not when it is rst computed.
To solve this problem, we will manually reset the
Value
Cfg_graph_state
if we detect that the
analysis has been run since the last time we computed the CFG. For that, we have to
remember the previous value of
Db.Value.is_computed (),
i.e. to register another state:
module Value_is_computed = S t a t e _ b u i l d e r . Ref
( Datatype . Bool )
( struct
l e t name = " Data_for_cfg . Value_computed "
l e t d e p e n d e n c i e s = []
l e t d e f a u l t () = f a l s e
end );;
This new state only consists of a reference to a boolean value.
Then we just replace
dump_function
in the code above by the following.
l e t dump_function f u n d e c fmt =
i f not ( Value_is_computed . g e t ()) && Db. Value . is_computed () t h e n begin
Value_is_computed . s e t t r u e ;
l e t s e l e c t i o n = S t a t e _ s e l e c t i o n . w it h_ de pe nd en ci e s Cfg_graph_state . s e l f i n
P r o j e c t . c l e a r ∼ s e l e c t i o n ();
end ;
Format. f p r i n t f fmt "@[ digraph cfg {% s }@]@. " ( dump_to_string_memoized f u n d e c )
The only part that need to be explained is the notion of selection and project. A selection is
just a set of states; here we selected the state
Cfg_graph_state
with all its dependencies, as
resetting this state would also impact states that would depend on it (even if there is none
for now). We use
Project.clear
to reset the selection.
Project explanation
A project [18] is a consistent version of all the states of Frama-C. Frama-C is multi-AST,
i.e.Frama-C plug-ins can change the AST of the program, or perform incompatible analysis
(e.g. with dierent entry points). Projects consistently groups a version of the AST of the
program, with the states related to this AST.
The
Project.clear
function has type :
val clear : ? s e l e c t i o n : State_selection .t → ? project :t → unit → unit
The arguments
selection and project can be seen as a coordinate system, and the function
allows to clear specic versions of specic states. By default, Frama-C functions act on the
current project.
dierent projects.
The developer has to use
Project.on
or optional arguments to act on
Frama-C automatically handles duplication and switch of states when
duplicating or changing of projects. This is the last benet of state registration.
To summarize:
To store results, plug-ins should register states ;
A project is a consistent version of all the states in Frama-C, together with a version of
the AST;
A session is a set of projects ;
30
2.3. THE CFG PLUG-IN
Frama-C transparently handles the versionning of states when changing or duplicating
projects, saving and reloading sessions from disk, etc.
The version of the state in a project can change; by default Frama-C functions operate
on the current project.
A selection is a set of states. Dependencies allow to create selections.
As a plug-in developer, you have to remember that is up to you to preserve consistency
between your states and their dependencies by clearing the latter when the former is
modied in an incompatible way. For instance, it would have been incorrect to not call
State_selection.with_dependencies
in the last code snippset of this tutorial.
Projects are generally created using copy visitors.
We encourage the reader to experiment
with multiple projects development by using them. An interesting exercise would be to change
the AST so that execution of each instruction is logged to a le, and then re-read that le
to print in the CFG how much time each instruction has been executed. Another interesting
exercise would be to use the
apply_once
function so that the CFG plug-in is executed only
once, as explained in section 2.3.4 of this tutorial.
31
Chapter 3
Software Architecture
Target readers:
beginners.
In this chapter, we present the software architecture of Frama-C. First, Section 3.1 presents
its general overview. Then, we focus on three dierent parts:
Section 3.2 introduces the API of Cil [17] seen by Frama-C;
Section 3.3 shows the organisation of the Frama-C kernel; and
Section 3.4 explains the plug-in integration.
3.1 General Description
The Frama-C platform provides services to ease:
analysis and source-to-source transformation of big-size C programs;
addition of new plug-ins; and
plug-ins collaboration.
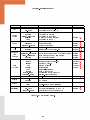
In order to reach these goals, Frama-C is based on a software architecture with a specic design
which is presented in this document, and summarized in Figure 3.1. Mainly this architecture
is separated in three dierent parts:
Cil (C Intermediate Language) [17] extended with an implementation of the specication
language ACSL (ANSI/ISO C Specication Language) [1].
This is the intermediate
language upon which Frama-C is based. See Section 3.2 for details.
The
Frama-C
kernel.
It is a toolbox on top of Cil dedicated to static analyses.
It
provides data structures and operations which help the developer to deal with the Cil
AST (Abstract Syntax Tree), as well as general services providing an uniform set of
features to Frama-C. See Section 3.3 for details.
The
Frama-C
plug-ins.
These are analyses or source-to-source transformations that
use the kernel, and possibly others plug-ins through their APIs.
details.
33
See Section 3.4 for
CHAPTER 3. SOFTWARE ARCHITECTURE
Plug-ins
Standard Plug-ins
Plug-in 1
...
Kernel-integrated Plug-ins
Plug-in n
...
Plug-in 1
Plug-in p
Plug-ins API inside Frama-C
Kernel-integrated Plug-ins Types
Plug-ins Values
Db
Dynamic
...
Plug-in types 1
Plug-in types q
Frama-C Kernel
General Services
Specific Services
Pro ject
Memory States
AST Manipulation
Plugin
Journal
Abstract Interpretation Lattices
Cmdline
Utilities
Type
Extended Cil
Extended Cil API
Extended Cil Kernel
Lexing, Parsing, Typing, Linking
Extended Cil AST
Figure 3.1: Architecture Design.
34
Log
3.2. CIL: C INTERMEDIATE LANGUAGE
3.2
Cil
:
C
Intermediate Language
Cil [17] is a high-level representation along with a set of tools that permit easy analysis and
source-to-source transformation of C programs.
Frama-C uses Cil as a library which performs the main steps of the compilation of C programs
(pre-processing, lexing, parsing, typing and linking) and outputs an abstract syntax tree
(AST) ready for analysis. From the Frama-C developer's point of view, Cil is a toolbox usable
through its API and providing:
Cil_types);
the AST description (module
useful AST operations (module
Cil);
some syntactic analysis like a (syntactic) call graph computation (module
or generic forward/backward dataow analysis (module
Dataflow2).
Callgraph)
Frama-C indeed extends Cil with ACSL (ANSI/ISO C Specication Language) [1], its speci-
cation language. The extended Cil API consequently provides types and operations in order
to properly deal with annotated C programs.
Cil modules belong to directory (and subdirectories of )
cil/src.
3.3 Kernel
On top of the extended Cil API, the Frama-C kernel groups together specic services providing
in dierent modules which are described below.
In addition to the Cil utilities, Frama-C provides useful operations (mainly in module
Extlib) and datastructures (e.g.
Rangemap).
src/lib and src/misc and they are not specic to
specialized version of association tables like
These modules belong to directories
the analysis or transformation of C programs.
Frama-C
provides
Abstract_interp)
generic
lattices
useful
for
abstract
and some pre-instantiated arithmetic lattices (module
abstract interpretation toolbox is available in directory
interpretation
src/ai.
Frama-C also provides dierent representations of C memory-states (module
(module
Ival).
The
Locations)
and data structures using them (e.g. association tables indexing by memory-states in
Lmap and Lmap_bitwise).
src/memory_state.
modules
Moreover, directory
src/kernel
The memory-state toolbox is available in directory
provides a bunch of very helpful operations over the
extended Cil AST. For example, module
Globals provides operations dealing with global
Visitor provides inheritable classes
variables, functions and annotations while module
in order to permit easy visiting, copying or in-place modication of the AST.
Besides, Frama-C also provides some general-purpose services, used by all other modules (even
the Frama-C version of Cil), which are shortly described below.
Module
Log
provides an uniform way to display user messages in Frama-C.
35
CHAPTER 3. SOFTWARE ARCHITECTURE
Module
Cmdline
Module
Plugin
parses the Frama-C command line.
provides a high-level API on top of the two previous modules for the
plug-in developer: a developer usually uses this module and does not directly use modules
Log
or
Directory
Cmdline.
src/type contains a library called Type.
It provides OCaml types as rst-class
values, as well as several standard operations over types. Such values and operations
are required by several others Frama-C services (journalization, registration of dynamic
values, projects, etc ). See section 4.9 for details.
Module
Journal
handles how Frama-C journalizes its actions. See section 4.11 for de-
tails.
Directory
src/project contains a library, called Project.
It provides analysis of several
ASTs in the same session. See section 4.12 for details.
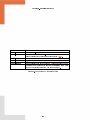
3.4 Plug-ins
In Frama-C, plug-ins are analysis or source-to-source transformations.
Each of them is an
extension point of the Frama-C kernel. Frama-C allows plug-in collaborations: a plug-in
use a list of plug-ins
even possible.
p1 ,
...,
pn
p
can
and conversely. Mutual dependences between plug-ins are
If a plug-in is designed to be used by another plug-in, it has to register its
API either by providing a
.mli
le, or in modules
Dynamic
or
Db.
This last method is only
available to kernel-integrated plug-ins and is now deprecated.
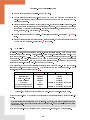
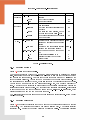
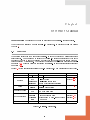
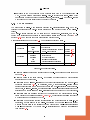
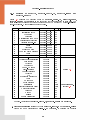
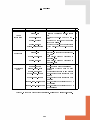
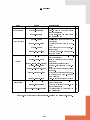
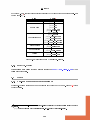
More generally, the set of functionalities available for a standard plug-in and for a kernelintegrated plug-in are mostly the same.
The dierences between a standard plug-in and a
kernel-integrated one are listed Figure 3.2.
Functionality
Standard plug-in
Kernel-integrated plug-in
dynamic linking
default
possible
static linking
possible
default
possible
possible
possible
possible
.mli le
API in Dynamic
API in Db
API in an
no
possible by modifying the kernel
add new abstract types
possible
possible
add new concrete types
no
possible by modifying the kernel
Figure 3.2: Dierences between standard plug-ins and kernel-integrated ones.
Both kinds of plug-ins may be either dynamically linked or statically linked within the Frama-C
kernel.
Dynamic linking is the standard way of linking.
However, it is only available in native
mode if you have a supported architecture for this feature. See the OCaml manual [14] for
additional details.
Both kinds of plug-ins may register their API through a
36
.mli
le, or module
Dynamic.
3.4. PLUG-INS
The standard way of registering the API of a plug-in is through a
Dynamic remains
Db is deprecated.
ing through module
registering through
.mli
le.
Register-
useful in case of mutual recursive plug-ins, while
37
Chapter 4
Advanced Plug-in Development
This chapter details how to use services provided by Frama-C in order to be fully operational
with the development of plug-ins. Each section describes technical points a developer should
be aware of. Otherwise, one could nd oneself in one or more of the following situations
1
(from bad to worse):
1. reinventing the (Frama-C) wheel;
2. being unable to do some specic things (e.g. saving results of your analysis on disk, see
Section 4.12.2);
3. introducing bugs in your code;
4. introducing bugs in other plug-ins using your code;
5. breaking the kernel consistency and so potentially breaking all the Frama-C plug-ins
(e.g. if you modify the AST without changing project, see Section 4.12.5).
In this chapter, we suppose that the reader is able to write a minimal plug-in like
hello
described in chapter 2 and knows about the software architecture of Frama-C (chapter 3).
Moreover plug-in development requires the use of advanced features of OCaml (module system,
classes and objects, etc ). Static plug-in development requires some knowledge of autoconf and
make. Each section summarizes its own prerequisites at its beginning (if any).
Note that the following subsections can be read in no particular order: their contents are
indeed quite independent from one another even if there are references from one chapter to
another one.
Pointers to reference manuals (Chapter 5) are also provided for readers who
want full details about specic parts.
4.1 File Tree Overview
Target readers:
beginners.
The Frama-C main directory is split in several sub-directories. The Frama-C source code is
mostly provided in directories
1
cil
and
src.
The rst one contains the source code of Cil [17]
It is fortunately quite dicult (but not impossible) to fall into the worst situation by mistake if you are
not a kernel developer.
39
CHAPTER 4. ADVANCED PLUG-IN DEVELOPMENT
extended with an ACSL [1] implementation. The second one is the core implementation of
Frama-C. This last directory contains directories of the Frama-C kernel and directories of the
provided Frama-C plug-in.
A pretty complete description of the Frama-C le tree is provided in Section 5.1.
4.2
Frama-C
Target readers:
Prerequisite:
Congure.in
not for standard plug-ins developers.
knowledge of autoconf and shell programming.
In this Section, we detail how to modify the le
configure.in
in order to congure plug-ins
(Frama-C conguration has been introduced in Section 2.3.8 and 2.3.5).
First Section 4.2.1 introduces the general principle and organisation of
configure.in.
Then
Section 4.2.2 explains how to congure a new simple plug-in without any dependency. Next we
show how to exhibit dependencies with external libraries and tools (Section 4.2.4) and with
other plug-ins (Section 4.2.5).
Finally Section 4.2.3 presents the conguration of external
libraries and tools needed by a new plug-in but not used anywhere else in Frama-C.
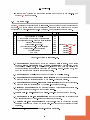
4.2.1 Principle
When you execute
autoconf,
le
configure.in
is used to generate the
configure
script.
Each Frama-C user executes this script to check his system and determine the most appropriate
conguration: at the end of this conguration (if successful), the script summarizes the status
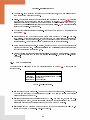
of each plug-in, which can be:
available (everything is ne with this plug-in);
partially available : either an optional dependency of the plug-in is not fully available,
or a mandatory dependency of the plug-in is only partially available; or
not available : either the plug-in itself is not provided by default, or a mandatory dependency of the plug-in is not available.
The important notion in the above denitions is dependency .
p
is either an external library/tool or another Frama-C plug-in.
A dependency of a plug-in
It is either mandatory or
optional. A mandatory dependency must be present in order to build
dependency provides features to
p
p,
whereas an optional
that are additional but not highly required (especially
p
must be compilable without any optional dependency).
Hence, for the plug-in developer, the main role of
configure.in
is to dene the optional
configure.in is the
addition of options -enable-p and -disable-p to configure for a plug-in p. These options
respectively forces p to be available and disables p (its status is automatically not available).
and mandatory dependencies of each plug-in. Another standard job of
Indeed
configure.in
is organised in dierent sections specialized in dierent conguration
checks. Each of them begins with a title delimited by comments and it is highlighted when
configure
is executed.
These sections are described in Section 5.2.
Now we focus on the
modications to perform in order to integrate a new plug-in in Frama-C.
40
4.2. FRAMA-C CONFIGURE.IN
4.2.2 Addition of a Simple Plug-in
In order to add a new plug-in, you have to add a new subsection for the new plug-in to Section
Plug-in wished. This action is usually very easy to perform by copying/pasting from another
existing plug-in (e.g.
occurrence)
and by replacing the plug-in name (here
occurrence)
by
the new plug-in name in the pasted part. In these sections, plug-ins are sorted according to
a lexicographic ordering.
For instance, Section Wished Plug-in introduces a new sub-section for the plug-in
occurrence
in the following way.
# occurrence
#
###########
check_plugin ( occurrence , src / occurrence ,
[ support for occurrence analysis ] , yes , no )
The rst argument is the plug-in name, the second one is the name of directory containing
the source les of the plug-in, the third one is a help message for the
enable-occurrence
option of congure, the fourth one indicates if the plug-in is enabled by default and the last
one indicates if the plug-in will be dynamically linked within the Frama-C kernel.
The plug-in name must contain only alphanumeric characters and underscores. It must
be the same as the
name
value given as argument to the functor
Plugin.Register
of
section 4.7 (with spaces replaced by underscore).
macro
check_plugin sets the following variables:
FORCE_OCCURRENCE,
REQUIRE_OCCURRENCE, USE_OCCURRENCE, ENABLE_OCCURRENCE, and DYNAMIC_OCCURRENCE.
The
The rst variable indicates if the user explicitly requires the availability of
setting the option
-enable-occurrence.
occurrence
via
The second and third variables are used by oth-
ers plug-ins in order to handle their dependencies (see Section 4.2.5).
The fourth variable
ENABLE_OCCURRENCE indicates the plug-in status (available, partially available or not available). If -enable-occurrence is set, then ENABLE_OCCURRENCE is yes (plug-in available);
if -disable-occurrence is set, then its value is no (plug-in not available). If no option is
specied on the command line of configure, its value is set to the default one (according to
the value of the fourth argument of check_plugin). Finally, DYNAMIC_OCCURRENCE indicates
whether the plug-in will be dynamically linked within the Frama-C kernel.
4.2.3 Conguration of New Libraries or Tools
Some plug-ins needs additional tools or libraries to be fully functional. The congure script
takes care of these in two steps. First, it checks that an appropriate version of the external
dependency exists on the system. Second, it veries for each plug-in that its dependencies
are met. Section 4.2.4 explains how to make a plug-in depend on a given library (or tool).
The present section deals with the rst part, that is how to check for a given library or tool
on a system. Conguration of new libraries and conguration of new tools are similar. In
this section, we therefore choose to focus on the conguration of new libraries. This is done
by calling a predened macro called
configure_library2 .
The
configure_library
macro
takes three arguments. The rst one is the (uppercase) name of the library, the second one
is a lename which is used by the script to check the availability of the library. In case there
are multiple locations possible for the library, this argument can be a list of lenames.
2
For tools, there is a macro
configure_tool
which works in the same way as
41
configure_library.
In
CHAPTER 4. ADVANCED PLUG-IN DEVELOPMENT
this case, the argument must be properly quoted (i.e. enclosed in a
[, ]
pair). Each name is
checked in turn. The rst one which corresponds to an existing le is selected. If no name in
the list corresponds to an existing le, the library is considered to be unavailable. The last
argument is a warning message to display if a conguration problem appears (usually because
the library does not exist). Using these arguments, the script checks the availability of the
library.
Results of this macro are available through two variables which are substituted in the les
generated by
configure.
HAS_library
is set to
SELECTED_library
yes
or
no
depending on the availability of the library
contains the name of the version selected as described above.
When checking for OCaml libraries and object les, remember that they come in two avors:
bytecode and native code, which have distinct suxes. Therefore, you should use the variables
LIB_SUFFIX
(for libraries) and
OBJ_SUFFIX
(for object les) to check the presence of a given
le. These variables are initialized at the beginning of the
configure script depending on the
availability of a native-code compiler on the current installation.
Example 4.1
The library Lablgtksourceview2 (used to have a better rendering of C sources
in the GUI) is part of Lablgtk2 . This is checked through the following command:
configure_library (
[ GTKSOURCEVIEW ],
[$OCAMLLIB/ lablgtk2 / lablgtksourceview2 .$LIB_SUFFIX],
[ lablgtksourceview not found ])
4.2.4 Addition of Library/Tool Dependencies
Dependencies upon external tools and libraries are governed by two macros:
plugin_require_external(plugin,library )
indicates that
plugin
requires
library
in
order to be compiled.
plugin_use_external(plugin,library ) indicates that plugin uses library , but can nevertheless be compiled if library is not installed (potentially oering reduced functionality).
Recommendation 4.1
of
p
The best place to perform such extensions is just after the addition
which sets the value of
Example 4.2
Plug-in
gui
ENABLE_p.
requires Lablgtk2 [12] and GnomeCanvas . It also optionally uses
Dot for displaying graphs (graph cannot be displayed withoud this tool).
declaration, there are the following lines in
So, just after its
configure.in.
plugin_require_external ( gui , lablgtk )
plugin_require_external ( gui , gnomecanvas )
plugin_use_external ( gui , dot )
This line specify that Lablgtk2 must be available on the system if the user wants to compile
gui.
42
4.3. PLUG-IN SPECIFIC CONFIGURE.IN
4.2.5 Addition of Plug-in Dependencies
Adding a dependency with another plug-in is quite the same as adding a dependency with an
external library or tool (see Section 4.2.4). For this purpose,
plugin_require(plugin1,plugin2)
states that
plugin1
plugin_use(plugin1,plugin2) states that plugin1
but requires plugin2 for full functionality.
configure.in
needs
uses two macros
plugin2.
can be used in absence of
plugin2,
There can be mutual dependencies between plug-ins. This is for instance the case for plug-ins
value
and
from.
4.3 Plug-in Specic Congure.in
Target readers:
Prerequisite:
standard plug-ins developers.
knowledge of autoconf and shell programming.
External plug-ins can have their own conguration le, and can rely on the macros dened for
Frama-C. In addition, as mentioned in section 4.5.2, those plug-ins can be compiled directly
from Frama-C's own Makele. In order for them to integrate well in this setting, they should
follow a particular layout, described below. First, they need to be able to refer to the auxiliary
configure.ac
le dening Frama-C-specic macros when they are used as stand-alone plug-
ins. This can be done by the following code
m4_define ([ plugin_file ], Makefile )
m4_define ([ FRAMAC_SHARE_ENV ] ,
[ m4_normalize ( m4_esyscmd ([ echo $FRAMAC_SHARE ]))])
m4_define ([ FRAMAC_SHARE ],
[ m4_ifval ( FRAMAC_SHARE_ENV ,[ FRAMAC_SHARE_ENV ],
[ m4_esyscmd ( frama -c - p r i n t - p a t h )])])
m4_ifndef ([ FRAMAC_M4_MACROS ] ,
[ m4_include ( FRAMAC_SHARE / configure . ac )]
)
plugin_file is the le which must be present to ensure that autoconf is called in the appropriate directory (see documentation for the AC_INIT macro of autoconf ). configure.ac can
be found in two ways: either by relying on the FRAMAC_SHARE shell variable (when Frama-C is
not installed, i.e. when conguring the plug-in together with the main Frama-C), or by calling
an installed Frama-C (when installing the plug-in separately). The inclusion of
configure.ac
needs to be guarded to prevent multiple inclusions, as the conguration le of the plug-in
might itself be included by
configure.in
(see section 4.5.2 for more details).
The conguration of the plug-in itself or related libraries and tools can then proceed as
described in Sections 4.2.2 and 4.2.3. References to specic les in the plug-in source directory
should be guarded with the following macro:
PLUGIN_RELATIVE_PATH ( file )
If the external plug-in has some dependencies as described in sections 4.2.4 and 4.2.5, the
congure script
configure
must check that all dependencies are met. This is done with the
following macro:
43
CHAPTER 4. ADVANCED PLUG-IN DEVELOPMENT
check_plugin_dependencies
An external plug-in can have dependencies upon previously installed plug-ins. However two
separately installed plug-ins can not be mutually dependent on each other.
they can be compiled together with the main Frama-C sources using the
option of
configure
Nevertheless,
-enable-external
(see section 4.5.2 for more details).
Finally, the conguration must end with the following command:
write_plugin_config ( files )
files are the les that must be processed by congure (as in AC_CONFIG_FILES macro).
PLUGIN_RELATIVE_PATH is unneeded here.
where
4.4
Frama-C
Target readers:
Prerequisite:
Makele
not for standard plug-in developers.
knowledge of make.
In this section, we detail the use of
Makefile
dedicated to Frama-C compilation.
This le
is split in several sections which are described in Section 5.3.2. By default, executing
make
only displays an overview of commands. For example, here is the output of the compilation
of source le
src/kernel/db.cmo.
$ make s r c / k e r n e l /db.cmo
Ocamlc
s r c / k e r n e l /db.cmo
If you wish the exact command line, you have to set variable
VERBOSEMAKE
to
yes
like below.
$ make VERBOSEMAKE= y e s s r c / k e r n e l /db.cmo
ocamlc . opt - c -w +a -4 -6 -7 -9 - annot -warn - e r r o r +a -32 -33 -34 -35 -36 -37 -38 -g
- I s r c / misc - I s r c / a i - I s r c / memory_state - I s r c / t o p l e v e l - I s r c / s l i c i n g _ t y p e s
- I s r c / pdg_types - I s r c / k e r n e l - I s r c / l o g i c - I s r c / l i b - I s r c / type
- I s r c / p r o j e c t - I s r c / buckx - I s r c / g u i - I e x t e r n a l - I c i l / s r c - I c i l / s r c / e x t
-I c i l / src / frontc -I c i l / src / logic -I c i l / ocamlutil -I lib / plugins -I lib
s r c / k e r n e l /db.ml
By default, warnings are considered as errors, but some of the new warnings of OCaml 4.00
are not. If you wish to make them errors as well, set variable
WARN_ERROR_ALL
3
to yes
In order to integrate a new plug-in, you have to extend section Plug-ins. For this purpose,
share/Makefile.plugin for each new plug-in (hence there are as many
include share/Makefile.plugin as plug-ins). Makefile.plugin is a generic makele
you have to include
lines
dedicated to plug-in compilation. Before its inclusion, a plug-in developer can set some variables in order to customize its behavior. These variables are fully described in Section 5.3.3.
These variables must not be used anywhere else in
you must use
In
addition,
:=
4
and not = .
the
results
share/Makefile.config.in
of
the
Makefile.
configure
(see section 5.3.2).
script
Moreover, for setting them,
must
be
exported
in
You must in particular add a line of
the form
3
4
this has no eect if you use OCaml < 4.00
Using
:= only sets the variable value from the aectation point (as usual in most programming languages)
= would redene the variable value for each of its occurrences in the makele (see Section 6.2
whereas using
The Two Flavors of Variables of the GNU Make Manual [11]).
44
4.5. PLUG-IN SPECIFIC MAKEFILE
ENABLE_plugin=@ENABLE_plugin@
so that
make
will know whether the plug-in is supposed to compiled or not. Other variables
may be exported there as well (DYNAMIC_plugin,
HAS_library ) if the corresponding information
is needed during compilation.
Example 4.3
For compiling the plug-in
Rte,
the following lines are added into
Makefile.
#
###############
# RTE a n a l y s i s #
#
###############
PLUGIN_ENABLE := $( ENABLE_RTE_ANNOTATION )
PLUGIN_NAME := RteGen
PLUGIN_DIR := src / rte
PLUGIN_CMO := rte_parameters rte register
PLUGIN_HAS_MLI := yes
PLUGIN_DISTRIBUTED := yes
PLUGIN_INTERNAL_TEST := yes
i n c l u d e share / Makefile . plugin
As said above, you cannot use the parameters of
Makefile.plugin anywhere in Makefile.
Makefile.plugin has been included.
You can yet use some plugin-in specic variables once
These variables are detailed in Section 5.3.3.
One other variable has to be modied by a plug-in developer if he uses les which do not
belong to the plug-in directory (that is if variable
UNPACKED_DIRS
PLUGIN_TYPES_CMO
is set). This variable is
and corresponds to the list of non plug-in directories containing source les.
A plug-in developer should not have to modify any other part of any Frama-C Makele.
4.5 Plug-in Specic Makele
Prerequisite:
knowledge of make.
In this section, we detail how to add a Makele to a plug-in.
4.5.1 Using Makefile.dynamic
In this section, we detail how to write a Makele for a given plug-in.
Even if it is still
possible to write such a Makele from scratch, Frama-C provides a generic Makele, called
Makefile.dynamic, which helps the plug-in developer in this task.
This le is installed in the
Frama-C share directory. So for writting your plug-in specic Makele, you have to:
1. set some variables for customizing your plug-in;
2. include
Makefile.dynamic.
Example 4.4
World
A minimal
Makefile is shown below.
That is the Makele of the plug-in
Hello
presented in the tutorial (see Section 2.2). Each variable set in this example has to be
set by any plug-in.
45
CHAPTER 4. ADVANCED PLUG-IN DEVELOPMENT
# Example o f
Makefile
f o r dynamic p l u g i n s
#
#
#
#
#
#
#
#
#
#
#
#
#
#
#
#
#
#
#
#
#
#
#
#
#
#
#
#
#
#
#
#
#
#
#
#
#
#
#
#
#
# Frama−c should be properly
# b e f o r e any use
of
this
installed
with "make i n s t a l l "
makefile
FRAMAC_SHARE
:= $( shell frama -c. byte - print - path )
FRAMAC_LIBDIR
:= $ ( shell frama -c. byte - print - libpath )
PLUGIN_NAME
= Hello
PLUGIN_CMO
= hello_world
i n c l u d e $( FRAMAC_SHARE )/ Makefile . dynamic
FRAMAC_SHARE
FRAMAC_LIBDIR must be set
PLUGIN_NAME is the capitalized name of your plug-in while
les .cmo generated from your OCaml sources.
must be set to the Frama-C share directory while
to the Frama-C lib directory.
PLUGIN_CMO
is the list of the
To run your specic Makele, you must have properly installed Frama-C before.
You may possibly need to do
make depend
before running
make.
Which variable can be set and how they are useful is explained Section 5.3.3. Furthermore,
Section 5.3.4 explains the specic features of
Makefile.dynamic.
4.5.2 Compiling Frama-C and external plug-ins at the same time
Target readers:
plug-in developers using the SVN repository of Frama-C.
It is also possible to have a completely independent plug-in recompile and test together with
Frama-C's kernel. For that, Frama-C must be aware of the existence of the plug-in. This can
be done in two ways:
All sub-directories of
src/ directory in Frama-C sources which are not known to Frama-
C's kernel are assumed to be external plug-ins.
One can use the
--enable-external
option of congure which takes as argument the
path to the plug-in
autoconf run in Framaenabled or disabled in the same way as
configure.in or configure.ac le, the conguration
In the rst case, the plug-in behaves as any other built-ins plug-ins:
C's main directory will take care of it and it can be
the others. If the plug-in has its own
instructions contained in it (in particular additional dependencies) will be read as well.
In the second case, the plug-in is added to the list of external plug-ins at congure time. If
the plug-in has its own congure, it is run as well.
4.6 Testing
In this section, we present ptests, a tool provided by Frama-C in order to perform nonregression and unit tests.
ptests runs the Frama-C toplevel on each specied test (which are usually C les). Specic
directives can be used for each test.
Each result of the execution is compared from the
previously saved result (called the oracle ).
A test is successful if and only if there is no
46
4.6. TESTING
dierence. Actually the number of results is twice that the number of tests because standard
and error outputs are compared separately.
First Section 4.6.1 shows how to use ptests. Next Section 4.6.2 introduces how to use predened directives to congure tests, while Section 4.6.3 explains how to set up various testing
goals for the same test base.
Last Section 4.6.4 details ptests' options, while Section 4.6.5
describes ptests' directive.
4.6.1 Using ptests
If you're using a
Makefile
written following the principles given in section 4.5, the simplest
way of using ptests is through
make tests
which is roughly equivalent to
$ t i m e ./ b i n / p t e s t s . byte
or
$ t i m e p t e s t s . byte
depending on whether you're inside Frama-C's sources or compiling a plug-in against an already installed Frama-C distribution.
In addition,
make tests
ensures that the ptests options specic to the plug-in under test are
correctly set. This can be done manually by issuing the following command:
$ make p t e s t s _ l o c a l _ c o n f i g .cmo
File
ptests_local_config.cmo
is then loaded by ptests and contains all the necessary infor-
mation for handling the test suite of the current plug-in.
ptests.byte runs tests
ptests_local_config.
belonging to a sub-directory of directory
tests
that is mentioned in
ptests also accepts specic test suites in arguments. A test suite is
either the name of a sub-directory in directory
tests
or a lename (with its path relative to
the current directory).
Example 4.5
If you want to test plug-in
sparecode and specic test tests/pdg/variadic.c,
just run
$ ./ b i n / p t e s t s . byte s p a r e c o d e t e s t s /pdg/ v a r i a d i c . c
which should display (if there are 7 tests in directory
tests/sparecode)
% Dispatch f i n i s h e d , waiting f o r workers to complete
% Comparisons f i n i s h e d , w a i t i n g f o r d i f f s t o c o m p l e t e
% D i f f s f i n i s h e d . Summary:
Run = 8
Ok = 16 o f 16
ptests accepts dierent options which are used to customize test sequences. These options are
detailed in Section 4.6.4.
Example 4.6
If the code of plug-in
plug-in
has changed, a typical sequence of tests is the
following one.
$ ./ b i n / p t e s t s . byte plug - i n
$ ./ b i n / p t e s t s . byte - update plug - i n
$ make t e s t s
47
CHAPTER 4. ADVANCED PLUG-IN DEVELOPMENT
So we rst run the tests suite corresponding to
plug-in
in order to display what tests have
been modied by the changes. After checking the displayed dierences, we validate the changes
by updating the oracles. Finally we run all the test suites in order to ensure that the changes
do not break anything else in Frama-C.
Example 4.7
For adding a new test, the typical sequence of command is the following.
$ ./ b i n / p t e s t s . byte -show t e s t s / plug - i n / new_test . c
$ ./ b i n / p t e s t s . byte - update t e s t s / plug - i n / new_test . c
$ make t e s t s
We rst ask ptests to print the output of the test on the command line, check that it corresponds
to what we expect, and then take it as the initial oracle. If some changes have been made to
the code in order to let
new_test.c
pass, we must of course launch the whole test suite and
check that all existing tests are alright.
If you're creating a whole new test suite suite, don't forget to create the sub-directories
suite/result and suite/oracle where ptests will store the current results and the oracles
for all the tests in suite
4.6.2 Conguration
In order to exactly perform the test that you wish, some directives can be set in three dierent
places. We indicate rst these places and next the possible directives.
The places are:
inside le
tests/test_config;
inside le
tests/subdir/test_config
inside each test le, in a special comment of the form
(for each sub-directory
subdir
of
tests);
or
/* run . config
... directives ...
*/
In each of the above case, the conguration is done by a list of directives. Each directive has
to be on one line and to have the form
CONFIG_OPTION : value
There is exactly one directive by line.
CONFIG_OPTION)
The dierent directives (i.e.
possibilities for
are detailed in Section 4.6.5.
Note that some specic congurations require dynamic linking, which is not available on
all platforms for native code.
that the
OPT
or
EXECNOW
ptests
takes care of reverting to bytecode when it detects
options of a test require dynamic linking. This occurs currently
in the following cases:
OPT
contains the option
-load-script
OPT
contains the option
-load-module
EXECNOW
use
make
to create a
.cmxs
48
4.6. TESTING
Example 4.8
Test
tests/sparecode/calls.c
declares the following directives.
/* run . config
OPT : - sparecode - analysis
OPT : - slicing - level 2 - slice - return main - slice - print
*/
These directives state that we want to test sparecode and slicing analyses on this le. Thus
running the following instruction executes two test cases.
$ ./ b i n / p t e s t s . byte t e s t s / s p a r e c o d e / c a l l s . c
% Dispatch f i n i s h e d , waiting f o r workers to complete
% Comparisons f i n i s h e d , w a i t i n g f o r d i f f s t o c o m p l e t e
% D i f f s f i n i s h e d . Summary:
Run = 2
Ok = 4 o f 4
4.6.3 Alternative Testing
You may want to set up dierent testing goals for the same test base. Common cases include:
checking the result of an analysis with or without an option;
checking a preliminary result of an analysis, in particular if the complete analysis is
costly;
checking separately dierent results of an analysis.
This is possible with option
-config of
ptests, which takes as argument the name of a special
test conguration, as in
$ ./ b i n / p t e s t s . byte - c o n f i g < special_name > plug - i n
Then, the directives for this test can be found:
inside le
tests/test_config_<special_name>;
inside le
tests/subdir/test_config_<special_name>
of
tests);
(for each sub-directory
subdir
or
inside each test le, in a special comment of the form
/* run . config_<special_name>
... directives ...
*/
All operations for this test conguration should take option
-config
in argument, as in
$ ./ b i n / p t e s t s . byte - update - c o n f i g < special_name > plug - i n
In
addition,
option
result_<special_name>
and
-config <special_name>
oracle_<special_name> to
of the specic conguration.
49
requires
store
subdirectories
results
and
oracle
CHAPTER 4. ADVANCED PLUG-IN DEVELOPMENT
kind
Name
Specication
-add-options
Additional
Toplevel
Default
options
passed
to
the
toplevel
-byte
-opt
-run
Use bytecode toplevel
no
Use native toplevel
yes
Delete current results; run tests and
yes
examine results
Behavior
-examine
Only examine current results; do not
no
run tests
-show
Run tests and show results, but do
not examine them; implies
-update
no
-byte
Take current results as new oracles;
no
do not run tests
-exclude suite
-diff cmd
Misc.
suite
cmd to show dierences between
Do not consider the given
Use
diff -u
results and oracles when examining
results
-cmp cmd
Use
cmd
to compare results against
cmp -s
oracles when examining results
-use-diff-as-cmp
Use the same command for di and
no
cmp
-j n
-v
-help
Set level of parallelism to
n
4
Increase verbosity (up to twice)
0
Display helps
no
Figure 4.1: ptests options.
4.6.4 Detailed options
Figure 4.1 details the options of ptests.
The commands provided through the
roles.
cmp
cmp
-cmp
options play two related but distinct
Only its exit code is taken into account by ptests and the
is discarded. An exit code of
two les will then be analyzed by
An exit code of
diff.
and
is always used for each test (in fact it is used twice: one for the standard output
and one for the error output).
output of
-diff
0
1
means that the two les have dierences. The
diff, whose role is to show the dierences between the les.
means that the two les are identical. Thus, they won't be processed by
An exit code of
2
indicates an error during the comparison (for instance because the
corresponding oracle does not exist). Any other exit code results in a fatal error. It is possible
to use the same command for both
will take as
The
cmp
cmp
and
diff
command the command used for
with the
diff.
-use-diff-as-cmp
-exclude option can take as argument a whole suite or an individual test.
option, which
It can be used
with any behavior.
4.6.5 Detailed directives
Figure 4.2 shows all the directives that can be used in the conguration header of a test (or
a test suite). Any directive can identify a le using a relative path. The default directory
considered for
.
is always the parent directory of directory
50
tests.
The
DONTRUN
directive
4.6. TESTING
Kind
Name
CMD
OPT
STDOPT
Command
Specication
default
Options given to the program
./bin/toplevel.opt
-val -out -input -deps
Add and remove options from
None
Program to run
the default set
EXECNOW
Run a command before the
None
following commands
MACRO
FILTER
Dene a new macro
None
Command used to lter re-
None
sults
Test suite
Miscellaneous
DONTRUN
FILEREG
COMMENT
GCC
Do not execute this test
None
selects the les to test
.*\.\(c|i\)
Comment in the conguration
None
Unused (compatibility only)
None
Figure 4.2: Directives in conguration headers of test les.
does not need to have any content, but it is useful to provide an explanation of why the test
should not be run (e.g test of a feature that is currently developed and not fully operational
yet).
If a test le is explicitly given on the command line of ptests, it is always executed,
regardless of the presence of a
DONTRUN
directive.
As said in Section 4.6.2, these directives can be found in dierent places:
1. default value of the directive (as specied in Fig. 4.2);
2. inside le
tests/test_config;
3. inside le
tests/subdir/test_config
(for each sub-directory
subdir
of
tests);
or
4. inside each test le
As presented in Section 4.6.3, alternative directives for test conguration <special_name>
can be found in slightly dierent places:
default value of the directive (as specied in Fig. 4.2);
inside le
tests/test_config_<special_name>;
inside le
tests/subdir/test_config_<special_name>
of
tests);
(for each sub-directory
subdir
or
inside each test le.
For a given test
tests/suite/test.c, each existing le in the sequence above is read in order
and denes a conguration level (the default conguration level always exists).
CMD
allows to change the command that is used for the following
a new
CMD
OPT
directives (until
directive is found). No new test case is generated if there is no further
directive. At a given conguration level, the default value for directive
CMD
directive of the preceding conguration level.
51
CMD
OPT
is the last
CHAPTER 4. ADVANCED PLUG-IN DEVELOPMENT
If there are several directives
dierent test cases.
The
OPT
OPT
in the same conguration level, they correspond to
directive(s) of a given conguration level replace(s) the
ones of the preceding level.
The
STDOPT
OPT
directive takes as default set of options the last
directive(s) of the
preceding conguration level. If the preceding conguration level contains several
directives, hence several test cases,
STDOPT
OPT
is applied to each of them, leading to the
same number of test cases. The syntax for this directive is the following.
STDOPT: [[+#-]"opt" ...]
options are always given between quotes. An option following a
+
# is added to
a - is removed
(resp.
the end (resp. start) of current set of options while an option following
from it. The directive can be empty (meaning that the corresponding test will use the
standard set of options). As with
OPT,
each
STDOPT
corresponds to a dierent (set of )
test case(s).
The syntax for directive
EXECNOW
is the following.
EXECNOW: [ [ LOG file | BIN file ] ... ] cmd
Files after
LOG
cmd
and compared from oracles,
are binary les also generated by
but not compared from
are log les generated by command
whereas les after
BIN
cmd
cmd. All the commands
EXECNOW are executed in order and before running any of the other
directives. If the execution of one EXECNOW directive fails (i.e. has a non-zero return
code), the remaining actions are not executed. EXECNOW directives from a given level are
oracles. Full access path to these les have to be specied only in
described by directives
added to the directives of the following levels.
The
MACRO
directive has the following syntax:
MACRO: macro-name content
where macro-name is any sequence of characters containing neither a blank nor an @, and
content extends until the end of the line. Once such a directive has been encountered,
each occurrence of @macro-name@ in a CMD, OPT, STDOPT or EXECNOW directive at this
conguration level or in any level below it will be replaced by content. Existing predened macros are listed in section 5.4.1.
The
FILEREG
directive contains a regular expression indicating which les in the direc-
tory containing the current test suite are actually part of the suite. This directive is
only usable in a
test_config
conguration le.
52
4.7. PLUG-IN GENERAL SERVICES
4.7 Plug-in General Services
Module
Plugin
provides an access to some general services available for all plug-ins.
goal of this module is twofold.
The
First, it helps developpers to use general Frama-C services.
Second, it provides to the end-user a set of features common to all plug-ins.
these services, you have to apply the functor
To access to
Plugin.Register.
Each plug-in must apply this functor exactly once.
Example 4.9
Here is how the plug-in
From
applies the functor
Plugin.Register
for its own
use.
i n c l u d e Plugin . Register
( struct
l e t name = " from analysis "
l e t shortname = " from "
l e t h e l p = " functional dependencies "
end )
Applying this functor mainly provides two dierent services. First it gives access to functions
for printing messages in a Frama-C-compliant way (see Section 4.8). Second it allows to dene
plug-in specic parameters available as options on the Frama-C command line to the end-user
(see Section 4.13).
4.8 Logging Services
Displaying results of plug-in computations to users, warning them of the hypothesis taken by
the static analyzers, reporting incorrect inputs, all these tasks are easy to think about, but
turn to be dicult to handle in a readable way. As soon as your plug-in is registered (see
Section 4.7 above), though, you automatically benet from many logging facilities provided
by the kernel. What is more, when logging through these services, messages from your plug-in
combine with other messages from other plug-ins, in a consistent and user-friendly way.
As a general rule, you should never write to standard output and error channels through
OCaml standard libraries.
Pervasives.stderr
For instance, you should never use
channels, nor
Format.printf-like
Pervasives.stdout
Format.fprintf to implement pretty-printers for your own complex
printf-like routines of Log.Messages to display messages to the user. All
Instead, you should use
data, and only the
these routines are immediately available from your plug-in general services.
Example 4.10
and
routines.
A minimal example of a plug-in using the logging services:
module S e l f = P l u g i n . R e g i s t e r
( struct
l e t name = " foo plugin "
l e t shortname = " foo "
l e t h e l p = " illustration of logging services "
end )
l e t pp_dg out n =
Format. f p r i n t f out
" you have at least debug % d" n
l e t run () =
53
CHAPTER 4. ADVANCED PLUG-IN DEVELOPMENT
S e l f . r e s u l t " Hello ,
S e l f . debug ∼ l e v e l :0
S e l f . debug ∼ l e v e l :1
S e l f . debug ∼ l e v e l :3
this is Foo Logs ! ";
" Try higher debug levels (% a)" pp_dg 0;
" If you read this , %a ." pp_dg 1;
" If you read this , %a ." pp_dg 3;
l e t () = Db.Main. extend run ()
Running this example, you should see:
$ frama - c - foo - debug 2
[ f o o ] H e l l o , t h i s i s Foo Logs !
[ f o o ] Try h i g h debug l e v e l s ( you have a t l e a s t debug 0).
[ f o o ] I f you r e a d t h i s , you have a t l e a s t debug 1.
Notice that your plug-in automatically benets from its own debug command line parameter,
and that messages are automatically prexed with the name of the plug-in. We now get into
more details for an advanced usage of logging services.
4.8.1 From printf to Log
Below is a simple example of how to make a
printf-based code towards being Log-compliant.
The original code, extracted from the Occurrence plug-in in Frama-C-Lithium version is as
follows:
l e t print_one v l =
Format. p r i n t f " variable %s (% d ): @\n" v.vname v. v i d ;
List . iter
( f u n ( ki , l v ) →
Format. p r i n t f " sid %a: % a@ \n " d_ki k i d_lval l v )
l
l e t p r i n t _ a l l () =
compute ();
O c c u r r e n c e s . i t e r print_one
The transformation is straightforward. First you add to all your pretty-printing functions an
additional
Format.formatter
parameter, and you call
fprintf
instead of
printf:
l e t print_one fmt v l =
Format. f p r i n t f fmt " variable %s (% d ): @\n" v.vname v. v i d ;
List . iter
( f u n ( ki , l v ) →
Format. f p r i n t f fmt " sid %a: % a@ \n " d_ki k i d_lval l v )
l
Then, you delegate toplevel calls to
printf
formatting string containing the necessary
towards an appropriate logging routine, with a
"%t"
and
"%a"
formatters:
l e t p r i n t _ a l l () =
compute ();
r e s u l t "%t " ( f u n fmt → O c c u r r e n c e s . i t e r ( print_one fmt ))
4.8.2 Log Quick Reference
The logging routines for your plug-ins consist in an implementation of the
face, which is included in the
Plugin.S
Log.Messages inter-
interface returned by the registration of your plug-in.
The main routines of interest are:
54
4.8. LOGGING SERVICES
result <options> "..."
Outputs most of your messages with this routine. You may specify ∼ level :n option to
discard too detailed messages in conjunction with the verbose command line option.
The default level is
1.
feedback <options> "..."
Reserved for short messages that gives feedback about the progression of long computations. Typically, entering a function body or iterating during xpoint computation.
The level option can be used as for
result .
debug <options> "..."
To be used for plug-in development messages and internal error diagnosis.
You may
specify ∼ level :n option to discard too detailed messages in conjunction with the debug
command line option. The default message level is
is
0.
Hence, without any option,
debug
1,
and the default debugging level
discards all its messages.
warning <options> "..."
For reporting to the user an important information about the validity of the analysis
performed by your plug-in. For instance, if you locally assume non arithmetic overow
on a given statement, etc. Typical options include ∼current: true to localize the message
on the current source location.
error <options> "..."
abort <options> "..."
Use these routines for reporting to the user an error in its inputs. It can be used for
non valid parameters, for instance. It should not be used for some not-yet implemented
feature, however.
The
abort routine is a variant that raises an exception and thus aborts the computation.
failure <options> "..."
fatal <options> "..."
Use these routines for reporting to the user that your plug-in is now in inconsistent state
or can not continue its computation. Typically, you have just discovered a bug in your
plug-in!
The
fatal
routine is a variant that raises an exception.
verify (condition) <options> "..."
First the routine evaluates the condition and the formatting arguments, then, discards
the message if the condition holds and displays a message otherwise. Finally, it returns
the condition value.
A typical usage is for example:
a s s e r t ( v e r i f y (x>0) " Expected a positive value (% d)" x)
4.8.3 Logging Routine Options
Logging routines have optional parameters to modify their general behavior.
involved type in
Log.mli.
55
Hence their
CHAPTER 4. ADVANCED PLUG-IN DEVELOPMENT
Level Option.
A minimal level of verbosity or debugging can be specied for the message
to be emitted. For the result and feedback channels, the verbosity level is used ; for the debug
channel, the debugging level is used.
∼ level :n minimal level required is
Category Option
n.
Debug, result, and feedback output can be associated to a debugging
key with the optional argument ∼dkey which takes an argument of type
a
private
alias for string.
Each category must be registered through the
category , which is
register_category
function. You can dene subcategories by putting colons in the registered name. For instance
a:b:c
denes a subcategory
c
of
a:b,
itself a subcategory of
a.
User can then choose to
output debugging messages belonging to a given category (and its subcategories) with the
-plugin-msg-key <category>
option.
In order to decide whether a message should be output, both level and category options are
examined:
if neither ∼ level nor ∼dkey, the eect is the same as having a level of
if only ∼ level is provided, the message is output if the corresponding verbosity or de-
1
and no category.
bugging level is sucient
if only ∼dkey is used, the message is output if the corresponding category is in used
(even if the verbosity or debugging level is
0)
if both ∼ level and ∼dkey are present, the message is output if the two conditions above
(sucient verbosity or debugging level and appropriate category in use) hold.
Source Options.
By default, a message is not localized. You may specify a source location,
either specically or by using the current location of an
∼source:s use the source location
s
(see
AST
visitor.
Log.mli)
∼current: true use the current source location managed by
Emission Options.
Cil.CurrentLoc.
By default, a message is echoed to the user after its construction, and
it is sent to registered callbacks when emitted. See Section 4.8.4 below for more details on
how to globally modify such a behavior. During the message construction, you can locally
modify the emission process with the following options:
∼emitwith:f suppresses the echo and sends the emitted event only to the callback func-
tion
f.
Listeners are not red at all.
∼once:true nally discards the message if the same one was already emitted before with
the ∼once option.
Append Option.
function taking a
All logging routines have the ∼append:f optional parameter, where
Format.formatter as parameter and returning unit.
to append some text to the logging routine.
This function
f
f
is
is invoked
Such continuation-passing style is sometime
necessary for dening new polymorphic formatting functions. It has been introduced for the
same purpose than standard
Format. kfprintf -like
56
functions.
4.8. LOGGING SERVICES
4.8.4 Advanced Logging Services
Message Emission
During message construction, the message content is echoed in the terminal. This echo may
be delayed until message completion when ∼once has been used. Upon message completion,
the message is emitted and sent to all globally registered hook functions, unless the ∼emitwith
option has been used.
To interact with this general procedure, the plug-in developer can use the following functions
dened in module
Log:
v a l set_echo :
? p l u g i n : s t r i n g → ? k i n d s : kind l i s t → b o o l → u n i t
v a l a d d _ l i s t e n e r : ? p l u g i n : s t r i n g → ? k i n d s : kind l i s t → ( e v e n t → u n i t ) → u n i t
Continuations
The logging routines take as argument a (polymorphic) formatting string, followed by the
formatting parameters, and nally return unit.
It is also possible to catch the generated
message, and to pass it to a continuation that nally returns a value dierent than unit.
For this purpose, you must use the
continuation
f
with_<log>
for additional parameter.
routines variants.
After emitting the corresponding message in the
normal way, the message is passed to the continuation
the log routine returns
These routines take a
f.
Hence,
f
has type
event → α,
and
α.
For instance, you typically use the following code fragment to return a degenerated value
while emitting a warning:
l e t rec fact n =
i f (n>12) t h e n
with_warning ( f u n _ → 0) " Overflow for %d , return 0 instead " x
e l s e i f n≤1 t h e n 1 e l s e n * f a c t (n -1)
Generic Routines
The
Log.Messages interface provides two generic routines that can be used instead of the basic
ones:
log ?kind ?verbose ?debug <options> "..."
Emits a message with the given kind, when the verbosity and/or debugging level are
sucient.
with_log f ?kind <options> "..."
Emits a message like
log, and nally pass the generated message to the continuation f ,
and returns its result.
The default kind is
Result,
but all the other kind of message can be specied. For verbosity
and debugging levels, the message is emitted when:
log "..."
log ∼verbose:n
log ∼debug:n
log ∼verbose:v ∼debug:d
1
n
least n
verbosity is at least
verbosity is at least
debugging is at
either verbosity is at least
or debugging is at least
57
d.
v
CHAPTER 4. ADVANCED PLUG-IN DEVELOPMENT
Channel Management
The logging services are build upon channels, which are basically buered formatters to
standard output extended with locking, delayed echo, and notication services.
The very safe feature of logging services is that recursive calls are protected. A message is
only echoed upon termination, and a channel buer is stacked only if necessary to preserve
memory.
Services provided at plug-in registration are convenient shortcuts to low-level logging service
onto channels. The
Log
interface allows you to create such channels for your own purposes.
Basically, channels ensure that no message emission interfere with each others during echo
on standard output.
Hence the forbidden direct access to
Pervasives .stdout.
However,
Log
interface allows you to create such channels on your own, in addition to the one automatically
created for your plug-in.
new_channel name
This creates a new channel.
There is only one channel per name, and the function
returns the existing one if any. Plug-in channels are registered under their short-name,
and the kernel channel is registered under
Log.kernel_channel_name.
log_channel channel ?kind ?prefix
This routine is similar to the
log
one.
with_log_channel channel f ?kind ?prefix
This routine is similar to the
with_log
one.
With both logging routines, you may specify a prex to be used during echo. The available
switches are:
Label t:
use the string
t
as a prex for the rst echoed line of text, then use an inden-
tation of same length for the next lines.
Prex t:
Indent n:
use the string
t
as a prex for all lines of text.
use an indentation of
n
spaces for all lines of text.
When left unspecied, the prex is computed from the message kind and the channel name,
like for plug-ins.
Output Management
It is possible to ask
Log
to redirect its output to another channel:
set_output out flush
The parameters are the same than those of
string and
ush
Format.make_formatter: out outputs a (sub)-
actually writes the buered text to the underlying device.
It is also possible to have a momentary direct access to
Pervasives .stdout,
or whatever its
redirection is:
print_on_output "..."
The routine immediately locks the output of
Log
and prints the provided message. All
message echoes are delayed until the routine actually returns. Notication to listeners
is not delayed, however.
58
4.9. THE TYPE LIBRARY: TYPE VALUES AND DATATYPES
print_delayed "..."
This variant locks the output only when the rst character would be written to output.
This gives a chance to a message to be echoed before your text is actually written.
Remark that these two routines can not be recursively invoked, since they have a lock to a nondelayed output channel. This constraint is veried at runtime to avoid incorrect interleaving,
and you would get a fatal error if the situation occurs.
Warning:
these routine are dedicated to expensive output only. You get the advantage of
not buering your text before printing. But on the other hand, if you have messages to be
echoed during printing, they must be stacked until the end of your printing.
Kernel\_function.CodeOutput.output. This routine prints
Log.print_delayed, unless the command line option -ocode has been set.
You get a similar functionality with
your text by calling
It this case, your text is written to the specied le.
4.9 The Type library: Type Values and Datatypes
Type values and datatypes are key notions of Frama-C. They are both provided by the
library.
Type
An overview as well as technical details may also be found in a related article in
French [19]. A short summary focusing on (un)marshaling is described in another article [7].
First, Section 4.9.1 introduces type values. Then Section 4.9.2 introduces datatypes built on
top of type values.
4.9.1 Type Value
A type value is an OCaml value which dynamically represents a static monomorphic OCaml
type
τ.
τ.
It gets the type
τ Type.t.
There is at most one type value which represents the type
Type values are used by Frama-C to ensure safety when dynamic typing is required (for
instance to access to a dynamic plug-in API, see Section 4.10.3).
Type values for standard OCaml monomorphic types are provided in module
Example 4.11
Datatype.
int is Datatype.int while the one for type string is
Datatype.string. The former has type int Type.t while the latter has type string Type.t.
The type value for type
Type values are created when building datatypes (see Section 4.9.2). There is no type value
for polymorphic types. Instead, they have to be created for each instance of a polymorphic
type.
Functions for accessing such type values for standard OCaml polymorphic types are
provided in moduleDatatype.
Example 4.12
int list is Datatype.list Datatype.int while the
one for type string →char →bool is Datatype.func2 Datatype.string Datatype.char
Datatype.bool. The former has type int list Type.t while the latter has type (string
→char →bool) Type.t.
The type value for type
59
CHAPTER 4. ADVANCED PLUG-IN DEVELOPMENT
4.9.2 Datatype
A datatype provides in a single module a monomorphic type and usual values over it.
signature is
Its
Datatype.S. It contains the type itself, the type value corresponding to this type,
equal, compare, hash and pretty which may respectively be used to check
its name, functions
equality, to compare, to hash and to pretty print values of this type. It also contains some other
values (for instance required when marshaling or journalizing). Whenever possible, a datatype
Datatype.S_with_collections.
For a type τ , this extended signature additionally provides modules Set, Map and Hashtbl
respectively implementing sets over τ , maps and hashtables indexed by elements of τ .
implements an extensible version of
Datatype.S,
namely
Datatype, while
Cil_datatype. Furthermore, when a kernel
implements Datatype.S.
Datatypes for OCaml types from the standard library are provided in module
those for AST's types are provided in module
module implements a datastructure, it usually
Example 4.13
The following line of code pretty prints whether two statements are equal.
( * assumed the type
of
[ stmt1 ]
and
[ stmt2 ]
is
Cil_types . stmt * )
Format. f p r i n t f
fmt ( * a formatter p r e v i o u s l y defined somewhere * )
" statements % a and %a are % sequal "
Cil_datatype .Stmt. p r e t t y stmt1
Cil_datatype .Stmt. p r e t t y stmt2
( i f Cil_datatype .Stmt. e q u a l stmt1 stmt2 t h e n "" e l s e " not ")
Example 4.14
Datatype.String
Module
Datatype.S_with_collections.
implements
Thus you can initialize a set of strings in the following way.
l e t string_set =
List . fold_left
( f u n a c c s → Datatype . S t r i n g . S e t .add s a c c )
Datatype . S t r i n g . S e t .empty
[ " foo " ; " bar "; " baz " ]
Building Datatypes
For each monomorphic type, the corresponding datatype may be created by applying the
functor
Datatype.Make.
In addition to the type
t
corresponding to the datatype, several
values must be provided in the argument of the functor. These values are properly documented
in the Frama-C API. The following example introduces them in a practical way.
Example 4.15
Here is how to dene in the more precise way the datatype corresponding to
a simple sum type.
t y p e ab = A | B o f i n t
module AB =
Datatype .Make
( struct
(*
the type corresponding
to
the unique name o f
built
t y p e t = ab
(*
the
the datatype * )
datatype ;
usually
the name o f
list
values
the
type * )
l e t name = " ab "
(*
representents
is
only used
of
for
the type :
safety
different
possible
check
*)
is .
a non−empty
check :
physical
the
best
the
representation
of
list
of
of
this
represents
the type ,
the
type .
the
best
the
l e t r e p r s = [ A; B 0 ]
(*
structural
type .
It
is
descriptor
describing
used when marshaling .
60
the
*)
physical
representation
of
the
It
4.9. THE TYPE LIBRARY: TYPE VALUES AND DATATYPES
l e t structural_descr =
Structural_descr . Structure
( S t r u c t u r a l _ d e s r .Sum [| [| S t r u c t u r a l _ d e s c r . p_int |] |])
(*
equality ,
compare and hash are
(*
the type ab
the standard OCaml ones * )
l e t e q u a l (x: t ) y = x = y
l e t compare (x: t ) y = P e r v a s i v e s . compare x y
l e t hash (x: t ) = Hashtbl . hash x
are simply
is
a standard
identity .
functional
Rehashing
l e t copy = Datatype . i d e n t i t y
l e t r e h a s h = Datatype . i d e n t i t y
is
type ,
(*
the type ab does never contain any value
(*
pretty
l e t mem_project = Datatype . never_any_project
printer
thus copying and rehashing
used when marshaling .
of
*)
type Project . t
*)
*)
l e t p r e t t y fmt x =
Format. p p _ p r i n t _ s t r i n g fmt
( match x w i t h A → "a" | B n → "b" ^ s t r i n g _ o f _ i n t n)
(*
p r i n t e r which must produce a
context .
It
is
v a l i d OCaml value
used when j o u r n a l i s i n g .
i n a given
*)
l e t i n t e r n a l _ p r e t t y _ c o d e p r e c _ c a l l e r fmt = f u n c t i o n
| A→
Type. par
prec_caller
Type. B a s i c
fmt
( f u n fmt → Format. p p _ p r i n t _ s t r i n g fmt "A" )
| B n →
Type. par
prec_caller
Type. C a l l
fmt
( f u n fmt → Format. f p r i n t f fmt "B %d" n)
( * A good
p r e f i x name to
use
f o r an OCaml v a r i a b l e
of
this
l e t varname v = " ab " ^ ( match v w i t h A → " _a_ " | B → " _b_ ")
end )
type .
*)
and reprs is mandatory. For
t, you can dene the function
internal_pretty_code equal to the predened function Datatype.pp_fail. Similarly, if you
never use values of type t as keys of hashtable, you can dene the function hash equal to
the function Datatype.undefined , and so on. To ease this process, you can also use the
predened structure Datatype.Undefined.
Only providing an eective implementation for the values
name
instance, if you know that you never journalize a value of a type
Example 4.16
(*
Here is a datatype where only the function
the same type than the one
of
t y p e ab = A | B o f i n t
module AB =
Datatype .Make
( struct
t y p e t = ab
l e t name = " ab "
l e t r e p r s = [ A; B 0 ]
i n c l u d e Datatype . Undefined
l e t e q u a l (x: t ) y = x = y
end )
the
equal
is provided.
previous example * )
Datatypes of Polymorphic Types
As for type values, it is not possible to create a datatype correspondign to polymorphic types,
but it is possible to create them for each of their monomorphic instances.
For building such instances, you must not apply the functor
Datatype.Make
since it will
create two type values for the same type (and with the same name): that is forbidden.
61
CHAPTER 4. ADVANCED PLUG-IN DEVELOPMENT
Datatype.Polymorphic for types with one type variable
Datatype.Polymorphic2 for types with two type variables. These functors
Instead, you must use the functor
and the functor
takes as argument how to build the datatype corresponding each monomorphic instance.
Example 4.17
Here is how to apply
Datatype.Polymorphic
corresponding to the type
'a t
below.
t y p e α ab = A o f α | B o f i n t
module Poly_ab =
Datatype . Polymorphic
( struct
t y p e α t = α ab
l e t name ty = Type.name ty ^ " ab "
l e t module_name = " Ab "
l e t r e p r s ty = [ A ty ]
l e t structural_descr d =
Structural_descr . Structure
( S t r u c t u r a l _ d e s c r .Sum
[| [| S t r u c t u r a l _ d e s c r . pack d |]; [| S t r u c t u r a l _ d e s c r . p_int |] |]
l e t mk_equal f x y = match x, y w i t h
| A x, A y → f x y
| B x, B y → x = y
| A _, B _ | B _, A _ → f a l s e
l e t mk_compare f x y = match x, y w i t h
| A x, A y → f x y
| B x, B y → P e r v a s i v e s . compare x y
| A _, B _ → 1
| B _, A _ → -1
l e t mk_hash f = f u n c t i o n A x → f x | B x → 257 * x
l e t map f = f u n c t i o n A x → A ( f x) | B x → B x
l e t mk_internal_pretty_code f p r e c _ c a l l e r fmt = f u n c t i o n
| A x →
Type. par
prec_caller
Type. B a s i c
fmt
( f u n fmt → Format. f p r i n t f fmt "A %a" ( f Type. C a l l ) x)
| B n →
Type. par
prec_caller
Type. C a l l
fmt
( f u n fmt → Format. f p r i n t f fmt "B %d" n)
l e t mk_pretty f fmt x =
mk_internal_pretty_code ( f u n _ → f ) Type. B a s i c fmt x
l e t mk_varname _ = " ab "
l e t mk_mem_project mem f = f u n c t i o n
| A x → mem f x
| B _ → false
end )
module Ab = Poly_AB.Make
( * datatype corresponding
to
the type
[ i n t ab ]
( * datatype corresponding
to
the type
[ int
( * datatype corresponding
to
the type
[ ( string ,
module Ab_int = Ab( Datatype . I n t )
list
*)
ab ]
*)
module Ab_Ab_string = Ab( Datatype . L i s t ( Datatype . I n t ))
int )
Hashtbl . t ab ]
module HAb = Ab( Datatype . S t r i n g . Hashtbl .Make( Datatype . I n t ))
*)
Clearly it is a bit painful. However you probably will never apply this functor yourself. It is
already applied for the standard OCaml polymorphic types like list and function (respectively
Datatype.List
and
Datatype.Function).
62
4.10. PLUG-IN REGISTRATION AND ACCESS
4.10 Plug-in Registration and Access
In this section, we present how to register plug-ins and how to access them. Actually there
are three dierent ways, but the recommended one is through a
.mli
Section 4.10.1 indicates how to register and access a plug-in through a
le.
.mli le.
Section 4.10.2
indicates how to register and access a kernel-integrated plug-in while Section 4.10.3 details
how to register and access a standard plug-in.
4.10.1 Registration through a .mli File
Target readers:
Prerequisite:
plug-in developers.
Basic knowledge of make and OCaml.
Each plug-in is compiled into a module of name indicated by the variable PLUGIN_NAME of its
Makefile (say Plugin_A. If this Makefile also set PLUGIN_HAS_MLI to yes, then its developer
has to provide a .mli for this plug-in (following the previous example, a le Plugin_A.mli).
This .mli le may thus contains the API of the plug-in.
Another plug-in may then access to
it has to declare in its
PLUGIN_DEPENDENCIES.
Example 4.18
Makefile
Plugin_A
as it accesses any other OCaml module, but
that it depends on
Plugin_A
through the special variable
Plugin_A declares and provides access to a function compute in the following
way.
File File plugin_a/my_analysis_a.ml
l e t compute () = ...
File File plugin_a/Plugin_A.mli
module My_analysis_a : s i g v a l compute : u n i t → u n i t
File File plugin_a/Makele
PLUGIN_NAME := Plugin_A
PLUGIN_CMO :=... my_analysis_a ...
PLUGIN_HAS_MLI := yes
...
i n c l u d e Makefile . dynamic
Then,
Plugin_B
may use this function
Compute
as follows.
File File plugin_b/my_analysis_b.ml
l e t compute () = ... Plugin_A. My_analysis_a . compute () ...
File File plugin_b/Makele
PLUGIN_NAME := Plugin_B
PLUGIN_CMO :=... my_analysis_b ...
PLUGIN_DEPENDENCIES := Plugin_A
...
i n c l u d e Makefile . dynamic
63
CHAPTER 4. ADVANCED PLUG-IN DEVELOPMENT
4.10.2 Kernel-integrated Registration and Access
Target readers:
Prerequisite:
kernel-integrated plug-in developers.
Accepting to modify the Frama-C kernel.
Otherwise, you can still register
your plug-in as any standard plug-in (see Section 4.10.3 for details).
A database, called
Db
(in directory
src/kernel),
groups together the API of all kernel-
integrated plug-ins. So it permits easy plug-in collaborations. Each kernel-integrated plug-in
is only visible through
plug-in
B,
Db.
For example, if a plug-in
it uses the part of
plug-in has to register in
Db
Db
corresponding to
B.
A
wants to know the results of another
A consequence of this design is that each
by setting a function pointer to the right value in order to be
usable from others plug-ins.
Example 4.19
Plug-in
Impact
registers function
compute_pragmas
in the following way.
File src/impact/register.ml
l e t compute_pragmas () = ...
l e t () = Db. Impact . compute_pragmas ← compute_pragmas
So each developer who wants to use this function calls it by pointer dereferencing like this.
l e t () = !Db. Impact . compute_pragmas ()
If a kernel-integrated plug-in has to export some datatypes usable by other plug-ins, such
datatypes have to be visible from module
Db.
Thus they cannot be declared in the plug-in
implementation itself like any other plug-in declaration because postponed type declarations
are not possible in OCaml.
Such datatypes are called plug-in types . The solution is to put these plug-ins types in some
les linked before
Db;
hence you have to put them in another directory than the plug-in
directory. The best way is to create a directory dedicated to types.
Recommendation 4.2
The suggested name for this directory is
If you add such a directory, you also have to modify
UNPACKED_DIRS
(see Section 5.3.3).
Example 4.20
Suppose you are writing a plug-in
p_types
Makefile
plug-in
for a plug-in
p.
by extending variable
which exports a specic type
t
corresponding to the result of the plug-in analysis. The standard way to proceed is the following.
File src/plugin_types/plugin_types.mli
t y p e t = ...
File src/kernel/db.mli
module P l u g i n : s i g
v a l run_and_get: ( u n i t → Plugin_types . t ) r e f
( * * Run plugin
end
@return
analysis
result
of
( if
the
it
was never launched
analysis .
64
*)
before ) .
4.10. PLUG-IN REGISTRATION AND ACCESS
File Makele
UNPACKED_DIRS = ... plugin_types
# Extend
this
variable
with the new d i r e c t o r y
This design choice has a side eect : it reveals exported types. You can always hide them
using a module to encapsulate the types (and provide corresponding getters and setters to
access them).
At this point, part of the plug-in code is outside the plug-in implementation. This code should
be linked before
Db
5.
To this eect, the les containing the exterior plug-in code must be added to the
variable
PLUGIN_TYPES_CMO
Makefile
(see Section 5.3.3).
4.10.3 Dynamic Registration and Access
Target readers:
standard plug-ins developers.
Registration of kernel-integrated plug-ins requires to modify module
the Frama-C kernel.
Db
which belongs to
Such a modication is not possible for standard plug-ins which are
fully independent of Frama-C. Consequently, the Frama-C kernel provides another way for
registering a plug-in through the module
Dynamic.
Dynamic.register in order to register a value from
a dynamic plug-in and you have to use function Dynamic.get in order to apply a function
previously registered with Dynamic.register.
In short, you have to use the function
Registering a value
The signature of
Dynamic.register
is as follows.
v a l r e g i s t e r : p l u g i n : s t r i n g → s t r i n g → α Type. t → j o u r n a l i z e : b o o l → α →
unit
The rst argument is the name of the plug-in registering the value and the second one is a
binding name of the registered OCaml value. The pair (plug-in name, binding name) must
not be used for value registration anywhere else in Frama-C. It is required for another plug-in
in order to access to this value (see next paragraph). The third argument is the type value of
the registered value (see Section 4.9.1). It is required for safety reasons when accessing to the
registered value (see the next paragraph). The labeled fourth argument
journalize indicates
whether a total call to this function must be written in the journal (see also Section 4.11).
The usual value for this argument is
Example 4.21
true.
The fth argument is the value to register.
run of the plug-in hello of the tutorial is registered.
unit → unit.
Here is how the function
The type of this function is
l e t run () : u n i t = ...
l e t () =
Dynamic. r e g i s t e r
∼ p l u g i n :" Hello "
" run "
( Datatype . f u n c Datatype . u n i t Datatype . u n i t )
∼journalize : true
run
5
A direct consequence is that you cannot use the whole Frama-C functionalities, such as module
this code.
65
Db,
inside
CHAPTER 4. ADVANCED PLUG-IN DEVELOPMENT
"Hello.run" is already
Type.AlreadyExists is raised during
If the string
used to register a dynamic value, then the exception
plug-in initialization (see Section 4.14).
Datatype.func Datatype.unit Datatype.unit returns the type value repunit → unit. Note that, because of the type of Dynamic.register and the types
of its arguments, the OCaml type checker complains if the third argument (here the value run)
has not the type unit → unit.
The function call
resenting
Accessing to a registered value
The signature of function
Dynamic.get
is as follows.
v a l g e t : p l u g i n : s t r i n g → s t r i n g → α Type. t → α
The arguments must be the same than the ones used at value registration time (with
Dynamic.register).
Otherwise, depending on the case, you will get a compile-time or a
runtime error.
Example 4.22
Here is how the previously registered function
run
of
Hello
may be applied.
l e t () =
Dynamic. g e t
∼ p l u g i n :" Hello "
" run "
( Datatype . f u n c Datatype . u n i t Datatype . u n i t )
()
The given strings and the given type value must be the same than the ones used when registering
the function. Otherwise, an error occurs at runtime. Furthermore, the OCaml type checker
will complain either if the third argument (here
(here
()
also) is not of type
unit.
()) is not of type unit or if the returned value
The above-mentionned mechanism requires to access to the type value corresponding to the
type of the registered value. Thus it is not possible to access to a value of a plug-in-dened
type. For solving this issue, Frama-C provides a way to access to type values of plug-in-dened
Type.Abstract.
types in an abstract way through the functor
Example 4.23
There is no current example in the Frama-C open-source part, but consider a
plug-in which provides a dynamic API for callstacks as follows.
module P =
Plugin . Register
( struct
l e t name = " Callstack "
l e t shortname = " Callstack "
l e t h e l p = " callstack library "
end )
(* A c a l l s t a c k
function
is
called
a
list
at
of
a pair
statement
corresponding type value
( k f * stmt ) where
[ stmt ] .
[ ty ] .
Building
*)
[ kf ]
is
the datatype
the
t y p e c a l l s t a c k = ( K e r n e l _ f u n c t i o n . t * Cil_datatype .Stmt. t ) l i s t
( * Implementation * )
let
let
let
let
|
|
empty = []
push k f stmt s t a c k = ( kf , stmt ) :: s t a c k
pop = f u n c t i o n [] → [] | _ :: s t a c k → s t a c k
rec print = function
[] → P. f e e d b a c k ""
( kf , stmt ) :: s t a c k →
P. f e e d b a c k " function %a called at stmt %a"
66
kernel
also
creates
the
4.11. JOURNALIZATION
Kernel_function . pretty kf
Cil_datatype .Stmt. p r e t t y stmt ;
print stack
( * Type values
*)
l e t kf_ty = K e r n e l _ f u n c t i o n . ty
l e t stmt_ty = Cil_datatype .Stmt. ty
module D =
Datatype .Make
( struct
type t = c a l l s t a c k
l e t name = " Callstack . t"
l e t r e p r s = [ empty; [ K e r n e l _ f u n c t i o n .dummy () , C i l .dummyStmt ] ]
i n c l u d e Datatype . S e r i a l i z a b l e _ u n d e f i n e d
end )
( * Dynamic API r e g i s t r a t i o n
*)
l e t r e g i s t e r name ty =
Dynamic. r e g i s t e r ∼ p l u g i n :" Callstack "
let
let
let
let
∼journalize :
f a l s e name ty
empty = r e g i s t e r " empty " D. ty empty
push = r e g i s t e r " push " ( Datatype . f u n c 3 kf_ty stmt_ty D. ty D. ty ) push
pop = r e g i s t e r " pop " ( Datatype . f u n c D. ty D. ty ) pop
p r i n t = r e g i s t e r " print " ( Datatype . f u n c D. ty Datatype . u n i t ) p r i n t
You have to use the functor
Type.Abstract
to access to the type value corresponding to the
type of callstacks (and thus to access to the above dynamically registered functions).
( * Type values
*)
l e t kf_ty = K e r n e l _ f u n c t i o n . ty
l e t stmt_ty = Cil_datatype .Stmt. ty
( * Access to
the type value
for
abstract
callstacks
*)
module C = Type. A b s t r a c t ( s t r u c t l e t name = " Callstack . t" end )
l e t g e t name ty = Dynamic. g e t
( * mutable
callstack
∼ p l u g i n :" Callstack "
name ty
*)
l e t c a l l s t a c k _ r e f = r e f ( g e t " empty " C. ty )
(*
operations
over
this
mutable
callstack
*)
l e t push_callstack =
(*
getting
the
function
outside
the
closure
is
more
efficient
*)
outside
the
closure
is
more
efficient
*)
outside
the
closure
is
more
efficient
*)
l e t push = g e t " push " ( Datatype . f u n c 3 kf_ty stmt_ty C. ty C. ty ) i n
f u n k f stmt → c a l l s t a c k _ r e f ← push k f stmt ! c a l l s t a c k _ r e f
l e t pop_callstack =
(*
getting
the
function
l e t pop = g e t " pop " ( Datatype . f u n c C. ty C. ty ) i n
f u n () → c a l l s t a c k _ r e f ← pop ! c a l l s t a c k _ r e f
l e t print_callstack =
(*
getting
the
function
l e t p r i n t = g e t " print " ( Datatype . f u n c C. ty Datatype . u n i t ) i n
f u n () → p r i n t ! c a l l s t a c k _ r e f
(*
...
algorithm
using
the
callstack
...
*)
4.11 Journalization
Not written yet: please report as feature request on
really need this section.
67
http: // bts. frama-c. com
if you
CHAPTER 4. ADVANCED PLUG-IN DEVELOPMENT
4.12 Project Management System
Prerequisite:
knowledge of OCaml module system and labels.
In Frama-C, a key notion detailed in this section is the one of project. An overview as well
as technical details may also be found in a related article in French [18]. Section 4.12.1 rst
Section 4.12.2 introduces the notion of states.
introduces the general principle of project.
State registration is detailed in Sections 4.12.3 and 4.12.4. The former is dedicated to standard (high-level) registration, while the latter is dedicated to low-level registration.
Then
Section 4.12.5 explains how to use project. Finally Section 4.12.6 details state selections.
4.12.1 Overview and Key Notions
A project group together an AST with the set of global values attached to it. Such values
are called states .
Examples of states are parameters (see Section 4.13), results of analyses
(Frama-C extensively uses memoization [15, 16] in order to prevent running analysis twice).
In a Frama-C session, several project (and thus several ASTs) can exist at the same time. The
project library ensures project non-interference: modifying the value of a state in a project
does not impact any value of any project in any other project. For ensuring this property,
each state must be registered in the project library as explained in Sections 4.12.3 and 4.12.4.
Such relation between states and projects are summarized in Figure 4.3.
Projects
States
AST
data
a
d1
value of
value of
...
data
p1
...
a in p1
d1 in p1
...
Project
...
dm
value of
dm
...
...
in
p1
...
Project
value of
value of
pn
a in pn
d1 in pn
...
value of
dm
in
pn
Figure 4.3: Representation of the Frama-C State.
To ease development, Frama-C maintains a current project (Project.current
ations are automatically performed on. For instance, calling
()):
all oper-
Ast.get () returns the Frama-C
AST of the current project. It is also possible to access to values in others projects as explained
in Section 4.12.5.
4.12.2 State: Principle
If a data should be part of the state of Frama-C, you must register it in the project library
(see Sections 4.12.3 and 4.12.4).
Here we rst explain what are the functionalities of each state and then we present the general
principle of registration.
State Functionalities
Whenever you want to attach a data (e.g.
a table containing results of an analysis) to an
AST, you have to register it as an internal state. The main functionalities provide to each
internal state are the following.
68
4.12. PROJECT MANAGEMENT SYSTEM
It is automatically updated whenever the current project changes:
always consistent with the current project.
so your data is
More precisely, you still work with your
global data (for instance, a hashtable or a reference) as usual in OCaml. The project
library silently changes this data when required (usually when the current project is
changing).
The extra cost due to the project system is usually an extra indirection.
Figure 4.4 summarizes these interactions between the project library and your state.
State 1
...
Project 1
Client 1 =
local version of state 1
answer 1
State n
current
project
request
broadcasting
...
State 1
...
answer n
Client n =
local version of state n
...
Project p
State n
Server = Project Library
Figure 4.4: Interaction between the project library and your registered global data.
It is part of the information saved on disk for restoration in a later session.
It may be part of a selection which is consistent set of states. Which such a selection,
you can control on which states project operations are consistently applied (see Section 4.12.6). For example, it is possible to clear all the states which depend on the value
analysis' results.
It is possible to ensure inter-analysis consistency by setting state dependencies.
For
example,
if
the
entry
point
of
the
analysed
program
is
changed
(using
Globals.set_entry_point), all the results of analyses depending on it (like value analysis' results) are automatically reset. If such a reset was not performed, the results of
the value analysis would not be consistent anymore with the current entry point, leading
to incorrect results.
Example 4.24
Suppose that the value analysis has previously been computed.
Format. p r i n t f "% B@ ." (Db. Value . is_computed ());
G l o b a l s . s e t _ e n t r y _ p o i n t s "f" t r u e ;
Format. p r i n t f "% B@ ." (Db. Value . is_computed ());
(*
true
(*
false
*)
*)
As the value analysis has been automatically reset when setting the entry point, the above
code outputs
true
false
69
CHAPTER 4. ADVANCED PLUG-IN DEVELOPMENT
State Registration: Overview
For registering a new state, functor
State_builder.Register is provided.
Its use is described
in Section 4.12.4 but it is a low-level functor which is usually dicult to apply in a correct
way.
Higher-level functors are provided to the developer in modules
Cil_state_builder
State_builder
and
that allow the developer to register states in a simpler way. They inter-
State_builder provides state
builders for standard OCaml datastructures like hashtables whereas Cil_state_builder does
nally apply the low-level functor in the proper way. Module
6
the same for standard Cil datastructures (like hashtables indexed by AST statements) . They
are described in Section 4.12.3.
Registering a new state must be performed when the plugin is initialized.
OCaml
let module
Thus, using
construct to register the new state is forbidden (except if you really
know what you are doing).
4.12.3 Registering a New State
Here we explain how to register and use a state. Registration through the use of the low-level
functor
State_builder.Register is postponed in Section 4.12.4 because it is more tricky and
rarely useful.
In most non-Frama-C applications, a state is a global mutable value.
One can use it in to
store results of analyses. For example, using this mecanism inside Frama-C to create a
state
which would memoize some information attached to statements would result in the following
piece of codew.
open Cil_datatype
type i n f o = Kernel_function . t * Cil_types . v a r i n f o
l e t s t a t e : i n f o Stmt. Hashtbl . t = Stmt. Hashtbl . c r e a t e 97
l e t compute_info ( kf , v i ) = ...
l e t memoize s =
t r y Stmt. Hashtbl . f i n d s t a t e s
w i t h Not_found → Stmt. Hashtbl .add s t a t e s ( compute_info s )
l e t run () = ... !Db. Value . compute (); ... memoize some_stmt ...
However, if one puts this code inside Frama-C, it does not work because this state is not
registered as a Frama-C state.
For instance, it is never saved on the disk and its value is
never changed when setting the current project to a new one. For this purpose, one has to
transform the above code into the following one.
module S t a t e =
C i l _ s t a t e _ b u i l d e r . Stmt_hashtbl
( Datatype . P a i r ( K e r n e l _ f u n c t i o n )( Cil_datatype . V a r i n f o ))
( struct
l e t s i z e = 97
l e t name = " state "
l e t d e p e n d e n c i e s = [ Db. Value . s e l f ]
end )
l e t compute_info ( kf , v i ) = ...
l e t memoize = S t a t e .memo compute_info
l e t run () = ... !Db. Value . compute (); ... memoize some_stmt ...
A quick look on this code shows that the declaration of the state itself is more complicated
(it uses a functor application) but its use is simpler. Actually what has changed?
6
These datastructures are only mutable datastructures (like hashtables, arrays and references) because
global states are always mutable.
70
4.12. PROJECT MANAGEMENT SYSTEM
1. To declare a new internal state, apply one of the predened functors in modules
State_builder
Cil_state_builder (see interfaces of these modules for the list of
available modules). Here we use Cil_state_builder.Stmt_hashtbl which provides an
or
hashtable indexed by statements. The type of values associated to statements is a pair
of
Kernel_function.t
and
Cil_types.varinfo.
The rst argument of the functor is
then the datatype corresponding to this type (see Section 4.9.2). The second argument
provides some additional information: the initial size of the hashtable (an integer similar
to the argument of
Hashtbl.create),
an unique name for the resulting state and its
dependencies. This list of dependencies is built upon values
self which are called state
kind (or simply kind ) and are part of any state's module (part of the signature of the
low-level functor
State_builder.Register).
This value represents the state itself as
rst-class value (like type values for OCaml types, see Section 4.9.1).
2. From outside, a state actually hides its internal representation in order to ensure some
invariants: operations on states implementing hashtable does not take an hashtable in
argument because they implicitly use the hidden hashtable. In our example, a predened memo function is used in order to memoize the computation of
compute_info.
This memoization function implicitly operates on the hashtable hidden in the internal
representation of
State.
Postponed dependencies
Sometimes, you want to access to a state kind before dening it.
That is usually the case when you have two mutually-dependent states: the dependencies of
the rst one providing when registering it must contain the state kind of the second one which
is created by registering it. But this second registration also requires a list of dependencies
containing the rst state kind.
For solving this issue, it is possible to postpone the addition of a state kind to dependencies
until all modules have been initialized. However, dependencies must be correct before anything serious is computed by Frama-C. So the right way to do this is the use of the function
Cmdline.run_after_extended_stage
(see Section 4.14 for advanced explanation about the
way Frama-C is initialized).
Example 4.25
Plug-in
from
puts a reference to its state kind in the following way.
reference is initialized at module initialization time.
File src/kernel/db.mli
module From = s t r u c t
...
val s e l f : State . t r e f
end
File src/kernel/db.ml
module From = s t r u c t
...
v a l s e l f = r e f S t a t e .dummy
end
( * postponed * )
File src/from/functionwise.ml
module Tbl =
K e r n e l _ f u n c t i o n .Make_Table
( Function_Froms )
( struct
71
This
CHAPTER 4. ADVANCED PLUG-IN DEVELOPMENT
l e t name = " functionwise_from "
l e t s i z e = 97
l e t d e p e n d e n c i e s = [ Db. Value . s e l f ]
end )
l e t () =
( * performed at module
Db.From. s e l f ← Tbl . s e l f
Plug-in
pdg
uses
from
initialization
runtime .
*)
for computing its own internal state. So it declares this dependency as
follow.
File src/pdg/register.ml
module Tbl =
K e r n e l _ f u n c t i o n .Make_Table
(PdgTypes.Pdg)
( struct
l e t name = " Pdg . State "
l e t d e p e n d e n c i e s = [] ( *
postponed because
not
l e t s i z e = 97
exist
yet
!Db. From . s e l f may
*)
end )
l e t () =
Cmdline . run_after_extended_stage
( f u n () →
State_dependency_graph . add_codependencies
∼ onto : Tbl . s e l f
[ !Db.From. s e l f ])
Dependencies over the AST
AST of the current project.
Most internal states depend directly or indirectly on the
However, the AST plays a special role as a state.
can be changed in place bypassing the project mechanism.
Namely, it
In particular, it is possible to
add globals. Plugins that perform such changes should inform the kernel when they are done
using
Ast.mark_as_changed
or
Ast.mark_as_grown.
The latter must be used when the only
changes are additions, leaving existing nodes untouched, while the former must be used for
more intrusive changes. In addition, it is possible to tell the kernel that a state is monotonic
with respect to AST changes, in the sense that it does not need to be cleared when nodes
are added (the information that should be associated to the new nodes will be computed as
needed).
Ast.add_monotonic_state. Ast.mark_as_grown
Ast.mark_as_changed will clear it.
This is done with the function
will not touch such state, while
4.12.4 Direct Use of Low-level Functor State_builder.Register
Functor
State_builder.Register
is the only functor which really registers a state. All the
others internally use it. In some cases (e.g. if you dene your own mutable record used as a
state), you have to use it. Actually, in the Frama-C kernel, there is only three direct uses of
this functor over thousands state registrations: so you will certainly never use it.
This functor takes three arguments. The rst and the third ones respectively correspond to
the datatype and to information (name and dependencies) of the states: they are similar to
the corresponding arguments of the high-level functors (see Section 4.12.3).
The second argument explains how to handle the local version of the state under registration.
Indeed here is the key point: from the outside, only this local version is used for eciency
purpose (remember Figure 4.4). It would work even if projects do not exist. Each project
knows a global version .
The project management system automatically switches the local
version when the current project changes in order to conserve a physical equality between
72
4.12. PROJECT MANAGEMENT SYSTEM
local version and current global version. So, for this purpose, the second argument provides a
t (type of values of the state) and ve functions create (creation of a new fresh state),
clear (cleaning a state), get (getting a state), set (setting a state) and clear_some_projects
(how to clear each value of type project in the state if any).
type
7
The following invariants must hold:
create () returns a fresh value
∀p of type t, create () = (clear p; set p; get ())
∀p of type t, copy p returns a fresh value
∀p1, p2 of type t such that p1 != p2, (set p1; get ()) != p2
(4.1)
(4.2)
(4.3)
(4.4)
Invariant 4.1 ensures that there is no sharing with any value of a same state: so each new
project has got its own fresh state. Invariant 4.2 ensures that cleaning a state resets it to its
initial value. Invariant 4.3 ensures that there is no sharing with any copy. Invariant 4.4 is a
local independence criteria which ensures that modifying a local version does not aect any
other version (dierent of the global current one) by side-eect.
Example 4.26
To illustrate this, we show how functor
State_builder.Ref
(registering a
state corresponding to a reference) is implemented.
module Ref
(Data: Datatype .S)
( I n f o : s i g i n c l u d e I n f o v a l d e f a u l t : u n i t → Data. t end ) =
struct
t y p e data = Data. t
l e t c r e a t e () = r e f I n f o . d e f a u l t
l e t s t a t e = r e f ( c r e a t e ())
Here we use an additional reference: our local version is a reference on the right value. We
can use it in order to safely and easily implement
get
and
set
required by the registration.
include Register
( Datatype . Ref (Data ))
( struct
t y p e t = data r e f ( * we r e g i s t e r a r e f e r e n c e on the given type * )
l e t create = create
l e t clear tbl = tbl ← Info . default
l e t g e t () = ! s t a t e
l e t set x = state ← x
l e t clear_some_projects f x =
i f Data. mem_project f !x t h e n begin c l e a r x; t r u e end e l s e f a l s e
end )
( Info )
For users of this module, we export standard operations which hide the local indirection
required by the project management system.
l e t set v = ! state ← v
l e t g e t () = !(! s t a t e )
l e t c l e a r () = ! s t a t e ← I n f o . d e f a u l t
end
As you can see, the above implementation is error prone; in particular it uses a double indirection (reference of reference). So be happy that higher-level functors like
State_builder.Ref
are provided which hide you such implementations.
7
As usual in OCaml,
=
stands for structural equality while
disequality).
73
==
(resp.
!=)
stands for physical equality (resp.
CHAPTER 4. ADVANCED PLUG-IN DEVELOPMENT
4.12.5 Using Projects
As said before, all operations are done by default on the current project. But sometimes plugin developers have to explicitly use another project, for example when the AST is modied
(usually through the use of a copy visitor, see Section 4.16) or replaced (e.g. if a new one is
loaded from disk).
An
AST
quired,
must
never
be
modied
inside
a
project.
If
such
an
operation
is
re-
you must either create a new project with a new AST, usually by using
File.init_project_from_cil_file
or
File.init_project_from_visitor;
or write the
following line of code (see Section 4.12.6):
let selection = State_selection.only_dependencies Ast.self in
Project.clear ~selection ()
Operations over projects are grouped together in module
Project.t.
Function
Project.set_current
Project.
A project has type
sets the current project on which all operations
are implicitly performed on the new current project.
Example 4.27
Frama-C session
Suppose that you saved the current project into le
8 thanks to the following instruction.
foo.sav
in a previous
P r o j e c t . s a v e " foo . sav "
In a new Frama-C session, executing the following lines of code (assuming the value analysis
has never been computed previously)
l e t print_computed () = Format. p r i n t f "% b@ ." (Db. Value . is_computed ()) i n
print_computed ();
(* f a l s e *)
l e t o l d = P r o j e c t . c u r r e n t () i n
try
l e t f o o = P r o j e c t . l o a d ∼name:" foo " " foo . sav " i n
Project . set_current foo ;
!Db. Value . compute ();
print_computed ();
( * true * )
Project . set_current old ;
print_computed ()
(* f a l s e *)
w i t h P r o j e c t . IOError _ →
K e r n e l . a b o r t " error while loading "
displays
false
true
false
This example shows that the value analysis has been computed only in project
project
old.
An important invariant of Frama-C is: if
then
p
foo
and not in
p is the current project before running an analysis,
will be the current project after running it. It is the responsability of any plug-in
developer to enforce this invariant for its own analysis.
To be sure to enforce the above-mentioned invariant, the project library provides an alternative
to the use of
Project.set_current: Project.on
applies an operation on a given project
without changing the current project (i.e. locally switch the current project in order to apply
the given operation and, after, restore the initial context).
8
A session is one execution of Frama-C (through
frama-c
74
or
frama-c-gui).
4.13. COMMAND LINE OPTIONS
Example 4.28
The following code is equivalent to the one given in Example 4.27.
l e t print_computed () = Format. p r i n t f "% b@ ." (Db. Value . is_computed ()) i n
print_computed ();
(* f a l s e *)
try
l e t f o o = P r o j e c t . l o a d ∼name:" foo " " foo . sav " i n
P r o j e c t .on f o o
( f u n () → !Db. Value . compute (); print_computed () ( * true * ) ) ();
print_computed ()
(* f a l s e *)
w i t h P r o j e c t . IOError _ →
exit 1
It displays
false
true
false
4.12.6 Selections
Project.clear or Project.on) have an
State_selection.t. This parameter allows the de-
Most operations working on a single project (e.g.
optional parameter
selection
of type
veloper to specify on which states the operation applies. A selection is a set of states which
allows the developer to consistently handle state dependencies.
Example 4.29
The following statement clears all the results of the value analysis and all its
dependencies in the current project.
l e t s e l e c t i o n = S t a t e _ s e l e c t i o n . w it h_ de pe nd en ci e s Db. Value . s e l f i n
P r o j e c t . c l e a r ∼ s e l e c t i o n ()
The selection explicitly indicates that we also want to clear all the states which depend on the
value analysis' results.
Use selections carefully: if you apply a function
which does not belong to
Example 4.30
s,
f
on a selection
s
and
f
handles a state
then the computed result by Frama-C is potentially incorrect.
The following statement applies a function
f
in the project
p
(which is not
the current one). For eciency purpose, we restrict the considered states to the command
line options (see Section 4.13).
P r o j e c t .on
∼selection
:( Parameter \ _ s t a t e . g e t _ s e l e c t i o n ()) p f ()
This statement only works if
f
only handles values of the command line options. If it tries to
get the value of another state, the result is unspecied and all actions using any state of the
current project and of project
p
also become unspecied.
4.13 Command Line Options
Prerequisite:
knowledge of the OCaml module system.
Values associated with command line options are called parameters . The parameters of the
Frama-C kernel are stored in module
Kernel while the plug-in specic ones have to be dened
in the plug-in source code.
75
CHAPTER 4. ADVANCED PLUG-IN DEVELOPMENT
4.13.1 Denition
In Frama-C, a parameter is represented by a value of type
module implementing the signature
Parameter_sig.S.
Typed_parameter.t
and by a
The rst representation is a low-level
one required by emitters (see Section 4.17) and the GUI. The second one provides a highlevel API: each parameter is indeed a state (see Section 4.12.2). Several signatures extending
Parameter_sig.S are provided in order to deal with the usual parameter types. For example,
there are signatures Parameter_sig.Int and Parameter_sig.Bool for integer and boolean
parameters.
Mostly, these signatures provide getters and setters for modifying parameter
values.
Implementing such an interface is very easy thanks to a set of functors provided by the output
Plugin.Register.
module of
Indeed, you have just to choose the right functor according to
your option type and eventually the wished default value. Below are some examples of such
functors (see the signature
1.
False
2.
Int
3.
4.
(resp.
(resp.
True)
Zero)
Parameter_sig.Builder
for an exhaustive list).
builds a boolean option initialized to
false
(resp.
true).
builds an integer option initialized to a specied value (resp. to
0).
String (resp. EmptyString ) builds a string option initialized to a specied value (resp.
to the empty string "").
StringSet builds an option taking a set of strings in argument (initialized to the empty
set).
Each functor takes as argument (at least) the name of the command line option corresponding
to the parameter and a short description for this option.
Example 4.31
occurrence
-occurrence of the plug-in
src/occurrence/options.ml). It is
The parameter corresponding to the option
is the module
Print
(dened in the le
implemented as follow.
module P r i n t =
False
( struct
l e t option_name = " - occurrence "
l e t h e l p = " print results of occurrence analysis "
end )
So it is a boolean parameter initialized by default to
false.
The declared interface for this
module is simply
module P r i n t : Parameter_sig . I n t
-impact-pragma of
impact. This parameter is dened by the module Pragma (dened in the
src/impact/options.ml). It is implemented as follow.
Another example is the parameter corresponding to the option
the
plug-in
le
module Pragma =
StringSet
( struct
l e t option_name = " - impact - pragma "
l e t arg_name = " f1 , ... , fn "
l e t h e l p = " use the impact pragmas in the code of functions f1 ,... , fn "
end )
76
4.13. COMMAND LINE OPTIONS
So it is a set of strings initialized by default to the empty set. Frama-C uses the eld
in order to print the name of the argument when displaying help. The eld
help
arg_name
is the help
message itself. The Interface for this module is simple:
module Pragma: Parameter_sig . S t r i n g _ s e t
Recommendation 4.3
called
plugin should belong to a module
Plugin_parameters inside the plug-in di-
Parameters of a same plug-in
Options, Plugin_options, Parameters
or
rectory.
Using a kernel parameters or a parameter of your own plug-in is very simple: you have simply
to call the function
Example 4.32
get
corresponding to your parameter.
To know whether Frama-C uses unicode, just write
K e r n e l . Unicode . g e t ()
Inside the plug-in
From,
just write
From_parameters . F o r c e C a l l D e p s . g e t ()
in order to know whether callsite-wise dependencies have been required.
Using
a
parameter
Dynamic.Parameter:
of
a
plug-in
p
in
another
plug-in
p0
requires
the
use
of
module
since the module dening the parameter is not visible from the out-
p in which p's parameters
Dynamic.Parameter denes
side of its plug-in, you have to use the dynamic API of plug-in
are automatically registered (see Section 4.10.3).
The module
sub-modules which provide easy access to parameters according to their OCaml types.
Example 4.33
Outside the plug-in
From,
just write
Dynamic. Parameter . Bool . g e t " - calldeps " ()
in order to know whether callsite-wise dependencies have been required.
4.13.2 Tuning
It is possible to modify the default behavior of command line options in several ways by
applying functions just before or just after applying the functor dening the corresponding
parameter.
Functions which can be applied afterwards are dened in the output signature of the applied
functor.
Example 4.34
the interval
Here is how the option "-slicing-level" restricts the range of its argument to
[0; 3].
module C a l l s =
Int
( struct
l e t option_name = " - slicing - level "
let default = 2
l e t arg_name = ""
l e t h e l p = " ... " ( * skipped here * )
end )
l e t () = C a l l s . s et _ r an g e ∼min:0 ∼max:3
77
CHAPTER 4. ADVANCED PLUG-IN DEVELOPMENT
Functions which can be applied before applying the functor are dened in the module
Parameter_customize.
Example 4.35
Here is how the opposite of option "-safe-arrays" is renamed into "-unsafe-
arrays" (otherwise, by default, it would be "-no-safe-arrays").
l e t () = Parameter_customize . set_negative_option_name " - unsafe - arrays "
module S a f e A r r a y s =
True
( struct
l e t module_name = " SafeArrays "
l e t option_name = " - safe - arrays "
l e t h e l p = " for arrays that are fields inside structs , assume that \
a c c e s s e s are in bounds "
end )
4.14 Initialization Steps
Prerequisite:
knowledge of linking of OCaml les.
In a standard way, Frama-C modules are initialized in the link order which remains mostly
unspecied, so you have to use side-eects at module initialization time carefully.
This section details the dierent stages of the Frama-C boot process to help advanced plug-in
developers interact more deeply with the kernel process. It can be also useful for debugging
initialization problems.
As a general rule, plug-in routines must never be executed at link time. Any useful code, be
it for registration, conguration or C-code analysis, should be registered as function hooks to
be executed at a proper time during the Frama-C boot process. In general, registering and
executing a hook is tightly coupled with handling the command line parameters.
The parsing of the command line parameters is performed in several phases and stages , each
one dedicated to specic operations. For instance, journal replays should be performed after
loading dynamic plug-ins, and so on. Following the general rule stated at the beginning of
this section, even the kernel services of Frama-C are internally registered as hooks routines to
be executed at a specic stage of the initialization process, among plug-ins ones.
From
the
plug-in
developer
point
of
view,
the
hooks
are
registered
by
calling
the
run_after_xxx_stage routines in Cmdline module and extend routine in the Db.Main module.
The initialization phases and stages of Frama-C are described below, in their execution order.
A The Initialization Stage:
this stage initializes Frama-C compilation units, following
some partially specied order. More precisely:
1. the architecture dependencies depicted on Figure 3.1 (cf. p. 33) are respected.
In
particular, the kernel services are linked rst, then the kernel integrated types for
plug-ins, and nally the plug-ins are linked in unspecied order;
2. when the GUI is present, for any plug-in
before the gui modules of
3. nally, the module
Boot
p, the non-gui modules of p are always linked
p;
is linked at the very end of this stage.
78
4.14. INITIALIZATION STEPS
Plug-in developers can not customize this stage. In particular, the module
Cmdline (one
of the rst linked modules, see Figure 3.1) performs a very early conguration stage,
such as checking if journalization has to be activated (cf. Section 4.11), or setting the
global verbosity and debugging levels.
B The Early Stage:
(a) rst,
the
this stage initializes the kernel services. More precisely:
journal
-journal-name)
name
is
set
to
its
right
value
(according
to
the
option
and the default project is created;
(b) then, the parsing of command line options registered for the
(c) nally, all functions registered through
Cmdline.Early
Cmdline.run_after_early_stage
stage;
are exe-
cuted in an unspecied order.
C The Extending Stage:
the searching and loading of dynamically linked plug-ins, of
journal, scripts and modules is performed at this stage. More precisely:
(a) the command line options registered for the
such as
-load-script
and
-add-path;
(b) the hooks registered through
Cmdline.Extending
stage are treated,
Cmdline.run_during_extending_stage
are executed.
Such hooks include kernel function calls for searching, loading and linking the various
plug-ins, journal and scripts compilation units, with respect to the command line
options parsed during stages B and C.
D The Running Phase:
the command line is split into several groups of command line
arguments, each of them separated by an option
if there is
n
-then or -then-on p,
occurrences of
-then
or an option
then there are
n+1
-then-on p
(thus
groups). For each
group, the following stages are executed in sequence: all the stages are executed on the
rst group provided on the command line, then they are executed on the second group,
and so on.
1.
The Extended Stage:
this step is reserved for commands which require that all
plug-ins are loaded but which must be executed very early. More precisely:
Cmdline.Extended stage are treated,
-debug-*;
through Cmdline.run_after_extended_stage.
Most of
(a) the command line options registered for the
such as
-verbose-*
and
(b) the hooks registered
these registered hooks come from postponed internal-state dependencies (see Section 4.12.3).
Remark that both statically and dynamically linked plug-ins have been loaded at this
stage. Verbosity and debug level for each plug-in are determined during this stage.
2.
The Exiting Stage:
this step is reserved for commands that makes Frama-C exit
before starting any analysis at all, such as printing help informations:
Cmdline.Exiting stage are treated;
the hooks registered through Cmdline.run_after_exiting_stage are executed in
an unspecied order. All these functions should do nothing (using Cmdline.nop)
or raise Cmdline.Exit for stopping Frama-C quickly.
(a) the command line options registered for the
(b)
3.
The Loading Stage:
another one.
this is where the initial state of Frama-C can be replaced by
Typically, it would be loaded from disk through the
-load
option or
computed by running a journal (see Section 4.11). As like as for the other stages:
79
CHAPTER 4. ADVANCED PLUG-IN DEVELOPMENT
(a) rst, the command line options registered for the
Cmdline.Loading
stage are
treated;
Cmdline.run_after_loading_stage
(b) then, the hooks registered through
are ex-
ecuted in an unspecied order. These functions actually change the initial state
of Frama-C with the specied one. The Frama-C kernel veries as far as possible
that only one new-initial state has been specied.
Normally, plug-ins should never register hooks for this stage unless they actually set
a dierent initial states than the default one. In such a case:
They must call the function
4.
The Conguring Stage:
Cmdline.is_going_to_load
while initializing.
this is the usual place for plug-ins to perform special
initialization routines if necessary, before having their main entry points executed. As
for previous stages:
(a) rst, the command line options registered for the
Cmdline.Configuring stage are
treated. Command line parameters that do not begin by an hyphen (character
'-') are not
options and are treated as C les. Thus they are added to the list of
AST (on demand);
Cmdline.run_after_configuring_stage
les to be preprocessed or parsed for building the
(b) then, the hooks registered through
are
executed in an unspecied order.
5.
The Setting Files Stage:
this stage sets the C les to analyze according to those
indicated on the command line. More precisely:
(a) rst, each argument of the command line which does not begin by an hyphen
(character
'-')
is registered for later analysis;
(b) then, the hooks registered through
Cmdline.run_after_setting_files
are exe-
cuted in an unspecied order.
6.
The Main Stage:
registered through
this is the step where plug-ins actually run their main entry points
Db.Main.extend.
For all intents and purposes, you should consider
that this stage is the one where these hooks are executed.
4.15 Customizing the AST creation
Prerequisite:
None
Plug-ins may modify the way source les are transformed into the AST over which the analyses
are performed. Customization of the front-end of Frama-C can be done at several stages.
A Parsing:
this stage takes care of converting an individual source le into a parsed AST
(a.k.a Cabs, which diers from the type-checked AST on which most analyses operate).
By default, source les are treated as C les, possibly needing a pre-processing phase.
It is possible to tell Frama-C to use another parser for les ending with a given sux
by registering this parser with the
.c
File.new_file_type
function. Suxes
.h, .i
and
are reserved for Frama-C kernel. The registered parser is supposed to return a pair
consisting of a type-checked AST (Cil_types.file) and a parsed AST (Cabs.file). The
former can be obtained from the latter with the
guarantees that the resulting
Cil_types.file
Frama-C kernel.
80
Cabs2cil.convFile
function, which
respects all invariants expected by the
4.16. VISITORS
B Type-checking:
a normal
Cabs.file (i.e.
not obtained through a custom parsing func-
tion) can be transformed before being type-checked. Transformation hooks are registered
through
C Frontc.add_syntactic_transformation.
After linking:
Once all source les have been processed, they are all linked together in
a single AST. Transformations can be performed on the resulting AST at two stages:
1. before clean-up (i.e. removal of useless temporary variables and prototypes that are
never called). At that stage, global tables indexing information related to the AST
(see gure 5.4) have not yet been lled.
2. after clean-up. At this stage, index tables are lled, and can thus be used. On the
other hand, the transformation must take care itself of keeping in sync the AST and
the tables
Registering
a
transformation
for
this
stage
is
done
through
the
func-
File.add_code_transformation_before_cleanup
(respectively
File.add_code_transformation_after_cleanup). If such a transformation modify the control-ow graph of a function f, in particular by adding statements, it must
call File.must_recompute_cfg, in order to have the graph recomputed afterwards.
tion
4.16 Visitors
Prerequisite:
knowledge of OCaml object programming.
Cil oers a visitor,
Cil.cilVisitor
that allows to traverse (parts of ) an AST. It is a class
with one method per type of the AST, whose default behavior is simply to call the method
corresponding to its children.
This is a convenient way to perform local transformations
Cil_types.file
by inheriting from it and redening a few methods. However,
over a whole
the original Cil visitor is of course not aware of the internal state of Frama-C itself. Hence,
there exists another visitor,
Visitor.generic_frama_c_visitor,
which handles projects in
a transparent way for the user. There are very few cases where the plain Cil visitor should be
used.
Basically, as soon as the initial project has been built from the C source les (i.e. one of
the functions
File.init_∗
has been applied), only the Frama-C visitor should occur.
There are a few dierences between the two (the Frama-C visitor inherits from the Cil one).
These dierences are summarized in Section 4.16.6, which the reader already familiar with Cil
is invited to read carefully.
4.16.1 Entry Points
Cil oers various entry points for the visitor. They are functions called
Cil.visitCilAstType
where astType is a node type in the Cil's AST. Such a function takes as argument an instance of a
cilVisitor
and an astType and gives back an astType transformed according to
Cil_types.file (Cil.visitCilFileCopy,
Cil.visitCilFile and visitCilFileSameGlobals) are slightly dierent and do not support
all kinds of visitors. See the documentation attached to them in cil.mli for more details.
the visitor. The entry points for visiting a whole
81
CHAPTER 4. ADVANCED PLUG-IN DEVELOPMENT
4.16.2 Methods
As
said
logic
has
above,
annotation).
list
describes
is
For
a
a
method
given
for
each
astType,
type
visitAction,
astType →astType'
type
Type
is
there
presented
should
in
the
be
next
done
for
the
astType'
global
the
children
In
addition,
section.
in
Cil
AST
(including
9
the method is called vastType ,
where
(for instance, one can transform a
what
type
is
astType
either
the
some
resulting
types
AST
have
and
ast-
visitAction
into several ones).
of
or
for
node,
two
and
modes
of
the declaration and one for use.
This is the case for varinfo
vvrbl), logic_var (vlogic_var_decl and vlogic_var_use) logic_info
(vlogic_info_decl and vlogic_info_use), logic_type_info (vlogic_type_info_decl
and
vlogic_type_info_use), and logic_ctor_info (vlogic_ctor_info_decl and
vlogic_ctor_info_use). More detailed information can be found in cil.mli.
visit:
one
(vvdec
for
and
For the Frama-C visitor, two methods,
vstmt
and
vglob
take care of maintaining the
coherence between the transformed AST and the internal state of Frama-C . Thus they
vstmt_aux
must not be redened. One should redene
and
vglob_aux
instead.
4.16.3 Action Performed
The return value of visiting methods indicates what should be done next.
There are six
possibilities:
SkipChildren
the visitor does not visit the children;
ChangeTo v
the old node is replaced by
DoChildren
the visit goes on with the children; this is the default behavior;
JustCopy
v
and the visit stops;
is only meaningful for the copy visitor. Indicates that the visit should go on
with the children, but only perform a fresh copy of the nodes
ChangeToPost(v,f)
the old node is replaced by
v,
case of
vglob_aux, f
v
will be applied to
f is applied to
ChangeTo(f(v)).
and
is however not exactly the same thing as returning
the result. This
Namely, in the
only after the operations needed to maintain
the consistency of Frama-C's internal state with respect to the AST have been performed. Thus,
ChangeToPost
should be used with extreme caution, as
f
could break
some invariants of the kernel.
DoChildrenPost f
JustCopyPost(f)
visit the children and apply the given function to the result.
is only meaningful for the copy visitor. Performs a fresh copy of the
nodes and all its children and applies
f
to the copy.
ChangeDoChildrenPost(v,f) the old node is replaced by v, the visit goes on with the
children of v, and when it is nished, f is applied to the result. In the case of vstmt_aux,
f is called after the annotations in the annotations table have been visited, but before
they are attached to the new statement, that is, they will be added to the result of
f.
9
Similarly,
vglob_aux
will consider the result of
This naming convention is not strictly enforced.
voffs.
f
when lling the table of globals.
For instance the method corresponding to
82
offset
is
4.16. VISITORS
ChangeDoChildrenPost(x,f) where x is the current node is not equivalent
DoChildrenPost f, as in the latter case, the visitor mechanism knows that it still
Note that
to
deals with the original node.
4.16.4 Visitors and Projects
Copy visitors (see next section) implicitly take an additional argument, which is the project
in which the transformed AST should be put in.
Note that the tables of the new project are not lled immediately. Instead, actions are queued,
Cil_types.file has been visited. One can access the queue with
get_filling_actions method, and perform the associated actions on the new project
with the fill_global_tables method.
and performed when a whole
the
In-place visitors always operate on the current project (otherwise, two projects would risk
sharing the same AST).
4.16.5 In-place and Copy Visitors
The
visitors
take
inplace_visit
as
and
argument
copy_visit.
a
visitor_behavior,
which
comes
in
two
avors:
In the in-place mode, nodes are visited in place, while
in the copy mode, nodes are copied and the visit is done on the copy. For the nodes shared
across the AST (varinfo, compinfo, enuminfo, typeinfo, stmt, logic_var, logic_info and
fieldinfo), sharing is of course preserved, and the mapping between the old nodes and their
copy can be manipulated explicitly through the following functions:
reset_behavior_name
get_original_name
resets the mapping corresponding to the type name.
gets the original value corresponding to a copy (and behaves as
the identity if the given value is not known).
get_name
gets the copy corresponding to an old value. If the given value is not known,
it behaves as the identity.
set_name
sets a copy for a given value. Be sure to use it before any occurrence of the
old value has been copied, or sharing will be lost.
get_original_name
AST nodes.
functions allow to retrieve additional information tied to the original
Its result must not be modied in place (this would defeat the purpose of
operating on a copy to leave the original AST untouched). Moreover, note that whenever
the index used for name is modied in the copy, the internal state of the visitor behavior
must be updated accordingly (via the
set_name
give correct results.
The list of such indices is given Figure 4.5.
83
function) for
get_original_name
to
CHAPTER 4. ADVANCED PLUG-IN DEVELOPMENT
Type
Index
varinfo
compinfo
enuminfo
typeinfo
stmt
logic_info
logic_var
fieldinfo
vid
ckey
ename
tname
sid
l_var_info.lv_id
lv_id
fname and fcomp.ckey
Figure 4.5: Indices of AST nodes.
SkipChildren
Last, when using a copy visitor, the actions (see previous section)
ChangeTo
must be used with care, i.e.
and
one has to ensure that the children are fresh.
Otherwise, the new AST will share some nodes with the old one.
Even worse, in such
a situation the new AST might very well be left in an inconsistent state, with uses of
shared node (e.g. a
varinfo
for a function
in a function call) which do not match the
f).
JustCopy instead
ChangeDoChildrenPost(x,fun x -> x) instead of ChangeTo(x).
corresponding declaration (e.g the
When in doubt,
GFun
f
denition of
a safe solution is to use
of
SkipChildren
and
4.16.6 Dierences Between the Cil and Frama-C Visitors
As said in Section 4.16.2,
vglob_aux
instead.
vstmt
and
vglob
should not be redened.
vstmt_aux
and
Be aware that the entries corresponding to statements and globals in
Frama-C tables are considered more or less as children of the node.
method returns
Use
ChangeTo
In particular, if the
action (see Section 4.16.3), it is assumed that it has taken care
file from a
SkipChildren
of updating the tables accordingly, which can be a little tricky when copying a
project to another one. Prefer
ChangeDoChildrenPost.
On the other hand, a
action implies that the visit will stop, but the information associated to the old value will be
associated to the new one. If the children are to be visited, it is undened whether the table
entries are visited before or after the children in the AST.
4.16.7 Example
Here is a small copy visitor that adds an assertion for each division in the program, stating
that the divisor is not zero:
open C i l _ t y p e s
open C i l
module M = P l u g i n . R e g i s t e r
( * Each annotation
We c r e a t e
annotations ,
line
i n Frama−C has an emitter ,
thus our own,
and that
and says
these
that
it
for
will
traceability .
only be used to emit code
annotations do not depend on Frama−C' s command
parameters .
*)
l e t syntax_alarm =
Emitter . c r e a t e
" Syntactic check " [ Emitter .Code_annot ]
84
∼correctness
:[]
∼ t u n i n g :[]
4.17. LOGICAL ANNOTATIONS
c l a s s non_zero_divisor p r j = o b j e c t ( s e l f )
i n h e r i t V i s i t o r . generic_frama_c_visitor ( Cil . copy_visit prj )
(* A d i v i s i o n
is
an e xp re ss io n : we o v e r r i d e
the vexpr method * )
method vexpr e = match e . enode w i t h
| BinOp(( Div |Mod), _, denom, _) →
l e t logic_denom = L o g i c _ u t i l s . expr_to_term ∼ c a s t : t r u e denom i n
l e t a s s e r t i o n = Logic_const . p r e l (Rneq, logic_denom , C i l . l z e r o ()) i n
( * At t h i s
to
point , we have
attach
it
information
the
the
of
built
correct
the
a s s e r t i o n we want to
statement . The
cil
o f which statement and f u n c t i o n
[ current_stmt ]
outside
let
|
|
in
let
to
and
[ current_kf ]
a statement or a f u n c t i o n
declaration .
Here ,
it
necessarily
are
methods ,
,
insert .
visitor
stmt = match s e l f # c u r r e n t _ k i n s t r w i t h
Kglobal → a s s e r t f a l s e
Kstmt s → s
remains
currently
visited
in
which return None when
e . g . when v i s i t i n g
returns
It
maintains the
[ Some ] .
a
global
*)
kf = Extlib . the s e l f # current_kf i n
( * The above statement and f u n c t i o n
need to
attach
function
statement
one
of
of
are
the new a s s e r t i o n
the new p r o j e c t .
( function )
of
the
the new p r o j e c t .
to
Cil
related
to
the
original
p r o j e c t . We
the corresponding statement and
provides
original
functions
project
to
to
convert a
the corresponding
*)
l e t new_stmt = get_stmt s e l f # b e h a v i o r stmt i n
l e t new_kf = g e t _ k e r n e l _ f u n c t i o n s e l f # b e h a v i o r k f i n
(*
Since we are copying the
the annotation
into
the
p r o j e c t . To avoid the
all
file
i n a new p r o j e c t , we cannot
current
cost
of
table ,
switching
o p e r a t i o n s on the new p r o j e c t
visit ,
as mentioned above .
but i n
This
projects
are queued
is
done i n
Queue.add
( f u n () →
A n n o t a t i o n s . add_a ssert syntax_alarm
s e l f # get_filling_actions ;
DoChildren
| _ → DoChildren
the
table
the end o f
following
∼ k f :new_kf
the new
back and f o r t h ,
until
the
insert
of
the
statement .
*)
new_stmt a s s e r t i o n )
end
( * This
the
function
creates
annotations
a new p r o j e c t
related
to
initialized
division .
with the
current
file
plus
*)
l e t c r e a t e _ s y n t a c t i c _ c h e c k _ p r o j e c t () =
ignore
( F i l e . c r e a t e _ p r o j e c t _ f r o m _ v i s i t o r " syntactic check " (new n o n _ z e r o _ d i v i s o r ))
l e t () = Db.Main. extend c r e a t e _ s y n t a c t i c _ c h e c k _ p r o j e c t
4.17 Logical Annotations
Prerequisite:
Nothing special (apart of core OCaml programming).
Logical annotations set by the users in the analyzed C program are part of the AST. However
others annotations (those generated by plug-ins) are not directly in the AST because it would
contradict the rule an AST must never be modied inside a project (see Section 4.12.5).
So all the logical annotations (including those set by the users) are put in global projectied
tables maintained up-to-date by the Frama-C kernel. Anytime a plug-in wants either to access
to or to add/delete an annotation, it must use the corresponding modules or functions and not
the annotations directly stored in the AST. These modules and functions are the following.
Module
Annotations
which contains the database of annotations related to the AST
(global annotations, function constracts and code annotations). Adding or deleting an
annotation requires to dene an emitter by
85
Emitter.create
rst.
CHAPTER 4. ADVANCED PLUG-IN DEVELOPMENT
Module
Property_status
of logical properties.
Emitter.create
should be used to get or to modify the validity status
Modifying a property status requires to dene an emitter by
rst. Key concepts and theoretical foundation of this module are de-
scribed in an associated research paper [6].
Module
Property
provides access to all logical properties on which property statuses
can be emitted. In particular, an ACSL annotation has to be converted into a property
if you want to access its property statuses.
Modules
Logic_const, Logic_utils
and
Db.Properties
contain several operations
over annotations.
4.18 Locations
Prerequisite:
Nothing special (apart of core OCaml programming).
In Frama-C, dierent representations of C locations exist. Section 4.18.1 presents them. Moreover, maps indexed by locations are also provided. Section 4.18.2 introduces them.
4.18.1 Representations
There are four dierent representations of C locations. Actually only three are really relevant.
Locations.
src/memory_state/locations.mli
All of them are dened in module
They are introduced below. See the documen-
tation of
for details about the provided operations on
these types.
Location_Bytes.t is used to represent values of C expressions like 2 or ((int)
&a) + 13. With this representation, there is no way to know the size of a value while
Type
it is still possible to join two values. Roughly speaking it is represented by a mapping
between C variables and osets in bytes.
Type
location,
equivalently
Location.t
aectation (including bitelds).
is used to represent the right part of a C
It is represented by a
Location_Bits.t
(see below)
attached to a size. It is possible to join two locations if and only if they have the same
sizes.
Type
Location_Bits.t
is similar to
Location_Bytes.t
with osets in bits instead of
bytes. Actually it should only be used inside a location.
Type
Zone.t is a set of bits (without any specic order).
It is possible to join two zones
even if they have dierent sizes.
Recommendation 4.4
Roughly speaking, locations and zones have the same purpose. You
should use locations as soon as you have no need to join locations of dierent sizes. If you
require to convert locations to zones, use the function
Locations.enumerate_valid_bits.
As join operators are provided for these types, they can be easily used in abstract interpretation analyses (which can themselves be implemented thanks to one of functors of module
Dataflow2,
see Section 5.1.1).
86
4.19. GUI EXTENSION
4.18.2 Map Indexed by Locations
Modules
Lmap
and
Lmap_bitwise
provide functors implementing maps indexed by locations
and zones (respectively). The argument of these functors have to implement values attached
to indices (resp. locations or zones).
These implementations are quite more complex than simple maps because they automatically
handle overlaps of locations (or zones).
So such implementations actually require that the
structures implementing the values attached to indices are at least semi-lattices; see the
corresponding signatures in module
Lattice_type.
For this purpose, functors of the abstract
interpretation toolbox can help (see in particular module
Abstract_interp).
4.19 GUI Extension
Prerequisite:
knowledge of Lablgtk2.
Each plug-in can extend the Frama-C graphical user interface (aka GUI ) in order to
support
its
own
functionalities
in
the
Frama-C
viewer.
For
this
purpose,
a
plug-in
Design.main_window_extension_points
→ unit thanks to Design.register_extension.
The
input
value
of
type
Design.main_window_extension_points is an object corresponding to the main win-
developer
dow
of
has
the
to
register
Frama-C
GUI.
a
function
It
of
provides
type
accesses
GUI and to several plug-in extension points.
Design.main_window_extension_points
to
the
main
widgets
of
the
Frama-C
The documentation of the class type
is accessible through the source documentation
(see Section 4.20).
The GUI plug-in code has to be put in separate les into the plug-in directory. Furthermore,
in the
Makefile,
the variable
PLUGIN_GUI_CMO
has to be set in order to compile the GUI
plug-in code (see Section 5.3.3).
Besides time-consuming computations have to call the function
!Db.progress
from time to
time in order to keep the GUI reactive.
The GUI implementation uses Lablgtk2 [12]: you can use any Lablgtk2-compatible code in
your gui extension.
A complete example of a GUI extension may be found in the plug-in
Occurrence
src/occurrence/register_gui.ml).
(see le
Potential issues
gets.
All the GUI plug-in extensions share the same window and same wid-
So conicts can occur, especially if you specify some attributes on a predened
object. For example, if a plug-in wants to highlight a statement
one wants to highlight
s
s
in yellow and another
in red at the same time, the behavior is not specied but it could
be quite dicult to understand for an user.
4.20 Documentation
Prerequisite:
knowledge of ocamldoc.
Here we present some hints on the way to document your plug-in. First Section 4.20.1 introduces a quick general overview about the documentation process.
Next Section 4.20.2
focuses on the plug-in source documentation. Finally Section 4.20.3 explains how to modify
the Frama-C website.
87
CHAPTER 4. ADVANCED PLUG-IN DEVELOPMENT
4.20.1 General Overview
Command
make doc
produces the whole Frama-C source documentation in HTML format.
The generated index le is
doc/index.html
doc/code/html/index.html.
A more general purpose index is
(from which the previous index is accessible).
make doc-kernel only generates the kernel documentation (i.e. Frama-C without any plug-in) while make $(PLUGIN_NAME)_DOC (by
substituting the right value for $(PLUGIN_NAME)) generates the documentation for a single
The previous command takes times. So command
plug-in.
4.20.2 Source Documentation
Each plug-in should be properly documented. Frama-C uses ocamldoc and so you can write
any valid ocamldoc comments.
ocamldoc
tags for
The tag
Frama-C
@since version
should document any element intro-
duced after the very rst release, in order to easily know the required version of the Frama-C
kernel or specic plug-ins. In the same way, the Frama-C documentation generator provides a
custom tag
@modify version description
which should be used to document any element
which semantics have changed since its introduction.
@plugin developer guide
Furthemore, the special tag
must be attached to each function
used in this document.
Plug-in API
Db
or
Dynamic
A plug-in should export functions in its plug-in interface or through modules
as explained in Section 4.10.
The interface name of a plug-in
plugin
must be
Plugin.mli.
Be careful to capitalization
of the lename which is unusual in OCaml but required here for compilation purposes. If
you declare such an interface, you also have to set the variable
Makefile
PLUGIN_HAS_MLI
in your
(see Section 5.3.3).
Internal Documentation for Kernel Integrated Plug-ins
The Frama-C documen-
tation generator also produces an internal plug-in documentation which may be useful for the plug-in developer itself.
doc/code/plugin/index.html
documentation into a le.
Makefile
This internal documentation is available via
for each plug-in
plugin.
le
You can add an introduction to this
This le has to be assigned into variable
PLUGIN_INTRO
of the
(see Section 5.3.3).
In order to ease access to this internal documentation, you have to manually edit the le
doc/index.html
in order to add an entry for your plug-in in the plug-in list.
Internal Documentation for External Plug-ins
External plug-ins can be documented
in the same way as plug-ins that are compiled together with Frama-C. However, in order
to be able to compile the documentation with
documentation of Frama-C's kernel (make
install-doc-code
doc,
command.
88
make doc,
you must have generated the
see above) and installed it with the
make
4.21. LICENSE POLICY
4.20.3 Website
Target readers:
Read private les
CEA developers with a SVN access.
README
and
metadoc.NE_PAS_LIVRER
in the SVN directory
doc/www/src.
4.21 License Policy
Target readers:
Prerequisite:
developers with a SVN access.
knowledge of make.
If you want to redistribute a plug-in inside Frama-C, you have to dene a proper license
policy. For this purpose, some help is provide in the
Makefile.
Mainly we distinguish two
cases described below.
If the wished license is already used inside
Frama-C, just extend the variable
corresponding to the wished license in order to include les of your plug-in. Next run
make headers.
Example 4.36
Plug-in
slicing
is released under LGPL and is proprietary of both
CEA and INRIA. So, in the makele, there is the following line.
CEA_INRIA_LGPL= ... \
src/slicing_types/*.ml* src/slicing/*.ml*
If the wished license is unknown inside Frama-C, you have to:
1. Add a new variable
2. Extend variable
v
corresponding to it and assign les of your plug-in;
LICENSES
with this variable;
3. Add a text le in directory
4. Add a text le in directory
plug-in (those assigned by
licenses
containing your licenses
headers containing the headers to add into les of your
v ).
The lename must be the same than the variable name
v.
Moreover this le
should contain a reference to the le containing the whole license text.
5. Run
make headers.
89
Chapter 5
Reference Manual
Target readers:
Developers which need to understand some Frama-C internal details.
This chapter is a reference manual for Frama-C developers.
It provides details completing
Chapter 4.
5.1 File Tree
This Section introduces the main parts of Frama-C in order to quickly nd useful information
inside sources. Our goal is not to introduce the Frama-C software architecture (that is the
purpose of Chapter 3) nor to detail each module (that is the purpose of the source documentation generated by
make doc).
The directory containing the Cil implementation is detailed
in Section 5.1.1 while the directory containing the Frama-C implementation itself is presented
in Section 5.1.2.
Figure 5.1 shows all directories useful to plug-in developers. More details are provided below.
Kind
Sources
Tests
Generated Files
Documentations
Shared libraries
Name
.
src
cil
ocamlgraph
external
tests
ptests
bin
lib
doc
headers
licenses
man
share
Specication
Reference
Frama-C root directory
Frama-C implementation
Section 5.1.2
Cil source les
Section 5.1.1
OcamlGraph source les
Source of external free libraries
Frama-C test suites
Section 4.6
ptests implementation
Binaries
Some compiled les
Documentation directory
Headers of source les
Section 4.21
Licenses used by plug-ins and kernel
Section 4.21
Man pages
Shared les
Figure 5.1: Frama-C directories.
91
CHAPTER 5. REFERENCE MANUAL
The Frama-C root directory contains the conguration les, the main
Makefile
and
some information les (in uppercase).
src
Frama-C sources are split in four directories:
the core of the implementation while
external
cil
(described in Section 5.1.2) contains
(described in Section 5.1.1),
ocamlgraph
and
respectively contains the implementation of Cil (extended with ACSL ), a
version of the OcamlGraph library [3] compatible within Frama-C, and external libraries
included in the Frama-C distribution.
The directory
tests
contains the Frama-C test suite which is used by the
ptests
tool
(see Section 4.6).
bin
Directories
and
lib
contain binary les mainly produced by Frama-C compila-
tion. Frama-C executables belong to the directory
lib/gui
bin, the directories lib/plugins and
lib/fc receives the compiled
receive the compiled plug-ins, and the directory
kernel interface. You should never add yourself any le in these directories.
Documentation (including plug-in specic, source code and ACSL documentations) is
provided in directory
doc.
Directories
headers
and
licenses
contains les useful for
copyright notication (see Section 4.21).
share contains useful libraries for Frama-C users such as the Frama-C C library
ad-hoc libraries such as libc and malloc for Frama-C), as well as user-oriented
Directory
(e.g.
Makeles.
5.1.1 The cil directory
The source les of Cil belong to the ve directories shown in Figure 5.2.
More details are
provided below.
Name
Specication
src
src/ext
src/frontc
src/logic
Main Cil les
Syntactic analysis provided by Cil
C frontend
ACSL frontend
Figure 5.2: Cil directories.
src contains the main les of
Cil. The most important modules are
Cil_types and Cil.
The rst one contains type declarations of the Cil AST while the second one contains
useful operations over this AST.
src/ext
contains syntactic analysis provided by Cil .
vides control ow graph, module
Dataflow2
Callgraph
For example, module
Cfg
pro-
provides a syntactic callgraph and module
provides parameterized forward/backward data ow analysis.
src/frontc
is the C frontend which converts C code to the corresponding Cil AST. It
should not be used by a Frama-C plug-in developer.
92
5.1. FILE TREE
src/logic
is the ACSL frontend which converts logic code to the corresponding Cil
AST. The only useful modules for a Frama-C plug-in developer are
provides some predened logic constructs (terms, predicates, . . . )
Logic_const which
and Logic_typing
which allows to dynamically extend the logic type system.
5.1.2 The src directory
The source les of Frama-C are split into dierent sub-directories inside
src.
Each sub-
directory contains either a plug-in implementation or some specic parts of the Frama-C
kernel.
Each plug-in implementation can be split into two dierent sub-directories, one for exported type declarations and related implementations visible from
Section 4.10.2) and another for the implementation provided in
Db.
Db
(see Chapter 3 and
Kernel directories are shown Figure 5.3. More details are provided below.
Kind
Name
Specication
kernel
logic
ai
memory_states
type
project
printer
lib
misc
gui
Toolboxes
Libraries
Entry points
Reference
Kernel toolbox
Logic toolbox
Abstract interpretation toolbox
Section 4.18
Memory-state toolbox
Section 4.18
Type library
Section 4.9
Project library
Section 4.12
AST printer library
Miscellaneous libraries
Additional useful operations
Graphical User Interface
Section 4.19
Figure 5.3: Kernel directories.
Directory
kernel
contains the kernel toolbox over Cil. Main kernel modules are shown
in Figure 5.4.
Directory
logic
is the logic toolbox.
It contains modules helping to handle logical
annotations and their status.
Directories
ai
and
memory_states
are the abstract interpretation and memory-state
ai, module Abstract_interp denes
Ival denes some pre-instantiated arithmetic lattices while, in memory_states, module Locations provides several representations of C
locations and modules Lmap and Lmap_bitwise provide maps indexed by such locations.
toolboxes (see section 4.18).
In particular, in
useful generic lattices and module
Directories
type
and
project
contain the type library and the project library respec-
tively described in details in Sections 4.9 and 4.12, while directory
printer contain the
modules dening the printer of the AST.
misc contain datastructures and
particular, module Extlib is the Frama-C extension
whereas module Type is the interface for type values
Directories
lib
and
operations used in Frama-C. In
of the OCaml standard library
(the OCaml values representing
OCaml types) required by dynamic plug-in registrations and uses and journalization
(see Section 4.9).
93
CHAPTER 5. REFERENCE MANUAL
Kind
AST
Global
tables
Logic
Plug-in
APIs
Command
Line
Options
Base
Modules
Visitor
Printer
System
Initializer
Name
Specication
Ast
Ast_info
File
Globals
Kernel_function
Emitter
Loop
Annotations
Property
Property_status
Db
Dynamic
Parameter_sig
Parameter_customize
Typed_parameter
Cmdline
Config
Plugin
Kernel
Log
Journal
CilE
Alarms
Stmts_graph
Floating_point
Visitor
Printer_api
Printer
Command
Task
Boot
Gui_init
Special_hooks
Reference
The Cil AST for Frama-C
Operations over the Cil AST
AST creation and access to C les
Operations on globals
Operations on functions
Emitter of property statuses
Section 4.17
Operations on loops
Operations on ACSL annotations
Section 4.17
Logical properties
Section 4.17
Status of properties
Section 4.17
Static plug-in database
Section 4.10.2
Interface for dynamic plug-ins
Section 4.10.3
Signatures of command line options
Section 4.13
Customize behavior of command line options
Section 4.13
Parameter as command line options
Section 4.13
Command line parsing
Section 4.13
Information about Frama-C version
General services for plug-ins
Kernel as a plug-in
Section 4.7
Section 4.13
Printing messages
Section 4.8
Journalization
Section 4.11
Useful Cil extensions
Alarm management
Accessibility checks using CFG
Floating-point operations
Frama-C visitors (subsume Cil ones)
Section 4.16
Signature of AST printers
AST printer
System operations
Higher-level API than
Command
Last linked module
Section 4.14
Very early initialization of the GUI
Section 4.14
Registration of some kernel hooks
Figure 5.4: Main kernel modules.
94
5.2. CONFIGURE.IN
Directory
gui1
contains the
gui
implementation part common to all plug-ins.
See
Section 4.19 for more details.
5.2 Congure.in
Figure 5.5 presents the dierent parts of
configure.in in the order that they are introduced
in the le. The second column of the tabular says whether the given part has to be modied
eventually by a kernel-integrated plug-in developer. More details are provided below.
Id
Name
Mod.
1
Conguration of make
no
2
Conguration of OCaml
no
3
Conguration of mandatory tools/libraries
no
4
Conguration of non-mandatory tools/libraries
no
5
Platform conguration
no
6
Wished Frama-C plug-in
7
Conguration of plug-in tools/libraries
8
Checking plug-in dependencies
9
Makele creation
10
Summary
Figure 5.5: Sections of
1.
Conguration of
option is
Reference
yes
yes
yes
yes
yes
Sections 4.2.2 and 4.2.4
Section 4.2.3
Section 4.2.5
Section 4.2.2
Section 4.2.2
configure.in.
make checks whether the version of make is correct.
Some useful
enable-verbosemake (resp. disable-verbosemake) which set (resp.
the verbose mode for make.
unset)
In verbose mode, full make commands are displayed on
the user console: it is useful for debugging the makele.
In non-verbose mode, only
command shortcuts are displayed for user readability.
2.
3.
Conguration of
OCaml checks whether the version of OCaml is correct.
Conguration of other mandatory tools/libraries checks whether all the external
mandatory tools and libraries required by the Frama-C kernel are present.
4.
Conguration of other non-mandatory tools/libraries checks which external nonmandatory tools and libraries used by the Frama-C kernel are present.
5.
Platform Conguration
sets the necessary platform characteristics (operating sys-
tem, specic features of gcc, etc ) for compiling Frama-C.
6.
Wished Frama-C Plug-ins sets which Frama-C plug-ins the user wants to compile.
7.
Conguration of plug-in tools/libraries
checks the availability of external tools
and libraries required by plug-ins for compilation and execution.
8.
Checking Plug-in Dependencies sets
which plug-ins have to be disabled (at least
partially) because they depend on others plug-ins which are not available (at least
partially).
1
From the outside, the GUI may be seen as a plug-in with some exceptions.
95
CHAPTER 5. REFERENCE MANUAL
9.
Makele Creation creates Makefile from Makefile including information provided
by this conguration.
10.
Summary displays summary of each plug-in availability.
5.3 Makeles
In this section, we detail the organization of the dierent Makeles existing in Frama-C.
First Section 5.3.1 presents a general overview. Next Section 5.3.2 details the dierent sec-
Makefile.config.in, Makefile.common, Makefile.generic and Makefile. Next
Section 5.3.3 introduces the variables customizing Makefile.plugin and Makefile.dynamic.
Finally Section 5.3.4 shows specic details of Makefile.dynamic.
tions of
5.3.1 Overview
Frama-C uses dierent Makeles (plus the plug-in specic ones). They are:
Makefile:
the general Makele of Frama-C;
Makefile.config.in: the Makele
ones coming from configure);
Makefile.common:
conguring some general variables (especially the
the Makele providing some other general variables;
Makefile.generic:
Makefile.plugin:
the Makele providing generic rules for compiling source les
the Makele introducing specic stu for plug-in compilation;
Makefile.dynamic:
the Makele usable by plug-in specic Makeles.
Makefile.dynamic_config: this Makele is automatically generated either from
Makefile.dynamic_config.internal or Makefile.dynamic_config.external. It sets
variables which automatically congure Makefile.dynamic.
Makefile.kernel
is automatically generated from
Makefile.
It contains several vari-
ables useful for linking a plug-in against the Frama-C kernel.
The rst one is part of the root directory of the Frama-C distribution while the other ones
are are part of directory
another one.
share.
Each Makele either includes or is included into at least
Figure 5.6 shows these relationship.
Makefile
and
Makefile.dynamic
are
independent: the rst one is used to compile the Frama-C kernel while the second one is used
Makefile.common
Makefile.generic, that denes
default compilation rules for various kinds of source les. Makefile.plugin denes generic
rules and variables for compiling plug-ins. It is used both by Makefile for kernel-specic
plug-ins integrated compiled from the Frama-C Makele and by Makefile.dynamic for plug-
to compile the Frama-C plug-ins. Their common variables are dened in
(which includes
Makefile.config.in).
They also include
ins with their own Makeles.
96
5.3. MAKEFILES
Makefile.config.in
Makefile.dynamic config.internal
Makefile.dynamic config.external
Makefile.common
Makefile.generic
Makefile.dynamic config
Makefile.kernel
Makefile
...
Makefile.plugin
specific Makefile for plug-in 1
...
Caption:
m1
m2
m1
m2
orange boxes
red boxes
green boxes
Makefile.dynamic
specific Makefile for plug-in n
Makefile m1 is included into Makefile m2
Makefile m2 is generated from Makefile m1
Plug-in Makefiles
Generated Makefiles
Other kernel Makefiles
Figure 5.6: Relationship between the Makeles
97
CHAPTER 5. REFERENCE MANUAL
5.3.2 Sections of
Makefile,
Makefile.generic
Figure
5.7
presents
Makefile.generic
the
and
Makefile.config.in,
dierent
Makefile
parts
Makefile.common
and
Makefile.config.in, Makefile.common,
of
in the order that they are introduced in these les. The
third row of the tabular says whether the given part may be modied by a kernel-integrated
plug-in developer. More details are provided below.
Id
Name
File
Mod.
1
Working directories
Makele.cong.in
no
2
Installation paths
Makele.cong.in
no
3
Ocaml stu
Makele.cong.in
no
4
Libraries
Makele.cong.in
no
5
Miscellaneous commands
Makele.cong.in
no
6
Miscellaneous variables
Makele.cong.in
no
7
Variables for plug-ins
Makele.cong.in
no
1 (bis)
Working directories
Makele.common
no
8
Flags
Makele.common
no
9
Verbosing
Makele.common
no
10
Shell commands
Makele.common
no
11
Command pretty printing
Makele.common
no
12
Tests
Makele.common
no
13
Generic rules
Makele.generic
no
14
Global plug-in variables
Makele
no
15
Additional global variables
Makele
no
16
Main targets
Makele
no
17
Coverage
Makele
no
18
Ocamlgraph
Makele
no
19
Frama-C Kernel
Makele
no
20
Plug-in sections
Makele
yes
21
Generic variables
Makele
no
22
Toplevel
Makele
no
23
GUI
Makele
no
24
Standalone obfuscator
Makele
no
25
Tests
Makele
no
26
Emacs tags
Makele
no
27
Documentation
Makele
no
28
Installation
Makele
29
File headers: license policy
Makele
yes
yes
30
Makele rebuilding
Makele
no
31
Cleaning
Makele
no
32
Depend
Makele
no
33
ptests
Makele
no
34
Source distribution
Makele
no
Figure 5.7: Sections of
1.
Working directories
denes
the
main
Reference
Section 4.4
Not written yet.
Section 4.21
Makefile.config.in, Makefile.common
(splitted between
directories
of
Makefile.config.in
Frama-C.
98
In
particular,
it
and
and
Makefile.
Makefile.common
declares
the
variable
5.3. MAKEFILES
UNPACKED_DIRS
which should be extended by a plug-in developer if he uses les which
do not belong to the plug-in directory (that is if variable
PLUGIN_TYPES_CMO
is set, see
Section 5.3.3).
2.
Installation paths denes where Frama-C has to be installed.
3.
Ocaml stu
4.
Libraries denes variables for libraries required by Frama-C.
5.
Miscellaneous commands denes some additional commands.
6.
Miscellaneous variables denes some additional variables.
7.
Variables for plug-ins
denes the OCaml compilers and specic related ags.
Frama-C (and using the
8.
9.
denes some variables used by plug-ins distributed within
configure
of Frama-C).
Flags denes some variables setting compilation ags.
Verbosing sets how make prints the command. In particular, it denes the variable
VERBOSEMAKE which must be set yes in order to see the full make commands in the user
console. The typical use is
$ make VERBOSEMAKE= y e s
10.
Shell commands sets all the shell commands eventually executed while calling make.
11.
Command pretty printing sets all the commands to be used for pretty printing.
Example 5.1
foo : bar
Consider the following target
foo
in a plug-in specic Makele.
$( PRINT_CP ) $@
$( CP ) $ < $@
Executing
$ make f o o
prints
Copying t o
foo
while executing
$ make f o o VERBOSEMAKE= y e s
prints
cp - f bar f o o
If one of the two commands is missing for the target
VERBOSEMAKE=yes
12.
13.
either
make foo
or
make foo
Tests denes a generic template for testing plug-ins.
Generic rules contains rules in order to automatically produces dierent kinds of les
(e.g.
14.
foo,
will not work as expected.
.cm[iox]
from
.ml
or
.mli
for OCaml les)
Global plug-in variables declares some plug-in specic variables used throughout the
makele.
99
CHAPTER 5. REFERENCE MANUAL
15.
Additional global variables declares some other variables used throughout the makele.
16.
Main targets provides the main rules of the makele.
The most important ones are
top, byte and opt which respectively build the Frama-C interactive, bytecode and native
toplevels.
17.
Coverage denes how compile the eponymous library.
18.
Ocamlgraph denes how compile the eponymous library.
19.
Frama-C Kernel
provides variables and rules for the Frama-C kernel.
Each part is
described in specic sub-sections.
20.
After Section Kernel, there are several sections corresponding to
plug-ins
(see
Section 5.3.3). This is the part that a plug-in developer has to modify in order to
add compilation directives for its plug-in.
21.
Generic variables provides variables containing les to be linked in dierent contexts.
22.
Toplevel provides rules for building the les of the form bin/toplevel.*.
23.
GUI provides rules for building the les of the form bin/viewer.*
24.
Standalone obfuscator provides rules for building the Frama-C obfuscator.
25.
Tests provides rules to execute tests.
make tests takes care of generating the appropriptests (see Section 4.6) for all test suites of the kernel
possible to pass options to ptests through the PTESTS_OPTS
ate environment and launching
and enabled plugins. It is
environment variable.
26.
Emacs tags
provides rules which generate emacs tags (useful for a quick search of
OCaml denitions).
27.
Documentation
provides rules generating Frama-C source documentation (see Sec-
tion 4.20).
28.
Installation provides rules for installing dierent parts of
29.
File headers: license policy
Frama-C.
provides variables and rules to manage the Frama-C
license policy (see Section 4.21).
30.
Makele rebuilding
configure
provides rules in order to automatically rebuild
Makefile
when required.
31.
Cleaning provides rules in order to remove les generated by makele rules.
32.
Depend provides rules which compute Frama-C source dependencies.
33.
Ptests provides rules in order to build ptests (see Section 4.6).
34.
Source distribution provides rules usable for distributing Frama-C.
100
and
5.3. MAKEFILES
Kind
Name
Specication
PLUGIN_NAME
PLUGIN_DIR
Module name of the plug-in
Directory containing plug-in source
Usual
information
no
les
PLUGIN_ENABLE
Whether the plug-in has to be com-
no
piled
PLUGIN_DYNAMIC
Whether the plug-in is dynamically
linked with Frama-C
PLUGIN_HAS_MLI
PLUGIN_DEPENDENCIES
Whether the plug-in gets an interface
Which plug-ins the plug-in depends
on
Source les
PLUGIN_CMO
PLUGIN_CMI
.cmo plug-in les
.cmi plug-in les without corresponding .cmo
.cmo plug-in les not belonging to
$(PLUGIN_DIR)
.cmo plug-in les not belonging to
$(PLUGIN_DIR)
Plug-in specic ags for ocamlc
Plug-in specic ags for ocamlopt
PLUGIN_TYPES_CMO
PLUGIN_GUI_CMO
Compilation
PLUGIN_BFLAGS
PLUGIN_OFLAGS
PLUGIN_EXTRA_BYTE
Additional
ags
bytecode
les
to
link
against
PLUGIN_EXTRA_OPT
PLUGIN_LINK_BFLAGS
Additional native les to link against
Plug-in specic ags for linking with
ocamlc
PLUGIN_LINK_OFLAGS
Plug-in specic ags for linking with
PLUGIN_LINK_GUI_BFLAGS
ocamlopt
Plug-in specic ags for linking a GUI
with
PLUGIN_LINK_GUI_OFLAGS
with
Figure 5.8: Standard parameters of
ocamlc
Plug-in specic ags for linking a GUI
ocamlopt
Makefile.dynamic
101
and
Makefile.plugin.
no
CHAPTER 5. REFERENCE MANUAL
5.3.3 Variables of
and Makefile.plugin
Makefile.dynamic
Figures 5.8 and 5.9 presents all the variables that can be set before including
or
Makefile.dynamic
Makefile.plugin
(see Sections 4.4 and 4.5). The last column is set to no if and only if
the line is not relevant for a standard plug-in developer. Details are provided below.
Variable
PLUGIN_NAME
is the module name of the plug-in.
This name must be capitalized (as is each OCaml module name). It must be distinct
from all other visible modules in the plugin directory, or in the Frama-C kernel.
Variable PLUGIN_DIR is the directory containing
src/plugin where plugin is the plug-in name.
Variable
plug-in source les. It is usually set to
PLUGIN_ENABLE must be set to yes if the plug-in has to be compiled. It is
@plugin_ENABLE@ provided by configure.in where plugin is the plug-in
usually set to
name.
Variable
PLUGIN_DYNAMIC must be set to yes if the plug-in has to be dynamically linked
with Frama-C.
Variable
PLUGIN_HAS_MLI must be set to yes if plug-in plugin gets a le .mli
Plugin.mli, see Section 4.20) describing its API.
(which
must be capitalized:
PLUGIN_DEPENDENCIES
Variable
must contains the list of name of plug-ins which this
plug-in depends on (see Section 4.10.1). By default, there is no dependency.
PLUGIN_CMO and PLUGIN_CMI are respectively .cmo plug-in les and .cmi les
.cmo plug-in les. For each of them, do not write their le path
le extension: they are automatically added ($(PLUGIN_DIR)/f .cm[io] for a
Variables
without corresponding
nor their
le
f ).
PLUGIN_TYPES_CMO
$(PLUGIN_DIR). They usually
Variable
name (see Section 4.10.2).
is
the
.cmo plug-in les
src/plugin_types
which
do
not
belong
to
plugin is the plug-in
Do not write le extension (which is .cmo): it is automatically
belong to
where
added.
PLUGIN_GUI_CMO is the .cmo plug-in les which have to be linked with the GUI
(see Section 4.19). As for variable PLUGIN_CMO, do not write their le path nor their le
Variable
extension.
PLUGIN_*_FLAGS
ocamldoc.
Variables of the form
ocamldep
Variable
or
PLUGIN_GENERATED
in dependencies.
ocamllex
Variable
are plug-in specic ags for
ocamlc, ocamlopt,
is les which must be generated before computing plug-
In particular, this is where
.ml
les generated by
ocamlyacc
and
must be placed if needed.
PLUGIN_DEPENDS
is the other plug-ins which must be compiled before the con-
sidered plug-in.
Using this variable is deprecated: you should consider to use
instead.
102
PLUGIN_DEPENDENCIES
5.3. MAKEFILES
Kind
Name
Specication
Dependencies
PLUGIN_DEPFLAGS
PLUGIN_GENERATED
Plug-in specic ags for
ocamldep
Plug-in les to compiled before
running
PLUGIN_DEPENDS
ocamldep
Other plug-ins to compiled before
no
the considered one
PLUGIN_DOCFLAGS
PLUGIN_UNDOC
Plug-in specic ags for
ocamldoc
Source les with no provided documentation
Documentation
PLUGIN_TYPES_TODOC
Additional source les to document
PLUGIN_INTRO
Text le to append to the plug-in
introduction
PLUGIN_HAS_EXT_DOC
Whether the plug-in has an external pdf manual
PLUGIN_NO_TESTS
Whether there is no plug-in specic test directory
PLUGIN_TESTS_DIRS
Testing
tests to be included in the default
test suite
PLUGIN_TESTS_DIRS_DEFAULT
PLUGIN_TESTS_LIBS
Directories containing tests
Specic
.cmo
les used by plug-in
tests
PLUGIN_NO_DEFAULT_TEST
Whether to include tests in default
test suite.
PLUGIN_INTERNAL_TEST
Whether the test suite of the plugin is located in Frama-C's own
tests directory
PLUGIN_PTESTS_OPTS
PLUGIN_DISTRIBUTED_BIN
Distribution
Plug-in specic options to ptests
Whether to include the plug-in in
no
binary distribution
PLUGIN_DISTRIBUTED
Whether to include the plug-in in
no
source distribution
PLUGIN_DISTRIB_EXTERNAL
Additional les to be included in
the distribution
Figure 5.9: Special parameters of
Makefile.dynamic
103
and
Makefile.plugin.
no
CHAPTER 5. REFERENCE MANUAL
Variable
PLUGIN_UNDOC
is the source les for which no documentation is provided. Do
$(PLUGIN_DIR).
not write their le path which is automatically set to
PLUGIN_TYPES_TODOC is the additional
They usually belong to src/plugin_types
Variable
source les to document with the plug-
in.
where
plugin
is the plug-in name (see
Section 4.10.2).
Variable
PLUGIN_INTRO
is the text le to append to the plug-in documentation intro-
doc/code/intro_plugin.txt
understood by ocamldoc.
duction. Usually this le is
contain any text
PLUGIN_HAS_EXT_DOC is set to yes if the
supposed to be a pdf le generated by make
for a plug-in
plugin.
It can
Variable
plug-in has its own reference manual.
It is
in directory
Variable
doc/$(PLUGIN_NAME)
PLUGIN_NO_TEST must be set to yes if there is no specic test directory for the
plug-in.
is
PLUGIN_TESTS_DIRS is the directories containing plug-in tests.
tests/$(notdir $(PLUGIN_DIR))).
Variable
Variable
PLUGIN_TESTS_LIB
.cmo).
Variable
.cmo plug-in specic les used by plug-in tests. Do
$(PLUGIN_TESTS_DIRS)) nor its le extension (which is
is the
not write its le path (which is
Its default value
PLUGIN_NO_DEFAULT_TEST
indicates whether the test directory of the plug-in
should be considered when running Frama-C default test suite. When set to a non-empty
value, the plug-in tests are run only through
Variable
make $(PLUGIN_NAME)_tests.
PLUGIN_INTERNAL_TEST indicates whether the tests of the plug-in are included
in Frama-C's own tests directory. When set to a non-empty value, the tests are searched
there. When unset, tests are assumed to be in the
tests
directory of the plugin main
directory itself. Having the tests of a plugin inside Frama-C's own
tests
suite is dep-
recated. Plugins should be self-contained.
Variable
PLUGIN_PTESTS_OPTS
ning the tests.
allows to give specic options to
It comes in addition to
PLUGIN_PTESTS_OPTS:=-j 1
PTESTS_OPTS
Variable
when run-
For instance,
will deactivate parallelization of tests in case the plugin
does not support concurrent runs. It is only used by
ptests
(see 5.3.225).
PLUGIN_DISTRIB_BIN
Makefile.dynamic.
indicates whether the plug-in should be included in a
binary distribution.
Variable
PLUGIN_DISTRIBUTED
indicates whether the plug-in should be included in a
source distribution.
Variable
PLUGIN_DISTRIB_EXTERNAL
is the list of les that should be included within
the source distribution for this plug-in.
They will be put at their proper place for a
release.
As previously said, the above variables are set before including
Makefile.plugin
in order to
customize its behavior. They must not be use anywhere else in the Makele. In order to deal
p, Makefile.plugin provides some variables which may be
p. These variables are listed in Figure 5.10. For each variable
with this issue, for each plug-in
used after its inclusion dening
104
5.4. PTESTS
of the form
p_VAR, its behavior is exactly equivalent to the value of the parameter PLUGIN_VAR
p2 .
for the plug-in
Kind
Name3
Usual information
Source les
Compilation ags
Dependencies
Documentation
Testing
plugin_DIR
plugin_CMO
plugin_CMI
plugin_CMX
plugin_TYPES_CMO
plugin_TYPES_CMX
plugin_BFLAGS
plugin_OFLAGS
plugin_LINK_BFLAGS
plugin_LINK_OFLAGS
plugin_LINK_GUI_BFLAGS
plugin_LINK_GUI_OFLAGS
plugin_DEPFLAGS
plugin_GENERATED
plugin_DOCFLAGS
plugin_TYPES_TODOC
plugin_TESTS_DIRS
plugin_TESTS_LIB
Figure 5.10: Variables dened by
5.3.4
Makefile.plugin.
Makefile.dynamic
Not written yet: please report as feature request on
http: // bts. frama-c. com
if you
really need this section.
5.4 Ptests
5.4.1 Pre-dened macros for tests commands
Ptests pre-denes a certain number of macros for each test about to be run. Figure 5.11 gives
their denition.
2
Variables of the form
p_*CMX
have no
PLUGIN_*CMX
counterpart but their meanings should be easy to
understand.
3
plugin
is the module name of the considered plug-in (i.e. as set by
105
$(PLUGIN_NAME)).
CHAPTER 5. REFERENCE MANUAL
Name
frama-c
PTEST_CONFIG
Expansion
path to frama-c executable
either the empty string or
_
followed by the name of the
current alternative conguration (see section 4.6.3).
PTEST_DIR
PTEST_FILE
PTEST_NAME
PTEST_NUMBER
current test suite directory
path to the current test le
basename of the current test le (without sux)
rank of current test in the test le. There are in fact two independent numbering schemes: one for
EXECNOW commands
OPT).
and one for regular tests (if more than one
Figure 5.11: Predened macros for ptests
106
Appendix A
Changes
This chapter summarizes the major changes in this documentation between each Frama-C
release. First we list changes of the last release.
Reference Manual:
Logical Annotations:
update list of main kernel modules.
document module
Command Line Options:
Plugin
Property.
update according to kernel changes that split the module
into several modules.
Architecture, Plug-in Registration and Access and Reference Manual:
ment registration of a plug-in through a
Makeles:
Testing:
introducing
MACRO
.mli
le.
Makefile.generic.
conguration directive.
Fluorine-20130601
Tutorial:
Architecture and Reference Manual:
fully rewritten.
remove references to
Cilutil
module.
Oxygen-20121001
Makele WARN_ERROR_ALL variable.
Log:
Visitor:
Testing:
Project Management System:
Fine tuning of AST dependencies.
Testing:
PLUGIN_PTESTS_OPTS
Type:
Debug category (dkey argument).
DoChildrenPost
action.
document the need for directories to store result and oracles.
added
PTESTS_OPTS
document the
type
and
library.
107
Makele's variables.
docu-
APPENDIX A. CHANGES
Logical Annotations:
Reference Manual:
Testing:
Website:
Command Line Options:
explain how to modify the default behavior of an option.
Command Line Options:
fully updated.
Project Management System:
fully updated.
update kernel les.
merge parts in Advanced Plug-in Development and in Reference Manual.
refer to CEA internal documentation.
fully updated.
Plug-in Registration and Access:
argument
journalize.
Congure.in:
Plug-in General Services:
Software Architecture:
Type replaced by Datatype and document labeled
updated.
updated.
Type
is now a library, not just a single module.
Nitrogen-20111001
Tutorial of the Future:
Types as rst class values:
Tutorial:
kernel-integrated plug-ins are now deprecated.
Visitors:
example is now out-of-date.
new chapter for preparing a future tutorial.
links to articles.
Carbon-20110201
Unchanged.
Carbon-20101201-beta1
Visitors:
Documentation:
Visitors:
tics wrt
update example to new kernel API.
external plugin API documentation.
x bug (replace
vstmt_aux.
DoChildrenPost by ChangeDoChildrenPost), change seman-
108
Carbon-20101201-beta1
Very Important Preliminary Warning:
Tutorial:
Testing:
adding this very important chapter.
x bug in the `Hello World' example.
updated semantics of
Initialization Steps:
CMD
and
STDOPT
directives.
updated according to new options
-then
and
-then-on
and to
the new `Files Setting' stage.
Visitors:
example updated
We list changes of previous releases below.
Boron-20100401
Congure.in:
Tutorial:
Project:
Initialisation Steps:
Plug-in Registration and Access:
Documentation:
Introduction:
Logical Annotations:
Tutorial:
updated
the section about kernel-integrated plug-in is out-of-date
no more
rehash
in datatypes
xed according to the current implementation
updateed according to API changes
updated and improved
is aware of the Frama-C user manual
fully new section
x an eciency issue with the Makele of the
Hello
plug-in
Beryllium-20090902
Makeles:
update according to the new
Makefile.kernel
Beryllium-20090901
Makeles:
Writing messages:
Initialization Steps:
update according to the new makeles hierarchy
fully documented
the dierent stages are more precisely dened. The implemen-
tation has been modied to take into account specities of dynamically linked plug-ins
Project Management System:
Makele.plugin:
mention value
descr
in Datatype
add documentation for additional parameters
109
APPENDIX A. CHANGES
Beryllium-20090601-beta1
Initialization Steps:
Command Line Options:
Plug-in General Services:
File Tree:
Makeles:
Architecture:
Tutorial:
congure.in:
Plug-in Registration and Access:
update according to the new implementation
update according to the new implementation
fully new section introducing the new module
Plugin
update according to changes in the kernel
update according to the new le
Makefile.config.in
Makefile.dynamic
and the new le
update according to the recent implementation changes
update according to API changes and the new way of writting plug-ins
update according to changes in the way of adding a simple plug-in
update according to the new API of module
Type
Lithium-20081201
Changes:
Command Line Options:
Congure.in:
Exporting Datatypes:
GUI: update, in particular the full example has been removed
Introduction:
Plug-in Registration and Access:
Project:
Reference Manual:
Software architecture:
Tutorial:
improve part about dynamic plug-ins
Tutorial:
use
Website:
better highlighting of the directory containing the html pages
fully new appendix
new sub-section Storing New Dynamic Option Values
compliant with new implementations of
configure_tool
configure_library
and
now embeded in new section Plug-in Registration and Access
improved
fully new section
compliant with the new interface
integration of dynamic plug-ins
integration of dynamic plug-ins
Db.Main.extend
to register an entry point of a plug-in.
110
Lithium-20081002+beta1
GUI: fully updated
Testing:
new sub-section Alternative testing
Testing:
new directive
Tutorial:
Visitor:
STDOPT
new section Dynamic plug-ins
ChangeToPost
in sub-section Action Performed
Helium-20080701
GUI: fully updated
Makele:
Project:
additional variables of
Makefile.plugin
new important note about registration of internal states in Sub-section Inter-
nal State: Principle
Testing:
more precise documentation in the reference manual
Hydrogen-20080502
Documentation:
new sub-section Website
Documentation:
new ocamldoc tag @plugin developer guide
Index:
Project:
Reference manual:
Software architecture:
fully new
new sub-section Internal State: Principle
largely extended
fully new chapter
Hydrogen-20080501
First public release
111
BIBLIOGRAPHY
Bibliography
[1] Patrick Baudin, Jean-Christophe Filliâtre, Thierry Hubert, Claude Marché, Benjamin
Monate, Yannick Moy, and Virgile Prevosto.
ACSL: ANSI C Specication Language.
Version 1.6, September 2012.
[2] Patrick Baudin and Anne Pacalet. Slicing plug-in.
http://frama-c.com/slicing.html.
[3] Sylvain Conchon, Jean-Christophe Filliâtre, and Julien Signoles.
Designing a generic
In Marco T. Morazán, editor, Trends in Functional
graph library using ML functors.
Programming, volume 8 of Trends in Functional Programming, pages 124140. Intellect,
UK/The University of Chicago Press, USA, 2008.
http://ocamlgraph.lri.fr.
[4] Loïc Correnson, Pascal Cuoq, Florent Kirchner, Armand Puccetti, Virgile Prevosto,
Julien Signoles, and Boris Yakobowski. Frama-C User Manual, September 2012.
//frama-c.cea.fr/download/user-manual.pdf.
http:
[5] Loïc Correnson, Zaynah Dargaye, and Anne Pacalet. Frama-C's WP plug-in, April 2013.
http://frama-c.com/download/frama-c-wp-manual.pdf.
[6] Loïc Correnson and Julien Signoles. Combining Analysis for C Program Verication. In
Formal Methods for Industrial Critical Systems (FMICS), 2012.
[7] Pascal Cuoq, Damien Doligez, and Julien Signoles.
Lightweight Typed Customizable
Unmarshaling. ML Workshop'11, September 2011.
[8] Pascal Cuoq, Florent Kirchner, Nikolai Kosmatov, Virgile Prevosto, Julien Signoles, and
Boris Yakobowski. Frama-C, A Program Analysis Perspective. In the 10th International
Conference on Software Engineering and Formal Methods (SEFM 2012), volume 7504 of
LNCS, pages 233247. Springer, 2012.
[9] Pascal Cuoq and Julien Signoles. Experience Report: OCaml for an industrial-strength
static analysis framework. In Proceedings of International Conference of Functional Pro-
gramming (ICFP'09), pages 281286, New York, NY, USA, September 2009. ACM Press.
[10] Pascal Cuoq, Boris Yakobowski, and Virgile Prevosto. Frama-C's value analysis plug-in,
April 2013.
http://frama-c.cea.fr/download/value-analysis.pdf.
[11] Free Software Foundation. GNU 'make', April 2006.
make/manual/make.html#Flavors.
http://www.gnu.org/software/
[12] Jacques Garrigue, Benjamin Monate, Olivier Andrieu, and Jun Furuse.
LablGTK2.
http://lablgtk.forge.ocamlcore.org.
[13] Philippe
Hermann
and
Julien
Signoles.
Frama-C's
RTE
http://frama-c.com/download/frama-c-rte-manual.pdf.
113
plug-in,
April
2013.
BIBLIOGRAPHY
[14] Xavier Leroy, Damien Doligez, Jacques Garrigue, Didier Rémy, and Jérôme Vouillon. The
Objective Caml system.
[15] Donald Michie.
http://caml.inria.fr/pub/docs/manual-ocaml/index.html.
Memo functions:
a language feature with "rote-learning" properties.
Research Memorandum MIP-R-29, Department of Machine Intelligence & Perception,
Edinburgh, 1967.
[16] Donald Michie. Memo functions and machine learning. Nature, 218:1922, 1968.
[17] George C. Necula, Scott McPeak, Shree Prakash Rahul, and Westley Weimer.
CIL:
Intermediate Language and Tools for Analysis and Transformation of C Programs. In
CC '02: Proceedings of the 11th International Conference on Compiler Construction,
pages 213228, London, UK, 2002. Springer-Verlag.
[18] Julien Signoles. Foncteurs impératifs et composés: la notion de projet dans Frama-C. In
Hermann, editor, JFLA 09, Actes des vingtièmes Journées Francophones des Langages
Applicatifs, volume 7.2 of Studia Informatica Universalis, pages 245280, 2009. In French.
[19] Julien Signoles. Une bibliothèque de typage dynamique en OCaml. In Hermann, editor,
JFLA 11, Actes des vingt-deuxièmes Journées Francophones des Langages Applicatifs,
Studia Informatica Universalis, pages 209242, January 2011. In French.
[20] Nicolas
Stouls
and
Virgile
Prevosto.
Frama-C's
Aoraï
http://frama-c.com/download/frama-c-aorai-manual.pdf.
114
plug-in,
April
2013.
LIST OF FIGURES
List of Figures
2.1
Plug-in Integration Overview. . . . . . . . . . . . . . . . . . . . . . . . . . . .
14
2.2
Control ow graph for le test.c.
. . . . . . . . . . . . . . . . . . . . . . . . .
21
2.3
Control ow graph colored with reachability information. . . . . . . . . . . . .
23
2.4
CFG plug-in architecture
. . . . . . . . . . . . . . . . . . . . . . . . . . . . .
26
3.1
Architecture Design.
. . . . . . . . . . . . . . . . . . . . . . . . . . . . . . . .
34
3.2
Dierences between standard plug-ins and kernel-integrated ones. . . . . . . .
36
4.1
ptests options. . . . . . . . . . . . . . . . . . . . . . . . . . . . . . . . . . . . .
50
4.2
Directives in conguration headers of test les.
. . . . . . . . . . . . . . . . .
51
4.3
Representation of the Frama-C State. . . . . . . . . . . . . . . . . . . . . . . .
68
4.4
Interaction between the project library and your registered global data. . . . .
69
4.5
Indices of AST nodes.
. . . . . . . . . . . . . . . . . . . . . . . . . . . . . . .
84
5.1
Frama-C directories.
. . . . . . . . . . . . . . . . . . . . . . . . . . . . . . . .
91
5.2
Cil directories. . . . . . . . . . . . . . . . . . . . . . . . . . . . . . . . . . . . .
92
5.3
Kernel directories.
. . . . . . . . . . . . . . . . . . . . . . . . . . . . . . . . .
93
5.4
Main kernel modules. . . . . . . . . . . . . . . . . . . . . . . . . . . . . . . . .
94
5.5
Sections of
. . . . . . . . . . . . . . . . . . . . . . . . . . . . .
95
5.6
Relationship between the Makeles . . . . . . . . . . . . . . . . . . . . . . . .
97
5.7
Sections of
5.8
Standard parameters of
5.9
Special parameters of
configure.in.
Makefile.config.in, Makefile.common
Makefile.
. . . . . .
98
Makefile.plugin.
. . . . . .
101
. . . . . . .
103
. . . . . . . . . . . . . . . . . . . . .
105
5.11 Predened macros for ptests . . . . . . . . . . . . . . . . . . . . . . . . . . . .
106
5.10 Variables dened by
Makefile.dynamic
Makefile.dynamic
Makefile.plugin. .
115
and
and
and
Makefile.plugin.
INDEX
Index
Lattice, see Lattice
Cfg, 92
check_plugin,
Toolbox, 35, 87, 93
CIL, 92
Abstract Interpretation, 86
Abstract Syntax Tree, see AST
Abstract_interp,
Syntactic Analysis, 92
35, 87, 93
Visitor, 94
Cil, 33, 34, 35, 39, 81
ACSL, 33, 35, 40, 92
API, 34, 35
Frontend, 93
ai, 93
Alarms,
AST, see AST
Visitor, 81
94
Entry Point, 81
Annotation, 35, 82, 85, 94
Annotations, 85, 94
add_assert, 84
ANSI C Specication language, see ACSL
Architecture, 33
Plug-in, 13
AST, 33, 35, 68, 81, 82, 85, 92, 94
Copying, 83, 84
Initializer, 94
Modication, 35, 39, 74, 82, 83
Sharing, see Sharing
Ast, 94
add_monotonic_state,
get, 25, 68
mark_as_changed, 72
mark_as_grown, 72
self, 29, 74, 84
Ast_info, 94
bin,
72
92
Binary, 92
Boot,
41
78, 94
C Intermediate Language, see Cil
Cabs
file, 80
Cabs2cil
convFile,
80
Call graph computation, 35
Callgraph, 35, 92
CEA_INRIA_LGPL, 89
CFG, 94
Cil, 35, 92
cilVisitor, 81, 81
behavior, 84
current_kinstr, 84
fill_global_tables, 83
get_filling_actions, 83, 84
vexpr, 84
vfile, 20
vglob, 82
vlogic_ctor_info_decl, 82
vlogic_ctor_info_use, 82
vlogic_info_decl, 82
vlogic_info_use, 82
vlogic_type_info_decl, 82
vlogic_type_info_use, 82
vlogic_var_decl, 82
vlogic_var_use, 82
voffs, 82
vstmt, 82
vvdec, 82
vvrbl, 82
copy_visit, 83, 84
DoChildren, 21, 22
DoChildrenPost, 20
dummyStmt, 66
get_name, 83
get_kernel_function, 84
get_original_name, 83
get_stmt, 84
inplace_visit, 83
JustCopy, 20
117
INDEX
lzero, 84
reset_behavior_name, 83
set_name, 83
SkipChildren, 20
visitAction, 82
ChangeDoChildrenPost, 82, 84
ChangeTo, 82, 84
ChangeToPost, 82
DoChildren, 82, 84
DoChildrenPost, 82
JustCopy, 82, 84
JustCopyPost, 82
SkipChildren, 82, 84
visitCilAstT ype, 81
visitCilFile, 81
visitCilFileCopy, 81
visitCilFileSameGlobals, 81
visitor_behavior, 83
cil, 39, 92, 92
src, 35, 92
ext, 92
frontc, 92
logic, 93
Cil_datatype, 60
Fundec
Hashtbl, 29
Stmt
equal, 60
Hashtbl, 70
pretty, 60, 66
t, 66
ty, 66, 67
Varinfo, 70
Cil_state_builder, 70,
Stmt_hashtbl, 70
Cil_types, 35, 92
binop
Div, 84
Mod, 84
Block, 20
Break, 20
compinfo, 83, 84
Continue, 20
enuminfo, 83, 84
exp_node
BinOp, 84
fieldinfo, 83, 84
file, 80, 81, 83, 84
fundec, 23
71
GFun, 20
global, 82
Goto, 20
If, 20
Instr, 20
logic_ctor_info, 82
logic_info, 8284
logic_type_info, 82
logic_var, 8284
Loop, 20
offset, 82
relation
Rneq, 84
Return, 20
stmt, 83, 84
Switch, 20
TryExcept, 20
TryFinally, 20
typeinfo, 83, 84
UnspecifiedSequence, 20
varinfo, 70, 71, 8284
CilE, 94
Cmdline, 36, 78, 79, 94
Exit, 79
is_going_to_load, 80
nop, 79
run_after_configuring_stage, 80
run_after_early_stage, 79
run_after_exiting_stage, 79
run_after_extended_stage, 71, 72,
run_after_loading_stage, 80
run_after_setting_files, 80
run_during_extending_stage, 79
stage
Configuring, 80
Early, 79
Exiting, 79
Extended, 79
Extending, 79
Loading, 80
Command, 94
Command Line, 17, 24
-ocode,
59
Option, 53, 75, 75
Parsing, 78
Config, 94
configure.in, 40, 43, 95
check_plugin, 41
check_plugin_dependencies,
118
43
79
INDEX
configure_library, 41
configure_tools, 41
DYNAMIC_plugin, 41
ENABLE_plugin, 41
FORCE_plugin, 41
HAS_library , 42
LIB_SUFFIX, 42
OBJ_SUFFIX, 42
plugin_require, 43
plugin_require_external,
plugin_use, 43
plugin_use_external, 42
REQUIRE_plugin, 41
SELECTED_library , 42
USE_plugin, 41
Db,
42
Consistency, 39, 69, 75, 82, 83
Context Switch, 72, 74
Control Flow Graph, see CFG
Copyright, 89
CP,
99
Dataflow,
35, 86, 92
Dataow analysis, 35, 92
Datatype, 59, 60, 71, 72
Datatype, 59, 60
Bool, 30
bool, 59
char, 59
func, 65, 67
func2, 59
func3, 67
Function, 62
identity, 60
Int, 62
int, 59
List, 62
list, 59
Make, 60, 61
never_any_project, 60
Pair, 70
Polymorphic, 62
Polymorphic2, 62
pp_fail, 61
Ref, 73
S, 60, 73
S_with_collections, 60
Serializable_undefined,
String, 29, 60
Hashtbl, 62
Set, 60
string, 59
Undefined, 61
undefined, 61
unit, 65, 67
34, 36, 64, 64, 65, 88, 93, 94
From.self, 71
Impact.compute_pragmas, 64
Main, 14
extend, 1317, 53, 78, 80, 84
progress, 87
Value
compute, 70, 74
get_stmt_state, 22
is_computed, 22, 30, 69, 74
is_reachable, 22
self, 70, 71, 75
Db.Properties, 86
Db.Value
self, 29
Design, 14
main_window_extension_points, 87
register_source_selector, 24
register_extension, 24, 87
doc, 92
Documentation, 87, 92, 100
Kernel, 88
Plug-in, see Plug-in Documentation
Source, 88
Tags, 88
Dot, 42
Dynamic, 14, 36, 65, 88, 94
get, 65, 66, 67
Parameter, 77
Bool, 77
register, 65, 65, 66
Emitter, 76
Emitter, 94
create, 85,
86
Entry Point, 69
Entry point, 13
Equality
Physical, 72, 73
Structural, 73
66
external, 92
Extlib, 35, 93
the, 84
File,
119
94
INDEX
CodeOutput, 59
SafeArrays, 78
add_code_transformation_before_cleanup, Unicode, 77
81
kernel, 93
create_project_from_visitor, 84
Kernel_function, 70, 94
init_from_c_files, 81
dummy, 66
init_from_cmdline, 81
get_definition, 24
init_project_from_cil_file, 74, 81
Make_Table, 71, 72
init_project_from_visitor, 74, 81
pretty, 66
must_recompute_cfg, 81
t, 66, 70
new_file_type, 80
ty, 66, 67
Floating_point, 94
Kind, 71
FRAMAC_LIBDIR, 16, 17, 25, 45
Lablgtk, 42, 87
FRAMAC_SHARE, 16, 17, 25, 45
add_code_transformation_after_cleanup,
81
From, 71, 72
Lablgtksourceview2, 42
From_parameters
ForceCallDeps, 77
Frontc
add_syntactic_transformation,
Lattice, 34, 35, 87, 93
Function, 35
Globals, 35, 94
Functions
get, 24
set_entry_point,
Lattice_type,
81
LGPL, 89
lib, 92, 93
fc, 92
gui, 92
plugins,
Conguration, 41, 95
Dependency, 42
licences,
24
94
Lmap, 35, 87, 93
Lmap_bitwise, 35,
Header, 89, 100
Location, 86, 93
Hello, 39
Highlighting, 87
Hook, 13
88
Initialization, 66, 78, 78
install-doc-code,
Ival, 35, 93
Journal,
88
14, 36, 94
Journalisation, 60
Journalization, 28, 65, 79
Kernel, 33, 34, 35, 40, 72, 93, 96, 100
Toolbox, 93
Kernel,
75, 94
87, 93
Loading, 69, 74, 79
89, 92
index.html,
89
92
Linking, 3436, 78, 79
Hashtable, 70, 71
headers,
89
License, 89, 100
LICENSES,
licenses,
GUI, 14, 87, 95
gui, 95
Gui_init,
92
Library, 40, 92
69
GnomeCanvas, 42
Gtk_helper
graph_window,
87
Lexing, 34, 35
Locations, 35, 86, 93
enumerate_valid_bits,
Location, 86
location, 86
Location_Bits, 86
Location_Bytes, 86
Zone, 86
Log, 35, 94
add_listener, 57
log_channel, 58
Messages, 53, 54
abort, 55
debug, 55
error, 55
failure, 55
120
86
INDEX
set_negative_option_name,
Parameter_sig, 94
Bool, 76
Builder, 76
EmptyString, 76
False, 76, 76
Int, 76
String, 76
StringSet, 76, 76
True, 76
Zero, 76
Int, 76, 76
S, 76
String_set, 77
Parameter_state
get_selection, 75
fatal, 55
feedback, 55
log, 57
result, 55
verify, 55
warning, 55
with_log, 57
new_channel, 58
print_delayed, 59
print_on_output, 58
set_echo, 57
set_output, 58
with_log_channel, 58
Logging, see Messages
logic,
93
Logic Type System, 93
Logic_const, 86, 93
prel, 84
Logic_typing, 93
Logic_utils, 86
expr_to_term, 84
Loop, 94
78
Parameters, 75
Parsing, 34, 35
Pdg, 72
Platform, 95
Plug-in, 13, 33, 36
Access, 65
Makefile, 44, 8789, 92, 96, 96, 97, 98
Makefile.common, 96, 98
Makefile.config.in, 44, 96, 97, 98
Makefile.dynamic, 14, 16, 17, 25, 45, 45, 63,
API, 28, 65
Architecture, 13
Command Line Options, 17, 24
Compilation, 100
Compiled, 92
96, 97, 102
Makefile.dynamic_config, 96
Makefile.dynamic_config.external, 96
Makefile.dynamic_config.internal, 96
Makefile.generic, 96, 98
Makefile.kernel, 96
Makefile.plugin, 44, 45, 96, 97, 102
Congure, 28
Dependency, 40, 40, 43, 95
Directory, 87, 102
Distribution, 104
Documentation, 19, 88, 88, 104
GUI, 14, 23, 42, 78, 87, 102
Marshaling, 60
Implementation, 93
memo,
Initialization, see Initialization
70
Memoization, 68, 70, 71
Kernel-integrated, 36
Memory State, 34, 35
Access, 64
Memory States
Registration, 64
Toolbox, 93
memory_states,
License, 89
93
Makele, 16, 25
Messages, 53
misc,
Messages, 15
93
Name, 102
Module Initialization, see Initialization
Occurrence, see Occurrence
ocamlgraph,
Pdg, see Pdg
92
Registration, 15, 65
Occurrence, 41, 87
Script, 14
Oracle, 46, 48, 50
Slicing, see Slicing
Sparecode, see Sparecode
Parameter, 68
Parameter_customize,
78, 94
Status, 40
121
INDEX
PLUGIN_PTESTS_OPTS, 104
PLUGIN_TESTS_DIRS, 104
plugin_TESTS_DIRS, 105
PLUGIN_TESTS_LIB, 104
plugin_TESTS_LIB, 105
PLUGIN_TYPES_CMO, 45, 65,
plugin_TYPES_CMO, 105
plugin_TYPES_CMX, 105
PLUGIN_Types_TODOC, 104
PLUGIN_UNDOC, 104
Test, 104
Testing, 19
Types, 34, 64, 93, 102, 104
Wished, 95
plugin_types,
64
Plugin
Kernel-integrated, 95, 98
Plugin, 13, 14, 36, 53, 94
Register, 1517, 24, 53, 66, 76
PLUGIN_BFLAGS, 102
plugin_BFLAGS, 105
PLUGIN_CMI, 102
plugin_CMI, 105
PLUGIN_CMO, 16, 17, 25, 45, 63, 102
plugin_CMO, 105
PLUGIN_DEPENDENCIES, 63, 102
PLUGIN_DEPENDS, 102
PLUGIN_DEPFLAGS, 102
plugin_DEPFLAGS, 105
PLUGIN_DIR, 45, 102
plugin_DIR, 105
PLUGIN_DISTRIB_BIN, 104
PLUGIN_DISTRIB_EXTERNAL, 104
PLUGIN_DISTRIBUTED, 45, 104
PLUGIN_DOCFLAGS, 102
plugin_DOCFLAGS, 105
PLUGIN_DYNAMIC, 102
PLUGIN_ENABLE, 45, 102
PLUGIN_EXTRA_BYTE, 102
PLUGIN_EXTRA_OPT, 102
PLUGIN_GENERATED, 102
plugin_GENERATED, 105
PLUGIN_GUI_CMO, 25, 87, 102
plugin_GUI_OFLAGS, 105
PLUGIN_HAS_EXT_DOC, 104
PLUGIN_HAS_MLI, 45, 63, 102
PLUGIN_INTERNAL_TEST, 45, 104
PLUGIN_INTRO, 88, 104
plugin_LINK_BFLAGS, 105
PLUGIN_LINK_GUI_BFLAGS, 102
plugin_LINK_GUI_BFLAGS, 105
PLUGIN_LINK_GUI_OFLAGS, 102
PLUGIN_LINK_OFLAGS, 102
plugin_LINK_OFLAGS, 105
PLUGIN_NAME, 16, 17, 25, 45, 63, 88, 102,
PLUGIN_NO_DEFAULT_TEST, 104
PLUGIN_NO_TEST, 104
PLUGIN_OFLAGS, 102
plugin_OFLAGS, 105
99, 102
Preprocessing, 35
Pretty_source
PVDecl, 24
PRINT_CP, 99
Printer, 94
printer, 93
Printer_api, 94
S.pp_exp, 20
S.pp_instr, 20
S.pp_stmt, 19
S.pp_varinfo, 20
Project, 28, 39, 60, 68, 81, 83, 93
Current, 68, 69, 72, 74, 75, 83
Initial, 81
Use, 74
Project, 14, 34, 36, 74
clear, 30, 30, 74, 75
current, 68, 74
IOError, 74
load, 74
on, 74, 75
save, 74
set_current, 74, 74
project, 93
Project_skeleton
t, 74
Property, 94
Status, 94
Property, 86, 94
Property_status,
86, 94
Ptests, 46, 100
ptests_local_config.cmo,
PTESTS_OPTS, 100
105
Rangemap,
35
Rte, 45
Saving, 39, 69, 70, 74
Selection, 69, 75
self,
122
71
47
INDEX
t
Session, 74
share,
92
Sharing, 83, 84
Widget, 87
Side-Eect, 73, 78
Slicing, 89
State, 68, 75, 76, 81, 82
Cleaning, 73, 75
Dependency, 69, 71, 72, 75
Postponed, 71, 79
Functionalities, 68
Global Version, 72
Kind, see Kind
Local Version, 72, 73
Task,
Conguration, 48
Directive, 48
Header, 48, 49
Suite, 47, 48, 92
Test
Directive
CMD, 51
COMMENT, 51
DONTRUN, 51
EXECNOW, 51, 52
FILEREG, 51, 52
FILTER, 51
GCC, 51
MACRO, 51, 52
OPT, 49, 51
STDOPT, 51, 52
test_config, 48, 51, 52
tests, 47, 50, 92
Tool, 40
Conguration, 41, 95
Registration, 68, 70
Dependency, 42
Type, 93
Sharing, 73
State, 71
dummy, 71
State_builder, 70, 71
Hashtbl, 29
Ref, 30, 73
Register, 70, 71, 72, 73
State_dependency_graph
S
add_codependencies, 72
State_selection, 75
S
only_dependencies, 74
with_dependencies, 75
S.with_dependencies, 30
with_dependencies, 31
Stmts_graph, 94
Structural_descr
p_int, 60, 62
pack, 62
structure
Sum, 60, 62
94
Test, 19, 46, 100
Name, 71, 72
Selection, see Selection
60, 62
Tags, 100
Sparecode, 47
Special_hooks, 94
src, 39, 92, 93
ai, 35
kernel, 35
lib, 35
memory_state, 35
misc, 35
project, 36
type, 36
Structure,
Dynamic, 59
Library, 59
Value, 59, 65, 66
Type, 14, 36, 93
Abstract, 66, 67
AlreadyExists, 66
name, 62
par, 60, 62
precedence
Basic, 60
Call, 60
t, 59, 65, 66
type, 93
Type value, 93
Typed_parameter,
t, 76
94
Typing, 34, 35
UNPACKED_DIRS,
45, 64, 99
Variable
Global, 35
VERBOSEMAKE,
123
44, 99
INDEX
Visitor, 19, 81
Behavior, 83, 83
Cil, see Cil Visitor
Copy, 74, 83, 83, 84
In-Place, 83, 83
Visitor, 35, 94
frama_c_inplace, 20
frama_c_visitor
current_kf, 84
vglob_aux, 20, 82
vstmt_aux, 21, 22, 82
generic_frama_c_visitor, 81, 84
visitFramacFileSameGlobals, 25
visitFramacFunction, 29
WARN_ERROR_ALL,
44
Website, 89
124