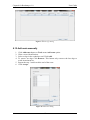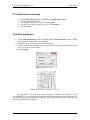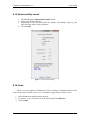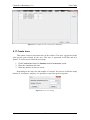
1
Citymob for Roadmaps v1.0 User Guide USER GUIDE Alberto Pardo Calvo Advisors Francisco J. Martinez Piedad Garrido Collaborators Juan Carlos Cano Carlos T. Calafate Pietro Manzoni Manuel Fogue Teruel, March 2011 1 Citymob for Roadmaps v1.0 User Guide Table of Contents 1. Citymob for Roadmaps................................................................................................. 3 2. License.......................................................................................................................... 3 3. Features......................................................................................................................... 4 4. System requirements .................................................................................................... 5 5. Installation .................................................................................................................... 5 6. Running Citymob for Roadmaps.................................................................................. 6 6.1 Check configuration ............................................................................................... 7 6.2 Create a new project ............................................................................................... 8 6.3 Open project ........................................................................................................... 8 6.4 Save project ............................................................................................................ 8 6.5 Import file ............................................................................................................... 8 6.6 Export file ............................................................................................................... 8 6.7 Exit ......................................................................................................................... 9 6.8 Load map ................................................................................................................ 9 6.9 Add randomly vehicles......................................................................................... 10 6.10 Add defined random vehicles ............................................................................. 11 6.11 Add vehicle type................................................................................................. 11 6.12 Add route manually ............................................................................................ 12 6.13 Add vehicles manually ....................................................................................... 13 6.14 Add downtowns.................................................................................................. 13 6.15 Select mobility model......................................................................................... 14 6.16 Views .................................................................................................................. 14 6.17 Create trace ......................................................................................................... 15 6.18 Visualize trace .................................................................................................... 16 6.19 Wizard ................................................................................................................ 16 6.20 About .................................................................................................................. 19 7. Troubleshooting.......................................................................................................... 20 7.1 Configuration problems........................................................................................ 20 7.2 Map problems ....................................................................................................... 22 7.3 Other problems ..................................................................................................... 22 2 Citymob for Roadmaps v1.0 User Guide This document explains how to use Citymob for Roadmaps. The user will find all the steps to create mobility traces and generate simulations in the user manual. This manual is only for users. 1. Citymob for Roadmaps Citymob for Roadmaps (C4R) is a mobility generator for vehicular networks. This means that it is a software which allows simulating traffic in different locations using real maps. Citymob for Roadmaps is a free software because its purpose is to be used by the scientist community. It is possible to access to the source code to validate algorithms. At the same time, users can adapt and fix the algorithms provided by the application. 2. License The license of CityMob for Roadmaps is GNU General Public License version 3. This license is chosen because makes the distribution of the software easier. In addition this licence provides a copy of the source code with the binaries. Therefore the scientist community can validate the solution. Moreover, the license allows modify the source code, so the application can be improved by a third party. The whole terms of use can be found in the C4R folder in a file called “license.txt”. Also is possible to find a unofficial Spanish translation (does not legally state) in the file “licencia.txt”. A disclaimer can be found in the about feature of the application and in the chapter as well. Citymob for Roadmaps (C4R) is a software which uses SUMO to create mobility traces based on real maps extracted from OpenStreetMap. It is specially designed for VANET research. Copyright (C) 20011 Alberto Pardo Calvo This program is free software: you can redistribute it and/or modify it under the terms of the GNU General Public License as published by the Free Software Foundation, either version 3 of the License, or any later version. This program is distributed in the hope that it will be useful, but WITHOUT ANY WARRANTY; without even the implied warranty of MERCHANTABILITY or FITNESS FOR A PARTICULAR PURPOSE. See the GNU General Public License for more details. 3 Citymob for Roadmaps v1.0 User Guide You should have received a copy of the GNU General Public License along with this program; if not, write to the Free Software Foundation, Inc., 51 Franklin St, Fifth Floor, Boston, MA 02110-1301 USA Linking Citymob for Roadmaps statically or dynamically with other modules is making a combined work based on Citymob for Roadmaps. Thus, the terms and conditions of the GNU General Public License cover the whole combination. In addition, as a special exception, the copyright holders of Citymob for Roadmaps give you permission to combine Citymob for Roadmaps program with free software programs or libraries that are released under the GNU LGPL and with code included in the standard release of Citymob for Roadmaps under the GPL license (or modified versions of such code, with unchanged license). You may copy and distribute such a system following the terms of the GNU GPL for Citymob for Roadmaps and the licenses of the other code concerned, provided that you include the source code of that other code when and as the GNU GPL requires distribution of source code. Note that people who make modified versions of Citymob for Roadmaps are not obligated to grant this special exception for their modified versions; it is their choice whether to do so. The GNU General Public License gives permission to release a modified version without this exception; this exception also makes it possible to release a modified version which carries forward this exception. 3. Features The user can find in Citymob for Roadmaps the next features: Highly portable system (tested for Windows and Linux). Generate mobility models using a powerful GUI. Work with real maps from OpenStreetMap. Vehicle routes defined by user. Vehicle random routes. Vehicle flows between 2 points. Attraction points. Vehicles movements defined by mobility models. Mobility models created with a comfortable wizard. Create mobility traces. Export mobility traces to ns-2 format. Export projects to SUMO format. Import files from different Citymob for Roadmaps projects. Visualize simulations. Citymob for Roadmaps simulates the vehicles movements. To this task, users may utilize this system to generate random routes or create routes defined by them. In addition, it is possible to add attraction points. Finally, the software creates movement trace files and allows visualizing these movements. 4 Citymob for Roadmaps v1.0 User Guide 4. System requirements Component Processsor Minimum requirements Pentium III, compatible with PC to 600 MHz 10 GB 1.5 GB 1024x768 Windows or Linux Java 6 SE 0.11.1 56K connection Hard disk RAM Screen resolution Platform Java runtime version SUMO version Internet connection Table 1 Minimum requirements to run Citymob for Roadmaps The minimum capacity of the hard disk could be greater for some tasks. In some circumstances, working with big maps and many vehicles, the trace file size could be greater than 10 GB, but it is unusual. 5. Installation Windows install 1. Open in the CD. 2. Copy the C4R folder into the desired destination folder. Linux install To be able to run Citymob for Roadmaps on Linux you need to install the follow packages: Proj, GDAL, Xerces-c, Fox. If you have not yet installed them, it is recommended to install them from the distro repositories. If it is impossible to find them in the repositories they can be directly installed from the CD. The libraries can be found in the folder called Libraries. 1. 2. 3. 4. 5. 6. Open a shell and enter into the SUMO folder. tar xzf sumo-src-0.11.1.tar.gz cd sumo-0.11.1 ./configure make cp –R ../../C4R <folder> 5 Citymob for Roadmaps v1.0 User Guide 6. Running Citymob for Roadmaps The first step is open the application and to familiarize oneself with the environment. The main window is divided in several areas. The names used for each division will be used along the document. Figure 1 Citymob for Roadmaps main window Main window areas: 1. Options menu. 2. Button panel. 3. Zoom slider. 4. Workspace. 5. State bar. 6. Cursor position. Figure 2 Citymob for Roadmaps toolbar 6 Citymob for Roadmaps v1.0 User Guide Buttons name: 1. New projet. 2. Open project. 3. Save project. 4. Select map. 5. Add vehicles randomly. 6. Add vehicle. 7. Add route. 8. Add downtown. 9. Visualize simulation. 10. Create trace. 11. Wizard. 6.1 Check configuration The first task before creating mobility traces is to check the application configuration. To do this task, follow the next steps: 1. Click Tools menu, and Options. 2. In Windows systems is necessary to indicate the SUMO folder in the SUMO installation path textbox. If the path does not appear, click the folder icon to search the SUMO path. 3. Check OpenStreetMap API textbox. It should be a text like: “http://api.openstreetmap.org/api/0.6/map?bbox=”. This is the API used currently. If the API changes, the new one should be found in http://wiki.openstreetmap.org/wiki/API. 4. Click Accept. Figure 3 Citymob for Roadmaps options dialog 7 Citymob for Roadmaps v1.0 User Guide 6.2 Create a new project 1. 2. 3. 4. Click New project or File menu New Project option. Select a folder. Select a name for the project. Click Save. There is an error in SUMO v0.11.1 which prevents working with paths with spaces. It is highly recommended to avoid paths with spaces. This error is solved in 0.12.2 version but there are other different errors, so it is better keep working with the 0.11.1 version. 6.3 Open project 1. Click Open project button or File menu Open project option. 2. Look for C4R project. 3. Click Open. 6.4 Save project 1. Click Save project button or File menu Save option. 6.5 Import file This option allows adding files from different projects. Even it is possible to add SUMO project files to the current C4R project. To do this task, follow the next steps: 1. Click File menu Import option. 2. Go to the file folder and select it. 3. Click Open. 6.6 Export file This option allows exporting a C4R project to SUMO format. To do this task, follow the next steps: 1. 2. 3. 4. Click File menu Export option. Select the export folder. Write a name for the exported project. Click Save. 8 Citymob for Roadmaps v1.0 User Guide 6.7 Exit Everytime the user wants to exit from the application or close the current Project, Citymob for Roadmaps ask for confirmation to the user. The user can choose amongst exit with save, exit without save and cancel exit actions. Figure 4 Citymob for Roadmaps exit dialog Figure 4 shows the different options when the user tries to exit from the application. These options are explained as follows: 1. Yes: Saves the changes and closes the current project. 2. No: Closes the current project without save changes. 3. Cancel: Cancels close project action. 6.8 Load map It is necessary to create a new project before to perform this task. It is possible to load a map using Import option or downloading it from OpenStreetMap. Figure 5 Citymob for Roadmaps map downloading dialog 9 Citymob for Roadmaps v1.0 1. 2. 3. 4. 5. 6. User Guide Panel of coordinates. Zoom slider. Selection information. Selection. Load map button. Map. To download OpenStreetMap maps follow the next steps: 1. Click Select map button or Tools menu Select map option. 2. Move by the world map looking for the desired position. To move up, down, left, right, drag the cursor clicking the right button. To zoom in or zoom out use the zoom slider or the wheel mouse. 3. Once in the right position and the right zoom select an area. OpenStreetmap does not support download of big maps, so it is important to check out the zoom level. There are two ways to select a map area. The simplest one consists of dragging the cursor with the left mouse button clicked. During the selection the selected area will become blue. The other way consists of putting the longitudes and latitudes in the panel of coordinates. The textbox coincide with the geographical points. The textbox on the top is the North, the left one the West, the right one the East and the bottom one the South. 4. Click Load map to download the selection. A download dialog will be displayed with a button to cancel the operation. When the download is finished the map will be drown in the workspace. 6.9 Add randomly vehicles 1. Click Add vehicles randomly button or Tools menu Add vehicles randomly option. 2. Put the number of vehicles to generate. 3. Put the vehicles rate that will be created in the downtown (must be a number between 0 and 1). 4. Put the departure time of the vehicles in the simulation. Figure 6 Random Vehicles dialog 10 Citymob for Roadmaps v1.0 User Guide 6.10 Add defined random vehicles 1. Click Tools menu, Add defined vehicles randomly option. 2. Select the Start position. It is possible to write the lane identification or clicking the lane in the workspace. If the user clicks the lane, the textbox is filled with the lane identification and the lane becomes blue with a red flag. 3. Perform the same operation than the step before for End position. 4. Write the vehicles number to generate. 5. Write the departure time for the vehicles of the simulation. 6. Click Add vehicle button. 7. To enter more vehicles is possible repeating the steps again. When all the vehicles were added Click Close Panel. Figure 7 Adding undefined random vehicles dialog Figure 8 Detail of the selected lane 6.11 Add vehicle type 1. Click Tools menu, Add vehicle type option. 2. Fill the table with data. The sigma parameter is a value between 0 and 1 to measure the driver imperfection. 3. To add more types just Click Add. 4. to remove types , select a row and Click Remove. 5. Click Accept to exit. 11 Citymob for Roadmaps v1.0 User Guide Figure 9 Vehicles type dialog 6.12 Add route manually 1. 2. 3. 4. Click Add route button or Tools menu Add route option. Write a route identification. Select a edge in the combobox and Click Add. To remove an edge Click Remove. This button only removes the last edge to avoid inconsistencies. 5. Repeat the step 3 until reach the end of the route. 6. Click Accept. Figure 10 Add routes dialog 12 Citymob for Roadmaps v1.0 User Guide 6.13 Add vehicles manually 1. 2. 3. 4. 5. Click Add vehicles button or Tools button Add vehicle option. Fill the fields of the table. It is possible add more vehicles Clicking Add. To remove a vehicle, select a row and Click Remove. Click Accept. 6.14 Add downtowns 1. Click Add downtowns button or Tools menu Add downtown option. When this feature is enabled the cursor changes. 2. Drag the cursor on the map to create downtowns. 3. Fill the dialog with identification for the downtown and the attraction rate. The rate is a value between 0 and 1. 4. Click Accept. Figure 11 Downtown dialog Figure 12 Appearance of a downtown in C4R The appearance of a downtown in the workspace is shown in the Figure 39. The user should be very careful choosing the lanes of the downtown because are made up for all the lanes in the downtown rectangle. These lanes include those which are not entirely included in the rectangle. 13 Citymob for Roadmaps v1.0 User Guide 6.15 Select mobility model 1. Click Tools menu Add mobility model option. 2. Select a model from the list. 3. Depending on the selected model the options will change. Anyway, just write the right values in the textboxes. 4. Click Accept. Figure 13 Mobility model dialog 6.16 Views There are several options in View menu. The procedures to handle the data in the view are the same in all the views, so it is possible to apply them to all the views. 1. Select View menu and the option desired. 2. To remove a row, select the row to be deleted and Click Remove. 3. Click Accept. 14 Citymob for Roadmaps v1.0 User Guide Figure 14 An example of view in Citymob for Roadmaps 6.17 Create trace This option creates a movement trace of the vehicles. The trace is generated in the same project path selected by the user. The trace is generated in SUMO and ns-2 format. To create traces follow the next steps: 1. Click Create trace button or Simulate menu Create trace option. 2. Write the simulation end time. 3. Write the number of traces to create. Depending on the map size and number of vehicles, the process could take many minutes or even hours. Anyway, it is possible to cancel the process anytime. Figure 15 Create trace dialog 15 Citymob for Roadmaps v1.0 User Guide Figure 16 Citymob for Roadmaps create trace dialog 6.18 Visualize trace 1. Click Visualize trace button Simulate menu Visualize trace option. Then the application will open SUMO. The user can visualize the map loaded and the vehicles in movement. Figure 17 Trace visualization using SUMO 6.19 Wizard In addition to all the features previously presented, Citymob for Roadmaps allows creating mobility traces following a wizard. Thus the traces can be created in few minutes. The objective is that the user can create mobility traces without being an expert. The steps of the wizard will be described in this user manual. 16 Citymob for Roadmaps v1.0 User Guide 1. Click Wizard button or About menu Wizard option. It will be displayed a welcome screen. 2. Click Next to continue. Figure 18 Wizard screen asking for a new Project. 3. Choose between Create new Project or Open existing project. After that click Next. 3.1 If Create new Project is chosen then follow the procedure described in section 6.2 and select a between download a map or import it. 3.1.1 3.1.2 If download map is selected then the download map will be displayed. The procedure to download a map is described in section 6.8. If import option is selected, just select the path of the map. 3.2 If Open existing project is selected, follow the procedure described in section 6.3. Figure 19 Wizard screen to create downtowns. 4. Create downtowns. This procedure is described in section 6.14. 17 Citymob for Roadmaps v1.0 User Guide Figure 20 Wizard screen to create random vehicles. 5. Add vehicles randomly in the same way than in section 6.9. Figure 21 Wizard screen to add mobility models. 6. Define mobility models as in section 6.15. 18 Citymob for Roadmaps v1.0 User Guide Figure 22 Wizard screen asking for output format. 7. Select the output format. It is possible choose between create an output trace and visualize the simulation using SUMO. After that click Finish to end. The researchers usually perform several simulations to validate their work. For this reason is possible to create several traces with the same configuration. This feature makes the research task easier avoiding the user click create trace option many times. 6.20 About The About feature shows information about the application. To open the dialog, follow the next steps: 1. Click Help menu About option. Figure 23 About dialog from Citymob for roadmaps 19 Citymob for Roadmaps v1.0 User Guide From this dialog is possible to obtain the following information: C4R version. Disclaimer. Collaborating organizations. People who have collaborated in the development of the application. Moreover, it is possible to access to the different organizations web pages by clicking the logo. 7. Troubleshooting 7.1 Configuration problems Problem The application shows an error message when starts. The message contents the text: “Cannot find configuration file c4r.cfg Please check if the file exists”. Or The application shows an error message when starts. The message contents the text: “The configuration file c4r.cfg could not be correct”. Please go to menu “Tools” option “options” to configure correctly”. Solution The Citymob for Roadmaps configuration file was not created or it is corrupt. To solve this problem follow the next steps: 1. Click Tools menu Options option. 2. In Windows systems is needed to check SUMO installation path textbox. If the SUMO path does not exist then click in the folder button to look for the SUMO installation path. 3. Check out the OpenStreetMap API textbox. It should be a text like: http://api.openstreetmap.org/api/0.6/map?bbox=”. This is the current API of OpenStreetMap. If the API changes, it is possible to find the new one in http://wiki.openstreetmap.org/wiki/API. 4. Click Accept. 20 Citymob for Roadmaps v1.0 User Guide Problem When the application tries to download a map or when tries to create a trace, the application shows a message with the text “Cannot run program “(path)”: CreateProcess error=2, the system cannot find the specified file”. Or When the application tries to visualize a trace shows a error message with the text: “An error ocurred while attemping to read from the file (file name)”. Solution These incidents have the same source. First check out the SUMO installed version. If the version is different of 0.11.1 there is not warranty about the application work. Therefore install the 0.11.1 version to solve the problem. If the SUMO version is right follow the next steps: 1. Click Tools menu Options option. 2. In Windows systems is needed to check SUMO installation path textbox. If the SUMO path does not exist then click in the folder button to look for the SUMO installation path. 3. Click Accept. Problem Downloading a map the application shows and error with a text which looks like an Internet Address. Solution 1. Click Tools menu, Options option. 2. Check the text of the OpenStreetMap API textbox. The text should be like: “http://api.openstreetmap.org/api/0.6/map?bbox=”. This is the current API. If the API changes, it is posible to find the new one in http://wiki.openstreetmap.org/wiki/API. 3. Click Accept. 21 Citymob for Roadmaps v1.0 User Guide 7.2 Map problems Problem When the map download dialog is opened, the window shows a cross mosaic instead of world map. Solution There is no Internet connection. Fix the connectivity problems to solve it. Problem When the user downloads a map appears a message with the text “Connection refused: connect”. Solution The message error means that OpenStreetMap servers are unavaiable. There is further informations about the server status in www.openstreetmap.org. Usually this happens when the servers are closed to maintenance. 7.3 Other problems Problem The application shows a message error with the text “Impossible convert the map to SUMO format. Further information in <path>”. Solution This error happens when any SUMO process cannot be executed successfully. The first step is check the SUMO version is 0.11.1. Different versions could not be compatible. The second step is check that the project path has not spaces. To solve it create a new project is a path without spaces. 22