1
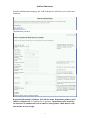
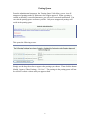
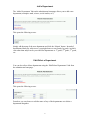
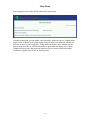
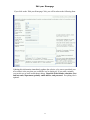
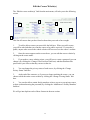
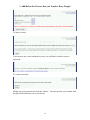
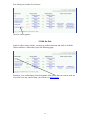
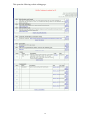
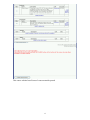
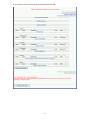
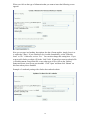
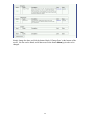
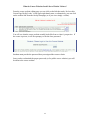
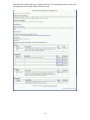
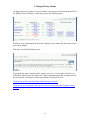
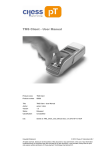
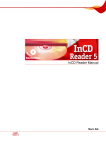
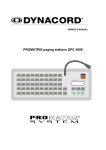
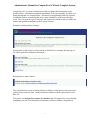
Administrator Manual for Campus Post It Website Template System
Campus Post It is a system which allows teachers to update their homepages on the
school website. Information is updated immediately (from any computer, in school or at
home) through the use of online forms. Absolutely no programming skills are required.
In addition, teachers can quickly and easily create websites for each course that they
teach. They can post any type of message, link, and/or file (which becomes available for
student and guardian download) on these course websites.
Examples include posting a message:
Posting notes or old exams (as a PowerPoint or Word file, for example, but any type of
file can be posted) for students to download:
Posting links to other websites:
They can make their course websites publicly available or make them private (passwordprotected) in which case, they would provide their students with the password to access
their site.
The system was designed by teachers, for teachers and is designed to be a user-friendly
technology time-saver for technology coordinators, teachers, students, and guardians.
1
Table of Contents
How does it work? .............................................................................................................. 3
Administrator Privileges ..................................................................................................... 5
Edit Instructor Homepages, Photos, Course Websites, or Delete an Instructor ............. 6
Add an Instructor ............................................................................................................. 7
Posting Queue.................................................................................................................. 8
Add a Department............................................................................................................ 9
Edit/Delete a Department ................................................................................................ 9
Main Menu........................................................................................................................ 10
Edit your Homepage ......................................................................................................... 11
Upload/Remove your Photo.............................................................................................. 12
Edit the Course Website(s) ............................................................................................... 13
1. Add/Delete the Courses that you Teach or Have Taught .......................................... 14
2. Edit the Site ............................................................................................................... 15
What if you want to Change all of the Due Dates at Once?....................................... 23
What do Course Websites Look Like to Website Visitors?....................................... 25
3. Change Privacy Status ............................................................................................... 27
4. Change Viewing Status ............................................................................................. 28
What do Hidden/Viewable, Public/Private, Course Website Links Look like to
School Website Visitors? ........................................................................................... 29
5. For Private Sites Only: Change Class Password ....................................................... 30
6. For Private Sites Only: Add/Remove Faculty Members ........................................... 31
Support.............................................................................................................................. 33
Note:
This manual is intended for administrators (technology coordinators) only. If you are
not the administrator for your school, you should use the user manual instead.
2
How does it work?
Campus Post It is designed to have a standard look so that it appears to be a seamless part
of your school’s website. Teachers will not have the ability to change colors or fonts on
their homepage or course websites. What they type is what they will see.
To begin, go to the faculty page on your school website. Click on a teacher’s name.
3
This opens the teacher’s homepage.
Teacher’s name and Department get posted here. If they have uploaded a
photo, it will be posted here too.
Teacher’s email address gets posted here. They want to list a
professional address as your primary email address.
They can post a personal website address if you have one.
Optional welcome message gets posted here.
If they list courses that they teach (or have taught),
they will be listed here. The hyperlinks lead to the
course websites. This is the entry point for students
to access your course websites.
This Maintenance link leads to the faculty login page where teachers
have the ability to make changes.
To make changes, the teacher must click on the maintenance link on the bottom right
hand side of the screen.
You can add this page to your Internet browser’s list of Favorites (optional).
Their Username is the primary email address
that is listed on the previous page (it should
appear automatically).
The password should have been given to the
teachers in an email. If they lose their
password, they can simply click on the
‘Forgot your Password?’ link and it will be
emailed to them.
If at any point a teacher needs to change his or her username (primary email address) he
or she can do so by logging in and changing the primary email address listed on his or her
homepage.
4
Administrator Privileges
As an administrator, you can login the same way that teachers do (you must know their
passwords) or you can access any teacher’s pages via the administrator link (with the
administrator username and password) that you were given by us (if you need this link
contact someone on the support page).
5
Edit Instructor Homepages, Photos, Course Websites,
or Delete an Instructor
Using the ‘Edit Instructor Homepages, Photos, Course Websites, or Delete an Instructor’
link from the administrator homepage:
The ‘Edit Instructor Homepages, Photos, Course Websites, or Delete an Instructor’ page
allows you to access any instructor’s homepage, add or remove an instructor’s digital
photo, and edit all course websites. In addition, you can delete an instructor if he or she
has left the school.
2
3
4
1
5
1.
To delete an instructor completely from the website, you should click on the link
labeled ‘Delete’ next to the instructor you wish to remove.
2.
More information on editing an instructor’s homepage can be found here.
3.
More information on uploading/removing an instructor’s photo can be found here.
4.
More information on editing an instructor’s course website can be found here.
5.
The ‘Requires Approval?’ drop down allows you to decide which instructors can
post information without approval (posted immediately), and which instructors’ postings
you must approve before they go live (see the Posting Queue for more information on
this). You can change these settings here by choosing Yes (to require approval) or No (to
allow the instructor to post immediately) and clicking on the button labeled ‘Update
Instructor Approval Settings’.
6
Add an Instructor
From the administrator homepage, the ‘Add an Instructor’ link allows you to add a new
instructor:
The link takes you here:
Required fields include: salutation, first and last name, department, primary email
address, and password. Everything else is optional. Upon adding a new instructor,
the instructor is automatically sent an email (to their primary email address) with
instructions on how to login.
7
Posting Queue
From the administrator homepage, the ‘Posting Queue’ link allows you to view all
unapproved postings made by instructors who require approval. When a posting is
created or edited by a restricted instructor, you will receive an email notification. You
can visit the posting queue as often as you like. Only new unapproved postings will
reside in the posting queue.
This opens the following screen:
Simply use the drop down box to approve the postings you choose. Then click the button
labeled ‘Approve These Postings – Go Live!’. The postings in the posting queue will not
be visible to website visitors until you approve them.
8
Add a Department
The ‘Add a Department’ link on the administrator homepage allows you to add a new
department (examples: math, science, social studies, etc.):
This opens the following screen:
Simply add the name of the new department and click the ‘Submit’ button. Instead of
departments labeled by subject area, you might choose to sort faculty by grade, in which
case rather than subject areas you would list departments as 1st grade, 2nd grade, 3rd grade,
etc.
Edit/Delete a Department
You can also edit or delete departments using the ‘Edit/Delete Departments’ link from
the administrator homepage:
This opens the following screen:
From here you can choose to edit the name of any of the departments or to delete a
department altogether.
9
Main Menu
Upon logging in, the teacher will be taken to the main menu:
From this main menu you can update your homepage, upload or remove a digital photo,
create course websites for all of the courses that you teach (even different websites for
different sections if you would like). If they make any of the course websites private
(password-protected) you will have the ability to grant other teachers access to them
(without having to know the password) and you can view those websites that other
teachers have granted you access to from here also.
10
Edit your Homepage
If you click on the ‘Edit your Homepage’ link, you will be taken to the following form:
Updating this information immediately updates the website, so be sure to proofread your
text so that it is the way that you would like it to be displayed. If you make a mistake,
you can always go back in and change things. Required fields include: salutation, first
and last name, department, primary email address, and password. Everything else is
optional.
11
Upload/Remove your Photo
If you click on the ‘Upload your Photo’ link, you will be taken to the following form:
Before uploading a photo, you should resize it, using a photo editing program, so that it
fits the rectangular shape or approximately width = 74 pixels and height = 94 pixels
(width = 1” and height = 1 ¼”). In addition, you should name the file the id number
provided. Then simply click the ‘Browse’ button and locate the file on your machine.
Once you have found it and clicked the ‘Open’ button in the new window, you should
click the ‘Upload’ button.
You should then see a screen like this:
You can now click the button that reads ‘Back to Main Screen’. If you like the way your
photo looks, you can move on to something else, or close the window. If you want to
change the photo, you can edit your file using your photo editing software and then click
on the ‘Upload your Photo’ button from the main menu and repeat the steps from above.
If at some point you decide that you don’t want a photo up at all, you can click the
‘Remove your Photo’ link from the main menu.
12
Edit the Course Website(s)
The ‘Edit the course website(s)’ link from the main menu, will take you to the following
screen:
4
5
2
3
6
1
This lists all courses that you have listed as those that you teach or have taught.
1.
To add or delete courses you must click the link here. When you add a course,
you will be asked whether you want the course to be public or private. If you make it
public, anyone who accesses the school website will have access to the course’s website.
2.
Once the course appears on the screen above, you can edit the course website by
clicking on the course name.
3.
If you make a course website private, you will have to create a password (you can
change it by clicking the ‘Change Class Password’ link here) and then distribute this
password to your class so that they can access the site.
4.
You can change the privacy status of each course, by clicking the ‘Change
Privacy Status’ link here.
5.
At the end of the semester, or if you are no longer teaching the course, you can
choose to hide the entire course website by clicking the ‘Change Viewing Status’ link
here.
6.
You can also allow certain faculty members to have access to your private course
website (without knowing the password) by clicking the ‘Add/Remove Faculty Members’
link here.
We will go into depth on each of these features in the next section.
13
1. Add/Delete the Courses that you Teach or Have Taught
To insert a course:
If you insert a new course and make it private you will then be asked to create a
password:
To create a password:
Simply type your password and click the ‘submit’. You must provide your students with
this password so that they can access the site.
14
Now when you visit the list of courses:
The new course appears.
2. Edit the Site
Again, to edit a course website, you must go to the main menu and click on ‘Edit the
course website(s)’ which takes you to the following page:
From here, you would simply click on the name of the course that you want to work on.
If you don’t see any courses listed, you will have to add a course.
15
This opens the following website editing page:
16
This course website has all sorts of course materials posted.
17
A new course with no materials posted would look like this:
18
When you click on the type of information that you want to insert the following screen
appears:
Here you can type in a heading, description, due date (if none applies, simply leave it as
is with today’s date). If you want this to be viewable immediately, set the ‘Hide this
Item?’ to ‘No’. Otherwise, set it to ‘Yes’. You can also change this setting later. If you
want to add a link to a website, fill in the ‘Link’ field. If instead you want to upload a file
(a Word document, PowerPoint file, or any other type of file) click on the ‘Browse’
button and locate your file on your machine. Click ‘Open’ and then click ‘Submit’ on
this form when you are finished.
Example of a textbook posting with a link to the textbook website:
19
Example of a syllabus posting with an uploaded Word file:
Once the material has been posted, you will have the ability to edit or delete it at any time
by simply editing the course website. Additionally, you have the option to hide any of
the items and unhide them when you are ready for website visitors to see them.
20
To hide an item, simply click on the checkbox to the left of the item.
Then click on the button labeled ‘Hide Checked Items’.
Website visitors will not see hidden items. All hidden items will appear toward the
bottom of the screen and you have the option to unhide them at any time.
21
To unhide an item scroll down toward the bottom of the page to the list of hidden items:
Once you have checked the items that you would like to unhide simply click the ‘Unhide
checked items’ button and your items will become visible to all website visitors.
22
What if you want to Change all of the Due Dates at Once?
From the course website editing page you can click on the link that reads ‘Edit all Due
Dates at Once’ in the upper right hand corner. This brings up a screen which allows you
to change any (or all) of the due dates on your course page without having to edit each
item individually.
23
Simply change the dates and click the button labeled ‘Change Dates’ at the bottom of the
screen. No date can be blank, and all date must fit the format dd/mm/yy in order to be
changed.
24
What do Course Websites Look Like to Website Visitors?
From the course website editing page you can click on the link that reads ‘See how this
Course Page Really Looks.’ in the upper right hand corner, or alternatively you can click
on the website link from the faculty homepage (as if you were simply a visitor).
You will see what the course website actually looks like from a visitor’s perspective. If
the course is private, it will first prompt you for the class password:
Students must provide the password that you assigned the course website.
Once you have submitted the proper password, (or for public course websites) you will
be taken to the course website:
25
It should look similar to the way it looked when you were editing the course website, but
any items that you selected to hide will not be seen:
26
3. Change Privacy Status
To change the privacy status of a course website, you must go to the main menu and click
on ‘Edit the course website(s)’ which takes you to the following page:
From here, you would simply click on the ‘Change Privacy Status’ link next to the course
you want to change.
This takes you to the following screen:
If you make the course website public, anyone can view it. If you make it private, you
will then be asked to provide a password. Upon creating the password, you must provide
the password to your class(es) so that your students can access the site.
Click here to see the steps associated with creating a password.
Click here to see what public verses private course websites look like to school website
visitors.
27
4. Change Viewing Status
If you want to hide the course website (making it inaccessible to everyone) you can
choose to hide the course website by going to the main menu and clicking on ‘Edit the
course website(s)’ which takes you to the following page:
From here, you would simply click on the ‘Change Viewing Status’ link next to the
course you want to change.
This takes you to the following screen:
28
What do Hidden/Viewable, Public/Private, Course Website Links
Look like to School Website Visitors?
To see what hidden verses viewable, and public verses private, course websites look like
to the public, go back to the instructor homepage by clicking the link from the ‘Edit the
course website(s)’ menu which opens the homepage in a new window (or alternatively,
visit the school website and click on the faculty page and then click on your name from
the list of faculty):
Opens the homepage:
These three courses have the viewing status ‘View’.
Anyone can visit ‘H3’ and ‘Regents Review Global
History’, but ‘technology’ visitors must have the
password (because it is private).
These two courses have the viewing status ‘Hide’
There is no link to a course website.
29
5. For Private Sites Only: Change Class Password
If you want to change the password on a private course website you can go to the main
menu and click on ‘Edit the course website(s)’ which takes you to the following page:
From here, you would simply click on the ‘Change Class Password’ link next to the
private course that you want to change. Public courses do not require passwords to
access them.
This takes you to the following screen:
Your current password should be shown and you can make changes and then click the
‘Submit’ button. If you want to remove the password restriction entirely, you must
change the privacy restriction on the course website by visiting the ‘Change Privacy
Status’ link from the ‘Edit course website(s)’ menu.
Click here to see what public verses private course websites look like to school website
visitors.
30
6. For Private Sites Only: Add/Remove Faculty Members
If you want to allow other faculty members to see your private course website go to the
main menu and click on ‘Edit the course website(s)’ which takes you to the following
page:
From here, you would simply click on the ‘Add/Remove Faculty Members’ link next to
the private course that you want to change. Faculty members can already access any
public course so there is no need to add them to those.
This takes you to the following screen:
Generally, the only faculty member that will have access by default is you. If you want
to remove access for any of the faculty members in the list, simply click the checkbox
next to their names and then click the ‘Delete these Faculty Members’ button. They will
no longer have access to your private course website.
31
If you want to allow other faculty members to see your private course, simply click the
‘Add more Faculty Members’ button. This takes you to a list of all faculty members who
do not have access:
To add faculty members, simply click the checkbox next to their names and then click the
‘Add these Faculty Members’ button. They will now have access to the private course
website.
32
Support
For further assistance, contact the technology coordinator at your school. He or she has
the ability to change all components that you have access to, and he or she can
add/remove faculty members, and departments. He or she can also schedule training
sessions with a member of our staff.
If you require more help, contact our sales and training consultant: Jennifer Parkinson via
email: [email protected] or phone: 631-886-1186.
For technical support (if you see an error message), contact our support staff via email:
[email protected] or phone: 631-886-1186.
33