1
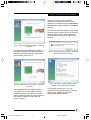
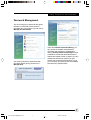
C o py r i g h t
Copyright
Fujitsu Limited has made every effort to ensure
the accuracy and completeness of this document.
However, as ongoing development efforts are
continually improving the capabilities of our
products, we cannot guarantee the accuracy of
the contents of this document. We disclaim
liability for errors, omissions or future changes.
LifeBook is a trademark of Fujitsu Limited.
Other product names are trademarks or
registered trademarks of their respective
companies.
© Copyright 2007 Fujitsu Limited. All rights
reserved. No part of this publication may be
copied, reproduced or translated, without the
prior written consent of Fujitsu Limited. No part
of this publication may be stored or transmitted
in any electronic form without the written consent
of Fujitsu Limited.
Microsoft, Windows, MS, MS-DOS, Windows NT
and Windows Vista are registered trademarks of
the Microsoft Corporation of the United States in
the United States and other countries.
Operations are subject to the following two
conditions:
Phoenix is a registered trademark of Phoenix
Technologies Corporation of the United States.
(2) This device must accept any interference
received, including interference that may
cause undesired operation.
Copyright© 1981-1999 Microsoft Corporation, All
rights reserved.
(1) This device may not be allowed to cause
harmful interference.
Website: www.pc-ap.fujitsu.com
Copyright© 1999 Phoenix Technologies, Ltd., All
rights reserved.
DECLARATION OF CONFORMITY
according to FCC Part 15
i
Intro_Vista supplement_EN
1
5/1/07, 04:19 pm
AUSTRALIAN WARNINGS
WARNING
FOR SAFETY REASONS, ONLY CONNECT
EQUIPMENT WITH A TELECOMMUNICATIONS COMPLIANCE LABEL. THIS INCLUDES
CUSTOMER EQUIPMENT PREVIOUSLY LABELLED PERMITTED OR CERTIFIED.
Connection of Non Certified/Approved
peripherals may result in the equipment
operating outside the Australian EMI
Standards.
Modems connected to the Australian
telecommunications network must be operated
in accordance with the Labelling Notice. This
modem has been specifically configured to
ensure compliance with the ACA Standards. Do
not adjust your modem or software outside the
values indicated below. To do so would result in
your modem being operated in a non-compliant
manner.
Call Attempts/Retries:
Applications software shall be configured so that
no more than 3 attempts are made to establish a
connection to a given number (Note: if the modem
can detect service tones, up to 10 attempts can
be made). If the call sequence is unsuccessful,
there shall be a delay of at least 30 minutes
before attempting to call the number again.
Failure to set the modem and any application
software used with the modem, to the values
shown above will result in the modem being
operated in a non-compliant manner.
Consequently, this would be in violation of the
Labelling Notice for this equipment and the
Telecommunications Act 1997 prescribes
penalties for the connection of non-compliant
equipment.
ii
Intro_Vista supplement_EN
2
4/1/07, 10:55 am
C o py r i g h t
NEW ZEALAND WARNINGS
The grant of a Telepermit for any item of terminal
equipment indicates only that Telecom has
accepted that the item complies with minimum
conditions for connection to its network. It
indicates no endorsement of the product by
Telecom, nor does it provide any sort of warranty.
Above all, it provides no assurance that any item
will work correctly in all respects with another
item of Telepermitted equipment of a different
make or model, nor does it imply that any product
is compatible with all of Telecom’s network
services.
This equipment is not capable under all operating
conditions of correct operation at the higher
speeds for which it is designed. 56 KBPS
connections are likely to be restricted to lower
bit rates when connected to some PSTN
implementations. Telecom will accept no
responsibility should difficulties arise in such
circumstances.
Immediately disconnect this equipment should it
become physically damaged, and arrange for its
disposal or repair.
This equipment shall not be used in any manner,
which could constitute a nuisance to other
Telecom customers.
This equipment shall not be set to make
automatic calls to the Telecom “111” Emergency
Service.
This device is equipped with pulse dialing while
the New Zealand standard is DTMF tone dialing.
There is no guarantee that Telecom lines will
always continue to support pulse dialing. It is
strongly recommended that pulse dialing is not
used.
Some parameters required for compliance with
Telecom’s Telepermit requirements are
dependent on the equipment (PC) associated
with this device. The associated equipment shall
be set to operate within the following limits for
compliance with Telecom’s Specifications:
For repeat calls to the same number.
There shall be no more than 10 call attempts
to the same number within any 30 minute
period for any single manual call initiation and
the equipment shall go on-hook for a period of
not less than 30 seconds between the end of
one attempt and the beginning of the next
attempt.
For Automatic calls to different numbers.
The equipment shall go on-hook for a period
of not less than 5 seconds between the end of
one attempt and the beginning of the next
attempt.
For Automatically answered Incoming
Calls.
Incoming calls shall be answered between 3
and 30 seconds from the start of the ringing.
For correct operation, the total of the RNs of all
devices connected to a single line at anytime
should not exceed 5. The RN of this Equipment
is 0.5.
WARNING:
CONNECTION OF NON CERTIFIED/
APPROVED PERIPHERALS MAY RESULT IN
THE EQUIPMENT OPERATING OUTSIDE THE
NEW ZEALAND EMI STANDARDS.
iii
Intro_Vista supplement_EN
3
4/1/07, 10:55 am
NOTE: Modem setting in Windows
Vista
A. If you are located in Australia
1. Click Start select Control panel select
"Phone and Modem Options".
2. Choose "Australia" in What Country/
region are you in now? pull down menu
bar.
B. If you are located in New Zealand
1. Click start select Control panel select
"Phone and Modem Options".
2. Choose “New Zealand in What Country/
region are you in now? pull down menu
bar.
3. Select Phone system as "Tone Dialing".
4. Click OK.
3. Select Phone system as "Tone Dialing".
4. Click OK.
NOTE:
The screens and illustrations shown in this
examples may slightly vary depending on the
operating environment that you have installed.
iv
Intro_Vista supplement_EN
4
4/1/07, 10:55 am
Ta b l e o f C o n t e n t s
Table of Contents
USING FINGERPRINT AUTHENTICATION ............................................................... 1
Characteristics of fingerprint authentication ....................................................................................
OmniPass Enrollment Wizard .........................................................................................................
OmniPass Password Replacement function ...................................................................................
Password Management ...................................................................................................................
File and Folder Encryption ..............................................................................................................
Backup and Restore OmniPass User Profiles ...............................................................................
OmniPass Control Center Overview ...............................................................................................
Version Information .........................................................................................................................
Scroling ...........................................................................................................................................
1
2
3
7
8
9
11
14
14
SHOCK SENSOR UTILITY ........................................................................................ 15
NOTE:
A copy of LifeBook User's Manual is located in your Microsoft Window OS or you can find it in Fujitsu’s
website at http://www.pc-ap.fujitsu.com/. You can use this LifeBook User's Manual to find out more
information about the functions and features of your notebook.
v
TOC_Vista supplement_EN
5
5/1/07, 04:15 pm
U s i n g F i n g e r p r i n t Au t h e n t i c a t i o n
USING FINGERPRINT
AUTHENTICATION*
With fingerprint authentication, you can omit
entering a user name and a password by just
sliding your finger onto the fingerprint sensor at
the time of logging in homepages or logging on
Windows. This chapter describes how to use
fingerprint authentication.
* NOTE:
This is only applicable for LifeBook with
Fingerprint Sensor.
To use fingerprint authentication, the user’s
fingerprints must be registered.
Characteristics of fingerprint
authentication
Fingerprint authentication can be
used in the following case.
• Logging on to Windows
When the user account of Windows is
password-protected, only persons who know
that password can log on to Windows using
that account. However, you have to enter the
password each time when you log on to
Windows.
With use of fingerprint authentication, you
can log on to Windows by only authenticating
fingerprints that have previously been
registered, thus omitting entering a
password.
• Canceling password-protected screen
saver
You can lock your computer if the screen
saver is password-protected. However, you
have to cancel this lock when canceling the
screen saver.
With use of fingerprint authentication, just
authenticating fingerprints that have
previously been registered enables this lock
to be canceled, thus omitting entering a
password.
• Logging into the homepage that requires
an ID (user name) and a password
To log into the homepage of which security
is set up, you may have to enter log-in
information such as an ID (user name) and
a password.
With fingerprint authentication, you can log
into these homepages by just authenticating
fingerprints if log-in information is previously
memorized for specific homepages.
Status for entering log-in information differs
depending on homepages; direct entering
log-in information into homepages, and
indication of screens specific to entering. In
either case, log-in using fingerprint
authentication can be performed.
• Recovery from the power-saving status
If the computer is password-protected for the
recovery from power-saving status, you have
to enter a password each time when your
computer is recovered from the power-saving
status.
With use of fingerprint authentication, you
can recover from the power-saving status by
authenticating fingerprints that have
previously been registered, thus omitting
entering a password.
1
P01-14_Vista supplement_EN
1
4/1/07, 10:55 am
OmniPass Enrollment Wizard
Figure 2: OmniPass Enrollment Wizard – User Name
& Password
Figure 1: OmniPass Enrollment Wizard - Welcome
The OmniPass Enrollment Wizard guides the
user through the process of enrolling an
OmniPass user. If you do not see the screen at
Startup, you can invoke the wizard by clicking
on the Windows taskbar; select All
Programs; select Softex and click on the
OmniPass Enrollment Wizard (see Figure 1).
To continue, click Start. Input the User Name
and Password (see Figure 2). The Domain field
is the local computer name with the “Local
Machine” appended to it. However, for domain
user, they should select the appropriate
domain name they belong to. Please check
with your administrator. Click Next to proceed.
Figure 3: OmniPass Enrollment Wizard – Enrolling
with OmniPass
Next, you are to select the finger that you wish
to enroll in OmniPass (see Figure 3). Notice
that the red arrow
indicates the finger that
you are currently enrolling in and the green
check indicates the finger you have already
enrolled with OmniPass. In the case of you
choosing a finger with green check (already
enrolled), OmniPass software allow you to
enroll. However, it will overwrite the old
fingerprint. Once you have selected the finger
to enroll, click Next.
You can click on the Practice button to practice
on the fingerprint enrolling especially for first
time users.
2
P01-14_Vista supplement_EN
2
4/1/07, 10:55 am
U s i n g F i n g e r p r i n t Au t h e n t i c a t i o n
As seen in Figure 5, upon successful
verification, the window will show a green
capture in the window and the text Verification
Successful beneath the window. Click Next to
proceed.
OmniPass recommends that you enroll at least
two fingers (see Figure 6) and if you choose to
enroll the second finger, please repeat the
process as shown in Figure 3, Figure 4 and
Figure 5.
Figure 4: OmniPass Enrollment Wizard – Capturing
Fingerprint
OmniPass will now capture the fingerprint of
the finger selected for OmniPass enrollment. It
will takes up to three fingerprint captures for
the enrollment (see Figure 4).
Figure 5: OmniPass Enrollment Wizard – Fingerprint
Verification
After OmniPass has successfully capturing
your fingerprint, you will need to verify the
enrolled fingerprint (see Figure 5). You will
need to repeat the action as you have done in
the capturing fingerprint section done as
shown in Figure 4.
Figure 6: OmniPass Enrollment Wizard – OmniPass
recommends at least two fingers
Figure 7: OmniPass Enrollment Wizard – Audio,
Taskbar, Authentication Window Setting
In this section (see Figure 7), you can
customize the OmniPass with your preferred
audio prompt, taskbar tips as well as
Authentication Window setting.
3
P01-14_Vista supplement_EN
3
4/1/07, 10:55 am
Figure 10: OmniPass Enrollment Wizard – Backup
File Password
Figure 8: OmniPass Enrollment Wizard – Backup
User Profile
To proceed, click Next. In this section of user
enrollment, you are required to back up the
newly created user profile (see Figure 8). The
backup profile can be restored in the event you
re-install OmniPass or replace your computer,
otherwise you will not be able to access your
password protected applications and websites.
Besides that, you will not be able to decrypt the
files previously encrypted with OmniPass. To
proceed, click Backup Now.
Figure 11: OmniPass Enrollment Wizard –
Congratulations
OmniPass has successfully created the new
user account and now you are ready to use
OmniPass to manage passwords, encrypted
files etc.
Figure 9: OmniPass Enrollment Wizard – Backup
User Profile
You will be prompted to save the backup of the
profile in your preferred location (see Figure 9)
and a password for the backup file (see Figure
10). This password will be required when you
are restoring this profile in the future.
4
P01-14_Vista supplement_EN
4
4/1/07, 10:55 am
U s i n g F i n g e r p r i n t Au t h e n t i c a t i o n
OmniPass Password
Replacement function
In this section of the OmniPass Password
Replacement function, you will learn how you
can teach OmniPass of your login credentials.
You can authenticate with OmniPass the next
time you gain access to the website where you
have taught OmniPass with the set of login
credentials. The description in the following
section does not indicate exhaustive password
replacement function that you can do.
Note: The password replacement functionality
is not limited to restricted access websites only.
Register log-in information on
homepages
To log into homepages of which security is set
up, you may have to enter log-in information
such as an ID (user name) and a password.
With fingerprint authentication, you can log in
these homepages by only sliding your finger
onto the fingerprint sensor if log-in information
is previously memorized for specific
homepages. Register log-in information
according to the following procedure.
3. Right-click on the OmniPass icon
from the notification area in the lower
right hand corner of the screen and
selects “Remember Password.”
• The mouse pointer will change into
Register log-in information on homepages
1. Display a homepage you want log-in
information to be registered.
2. Enter log-in information.
• When a screen specific for entering log-in
information is indicated, do not press the
“Sign-in” or “OK” button, etc.
4. With the mouse pointer changed to
,
click on the area of log-in information
entered in Step 2.
5
P01-14_Vista supplement_EN
5
4/1/07, 10:55 am
5. Next, you will be prompted to enter a
Friendly Name for the website.
• It is recommended that you input a name
that will reminds you which website you
are logging on.
• You can have different sets of login
credentials associated with the same
password-protected resource. However,
please provide different friendly name to
it. If you provide the same friendly name,
OmniPass will overwrite the previous set
of credentials associated with the
password-protected resource.
• OmniPass will be using the friendly name
to choose one from the many credentials
remembered for the same site.
• Automatically enter this password
protected site when it is activated. Do
not prompt for authentication is a less
secure option. If checked, OmniPass will
allow you to log onto the passwordprotected website without prompting for
authentication.
WARNING: Should you leave your
computer unattended, unlocked, with
your OmniPass user logged in, anyone
using your computer can browse to your
password protected sites and gain
automatic access.
• Click Finish to complete the remember
password procedure. The site location,
credentials to access the site, and the
OmniPass authentication settings for the
site are now stored in OmniPass’ secure
database.
• The OmniPass authentication settings
(Settings for this Password Site) can
always be changed in Manage Vault via
Manage Your Passwords in OmniPass
Control Center.
• Automatically click the “OK” or
“Submit” button for this password
protected site once the user is
authenticated. When selected, you will
be prompted to authenticate with
OmniPass each time for an access to the
password-protected website. Upon
successful authentication, you will be
logged on automatically.
6
P01-14_Vista supplement_EN
6
4/1/07, 10:55 am
U s i n g F i n g e r p r i n t Au t h e n t i c a t i o n
Password Management
You can manage your passwords through an
interface in OmniPass. Double-click the
OmniPass key in the system tray and click on
Manage Your Passwords.
You will be prompted to authenticate with
OmniPass before gaining access to the
Manage Vault.
Under the Password Protected Dialog, you
can choose the website remembered by
OmniPass and manage the credentials by
clicking Unmask Values. Delete Page is used
to delete the credentials associated with the
website but ceased to exist or expired. The two
checkboxes determines whether you gain
access with OmniPass authentication or logs
you on directly upon entering the remembered
site without any authentication.
7
P01-14_Vista supplement_EN
7
4/1/07, 10:55 am
File and Folder Encryption
Besides managing passwords for the
password-protected resources, OmniPass
enables you to encrypt and decrypt files and
folders in your system. Encryption is converting
your data to a form in which unauthorized user
cannot read. Once a file is encrypted, it needs
to be decrypted so that the file can be read or
accessed.
If you choose to encrypt a folder, the folder and
all the files in this folder will be encrypted.
Contents in C:\Windows and C:\Program
Files and the folder where OmniPass is
installed cannot be encrypted.
Encrypted file will have the extension “.opf”
whereas the encrypted folder will have the
extension “.opef”.
To encrypt a file or folder, right-click on it and
selects OmniPass Encrypt File(s). You will be
prompted to authenticate with OmniPass for
the encryption.
To decrypt a file or folder, right-click and select
OmniPass Decrypt File(s). You will need to
authenticate to OmniPass for the decryption
process.
8
P01-14_Vista supplement_EN
8
4/1/07, 10:55 am
U s i n g F i n g e r p r i n t Au t h e n t i c a t i o n
As mentioned earlier, when encrypting a folder,
the folder and all the files in this folder will be
encrypted. Files that are copied into this
encrypted folder will also be encrypted. The
files in this folder can be read and modified
and they will be encrypted automatically once
saved and closed as long as they remain in
that folder. In order to decrypt a file in the
encrypted folder, you can right-click on the file
and select Decrypt To….
Sample icon for encrypted file versus icon for
non-encrypted file is shown above.
Backup and Restore
OmniPass User Profiles
Backup OmniPass User Profile
Select Backup a user’s OmniPass profile to
back up the OmniPass user profile thru the
OmniPass Enrollment Wizard.
You need to select a target location for the file
to be decrypted. However, the original
encrypted file will still remain in the encrypted
folder.
You will need to authenticate to backup your
profile and to save the profile (“.opi”) in the
desired location upon successful
authentication.
9
P01-14_Vista supplement_EN
9
4/1/07, 10:55 am
Restore OmniPass User Profile
To restore a user profile, select the Restore a
user’s OmniPass profile and select the profile
to be restored.
The user profile contains all your user specific
OmniPass data. It is encrypted and password
protected. However, this profile does not
contain any of the encrypted data files. You can
associate a password with the backup profile.
You may be prompted for a password for the
backup profile if it is password-protected.
When selecting the .opi file in a restore,
OmniPass will prompt you for authentication.
The credentials that will allow a user profile to
be imported are the Windows login credentials
of the exported user. They are the credentials
that had to be submitted when the user profile
was exported. You will need User Name,
Password, and Domain.
10
P01-14_Vista supplement_EN
10
4/1/07, 10:55 am
U s i n g F i n g e r p r i n t Au t h e n t i c a t i o n
OmniPass Control Center
Overview
The OmniPass Control Center can be
accessed by the following:• Clicking
on the Windows taskbar; select
All Programs; select Softex; click
OmniPass Control Center
• Double-click on the Softex OmniPass in the
Control Panel
• Right-click on the OmniPass icon
from
the notification area in the right corner of the
screen and click open.
Manage Your Passwords
Please refer to Password Management
section for the Manage Your Passwords
portion of the Control Center.
Protect Your Files
In this portion of the OmniPass Control Center,
Protect Your Files provides a Windows
Explorer feel of the files and folders that you
can encrypt and decrypt. However, files that
are in use cannot be encrypted. This also
includes system files and the folder OmniPass
is installed. You will be prompted to
authenticate with OmniPass for an encrypt/
decrypt process.
Please refer to File and Folder Encryption
section for more info.
There are five main portions in the OmniPass
Control Center namely:• Manage Your Passwords
• Protect Your Files
• Change Your User Settings
• Change Your System Settings
• Run Enrollment Wizard
11
P01-14_Vista supplement_EN
11
4/1/07, 10:55 am
Change Your User Settings
Change Your System Settings
With this selection, you can adjust your
preferences such as: Audio setting, Taskbar
tips, Authentication Window setting and File
Encryption setting.
OmniPass system settings refer to the setting
of your OmniPass software and the setting will
apply to all the users who logs on to the
system.
You can set how OmniPass can notify a user in
the event of a successful login or denied
access through the Change user audio
settings and the Change taskbar tips shown
to the user interfaces.
Through the Modify OmniPass startup
options, you can determine whether a user is
set to automatically logged on to OmniPass at
startup, manually log on to OmniPass at
startup or do not log on to OmniPass at
startup.
You also can set the appearance of the
OmniPass Authentication window through the
Change authentication window settings,
whether you prefer a transparent or solid
window.
The second selection: Modify Windows Fast
User Switching Option allows Windows users
to switch between their Windows desktops
using OmniPass. This feature should only be
enabled if your system is not protected by
Ctl+Alt+Del at logon.
12
P01-14_Vista supplement_EN
12
4/1/07, 10:55 am
U s i n g F i n g e r p r i n t Au t h e n t i c a t i o n
Run Enrollment Wizard
In this portion, you can add/remove user to/
from OmniPass, backup/restore a user’s
OmniPass profile as well as to modify a user’s
device enrollment.
Note: The OmniPass guide indicated in this
manual serves as a rough guide to the usage
of the OmniPass software and the diagram
may differ from the version installed in the
user’s system. Please refer to the user’s
manual in the OmniPass software for more
information and details.
You will need to authenticate with OmniPass
whenever you wish to modify the user’s device
enrollment. For an example, you can enroll
more fingers with OmniPass and it is not
limited to just one or two fingers.
13
P01-14_Vista supplement_EN
13
4/1/07, 10:56 am
Version Information
Scrolling
Version information on fingerprint
authentication utility is displayed in the lefthand-side pane of the window.
The Fingerprint sensor now comes with a
scrolling function. Taking advantage of the
sensor’s technology, users will be able to scroll
up and down a document by swiping the finger
upwards to scroll up and swiping down to scroll
down.
Version Details
14
P01-14_Vista supplement_EN
14
4/1/07, 10:56 am
Shock Sensor Utility
SHOCK SENSOR UTILITY
General information
The Shock Sensor Utility is designed to decrease
the risk of damage to the computer's hard disk
drive (HDD) in the event of excessive impact or
vibration. Additionally, the Shock Sensor Utility
has the ability to improve the security of the
computer by automatically locking the computer
with a password when it is carried. Note that the
HDD protection and computer locking features
are mutually exclusive; both cannot be selected
at the same time.
Setting up the Shock Sensor Utility
1. Double-click the Shock Sensor Utility icon
( ) in the Notification Area at the bottomright of the screen. The [Shock Sensor Utility]
window appears.
• Action
Select the action you wish this utility to
perform:
– Protect HDD from impact
HDD head is retracted when an impact
to the computer is detected.
– Lock computer when carried
Lock the computer when it is being
carried.
– Nothing
No action.
2. Click the [Setting] button ( ). The [Shock
Sensor Utility Settings] window appears.
• Sensitivity of impact/horizontal move/
fall/carry detection
Adjust the sensitivity of the acceleration
sensor based on system motion or
impact.
• Ignore periodic vibration
If vibration is periodic, disregard it.
• Ignore mouse click
When the mouse is clicked, sensitivity is
temporarily lowered.
15
P15-16_ Vista supplement_EN
15
4/1/07, 10:56 am
• Ignore keyboard action
When the keyboard is used, sensitivity is
temporarily lowered.
• Confirm calibration when user logs on
Select [Confirm calibration when user
logs on] if you want to recognize the
current orientation as horizontal at logon.
• Perform calibration automatically
when user logs on
Select [Perform calibration automatically
when user logs on] if the system is
normally used on a horizontal surface.
• Display a balloon tool tip when impact
is detected
When this is selected, a message is
displayed from the Shock Sensor Utility
icon ( ) in the Notification Area when
an impact is detected.
• The Shock Sensor works only when a user
is logged onto the computer. It does not
work when the computer is shut down, when
a user is not logged on, when in sleep mode,
or while being shut down.
• The “Lock computer when carried” function
is available only on certain models. This
function can be selected from the menu of
those models which support it.
• While the Shock Sensor Utility Settings
window is displayed, the “Lock computer
when carried” function does not work.
Please close the window to use the function.
System Requirements
The Shock Sensor Utility runs under the following
operating environment.
System
Microsoft® Windows Vista™
Ultimate
Microsoft® Windows Vista™
Home Premium
Microsoft® Windows Vista™
Home Basic
Microsoft® Windows Vista™
Business
Microsoft® Windows Vista™
Enterprise
Available
hard disk
space
3 MB or more
• [Calibrate Now]
The calibration is executed. Please
position the computer as horizontally as
possible, then click the [Calibrate Now]
button. The current horizontal position will
be recognized as the true horizontal by
performing the calibration.
3. Click the [OK] or [Cancel] button (
[Setup] window closes.
). The
Notes
Requirements
OS
Before using the Shock Sensor utility, please be
aware of the following points.
• The Shock Sensor Utility does not completely
protect the HDD of the computer.
• The Shock Sensor Utility does not provide the
computer with absolute security.
• The computer may stop temporarily while HDD
head is being retracted. To start the computer
again, please keep it horizontal.
• The Shock Sensor Utility does not protect an
external HDD; it only protects the HDD built
into the computer.
16
P15-16_ Vista supplement_EN
16
4/1/07, 10:56 am