1
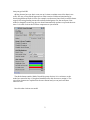
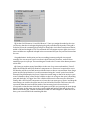
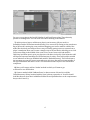
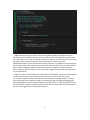
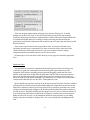
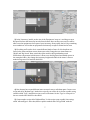
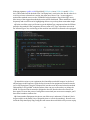
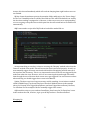
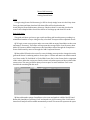
Power Grid Inventory
Getting Started Guide
Setup
To begin using Power Grid Inventory (or PGI for short) simply locate it in the Unity Asset
Store, purchase and then download. All related files will be found under the
Assets/Plugins/PowerGridInventory directory. Simple as that! You can take a look at the
scene in the examples folder for an idea of how to set things up and what PGI can do.
Basic Grid Setup
This guide will show you how to get a quick and dirty grid-based inventory working in a
minimalized number of steps. Along the way a few basic concepts will be explained as well.
1) To begin, create a new project and a new scene. Add an empty GameObject to the scene
and name it 'Inventory'. This object will represent the storage object of our inventory data.
Add a PGI Inventory Model component to this GameObject either through the Component->
Power Grid Inventory menu or through the 'Add Component' button.
2) Next, add a UI Panel to the scene. For ease of editing you may wish to change the newly
generated Canvas's rendering mode to Screen Space - Camera and attach our default camera
to it. Next, set the 'Ui Scale Mode' to 'Scale With Screen Size' in the Canvas Scaler component
of the canvas. After that, resize your Panel so that it only takes up most of the top-half of the
camera view. This way you'll have pleny of screen space to work with later. Your scene
should look something like this now:
3) Next, add another empty GameObject to the scene and make it a child of the UI Panel.
Name this GameObject 'Inventory View' and attach to it a PGI Inventory View. You'll notice
that a RectTransform will be added automatically as well. This area will represent the space
1
that your grid will fill.
4) Now that we have our basic scene set up it's time to explain some of the data in our
scene. PGI uses a View/Model approach to make it easier to add new functionality by
developing different kinds of views (for example, one that uses Game Pads) as well as better
support for saving/loading inventories and networked games. For the most part, if the
model is changed in some way, the view should automatically update to represent the new
state. Let's take a look at the PGIView component we just created.
The third element entitles 'Model' should be pretty obvious. It is a reference to the
model we created in Step 1. Drag that GameObject into this slot now to assign it. The
rest of the elements are explained in the user manual and you can just leave them
alone for now.
Now let's take a look at our model.
2
5) Set the Grid Columns to 10 and Grid Rows to 5. Once you assign the model to the view
you'll notice that the view begins displaying the grid you defined in the model. This grid is
scaled to fill out the containing RectTransform. Change the view's RectTransform so that its
width is 300 and its height is 150. This will make the cells appear square. Again, the rest of
these variables are explained in depth in the user manual and you can just leave them alone
for now.
Congradulations! At this point you have a working inventory and grid view up and
running! You can run your scene to see how it look. Obviously, however, we don't have
anything to put in it just yet. The next thing we'll need to do is create a few dummy items to
test it with.
6) Create yet another empty GameObject in the root of our scene and entitile it 'Sword'.
Add a BoxCollider2D and Sprite Renderer component to it. These aren't required for use in
PGI but they will let us see and interact with the items so that we can test them. Next, drag a
sprite into the Sprite Renderer. I would recommend using the 'sword' sprite found under
Example/CompleteExample/Art/Icons/. Resize the sword image so that it fits nicely in your
scene somewhere. Next, resize the box collider so that it is as large as the sprite's bounding
area and check the 'Is Trigger' box. This collider will be used to detect mouse clicks later.
Finally, add a PGI Slot Item component to it. Leave the icon asset type as 'Sprite' and drag the
same image you used for the sprite into the Icon field of the Slot Item. Take note, this icon
represents what the item looks like inside of the inventory but it does not have to
correspond to what the item looks like in the game world. We are just using the same image
here for clarity. At this time you can also set the width and height of the item in slot cells
when stored in the grid. I would recommend a width of 2 and a height of 3. When this is all
done, your scene should look something like this:
3
For now you can ignore the StackID, MaxStack, and StackCount values. They obviously
pertain to stacking items. You can learn more about stacking in the Manual.
7) At this point we have a valid item to place in our inventory (all you need is a
GameObject with a PGISlotItem attached really). You can test it by turning on the auto-detect
flag of the model, running the scene, and then dragging your item to make it a child of the
model. But obviously we still don't have a way of actually getting it into our system from a
player's standpoint. Next you'll create a simple script to do just that by allowing you to click
on the item sitting in the middle of the scene. First, create a new script and entitle it
'MyPickup' and then open it up in your favorite code editor. At the top of the behaviour add
the RequireComponent attributes for PGISlotItem just for safety. Then add a public variable
to our behaviour of the type PGIModel and entitle it 'DefaultInventory'. This will reference
the inventory we want our item to enter when we pick it up. Also add a private variable of
the type PGISlotItem and name it 'Item'. This will reference this object's own PGISlotItem
component.
8) Next, you'll want to add an 'Awake' method in which you'll want to get
a reference to our PGISlotItem.
9) Create a method called 'OnMouseDown' to detect mouse click and in it call the
'DefaultInventory.Pickup' method with the 'Item' reference passed to it. Your file should
look like this now (note that I added BoxCollider2D and SpriteRenderer to the requirements
but you don't have to):
4
10) Attach the new script to the sword and drag the Inventory GameObject from the
heirarchy into the Default Inventory reference of the script. You should now be able to run
the scene, click on your item and watch it enter the inventory! You should see the item enter
the grid as well as change its location in the heirarchy view panel (if you left
'MessWithTransforms' on in the inventory model). However, it probably seems strange that
the item still exists in the world as a sprite when it's also in your inentory. So what you'll do
next is make it disappear when it enters and inventory and make it re-appear when it
leaves. And to do this we'll need to take a look at the triggered events under the foldout tab
in your PGISlotItem.
11) Click on the 'Events' foldout tab on the Sword's PGISlotItem component and locate the
'On Store In Inventory' and 'On Remove From Inventory' events. These two events
correspond to when the item enters and leaves an inventory's storage model. For each of
these events add a new method to trigger by clicking the little plus sign and dragging the
Sword GameObject from the heirarchy panel into the slot. Next, use the dropdown to locate
the GameObject->SetActive method. Check the little box that represents the bool parameter
for the event triggered upon leaving the inventory.
5
Next, run the game again and try picking up your item by clicking on it. It should
disappear from the scene view. To test if it returns when you drop the item from the
inventory simply drag and drop the item anywhere outside of the main UI panel. While this
is a little ham-handed, what you are doing is simply activating and deactivating the
gameobject (and thus all components, like renderers and such) when the item moves to and
from inventories.
These events can be found on the items, models, slots, and views in PGI and are an
extremely powerful way to customize PGI to meet your needs. In fact, almost all of the
'advanced' features advertized in PGI aren't even core elements! They are simply
components with event handlers that are tied to these events!
So that wraps it up for the basics of PGI. Next up you're going to learn about equipment
slots.
Equipment Slots
The main difference between equipment slots and the grid you have been using so far
(refered to as 'grid slots' sometimes) is that while the grid is generated for you, the
equipment slots must be manually placed by hand by dragging prefabs into the scene.
Another important factor is that while the grid takes item size into account and requires
there to be enough empty cells for an item to be placed in it, equiment slots do not care
about the item's size by default, although if you wanted one to, I suppose you could make a
component do that and wire it to the slot's 'CanEquipItem' event.
1) You should start up where you left off in the above tutorial. Find the 'Grid Slot' prefab in
the Plugins/Power Grid Inventory/Prefabs folder and make a duplicate of it, then move that
duplicate to another location in your project panel. This is always a good idea to do so that
you don't accidentally make changes to the default prefab. Rename this prefab to whatever
you like (I choose 'EquipSlot Prefab) and then drag it into your scene to make an instance of
it. In the hiearchy panel make it a child of the UI panel we created in the previous tutorial.
Make sure the scale is set to 1 in all dimensions and then resize and place to your liking.
Finally, name this GameObject 'Weapon Slot'. Your scene should look something like this
now.
6
2) In the 'Inventory' model, set the size of the 'Equipment' array to 1 and drag our new
Weapon Slot from the hierarchy into the first element. Now run the scene and you will be
able to use the equipment slot as part of your inventory. Pretty spiffy, but let's try something
more ambitious. Let's make an equipment slot that only accepts a certain kind of item.
3) First thing we'll need to do is create different kinds of items. So let's duplicate our
Sword a few times and then movwe them apart a bit. Change the new items names to
'Shield' and 'Big Sword'. Next, switch the sprite used for the SpriteRenderer and
PGISlotItem components in both items. I chose to use the Big Sword and Shield sprites in
the examples folder. Also change the inventory height and width of the items. I chose to
make the big sword 3x3 and the shield 2x2.
4) Now that we have some different items we need a way to tell them apart. Create a new
script and call it 'MyItemType'. Inside this script all you need to do is declare a public string
variable called 'Type'. Attach this script to each of the items. Set the 'Type' to 'weapon' for
the two swords and 'shield' for the shield.
5) Create another script called 'MyItemFilter'. In this script create a public List<string>
called 'AllowedTypes'. After that, define a public method called 'IsTypeValid' with the
7
following signature public void IsTypeValid(PGISlotItem item, PGIModel model, PGISlot
slot). This method will be hooked to the 'Can Equip Item' event in the slot. But in order for it
to work you have to know how it works. Any time one of these 'Can...' events triggers a
method that method can access the 'PGIModel.CanPerformAction' flag. If this flag is set to
false in any of the triggered methods the action will be disallowed. These method are called
frequently and are used even for highlighting effects so try to keep them somewhat simple.
6) In the new filter script you'll want to get the MyItemType component from the PGIItem
passed to the method. If the component does not exist or its 'Type' value does not exist in
the 'AllowedTypes' list, set this flag to false and the item will not be allowed to be equipped.
7) Attach this script to your equipment slot GameObject and add 'weapon' to the list of
allowed types in the inspector. Open the list of events in the equipment slot and locate the
on 'On Can Equip Item'. Drag the 'Weapon Slot' into the event object and select the method
'MyItemFilter->IsTypeValid' in the dropdown. Now run your scene and try to pickup the
shield. You'll notice that it cannot be equipped to the slot. But the other two sowrds can.
Once again, I'll stress the power of using these events. And just as one more example, you'll
learn how to make a trashcan slot.
8) Create another Equipment slot just as you did in step 1 and name it 'Trashcan' (don't
forget to add it to the model's list of quipment slots or it won't do anything). Be sure to uncheck the 'Skip Auto Equip' flag. Doing this will ensure the model does not try to auto-equip
8
items to this slot and immdiately which will result in dumping them right back out once we
are finished.
9) Now locate the trashcan sprite in the examples folder and drag it to the 'Source Image'
for the 'Icon' GameObject that is a child of the trashcan. This will be the default icon used by
the slot when nothing is equipped to it. However, in this case as soon as we equip anything
to it we are going to drop the item at which point the slot will switch back to its default icon
automatically.
10) Create another script called 'MyTrashcan' and add a method like so:
An important thing to note here is that we are using the 'Unequip' method rather than the
'Remove' method of the model. This will ensure the item is processed properly. As well, we
must manually trigger all events associated with both the unequipping and the removal of
the item from the ionventory. This is very important because events are not triggered by the
model but rather the view. However, since we are removing the item through code rather
than through the use of the view these events never get triggered. You can learn more about
when and why you should trigger these events in the Manual.
Update: The above step is no longer necessary strickly speaking. A convienience method
called PGIModel.Drop() can be used in place of the three methods shown in the example
above (inv.Unequip, item.TriggerUnequipEvents, and item.TriggerRemoveEvents). However,
I've left them in as an example of how to manually trigger these events.
11) Attach the script to your trashcan GameObject. Now locate the 'On Equip Item' event
in the trashcan slot and, as before, rig it up to the MyTrashcan->TrashItem method.
Wrapping Up
9
And with that, I've covered most of the basics used by Power Grid Inventory. Hopefully by
now you have learned the basics neccessary for it and maybe along way the have even
become a little inspired with tricks and ideas that it can be used to realize.
Once again, I'd like to stress the usefulness of the triggered events in the various
components as they are the key to all advanced functionality. For more examples please
have a look at the examples folder that came with PGI and try out the demo scenes they
came with.
I hope this guide has been useful in explaining PGI but if for any reason you are still having
trouble or aren't sure how you can implementing a particularly tricky idea, please feel free
to contact me at [email protected] for help.
10