1
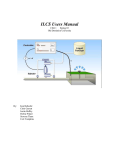
User's Manual
Version 8.0
®
For the IBM PC and 100% Compatibles
MOD2 INC.
Information in this document is subject to change without notice and does not represent a commitment
on the part of MOD2 INC.. The software described in this document is furnished under a license
agreement or nondisclosure agreement. The software may be used or copied only in accordance with
the terms of the agreement. It is against the law to copy the software on any medium except as
specifically allowed in the license or nondisclosure agreement. No part of this manual may be
reproduced or transmitted in any form or by any means, electronic or mechanical, including
photocopying and recording, for any purpose without the express written permission of MOD2 INC.
U.S. Government Restricted Rights
The SOFTWARE and documentation are provided with RESTRICTED RIGHTS. Use, duplication, or
disclosure by the Government is subject to restrictions as set forth in subparagraph (c) (1) (ii) of the
Rights in Technical Data and Computer Software clause at DFARS 252.227-7013 or subparagraphs (c)
(1) and (2) of the Commercial Computer Software - Restricted Rights at 48 CFR 52.227-19, as
applicable. Contractor/manufacturer is MOD2 INC./112 W. 9th Street Suite 1015/Los Angeles, CA
90015.
Copyright MOD2 INC., 2007. All rights reserved.
Printed in the United States of America.
Written and Edited by Omeed
Edition 1 ed.
Revised January 5, 2000
Revised 2nd ed. 01-08-2001
MOD2 is a registered trademark of MOD2 INC.
Microsoft, MS, MS-DOS, CodeView, and the Microsoft logo are registered trademarks, and Windows and
Windows/386 are trademarks of Microsoft Corporation.
386 is a trademark of Intel Corporation.
386-Max is a trademark of Qualitas, Inc.
Acer is a registered trademark of Acer Technologies Corporation.
Apple and LaserWriter are registered trademarks of Apple Computer, Inc.
Ashton-Tate, dBASE III and Framework II are registered trademarks of Ashton-Tate Corporation.
AST and RAMpage! are registered trademarks of AST Research, Inc.
AT&T is a registered trademark of American Telephone and Telegraph Company.
Bitstream is a registered trademark, and Fontware is a trademark of Bitstream, Inc.
Borland and SideKick are registered trademarks of Borland International, Inc.
Centronics is a registered trademark of Centronics Data Computer Corp.
COMPAQ DESKPRO is a registered trademark of Compaq Computer Corporation.
CompuServe is a registered trademark of CompuServe, Inc.
Dow Jones News/Retrieval is a registered trademark of Dow Jones And Company, Inc.
Epson is a registered trademark of Epson America, Inc.
Hayes is a registered trademark of Hayes Microcomputer Products, Inc.
Hercules is a registered trademark of Hercules Computer Technology.
HP, LaserJet and PCL are registered trademarks of Hewlett-Packard Company.
IBM, PS/2, and TopView are registered trademarks of International Business Machines Corporation.
Intel is a registered trademark, and Above is a trademark of Intel Corporation.
ITC Zapf Dingbats is a registered trademark of International Typeface Corporation.
Linotronic is a trademark of Linotype AG and its subsidiaries.
Lotus and 1-2-3 are registered trademarks of Lotus Development Corporation.
MultiMate Advantage II is a trademark of MultiMate International Corporation, an Ashton-Tate company.
NEC is a registered trademark of NEC Corporation.
Olivetti is a registered trademark of Ing. C. Olivetti.
PFS: and First Choice are registered trademarks of Software Publishing Corporation.
PageMaker is a registered trademark of Aldus Corporation.
Paintbrush is a trademark of Zsoft Corporation.
PostScript is a registered trademark of Adobe Systems, Inc.
Recorder was developed for Microsoft by Softbridge Ltd.
Terminal was developed for Microsoft by Future Soft Engineering, Inc.
TI is a registered trademark of Texas Instruments, Inc.
Type Director is a trademark of Agfa Corporation, AGFA Compugraphic Division.
VT 100 is a trademark of Digital Equipment Corporation.
WordPerfect is a registered trademark of WordPerfect Corporation. Document No. YN03495-2824
2
Contents
MOD2 8.0 . . . . . . . . . . . . . . . . . . . . . . . . . . . . . . . . . . . . . . . . . . . . . . 9
Features of MOD2 . . . . . . . . . . . . . . . . . . . . . . . . . . . . . . . . . . . . . 9
About Your MOD2 Documentation . . . . . . . . . . . . . . . . . . . . . . . 13
PART 1 MOD2 Fundamentals
Chapter 1 Getting Started . . . . . . . . . . . . . . . . . . . . . . . . . . . . . 19
System Requirements . . . . . . . . . . . . . . . . . . . . . . . . . . . . . . . . . . . 19
Installing MOD2 . . . . . . . . . . . . . . . . . . . . . . . . . . . . . . . . . . . . . . . 20
Starting MOD2 . . . . . . . . . . . . . . . . . . . . . . . . . . . . . . . . . . . . . . . . 20
Selecting a User . . . . . . . . . . . . . . . . . . . . . . . . . . . . . . . . . . . . . . . . 21
Exiting MOD2 . . . . . . . . . . . . . . . . . . . . . . . . . . . . . . . . . . . . . . . . . 22
Chapter 2 Basic Skills . . . . . . . . . . . . . . . . . . . . . . . . . . . . . . . . . 23
The MOD2 Screen . . . . . . . . . . . . . . . . . . . . . . . . . . . . . . . . . . . . . 23
Moving Throughout MOD2 . . . . . . . . . . . . . . . . . . . . . . . . . . . . . 24
Selecting a Starting and Ending Date . . . . . . . . . . . . . . . . . . . . . 24
Output Devices . . . . . . . . . . . . . . . . . . . . . . . . . . . . . . . . . . . . . . . . 25
Client Memberships . . . . . . . . . . . . . . . . . . . . . . . . . . . . . . . . . . . . 27
Invoice Models . . . . . . . . . . . . . . . . . . . . . . . . . . . . . . . . . . . . . . . . 28
Chapter 3 Initialization Sequence . . . . . . . . . . . . . . . . . . . . . 30
3
Contents
PART 2 Using MOD2
Chapter 4 Sales Management . . . . . . . . . . . . . . . . . . . . . . . . . 33
Adding Invoices . . . . . . . . . . . . . . . . . . . . . . . . . . . . . . . . . . . . . . . . 33
Displaying Invoices . . . . . . . . . . . . . . . . . . . . . . . . . . . . . . . . . . . . . 41
Voiding Invoices . . . . . . . . . . . . . . . . . . . . . . . . . . . . . . . . . . . . . . . 43
Invoice Reports . . . . . . . . . . . . . . . . . . . . . . . . . . . . . . . . . . . . . . . . . 44
Listing the Most Recent Invoices . . . . . . . . . . . . . . . . . . . . . . . . . 46
Working with Credit Memos . . . . . . . . . . . . . . . . . . . . . . . . . . . . . 47
Chapter 5 Inventory Management . . . . . . . . . . . . . . . . . . . . 55
Adding New Inventory . . . . . . . . . . . . . . . . . . . . . . . . . . . . . . . . . 55
Displaying Inventory . . . . . . . . . . . . . . . . . . . . . . . . . . . . . . . . . . . 56
Modifying Inventory . . . . . . . . . . . . . . . . . . . . . . . . . . . . . . . . . . . 58
Inventory Reports . . . . . . . . . . . . . . . . . . . . . . . . . . . . . . . . . . . . . 59
Performing a Gross Profit Analysis . . . . . . . . . . . . . . . . . . . . . . . 61
Generating a Statistical Report of Inventory . . . . . . . . . . . . . . . 62
Chapter 6 Transactions . . . . . . . . . . . . . . . . . . . . . . . . . . . . . . . 64
Adding a Transaction . . . . . . . . . . . . . . . . . . . . . . . . . . . . . . . . . . . 64
Displaying a Transaction . . . . . . . . . . . . . . . . . . . . . . . . . . . . . . . . 73
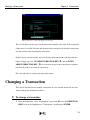
Changing a Transaction . . . . . . . . . . . . . . . . . . . . . . . . . . . . . . . . . 74
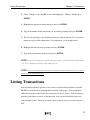
Listing Transactions . . . . . . . . . . . . . . . . . . . . . . . . . . . . . . . . . . . . 75
4
Contents
Chapter 7 Client Management . . . . . . . . . . . . . . . . . . . . . . . . 78
Adding Clients . . . . . . . . . . . . . . . . . . . . . . . . . . . . . . . . . . . . . . . . 78
Displaying Clients . . . . . . . . . . . . . . . . . . . . . . . . . . . . . . . . . . . . . 84
Modifying Client Information . . . . . . . . . . . . . . . . . . . . . . . . . . . . 91
Listing Clients . . . . . . . . . . . . . . . . . . . . . . . . . . . . . . . . . . . . . . . . . 93
Generating Client Statements . . . . . . . . . . . . . . . . . . . . . . . . . . . . . 95
Listing Clients of a Salesperson . . . . . . . . . . . . . . . . . . . . . . . . . . 97
Tagging and Grouping Clients . . . . . . . . . . . . . . . . . . . . . . . . . . . 97
Chapter 8 Client Sales Orders . . . . . . . . . . . . . . . . . . . . . . . . 100
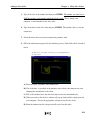
Adding a Sales Order . . . . . . . . . . . . . . . . . . . . . . . . . . . . . . . . . . . 100
Displaying a Sales Order . . . . . . . . . . . . . . . . . . . . . . . . . . . . . . . . 103
Voiding a Sales Order . . . . . . . . . . . . . . . . . . . . . . . . . . . . . . . . . . . 106
Sales Order Reports . . . . . . . . . . . . . . . . . . . . . . . . . . . . . . . . . . . . . 106
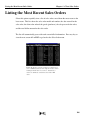
Listing the Most Recent Sales Orders . . . . . . . . . . . . . . . . . . . . . 108
Chapter 9 Salesperson Management . . . . . . . . . . . . . . . . . . 109
Adding a Salesperson . . . . . . . . . . . . . . . . . . . . . . . . . . . . . . . . . . . 109
Displaying a Salesperson . . . . . . . . . . . . . . . . . . . . . . . . . . . . . . . . 110
Changing Salesperson Information . . . . . . . . . . . . . . . . . . . . . . . 113
Listing Salespersons . . . . . . . . . . . . . . . . . . . . . . . . . . . . . . . . . . . . 113
Listing Open Invoices for a Salesperson . . . . . . . . . . . . . . . . . . . 114
Listing Clients of a Salesperson . . . . . . . . . . . . . . . . . . . . . . . . . . 114
5
Contents
Chapter 10 Goods in Process Management . . . . . . . . . . . . 115
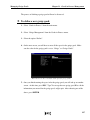
Managing Greige Goods . . . . . . . . . . . . . . . . . . . . . . . . . . . . . . . . . 115
Purchase Orders and Contracts . . . . . . . . . . . . . . . . . . . . . . . . . . . 118
Working with Dye Orders . . . . . . . . . . . . . . . . . . . . . . . . . . . . . . . 129
Transferring Goods . . . . . . . . . . . . . . . . . . . . . . . . . . . . . . . . . . . . . 142
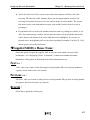
Chapter 11 Managing Received Goods . . . . . . . . . . . . . . . . . 146
Detailed Versus Summary Receiving . . . . . . . . . . . . . . . . . . . . . . 146
Logging Received Merchandise . . . . . . . . . . . . . . . . . . . . . . . . . . 147
Displaying Received Merchandise . . . . . . . . . . . . . . . . . . . . . . . 152
Voiding Received Merchandise . . . . . . . . . . . . . . . . . . . . . . . . . . 156
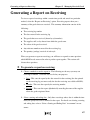
Generating a Report on Receiving . . . . . . . . . . . . . . . . . . . . . . . . 157
Viewing the Most Recent Receivings . . . . . . . . . . . . . . . . . . . . . . 158
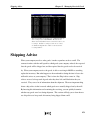
Shipping Advise . . . . . . . . . . . . . . . . . . . . . . . . . . . . . . . . . . . . . . . 159
Associate Expense . . . . . . . . . . . . . . . . . . . . . . . . . . . . . . . . . . . . . . 165
Chapter 12 Packing Lists . . . . . . . . . . . . . . . . . . . . . . . . . . . . . 172
What is a Packing List? . . . . . . . . . . . . . . . . . . . . . . . . . . . . . . . . . 172
Adding a Packing List . . . . . . . . . . . . . . . . . . . . . . . . . . . . . . . . . . 175
Displaying a Packing List . . . . . . . . . . . . . . . . . . . . . . . . . . . . . . . 180
Voiding a Packing List . . . . . . . . . . . . . . . . . . . . . . . . . . . . . . . . . . 183
Viewing Open and Pending Packing Lists . . . . . . . . . . . . . . . . . . 184
Listing the Most Recent Packing Lists . . . . . . . . . . . . . . . . . . . . . 185
6
Contents
PART 3 Additional Topics
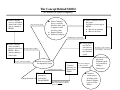
Chapter 13 The Concept Behind MOD2 . . . . . . . . . . . . . . . 188
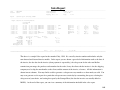
Chapter 14 Sample Reports . . . . . . . . . . . . . . . . . . . . . . . . . . . 192
Chapter 15 What are the MOD2 Files? . . . . . . . . . . . . . . . . 210
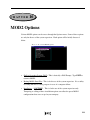
Chapter 16 MOD2 Options . . . . . . . . . . . . . . . . . . . . . . . . . . . 211
Chapter 17 Printer Setup . . . . . . . . . . . . . . . . . . . . . . . . . . . . . . 213
Chapter 18 Adding User Names . . . . . . . . . . . . . . . . . . . . . . . 214
Appendixes
A Frequently Asked Questions . . . . . . . . . . . . . . . . . . . . . . . . 216
B How to Contact MOD2 . . . . . . . . . . . . . . . . . . . . . . . . . . . . . . 220
7
Welcome to MOD2
8
MOD2 8.0
Welcome to MOD2, the intelligent approach to business management. With MOD2,
your business will be able to operate more efficiently than ever before. Each module of
MOD2 was specifically designed to fit your particular business. This feature is what
places MOD2 high above all other programs similar to it. MOD2 was customized to fit
the needs of your company. Because of this, MOD2 can be called an “intelligent”
program because it recognizes what you are trying to do and then accordingly asks only
for the information needed to complete that task. Organizing your sales and invoices,
managing all your clients and client information, logging receivings and shipments,
keeping track of your inventory, and much, much more are simplified with MOD2.
This introductory section of the MOD2 User’s Manual describes several of the features of
MOD2 and the various modules which you can add to it later. More importantly, it goes
over the structure of the manual and defines the typographical conventions and
terminology found within the manual.
Features of MOD2
The key benefit of using MOD2 is that all information entered into the program is kept on
line. MOD2 uses advanced internal data structures and special algorithms to store your
transactions efficiently. As you add more and more transactions in MOD2, it will learn
more and more about your business and will help you identify and understand patterns in
your business. In other software packages, you set table sizes and file sizes in advance,
and you are forced to keep the information on line only for a limited time. In MOD2, all
files and table sizes are maintained dynamically. Our software engineers have designed
your MOD2 software to be able to expand automatically. You will experience that within
a few months of use. MOD2 becomes an information center as it holds the details of any
information that is relevant to your business.
9
Features of MOD2
MOD2 8.0
The MOD2 standard program is capable of the following:
♦
♦
♦
♦
♦
♦
♦
♦
♦
♦
♦
♦
♦
♦
♦
♦
♦
♦
♦
♦
♦
♦
♦
♦
♦
Inventory: In-house and outside warehouse
Receivable
Invoicing: Factored and non-factored
Credit Memos
Purchase orders
Detailed packing lists
Purchase Contracts
Payments from customers
Debit and credit invoice
Post dated checks
Discounts and write offs
Returned checks
Salesman’s commission (2 methods of calculation)
- Based on invoices shipped
- Based on invoices paid
Detailed aging
Unlimited client notes
Multiple invoice groups
Customer management
Customization of existing forms:
Includes invoices, credit memos, packing lists, and purchase contracts
Unlimited history storage
Unlimited multi user access
Ability to restrict access by station numbers
Tracking of all activity by all users for maximum security
Automatic file and record locking under multi user environment for maximum data integrity
Multiple printer configuration
Ability to setup multiple company or divisions under the same setup.
In addition to all the above, MOD2 also supports the following optional modules:
♦ Goods in process: Domestic - Capable of the following:
•
•
•
•
•
•
Inventory: In-house and outside warehouse, including dye houses
Detailed packing lists on roll by roll basis
Generation of bar code ID and laser/light pen interface
Purchase contracts
Dye orders
Provisions for 1st quality, 2nd, run of mill, dark shades, light shades, prints, mixed
grades, short rolls, as are greige goods.
10
Features of MOD2
•
•
•
•
•
•
•
•
•
•
•
•
•
MOD2 8.0
Provisions for 1st, 2nd, and special grade of finished goods
Lot # assignment
Provision for flat, laundered, cross-dye, and hydrox dye orders
Detailed history of each roll
Delivery receipt generation and implementation
Dynamic calculations of working losses on dye order or greige lot levels
Extensive reporting
Automatic posting to finished goods inventory
Alphanumeric style and color names
Multiple receiving of dye orders
Customization of forms, dye orders, purchase contracts, greige lots, greige
receiving
Lab dip requests and lab dip approval tracking
Tracking of dye house assigned color numbers
♦ Goods in process: Imports - Capable of the following
•
•
•
•
•
•
•
•
•
•
•
•
•
•
Import contract generation
Tracking of open contracts
Tracking of partial shipments on contracts
Input and tracking of scheduled shipments
Receiving of each contract
Tracking of each shipment in the inventory system
Detailed packing lists on roll by roll basis
Generation of bar code ID’s and laser/light pen interface
Goods in transit management
Direct shipments
Unique roll ID assignments
Will handle generation of Proforma Invoices for export purposes
Tracking and cost analysis such as L/C, Custom, Shipping, and other costs
Ability to look up on contract quantity and in transit goods for any style
♦ Bar-Coding - Capable of the following:
•
•
•
•
•
Detailed and unique inventory tracking
Generation of bar code ID labels for goods received
Each unit in the inventory can have its own unique bar code ID which will
distinguish it from the rest of the items
Reading of bar code labels for the purpose of issuing packing lists and obtaining
physical inventory
Integration of wireless workstation for use in warehouse for easy scanning of bar
coded merchandise.
11
Features of MOD2
MOD2 8.0
♦ Scanning - Capable of:
•
Scanning and integration of inventory item pictures into the inventory module.
This feature will allow users to see the picture image of the inventory item on the
screen as they display their inventory.
12
About Your MOD2 Documentation
MOD2 8.0
About your MOD2 Documentation
The MOD2 documentation consists of this User’s Manual. The pages that follow outline
the contents of the User’s Manual and define the typographical conventions and some
terminology found in the manual, as well as much more. This section is divided into the
following parts:
♦ What’s Included in Your MOD2 User’s Manual? - A brief outline of the manual,
showing and describing the different parts of it.
♦ Conventions - A list of all the typographical conventions you will find in this manual.
♦ Common Keys Used in MOD2 - Descriptions and functions on keys you will be
frequently using in MOD2.
♦ Terminology - Terms you need to know to better understand this manual.
♦ Assumptions - Assumptions made by the manual.
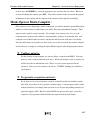
What’s Included in Your MOD2 User’s Manual?
The User’s Manual was written in a convenient format for you. Each chapter and
procedure in PART 2: USING MOD2 is ordered in the same way you see them on screen. For
that reason, it is recommended for you to be at your computer in MOD2 whenever you
are following a procedure to do a certain task. This way you can perform each step as it
is being described and it will help you to better understand what is being said.
The User’s Manual is divided into the following parts:
Part 1, MOD2 Fundamentals. Chapters in this part focus on the basic skills needed
to start, quit, and work with MOD2. You should know everything in these chapters
before going on to PART 2.
13
About Your MOD2 Documentation
MOD2 8.0
Part 2, Using MOD2. Chapters in this part explain step-by-step how to perform each
function in each module of MOD2.
Part 3, Additional Topics. This part contains supplementary information regarding
the use of MOD2.
Appendixes. The appendixes provide reference material on the following topics:
♦ Solutions to common encountered problems.
♦ Methods of contacting MOD2 INC. if you need technical support.
Conventions
To help you locate and interpret information easily, the User’s Manual employs
consistent visual cues and typographical conventions. They are defined below.
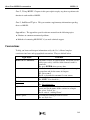
Type Style
Used For
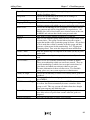
BOLD ALL CAPITALS......
The names of keys on your keyboard. Everytime you are
told to press a key, it will be in this format to make it
stand out.
Ex: press ENTER when you are done.
Used whenever you are referred to go to a certain step in
a procedure and for the names of chapters.
Ex: Go to STEP 5.
Ex #2: as described in CHAPTER 2: BASIC SKILLS.
Notes and tips.
Ex: NOTE - You should do.....
An important statement you should note.
Ex: Do not forget to...
Used when you are directly referred to an item on the
screen and for the names of the sections in a chapter.
Ex: select “Style #” by...
Ex #2: refer to “Adding Clients”
Used when describing an item on screen.
Ex: use Style # to...
SMALL CAPITALS.....................
Italic......................................
Underlined.............................
“Quotes.”...............................
Initial Capitals........................
14
About Your MOD2 Documentation
MOD2 8.0
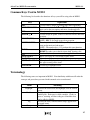
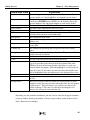
Common Keys Used in MOD2
The following list describes the functions of keys you will be using often in MOD2.
Key
Operation
Used to remove (delete) a selected item, where applicable.
These keys include and . They move the highlight,
move you to the next option, and move you through lists.
Takes you to the last item when you are viewing a list.
END..........................
ENTER
............... Used to accept an option, to move to the next screen, and to do
an action.
ESCAPE (ESC)......... Used to back up to a prior screen.
NOTE – ESC is also used to not select an option.
FUNTION KEYS...... These keys include the F1 - F12 keys. They are used to select
items on the main and sub-menus.
NOTE – The number keys 1-12 perform this same function.
HOME....................... Used to go to the details of an item, where applicable.
HOME also takes you to the first item when viewing a list.
INS............................ Used to add (insert) a new item, where applicable.
PAGE DOWN........... Moves you a page or a screen-full of lines down.
PAGE UP.................. Moves you a page or a screen-full of lines up.
SHIFT+SPACEBAR. When pressed together, this tags all the items in a list. Press
this again to untag all the items.
SPACEBAR.............. Used to tag a highlighted item.
DEL...........................
DIRECTION KEYS.
Terminology
The following terms are important in MOD2. Your familiarity with them will make the
concepts and procedures presented in this manual easier to understand.
Term
Meaning
Highlight
To move the colored bar (the highlight) over an item on
screen.
Good programs are those that can be broken up into
smaller parts. Each part is called a module. Goods in
process, scanning, and bar-coding are all modules that
can be added to MOD2.
To select an item (a small diamond shape appears next
to tagged items).
To deselect an item.
Module
Tag
Untag
15
About Your MOD2 Documentation
MOD2 8.0
Assumptions
This User’s Manual assumes the following:
•
You are using MOD2 on a network.
•
Whenever you are asked to enter a name, you enter the client’s name. However, it is also
possible to enter the client’s MOD2 account number under Name instead.
16
Part MOD2 Fundamentals
1
17
MOD2 Fundamentals
CHAPTERS
1 Getting Started . . . . . . . . . . . . . . . . . . . . . . . . . . . . . . . . . . . 19
2 Basic Skills . . . . . . . . . . . . . . . . . . . . . . . . . . . . . . . . . . . . . . 23
3 Initialization Sequence . . . . . . . . . . . . . . . . . . . . . . . . . . . 30
18
CHAPTER
1
Getting Started
This chapter focuses mainly on how to start and exit MOD2, as well as the system
requirements to run MOD2 and directions on how to select a user when you log on to
MOD2.
System Requirements
The following is the minimum hardware and software you need to run MOD2.
( this information is as of May 2007 ) Contact mod2 for latest requirements
•
PC compatible machine running Microsoft Windows (Pentium 200 mhz or higher
recommended)
•
You can use MOD2-OverTheWeb on Apple Mac, or Linux
•
PC work station Min of 256MB of RAM (512MB or higher Recommended)
•
Windows Vista, Windows XP, Windows 2003, Windows 2000 or later
•
Windows 2000 Server, Window 2003 server or Later
•
SVGA color monitor
•
Reliable, high-performance hard disk recommended
•
Reliable tape backup (optional)
•
TCP/IP connection to mod2 database server
•
A network printer or a local printer (MOD2 can support up to sixteen different
printers at one time. We recommend HP Postscript Printers)
For the requirements and configurations for the server computer, please see your system
supervisor.
19
Starting MOD2
Chapter 1 Getting Started
Installing MOD2
MOD2 is usually installed for you on your network drive. A typical path to where your
MOD2 files are located would be: your network drive\your company name\present. For
example, if your network drive is drive F and your company name is DemoTwo, this
would be the path to where your MOD2 files are: f:\demotwo\present.
Starting MOD2 from WINDOWS
When your MOD2 software was installed, your system supervisor set up the names and
the paths needed to start MOD2 from your menu program or from the Windows Program
Manager. If your installation includes MOD2 as one of your menu items or as an icon in
Windows, use that to start MOD2. Once you have started MOD2, you will be asked to
select a user and enter the appropriate password. See “Selecting a User” later in this
chapter for more information on how to do this.
20
Selecting a User
Chapter 1 Getting Started
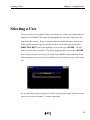
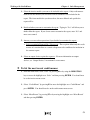
Selecting a User
The user selection screen, pictured below, lists all the users within your company that are
authorized to use MOD2. The name already highlighted is the name of the person who
logged onto the network.. If you are running within a network, the names of other users
along with the time they logged on will be presented. Select your name by using the
DIRECTION KEYS to move the highlight over it and then press ENTER. You will
then be asked to enter a password. Type in the appropriate password and press ENTER.
If the correct password was entered, you will end up in MOD2 on the main menu screen.
If the wrong password was entered, you will have two more chances to type in the correct
one.
If your name did not appear on the user selection screen, please consult with your system
supervisor or refer to CHAPTER 17: ADDING USER NAMES.
21
Exiting MOD2
Chapter 1 Getting Started
Exiting MOD2
You may exit MOD2 in one of three ways. They are listed below.
♦ From the MOD2 main menu, press F10. To exit, type Y and then press ENTER. To
return to MOD2, type N and press ENTER.
♦ From the main menu, move the highlight to “Exit MOD2” and press ENTER. To exit,
type Y and then press ENTER. To return to MOD2, type N and press ENTER.
♦ From the main menu, press ESC. To exit, type Y and then press ENTER. To return to
MOD2, type N and press ENTER.
22
CHAPTER
2
Basic Skills
This chapter deals with several basic concepts in MOD2. You should know all the
information in this chapter before continuing to the next one. Sequences of events that
occur often when you use MOD2, such as selecting an output device, will be presented in
this chapter. When you come across these sequences in the later chapters, you will be
referred back to the appropriate section regarding it in this chapter where it will be
discussed.
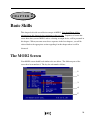
The MOD2 Screen
Your MOD2 screen should look similar to the one below. The different parts of the
screen have been numbered. The key for each number follows.
1
2
3
4
5
23
Moving Throughout MOD2
Chapter 2 Basic Skills
Key:
1 - Your company name will appear here.
2 - The title of the sub-menu appears here.
3 - The colored bar is the highlight.
4 - This is a sub-menu.
5 - This is the main menu.
Moving Throughout MOD2
It is fairly easy to move throughout MOD2. ENTER, ESC, and the DIRECTION
KEYS are about all you need to navigate through the various menus and screens in
MOD2. Use ENTER to accept a highlighted option and to move to the next screen. The
DIRECTION KEYS allow you to move through lists, move to the next option, and
move the highlight. The key that you will probably use the most is the ESC key. Use
this key to move back to a prior screen and to not do an action. If in the middle of a
process, such as adding an invoice, you change your mind and decide not to add the
invoice, keep on pressing ESC until you are back on the menu screens. ESC is almost
always available to you so that you may at any time move back to a prior screen or back
to the menu screens if you get stuck or make a mistake. Using these three keys will allow
you to maneuver through MOD2 fast and effectively.
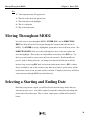
Selecting a Starting and Ending Date
Each time you generate a report, you will be asked to enter the range of time that you
want the report to cover. You will be required to enter the starting date and ending date
for the time field of the report. This is a short, simple process which will be detailed
below.
24
Selecting a Starting and Ending Date
Chapter 2 Basic Skills
To select a starting and ending date:
1. Use the DIRECTION KEYS to move the highlight over the starting date you want for
the report and then press ENTER. You may pick one of the default dates listed or you
may enter a specific date of your own. To do this, select “Enter Specific Date” and
press ENTER. Type in the starting date you want and then press ENTER.
2. Select the ending date you want for the report and then press ENTER.
TIP - When entering a specific date, you do not need to enter slashes.
This is done for you. Also be sure
to place a “0” (zero) if the month or day is a single digit. For example, type 080195 for August 1st, 1995.
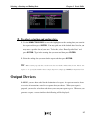
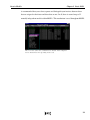
Output Devices
In MOD2, you are often asked for the destination of a report. A report can consist of one
or a series of transactions sorted in a sequence that you choose. When your report is
prepared, you need to select how and where you want your report to go to. Whenever you
generate a report, a screen similar to the following will be displayed:
25
Output Devices
Chapter 2 Basic Skills
For example, you can select Screen to view the report on screen or you can select a
printer to print a copy to file for your records. Below are the descriptions of the first two
devices and their operation.
NOTE - All MOD2 installations reserve the first two devices for Screen and Disk accordingly.
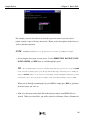
• Screen displays the report on your screen. Use the DIRECTION, PAGE UP, PAGE
DOWN, HOME, and END keys to scroll through the report.
TIP - To search through the report for a particular string while the report is on screen, press HOME
to take you to the beginning of the report. Next press F for find. Type in the string you are looking for
and press ENTER. If there are any references to that string, it will be highlighted and the line it occurs
in will change color. To search for the next instance of the same string within the report, press F3.
When you are through examining the list, press F10 or simply press ESC to go back to
the menu screen you were on.
• Disk saves the report on the hard disk in the directory where your MOD2 files are
located. When you select Disk, you will be asked for a filename. Enter a filename for
26
Client Memberships
Chapter 2 Basic Skills
• the report and press ENTER. All lists that are saved to disk have the extension
“REP,” which stands for reports. You may view a list saved to disk at any time by
opening the file it was saved as in most text editors and word processors.
• Devices U through Z represent devices, usually printers, within your company. When
you select one of these, the report will be sent to that device. This provides you with a
hard copy of the list which you may review, write notes on, or keep for reference. On
your screen, the name of the device will be shown, such as HP LaserJet, instead of
Device U, V, etc.
Client Memberships
Memberships organize different types of clients. A client that buys merchandise from
you, a salesperson for your company, a shipping company, and a MOD2 user are all
different types of clients. By placing them in separate categories, or memberships, you
are efficiently organizing your clients within MOD2. You will benefit by this method of
organization each time you want to generate a list of your clients. All you have to do is
choose the memberships you want to be included in the report. This way you have the
ability to create reports including all your clients or just a select few, based on the
memberships you designate.
Modifying a Client’s Membership Status
To change the membership status of a client or to include a client in multiple
memberships, you may do so on the client information modification screen. Follow STEP
5 in “Modifying Client Information” of CHAPTER 7: CLIENT MANAGEMENT to change a
client’s membership. You should then see the membership selection screen. To change a
client’s membership to another one, move the highlight over the one you want to remove
and untag it by pressing the SPACEBAR. Then move the highlight to the new
membership you want for the client and tag it by pressing the SPACEBAR again. A
27
Invoice Models
Chapter 2 Basic Skills
diamond shape will appear next to a tagged membership. To include the client in more
than one membership, tag all the groups in which you want the client to be a member of
and untag those that you do not want him/her to be in.
When you are finished choosing the client’s new membership(s), press ENTER to go
back to the client information modification screen.
TIP - To tag all the membership types, simply hold the SHIFT key and while holding it, press the
SPACEBAR; then let go of both. To untag all the membership types, do the same keystroke again.
These are some of the memberships you may choose from.
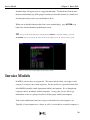
Invoice Models
In MOD2, your invoices are categorized. The names and the labels you assign to each
category is set up by your system supervisor. Invoice models are a powerful feature that
allow MOD2 to handle virtual departments within your company. It is as though your
company consists of multiple smaller companies. At any point, you are able to get
information on one or a group of models or all the groups within your company.
Your system administrator may have setup several models for your company’s use.
Typically, if your company uses a factor, or sells it’s receivable to an outside company, it
28
Invoice Models
Chapter 2 Basic Skills
is recommended that you at least separate and distinguish your invoices between those
that are assigned to the factor and those that are not. In all, there is room for up to 32
mutually independent models within MOD2. This mechanism is used throughout MOD2.
These are some of the more common invoice models. Your company’s
invoice models may vary depending on its needs.
29
CHAPTER
3
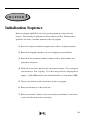
Initialization Sequence
Before you begin using MOD2, you need to get the program up-to-date with your
business. The following are guidelines on how to achieve just that. Following these
guidelines will ensure a smoother transition to the new program.
1) Enter all salespersons with their complete name, address, and phone numbers.
2) Enter all the shipping companies you use for shipping your merchandise.
3) Enter all of your customers with their complete address, phone number, and
appropriate salesperson.
4) Define all of your styles and colors for your current inventory. (Try to categorize
your inventory to 10 or 15 groups. Use a three letter prefix for each group that is
unique. i.e. DS6-1000 would be used for Denim Solid 6 oz. Style number 1000).
5) Choose a cut off date to print your invoices by the new program.
6) Enter your inventory as of the cut off date.
7) Enter your customer’s balance. (You can enter their open balance as one invoice
or enter all of the open invoices separately).
30
Part Using MOD2
2
31
Using MOD2
CHAPTERS
4 Sales Management . . . . . . . . . . . . . . . . . . . . . . . . . . . . . . . . 33
5 Inventory Management . . . . . . . . . . . . . . . . . . . . . . . . . . . 55
6 Transactions . . . . . . . . . . . . . . . . . . . . . . . . . . . . . . . . . . . . . 64
7 Client Management . . . . . . . . . . . . . . . . . . . . . . . . . . . . . . . 78
8 Client Sales Orders . . . . . . . . . . . . . . . . . . . . . . . . . . . . . . . 100
9 Salesperson Management . . . . . . . . . . . . . . . . . . . . . . . . . 109
10 Goods in Process Management . . . . . . . . . . . . . . . . . . 115
11 Managing Received Goods . . . . . . . . . . . . . . . . . . . . . 146
12 Packing Lists . . . . . . . . . . . . . . . . . . . . . . . . . . . . . . . . . . 172
32
CHAPTER
4
Sales Management
Sales is the most important part of a business. Keeping track of all your sales and
invoices is a very difficult but vital task. MOD2 takes this burden off of you by
efficiently managing your sales in an organized manner. It is like a file cabinet with
unlimited space that can sort your invoices by number, customer, date, or some other
format that you prefer. Options such as adding, displaying, voiding, and listing invoices
are now at your fingertips. This chapter will guide you step-by-step on how to manage
your sales with MOD2.
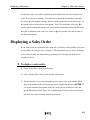
Adding Invoices
This section describes how to add invoices to MOD2. When you add an invoice, it will
be stored in MOD2 as well as printed by printer. You can always refer back to an added
invoice later on (See “Displaying Invoices” later in this chapter). You may use the
printed copies of the invoice to file in record and give to your customers.
To add an invoice:
1. From the main menu, select “Sales” by pressing F1 or by using the DIRECTION
keys to move the highlight over “Sales” and then pressing ENTER. You are now on
the invoice menu screen.
2. Select “Add” by pressing F1 or move the highlight over “Add” and then press
ENTER.
33
Adding Invoices
Chapter 4 Sales Management
3. Pick an invoice model by highlighting the applicable group (model) and then press
ENTER. For explanations on the purpose of invoice models, see “Invoice Models”
in CHAPTER 2: BASIC SKILLS.
4. Enter the invoice number; then press ENTER.
5. Type in the date of the invoice and press ENTER. The default value is set to the
current day. If that is what you want, then just press ENTER.
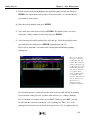
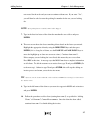
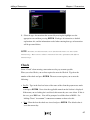
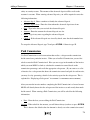
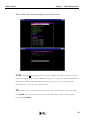
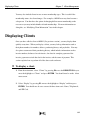
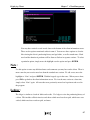
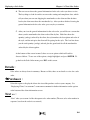
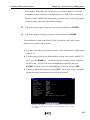
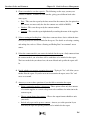
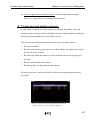
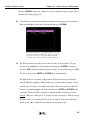
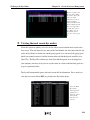
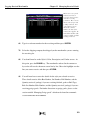
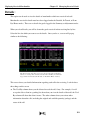
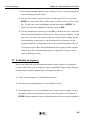
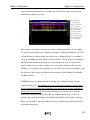
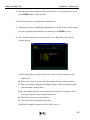
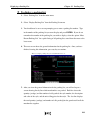
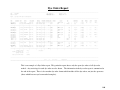
6. A list showing all available packing lists will come up. Select the packing list that
goes with the order and then press ENTER (continue from STEP 12).
Please refer to CHAPTER 12: PACKING LISTS for important information regarding
packing lists.
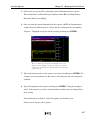
Here you are shown a
list of open and unused
packing lists. The last
column, Day, shows the
number of days since the
packing list was created.
Packing lists added the
same day are shown in
green, those added
between within 15 days
are shown in yellow,
and those added after 15
days are shown in red.
The last line is a
summary of all the
packing lists combined.
If you did not generate a packing list for the order or if you could not find the packing
list you wanted on the given list, you must either add one (see “Adding a Packing
List” in CHAPTER 12: PACKING LISTS) or press ESC. When you press ESC, you will
be asked whether you want to manually select a packing list. Enter “Yes” if the
packing list for the order was not listed on the given list or “No” if a packing list was
34
Adding Invoices
Chapter 4 Sales Management
not created for the order and you want to continue without one. If you enter “Yes”,
you will then be asked to enter the packing list number for the one you are looking
for.
NOTE - If no packing lists are available, STEP 6 will be skipped.
7. Type in the first few letters of the client the merchandise was sold to and press
ENTER.
8. The next screen shows the closest matching clients based on the letters you entered.
Highlight the appropriate client by using the DIRECTION keys and then press
ENTER (if it is a long list of clients, use the PAGE UP and PAGE DOWN keys to
move the highlight up or down one screen at a time). Continue from STEP 11.
If the company you are looking for is not listed, this means they are a new client.
Press ESC at this time. A message says that MOD2 must have complete information
on all clients. To add the customer as an active client, type Y and press ENTER (Go
to the next step). Otherwise type N and press ENTER; this will stop the adding an
invoice process and return you to the invoice menu.
TIP - If you are sure the client to whom the order is sold to is in MOD2, try entering fewer letters under
the “Sold to” name.
9. Type in the full name of the client as you want it to appear in MOD2 and on invoices
and press ENTER.
10.
Follow the procedure to add a client (starting from STEP 5) as specified in “Adding
Clients” of CHAPTER 7: CLIENT MANAGEMENT. Once the client has been added,
continue from STEP 11 to finish adding the invoice.
35
Adding Invoices
11.
Chapter 4 Sales Management
If the ship to location name is the same as the sold to, just press ENTER (go to the
next step). Otherwise, you need to type in the first few letters of the ship to name
and go back to STEP 8. Once you have selected (or added) the ship to name,
continue from STEP 12.
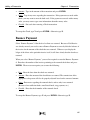
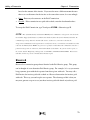
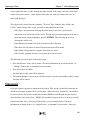
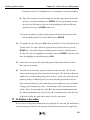
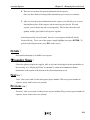
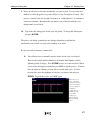
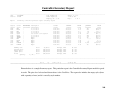
12.
Type in the information requested on this screen. Press ENTER to move to the
next field and ESC to go back one. For explanations on what each item means, see
the list at the end of this section. If you selected a packing list for this invoice, all of
the information you need to enter on this screen has already been entered into the
packing list. Therefore, just press ENTER at every field and then proceed from
STEP 20
(if you want to change some of the information which you entered in the
packing list, you may still do so).
This is the information you will have to enter in STEP 12. If
you selected a packing list, many of the fields will already
hold the proper values.
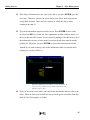
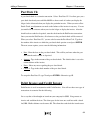
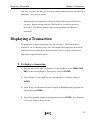
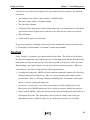
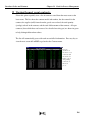
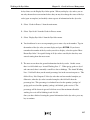
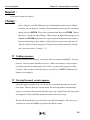
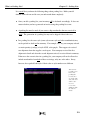
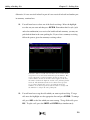
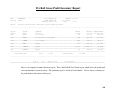
13.
Now you are on the screen where you can pick the merchandise that was sold to the
client. There are four ways in which you can select the goods sold to the client: By
Style #, Color, Description, or Vendor.
36
Adding Invoices
Chapter 4 Sales Management
NOTE - STEP 14 uses Style #
as the method to pick the items sold to the client. You may however use
whichever method is convenient for you. If you want, you may use Color to select a certain item and
Description to select another one, or some other combination of methods.
NOTE - Out of all the methods available to select the merchandise, Vendor is slightly different.
When
you move the highlight to Vendor, a list of all the vendors appears. Select the appropriate one and press
ENTER. A list showing all the items bought from that vendor appears. This list replaces the list
mentioned in STEP 14.
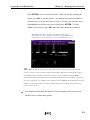
Here, you must
use one of the
four methods to
select the
merchandise
sold. As you
add items, they
are listed at the
top of the
screen and
below them a
running total
and quantity
(yardage) is
shown.
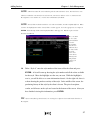
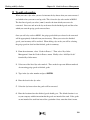
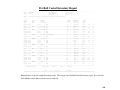
14.
Under “Style #,” enter the style number of the item sold to the client and press
ENTER. A list will come up showing the style number and all the colors available
for that style. Move the highlight over the one you want. While the highlight is
over it, you will be able to see some information about it. On the right side, there is
a chart showing the purchase activity of that style. In the middle of the screen, the
purchasing history of that style by the client is shown. The price description,
vendor, and all notes on the style are located at the bottom of the screen. After you
have finished viewing this information, press ENTER.
TIP - If you cannot find a particular style, try entering fewer digits or letters under Style #, Color, or
Description.
37
Adding Invoices
15.
Chapter 4 Sales Management
Type in the unit price for the item and press ENTER. To accept the default price,
just press ENTER.
16.
Type in the quantity (yardage) of that item sold to the client and press ENTER.
17.
Repeat STEPS 14-16 to select the rest of the items sold to the client. (Remember
that you do not have to use Style # as the method to pick the merchandise even
though STEP 14 uses it).
18.
When you have finished entering all the merchandise, press ESC (Make sure you
are on the Style #, Color, Description, and Vendor screen when you do this).
19.
Enter the freight charge for the order and press ENTER. To accept the value you
entered at STEP 12, just press ENTER.
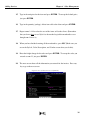
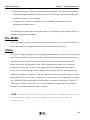
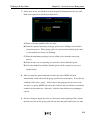
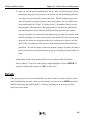
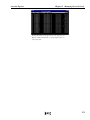
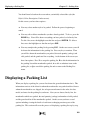
20.
The next screen shows all the information you entered for the invoice. Press any
key to go to the next screen.
A quick review of what you entered (STEP 20)
38
Adding Invoices
21.
Chapter 4 Sales Management
Once you view the general information for the invoice, you will be on a screen that
shows the goods you selected to be sold to the client, the Sub-total, the freight
charge, and the Grand Total. If all the information, the merchandise you selected,
the prices, and quantities are correct, type Y then ENTER to accept the invoice (Go
to STEP 22).
To re-enter the general information for the invoice and to change the goods sold to
the client, press E then ENTER to edit the invoice. Follow STEPS 14-18 to add other
items to the list of merchandise sold. To remove an item, press the HOME key,
highlight the appropriate line, and press DEL. To increase or decrease the price
and/or quantity (yardage) of an item, press the HOME key, select the appropriate
line, and enter the new values (Go to STEP 12).
To add and/or substitute items sold to the client, press A then ENTER. See the
paragraph above to learn how to remove a selected item and how to increase or
decrease the price and/or quantity (yardage) of an item (Go back to STEP 14).
To quit and go back to the invoice menu, press Q then ENTER.
22.
Type in all memos, if any, to be printed on the invoice and press ENTER. An
example of a memo would be “Thank you for your order” or whatever you prefer.
The invoice will be saved in the MOD2 and printed by the printer. You will then be
returned to the invoice menu.
While you are adding an invoice, you are required several times to enter information
about the invoice and the order. The following list explains each item and what they
mean. The list is in order of appearance during the adding an invoice process.
39
Adding Invoices
Chapter 4 Sales Management
Information Asked
Explanation
Invoice model..............
This is the type of invoice you want to enter. For more details on
invoice models, see “Invoice Models” in CHAPTER 2: BASIC SKILLS.
This is the invoice number. When you are asked for this, you can
usually press ENTER because MOD2 sets the default value for the
invoice number as the subsequent number of each invoice model.
The date of the invoice. This date will be shown on printed copies.
The name of the company the order was sold to.
The name of the company where the order should be shipped to.
The purchase order number. If the client placed a purchase order,
enter the clients purchase order number here.
The salesperson of the order.
How the client will pay for the order (C.O.D., credit card, check, net
30 days, etc.)
The shipping or trucking company that will be used to ship the order
to the client.
The commission percentage the salesperson will receive for this
order.
The cost to ship the merchandise to the client. This amount will be
added to the client’s balance.
Use this to find and select items based on their style number.
Use this to find and select items based on their color.
Use this to find and select items based on their description. You must
type in at least three letters that are in the description of the item.
MOD2 will locate all the items that have the letters or words you
entered in their description. When the highlight is over the item you
want (See STEP 14), the letters or words you entered to find the item
will be highlighted in the description area at the bottom of the screen.
Use this to find and select items based on the vendor of the item.
Any notes or comments for the client that you want printed on the
invoice.
This reserved entry records the actual date a transaction was added
regardless of the date entered for the transaction date (the date printed
on the invoice). This field may be viewed however it may not be
edited or changed. This entry is useful when checking the sales
activity of a salesperson on a particular day.
Invoice #......................
Date.............................
Sold to name................
Ship to location name...
PO #............................
Salesperson..................
Terms..........................
Shipped via..................
Commission.................
Freight.........................
Style #.........................
Color...........................
Description..................
Vendor.........................
Memo..........................
Stamped Date...............
Depending on your particular installation, you may also be asked for an approval number,
reference number, packing slip number, delivery receipt number, and/or another field or
fields. Enter these accordingly.
40
Displaying Invoices
Chapter 4 Sales Management
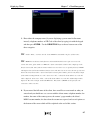
Displaying Invoices
You often need to refer back to an invoice at a later date. You can do this with MOD2 by
displaying the invoice. When you display an invoice, you are shown the general
information for the invoice, the merchandise sold to the client, and the Sub Total, freight
charge, and Grand Total. You are also shown any payments given for the invoice and the
current balance of the invoice. There are many other options available to you as well.
This section tells you how to display an invoice and perform all the options mentioned
above.
To display an invoice:
1. From the main menu, select “Sales” by pressing F1 or by using the DIRECTION
keys to move the highlight over “Sales” and then pressing ENTER. You should now
be on the Invoice menu.
2. Select “Display” by pressing F2 or move the highlight to “Display” and press
ENTER.
3. Type in the number of the invoice you want to display and press ENTER.
TIP - If you do not know the Invoice number, try listing the most recent invoices.
See “Listing the Most
Recent Invoices” later in this chapter for more information on how to do this.
4. The next screen shows the general information for the invoice. Press any key to go to
the next screen when you have finished viewing this information.
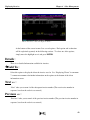
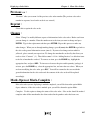
5. This screen you should now be on shows the items purchased by the client and any
payments made towards the invoice. At the bottom-right hand side of the screen is
the balance of the invoice. A positive balance shows debt and a negative balance
shows overpayment.
41
Displaying Invoices
Chapter 4 Sales Management
This is what you see when you display an invoice.
At the bottom of the screen in STEP 5 are several options. Each option and its function
will be explained separately in the following sections. To select one of the options,
simply move the highlight over it and press ENTER.
Details :
There is no detailed information available for invoices.
Sold To :
Select this option to display the client the invoice was for. See “Displaying Clients” in CHAPTER
7: CLIENT MANAGEMENT for further information on the options at the bottom of the client
information screen.
Next »» :
“Next” takes you to STEP 4 of the subsequent invoice number (The next invoice number in
sequence, based on the order it was entered).
Previous «« :
“Previous” takes you to STEP 4 of the previous invoice number (The previous invoice number in
sequence, based on the order it was entered).
42
Voiding Invoices
Chapter 4 Sales Management
Reprint :
Select this to reprint the invoice. This is useful if the original invoice was damaged or lost and saves you the
time of having to re-enter all the information for the invoice and the merchandise sold to the client. If you
are asked for a memo, enter it accordingly. (See STEP 22 of “Adding Invoices” for more information on
entering a memo).
Change :
Select “Change” to modify different aspects of information for the invoice. Before each item you can
change is a number. Enter the number next to the item you want to change and press ENTER. Type in the
replacement and then press ENTER. Repeat this process to make any
other changes. When you are through making changes, press 0 (zero) then ENTER to go back to the
invoice general information screen (STEP 4). If you need to change an item which is yellowed, please
consult your supervisor. To change the merchandise sold to the client, you need to select “Contents” (-1).
Then follow STEPS 14-18 in “Adding invoices” to add other items to the list of merchandise sold. To
remove an item, press the HOME key, highlight the appropriate line, and press DEL. To increase or
decrease the price and/or quantity (yardage) of an item, press the HOME key, select the appropriate line,
and enter the new values. When you are done modifying the invoice, press ESC. You will be returned to
the screen with the general information for the invoice (STEP 4) and the contents of the invoice will be
updated accordingly.
Voiding Invoices
For the security of your company, no one may delete an invoice from MOD2. You may, however,
void an invoice when the need arises. When you attempt to void an invoice, you will be asked for
an authorization code. Please see your system supervisor for the password. After you void an
invoice, you will see “VOIDED” blinking in red whenever you display it. When you generate a
report of invoices (see “Invoice Reports” later in this chapter), you will have the option of including
voided invoices in the report or not. If you void an invoice for which a packing list was made, be
sure to void the packing list as well or else your inventory will not be credited appropriately (For
discussion of this, see “What is a Packing List” in CHAPTER 12: PACKING LISTS.
43
Invoice Reports
Chapter 4 Sales Management
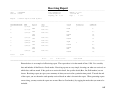
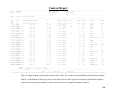
Invoice Reports
When you want to view a list of particular invoices sorted in a particular manner and
within a certain time field, simply generate an invoice report. An invoice report may not
only be viewed on screen but can also be sent to one of the installed devices on your
system, thus producing a neat and detailed hard copy of the report. This section will
discuss and explain the questions you need to respond to in order to generate the report.
To generate an invoice report:
1. Choose a method to sort the report in - There are various ways to sort invoices in
MOD2. Each is unique, offering you different ways to view the report.
•
Date - This sorts the report by the date printed on the invoice.
•
Number - This sorts the report by the invoice number.
•
Sold To - This sorts the report alphabetically based on who the invoice was sold
to.
•
SalesPerson detailed - This will show a detailed sales report for the salesperson
that includes individual invoice information each on a separate line. The
summary method is included in the detailed one.
•
SalesPerson summary - This will show a summary of a salesperson’s sales
activity.
•
State - This method sorts the invoices alphabetically by the state where the invoice
was sold to.
•
Analyze & Graph - This method is usually used over a several month period. It
will provide management information and a comparison graph for the sales
activity within the time field selected.
•
Stamped Date - This sorts the report by the actual date the report was added to
MOD2. This method is useful when checking the sales activity of a salesperson
on a particular day.
44
Invoice Reports
Chapter 4 Sales Management
2. Select a starting and ending date - Only those invoices whose date is within the time
field you choose here will be included in the report. For details on selecting a starting
and ending date, refer to “Selecting a Starting and Ending Date” in CHAPTER 2: BASIC
SKILLS.
3. Select the invoice models you want to be included in the report - The fewer invoice
models you choose here, the more filtered and specific the report will be.
4. Answer yes or no to the remaining questions - These questions give you further
options on how the final report will be displayed.
•
Select a particular Sold To / salesperson - These options allow you to generate a
more specific report. You will be asked these if you customize the report.
•
Include credit memo in report - If you answer yes to this question, MOD2 will
take into account any credit memos for the invoices reported and will then not
only include the gross volume, but also the total value of the credit memos and
the net volume. This way you can see how much was sold, how much was
returned, and how much was sold after deducting the returns.
•
Include voided invoice in report - Answer yes if you want voided invoices to be
included in the report.
•
Include only the voided invoice in report - You will see this question if you
wanted voided invoices to be included in the report. Answer yes if you want the
report to show only the voided invoices.
5. Select an output device to print the report to - For more information on output
devices, see “Output Devices” in CHAPTER 2: BASIC SKILLS.
45
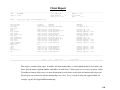
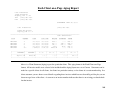
Listing the Most Recent Invoices
Chapter 4 Sales Management
Listing the Most Recent Invoices
This section explains how to list the most recent invoices. It is a short, simple, however
useful procedure which you will probably use often. When you list the most recent
invoices, you are shown the invoice model, number, date, to whom the order was sold,
the salesperson of the order, and the amount of the invoice.
To list the most recent invoices:
1. From the main menu, select “Sales” by pressing F1 or use the DIRECTION keys to
move highlight to “Sales” and press ENTER.
2. Select “Most Recent” by pressing F8 or by moving the highlight over “Most Recent”
and then pressing ENTER.
You will then be shown the most recent invoices along with all the information
mentioned above. Press any key to view the next screen-full of information. To go back
to the invoice menu, press ESC.
46
Working with Credit Memos
Chapter 4 Sales Management
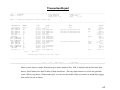
Working with Credit Memos
This section describes what to do in the unfortunate event of returned merchandise.
When a client returns merchandise, you must add a credit memo to credit their account
and update the inventory. You may also display a credit memo for reference, void a
credit memo, generate a credit memo report, and list the most recent credit memos. All
of this and more will be explained in this section.
NOTE - Goods assigned a Credit Memo will return to your inventory in SUMMARY.
To add a credit memo:
1. From the main menu, select “Sales” by pressing F1 or by using the DIRECTION
keys to move the highlight over “Sales” and then pressing ENTER. You should now
be on the invoice menu screen.
2. Select “Credit Memo” by pressing F9 or move the highlight over “Credit Memo” and
press ENTER. You should now be on the credit memo menu screen.
3. Select “Add” by pressing F1 or by moving the highlight over it and pressing ENTER.
4. Type in the number of the invoice you want to add a credit memo for and press
ENTER.
TIP - If you do not know the invoice number, try listing the most recent invoices.
See “Listing the most
recent invoices” earlier in this chapter for more information on how to do this.
5. The next screen shows the general information for the invoice. Press any key to go to
the next screen.
47
Working with Credit Memos
Chapter 4 Sales Management
6. This screen shows the items sold to the client, any payments made toward the invoice,
and the balance for the invoice.
7. To generate a credit memo for the invoice, type Y and press ENTER (go to the next
step). Otherwise, type N and press ENTER to stop the adding a credit memo process.
You will then be returned to the credit memo menu.
8. If all the goods were returned, type Y and press ENTER. If not, type N and press
ENTER.
9. Type in the date of the credit memo and press ENTER.
10.
If you want to credit the client’s account for the freight charge, press ENTER to
accept the default value, which is the amount of the freight charge. If your policy is
such that shipping and handling charges are not refundable, type 0 (zero) and press
ENTER. To partially credit the freight charge, type a number between zero and the
default value and press ENTER.
11.
Enter the shipping company with which the customer returned the merchandise and
press ENTER.
12.
Type in the reason for the return (such as damaged, not satisfied, wrong color, etc.)
and press ENTER.
13.
Enter the reference or packing slip # (such as the RMA #) and press ENTER.
14.
Type in who prepared the credit memo and press ENTER.
15.
Enter any notes on the credit memo, client, or invoice and press ENTER. If all the
goods were returned, this will be the last step.
48
Working with Credit Memos
16.
Chapter 4 Sales Management
Follow STEPS 14-18 in “Adding Invoices” earlier in this chapter to select the items
returned and to be credited. When you complete STEP 18, you are asked to accept
the credit memo, edit it, add or substitute items to it, or to quit. Type Y then
ENTER to accept it, E then ENTER to make changes to the credit memo
information and the items credited (Follow STEPS 14-18 in “Adding Invoices” to add
other items to the list of merchandise returned. To remove an item, press the
HOME key, highlight the appropriate line, and press DEL. To increase or decrease
the price and/or quantity (yardage) of an item, press the HOME key, select the
appropriate line, and enter the new values), A then ENTER to add or substitute
items (see above), or Q then ENTER to quit and return to the credit memo menu.
Once you have added the credit memo, the printer will produce a hard copy of it. Your
inventory will also be updated.
To display a credit memo:
1. From the main menu, select “Sales” by pressing F1 or by using the DIRECTION
keys to move the highlight over “Sales” and then pressing ENTER. You should now
be on the invoice menu screen.
2. Select “Credit Memo” by pressing F9 or move the highlight over “Credit Memo” and
press ENTER. You should now be on the credit memo menu screen.
3. Select “Display” by pressing F2 or by moving the highlight over “Display” and then
pressing ENTER.
49
Working with Credit Memos
Chapter 4 Sales Management
4. Type in the credit memo number and press ENTER. The credit memo number is a
“C” followed by the invoice number the credit memo was made out for. For example,
if invoice number “123” has a credit memo, the credit memo number would be
“C123.” If multiple credit memos are made for the same invoice, the credit memo number will
have an extra “C”. From the example already given, if invoice number “123” has three credit
memos, one will be “C123”, the second “CC123”, and the last “CCC123”.
5. The next screen shows the information for the credit memo. Towards the top-right
hand side of the screen is a box that within it lists any notes on the credit memo,
client, or invoice. If you notice, the commission the salesperson received is also
appropriately deducted based on the items returned. When you finish viewing the
information on this screen, press ENTER to go to the next one.
6. This screen shows the items that were returned by the client. Note that the Grand
Total is negative, indicating that it has been deducted and credited to the client’s
balance.
At the bottom of the screen in STEP 6 are several options. Each option and its function
will be explained below in separate sections. To select one of the options, simply move
the highlight over it and press ENTER.
Details :
There is no detailed information available for credit memos.
Returned By :
Select this option to display the client the credit memo was for. See “Displaying Clients” in
CHAPTER 7: CLIENT MANAGEMENT
for further information on the options at the bottom of the
client information screen.
Next »» :
50
Working with Credit Memos
Chapter 4 Sales Management
“Next” takes you to STEP 5 of the subsequent credit memo number (The next credit memo
number in sequence, based on the order it was entered).
Previous «« :
“Previous” takes you to STEP 5 of the previous credit memo number (The previous credit memo
number in sequence, based on the order it was entered).
Reprint :
Select this to reprint the credit memo. This is useful if the original copy of the credit memo was
damaged or lost and saves you the time of having to re-enter all the information for the credit
memo again.
Change :
Credit Memos may not be changed. The only way to change a credit memo is to void it and then
issue a new one.
To void a credit memo:
51
Working with Credit Memos
Chapter 4 Sales Management
For the security of your company, no one may delete a credit memo from MOD2. You
may, however, void a credit memo when the need arises. When you attempt to void an
credit memo, you will be asked for an authorization code. Please see your system
supervisor for the password. After you void a credit memo, you will see “VOIDED”
blinking in red whenever you display it.
Please note the following three important consequences of voiding a credit memo :
♦ When you void a credit memo, your inventory will be deducted accordingly. This is
because issuing a credit memo is saying the customer never returned the goods.
When you issue a credit memo, your inventory is credited because goods are returned
to stock. When you void a credit memo, the opposite occurs.
♦ Since voiding a credit memo is saying the client never did return the goods, the
invoice pertaining to the credit memo becomes open again and the amount of the
credit memo is added to the customer’s balance. Open invoices are those which have
not been paid for.
To generate a credit memo report:
1. Choose a method to sort the report in - The methods listed are identical to the ones for
generating an invoice report with the exception of Returned By instead of Sold To.
Please refer back to the section “Invoice Reports” for descriptions of each sort method.
2. Select a starting and ending date - Only those credit memos whose date is within the
time field you specify here will be included in the report. For details on selecting a
starting and ending date, refer to “Select a Starting and Ending Date” in CHAPTER 2:
BASIC SKILLS.
52
Working with Credit Memos
Chapter 4 Sales Management
3. Select the invoice models you want to be included in the report - Only credit memos
from the invoice models you select here will be candidates to be included in the
report. The fewer models the you choose here, the more filtered and specific the
report will be.
4. Decide whether you want to customize the report - Typing in “Yes” will allow you to
further filter the report. If you do not want to customize the report, enter “No” and
move on to STEP 6.
5. Answer yes or no to these questions if you decided to customize the report.
•
Select a particular Returned By / Salesperson - These options allow only the credit
memos of a certain client or a certain salesperson to be candidates for inclusion in
the contract report.
6. Select an output device to print the report to - For more information on output
devices, see “Output Devices” in CHAPTER 2: BASIC SKILLS.
To list the most recent credit memos:
1. From the main menu, select “Sales” by pressing F1 or by using the DIRECTION
keys to move the highlight over “Sales” and then pressing ENTER. You should now
be on the invoice menu screen.
2. Select “Credit Memo” by pressing F9 or move the highlight over “Credit Memo” and
press ENTER. You should now be on the credit memo menu screen.
3. Select “Most Recent” by pressing F5 or by moving the highlight over “Most Recent”
and then pressing ENTER.
53
Working with Credit Memos
Chapter 4 Sales Management
You will then be shown the most recent credit memos along with its accompanying
information. This information includes the invoice model, the credit memo number, the
date of the credit memo, who the merchandise was returned from, the salesperson of the
original order, and the amount of the credit memo.
54
CHAPTER
5
Inventory Management
This chapter instructs you how to use MOD2 to manage your inventory. You may add,
display, modify and delete inventory with ease at any time. Advanced options such as
listing inventory and performing a gross profit analysis on inventory are also possible.
For related topics on managing inventory, see CHAPTER 10: GOODS IN PROCESS
MANAGEMENT.
Adding New Inventory
This section describes how to define new inventory in the MOD2 program. To sell a
certain item to a client, it must first be defined in MOD2. Once this is done, you may
perform all the tasks mentioned above and more.
To add new inventory:
1. From the main menu, select “Inventory” by pressing F2 or use the DIRECTION keys
to move the highlight over “Inventory” and press ENTER.
2. Select “Define” by pressing F1 or by moving the highlight over “Define” and pressing
ENTER.
3. Type in the style number you want to add and press ENTER.
4. Type in the number of colors you want to add for that style and press ENTER.
55
Displaying Inventory
Chapter 5 Inventory Management
5. Type in the names of each color for the style.
6. On the next screen, you need to enter the information requested for the style. Do so,
pressing ENTER after you are finished typing in each item to go to the next line.
NOTE - The information you enter here will automatically set all the colors of that style with those
specs. If you want a particular color of the style to have a different price, description, or some other spec,
see “Modifying Inventory” later in this chapter.
6. Press ESC. Type Y to accept the new style, E to edit the information for that style
again, or Q to quit. After choosing one of the above, press ENTER to return to the
menu screens.
NOTE - Disregard the several options you see at the bottom of the screen.
These are used when
displaying inventory.
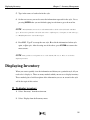
Displaying Inventory
When you want to quickly view the information and history on a particular style, all you
need to do is display it. There are many methods which you can use to display inventory.
These methods plus a brief description of the information you see on screen for the style
will be the topic of this section.
To display inventory:
1. Select “Inventory” from the main menu.
2. Select “Display from the Inventory menu.
56
Displaying Inventory
Chapter 5 Inventory Management
3. Use one of the methods on screen to find the style you are looking for.
•
Use Style # to locate a style by its style number.
•
Use Color to locate a style by its color.
•
Use Description to locate a style by its description. You need to enter at least a
three character string for MOD2 to find the style by the Description method.
•
Use Vendor to locate a style by its vendor.
•
Use Client in conjunction with one of the above methods to see the purchasing
history of a particular client in regards to a particular style. To use this method,
enter the client’s name under “Client.” Then use one of the four methods
described above to locate a particular style. On the next screen, once you
highlight the style you are looking for, you will see a menu showing the
purchasing history of the style by the client you chose. Of course, you may still
see all clients involved with that style by selecting “History” on the next screen.
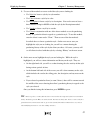
4. On the next screen, highlight the style you are looking for. While the style is
highlighted, you will see various information and history on the style. They are:
•
On the right-hand side, you will see a chart showing the sales activity of that style
during various periods of time.
•
At the bottom-left hand side of the screen, you will a short summary on the style,
which includes the vendor, the selling price, the description, and any notes on the
style.
•
If you selected a particular client (see STEP 3 above), there will be a menu towards
the middle of the screen showing that client’s purchasing history in regards to the
style you selected.
Once you finish viewing this information, press ENTER to go on.
TIP - In the step above, you may filter the list so as not to show the empty styles (styles not currently in
stock). To do this, press the Z key on your keyboard. You may use this feature whenever you search for a
particular item in your inventory and are given a list of items from which you must choose one, such as
when modifying inventory or even when adding an invoice.
57
Modifying Inventory
Chapter 5 Inventory Management
TIP - If the MOD2 EIS (Executive Information System) extensions have been loaded and installed on
your particular system setup, you may use them in the above step. The EIS feature gives you one-touch
access to extended information, analysis, and graphs on a style. The Imaging feature of EIS allows you to
see an actual image of the style right on your screen, whether it be print or solid. To use EIS, highlight the
style you want to display and press the RIGHT ARROW KEY. If you press this key again, you will see
more EIS information. When you have finished viewing this information, press any key to return to the
previous menu and to continue with the displaying inventory process.
5. The next screen shows the information for the style. At the bottom of the screen are
several options. To use one of these options, highlight it and press ENTER. When
you are done, press ESC to return to the inventory menu.
Modifying Inventory
If the information on one or more of the styles in your inventory changes, such as its
price, description, or the vendor you receive it from, you may modify it.
To modify inventory:
1. Select “Inventory” from the main menu.
2. Select “Modify” from the Inventory menu.
3. Select the style you want to modify in a similar fashion as that described in
“Displaying Inventory” earlier in this chapter.
4. Highlight the style you are looking for and press ENTER.
5. On the following screen you will see a menu with several options in it. These options
allow you to display the style, change the style information, change the style contents,
58
Inventory Reports
Chapter 5 Inventory Management
add a new color number, and go to the next or previous styles. Make all changes that
are necessary. When you have finished modifying the inventory, press ESC on the
screen where you select the options to return to the Inventory menu.
Inventory Reports
To obtain a detailed listing of certain items in your inventory, all you have to do is
generate an inventory report. Inventory reports can show many things depending on the
type of report you choose. They can be useful to check the quantity (yardage) of all or
certain items in your inventory so you know which ones you have a sufficient amount of
and which ones you need to order more of.
To generate an inventory report:
1. Select “Inventory” from the main menu.
2. Select “Report” from the Inventory menu.
3. You should now be on a screen prompting you to choose a folder. The items in your
inventory are grouped within these folders. Choose the folder whose contents you
want to be included in the report. For example, if you select “Standard,” all the styles
within the Standard folder (those that were added to MOD2 by defining a new style
through the Inventory menu) will be candidates for the report. They are candidates
because the report can be further filtered, so maybe not all of the styles within the
Standard folder will actually end up in the report. You may select more than one
folder by tagging all those which you want. To include your entire inventory in the
report, you must basically tag all the folders. Press ENTER to go to the next menu.
59
Inventory Reports
Chapter 5 Inventory Management
4. Select one of the listed inventory report models. Each model has its own advantages
and will affect the layout of the report. Below are short descriptions of each model.
•
Controller inventory report model - This model is usually used by someone who
wants extended information for the inventory. If you select this model, you will
also be asked to choose a field.
•
Office listing model - A listing which you can use that does not include costing
information. If you select this model, you will also be asked to choose a field.
•
Inventory listing [simple] - This will give a simple or summary listing of the
inventory.
•
Each on a page model - Each style will be shown on a separate page.
•
Inventory listing [detailed] - This provides a detailed listing of inventory that
included all costing information. It is usually used by the supervisor.
•
Per roll & location printout - The individual details of each roll will be listed.
** This report model will only work if you have detailed inventory management
installed as part of your MOD2 setup. Please contact your system supervisor for
the availability of this.
•
Per roll gross profit & analysis - This will give you costing on a roll by roll.
** This report model will only work if you have detailed inventory management
installed as part of your MOD2 setup. Please contact your system supervisor for
the availability of this.
5. Select a price level for the report and then press ENTER.
6. Decide whether you want the empty styles to be included in the report. An empty
style is one whose quantity (yardage) is zero, meaning you do not have it in stock.
7. Choose whether you want to sort the report by Style #, Color, Vendor, or by Last
Activity Date. Last Activity Date will sort the report by the last time a style was
involved in a transaction.
60
Performing a Gross Profit Analysis
Chapter 5 Inventory Management
8. Select an output device. For more information on output devices, see “Output
Devices” in CHAPTER 2: BASIC SKILLS.
Performing a Gross Profit Analysis
A gross profit analysis is a powerful report which MOD2 can perform to analyze your
business. It calculates the profit made on each item in your inventory from selling them
to clients. For example, let us say you have a style called Style X. MOD2 will go
through all the invoices that contain Style X and will then compare the price Style X was
sold to the cost price. It will then calculate the profit. On screen, you will be shown the
total quantity (yardage) of Style X sold, the average price of Style X, the total profit made
from Style X, and the percentage of your inventory sold that came from Style X. You
may also specify a certain time period for MOD2 to work in so it will only look for
inventory sold within the dates you choose. After calculating all this information for
Style X, the same will be done for the rest of the styles in your inventory and at the end of
the report you will be shown the total profit made from all your inventory sold within the
dates you chose.
When you perform a Gross Profit Analysis, you will be prompted for the following
information:
•
A starting and ending date. MOD2 will only search for merchandise sold within the
time field you specify here. This way you can calculate the profit made within a
certain period of time. Refer to “Selecting a Starting and Ending Date” in CHAPTER 2:
BASIC SKILLS
•
on how to select a starting and ending date.
A cost level. As you know, every item in your inventory can have multiple price
levels. Here you need to tell MOD2 which price level it is that you want to be your
cost price so it can be compared to the sold price.
61
Generating a Statistical Report of Inventory
•
Chapter 5 Inventory Management
Invoice models. MOD2 searches the invoices to find the goods sold to calculate the
profit. This option allows you to restrict its search so that it only goes through those
invoices which are defined as one of the invoice models you select here.
•
The cutoff percentage. During the course of dealing with a client, it may turn out that
you have sold him/her several samples of items in your inventory. If the client liked
one of the samples, he would buy the goods corresponding to that sample in a large
quantity (yardage). As time passes, you may have sold the client several samples plus
a few other items, however these items at bulk quantities. These bulk quantities
might make up 80 to 90 percent of what you sold to the client while the numerous
samples make up the other 10 to 20 percent. Since you are only interested in the
profit made by the bulk quantities and you do not want a gross profit analysis on all
those various samples, you need to select a cutoff percentage, in this case around 80
or 90 percent.
•
An output device. Refer to “Output Devices” in CHAPTER 2: BASIC SKILLS for more
information on output devices.
Generating a Statistical Report of Inventory
The Statistical Report of Inventory is another powerful report which MOD2 can perform
to analyze your business. This report will show all the styles a client bought within a
certain time period, how many of each style was purchased, the average price that the
client paid each time he purchased the style, the total average price he paid for each style,
and the total average price the client has paid altogether for all the styles. This report
ranks your customers from those that bought the most to those that bought the least
according to dollar amount. This report along with the Gross Profit Analysis report are
two useful tools which you may use to analyze your business.
62
Generating a Statistical Report of Inventory
Chapter 5 Inventory Management
To generate a statistical report of inventory:
1. Select a starting and ending date for the report. MOD2 will look for merchandise sold
only within the time field you specify here. See “Selecting a Starting and Ending
Date” in CHAPTER 2: BASIC SKILLS if need more information on how to select a starting
and ending date.
2. MOD2 searches through your client’s invoices to find out what merchandise he/she
has bought. By selecting invoice models here, you may restrict its search. MOD2
will only go through those invoices which are defined as one of the invoice models
you select here. Tag the invoice models you want and then press ENTER.
3. You will now be asked to enter the minimum sales amount. Enter a dollar amount
here. MOD2 will only search the invoices of those clients whose total amount of
purchasing from your company totals to more than the dollar amount you enter here.
For example, if you type in 1000, the program will only generate a statistical report of
inventory for those clients who have in all bought more than $1000 from your
company. This way you can generate the report for a select group of clients.
4. There are three more questions that have to be answered before the report can be
generated. They are:
- Whether you want details of each item in the report.
- Whether you want the report to display each client on a page.
- Whether you want to generate the report for a particular customer.
Answer these questions appropriately.
63
CHAPTER
6
Transactions
The transaction module of MOD2 records payments, credits, debits, and other
transactions that occurred and then accordingly adjusts the balance of the appropriate
client. Once you have added a transaction, it will be shown when you display the
transaction as well as in the ledger and also when you display the invoice the transaction
was for. You may also change a transaction and list the transactions that occurred within
a certain period. This chapter will present how to work with transactions and will explain
how to do all the tasks mentioned above.
Adding a Transaction
Each time a transaction occurs, such as a paid invoice, you need to enter the transaction in
MOD2 for it to update the balance of the invoice appropriately. You can do so by adding
a transaction, which will be discussed in this section.
To add a transaction:
1. From the main menu, select “Transactions” by pressing F3 or by using the
DIRECTION KEYS to move the highlight over “Transactions” and then pressing
ENTER. You should now be on the transaction menu screen.
2. Select “Add” by pressing F1 or move the highlight to “Add” and press ENTER. You
should now see a screen similar to the following:
64
Adding a Transaction
Chapter 6 Transactions
3. Select the type of transaction that occurred by moving the highlight over the
appropriate one and then pressing ENTER. Each type of transaction, a detailed
explanation of it, and the information needed when entering that type of transaction
will be presented below.
NOTE - Each time you add a transaction, you are first shown the most recent entries of that
transaction type. This occurrence will not be mentioned below in the explanations of the different
transaction types.
Check
Select “Check” when entering a transaction used to pay accounts payable.
When you select Check, you are first required to enter the Check #. Type here the
number of the check and press ENTER. The next screen requires you to enter the
following:
• Pay To - Type in the first few letters of the name of the client the payment was made
to and press ENTER. Next select the applicable name from the list that is displayed.
If the name you are looking for is not listed, this means they are a new client. If this is
the case, press ESC now. You will be prompted to add the client to MOD2. See
“Adding Clients” in CHAPTER 7: CLIENT MANAGEMENT on how to do this.
•
Date - Enter the date the check was issued and press ENTER. The default value is
set to the current day.
65
Adding a Transaction
Chapter 6 Transactions
•
Amount - Type in the amount of the transaction and press ENTER.
•
Notes - Type in any notes regarding the transaction. If the payment was made with a
check, you may want to enter the bank code. If the payment was made with a money
order, you may want to type some information about the money order.
•
Check # - Not used when entering a Check transaction.
To accept the Check, type Y and press ENTER. Otherwise type N.
Bounce Payment
Select “Bounce Payment” if the check of a client was returned. Because a Paid Invoice
was already entered, you need to enter a Bounce Payment to correctly debit the balance of
the invoice for the amount of the check that was returned. Whenever you display the
ledger of the client or the particular invoice itself, it will show clearly that the check was
returned.
When you select “Bounce Payment,” you are first required to enter the Bounce Payment
#. Enter here the number of the invoice pertaining to the returned check here and press
ENTER. The next screen requires you to enter the following:
•
Date - Enter the date when the check was returned.
•
Amount - Enter the amount of the check that was returned. The commission of the
appropriate salesperson will also be properly adjusted based on the corrected amount.
•
Notes - Enter notes regarding the returned check, such as why it was returned
(Because of not sufficient funds, uncollected funds, stop payment, etc.).
•
Check # - Enter the check number of the returned check.
To accept the Bounce Payment, type Y and press ENTER Otherwise type N.
66
Adding a Transaction
Chapter 6 Transactions
Discount
Select “Discount” when you want to give a client a discount for a particular invoice. This
transaction is used only when both sides agree upon the discount. If you are forced to
discount the client because, for example, they went out of business and cannot fully pay,
please see “Write Off” later in this section.
When you select “Discount,” you will be first asked to enter the Discount #. Enter here
the number of the invoice pertaining to the Discount here and press ENTER. The next
screen requires you to enter the following:
•
Date - Type in the date you issued the discount.
•
Amount - Type in the amount of the discount. The commission of the appropriate
salesperson will also be properly adjusted based on the corrected amount.
•
Notes - Type in any notes regarding the discount, such as the reason why it was given.
•
Check # - Not used when entering a Discount transaction.
To accept the Discount, type Y and press ENTER. Otherwise type N.
Paid Invoice
Select “Paid Invoice” to enter any kind of payments, regardless of the amount, for a
particular invoice. After you enter a Paid Invoice, the balance of the invoice will be
correctly adjusted.
When you select Paid Invoice, you are first required to enter the Paid Invoice #. Type
here the number of the invoice pertaining to the payment received and press ENTER.
The next screen requires you to enter the following:
•
Date - Enter the date you received the payment for the invoice.
•
Amount - Type in the amount of the payment. The default value is set to the current
balance of the invoice.
67
Adding a Transaction
Chapter 6 Transactions
•
Notes - Enter any notes regarding the payment.
•
Check # - If the payment was a check, enter the check number here.
To accept the Paid Invoice, type Y and press ENTER. Otherwise type N.
Write Off
Select “Write Off” when you are forced to give a client a discount. If a client could not
fully pay an invoice, such as if they went out of business, you need to enter a Write Off so
the balance of the invoice becomes $0. Whenever you view the ledger of the client or
look up the particular invoice, it will be reflected that a discount was given that was not
agreed upon by both sides, meaning you were forced to give the discount to the client.
When you select Write Off, you will first be asked to enter the Write Off #. Enter here
the number of the invoice pertaining to the Write Off and press ENTER. The next screen
requires the following information:
•
Date - Type in the date you are issuing the Write Off.
•
Amount - Enter the amount of the Write Off. The default value is set to current
balance of the invoice. The commission of the appropriate salesperson will be
properly adjusted based on the corrected amount.
•
Notes - Type in any notes regarding the write off, such as why it was given.
•
Check # - Not used when entering a Write Off transaction.
To accept the Write Off, type Y and press ENTER. Otherwise type N.
68
Adding a Transaction
Chapter 6 Transactions
Post Date Ck
A post dated check is a cosmetic transaction. Select “Post Date Ck” if a client gave you a
post dated check and you would like MOD2 to show record of it when you display the
ledger for the client and when you display the particular invoice. When you enter a Post
Dated Check, no adjustments are made to the balance of the invoice in any way. You are
just notified of its existence when you view the ledger or display the invoice. After the
check has been cashed or deposited, enter the check under the Paid Invoice transaction.
Once you enter the Paid Invoice, all references to the post dated check will be removed.
When you select “Post Date Ck,” you are asked to enter the Post Date Ck #. Type here
the number of the invoice to which the post dated check pertains to and press ENTER.
The next screen requires you to enter the following information:
•
Date - Enter the date on the post dated check. This will let you know when the post
dated check can be cashed or deposited.
•
Amount - Type in the amount of the post dated check. The default value is set to the
current balance of the invoice.
•
Notes - Enter any notes regarding the post dated check.
•
Check # - Type in the check number of the post dated check.
To accept the Post Date Ck, type Y and press ENTER. Otherwise type N.
Debit Invoice and Credit Invoice
Debit Invoice is used in conjunction with Credit Invoice. You will use these two types of
transactions in scenarios like the following:
Let us say that a client bought an item from your company for $500. You generate an
invoice and send him the item. The client pays for the item one week later with a check
for $500. His/her balance now becomes $0. The client then sends back the item because
69
Adding a Transaction
Chapter 6 Transactions
it was damaged or for some other reason. You generate a credit memo for the returned
item. Now the invoice has a balance of -$500, which means the client has $500 credit.
You then send the client a similar item , but a little better than the previous one. This
item costs $550. You generate a new invoice for the $550 item. The client wants to use
his/her credit to pay for the new item and just pay the difference. This is where Debit
Invoice and Credit Invoice come in. You have to deduct $500 from the first invoice and
credit it to the second one.
Select “Debit Invoice.” You will be asked to enter the Debit Invoice #. Type here the
number of the first invoice from which you must deduct the money from. Under “Date,”
type in the date you are entering the Debit Invoice. Under “Amount,” type in the amount
you are deducting ($500). Under “Notes,” type in any notes relevant to the Debit Invoice
and to the transaction. Under “Check #,” do not enter anything because this is not used
with the Debit Invoice transaction. Once you accept the Debit Invoice, the balance for the
first invoice will become $0.
Now select “Credit Invoice.” You will be asked to enter the Credit Invoice #. Type here
the number of the second invoice which you must credit the money to. Under “Date,”
type in the date you are entering the Credit Invoice. Under “Amount,” type in the amount
you are crediting ($500). Under “Notes,” type in any notes relevant to the Credit Invoice
and to the transaction. Under “Check #,” do not enter anything because this is not used
with the Credit Invoice transaction. Once you accept the Credit Invoice, the second
invoice will be credited $500. The balance for the second invoice will then become $50.
NOTE - Debit Invoice and Credit Invoice are always used together and in the order specified above.
Advanced Deposit
Select “Advanced Dep.” if the client gave an advanced deposit. A customer is sometimes
required to give an advanced deposit for something they want to purchase that is either
valuable or will take a long time to obtain. Advanced deposits are usually given for
70
Adding a Transaction
Chapter 6 Transactions
safety or security reasons. The amount of the advanced deposit will be credit to the
customer’s account. When entering advanced deposits, you will be required to enter the
following information:
•
Advance dep. # - Enter a number to identify the advanced deposit.
•
Advance deposit from - Enter the client whom the advanced deposit was from.
•
Date - Type in the date you received the advanced deposit.
•
Amount - Enter the amount the advanced deposit was for.
•
Notes - Type in any notes regarding the advanced deposit.
•
Check # - If the advanced deposit was issued by check, enter the check number here.
To accept the Advance Deposit, type Y and press ENTER. Otherwise type N.
Paid Commission
Use Paid Commission to add a transaction that credits a salesperson the commission
he/she earned on a particular invoice. When you select Paid Commission, you are first
asked to enter the Paid Commission #. Here you are to type in the number of the invoice
which you want MOD2 to look at, calculate the commission earned based on the
commission percentage, and credit the appropriate salesperson. (If you want to see a list
of invoices for a salesperson that shows the commission earned and paid for each invoice,
you may do so by generating a detailed sales activity report for the salesperson. This is
explained in “Displaying a Salesperson” in CHAPTER 9: SALESPERSON MANAGEMENT).
After you enter the invoice number, completing the Paid Commission is a breeze because
MOD2 will already know who the salesperson of the invoice was and exactly how much
he/she earned. When entering a Paid Commission, you will be asked for the following
information:
•
Date - Enter the date you are adding the Paid Commission.
Amount - When asked for the amount, you will almost always just have to press ENTER.
This is because the default value for Amount is already set to the commission earned
71
Adding a Transaction
Chapter 6 Transactions
based on the amount of the invoice. If you need to enter a different amount because
there was a credit memo for the invoice or for some other reason, do so accordingly.
•
Notes - Enter any relevant notes on the Paid Commission.
•
Check # - If the commission was paid with a check, enter the check number here.
To accept the Paid Commission, type Y and press ENTER. Otherwise type N.
NOTE - The default method of calculation in MOD2 for the commission a salesperson earned is by the
merchandise shipped (added invoices). This means that the default value for the Amount field will be the
commission percentage times the amount of the invoice. If, however, you want to calculate the
salesperson’s commission based on payments received for the invoice, you will have to manually enter that
value into the Amount field. MOD2 can generate a report for you that shows the commission earned by a
particular salesperson on each invoice from both methods of calculation. To generate such a report, see
the section entitled “Displaying a Salesperson” in CHAPTER 9: SALESPERSON MANAGEMENT. That section
will show you how to generate a Detailed Sales Activity report.
Reserved
Reserved is a transaction group almost identical to the Paid Invoice group. This group
can be thought of as an alternative Paid Invoice group. For example, let’s say you want to
keep payments given with check separate from those given with cash. You may add a
Paid Invoice for invoices paid with a check or a Reserved transaction for invoices paid
with cash. This way you can keep the two separate. The advantage of this is that you
may now generate a report to see just those invoices paid with check or just those paid
72
Displaying a Transaction
Chapter 6 Transactions
with cash. Of course, the above was merely an example of how you can use the Reserved
transaction. Use it anyway you like.
•
Entering a Reserved transaction is similar to adding a Paid invoice with only one
exception. Instead of being asked for a Paid Invoice #, you will be asked for a
Reserved #. Type here the number of the invoice pertaining to the Reserved
transaction.
Displaying a Transaction
To quickly view a specific transaction, you need to display it. When you display a
transaction, you are shown the status, date, and amount of the transaction, the client the
transaction was for, and any notes on the transaction. How to display a transaction is
what will be explained in this section.
To display a transaction:
1. From the main menu, select “Transactions” by pressing F3 or use the DIRECTION
KEYS to move the highlight to “Transactions” and press ENTER.
2. Select “Display” by pressing F2 or move the highlight over “Display” and press
ENTER.
3. Select the type of transaction you want to display by highlighting the appropriate one
and then pressing ENTER.
4. Type in the applicable number of the transaction and press ENTER. You should now
see a screen similar to the one below:
73
Changing a Transaction
Chapter 6 Transactions
This is what you see when you display a transaction.
This screen shows you the type of transaction and its number, the status of the transaction
(either active or voided), the date and amount of the transaction, the client the transaction
was for, and any notes regarding the transaction.
On this screen, you may swiftly and easily display other transactions with the touch of a
button. Simply press the UP ARROW DIRECTION KEY () and the DOWN
ARROW DIRECTION KEY () to see the next and previous transaction in sequence,
based on the order it was entered, respectively.
Press any other key to return to the transaction menu.
Changing a Transaction
This section describes how to modify a transaction if it was entered incorrectly or if you
want to change the information within it.
To change a transaction:
1. From the main menu, select “Transactions” by pressing F3 or use the DIRECTION
KEYS to move the highlight over “Transactions” and then press ENTER.
74
Listing Transactions
Chapter 6 Transactions
2. Select “Change” by pressing F3 or move the highlight to “Change” and then press
ENTER.
3. Highlight the appropriate transaction type and press ENTER.
4. Type in the number of the transaction you are looking to change and press ENTER.
5. The next screen displays the information entered for the transaction. Press any key to
change an aspect of this information. You should now see the change menu.
6. Highlight the item you want to change and press ENTER.
7. Type in the replacement for the item and press ENTER.
NOTE - If you need to change the client the transaction was for, you will be asked for an authorization
code. Please consult your system supervisor if this is the case.
NOTE - Do not void a transaction unless you are absolutely sure that is what you want to do.
Voiding
transactions is an irreversible process.
Listing Transactions
You may find it helpful to generate a list of some or all transactions that have occurred.
MOD2 lists transactions by grouping them according to their type. It can group them
further by the model of the invoice the transaction was for, if desired. You can choose to
print the report either on screen, to the hard disk, or to one of the installed devices on
your particular system. You may also choose from a variety of ways to sort the report as
well.
75
Listing Transactions
Chapter 6 Transactions
To list transactions:
1. From the main menu, select “Transactions” by pressing F3 or by using the
DIRECTION KEYS to move the highlight over “Transactions” and then pressing
ENTER.
2. Select “List” by pressing F4 or by highlighting “List” and then pressing ENTER.
3. Tag the transaction group(s) or type(s) you want to be included in the report by
highlighting them and pressing the SPACEBAR. Untag those group(s) that you do
not want to be in the report by highlighting them and pressing the SPACEBAR.
When you have finished selecting the groups you want, press ENTER to continue.
TIP - To tag all the transaction types, simply hold the SHIFT key and while holding it, press the
SPACEBAR; then let go of both. To untag all the membership types, do the same keystroke again.
4. Select the Layout Output Format you want for the report and press ENTER. Choose
“Long output” to display the report in its complete format, including any notes and
memos. Choose “Short Output” for a condensed version of the report which fits in 80
columns.
5. Highlight the method with which you want to sort the list and press ENTER.
•
Date sorts the list by date of the transaction with the least recent ones being at the
end of the list.
•
Number sorts the list numerically according to the transaction number.
•
Client sorts the list alphabetically according to the name of the client the
transaction was for.
•
Amount sorts the list numerically according to the amount of the transaction.
•
Client Summary prints only a numerical list of the total sum for each client.
76
Listing Transactions
Chapter 6 Transactions
7. Select the starting and ending date for the report. See “Selecting a Starting and
Ending Date” in CHAPTER 2: BASIC SKILLS on how to do this.
8. Decide whether you want to select particular invoice models to further filter the
report. Type Y to do so or N to not. If you typed Y, you will be required to tag those
models which you want included in the report and untag those which you do not want.
9. Select the output device you want to print the report to from the list of installed
devices on your particular system. Once you do this, the list will be printed to the
device you selected. For more information on output devices, see “Output Devices”
in CHAPTER 2: BASIC SKILLS.
77
CHAPTER
7
Client Management
MOD2's client management capabilities allow you to easily organize clients and client
information. With a few keystrokes you are able to add, display, or modify client
information. This chapter takes you step-by-step in performing the above tasks as well as
others which will also be discussed.
Adding Clients
This section describes how to add clients and client information to the MOD2 program.
Once you have added a client, you will have fast and easy access to information such as
their address, phone number, and fax number as well as purchasing history and other
options. For more information on viewing client information, see “Displaying Clients”
later in this chapter.
To add a client:
1. From the main menu, select “Clients” by pressing F4 or use the DIRECTION keys
to move the highlight to “Clients” and press ENTER. You should now be on the
client menu screen.
2. Select “Add” by pressing F1 or by moving the highlight over “Add” and then pressing
ENTER. You should now see a screen with three items on it: Name, Telephone #,
and ZIP Code.
78
Adding Clients
Chapter 7 Client Management
3. Under Name, type in the full company name of the client just as you want it to appear
in MOD2 and on invoices (if you are adding a person, enter his/her name); then press
ENTER.
NOTE - If you enter a name already in the database, MOD2 will display a warning saying that the
client already exists and will stop you from re-entering it.
The next screen shows the closest matching names to the one you entered. The purpose
of this screen is to show you if you already entered the particular name but had perhaps
misspelled it or wrote it differently.
For example, if you entered “Fabric Inc.” as a company name to add but there already was
a Fabric Inc. stored in the database however with two dots after “Inc.” instead of one, the
next screen would display “Fabric Inc..” You then have the option of continuing adding
Fabric Inc. or stopping the adding a client process. If you stop adding the client, you may
then go and change “Fabric Inc..” to “Fabric Inc.” For more information on this, see
“Modifying Client Information” later in this chapter.
NOTE - If there are no close matches to the name you entered, this screen is skipped and the procedure
continues with STEP 5.
4. To continue, press ESC.
To stop the adding a client process, press ESC twice.
5. Pick the type of account membership you want the client to have by moving the
highlight over the type you desire. To tag that type, press the SPACEBAR. To untag
it, press the SPACEBAR again (A small diamond shaped figure appears before the
type of membership when it is selected). If you are adding a shipping company like
“UPS,” select that membership; if you want to add a MOD2 user, select that type, and
so on. When you are done, press ENTER to continue.
79
Adding Clients
Chapter 7 Client Management
These are the many client memberships you may choose from :
NOTE - Pick only one membership for the client you are adding.
You may later include the client in
other membership types. For example, a MOD2 user may also be a salesperson. For more information on
doing this, see “Modifying Client Information” later in this chapter. For an explanation of all the
membership types, see the list at the end of this section.
TIP - Normal active account is the default membership.
If you just want this type of account, simply
press ENTER. If you want to change the type of account membership, remember to deselect this by
pressing the SPACEBAR.
80
Adding Clients
Chapter 7 Client Management
6. On the next screen, fill in the information about the client by typing it in with the
keypad. To move to the next bit of information, press ENTER. To go back a step,
press ESC.
NOTE - Under telephone #, if you enter a number identical to that of an existing client already in the
database, you will next see a screen showing the client MOD2 matched the phone number with. Press
ENTER to go back to the previous screen. At the bottom of the screen , you are asked if the client you are
currently entering is the same client as the one MOD2 matched the phone number with. If this is the case,
just press ENTER because the default value is already set as “Yes.” The adding a client process will then
be aborted and you will be returned to the client menu screen. If the two clients are different (perhaps they
are two divisions of the same company with one general phone number for both), then type “no” and press
ENTER to continue adding the client. This feature of MOD2 further ensures that you do no enter the same
client over again.
7. When you are done, you are asked if you want to accept and save the new account.
Press Y then ENTER to do so, E then enter to edit and make changes to the client
information, or press Q then ENTER to quit and go back to the client menu.
While you are adding a client, you are prompted several times to enter information about
the client. The following list shows what is asked of you and explains what they mean.
The list is in order of appearance during the adding a client process.
Information Asked
Explanation
Name............................
The name of the company. This is the name that you will need to
refer to whenever MOD2 asks for a client. (If you are entering a
person, enter his or her name under this category).
Membership.................. The type of membership you want the client to have. A client can be
a company that buys from you, a salesperson for your company, a
MOD2 user, or more.
Contact......................... The contact is the name of the person with whom you speak with
when dealing with the client (such as the buyer’s name).
Street Address............... The street address of the company you are adding to record.
(If you are entering a person, enter his/her address)
81
Adding Clients
Chapter 7 Client Management
City, State, ZIP Code.... The city, state, and ZIP Code of the company you are adding.
(If you are entering a person, enter their city, state, and ZIP Code).
Notes............................ Any notes, memos, or comments you may have on the client, client
information, etc.
Telephone #.................. The phone number of the company (or person) you are adding.
Usually the number where you can reach the contact person. Do not
put dashes or parenthesis when you enter the phone number. This is
done automatically for you.
Fax #............................ Number where you can fax the company or contact person.
Pager #......................... The contact's pager number, if available.
Salesperson................... Salesperson of the new account (if applicable). To accept the default,
House Account, just press ENTER.
Ship With...................... The form of shipping you usually use to send items to the client (if
applicable). When adding an invoice, this sets the default “Shipped
Via” value to what you enter here, but it can be changed on each
invoice.
Billing Days.................. The number of days you are willing to give a client credit.
Credit Line.................... The maximum credit you want extended to the client. Enter 0 (zero)
if you will be dealing with the client on a C.O.D. basis
Territory........................ Select the territory where the client is located.
Salesperson Nickname... * You are asked this only if you selected “Salesperson” as the client's
membership.
Default %...................... * You are asked this only if you selected “Salesperson” as the client's
membership. Type in the salesperson's normal commission
percentage. When adding an invoice, this sets the default
commission value to what you enter here, but it can be changed on
each invoice.
The next list shows all the types of membership and explains what each one means.
Type of Membership
Explanation
Trash Can Folder..............
Selecting this membership is almost the same as deleting the
client. Use this if you want to remove a client with whom you
absolutely do not do business anymore. A client of this
membership is considered to be “not active.” When you display
clients or list clients, a “not active” client is not shown; when you
modify clients, it is shown just in case you want to change their
membership to “active” status again.
A special group that can be accessed only if the person accessing
the customer is a member of the private group also.
This is the default membership because you will probably use this
one the most. Use this membership for your clients and customers.
Private..............................
Normal Active Account....
82
Adding Clients
Chapter 7 Client Management
Pay to Client.....................
This group is for companies you regularly pay for their services
(such as Sparkletts water).
Salesperson....................... Choose this membership if the client you are adding is a
salesperson for your company.
Purchasers / Agents........... Use this membership for clients who help you deal with mills.
Shipping / Trucking.......... Select this membership if the client you are adding is a shipping or
trucking company with which you use to send and/or receive goods.
MOD2 Users.................... Choose this membership if you are adding a client who works at
your company and will be using MOD2 on a regular basis. All
MOD2 users will be listed on the user selection screen at the start
of MOD2 and each can have his/her own password with
Reserved........................... This group is for the internal and future use of MOD2.
Tagged............................. This is a user definable group which you may assign certain clients
of your choice. This group is useful when you want to print a
report that includes only a particular group of clients. All you have
to do is make those clients a member of the this group and then
generate a client report for this membership. See “Tagging and
Grouping clients” later on in this chapter for more information.
Vendors / Mills................. Pick this membership for companies from which you buy or place
orders with.
Finishers / Dye Houses..... Select this membership for companies you can issue Dye orders
with.
User Loadables................. There are six user loadables memberships available in MOD2.
These are memberships which you can create yourself. They are
special memberships to which you can assign certain clients of
your choice and which you can name whatever you want.
For more information on how to define a new, User Loadable
group, please see your system supervisor or administrator.
Country of Origin............. Choose this membership to define a new country where goods are
produced.
Registered........................ This group, like the Reserved group, is for the internal and future
use of MOD2.
MOD2 Automatic Tagged This membership is for the internal use of MOD2. Once you sell
to a client, that client automatically becomes a member of this
group as well. This way you can tell which clients have bought
from your company and which have not.
Custom Broker................. Pick this membership if you are defining a company which takes
care of the release of goods from customs when the goods are
imported.
Territory Definition........... Select this membership to define a new territory.
83
Displaying Clients
Chapter 7 Client Management
You may also include clients in two or more membership types. This is useful if the
membership status of a client changes. For example, a MOD2 user may later become a
salesperson. You then have the option of changing his/her current membership to the
new one or you may include him/her in both memberships. For more information on
doing this, see “Modifying Client Information” later in this chapter.
Displaying Clients
Once you have added a client to MOD2 (See previous section), you may display them
quickly at any time. When you display a client, you may look up information such as
their phone number, fax number, address, purchasing history, and pay habits. You may
also print a statement of their purchasing history, which includes information such as
invoice numbers, balances for each invoice, due date for complete payment of the
invoice, payment received thus far for the invoice, and the terms of payment. This
section explains how to perform all of the above tasks and more.
To display a client:
1. From the main menu, select “Clients” by pressing F4 or use the DIRECTION keys to
move the highlight to “Clients” and press ENTER. You should now be on the client
menu screen.
2. Select “Display” by pressing F2 or move the highlight to “Display” and then press
ENTER. You should now be on a screen with three items on it: Name, Telephone #,
and ZIP Code.
84
Displaying Clients
Chapter 7 Client Management
3. Enter either the company name (if you are displaying a person enter his/her name
instead), telephone number, or ZIP Code of the client by typing it in with the keypad
and then press ENTER. Use the DIRECTION keys to choose between one of the
three categories.
TIP - Under “Name,” you may enter the client’s MOD2 account number in place of their name.
TIP - MOD2 has an advanced and efficient search method which does not require you to enter the
clients entire name, phone number, or ZIP Code. If you want to find a client by name, simply type in the
first few letters of the name (it doesn’t matter whether you enter lower case or capitalized letters). MOD2
will display a list of all clients with those first few letters. The more letters you enter, the more specific and
shorter the list of clients will be. If you want to find a client by phone number, just enter the first few digits
of the number starting from the area code. If you enter “213,” a list of all clients with the area code 213
will be displayed. If you enter “2135,” a list of all clients with the area code 213 and first digit 5 will be
displayed. The same technique works with ZIP Codes. This feature of MOD2 was designed for your
convenience and to save time.
4. If you entered the full name of the client, there would be an exact match to what you
entered and you should now see a screen with the clients name, telephone number, fax
number, the name of the contact person, the contact’s pager number, the client’s
MOD2 account number, the date when the account was opened, and several options at
the bottom of the screen which will be explained at the end of this section.
85
Displaying Clients
Chapter 7 Client Management
If you entered the first few letters of the client’s name or if you entered their phone
number or ZIP Code, you should now be on a screen which lists the closest matching
clients to what you entered (See hint above). On this screen, use the DIRECTION
keys to move the highlight to the client you want to display. If it is a long list of
clients, you may use the PAGE UP and PAGE DOWN keys to move the highlight
one page at a time up or down (so you don’t have to hold the DIRECTION key for a
long time). When the highlight is over the name of the client you are looking for, you
will be able to see “quick” information on the client at the bottom of the screen. This
information consists of the client’s name, address, phone number, fax number, the
name of the contact person, the contact’s pager number, and any notes. To see more
information and options on the client, press ENTER to pop-up the client information
screen.
86
Displaying Clients
Chapter 7 Client Management
You may have noticed several words down at the bottom of the client information screen.
These are the options mentioned earlier in STEP 4. You can use these options to do tasks
like viewing the client’s purchasing history and pay habits, as well as much more. Each
word and the function it performs will be discussed below in separate sections. To select
a particular option, simply move the highlight over the option and press ENTER.
Note :
Use this option to enter any additional notes and comments you may have on the client. There is
more room for you to write notes here than the standard note section. To add a note, move the
highlight to “Note” and press ENTER. With the keypad, type in the notes. When you are done,
press F10 to go back to the client information screen. To view the note section at a later time,
simply select “Note” again. All notes that were previously entered are kept intact and saved in
the program.
Ledger :
The ledger is similar to a book of debits and credits. Use ledger to view the purchasing history of
a client. This includes all their invoices and shows which ones have been paid, which ones were
voided, which ones have not been paid, and more.
87
Displaying Clients
Chapter 7 Client Management
On the right hand side is a table showing the dollar amount of the returns and sales of the client
within various time periods. At the bottom of the table, the values for returns and sales are
totaled and displayed.
The ledger itself is divided into five columns. These are Type, Number, Date, Debits, and
Credits. At the bottom of the screen, you will see the balance for the client.
- Under Type, all transactions involving the client such as an invoice, a paid invoice
transaction, or a credit memo will be listed. To find out more information on an invoice or
other transaction, simply highlight it and press ENTER. This will bring up a screen
showing the details for it.
- Under Number, the number (#) of the transaction will be displayed.
- Under Date, the date that was entered for the transaction will be shown.
- Under Debits, charges that are assigned to the client are listed.
- Under Credits, payments that are received from the client are listed.
The following also occur while viewing the ledger:
•
Post-dated checks, if any, will be shown. For more information on post-dated checks, see
“Adding a Transaction” in CHAPTER 6: TRANSACTIONS.
•
Past due invoices will blink.
•
Invoiced that are fully paid will be dimmed.
•
When the highlight is over an invoice and the invoice is past due, the number of days past the
due date will be shown.
Statement :
Select this option to generate a statement for the client. This option is useful for clients that are
in debt and you want to print a bill to send to them. When you select “Statement,” you will first
be asked to choose the invoice models that you want MOD2 to look through for open invoices
(those that have not been paid yet). MOD2 will not check for open invoices of an invoice model
which you did not select. Next you will be asked to select an output device. For more
information on output devices, see “Output Devices” in CHAPTER 2: BASIC SKILLS. After you
88
Displaying Clients
Chapter 7 Client Management
select the invoice models and an output device, the statement will be generated. The statement
will include:
•
your company name, address, phone number, and FAX number
•
The client’s name, address, and phone number
•
The date of the statement
•
A listing of all the open invoices for the client and the necessary information for each (all the
open invoices means all open invoices that are in one of the invoice models you selected)
•
The total balance
•
A table with an aged view of the client
To generate statements for multiple clients and for more information on client statements, refer
to “Generating Client Statements” in CHAPTER 7: CLIENT MANAGEMENT.
Analysis :
Select “Analysis” to perform a gross profit analysis on the client. This will show all the goods
the client has bought from your company between a certain time period and then determines how
much profit was made on each good as well as the total profit of all the goods sold to the client.
By performing a gross profit analysis, you can see the client’s purchasing patterns. When you
select Analysis, you will be prompted for the following information:
•
A starting and ending date. MOD2 will only search for merchandise purchased by the client
within the time field you choose here. This way you can calculate profit within a certain
period of time. Refer to “Selecting a Starting and Ending Date” in CHAPTER 2: BASIC SKILLS
on how to select a starting and ending date.
•
A cost level. As you know, every item in your inventory can have multiple price levels.
Here you need to tell MOD2 which price level it is that you want to calculate the profit on.
•
Invoice models. MOD2 searches the invoices for the client to find the goods sold to him so it
can calculate the profit. This option allows you to restrict its search so that it only goes
through those invoices which are defined as one of the invoice models you select here.
89
Displaying Clients
•
Chapter 7 Client Management
The cutoff percentage. Select a cutoff percentage for the report. For a detailed explanation
of cutoff percentages and why they are used, refer to “Performing a Gross Profit Analysis” in
CHAPTER 5: INVENTORY MANAGEMENT.
•
An output device. Refer to “Output Devices” in CHAPTER 2: BASIC SKILLS for more
information on output devices.
To perform a gross profit analysis on all your clients, see “Performing a Gross Profit Analysis” in
CHAPTER 5: INENTORY MANAGEMENT.
Pay-Habit :
Select “Pay-Habit” to pop up a box showing on average how many days it took for the client to
pay for his invoices (how long it took for the invoice to become a paid invoice).
Quote :
Use “Quote” to pop up a quick screen showing the purchasing history of the client on a particular
style. This is useful when you are on the phone with the client and you want to quickly view in
which invoices you sold the client a certain style, the date of the invoice, how many he/she
bought of that style, and the price for each. If the client wants to purchase a style he/she has
bought before in the past, you may use this option for your reference when dealing with the
client. Also, some clients might call and simply say to give them style X at the same price they
bought it last month, for example. You then use Quote to find out exactly how much it was that
they purchased Style X last month. To use Quote, you must first locate and highlight a particular
style. MOD2 will find every instance when the client was involved with that style. There are
various ways to locate a style. These are listed and explained in STEPS 3 and 4 of “Displaying
Inventory” in CHAPTER 5: INVENTORY MANAGEMENT.
NOTE - Do not change the name already entered for Client.
This name is automatically preset to the client you
have currently displayed. Find the style that you are looking for by either entering a style number, color,
description, or vendor.
90
Modifying Client Information
Chapter 7 Client Management
Output :
Output prints a copy of the ledger to one of the installed devices on your computer. To select
output, move the highlight to “Output” and press ENTER. Select the output device you want to
print to by moving the highlight over the one you want and then pressing ENTER. For more
information on output devices, see “Output Devices” in CHAPTER 2: BASIC SKILLS.
Envelope :
If your printer can print envelopes and your MOD2 installation was configured to support this,
you may print the client’s name and address on an envelope. Consult your system supervisor for
the availability of this feature.
Label :
If your printer can print labels and your MOD2 installation was configured to support this, you may
print the client’s name and address on labels. Consult your system supervisor for the availability of
this feature.
Modifying Client Information
In the real world, companies often move and telephone numbers frequently change.
Because of this, MOD2 has an option to change client information so your records will
always be up-to-date. This option saves you the time of having to re-enter the client into
the computer. How to do this function is the topic of this section.
To modify client information:
1. From the main menu, select “Clients” by pressing F4 or use the DIRECTION keys to
move the highlight to “Clients” and then press ENTER. You should now be on the
client menu screen.
91
Modifying Client Information
Chapter 7 Client Management
2. Select “Modify” by pressing F3 or move the highlight over “Modify” and press
ENTER. You should now be on a screen that has three items on it: Name, Telephone
#, and ZIP Code.
3. You have three choices on this screen:
Under “Name,” enter the first few letters of the company name you want to
change or, if you prefer, enter the client’s full name as it is stored in MOD2. (If
you are modifying a person, enter his/her name instead)
Under “Telephone #,” enter the first few digits of the client’s phone number
starting from the area code or, if you prefer, enter the clients complete phone
number (Do not enter dashes or parenthesis. This is done for you).
Under “ZIP Code,” enter either the clients full ZIP Code or the first few digits of
it.
4. If you entered the client’s full name, you will next see a screen where you can change
different aspects of information about the client. Continue from STEP 5.
Otherwise you will see a list of the closest matching clients to what you entered.
Select the client you want to change by using the DIRECTION keys to move the
highlight over the client and then press ENTER. You will then be on the screen
where you can modify client information.
5. Before each item you can change is a number. To change a certain item, type in the
number before it with the keypad and then press ENTER.
6. Using the keypad, type in the replacement for the item you want to change. When
you are done, press ENTER.
Client Memberships - To change the membership statues of a client or to include a client
in multiple memberships, you may do so on this screen. Follow STEP 5 to change a
92
Listing Clients
Chapter 7 Client Management
client’s membership. You should then see the membership selection screen. To change a
client’s membership to another one, move the highlight over the one you want to remove
and untag it by pressing the SPACEBAR. Then move the highlight to the new
membership you want for the client and tag it by pressing the SPACEBAR again. A
diamond shape appears next to a tagged membership. To include the client in more than
one membership, tag the groups in which you want the client to be a member of and untag
those that you do not want him/her to be in. When you are finished choosing the client’s
new membership(s), press ENTER to go back to the previous screen.
TIP - To tag all the membership types, simply hold the SHIFT key and while holding it, press the
SPACEBAR; then let go of both. To untag all the membership types, do the same keystroke again.
You can make as many changes as you want. Just repeat STEPS 5 and 6. When you are
done making changes, press ZERO (0) then ENTER to go back to the client menu or
simply press ESC.
Listing Clients
Often you might find it helpful to print a list of all your clients or certain clients to use for
your reference. MOD2 lists clients by grouping them according to their membership
status. You control which types of memberships you want included in the report. You
also have the option of selecting a format to display the report in and on what medium to
print the report, such as on screen, to the hard disk, or to one of the installed devices in
your company.
To List Clients:
1. From the main menu, select “Clients” by pressing F4 or use the DIRECTION keys to
move the highlight over “Clients” and press ENTER. You should now be on the
client menu screen.
93
Listing Clients
Chapter 7 Client Management
2. Select “List” by pressing F4 or move the highlight to “List” and press ENTER. You
should end up on the membership selection screen.
3. Tag the client memberships that you want included in the list by moving the highlight
over it and then press SPACEBAR. (Remember: A small diamond is present
next
to the membership type when it is tagged). To remove client memberships which you
do not want included in the list, move the highlight over each one and untag them.
TIP - To tag all the membership types, simply hold the SHIFT key and while holding it, press the
SPACEBAR; then let go of both. To untag all the membership types, do the same keystroke again.
4. Press ENTER when you have finished choosing the client memberships you want to
be included in the report. You should now be on the format selection screen.
5. Select the format that you want the list to be displayed in by moving the highlight to
the format you want and then pressing ENTER.
6. Select on what basis to order the list by moving the highlight over the one you prefer
and then pressing ENTER.
•
Name orders the list alphabetically according to the company or person’s name.
•
Telephone # orders the list numerically according to the phone numbers of the clients.
•
Salesperson orders the list alphabetically according to the salesperson of the account.
•
ZIP Code orders the list numerically according to the ZIP Code of the client.
•
Account # orders the list numerically according to the client’s MOD2 account
number.
7. Select one of the output devices from the list of devices installed on your particular
system by moving the highlight to the one you want and then pressing ENTER. For
more information on output devices, see “Output Devices” in CHAPTER 2: BASIC
SKILLS.
94
Generating Client Statements
Chapter 7 Client Management
Generating Client Statements
In a business, it is imperative to be able to manage your receivable. To do so, you need
the answers to the following questions:
•
Who owes me money?
•
How much do they owe me?
•
How long have they owed me?
•
What is the total sum of money owed to me?
•
How can I see an aged view of the client, showing me how long it took for an invoice
to be paid?
•
How can I send a bill to those who owe me money?
MOD2 has the answers to all these questions. To obtain these answers, you need to
generate client statements for those clients that are in debt. When generating statements,
you will be asked for various information required to put the report together. These will
be discussed below:
•
Eligibility - Here you must select which clients will be eligible candidates to be
included in the report. There are four types of eligibility:
1) All clients. Select this if you want to know all the clients who owe you money
and want to generate a statement for each one.
2) Clients of salesperson. Select this if you want to generate statements for all owing
clients of a particular salesperson.
3) Clients of territory. Select this to generate statements for clients in a particular
territory.
4) Clients of a group. Select this if you want to generate statements for all owing
clients of one or more client membership groups.
95
Generating Client Statements
•
Chapter 7 Client Management
Statement format - There are various layouts which you may choose to display the
statements in. They include:
1) Each client on a page - This format will have statements for each client on
separate pages. This is the format you want to use when sending your clients a
bill.
2) Detailed aging summary - This format gives you lots of information. Each
invoice will be listed on a separate line. When you select this format, you will
also be asked later on whether you want to include the notes in the statement.
3) Narrow summary - Use this for a simple statement.
4) Short aging - Use this to show the clients and their aging each on a line.
•
End period - This is the cutoff date. You may not want to generate statements for
recent invoices because it is not yet time to send those clients a bill. All invoices after
the date you enter here will not be included in the statements.
•
Invoice models - MOD2 searches through the client’s invoices to see how much
he/she owes. This option allows you to restrict its search. MOD2 will only go
through those invoices which are defined as one of the invoice models you select
here.
•
Aging layout - Select the aging layout you want to be shown on the statement.
•
Output device - Select an output device. See “Output Devices” in CHAPTER 2: BASIC
SKILLS
for further information on output devices.
The statements will then be generated. They will show the client’s address, your
company’s address and phone number, the date of the statement, the client’s salesperson,
the amount owed, the aging table, and various other information depending on which
statement format you selected. The last page will be an aging summary for your own
reference. It will include the number of accounts (clients) who owe you, the cutoff date,
the total balance owed to you, as well as an aged view of all the owing clients combined.
96
Listing Clients of a Salesperson
Chapter 7 Client Management
Listing Clients of a Salesperson
The option “List Specific Salesperson” simply lists all the clients of a particular
salesperson. All you have to do is select the salesperson, select one of the listed layout
formats, select how you want to sort the list, and you’re done. The layout formats are
each unique, some showing more information than others. Select the one that most
closely fits your needs. Listing the clients of a salesperson is a useful option if you are
only interested in knowing all the clients of a salesperson as well as their address, phone
number, etc. This report does not include purchasing history nor does it show the debits
or credits of a client. There are other reports which can do that for you.
Tagging and Grouping Clients
The option Mask/Tag/Group on the Client menu screen allows you pick a particular client
membership and either include all your clients in that membership, exclude all your
clients from that membership, or manually select which clients should be included in or
excluded from that membership. To use this option, you must first know what a mask is
used for. A mask can be setup to change the membership of a group of clients rapidly
without going to each client record individually and assigning the new membership.
When you select Mask/Tag/Group, you will be asked to select a mask if you already have
not already done so. Once you select a mask, you will be on a screen with five options.
97
Tagging and Grouping Clients
Chapter 7 Client Management
These are the mask options. Your current mask number
(membership number) is shown at the top of the screen.
Each option will be described below.
0 - Select this to exit this screen and to go back to the Client menu.
1 - Select this to change your mask. The window showing all the memberships will pop
up. Tag one of the memberships and then press ESC. That membership will become
your new mask.
2 - This option will untag all clients matching your mask. Suppose you selected
“Salesperson” as your mask. If you choose this option, MOD2 will go through all
your clients and exclude everyone from the Salesperson membership.
3 - This option will make all your clients included in the mask you selected. Suppose
you wanted to place all the clients stored in MOD2 in the Trash Can Folder. All you
would have to do is select “Trash Can Folder” as your mask and then select this
option to make everyone part of the mask, or of the Trash Can Folder.
4 - This option is for the use of the system supervisor or administrator.
You may also use the mask you chose to select particular clients which you want to
include or exclude from the mask. Suppose you selected “MOD2 Users” as your mask.
You would then have to select the option “Modify” and then list some clients. Let’s say
you told MOD2 to list all clients whose name begin with the letter “D”. When MOD2
98
Tagging and Grouping Clients
Chapter 7 Client Management
shows the list on screen, you should notice two options on the right hand side which you
usually do not see. These options tell you how to tag and untag particular clients. First,
highlight the client you want to tag or untag. Then, if you want to make the highlighted
client a MOD2 User, press INS. To exclude a MOD2 User from the MOD2 User
membership, press DEL. The highlighted person will no longer be a MOD2 User.
99
CHAPTER
8
Client Sales Orders
A sales order is a purchase order that a client makes to your company. MOD2 allows you
to enter sales orders you receive into the program but they play no role in the overall
course of the order. This means you still have to create a packing list and generate an
invoice as usual, even though the sales order holds the merchandise requested by the
client. The purpose of sales orders in MOD2 is simply to record the merchandise a
customer ordered from your company for future reference. You may of course add,
display, and void sales orders as well as generate sales order reports and view the most
recent sales orders. This chapter will discuss these five sales order options.
Adding a Sales Order
Clients usually issue a purchase order for the goods they wish to buy from a company.
When a client gives your company a sales order, you may enter it in MOD2 so you have a
record of the merchandise ordered by the client. You may then look up the sales order at
a later time to see what the client ordered, for example before you go to create a packing
list for the order.
To add a sales order:
1. From the main menu, select “Sales Order”. Then select “Add Sales Order” from the
Sales Order menu.
2. Select one of the listed sales order models (PO models). The model you choose will
describe the type of sales order you will be entering.
100
Adding a Sales Order
Chapter 8 Client Sales Orders
3. Type in the sales order number and then press ENTER. The number you enter here is
NOT the purchase order number which the client issued. This is simply your
company’s record number for the sales order.
4. Type in the date for the sales order and press ENTER. The default value is set to the
current day.
5. Select the client who issued your company the purchase order.
6. Fill in the information requested on the following screen. Each field will be described
below.
On this screen, you will be entering the general information for
the sales order.
A
B
D
E
F
G
H
C
A) Enter the client’s purchase order number here.
B) This is the date, as specified in the purchase order, when your company can start
shipping the merchandise to the client.
C) This is the absolute latest date the client must receive the merchandise by.
D) When you come to this field, a window will pop-up listing all the salespersons for
your company. Choose the appropriate salesperson for the sales order.
E) Enter the commission the salesperson will receive for this order.
101
Adding a Sales Order
Chapter 8 Client Sales Orders
F) Select the shipping company with which you will be shipping the merchandise
ordered to the client as specified in the client’s purchase order.
G) Select the method of payment (terms) for the order.
H) Enter the factor approval number here, if any.
7. After you enter the general information for the sales order, you will be selecting the
merchandise the client ordered in the purchase order. Use of the four methods (Style
#, Color, Description, or Vendor) to select the goods the client ordered. This process
is similar to the one described in STEP 14 of “Adding Invoices” in CHAPTER 4: SALES
MANAGEMENT.
Remember that you may use any of the four methods to select the
merchandise you ordered even though STEP 14 uses Style #.
8. Enter the unit price the client will be paying for the style you selected as specified in
the purchase order.
9. Type in the quantity (yardage) the client ordered of the style you selected and then
press ENTER.
You should now be back on the Style #, Color, Description, and Vendor screen.
On this screen, you have three options :
♦ If the client ordered other merchandise which you have not yet selected, you may add
those items to the sales order by repeating STEPS 7-9.
♦ You may edit or delete the merchandise which you have already selected to be
ordered. To do so, press the HOME key. You will be shown everything entered for
the sales order so far line by line. To edit a line, move the highlight over that line and
press ENTER. To delete a line, move the highlight over that line and press DEL.
♦ You may complete the sales order by pressing ESC.
102
Displaying a Sales Order
Chapter 8 Client Sales Orders
On the next screen, you will be shown the general information you entered for the sales
order. Press any key to continue. You will next be shown the merchandise ordered by
the client, the total quantity (yardage) ordered, and the grand total for the entire order. At
the bottom of the screen you have four options. Press Y to accept the sales order, E to
edit the general information for the sales order and the merchandise ordered by the client,
A to add or substitute items to the sales order, or Q to not add the sales and to return to
the Sales Order menu.
Displaying a Sales Order
If you want to look up a particular sales order and see what was ordered in that sales order
and by whom, all you have to do is display it. The information you see when you display
a sales order can help you when creating a packing list by showing you the items the
customer ordered.
To display a sales order:
1. Select “Sales Order” from the main menu.
2. Select “Display Sales Order” from the Sales Order menu.
3. You should now be on a screen prompting you to enter a sales order number (PO#).
Type in the number of the sales order you want to display and then press ENTER. If
you do not remember the number of the sales order you are looking for, select the
option “Most Recent Sales Order” for a quick listing of all sales orders sorted by the
date they were entered starting from the most recent.
103
Displaying a Sales Order
Chapter 8 Client Sales Orders
4. The next screen shows the general information for the sales order you chose to view.
The key things to look for on this screen are the starting and completion dates, which
tell you when you can start shipping the merchandise to the client and the absolute
last day the client must have the merchandise by. After you have finished viewing the
general information for the sales order, press any key to continue.
5. After you view the general information for the sales order, you will be on a screen that
shows you the merchandise the client ordered line by line. Each line shows the
quantity (yardage) ordered by the client, the style number, the description and color of
the style, and the unit price the client will be paying for the style. The last line shows
you the total quantity (yardage) ordered plus the grand total for all the merchandise
ordered by the client together.
At the bottom of the screen in STEP 5, there are seven options which will each be
discussed below. To use one of the options, simply highlight it and press ENTER. To
go back to the Sales Order menu, press ESC on this screen.
Details :
Sales orders are always done in summary. Because of this, there are no details to view for a sales
order.
Purchaser :
Select this option to display the client who issued the purchase order to your company. See
“Displaying Clients” in CHAPTER 7: CLIENT MANAGEMENT for further information on the options
at the bottom of the client information screen.
Next »» :
“Next” takes you to STEP 4 of the subsequent sales order number (The next sales order number in
sequence, based on the order it was entered).
104
Displaying a Sales Order
Chapter 8 Client Sales Orders
Previous «« :
“Previous” takes you to STEP 4 of the previous sales order number (The previous sales order
number in sequence, based on the order it was entered).
Reprint :
Select this to reprint the sales order.
Change :
Select “Change” to modify different aspects of information for the sales order. Before each item
you can change is a number. Enter the number next to the item you want to change and press
ENTER. Type in the replacement and then press ENTER. Repeat this process to make any
other changes. When you are through making changes, press 0 (zero) then ENTER to go back to
the sales order general information screen (STEP 4). If you need to change an item which is
yellowed, please consult your supervisor. To change the merchandise ordered by the client, you
need to select “Contents” (-1). Then follow STEPS 14-18 in “Adding Invoices” to add other items
to the list of merchandise ordered. To remove an item, press the HOME key, highlight the
appropriate line, and press DEL. To increase or decrease the price and/or quantity (yardage) of
an item, press the HOME key, select the appropriate line, and enter the new values. When you
are done modifying the sales order, press ESC. You will be returned to the screen with the
general information for the sales order and the contents of the sales order will be updated
accordingly.
Mark-Open or Mark-Complete :
If the sales order you are displaying is marked completed, you will be shown the option MarkOpen; otherwise, if the sales order is marked open, you will be shown the option MarkComplete. Use this option to change the status of the sales order. Sales orders should be marked
complete when all the merchandise the client ordered in the purchase order has been sent.
105
Sales Order Reports
Chapter 8 Client Sales Orders
Voiding a Sales Order
For the security of your company, no one may delete a sales order from MOD2. You
may, however, void a sales order when the need arises. When you attempt to void a sales
order, you will be asked for an authorization code. Please see your system supervisor for
the password. After you void a sales order, you will see the word “VOIDED” blinking in
red whenever you display it.
Sales Order Reports
To view a listing of particular sales orders between a certain time period, select the option
“Reports on Sales Order”. When you generate a sales order report, you are allowed to
choose which sales order models you want to be included in the report and the method by
which you want to sort the report. You may even filter the report down to only those
sales orders of a particular client (purchaser) of your choice by selecting the customize
option (STEP 4). This section will discuss the process of generating a sales order report.
1. Choose a method to sort the report in - There are various way to sort sales orders in
MOD2. Select the one appropriate to your needs. Each method will be briefly
explained below.
•
Date - This will sort the report according to the date entered for the sales order
(the date that is printed on the sales order).
•
Number - Select “Number” to sort the report numerically according to the sales
order number.
•
Purchaser - This method will sort the report alphabetically according to the name
of the purchaser (the client who issued the purchase order to your company).
•
Stamped Date - Select “Stamped Date” to sort the report based on the actual date
the sales order was entered into MOD2.
106
Sales Order Reports
•
Chapter 8 Client Sales Orders
Required By Date - Choose this option to sort the report based on the date the
purchaser must receive the merchandise by. This date is specified when the sales
order was added under the Cancel field. This method of sorting will list the sales
orders by priority, or the ones which are required soonest to the ones required
latest.
2. Select a starting and ending date - Only those sales orders whose date is within the
time field you specify here will be included in the report. For details on selecting a
starting and ending date, refer to “Select a Starting and Ending Date” in CHAPTER 2:
BASIC SKILLS.
3. Select the sales order models (PO Models) that you want to be included in the report Only sales orders from the sales order models you select here will be candidates to be
included in the report. The fewer models the you choose here, the more filtered and
specific the report will be.
4. Decide whether you want to customize the report - Typing in “Yes” will allow you to
further filter the report. If you do not want to customize the report, enter “No” and
move on to STEP 6.
5. Answer yes or no to these questions if you decided to customize the report.
•
Select a particular purchaser - Enter “Yes” if you want to view only the sales
orders that were issued by a client of your choice.
•
Select a particular salesperson - If you want the report to contain the sales orders
of a particular salesperson, enter “Yes” here and then select the appropriate
salesperson.
6. Select an output device to print the report to - For more information on output
devices, see “Output Devices” in CHAPTER 2: BASIC SKILLS.
107
Listing the Most Recent Sales Orders
Chapter 8 Client Sales Orders
Listing the Most Recent Sales Orders
Select this option to quickly view a list of sales orders sorted from the most recent to the
least recent. This list shows the sales order model and number, the date entered for the
sales order, the client who ordered the goods (purchaser), the salesperson for the order,
and the total dollar amount for the sales order.
The list will automatically pause with each screen-full of information. Press any key to
view the next screen-full or ESC to go back to the Sales Order menu.
Listing the most recent sales orders is a quick way to
view a summarization of your company’s sales orders
starting from the most recent ones. Voided sales
orders are dimmed, as shown in sales order #42
above.
108
CHAPTER
9
Salesperson Management
This chapter deals with salespersons and how to manage them correctly through MOD2.
The main focus of this chapter is not on adding, displaying, nor modifying a salesperson.
These procedures have already been discussed in CHAPTER 7: CLIENT MANAGEMENT. This
chapter, however, will focus more on the special reports you may generate for a
salesperson plus it will discuss the commission of a salesperson. The most important and
the most powerful salesperson report in MOD2 is without doubt the Detailed Sales
Activity report. This informative report will be discussed in depth in this chapter.
Adding a Salesperson
To add a salesperson is as easy as adding a regular client from the Client menu. All you
have to do is select “Salespersons” for the client’s membership and that client will
become a salesperson for your company.
A salesperson may be added either from the Client menu or the Salesperson menu. When
you select the option “Define New” from the Salesperson menu, you are first shown a list
of existing salespersons. Selecting any of these listed salespersons will display them, just
as if you were displaying a regular client (see “Displaying Clients” in CHAPTER 7: CLIENT
MANAGEMENT).
If you want to add a new salesperson, press ESC on the screen with the
listed salespersons. Then follow the procedure starting from STEP 3 in “Adding Clients”
of CHAPTER 7: CLIENT MANAGEMENT. When you are prompted to select a membership,
the default will be set to Salespersons because you are adding the Salesperson from the
Salesperson menu.
109
Displaying a Salesperson
Chapter 9 Salesperson Management
Displaying a Salesperson
Only one step is necessary to display a salesperson if you do so from the Salesperson
menu. After you select the option “Display”, you will be shown a list of existing
salespersons at your company. Select the one you wish to display and then press
ENTER. The client information screen will then pop-up for your review. For a
description of what you see on the client information screen, refer to “Displaying Clients”
in CHAPTER 7: CLIENT MANAGEMENT.
There are several options at the bottom of the client information screen. These options
are all described in “Displaying Clients”. Two of the options are somewhat different
when you display a salesperson. These options are the Ledger and the Statement. The
differences when using these options for a salesperson will be explained below.
Ledger
Selecting this option when displaying a salesperson will show you two other options: Detailed
Sales Activity and Ledger. If your salesperson has bought merchandise from your company, such
as rolls to be used for samples, you may view the ledger for that salesperson. The Ledger is
described in CHAPTER 7.
The Detailed Sales Activity option will generate a commission report for the salesperson you are
currently displaying. The commission of a salesperson can be calculated in one of two ways:
based on merchandise shipped (added invoices) or based on payments received (Paid Invoice
Transaction). When you enter a Paid Commission transaction, MOD2 defaults to the former
method of calculation (merchandise shipped). However, if you want to credit your salesperson
based on the payments received for a particular invoice, select the Detailed Sales Activity option.
You may then generate a report showing you the commission the salesperson earned by both
methods.
110
Displaying a Salesperson
Chapter 9 Salesperson Management
To generate a detailed sales activity (commission) report:
1. While displaying the salesperson, select the option “Ledger” and then select “Detailed
Sales Activity”.
2. Select a starting and ending date for the report. When MOD2 generates a sales
activity report, it will include only those invoices whose dates lie between the time
field you select here. For more information on starting and ending dates, refer back to
“Selecting a Starting and Ending Date” in CHAPTER 2: BASIC SKILLS.
3. If you want to include a separate column for payments and credit memos for each
invoice, answer “Yes” to the question asked here.
4. If you want to include a column showing the commission the salesperson earned
based on merchandise shipped for each invoice, answer “Yes” to the next question.
5. Select the invoice models you want to be included in the commission report.
6. Decide whether you want to customize the report. Typing in “Yes” will allow you to
further filter the report. If you do not want to customize the report, enter “No” and
move on to STEP 8.
7. Answer yes or no to the following question(s) if you decided to customize the report.
•
Select a particular Sold To - Enter “Yes” here if you want to include only the
invoices of a particular client in the commission report.
8. Select an output device to print the report to - For more information on output
devices, see “Output Devices” in CHAPTER 2: BASIC SKILLS.
A sample sales activity report is shown on the following page.
111
Detailed Sales Activity (Commission) Report
--------------------------------------------------------------------------------------------------------------------------------------------------------------------------------------------User
:MOD2USER
Demo Industries
August 05, 1996
Station :21828
12345 AnyStreet
08:52:40 AM
AnyCity, CA 90015
Page :
1 of 2
Report
:Commission report sorted by number
--------------------------------------------------------------------------------------------------------------------------------------------------------------------------------------------########
========
8
10
14
15
17
18
DATE
SOLD-TO
====
=======
|06/24/96|Demo Comp.
|06/25/96|Demo Comp.
|07/03/96|Demo Industries
|07/03/96|Demo Industries
|07/03/96|Demo Industries
|07/12/96|Demo 2
Demo SalesPerson KNOWN AS [ Mike ]
12345 Any Street
Los Angeles, CA 90014
Salesperson
PO#
===========
===
|Demo SalesPers||Demo SalesPers|98765
|Demo SalesPers||Demo SalesPers||Demo SalesPers|12345
|Demo SalesPers|Typical %
Sales
$18,580.35
Discount
Commission on Paid Invoices
Commission Payments
Commission Total
$200.00
$399.04
$459.55
$516.79
TERMS
=====
|net 60
|net 60
|net 60
|net 60
|C.O.D
|net 60
|
|
|
|
|
|
COMM%
TOTAL CRDT-MEMO
=====
===== =========
3.00 | 10000.00|
0.00|
3.00 | 3750.00| -105.00|
2.00| 2599.35|
0.00|
3.00| 1375.00|
0.00|
2.00|
852.50|
0.00|
0.00|
3.50|
0.00|
FREIGHT
=======
0.00|
0.00|
0.00|
0.00|
0.00|
0.00|
DISC. PAYMENTS
===== ========
0.00| 10000.00|
200.00|
0.00|
0.00| 2599.35|
0.00| 1000.00|
0.00|
852.50|
0.00|
3.50|
BALANCE COMM./PAID COMM./SHIPPED COMM./PAYMENTS
======= ========== ============= ==============
0.00|
300.00|
300.00|
300.00
3445.00|
0.00|
106.50|
0.00
0.00|
51.99|
51.99 |
0.00
0.00|
30.00|
41.25 |
30.00
0.00|
17.05|
17.05 |
17.05
0.00|
0.00|
0.00 |
0.00
2.00
Average %
2.78
--------------------------------------------------------------------------------------------------------------------------------------------------------------------------------------------_____________________________________________________________________________________________________________________________________________________________________________________________
Covers
:06/01/96 to 07/31/96
--------------------------------------------------------------------------------------------------------------------------------------------------------------------------------------------User
:MOD2USER
Demo Industries
Page :
2 of 2
--------------------------------------------------------------------------------------------------------------------------------------------------------------------------------------------SalesPerson
COMMISSION
PAYMENTS
SALES
PERCENT
=============================================================================================================================================================================================
Demo SalesPerson
516.79
459.55
18,580.35
100.00%
=============================================================================================================================================================================================
TOTAL 1
516.79
459.55
18,580.35
2.78% Average
--------------------------------------------------------------------------------------------------------------------------------------------------------------------------------------------E N D
O F
R E P O R T
08:52:40 AM
=============================================================================================================================================================================================
Pictured above is a detailed sales activity report for a salesperson. This report shows you the invoices of a particular
salesperson within a certain time field. This report is mainly used to see the commission a salesperson would earn for
an invoice by both methods of calculation. This means that you are shown both the amount he should receive based on
payments received and based on merchandise shipped. The default method of calculation by MOD2 is the second
method, based on merchandise shipped (added invoices). If your company credits salespersons based on payments
received (added Paid Invoice transactions), then this report will show you how much he/she earned by that method and
then you can enter that value when you do a Paid Commission transaction to credit the salesperson. The report shows
you extensive information regarding each invoice. A commission summary can be viewed at the end of the report.
112
Listing Salespersons
Chapter 9 Salesperson Management
Statement
Selecting this option will reveal two other options: Statement with One Client and Self
Statement. Statement with One Client is used to generate a statement for a particular client. Self
Statement, on the other hand, is used to generate a statement for the salesperson whom you are
displaying. This option is useful if the salesperson has bought merchandise from your company
such as rolls to be used for samples and you would like to create a statement for that salesperson.
For more detailed information on client statements, please refer to the section “Generating Client
Statements” in CHAPTER 7: CLIENT MANAGEMENT.
Changing Salesperson Information
The process of changing particular aspects of information for a salesperson is identical to
the process described in “Modifying Client Information” in CHAPTER 7: CLIENT
MANAGEMENT.
In fact, the option Change on the Salesperson menu has the same function
as the option “Modify” on the Client menu.
Listing Salespersons
The option “List All Salespersons” allows you to generate a report showing all
salespersons in your company along with their respective information such as name,
address, and phone number. You may also include other clients in the report by selecting
the memberships which you want to be included. For more information on listing
salespersons and other clients, please refer to the section “Listing Clients” in CHAPTER 7:
CLIENT MANAGEMENT.
113
Listing Open Invoices for a Salesperson
Chapter 9 Salesperson Management
Listing Open Invoices for a Salesperson
This option is identical to the Generate Statement option in CHAPTER 7: CLIENT
MANAGEMENT.
It can be used to generate statements for clients of a particular salesperson
with open invoices (invoices which have not been paid for). You are not, however,
limited to generating statements for just clients of a salesperson. You may select clients
of a particular membership, clients in a particular territory, or all your clients as well. For
further information regarding this option, please see “Generating Client Statements” in
CHAPTER 7: CLIENT MANAGEMENT.
Listing Clients of a Salesperson
The option “List Clients” on the Salesperson menu will generate a report showing you all
the clients and their respective information for the salesperson of your choice. To
generate the report, all you need to do is select the salesperson, a report format, one of the
methods of sorting, and an output device. See the section “Listing Clients of a
Salesperson” in CHAPTER 7: CLIENT MANAGEMENT for more information regarding this
option.
114
CHAPTER
10
Goods in Process Management
This chapter discusses the most complex feature in MOD2. This feature also happens to
be one of the most important to your business.
CHAPTER 5: INVENTORY MANAGEMENT
focused on how to manage inventory which was already in your warehouse and which
you had already received. This chapter, however, deals not with goods which are in your
warehouse but rather with goods that are “in process”. Goods in process are goods which
are in the stage of being ordered, prepared, shipped, converted through a dye house if they
are greige, or received by your company. This chapter will help you to efficiently manage
goods which are in one of these stages through MOD2. The receiving stage, because it by
itself is fairly detailed and complex, will be discussed in the next chapter, MANAGING
RECEIVED GOODS.
Managing Greige Goods
Greige goods can best be described as “raw materials”. Since they are “raw materials”,
they must undergo a process called converting which results in finished goods. The
converting process takes place at a dye house. If your company issues contracts (company
purchase orders) to domestic mills who produce greige goods, then you must know how
to define greige goods within MOD2. This section covers how to do that. The options
Display, Modify, and Report will not be discussed in this section because they are
identical to the ones on the Inventory menu. Only the option Define is different because
here you are defining greige goods while on the inventory menu you are defining finished
goods. If you have any questions regarding displaying, modifying, or generating reports
on inventory, please refer back to CHAPTER 5: INVENTORY MANAGEMENT.
115
Managing Greige Goods
Chapter 10 Goods in Process Management
There are essentially two tasks which must be done when you want to define a new greige
good.
1) You must define the greige good from the Greige Inventory menu. When you define
greige goods, you should set the color as “Greige” or “Greige-Goods”. Not doing so
will complicate other procedures such as adding a domestic contract. For your
convenience, the default color will be set to “Greige-Goods”, so all you have to do
when asked for color is press ENTER.
2) You must define the same good from the Inventory menu as well. Through the
Inventory menu, you should define the good as it would be finished with all the colors
available for it.
An example using the two steps above would be the following:
Suppose you want to define a new style, Style #1234, which is a greige good. You would
first have to go to the Greige Inventory menu and define Style#1234 with color set as
“Greige”. After you enter all the specs necessary to define the greige good, you would
have to go to the Inventory menu and define the style there as well. Let’s say Style#1234
comes in three colors: red, blue, and green. Following the process given for “Adding
New Inventory” in CHAPTER 5: INVENTORY MANAGEMENT, you would define Style#1234
with the three colors it comes in. Once you do this, you have successfully defined the
style.
116
Managing Greige Goods
Chapter 10 Goods in Process Management
The process of defining a greige good will now be discussed.
To define a new greige good:
1. Select “Goods in Process” from the main menu.
2. Select “Greige Management” from the Goods in Process menu.
3. Select the option “Define”.
4. On the next screen, you will have to enter all the specs for the greige good. Make
sure the color for the greige good is set to “Greige” or “Greige-Goods”.
This is the screen where you define all the specs for greige goods.
5. Once you finish entering the specs in for the greige good, you will end up on another
screen. At this time, press ESC. Type Y to accept the new greige good, E to edit the
information you entered for the greige good, or Q to quit. After choosing one of the
above, press ENTER.
117
Purchase Orders and Contracts
Chapter 10 Goods in Process Management
Purchase Orders and Contracts
This section covers the stage when goods are ordered. When your company wants to
order more merchandise, whether it be for stock or for a particular customer, it needs to
issue a purchase order to a mill. In doing so, it makes a contract with the mill for certain
goods to be prepared and shipped by a certain date. This section describes how to
manage these contracts. You may add a contract, display a contract, void a contract,
generate a report on particular contracts, view open and pending contracts, and view the
most recent contracts.
To add a contract:
1. From the main menu, select “Goods in Process”. Then from the Goods in Process
menu, select “Purchase Management”. Finally, from the Contract menu, select the
option “Add Contract”.
2. Select one of the listed contract models. In MOD2, there are four different contract
models. Each is briefly described below.
♦ Domestic - Select this model if you are issuing a contract with a mill within the
United States from which you will be receiving greige goods which will later be
converted to finished goods at a dye house.
♦ Import - Select this model if you are issuing a contract with an overseas mill from
which you will be receiving finished goods.
♦ Local - Select this model if you are issuing a contract with a mill within the
United States from which you will be receiving finished goods. This model is
similar to the Import model but it is instead used for mills within this country.
♦ Off Shore - This model is identical to the Import model with the exception that the
goods will be received in another country, outside of the U.S.
118
Purchase Orders and Contracts
Chapter 10 Goods in Process Management
3. Type in the contract number and press ENTER.
4. Type in the date for the contract and press ENTER. The default value is set to the
current day.
5. Select the supplier (mill) from which you are ordering goods.
6. Choose one of the listed locations where the goods will be delivered. The highlight
will default over your company’s warehouse. To select a location not on the list,
choose the option “Specify Specific Location” and type in the location. All deliver to
locations must be defined within MOD2.
7. Select the shipping company the goods will be shipped via.
8. You will now be prompted to select an agent. Agents are people who help you deal
with mills. If the order to the mill went through an agent, highlight that agent and
press ENTER. If there was no agent, select “House Account”.
9. If you selected a Domestic contract, you will next be asked for the following:
•
% Seconds - Type in the maximum acceptable percentage of the goods you are
ordering to be second quality goods.
•
% Discount - Type in the percentage you will be discounted for the second quality
goods.
Otherwise, if you selected an Import, Local, or Off Shore contract, you will be asked
for the Agent %. Here, type in the percentage of the value of the goods ordered which
the agent will receive for his services in dealing with the mill.
119
Purchase Orders and Contracts
10.
Chapter 10 Goods in Process Management
You will now have to enter various information for the contract. This information
will differ depending on which contract you select.
For all contracts, you are asked the following:
♦ Intended For - If the goods you are ordering are intended for your company’s
stock, select “Stock”. Otherwise, if they are intended for a particular client,
select “For-customer” and then enter the client’s name.
♦ Required Date - Enter the date the goods are required to be received by.
♦ Country of Origin - Select the country where the goods originated from. For
Domestic and Local contracts, the highlight will default over USA.
♦ Terms - Type in the method of payment for the goods you are ordering. For
Import contracts, the default is set to Open L/C.
If you selected a Domestic contract, you will also be asked for the following:
♦ Our Coding # - Enter a reference number for the domestic contract.
If you selected either an Import, Local, or an Off Shore contract, you will in
addition be asked for the following information regarding the contract:
♦ Cust PO # - If the goods you are ordering are intended for a particular client and
if that client placed a sales order (customer purchase order) with your company,
enter the clients purchase order number here.
♦ XCO - Type in the tentative date when the goods are planned to be shipped out
by the mill. XCO is another term for ETD, or estimated time of departure.
♦ LC# - If the terms of payment for the contract was with a letter of credit, enter
the letter of credit number here.
11.
After you enter all the general information for the contract, you will have to select
the goods which you are ordering from the mill. Use of the four methods (Style #,
Color, Description, or Vendor) to select the goods you are ordering. This process is
similar to the one described in STEP 14 of “Adding Invoices” in CHAPTER 4: SALES
120
Purchase Orders and Contracts
MANAGEMENT.
Chapter 10 Goods in Process Management
Remember that you may use any of the four methods to select the
merchandise you are ordering even though STEP 14 uses Style #. If you selected a
Domestic contract, MOD2 will automatically search for and list all the greige goods
in your inventory (those with color defined as greige).
12.
Type in the unit cost price for the good you selected and then press ENTER.
13.
Type in the quantity (yardage) you want to order and then press ENTER.
You should now be back on the Style #, Color, Description, and Vendor screen.
On this screen, you have three options :
♦ You may select other goods which you wish to order from the mill. Simply repeat
STEPS 11-13.
♦ You may edit or delete goods which you have already selected to be ordered. To
do so, press the HOME key. You will be shown everything you have ordered so
far line by line. To edit a line, move the highlight over that line and press
ENTER. To delete a line, move the highlight over that line and press DEL.
♦ You may complete the contract by pressing ESC. On the next screen, you will be
shown the general information you entered for the contract.
After you have finished selecting the merchandise you wish to order, you
are shown a detailed review of the general information you entered for
the contract.
121
Purchase Orders and Contracts
Chapter 10 Goods in Process Management
Press any key to continue. You will next be shown the merchandise you ordered,
the total quantity (yardage) ordered, and the grand total for everything. At the
bottom of the screen you have four options. Press Y to accept the contract, E to
edit the general information for the contract and the merchandise ordered, A to
add or substitute items to the contract, or Q to not add the contract and to return to
the Contract menu.
To display a contract:
Whenever you want to quickly look up the general information and the merchandise
ordered in a particular contract, simply select the “Display Contract” option. In seconds
this information will be available for your review. Also, if you should need to change the
status, merchandise ordered, or the general information for a contract, you may do so by
displaying the contract as well.
1. Select “Goods in Process” from the main menu.
2. Select “Purchase Management” from the Goods in Process menu.
3. Select “Display Contract” from the Contract menu.
4. You should now be on a screen prompting you to enter a contract number. Type in
the number of the contract you want display and press ENTER. If you do not
remember the number of the contract you wish to display, select the option “Most
Recent Contract” for a quick listing of all contracts sorted from the most to the least
recent.
122
Purchase Orders and Contracts
Chapter 10 Goods in Process Management
5. The next screen shows the general information for the contract. If the contract model
was either Import, Local, or Off Shore, you will also be shown the Original XCO and
XCO fields. XCO is the tentative date by when the goods are supposed to be shipped
out by the mill (also known as ETD, estimated time of departure). These two fields
are usually the same unless you modify the XCO date (which can be done by selecting
“Change” on the next screen). After you modify the XCO date, the Original XCO
field will hold the initially proposed ETD and the XCO field will hold the new ETD.
Once you have finished viewing all this information, press any key to continue.
This is a sample contract general
information screen. The status of
the contract, which can be either
“marked complete” or “still
open”, will be shown next to the
contract model. By comparing
the Original XCO field with the
XCO field, you can determine
whether the mill was able to ship
out the goods your company
ordered by the initially proposed
ETD.
6. After you view the general information for the contract, you will end up on a screen
showing line by line the goods your company ordered from the mill. Each line shows
the quantity (yardage) ordered, the style number, the description and color of the style,
and the unit cost price for that style. The last line shows you the total quantity
(yardage) ordered plus the grand total for all the merchandise ordered together.
At the bottom of the screen in STEP 6, there are seven options which will each be
discussed below. To use one of the options, simply highlight it and press ENTER. To
go back to the Contract menu, press ESC on this screen.
123
Purchase Orders and Contracts
Chapter 10 Goods in Process Management
Details :
There are no details when displaying contracts.
Supplier Name :
Select this option to display the mill with whom your company made the contract. See
“Displaying Clients” in CHAPTER 7: CLIENT MANAGEMENT for further information on the options
at the bottom of the client information screen.
Next »» :
“Next” takes you to STEP 5 of the subsequent contract number (The next contract number in
sequence, based on the order it was entered).
Previous «« :
“Previous” takes you to STEP 5 of the previous contract number (The previous contract number in
sequence, based on the order it was entered).
Reprint :
Select this to reprint the contract. This is useful if the original contract was damaged or lost and
saves you the time of having to re-enter all the information for the contract and the merchandise
ordered by your company.
Change :
Select “Change” to modify different aspects of information for the contract. Before each item
you can change is a number. Enter the number next to the item you want to change and press
ENTER. Type in the replacement and then press ENTER. Repeat this process to make any
other changes. When you are through making changes, press 0 (zero) then ENTER to go back to
the contract general information screen (STEP 5). If you need to change an item which is
yellowed, please consult your supervisor. To change the merchandise ordered from the mill, you
need to select “Contents” (-1). Then follow STEPS 14-18 in “Adding Invoices” to add other items
to the list of merchandise ordered. To remove an item, press the HOME key, highlight the
appropriate line, and press DEL. To increase or decrease the price and/or quantity (yardage) of
124
Purchase Orders and Contracts
Chapter 10 Goods in Process Management
an item, press the HOME key, select the appropriate line, and enter the new values. When you
are done modifying the contract, press ESC. You will be returned to the screen with the general
information for the contract and the contents of the contract will be updated accordingly.
Mark-Open or Mark-Complete :
If the contract you are displaying is marked completed, you will be shown the option Mark-Open;
otherwise, if the contract is marked open, you will be shown the option Mark-Complete. These
options can be useful in certain situations. For example, in an extreme case, let’s say your
company made a contract with a mill for a certain quantity (yardage) of a particular style, your
company received half of what it ordered, and then the mill went out of business a week later.
Since the mill cannot send you the rest of the order, you are forced to mark the contract complete
and you may do so simply by selecting the option Mark-Complete when displaying the contract.
Voiding contracts:
For the security of your company, no one may delete a contract from MOD2. You may,
however, void a contract when the need arises. When you attempt to void a contract, you
will be asked for an authorization code. Please see your system supervisor for the
password. After you void a contract, you will see “VOIDED” blinking in red whenever
you display it.
To generate a report on contracts:
If you want to view a list of contracts sorted by a particular method and within a certain
time field, all you have to do is generate a contract report. Contract reports can be useful
in many situations, for example when you want to see all open and pending contracts of a
particular supplier (mill). But first, before MOD2 can generate the report, you need to
respond to a few questions which will filter the report into the desired format.
125
Purchase Orders and Contracts
Chapter 10 Goods in Process Management
1. Choose a method to sort the report in - The following are the ways you may sort
contracts in MOD2. Each has its own benefits, giving you a different look at the
same report.
•
Date - This sorts the report by the date entered for the contract (the date printed on
the contract, not necessarily the date the contract was added in MOD2).
•
Number - This sorts the report by the contract number.
•
Supplier - This sorts the report alphabetically according the name of the supplier.
2. Select a starting and ending date - Only those contracts whose date is within the time
field you specify here will be included in the report. For details on selecting a starting
and ending date, refer to “Select a Starting and Ending Date” in CHAPTER 2: BASIC
SKILLS.
3. Select the contract models you want to be included in the report - Only contracts from
the contract models you select here will be candidates to be included in the report.
The fewer models the you choose here, the more filtered and specific the report will
be.
4. Decide whether you want to customize the report - Typing in “Yes” will allow you to
further filter the report. If you do not want to customize the report, enter “No” and
move on to STEP 6.
5. Answer yes or no to these questions if you decided to customize the report.
•
Select a particular supplier / salesperson - These options allow only the contracts
of a certain supplier or a certain salesperson to be candidates for inclusion in the
contract report.
•
Choose output format for contracts - Choose the output format which best suits
your needs.
•
Include only open and in process contract - Answer yes to this question if you
want only the open and pending contracts to be included in the report.
126
Purchase Orders and Contracts
Chapter 10 Goods in Process Management
6. Select an output device to print the report to - For more information on output
devices, see “Output Devices” in CHAPTER 2: BASIC SKILLS.
Viewing open and pending contracts:
Use this option to quickly see which contracts are still open and pending. Open and
pending contracts are those contracts which have not been marked complete, meaning the
goods ordered have probably not yet been fully received.
You are shown the following information for each open and pending contract :
•
The contract number.
•
The date of the contract (not the date it was added, which is the stamped date, but the
date entered for the contract).
•
The client with whom the contract was made and from you are ordering the goods
(the mill).
•
The total dollar amount of the contract.
•
The total quantity (yardage) ordered in the contract.
For your convenience, you may print the list of all the open and pending contracts by
pressing P.
This screen shows you all open and pending contracts, or
contracts which have not been marked complete yet.
127
Purchase Orders and Contracts
Chapter 10 Goods in Process Management
Viewing the most recent contracts:
Select this option to quickly view a list of contracts sorted from the most recent to the
least recent. This list shows the contract model and number, the date entered for the
contract, the supplier (mill) from whom the goods were ordered, the total quantity
(yardage) ordered in the contract, and the total dollar amount of the contract. All open
contracts (those which have not been used in a detailed receiving yet) are shown in green
to help distinguish them from others.
The list will automatically pause with each screen-full of information. Press any key to
view the next screen-full or ESC to go back to the Contract menu.
You can
quickly view
the most recent
contracts with
the touch of a
button. Open
and pending
contracts are
shown in
green.
128
Working with Dye Orders
Chapter 10 Goods in Process Management
Working with Dye Orders
Greige goods need to undergo a process called converting to make them into finished
goods. This conversion takes place at a dye house. Your company must issue a dye order
telling the dye house which greige good you want converted and which colors you want
them converted into.
There are two kinds of dye orders in MOD2: an input dye order and an output dye order.
Input dye orders are used by knitters. Knitters buy, receive, and sell their merchandise in
pounds. When they issue a dye order with a dye house, they are charged for the pounds
of greige goods to be converted. Output dye orders are used by weavers. Weavers buy,
receive, and sell their merchandise in yards, the more common method. They, unlike
knitters, are charged not for the pounds of greige goods which they wanted converted but
for the yards of finished goods which was converted. This is why the terms input and
output are used. The cost in an input dye order comes from the goods going in while the
cost in an output dye order comes from the goods going out.
In MOD2 you do need to select whether you want to do an input dye order or an output
dye order. When the software was first installed for your company, this was setup for you
according to type of business you have. Because output dye orders are the more common
ones, this section will refer to all units as yards.
There are several dye order options from which you may choose on the Dye Order menu.
These include adding, displaying, and voiding dye orders, viewing pending and the most
recent dye orders, and generating a report on dye orders. This section will discuss all of
these options in order to make working with dye orders an easier task.
129
Working with Dye Orders
Chapter 10 Goods in Process Management
To add a dye order:
When you issue a dye order, you need to instruct the dye house what you want converted
and which colors you want to end up with. This is how the dye order works in MOD2.
The first line of goods you select (STEP 8) must be the item which you want to be
converted. Lines two and on in the dye order must list the finished goods and the colors
which you want the greige goods converted into.
Once you add a dye order to MOD2, the greige good which you selected to be converted
will be appropriately deducted from your inventory. When you receive the finished
goods, your inventory will be credited. When adding a dye order, you will be selecting
the greige goods in detail and the finished goods in summary.
1. From the main menu, select “Goods in Process”. Then select “Dye Order
Management” from the Goods in Process menu. Finally select “Add Dye Order”
from the Dye Order menu.
2. Select one of the listed dye order models. These models represent different methods
of converting greige goods to finished goods.
3. Type in the dye order number and press ENTER.
4. Enter the date for the dye order.
5. Select the dye house where the goods will be converted.
6. Enter the location where the finished goods should go to. The default location is set
to your company with the intention that the goods are intended for stock. If the goods
are not intended for stock but instead for a particular client, enter that client’s name.
130
Working with Dye Orders
Chapter 10 Goods in Process Management
7. On the next screen, you will have to enter the general information for the dye order.
Each item requested for will be described below.
A
B
C
D
E
A) Enter a reference number for the dye order.
B) Enter the expected percentage of greige goods you are willing to lose from the
conversion process. When greige goods are converted into finished goods, there
is some natural loss because of shrinkage.
C) Enter the maximum percentage you are willing to lose from the conversion
process.
D) Enter the date you are expecting to receive the converted finished goods.
E) Select the method by which the finished goods will be sent back to you (or to
another client).
8. After you enter the general information for the dye order, MOD2 will then
automatically search and list all the greige goods from your inventory. It does this by
searching for the color “greige”. If the color for the greige good you want to issue
was not set as greige, MOD2 will not be able to find it and you will have to manually
search for it the normal way. Otherwise, select the item which you are planning to
convert.
9. If you are doing an output dye order (see discussion at the beginning of this section),
the unit cost price for the greige good will not affect the grand total for the dye order.
131
Working with Dye Orders
Chapter 10 Goods in Process Management
Just press ENTER to move on. Otherwise, if you’re doing an input dye order, type in
the unit cost for the greige good.
10.
You will now be shown a list of all the receivings for the greige good you selected.
Move the highlight over the one you want and then press ENTER.
Here you are shown the receiving log number, the date
it came in, the contract number, the date it was ordered,
the supplier for the greige good, the number of rolls
available, and the active quantity (quantity not used).
11.
Tag the rolls which you want to send to the dye house to be converted. To tag a
roll, move the highlight over the appropriate line and press ENTER. To untag a
roll, press DEL on the line which you want to untag. To tag all the rolls, press INS.
To split a roll, press the SHIFT and ENTER keys simultaneously.
The Split option is very useful. Suppose the rolls for the receiving you selected
were all 100 yards (quantity = 100) and there were 5 rolls in that receiving. If you
wanted to dye 475 yards, you would not be able to unless you split one of the rolls.
To do so, you must highlight one of the rolls and press SHIFT and ENTER at the
same time. Then you will be prompted to enter the number of yards you want to
take out. Here you could type in 75, leaving 25 yards for later use. Then if you tag
the other 4 rolls, you will have the 475 yards you wanted. You may use the Split
option on any roll to obtain the exact amount you are going to dye.
132
Working with Dye Orders
These are the details
for the greige good
you selected.
Chapter 10 Goods in Process Management
Once you select a receiving, you will end up on this screen. Here you
must tag the rolls which you want to be sent to the dye house for
conversion.
This column shows
where the roll is
located if not
at your company’s
warehouse. This
could be another
warehouse or even
the client to whom the
roll was shipped.
This column stands
for System ID,
which is the
identification
number assigned to
that roll by MOD2.
This column shows
the original quantity
(yardage) for the
roll when it was
received.
These are the
options you may use
on this screen. The
function of each is
described above.
12.
This shows the current
number of rolls which
you have tagged
This column shows the
quantity (yardage)
available to be used.
This is the current
quantity (yardage)
tagged
This column shows
the status of the roll.
TAG means that the
roll has been selected,
USED means that the
roll has been
completely used, and
OK means that the
roll is available to
use.
When you have finished tagging the bales, press ESC. You will be back on the
screen which shows the receivings for the greige good you selected. To select
another receiving for the same greige good, move the highlight over the appropriate
line and press ENTER. Repeat this step until you have selected all the bales which
you want to be sent to the dye house for conversion. When you have finished
selecting the bales, press ESC while on the screen with the list of receivings.
13.
You should now be on the Style #, Color, Description, and Vendor screen. Now
you must select the finished goods and colors which you want the greige good to be
converted to. MOD2 requires that you select at least one line of finished goods for
the dye order. If you do not select any finished goods, the dye house won’t know
what colors to dye the greige goods!
Repeat the following steps until you complete the selection of the finished goods.
A. Use either Style #, Color, Description, or Vendor to find the finished good you
want the greige good to be converted to. This process is similar to the one
133
Working with Dye Orders
Chapter 10 Goods in Process Management
described in STEP 14 of “Adding Invoices” in CHAPTER 4: SALES MANAGEMENT.
B. Type in the unit price you will be charged to dye the greige good into the color
and style you selected and then press ENTER. If you are performing an input
dye order (used by knitters), the cost of the finished goods will not affect the
grand total so just press ENTER to move on.
C. Type in the quantity (yardage) of the greige good which you want to be dyed
into the finished good you selected and then press ENTER.
14.
To complete the dye order, press ESC while on the Style #, Color, Description, and
Vendor screen. To edit or delete the goods you have already selected, press the
HOME key. You will be shown everything you have selected so far line by line.
To edit a line, move the highlight over that line and press ENTER. To delete a line,
move the highlight over that line and press DEL.
15.
On the next screen you will be shown the general information for the dye order.
Press any key to continue.
16.
You will next be shown the goods you selected for the dye order. The first line
shows you the greige good you selected to be converted. The other lines show you
which colors you wanted the greige good to be dyed. You are also shown the total
quantity (yardage) of finished goods you selected and the grand total for the dye
order (calculated based on yards of finished goods for output dye orders or pounds
of greige goods for input dye orders). At the bottom of the screen you have four
options. Press Y to accept the dye order, E to edit the general information for the
dye and the merchandise you selected, A to add or substitute items to the dye order,
or Q to not add the dye order and to return to the dye order menu.
To display a dye order:
If you want to see the general information for a particular dye order and you would like to
view the greige good selected to be dyed plus the finished goods they were supposed to
134
Working with Dye Orders
Chapter 10 Goods in Process Management
be dyed into, use the Display Dye Order option. When you display a dye order, you are
not only shown what was mentioned above but you may also change the status of the dye
order (open or complete) and modify various aspects of information for the dye order.
1. Select “Goods in Process” from the main menu.
2. Select “Dye Order” from the Goods in Process menu.
3. Select “Display Dye Order” from the Dye Order menu.
4. You should now be on a screen prompting you to enter a dye order number. Type in
the number of the dye order you want display and press ENTER. If you do not
remember the number of the dye order you wish to display, select the option “Most
Recent Dye Order” for a quick listing of all dye orders sorted by the date they were
entered starting from the most recent.
5. The next screen shows the general information for the dye order. On this screen,
there is a field which says “Actual Working Loss %”. When greige goods are dyed
and converted, there is normally a small loss due to shrinkage. The Actual Working
Loss % field will show you the actual percentage lost in the conversion process. This
field will say “Not Computed” if the dye order has not been marked complete yet.
Otherwise, when the dye order is marked complete, this field will show the
percentage lost. This percentage is calculated based on the quantity (yardage) of
greige goods used and the quantity (yardage) of finished goods received. The
percentage will be shown in green if it did not exceed the maximum allowable
working loss or it will be blinking in red if it did.
Once you have finished viewing the general information for the dye order, press any
key to continue.
135
Working with Dye Orders
Chapter 10 Goods in Process Management
6. After you view the general information for the dye order, you will end up on a screen
showing the greige good to be converted on the first line and the finished goods they
were supposed to be converted to on the other lines. The line with the greige goods
shows the quantity (yardage or pounds) sent to the dye house, the style number and
color (which should be “Greige” or “Greige-Goods”), the number of rolls sent, and
the description. The unit price for the greige good does not affect the grand total if
you did an output dye order. The lines with the finished goods show the quantity
(yardage or pounds) you want produced from the greige good, the style number of the
finished merchandise, the color of the finished good which will be the color you want
the greige good dyed, the description of the good, and the unit cost price to dye that
good. If this is an input dye order, the price of the finished goods will not affect the
grand total. The last line shows you the total quantity (yardage or pounds) of finished
goods you wanted to be produced from the greige good and the grand total for the dye
order.
At the bottom of the screen in STEP 6, there are seven options which will each be
discussed below. To use one of the options, simply highlight it and press ENTER. To
go back to the Dye Order menu, press ESC on this screen.
Details :
Since greige goods are selected in detail when a dye order is added, you may view these details
while displaying that dye order. After you select Details, you need to press ENTER on the line
which lists the greige good (the first line). A window will then pop up showing you all the
details you need to know.
136
Working with Dye Orders
Chapter 10 Goods in Process Management
While displaying a dye order, you may view the details of the
greige goods sent to the dye house by selecting the Details.
Dye House :
Select this option to display the dye house to whom you sent the greige goods to be converted.
See “Displaying Clients” in CHAPTER 7: CLIENT MANAGEMENT for further information on the
options at the bottom of the client information screen.
Next »» :
“Next” takes you to STEP 5 of the subsequent dye order number (The next dye order number in
sequence, based on the order it was entered).
Previous «« :
“Previous” takes you to STEP 5 of the previous dye order number (The previous dye order number
in sequence, based on the order it was entered).
Reprint :
Select this to reprint the dye order.
Change :
Select “Change” to modify different aspects of information for the dye order. Before each item
you can change is a number. Enter the number next to the item you want to change and press
ENTER. Type in the replacement and then press ENTER. Repeat this process to make any
137
Working with Dye Orders
Chapter 10 Goods in Process Management
other changes. When you are through making changes, press 0 (zero) then ENTER to go back to
the dye order general information screen (STEP 5). If you need to change an item which is
yellowed, please consult your supervisor.
Mark-Open or Mark-Complete :
If the dye order you are displaying is marked completed, you will be shown the option MarkOpen; otherwise, if the dye order is marked open, you will be shown the option Mark-Complete.
Open dye orders are probably those which have not yet been fully received. After you add a
receiving from a dye house (see CHAPTER 11: MANAGING RECEIVED GOODS), you have the option
of marking the dye order with the dye house complete or not. If you are still expecting to receive
more finished goods from the dye house for that dye order, you would enter “no” because you
would want to keep the dye order on the pending list. Here while displaying the dye order, you
have the option of changing its status. You may take a dye order off the pending list by marking
it complete or you may put it on the pending list by marking it open. Use this option when the
need arises.
Voiding dye orders:
For the security of your company, no one may delete a dye order from MOD2. You may,
however, void a dye order when the need arises. When you attempt to void a dye order,
you will be asked for an authorization code. Please see your system supervisor for the
password. After you void a dye order, the greige good which you selected to be
converted in the dye order will be accordingly credited back into your inventory. You
will also see “VOIDED” blinking in red whenever you display it.
To generate a report on dye orders:
The situation might come up when you want to view a list of particular dye orders sorted
by a certain method or you may want to see a list of all open dye orders. When such a
situation occurs, you may turn to MOD2 for answers. The option Reports on Dye Order
will quickly generate a report for your review. All MOD2 needs to create the report are
138
Working with Dye Orders
Chapter 10 Goods in Process Management
answers to a few questions which are necessary to filter it. This section will describe
these questions which you must respond to in order to generate the report.
1. Choose a method to sort the report in - There are two ways to sort dye orders in
MOD2. Select the one appropriate to your needs.
•
Open Dye Orders - Choose this if you only want open and pending dye orders
(those which have not yet been marked complete) to be included in the report. If
you select this option, skip down to STEP 3.
•
All Dye Orders - Choose this to include all dye orders in the report.
2. Select a starting and ending date - Only those dye orders whose date is within the time
field you specify here will be included in the report. For details on selecting a starting
and ending date, refer to “Select a Starting and Ending Date” in CHAPTER 2: BASIC
SKILLS.
3. Select the dye order models you want to be included in the report - Only dye orders
from the dye order models you select here will be candidates to be included in the
report. The fewer models the you choose here, the more filtered and specific the
report will be.
4. Decide whether you want to customize the report - Typing in “Yes” will allow you to
further filter the report. If you do not want to customize the report, enter “No” and
move on to STEP 6.
5. Answer yes or no to these questions if you decided to customize the report.
•
Select a particular dye house - Enter “Yes” here if you want to only view the dye
orders of a particular dye house. This option can be useful in certain situations,
such as if you wanted to view the open dye orders of one particular dye house.
139
Working with Dye Orders
•
Chapter 10 Goods in Process Management
Do you want the detailed receiving for each dye order - Answer yes to this
question if you would like to see detailed information regarding any receivings for
each dye order.
6. Select an output device to print the report to - For more information on output devices,
see “Output Devices” in CHAPTER 2: BASIC SKILLS.
Viewing open and pending dye orders:.
Use this option to quickly see which dye orders are still open and pending. Open and
pending dye orders are those dye orders which have not been marked complete, meaning
the finished goods which you wanted the greige goods converted into have probably not
yet been fully received.
You are shown the following information for each open and pending dye order :
•
The dye order number.
•
The date of the dye order (not the date it was added, which is the stamped date, but
the date entered for the dye order).
•
The name of the dye house to whom you sent the greige goods to be converted.
•
The total dollar amount of the dye order. If you did an input dye order, which is used
by knitters, this amount is calculated based on the pounds of greige goods which you
sent to the dye house. Otherwise, if you did an output dye order, which is used by
weavers, the amount is calculated based on the yards of finished goods you wanted to
be made out of the greige goods.
•
The total quantity (yardage or pounds) of the finished goods you wanted to be made
out of the greige goods..
For your convenience, you may print the list of all the open and pending dye orders by
pressing P.
140
Working with Dye Orders
Chapter 10 Goods in Process Management
This screen shows you
all open and pending
dye orders. Open dye
orders are those
which have not been
marked complete,
which probably means
that the finished goods
that were supposed to
be made have not yet
been fully received.
To print the list of
open dye orders, press
P.
Viewing the most recent dye orders:
Select this option to quickly view a list of dye orders sorted from the most recent to the
least recent. This list shows the dye order model and number, the date entered for the dye
order, the dye house to whom you sent the greige goods to be converted, the greige good
which you wanted converted, and the location where the finished goods would be sent
(Dyed To). The Dyed To column says stock if the finished goods are to be shipped to
your company once they are dyed or it says the name of a client if the finished goods are
to go to a particular client.
The list will automatically pause with each screen-full of information. Press any key to
view the next screen-full or ESC to go back to the Dye Order menu.
Select the Most
Recent Dye
Order option to
quickly view a
list of dye orders
sorted by the
date they were
entered.
141
Transferring Goods
Chapter 10 Goods in Process Management
Transferring Goods
Use the Move/Transfer option whenever you want to change the location of merchandise
in your inventory. When you transfer goods, the location of the goods is changed but the
goods are not removed from your inventory. Using the transfer option allows you to keep
track of your inventory so you know where each item is at all times. The Move/Transfer
option is commonly used when you want to issue a dye order with a dye house and you
want to change the location of a certain greige good to that dye house. This section will
cover the various options on the Transfer/Move menu.
To add a transfer/move:
When you add a Transfer, note that you must select the goods to be moved in detail. If
the merchandise you are moving was received in detail, all you have to do is tag the rolls
you want to change the location of. Otherwise, if the merchandise was received in
summary, you will have to manually type in the details for every roll you move.
1. From the main menu, select “Goods in Process”.
2. From the Goods in Process menu, select “Move/Transfer”.
3. From the Transfer/Move menu, select the option “Add Transfer/Move”.
4. Highlight the transfer model you wish to add and press ENTER.
5. Type in a transfer number and then press ENTER.
6. Enter the date for the transfer.
7. Select the location where the goods will be transferred to.
142
Transferring Goods
Chapter 10 Goods in Process Management
8. Enter the general information requested for the transfer on the next screen. This
information consists of a reference number, a bill of lading number, and the method
the merchandise which will be transferred will be shipped by.
9. On the next screen, you will have to select the merchandise which you want to
transfer. This process is similar to the one in “Adding a Packing List” in CHAPTER 12:
PACKING LISTS.
The only difference is that you will not be entering prices for the
goods you are transferring. Begin at STEP 9 in “Adding a Packing List” and perform
all steps up to the end of the section.
To display a transfer/move:
1. From the Transfer/Move menu, select the option “Display Transfer/Move”.
2. Enter the number of the transfer you want to display. If you do not recall the transfer
number, try listing the most recent transfer/moves.
3. The next screen will show you the general information for the transfer. After you
have viewed this information, press any key to continue.
4. After you view the general information for the transfer, you will end up on a screen
showing line by line the goods which you transferred. Each line shows the quantity
(yardage) and the number of rolls shipped, the style number, the description, and the
color of the style (if you shipped greige goods, the color field should be “Greige”).
The last line shows you the total quantity (yardage) and the total number of rolls
shipped to the location you selected.
143
Transferring Goods
Chapter 10 Goods in Process Management
At the bottom of the screen in STEP 5, there are six options which will each be discussed
below. To use one of the options, simply highlight it and press ENTER. To go back to
the Transfer/Move menu, press ESC on this screen.
Details :
No detailed information is available for transfers.
Location Name :
Select this option to display the client to whom the merchandise was transferred. See
“Displaying Clients” in CHAPTER 7: CLIENT MANAGEMENT for further information on the options
at the bottom of the client information screen.
Next »» :
“Next” takes you to STEP 3 of the subsequent transfer number (The next transfer number in
sequence, based on the order it was entered).
Previous «« :
“Previous” takes you to STEP 3 of the previous transfer number (The previous transfer number in
sequence, based on the order it was entered).
Reprint :
Transfers may not be printed.
Change :
Select “Change” to modify different aspects of information for the transfer. Before each item
you can change is a number. Enter the number next to the item you want to change and press
ENTER. Type in the replacement and then press ENTER. Repeat this process to make any
other changes. When you are through making changes, press 0 (zero) then ENTER to go back to
the transfer general information screen (STEP 3). If you need to change an item which is
yellowed, please consult your supervisor. To change the merchandise transferred to the location
you specified, you need to select “Contents” (-1). Then follow STEPS 14-18 in “Adding Invoices”
144
Transferring Goods
Chapter 10 Goods in Process Management
to add other items to the list of merchandise transferred. To remove an item, press the HOME
key, highlight the appropriate line, and press DEL. To increase or decrease the quantity
(yardage) of an item, press the HOME key, select the appropriate line, and enter the new value.
When you are done modifying the transfer, press ESC. You will be returned to the screen with
the general information for the transfer and the contents of the transfer will be updated
accordingly.
Voiding a transfer/move:
For the security of your company, no one may delete a transfer from MOD2. You may,
however, void a transfer when the need arises. When you attempt to void a transfer, you
will be asked for an authorization code. Please see your system supervisor for the
password. After you have voided a transfer, you will see “VOIDED” blinking in red
when you display it. The record of the transfer will also be removed from the history of
the goods which were transferred.
Listing the most recent transfers/moves:
Select this option to quickly view a list of transfers sorted from the most recent to the
least recent. This list shows the model and number of the transfer, the date entered for
the it, and the location where the goods were transferred to.
The list will automatically pause with each screen-full of information. Press any key to
view the next screen-full or ESC to go back to the Transfer/Move menu.
145
CHAPTER
11
Managing Received Goods
Whenever your company receives merchandise that it ordered from a supplier, mill, or
dye house, you need to record that receiving in MOD2 so your inventory will be
appropriately credited and updated. This can be done from the Receiving menu. The
Receiving Menu can either be accessed from the Inventory menu or the Goods in Process
menu. This chapter will discuss how you can manage the goods you receive through
MOD2.
Detailed Versus Summary Receiving
In MOD2, there are two categories of receiving: summary and detailed. In a summary
receiving, you only need to specify the merchandise you received and the quantity
(yardage) received for each style. Detailed receivings, on the other hand, are a little more
difficult but more efficient. In a detailed receiving, you have to specify the box, lot, and
roll number for each roll in the shipment you received. This information is called the
details of the rolls. Once you enter these details, other processes such as adding a packing
list become much simpler. In a packing list, detailed inventory needs only to be tagged
(see CHAPTER 12: PACKING LISTS for more information on this).
The main argument for doing detailed receivings rather than summary ones is, however,
not because of the simplification it provides you in the future. The chief advantage that
detailed inventory has is that it can be more easily tracked. When you sell summary
inventory, all you specify is what was sold and how much of it was sold. With summary
146
Logging Received Merchandise
Chapter 11 Managing Received Goods
goods, there is no indication nor reference to where those goods came from, where they
are currently located, nor whether you even had the merchandise in stock to begin with.
You could sell 5,000 yards to a client even though you only had 1,000 at the time. When
you sell detailed goods, the rolls that you tag in the packing list each have their respective
details. These details let you know where each roll is plus the box, lot, and roll number
for each roll. Since you must tag the rolls that you want to sell, it is impossible to sell
more than what you have. For all the reasons stated, it is clear that it is both to your and
to your company’s advantage to do detailed receivings rather than summary receivings.
TIP - It is highly recommended, although not required, that you do not have both summary and detailed
inventory for the same style. Try to keep each style either all in detail or all in summary.
Logging Received Merchandise
This section will explain how to record received merchandise into MOD2 step by step.
You must always add a receiving when you receive goods from a supplier, mill, or dye
house so that your inventory will always be up-to-date. The Add Receiving process
differs based on the Receive Goods mode you select.
To log received merchandise:
1. From the Receiving menu, select the option “Add Receiving”.
2. Select one of the listed Receive Goods modes. The mode you select will determine
the type of receiving you will be performing. The Adjustment and Summary modes
are summary receivings while the Detailed, In-Transit, and From Dye House modes
are detailed receivings. When to use each mode will now be discussed.
147
Logging Received Merchandise
Chapter 11 Managing Received Goods
♦ Adjustment - Use this to adjust the quantity (yardage) of your summary inventory.
The process of performing an adjustment is identical to doing a summary
receiving. The reason for the different names is so you can distinguish your
adjustments from your actual physical receivings.
♦ Summary - Use this to perform a receiving where you only specify what was
received and how much of it was received. All you need to know for this type of
receiving are the style numbers of the goods received plus the quantity (yardage)
received of each. This type of receiving is simple to perform but lacks the
tracking capability and extensive detailed information offered by detailed
receivings.
♦ Detailed - Use this mode to perform a standard, roll-by-roll, detailed receiving for
the merchandise received from the supplier or mill. In this mode, you must
specify the box and lot number for each roll. Detailed receivings may also be
tracked and they simplify other processes such as the adding of a packing list.
♦ In-Transit - This receiving mode is used by those who generate bar-codes for their
rolls. Please see your system supervisor for more information on In-Transit
receivings.
♦ From Dye House - Select this mode when receiving finished goods from a dye
house.
3. Type in the receiving number and then press ENTER.
4. Enter the date you received the merchandise and then press ENTER. The default
date is set to the current day.
148
Logging Received Merchandise
Chapter 11 Managing Received Goods
The process for adding a receiving now changes depending on the Receive Goods mode
you selected.
If you selected an Adjustment or Summary receiving, continue here.
5s.
Select one of the listed suppliers from which you received the merchandise.
6s.
Type in a reference number for the receiving and then press ENTER.
7s.
You will now be selecting the merchandise you received. Use one of the four
methods to select the goods received (Style #, Color, Description, Vendor).
This process is similar to the one described in STEP 14 of “Adding Invoices” in
CHAPTER 4: SALES MANAGEMENT.
Remember that you may use any of the four
methods even though STEP 14 uses Style #.
8s.
Type in the quantity (yardage) you received for the style you selected and then
press ENTER. If you are doing an adjustment, enter a negative number to
decrease the quantity (yardage) of that style in your inventory or a positive
number to increase the quantity (yardage) of that style.
9s.
Proceed from STEP 10.
Otherwise, if you selected a Detailed, In-Transit, or From Dye House receiving, continue
here.
5d. You will now see a window that shows you all open and pending contracts if
you are in the Detailed or In-Transit mode or all open and pending dye orders if
you are in the From Dye House Receive Goods mode. Select the contract or dye
order that pertains to the receiving you are doing.
149
Logging Received Merchandise
Chapter 11 Managing Received Goods
When you receive goods
in detail, you have to
select the contract or dye
order the receiving
pertains to. Here you are
shown a list of open and
pending contracts. For
each contract, you are
shown the contract
number, the date of the
contract, the supplier, the
total dollar amount of the
contract, and the quantity
(yardage) ordered.
6d. Type in a reference number for the receiving and then press ENTER.
7d. Select the shipping company that shipped you the merchandise you are entering
the receiving for.
8d. You should now be on the Style #, Color, Description, and Vendor screen. At
this point, press the HOME key. The merchandise ordered in the contract or
dye order will now be shown on screen line by line. Move the highlight over the
line you want to receive and then press ENTER.
9d. You will now have to enter the details for the style you selected to receive.
These details consist of the Box Number, Lot Number, Roll Number, and the
Quantity received (yardage) if you are receiving finished goods or Bale Type,
Bale Lot Number, Bale Number, and the Quantity received (yardage) if you are
receiving greige goods. For further discussion on greige goods, please see the
section entitled “Managing Greige goods” which can be found in CHAPTER 4:
GOODS IN PROCESS MANAGEMENT.
150
Logging Received Merchandise
Chapter 11 Managing Received Goods
Press ENTER to move on to the next field. When you are done entering the
details, press ESC to stop the process. You then have the option of editing a
previous line or to select other styles to receive. To edit a previous line, move
the highlight over the line you want to edit and press ENTER. To select
another style to receive, press ESC once more and continue from STEP 10.
This is the screen where you will be entering the details of the
merchandise you are receiving in a detailed receiving. A summary of
what you have entered so far can be seen at the bottom of the screen.
TIP - When entering the details for the rolls, if more than one roll has the same box, lot, and
yardage, you may enter the quantity (yardage) in the format Y X R, where Y stands for the yards per
roll and R stands for the number of rolls. For example, entering “250X10” will make MOD2
automatically add ten rolls at 250 yards each. Another useful function is the automatic conversion of
meters to yards. If you enter “500m” for the quantity (yardage), MOD2 will automatically convert the
number to yards, which in this case would be 546.81 yards. These two shortcuts are shown in the
legend, as pictured above.
10.
You should now be back on the Style #, Color, Description, and Vendor screen.
On this screen, you have three options :
151
Displaying Received Merchandise
Chapter 11 Managing Received Goods
♦ You may select another style to be received. Repeat the process beginning at
STEP 7s
if you are doing an Adjustment or Summary receiving; otherwise, if you
are doing a Detailed, In-Transit, or From Dye House receiving, continue from
STEP 8d.
♦ You may edit or delete merchandise you have already received. To do so, press
the HOME key. You will be shown everything you have selected to be
received so far line by line. To edit a line, move the highlight over that line and
press ENTER. To delete a line, move the highlight over that line and press
DEL.
♦ You may complete the receiving by pressing ESC. On the next screen, you will
be shown the information for the receiving log. Press any key to continue. On
the next screen you will be shown the merchandise you selected to be received
and the total quantity (yardage) received. At the bottom of the screen you have
four options. Press Y to accept the receiving, E to edit the information for the
receiving and the merchandise selected to be received (only for Adjustment or
Summary mode), A to add or substitute items to the receiving, or Q to not add
the receiving and to return to the Receiving menu.
Displaying Received Merchandise
Choose the option “Display Receiving” to see the general information and the
merchandise received in a particular receiving. Displaying receiving can be helpful in
certain situations, such as if there was a ship advise for a receiving. By displaying the
receiving and comparing the merchandise received with the merchandise shipped in the
ship advise, you can quickly determine if any goods were lost during shipment (please
refer to the section “Shipping Advise” later in this chapter for further discussion of ship
advises). If the merchandise was received in detail, you may view these details when
displaying the receiving. Also, if any rolls in that receiving were used in another
transaction such as a transfer, dye order, or packing list, the transaction type and number
will be displayed for you.
152
Displaying Received Merchandise
Chapter 11 Managing Received Goods
To display a receiving:
1. Select “Goods in Process” from the main menu. Next choose “Receive Management”
from the Goods in Process menu.
2. Select the option “Display Receiving” from the Receiving menu.
3. You should now be on a screen prompting you to enter a receiving number. Type in
the number of the receiving you want display and press ENTER. If you do not
remember the number of the receiving you wish to display, select the option “Most
Recent Receiving” for a quick listing of all receivings sorted from the most to the
least recent.
4. The next screen shows the general information for the receiving.
After viewing this information, press any key to continue.
5. After you view the general information for the receiving, you will be on a screen
showing line by line the goods that your company receiving in the receiving you
displayed. Each line shows the quantity (yardage) received, the style number, the
description, and the color of the style. The last line shows you the total quantity
(yardage) received in the particular receiving you displayed. If the goods were
received in detail, that is, if they were received in either the Detailed, In-Transit, or
From Dye House modes, the last line will also show the total number of rolls
received.
At the bottom of the screen in STEP 5, there are six options which will each be discussed
below. To use one of the options, simply highlight it and press ENTER. To go back to
the Receiving menu, press ESC on this screen.
153
Displaying Received Merchandise
Chapter 11 Managing Received Goods
Details :
This option can be used to view the details of merchandise which was received in detail.
Merchandise received in detail must have been logged under the Detailed, In-Transit, or From
Dye House modes. There are no details for goods logged in the Summary or Adjustment modes.
When you select Details, you will be shown the goods received in that receiving line by line.
Select the line for which you want to see the details. Once you do so, a screen will pop up
similar to the following:
The Detail option will allow you to view the details of the individual
rolls in a receiving that consists of detailed merchandise (merchandise
logged under the Detailed, In-Transit, or From Dye House modes).
This screen shows you detailed information regarding each roll in the receiving. Look for these
three things on this screen.
♦ The Used By column shows you the client who used the roll, if any. For example, if a roll
was packed for a client in a packing list, then when you view the details of that roll, the Used
By column will show that client’s name. The other columns show you various other
information about the rolls, including the original and available quantity (yardage) and the
status of the roll.
154
Displaying Received Merchandise
Chapter 11 Managing Received Goods
♦ At the end of the list of rolls, you are shown a three line summary of all the rolls in the
receiving. The first line of this summary shows you the original number of rolls in the
receiving, how many have been used so far, and how many are still available. The second
line shows you the same information except in yards and the last line shows it to you in
percentages.
♦ If a particular roll was involved in another transaction such as a packing list, transfer, or dye
order, the transaction type, number, and date plus the client associated with that transaction
will be shown at the bottom of the screen when that roll is highlighted. As you can see
pictured above, the highlighted roll was involved in packing list number 38 on July 25, 1996
and the goods were packed for Demo 1.
Supplier/Mill/Dye House Name :
Select this option to display the supplier, mill, or dye house from which you received the
merchandise. See “Displaying Clients” in CHAPTER 7: CLIENT MANAGEMENT for further
information on the options at the bottom of the client information screen.
Next »» :
“Next” takes you to STEP 4 of the subsequent receiving number (The next receiving number in
sequence, based on the order it was entered).
Previous «« :
“Previous” takes you to STEP 4 of the previous receiving number (The previous receiving number
in sequence, based on the order it was entered).
Reprint :
Select this to reprint the receiving log.
155
Voiding Received Merchandise
Chapter 11 Managing Received Goods
Change :
Select “Change” to modify different aspects of information for the receiving. Before each
item you can change is a number. Enter the number next to the item you want to change
and press ENTER. Type in the replacement and then press ENTER. Repeat this process
to make any other changes. When you are through making changes, press 0 (zero) then
ENTER to go back to the ship advise general information screen (STEP 4). If you need to
change an item which is yellowed, please consult your supervisor. To change the
merchandise received in a summary receiving (either Summary or Adjustment mode),
select “Contents” (-1). To change the merchandise received in a detailed receiving
(Detailed, In-Transit, or From Dye House mode), please see your system supervisor.
Voiding Received Merchandise
For the security of your company, no one may delete a receiving from MOD2. You may,
however, void a receiving when the need arises. When you attempt to void a receiving,
you will be asked for an authorization code. Please see your system supervisor for the
password. After you have voided a receiving, you will see “VOIDED” blinking in red
when you display it. Your inventory will also be appropriately deducted from.
156
Generating a Report on Receiving
Chapter 11 Managing Received Goods
Generating a Report on Receiving
To view a report of receivings within a certain time period and sorted in a particular
method, select the “Reports on Receiving” option. Receiving reports show you a
summary of the goods that were received. This summary information consists of the
following:
♦ The receiving log number
♦ The date entered for the receiving log
♦ The goods that were received (shown by style number)
♦ The supplier, mill, or dye house from which the goods came.
♦ The colors of the goods received.
♦ Any reference numbers entered for the receiving log.
♦ The quantity (yardage) received of each style.
When you generate a report on receiving, you will have to respond to some questions
which MOD2 needs answered in order to put the report together. This section will
discuss these questions.
To generate a report on receiving:
1. Choose a method to sort the report in - The following are the ways you may sort
receivings in MOD2. Select the one best fit for your purposes.
•
Date - This sorts the report by the date entered for the receiving (the date printed
on the receiving log, not necessarily the date the receiving was added to MOD2).
•
Number - This sorts the report by the receiving number
•
Supplier - This sorts the report alphabetically according the name of the supplier
where the goods originated from.
2. Select a starting and ending date - Only those receivings whose date is within the time
field you specify here will be included in the report. For details on selecting a starting
and ending date, refer to “Select a Starting and Ending Date” in CHAPTER 2: BASIC
SKILLS.
157
Viewing the Most Recent Receivings
Chapter 11 Managing Received Goods
3. Select the receiving modes you want to be included in the report - Only receivings
from the receiving modes you select here will be candidates to be included in the
report. The fewer models the you choose here, the more filtered and specific the
report will be.
4. Decide whether you want to customize the report - Typing in “Yes” will allow you to
further filter the report. If you do not want to customize the report, enter “No” and
move on to STEP 6.
5. Answer yes or no to these question(s) if you decided to customize the report.
•
Select a particular supplier - Answer “Yes” if you want to narrow down the report
to the receivings of a particular supplier of your choice.
6. Select an output device to print the report to - For more information on output
devices, see “Output Devices” in CHAPTER 2: BASIC SKILLS.
Viewing the Most Recent Receivings
Select this option to quickly view a list of receivings sorted from the most recent to the
least recent. This list shows the receiving model and number, the date entered for the
receiving, the supplier or dye house from where the goods were shipped, the contract
number which the receiving refers to (if it is a detailed receiving), and the reference
number entered for the receiving, if any.
The list will automatically pause with each screen-full of information. Press any key to
view the next screen-full or ESC to go back to the Receiving menu.
158
Shipping Advise
Chapter 11 Managing Received Goods
You may instantly at any time view a summarization of
all receivings entered into MOD2. The list you are
shown is sorted from the most recent to the least recent
receivings. Voided receivings, as you can see above,
are dimmed and plus there will be a star next to the
receiving number.
Shipping Advise
When your company needs to order goods, it makes a purchase order to a mill. The
contract it makes with the mill specifies which goods your company ordered, the expected
date the goods will be shipped out, and the required date the goods need to be received
by. When your company receives the goods, it adds a receiving in MOD2 to according
update the inventory. But what happens to the merchandise during the time it leaves the
mill and it arrives at your company? That’s where the Ship Advise comes in. Ship
advises are used to keep track of goods after they have left a mill but before they are
received. They store a lot of information about the shipment. The most important thing
about a ship advise is that it records which goods were actually shipped out by the mill.
By knowing this information and examining the receiving, you can quickly determine
whether any goods were lost during shipment. This section will help you to learn how to
use ship advises to keep track of inventory being shipped from a mill.
159
Shipping Advise
Chapter 11 Managing Received Goods
To add a ship advise:
Once the goods your company ordered have been shipped out, the mill usually notifies
you to verify that it has left. The mill also gives you information regarding what was
shipped out and how it was shipped. You must know this information when you want to
add a ship advise to MOD2.
1. Select the option “Add Ship Advise” from the Ship Advise menu.
2. Select one of the listed ship advise models. Use the model which best describes the
method of shipment.
•
Standard - Use standard for goods shipped overseas by boat. This model should
be used for the method of shipment you use the most often.
•
Air - Use this model for shipments via air. Air shipments have a higher priority
and the goods are transported faster. The cost of shipment by air is assumed to be
higher than merchandise shipped the standard method so if in your ship advises
you see several air shipments, note that they will arrive sooner and will cost more.
•
Priority - Use this model if the method of shipment did not fit in the above two
models but you still want to give some priority to the shipment.
3. Type in the date for the ship advise and press ENTER. The default date is set to the
current day so if that is what you want, just press ENTER.
4. A window should now pop up showing all open and pending contracts. Select the
contract you are entering the ship advise for and press ENTER.
5. Type in the ship advise number and press ENTER. The default ship advise number is
set to the number of the contract you selected.
160
Shipping Advise
Chapter 11 Managing Received Goods
NOTE - If the mill sent your order in multiple shipments, you should add a ship advise for each
shipment. If you like to use the contract number as the ship advise number, you may still do so even though
you are entering multiple ship advises for the same contract. MOD2 will automatically distinguish ship
advises with the same number. For example, if you received three shipments for contract 20 and you
added three separate ship advises all with the number 20, this is how MOD2 would store the ship advises :
ship advise 20, 20-1, and 20-2.
6. On the next screen you will be entering various information regarding the shipment.
Fill in these fields accordingly.
This screen is
where you fill in
the information
regarding
shipments from a
mill when doing a
ship advise. As
you can see, the
Destination field
is already filled
because that was
specified in the
contract.
7. You will now have to specify how much of the goods you originally ordered was
actually shipped out. Press the HOME key at this time. You will be shown, line by
line, the merchandise ordered, the quantity (yardage) ordered, the style number, and
the description. Move the highlight over a line of merchandise which was shipped
and press ENTER. Type in the quantity (yardage) shipped and press ENTER.
8. Repeat STEP 7 until you have selected all the goods which were shipped. Once you
finish selecting goods, press ESC. The next screen will show the general information
for the ship advise. Press any key to continue.
161
Shipping Advise
Chapter 11 Managing Received Goods
9. You will now be shown the goods which you selected for the ship advise. Press Y to
accept the ship advise, E to edit the general information and the goods selected for the
ship advise, A to add or substitute items to the ship advise, or Q to not add the ship
advise and to return to the Ship Advise menu.
To display a ship advise:
If you want to know the general information and the specific merchandise sent in a
shipment from a mill, all you have to do is display the ship advise pertaining to that
shipment. Ship advises can be used to compare the goods received with the goods
actually sent and can help you determine whether any goods were lost during shipment.
To display a ship advise, all you need is the ship advise number which is usually the same
as the number of the contract pertaining to the goods shipped.
1. Select “Shipping Advise” from the Receiving menu.
2. Select the option “Display Ship Advise” from the Ship Advise menu.
3. You should now be on a screen prompting you to enter a ship advise number. Type in
the number of the ship advise you want display and press ENTER. Most ship advises
have the same number as the contract used to order the goods which were shipped. If
you do not remember the number of the ship advise you wish to display, select the
option “Most Recent Ship Advise” for a quick listing of all ship advises sorted from
the most to the least recent.
4. The next screen shows the general information for the ship advise.
Once you have finished viewing all this information, press any key to continue.
5. After you view the general information for the ship advise, you will end up on a
screen showing line by line the goods shipped out by the mill. Each line shows the
162
Shipping Advise
Chapter 11 Managing Received Goods
quantity (yardage) shipped, the style number, the description, and the color of the
style (if you shipped greige goods, the color field should be “Greige”). The last line
shows you the total quantity (yardage) shipped to your company in that shipment.
At the bottom of the screen in STEP 5, there are six options which will each be discussed
below. To use one of the options, simply highlight it and press ENTER. To go back to
the Ship Advise menu, press ESC on this screen.
Details :
No detailed information is available for ship advises.
Supplier Name :
Select this option to display the mill who prepared and shipped you the goods. See “Displaying
Clients” in CHAPTER 7: CLIENT MANAGEMENT for further information on the options at the bottom
of the client information screen.
Next »» :
“Next” takes you to STEP 4 of the subsequent ship advise number (The next ship advise number
in sequence, based on the order it was entered).
Previous «« :
“Previous” takes you to STEP 4 of the previous ship advise number (The previous ship advise
number in sequence, based on the order it was entered).
Reprint :
Select this to reprint the ship advise.
Change :
Select “Change” to modify different aspects of information for the ship advise. Before each item
you can change is a number. Enter the number next to the item you want to change and press
163
Shipping Advise
Chapter 11 Managing Received Goods
ENTER. Type in the replacement and then press ENTER. Repeat this process to make any
other changes. When you are through making changes, press 0 (zero) then ENTER to go back to
the ship advise general information screen (STEP 4). If you need to change an item which is
yellowed, please consult your supervisor. To change the merchandise shipped from the mill, you
need to select “Contents” (-1). Then follow STEPS 14-18 in “Adding Invoices” to add other items
to the list of merchandise shipped. To remove an item, press the HOME key, highlight the
appropriate line, and press DEL. To increase or decrease the quantity (yardage) of an item, press
the HOME key, select the appropriate line, and enter the new value. When you are done
modifying the ship advise, press ESC. You will be returned to the screen with the general
information for the ship advise and the contents of the ship advise will be updated accordingly.
Voiding ship advises:
For the security of your company, no one may delete a ship advise from MOD2. You
may, however, void a ship advise when the need arises. When you attempt to void a ship
advise, you will be asked for an authorization code. Please see your system supervisor for
the password. After you have voided a ship advise, you will see “VOIDED” blinking in
red when you display it.
Viewing the most recent ship advises:
Select this option to quickly view a list of ship advises sorted from the most recent to the
least recent. This list shows the model and number, the date entered for the ship advise,
the supplier (mill) from whom the goods are being shipped, and the contract number
which the ship advise refers to.
164
Associate Expense
Chapter 11 Managing Received Goods
The list will automatically pause with each screen-full of information. Press any key to
view the next screen-full or ESC to go back to the Ship Advise menu.
You can easily look up the most recent ship advises. Ship advise
numbers with dashes, such as 22-2 (shown above), show that the
mill sent the goods you ordered in contract #22 in multiple
shipments. In the example given, 22-2 would be the third
shipment.
Associate Expense
There are many expenses involved in the merchandise you receive. When you make a
contract with a supplier, you record in MOD2 the merchandise you ordered, how much of
each style you ordered, and the unit cost price you ordered each style at. When you
receive the goods, however, you sometimes realize that the total amount of money you
paid for the goods turned out to be more than what you expected to pay. This is because
there are several expenses that increase the cost of the goods you buy. The supplier might
have charged you for the cartons it sent you the rolls in or for the cardboard tubes in the
middle of each roll. Shipping costs and other expenses also factor in and increase the
price that you pay for the goods. The key point is that all these expenses add to the COST
of each style you receive. You might pay a supplier $1.75 per yard for a particular style
but when all the expenses are added in, you might in actuality be paying $2.25 per yard.
So that you can keep track of your expenses for the merchandise you receive, MOD2
includes the Associate Expense menu where you can manage your expenses.
165
Associate Expense
Chapter 11 Managing Received Goods
MOD2 allows you to associate expenses with particular receivings. To add an expense,
you must first have the style “EXPENSE” defined in your inventory with all the specific
types of expenses as colors of the style. Please see your system supervisor if
“EXPENSE” is not defined in your inventory or if a particular type of expense is not
present.
You benefit in two ways by entering expenses into MOD2:
1) You can quickly view the expenses in a particular receiving by simply displaying the
expense.
2) You can calculate the true cost of a particular style by generating a costing report.
Ask your system supervisor for information on how to do this.
To add an expense:
In MOD2, expenses are always associated with receivings. Each receiving can have its
own set of expenses. The expense number is always identical to the receiving it pertains
to. Once the expense has been added, you may perform a special costing report to see the
actual cost of a particular style.
1. Select the option “Add Expense” from the Expense menu.
2. Select one of the listed expense models.
3. Enter the number of the receiving for which you are adding the expenses.
4. Type in the date for the expense and then press ENTER.
166
Associate Expense
Chapter 11 Managing Received Goods
5. On the next screen you will be entering the general information for the expense.
These include the Cost Sheet Reference Number and the Bill of Lading Number.
Enter these fields in accordingly.
6. Once you enter the general information for the expense, MOD2 will automatically
search and list all defined expenses. It does this by searching for the style number
“Expense”. Highlight an expense for the receiving and then press ENTER.
There are many expenses for the merchandise you receive.
Above are some examples of expenses. The more expenses
you have for a particular receiving, the higher the cost of the
goods received.
7. Type in the unit cost price for the expense you selected and then press ENTER. For
example, if you selected tubes for the expense, enter the price you were charged for
each tube.
8. Type in the quantity of the expense and then press ENTER. Using the example in
STEP 7,
if the expense were tubes, enter the number of tubes you were charged for in
the receiving.
You should now be on Style #, Color, Description, and Vendor screen.
On this screen, you have three options :
167
Associate Expense
Chapter 11 Managing Received Goods
♦ You may enter another expense for the receiving. To do so, select the appropriate
expense and then go back to STEP 7.
♦ You may edit or delete expenses you have already entered. To do so, press the
HOME key. You will be shown all the expenses you have selected so far, line by
line. To edit a line, move the highlight over that line and press ENTER. To
delete a line, move the highlight over that line and press DEL.
♦ You may complete the expense by pressing ESC. On the next screen, you will be
shown the general information for the expense. Press any key to continue. On the
next screen, you will see the expenses that you selected for the receiving, the unit
cost and quantity of each expense, and the grand total for all expenses for the
receiving combined. At the bottom of the screen you have four options. Press Y
to accept the expense, E to edit the information for the expense and the expenses
selected, A to add or substitute other expenses, or Q to not add expense and to
return to the Expense menu.
To display an expense:
If you want to know the general information and the specific expenses for a particular
receiving, all you have to do is display the expense pertaining to that receiving. Expense
numbers always match the number of the receiving they pertain to.
1. Select “Associate Expense” from the Receiving menu.
2. Select the option “Display Expense” from the Expense menu.
3. You should now be on a screen prompting you to enter an expense number. Type in
the number of the receiving which you want to view the expenses of and then press
ENTER. Expense numbers always match the number of the receiving they pertain to.
168
Associate Expense
Chapter 11 Managing Received Goods
4. The next screen shows the general information for the expense.
Once you have finished viewing all this information, press any key to continue.
5. After you view the general information for the expense, you will end up on a screen
showing line by line all the expenses for the receiving you selected. For each
expense, you are shown the unit cost and quantity. The last line shows the total
quantity and the grand total for all expenses together.
At the bottom of the screen in STEP 5, there are several options which will each be
discussed below. To use one of the options, simply highlight it and press ENTER. To
go back to the Expense menu, press ESC on this screen.
Details :
No detailed information is available for an expense.
Supplier Name :
Select this option to display the supplier, mill, or dye house that shipped you the merchandise in
the receiving. See “Displaying Clients” in CHAPTER 7: CLIENT MANAGEMENT for further
information on the options at the bottom of the client information screen.
Next »» :
“Next” takes you to STEP 4 of the subsequent expense number (The next expense number in
sequence, based on the order it was entered).
Previous «« :
“Previous” takes you to STEP 4 of the previous expense number (The previous expense number in
sequence, based on the order it was entered).
169
Associate Expense
Chapter 11 Managing Received Goods
Reprint :
Select this to reprint the expense.
Change :
Select “Change” to modify different aspects of information for the expense. Before
each item you can change is a number. Enter the number next to the item you want to
change and press ENTER. Type in the replacement and then press ENTER. Repeat
this process to make any other changes. When you are through making changes, press
0 (zero) then ENTER to go back to the expense general information screen (STEP 4).
If you need to change an item which is yellowed, please consult your supervisor. To
add new expenses to the receiving or to change the price and/or quantity of existing
ones, you need to select “Contents” (-1).
Voiding expenses:
For the security of your company, no one may delete an expense from MOD2. You may,
however, void an expense when the need arises. When you attempt to void an expense,
you will be asked for an authorization code. Please see your system supervisor for the
password. After you have voided the expense, you will see “VOIDED” blinking in red
whenever you display it.
Viewing the most recent expenses:
Select this option to quickly view a list of expenses sorted from the most recent to the
least recent. This list shows the expense model, the receiving number with which the
expense is associated, the date entered for the expense, the supplier from where the goods
were shipped, and the total dollar amount of expenses for the receiving.
The list will automatically pause with each screen-full of information. Press any key to
view the next screen-full or ESC to go back to the Expense menu.
170
Associate Expense
Chapter 11 Managing Received Goods
Viewing the most recent expenses is a one step process.
Expense numbers match the receiving numbers they are
associated with.
171
CHAPTER
12
Packing Lists
This chapter focuses on how to use packing lists. Packing lists play an important role in
MOD2. This chapter will help make packing lists play an important role in your business
as well. The first section of the chapter is devoted to defining and describing packing
lists. This includes the advantages and uses of packing lists, as well as some limitations
placed on them. The rest of the chapter explains step by step how to perform the basic
packing list operations : Adding, displaying, voiding, generating reports, viewing open
and pending, and viewing the most recent. Pictures have been placed throughout the
chapter to help illustrate what is being discussed.
What is a Packing List?
A packing list is a listing of the merchandise to be packed and shipped to a client. This
listing consists of those items in your inventory which were packed plus information for
each item, including Box Number, Lot Number, Roll Number, and Quantity (Yardage).
In addition to this, a packing list also holds various other information such as the terms
and salesperson of the order, the company the order will be shipped via, and much more.
Once a client makes an order to your company, it is both convenient and more efficient to
generate a packing list for the order. Although it is not mandatory to generate a packing
list for the orders you send out (except when the merchandise to be sent was received in
detail), it is highly recommended to do so. The advantages of packing lists become
evident each time you want to generate an invoice. When you generate an invoice, if any
172
What is a Packing List?
Chapter 12 Packing Lists
open and unused packing lists are available, they will be listed when you are asked to
whom the merchandise was sold.
This is the list of
open packing lists
when generating an
invoice. Packing
lists added the same
day are shown in
green, those added
within 15 days are
shown in yellow, and
those added after 15
days are shown in
red.
Here you have the option of selecting one of the available packing lists or, if a packing
list was not created for the order, manually selecting to whom the merchandise was sold
and which items in your inventory were sold (refer to “Adding Invoices” in CHAPTER 4:
SALES MANAGEMENT
for the procedure on how to do this). If you do select a packing list,
MOD2 will then automatically know most of the information needed to generate the
invoice such as what was sold, to whom it was sold, and the details of each item sold.
Otherwise, if you do not select a packing list, you will have to select the merchandise sold
but will not be able to enter the details for the merchandise (Box Number, Lot Number,
and Roll Number).
In MOD2 there are two different kinds of packing lists: a detailed packing list and a
summary packing list. The difference between a detailed and a summary packing list is
that in a detailed packing list, the merchandise you select consists of those merchandise
which you received in detail. In a detailed packing list, all you have to do is tag the
merchandise which you want to pack while in a summary packing list, you have to
manually type in the Box Number, Lot Number, Roll Number, and Quantity (Yardage).
Please see CHPATER 11: MANAGING RECEIVED GOODS for further information on detailed
and summary receiving.
173
What is a Packing List?
Chapter 12 Packing Lists
It is crucial that you know the following things about packing lists. Make yourself
familiar with each one and be sure you understand them completely.
♦ Once you add a packing list, your inventory will be deducted accordingly. It does not
matter whether you have generated an invoice using that packing list or not.
♦ A packing list must be made if you want to ship merchandise that was received in
detail. The generation of a packing list may not be skipped if that is the case.
♦ In a packing list, the same style (same style means style and color combination) may
not be packed in detail and in summary. For example, let’s say your company ordered
a certain quantity (yardage) of style #8765, color purple. Then suppose it received
two shipments from the supplier a week apart. Your company received the first
shipment in detail and when the second shipment arrived, it received that in summary.
If that were the scenario, then in a packing list, your company will not be allowed to
include merchandise from both of these receivings; only one or the other. It may,
however, have packed both styles if their color or style number were different.
You may not
pack these two
in the same
packing list
because they
are of the same
style and color
and because
one was
received in
summary while
the other in
detail.
174
Adding a Packing List
Chapter 12 Packing Lists
♦ After you add a packing list, your inventory will be deducted and the packing list will
be placed on “active” or “ready-to-use” status. Once you add an invoice, the packing
list will be “closed” or deactivated”. So what happens if you void an invoice?
When you void an invoice, you are basically saying that the invoice was never added,
so the packing list for that invoice is placed on the “active” status again. What does
this mean? This means that even though you voided the invoice, your inventory was
not appropriately adjusted. To correctly credit your inventory, you must void the
packing list for that invoice as well.
Adding a Packing List
This section covers the procedure to add packing lists. Directions on how to perform a
detailed packing list and a summary packing list will be explained. If you do not know
the difference between a detailed and summary packing list, please refer back to the
previous section, “What is a Packing List?”.
To add a packing list:
1. From the main menu, select “Packing List” by pressing F9 or by using the
DIRECTION keys to move the highlight over “Packing List” and then pressing
ENTER. You should now be on the Packing List menu.
2. Select the option “Add Packing List”.
3. Choose the packing list model you wish to use and then press ENTER.
4. Type in the packing list number and press ENTER.
175
Adding a Packing List
Chapter 12 Packing Lists
5. Enter the date for the packing list. The default date is set to the current day, so just
press ENTER if that is what you want.
6. Select the client you are packing the merchandise for.
7. Select the client you are shipping the merchandise to. If this client is identical to the
one you are packing the merchandise for, then just press ENTER to go on.
8. Type in all the information requested on this screen. Each field will be briefly
explained below.
A
B
C
D
E
F
G
A) If the client placed a purchase order (sales order), enter their purchase order
number here.
B) If this order will go to a factor, enter the number the factor assigns you here.
C) This is the number a shipping or trucking company assigns you when you ship
your merchandise through them.
D) If your company makes a sales contract when a client issues a purchase order,
enter your company’s sales contract number here.
E) Select the salesperson for the order here.
F) Choose the terms of payment for the order.
G) Select the shipping company the order will be sent via.
176
Adding a Packing List
Chapter 12 Packing Lists
9. Now you will have to select the merchandise you want to pack. Use one of the four
methods to select the goods to be packed (Style #, Color, Description, Vendor). This
process is similar to the one described in STEP 14 of “Adding Invoices” in CHPATER 4:
SALES MANAGEMENT.
Remember that you may use any of the four methods even
though STEP 14 uses Style #.
10.
Type in the unit selling price for the style you picked. To accept the default price,
just press ENTER.
The process for adding a packing list now changes depending on whether the
merchandise you selected was received in summary or in detail.
If it was received in summary, continue here.
11.
You will now have to manually enter the details for the style you selected.
These details include the Box Number, Lot Number, Roll Number, and the
Quantity packed (Yardage). Press ENTER to move on to the next field. When
you are done entering this information, press ESC to stop the process. You then
have the option of editing a previous line or to pack other styles. To edit a
previous line, move the highlight over the line you want to edit and press
ENTER. To pack other styles, press ESC again.
This is the screen
where you will be
entering the details
of the merchandise
you are packing in
a summary
packing list. A
running total of
the quantity
(yardage) is
displayed in the
upper-left hand
corner.
177
Adding a Packing List
Chapter 12 Packing Lists
Otherwise, if it was received in detail or part of it was received in detail and another part
in summary, continue here.
11.
You will now have to select one of the listed receivings. Move the highlight
over the one you want and then press ENTER. Remember that if a style (style
and color combination) was received in both detail and summary, you may not
pack both of them in the same packing list. If you select a summary receiving,
follow the process given for summary receivings above.
You will see this screen if the style you chose was received in detail
or if part was received in detail and another part in summary. Here
you are shown the receiving log number, the date it came in, the
contract number, the date it was ordered, the supplier for the style,
the number of rolls in the shipment, and the active quantity (quantity
not used). The information for the style is shown at the top of the
screen. Notice that this style was received both in detail and
summary, so you may not pack any of the detailed receiveings with
the summary receiving in the same packing list.
12.
You will now have to tag the rolls which you want to pack and ship. To tag a
roll, move the highlight over the appropriate line and press ENTER. To untag a
roll, press DEL on the line which you want to untag. To tag all the rolls, press
INS. To split a roll, press the SHIFT and ENTER keys simultaneously.
178
Adding a Packing List
Chapter 12 Packing Lists
The Split option is very useful. Suppose the rolls for the receiving you selected
were all 100 yards (quantity = 100) and there were 5 rolls in that receiving. If
you wanted to pack 475 yards, you would not be able to unless you split one of
the rolls. To do so, you must highlight one of the rolls and press SHIFT and
ENTER at the same time. Then you will be prompted to enter the number of
yards you want to take out. Here you could type in 75, leaving 25 yards for
later use. Then if you tag the other 4 rolls, you will have the 475 yards you
wanted. You may use the Split option on any roll to obtain the amount you are
going to pack.
This column stands
for System ID,
which is the
identification
number assigned to
that roll by MOD2.
If your company
generates bar code
labels, this number
will be printed on
the label.
Once you select a receiving, you will end up on this screen. Here you
must tag the rolls which you want to be placed in the packing list.
This column shows
where the roll is
located if not
at your company’s
warehouse. This
could be another
warehouse or even
the client to whom the
roll was shipped.
These are the
options you may use
on this screen. The
function of each is
described above.
This shows the current number of rolls
which you have tagged
This column shows the original quantity
(yardage) for the roll when it was received.
13.
This is the current quantity
(yardage) tagged
This column shows the quantity
(yardage) available to be used.
This column shows
the status of the roll.
TAG means that the
roll has been selected,
USED means that the
roll has been
completely used, and
OK means that the
roll is available to
use.
When you have finished tagging the merchandise, press ESC. You will be back
on the screen which shows the receivings for the style you selected. To select
another receiving of the same style, move the highlight over the appropriate line
and press ENTER. Otherwise, to pack another style, press ESC.
179
Displaying a Packing List
Chapter 12 Packing Lists
You should now be back on the screen where you initially selected the style (the
Style #, Color, Description, Vendor screen).
On this screen, you have three options :
♦ You may select another style to be packed. Follow the process beginning at
STEP 9.
♦ You may edit or delete merchandise you have already packed. To do so, press the
HOME key. You will be shown everything you have packed so far line by line.
To edit a line, move the highlight over that line and press ENTER. To delete a
line, move the highlight over that line and press DEL.
♦ You may complete the packing list by pressing ESC. On the next screen, you will
be shown the information for the packing list. Press any key to continue. Then
you will be shown the merchandise you packed, the total quantity (yardage) and
rolls packed, and the grand total for everything. At the bottom of the screen you
have four options. Press Y to accept the packing list, E to edit the information for
the packing list and the merchandise packed, A to add or substitute items to the
packing list, or Q to not add the packing list and to return to the Packing List
menu.
Displaying a Packing List
When you display a packing list, you are first shown the general information for it. This
information consists of the client for whom the merchandise was packed and the client to
whom the merchandise was shipped, the salesperson and terms for the order, the date,
model, and notes for the packing list, and more. Next you are shown, line by line, the
merchandise which was packed, the total quantity (yardage) and number of rolls packed,
and the grand total for all the merchandise packed. On this screen you have several
options including viewing the details of each item to changing certain aspects of the
packing list. This section will cover the process of displaying a packing list step by step.
180
Displaying a Packing List
Chapter 12 Packing Lists
To display a packing list:
1. Select “Packing List” from the main menu.
2. Select “Display Packing List” from the Packing List menu.
3. You should now be on a screen prompting you to enter a packing list number. Type
in the number of the packing list you want display and press ENTER. If you do not
remember the number of the packing list you wish to display, select the option “Most
Recent Packing List” for a quick listing of all packing lists sorted from the most to the
least recent.
4. The next screen shows the general information for the packing list. Once you have
finished viewing this information, press any key to continue.
This is a sample packing list general information screen.
5. After you view the general information for the packing list, you will end up on a
screen showing line by line which merchandise was packed. Each line shows the
quantity (yardage) and the number of rolls packed, the style number, the description
and color of the style, and the unit selling price for that style. The last line displays
the total quantity (yardage) and number of rolls packed plus the grand total for all the
merchandise together.
181
Displaying a Packing List
Chapter 12 Packing Lists
At the bottom of the screen in STEP 5, there are six options which will each be discussed
below. To use one of the options, simply highlight it and press ENTER. To go back to
the Packing List menu, press ESC on this screen.
Details :
Select this option to view the details of a particular line of merchandise in the packing list. When
you first press ENTER on this option, you will only be shown the lines of merchandise.
Highlight the line which you want to see the details of and press ENTER. A window will pop
up showing the various details for that line of goods.
Client Name :
Select this option to display the client the packing list was for. See “Displaying Clients” in
CHAPTER 7: CLIENT MANAGEMENT
for further information on the options at the bottom of the
client information screen.
Next »» :
“Next” takes you to STEP 4 of the subsequent packing list number (The next packing list number
in sequence, based on the order it was entered).
Previous «« :
“Previous” takes you to STEP 4 of the previous packing list number (The previous packing list
number in sequence, based on the order it was entered).
Reprint :
Select this to reprint the packing list. This is useful if the original packing list was damaged or
lost and saves you the time of having to re-enter all the information for the packing list and the
merchandise packed for the client. If you are asked to enter a note or message that is to appear
on the packing list, enter it accordingly.
182
Voiding Packing Lists
Chapter 12 Packing Lists
Change :
Select “Change” to modify different aspects of information for the packing list. Before each item
you can change is a number. Enter the number next to the item you want to change and press
ENTER. Type in the replacement and then press ENTER. Repeat this process to make any
other changes. When you are through making changes, press 0 (zero) then ENTER to go back to
the packing list general information screen (STEP 4). If you need to change an item which is
yellowed, please consult your supervisor.
** There are two important restrictions to the modification of a packing list ** :
1) You may not modify the contents nor the details of rolls for a packing list which was
entered in the detailed mode. For the discussion of summary and detailed packing lists,
please refer back to the section “What is a Packing List” at the beginning of this chapter.
2) You may not modify the contents nor the details of rolls for a packing list which has
already been invoiced. Packing lists which have been used in an invoice are no longer
open and pending and its contents may not be modified.
The only way to modify the contents of a packing list in the two cases above is to void the
packing list and create a new one.
Voiding a Packing List
For the security of your company, no one may delete a packing list from MOD2. You
may, however, void a packing list when the need arises. When you attempt to void a
packing list, you will be asked for an authorization code. Please see your system
supervisor for the password. After you void a packing list, the merchandise listed within
it will be automatically put back into your inventory. Also, you will see “VOIDED”
blinking in red whenever you display a voided packing list.
183
Voiding Packing Lists
Chapter 12 Packing Lists
Viewing Open and Pending Packing Lists
This option is useful to quickly see which packing lists are open and pending. Open and
pending packing lists are those packing lists for which an invoice has not yet been
generated, meaning they are not used. Once you add an invoice using the packing list, it
will be taken off the open and pending list. On the open and pending list screen, all
packing lists added that same day will be shown in green, those added within 15 days will
be shown in yellow, and those added after fifteen days will be shown in red. The last line
shows the summary of all open packing lists, consisting of the total number of open
packing lists and the total number of rolls and quantity (yardage) from all the open
packing lists.
You are shown the following information for each open and pending packing list :
•
The packing list number.
•
The date of the packing list (not the date it was added, which is the stamped date, but
the date entered for the packing list).
•
The client for whom the packing list was made.
•
The total number of rolls in that packing list.
•
The total quantity (yardage) in that packing list.
•
The number of days that have passed since the packing list was added.
For your convenience, you may print the list of all the open and pending packing lists by
pressing P.
This screen
shows all open
and pending
packing lists.
Open and
pending packing
lists are those
which have not
been used in an
invoice yet. You
may print the list
by pressing P.
184
Listing the Most Recent Packing Lists
Chapter 12 Packing Lists
Listing the Most Recent Packing Lists
Select this option to quickly view a list of packing lists sorted from the most recent to the
least recent. This list shows the packing list model and number, the date entered for the
packing list, the client for whom the packing list was made, the salesperson for the order,
and the total dollar amount of the packing list. All open packing lists (those which have
not been invoiced yet) are shown in red to help distinguish them from others.
The list will automatically pause with each screen-full of information. Press any key to
view the next screen-full or ESC to go back to the Packing List menu.
With the press of a button, you can quickly view the most recent
packing lists. All open and pending packing lists will be shown in
red.
185
Part Additional Topics
3
186
Additional Topics
CHAPTERS
13 The Concept Behind MOD2 . . . . . . . . . . . . . . . . . . . . . . . 188
14 Sample Reports . . . . . . . . . . . . . . . . . . . . . . . . . . . . . . . . . . 192
15 What are the MOD2 Files?. . . . . . . . . . . . . . . . . . . . . . . . 210
16 MOD2 Options . . . . . . . . . . . . . . . . . . . . . . . . . . . . . . . . . . 211
17 Printer Setup . . . . . . . . . . . . . . . . . . . . . . . . . . . . . . . . . . . . 213
18 Adding User Names . . . . . . . . . . . . . . . . . . . . . . . . . . . . . . 214
187
CHAPTER
13
The Concept Behind MOD2
MOD2 was designed to fit in smoothly with your business. It functions in a logical and
ordered manner, just like your business operates. There is a particular route or path that
an order goes through from the point a customer gives a purchase order to your company
to when the merchandise ordered is actually shipped out. This path consists of several
stages which the order must travel through. This chapter will show you a visual depiction
of the various stages, what occurs at each stage, and what path the order takes through
these stages. After examining the flow chart, you will better understand how MOD2
operates and how the various options on the MOD2 menu are linked.
Each stage in the chart is numbered. For more information on a particular stage, refer to
the appropriate number on the list found after the flow chart.
188
The Concept Behind MOD2
(as shown for Demo Company)
Demo Company
receives a purchase
order from a client
(this is external to
MOD2)
If goods not in stock
b Demo Company receives
the goods.
2 methods of receiving in
MOD2 :
♦ Receive in summary
♦ Receive in detail
a Demo Company
places a contract
purchase order with
a supplier or mill
for more goods.
♦ Import Contract
♦ Domestic Contract
If finished goods received
Demo Company
enters customer
purchase order into
MOD2. This is
done by adding a
Sales Order
c Greige goods
are sent to a
dye house to
be converted
into finished
goods
If sales order is added
If sales order is not added
Goods are prepared
for shipment to client
A packing list was made
If goods in stock
Demo Company
generates a
packing list
through MOD2
Demo
Company
generates an
invoice from
MOD2
A packing list was not made.
This route cannot be taken if
goods are detailed
Goods are shipped
to the customer
If greige goods received,
they undergo “conversion”
Customer keeps
the goods.
Payments made
are recorded by
adding a
Transaction
Customer
returns part or
all of the goods.
Demo Company
issues a Credit
Memo.
Chapter 13 The Concept Behind MOD2
Additional Information for Each Stage in Flow Chart
When a customer wants to order goods from a company, they usually do so by issuing
a purchase order. This stage occurs outside of MOD2.
Purchase orders which customers give your company are called Sales Orders in
MOD2. Sales orders may be entered into MOD2 but whether they are added or not
has no effect on the course of the order.
See CHAPTER 8: CLIENT SALES ORDERS.
At this stage, you need to decide whether you have the goods the client ordered in
stock or not.
a If the goods are not in stock, then your company must order the goods from a
supplier or mill. This is done by issuing what is called a contract purchase order
with the supplier or mill. In MOD2, there are two main types of contracts:
Domestic contracts and Import contracts. When the mill sends you the goods, it
usually notifies your company the date the goods were sent out and the expected
date they should arrive. This information can be entered in a Ship Advise.
See the section “Purchase Orders and Contracts” in CHAPTER 10: GOODS IN PROCESS
MANAGEMENT.
Also see “Shipping Advise” in CHAPTER 11: MANAGEING RECEIVED
GOODS.
b When your company receives the goods it ordered from the mill, it must record this
receiving in MOD2 so the inventory can be correctly adjusted. There are two kinds
of receiving in MOD2: Summary receivings and detailed receivings. If on top of
the cost of the goods, you paid for shipping costs, cartons, etc., you may record
these extra expenses for the receiving by adding an Expense. See CHAPTER 11:
RECEIVE MANAGEMENT
and also the section “Associate Expense” within that chapter.
190
Chapter 13 The Concept Behind MOD2
c If the goods you received were greige goods, they are usually sent to a dye house to
undergo a process known as “conversion”. Greige goods are like colorless, raw
materials. Dye houses dye greige goods into the particular colors you want, thus
converting them into finished goods.
See “Working with Dye Orders” in CHAPTER 10: GOODS IN PROCESS MANAGEMENT.
This stage may not be skipped if the goods to be sent to the customer were received in
detail. It is recommended to always do a packing list because it is more efficient and
it makes the adding of an invoice much simpler. Once a packing list has been added,
the goods will be deducted from your inventory even though an invoice has not yet
been generated.
See CHAPTER 12: PACKING LISTS.
If a packing list was made, this stage is a matter of repeatedly pressing ENTER. If
not, you will have to select the goods to be sent to the customer while you do the
invoice (only for summary inventory).
See CHAPTER 4: SALES MANAGEMENT.
If the customer keeps the merchandise, then he/she will of course have to pay for it.
Payments are managed through the Transaction menu.
See CHAPTER 6: TRANSACTIONS.
If the customer returns part or all of the goods you sent to him/her, then you must
issue a Credit Memo. Credit memos will both credit your client and credit your
inventory. Goods issued credit memos return to your inventory as summary goods.
See “Working with Credit Memos” in CHAPTER 4: SALES MANAGEMENT.
191
CHAPTER
14
Sample Reports
One of the most powerful features of MOD2 are its reports. You can generate reports
from almost any part of the program at any time in a couple of seconds. Each report can
be customized to fit your needs. They can be viewed either on screen or printed to one of
the installed devices on your computer system, such as a printer. Most reports allow you
to select a starting and ending date, allowing you to generate a report for a certain time
period, such as for a particular month or year.
This chapter includes samples for the more common reports. The reports that will be
shown are listed below. Each report will be briefly discussed.
The following sample reports are included in this chapter:
♦ Sales report
♦ Client report
♦ Receiving report
♦ Contract report
♦ Transaction report
♦ Dye Order report
♦ Detailed Sales Activity (Commission) report
♦ Several types of Inventory reports
♦ Several types of Client Statement (Aging) reports
192
Sales Report
---------------------------------------------------------------------------------------------------------------------------------------------------------User
:MOD2USER
Demo Industries
August 03, 1996
Station :29573
12345 AnyStreet
05:00:25 PM
AnyCity, CA 90015
Page :
1 of 1
Report
:Journal report sorted by number
---------------------------------------------------------------------------------------------------------------------------------------------------------Report contains the following models :
non-factored
factored
07/03/96
07/03/96
07/03/96
07/03/96
07/12/96
07/22/96
07/22/96
07/25/96
13
14
15
17
18
19
20
21
07/03/96
07/03/96
07/03/96
07/03/96
07/12/96
07/22/96
07/22/96
07/25/96
Summary
Gross Volume
Freight
NET Volume
Discount
Commission
Average per day
Average per unit
09/01/96
09/01/96
09/01/96
07/03/96
09/10/96
09/20/96
09/20/96
09/23/96
Demo
Demo
Demo
Demo
Demo
Demo
Demo
Demo
Industries
Industries
Industries
Industries
2
Inc.
Industries
1
07/01/96 to 07/31/96
$27,236.24
Units
$5.00
$27,231.24
$246.00
$402.25
$907.71
$20.69
31 Days
1,316
Demo SalesP
Demo SalesP
Demo SalesP
Demo SalesP
Demo SalesP
House Accou
Demo SalesP
Salesperson
60
60
60
0
60
60
60
60
1212
12345
41
House Del.
House Del.
House Del.
UPS
House Del.
House Del.
Federal Ex
UPS
0.00
2.00
3.00
2.00
0.00
2.00
0.00
3.00
$0.00
$51.99
$41.25
$17.05
$0.00
$158.00
$0.00
$139.39
$5,625.00
$2,599.35
$1,375.00
$852.50
$3.50
$7,900.00
$4,229.64
$4,651.25
%100.00
%0.02
%99.98
%0.90
%1.48
---------------------------------------------------------------------------------------------------------------------------------------------------------E N D
O F
R E P O R T
05:00:25 PM
==========================================================================================================================================================
The above is a sample Sales report for the month of July, 1996. It is sorted by invoice number and includes only the
non-factored and factored invoice models. In the report, you are shown a great deal of information such as the date of
the invoice, the due date for the invoice (when payment is expected by), the salesperson for the order and his/her
commission percentage, the purchase order number for the order, if any, the client who the invoice is for, the shipping
company used to ship the merchandise to the client, and the amount of the invoice, of course. All this information is
shown in neat columns. You may find it useful to generate a salesperson every month to see how much you sold. You
may even generate a sales report for a particular salesperson on a certain day by customizing the report, selecting the
salesperson of your choice, and sorting the report by the Stamped Date (the date the invoice was actually added to
MOD2). At the end of the report, you can view a summary of the information included in the sales report.
193
Client Report
----------------------------------------------------------------------------------------------------------------------------------User
:MOD2USER
Demo Industries
August 03, 1996
Station :29573
12345 AnyStreet
03:05:35 PM
AnyCity, CA 90015
Page :
1 of 1
Report
:Client List report sorted alphabetically
----------------------------------------------------------------------------------------------------------------------------------Customer Name
======== ====
Bob Smith
Controller
Demo 1
Demo 2
Demo Company
Demo Corp.
Demo Corporation
Demo Inc.
Demo Industries
Demo SalesPerson
Demo Test
Demo Test 2
Federal Express
House Account
House Del.
Janet
John
Mr. X
Salesperson 2
UPS
Telephone
=========
(213) 123-4567
() - (213) 123-4567
(213) 987-6543
(213) 123-4567
(213) 987-6543
(213) 123-4567
(213) 987-6543
(123) 456-7890
(213) 123-4567
(213) 234-5678
(213) 345-6789
(213) 456-7890
() - () - (213) 567-8901
(213) 678-9012
(213) 789-0123
(213) 890-1234
(213) 901-2345
Address1
========
23456 Any Boulevard
Address2
========
Los Angeles, CA
12345 AnyStreet
45678 Any Avenue #123
12345 AnyStreet
12345 AnyStreet
3242 Any Road
25211 3rd Street #1015
12345 Any Street
98765 President Blvd.
12345 AnyStreet
12345 AnyStreet
12345 AnyStreet
AnyCity, CA 90015
Any City, NY 10010
AnyCity, AnyState 98765
AnyCity, AnyState 98765
Atlanta, Georgia 12345
Los Angeles, Ca 90005
AnyCity, CA 90001
Washington DC, 54565
AnyCity, AnyState 98765
AnyCity, AnyState 98765
AnyCity, AnyState 98765
12345
12345
12345
95494
12345
AnyCity,
AnyCity,
AnyCity,
AnyCity,
AnyCity,
AnyStreet
AnyStreet
AnyStreet
Any Avenue
AnyStreet
90000
AnyState
AnyState
AnyState
CA 90002
AnyState
98765
98765
98765
98765
----------------------------------------------------------------------------------------------------------------------------------E N D
O F
R E P O R T
03:05:35 PM
===================================================================================================================================
This report is a simple client report. It includes all client memberships, is sorted alphabetically by client name, and
shows only the name, telephone number, and address of each client. Client reports are very easy to generate. Other
Client Report formats allow you to see more information for each client, such as their fax number and salesperson.
Client reports are restricted to only the memberships you select. To see a report of only your suppliers/mills, for
example, tag only the Supplier/Mill membership.
194
Receiving Report
----------------------------------------------------------------------------------------------------------------------User
:MOD2USER
Demo Industries
August 03, 1996
Station :29573
12345 AnyStreet
03:31:42 PM
AnyCity, CA 90015
Page :
1 of 1
Report
:Journal report sorted by date
----------------------------------------------------------------------------------------------------------------------###############
===============
4
DATE
====
06/04/96
5
06/07/96
10
06/11/96
Style#
======
User
====
Demo Inc.
2824
06/16/96
7
06/22/96
8
06/25/96
RED
500
FUSIA
RED
78
130
FUSIA
65
Demo Inc.
2925
AQUA
Demo Inc.
6789
94
1
FUSIA
200
FUSIA
RED
440
135
FUSIA
750
Demo Inc.
6789
2345
9
50
-
Demo Inc.
6789
06/22/96
QUANTITY
========
Demo Inc.
6789
2345
6
Reference
=========
-
BLUE
Demo Inc.
1234
11
COLOR
=====
06/25/96
Demo Inc.
6789
Total
2,442
----------------------------------------------------------------------------------------------------------------------E N D
O F
R E P O R T
03:31:42 PM
=======================================================================================================================
Pictured above is an example of a Receiving report. The report above is for the month of June, 1996. It is sorted by
date and includes all the Receive Goods modes. Receiving reports are very simple, showing you what was received, on
which date, and how much. If the goods were received in detail, the specific details (Box, Lot, Roll number) are not
shown. Receiving reports just give you a summary of what you received in a particular time period. Towards the end
of the report, you are shown the total quantity received based on what is shown in the report. When generating reports
on receiving, you may restrict the report one or more Receive Good mode(s) by tagging the modes that you want to be
included.
195
Contract Report
---------------------------------------------------------------------------------------------------------------------------------------------------------User
:MOD2USER
Demo Industries
August 03, 1996
Station :29573
12345 AnyStreet
03:28:09 PM
AnyCity, CA 90015
Page :
1 of 1
Report
:Journal report sorted by date
---------------------------------------------------------------------------------------------------------------------------------------------------------DATE
TYPE
##########
NOTES
====
====
==========
07/01/96 IMPORT
5
____________________
07/03/96 IMPORT
6
____________________
07/05/96 IMPORT
7
____________________
07/08/96 LOCAL
10
____________________
07/08/96 OFF-SHORE 11
____________________
07/08/96 LOCAL
13
____________________
07/08/96 DOMESTIC
14
____________________
07/08/96 OFF-SHORE 17
____________________
07/08/96 IMPORT
18
____________________
07/08/96 DOMESTIC
20
____________________
07/08/96 IMPORT
22
____________________
07/08/96 IMPORT
8
____________________
07/08/96 DOMESTIC
9
____________________
07/09/96 IMPORT
23
____________________
07/09/96 LOCAL
24
____________________
07/09/96 DOMESTIC
25
____________________
07/09/96 DOMESTIC
26
____________________
07/09/96 IMPORT
28
____________________
07/15/96 DOMESTIC
30
INTENDED
PO#
QUANT.
STYLE#
COLOR
PRICE
=============
Demo Inc.
SUPPLIER/MILL
XCO
===
: 07/01/96
======= ========
09/01/96 STOCK
REQ._BY
===
======
200
======
8765
=====
PURPLE
=====
2.50
Demo Inc.
: 08/01/96
09/01/96 STOCK
12345
5,000
8765
PURPLE
2.50
Demo Inc.
: 08/01/96
10/01/96 STOCK
300
6543
GREEN
2.15
Demo Inc.
: 07/08/96
09/01/96 STOCK
259
787
BLUE
3.00
Demo Inc.
: 07/08/96
09/01/96 STOCK
500
9876
PURPLE
2.50
Demo Inc.
: 07/08/96
09/01/96 STOCK
427
2824
BLUE
1.75
Demo Inc.
: 07/08/96
09/01/96 STOCK
350
8765
GREIGE-GOODS
2.25
Demo Inc.
: 07/08/96
09/01/96 STOCK
555
5678
GREEN
1.50
Demo Inc.
: 08/01/96
10/01/96 STOCK
299
787
BLUE
3.00
Demo Inc.
: 07/08/96
09/01/96 STOCK
200
6789
GREIGE-GOODS
1.75
Demo Inc.
: 08/21/96
10/01/96 STOCK
125
6543
GREEN
5.00
Demo Inc.
: 08/01/96
10/01/96 STOCK
500
6543
RED
2.50
Demo Inc.
: 07/08/96
09/01/96 STOCK
300
6789
GREIGE-GOODS
1.75
Demo Inc.
: 08/01/96
10/01/96 STOCK
200
5678
GREEN
1.50
Demo Inc.
: 07/09/96
09/01/96 STOCK
350
6789
FUSIA
2.50
Demo Inc.
: 07/09/96
09/01/96 STOCK
400
6789
GREIGE-GOODS
1.75
Demo Inc.
: 07/09/96
09/01/96 STOCK
600
1234
GREIGE-GOODS
1.23
Demo Inc.
: 08/01/96
10/01/96 STOCK
100
9876
PURPLE
2.71
Demo Inc.
: 07/15/96
09/01/96 STOCK
500
6789
GREIGE-GOODS
1.75
1015
123
Summary
07/01/96 to 07/31/96
31 Days
Volume
$28,869.70
Units
12,348
---------------------------------------------------------------------------------------------------------------------------------------------------------E N D
O F
R E P O R T
03:28:09 PM
==========================================================================================================================================================
This is a sample Contract report for the month of July, 1996. It is sorted by date and includes all the different contract
models. At the bottom of the report, you are shown the total cost of the goods your company ordered in the purchase
contracts listed plus the total number of units (yards for weavers or pounds for knitters) ordered.
196
Transaction Report
-------------------------------------------------------------------------------------------------------------------------------------User
:MOD2USER
Demo Industries
August 03, 1996
Station :29573
12345 AnyStreet
03:26:18 PM
AnyCity, CA 90015
Page :
1 of 1
Report
:Transaction detailed list report sorted by date
-------------------------------------------------------------------------------------------------------------------------------------TRANSACTION
===========
PAID INVOICE
PAID INVOICE
PAID INVOICE
PAID INVOICE
DISCOUNT
post date ck
DISCOUNT
PAID COMMISSION
PAID COMMISSION
PAID COMMISSION
PAID INVOICE
PAID INVOICE
PAID INVOICE
PAID COMMISSION
PAID COMMISSION
DISCOUNT
post date ck
NUMBER
======
11
15
17
14
19
10
4
10
17
6
6
8
18
8
15
21
20
DATE
====
07/01/96
07/03/96
07/03/96
07/03/96
07/06/96
07/15/96
07/15/96
07/18/96
07/18/96
07/18/96
07/18/96
07/18/96
07/18/96
07/18/96
07/18/96
07/28/96
07/28/96
Total
CLIENT
======
Demo 1
Demo Industries
Demo Industries
Demo Industries
Demo Inc.
Demo Comp.
Demo Industries
Demo SalesPerson
Demo SalesPerson
Demo SalesPerson
Demo Industries
Demo Comp.
Demo 2
Demo SalesPerson
Demo SalesPerson
Demo 1
Demo Industries
MEMO
====
This Invoice Was Fully Paid
This Invoice Was Fully Paid
This Invoice Was Fully Paid
This Invoice Was Fully Paid
123
4564
789
0
0
0
12345
0
0
0
10124
9427
77214
0
0
0
1932
AMOUNT
======
$899.82
$1,375.00
$852.50
$2,599.35
$196.00
$3,750.00
$140.00
$112.50
$17.05
$6.50
$330.00
$10,000.00
$3.50
$300.00
$41.25
$50.00
$4,229.64
$24,903.11
transaction(s) between 07/01/96 and 07/31/96
-------------------------------------------------------------------------------------------------------------------------------------E N D
O F
R E P O R T
03:26:18 PM
======================================================================================================================================
Above you are shown a sample Transaction report for the month of July, 1996. It includes only the Discount, Paid
Invoice, Paid Commission, and Post Dated Check transactions. The long output format was used in this particular
report. When you generate a Transaction report, you can select the models which you want to be included by tagging
them on the list you are shown.
197
Dye Order Report
------------------------------------------------------------------------------------------------------------------------------------------------------------------------------------------------------User
:MOD2USER
Demo Industries
August 05, 1996
Station :21828
12345 AnyStreet
11:28:55 AM
AnyCity, CA 90015
Page :
1 of 1
Report
:Open dye orders report sorted by date
------------------------------------------------------------------------------------------------------------------------------------------------------------------------------------------------------TYPE
######## DATE
MODEL
DYE-HOUSE
DESTIN.
EXPECTED WORKING-LOSS%
STYLE#
COLOR
QTY
CONTRACT#
COST
RECV'D
OPEN
TOTAL
====
======== ====
=====
=========
=======
======== =============
======
=====
===
=========
====
======
====
=====
DYE ORDER |4
|07/12/96| FLAT
|Demo Inc.
|Demo Indus|07/21/96| 3.00- 5.00|1234
|GREIGE-GOODS
|
710
|
700|26
| 1.230|
350|
360|
442.80
DYE ORDER |4
|
|
|
|
|
|
|1234
|RED
|
700
|
|
| 1.750|
RECEIV
|60
|08/05/96| FROM DYEHSE|Demo Inc.
|Demo Indus|24 days |
|
|
|
4 Rolls
|
350|
_______________________________________________________________________________________________________________________________________________________________________________________________________
|
|
|
|
|
|
|
w/l=%|
|
|
|
|
|
|
|
|
|
|
|
|
|
|
DYE ORDER |10
|07/15/96| PADDLE-DYE |Demo Inc.
|Demo Indus|07/01/96| 1.00- 3.00|6789
|GREIGE-GOODS
|
300 |
290|29
| 1.750|
0|
300|
525.00
DYE ORDER |10
|
|
|
|
|
|
|6789
|RED
|
290 |
|
| 1.750|
|
|
|
|
|
|
|
|
|
|
|
DYE ORDER |12
|07/15/96| JET-DYE
|Demo Inc.
|Demo Indus|07/01/96| 1.00- 3.00|6789
|GREIGE-GOODS
|
500 |
485|25
| 1.750|
0|
500|
875.00
DYE ORDER |12
|
|
|
|
|
|
|6789
|BLUE
|
485 |
|
| 2.790|
|
|
|
|
|
|
|
|
|
|
|
DYE ORDER |19
|07/15/96| LAUNDERED |Demo Inc.
|Demo Indus|07/01/96| 3.00- 5.00|1234
|GREIGE-GOODS
|
920 |
920|26
| 1.230|
0|
920|
1131.60
DYE ORDER |19
|
|
|
|
|
|
|1234
|RED
|
920 |
|
| 2.790|
|
|
|
|
|
|
|
|
|
|
|
DYE ORDER |20
|07/15/96| BECKS-DYE |Demo Inc.
|Demo Indus|07/01/96| 5.00- 7.00|1234
|GREIGE-GOODS
|
1080 |
1070|26
| 1.230|
0|
1080|
1328.40
DYE ORDER |20
|
|
|
|
|
|
|1234
|RED
|
1070 |
|
| 1.990|
|
|
|
|
|
|
|
|
|
|
|
DYE ORDER |21
|07/15/96| FLAT
|Demo Inc.
|Demo Compa|07/2/96 | 1.00- 3.00|1234
|RED
|
400 |
395|26
| 1.230|
370|
30|
36.90
DYE ORDER |21
|
|
|
|
|
|
|9876
|PURPLE
|
395 |
|
| 2.710|
RECEIV
|57
|08/05/96| STANDARD
|Demo Inc.
|Demo Compa|21 days |
|
|
|
4 Rolls
|
225|
RECEIV
|58
|08/05/96| FROM DYEHSE|Demo Inc.
|Demo Compa|21 days |
|
|
|
3 Rolls
|
145|
_______________________________________________________________________________________________________________________________________________________________________________________________________
|
|
|
|
|
|
|
w/l=%|
|
|
|
|
|
|
|
|
|
|
|
|
|
|
|
|
DYE ORDER |8
|07/15/96| FLAT
|Demo Inc.
|Demo Indus|07/01/96| 1.00- 5.00|8765
|GREIGE-GOODS
|
500 |
490|14
| 2.250|
0|
500|
1125.00
DYE ORDER |8
|
|
|
|
|
|
|8765
|PURPLE
|
490 |
|
| 2.500|
|
|
|
|
|
|
|
|
|
|
|
DYE ORDER |9
|07/15/96| BECKS-DYE |Demo Inc.
|Demo Indus|07/01/96| 1.00- 4.00|1234
|GREIGE-GOODS
|
450 |
445|26
| 1.230|
350|
100|
123.00
DYE ORDER |9
|
|
|
|
|
|
|1234
|RED
|
445 |
|
| 1.750|
RECEIV
|59
|08/05/96| FROM DYEHSE|Demo Inc.
|Demo Indus|21 days |
|
|
|
7 Rolls
|
350|
_______________________________________________________________________________________________________________________________________________________________________________________________________
|
|
|
|
|
|
|
w/l=%|
|
|
|
|
|
|
|
|
|
|
|
|
|
|
quantity ordered
eligible for working loss
quantity received
4795
0
1070
Total cost of OPEN orders
$5587.70
$10,855.95
------------------------------------------------------------------------------------------------------------------------------------------------------------------------------------------------------E N D
O F
R E P O R T
11:28:58 AM
=======================================================================================================================================================================================================
This is an example of a Dye Order report. This particular report shows only the open dye orders of all dye order
models. Any receivings for each dye order are also shown. The information in the dye order report is summarized at
the end of the report. There is also another dye order format which includes all the dye orders, not just the open ones
(those which have not yet been marked complete).
198
Detailed Sales Activity (Commission) Report
--------------------------------------------------------------------------------------------------------------------------------------------------------------------------------------------User
:MOD2USER
Demo Industries
August 05, 1996
Station :21828
12345 AnyStreet
08:52:40 AM
AnyCity, CA 90015
Page :
1 of 2
Report
:Commission report sorted by number
--------------------------------------------------------------------------------------------------------------------------------------------------------------------------------------------########
========
8
10
14
15
17
18
DATE
SOLD-TO
====
=======
|06/24/96|Demo Comp.
|06/25/96|Demo Comp.
|07/03/96|Demo Industries
|07/03/96|Demo Industries
|07/03/96|Demo Industries
|07/12/96|Demo 2
Demo SalesPerson KNOWN AS [ Mike ]
12345 Any Street
Los Angeles, CA 90014
Salesperson
PO#
===========
===
|Demo SalesPers||Demo SalesPers|98765
|Demo SalesPers||Demo SalesPers||Demo SalesPers|12345
|Demo SalesPers|Typical %
Sales
$18,580.35
Discount
Commission on Paid Invoices
Commission Payments
Commission Total
$200.00
$399.04
$459.55
$516.79
TERMS
=====
|net 60
|net 60
|net 60
|net 60
|C.O.D
|net 60
|
|
|
|
|
|
COMM%
TOTAL CRDT-MEMO
=====
===== =========
3.00 | 10000.00|
0.00|
3.00 | 3750.00| -105.00|
2.00| 2599.35|
0.00|
3.00| 1375.00|
0.00|
2.00|
852.50|
0.00|
0.00|
3.50|
0.00|
FREIGHT
=======
0.00|
0.00|
0.00|
0.00|
0.00|
0.00|
DISC. PAYMENTS
===== ========
0.00| 10000.00|
200.00|
0.00|
0.00| 2599.35|
0.00| 1000.00|
0.00|
852.50|
0.00|
3.50|
BALANCE COMM./PAID COMM./SHIPPED COMM./PAYMENTS
======= ========== ============= ==============
0.00|
300.00|
300.00|
300.00
3445.00|
0.00|
106.50|
0.00
0.00|
51.99|
51.99 |
0.00
30.00
0.00|
30.00|
41.25 |
0.00|
17.05|
17.05 |
17.05
0.00|
0.00|
0.00 |
0.00
2.00
Average %
2.78
--------------------------------------------------------------------------------------------------------------------------------------------------------------------------------------------_____________________________________________________________________________________________________________________________________________________________________________________________
Covers
:06/01/96 to 07/31/96
--------------------------------------------------------------------------------------------------------------------------------------------------------------------------------------------User
:MOD2USER
Demo Industries
Page :
2 of 2
--------------------------------------------------------------------------------------------------------------------------------------------------------------------------------------------SalesPerson
COMMISSION
PAYMENTS
SALES
PERCENT
=============================================================================================================================================================================================
Demo SalesPerson
516.79
459.55
18,580.35
100.00%
=============================================================================================================================================================================================
TOTAL 1
516.79
459.55
18,580.35
2.78% Average
--------------------------------------------------------------------------------------------------------------------------------------------------------------------------------------------E N D
O F
R E P O R T
08:52:40 AM
=============================================================================================================================================================================================
Pictured above is a detailed sales activity report for a salesperson. This report shows you the invoices of a particular
salesperson within a certain time field. This report is mainly used to see the commission a salesperson would earn for
an invoice by both methods of calculation. This means that you are shown both the amount he should receive based on
payments received and based on merchandise shipped. The default method of calculation by MOD2 is the second
method, based on merchandise shipped (added invoices). If your company credits salespersons based on payments
received (added Paid Invoice transactions), then this report will show you how much he/she earned by that method and
then you can enter that value when you do a Paid Commission transaction to credit the salesperson. The report shows
you extensive information regarding each invoice. A commission summary can be viewed at the end of the report.
199
Controller Inventory Report
-------------------------------------------------------------------------------------------------------------------------------------User
:MOD2USER
Demo Industries
August 05, 1996
Station :21828
12345 AnyStreet
01:28:08 PM
AnyCity, CA 90015
Page :
1 of 1
Report
:Inventory controller printout report sorted by Style#
-------------------------------------------------------------------------------------------------------------------------------------Style#
======
1234
2345
2345
2824
2925
5678
5678
6543
6543
6789
6789
8765
9876
COLOR
=====
RED
BLUE
RED
BLUE
AQUA
AQUA
GREEN
GREEN
RED
BLUE
RED
PURPLE
PURPLE
REFERENCE#
==========
0
0
0
0
0
0
0
0
0
!
!
0
0
Summary Cost
Selling price
market price
jobber price
F-cost
Quantity
Description
===========
100% Cotton
100% Cotton
100% Cotton
100% Cotton
50% Cotton 50% Polyester
100% Cotton
100% Cotton
Rayon
Rayon
Rayon
Rayon
Rayon
Rayon
Total
Total
Total
Total
Total
$6,387.30
$12,293.44
$12,293.44
$12,293.44
$12,293.44
Vendor
======
Demo Inc.
Demo Inc.
Demo Inc.
Demo Inc.
Demo Inc.
Demo Inc.
Demo Inc.
Demo Inc.
Demo Inc.
Demo Inc.
Demo Inc.
Demo Inc.
Demo Inc.
Average
Average
Average
Average
Average
UPDATED
=======
08/05/96
08/03/96
07/26/96
08/05/96
08/03/96
07/26/96
08/03/96
07/26/96
08/03/96
08/05/96
08/01/96
08/05/96
08/05/96
/unit
/unit
/unit
/unit
/unit
PRICE
=====
1.75
1.20
2.00
1.80
1.75
1.50
1.50
2.30
0.99
1.25
1.25
1.45
2.75
QUANTITY
========
419
515
28
-73
520
421
371
320
90.00
0
75
1,198
130
VALUE
=====
$733.25
$618.00
$56.00
$-,131.40
$910.00
$631.50
$556.50
$736.00
$89.10
$0.00
$93.75
$1,737.10
$357.50
$1.5913
$3.0626
$3.0626
$3.0626
$3.0626
4,014.00
-------------------------------------------------------------------------------------------------------------------------------------E N D
O F
R E P O R T
01:28:08 PM
======================================================================================================================================
Pictured above is a sample Inventory report. This particular report is the Controller Inventory Report model for goods
in stock. The price level selected and shown above is the Cost Price. The report also includes the empty styles (those
with a quantity of zero) and it is sorted by style number.
200
Per Roll Gross Profit Inventory Report
----------------------------------------------------------------------------------------------------------------------User
:MOD2USER
Demo Industries
August 03, 1996
Station :29573
12345 AnyStreet
05:07:57 PM
AnyCity, CA 90015
Page :
1 of 1
Report
:Per Roll Gross Profit & Analysis report sorted by Style#
----------------------------------------------------------------------------------------------------------------------Style#
|COLOR
|QUALITY
UNITS|
PROFIT| PROFIT/UNIT;
======
======
========
======
======= ============
2345
|BLUE
|100% Cotton
25|
200.99|
$8.0397
_______________________________________________________________________________________________________________________
2925
|AQUA
|50% Cotton 50% Polyester
114|
-,537.51|
$-4.7150
_______________________________________________________________________________________________________________________
5678
|GREEN
|100% Cotton
225|
562.50|
$2.5000
_______________________________________________________________________________________________________________________
6543
|RED
|Rayon
210|
-,173.67|
$-0.8270
_______________________________________________________________________________________________________________________
8765
|PURPLE
|Rayon
5,805|
10,585.50|
$1.8235
_______________________________________________________________________________________________________________________
9876
|PURPLE
|Rayon
65|
474.35|
$7.2977
_______________________________________________________________________________________________________________________
Detailed Profit
Total
6,444
Average /unit
$1.7244
----------------------------------------------------------------------------------------------------------------------E N D
O F
R E P O R T
05:08:02 PM
=======================================================================================================================
Above is an example of another Inventory report. This is the Per Roll Gross Profit report, which shows the profit made
on the merchandise in your inventory. This particular report is sorted by Style Number. You are shown a summary of
the profit made at the bottom of the report.
201
Per Roll Costed Inventory Report
-------------------------------------------------------------------------------------------------------------------------------------User
:MOD2USER
Demo Industries
August 03, 1996
Station :29573
12345 AnyStreet
05:08:32 PM
AnyCity, CA 90015
Page :
1 of 1
Report
:Inventory listing based on calculated costs report sorted by Style#
-------------------------------------------------------------------------------------------------------------------------------------Style#
======
1234
|COLOR
======
|RED
STOCK|
COST/UNIT|
VALUE
======
==========
=====
105
|
$6.3133|
662.90
|
|
receive go #37
07/15/96
19 days
105
|
$6.3133|
662.90
2.76
0.03
______________________________________________________________________________________________________________________________________
2345
|BLUE
|100% Cotton
15
|
$28.1005|
421.51
|
|
receive go #15
06/28/96
36 days
15
|
$28.1005|
421.51
3.33
0.22
______________________________________________________________________________________________________________________________________
2345
|RED
|100% Cotton
18
|
$31.1281|
560.31
|
|
receive go #15
06/28/96
36 days
13
|
$28.1005|
365.31
2.88
0.22
receive go #17
06/28/96
36 days
5
|
$39.0000|
195.00
1.54
0.31
______________________________________________________________________________________________________________________________________
2925
|AQUA
|50% Cotton 50% Polyester
20
|
$51.6357|
1,032.71
|
|
receive go #6
06/25/96
39 days
20
|
$51.6357|
1,032.71
8.83
0.44
______________________________________________________________________________________________________________________________________
5678
|GREEN
|100% Cotton
233
|
$2.3584|
549.50
|
|
receive go #25
07/08/96
26 days
8
|
$26.5000|
212.00
1.21
0.15
receive go #50
08/01/96
2 days
100
|
$1.5000|
150.00
0.07
0.00
receive go #52
08/03/96
0 days
125
|
$1.5000|
187.50
0.00
0.00
______________________________________________________________________________________________________________________________________
6543
|GREEN
|Rayon
320
|
$27.5000|
8,800.00
|
|
receive go #22
07/05/96
29 days
320
|
$27.5000|
8,800.00
55.93
0.17
______________________________________________________________________________________________________________________________________
6543
|RED
|Rayon
290.00|
$3.7770|
1,095.32
|
|
receive go #24
07/08/96
26 days
290.00|
$3.7770|
1,095.32
6.24
0.02
______________________________________________________________________________________________________________________________________
6789
|RED
|Rayon
45
|
$4.1744|
187.85
|
|
receive go #35
07/15/96
19 days
45
|
$4.1744|
187.85
0.78
0.02
______________________________________________________________________________________________________________________________________
8765
|PURPLE
|Rayon
1,699
|
$2.8237|
4,797.50
|
|
receive go #18
07/01/96
33 days
55
|
$2.5000|
137.50
0.99
0.02
receive go #20
07/03/96
31 days
1,339
|
$2.5000|
3,347.50
22.74
0.02
receive go #21
07/03/96
31 days
305
|
$4.3033|
1,312.50
8.92
0.03
______________________________________________________________________________________________________________________________________
9876
|PURPLE
|Rayon
100
|
$2.7100|
271.00
|
|
receive go #53
08/03/96
0 days
100
|
$2.7100|
271.00
0.00
0.00
______________________________________________________________________________________________________________________________________
Detailed True Cost
|QUALITY
========
|100% Cotton
Total units
2,845.00
$6.4600
$18,378.60
-------------------------------------------------------------------------------------------------------------------------------------E N D
O F
R E P O R T
05:08:38 PM
======================================================================================================================================
Pictured above is the last sample Inventory report. This report is the Per Roll Costed Inventory report. It is sorted by
Style Number and it shows you the cost for each roll.
202
Each Client on a Page Aging Report
Demo Industries
12345 AnyStreet
AnyCity, CA 90015
TEL
(123) 456-7890
FAX
(123) 456-7890
STATEMENT DATE 08/05/96
Demo Industries
(123) 456-7890
12345 Any Street
Anycity, CA 90001
______________________________________________________________________________
Demo SalesPerson
TYPE
---INVOICE
INVOICE
INVOICE
INVOICE
INVOICE
NUMBER
-----1
3
5
7
20*
DATE
---01/01/96
01/02/96
01/02/96
01/05/96
07/22/96
DUE-DATE
-------03/01/96
03/02/96
01/02/96
03/05/96
09/20/96
AMOUNT
-----155.00
330.00
640.00
92.50
4229.64
PAYMENTS
-------0.00
135.00
520.00
12.50
0.00
TERMS
----Net 60
Net 60
Visa
Net 60
net 60
+--------------+-----------+-----------+-----------+-----------+-----------+
|
BALANCE |
CURRENT |
1..30 |
31..60 |
61..90 |
91..++ |
+--------------+-----------+-----------+-----------+-----------+-----------+
|
$4,779.64|
4229.64|
0.00|
0.00|
0.00|
550.00|
+--------------+-----------+-----------+-----------+-----------+-----------+
Above is a Client Statement (Aging) report for a particular client. This aging format is the Each Client on a Page
format. All invoice models were selected to be included and the Aging Layout was set to Current. Statements can be
made for a specific client, for all clients, for clients in a particular territory, or for clients of a certain membership. In a
client statement, you are shown several details regarding those invoices which have not been fully paid for plus you are
shown an aged view of the client. A star next to an invoice number indicates that there is an existing post dated check
for that invoice.
203
Detailed Aging Report
CLIENT:
Demo Industries
12345 Any Street
Anycity, CA 90001
Telephone
Salesperson
: (123) 456-7890
: Demo SalesPerson
Statement
:
1 CUT date :08/05/96
Date printed : 08/05/96
..................................................................................................................................
type
:model
:number
:salesperson
:
date : due date:
amount: payment: open bal: terms
:late :
..................................................................................................................................
INVOICE
: non-factored:1
:House Account
: 01/01/96: 03/01/96:
155.00:
0.00:
155.00: Net 60
: 157:
INVOICE
: non-factored:3
:Demo SalesPerso : 01/02/96: 03/02/96:
330.00:
135.00:
195.00: Net 60
: 156:
INVOICE
: non-factored:5
:House Account
: 01/02/96: 01/02/96:
640.00:
520.00:
120.00: Visa
: 216:
INVOICE
: non-factored:7
:Demo SalesPerso : 01/05/96: 03/05/96:
92.50:
12.50:
80.00: Net 60
: 153:
INVOICE
: non-factored:20*
:Demo SalesPerso : 07/22/96: 09/20/96: 4229.64:
0.00: 4229.64: net 60
:
:
..................................................................................................................................
BALANCE
CURRENT
1..30
31..60
61..90
91..++
$4,779.64
4229.64
0.00
0.00
0.00
550.00
***********************************************************************************************************************************
This Client Statement report was generated for a specific client in the Detailed Aging format. A star next to an invoice
number indicates that there is an existing post dated check for that invoice.
204
Narrow Summary Aging Report
CLIENT: Demo Industries
Statement
: 2 CUT date :08/05/96
12345 Any Street
Salesperson : Demo SalesPerso
Anycity, CA 90001
Tel (123) 456-7890
Date printed : 08/05/96
Fax (123) 456-7891
_______________________________________________________________________________________________________________________
|number
|salesperso| date |due date|
amount| payment| open bal| terms
|late| model
|
_______________________________________________________________________________________________________________________
|1
|House Acco|01/01/96|03/01/96|
155.00|
0.00|
155.00|Net 60
| 157| non-facto|
|3
|Demo Sales|01/02/96|03/02/96|
330.00|
135.00|
195.00|Net 60
| 156| non-facto|
|5
|House Acco|01/02/96|01/02/96|
640.00|
520.00|
120.00|Visa
| 216| non-facto|
|7
|Demo Sales|01/05/96|03/05/96|
92.50|
12.50|
80.00|Net 60
| 153| non-facto|
|20*
|Demo Sales|07/22/96|09/20/96| 4229.64|
0.00| 4229.64|net 60
|
| non-facto|
_______________________________________________________________________________________________________________________
BALANCE
CURRENT
1..30
31..60
61..90
91..++
$4,779.64
4229.64
0.00
0.00
0.00
550.00
_______________________________________________________________________________________________________________________
The sample Client Statement report above was made for a particular client in the Narrow Summary format. A star next
to an invoice number indicates that there is an existing post dated check for that invoice.
205
AA Aging Report
---------------------------------------------------------------------------------------------User
:MOD2USER
Demo Industries
August 05, 1996
Station :21828
12345 AnyStreet
03:01:58 PM
AnyCity, CA 90015
Page :
1 of 1
Report
:Client statement
---------------------------------------------------------------------------------------------DATE
====
INVOICE
=======
DUE
===
CURRENT
=======
1-30
====
31-60
=====
61-90
=====
91+
===
CLIENT: Demo Industries
Tel :(123) 456-7890
01/01/96
01/02/96
01/02/96
01/05/96
07/22/96
1
3
5
7
20*
TOTAL DUE:
03/01/96
03/02/96
01/02/96
03/05/96
09/20/96
$4,779.64
155.00
195.00
120.00
80.00
4229.64
4229.64
0.00
0.00
0.00
550.00
This Client Statement was generated in the AA forma for a particular client. A star next to an invoice number indicates
that there is an existing post dated check for that invoice.
206
Very Short Aging {DE} Report
--------------------------------------------------------------------------------------------------------------------------------User
:MOD2USER
Demo Industries
August 05, 1996
Station :21828
12345 AnyStreet
09:29:18 AM
AnyCity, CA 90015
Page :
1 of 1
Report
:Client statement
--------------------------------------------------------------------------------------------------------------------------------Name
====
Demo 1
Demo Company
Demo Industries
CURRENT 1..30 31..60
======= ===== ======
| -,145|
0|
0|
|
317|
0|
0|
| 4,230|
0|
0|
61..90
======
0|
0|
0|
91..++
======
0|
0|
550|
BALANCE
=======
-,145|
317|
4,780|
Telephone #
[----NOTES----]
========= =
===============
(213) 000-0000|. . . . . . . . . . .
(213) 000-0000|_______________________________
(123) 456-7890|. . . . . . . . . . .
+-----------------------------------+
| Aging summary as of:08/05/96
|
+-----------------------------------+
Demo Industries
12345 AnyStreet
AnyCity, CA 90015
(123) 456-7890
Number of accounts :
BALANCE
CURRENT
1..30
31..60
61..90
91..++
3
$4,952.44
$4,402.44
$0.00
$0.00
$0.00
$550.00
100.00%
88.89%
0.00%
0.00%
0.00%
11.11%
The Client Statement report pictured above was made for all owing clients. It was generated in the Very Short Aging
{DE} format.
207
Finance Charges Added Aging Report
Demo Industries
12345 AnyStreet
AnyCity, CA 90015
TEL
(123) 456-7890
FAX
(123) 456-7890
STATEMENT DATE 08/05/96
Demo Industries
(123) 456-7890
12345 Any Street
Anycity, CA 90001
_______________________________________________________________________________
Demo SalesPerson
NUMBER
DATE
--------1
01/01/96
3
01/02/96
5
01/02/96
7
01/05/96
20*
07/22/96
FINANCE CHARGES
DUE-ON
-----03/01
03/02
01/02
03/05
09/20
AMOUNT
-----155.00
330.00
640.00
92.50
4,229.64
45.82
CREDITS TERMS
------- ----0.00 Net 60
135.00 Net 60
520.00 Visa
12.50 Net 60
0.00 net 60
LATE
FINANCE CHARGE
------------157
12.00
156
15.00
216
12.78
153
6.04
+--------------+-----------+-----------+-----------+-----------+-----------+
|
BALANCE |
CURRENT |
1..30 |
31..60 |
61..90 |
91..++ |
+--------------+-----------+-----------+-----------+-----------+-----------+
|
$4,825.46|
4229.64|
0.00|
0.00|
0.00|
550.00|
+--------------+-----------+-----------+-----------+-----------+-----------+
This Aging report is in the Finance Charges Added format. It is for a particular client and it includes finance charges
for overdue invoices. The finance charge percentage is assumed to be 18%., or 1 ½ % per month. A star next to an
invoice number indicates that there is an existing post dated check for that invoice.
208
Short Format Aging Report
---------------------------------------------------------------------------------------------------------------------------------------------------------User
:MOD2USER
Demo Industries
August 03, 1996
Station :29573
12345 AnyStreet
04:42:48 PM
AnyCity, CA 90015
Page :
1 of 1
Report
:Client statement
---------------------------------------------------------------------------------------------------------------------------------------------------------Name
====
Demo 1
Demo Company
Demo Industries
Telephone #
========= =
(213) 000-0000
(213) 000-0000
(123) 456-7890
BALANCE
=======
4,506.55
317.50
4,779.64
CURRENT
=======
4,506.55
317.50
4,229.64
1..30
=====
0.00
0.00
0.00
31..60
======
0.00
0.00
0.00
61..90
======
0.00
0.00
0.00
91..++
======
0.00
0.00
550.00
[----NOTES----]
===============
_______________________________
. . . . . . . . . . .
_______________________________
+-----------------------------------+
| Aging summary as of:08/03/96
|
+-----------------------------------+
Demo Industries
12345 AnyStreet
AnyCity, CA 90015
(123) 456-7890
Number of accounts :
BALANCE
CURRENT
1..30
31..60
61..90
91..++
3
$9,603.69
$9,053.69
$0.00
$0.00
$0.00
$550.00
100.00%
94.27%
0.00%
0.00%
0.00%
5.73%
The Client Statement report shown above was generated for all owing clients in the Short Format Aging format. It
includes all invoice models plus shows a summary of the aging information towards the end of the report.
209
CHAPTER
15
What are the MOD2 files?
There are several types of files used by MOD2. These files are required by MOD2 to run
properly. They are described below.
Caution - Do not tamper, edit, or modify these files in any manner. Doing so will
damage your MOD2 program.
File extension
Description
BAT.......................
CHR......................
DAT......................
These are batch files used by MOD2.
These are fonts used within MOD2.
These are data files used to store information such as invoices and
client phone numbers.
These are dynamic link library files. They are associated with the
EXE files.
These are executable files that can be run, such as MOD2.EXE.
DLL.......................
EXE.......................
210
CHAPTER
16
MOD2 Options
Various MOD2 options can be access through the Options menu. Some of these options
are only for the use of the system supervisor. Each option will be briefly discussed
below.
These are the various MOD2 options.
•
Shell to Operating System (DOS) - This is basically a DOS-Prompt. Type EXIT to
return to MOD2.
•
Backup MOD2 Data Files - This is for the use of the system supervisor. It is a utility
to backup MOD2 for safety purposes in case of a computer failure.
•
Installation - *CAUTION* - This is for the use of the system supervisor only.
Tampering or editing of these installation options can affect the preset MOD2
configurations that were set up for your company.
211
Chapter 16 MOD2 Options
•
Monitor Logs - The actions of all users of MOD2 are recorded for the safety of your
company. Use this option to view these recordings.
•
Maintenance - These options are for the use of the system supervisor. They
regenerate the MOD2 data files.
•
Auxiliary Utilities - This option is for the internal use of MOD2.
•
Remote Connection - If you have the proper equipment and software and if this
option was set up on your particular MOD2 installation, then you may use this feature
to remotely log in to your computer.
•
Help & On Line Manual - Select this to view the on line manual.
•
About MOD2 - This option shows you information about your computer’s technical
specifications.
212
CHAPTER
17
Printer Setup
When MOD2 was first installed for your company, all your printers were configured and
setup within MOD2. For directions on how to setup new or additional printers, please
consult with your system supervisor. MOD2 can support up to eight output devices. Two
of these are reserved for Screen and Disk, thus allowing MOD2 to support a maximum of
six printers or other devices.
213
CHAPTER
18
Adding User Names
Defining new MOD2 users is a fairly simple process. Simply follow the directions in
“Adding Clients” of CHAPTER 7: CLIENT MANAGEMENT. When you are asked to select a
membership, choose “MOD2 users.” Once you accept the account, the name of the
MOD2 user will be added to the user selection screen and the person will thus become an
authorized user of MOD2. Each MOD2 user can have his/her own password with either
low or high level clearance. Please see your system supervisor or administrator for
instructions on how to set the passwords for a MOD2 user.
214
Appendixes
A Frequently Asked Questions . . . . . . . . . . . . . . . . 216
B How to Contact MOD2 . . . . . . . . . . . . . . . . . . . 220
215
APPENDIX
A
Frequently Asked Questions
This section consists of answers to common questions and solutions to typical problems.
Q. Can I void a Packing List after I have issued an invoice to it?
A. No, you cannot void a Packing List if you have issued an invoice to it unless you want
to void your sales invoice too and re-issue another one for the order.
Q. When you create a Packing List in detail and you decide that you want to void it, will
the items go back in the inventory in summary or in detail?
A. Items entered in to the Packing List in detail go back into inventory in detail.
Q. Can I re-use a voided Packing List number?
A. No, voided packing list numbers like any other number assigned to a document within
the program cannot be re-used once it has been voided.
Q. Can I make a voided Packing List active again?
A. No, a voided packing list cannot be re-activated.
Q. What are masks for?
A. A mask can be setup to change the membership of a group of clients rapidly without
going to each client record individually and assigning the new membership.
Q. I cannot print a particular invoice/packing list; what could be wrong?
A. See the June 1996 issue of the MOD2 Link newsletter.
216
Appendix A Frequently Asked Questions
Q. What is the purpose of regeneration?
A. MOD2 uses fast tables for history lookup so if changes have been made to correct a
mistake or an error, then you need to regenerate these tables. During normal course of
operation, there is no need to do this.
Q. When do I run Master regeneration - ALL?
A. This regenerate is necessary to correct all the tables within the program. All changes
made that may have affected the linked modules are generally corrected by the Master
Regenerate.
Q. Why does an advance deposit appear at the bottom of the ledger and not below the
corresponding invoice number?
A. Advance Deposits do not use the same number as your Invoice Number.
Q. Can I make a voided Advance Deposit active again?
A. No, a voided Advance Deposit cannot be reactivated.
Q. Can I void an Invoice and re-use the same Invoice number?
A. Yes, you can void an invoice but the system does not allow you to re-use the same
invoice number. You may, however, add an extra character to the number. For
example, if you voided Invoice #1234 and you want to generate another invoice with
the same number, enter #1234a for the number.
Q. Should I void an invoice in the event of returned merchandise?
A. In case of returned merchandise, issue a Credit Memo to your client instead of
voiding the invoice to both credit your client and to return the merchandise into your
inventory. Goods returned and issued Credit Memos are returned into inventory as
summary goods.
217
Appendix A Frequently Asked Questions
Q. What are purchase orders?
A. Purchase orders are orders your customers give to your company. They are entered
into MOD2 as a Sales Order.
Q. What are purchase contracts?
A. Purchase contracts are orders that you issue from your company to a supplier or mill.
Q. Can I back date a purchase order?
A. Yes, you can assign any date on your purchase orders as required.
Q. Can I make a voided invoice active again?
A. No, once you have voided an invoice, you cannot make it active or re-use the same
invoice number again.
Q. Will a postdated check automatically change into a paid invoice on its due date? If
not, do I need to void the postdated check and apply it as a paid invoice?
A. No, a postdated check does not automatically revert into payment on the date that it is
due. You need to apply the postdated check into a paid invoice to close the
transaction.
Q. I cannot print on the network printer, what could be wrong?
A. Printing problems may arise out of several reasons. First you need to check if your
server has been switched on. Check all possible connections from your computer to
the printer and from the printer to the server. Check if you are logged in to the
network. To make sure, reboot your computer and log back in. If you are logged in
and you still cannot print, you can check your printer connections in the Control Panel
on Windows. For previous versions of Windows, double click on the Print Manager
icon to check your printer properties. For the Windows 95 version, click on Settings
and select Printers and then click on your printer icon. Click on properties and select
218
Appendix A Frequently Asked Questions
Detail to view your printer connections. If you are connected to the network printer,
your printer port should be routed to the network printer queue (can be shown as
\\Servername\q_1) and not on other ports (other ports are either LPT1 or LPT2,
whichever is available as a default). If you are connected to the network printer and
nothing is happening when you send a document out to print, then you must be having
network connections or configuration problems. If this is the case, consult a technical
advisor.
Q. I need to change some information for a Credit Memo. How can I do so?
A. Credit Memos may not be changed. To change a credit memo, void it and then issue
a new one.
219
APPENDIX
B
How to Contact MOD2
If you have a problem related to hardware, printing, or the network, please consult your
system supervisor or administrator. If you experience a problem with your MOD2
software, first consult this manual. If that does not solve the problem, try referring to
APPENDIX A : FREQUENTLY ASKED QUESTIONS,
which has the solutions to common
problems. If your problem is still not resolved, feel free to contact us for technical
support and assistance. We will help you resolve the problem as soon as possible to get
you back up running. We understand how important our software is to your business and
will assist you in any way we can.
There are a variety of ways you can reach MOD2 INC. They are listed below:
♦ Fax Support
You may fax your problem to us. This is the recommended and probably the most
efficient way to get your problem solved. Fill out the assistance request sheet at the
end of this manual and fax it to us. You may fax MOD2 INC. at: (213) 747-9250.
♦ Phone Support
You may call MOD2 INC. for over the phone assistance. Before you call, follow the
instructions on the assistance request sheet at the end of this manual. Our office hours
are from 8:00 AM to 5:0 0 PM Mondays through Fridays, Pacific Standard Time. If
you call after hours, leave a message and we will get back to you on the next business
day. Our phone number is : (213) 747-8424.
220
Appendix B How to Contact MOD2
♦ E-MAIL and WEB Site
If you have a modem, you may E-MAIL or visit our WEB Site. Our MOD2 E-MAIL
address is [email protected]. Our WEB Site, just point your browser to
http://www.mod2.com
♦ Write to us
You may write and send your problem to us. Our mailing address is 3317 South
Broadway, Los Angeles CA 90007 Be sure to include a filled out assistance request
sheet, which is located at the end of this manual.
221
MOD2 Assistance Request Sheet
(Make copies of this page before filling it out)
Instructions
When you need assistance with your MOD2
software, first consult this manual. If that
does not solve your problem, contact us by
one of the methods described in APPENDIX B.
If your problem is related to hardware,
printing, or to the network, please consult with
your system supervisor or administrator.
So that we can answer you question as quickly
as possible, please gather all information that
applies to your problem. If you call us, please
use a telephone near your computer and have
all the information requested on this form
available.
Diagnosing a Problem
So that we can assist you more effectively,
please be prepared to answer the following
questions regarding your problem with
MOD2.
1. Can you reproduce the problem?
yes no
3. Have you experienced this problem before?
yes no
4. Describe the problem in detail.
__________________________________
__________________________________
__________________________________
__________________________________
__________________________________
__________________________________
5. Did you get an error message?
yes no
If yes, what was the ERROR # :________
Product
Product name:
MOD2
Version number: _______
2. In which module(s) does the problem occur?
Sales
Goods in Process
Inventory
Options
Transactions Packing List
Clients
Bar-Coding
Sales Order Accounting
Salesperson Scanning
Other (please specify)
__________________________________
Your Information (for fax only)
Company name: _____________________
Your name:
_____________________
Telephone #:
_____________________
Fax #:
_____________________