1
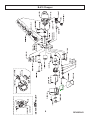
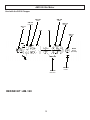
USER MANUAL
Fiberglass Roving
Choppers
5845 WEST 82ND STREET
INDIANAPOLIS, INDIANA
46278 U.S.A.
Phone (317) 875-5592
Fax
(317) 875-5456
Email [email protected]
Web www.glascraft.com
Table Of Contents
Introduction
About This Manual.................................................................................................................................................... 1
General Information ................................................................................................................................................. 2
Parts & Illustrations
Repair Kits ..............................................................................................................................................................
B-410 Assembly ......................................................................................................................................................
B-510 Assembly ......................................................................................................................................................
AM-100 Air Motor ....................................................................................................................................................
AM-100-2 Air Motor .................................................................................................................................................
3
4
6
8
9
Safety
Operating Your Polyester System Safety ................................................................................................................
10
Installation
LPA2 / Indy Gun .......................................................................................................................................................
Indy-X Gun ...............................................................................................................................................................
Formula Gun ............................................................................................................................................................
Operation ..................................................................................................................................................................
18
20
21
23
Maintenance
Blade Replacement Procedure ................................................................................................................................ 25
Chopper Blade Installation Illustration ..................................................................................................................... 26
Anvil Sleeve Replacement / Adjustments ................................................................................................................ 27
Notes .......................................................................................................................................... 29
Limited Warranty Policy ........................................................................................................... 31
Technical Assistance ............................................................................................................... 32
For Your Reference ....................................................................................INSIDE BACK COVER
Introduction
About This Manual
Before operating, maintaining or servicing any
GlasCraft system, read and understand all of
the technical and safety literature provided with
GlasCraft products. If you do not have the proper or related manuals and safety literature for
your GlasCraft system, contact your GlasCraft
distributor or GlasCraft, Inc.
In this GlasCraft technical and safety publication, the following advisories will be provided
where
appropriate:
NOTE
Is information about the procedure in progress.
CAUTION
Is imperative information about equipment
protection.
made from the GlasCraft assembly instructions
provided.
This manual provides information for the assembly, operation, maintenance and service of this
GlasCraft product as used in a typical configuration. While it lists standard specifications and
procedures, some deviations may be found.
In order to provide our users with the most upto-date technology possible, we are constantly
seeking to improve products. If technological
change occurs after a product is on the market,
we will implement that technology in future production and, if practical, make it available to current users as a retrofit, up-date or supplement.
If you find some discrepancy between your unit
and the available documentation, contact your
GlasCraft distributor to resolve the difference.
GlasCraft, Inc. reserves the right to change or
modify this product as it deems necessary.
WARNING
Is imperative information about personal safety.
The information in this document is intended
only to indicate the components and their normal
working relationship typical use. Each assembly
should be directed by a GlasCraft distributor or
Careful study and continued use of this manual
will provide a better understanding of the equipment and process, resulting in more efficient
operation, longer trouble-free service and faster,
easier troubleshooting.
1
General Information
The manner in which this equipment is adjusted and
used will ultimately determine the quality of the finished
parts it is used to produce. Glass/resin ratios, cure
times and outputs are readily adjustable with the use of
the pressure regulators provided. However, the amount
of material waste, evenness of application and speed of
operation will be regulated by the skill of the operator.
Any change in the resin pressure regulator setting will
require simultaneous changes in the roving cutter to
maintain identical glass/resin ratios and cure times. At
very high outputs, it may become necessary to use multiple strands of roving in order to achieve sufficient glass
content.
NOTE
Do not attempt to achieve glass contents in excess of
40%
The experience of most fiberglass operations indicates that
extremely high glass/resin ratios result in laminates that
are difficult to roll out and insufficiently “wet-out” for highest
strength. On the other hand, very low glass contents may
result in laminates with very low mechanical strengths and a
tendency to fracture under stress.
When spraying with a Chopper attached, proper Chopper
adjustment is essential to achieving an even dispersal of cut
roving in the resin fan.
If the Chopper is off-center, roving will collect on one side of
the spray pattern with excess resin on the other side. If the
Chopper height adjustment is too low, roving will miss the
resin completely and fall to the floor dry. If adjusted too high,
roving will tend to concentrate in the middle of the spray
pattern.
Whenever possible, the gun should be held perpendicular to
the mold surface. A working distance of 18 to 36 inches will
generally give good results.
2
Parts & Illustrations
B-210-71 Repair Kit
Part
Number
Description
Qty.
B-210-17
BLADES
100
B-210-21W
SMALL WHITE RUBBER WHEEL
1
5133-62MD
SNAP RING
2
B-510-71 Repair Kit
Part
Number
Description
Qty.
B-510-25
BLADES
100
B-510-08
LARGE WHITE RUBBER WHEEL
1
AM-120 Repair Kit
Part
Number
Description
Qty.
AM-103
VANE
8
AM-109
GASKET
2
AM-112
BEARING
2
AM-113
SEAL
1
7606-17
O-RING
1
Chopper Snout Options
Part
Number
Description
Gun
23543-00
OPEN SNOUT
INDY / FORMULA
23543-01
CLOSED SNOUT
INDY / FORMULA
23543-02
OPEN SNOUT
INDY X
B-210-91
CLOSED SNOUT (NARROW)
LPA2 / INDY / FORMULA
B-210-92
CLOSED SNOUT (WIDE)
LPA2 / INDY / FORMULA
3
B-410 Chopper
4
REVISION R
B-410 Parts List
Part
Number
Description
378
FELT OILER
13076-10
O-RING
13076-11
O-RING
17390-02
SPRING WASHER
5133-62MD
SNAP RING
7606-05
O-RING
7733-13
NUT
7734-06
LOCK WASHER
7958-48C
MACHINE SCREW
8160-12C
SET SCREW
8212-16F
MACHINE SCREW
Part
Number
Description
Qty.
9944-16C
MACHINE SCREW
21561-00
LOCK NUT
1
21568-00
MUFFLER ASSEMBLY
21562-00
FELT WASHER
2
AM-100-1
AIR MOTOR ASSEMBLY
21563-01
SPEED KNOB
1
B-210-10A
AIR MOTOR SPACER
21564-00
MUFFLER TUBE
1
B-210-14A
NUT GUARD
21567-24F
SCREW
1
SNAP RING
7486-23
WASHER
1
B-210-14B
B-210-14C
GUARD LINER
B-210-14E
CHOPPER GUARD
B-210-15-1
FEED BAR
B-210-15-2
BUSHING
B-210-16A
CUTTING BLADE BAR
B-210-16B
RET.BAR SPRING
B-210-16C
CUTTER HEAD
B-210-16E
CUTTING HEAD BOLT
B-210-16F
SNAP RING
B-210-17
CUTTING HEAD BLADE
B-210-32A2
THUMB SCREW
B-210-32B
CONTROL BLOCK NUT
B-210-71
CHOPPER PARTS KIT
B-210-91
CUTTER GUARD SNOUT
B-310-24-2
ECCENTRIC NUT
B-310-30
CHOPPER BLOWER TUBE
B-310-4
Part
Number
Description
Qty.
B-210-17
CUTTING HEAD BLADE
100
B-210-21W
SMALL WHITE RUBBER WHEEL
1
5133-62MD
SNAP RING
2
CUTTER CLIP
B-410-01
AIR MOTOR TUBE
B-410-02-3
NUT CAP
B-410-07
TEE SWAGE PIPE FITTING
B-410-13
CUTTER BACK PLATE
GC-1021
USER MANUAL
5
REVISION R
B-510 Chopper
6
REVISION D
B-510 Chopper Parts List
Part
Number
Description
Part
Number
Description
378
FELT OILER
B-510-17
COMPRESSION SPRING
13076-10
O-RING
B-510-18
COMPRESSION SPRING
13076-11
O-RING
B-510-19
RETAINING RING
16828-01
RETAINING RING
B-510-20
GUARD CASTING
17390-01
SPRING WASHER
B-510-21
TURN KNOB
7486-03
WASHER
B-510-22
CHOPPER CHUTE
7606-05
O-RING
B-510-23
SCREW
7734-06
LOCK WASHER
B-510-24
COVER INSERT
8160-08C
SET SCREW
B-510-25
1 in. CUTTING HEAD BLADE
8160-12C
SET SCREW
B-510-71
CUTTER SPARE PARTS KIT
8212-12F
SCREW
GC-1021
USER MANUAL
8212-16F
SCREW
9944-12C
SCREW
9944-16C
SCREW
9944-36C
SCREW
21568-00
CHOPPER MUFFLER ASSEMBLY
23531-02
SHOULDER SCREW
23535-01
SNAP RING
AM-100-2
AIR MOTOR ASSEMBLY
B-210-10A
AIR MOTOR SPACER
B-210-16F
SNAP RING
B-210-17
CUTTING HEAD BLADE
B-210-32A1
LOCK NUT
B-210-32A2
THUMB SCREW
B-210-32B
CONTROL BLOCK NUT
B-310-4
Part
Number
Description
Qty.
21561-00
LOCK NUT
1
21562-00
FELT WASHER
2
21563-01
SPEED KNOB
1
21564-00
MUFFLER TUBE
1
21567-24F
SCREW
1
7486-23
WASHER
1
CUTTER CLIP
B-410-01
AIR MOTOR TUBE
B-410-02-3
NUT CAP
B-410-07
TEE SWAGE PIPE FITTING
B-510-01
BACK PLATE
B-510-02
SLIDING LOCK
B-510-03
ADJUSTMENT KNOB
B-510-04
ADJUSTMENT WASHER
B-510-05
FEED BAR
B-510-08
LARGE WHITE RUBBER WHEEL
B-510-09
ROLLER HUB
B-510-11
IDLER BEARING
B-510-14
ANGLE WEDGE CUTTER HEAD
B-510-15
ANGLE WEDGE INSERT
B-510-16
BLOWER TUB
7
REVISION D
AM-100 Air Motor
Used with B-410 Chopper
AM-109
AM-109
Gasket
Gasket
AM-114
AM-115
Front Cap
5133-62MD
Rear Cap
AM-113
Snap Ring
Seal
N/A
N/A
AM-112
Bearing
B-210-23
Tire Shaft
NOTE:
End Cap
(Not Shown)
N/A
B-210-23A
Roll Pin
AM-110
AM-103
Rotor Vane
REPAIR KIT: AM-120
8
R oll Pin
REVISED 2/98
AM-100-2 Air Motor
Used with the B-510 Chopper
AM-109
AM-109
Gasket
G asket
AM-114
AM-115
Front Cap
Rear Cap
AM-113
Seal
N/A
N/A
AM-112
Bearing
NOTE:
End Cap
(Not Shown)
N/A
AM-110
AM-103
Rotor Vane
REPAIR KIT: AM-120
9
R oll Pin
Safety
Operating Your Polyester System
Safely
particularly Paragraph (m) Organic Peroxides
and Dual Component Coatings.
1.0 Introduction
Other standards and recognized authorities to consult are the National Fire Protection Association
(NFPA) bulletins as follows:
Any tool, if used improperly, can be dangerous.
Safety is ultimately the responsibility of those using
the tool. In like manner, safe operation of polyester processes is the responsibility of those who use
such processes and those who operate the equipment. This manual outlines procedures to be followed in conducting polyester operations safely.
• NFPA No. 33 Chapter 14, Organic Perox
ides and Dual Component Materials
• NFPA No. 63 Dust Explosion Prevention
• NFPA No. 70 National Electrical Code
• NFPA No. 77 Static Electricity
• NFPA No. 91 Blower and Exhaust System
• NFPA No. 654 Plastics Industry Dust
Hazards
• Type of Fire Extinguishing equipment
recommended :
This system has been specifically designed for use
of Polyester Resin ,Gel-Coat ,and Methyl Ethyl Ketone Peroxides (MEKP) applications. Other formulations or blends considered for use in this equipment is strictly prohibited without the expressed
consent by GlasCraft Inc.
Fire Extinguisher -- code ABC ,rating number
4a60bc. Extinguishing Media -- Foam, Carbon Dioxide, Dry Chemical, Water Fog.
GlasCraft, Inc. cannot eliminate every danger nor
foresee every circumstance that might cause an injury during equipment operation. Some risks, such
as the high pressure liquid stream that exits the
spray tip, are inherent to the nature of the machine
operation and are necessary to the process in order to manufacture the end-product. For this reason, ALL personnel involved in polyester operations
should read and understand the Safety Manual. It is
very important for the safety of employees involved
in the operation that equipment operators, maintenance and supervisory personnel understand the
requirements for safe operation.
Copies of the above bulletins are available, at a
nominal charge from:
National Fire Protection Association
470 Atlantic Avenue
Boston, MA 02210
Research Report No. 11 of the American Insurance
Association deals with “Fire, Explosion and Health
Hazards of Organic Peroxides”. It is published by...
American Insurance Association
85 John Street
New York, New York 10038
Each user should examine his own operation,
develop his own safety program and be assured
that his equipment operators follow correct procedures.GlasCraft hopes that this manual is helpful
to the user and recommends that the precautions
in this manual be included in any such program.
GlasCraft recommends this Safety Manual remain
on your equipment at all times for your personnel
safety.
Local codes and authorities also have standards to
be followed in the operation of your spraying equipment. Your insurance carrier will be helpful in answering questions that arise in your development of
safe procedures.
1.2 Personnel Safety Equipment
In addition to the manual, GlasCraft recommends
that the user consult the regulations established under the Occupational Safety & Health Act (OSHA),
particularly the following sections:
•
•
•
1910.94 Pertaining to ventilation.
1910.106 Pertaining to flammable liquids.
1910.107 Pertaining to spray finishing
operations,
GlasCraft recommends the following Personal
Safety Equipment for conducting safe operations of
the Polyester Systems:
10
Safety
MEKP is not a single chemical. Various polymeric
forms may exist which are more or less hazardous
with respect to each other. These differences may
arise not only from different molecular structures (all
are, nevertheless, called “MEKP”) and from possible
trace impurities left from the manufacture of the
chemicals, but may also arise by contamination of the
MEKP with other materials in its storage or use.Even
a small amount of contamination with acetone, for
instance, may produce an extremely shock-sensitive
and explosive compound.
GlasCraft recommends that the user consult the state
and local regulations established for all Safety equipment listed.
2.0 Material Safety
2.1 Hazards Associated with
Laminating Operations
The major hazards which should be guarded against in
polyester laminating operations are those associated
with:
Contamination with promoters, or materials
containing promoters, such as laminate sandings,
or with any readily oxidizable material, such as
brass or iron, will cause exothermic “redox”
reactions which can become explosive in nature.
Heat applied to MEKP, or heat build-up from
contamination reactions can cause it to reach
what is called its Self-Accelerating Decomposition
Temperature (SADT).
1. The flammability and explosion dangers of the
catalyst normally used - Methyl Ethyl Ketone
Peroxide (MEKP).
2. The flammability dangers of clean-up solvents
sometimes used (GlasCraft recommends that
clean-up solvents be nonflammable), and of resin
diluents used, such as styrene.
Researchers have reported measuring pressure ratesof-rise well in excess of 100,000 psi per second when
certain MEKP’s reach their SADT. (For comparison, the
highest pressure rate-of-rise listed in NFPA Bulletin No.
68, “Explosion Venting”, is 12,000 psi per second for
an explosion of 12% acetylene and air. The maximum
value listed for a hydrogen explosion is 10,000 psi per
second.)
3. The flammability dangers of catalyst diluents, if
used. (GlasCraft recommends that catalyst not
be diluted.)
4. The flammability dangers of the uncured
liquid resins used.
Some forms of MEKP, if allowed to reach their SADT,
will burst even an open topped container. This
suggests that it is not possible to design a relief valve
to vent this order of magnitude of pressure rate-of-rise.
The user should be aware that any closed container,
be it a pressure vessel, surge chamber, or pressure
accumulator, could explode under certain conditions.
There is no engineering substitute for care by the user
in handling organic peroxide catalysts.
5. The combustibility dangers of the cured laminate,
accumulations of overspray, and laminate
sandings.
6. The toxicity dangers of all the chemicals used in
laminating operations with respect to ingestion,
inhalation and skin and eye hazards.
2.2
Catalyst
If, at any time, the pressure relieve valve on top of the
catalyst tank should vent, the area should be evacuated
at once and the fire department called. The venting
could be the first indication of a heat, and therefore,
pressure build-up that could eventually lead to an
explosion. Moreover, if a catalyst tank is sufficiently
full when the pressure relief valve vents, some
catalyst may spray out, which could cause eye injury.
For this reason, and many others, anyone whose job
puts them in an area where this vented spray might
go, should always wear full eye protection even when
laminating operations are not taking place.
(Methyl Ethyl Ketone Peroxide)
MEKP is among the more hazardous materials found
in commercial channels. The safe handling of the
“unstable (reactive)” chemicals presents a definite
challenge to the plastics industry. the highly reactive
property which makes MEKP valuable to the plastics
industry in producing the curing reaction of polyester
resins also produces the hazards which require
great care and caution in its storage, transportation,
handling, processing and disposal.
11
Safety
Safety in handling MEKP depends to a great extent on
employee education, proper safety instructions and safe
use of the chemicals and equipment. Workers should
be thoroughly informed of the hazards that may result
from improper handling of MEKP, especially in regards
to contamination, heat, friction and impact. They should
be thoroughly instructed regarding the proper action
to be taken in the storage, use and disposal of MEKP
and other hazardous materials used in the laminating
operation.
In addition, users should make every effort to:
1. Store MEKP in a cool, dry place in original
containers away from direct sunlight and away
from other chemicals.
2. Keep MEKP away from heat, sparks and open
flames.
3. Prevent contamination of MEKP with other
materials, including polyester overspray and
sandings, polymerization accelerators and
promoters, brass, aluminum and nonstainless steels.
4. Never add MEKP to anything that is hot, since
explosive decomposition may result.
5. Avoid contact with skin, eyes and clothing.
Protective equipment should be worn at all
times. During clean-up of spilled MEKP,
personal safety equipment, gloves and eye
protection must be worn. Fire fighting
equipment should be at hand and ready.
with copious quantities of clean water and
disposed of in accordance with the catalyst
manufacturer’s instructions.
The extent to which the user is successful in
accomplishing these ends and any additional recommendations by the catalyst manufacturer determines
largely the safety that will be present in his operation.
2.3 Clean-Up Solvents and Resin
Diluents
WARNING
A hazardous situation may be present in your pressurized fluid system!
Hydrocarbon Solvents can cause an explosion when
used with aluminum or galvanized components in a
closed (pressurized) fluid system (pumps, heaters, filters, valves, spray guns, tanks, etc.)
The explosion could cause serious injury, death and/or
substantial property damage.
Cleaning agents, coatings, paints, etc. may contain
Halogenated Hydrocarbon Solvents.
Some GlasCraft spray equipment includes aluminum or
galvanized components and will be affected by
Halogenated Hydrocarbon Solvents.
There are three key elements to the Halogenated
Hydrocarbon (HHC) solvent hazard.
6. Avoid spillage, which can heat up to the point
of self-ignition.
1. The presence of HHC solvents. 1,1,1Trichloroethane and Methylene Chloride are the
most common of these solvents. However, other
HHC solvents are suspect if used; either as part
of paint or adhesives formulation, or for clean-up
flushing.
7. Repair any leaks discovered in the catalyst
system immediately, and clean up the leaked
catalyst at once in accordance with the
catalyst manufacturer’s instructions.
2. Aluminum or Galvanized Parts. Most handling
equipment contains these elements. In contact
with these metals, HHC solvents could generate
a corrosive reaction of a catalytic nature.
8. Use only original equipment or equivalent parts
from GlasCraft in the catalyst system
(i.e.: hoses, fittings, etc.) because a dangerous
chemical reaction may result between
substituted parts and MEKP.
3. Equipment capable of withstanding pressure.
When HHC solvents contact aluminum or galva
nized parts inside a closed container such as a
pump, spray gun, or fluid handling system, the
chemical reaction can, over time, result in
a build-up of heat and pressure, which can reach
explosive proportions. When all three elements
are present, the result can be an extremely
violent explosion. the reaction can be sustained
with very little aluminum or galvanized metal; any
amount of aluminum is too much.
9. Catalyst accumulated from the purging of
hoses or the measurement of fluid output
deliveries should never be returned to the
supply tank. such catalyst should be diluted
12
Safety
The reaction is unpredictable. Prior use of an HHC solvent without incident (corrosion or explosion) does NOT
mean that such use is safe. These solvents can be dangerous alone (as a clean-up or flushing agent) or when
used as a component or a coating material. There is no
known inhibitor that is effective under all circumstances.
Furthermore, the mixing of HHC solvents with other
materials or solvents, such as MEK, alcohol, and toluene, may render the inhibitors ineffective.
The use of reclaimed solvents is particularly hazardous.
Reclaimers may not add any inhibitors. Also, the possible presence of water in reclaimed solvents could feed
the reaction.
Anodized or other oxide coatings cannot be relied upon
to prevent the explosive reaction. Such coatings can
be worn, cracked, scratched, or too thin to prevent contact. There is no known way to make oxide coatings or
to employ aluminum alloys which will safely prevent the
chemical reaction under all circumstances.
Several solvent suppliers have recently begun promoting
HHC solvents for use in coating systems. The increasing
use of HHC solvents is increasing the risk. Because of
their exemption from many State Implementation Plans
as Volatile Organic Compounds (VOC’s), their low flammability hazard, and their not being classified as toxic or
carcinogenic substances, HHC solvents are very desirable in many respects.
WARNING
Do not use Halogenated Hydrocarbon solvents in pressurized fluid systems having aluminum or galvanized
wetted parts.
NOTE
GlasCraft is aware of NO stabilizers available to prevent
Halogenated Hydrocarbon solvents from reaction under
all conditions with aluminum components in a closed
fluid system.
TAKE IMMEDIATE ACTION...
Halogenated Hydrocarbon solvents are dangerous
when used with aluminum components in a closed fluid
system.
supplier regarding the best non-flammable clean-up solvent with the heat toxicity for your application.
If, however, you find it necessary to use flammable
solvents, they must be kept in approved, electrically
grounded containers.
Bulk solvent should be stored in a well-ventilated, separate building, 50 feet away from your main plant.
You should allow only enough solvent for one day’s use
in your laminating area.
“NO SMOKING” signs must be posted and observed in
all areas of storage or where solvents and other flammable materials are used.
Adequate ventilation (as covered in OSHA Section
1910.94 and NFPA No. 91) is important wherever solvents are stored or used, to minimize, confine and exhaust the solvent vapors.
Solvents should be handled in accordance with OSHA
Section 1910.106 and 1910.107.
2.4 Catalyst Diluents
GlasCraft spray-up and gel-coat systems currently produced are designed so that catalyst diluents are not required. GlasCraft, therefore, recommends that diluents
not be used. This avoids the possible contamination
which could lead to an explosion due to the handling and
mixing of MEKP and diluent. In addition, it eliminates any
problems from the diluent being contaminated through
rust particles in drums, poor quality control on the part of
the diluent supplier, or any other reason. If, however, diluents are absolutely required, contact your catalyst supplier and follow his instructions explicitly. Preferably, the
supplier should premix the catalyst to prevent possible
“on the job” contamination while mixing.
WARNING
If diluents are not used, it should be remembered that
catalyst spillage, gun, hose and packing leaks are potentially more hazardous, since each drop contains a higher
concentration of catalyst, and therefore will react quicker
with overspray and the like.
Consult your material supplier to determine whether
your solvent or coating contains Halogenated Hydrocarbon Solvents.
2.5 Uncured Liquid Resin
GlasCraft recommends that you contact your solvent
Resin should be stored in a well ventilated building at
least 50 feet from your main plant. In addition, the storage temperature should not exceed 75 degrees F.
13
Safety
In your main plant, store only enough resin for one day’s
production.
“NO SMOKING” signs must be posted and observed in
all areas where resin is stored and/or used.
Refer to OSHA Section 1910.94, 1910.106, 1910.107
and consult resin suppliers for more detailed information.
Adequate ventilation (as covered in OSHA Section
1910.94 and NFPA No. 91) is important wherever solvents are stored or used, to minimize, confine and exhaust the solvent vapors.
Resin must never be stored in an area where MEKP is
stored or used.
Open-top drums should not be used, due to possible
contamination and possible catalyzation from overspray
or spillage of MEKP into drum, which could not only severely damage the polyester spray system, but might
also cause the drum of resin to ignite.
When spraying test patterns or purging the gun, always
remove the test samples and waste from the building immediately and dispose of them in accordance with your
material supplier’s recommendations.
2.6 Cured Laminate, Overspray and
Laminate Sandings Accumulation
Remove all accumulations of overspray, FRP sandings,
etc. from the building as they occur. If this waste is allowed to build up, spillage of catalyst is more likely to
start a fire, In addition, the fire would burn hotter and
longer.
Floor coverings, if used, should be non-combustible.
Spilled or leaked catalyst may cause a fire if it comes in
contact with an FRP product, oversprayed chop or resin,
FRP sandings or any other material with MEKP.
To prevent this spillage and leakage, you should:
4. Arrange the hoses and fiberglass roving guides
so that the fiberglass strands DO NOT rub
against any of the hoses at any point. If allowed
to rub, the hoses may be cut through, causing a
hazardous leakage of material which could increase the danger of fire. Also the material may
spew onto personnel in the area.
2.7 Toxicity of Chemicals
GlasCraft recommends that you consult OSHA Sections
1910.94, 1910.106, 1910.107 and NFPA No. 33, Chapter 14, and NFPA No. 91.
Contact your chemical supplier(s) and determine the
toxicity of the various chemicals used, as well as the
best methods to prevent injury, irritation and danger to
personnel.
Also determine the best methods of first aid treatment for
each chemical used in your plant.
2.8 Treatment of Chemical Injuries
Great care should be used in handling the chemicals
(resins, catalyst and solvents) used in polyester systems.
Such chemicals should be treated as if they hurt your
skin and eyes and as if they are poison to your body. For
this reason, GlasCraft recommends the use of protective
clothing and eye wear in using polyester systems.
However, users should be prepared in the event of such
an injury. Precautions include:
1. Know precisely what chemicals you are using and
obtain information from your chemical supplier on
what to do in the event the chemical gets
onto your skin or into the eyes, or is swallowed.
2. Keep this information together and easily available
so that it may be used by those administering first
aid or treating the injured person.
1. Maintain your GlasCraft System. Check the gun
several times daily for catalyst and resin packing
or valve leaks. REPAIR ALL LEAKS IMMEDIATELY.
2. Never leave the gun hanging over, or lying inside
the mold. A catalyst leak in this situation would
certainly damage the part, possible the mold, and
may cause a fire.
3. Inspect resin and catalyst hoses daily for wear or
stress at the entry and exits of the boom sections
and at the gun and fittings. Replace if wear or
weakness is evident or suspected.
3. Be sure the information from your chemical
supplier includes instructions on how to treat
any toxic effects the chemicals may have.
14
Safety
3.1 Emergency Stop Procedures
WARNING
The following steps should be followed in order to
stop the machinery in an emergency situation:
Contact a doctor immediately in the event of any injury and give him the information you have collected.
If your information includes first aid instructions, administer first aid immediately while you are contacting the doctor.
1. The yellow air valve located where the air
enters the machine should be pushed to
the “OFF” (closed) position. To do this simply
push on the lever protruding out the side of
the valve. This will also cause all the system
air to bleed out of the system in a matter of a
few seconds thus making the system
incapable of operating.
Fast treatment of the outer skin and eyes that contact such chemicals generally includes immediate
and thorough washing of the exposed skin and immediate and continuous flushing of the eyes with
lots of clean water for at least 15 minutes or more.
These general instructions of first aid treatment,
however, may be incorrect for some chemicals; that
is why you must know the chemicals and treatment
before an accident occurs. Treatment for swallowing a chemical frequently depends upon the nature
NOTE
Step 2 is a precautionary step and should be followed whenever the emergency stop valve is activated to the stop mode. Failure to do so will damage
regulators and components when reactivating to the
ON position.
of the chemical.
NOTE
2. Turn all system regulators to OFF (counterclockwise) position.
Refer to your System User Manual for complete and
detailed operating instructions and service information.
NOTE
Verify that the Catalyst Pressure Relief Line and the
Resin Return Line are secured before relieving catalyst and resin fluid pressure.
3.0 Equipment Safety
WARNING
3. Catalyst pressure in the Slave Pump can be
eliminated by rotating the yellow valve handle
on the Slave Pump 90 degrees to the “ON”
position.
GlasCraft suggest that personnel safety equipment
such as EYE GOGGLES, GLOVES, EAR PROTECTION, and RESPIRATORS be worn when servicing
or operating this equipment. Ear protection should
be worn when operating a fiberglass chopper to protect against hearing loss since noise levels can be
as high as 116 dB (decibels).
This equipment should only be operated or serviced
by technically trained personnel!!!
NOTE
The “ON” position the valve handle is parallel (in
line) with the valve body .
The “OFF” position the valve handle is perpendicular (across) the valve body.
WARNING
4. Resin pressure can be eliminated by rotating
the yellow handled valve on the bottom of
the fluid filter 90 degrees. Place a container
under the bottom of the valve to catch any
resin that is ejected from the valve.
Never place fingers, hands, or any body part near or
directly in front of the spray gun fluid tip. The force of
the liquid as it exits the spray tip can cause serious
injury by shooting liquid through the skin. NEVER
LOOK DIRECTLY INTO THE GUN SPRAY TIP
OR POINT THE GUN AT OR NEAR ANOTHER
PERSON.
(TREAT THE GUN AS IF IT WERE A LOADED PISTOL)
15
Safety
3.2 General Safety Precautions
•
Do not operate Fiberglass Chopper Guns with
out protective covers in place.
• Correct packing or valve seat leaks immediately.
• Never immerse the gun in any liquid.
• Periodically check operation of catalyst alarms
to make sure they are operation properly.
• Frequently check condition of hoses. Replace worn
hoses and other parts before they fail.
• Catalyst fluid nozzles and seals MUST be in good
condition at all times to prevent internal and
external leaks. Inspect periodically and replace
as needed, or at intervals of three to four months.
Use catalyst nozzle seal only once to prevent
possible leakage of catalyst into air passages
of gun.
• Make absolutely certain that all pressure has been
relieved from the gun before disassembly from the
hoses before loosening any fittings; from the
material or catalyst pump before disassembly; from
the catalyst injector before disassembly or filling.
• If you have any doubt that fluid pressure is relieved,
call your GlasCraft distributor or GlasCraft, Inc.
before proceeding with any disassembly.
• Use only genuine GlasCraft replacement parts when
repairing your system. Substitutes may not be the
proper material or may not fit the system and may
cause dangerous operating conditions and the
failure of other components.
The following general safety precautions should be
followed when servicing or operating this equip
ment to ensure operator safety:
•
•
•
•
•
•
•
•
•
When filling catalyst container, protective eye
equipment must be worn to protect against
injuries.
Always maintain adequate material levels to
prevent loss of prime during system operation.
At the first sign of a leak, stop operations, activate emergency stop valve, back off air regulators and open all bleed valves to remove
all pressure from the gun, hoses, pump, catalyst
system and any other liquid containers.
Solvent Pot Pressure Relief:
Turn Solvent Pressure Regulator counter clock
wise (ccw) until regulator handle stops.
Open Petcock valve to bleed Solvent Tank
pressure completely.
Catalyst Injector Pressure Relief:
Refer to Catalyst Injector User Manual for
proper pressure relief.
Never operate a Fiberglass System with
fixed Pinch Point guards removed from system.
16
Safety
Never use hard materials such as wire, pins, etc., To
clear a plugged gun. Hard materials can cause permanent damage. Dab with a bristle brush, blow backwards with air until clear while wearing a protective
eye shield. Repeat as many times as necessary.
Do not perform any maintenance or repairs until you
have followed the precautions stated above. If you,
as an equipment operator or supervisor, do not feel
that you have been adequately trained or instructed
and that you lack the technical knowledge to operate
or perform maintenance on a piece of glascraft equipment, please call glascraft, inc. Before operating or
performing maintenance on the equipment.
3.3 Grounding
Grounding an object means providing an adequate
path for the flow of an electrical charge from the object to the ground. An adequate path is one that permits charge to flow from the object fast enough that
it will not accumulate to the extent that a spark can
be formed. It is not possible to define exactly what
will be an adequate path under all conditions since it
depends on many variables.
In any event, the grounding means should have
the lowest possible electrical resistance. Grounding
straps should be installed on all loose conductive
objects in the spraying area. This includes material
containers and equipment. GlasCraft recommends
grounding straps be made of AWG No. 18 stranded
wire as a minimum, and that larger wire be used
where possible. NFPA Bulletin No. 77 states that the
electrical resistance of such a leakage path may be
as low as 1 meg ohm (106 ohms) but that resistances
as high as 10,000 meg ohms will produce an adequate leakage path in some cases.
If you have any questions regarding the above precautions or any service or operation procedures, call
your glascraft distributor or glascraft, inc.
NOTICE
All statements, information and data given herein
are believed to be accurate and reliable but are presented without guaranty, warranty or responsibility of
any kind expressed or implied. The user should not
assume that all safety measures are indicated or that
other measures are not required.
Whenever flammable or combustible liquids are
transferred from one container to another, or from
one container to the equipment, both containers or
container and equipment shall be effectively bonded
and grounded to dissipate static electricity.
For further information, see National Fire Protection Association (NFPA) 77 titled “Recommended
Practice on Static Electrical”. Refer especially to Section 7-7 titled “Spray Application of Flammable and
Combustible Materials”. Check with local codes and
authorities for other specific standards that might apply to your application.
5845 WEST 82nd STREET, SUITE 102
INDIANAPOLIS, INDIANA 46728 U.S.A.
PHONE (317) 875-5592
FAX (317) 875-5456
17
Installation
Mounting Instructions
B-410, LPA 2 Gun
8. Adjust Chopper mount until chopped glass enters spray
pattern at desired entry location. Chopped glass should
be uniformly entering the spray pattern resulting in an
evenly distributed resin spray and chopped glass pattern on the test substrate.
NOTE
The following Mounting Instructions pertain to mounting
a Model B-410 onto a Model LPA, Model LPA-II Spray
Gun.
NOTE
Test spraying should be done on a clean piece of paper or
cardboard and disposed of properly.
1. Remove Set Screw, P/N D-145-08C from the Gun
body located where the Chopper is mounted and replace at the top of the handle. (see Fig. 1)
2. Attach the Chopper assembly into the mounting
hold and tighten with the Chopper snout pointing
down into the resin spray pattern. The correct adjustments for glass entering the pattern will be done
when the spray test is completed.
Mounting Instructions
B-410, & B-510, Indy Gun 23550-00
3. Chopper “On/Off” Lever, P/N B-310-11, located on
the base of the Chopper mount, should be in the
“OFF” position. (see Fig. 2)
1. The B-410 / 510 Chopper Assy. Mounts to Cutter Pivot
4. Thread roving from box through the Roving Guidance
Tube, P/N 21491-00 on Chopper Rotating Mount, P/N
23513-00. Tighten down Bar, P/N B-310-4 with Screws,
P/N 8212-16F. P/N, 17798-XX Hose attaches to fitting
P/N 1880-00 in back of gun.
system and into the back of the Chopper Feed Bar,
P/N B-210-15. It is suggested that the top feed hole
be used if only one strand of glass is being used.
5. After all components have been securely installed,
turn on main air supply slowly until fully on.
D-145-08C
Fig. 1
6. Activate the Chopper “On/Off” Lever to the “On” position. (see Fig. 2)
7. Depressing the Gun Trigger fully, a spray pattern of
resin and catalyst with chopped glass should now
be present.
18
Installation
2. The Slide Valve, P/N 20086-01 controls air to the
Gun for the Chopper. Sliding it forward turns the air
on, while sliding it back, turns the air off.
Chopper Air Requirements
100 PSI / 8 CFM
Adjusting Speed & Blower Air
1. The Blower Air is adjusted by the Thumb Screw, P/N B210-32A2. Only a small amount of air is required to:
a.
Cool Chopper Head.
b.
Assist in Dispersing chop.
Speed Control / Muffler
1. The Muffler Assembly controls the Amount, and Speed
of air exhausting the Air Motor.
2. As the Speed Knob, P/N 21563-01 and Machine Screw,
P/N 21567-24F is turned out, the Air Motor speed increases.
3. Once it is set, Lock the Knob / Screw down with the
3. The Gun Trigger is staged: ¼ pull on the trigger will
actuate material only. Full back on the trigger actutes the Chopper and Material. The Stager can be
adjusted by adjusting the Set screw, P/N 23532-01
in the Gun Trigger, p/n 23503-00.
Body, P/N 21561-00.
Adjusting Chopper Mount
1. Loosen Screw, P/N 8212-16F to twist the Chopper side
to side on the Pivot Tube, P/N 21491-00. Retighten once
it is set.
Loosen screws
2. Loosen Screw, P/N 20188-16C to pivot the Chopper up
& down on the Chopper Bracket, P/N 23512-00. Retighten once it is set.
Loosen
19
Installation
NOTE
For B-510
Loosen Lock Nut, P/N 7729-04, Pivot Chopper Mount
to desired angle, Retighten P/N 7729-04. Once general
position can be found, fine tuning can be adjusted by
moving the chute, P/N B-510-22.
2. Air Hose P/N 17798-XX attaches to fitting, P/N
1880-00 on back of gun.
3. The Snout, P/N 23543-00 is standard with the Indy
System. The end of the Snout is adjustable. Optional
snouts are available for the B-410 only, which include
the B-210-91 and B-210-92.
NOTE
Test spraying should be done on a clean piece of paper
or cardboard and disposed of properly.
Mounting Instructions
B-410, B-510, Indy-X Gun 23575-00
1. The B-410 / B-510 Chopper Assembly mounts to
Cutter Pivot Tube, P/N 21491-00 on Chopper Valve,
P/N 23569-00. Once Chopper is set, tighten Cutter
Clip, P/N B-310-4 with Screws.
3. The Cutter Valve Lever, P/N B-310-11 controls air
flow to the chopper. Perpendicular to the
Chopper Valve = Air On.
Inline with Valve = Air OFF.
NOTE
This is a positive ON/OFF valve. It does not regulate Air
Flow.
20
Installation
4. The Catalyst Atomizing Air Line connects to Connec-
tor Fitting, P/N 20796-00. When the gun is triggered,
Line Air will run the Chopper Motor and regulated air
will flow thru to the atomized circuit.
NOTE
For B-510
A general position can be found. Fine tuning of the
Glass angle can be adjusted by moving the Chute P/N,
B-510-22.
Centering Adjust
Loosen Bar Screws, P/N 8212-16F and Twist Chopper
left or right to desired location, then retighten P/N 821216F Shoulder Screw.
Bar
Chopper Air Requirements
100 PSI @ 8 CFM
Adjusting Speed & Blower Air
Mounting Instructions
B-410, B-510, Formula Gun 23750-00
1. The blower air is adjusted by the Thumb Screw, P/N
1. The B-410 / B-510 Chopper Assembly mounts to
B-210-32A2. a small amount of air is required to:
Cutter Pivot Tube, P/N 21491-00. Once the Chopper
is set, tighten Cutter Clip, P/N B-310-4 with Screws.
a. Cool Chopper Head
b. Assist in Dispersing chop.
Adjusting Chopper Mount
Angle Adjust:
1. Loosen Lock Nut, P/N 7729-04, Pivot Chopper
Mount to desired Angle. Retighten, P/N 7729-04 Hex
Nut.
Lock Nut
21
Installation
2. Air Hose P/N 17798-XX attaches to fitting, P/N
1880-00 on back of gun.
Chopper Air Requirements
100 PSI / 8 CFM
Adjusting Speed & Blower Air
1. The Blower Air is adjusted by the Thumb Screw, P/N B210-32A2. Only a small amount of air is required to:
a.
Cool Chopper Head.
b.
Assist in Dispersing chop.
Speed Control / Muffler
1. The Muffler Assembly controls the Amount, and Speed
of air exhausting the Air Motor.
2. As the Speed Knob, P/N 21563-01 and Machine Screw,
P/N 21567-24F is turned out, the Air Motor speed increases.
3. Once it is set, Lock the Knob / Screw down with the
Body, P/N 21561-00.
Adjusting Chopper Mount
3. The Cutter Valve, P/N 23776-00 controls the air
1. Loosen Screw, P/N 8212-16F to twist the Chopper side
to side on the Pivot Tube, P/N 21491-00. Retighten once
it is set.
flow to the chopper.
NOTE
This is a positive ON/OFF valve. It does not regulate
Air Flow.
2. Loosen Screw, P/N 7958-16C to pivot the Chopper up
& down on the Chopper Bracket, P/N 23512-00. Retighten once it is set.
22
Operation
Air Requirements
All GlasCraft Choppers require 8 CFM (cubic feet per
minute) @ 100 PSI. of dry, filtered, compressed air. The
air supply hose to the Chopper must be new and have
at least a 5/16” inside diameter.
CAUTION
Do not wet the end of the roving or attempt to feed
frayed roving into the Chopper as this may cause it to
wrap around the feed roller and jam.
Avoid wetting the roving with over-spray to prevent similar problems
2. The Motor Oiler is located on the forward port of the Air
CAUTION
Motor. It is recommended that the Oiler Felt, P/N 378,
be lubricated with Air Motor Oil, P/N 562. Depending on
use, it is generally recommended that two or three drops
of oil be placed on the Felt every other day.
Do not attempt to use lower air pressures or a smaller
hose as erratic operation may result.
Chopper Operation
Models B-410 / B-510
1. To introduce roving to the Chopper, cut the free end
of the roving cleanly and double it over approximately one inch from the end. Feed into one of the
three holes provided in the back of the cutter while
running at moderate speed.
B-410
B-410
B-510
23
B-510
Operation
3. The Muffler/Speed Control is located on the rear
port of the Air Motor. Adjustment of Knob, P/N
21563-01 controls the Air Motor speed and determines the cutting rate. Adjust this valve until the desired glass content is achieved.
B-510
NOTE
B-410
This Valve should be at least slightly open at all times or the
Chopper may tend to fill and jam.
5. Adjust this valve until a good glass/resin fan results with a
minimum of drop-off. If an excessive amount of bypass air is
used, the roving may filamentize or cotton, causing various
wet-out problems.
6. When desired adjustment has been made, lock Thumb
Screw, P/N B-210-32A2, in place by tightening Lock Nut,
P/N B-210-32A1. Do not over-tighten!
Roving Cut-Length Adjustment
B-510
4. The Chopper Blower Control Valve is located on
the rear of the Back Plate. Adjustment of Thumb
Screw, P/N B-210-32A2 controls the amount of bypass air which serves to vary the dispersion of the
cut roving as it leaves the Chopper.
The cut length of the roving fibers may vary from 1/2” to 4”
depending upon the number of blades in the cutting head.
The cutting head has a circumference of 4” and is divided by
eight slots at 1/2” intervals. Any number of blades may be
omitted to achieve cut-lengths greater than 1/2” or blends of
lengths. The most popular length in use today is 1”, which
may be achieved with four equally spaced blades. The
chopper is delivered to you set in this matter.
WARNING
Relieve all air pressure from the system before attempting
any repair or maintenance procedures on this equipment.
Do not operate the Chopper with the cover or guard removed.
The blades may fly free if improperly installed.
B-410
24
Maintenance
Blade Replacement
2. To re-insert Blades, place in slot, sharp edge out.
NOTE
NOTE
Refer to Figure 7 illustration during the following Blade
Replacement instructions.
It is very important that the Blade be held against the side of
the slot which will contact the Anvil Roller first.
WARNING
3. Next, place in the Blade Retainer Bar, P/N B-210-16A
and install Spring, P/N B-210-16B with a screwdriver or
needle-nose pliers.
Cutter Blades are EXTREMELY SHARP.
Use extreme caution to prevent accidental cuts or nicks!
B-410
B-510
1. Using a small slotted-blade screwdriver, carefully pry 1. Using a 1/8” Allen Wrench, loosen and remove P/N,
out the Blade Retainer Bar, P/N B-210-16A, Retainer
Bar Spring, P/N B-210-16B and the Blade, P/N
B-210-17. Be careful not to lose these small parts
as they come free of the slot. Clean slots before replacing Blades.
B-510-23 screw. This will allow removal of P/N, B-51015 wedge insert.
2. Remove old blade.
3. Clean slot on P/N, B-510-14 as necessary.
4. Install new blade. Set insert in properly.
5. Reinstall P/N, B-510-23 screw and snug tightly.
25
Chopper Blade Installation Illustration
CORRECT
BLADE ASSEM BLY
LARGE RECTANGULAR
NOTCH VISIBLE
BLADE
CUTTER
HEAD
THIS MUST BE VISIBLE
WHEN GUARD ASSEMBLY
IS REMOVED.
CUTTER
HEAD
BLADE RETAINER BAR
RETAINER BAR SPRING
INSTALL BLADE FROM
THIS POSITION ONLY!
INCORRECT
BLADE ASSEM BLY
BLADE
BLADE RETAINER BAR
RETAINER BAR SPRING
SMALL NOTCH
THIS SIDE OF ASSEM BLY
MUST FACE CUTTER PLATE
CUTTER
HEAD
CUTTER
HEAD
B-210-16A
BLADE RETAINER
BAR
B-210-16B
RETAINER BAR
SPRING
B-210-17
BLADE
Fig. 7
26
CORRECT
BLADE ASSEM BLY
Maintenance
Anvil Sleeve Replacement
B-510 Adjustments
If the Chopper fails to cut properly with new blades, the
anvil roller needs replaced.
The B-510 adjustments are set at the factory during final
inspection of the unit. This adjustment is set without running glass roving through the chopper. It is also important
to remember that the chopper head is the drive mechanism
of the assembly, adjustments are being made to the Rubber
Roller, P/N B-510-08 and Idler Bearing, P/N B-510-11.
1. Remove Retaining Ring, P/N 5133-62MD with a
screwdriver. Care must be taken not to spring the
Retaining Ring excessively.
After feeding in the strands of roving “In Process” adjustments may be required. This adjustment is dependent on the
type of glass roving being used and the number of strands.
2. Slide or pry off the old anvil roller and install a replacement by pressing it in place. To prevent the
blades from making deep cuts in roller’ surface,
be sure to rotate the roller as it is pressed on.
Adjust as follows:
1. Shut off air supply to chopper.
CAUTION
Do not use a hammer when installing a new sleeve as
permanent damage may result.
2. Loosen Lock Screw, P/N 9944-16C for the Rubber Roller, P/N B-510-08.
3. Replace the Retaining ring with ordinary pliers.
3. Loosen Adjustment Knob, P/N B-510-03 for the P/N
B-510-08. This action will allow the glass in between
the Cutter Head and Roller to relax and move roller
away from Cutter Head slightly.
4. Operate the Chopper for a minute or so with the
cover in place, to run the new anvil roller. The Chopper should now start and run freely.
Chopper Adjustments
4. Retighten Lock Screw, P/N 9944-16C.
Should adjustments be necessary, they may be accomplished by simply loosening either the Cutting Head or
the Idler Bearing, rotating the Eccentric Nut in the back
and retightening.
5. Loosen Lock Screw, P/N 9944-16C for the Idler Bearing,
P/N B-510-11.
6. The Idler Bearing should now find its setting with the
spring pressure applied to it.
B-410 Adjustments
7. Retighten Lock Screw, P/N 9944-16C.
1. Cutting head should have sufficient squeeze to cut
properly. Excessive Anvil Squeeze or roll interference will overload the motor or create starting problems. Insufficient Squeeze will result in incomplete
cutting.
2. Idler Bearing should be adjusted so there is only
8. Turn air supply on to chopper and operate, verify glass
is consistently cut to length. Chopper Air Motor
CAUTION
slight contact with the Anvil Roller. Excessive pressure will create motor drag and cause starting problems. Insufficient squeeze will allow the roving not
to feed or drop out of the chopper when it is stopped.
The clearances in this Motor range are from .0015 to .002
and are extremely critical. For this reason, it is advisable
that the Motor NEVER be disassembled in the shop!
27
Maintenance
Model B-410 / B-510
The Air Motor on your Chopper is precision built and
under normal operation will last hundreds of hours of
continuous use with proper care. It is recommended that
the Oiler Felt, P/N 378, be lubricated with Air Motor Oil,
P/N 562. Depending on use, it is generally recommended that two or three drops of oil be placed on the Felt
every other day.
NOTE
Before cutting glass...
...RELIEVE AIR PRESSURE TO CHOPPER.
...remove Chopper Guard and carefully wipe clean
excess Oil on Guard, Anvil Sleeve, etc.
...replace Guard.
28
Notes
29
Notes
30
Limited Warranty Policy
GLASCRAFT, INC. (“GlasCraft”) warrants to the original Purchaser of GlasCraft manufactured equipment
and parts, that all GlasCraft manufactured equipment and parts will conform to their published written specifications and
be free of defects in workmanship and material for a period of one (1) year from the original date of installation. GlasCraft
makes no warranty to anyone other than the original Purchaser.
If any GlasCraft manufactured part or equipment is found to be defective in workmanship or material within the one-year
period from the date of installation, as determined solely by GlasCraft, GlasCraft, in its sole discretion, will either repair
or replace the defective part or equipment at GlasCraft’s cost, including freight charges both ways, or credit or refund the
purchase price for the defective equipment or part.
A warranty claim will be honored only when:
1. GlasCraft has been informed, in writing, of any such defect in workmanship or material within ten (10) days
after discovery by the original Purchaser;
2. An official of GlasCraft has issued a return authorization number; and
3. The claimed defective equipment or part has been returned to GlasCraft by the original Purchaser, freight
prepaid (with proper return authorization number(s) attached), to: GlasCraft, Inc., 5845 West 82nd Street,
Suite 102, Indianapolis, IN 46278, U.S.A.
This warranty shall not apply to any equipment or parts that have been altered or repaired by anyone other than GlasCraft
or to defects or damage resulting from improper installation, misuse, negligence, accident, or use not specified by
GlasCraft. This warranty shall not apply to any equipment where any parts or components were replaced by any parts
or components not manufactured or supplied by GlasCraft. The decision by GlasCraft shall be conclusive and binding
on Purchaser.
GlasCraft does not warrant that any equipment or parts sold to Purchaser meet or comply with any local, state, federal,
or other jurisdiction’s regulations or codes. GlasCraft does not warrant that any equipment or part sold to Purchaser,
when used individually or in concert with any other part, equipment, device, component or process, does not infringe on
any patent rights of any third party. GlasCraft only warrants that it has no specific knowledge of any such infringement.
GlasCraft makes no warranty as to any parts or equipment manufactured by others. Purchaser shall look solely and
only to the manufacturer of such parts or equipment with respect to any warranty claims. GlasCraft hereby assigns to
Purchaser the original manufacturer’s warranties to all such equipment and parts, to the full extent permitted.
THE AFORESAID WARRANTY IS IN LIEU OF ALL OTHER WARRANTIES, EXPRESS OR IMPLIED. SPECIFICALLY THERE ARE NO WARRANTIES OF MERCHANTABILITY OR FITNESS
FOR A PARTICULAR PURPOSE, WHICH WARRANTIES ARE SPECIFICALLY DISCLAIMED.
GlasCraft shall not be liable for any loss or expense resulting from damage or accidents caused by improper use or application of materials manufactured or sold by GlasCraft or its distributors or agents.
UNDER NO CIRCUMSTANCES SHALL GLASCRAFT’S LIABILITY EXCEED THE AMOUNT PURCHASER PAID FOR THE CLAIMED DEFECTIVE EQUIPMENT OR PART. UNDER NO CIRCUMSTANCES SHALL GLASCRAFT BE LIABLE FOR INCIDENTAL OR CONSEQUENTIAL DAMAGES OR FOR LOST PROFITS.
No action arising from or relating to any goods manufactured by or purchased from GlasCraft may be brought more than
one (1) year after the cause of action accrues.
31
Technical Assistance............
Thank You for selecting GlasCraft spray equipment
Should you have any questions or need technical assistance, contact your factory authorized
GlasCraft distributor.
Distributor: _________________________
Phone: ____________________________
Contact: ___________________________
For any issues your distributor cannot address, the GlasCraft technical service department is
always available to assist you with the operation of your spray equipment. To help our technical
representatives expedite your call and better address your questions, please have the following
information ready and available when you phone GlasCraft.
* If your questions are not urgent, You can e-mail all correspondence to [email protected]
Model: _____________________________
Air compressor size: __________________
Compressor to system supply line: _______
Spray gun: __________________________
Serial number: _______________________
Pressure at the system: _______________
Material pump: _______________________
Serial number: _______________________
Main air line volume: __________________
System gauge pressures
Catalyst pump: _______________________
AAC pressure: _____________________
Chopper: ____________________________
Serial number: _______________________
Atomizing air pressure: ________________
(external mix)
Type of material: ______________________
Material pump pressure: _______________
Type of catalyst: ______________________
Solvent flush pressure: ________________
Catalyst percentage: __________________
32
For Your Reference
Date Purchased
__________________________________________________
Distributor
______________________________________________________
______________________________________________________
Contact
______________________________________________________
Phone
______________________________________________________
E-mail
______________________________________________________
GlasCraft manufactures a complete line of FRP spray systems. If your application is in-plant or a field
contractor - GlasCraft has a system package to meet your requirements.
FORMULA - INTERNAL & EXTERNAL MIX POLYESTER EQUIPMENT
CHOPPER & GELCOAT SYSTEMS
. NO NEEDLE IN THE SPRAY GUN
. INFINITELY ADJUSTABLE CATALYST PUMP
INDY - INTERNAL & EXTERNAL MIX EQUIPMENT
. LOWEST LEVEL OF EMISSIONS
. AUTOMATIC EQUIPMENT FOR ROBOT APPLICATIONS
SPARTAN - CLOSED MOLD / RTM EQUIPMENT
. HAND HELD & DELUXE MODELS
. PROGRAMMABLE CATALYST PERCENTAGES
SPECIALTY DISPENSE EQUIPMENT
. APD - HIGH VISCOSITY POLYESTER PUTTY DISPENSE
. RCD - RESIN / CATALYST DISPENSE
. PFR - PRESSURE FED ROLLERS
For more information concerning any of these GlasCraft products,
contact your local authorized GlasCraft distributor or visit www.glascraft.com
Quality and Performance…
GENUINE GLASCRAFT
www.glascraft.com
GC-1021
REVISION SEP T. 06
5845 WEST 82nd STREET
INDIANAPOLIS, INDIANA 46278
U.S.A.
Phone (317) 875-5592
Fax
(317) 875-5456
E-Mail [email protected]