1
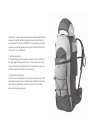
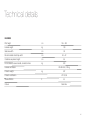
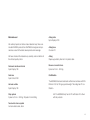
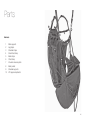
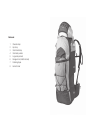
EASINESS
User manual
Edition 2 / 11_2012
Edition 2 / 11_2012
Contents
Thank you for flying ADVANCE ....................................................... 4
About ADVANCE .............................................................................. 5
The EASINESS.................................................................................. 6
Welcome on board!....................................................................... 6
Special features of the EASINESS................................................ 6
Safety advice.................................................................................... 7
General advice about paragliding................................................ 7
Preparing the product for use.......................................................... 8
Delivery......................................................................................... 8
Delivery package.......................................................................... 8
Adjusting the harness................................................................... 8
Fitting the speedbar.................................................................... 10
Installing a reserve in the front container.................................... 10
Fitting the protector..................................................................... 14
Adjusting the rucksack................................................................ 14
Using the EASINESS...................................................................... 16
Packing the rucksack.................................................................. 16
Packing the back pocket for flight ............................................. 16
Reserve suspension ................................................................... 16
Throwing the reserve....................................................................17
Use in school ...............................................................................17
Use with other makes of paraglider.............................................17
Winching ......................................................................................17
Acro flying .................................................................................. 18
Tandem flying.............................................................................. 18
Before takeoff.............................................................................. 18
Maintenance, repairs and care ...................................................... 19
Care and maintenance ............................................................... 19
Check ......................................................................................... 20
Repairs ....................................................................................... 20
Disposal ..................................................................................... 20
Technical details............................................................................. 22
Technical Data............................................................................. 22
Material used............................................................................... 23
Certification................................................................................. 23
Service............................................................................................ 24
ADVANCE Service Centres......................................................... 24
ADVANCE website ..................................................................... 24
Warranty...................................................................................... 24
Parts................................................................................................ 26
Harness....................................................................................... 26
Rucksack..................................................................................... 27
Annex.............................................................................................. 28
3
Thank you for flying ADVANCE
Congratulations on your choice of an EASINESS - a quality product
from ADVANCE. We are confident that you will spend many rewarding hours in the air with it.
This manual contains instructions and important advice about safety,
care and maintenance. We strongly advise that you read it carefully
before your first flight with the harness. You can always find the latest
version of the manual and additional up-to-date information on
www.advance.ch. Any new safety-related findings about the product
will be published there. For questions or problems please contact
your supplier or ADVANCE direct.
We wish you a lot of fun with the EASINESS and, as always, “happy
landings”.
Team ADVANCE
4
About ADVANCE
ADVANCE is one of the leading worldwide paraglider manufacturers,
and is based in Switzerland. Since the company was founded in
1988 it has maintained its own policies and concepts, both in development and production. The results are matured products with unmistakable characteristics.
Backing the brand is a team of experts who share the passion of
those who put their trust in ADVANCE products. With their own understanding of flight they bring their personal experience and dedication to the working processes.
Total control of the production process and close supervision of the
working practices in the dedicated factory in Vietnam guarantee a
high standard of workmanship. A long term relationship with fabric
and line manufacturers also enables ADVANCE knowledge and expertise to find its way directly into the development of new materials.
ADVANCE puts great importance on after-sales customer support,
and has built up a worldwide service network for this purpose. An
on-going interaction with customers brings new insights that find
their way into ADVANCE products – thus completing the «Circle of
Service».
5
The EASINESS
Welcome on board!
EASINESS is an extremely light and very comfortable reversible harness. The no-seatboard, one-size-fits-all harness weighs 1.3 kg and
is best suited to Hike & Fly pilots, leisure flyers, travellers and vol bivouackers .
Special features of the EASINESS
• Easy handling
• Uncompromisingly light and sophisticated in design
• The most from the least (minimum build, big result)
This reversible harness, with carabiners, weighs in at around 1.3 kgs
as a result of high quality light materials and a strikingly simple concept: an optional protector weighs another 270 gm.
• Clothing can be stuffed in the bungee chords on the back pocket.
• There’s an opening for a Camelbak tube and a fixing loop on a shoulder strap.
• A special helmet holder on top leaves more room inside the ruck-
sack.
• Ergonomically shaped back support and breathable double-mesh material on the shoulder straps for cool carrying.
• Hand/wrist loops on the shoulder straps for relaxed hiking.
• Stowable holding loops on the side of the rucksack for carrying mountain gear – (snowshoes, crampons, ice axe, etc.).
• Wide hip strap for perfect stability and good walking comfort.
• Loads of extra little packing places.
• The speed system has roller bearings and is nice to use.
• One size fits all: suits pilots from 155 cm to 190 cm tall.
• This light harness has the ADVANCE look: elegant, simple, classy.
More important details
• The harness has the well-tried-and-tested, two-slide-buckle
ADVANCE combined chest-with-leg-straps closure system (called Safe-T-System).
• A normal sized round reserve can be carried in the adjustable capacity front container.
6
Safety advice
As with all commercial reserve parachutes paraglider harnesses,
because of their design, are not at all suitable for freefall parachuting. The reserve and its attachments are not designed for an abrupt
opening.
All adjustments to the harness should definitely be made before flight.
Correct harness settings contribute decisively to functioning, safety
and comfort in flight.
items of equipment should be checked for damage and airworthiness.
A proper pre-takeoff check must also be carried out.
When carrying out paraglider sports every pilot bears sole responsibility for all risks including injury and death. Neither the manufacturer
nor the seller of a paraglider can guarantee or be held responsible for
the pilot’s safety.
The EASINESS is only to be used for paragliding.
General advice about paragliding
Flying a paraglider calls for appropriate training and a sound knowledge of the subject, as well as, of course, the necessary insurance
cover and licence. A pilot must be able to correctly assess the weather conditions before taking off. His or her capabilities must be adequate for the actual paraglider. The paraglider pilot is also required
bear a sense of responsibility towards the natural world, especially
regarding the preservation of wildlife and landscape.
Wearing an adequate helmet, suitable boots and clothing, and carrying an emergency parachute are essential. Before every flight all
7
Preparing the product for use
Delivery
Adjusting the harness
Before delivery every ADVANCE product has to be checked by the
dealer for completeness and correct basic settings. The completed
warranty document will ensure that defects in the product attributable
to manufacturing faults are covered by the ADVANCE warranty. (See
Warranty in the section «Service».)
The EASINESS is simple to adjust because, to a great extent, it
adapts itself to fit the pilot’s body.
Delivery package
All the EASINESS settings can be adjusted in the air as well as on the
ground. ADVANCE recommend that you check out the settings carefully before you fly. In any case the first test flight should take place in
quiet conditions.
The EASINESS harness package contains:
• Reversible harness
• 2 riser quicklinks (as carabiners)
• ‘EASINESS Getting Started’ booklet
• 3 reserve connection straps (attached to the shoulder straps)
Tip: Pack the back pocket and install the reserve before you start adjusting. This will give something close to a realistic fly-
ing attitude.
Options for the EASINESS are:
• an adjustable size front container with reserve handle and a
reserve Y-connection
• a 270g lightweight, LTF approved airbag protector
All adjusters are completely open at delivery.
1. Start at the basic settings
To save weight the leg straps 1 are not adjustable. Carabiner distance is variable. Advance recommend that you fly with a carabiner
distance of 40 to 42 cm.
8
2. Setting the upper body angle
Now you can alter your upper body recline angle using the back
straps 2 . The back straps at the sides are mounted relatively high.
This gives good back support and takes weight off the shoulders.
Finally you can tighten or loosen the shoulder straps as you wish –
quite loose, or providing light support – but without putting pressure
on the shoulders.
2
1
1
3. Setting the distance between the leg rests
Finally you can set the distance between the two leg rests; when
shortened this makes the EASINESS feel compact and more stable
in flight 3 .
3
4. Checking the settings
Recheck that the shoulder straps give only light support.
9
2
Fitting the speedbar
Lead the speed lines through the D rings 1 under the leg rests. Then
pull them through the pulleys and the hole in the elastic cover 2 ,
then connect them with the glider.
Caution: The speed system is correctly set up when you can use the whole accelerate range of the glider. Make absolutely
sure that the speed lines are not adjusted too short, so that the glider would be always accelerated in flight.
Installing a reserve in the front container
General advice
Every reserve/harness combination has its own characteristics. It is
essential that pilot and parachute packer are familiar with the system
to make sure it works reliably.
1
The adjustable size front container has room for round reserves of
volumes from approximately 3 to 6 litres. Instructions for connecting
the reserve with the harness and fitting it in the supplied front container follow. We strongly recommend that you go to a qualified person or your dealer to do this to ensure correct installation.
10
Info: The volume formula can be used as a very rough
approximation (Reserve weight in kilos x 2.7 = Volume in
litres). Even so, depending on packing style and quality, a re-
serve so calculated to be within the maximum volume limit may not release properly.
Caution: In every case a compatibility test must be carried out to confirm that a particular reserve/front container combi-
nation works correctly.
Connecting the reserve with the harness connection
Connect the supplied harness connection with the reserve bridle using a Maillon Rapide (quicklink) of at least 2400 daN minimum safe
load. Secure both webbings in position on the Maillon using, for example, rubber O rings, so that they do not slip round and side load
the Maillon when the reserve opens.
Inter-looping this connection should only be done by the harness
manufacturer or a trained and qualified person. An incorrectly looped
connection can cause slipping, friction, melting and failure when the
reserve opens.
11
Connecting the reserve handle with the inner container
Connect the front container on the chest strap
Connect the supplied reserve handle on the centre loop of your reserve inner container.
The EASINESS front container must be fixed to the chest strap by the
three Velcro loops AND the two loops at the sides of the front container. The two side loops are to secure the left and right ends of the
front container on the chest strap, and also prevent it from sliding
sideways.
Caution: Never fasten the inner container to the reserve itself.
Packing the inner container in the front container
First lay the harness connection in the front container so that an end
of the Y-connection appears out of the right and left of the front container. Then put the inner container on top. Make sure that the reserve handle connection lies against the front of the front container,
so that there will be the shortest distance between the reserve handle and its connection to the inner container.
Close the front container with the closure loops and fix the reserve
handle in its pockets on the front. Lead the two reserve handle yellow
cables through the closure loops and into their ‘buttonholes’. The reserve handle should sit snugly on the front container, easy to see and
reach. Make sure the yellow cables run cleanly, to guarantee a correct release.
After closing the chest strap the reserve has to be connected to the
harness. There are two ways of doing this for the EASINESS (see also ‘Fitting the reserve’ in the section “In flight – use in practice”):
a)An inter-looped harness V-connection runs from the shoul-
der strap loops, through the harness side channel to the re
serve.
b)The ends of the Y-connection supplied with the front con
tainer are hung in the main carabiners.
Caution: The EASINESS was developed and tested with its own front container.
Caution: lf the front container is only fixed to the chest strap by the three Velcro there’s the danger that the front container
can come oft and be thrown tagether with the reserve.
12
See also „EASINESS front container fitting instructions“ p. 28
Caution: The reserve can only work if the front container is secured according to these instructions.
Info: Doing the compatibility test yourself gives you confidence
in the reserve system.
Carrying out a compatibility check
Correct fitting of a reserve must always be checked by a test release.
To do this sit in the harness hung up by its carabiners in a harness
hanger. It should be possible to operate the reserve from the flying
position faultlessly, as described in this manual. Make sure that the
release force is not less than 4 daN - and not more than 7 daN. If you
are not confident about doing this do not hesitate to contact an expert or your ADVANCE dealer.
Caution: Make sure that the pull on the reserve handle first pulls the yellow cables out, then acts on the inner container connection.
Caution: Before every flight check that the reserve handle
is in its correct position, and that the yellow cables are cor-
rectly stowed. We recommend that a hand is briefly placed on the reserve handle during each flight to remind yourself of
its position. We also advise that you mentally rehearse the sideways throwing action.
13
Fitting the protector
An optional LTF- approved airbag protector can be zipped to the
EASINESS. One half of the zip fastener is under the EASINESS, the
other on the protector. The zip puller is secured by a ball (Chicken
Loop System). The front of the protector is then located by Velcro
tape on the centre loop under each leg rest. Finally the side flaps are
held by strap and plastic buckle on the square rings at the harness
sides.
Info: An extremely small pack-up volume (weight: 270 gm) means that the protector lives perfectly inside the EASINESS rucksack, and doesn’t have to be removed for hiking.
Adjusting the rucksack
The EASINESS rucksack size comes into its own when it carries a
PI (or any light glider), a front container reserve, helmet and clothes.
Thanks to its compactness and geometry the rucksack can be carried
by short or tall pilots without losing comfort.
Stowages at the sides, pockets on the back and in the hip strap, multifunction bungee on the back – there’s plenty of space for those essential extras. The side pocket can take a 1.5 ltr PET bottle – with the
14
rucksack full. The two lower side pockets can be easily reached while
underway. Close the rucksack zips gently and never under load. For
an individual and ideal set up ADVANCE recommend that you proceed
as below with the fully packed rucksack (see ‘Packing the Rucksack’
in the section “Use in Practice”).
2
1. Hip strap adjustment
The fastened hip strap of the packed rucksack should sit centrally on
the upper edge of the pelvis/hip bones. In this position pull in the hip
strap so that it feels comfortable. When the rucksack is correctly adjusted its weight is mainly taken on the hip bones.
2. Shoulder strap adjustment
Pull the shoulder straps lightly in until you can just feel them, but without feeling pressure. The low-mounted straps fit different body sizes.
When properly adjusted the shoulder straps sit on the shoulders
without exerting heavy pressure.
1
15
Using the EASINESS
Packing the rucksack
Fold the paraglider to the width of the rucksack, pack it in its inner
bag and put into the rucksack first – on the back padding. Compress
the package with your weight so that the rucksack closes and the
zips can be easily pulled. There’s room for clothes, reserve and instruments in the EASINESS. The helmet can go inside or on top in
the detachable helmet-holder.
Caution: Never drag the EASINESS over the ground. Only
close the zips under easygoing load and never pull them against too much tension. Do not pack pointed or sharp-
edged objects in the back pocket, outside pockets or inside the rucksack – they can damage the fabric.
Packing the back pocket for flight
Careful packing of the back pocket has an important effect on your
comfort in flight. Oddly-shaped and hard objects can be felt through
the harness back, and can disturb your comfort.
Pack your glider inner bag first, at the bottom of the back pocket.
Use the rest of the space thoughtfully. Pack walking poles (points up-
wards), provisions and clothing carefully in the back pocket, but do
not pack it so full as to overstrain it.
Tip: ADVANCE recommend that walking poles always have rubber tips. These save your ears on the road and protect the back pocket when packed.
Tip: space in the back pocket is limited. Do not use plastic containers; to save space take drinks in PET bottles and food in zip bags or in bar form – when used up they take up no space. You can take your camelbak in the back pocket and lead the tube out through the special opening.
Reserve suspension
The EASINESS has two types of reserve connection. ADVANCE recommend version a):
a) The harness connection runs from the shoulder straps via the side channel to the reserve.
The three part connection is already made up and fitted on delivery. It forms a V-connection from the shoulder straps and should be connected to the reserve bridle by a Maillon Rapide quicklink, or inter-looped.
16
b) Y-connection to the main carabiners:
In this case you should remove the reserve connections
already installed at the shoulder straps. The two ends of the Y-connection, supplied with the front container, should be hung in the main carabiners before every flight, in such a way that they do not touch the carabiner fasteners. In addition you must check that the front container is attached to the chest strap by its three Velcro loops. (See also ‘Connecting
the front container with the harness’ in the section “Preparing the Harness”.)
opens, making a parachute roll easier on touchdown.
b) If the reserve is connected to the main carabiners it can
be difficult to get into the upright position after the reserve opens, so this must be done actively.
Caution: As usual with a front container it can be difficult to reach the reserve handle if the paraglider lines are twisted.
Caution: Always hang the Y-connection ends in the carabiners
first, then the paraglider risers – so that the reserve connec-
tions cannot touch the carabiner fasteners in flight.
The EASINESS can be used in the school environment.
Use in school
Use with other makes of paraglider
Throwing the reserve
The harness can be flown with any paraglider – there’s no restriction.
In an emergency pull the reserve handle free with a strong tug, then
throw it and the inner container into free airspace. The lines pay out
and the inner container opens. The reserve canopy will pull out, extend itself and fill.
Winching
ADVANCE harnesses are suitable for winching. With the EASINESS
the towing link must only be quicklinks attached directly to the main
carabiners.
a) If the reserve supports the harness by the shoulder straps the pilot will be automatically brought upright when the reserve
17
If you are in any doubt about this always ask the winch driver or a
person authorised by the manufacturer.
Acro flying
Because of its lightweight materials the EASINESS is not suitable for
acro manoeuvres. In addition the harness can only carry one reserve
(Front container). ADVANCE recommend a harness with two reserves
for acro flying.
Tandem flying
The EASINESS harness can be used by a tandem passenger. The
EASINESS cannot carry a tandem reserve so is not suitable for the
tandem pilot.
Before takeoff
Before every takeoff carry out the following checks:
1. Harness and helmet done up, reserve OK?
2. Lines free?
3. Canopy open?
4. Wind direction and strength assessed?
5. Airspace and field of view clear?
18
Maintenance, repairs and care
Care and maintenance
When choosing materials special attention was given to saving weight.
The harness was still designed for high loading, but not for extreme
physical demands. The life of the harness depends, to a great extent,
on the way it’s looked after by its users, and we recommend that the
harness is routinely inspected for signs of wear, damaged seams and
webbing, and that damaged parts are replaced. It is especially important to note that any suspected damage should be immediately
taken to an authorised workshop for repair.
Caution: Do not modify your harness, and never fly with a harness that has any kind of damage to its webbing.
It is recommended that the harness is completely checked at least
once a year: this must include the condition of the seams and webbing parts, and the operation of the buckles. Don’t forget the regular
airing and repacking of your reserve parachute. If your reserve has
been thrown in an emergency your harness should also be checked
by the manufacturer or an authorised service centre.
Ultraviolet light, temperatures below -20°C and above +60°C, humidity, salt water, aggressive cleaning agents, unsuitable storage as
well as physical abuse (dragging over the ground) speed up the ageing process.
The life of your harness can be greatly extended if you observe the
following points:
• Allow a wet or damp harness to dry completely at room temperature,
or outside in the shade. Always repack your reserve.
• If your harness gets wet with sea water rinse it thoroughly in fresh water. Always repack your reserve.
• Only clean your harness with fresh water, and a little neutral soap if necessary. Never use solvents.
• Check the harness connection and reserve bridle after every reserve
deployment.
• A qualified person must check the harness after any very high
loading (e.g. heavy crash).
• Regularly inspect the harness for damaged seams and webbing. In
particular check the harness/reserve connection and the seams near the main carabiners.
• Don’t subject the harness to extremes of temperature and make sure it gets adequate ventilation, to prevent condensation forming.
• Do not leave the harness in the sun (UV radiation) before and after flying.
19
Most reserve parachute manufacturers recommend an inspection
and repacking every six months, so as to guarantee a fast and routine opening every time. If the reserve gets wet, damp or overheated
it must definitely be repacked. We strongly recommend that you let
a qualified person pack your reserve. In addition, ADVANCE also
strongly recommend that you regularly check the front container to
see that the yellow cables run through their loops properly. Then you
can be sure they will easily release the reserve when required.
Check
All your equipment must be given a check every 24 months (2 years).
With intensive use (more than 150 flying hours per year) an annual
check is needed, after the first check.
The check includes a visual assessment of the material, webbing
parts and connections, the most important sewing as well as the
suspension carabiners. All parts are inspected for tears, kinks, frayed
seams, general damage and evidence of serious misuse. Finally the
overall condition of the harness is rated and recorded in the service
handbook.
Repairs
As a general rule you should not attempt to repair a harness yourself.
The various seams are made with great precision, and, for this reason, only the manufacturer or an authorised service centre may make
repairs using original materials.
Disposal
Environmental protection plays an important role in the selection of
materials and the manufacture of an ADVANCE product. We use only
non-toxic materials that are subjected to continuous quality and environmental impact assessments. When your harness reaches the end
of its useful life in a number of years’ time, please remove all metal
parts and dispose of the rest of the harness in a waste incineration
plant.
You can find additional information about the check in this manual in
the section “Service”, or at www.advance.ch.
20
Technical details
EASINESS
Pilot height
cm
155 – 190
Harness weight
kg
1.30
Seat area width
cm
38
Recommended chest strap width
cm
40 – 42
Carabiner suspension height
cm
46
Front container, reserve handle, connection lines
kg
0.18
Harness certification
Protector weight
DIN EN 1651, 120 kg
kg
Protector certification
Volume PIPACK
Colours
0.27
LTF 91/09
lt
43
black lime
22
Materials used
Airbag sides
Nylon Ripstop 210D
We routinely inspect and test our base materials many times over.
Like all ADVANCE products the LIGHTNESS is designed and produced as a result of the latest developments and knowledge.
Airbag base
Cordura 210
We have chosen all the materials very carefully, under conditions of
the strictest quality control.
Airbag
Shape supported by internal 3 mm plastic cable
Rucksack outside and inside
Nylon Ripstop 70D
Reserve connection lines
Dyneema 10 mm - 2320 kg
Seat area
Nylon Oxford 210D
Certification
Harness outside
Nylon Ripstop 70D
The EASINESS has been tested and certified in accordance with DIN
EN-Norm 1651 at 120 kg supported weight. The airbag has LTF certification.
Strap system
Dyneema 10 mm - 2320 kg / Polyester 25 mm 800kg
Info: The EASINESS only has its LTF certification if it is flown with the protector.
Two-buckle closure system
Alu-frame slide buckle, black
23
Service
ADVANCE Service Centres
ADVANCE operates two company-owned service centres that carry
out checks and repairs of all types. The workshops based in Switzerland and France are official maintenance operations, certified by the
DHV, which possess many years’ experience and in-depth productspecific expertise. The ADVANCE worldwide service network includes
other authorised service centres that provide the same services. All
service facilities use original ADVANCE materials exclusively. You can
find all information on checks and repairs and the relevant addresses
at www.advance.ch.
ADVANCE website
At www.advance.ch you will find detailed information about ADVANCE
and its products as well as useful addresses, which you can contact
if you have any questions.
On the www.advance.ch website you will be able to:
• complete the warranty card online up to 10 days after purchase of the glider, enabling you to enjoy the full benefits of the ADVANCE warranty
• find out about new safety-related knowledge and advice concern-
ing ADVANCE products
• download an application form in PDF format which you can use when sending your glider in for a check at ADVANCE
• find an answer to a burning question among the FAQs (Frequently Asked Questions)
• subscribe to the ADVANCE Newsletter so that you will be regularly informed by e-mail about news and products.
It is well worth visiting the ADVANCE website regularly because the
range of services offered is continually being expanded.
Warranty
In order to benefit from the full cover of the ADVANCE warranty we
ask you to fill out the appropriate form within 10 days of purchase.
You can do this on the internet under the heading “Warranty”.
As part of the ADVANCE warranty, we undertake to rectify any defects
in our products that are attributable to manufacturing faults. To make
a claim on the warranty notify ADVANCE immediately if a defect is
discovered, and send the defective product in for inspection. The
manufacturer will then decide how a possible manufacturing fault
is to be rectified (repair, replacement of parts or replacement of the
product). This warranty is valid for three years from the date of purchase of the product.
24
The ADVANCE warranty does not cover any claim other than those
indicated above. Claims in respect of damage resulting from careless
or incorrect use of the product (e.g. inadequate maintenance, unsuitable storage, overloading, exposure to extreme temperatures, etc.)
are expressly excluded. The same applies to damage attributable to
an accident or normal wear and tear.
Parts
3
3
9
1
4
1
Harness
7
1
2
3
4
5
6
7
8
9
10
Main supports
Leg straps
Shoulder straps
Small chest strap
Back straps
Chest strap
2-buckle closure system
Back pocket
Shoulder supports
LTF approved protector
6
8
5
2
2
10
26
8
Rucksack
1
2
3
4
5
6
7
8
Shoulder strap
Hip strap
Small chest strap
Small side pockets
Large side pockets
Bungee chord (multifunctional)
Fastening tapes
Helmet holder
1
3
7
5
6
2
7
4
27
Annex
EASINESS front container fitting instructions
The EASINESS front container must be fixed to the chest strap by the
three Velco loops AND the two loops at the sides of the front container. If the front container is only fixed to the chest strap by the three
Velcros there’s the danger that the front container can come off and
be thrown together with the reserve.
The two side loops are to secure the left and right ends of the front
container on the chest strap, and also prevent it from sliding sideways. It is essential that they are looped over the ends of the chest
strap, and they must never be hung in the main carabiners!
Caution: Loops (A & B) and Velcro tabs (1-3) must all fixed on the chest strap.
28
Pilot’s view: Front container mounted correctly
A
B
1
2
3
29
31
advance thun ag
u t t i g e n g s t r a s s e 87
ch 3600 thun
f o n + 41 3 3 225 70 10
f a x + 41 3 3 225 70 11
w w w. a d v a n c e.c h
i n f o @ a d v a n c e.c h