1
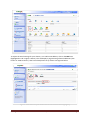
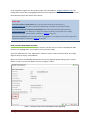
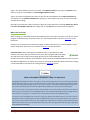
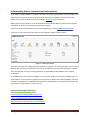
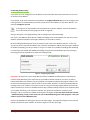
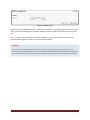
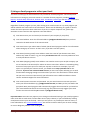
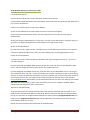
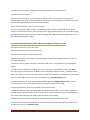
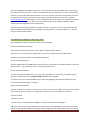
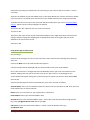
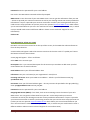
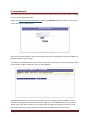
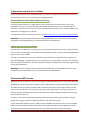
 Cymru 1 Gold and Silver Hosting Account Email Guide Thank you for choosing Cymru 1 to provide your website hosting and email. In this guide you will find information on how to login to your control panel to set up, modify and delete email addresses, and how to configure Outlook, Outlook Express, Thunderbird, Mac Mail and Entourage to work with them. Before you begin reading, please take a moment to make a written note of your domain name and your Control Panel username and password in the box below. Details of these were included in the Welcome email we sent you when you signed up. Keep this information in a safe and secure place so that you can refer to it in the future. You will be asked to provide your domain name if you contact technical support so that we can easily identify your account. If you do not know your Control Panel username and password please contact Technical Support so that we can send you a reminder. Your domain name: _________________________________ Your Control Panel Username: ________________________ Your Control Panel Password: ________________________ Contents: NOTE: Throughout this guide you will see words highlighted in light blue and underlined like this. These words act just like hyperlinks in a website – if you click on them you will instantly be taken to the appropriate part of this document. For example you can click on any of the links in the contents list below: 1 ) About Your hosting account ............................................................................. Page 3 2) Logging in and using your Control Panel ................................................................ Page 4 3) Creating new Email addresses ............................................................................. Page 5 4) Forwarding, Aliases, Passwords and other options .................................................. Page 6 5) Using an Email program to collect your messages .................................................. Page 7 6) Using Webmail ...................................................................................................... Page 8 7) Anti‐Virus and Anti‐Spam facilities ............................................................................ Page 9 8) Optional Extras ....................................................................................................... Page 9 9) How to contact Cymru1 .......................................................................................... Page 10 th
Cymru 1 Hosting Account Email Guide, V1.0, Published February 14 2008 © Cymru 1 Limited. All Rights Reserved. Unauthorised reproduction or dissemination in whole or in part is explicitly prohibited. Cymru 1 Limited is Registered in Wales. Company number: 4262212. Registered address: 7‐9 High Street, Porthmadog, Gwynedd LL49 9LR (no post to this address please) Postal Address: Cymru 1 Limited, PO Box 30, Porthmadog, Gwynedd LL49 9UG. Sales: Telephone 0870 940 4101. Email: [email protected] Billing: Telephone 0870 950 4103. Email: [email protected] Support: Telephone 0871 871 4747. Email: [email protected] Calls to our 0871 Technical Support number cost 10p per minute from a normal BT line. Lines are normally open from 9:30am to 5:30pm Monday to Friday, excluding public holidays. Plesk is a trademark of SW Soft, 13755 Sunrise Valley Drive, Suite 600, Herndon, VA 20171, USA. Hosting Account Email Guide v1.0 © Cymru 1 Limited Page 2 1) About Your Hosting Account Your hosting account provides publicly accessible webspace for your website, allowing anyone anywhere in the world to access it as long as they have access to the Internet. It also keeps track of statistics about visitors to your site, provides email and anti‐spam facilities and many other features. Cymru 1 provides two basic types of account: Silver and Gold. Although they differ in their features and capabilities, both are hosted on very powerful and extremely reliable servers co‐located at the Telehouse North Datacentre, in the heart of London’s Docklands – one of the main hubs of Internet connectivity in the UK. Cymru 1 Hosting account features include: •
•
•
•
•
•
•
Business‐class performance and reliability – ensuring your site stays accessibly to visitors Easy to use online Control Panel to administer your account Advanced security – helping to protect your site and others from hackers Sophisticated spam filtering (Gold account only) – reduce unwanted emails Virus protection – reduce the possibility of a virus getting onto your computers Extensive visitor statistics – see how popular your website really is Optional PHP scripting and MySQL Database facilities – for advanced hosting needs Hosting Account Email Guide v1.0 © Cymru 1 Limited Page 3 2) Logging in to and Using your Control Panel You control and configure your hosting account using an online Control Panel. This is powered by a sophisticated software platform known as Plesk. To login to your Control Panel, open your web browser and visit https://www.cymru1.net/gold ∙ In the Login box, enter your Control Panel username ∙ In the Password box, enter your Control Panel password ∙ Click on the Login button Please contact Technical Support if you do not remember your Control Panel Username and Password. Fig 1: The Plesk Control Panel Login page You will then see the main Plesk “desktop” which is where you make changes and control your hosting account: Fig 2: The Plesk Control Panel My Desktop page For detailed information on using the Plesk control panel in general, please download and read the full Plesk 8 User Manual. This is available from http://www.cymru1.net/gold/goldother.php Hosting Account Email Guide v1.0 © Cymru 1 Limited Page 4 3) Creating new Email addresses Once logged in to the Control Panel, click on the Home link you’ll see in the General box in the left hand column of the My Desktop page. See Figure 3 on the left. Fig 3: Home link You’ll then see a page with a list of all the domain names you have associated with your hosting account shown at the bottom. See Figure 4 below. Note: You may only have one domain. Figure 4: The Domain List Click on the domain name that you want to adjust. E.g. if you want to add, modify or delete email addresses for yourdomain.com then click on the yourdomain.com link in your list of domain names at the bottom of the page. Doing so will show you a new page with all the main domain options that are available, as well as show some summary statistics for it. See Figure 5 on the next page. Please be careful not to click on any icons not related to the task at hand! Hosting Account Email Guide v1.0 © Cymru 1 Limited Page 5 Figure 5 – Domain options – Mail icon is highlighted in red To adjust the email settings for your domain, or to add a new address, click on the Mail icon (highlighted in red in Figure 5 above). This will display a page showing all email addresses (also known as “Mail Accounts”) that have already been set up. Please see Figure 6 below. Figure 6 – Email address list (with Add New Mail Account and Show Aliases highlighted) Hosting Account Email Guide v1.0 © Cymru 1 Limited Page 6 In the example in Figure 6 on the previous page, one email address, [email protected], has already been set up. We have highlighted the two most important icons (Add New Mail Address and Show Aliases) and we will discuss these shortly. Quick Tips: If you want to delete an email address: Put a tick in the tick box on the left of the address (e.g. [email protected]) then click on the “Remove Selected” link and confirm the removal when asked. If you want to modify the settings for an email address: click on the name of the email address itself (e.g. [email protected]). This allows you to configure Forwarding and Aliases, and also allows you to change passwords. We’ll discuss all these options a little later in Section 4 of this guide. If you want to view Aliases: click on the Show Aliases link (highlighted in red in Figure 6 on the previous page). We’ll explain what Aliases are a little later in Section 4 of this guide. HOW TO ADD A NEW EMAIL ADDRESS: To add a brand new email address to your account, the first step is to click on the Add New Mail Account icon (highlighted in red in Figure 6 on the previous page) The terms “Mail Account” and “Mail Name”, which are used a lot in the Control Panel, are simply different ways of saying “email address”. When you click on the Add New Mail Account icon a new page will appear asking you for certain details in order to create the address. Please see Figure 7 below. Figure 7 ‐ Creating an email account (with Mailbox tick box highlighted) Hosting Account Email Guide v1.0 © Cymru 1 Limited Page 7 Type in the email address you want to create in the Mail account box (e.g. type in myname if you want to create an email address of [email protected]). Type in and then the password you want to have for this email address in the New Password box and repeat it in the Confirm Password box (typing it in twice makes sure that you have not made a mistake when typing). Normally you should not need to change or adjust any other options on this page. Make sure there is a tick in the Mailbox tick box then simply click on the OK button to create the new address. What’s the next step? After creating your new Mail Account (email address) the next step is normally to set up your email program to download any email that is sent to it. We’ll explain how to do this in Section 5 of this document. However you may also like to setup Forwarding, or add an Alias for your new email address. We’ll explain what these options are in a moment in Section 4 of this document. Important Note: After creating your first Mail account, to immediately create another one click on the Up Level link you’ll see at the top right hand of the page. This will return you to the email list page where you can click on Add New Mail Account once more to add the second address. Do not confuse the Add New Mail Account icon with the Add New Mail Alias icon which you will see on your page immediately after successfully creating a new email address. We’ll discuss creating Aliases in Section 4 shortly. What is the Mailbox tick box for? Why it is important? We highlighted the Mailbox tick box in red in Figure 7 on the previous page. If there is a tick in this box (and by default there should be one) when you click on the OK button then you will create a fully‐functional email address complete with its own mailbox (email storage space) on our servers. This is the normal way of doing things and email sent to your newly created email address can then be downloaded directly from our servers into your email program. If, on the other hand, you only wish to Forward email received on your newly created email address to a different address (e.g. you want email sent to [email protected] to be automatically forwarded to [email protected]) and do not want a copy kept on our servers then you should remove the tick from the Mailbox tick box. In summary, a tick in the Mailbox tick box means a copy of all received email will be stored on our servers until you download it using your email program. No tick in the Mailbox tick box means no copy will be stored on our servers. So if you have no tick in that box, and do not later configure the email address to forward received email to another address then all email sent your new address will vanish, never to be seen again. We’ll cover this again a little later when talking about Forwarding. Hosting Account Email Guide v1.0 © Cymru 1 Limited Page 8 4) Forwarding, Aliases, Passwords and other options To forward to another address or add an email Alias, or change a password for an email address, first login to your Control Panel, click on the Home link and then on the Mail icon to get to the Mail section of your Control Panel account as detailed in Section 2 of this document. When you do so you will see a list of all the Mail accounts (email addresses) that you have already configured, as shown in the example in Figure 6 on Page 6. Click on the name of the address you want to configure (e.g. click on [email protected]). You’ll see an Email summary page similar to the example in Figure 8 shown below. Figure 8 – Email account details The icons at the top of the page can all be clicked on to adjust or set up various options for the email address. We’ll go into more detail shortly, but you would click on the Add New Mail Alias to add an Alias, the Preferences icon to change passwords, and the Redirect and Mailbox icons to adjust Forwarding. In the Info section on the summary page you can see what options are currently configured for the email address. In the example in Figure 8 we can see that no Redirect is in effect (Redirect: Off) and that the email address has a Mailbox associated with it (Mailbox: On). In the Mail aliases section we can see that no Mail Aliases have been set up. On the next few pages we’ll discuss: How to setup Forwarding (Redirecting email) How to add Mail Aliases (additional addresses) How to change the Password for an email address Hosting Account Email Guide v1.0 © Cymru 1 Limited Page 9 Forwarding (Redirecting): If you wish, you can configure an email address to automatically forward any email that is sent to it to another email address. For example, if you have created an email address of [email protected] you can configure your hosting account to automatically forward any email sent to that address to any other address – for example you@your‐isp.com To arrange for an email address to forward email to another address, click on the Redirect icon in the Email Summary page (as shown in Figure 8) Doing so will open a new page allowing you to configure the required settings: Put a tick in the Redirect check box to enable forwarding to the email address that you enter in the Redirect address line below it (see Figure 9 below). Click on OK to confirm. No Forwarding (Redirecting) will occur if you do not put a tick in the Redirect tick box. In this way you do not have to remove the address you entered in the Redirect address box (see Figure 9 below) to disable Forwarding, nor do you have to re‐type it in order to re‐enable Forwarding after disabling it. Instead you can enable and disable forwarding to a particular email address just by inserting or removing the tick in the Redirect tick box and clicking on OK. Figure 9 – Configuring Forwarding Important: At this point, if your email address also has a Mailbox enabled (which is normally the case for email addresses) then email sent to your address will be stored on our server as well as being forwarded to the address you just specified in the Redirect address box (Figure 9 above). You do not have unlimited space in your account to store emails, however. So unless you download the messages from your mailbox our servers to your PC using your email program (which will cause the copies stored on our servers to be deleted once they have been safely saved on your computer) then your mailbox will fill up to its maximum capacity very quickly and refuse to accept any new messages. This is not what you would normally want to happen. If you only want to forward emails – without keeping a copy on our servers for you to download using your email program – then you need to carry out one additional step: Click on the Mailbox icon (See Figure 8 on the previous page). The page will change to show you the options you have for your mailbox, as shown in Figure 10 on the next page: Hosting Account Email Guide v1.0 © Cymru 1 Limited Page 10 Figure 10 – Mailbox options Note the tick in the Mailbox tick box. In order to stop copies of messages being stored on our server when you are forwarding them to another address, remove the tick from the tick box then click on OK. Warning: When you remove the tick from the Mailbox tick box, any emails for the address in question which might be stored on our server will be deleted. Summary: If you only want to Forward (Redirect) email, and do not want a copy stored in your hosting account for your to download using your email program, then you need to disable the Mailbox associated with a Mail Account as explained on this page. If you do not do so your account will quickly go over its disk space limit and new emails may be rejected. Hosting Account Email Guide v1.0 © Cymru 1 Limited Page 11 Aliases: An Email Alias, as its name suggests, is basically an alternate name for an existing email address. Using Aliases allows you to accept email for more than one email address without having to create additional full Mail accounts and mailboxes and without having to add/configure additional email accounts in your email program. For example, imagine you have already created a normal Mail account for [email protected] and have correctly configured your email program to download emails sent to that address to your computer. Now, what if you decide you also want to receive email for [email protected]? You could create a full Mail address of [email protected], complete with its own mailbox and password as explained in Section 3 of this guide. You would then need to configure your email program to download emails from that new address to your computer. There is nothing wrong with this option and in fact if you want to download email sent to [email protected] on a different computer to the one that downloads [email protected] this is the best option. However, you could alternatively simply add an Alias of info to your [email protected] email address. Doing so would result in the [email protected] also accepting email sent to [email protected]. There is then no need to add an account for [email protected] in your email program since mail sent to info@ will arrive in your sales@ mailbox to be downloaded without any need for any adjustments to any settings in your email program. To add an Alias to an existing Mail account in your Control Panel click on the Add New Mail Alias icon (as shown in Figure 8). The page will change and will ask you to enter the address you want to add as an Alias, as shown in Figure 11 below. Figure 11 – Adding an Alias In the Mail alias name box, simply enter the Alias you want to add (e.g. info). Click on OK. NOTE: You cannot enter a full email address in this box. For example do not enter [email protected] ‐ just enter info. This is because you cannot create an alias based on any domain other than the one associated with the full email address you are creating the Alias for. Hosting Account Email Guide v1.0 © Cymru 1 Limited Page 12 Changing Passwords: To change the password for an Email account, click on the Preferences icon as shown in Figure 8. The page will change to allow you to change the password. Enter the new password in the New Password box, and confirm it by typing it in again in the Confirm Password box as shown in Figure 12 below. Click on OK. Figure 12 – Changing email password Other options: There are a number of other options you can configure for your email addresses. For example you can create mail groups, so that email sent to one address can be automatically forwarded to a number of other addresses all at the same time, or you can create “out of office” auto‐responders and much more. Details of these options can be found in the full Plesk Control Panel user manual available from http://www.cymru1.net/gold/goldother.php Hosting Account Email Guide v1.0 © Cymru 1 Limited Page 13 5) Using an Email program to collect your Email The basics of setting up an email account is very similar for all Email programs. You’ll find specific information on setting up you email account in a number of Email programs, including Outlook Express, Outlook 2003, Outlook XP, Outlook 2007, Thunderbird, Entourage and Mac Mail a little later on. Regardless of which program you use, when setting up an email account in any email program you will be asked for the same basic set of information. Please use the following as a guide on how to answer the basic questions when asked. Even if you are an expert computer user, please pay attention to item 6 and also the important notes that follow: 1) Your Name. Enter your real name (or the name of your company if you prefer) 2) Your Email Address. Enter the full email address ([email protected]) that you have created in the Mail section of the Control Panel. 3) Your Email server type. Select POP3 if asked. (Not all email programs ask for this information when setting up an account so don’t worry if you don’t see this option). 4) Your POP3 (incoming email) server address. Enter the name of your domain name here, without any www or similar. E.g. just enter yourdomain.com and not www.yourdomain.com or mail.yourdomain.com etc. 5) Your SMTP (outgoing email) server address. You need to contact your ISP (the company you use to connect to the internet) for advice on what to enter here. Often it is something along the lines of smtp.your‐isp.com or mail.your‐isp.com or similar. For example, if you use Cymru 1 to provide your internet access, you would enter smtp.cymru247.net for this question. If you use our universal SMTP service: (an extra‐cost option allowing you to send email without changing settings no matter where you are in the world and no matter which ISP you use to connect to the internet) you will need to enter a different address. Please contact Technical Support for more information. 6) Your email account username and password. For your email account username you must enter your full email address (e.g. [email protected]) and NOT just the part before the @ symbol. Many email programs will automatically suggest the username for you based on your email address but will do so incorrectly (e.g. they will incorrectly suggest your email account username should be you instead of [email protected]). Important Note: Some ISPs may require you to change an advanced setting in your email program in order to be able to send email via their SMTP servers (step 5 above). If you have difficulty sending email please contact your ISP for help ‐ unless you use Cymru 1 to provide your internet access, or have subscribed to our Universal SMTP service, we will not be able to advise you on which settings to use nor diagnose problems with sending email. Hosting Account Email Guide v1.0 © Cymru 1 Limited Page 14 Using Outlook Express to collect your email Launch Outlook Express. Click on the Tools drop down menu, and select Accounts from this list. A new window called Internet Accounts will appear, with several tabs across the top (All, Mail and so on). Click on the Mail tab. Create a new email account. You do this as follows: 1) Click on the Add button and select Mail from the list of items that appear. 2) This will launch a Wizard that will ask you some questions and set up your email system automatically. 3) The first thing the Wizard asks for is your name. Just tell it your real name (or company name), as you'd like it to appear along with your email address at the top of your email. 4) Click on the Next button 5) In the next screen, make sure the "I already have an e‐mail address that I'd like to use" option is selected. In the Email address line, enter your email address (e.g. [email protected]) 6) Click on the Next button 7) In the next screen, make sure POP3 is selected in the "My Incoming mail server is '" line. If it is not, then change it. 8) In the Incoming mail (POP3, IMAP or HTTP) server line, enter the name of your domain's POP3 server, which is simply the name of your domain (e.g. mydomain.com) 9) In the Outgoing mail (SMTP) server line, enter the name of your ISP’s SMTP server. You can get this information from your ISP – unless we provide your internet connection as well as your hosting account we cannot provide this information. If Cymru 1 provides your Internet connection as well as your hosting account then you need to enter smtp.cymru247.net (Unless you use our optional Universal SMTP service which allows you to send email wherever you are in the world and no matter which ISP you connect with, in which case you would need to enter a different address. Please contact Technical Support for more information) 10) Click on the Next button 11) In the next screen you will be asked for your email account username and password. ** You need to enter your full email address as the email account username and NOT just the part before the @. So if you want to configure Outlook Express to collect email for [email protected] you need to enter [email protected] and NOT just you. Enter the password you chose for your email address when you set it up. Please note that usernames and passwords are CaSE SEnsitiVE. Hosting Account Email Guide v1.0 © Cymru 1 Limited Page 15 12) Make sure that "Log on using Secure Password Authentication" is NOT ticked. 13) Click on the Next button 14) You are almost finished. The next screen will tell you that you've finished setting up your account. Now simply click on the Finish button. A new account will have been created and you'll see it listed in the Mail tab of the Internet Accounts window. 15) To close this window, click on the Close button. 16) Click on the big Send/Recv button in the Outlook Express button bar towards the top of the screen to send and receive your email. Further help on using Outlook Express can be found by using the Outlook Express Help menu option, just to the right of the Messages menu option at the top of the main Outlook Express window. Using Microsoft Outlook (version 2003, 2005, XP and 2007) to collect your email Run Outlook and click on the Tools menu. Select E‐Mail accounts from the list displayed. Now do the following to create a new account: 1) Select "Add a new e‐mail account" from the main E‐mail Accounts window and click on Next. A new page will appear 2) From the "Server Type" list window, select POP3 and click on the Next button. A new page will appear 3) Under the User Information heading, enter your real name or organisation in the "Your Name" line. This is just the information that will be transmitted along with your emails ‐‐ it doesn't matter what it is as long as you don't mind other people seeing this information at the top of all your emails. 4) In the E‐mail Address line, enter your email address (e.g. [email protected]). 5) In the User Name line, enter your full email address again (e.g [email protected]) – not not just enter the part of the email address before the @ (i.e. do not just enter me) 6) In the Password line, enter the password for this email account. 7) Make sure there is a tick in the Remember password box if you don't want to have to type your password in each time you collect your email. However, if other people use your computer and you don't want them collecting your email, make sure there is no tick here. 8) Make sure there is no tick in the Log on using Secure Password Authentication box. 9) In the Incoming mail server (POP3) line, enter your domain's pop3. server address, which is just your domain name (e.g. mydomain.com) Hosting Account Email Guide v1.0 © Cymru 1 Limited Page 16 10) In the Outgoing mail (SMTP) server line, enter the name of your ISP’s SMTP server. You can get this information from your ISP – unless we provide your internet connection as well as your hosting account we cannot provide this information. If Cymru 1 provides your Internet connection as well as your hosting account then you need to enter smtp.cymru247.net (Unless you use our optional Universal SMTP service which allows you to send email wherever you are in the world and no matter which ISP you connect with, in which case you would need to enter a different address. Please contact Technical Support for more information) 11) At this point everything should be working correctly. If you click on the "Test Account Settings" button, Outlook XP will make sure everything is working correctly, and tell you what isn't ‐ this can help you trouble‐shoot further. Using Mozilla Thunderbird to collect your Email Run Thunderbird. Click on Tools then select Account Settings. Click on the Add Account button Select Email account from the list of three options and proceed as follows: 1) Enter your real name (or your organisation’s name if you prefer) in the Your Name box. 2) Enter your full email address in the Email Address box 3) Click on the Next button 4) Select POP3 rather than IMAP when asked, and enter your POP3 server address (which is your full domain name – e.g. yourdomain.com) in the Incoming Server box. 5) Click on the Next button 6) In the Incoming User Name box, enter your full email address – not just the part before the @ symbol. In other words enter [email protected] and not just you. 7) Unless you use our Universal SMTP service, leave the Outgoing User Name box blank (or enter your full email address again if need be). 8) Click on the Next button 9) In the Account name, enter a name for the account you have just created. This is just a description and is not part of any settings. It is usually best to enter your full email address in this box. 10) Click on Next. 11) Click on Finish. 12) Click once on “Outgoing Server (SMTP)” in the left hand column to highlight it. 13) If this is the very first email address you have entered in Thunderbird then you can use the Add button on the right hand side of the page to add an outgoing server SMTP address. Give it is textual Hosting Account Email Guide v1.0 © Cymru 1 Limited Page 17 description (normally you should enter the same thing as you enter for the server name – see the next step) 14) Enter the address of your ISP’s SMTP server in the Server Name box. Contact your ISP for details. If you use Cymru 1 to provide your internet access you would normally enter smtp.cymru247.net 15) Make sure there is no tick in the Use name and password (Unless you use our Universal SMTP service – please contact Technical Support for details). 16) Choose the “No” option for the Use secure connection. 17) Click on OK. 18) Click on the name of your newly created email address in the right hand colum of the Account settings window. Change the Outgoing Server (SMTP) drop down in the right hand part of the window to the correct smtp server. 19) Click on OK. Using Entourage to collect email Run Entourage. Click on the Entourage menu item at the top of the screen. Select Account Settings from the drop‐
down list. Click on the New icon in the small window that appears. A further window will be displayed and you will be asked to enter your email address. Do so, then click on the “Configure My Account Manually button you’ll see at the bottom of the window, making sure that you do not have a tick in the “My account is an Exchange Server”. A new window will appear asking you to select the type of account you want to setup. Select POP from the list. A further window appears with several blanks for you to fill in. Answer as follows: Account Name: This is just a textual description for the account you are about to add. Enter your full email address here to avoid confusion. Name: Enter your real name (or your organisation’s name) here Email address: Enter your full email address here Account ID: Enter your full email address again – do not just enter the part before the @ symbol (e.g. enter [email protected] and not just you. POP server: Enter your POP3 server address – which is your full domain name (e.g. yourdomain.com) Hosting Account Email Guide v1.0 © Cymru 1 Limited Page 18 Password: Enter the password for your email address Put a tick in the Remember Password tick box if prompted. SMTP server: Enter the name of your ISP’s SMTP server. You can get this information from your ISP – unless we provide your internet connection as well as your hosting account we cannot provide this information. If Cymru 1 provides your Internet connection as well as your hosting account then you need to enter smtp.cymru247.net (Unless you use our optional Universal SMTP service which allows you to send email wherever you are in the world and no matter which ISP you connect with, in which case you would need to enter a different address. Please contact Technical Support for more information) Click on OK. Using Mac Mail to collect your email Run Mail. In the main OS X menu bar at the top of the screen, click on Mail then select Preferences from the drop down list. A new window will appear. Select the Accounts icon then click on the small “+” symbol you’ll see at the bottom of the left hand column. A new page will appear – fill it in as follows: Select POP as the account type. Description: This is just a textual description for the account you are about to add. Enter your full email address here to avoid confusion. Email address: Enter your full email address here Full Name: Enter your real name (or your organisation’s name) here Incoming mail server: Enter your POP3 server address – which is your full domain name (e.g. yourdomain.com) Username: Enter your full email address again – do not just enter the part before the @ symbol (e.g. enter [email protected] and not just you. Password: Enter the password for your email address Outgoing Mail Server (SMTP): If it is blank, click on Server Settings. Enter the name of your ISP’s SMTP server. You can get this information from your ISP – unless we provide your internet connection as well as your hosting account we cannot provide this information. If Cymru 1 provides your Internet connection as well as your hosting account then you need to enter smtp.cymru247.net (Unless you use our optional Universal SMTP service which allows you to send email wherever you are in the world and no matter which ISP you connect with, in which case you would need to enter a different address. Please contact Technical Support for more information). Hosting Account Email Guide v1.0 © Cymru 1 Limited Page 19 6) Using Webmail If you are away from your home or office computer and need to check your email or send a message you can use our Webmail system. Simply visit http://webmail.yourdomain.com where yourdomain.com is the name of your domain name. You will see a page like this: Figure 13 – Horde Webmail Login Enter your full email address in the Username box, and enter the password for that email address in the Password box. Click on Login. If you have not used Webmail for some time, or have never used it at all, you may see a page similar to that shown in Figure 14 (below) after you have logged in: Figure 14 – Horde Maintenance Click on Skip Maintenance. You will then normally see an error page saying “Forbidden”. This is caused by a combination of a security rule and a slight error in the Webmail system. To continue simply click on the “back” button in your web browser (the big arrow pointing to the left, which takes you back to the previous page you visited). Click on Skip Maintenance once more. Hosting Account Email Guide v1.0 © Cymru 1 Limited Page 20 Tip: Missing messages in Webmail
The Webmail system shows you the messages that are currently stored in your mailbox on our servers. It cannot show you emails you have already downloaded to your computer using your email program. In other words the webmail system will only show you new messages that have arrived in your mailbox since the last time you used your email program on your home or office computer. Please note that when you use the Horde webmail system to send messages, although a copy of the sent message will be stored in the Webmail system for you to view later on, you will not see a copy of your sent email in your email program on your home of office computer. This is because only messages you send using your email program will be shown in the “sent items” folder on your home or office PC and similarly only messages you send using Webmail will be visible in the “sent items” folder in Webmail. VITAL: Deleting messages in Webmail
Permanently deleting messages in Webmail is a two step process. First, put a tick in the tick box to the right of any message you want to delete, then click on the Delete link you’ll see above the column of tick boxes. This marks the messages for later permanent deletion by drawing a line through the subject and sender’s address in the list of emails in your inbox. If you like you can think of clicking the Delete button like moving the messages to your Recycle/Trash bin. They have not been permanently deleted and still take up storage space in your mailbox. To permanently delete messages you therefore need to do one more thing: click on the Purge Deleted link you’ll find at the top of the email list on the right hand side of the page. Doing so permanently removes all trace of the emails and they will no longer take up any room in your mailbox. Alternative Webmail system If you do not like the Horde Webmail system you can alternatively use a third‐party webmail system known as Mail2Web which is available at http://www.mail2web.com Simply enter your full email address and password when prompted in order to view your messages. Please note that messages you send using Mail2Web will not be stored anywhere – they will only be sent to their recipient. Hosting Account Email Guide v1.0 © Cymru 1 Limited Page 21 7) Anti‐Spam and Anti‐Virus facilities As well as the features we’ve covered already, you may like to explore the many other features of your hosting account, some of which we have highlighted here: SpamGuardian Anti‐Spam facilities (Gold accounts only): Your Gold account features an advanced anti‐spam system that can help to block a very large proportion of the spam (unsolicited email) that would otherwise arrive in your mailbox. You can even view an online chart of how much spam is being blocked so that you can see how effective it is based on the settings that you choose. For more information on this feature, please visit http://www.cymru1.net/help/spamguardian.php WARNING: Anti‐Spam facilities will automatically be disabled for any email address that you have configured to Forward (Redirect) any received emails to another address. ClamAV and F‐Prot Anti‐Virus facilities: All email that is received by our hosting servers is automatically scanned for viruses using ClamAV or F‐Prot anti‐virus technologies. Any emails containing known viruses are automatically deleted before they can reach your mailbox. The anti‐virus facilities on our servers should not be considered as a substitute for installing, and constantly updating, a good quality anti‐virus application on any PC used to receive email, however. We cannot guarantee that our anti‐virus facilities will detect and delete all viruses that might be sent to your email addresses. WARNING: Anti‐virus facilities will automatically be disabled for any email address that you have configured to Forward (Redirect) any received emails to another address. 8) Universal SMTP service When you set up an account in your email program (Outlook/Outlook Express, Entourage, Mac Mail, Thunderbird etc) you must enter an address for an “SMTP Server” in order to be able to send email. The SMTP server you specify normally needs to be that of the ISP you are using to connect to the internet. If you only ever use one ISP (e.g. you have your email program running on your home or office PC and do not change your ISP) then you will never need to change the SMTP server setting once you have entered it. However, if you have a notebook/laptop and move from place to place you are likely to need to change this setting to match the ISP being used at each different location. To get around this problem, Cymru 1 offers a Universal SMTP service where you can use our SMTP servers no matter which ISP you connect with, eliminating the need to make adjustments all the time. Please contact the Sales department for more information on this extra‐cost option. Hosting Account Email Guide v1.0 © Cymru 1 Limited Page 22 9) How to contact us Technical support You will find extensive online help, including information on using and trouble‐shooting your email accounts, webspace and Control Panel at http://www.cymru1.net/help/goldhelp.php In addition, context‐sensitive help and additional information is available within the Control Panel by clicking on the Help link next to the blue “?” icon you’ll see at the bottom of the left hand navigation column. But if you need help or assistance on a topic that is not covered in any of the online resources you can contact us by email or by telephone: Gold and Silver hosting account customers are entitled to Diamond Support. To contact the Diamond Support department by email please send message to [email protected] being sure to include your domain name so that we can locate your account as quickly as possible, and a detailed description of your problem and any error messages you have encountered. If the matter is extremely urgent or you are unable to send email, you can alternatively contact the Diamond Support department by telephone on 0871 871 4747 (calls cost 10p per minute from a normal BT line). Select Diamond Support if you are prompted to choose a department when you call. Lines are normally open between 9:30am and 5:30pm, Monday to Friday. Accounts and Billing If possible, please send an email to [email protected] being sure to include your domain name so that we can locate your account as quickly as possible. Alternatively you can contact the Billing department by phone on 0870 950 4103. Lines are normally open between 9:30am and 5:30pm, Monday to Friday. Sales If possible, please send an email to [email protected] being sure to include your domain name so that we can locate your account as quickly as possible. Alternatively you can contact the Sales department by phone on 0870 950 4101. Lines are normally open between 9:30am and 5:30pm, Monday to Friday. Hosting Account Email Guide v1.0 © Cymru 1 Limited Page 23