1
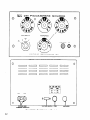
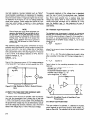
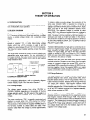
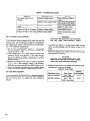
Model 261
Picoampe:reSource
Instruction Manual
Contains Operating and Servicing Information
WARRANTY
Keithley Instruments, Inc. warrants this product to be free from defects in material and workmanship for a period of 1 yew from date of
shipment.
Keithley Instruments, Inc. warrants the following items for 90 days from the date of shipment: probes, cables. rechargeable batteries,
diskettes. and documentation.
During the warranty period, we will, at our option, either repair or replace any product that proves to bc defective.
To exercise this warranty, write or call your local Keithley representative, or contact Keithley headquarters in Cleveland, Ohio. You will
be given prompt assistance and return instructions. Send the product, transportation prepaid, to the indicated service facility. Repairs
will be made and the product returned, transportation prepaid. Repaired or replaced products are warranted for the balance of the original warranty period, or at least 90 days.
LIMITATION OF WARRANTY
This warranty does not apply to delccts resulting from product modification without Keithley’s express written consent, or misuse of
any product or part. This warranty also does not apply to fuses, software, non-rechargeable batteries, damage from battery leakage, or
problems arising from normal wear or failure to follow instructions.
THIS WARRANTY IS IN LIEU OF ALL OTHER WARRANTIES, EXPRESSED OR IMPLIED, INCLUDING ANY IMPLIED
WARRANTY OF MERCHANTABILITY
OR FITNESS FOR A PARTICULAR USE. THE? REMEDIES PROVIDED HEREIN ARE
BUYER’S SOLE AND EXCLUSIVE REMEDIES.
NEITHER KEITHLEY INSTRUMENTS, INC. NOR ANY OF ITS EMPLOYEES SHALL BE LIABLE FOR ANY DIRECT, INDIRECT, SPECIAL, INCIDENTAL OR CONSEQUENTIAL DAMAGES ARISING OUT OF THE USE OF ITS INSTRUMENTS AND
SOFTWARE EVEN IF KEITHLEY INSTRUMENTS, INC., HAS BEEN ADVISED IN ADVANCE OF THE POSSIBILITY OF
SUCH DAMAGES. SUCH EXCLUDED DAMAGES SHALL INCLUDE, BUT ARE NOT LIMITED TO: COSTS OF REMOVAL
AND INSTALLATION, LOSSES SUSTAINED AS THE RESULT OF INJURY TO ANY PERSON, OR DAMAGE TO PROPERTY.
Keithley Instruments, Inc. * 28775 Aurora Road * Cleveland, OH 44139 * 216-248-0400 -Fax: 216-248-6168 * http:llwww.kcithley.com
Model
261 Picoampere
Source
Instruction
Manual
0 1983, Keithley Instruments,
Inc.
Test Instrumentation
Croup
All rights reserved.
Cleveland,
Ohio, U.S.A.
Third Printing
Document
Number: 29046 Rev. C.
Model 261
Picoampere
Source
Revised
1116189
OUTPUT:
lPl4A
(10-1lA full range) to 1.1 x 10⁻⁴A, positive or negative, in eight decade
ranges.
AC&RACY:
Exclusive of input drop consideration:
WORST-CASE
ACCURACY WITH
WITH SETTING
10.00 SET-I-ING
UOV SOURCE
OTHER THAN
RANGE
VOLTAGE)
10.00*
SETTING
SPAN, AMPERE
10-7 to 1.1 x lrv4
f0.25%
10-7 to KY5
iO.25%
?a.5 %
lti
10-s to1cF7
M.5 %
MO.6 %
ffl.8 %
1w9
10-9 to10-8
fo.6 %
il.1 %
w-10
lo-l0 to 10-9
l&11 to lo-10
ti.6 %
a.3 %
lo-11
lo-12
lo-12 to lo-11
M.7 %
il.6 %
32.0 %
lo-12
lo-14 to 10-12
‘All accuracies are f the percentage given, a.01 x range switch setting.
LONG-TERM
STABILITY:
Will operate within stated specifications for three months after
calibration. After three months add 0.15% per month to 10-g through 10-12A range setting
accuracy specifications.
TEMPERATURE
COEFFICIENT: ffl.l%/“C
from 15°C to 30°C on 10-7 to 10-5A range settings.
Approximately
O.l5%/“C on lo-12 to 10-gA range settings. Exact values for these ranges
supplied with instrument.
WARM-UP TIME: 1 hour.
LINE REGULATION:
0.01% for 10% change in line voltage.
SOURCE VOLTAGE: 0 to 11V in O.OlV’steps.
RESOLUTION:
3 significant figures from lO-12A to 1.1 x 10⁻⁴A.
RANGE RESISTORS: 105 to 10120 in decade steps; *5%.
RANGE RESISTOR ACCURACY: Value with power on, given on certificate.
~5 %:108 to 101252
lt0.1 %:107 to 106 n
~0.02%:105~.
OUTPUT ISOLATION:
Low to ground: >109n shunted by O.OOl@
CERTIFICATION:
A Calibration
Certificate is furnished including
range resistor values,
thermal coefficients,
temperature
and date of calibration.
Certification
traceable to the
National Institute of Standards and Technology is also available.
POWER: 10%125V or 210-250V (switch selected), 50-6QHz,6W.
DIMENSIONS,
WEIGHT: 155mm high x 225mm wide x 300mm deep (6.25 in. x 9 in. x 12 in.).
Net weight 4.lkg (9 lbs.).
ACCESSORY SUPPLIED: Model 2611 Test Cable.
TABLE OF CONTENTS
1.1
SECTION 1 GENERAL INFORMATION
Introduction ..............................................
1.2
1.3
1.4
1.5
1.6
1.7
1.6
1.9
Model261Features..
.....................................................................
WarrantyInformation
.......................................................................
ManualAddenda..
.........................................................................
SafetyTerms
..............................................................................
Unpackingar~dlnspection
...................................................................
Using the Model 261 Instruction
Manual. .......................................................
...
.........................................................................
Speclflcatlon:r.
.....................................................................
Optional Accessories
SECTION
2.1
2.2
2.3
2.4
2.5
2.6
2.6.1
2.6.2
2.7
2.6
2.6.1
2.6.2
2.9
2.9.1
2.9.2
2.10
2.10.1
2.10.2
2.11
2.12
2.13
Page
Title
Paragraph
1-l
..............................
....
..
l-1
l-l
l-1
1~1
1~1
l-1
.1-l
1~2
2 ~OPERATION
........................................
.....
........
Introduction
....................
......
Front Panel Controls and Terminals .................................................
............................................................
Rear Panel Controls and Terminals
PreparationForUse
.........................................................................
BasicOperatingProcedure
...................................................................
AccuracyCollsidarations
....................................................................
Input Voltage Drop (Voltage Burden1 ........................................................
Proper Multiplier Settings ..................................................................
DutputConnactions
................................................
.......................
..................................
Input Voltage Drop for Fsedback and Shunt-Type
Picoammeters
Feedback-‘TypePicoammeter
...............................................................
.......................
........................................
Shunt-TypNs Picoammeter
.............................
Compensation
for Input Voltage Drop of Feedback~Type
Picoammetsr
......
Calculating Voltage Drop Error., ................................................
CompensatingEquation
................................
...........................
....
Picoammetsrs ............
Compensation
Drop for Input Voltage Drop of Shunt~Type
High-Impedance
CalculatingtheError
........................................................................
CompenstitingEquations
..................................................................
.................
Compensation
for Input Voltage Drop of Shunt-Type
Low Impedance Picoammeters
..................................................
.........
Range Resistor Voltage Coefficient
.....................................................
Compensation
for Temperature
Coefficient
..
..
2-l
2-1
2-1
2~1
2-1
2-3
2-3
2-3
2-3
2-4
2-4
2-4
2-5
2-5
2-5
2-5
2-5
2-6
2-6
2-6
2-6
SECTION 3 APPLICATIONS
3.1
3.2
3.3
3.4
SECTION 4 PERFORMANCE
4.1
4.2
4.3
4.4
4.5
4.5.1
4.5.2
4.5.3
4.6
VERIFICATION
AND CALIBRATION
Introduction
...............................................................................
EnvironmsntelConditions
....................................................................
RecommendedTestEquipment............................................................~
InitialConditions
...........................................................................
VerificationProcedure
.......................................................................
TopCoverRemoval
.......................................................................
................................................................
Range Resistor Verification
........................................................
Multiplier Switch Setting Verification
Calibration .................................................................................
SECTION
5.1
5.2
5.3
5.3.1
5.3.2
5.3.3
3-l
3-1
3-l
3-2
...............................................................................
Introduction
CurrentSuppression..
.................................................
....................
GaivanometricMeasurements
................................................................
0hmmeterC;llibration
.......................................................................
..
4-l
4-l
4-1
4-1
4-1
4-l
4-1
4-2
4-2
6 THEORY OF OPERATION
.....................................................
.........................
Introduction
..................................
Block Diagram ..........................................
CircuitDescription
..........................................................................
VoltageSupply
...........................................................................
RangeResistors
..........................................................................
Kelvin-Varley
Voltage Divider, ..............................................................
5-l
5-1
5-1
5-l
5-l
5-2
SECTION 6 MAINTENANCE
6.1
6.2
6.3
6.4
Introduction
...............................................................................
ServicingSchedule
.........................................................................
TopCaverRt!moval
.........................................................................
PalfSReplact!me”t
..........................................................................
6-l
6-1
6-l
6-1
TABLE OF CONTENTS
6.6
6.5.1
6.52
6.6.3
6.6
Troubleshooting.
...........................................................................
Troubleshooting
Equipment ................................................................
CommonFeults..
........................................................................
..............................................................
TroubleshootingGuidelines..
Fuse Replacement
..........................................................................
SECTION
7.1
7.2
7.3
7.4
7.5
(CONT.)
7 REPLACEABLE
61
6-l
6-l
6-2
62
PARTS
...............................................................................
Introduction
Parts List ..................................................................................
Ordering Parts .............................................................................
Factory Service. ............................................................................
Schematic
Diagram and Component
Layouts ...................................................
7-1
7-l
7-1
7-1
7-l
LIST OF FIGURES
Figure
2-l
2-2
2-3
2-4
2-5
2-6
3-1
3-2
3-3
4-l
5-l
7-l
7-2
7-3
7-4
7-5
7-6
7-7
7-a
Title
...........................................................
FrontPenelControlsandTerminals
Rear Panel Controls and Terminals
...........................................................
...........................................................
ConnectingtheMode1261Source
High Resistance Paths in Output Connections
..................................................
Simplified Circuit of Feed-Sack Tvpe Picoammeter
.............................................
Tvpical Shunt Type Picoemmeter
............................................................
Current Suppression
Circuit Connections
.....................................................
.............................................................
GalvanometricMeasurements..
Guarded Circuit for Ohmmeter Calibration
.....................................................
Top Chaws View
...........................................................................
............................................................................
BlockDiagram
Voltage Supplv Board. Component
Location Drawina ...........................................
Calibr&tion’f&d,
C
Calibr&tion’f&rd,
Component
Location Drawing, D&g. No. 30483C ..............................
.............................................................
AMPERESRangeSwitch.Sl02
AM
Asssl
10t2Kl Resistor Assembly
IRlOa). .............................................................
..............................................................
X.01 Multiplk
X.OlMultiplisrSwitch.Sl03..
..............................................................
X.OlMultiplierSwitch.Sl04..
Xl Multiplier Switch, S105. .................................................................
Model 261 Schematic Diagram. Dwg. No. la323E ..............................................
Page
2-2
2-2
2-3
2-4
2-4
2-5
3-l
3-1
3-2
4-2
51
7-l
7-2
7-5
7-5
7-6
7-6
7-6
7-7
LIST OF TABLES
Table
2-l
2-2
41
4-2
4-3
4-4
4-5
61
6-2
7-l
7-2
ii
Title
Current Output Examples ....................................................................
Causes of Discrepancy
in Model 261 Output Current and Correction
Index ...........................
Recommended
Equipment for Verification
and Calibration
........................................
Range Resistor Verification
..................................................................
Range Resistor Accuracy
....................................................................
Voltage For Multiplier Switch Settings .........................................................
...........................................................................
RangeCalibration
Troubleshooting
Guide ......................................................................
................................................................................
FuseTypes
Model261PartsList
........................................................................
Mechanical Parts ...........................................................................
Page
2-3
2-6
4-l
4-2
42
43
4-3
82
62
7-3
7-5
SECTION 1
GENERAL INFORMATION
1.1 INTRODUCTION
1.4 MANUAL
The Model 261 Picoampere Source is a secondary standard
for use in calibrating picoammeters
and electrometers.
The
output of the Model 261 can be adjusted between 10-‘4A and
1.1 x 10.4A in eight decade ranges. The source has 3 digit
resolution for current outputs b#etween 10~12and 10~4A.
Changes pertaining to the instrument
that occur after the
printing of this manual will be found in an addendum included
with this manual. Be sure to note any changes before attempting to operate or service the instrument.
1.5 SAFETY
The current output of the Mlodel 261 is derived from a
variable voltage source and a selectable range resistance. The
voltage supply is highly ragulatled for stability and uses highquality components throughoul
for reliability. The low side of
the output can be floated to avoid possible ground loop problems.
ADDENDA
TERMS
The WARNING
heading
used in this manual explains
dangers that could result in personal injury or death.
The CAUTION
heading used in this manual explains hazards
that could damage the instrument.
1.6 UNPACKING
1.2 MODEL
Important
AND
INSPECTION
261 FEATURES
Model 261 features
iixlude:
1. 11V Internal Source. The internal voltage source can be set
to a value between 0 and 1’lV in O.OlV increments.
This
permits accurate calibration
of picoammeters
and electrometers with input voltagt! drops up to 1OmV without
calibration correction.
2. Stable
High-Meg
Resistance
Standards.
The highmegohm resistance standards are selected for maximum
stability. Individual temperature coefficients and resistance
values are supplied with each instrument.
3. Line Operation. The Model 261 is line operated from either
105.125V or 210.250V power sources. Voltage selection is
easily accomplished
with the rear panel line voltage selection switch.
4. Eight Current Ranges. Eight current ranges are user selectable with a single front panel control.
5. Shielded Output Connector.
The UHF output connector
on the front panel is Teflon@ insulated to minimize possible leakage problems.
6. Floating Low Connection.
The low side of the output connection can be floated to miinimize the effects of ground
IOOPS.
1.3 WARRANTY
INFORMATION
Warranty information may be found inside the front cover of
this manual. If warranty
service is required, contact the
Keithley representative
in your area or the factory to determine the correct course of action. Keithley Instruments,
Inc.,
maintains service facilities in the United States, West Germany,
Great Britain, the Netherlands,
Switzerland
and
Austria. Information
concerning
the application,
operation,
or setvice of your instrument may be directed to the applications engineer at any of these locations. Addresses can be
found inside the front cover of this manual.
The Model 261 was carefully inspected
before shipment.
Upon receiving the unit, carefully unpack all items from the
shipping canon and check for any damage that might have
occurred during transit. Report any damage to the shipping
agent at once. Save the original packing material in case
reshipment becomes necessary. Contact the nearest Keithley
representative
or the factory if the unit fails to function properly.
The following
items are
ment:
1. Model 261 Picoampere
2. Model 261 Instruction
3. Model 2611 Test Lead
4. Additional accessories
1.7 USING
THE MODEL
included
in every
Model
261 ship-
Source
Manual
Cable
as ordered.
261 INSTRUCTION
MANUAL
This manual is intended to familiarize the operator with the
operating controls and features of the Model 261 Picoampere
Source.
Also included
is information
on calibration,
maintenance
and spare parts. The manual is divided into the
following sections:
1. Sections 2 and 3 contains pertinent operating information,
including applications
and possible pitfalls to avoid when
using the source.
2. Section 4 covers performance
verification
and calibration
procedures.
3. A complete description of operating theory is contained in
Section 5.
4. Troubleshooting
and maintenance procedures are covered
in Section 6.
5. Parts ordering information can be found in Section 7.
1.8 SPECIFICATIONS
A complete list of Model 261 specifications
mediately preceding this section.
can be found im-
1-l
1.9 OPTIONAL
ACCESSORIES
The Model 4003A Rack Mounting Kit allows the Model 261
to be conveniently
mounted in a standard 19 inch rack. The
overall dimensions of the Model 4003A kit is 5% inches high
1-2
by 19 inches deep. Two different covers are provided for use
with either 10 inch deep or 13 inch deep instruments. Contact
your nearest Keithley representative
or the factory for information on ordering the Model 4003A.
SECTION 2
OPERATION
2.1 INTRODUCTION
This section contains information
necessary to set up the
Model 261 and operate the unit. Also included are compensating equations
necessary when using the source with
measuring instruments with higlh input voltage drops.
2.2 FRONT
PANEL
CONTROLS
AND
TERMINALS
Figure 2-l shows the front panel of the Model 261, The functions of the various controls and terminals are described
below.
POLARITY
Switch.
The POLARITY switch has four positions which are used to control power, turn the instrument
output off and on, and set the polarity of the source output.
In the AC OFF position, the IModel 261 power is disconnected. In the OFF position, power is applied to the instrument, but the source is disconnected
from the output jack.
When the POLARITY switch iri in this position, the output
resistance of the source is equal to the reciprocal of the
AMPERES switch setting, regwlless of the multiplier settings
in use. The + and - positions s,elect positive or negative current output values.
Range (AMPERES)
Switch.
The range switch
of eight decade current ranges between 10~5and
actual output is affected by the positions of the
plier switches. When the multiplier switches are
positions, the range switch indicates the actual
rent.
selects one
10.‘*A. The
three multiin the 1 .OO
output cur-
Multiplier
Switches.
The mull:iplier switches control the internal voltage source of the instrument. These switches provide multiplying
values that determine the actual output of
the source. To determine the current output, multiply the
current range by the multiplier s,etting. The multiplier switches control the output through the use of a 3-decade KelvinVarley divider. The Xl and X.01 switches each have 11 positions between 0 and 10; the X:1 switch has 10 positions between 0 and 9. The illuminated decimal point between Xl and
X.1 switches also serves as a pilot lamp.
Voltage
Switch.
The voltage switch sets the source for
105.125V or 210.250V operation. A screwdriver can be used
to set the switch to the desired position.
FUSE. By unscrewing
the fuse holder cap, the fuse is accessable. See Section 6 for fuse replacement
procedures.
Power Cord. The 3wire cord is permanently attached to the
rear panel. The opposite end of the power cord has a standard 3-prong plug attached. This plug should be used only
with grounded outlets.
COM end GND terminals.
The COM terminal is connected
to the low side of the source output. The GND terminal is
connected
to chassis ground, which is connected
to the
power line ground wire in the 3.wire power cord. Normally,
the GND and COM terminals are connected together with a
shorting link, which is provided. The link can be removed to
float the low side from ground.
2.4 PREPARATION
Before
1. Set
ting
see
operating the Model 261, perform the following steps:
the line voltage selection switch to the appropriate setdepending on the local power line voltage. Check to
that the appropriate fuse is installed.
CAUTION
Operating
the source on en incorrect
line
voltage
may damage
the unit.
possibly
voiding
the warranty.
2. Sat the Model 261 front panel controls as follows:
POLARITY Switch: AC OFF
Range Switch: Desired current range
Multiplier Switches: 10.00
3. Plug in the source to AC power and rotate the POLARITY
switch to the OFF position. The decimal point pilot light
should come on, indicating the unit is receiving power. If
not, disconnect the instrument
from the power line and
check to see that the fuse is good.
2.5 BASIC
OUTPUT
Receptacle.
The OUTPUT
receptacle
is a
Teflon@ insulated UHF type connector. The low (threaded)
side floats from ground unless the COM and GND terminals
on the rear panel are connected together. A chassis ground
terminal (GI is located next to the OUTPUT connector.
2.3 REAR
PANEL
CONTROLS
AND
TERMINALS
Figure 2-2 shows the rear panel of the source. The purpose of
the various controls and terminals is described below.
FOR USE
OPERATING
PROCEDURE
Operation of the Model 261 is fairly straight forward. Once
the unit is connected
to the measuring
instrument,
the
operator need only select the appropriate range and multiplier
switch settings and select the output current polarity. The
basic operating procedure is as follows:
1. Plug in the instrument to the appropriate power source and
rotate the POLARITY switch to the OFF position. The pilot
light should indicate that power is applied to the source.
Allow a one hour warm-up period for rated accuracy.
2-1
Figure
0
2-l.
Front
Panel
--
III
---
III---
-II
III
Controls
and Terminals
0
0
6
0
0
GROUND
AND
VOLTAGE SWTCH
COMMON TERMINALS
Figure
2-2
2-2. Rear Panel
Controls
FVSE
and Terminals
LINE CORD
2. Connect the source to the measuring instrument as shown
in Figure 2-3. Use the suppli’sd Model 2611 cable to make
the necessary connections.
3. Select the desired range and multiplier settings according
to the required output current. Some examples are shown
in Table 2-l. Note that accuracy figures are given with the
multiplier settings at 10.00.
4. Place the POLARITY
switc:h in the + or - position,
depending on the desired output polarity.
This procedure covers the basic steps for using the Model
261; however, some precautiorls may be necessary to ensure
rated accuracy, as described irl the following paragraphs.
Table
Desired
2-l. Current
Current
Output
10-E
10-l’
104
10~5
10~12
10-7
1o-9
10~10
10~6I
CONSIDERATIONS
The range switch setting times the multiplier switch sening
gives the Model 261 current output. The accuracy of the output, however, depends upon several factors.
Output connections from the source to the picoammeter
are
very important, especially for the lower ranges. The accuracy
of the current at the Model 261 OUTPUT receptacle will
mean little if poor or improper hookups are made from the
source to the picoammeter.
2.6.1 Input
Voltage
Drop
(Voltage
Burden)
For specified
output accuracy,
the voltage drop of the
measuring instrument must be less than l/1000 of the internal source voltage of the Model 261. The internal source
voltage in volts is read directly from the multiplier switch settings, regardless of the range switch setting. The voltage
drop of the picoammeter
is a characteristic
of that instrument; it can be found in its instruction manual or it must be
calculated.
Examples
Rang8 a I lklultiplier
60uA
21 .ipA
89.5nA
lOO/J.A
1.35pA
250nA
7.5”A
455pA
3.66!.LA
2.6 ACCURACY
6.00
2.17
8.95
10.0
1.35
2.50
7.50
4.55
3.66
For picoammeter
with a 1mV or less voltage drop, set the
Model 261 multiplier switches to 1 .OO. For a voltage drop between 10 and lmV, set the multiplier switches to 10.00 and
set the range switch one decade lower. This sening does not
affect the Model 261 accuracy for outputs greater than l@*A.
Note that even for a voltage drop l/100 of the source
voltage, an error of only 1% is added to the specified accuracy.
2.6.2 Proper
Multiplier
Settings
Setting the multiplier switches to 10.00 ensures the most accurate output current, give” the proper voltage drop source
voltage ratio. Setting the multiplier switches to other than
10.00 does not affect the accuracy for outputs greater that
10.sA. In all cases, however, the Model 261 output accuracy
is at least that of the worst-case accuracy listed in the accuracy specifications.
MooEL
Z61~l
CABLE
When the Model 261 is used on the 10~s to 10~12ranges at
other than the calibrated temperature
(stated on the calibration certificate furnished with the source1 a discrepancy in the
output current will occur. On other ranges the effect is not
significant.
2.7 OUTPUT
I-Q
Make all connections
carefully between the Model 261 and
meters having fast response speeds. Tie down cables to
avoid vibrations. Cable movements cause meter jiner on the
10.sA and lower ranges due to capacitance changes.
INPUT
I
MEASURING
Figure
2-3. Connecting
CONNECTIONS
INSTRUMENT
thle Model
261 Source
For currants 10.sA and less, carefully shield the output connections and the input connections
of the picoammeter.
Unless the shielding is thorough,
any changes in the electrostatic field near the input circuitry will cause definite disturbances on the measuring instrument.
2-3
Use high resistance,
low-loss materials (such as Teflon@
(recommended),
polyethylene
or polystyrene)
for insulation.
The insulation leakage resistance of test fixtures and leads
should be several orders of magnitude higher than the internal resistance of the source. If it is not, leakage losses will
cause lower readings. Coaxial cables used should be a lownoise type which employ a graphite or other conductive
coating between the dielectric and the surrounding
shield
braid.
NOTE
Ground loops may occur when equipment connected to the Model 261 has one side of the input grounded. In this case disconnect the shorting link between the Model 261 COM and GND
binding posts. The low side of the output then
floats; output isolation from low to ground is
greater than 109fl shunted by 0.0Ol~F with the
link removed.
High resistance paths in the output connections
do not appreciably reduce the Model 261 current output accuracy if the
source is used with a low input voltage drop or feed-backtype picoammeter.
As an example, the Model 261 is used
with a picoammeter
with a 1mV drop (Figure 2-4). The source
is set to 10.‘2A. If the leakage resistance is 10’20, the error
caused by leakage, R,, is:
o.o01mv=
10~~5A
1O’Tl
The general magnitude
of the voltage drop is dependent
upon the type of circuit the picoammeter
uses. Feedback
types have a low input voltage drop of approximately
1mV or
less. Shunt types generally
have a relatively
large input
voltage drop (about 1OmV or more). However, some lowcurrent shunt-type
ammeters
can be calibrated as if they
were the feedback
type. To help determine
the type of
picoammeter
under calibration,
a brief description of the circuits follows.
2.8.1 Feedback-Type
The feedback-type
picoammeter
is basically an operational
amplifier with a feedback resistor connected between the input and the output as shown in Figure 2-5. If the amplifier input current, I@,is small compared to the input current, ji, an
expression for the amplifier output voltage, V,, for an Input
current of Ii is:
v =‘iV
O-G--
Equation
Is= lW=A
MODEL 261 I PICOAMMETER
2-4. High Resistance
Paths in Output
tions
2.8 INPUT VOLTAGE
DROP FOR FEEDBACK
SHUNT-TYPE
PICOAMMETERS
Equation
2
Typical values for the preceding parameters
meter are:
Input current to picoammeter,
Ii = 10.‘>A
Amplifier gain, k = 104
Picoammeter feedback resistor, I$= 1OW
Amplifier output voltage, V,,= 1V
Input voltage drop, Vi= lOO@V
I
vvb
I
for a picoam-
I
RF
I
Connec-
AND
The output current accuracy is specified under the assumption that the picoammeter
input voltage drop is less than
l/1000 of the Model 261 source voltage. Most feedback electrometers will easily meet this condition. Any error caused by
the picoammeter
voltage drop may be eliminated by calculation if the voltage drop is known. However, only a 1% error is
added if the voltage drop is 1 I100 of the source voltage.
2-4
resistor; k is the
If k > > 0, V, = $R,. The output voltage may be used to drive
either a recorder or the meter, M. The input voltage drop, Vi,
is:
1mV
DROP
Figure
1
where R, is the vaue in ohms of the feedback
amplifier gain.
Vi = -V,/ k
This is 0.1% of the source current. lO~‘zA. Leakage resistance
of the Model 2611 Test Cable is nominally greater then 1OW.
Picoammeter
Figure
2-5. Simplified
Circuit
Picoammeter
2.8.2 Shunt-Type
of Feed-Back
Type
Picoammeter
This type consists of a voltmeter,
V, calibrated in amperes.
which responds to the IR drop across a shunt resistor, R,.
Refer to Figure 2-6. The voltmeter can be one of two kinds:
A high impedance voltmeter, such es an electrometer,
which
has an extremely
high input impedance,
Zi; or a low impedance voltmeter.
High Impedance Voltmeter-The
input voltage drop, liR,, of e
picoammeter
using a high-impedance
voltmeter
is usually
1mV or more, due to voltmeter sensitivity
limitations.
Rise
time is usually slow, possibly several minutes for very low current levels. Typical values are:
Input current to picoammetelr,
Ii = 10.‘ZA
Picoammeter
shunt resistor, R,= 10’92
Voltmeter input impedance, ;Z,= 10’4fl
Input voltage drop, Vi= 10mV
Low Impedance Voltmeter-The
circuit of a shunt-type
picoammeter using a low-impedance
voltmeter is essentially the
same as Figure 2-6, except a more sensitive but lower input
impedance
voltmeter
is used. A lower input voltage drop
results, but response speed and maximum current sensitivity
are usually less. The voltage drop is liR,. Typical values are:
Input current to picoammeter,
Ii = 10.‘DA
Picoammeter
shunt resistance, R,= 106fl
Voltmeter input impedance, ;Z, =9x 1070
Input voltage drop, Vi = lOO@V
where E”, is the percent of error due to the picoammeter
input voltage drop;
Vi is the picoammeter
input voltage drop in volts;
V, is the Model 261 source voltage, read directly in volts
from the multiplier switch settings.
When the input resistance
Equation
2-6. Typical
2.9 COMPENSATION
FEEDBACK-TYPE
Shunt
Type
Picoammeter
FOR INPUT VOLTAGE
PICOAMMETERS
DROP
OF
Errors caused by picoammeter
iinput voltage drops of 1mV or
less are negligible for Model 261 outputs between 1.1 x lC@
and 10.“A. Following the instructions
in paragraph 2.6 will
bring the output current accuracy to between f0.25%
and
f0.7%.
2.9.1 Calculating
Voltage
Drop
Error
When either the picoammeter
voltage drop or input resistance is known, use either Equiation 3 or 4 to determine the
error.
When the voltage
drop is known:
Ev,=V.xlOO
Equation
2.9.2 Compensating
in ohms:
which is the
Equation
If the voltage drop is known, the actual Model 261 output
current can be calculated. Equation 5 gives the output current
value if the input voltage drop is the only significant source of
error.
la = I&V,
Vi)
Equation
5
the actual output current from the Model 261;
range switch setting (reciprocal of range resistor
Model 261 source voltage, read directly
multiplier switch settings;
picoammeter
input voltage drop in volts.
in volts
2.10 COMPENSATION
DROP FOR INPUT VOLTAGE
DROP OF SHUNT-TYPE
HIGH-IMPEDANCE
PICOAMMETERS
As long es the voltage drop is lees than 111000 of the source
voltage, errors due to the input voltage drop of this type
picoammeter
will not affect the Model 261 accuracy. Following the instructions in paragraph 2.6 will bring the accuracy of
the Model 261 output current to between
f0.2596
and
*0.7%.
The chief point is sening the multiplier switches to
higher values, so that the source voltage is 1000 times the
picoammeter
input voltage drop. If the meter sensitivity is adjustable, use the most sensitive range to obtain the smallest
voltage drop.
NOTE
If the instrument can measure current on either a
feedback-type
or shunt-type circuit, calibrate on
the feedback circuit. For example, calibrate the
Keithley Model 610C Electrometer
in the FAST
mode (feedback circuit) not the normal mode
(shuntl.
2.10.1 Calculating
VS
4
where Ri is the picoammeter
input resistance
Rs is the Model 261 source resistance,
reciprocal of the range switch sening.
where Ia is
Is is the
valuel;
Vs is the
from the
Vi is the
Figure
is known:
the Error
3
Equation 3 determines the error when the picoammeter
input
voltage drop is known. The voltage drop is easily found, since
the meter or other readout device indicates the voltage drop
on these type picoammeters.
2-6
X10.2
Compensating
Equations
Using equation 8 completely
to the input voltage drop.
Since the picoammeter
voltage drop can be found,
261 output current can be corrected.
Equation
output current value if the input voltage drop
significant source of error and if the voltage drop
l/l0 the source voltage.
la = I,(V, - vi1
where I8 is
Is is the
value);
V, is the
from the
Vi is the
Equation
the Model
6 gives the
is the only
is less than
6
the actual output current from the Model 261;
range switch setting (reciprocal of range resistor
Model 261 source voltage, read directly
multiplier switch setting;
picoammeter
input voltage drop in volts.
in volts
Using this correction,
accuracy is nominally f0.5%
(Model
261 accuracy). This error results from the factory calibration
method used for the Model 261 that adjusts the source voltage from that indicated to match the range resistor used.
For greater accuracy, or if the input drop is more than 0.1
times the source voltage, use equation 8 to compensate
for
the error. The following equation is based on the calibration
procedures.
v,, = v,IR,I)=
l/Is
Equation
V,R,,l,
7
where V,, is the actual source voltage;
V, is the Model 261 source voltage, read directly in volts
from the multiplier switch setting;
I?,, is the actual source resistance from the calibration certificate supplied with the Model 261;
Is is the Model 261 range switch setting (reciprocal of range
resistor value).
Using equation
Ia= I,lI,V,R,,
7 in equation
6 and substituting
Equation
-vi1
V,, for V,,
8
where Ia is the actual output current from the Model 261;
Vi is the picoammeter
input voltage drop in volts read from
the meter.
Table
cause
2-2. Causes
of Discrepancy
Picoammeter
in Output
input voltage
of Discrepancy
in Model
2.11 COMPENSATION
SHUNT-TYPE
METERS
DROP OF
PICOAM-
For the most part, the voltage drop for this type picoammeter
is about the equivalent
of that of the feedback-type
picoammeter-about
1mV or less. Following the directions in
paragraph 2.6 will ensure that Model 261 output currents are
within the specified accuracy.
To compensate for output current difference caused by input
voltage drops, use equation
8. This calculation
will be
precise, since the voltage drop is read directly from the
picoammeter.
2.12 RANGE
RESISTOR
VOLTAGE
COEFFICIENT
Ordinarily, the voltage coefficient of high-megohm
resistors
can lead to significant errors. However, the range resistors
used in the Model 261 have an extremely low voltage coefficient of only 5ppmlV.
This low value results in a worst-case
current change due to voltage coefficient of only 0.0055%
with the multiplier switches set for 1lV. Thus. the output
discrepancy
because of voltage coefficient
is one or two
orders of magnitude smaller than other sources of error, and
car? be ignored for all practical purposes.
2.13 COMPENSATION
CIENT
FOR TEMPERATURE
COEFFI-
When the Model 261 is used for range switch settings above
10~sor when the unit is operated at the temperature
indicated
on the calibration certificate, no significant errors will occur in
the output.
However,
for range switch settings between
l@sA and lUJ2A. the change in range resistance because of
temperature
coefficient can affect the output considerably.
The Model 261 is calibrated
at a specified
temperature
f0.5”C.
which is stated on the calibration certificate, for the
various ranges. The certificate also lists the temperature coefficients by range.
261 Output
Current
and Correction
Index
Equation
to Compensate
for Discrepancy
drop more than
5
6 or 8
all
2-6
for the error due
FOR INPUT VOLTAGE
LOW-IMPEDANCE
Current
Model 261 ambient temperature differs from
that stated in Calibration Certificate
compensates
Low-Impedance
all
10~8to 10-14
I
2.11
8
2.13
9
Compensating
Equation-The
effect of temperature
differences on the Model 261 current can be calculated using
equation
9. This gives the output
current value if the
temperature
effect is the only silgnificant source of error.
I
la=l~*~s[
100
(l+(T,-T,)x.Olxtg
Equation9
where la is the actual or compensated
Model 261 current output;
Is is the indicated current output (range switch setting
tlmes the multiplier switch settings);
T2 is the room temperature
in OC;
T, is the calibration temperature
in “C;
tc is the temperature
coefficient
of the range resistor in
%/OC given on the calibration certificate.
2-712-a
SECTION 3
APPLICATIONS
3.1 INTRODUCTION
The Model 261 was designed to serve as a secondary source
in calibrating picoammeters
an’d electrometers.
While this is
the primary purpose of the unit, it can also be used for
various other applications,
irxzluding current suppression,
galvanometric
measurements,
and ohmmeter
calibration.
This section briefly covers the methods for each of these applications; these examples by no means exhausts the possibilities of using the Model 261.
3.2 CURRENT
SUPPRESSION
The Model 261
currents so that
small variations
used to cancel
meter measures
phototube.
can be used to suppress steady background
a picoammeter
or electrometer
can measure
in signal. For example, the Model 261 can be
phototube
dark currents while the picoamsmall variations in the normal output of the
to determine any circuit limitations.
Always
meter for the best possible sensitivity
61OC
NULL DETECTOR
The basic circuit for current suppression is shown in Figure
3.1, Because of its popularity,
the Keithley Model 610C is
used as the current measuring device. Other instruments with
similar characteristics
will serve equally well in this application. Using the Models 261 and 6lOC, suppression up to 1000
times full scale is possible. Suppression
up to at least 100
times full scale is possible with most picoammeters.
The basic procedure for current suppression is as follows:
I. Connect the Models 261 and 610C to the unknown currant
as shown in Figure 3-l; use the Model 2611 test cable or
other similar coaxial cable.
2. Set the Model 261 to the desired current as described in
Section 2. Set the output polarity of the source opposite to
that of the unknown currem. Also set the source output
value as close as possible to the unknown current.
3. Set the Model 610C FEEDBACK switch to FAST. In this
mode, the Model 610C acts as a feedback tvpe picoammater.
4. Set the Model 61OC to the least sensitive current range.
Varv the Model 261 source outout until a null is reached.
5. Grabually increase the Model SiOC sensitivity,
nulling the
current with the Model 261 c1zmtroIs in each case. Keep the
Model 610C multiplier switch on 1.
6. Set both the Models 261 and 610C range switches to the
same setting. If the electrometer
is set to a lower range,
the Model 261 source resistance will divide the Model 610C
feedback current, impairing its zero stability.
7. Switch the electrometer
multiplier setting gradually from 1
to 0.001. In the lowest sening, the Model 610C current
sensitivity is 1000 times the ‘unknown current.
The basic procedure for using this method with other instruments is the same. Check the picoammeter’s
specifications
I
MODEL 261
CURRENT SOURCE
UNKNOWN
CURRENT
Figure
set the picoam-
3-1. Current
3.3 GALVANOMETRIC
Suppression
Circuit
Connections
MEASUREMENTS
In practice, using the Model 261 for galvanometric
measurements is very similar to the current suppression procedures
discussed in the previous paragraph. In this application,
the
Model 261 bucks out an unknown current, while a measuring
instrument,
such as the Keithley Model 614, serves as a null
detector.
The basic circuit for galvanometeric
measurements
is shown
in Figure 3-2. Iu is the unknown current; V, is the Model 261
source voltage and Rs is the source resistance.
Is is the
source current, while IM is any residual current seen by the instrument.
R, is the picoammeter
feedback resistor; k, the
amplifier gain; R, the multiplier resistance.
Follow the same basic procedure for this measurement
as
described in the last paragraph.
Once maximum
nulling is
achieved, the unknown currant value can be determined by
adding the Model 261 source output value to any residual
value shown on the measuring instrument.
t Iu
1
J
I
hi
1. RF
Figure
-L
3-2. Galvanometric
Measurements
3-1
3.4 OHMMETER
CALIBRATION
The Modal 261 contains calibrated
resistance
standards,
which make it useful for checking high resistance measuring
instruments.
The front panel AMPERES switch setting indicates the reciprocal of the internal source resistance. For example, the source resistance will be 1MR if the AMPERES
switch is in the 10-s position. The exact resistance for any
position of the AMPERES switch can be found listed on the
supplied calibration certificate.
The basic procedure for ohmmeter calibration is as follows:
1. Set the POLARITY switch to the OFF (not AC OFF1 position.
2. Set the AMPERES switch to the reciprocal of the desired
resistance.
3. Connect the ohmmeter to the Model 261 OUTPUT connector using an appropriate
coaxial cable. See Section 2
for precautions to be taken when making connections.
4. Carefully shield connections
when making measurements
greater
than
1OW. Use guarded
connections
for
measurements
of 1OW and more, as shown in Figure 3.3.
Guarded connections
are necessary
in such cases to
minimize the shunting
effects of cable and connector
leakage resistance. For example, using the 1O’Q range, a
10W leakage resistance will add an error of 1%. To make
the proper connections
within the unit, place the CALOPERATE switch in the CAL position (see Section 4).
3-2
WARNING
Disconnect
the instrument
from the power
line before removing
the top cover. Failure
to observe
this precaution
may result in
personal
injury
or death
due to electric
shock.
Remove the link between the GND and COM terminals on
the rear panel of the sourca. The outer shell of the OUTPUT jack is the guard terminal, while the G binding post
next to it is connected to the low side of the ohmmeter.
6. Observe the ohmmeter reading and compare it to the appropriate value listed on the calibration certificate.
Range
resistor values will be within the stated tolerance for up to
three months after factory calibration.
MODEL 261
zx&.?&:.-..
Figure
3-3. Guarded
Circuit
For Ohmmeter
Calibration
PERFORMANCE
SECTION 4
VERIFICATION AND CALIBRATION
one hour to stabilize an instrument
side the allotted range.
4.1 INTRODUCTION
This section contains information
necessary to verify that
Model 261 performance
is within specified accuracy and to
calibrate the instrument.
Moclel 261 specifications
may be
found at the front of this manual. Ideally, performance varification should be performed when the unit is first received to
make sure that no damage or change in calibration
has
occurred during shipment.
The verification
procedure may
also be performed if accuracy !is suspect or following calibration. If instrument
performamx
is substandard,
calibration
may be performed as described et the end of this section.
NOlTE
If the instrument does not meet specifications,
and less than three months have passed since
the date of shipment,
contact your Keith&
representative
or the factov
to determine the
action to be taken.
4.2 ENVIRONMENTAL
2. Turn on the power to the Model 261 and allow it to warm
up for at least one hour before beginning verification or calibration procedures.
4.5 VERIFICATION
4.5.1 Top
Cover
WARNING
Disconnect
the Model 261 from
line
and
other
instrumentation
removing
the top cover.
EQUIPMENT
Recommended
test equipmenlt for Model 261 performance
verification
and calibration
is listed in Table 4-l. Different
equipment
may be used as long as the accuracy specifications are at least four times better than Model 261 specifications.
If less accurate
equipment
is used, additional
allowances must be made for test equipment inaccuracy.
the power
before
1. Remove the four screws securing the top cover to the
chassis.
2. Grasp the top cover by the handle, and gently pull the
cover up and back until it clears the chassis.
3. To replace the cover, reverse the above procedure.
4.5.2 Range
4.4 INITIAL
Removal
The procedure in this section require that the top cover be
removed
to allow access to test points and the CALOPERATE switch. To remove the top cover. proceed as
follows:
COhlDlTlONS
TEST
PROCEDURE
Model 261 operation is based on connecting
an accurate,
known resistor in series with a stable, accurate voltage
source. The resulting current is easily predicted with Ohm’s
law. This same principle can be used to verify Model 261 parformance; if both the resistance and voltage are within specifications, it can be assumed that the output current is accurate as well.
All measurements
should be made at an ambient temperature
between lB°C and 26°C 165O 11082°F) with a relative humidity less than 80%.
4.3 RECOMMENDED
that is 10°C 116’-‘F) out-
Resistor
Verification
CONDITIONS
Before performing
the following procedures,
make sure the
Model 261 meets the followin!> conditions:
1. If the unit has been subjected to temperatures
below lB°C
(65°F) or above 26°C (62°F). allow sufficient time for it to
reach a temperature
within this range. Generally, it takes
Table
Measuring
4-l.
Recommended
Equipment
The following
procedure outlines a method which can be
used in the field to measure the actual value of the high
megohm range rasistors. The inherent drift of these resistors
sets the 3-month accuracy limit of the Model 261. Note that
resistor verification is also necessary to complete calibration.
for Verification
and Calibration
System
Measurement
Measurement
of l&s through 10-12 range resistors.
of Power Supply. Kelvin-Varley Voltage
Divider
4-1
Table
Model 261
Amperes
Switch
Setting
4-2. Range
Verification
Range
Resistance
Value (Ohms1
Measuring
Potential
(Volts)
105*0.02%
w*l%
107* 1%
108*1%
NY* 1%
10’0f2%
lO”i2%
10’2*236
0.9
10
10
10
10
10
10
10
lo-5
106
107
108
10-s
10’0
10”
10’2
‘Accuracy
Resistor
of equipment
Measurement
Accuracy*
* 0.02%
+ 0.03%
f0.025%
ztO.O35%
f 0.05%
f 0.07%
zto.156
kO.2%
listed in Table 41.
1. Disconnect
the Model 261 line cord from the power
source.
2. Remove the line connecting
the COM and GND binding
posts on the rear panel.
3. Set the CAL-OPERATE
(Figure 4-l) in the CAL position.
In this position, the low side of the range resistor is connected to chassis ground while the low side of the OUTPUT jack is connected as a guard between the high side of
the output and ground.
4. Connect the Model 261 OUTPUT jack to the resistance
measuring device. Use a suitable cable.
5. Select the desired Model 261 range resistance with the
AMPERES switch. The nominal resistor values are equal
to the reciprocal of the switch sening.
6. Set the measuring device to the voltage sening in the
table.
7. Measure and record the resistance value for each range
resistor. The measured value for each resistor should
agree with the value stated on the calibration certificate
within the tolerance listed in Table 43. If not, calibration
of the affected ranges will be required.
Table
43.
Range
Resistor
Accuracy
r
-1
L
4.5.3 Multiplier
Switch
Setting
Verification
This procedure checks the accuracy of the divided potential
from the voltage supply. Proceed as follows:
1. Connect the Model 179A DMM across the Kelvin-Varley
voltage divider. Connect the HI lead to the gray-white wire
on the X.01 switch, and connect the LO lead to the blackblue wire connection on the Xl switch (See Figure 4-11.
2. Connect the Model 261 to the power line.
3. Set the unit to the 10~s range; set the polarity switch to +
and set the multiplier
switches
to 10.00. The CALOPERATE switch should be in the OPERATE position.
4. Adjust R210 (Figure 4-l) for a reading of 10.000 +O.O05V
on the meter.
5. Switch each multiplier switch through the settings listed in
Table 4-4 and verify that the required reading is observed
on the meter.
6. Return the multiplier switches to the 10.00 setting and adjust R210 for a reading of 10.012 +O.O05V on the meter.
NOTE
This last step must be performed
unit to the stated specifications.
to return the
4.6 CALIBRATION
Calibrate the ranges after performing the previous procedures
in this section, paragraph 4.5. Range calibration is based on
all other adjustments
and verifications
being complete and
accurate. Perform this calibration any time the voltage supply
is adjusted or if any Kelvin-Varley
resistor or range resistor is
replaced.
Figure
4-l. Top Chassis
View
Table
The basis of this calibration is I = V/R. The range potential is
adjusted to correspond to the exact range resistor value, so
that the current produced is equal to one times the range.
1. Set the Model 261 CAL-OPERATE
switch to OPERATE.
Connect the Model 261 to the proper line source. Connect
the Model 179A Digital Multimeter
across the KelvinVarley divider. Connect the HI lead to the grey-white wire
on the X.01 switch, S103, and the LO lead to the blackblue wire on the Xl switch, 5105 (Figure 4-l).
2. Set the Model 261 controls to:
Polarity Switch:
+
Range Switch:
10-s
Multiplier Switch:
10.00
3. Adjust the 10-s CAL potentiometer,
R210 (Figure 4-11, for
10.012V *5mV when read on the Model 179. Setting the
voltage 12mV high compensates for any loading errors on
the lo-sA range.
4. Sat the multiplier dials to 10.00; switch the Model 261
through all ranges. Use the internal potentiometer
for each
range to set the range potential to 10R volts f the tolerance listed in Table 4-5. R is; the exact resistor value found
in paragraph 4.5.2 excluding the exponent value.
Multipli
Switch
Settin,g
Range
Switch
Setting
lO.OC
10.00
10.00
lO.OCl
10.00
10.00
10.00
106
107
108
109
10’0
10”
10’2
R113
R114
R115
R116
R117
R118
RllS
I
Voltage
Switch
Reading
1ov
sv
8V
7v
6V
5v
4v
3v
2v
1v
0.9v
0.w
0.N
0.6V
0.5v
0.4v
0.3v
0.2v
O.lV
o.osv
0.08V
O.ON
0.06V
0.05v
0.04v
0.03v
0.02v
O.OlV
o.oov
10.00
9.00
8.00
7.00
6.00
5.00
4.00
3.00
2.00
1 .oo
0.90
0.80
0.70
0.60
0.50
0.40
0.30
0.20
0.10
0.09
0.08
0.07
0.06
0.05
0.04
0.03
0.02
0.01
0.00
4-5. Range
Adjustment
for Multiplier
Multiplier
Switch
Settings
Example-The
10-I’ range reisistor is measured (paragraph
4.51 and its value is 1.019 x 1OW. The range potential is now
adjusted when the range switch is set to 10~” and the
multiplier switches to 10.00. Using Table 4-5, potentiometer
R118 is set so the voltmeter reads 10.19OV *5mV.
Table
4-4. Voltage
Settings
‘0lerance
* 5mV
* SmV
*8mV
f7mV
*6mV
* 5mV
-t 4mV
+ 3mV
*2mV
flmV
f 1.84mV
k 1.64mV
* 1.44mV
* 1.24mV
* 1.04mV
* 0.84mV
k 0.64mV
* 0.44mV
k 0.24mV
*310+/
* 28O@V
+ 25OpV
+ 22opv
* lSO/IV
-t 160&V
* 130@
f 1oopv
* lOO@V
f lOO/lV
Calibration
10 x R Volts
Wl= Range Resistor)
R = 10-C Range
R = 1W Range
R = 1W Range
R = l&9 Range
R = l&lo Range
R = l@” Range
R = 10-12 Range
Resistor
Resistor
Resistor
Resistor
Resistor
Resistor
Resistor
I
Tolerance
*
*
*
*
*
*
*
5mV
5mV
5mV
5mV
5mV
5mV
5mV
4-3144
SECTION 5
THEORY OF OPERATION
5.1 INTRODUCTION
This section contains a block diagram
tion of Model 261 circuit operation.
5.2 BLOCK
and a detailed descrip-
DIAGRAM
The basic block diagram for the Model 261 is shown in Figure
5-1. The source is made up of ,three basic sections: a voltage
source, a variable voltage divider, and a selectable range
resistor.
The voltage source uses a stable zener regulated supply to
provide
a constant
11V. A 3.dial Kelvin-Varley
voltage
divider, which has kO.l%
eccuracy,
is used to set the
voltage to a value between OV and 11V in O.OlV increments.
The three front panel multiplier switches contain the divider
resistors.
The range switch controls the output current by selecting an
appropriate
series range resistor. For any combination
of
front panel controls, the output current can be found simply
by dividing the voltage divider output value by the selected
range resistance value.
RANGEOFRESISTOR
,ONCOFEIGHT,
“AllIABLEYDLT~GE
SOURCr
r---e-.----~
,... !,,T,&;p,;
5.3 CIRCUIT
Figure 5-l. Bllock
DESCRIPTION
m
Diagram
For component
designations,
refer to schematic
diagram
number 18323E. Figure 7-6 at the end of Section 7.
5.3.1 Voltage
Supply
The voltage
supply
operates
from either 105.125V
or
210.25OV. 50-60Hz. depending
on the position of the line
voltage selection switch. The DC output of the supply is a
stable 11V with 0.01% stability for a 10% change in line
voltage.
The power transformer,
T201,. is specially constructed
and
shielded to provide better than lOsIT shunted by 0.0011rF
isolation from the transformer
secondary to ground or line.
The secondary of the transformer supplies 15VRMS which is
the full-wave
rectified by diodes D202 and D203. Filter
capacitor C202 filters this voltage to provide approximately
17VDC.
To obtain a stable, accurate voltage, the conduction
of the
series pass transistor
Cl202 is regulated
by comparing
a
sample voltage with a reference
voltage.
The sampling
voltage is provided by dividing action of resistors R211, R210,
R201, and one of the range calibration
resistors fR210,
R113-RllS).
The reference voltage is provided
by zener
diode, D207. Any difference between these two voltages is
amplified by a differential
amplifier made up of D204 and
D205. The signal is further amplified by Cl203 and applied to a
Darlington pair made up of D201 and D202. In this manner.
the conduction of D202 is controlled to oppose any tendency
for the output voltage to change. The 11V regulator output is
applied to the Kelvin-Vsrley
voltage divider through
the
POLARITY switch S106.
Transistor D203 operates at a high gain by connecting its collector to a negative supply voltage. This arrangement permits
linear operation
of Cl202 under wide variations
in supply
voltage. To supply D203, one side of the T201 secondary
voltage is rectified by D201 and filtered by C201. Resistor
R202 and saner diode D204 regulate this voltage to a stable
-6V, referred to the collector of D202.
Resistors R204 and R205 and diode D205 provide current
overload protection. Excessive current drawn from the supplv
causes an increased voltage drop across R204, which forward biases 0205, preventing the collector of 0203 from going more negative. Since this prevents D203’s error signal
from increasing any further, so D202 cannot increase conduction, and further current increase is prevented.
5.3.2 Range
Resistors
The range resistors, RlOl through R108 are mounted on a
specially designed rotary switch, range switch 5102, which
has silver-plated
contacts. The 10-s range resistor, RlOl, is a
0.02% wirewound
resistor. Resistors R102 through R104 are
1% carbon film resistors.
High-megohm
resistors R105
through R107 are special glass-sealed resistors that are individually selected after a 3 month stability test. R108 is made
up of ten 1OW resistors mounted on a separate assembly.
which is then mounted oh S102.
Capacitor Cl01 and resistors RlOS, RllO, and Rlll
form a
damping network to compensate
for the capacitance across
high-megohm
resistors R106 through R108. This network
eliminates high current transients when the Model 261 is first
turned on. The voltage source connects through one deck of
S102 to the range calibration
controls,
RZO, and R113
through RllS. These range calibration controls form part of
the voltage divider that forms the feedback signal for the
regulator in the voltage supply.
5-l
The range switch, OUTPUT jack, and the range resistors are
encased in a floating shield which is normally connected to
the low side of the output. The shield is connected as a guard
when the calibration switch SlOl, is in the CAL position.
5.3.3 Kelvin-Varley
Voltage
The
voltage
5-2
Kelvin-Varley
Divider
divider
uses
0.1%
precision
resistors, which are mounted on the multiplier switches 5103,
S104, and S105. These resistors (R120 through R1521 are
used to divide the 1lVDC supplied by the voltage supply
down to the selected voltage between 0 and 11V in 0.01 increments. The voltage is selected with the three multiplier
switches, S103 through S105.
SECTION 6
MAINTENANCE
6.1 INTRODUCTION
This section contains maintenance
and troubleshooting
procedures for the Model 261 Picoammeter
Source. It is recommended that these procedures
be followed
as closely as
possible to maintain the accuracy of the instrument.
6.2 SERVICING
SCHEDULE
The Model 261 requires no periodic maintenance
beyond the
normal care required of high-#quality elecfronic equipment.
Normally. no part should need replacement except the fuse.
Ideally, the high-megohm
range resistors should be checked
every three months to ensure instrument accuracy. Refer to
Section 4 for procedures to be used. The source may also be
calibrated if accuracy is suspect Use the procedures outlined
in Section 4 when calibrating the unit. Alternately.
the Model
261 may be returned to Keithley Instruments.
Inc. for calibration.
6.3 TOP COVER
The range resistors are specially selected and aged 10 ensure
rate accuracy for three months after calibration.
Normally,
these resistors do not need replacement.
If replacements
are
necessary. order them from Keithley Instruments,
Inc. In an
emergency, these parts can be ordered from another source,
but their accuracy or stability cannot be guaranteed.
This
could seriously affect the accuracy of the source on one or
more ranges. In any case, recalibration
will be necessary if
one of the range resistors is replaced.
CAUTION
Do not touch the body of the range rasistars at any time.
Contamination
of the
special
insulating
material
may
cause
leakage,
affecting
the accuracy
of the
source
output.
The 10’2 resistor
assembly
on S102 is not field installable;
the instrument must be returned
to the factory
for
repair and calibration
if this assembly
must
be replaced.
Do not use any spray-on
cleaning material
on the S102 assembly.
REMOVAL
6.5 TROUBLESHOOTING
Maintenance
or troubleshooting
the top cover be removed.
of the unit will require that
WARNING
These instructions
ara intended
for qualified
servicing
persalnnel
only.
Do not
remove the top cover unless qualified
to do
so. Also, disconnect
the Model 261 from
the
power
line
and other
instruments
before removing
the top cover.
Failure to
observe
these
precautions
may result
in
serious personal
injury or death because of
the possibility
of electric
shock.
To
1.
2.
3.
remove the top cover, use the following procedures:
Disconnect the Model 261 from the power line.
Remove the screws securing the top cover to the chassis.
Grasp the handle on the top cover and carefully separate
the cover from the chassis.
The cover can be installed by reversing this procedure.
Be
sure to line up the holes in the (cover with those in the chassis
before replacing the screws.
6.4 PARTS
REPLACEMENT
Section 7 lists the replaceable parts available for the Model
261. When replacing
parts, lbe sure to use only reliable
replacements
which meat orilginal specifications.
Replace
parts only as necessary.
The following
procedures include
troubles which may occur in the
cedures outlined and only specified
ponrnts can be identified with the
component
layout drawings at the
tion, Section 7 contains
several
resistor locations.
instructions
for repairing
Model 261. Use the proreplacement parts. Comhelp of the schematic and
end of Section 7. In addidrawings
pertaining
to
If the trouble cannot be located, the instrument
may be
returned to Keithley Instruments,
Inc. for repair services.
Contact your nearest Keithley representative
or the factorv
for information.
6.5.1 Troubleshooting
Equipment
The following
equipment
is recommended
for use when
troubleshooting
the Model 261: Keithley Model 179A or
similar DC voltmeter with 0.04% basic DC accuracy and a
minimum input impedance of IOMR.
6.5.2 Common
Faults
Table 6-l lists the most common troubles that might affect
the Model 261. If the steps listed in the tatle do nor rectify the
problem, a step-by-step
circuit analysis may be required. Use
the operating theory covered in Section 5 for this purpose.
6-1
Table
Difficulty
No current output
Ranges.
6-l. Troubleshooting
Probable
on all
1 Defective
Defective
No current output
range.
on one
Defective
Guide
Cause
Solution
voltage supply.
1Check
“open.”
Kelvin-Varley divider. Check
check
range resistor.
Check
resistor
0202 and D208 for
S103 through S106;
R120 through R152.
corresponding
range
for open circuit.
Output
too high on all ranges.
Defective
voltage supply.
Check Cl202 for short.
Output
too high on one range.
Defective
range resistor.
Check corresponding
resistor.
6.5.3 Troubleshooting
Guidelines
If the instrument does not operate at all, check the fuse, line
cord, and power source. If these are all found to be in good
working order, use the following procedure to troubleshoot
the voltage supply. (Refer to the schematic at the end of Section 7 for component
designations):
1. Set the front panel POLARITY switch to + and connect
the meter between J202 and the emitter of D202. The
voltage should be -11.6V.
2. If the voltage is about -17V. 0202 might be shorted. If the
voltage at J202 is much less than -11.6V. check the voltage at the collector of 0202; it should be 17V *ZO%.
Absence of this voltage indicates the rectifier circuit is not
working properly.
3. Measure the voltage at the anode of 0204; it should be
17.1V i 10%. If this bootstrap
voltage is not sufficient,
0203 will not operate and Q201 and 0202 will be cut off.
4. Check the reference amplifier and error amplifier stages
using the schematic diagram voltage levels as a guide.
range
WARNING
Disconnect
the instrument
from
line
and
other
instrumentation
replacing
the fuse.
6-2
the power
before
1. Locate the fuse holder on the rear panel; rotate the fuse
carrier counter-clockwise
until the carrier is free of the
holder.
2. Remove the fuse carrier from the holder, then remove and
discard the defective fuse. Replace the fuse with the type
recommended
in Table 6-2.
CAUTION
Use only
the recommended
fuse type;
replacing
the fuse with a unit with a higher
rating may cause instrument
damage.
3. Replace the fuse carrier in the holder and rotate the carrier
clockwise until it seats in the holder.
Table
62.
Fuse Types
6.6 FUSE REPLACEMENT
A line fuse protects the Model 261 from possible damage in
case of excessive line current. If the unit is totally inoperative,
the fuse may be open. To replace the fuse, proceed as
follows:
I
Operating
Limits
Fuse Types
105-125V.
50.60Hz
210.25OV.
50.60Hz
3AG. 1/8A,
25OV. Slow Blow
3AG. 1/16A,
25OV, Slow Blow
Keithley
Part Number
FU-20
FU-21
SECTION 7
REPLACEABLE PARTS
7.1 INTRODUCTION
This section contains replacement
schematic diagram and component
261.
7.2 PARTS
1.
2.
3.
4.
5.
parts information
and a
drawings for the Model
7.4 FACTORY
LIST
Table 7-1 lists the replaceable Iparts for the Model 261. Parts
are listed alphabetically
accorcling to circuit designation.
7.3 ORDERING
Instrument Model Number
Instrument Serial Number
Part Description
Circuit Designation (where
Keithley Part Number
applicable)
SERVICE
If the instrument is to be returned to the factor, for service,
complete the service form which follows this section and
return it with the instrument.
PARTS
7.5
To place an order for Model 26’1 parts or obtain parts information, contact your Keithley representative
or the factory. See
the inside front cover of this manual for addresses. When
ordering parts, include the following information:
0
SCHEMATIC
LAYOUTS
-*
t-
-
D204
-
0
0
draw-
Q203 T
II205
a201
JZOZ (3
location
I1
-R204
f---+
c201
COMPONENT
0
0202, -j
YLVL
AND
Parts list, schematic diagram and component
ings are shown on the following pages.
A202
D201
DIAGRAM
I7209
D206
R203
f----w
R207
D207
-I t-
D208
8
0204
c202
3
Figure
7-1. Voltage
Supply
Board,
Component
Location
Drawing
7-1
I l-----J
Table
Circuit
Desig.
7.1. Model
Description
Location
Cl01
c201
c202
c203
C204
D201
D202
D203
D204
D205
0206
D207
D208
Capacitor,
Capacitor,
Capacitor,
Capacitor,
Capacitor,
OS201
F201
F201
JlOl
J102
J103
J104
J201
J202
P201
LED, Fled
Fuse, ‘l/8A, 250V. (105125V Operation)
Fuse, ‘1/16A. 25OV. (21025OV Operation)
Bindin! Post, G
Binding Post. GND
Binding Post, COM
Receptacle. UHF
Test Jsck
Test Jsck
Cord Set, 6 foot
Transistor, PNP, Germanium, 2N1372
Transistor, PNP, Silicon, 40319
Transistor. PNP. Germanium, 2N1372
Transistor, PNP, Germanium, 2N1372
Transistor. PNP, Germailium, 2N1372
Resistor, 100kR. .02%. 1/2W Wirewound
Resistor. 1MlI 1%. %W, Carbon
Resistor. 10MR. 1%. % W, Carboti
Resistor, 100Mn. 1%
Resistor, 1GO. 1%
Resistor, IOGR, 2%
Resistor, 10OGQ 2%
Resistor, Assembly, 1TlI. 2%
Resistor, 10Mn. 10%. %W. Composition
Resistor. 1.5MQ. 10%. % W. Composition
Resistor, 150kR. 10%. ‘/W. Composition
Potentiometer,
200R. % W. 10%
Potentiometer,
2000. % W. 10%
Potentiometer.
2OOfl. KW. 10%
Potentiometer,
2OOfI. % W. 10%
Potentiometer,
ZOO? % W. 10%
Potentiometer,
200R. K W. 10%
Potentiometer,
2000. K W. 10%
Resistor. 12.811. .l%. %W, Wirewound
Resistw, 12.6Q ,196. %W. Wirewound
Resistor. 12.60. .l%. %W, Wirewound
Resistor, 12.60, .l%. % W, Wirewound
Resistor. 12.61). .l%. ‘/.W. Wirewound
Resistor. 12.6R. .l %. % W, Wirewound
Resistor. 12.8R. .l%, %W, Wirewound
Resistor, 12.m. .l%, %W. Wirewound
Resistor. 12.6R. .l%, %W. Wirewound
Resistor, 12.811. .l O%, ‘/W. Wirewound
Resistor, 12.m. .l%. ‘/W. Wirewound
Resistor, 12.6lI. .l%. ‘/W. Wirewound
Resistor, 12.8R. .l%. ‘/W. Wirewound
Resistor. 12.8R. .l%. ‘/W. Wirewound
Resistor. 12.80, .l%. ‘/.W, Wirewound
Resistor. 12.8R. .l %. )/I W, Wirewound
Resistor, 12.8R. .l%. %W, Wirewound
MO1
Dzo2
0203
a204
a205
RlOl
R102
R103
R104
R105
R106
R107
R108”
R109
RllO
Rlll
R113
R114
R115
R116
R117
A118
R119
R120
R121
R122
R123
R124
R125
R126
R127
R128
R129
R130
R131
R132
R133
R134
R135
R136
I108 is n
261 Parts List
.l@F. 50V. Mylar
5OOpF. 25V. Aluminum Electrolytic
5OOgF. 25V. Aluminum Electrolytic
.22gF, 5OOV. Ceramic Disc
5OOpF. 25V. Aluminum
Electrolvtic
Rectifier. Silicon, 1 N645
Rectifier, Silicon, 1 N645
Rectifier. Silicon, 1 N645
Diode, Zener, lN706
Rectifit!r. Silicon, 1 N645
Rectifi#?r. Silicon, lN645
Diode, Zener. 1 N823
Rectifier,
Silicon, 1 N645
Chassis
Voltage Supply
Voltage Supply
Voltage Supply
Voltage Supply
Voltage Supply
Voltage Supply
Vclkage Supply
Voltage Supply
Voltage Supply
Voltage Supply
Voltage Supply
Voltage Supply
Front Panel
Rear Panel
Rear Panel
Front Panel
Rear Panel
Rear Panel
Front Panel
Voltage Supply
Voltage Supply
Rear Panel
Voltage Supply
Voltage Supply
Voltage Supply
Voltage Supply
Voltage Supply
5102
5102
s102
5102
5102
s102
5102
5102
5102
s102
s102
Calibration Board
Calibration Board
Calibration Board
Calibration Board
Calibration Board
Calibration Board
Calibration Board
s103
s103
s103
5103
s103
s103
s103
s103
5103
5103
5103
5104
5104
s104
s104
s104
5104
Keithley
Part No.
c-41-0.1
c-94500
c-94-500
c-22-.01
c-94500
RF-14
RF-14
RF~l4
DZ- 1
RF-14
RF~l4
DZ-36
RF-14
PL-67
FU-20
FU-21
BP-15
BP-1lG
BP-11B
cs-84
TJ-4
TJ-5
co-5
TG-8
TG~50
TG-8
TG-8
TG-8
R-47.100k
R-12.1M
R-12.10M
R-289.l00b
R-289.IG
R~Z89-10G
R-289-1 ooc
320428
R-I-IOM
R-l-1.5M
R~1~150k
RP-104200
RP-104200
RP-104200
RP-104-200
RP-104200
RP-104200
RP-104-200
R-67-12.8
R-67-12.8
R-67-12.8
R-67-12.8
R-67-12.8
R-67-12.8
R-67-12.8
R-67-12.8
R-67-12.8
R-67-12.8
R-67-12.8
R-67-12.8
R-67-12.8
R-67-12.8
R-67-12.8
R-67-12.8
R-87-12.6
eld installable.
7-3
Table 7-1. Model 261 Parts List (Cont.)
CiVXM
Description
Locatkm
RI37
RI38
I31 39
R140
Iv41
R142
RI43
R144
RI45
R146
RI47
RI48
R149
R150
RI51
R152
R153
R154
Resistor,
Resistor,
Resistor,
Resistor,
Resistor,
Resistor,
Resistor,
Resistor,
Resistor,
Resistor,
Resistor,
Resistor,
Resistor,
Resistor,
Resistor,
Resistor,
Resistor,
Resistor,
s104
s104
s104
s104
s105
s105
s105
5105
5105
s10.5
s105
5105
5105
5105
s105
5105
5103
R-67-12.8
R-67-12.8
R-67-12.8
R-67-12.8
R-67-64
R-67-64
R-67-64
R-67-64
R-67-64
R-67-84
R-67-84
R-67-64
R-67-64
R-67-64
R-67-64
R-67-64
R-67-32
R-1.1.8k
R201
R202
R203
R204
R205
R206
R207
R208
R209
R210
R211
Resistor, 760R, .l%. 1/2W, Wirewound
Resistor, 2.2k.Q. lo%, 1/2W, Composition
Resistor, 1Okn. 1O%, ll2W. Composition
Resistor, lOQ, l%, 1/2W, Carbon
Resistor, 2.7kR. lo%, 1/2W, Composition
Resistor, IOkQ lo%, ll2W. Composition
Resistor, 634Q, l%, 1/8W. Metal Film
Resistor, 4.7kR. lo%, 1/2W, Composition
Resistor, 27OkQ 1O%, 1/2W, Composition
Potentiometer, 200R. 10%. 1/2W
Resistor, 47OQ (Nominal), I%, 1/2W, Wirewound
Voltage Supply
Voltage Supply
Voltage Supply
Voltage Supply
Voltage Supply
Voltage Supply
Voltage Supply
Voltage Supply
Voltage Supply
Calibration Board
Voltage Supply
R-58-760
R-I-2.2k
R-1-1Ok
R-12-10
R-I-2.7k
R-I-1Ok
R-88-634
R-l -4.7k
R-1.2.7k
RP-104.200
R-58-470
SlOl
5102
Slide Switch (Cal-Operate)
Rotary Switch less Components,
Rotary Switch with Components,
Knob, Amperes Switch
Rotary Switch less Components,
Rotary Switch with Components,
Knob. O-IO Readout
Rotary Switch less Components,
Rotary Switch with Components.
Knob. O-9 Readout
Rotary Switch less Components,
Rotary Switch with Components.
<nob. O-10 Readout
?otary Switch, POLARITY
<nob. Polarity Switch
Chassis
Front Panel
Front Panel
Front Panel
Front Panel
Front Panel
Front Panel
Front Panel
Front Panel
Front Panel
Front Panel
Front Panel
Front Panel
Front Panel
Front Panel
SW-45
SW-1 80
185248
KN-55
SW-180
184638
KN-57
SW-159
184568
tiN-56
SW-182
184658
KN-57
SW-189
KN-46
Front Panel
SW-151
s103
5104
s105
S106
5201
T201
7-4
Kelthley
Part No.
Desig.
12.8Q .I%. 1/4W, Wirewound
12.8Q .I%. 1/4W, Wirewound
12.8Q, .l%, 1/4W, Wirewound
12.8Q .l%. ll4W. Wirewound
640, .I%, 1/4W, Wirewound
64Q .l%, 1/4W. Wirewound
64Q .I%, 1/4W. Wirewound
64Q .I%. 1/4W. Wirewound
64R, .l%, 1/4W, Wirewound
64fL .I%. 1/4W, Wirewound
64G .l%. 1/4W, Wirewound
64R, .l%, 1/4W, Wirewound
64Q, .l%, 1/4W, Wirewound
64R. .l%, 1/4W, Wirewound
84R, .I%, 1/4W, Wirewound
64R, .l%, 1/4W, Wirewound
32R, .I%, 1/2W, Wirewound
1.8kR, 10%. 1/2W, Composition
Slide Switch
AMPERES
AMPERES
X.01 Multiplier
X.01 Multiplier
X.1 Multiplier
X.1 Mutliplier
Xl Multiplier
Xl Multiplier
TR-78
To 101&I
Resistor
Assembly
LWOW
Figure
Table
Description
7-2. Mec:hanical
Range
Switch,
5102
Parts
Keithley
Part No.
-
Top Cover Assembly
Handle
Bottom Cover Assembly
Support Assembly Bail Left
Support Bail Left
Support Assembly Bail fqigh
Support Bail Right
Feet
Feet (Rubber Ball)
Bottom Panel
Front Panel/Chassis
Asey.
Cable Clamp
Shorting Link
Label
Range Switch Shield As,sy.
Front Panel Assembly
-
7-3. AMPERES
t
I
185538
HH-18
17148C
192058
147038
192068
147058
FE-5
FE-6
17149c
185598
cc-4
BP-6
MC-30
185368
18464C
Figure
74. 10’2R Resistor
Assembly
IR108)
7-6
Figure
7-5. X.01 Multiplier
Switch,
S103
Figure
7-6. X.01 Multiplier
Switch,
5104
-
1
il
==Y=
I0
Figure
7-6
7-7. Xl Multiplier
-
-
Switch,
34
z
-
S106
6 DECK
2
pl/
, DECK,
1
Service Form
Serial No.
Model No.
Name and Telephone
No.
Date
_
Company
List all control settings, describe problem and check boxes that apply to problem.
Cl Intermittent
cl Analog output follows display
0
0
u
0
a
0
Batteries and fuses are OK
u
Checked all cables
IEEE failure
Front panel operational
Obvious problem on power-up
All ranges or functions are bad
Particular range or function bad; specify
Display or output (check one)
0
0
0
Drifts
Unstable
Overload
0
Calibration
0 Unable to zero
m Will not read applied input
u
only
0 Data required
(attach any additional
Certificate
of calibration
sheet:; as necessary)
Show a block diagram of your measurement
Also, describe signal source.
system including
Where is the measurement
(factory, controlled
being performed7
Any additional
connected (whether power is turned on or not).
laboratory, out-of-doors,
etc.)
temperature?
Other?
~
information.
all instruments
Ambient
What power line voltage is used?
Relative humidity?
required
(If special modifications
have been made by the user, please describe.)
“F