1
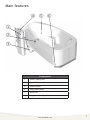
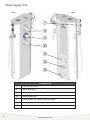
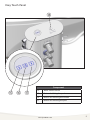
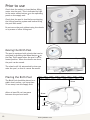
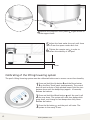
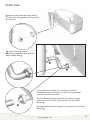
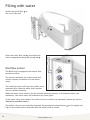
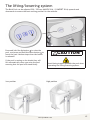
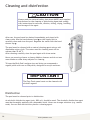
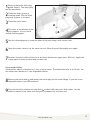
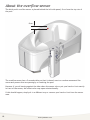
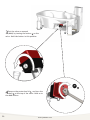
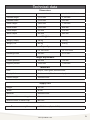
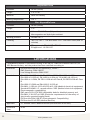
User manual
Fjordblink Birth Pool and Water
Supply Unit
www.fjordblink.com
Content
Intended use. . . . . . . . . . . . . . . . . . . . . . . . . . . . . . . . . . . . . . . . . . . . .
Symbols used in this manual. . . . . . . . . . . . . . . . . . . . . . . . . . . . . . . . . . .
Safety . . . . . . . . . . . . . . . . . . . . . . . . . . . . . . . . . . . . . . . . . . . . . . . . .
Product labels. . . . . . . . . . . . . . . . . . . . . . . . . . . . . . . . . . . . . . . . . . . .
Main features . . . . . . . . . . . . . . . . . . . . . . . . . . . . . . . . . . . . . . . . . . . .
Water Supply Unit . . . . . . . . . . . . . . . . . . . . . . . . . . . . . . . . . . . . . .
Easy Touch Panel . . . . . . . . . . . . . . . . . . . . . . . . . . . . . . . . . . . . . . .
Prior to use. . . . . . . . . . . . . . . . . . . . . . . . . . . . . . . . . . . . . . . . . . . . . .
Moving the Birth Pool . . . . . . . . . . . . . . . . . . . . . . . . . . . . . . . . . . . .
Placing the Birth Pool . . . . . . . . . . . . . . . . . . . . . . . . . . . . . . . . . . . .
Support feet adjustment . . . . . . . . . . . . . . . . . . . . . . . . . . . . . . . . . .
Calibrating of the lifting/lowering system. . . . . . . . . . . . . . . . . . . . . . .
Outlet hose. . . . . . . . . . . . . . . . . . . . . . . . . . . . . . . . . . . . . . . . . . .
Filling with water. . . . . . . . . . . . . . . . . . . . . . . . . . . . . . . . . . . . . . . . . .
Overflow sensor . . . . . . . . . . . . . . . . . . . . . . . . . . . . . . . . . . . . . . . .
The lifting/lowering system. . . . . . . . . . . . . . . . . . . . . . . . . . . . . . . . . . .
Cleaning and disinfection. . . . . . . . . . . . . . . . . . . . . . . . . . . . . . . . . . . . .
Disinfection. . . . . . . . . . . . . . . . . . . . . . . . . . . . . . . . . . . . . . . . . . .
About the overflow sensor . . . . . . . . . . . . . . . . . . . . . . . . . . . . . . . . . . . .
In case of power failure. . . . . . . . . . . . . . . . . . . . . . . . . . . . . . . . . . . . . .
Technical data. . . . . . . . . . . . . . . . . . . . . . . . . . . . . . . . . . . . . . . .
Certifications . . . . . . . . . . . . . . . . . . . . . . . . . . . . . . . . . . . . . . . .
Disposal and recycling. . . . . . . . . . . . . . . . . . . . . . . . . . . . . . . . . . . . . . .
2
www.fjordblink.com
3
4
5
6
7
8
9
10
10
10
11
12
13
14
14
15
16
16
18
19
21
22
23
Intended use
The Fjordblink® Medical Birth Pool is a physiotherapeutic and medical relaxation pool for water
births and can also be used for comfortable reclining and resting.
The Fjordblink® Medical Birth Pool is designed for delivery/maternity wards or units and should
be used only by healthy women giving birth naturally.
Models covered in this manual: MILIEU 2014 and COMFORT 2014. The only differences between
these two pools are the pool size and the location of their lifting/lowering system.
Copyright Fjordblink ApS. This manual contains information protected by copyright law. No part
of it may be reproduced or transmitted in any form without prior written permission from the
copyright holder.
This manual is subject to change without further notice.
Version 1.1 03/2015
Original instructions
Prepared by Technical Writer Ole Krog
krogco.dk
www.fjordblink.com
3
Symbols used in this manual
The following symbols are used in this manual as well as the associated documentation supplied
with the product.
!
!
WARNING
CAUTION
indicates a potentially hazardous
situation which, if not avoided, may result in
minor or moderate injury. It may also be used to
alert against unsafe practices.
CAUTION
IMPORTANT
NOTICE
indicates a potentially hazardous
situation which, if not avoided, could result in
death or serious injury.
WARNING
indicates important information
about handling and use of the product.
IMPORTANT
is used to address practices not related
to personal safety.
NOTICE
Feet crush hazard. Take care to avoid injury to
feets when in the vicinity of moving mechanical
parts.
Electricity or potentially dangerous voltage.
Labelident GmbH Art.-No.: W08-05
4
www.fjordblink.com
Safety
!
WARNING
•Read and understand the manual completely before use. Keep the manual close to the
unit.
•Comply with this manual to avoid accidents involving serious personal injury.
•Never use or handle this product in other ways than are specified in this manual, as this
can put your safety at risk and cause damage to the product.
•Make sure that everyone who is to install or use the product and its systems has the necessary information and access to this manual.
!
CAUTION
•Please comply with these instructions to avoid the product becoming damaged or destroyed.
•Do not perform repairs, disassembly, or assembly operations, extensions, re-adjustments
or modifications to this product. These must be carried out by Fjordblink or persons authorized by Fjordblink only.
•Never use the product if it is defective or damaged. Do not use a defective product before
it has been repaired.
NOTICE
•The information in this manual is based on correct fitting and installation of the product in
accordance with our Assembly instruction.
•Fjordblink cannot be held liable if the product is used in any way which differs from that
described in this guide.
•Fjordblink reserves the right to amend this manual without prior notice.
www.fjordblink.com
5
Product labels
The product labels are placed on the back of the Water Supply Unit and on the lower part of the
Birth Pool.
Serial number: XXXXXXX-XXXXXX-XX
Item: Supply Unit 2014
Voltage: 230 V
1 two pole earth wired
Max. fuse: 10 A
IP 55
: XXXXXX
FJORDBLINK® Medical ApS
Vibelandsvej 8
DK-3200 Helsinge
Tel.: +45 40 74 05 23
Serial number: XXXXXXX-XXXXXX-XX
Item: Milieu 2014
Voltage: 230 V
Frequency: 50 HZ
Max. fuse: 10 A
Total Watt: 690 Watt
: XXXXXX
FJORDBLINK® Medical ApS
Vibelandsvej 8
DK-3200 Helsinge
Tel.: +45 40 74 05 23
This product is CE-marked in accordance with the European Medical
Device Directive 93/42/EEC, including amendments incorporated
in Directive 2007/47/EEC. It also complies with all relevant
requirements in the Council Directive 2006/42/EC (of 17 May 2006)
on machinery and with Council Directive 2011/65/EC (of 8 June
2011) on RoHS. A declaration of conformity can be found at www.
fjordblink.com.
Additional information
The unit's unique serial number
The unit's name
Information about power supply and fuses
Manufacturing date
Manufacturer's name and address.
6
www.fjordblink.com
Main features
④ ⑤ ⑥
①
②
③
Component
1
Water Supply Unit
2
Quick filler
3
Water outlet
4
Easy Touch Panel
5
Birth Pool
6
Support with adjustable feets
www.fjordblink.com
7
Water Supply Unit
Front
Back
⑦
⑧
⑨
⑩
⑪
⑫
⑬
Component
8
7
Hand shower head
8
Water filler tap
9
Water temperature mixing tap
10
Hand shower tap
11
Power supply for lifting/lowering system
12
Power supply for drain system valve and overflow sensors
13
Drain system valve
www.fjordblink.com
Easy Touch Panel
⑭
Component
⑮ ⑯ ⑰
14
Water outlet button
15
Button for lifting the pool
16
Button for lowering the wheels
17
Button for lowering the pool
www.fjordblink.com
9
Prior to use
Check that the outlet is closed before filling
water into the pool. This is indicated by light
in the water outlet button 1 on the operating
panel on the supply unit.
1
Check that the pool is level before activating
the lifting/lowering system and before filling
the pool with water.
Do not move the pool without using the wheels
or by means of other lifting tool.
Moving the Birth Pool
2
The pool is equipped with wheels that can be
activated by pressing the Wheel button 2 on
the Easy Touch panel when the pool is at its
lowest position. When the wheels are down,
the pool can be moved.
The wheels will lift automatically when you
raise the pool, so that it cannot be moved.
Placing the Birth Pool
The Birth Pool should be placed on a
stable level surface, not more than
20 cm away from the Supply Unit.
Allow at least 50 cm free space
between the pool and walls.
50 cm
50 cm
≤ 20 cm
10
www.fjordblink.com
Support feet adjustment
1
Connect the pool to the
mains and set it in its
lowermost position by pressing
the Down button 1 on the Easy
Touch panel.
2
Press the Wheel button
to lower the wheels.
2
1
2
!
CAUTION
Avoid being trapped beneath the pool when operating the
lifting/lowering system. Ensure that there is free access
around the pool.
3
Mark the pool's position with
colored tape 3 on the floor, so
thath the pool always can be placed at
the same spot.
3
3
3
www.fjordblink.com
11
1
1
4
Remove the magnetic cover panels
the support feets.
5
6
1
to gain access to
Adjust the feets under the pool until there
is 5 mm free space under each foot.
Tighten the counter nut 2 in order to
secure the stability of the pool.
2
Floor
5 mm
Calibrating of the lifting/lowering system
The pool's lifting/lowering system must be calibrated before use to ensure correct functionality.
1
Press and hold the Up button 3 and the Down button
4 on the Easy Touch panel simultaneously. The control
box will emit a series of high pitched beeps. Hold the two
buttons down until the beeps stop (approx. 10 seconds).
Release the buttons.
4
5
3
2
Press and hold the Wheel button 5 until the pool is all
the way down. The system will emit slow beeps while
going down, and change to fast beeps when fully down.
Release the button.
3
12
Press the Up button 3 , and the pool will raise. The
system is now ready to use.
www.fjordblink.com
Outlet hose
1
Remove the outlet plug and mount
the outlet hose 1 before filling water
into the pool.
1
2
Attach the outlet hose
between the Birth Pool and the
Water Supply Unit 2 .
2
2
3
The outlet hoses comes in two different versions:
A disposable hose for single use, and a non-disposable
hose that can be autoclaved.
The non-disposable hose can easily be removed again
without the use of tools. Just unscrew the two outlet
flanges 3 .
4
The disposable hose uses a push-fit connection on the hose
flanges 4 .
www.fjordblink.com
13
Filling with water
Attach the quick filler
the rim of the pool.
1
to
1
Open the water filler tap 2 , and adjust the
water temperature using the mixing tap 3 .
4
Overflow sensor
The Birth Pool is equipped with sensors that
prevent overflow.
2
The sensors maintains the water's level and
ensure constant circulation of fresh warm
water.
3
The overflow sensors will open the outlet valve
automatically, when the water level reaches
the pre-chosen maximum.
When the water level drops to the pre-chosen minimum (approx. 4 centimeters below the
maximum), the outlet valve will automatically close again.
If the outlet valve opens before the water level has reached its maximum, please see section
"About the overflow sensor".
The outlet valve can be controlled manually by pressing the outlet button
Light in the outlet button indicates that the outlet valve is closed
14
www.fjordblink.com
4
on the supply unit.
The lifting/lowering system
The Birth Pool can be adjusted 290 / 335 mm (MILIEU 2014 / COMFORT 2014) upwards and
downwards to ensure the best working position for the midwife.
2
1
Press and hold the Up-button 1 to raise the
pool, and press and hold the Down-button 2 to
lower the pool. Motion stops when the button
is released.
If the pool is resting on its wheels they will
lift automatically when you raise the pool
ensuring that the pool will stand firmly.
Low position
!
CAUTION
Avoid being trapped beneath the pool when
operating the lifting/lowering system.
High position
www.fjordblink.com
15
Cleaning and disinfection
!
CAUTION
Always read the material safety data sheet (MSDS) and supplied
instructions for the cleaning or disinfecting agent and comply
with instructions for safe use, dilution, rinsing, drying, handling
and storage of the agent.
After use, the pool must be drained immediately and rinsed with
clean water. Use the hand shower head 1 on the Supply Unit to
carefully clean and rinse the pool. Regulate the water with the hand
shower tap 2 .
The pool must be cleaned with a neutral cleaning agent using a soft
disposable cotton cloth. The water used for cleaning must not be
warmer than 55-60o C.
After cleaning carefully rinse the pool again with clean water.
1
2
Never use scouring-cleaner or heavy alkaline cleaners and do not use
razor blades or other sharp objects for cleaning.
To keep the Birth Pool's surface nice and shiny we recommend a
regular polish with wax or SPA-polish, designed for acrylic surfaces.
IMPORTANT
The Easy Touch panel must not be cleaned with
alcoholic agents.
Disinfection
The pool must be cleaned prior to disinfection.
An alcoholic disinfection agent (min. 80% vol.) should be used. The alcoholic disinfection agent
must be thoroughly applied with a disposable cloth. Never use stronger solutions (e.g. caustic
soda). You can also use Actichlor plus as a cleaning agent.
16
www.fjordblink.com
1
Remove the pool's drain plug
1 and clean it. The drain plug
can be autoclaved.
2
Clean the drain 2 using a
cleaning brush. Put the drain
plug back in place in the pool.
3
3
Close the outlet valve.
1
4
Fill water in the bottom of the
pool (approx. 10 cm). Add a
neutral cleaning agent.
5
6
7
2
Use the cleaning agent to clean the sides of the pool using a soft cotton cloth.
Open the outlet valve to let the water run out. Rinse the pool thoroughly once again.
Disinfect the pool with Actichlor or an alcoholic disinfection agent (min. 80% vol.). Apply the
liquid agent to pool's surfaces and let them dry.
If you use Actichlor:
One Actichlor tablet is dissolved in 1 liter of warm water. The dissolution time is 10-15 min. You
can either use a bucket or 1 liter disposable bottles.
8
Remove the outlet hose 3 and mount the outlet plug on the outlet flange. If you use a nondisposable hose it can be autoclaved.
9
Pour the Actichlor solution into the drain 2 so that it fills the pool's drain tubes. Let the
solution remain in the tubes until the pool is prepared for the next user. www.fjordblink.com
17
About the overflow sensor
The birth pool's overflow sensor is placed behind the left side panel, 8 cm from the top rim of
the pool.
8 cm
The overflow sensor has a 5 seconds delay so that it doesn't react on random movement like
waves and persons that are passing by or touching the pool.
However if you sit leaning against the side where the sensor sits or put your hand or foot exactly
in front of the sensor, the outlet valve may open unintentionally.
If this should happen, simply sit in a different way or remove your hand or foot from the sensor
area.
18
www.fjordblink.com
In case of power failure
If the power fails while the pool is filled with water, it must be
drained manually.
!
WARNING
Labelident GmbH Art.-No.: W08-05
Always disconnect the power
before removing the pool's
side panels.
1
1
Unplug the power
connector 1 from the
Supply Unit before touching
the outlet valve under the
pool.
2
Remove one of the side
panels on the pool, by
pulling carefully down at the
end of the pool. The panel is
attached to the pool frame
with small springs. Loosen the
springs 2 carefully.
2
2
www.fjordblink.com
19
3
Set the valve on manual
(MAN) by turning the button 1 on the
valve. Hold the button in this position.
N
MA
TO
AU
1
3
4
Remove the protection lid 2 and turn the
shaft 3 at the top of the valve. Hold on to
the MAN button.
20
www.fjordblink.com
2
Technical data
Dimensions
Model MILIEU 2014
Model COMFORT 2014
Outside length
1,970 mm
1,700 mm
Outside width
1,130 mm
995 mm
Inside length
1,820 mm
1,550 mm
Inside width
1,010 mm
850 mm
Inside depth
570 mm
510 mm
Water depth
520 mm
445 mm
Weight
Weight, empty
146 kg
132 kg
Weight, full
650 kg
410 kg
Capacity
Discharge time
Ca. 520 litres
Ca. 310 litres
3-4 min.
2½-3 min.
Height adjustment
Lowest position
760 mm
730 mm
Highest position
1,050 mm
1,065 mm
Materials
Pool
Acrylic, Fibre glass,Stainless steel
Supply Unit
Stainless steel, Powder coated polyester
Outlet flanges
Stainless steel
Supply Unit
Height
101 cm
Width
36 cm
Material
Stainless steel
Bottom outlet connecting piece
43 mm
Bottom outlet to water trap
Ø50 mm
Power consumption
~ 480 W/hour (2,1A x 240V)
www.fjordblink.com
21
Disposable hose
Diameter
38 mm (inside)
Length
1 or 1.5 m
Material
LDPE low density
Melting temperature
110o C
Non-disposable hose
Diameter
38 mm (inside)
Length
1m
Material
Vulcano PU-H 09 Etere (Polyurathan)
Microorganism and hydrolysis-resistant
Working pressure
10 BAR/+90o C
Cleaning
-40o C to +90o C – can also resist 125o C over short time (max 25
minutes)
Approvals
FDA approved – FDA-21 CFR 177.2600
EU approved – 10/2011/EC
Certifications
FJORDBLINK® Medical is certified according to DS/EN ISO 13485:2012 Medical Devices (AC
2009 Bureau Veritas), and the product has been certified according to:
22
Directives
EU Directive 2006/42/EC (Machinery), Annex I
EMC Directive: 2004/108/EC
Low Voltage Directive 2006/95/EC
Standards
EN 61000-4-2:1995+A1+A2, EN 61000-4-3:2006, EN 61000-4-4:2005
EN 61000-4-5:1995+A1, EN 61000-4-6:1996+A1, EN 61000-4-8:1993+A1
EN 61000-4-11:2004, EN 55011:1998+A1+A2 Class B, EN 55022:1998+A2 Class
B
EN 61000-3-2:2000 and EN 61000-3-3:1995+A1
EN 60601-1:1990+A1:1993+A2:1995+A13:1996 (Medical electrical equipment)
Standard EN 60601-1-2, second edition: 2002 (Medical electrical equipment,
Electromagnetic compatibility)
EMC parts of EN 1970:2000 (Adjustable beds for disabled persons) and
EN 60601-2-38:1997+A1:2000 (Particular requirements for the safety of
electrically operated hospital beds)
EU Directive 2004/108/EC (Electromagnetic Compatibility)
EU Directive 93/42/EEC (Medical Devices)
Approvals
CE- marked Class 1 Medical Devices (EU Directive 93/42/EEC)
Protection
class
IP 66
www.fjordblink.com
Disposal and recycling
The unit contains reusable materials. There are no known hazards or risks associated with
disposal of the product. All components can be discarded after having been cleaned and
disinfected.
When disposing of the product, we recommend that it be disassembled and broken down into
different waste groups for recycling or combustion.
The following table provides information on the recycling and handling of the product.
Recyclable
components
Material
Steel
Steel can be recycled by being melted down and included as a
secondary material in the production of new steel.
Acrylic
Acrylic as a plastic is recyclable. It is considered a Group 7
recyclable. Use plastic sorting and recycling systems where they
are locally available, otherwise incinerating plastic has the added
benefit of generating energy which can be used for, for example,
combined heat and power production.
Fibreglass
Fibreglass can be recycled and used in cement production. Cement
is dependent on large quantities of sand. And sand is also the
main constituent of glass, and thus also of fibreglass. Fibreglass
additionally contains polyester which can be used as an energy
source in cement production, thereby replacing the use of fossil
fuels.
Electronics
The electronic components should be collected separately and
returned to the designated recycling service.
www.fjordblink.com
23
Fjordblink Medical ApS
Vibelandsvej 8 – 3200 Helsinge
Denmark
Tel: +45 40 74 05 23
E-mail: [email protected]
www.fjordblink.com
FJORDBLINK® Birth Pools
Designed by midwives
For midwifes
www.fjordblink.com