1
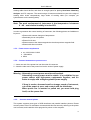
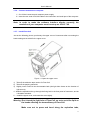
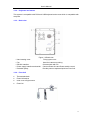
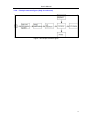
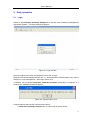
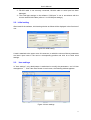
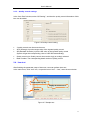
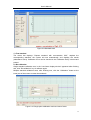
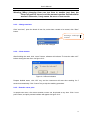
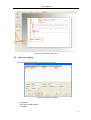
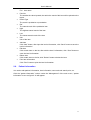
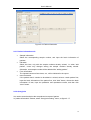
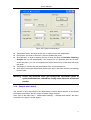
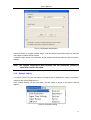
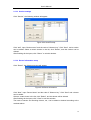
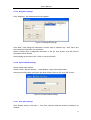
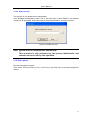
User’s Manual
Semi-auto Chemistry Analyzer
User’s Manual
SACA-19100
PLEASE READ THIS MANUAL CAREFULLY BEFORE
OPERATION
3, Hagavish st. Israel 58817
Tel: 972 3 5595252, Fax: 972 3 5594529
[email protected]
MRC.VER.01-10.13
1
User’s Manual
How to use this manual
It’s greatly appreciated you become the user of Semi-auto Chemistry Analyzer.
In order to get the best effect, you must be familiar with our instruments and their functions
before performing the clinical diagnostic tests.
This manual is the operating guidance of Semi-auto Chemistry Analyzer, which including the
contents of instrument installation, daily test, quality control, and daily maintenance, etc. As to
the users who uses external printer, please refer to the user’s manual of external printer at
the same time.
Please reserve all the packing materials for the use of deposit, transportation and
maintenance in the future.
You may contact with your distributor if there is any problem.
As to the instruments of different version or configuration, their functions
are slightly different.
Note:
Indications, advices and suggestions. Italics are used to differ from each
other.
Warning: Warning indications must be obeyed, so as to ensure
the normal operation of instruments and correct and
real test results. Bold-face is used to make the
difference.
2
User’s Manual
Symbols on the instrument
Symbols on the instrument
This symbol means that the labeled item is hot while the instrument is in use.
Don’t touch the labeled item as you could be burnt.
The symbol is labeled on the lamp support of optic system.
This means that the labeled item could lead to personal injury and/or damage
to the analyzer.
The symbol is labeled beside the power outlet and some external interface.
The symbols for “SERIAL NUMBER”, The serial number shall be after or below
the symbol, adjacent to it.
The symbol means the product is in vitro diagnostic medical device.
The symbol indicates the manufacturer and its address, after which are shown
its name and address.
The symbol indicates the date of manufacture, after which are shown its
manufacture date.
The symbol indicates EU representatives of the manufacturer and their
addresses, after which are shown their names and addresses.
The symbol indicates biological pollution, marked in the part where the
instrument contacts the clinical reagent. The symbol appears in black side and
yellow background.
Symbols on the sales packaging
The symbol means that the environment of instruments must be damp proof in
the course of transport, and instrument must be kept in a dry environment.
This means that instrument should handle with care in the course of
transportation, so as not to damage it.
The symbol means the instrument packaged should not be upended at any
time
The symbol means that the level piled up can't exceed 8 layers, as not to
damage instrument.
The symbol indicates temperature range of the analyzers during storage and
transportation.
3
User’s Manual
Warning and Safety Indications
This instrument is only used for in vitro diagnosis, please carefully read the following
warnings before the usage, and strictly obeys them.
Warning: Please carefully read the following announcements before using
this instrument.
Cut off the power source at once if there is abnormal smells or smokes,
and pull out the power plug from the outlet. At the moment, you must
immediately propose test applications to the distributors and the agents
of our company. If it is continuously used under this condition, it may
cause fire, electric shock or personnel casualty.
Neither blood and reagent nor metal pieces of staple and pin should be
dropped into the instrument; otherwise it would lead to short circuit or
smoke and fire. If there is something abnormal, cut off the power source
at once, and pull out the power plug from the outlet. At the moment,
you must immediately propose test applications to the distributors and
the agents of our company.
Operators don’t touch the electric circuit inside the instrument,
especially wet hands, which may be easier to get electric shock.
Rubber gloves must be put on while maintaining and checking the
instrument, and prescriptive tools and spare parts should be used. After
finishing the operation, please use disinfecting liquid soap to wash
hands. Otherwise, the parts of skin that contact with blood may be
infected, electrically injured or burned.
Extremely be careful while dealing with samples. Rubber gloves must
be put on, or it may cause infection. If the sample enters into eyes or
wounds, use a great amount of water to wash at once, and accept the
checkup of doctors.
Reagent Application
If the reagent enters into eyes, use a great amount of water to wash at
once, and accept the checkup of doctors.
If drink the reagent at error, turn to the doctors immediately, and take a
lot of water to vomit the reagent at the same time.
If hand or skin is stained with the reagent, clear with water at once.
The used tubes and other instruments should be properly disposed as
the medical wastes or infective wastes. If the person is stained with
blood, there is possibility of being infected by pathogens.
Power voltage, connection and earthing
Be sure not to insert the plug into the electrical outlet of alternating
current over 220v. Otherwise, it may cause fire or electrical shock.
4
User’s Manual
When the instrument is installed, three-core power cable accompanied
with the machine must be used, and ensure it is well earthing.
Otherwise, it may cause fire or electrical shock.
Be sure not to damage the isolation protection peel of power line. Don
not pull the power line with exertion or hang heavy things on it.
Otherwise, it may cause broken circuit or short circuit, thus lead to
electrical shock or fire.
Power source must be cut off when connect the peripheral equipments.
Otherwise, it may cause electrical shock or troubles.
Specifications of Pharmaceutical affairs law: It is forbidden to refit the
medical instruments.
5
User’s Manual
Content
How to use this manual ..................................................................... 2
Symbols on the instrument ................................................................ 3
Warning and Safety Indications ......................................................... 4
1.
Brief introduction of instrument ............................................... 8
1.1.
Product introduction .................................................................................8
1.1.1.
1.1.2.
1.1.3.
1.2.
1.3.
1.4.
1.5.
Product property, structure and composition ............................................8
Product applicability .................................................................................8
Instrument technique parameter...............................................................9
Instrument installation...............................................................................9
1.5.1.
1.5.2.
1.5.3.
1.5.4.
1.5.5.
1.5.6.
1.5.7.
1.6.
Product name Semi-auto Chemistry Analyzer.........................................8
Model ............................................................................................................8
Product property ...........................................................................................8
Instrument Opening and Sealing..................................................................9
Select proper position...................................................................................9
Power source requirement .........................................................................10
Connect instrument to power source..........................................................10
Connect external printer .............................................................................10
Connect instrument to computer ................................................................11
Install Flow-Cell ..........................................................................................11
Main structure.........................................................................................12
1.6.1.
1.6.2.
1.6.3.
1.6.4.
1.6.5.
1.6.6.
Front view ...................................................................................................12
Keyboard and mouse .................................................................................13
Back view....................................................................................................13
Flow-Cell.....................................................................................................13
Light source and peristaltic pump...............................................................14
Principle structure figure (Only for reference) ............................................15
2.
Daily operation...................................................................... 16
2.1.
2.2.
2.3.
Login ......................................................................................................16
Initial setting ...........................................................................................17
Item settings ...........................................................................................17
2.3.1.
2.3.2.
2.3.3.
2.4.
Test method ................................................................................................19
Calibration settings .....................................................................................19
Quality control settings ...............................................................................21
Item test..................................................................................................21
2.4.1.
2.4.2.
2.4.3.
Calibration test............................................................................................22
Control test .................................................................................................24
Change test item.........................................................................................25
6
User’s Manual
2.4.4.
2.4.5.
2.5.
2.6.
Close window..............................................................................................25
Reaction curve print....................................................................................25
Input item setting ....................................................................................26
Patient information .................................................................................27
2.6.1 Patient information edit ....................................................................................28
2.6.2 Query/print........................................................................................................28
2.7.
2.8.
Print by item ...........................................................................................30
Quality control query ..............................................................................31
2.8.1.
2.8.2.
2.8.3.
2.9.
2.10.
Quality control window................................................................................31
Data input....................................................................................................32
Indoor quality control ..................................................................................33
Calibration query ....................................................................................34
User management..................................................................................35
2.10.1. New user .......................................................................................................36
2.10.2. Delete user .................................................................................................36
2.10.3. User authorization ......................................................................................36
2.11.
2.12.
2.13.
System maintenance..............................................................................36
Sample batch delete...............................................................................37
System setting........................................................................................38
2.13.1. Hospital name ...............................................................................................39
2.13.2 Department setting .....................................................................................39
2.13.3 Section settings ..........................................................................................40
2.13.4 Doctor information setup ............................................................................40
2.13.5 Diagnose settings .......................................................................................41
2.13.6 Input method settings .................................................................................41
2.13.7 Com port settings........................................................................................41
2.14.
Data backup and recovery......................................................................42
2.14.1
2.14.2
Data backup................................................................................................42
Data recovery .............................................................................................43
2.15.
Exit system .............................................................................................43
3.
Maintenance ......................................................................... 44
3.1.
3.2.
Overview ................................................................................................44
Clean instrument ....................................................................................44
3.2.1.
3.2.2.
3.3.
Instrument maintenance .........................................................................45
3.3.1.
3.3.2.
3.3.3.
3.3.4.
3.4.
Clean the surface of instrument .................................................................44
Clean Flow-Cell ..........................................................................................44
Change fuse ...............................................................................................45
Adjustment of peristaltic pump tube ...........................................................45
Change of aspiration tube ..........................................................................45
Change light source lamp...........................................................................46
Simple trouble shooting ..........................................................................46
7
User’s Manual
1. Brief introduction of instrument
1.1. Product introduction
1.1.1. Product name
Semi-auto Chemistry Analyzer
1.1.2. Model
1.1.3. Product property
The design is based on the platform of PC computer, its unique information administration
system can be used in the operation system of Windows 2000/XP.
Open system design, meets different needs of users.
Rotational plane grating spectroscopic system is adopted with high precision,
and the wavelength can be continuously adjusted within the test range.
It has two test modes of single wavelength and double wavelength.
Following test methods can be provided:
Endpoint reaction method
(Endpoint)
Kinetics method
(Kinetics)
Two points method
(Two Points)
Double wavelength determination
(Dichromatic)
Absorbance determination
(Absorbance)
Multi-calibration curve method
(Multi- Calibration)
It can perform the analysis of serum, plasma, whole blood and urine.
Open for reagent, and there is no specific restriction.
English comprehensive report, programming parameter, as well as the data and
reaction curve of quality control can be printed.
Computer, any external printer and external incubation position can be selected
to equip with.
1.2. Product property, structure and composition
It is composed of optical system, channel system, external computer control system and
software, etc.
1.3. Product applicability
It is for the clinical tests of body blood and the tests of all kinds of routine biochemical indexs
of other body fluids.
8
User’s Manual
1.4. Instrument technique parameter
Resolution:
0.001Abs (Display) ,0.0001 Abs (Internal calculation)
Light source:
Halogen tungsten lamp
Wavelength:
330-800nm continuously adjustable
Temperature control:
Flow-Cell :
Interface:
Room temperature,25,30, 37
Flow-Cell system
RS232 bidirectional communication
Display:
External displayer
Print:
Work environment:
Storage environment:
Weight:
Overall dimensions:
Power supply:
External printer
0 -40 ;relative humidity≤85%
-10 -40 ; relative humidity≤85%
8kg
368mm(L)×192mm(W)×266mm(H)
a.c.110V/220V±11V/22V, 50Hz/60Hz
Power input:
80VA
Fuse pattern:
Fuse specification:
Ф5×20
3.15AL250V
1.5. Instrument installation
1.5.1. Instrument Opening and Sealing
Open the instrument package, and take the instrument out of the box.
Take off the packing materials, and take the instrument out of the plastic package. Preserve
the packing box and materials well, and it’s convenient for you to repack the instrument
someday in the future.
Check the articles inside the package box, and confirm the following stuffs should be
included:
Semi-auto Chemistry Analyzer
User’s manual
Packing list
Warranty certificate
Power line
QC certificate
Note: The product accessories should be in accordance with the packing
list. Please contact with the distributor when the accessories are not
correct.
1.5.2. Select proper position
Find a place without direct sunshine in your working place. The surface of the selected
9
User’s Manual
working table should be flat, and there is enough space for placing Semi-auto Chemistry
Analyzer and PC computer. The anterior edge of instrument should be near to the edge of
working table. Avoid comparatively large shake of working table (For example, put
hydroextractor on the working table).
Note: The work environment of instrument is that temperature is between
0 -40 and relative humidity is below 85%.
In order to guarantee the normal working of instrument, the following places are forbidden to
be put on:
Places with extreme changes of temperature.
Particularly hot or cold places.
Places full of dust.
Places nearer to the electromagnetic devices that produce magnetic field.
Places with direct sunshine.
1.5.3. Power source requirement
a.c.110V/220V±11V/22V
50Hz/60Hz
80VA
1.5.4. Connect instrument to power source
1)Insert one end of the power line into the outlet of instrument.
2)Insert the other end of the power line into the outlet of power supply.
Warning : Alternating current power must be well earthed.
Alternating current power must be stable. It is prohibited to use
power source with high-power equipments together, and it’s
better to equip with voltage-regulated power supply.
If there is smoke, abnormal smell or strange sound of instrument,
cut off the power at once, and contact with the distributor.
When power line is inserted or pulled out, you must hold plug
itself, not the power line.
1.5.5.
Connect external printer
This system supports most types of USB Interfaces and parallel Interface printers. Please
connect printer to the PC mainframe connected with this instrument by referring to the printer
user’s manual, and install the driver program for printer on the computer.
10
User’s Manual
1.5.6. Connect instrument to computer
1)Cut off the instrument and computer power supply.
2)Insert the two ends of RS-232 cable to the instrument and serial port of the computer.
Note: In order to make the software Interface display correctly, the
resolution of your computer must be set up as 1024 × 768.
1.5.7. Install Flow-Cell
Just as the following picture, push away the upper cover of instrument after unscrewing the
hand-rotating screw which fix the upper cover.
Figure 1-1 Open the upper cover
1) Take off the adhesive tape used to fix Flow-Cell.
2) Take off the packing materials.
3) Slightly insert Flow-Cell into thermostatic bath (the light hole directs to the direction of
light source).
4) Make the aspiration tube go through the fixing hole in the front panel of instrument, and let
it forwards extended.
5) Install the upper cover, and rotate the screw tightly.
Warning: Don’t touch the light hole of Flow-Cell, so as to avoid the lipid on
the hands affecting the transmittancy of Flow-Cell.
Make sure not to press and bend along the aspiration tube,
11
User’s Manual
otherwise, fluid flow is easy to produce bubbles, and cause
inaccuracy of test result.
1.6. Main structure
1.6.1. Front view
Figure 1-2 Connected with PC
Figure 1-3 Front view
Indicating lamp1: State indicating lamp.
Indicating lamp2: State indicating lamp.
Indicating lamp3: State indicating lamp.
Indicating lamp4: State indicating lamp.
Rinse key: Start or stop the rinse for instrument pipeline.
Steel needle for aspiration tube: Conduct the aspiration tube to extend.
Aspiration key: Press this key on testing state, the instrument will aspirate the sample
into Flow-Cell automatically.
Labeling
12
User’s Manual
1.6.2. Keyboard and mouse
This system is compatible with PS/2 and USB keyboard and mouse which is compatible with
computer.
1.6.3. Back view
Figure 1-4 Back view
Hand rotating crew:
Fixing upper cover.
Fan:
Used for instrument cooling.
RS-232 Interface:
Communicate with PC.
Power supply interface and switch: Connect Power line and Power switch control.
Peristaltic pump:
Provide power to aspirate liquid into Flow-Cell.
1.6.4. Flow-Cell
Thermostatic bath
Flow-Cell bracket
Inner cover of light source
Flow-Cell
Figure 1-5 Flow-Cell
13
User’s Manual
1.6.5. Light source and peristaltic pump
• Light source module
Open the upper cover of instrument, light source module is at the back of grating system, and
composed of light source lamp, bracket of light source, light source socket and lens.
Figure 1-6 Light source module
Peristaltic pump system
Peristaltic pump system consists peristaltic pump generator, peristaltic pump installation
board, peristaltic pump and pump tube. Peristaltic pump is installed on the outside of the
board behind the instrument, and it’s easy to change the peristaltic pump tube.
Figure 1-7 Peristaltic pump system
14
User’s Manual
1.6.6. Principle structure figure (Only for reference)
Figure 1-8 Principle structure figure
15
User’s Manual
2. Daily operation
2.1. Login
Switch on the Semi-auto Chemistry Analyzer first, and then start “Laboratory Management
Information System”. The login window will appear:
Figure 2-1 Login window
Input the original user name and password, Click “OK” to login.
Original user name and password both are “1”,the authorization is administrator,they can be
changed in “User management “ after login( refer to 2.8).
If software can not detect Semi-auto Chemistry Analyzer connecting to computer in 3
seconds, the following window will appear:
Figure 2-2 communication error
Possible reasons that causes communication failure:
1)Semi-auto Chemistry Analyzer has not connected to power source.
16
User’s Manual
2)RS-232 cable is not correctly connected, RS-232 cable or serial port has been
damaged.
3)The COM port settings in the software “COM port” is not in accordance with the
current used RS-232 cable (refer to 2.11.8 COM port settings).
2.2. Initial setting
After install of the software, initial setting window as follow will be displayed in the first time of
use:
Figure 2-3 Initial setting
A card is attached to the upper cover of instrument, on which the values of above parameters
are listed. Input items in the card to corresponding position and click ok to finish initial
settings.
2.3.
Item settings
In ”item settings”, only administrator is authorised to modify the parameters(as 2.8 User
management ). Click “Item Para” button in main menu, the following window appears:
Figure 2-4 Item settings
17
User’s Manual
Click the items to be changed in the item name list on the left side, the basic parameter of this
item will be displayed at right. User can edit the parameters, standard settings and quality
control according to the reagent instructions. Users can also define test item by themselves.
Print number:
The smaller the value inputted, the earlier the result of this item will be
printed on the report.
Item name:
item name in abbreviation.
Full name:
Full item name.
Unit:
8 conventional units are provided in pull-down list, input unit also can
be defined by user.
Mode:
Three test methods can be selected (endpoint, two points and kinetics).
Details are shown in: 2.4.1Test method.
Digit num:
Default value as “3”.
Factor:
If “calibration method” of this item select “Factor”,here must be filled.
Temperature:
Ambient temperature, 25 , 30 and 37 .
Primary wavelength: Input required wavelength in 330-800nm.
2nd wavelength:
Double wavelength test is only suitable for endpoint method item. If
secondary wavelength is not required,please select”0”.
Aspirate vol.:
Test the amount of imbibed liquid, usually is 500uL.
Print item:
If this is not selected, the item will not be printed.
Read time:
According to test requirement,fill in Reading time. When test methods
is endpoint method,it need not to be filled.
Reagent blank:
Showing the latest absorbance value of reagent blank. If “Always retest
reagent blank” is selected, the “Reagent blank” will be tested every
time.
Print:
Click ”Print” button,If ”print all” is selected, all the existing item
parameters will be printed. Or only this item parameters will be printed.
New:
Click ”New”,after input information such as item name,Click ”save” to
save a user-defined item.
Save:
After Click ”save”,software will display ”Save successfully”, otherwise
error message will appear. When user has revised or supplemented
according to hints, Click ”save” again.
Delete:
Select the item needed to be deleted in the item list,,Click ”Delete”,
system will ask you “delete or not”,Click ”OK” to delete selected item,
Click ”Cancel” may cancel the inquisition of deleting item.
Note:
Only administrator has the authorization to modify item parameters.
In order to make testing samples keep temperature stable and eliminate
small air bubble in Flow-Cell,a certain time delays is necessary.
For most endpoint test,time delay is 5 seconds
Kinetics under 25 , time delay should not less than 10 seconds
Kinetics under 30 , time delay should not less than12 seconds
Kinetics under 37 , time delay should not less than 15 seconds
18
User’s Manual
Print number of different item should not be the same.
Items that system can calculate automatically:
1.、GLB(Globulin) =TP(Total protein)-ALB(Albumin)
ALB/GLB
2、IBILI(Indirect Bilirubin)= TBILI(Total Bilirubin)-DBILI(Direct Bilirubin)
3、AST/ALT
4、LDH/AST
5、GGT/AST
6、ApoA/ApoB
7、LDL=CHOL-HDL-TRIG/2.2
Note:
All calculation item must be set in Item settings at first,and select “Print
item”,then they can be printed in comprehensive report of patient.
Calculation time of calculation items will extend with the increasing of
number of patients.
2.3.1. Test method
• Endpoint Endpoint method is that after mixing reagents and sample, reaction reaches
the endpoint after a certain time(i. e. color or absorbance of reaction solution do not change
any longer)
,at this time,measure the absorbance value of reaction solution,concentration
of reaction solution can be obtained according to Lambert-Beer’s Law. Kits of some test
item require to test with Dual wavelength,in this way,some interference factor can be
eliminated. This instrument provides Dual wavelength test method.
• Kinetics Kinetics method is that after mixing reagents and sample,continually measure
the absorbance value of reaction solution with photometer,When absorbance value begin
to change linearly, measure its change rate, concentration of reaction solution can be
obtained according to Lambert-Beer’s Law.
• Two points Two points method test is a special case of kinetics test , i.e. when
absorbance value begin to change linearly,measure the difference of absorbance of two
points in the linear section,thus obtain the concentration of reaction solution.
2.3.2. Calibration settings
In “Calibration Para” column of “Item Para ” menu,as the following window:
19
User’s Manual
Figure 2-5 Calibration settings
• Calibration method
None: Calculate on the basis of input factor, calibration with standard is not needed.
Linear: Linear calibration means using one or a group of standard preparation with the linear
relation between the concentration and absorbance to calibrate.
Multipoint linear: When the concentration of used standard is not in linear relation with its
absorbance, non-linear calibration is used, multiple standard with different concentrations are
adopted (at the most, 8 standard with different concentrations).
Cubic curve regression (Non-Linear 3P): Perform curve fitting regression according to the
concentration of inputted standard.
Cubic curve logarithmic regression (Non-Linear Log it-log 3P): Perform logarithmic
curve fitting regression according to the concentration of inputted standard preparation.
•
Standard number
The standard number of “Linear”method is“1 and “Multipoint linear” can set 6 standard
numbers at the most.
•
Repeated number
The times of each standard been tested. (1, 2 or 3 can be selected)
•
Standard concentration
Click “new” button first, input the value of “standard 1” in the column of “concentration”, repeat
this step, and input all the standard concentrations one by one. After finishing adding, click
“save” button to save the concentration. Click “delete” button to delete the current
concentration value.
Note: Before saving, the standard with blank concentration value should be
deleted first. Software will re-calibrate after revising the standard
concentration.
20
User’s Manual
2.3.3. Quality control settings
In the “Item Para” window, select “QC Setting”, and then the quality control information of this
item can be edited.
Figure 2-6 Quality control setting
•
•
•
3 quality controls can be set at the most.
AVG (Average): Input the target value of the inputted quality control.
SD (Standard deviation): Input the SD value of the inputted quality control
System will get the corresponding value of 1SD-3SD automatically).
•
•
Quality control rule: Quality control rules can be singly or multiply selected.
Batch number: The corresponding batch number of quality control.
2.4. Item test
After finishing the parameter setup of item test, users can perform item test.
In the main menu, Click “test” icon, or open the menu “test”→ “test”, enter the test window:
Result of that very day
Display the reaction curve
Item list
Figure 2-7 Sample test
21
User’s Manual
Sample
information
Test result
Figure 2-8 Data of today
•
Test item
Select the needed test item, Click “Start” button, start testing according to the instructions
on the status bar.
•
Parameter
Display the current tested item parameters.
•
Test column
Display the reaction curve and the latest sample test results.
•
Data of today
Display the tested sample data of today, including sample number, test item, result
and the value of ABS.
Status bar
Display the tested procedure, and indicate the related requirements of user operation.
•
•
Sample ID change window
Sample number will increase 1 automatically.
If this sample needs to be tested again, change the sample number to the corresponding
number, and Click “OK”. For example, the current sample number is “2”, change to “1”,
and click “OK” key, it will retest No. 1 sample.
•
Print chart
Click “Print Chart” could print the reaction curve.
2.4.1. Calibration test
After the blank test and standards has been set, click “Calibration” to perform calibration test
in the menu of “sample test”. As figure 2-9:
22
User’s Manual
Figure 2-9 Standard tests
1)
)Test standard
The status bar displays “Prepare standard with concentration XXX”, aspirate the
corresponding standard, the system will test automatically, and displays the results
(absorbance value). Calibration curve can be checked in the “Calibration Query” window and
printed.
2)
)Re-calibration
Single standard calibration test, in the “new factor display window” appeared after finishing
test, click “Re-calibration” key to calibrate again.
Multiple standard calibration tests, after finishing test, click the “Calibration” button at the
lower part of the screen to retest the standards.
Figure 2-10 Single point calibration result and return factor
23
User’s Manual
3)
)Save results
After finishing single standard calibration test, “new factor display window” will appear. Click
“Save” to save the new factor, and turn back to the sample test menu.
After finishing multiple standard calibration tests, the calibration correlation coefficient will be
saved automatically.
4)
)Cancel
In the appeared “new factor display window”, Click “cancel”, and the calibration result of this
time will not be saved, it will return to the sample test menu automatically.
Note: Calibration and quality control test only can be performed after that
you have set the standard and quality control parameter. Factor can
be inputted, or gotten from calibration test.
2.4.2. Control test
After finishing the blank test, quality control has been set; quality control can be performed at
any time.
In “sample test” menu, click “QC” button, “quality control select” window will appear. As figure
2-11:
Selection
frame
of
quality
control
Figure 2-11 Quality control test
In the “Control Select” window, choose the quality control needed to be tested, click “OK” key
to start quality control test. Click “cancel” key to cancel quality control test, and return to the
sample test menu.
Quality control results were listed in “quality control result” of “Data of today” menu, quality
control chart can be searched in quality control management.
24
User’s Manual
Warning: When changing from one test item to another test item, the
Flow-Cell must be rinsed, and the remnant reaction fluid should be
washed. Otherwise, it may cause the error of test results.
2.4.3. Change test item
Click “test item”, open the board of item list, select item needed to be tested, click “Start”
button.
Pressing it could open the
item list
Figure 2-12 Item changes
2.4.4. Close window
After finishing the work, click “return” button, software will indicate “To rinse the tube unit?”
before closing the test menu. As figure 2-13:
Figure 2-13 Rinse indication
Prepare distilled water, click “OK” key, and the instrument will start tube washing for 5
seconds automatically. Click “Cancel” key to skip the washing procedure.
2.4.5. Reaction curve print
In sample test menu, the current reaction curves can be printed at any time. Click “curve
print” button, and print preview interface will appear. As figure 2-14:
25
User’s Manual
Print
Printer settings
Print settings
Figure 2-14 Reaction curve print
2.5. Input item setting
It is used to edit the information of item which is not test.
Figure 2-15 Input item setting
•
Item Name
Item name in abbreviation.
•
Full Name
26
User’s Manual
Full item name
2.6.
•
Print No.
The smaller the value inputted, the earlier the result of this item will be printed on the
report.
•
Result Type
The result is qualitative or quantitative.
•
Ref
The natural result of the qualitative item
•
High
The highest natural result of the item
•
Low
The lowest natural result of the item
•
Unit
Unit of the item
•
Add item
Click “Add” button, after input the item’s information, click “Save” button to save the
item’s information.
•
Edit item
Click certain item on the list, after edit the item’s information, click “Save” button to
save the item’s information.
•
Delete item
Click certain item on the list, click “Delete” button to delete the item.
•
Print item information
Click “Print” button to print the item’s information.
Patient information
It is used to edit patients’ information, item information, test result and search print, etc.
Click the “patient information” column under the “Management” of the main menu, “patient
information” menu as figure 2-16 will appear.
27
User’s Manual
Figure 2-16 Patient information
2.6.1 Patient information edit
•
Sample information
Select the corresponding sample number, and input the basic information of
patients.
•
Edit state
Select this item, only edit the sample numbers already existed, i.e. when “add
patient”, cursor only changes among the sample numbers already existed.
Otherwise, new sample number will be added while “adding patient”.
•
Form information
The inputted content of test doctor, etc., will be indicated in the report.
•
Item information
If the patient data is needed to be added or revised, select a certain patient first,
input the basic information of the patient first, click “Add” button, choose the basic
information of item, input the qualitative and quantitative results, and then click
“save” button.
2.6.2 Query/print
It is used to search and print the comprehensive report of patient.
In “patient information” window, select “Query/print setting” menu, as figure 2-17:
28
User’s Manual
Figure 2-17 Query/print setting
•
Query
Perform single or combined searching according to the test date, sample number,
name and qualitative result.
After inputting the related search conditions, click “search” button. Switching to
“patient information” window can check the searched results.
•
Table select
The searched results can be printed according to the four kinds of table styles.
Select the needed form, the right side of the menu displays the table of
corresponding report forms.
•
Report print
In “patient information” window, select the needed patient, click “Preview” (Figure
2-18), and perform print.
If several patient reports of the total need to be printed, press “Ctrl” key and click the
patients you want to print report. In the front of the selected patient information will
be added print mark “·”.
If the option of “print all” in “sample information” is selected, all the displayed patient
report will be printed.
29
User’s Manual
Figure 2-18 Print previews
2.7. Print by item
Print all the test results within the selected time according to the items.
•
Click “Print by item” under the “Management” of the main menu, an menu as shown
in the Window will appear:
Figure 2-19 Print by item
•
Singly or multiple input “Time Span” and “item name”, click “search”, and the right
side of the menu will display the searched results.
•
•
Select the report print forms (Sell-adapt, A4 print, Double)
After selecting the content needed to be printed or “Print All”,
Click “print preview”, the picture as figure 2-20 will appear.
•
Click print button to perform print.
30
User’s Manual
Figure 2-20 Print preview
2.8. Quality control query
Input quality control item to search quality control window.
2.8.1. Quality control window
Click “QC Management” under “Management”, the following window appears:
31
User’s Manual
Figure 2-21 QC management
In “Quality control” window, select time span, item name, quality control and batch number.
Click “Plot” key to draw the corresponding quality control chart with the time.
Quality control indication: Quality control can be indicated whether it is controlled according to
the selected quality control principles.
Print preview: It has the function of previewing and printing the displayed quality control chart.
2.8.2.
Data input
It can perform the input, editing or searching of the data of quality control.
Quality control data list
Figure 2-22 Data input
32
User’s Manual
•
Query: Input the searching time period or item name, click “Query”, the data list of quality
control will display the searched results.
•
Data input
1)New: Click “New” button, select “item name”. After inputting the corresponding quality
control value, batch number and the test date, click “Save”.
2)Delete: Select a certain result among the “Quality control list”, click “Delete”.
2.8.3. Indoor quality control
Click “Chamber QC”, the menu of Indoor quality control appears, as figure 2-23:
Figure 2-23 Indoor quality control
After inputting the content of “Report Title” and “Item Set”, click “Preview”, and the display is
as the figure 2-24:
33
User’s Manual
Figure 2-24 Print preview of indoor quality control
Note: In order to ensure the print effect of quality control, it is suggested to
use laser jet or ink jet printer while printing quality control chart.
2.9. Calibration query
In the main menu, clicking “Calibration Query” under “Management”, you can enter the menu
of calibration curve query. As figure 2-25:
34
User’s Manual
Figure 2-25 Calibration query
•
Item list can be selected: Display the calibrated item that can be searched.
•
Calibration curve Window: After selecting items, the calibration curve of this
item can be displayed.
•
Fitting mode: Fitting curve and fitting straight line modes can be selected to
display calibration curve.
•
•
Print preview: Perform the print of calibration curve. “”
Return: Return to the main menu.
2.10. User management
Click main menu → “File”→ “Administrator Settings”→ “User Manage”, the menu as shown in
the window will appear:
Figure 2-26 User manage
35
User’s Manual
2.10.1. New user
Click “New” button, input the corresponding contents in the columns of “Name” and
“Password”, etc.
Select “Operator” (operator settings refers to Section 2.11.4) and “Level”, click “Save” key to
save the user.
2.10.2. Delete user
Select a certain user in the user list, click “Delete” to delete this user.
After finishing all the inputs, click “Close” to exit this window.
2.10.3. User authorization
Administrator: User management (i.e. newly add, delete or revise user), sample
batch delete, database backup, database recover and system maintenance can be
performed.
Common user: Basic functions of daily item editing, testing, printing and query, etc.
Note: It is suggested to set up only one administration user, so as to ensure
the correctness of the instrument configuration.
The test doctor corresponding to the login user will be displayed in
the report list, and it needs to log in again while changing users.
2.11.
System maintenance
This function is only authorized to the administrator.
Click “File” on the main menu → “administrator settings”→ “System Maintenance”, the menu
as shown in the figure 2-27 will appear:
36
User’s Manual
Figure 2-27 System maintenance
Temperature factor: the factor of this item is used to revise the temperature.
Pump factor: the factor of this item is used to calibrate the pump.
Shut light time: In order to prolong the life of lamp, the lamp of Semi-auto Chemistry
Analyzer will turn off automatically if the system has no operation after the set time.
Under test menu, you can use keyboard and cursor time to turn on the lamp and begin
test again.
Temperature: It shows the real temperature of the current transducer.
Save: After revising the related data, please click “Save” and return and the new settings
become valid.
Warning: Please pay attention when you change the correlation factor of
system maintenance, otherwise, it may cause the error of the test
results.
2.12. Sample batch delete
The function is only authorized to the administrator. Perform batch deletion to the sample
information according to the time range or sample range numbers.
Click “File” on the main menu→ “Administrator settings”→ “Sample batch delete”, the menu
as shown in the figure 2-28 will appear:
37
User’s Manual
Figure 2-28 Sample batch delete
Select the frame of “sample number range”, and the sample information within the set time
and sample numbers will be deleted.
If “sample range” frame is not selected, all the sample information within the set time will be
deleted.
Note: The sample information after deletion can not recovered, please be
careful to use this function.
2.13. System setting
It is mainly used to set the information of hospital name, department, sender, test doctor,
examiner and clinical diagnosis, etc.
Click “System Setting” on the main menu, and the menu as shown in the figure 2-29 will
appear:
Figure 2-29 System setting
38
User’s Manual
2.13.1. Hospital name
Click “Hospital”, the following window will appear:
Figure 2-30 hospital name
Input hospital name, click “OK”, and click “Close” to exit.
2.13.2 Department setting
Click “Department”, the following window will appear:
Figure 2-31 Department setting
Click “New” key to input “Department name” and the code of “shortcut key”. Click “save”, and
add another department. Select the department name in the list, click “Delete”, and this
department can be deleted.
After finishing all the inputs, click “Close” to exit this window.
39
User’s Manual
2.13.3 Section settings
Click “Section”, the following window will appear:
Figure 2-32 Section setup
Click “add”, input “Section name” and the code of “shortcut key”. Click “Save”, and a section
can be added. Select a certain section in the list, click “Delete”, and this section can be
deleted.
After finishing all the inputs, click “Return” to exit this window.
2.13.4 Doctor information setup
Click “Doctor”, the following window will appear:
Figure 2-33 Doctor information
Click “New”, input “Doctor Name” and the code of “Shortcut key”. Click “Save” and a doctor
can be added.
Select a certain doctor in the list, click “Delete”, and this doctor will be deleted.
After finishing all the inputs, click “Close” to exit this window.
The items of sender and checking doctors, etc., can be added or deleted according to the
methods above.
40
User’s Manual
2.13.5 Diagnose settings
Click “Diagnose”, the following window will appear:
Figure 2-34 Diagnose settings
Click “New”, input “Diagnose information” and the code of “Shortcut key”. Click “Save” and
more diagnosis information can be added.
Select a certain piece of diagnosis information in the list, click “delete”, and this piece of
information will be deleted.
After finishing all the inputs, click “Close” to exit this window.
2.13.6 Input method settings
Set up default input method.
Click the menu “System Setting”→ “Input Method”, open input setup window.
Select input method after clicking the pull-down frame (Figure 2-35), click “OK” to save.
Figure 2-35 Input method settings
2.13.7 Com port settings
Click “System setting” in the menu→ “Com Port”, open the selection window of COM port, as
Window:
41
User’s Manual
Figure 2-36 COM port settings
Click the pull-down frame, the first is the COM port list of the local computer.
Select the corresponding COM port, and click ensuring. New COM port can be used to
perform device connection and communication.
Note: Please ensure whether connection of RS-232 cable is in accordance
with the settings, otherwise, it may cause communication errors.
2.14. Data backup and recovery
2.14.1 Data backup
This function is only authorized to Administrator.
Click “Database Management” under “File” in the main menu, and select “Backup”, as figure
2-37:
Figure 2-37 Data backup
Click “…” key, select “Destination path” to save data files, and Click “Backup” to finish.
Note: System must be restarted after data backup.
42
User’s Manual
2.14.2 Data recovery
This function is only authorized to administrator.
Click “Database management” under “File” in the main menu, select “Restore”, the interface
as figure 2-38 will appear. Select the primarily backuped database, and Click “recover”.
Figure 2-38 Data recovery
Note: System must be restarted after data backup.
This operation is only performed by the system administrator, and
common users can not try this operation.
2.15. Exit system
Exit this management system.
Click “Close” under the menu of “File” or “Exit” key in the main menu to exit the management
system.
43
User’s Manual
3.
Maintenance
3.1. Overview
Semi-auto Chemistry Analyzer is a clinical precise analyzer, and daily maintenance work
must be well done to make the instrument in good condition. The maintenance of Semi-auto
Chemistry Analyzer is very simple, but it must be done carefully.
3.2. Clean instrument
3.2.1. Clean the surface of instrument
● Keep the clean of instrument working environment.
● Neutral cleaner and wet cloth can be used to clean the surface of instruments.
Warning: Please don’t let any solvent, lip and erosive material touch the
instrument.
3.2.2. Clean Flow-Cell
Flow-Cell must be kept clean, so as to ensure the accuracy and reliability of the test results.
Flow-Cell must be cleaned under the following conditions:
1)While powering on, the deviation of water blank value is too big.
2)Change test items.
3)Before power off.
Cleaning method:
1)Clean the outside of Flow-Cell
•
Flow-Cell must be placed according to the requirements. (Refer to 1.5.7).
•
If the exterior of Flow-Cell is polluted, soft cloth with dehydrated alcohol can be
used to slightly wipe it.
2)Clean the inside of Flow-Cell
•
After starting the instrument, prepare enough distilled water, and put it under
the aspiration tube.
•
•
Press rinse key on the instrument to perform washing.
Each washing lasts about 5 seconds.
Warning: Don’t leave the reaction fluids or other pollutants in the Flow-Cell
for a long time.
44
User’s Manual
3.3. Instrument maintenance
3.3.1. Change fuse
Fuse is installed in the fuse box beside the power switch of the back of the instrument, open
the box cap and it’s very convenient to change the fuse.
Fuse specification: 250V, 3.15A.
Users are suggested to use voltage regulated power supply.
Warning: Must use the fuse of the specifications above. When you are
changing the fuse, it is forbidden to operate with electricity!
3.3.2. Adjustment of peristaltic pump tube
After the instrument is used for half a year, the position of peristaltic pump shall be adjusted.
The methods are:
•
Rotate the lock catch of peristaltic pump tube clockwise, and open the back
plate of pump tube.
•
•
Take off the peristaltic pump tube.
Loose the fixing steel wire on the connecter of pump tube, rotate the pump tube
for 180°, and then re-fix the steel wires.
•
Install the pump tube well, and lock (rotate the lock catch of peristaltic pump
counterclockwise).
Warning: If the tube installation is not correct, it may cause the malfunction
of fluid aspiration of the instrument.
3.3.3. Change of aspiration tube
If aspiration tube (or flow Flow-Cell) is blocked by miscellaneous objects, syringe can be used
to clean and dredge. If the damage or block of aspiration tube is serious, you can change an
aspiration tube. The methods are:
•
•
Pull flow Flow-Cell out.
Remove the aspiration tube at the entrance, and change a new aspiration tube.
At one end of the new aspiration tube, compass tube (the middle) is sheathed
first, and then fixing tube (the thickest) is sheathed. Pay attention: to leave 1cm
outside the compass tube. (As figure 3-1).
•
Fix the fixing tube to the entrance of flow Flow-Cell.
45
User’s Manual
Compass tube
Aspiration tube
Fixing tube
Figure 3-1 Aspiration tube connector at the entrance of flow Flow-Cell
3.3.4.
Change light source lamp
Please cut off the instrument power supply before changing lamp.
Pull out the connecting line of the light support power supply, and rotate out the screw 1
and 2 on the light source bracket. (refer to figure 1-7 Light source module)
Take off the light source bracket, change a new one, put as the original way, and rotate
screw 2 tightly.
Connect the power source connecting line of the light source unit well.
Make the spiral images in the middle of the seam of monochromator through lens by
slightly regulate the position of light source with screw 1 and 2.
3.4. Simple trouble shooting
Trouble
1)Analyzer can not be started.
2) The lamp is not lighted.
bulbs.
3) Printer can not be started.
4) Printer can not print.
5) There is no fluid in the Flow-Cell.
Shooting
——Check whether the instrument is switched on.
——Check whether the power plug is loosened.
——Check the fuse.
——Check the power supply.
——Check power supply before changing
——If the lamp is damaged, then change lamp.
——Check whether the power plug is loosened.
——Check ON/OFF button of printer.
——Check the fuse of printer.
——Check whether it is normally connected.
——Check whether peristaltic pump is
normally running.
——Check the connection of aspiration tube
and flow Flow-Cell, etc.
——Aspiration tube is too long or too short.
——Aspiration tube may be blocked, and it
should be cleared and dredged.
——Flow-Cell is very dirty.
46
User’s Manual
6) There is no reading on the photometer.
——Check whether the lamp of photometer is
lighted.
——Try another wavelengh to read.
——Flow-Cell is not inserted to the bottom.
7) The Deviation of water blank is too big. ——Clean Flow-Cell.
——Change new distilled water.
——Check the lamp of photometer.
8) The result reproducibility is low.
——There are bubbles inside the Flow-Cell,
and it should be washed.
——Check the aspiration condition of Flow-Cell.
——The amount of reagent is too little, and the
volume should be increased.
——Change the lamp of photometer.
——Reaction fluid is polluted.
——The aspiration tube has been inserted too
deep into the Flow-Cell, pull it out slightly.
9) The aspiration volume of Flow-Cell not stable. ——Check whether aspiration tube is
blocked.
——Peristaltic pump tube should be changed.
10) Quality control out of target value range. ——Check the valid date of reagent.
——Check whether the settings are correct,
and whether it need revise parameters.
——Make sure quality control is not polluted.
——Measure again with other methods.
——Check the Flow-Cell, use another reagent
or quality control to test again.
47