1
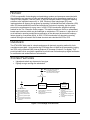
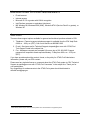
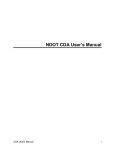
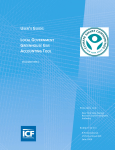
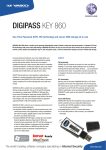
User Manual for CDX/OTAQ Fuels
Reporting System - Phase II
User Manual for CDX/OTAQ Fuels Reporting System - Phase II
Compliance and Innovative Strategies Division
Office of Transportation and Air Quality
U.S. Environmental Protection Agency
Prepared for EPA by
Computer Sciences Corporation
EPA Contract No. GS00T99ALD0203
Work Assignment No. T038
EPA420-B-07-012
July 2007
TABLE OF CONTENTS
The structure of this manual ..........................................................................3 Section 1 ........................................................................................................4 Fuels Reporting System .................................................................................4 History ...........................................................................................................5 Overview........................................................................................................5 System Features .............................................................................................5 Minimum User System Requirements...........................................................6 Support...........................................................................................................6 Section 2 ........................................................................................................7 Central Data Exchange ..................................................................................7 User Registration for CDX ............................................................................8 Signing of Digital Signature Agreement .....................................................10 Section 3 ......................................................................................................11 Digital Certificates.......................................................................................11 Application Stage.........................................................................................12 Authentication Stage....................................................................................12 Retrieval Stage.............................................................................................13 Exporting your Digital Certificate ...............................................................15 Section 4 ......................................................................................................18 CDX Submissions........................................................................................18 Complete a CDX Submission ......................................................................19 Installing the OTAQ Public Key .................................................................24 2
THE STRUCTURE OF THIS MANUAL
This manual details the functions of the Fuels Reporting system, and is organized to roughly
approximate the order in which the various functions of the system would be used. However,
some functions may be performed only during initial registration and setup, while others may be
optional for regular reporting.
This document provides step-by-step guidance to lead you through the necessary registration
and data input steps for using the U.S. Environmental Protection Agency (EPA) Central Data
Exchange (CDX) / Office of Transportation and Air Quality (OTAQ) Fuels Reporting System,
Phase II.
y Discussion
For an introduction to a specific area of the system a brief discussion may be used.
• Special Note:
This area will be used for readers to pay special attention to
specific information regarding the system. An icon will be
placed near the areas of sections in which the reader is
encouraged read the special note box.
1Step-by-Step
This feature will give step-by-step instructions in a particular area.
Sample Steps
Sample Actions
1. Place your mouse over the
Left click once
button at the bottom left
3
SECTION 1
FUELS REPORTING SYSTEM
In this section, you will learn:
•
The History and Overview of the system
•
The Features
•
The minimal User System Requirements
•
How to receive Support for the System
4
HISTORY
OTAQ is responsible for developing and maintaining systems and processes associated with
the registration and reporting of fuels and fuel additives as well as compliance reporting for a
variety of fuels programs. Over the years, OTAQ has offered a handful of electronic reporting
solutions to the regulated community. In 1995, Electronic Data Interchange (EDI) was
implemented as an Agency pilot program for reporting Confidential Business Information (CBI)
data. EDI demonstrated the benefits and efficiencies of electronic reporting, but the system
proved to be cumbersome for many users. In 2001 OTAQ introduced a simplified reporting
method for the Tier 2 Gasoline Sulfur program. This method employs a flat file or spreadsheet
based report structure which may be submitted on a diskette or CD; however, it stops short of
an all-electronic reporting method since certification of the data must be done with hardcopy
letters signed by a corporate official. In 2006, OTAQ introduced a fully electronic reporting
method utilizing the successful flat file data structure and submitted via EPA’s CDX.
OVERVIEW
The OTAQ/CDX Web portal is a simple and secure all-electronic reporting method for fuels
compliance report data. Users access the OTAQ data flow via Web forms accessed by logging
into CDX using a Microsoft (MS) Internet Explorer (IE) browser (Version 5.5 or higher). The
portal includes built-in encryption capabilities to protect user files and employs digital certificates
for certification and authentication of submissions.
SYSTEM FEATURES
•
•
Upload and submit any document of any type
Digitally encrypt and sign the submission
Receive CDX Inbox message for
the submission notification
View and download the submission
file(s) from the Inbox messages
OTAQ Web Reviewer
CDX IIS
Web Server
OTAQ Web Submitter
Obtain the Digital Certificate
Enter submission metadata
Use the UI provided by CDX to
encrypt and sign the submission
data
Upload the encrypted and signed
data
Receive CDX Inbox message and
e-mail message for the submission
confirmation
Host the ASPEncrypt, bTrade, and
CAM components
Provide UI for file upload and Inbox
message retrieval
Figure 1-1. OTAQ High Level Overview
5
CDX
WebLogic
Server
Archive, audit, and log the
submission
Support authorized submission
data retrieval
Send confirmation message to the
submitter
Send notification message to the
reviewer(s)
MINIMUM USER SYSTEM REQUIREMENTS
•
E-mail account
•
Internet access
•
Microsoft IE 5.5 or greater with 128-bit encryption 1
•
Intel Pentium processor or equivalent (minimum)
•
MS Windows 98, Windows 2000 (W2K), Windows NT4.0 (Service Pack 5 or greater), or
Windows XP
SUPPORT
There are three support options available for general and technical questions related to CDX:
1. Telephone - Person-to-person telephone support is available from the CDX Help Desk
8:00 a.m. - 6:00 p.m. (EST). Call our toll-free line at 888.890.1995.
2. E-mail - Send an e-mail to Technical Support at [email protected] with “OTAQ Fuel
Tech Support” listed in the subject line.
3. Fax - Assistance requests are accepted 24 hours a day at 301.429.3905. Support
personnel will respond to faxed requests Monday - Friday from 8:00 a.m. - 6:00 p.m.
(EST).
If you have questions about the content, format, or the policy for OTAQ Fuel Submissions
information, please call your EPA contact.
Please send any technical issues or comments about the OTAQ Fuel system to CDX Technical
Support at [email protected] with “OTAQ Fuel Comments” in the subject line. Thank you for
your participation.
Any suggestions for enhancements to the OTAQ Fuel system should be directed to
[email protected].
1
Other Web browsers may be used, but these systems have not been tested or supported by EPA
6
SECTION 2
CENTRAL DATA EXCHANGE
In this section, you will learn how to:
•
Register for CDX
•
Signing of Digital Signature Agreement
7
USER REGISTRATION FOR CDX
y Discussion
Information regarding each user of the system needs to be provided to EPA as part of the user
registration process. This step is known as user pre-registration. Please visit the following page
to pre-register users for CDX: http://www.epa.gov/otaq/regs/fuels/fuelsregistration.htm
In order to use the Fuels Reporting System, two registration steps must take place. First, a
customer must register their company with EPA. This identifies the company to EPA, and
provides EPA with detailed contact information. Once EPA accepts a company’s registration, a
four digit code is issued to the company, known as a company/ entity ID . This code is unique to
each company and is necessary to associate any and all data submissions to EPA belonging to
that specific company.
After a company has obtained a four-digit Company/ Entity Identification number from EPA, the
company must register the employees from their company that will be authorized to submit data
on the company’s behalf. This is known as user registration, and the participants are designated
as users of the system. At that point, the user will need to continue through various screens to
create a username and password, which will be used for all subsequent access to the system.
Most of the pages presented to the user will be pre-populated with information taken from the
spreadsheet that was submitted by the company to EPA, as part of the pre-registration process.
The following section details the process the user will need to complete in order to obtain an
account on the system, using their CRK.
1Step-by-Step
Steps
Actions
1. The user has called the CDX Help Desk at 888.890.1995
and has been given a Web address and a CRK code
Type:
https://epacdxtest.csc.com/SS
L/CDX/preregistration.asp
2. Enter CRK code
Enter your CRK code
3. Finish
Click <Register>
4. Carefully read the warning notice and the privacy
statement, once complete
<Click here to continue>
5. Carefully read the CDX Terms & Conditions and print a
copy for your records
Click on <I Accept> at the
bottom of the “Terms &
Conditions” screen to continue
When you accept the terms and conditions, the “CDX Registration: User Information” screen will
display. The “CDX Registration: User Information” screen displays the information you provided
when you pre-registered in CDX. Make any necessary changes to the displayed information.
8
1Step-by-Step Steps
Actions
More than 7 characters; Don’t
use $, %, . ,” ,or @
• 6. Choose your user name
7. Choose your user password
More than 7 characters with a
least 1 number; Don’t use $, %,
. ,” ,or @
A unique user name is required within CDX. If the user name supplied is already in use, you will
be prompted to select another user name.
• • The user name and password must be at least eight characters long.
Additionally, the password must include at least one number. Both user
name and password are restricted to alphanumeric characters, and may
not begin with a number or contain spaces or symbols, (e.g., $, #, “, or @).
The user name and password should not be the same.
Note: You will need your user name and password each time you logon to
CDX. Remember your user name and password. If you forget your user
name and password, CDX Technical Support will supply the secret
question, and you must provide the secret answer to reset your password.
In addition to the user name and password, you must provide a secret question and secret
answer. For example, you might supply the question “Dog’s Name”, and enter “Ruby” as the
answer.
1Step-by-Step
Steps
Actions
9. When you have completed the “CDX Registration: User
Information” screen
Click on <Next>
10. Complete the next page of the CDX Registration form, which
contains contact information
Click on <Next>
11. Confirm the Office of Transportation and Air Quality Program
Click on <Next>
12. Verify your role as a submitter and the program is OTAQ
Click on <Next>
13. Congratulations on the completion. You will now receive an e-mail
Click on <Finished>
9
SIGNING OF DIGITAL SIGNATURE AGREEMENT
y Discussion
You are now finished with the online portion of CDX registration. Read the screen and
click on the “Finished” button. The OTAQ Program requires approval for use of the
dataflow, so your access to OTAQ: DC Fuel will be on hold until approved by OTAQ.
Your OTAQ account will be activated upon your approval.
A digital signature agreement will be automatically generated. The OTAQ program uses
an IdenTrust digital certificate. Click the Accept & Print button to print your digital
signature agreement. This document is needed for EPA to approve your digital
certificate and verify that you understand the responsibilities of your digital signature.
After you have printed, read and signed the agreement, fax it as soon as possible to
the CDX Help Desk at 301.429.3905.
• Note: As soon as possible, fax the signed agreement
to the CDX Help Desk: Fax number is 301.429.3905
and mail it to the address on the form
After you have accepted and printed the digital signature agreement, you will be taken to
the digital certificate voucher page. Click the “print and continue” button to print this
page as well as to navigate to your CDX homepage. You will need to keep the voucher
number that appears on your screen for later use to verify your sponsorship by the EPA
and obtain your digital certificate.
1Step-by-Step
Steps
Actions
1. Click the Print and Continue button to proceed to the
Digital Signature Trust page
Click the <Print & Continue>
button
2. Open your new account profile
• Click OTAQ: DCFUEL
3. You will notice that you do not have a digital
certificate installed
• Click Cancel
Note: If you do not see the OTAQ:DCFUEL link (Step
2), please call the Help Desk at 1.888.890.1995
Click cancel and open your email, where you will notice emails from CDX
Registration (The CDX Help Desk).
10
SECTION 3
DIGITAL CERTIFICATES
In this section, you will learn how to:
•
Apply for a Digital Certificate
•
Obtain a Digital Signature
11
APPLICATION STAGE
y Discussion
Now you begin the process to obtain your digital certificate. There are three steps to
the application process: 1) Application; 2) Authentication; and 3) Retrieval.
1Step-by-Step
Steps
Actions
1. If necessary, navigate to the IdenTrust website
http://www.digsigtrust.com/retrieve
cert.html
2. Read the US Government Warning
Click <OK>
3. Enter the data on each screen until complete,
continue to click next, but choose <Back> when
necessary
Click <Next>
AUTHENTICATION STAGE
y Discussion
The certification entity will now begin the authentication process. Please be sure to send in your
“Digital Certificate Agreement” as soon as possible. Expect a phone call from the CDX Help
Desk to verify your applicant information. The authentication stage should take no longer than 2
business days.
You will receive an e-mail acknowledging your application request. The e-mail will provide an
application ID and a website address that can be accessed to track your approval status.
1Step-by-Step
Steps
Actions
1. Look for an e-mail from the CDX help desk
• Í
Subject line “Your Certificate
Application is received”
Please note that you will need your pass phrase
when the Retrieval Stage begins!! This is not the
same as your CDX password.
12
RETRIEVAL STAGE
y Discussion
When your digital certificate is approved you will receive this e-mail from the CDX Help
Desk. This e-mail provides you the website and activation code needed to start the
retrieval process.
1Step-by-Step
Steps
Actions
1. Open the email with the subject “Your Certificate
Application is received” you may click on or type in the
website address provided to begin the retrieval stage
http://www.digsigtrust.com/retriev
e-cert.html
2. You will follow the instructions listed on the website
Click on <Next>
3. In the next screen we need to verify the ActiveX control
Click on “Tools” menu a the top of
your browser, then select
“Internet Options”
4. Enable the appropriate controls / plug-ins according to
the instructions
Click on the “Security Tab” and
select the “Internet Icon.” Then
click on the <Custom Level>
button
5. Once the security screen is shown, Under ActiveX
controls and plug-ins
Select <Enable> under Automati
c prompting for ActiveX
controls and Download signed
ActiveX controls
6. When you have enabled both
Choose <Next > below to
continue.
7. In order to continue you will need to
• • Click <OK> out of the security
settings and internet options, then
click <Next>
You now need your Activation Code (Provided in the
email sent to your actual email address and Pass phrase.)
13
1Step-by-Step
Steps
Actions
8. If a warning screen appears
Click <YES> and continue
9. In the creating new RSA exchange key window
Click on <Set Security Level>
10. In the Set Security Level window
Choose “High” and then click
on <Next>
11. Create a password for your RSA exchange key
Then click <Finish> and <OK>
12. Potential Scripting Violation window will open
Click <Yes>
13. You will be navigated to the Retrieve Digital Certificate:
Read the information and then
click <Next>
Certificate Information page
• • Now the system will verify the certificate has been
properly retrieved. Read the information on the
screen, PRINT THE INSTRUCTIONS.
1Step-by-Step
Steps
Actions
14. Review and verify that the information on the page, once next is
clicked you are stating the information is correct. BE SURE!
Click <Next>
15. Now is the time to verify the certificate has been downloaded
properly
Click <Next>
16. Click on the appropriate digital certificate if you have more than
one
Type in the correct password,
click <OK>
17. The Certificate Retrieval page appears
Click <Finish> and the
process is complete.
Click <YES> if you want to
close the window
18. You have the option to keep the window open or closed
14
EXPORTING YOUR DIGITAL CERTIFICATE
y Discussion
You must export your certificate into a file on your PC and also store a copy of it in a safe place (on a
CD; backed up on a network server; consult your PC support staff if needed). This will provide 2
benefits: first, it will allow you to re-install the certificate onto your PC in case of a malfunction, and
second, it will allow you to move your signing authority onto a new PC if needed.
The certificate export procedure is a mechanism to copy a user’s certificate (from their browser's
proprietary certificate store) into a standard certificate file (NIST approved PKCS#12 format) on their
PC file system.
1Step-by-Step
Steps
Actions
3. Select on the certificate you wish to export
Click on the “Tools” menu and
select “Internet Options”
<Certificates> button near the
center of the dialog box. You
should see your certificate(s) in
the dialog box that appears
Click the <Export> button
4. The Certificate Export Wizard appears
Read the page and click <Next>
5. Under Export Private Key
Select the “Yes, export the private
key” radio button option
click <Next>
1. From the internet
2. Then click on the “Content” tab click the
6. In order to continue
8. To continue
Select the “Personal Information
Exchange – PKCS #12 (.PFX)”
format, and check the middle
option (Enable strong
protection)
Click <Next>
9. Type a password for your new certificate. Read
Click <Next> when done
7. Do not select “Delete the private key if the export is
successful”
• important box below
15
• This password does not have to be the same as the
password for your certificate, CDX account, nor your
computer. In fact, it is recommended to have a DIFFERENT
password for the certificate.
1Step-by-Step
Steps
Actions
10. Another screen appears asking you to specify the name
of the file you want to export “File to Export”
Click the <Browse> button
11. Specify a file name for your certificate. Note: the export
format should use the “Personal Information Exchange
(pfx)” suffix automatically
Specify a file name.
12. Navigate to the directory where you want to save your
certificate file. Remember where you are saving the file for
later use
Type a “File Name” and click
<Save> and then click <Next>
13. Click “Finish” to close the wizard
You may see the following
confirmation dialog box. If so,
click <OK>
You may see the following
confirmation dialog box. If so,
click <OK>
Enter your password for the
export process. Click <OK>
14. Click “Finish” to close the wizard
15. The password must be entered to proceed to the
exporting. EPA recommends NOT checking the
“Remember password” box
Click <OK> to recognize the
export was successful!
16. Finish the export
16
17
SECTION 4
CDX SUBMISSIONS
In this section, you will learn how to:
•
Complete a submission
•
Install the OTAQ Public Key
18
COMPLETE A CDX SUBMISSION
y Discussion
The following guide is to assist users with submission of files via the EPA’s Central Data
Exchange, OTAQ Fuel Reporting System work flow. This guide assumes that the user has
already registered with CDX and downloaded their Digital Signature. If the user has not
completed these tasks, then they should either wait until the registration process is complete or
call the CDX help desk at 1.888.890.1995.
Follow the step by step guide to complete your first submission.
1Step-by-Step
Steps
Actions
1. Login to CDX
Type:
https://cdx.epa.gov/SSL/cdx/login.asp
2. Enter your user id and password in the data entry fields
provided
Click LOGIN or press <Enter>.
3. Your 'MyCDX Home Page' will be displayed. Navigate to
the OTAQ DCFUEL forms
Click the OTAQ DCFUEL link
4. (Possible; optional) A security dialog box will appear.
"Select your Digital Certificate" (Normally, it will be
identified with your name and the issuer will be "DST
ACES Business Representative CA A2"). Note: This
typically only happens if you have two or more certificates
installed on your browser.
Click OK
5. (2nd Submission and subsequent times only) Select the
OTAQ Private Exchange Key
Click OK
6. (optional; depends on personal browser settings) "Allow
secure and nonsecure items to be displayed?"
Click Yes
7. A form will appear.
Fill out the form. You will need several
EPA-supplied pieces of information,
including Company ID.
8. ONLY IF TESTING
Call Scott Christian at (202) 343-9498
and type TEST in EPA Company Entity
ID field
9. When finished with the form
Be sure to select all programs you are
reporting. Click Continue.
19
y Discussion
There are several sections of the form in which are required. The first section needs to be
completed with EPA Company/Entity information, which is required, if you do not know your ID,
please contact Scott Christian at (202)343-9498.
Note if you are submitting more than one Company ID, we only require that one of the IDs is
present in the EPA Company Entity ID field.
The second section will be completed for you. If it is not, please fill in the information, it is
required.
The third section is to determine whether this is an original report status or resubmission.
The next section is where the report file is uploaded. Preferably, all reports submitted need to be
on one sheet, a text file, or a CSV file.
20
You may submit for more than one fuel reporting program on one sheet as long as you select
which programs you are certifying. (i.e. Gasoline Sulfur, Diesel Sulfur, Reformulated Gasoline)
Comments are permitted before continuing.
21
1Step-by-Step Steps
Actions
10. Determine the file in which you will need to upload
Click Browse TWICE
11. Find the particular file
Double-click the file name
12. Verify the file name is listed in the box
Scroll down and continue to
fill the form
13. Read all options
Check those that may apply
14. Add any comments which are optional, reset will clear the form
Click Continue
22
1Step-by-Step Steps
Actions
15. Security Information
Click Yes
16. If you see a warning stating the OTAQ Public Key
needs to be installed (Follow steps in the next section:
“Installing the OTAQ Public Key” )
Click OK
17. Review your file
Scroll to the bottom of the page
18. Encrypt and Sign
Double Click the Encrypt and Sign
button (Note: if you see an error
and have not installed the OTAQ
Public key please follow the steps
in the next section before
continuing.)
19. Ready the encrypted file for submission
• 20. Submit the form
Paste the encrypted file path into
the Encrypted File input box
Click the Submit button
23
• A feature of the system is once the file has been encrypted
and signed its path is added to your clipboard so you can
paste it into the input box, rather than search your
computer for it. The extra step of uploading the path is to
allow more companies to use CDX in a safe manner.
INSTALLING THE OTAQ PUBLIC KEY
y Discussion
A public key (a type of digital certificate) issued by OTAQ needs to be installed on your
computer to facilitate the encryption of your submission file, and ensure that ONLY authorized
EPA personnel (the only people with access to the corresponding private key) may decrypt and
view your submission.
When you click on the link to retrieve and install the public key, a popup screen will be
displayed.
1Step-by-Step
Steps
Actions
1. Click the first link to retrieve and install the public key
click click here
2. You now want to open the file
Click Open
24
Figure 4-1. File Download
25
The following dialog box should appear, prompting you for the location to install the certificate.
Figure 4-2. Certificates
1Step-by-Step
Steps
3. Click the
Actions
in the left hand corner
Click the
button
4. Open the Certificates folder to view the public key
Double click the
Certificates Folder
5. Open the key to the right
Double click OTAQ
Development Public
Key
6. To install the key
Click on Install
Certificate
Figure 4-3. Certificates Folder
26
Figure 4-4. General Certificate Tab
y Discussion
Clicking 'Install' will launch the Internet Explorer 'Certificate Import Wizard'. This software will put
the certificate file in its proper place on your computer and integrate its function with your copy
of Internet Explorer.
1Step-by-Step
Steps
Actions
7. Read the Welcome Screen
Click Next
8. Select the second option
Click the option to Place all
certificates in the following
store
27
Figure 4-5. Certificate Import Wizard
Figure 4-6. Continue with Wizard
28
1Step-by-Step Steps
Actions
9. In order to select the Certificate Store
Click Browse
10. An additional popup will appear with a list of allowable
locations for the certificate. Scroll through the list to find
'Trusted Root Certification Authorities'.
Click Trusted Root
Certification
Authorities
11. Close the dialog box
Click OK
12. The Public Key will be stored in 'Trusted Root Certification
Authorities'
Click Next
13. You have successfully completed the Certificate Import
Wizard
Click Finish
14. A security warning dialog will be displayed to confirm the
action.
Click Yes
15. The import was successful
Click OK
Figure 4-7. Finish Screen
29