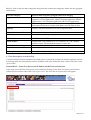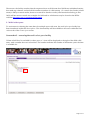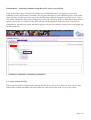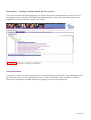
1
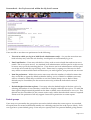
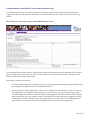
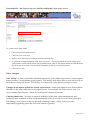
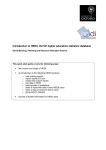
heidi 3 – Pre release notes
This document describes the changes that will be incorporated in heidi 3 which is to be released on
Monday 14 September 2009. The changes in heidi 3 have resulted from analysing user feedback and a
process of prioritisation by the heidi User Group. The development plan for heidi 4 is now nearing
completion and requirements for future releases of heidi are continually being sought.
To accompany the release of heidi 3 a number of training videos showing the new functionality will be
published on the heidi information web site when heidi 3 is released. In addition full guidance is
provided within on-screen help and the heidi user manual.
If you have any queries regarding heidi 3, please email [email protected].
Summary of changes - system
Report enhancements
1. New categorisation of data explorer
To assist users in locating data, a new top level data categorisation has been added to the data explorer,
which groups together similar data in one place. This functionality will be available to all users within
the Data columns tab of the Create report screen.
Screen shot 1 – Data columns screen showing new level of data explorer
Page 1 of 14
Below is a list of the new data categories along with the current data categories which are now grouped
under them;
New data category
Applications
Equality
Previous data categories grouped within new category
CUKAS accepted applicants, CUKAS applications, GTTR accepted
applicants, GTTR applications, NMAS accepted applicants, NMAS
applications, UCAS accepted applicants and UCAS applications
Estate Management Statistics, Funders Forum Metrics (FFM), HEMS,
Performance Indicators, Student Staff Ratios and UK Pattern data
Student, staff and destinations of leavers equality data
HESA destinations of leavers
HESA finance
Destinations of leavers data
Finance Return (£000s) and Key Financial Indicators
HESA staff
HESA student
National Student Survey
Research Assessment Exercise
Staff FPE and Staff FTE
Student FPE – HE, Student FTE – FE, Student FTE – HE, Student
instance count – FE and Student instance count - HE
summary results from the National Student Survey
summary results from the Research Assessment Exercise
Training Development Agency
Training Development Agency data
Derived statistics
2. Data description search facility
A search facility has been introduced to enable users to search the contents of the data explorer to assist
in locating data. This functionality will be available to all users within the Data columns tab of the Create
report screen
Screen shot 2 – Data description search button on the Data columns tab
Users may access the Data Description search facility by clicking on the Data descriptions search button
within the Data columns tab of the Create report screen. The Find data descriptions box will appear.
Page 2 of 14
Screen shot 3 – The Data descriptions search box
Users may use this facility to enter a word or phrase as their search criteria. There are two boxes which
allow users to search for two unconnected words or phrases. In addition the search may be restricted to
one year or all years, and to matching whole words within the search. The Find now button will bring
back a list of search results.
Screen shot 4 – The Search results box and locating search results within the data explorer
Users may click on a search result and the data explorer will expand and highlight the result.
Page 3 of 14
Please note: the facility searches data descriptions down to field name level (fields are individual entities
that make up a dataset, and each field contains a number of valid entries). i.e. a search for Gender (a field
name) is likely to return results, however a search for female or male (valid entries that belong to this
field) will not return a result. An example of a field and its valid entries may be found on the HESA
website http://www.hesa.ac.uk/staffgender20072008.
3. Multi-select years
To assist users in selecting the same data for multiple years with ease, the multi-select year facility has
been introduced within the data explorer. This functionality will be available to all users within the Data
columns tab of the Create report screen
Screen shot 5 – accessing the multi-select years facility
If data at field level is available for other years, a Y icon will be displayed to the right of the field valid
entry with a number shown it in brackets. The number indicates the number of alternative years the data
is available for.
Page 4 of 14
Screen shot 6 – selecting columns using the multi-select years facility
Users may click on the Y icon and a secondary list of valid field entries will appear, one for each
academic year for which data is available. The original valid entry is now followed by the words ‘multiselect all years’ and the year at the top of the data explorer will have changed to read All years. Users
may select columns for all years by clicking the ‘multi-select all years’ node, or alternatively may click on
specific year nodes. A column for the years selected will be displayed within the Report columns box.
Alternatively, the user may return the data explorer to its previous state by clicking on a node higher up
the data explorer.
4. Locate column facility
Users may now locate a column that is specified in the Report columns box within the data explorer. This
functionality will be available to all users within the Data columns tab of the Create report screen
Page 5 of 14
Screen shot 7 – Locating a column within the data explorer
Users may use this facility by highlighting one column description within the Report columns box and
clicking the Locate column button (located underneath the Report columns box). The data explorer will
expand to its position when the column was created.
User preferences
Users are now able to set their own preferences to personalise their use of heidi. User preferences can be
set within the Preferences tab of the My details screen. This functionality will be available to all users
however the preferences available will vary depending on a users role permissions
Page 6 of 14
Screen shot 8 – the Preferences tab within the My details screen
Users are able to set their own preferences for the following:
•
The role in which you log in to heidi (local administrators only) – if a user has more than one
heidi role they may select the role that they would prefer to automatically log in as
•
Email notification – Users may tick this box if they wish to receive heidi data and service news
emails. This is an opt-in service. As standard, local administrators will be opted in to this service
however may opt out by unticking the box. Users that are not local administrators will be opted
out of this service and may opt in if they wish. Please note: by opting out of this service there
may still be occasions when emails will be sent to you with regard to your personal user account
•
Item list preferences - Within this section users may select the number of visible list items that
they would like to appear by default within the Manage screens of heidi. In addition users may
select a column by which they would like to sort lists within Manage screens. Both of these
defaults may be overridden (for the current session only) within the individual screens if
required
•
Default height of the data explorer - Users may select the default height of the data explorer by
selecting the number of rows that they would like to display within the data explorer. To make the
data explorer height amend dependant on the data available, users should select Auto resize. This
default may be overridden (for the current session only) within the individual screens if required.
Please note: this preference will only appear if users have permission to create reports.
Default groups
Users may now personalise the groups that are used as default when they create reports. As standard,
all reports that are created within heidi initially use a default group (known as the System default). Each
row type has a system default group. Users may now specify their own personal default group (known
Page 7 of 14
as My default) for each row type if they wish to do so. This facility is available within the Manage group
screen. This facility will be available to all users that have permission to create their own groups.
Screen shot 9 – The Update default facility within the Manage groups screen
Users may set a group as their personal default as follows:
•
Click on Groups on the heidi tool bar
•
Click the select box next to the name of the group
•
Click on Update default
•
Click Select as default to confirm, or alternatively click Cancel. By confirming this selection the
group will be used by default for all reports created for this row type, from this point onwards,
until an alternative default is selected
•
The phrase {my default} will appear next to the group name on the Manage group screen. The group
will not automatically be applied to reports that already exist.
Users may create a personal default group for each row type. If users do not create a personal default
group, or de-select a personal default group, the system default group will automatically be used when
reports are created.
Please note:
•
If the group selected does not belong to the user, the owner of the group may amend the group
and this will automatically apply to the users’ reports. Therefore we would advise that if users
wish to use another users’ group as their default group, they create a copy of the group and set
this as their default
•
Users may not select two personal default groups for one row type
•
If a personal default group for a row type already exists, users may either de-select the group if
they wish to change it, or select an alternative group and set this as their personal default group.
This will automatically override the previous personal default group
•
When a personal default group is set, this will apply only to the users account (with the
exception of local administrators, where a personal default can be set for all local administrators).
Page 8 of 14
heidi change log
A change log has been introduced that lists all system and data releases since heidi went live in April
2007. This log will be regularly updated and can be accessed by all heidi users by clicking on the blue
Change log link that appears at the bottom of the heidi screen when logged in.
Screen shot 10 – the heidi change log link
Screen shot 11 – the heidi change log link
Page 9 of 14
Usage statistics (available to local administrators only)
Local administrators are now able to produce a summary report on the usage of heidi within their
organisation for a chosen period. This facility can be accessed from the Usage statistics tab of the Logs
screen.
Screen shot 12 – the Usage statistics tab within the logs screen
Local administrators may create a Usage statistics report by entering a start and end date for the report
period within the Report between date boxes and click the View usage statistics button. The report will
display in the bottom half of the screen.
The report contains two sections:
•
A set of standard statistics to monitor usage at your organisation during the period selected or at
the snapshot date (the end date of the period entered)
•
A list of all users at the organisation. The user list displays all users that have a user account at
the organisation as of the day when the report is run. The User login for the reporting period
column displays the number of times each user has logged into heidi between the start and end
dates entered for the Usage statistics report. In addition users that have never logged in to heidi
are identified via the wording inactive user appearing next to their name. Local administrators
may choose to use this list to assist in managing user accounts for their organisation.
Page 10 of 14
Change role facility (available to local administrators only)
If a local administrator has more than one heidi role, they may now switch between roles without
logging out of heidi. The Change role facility is available on the heidi home page.
Screen shot 13 – the Change role facility on the heidi home page
Multiple roles (available to local administrators only)
It is now possible for local administrators to add more than one additional role to their user account.
This facility has been added to give local administrators the flexibility of seeing how heidi appears to
each role that they create. Local administrators may add an additional role to their user account by
doing the following:
•
Click Users on the heidi tool bar
•
Click on Create new user
•
Enter the email address used for your local administrator account, your name, and select the role
that you wish to add to your account
•
Click Save & close.
News enhancements (available to local administrators only)
Local administrators may now use the News facility within heidi to generate emails containing the
contents of the news item to send to all users at their organisation.
Page 11 of 14
Screen shot 14 – the Send to my users facility within the Create news screen
To create a news item email:
•
Click News on the heidi tool bar
•
Click on Create news item
•
Enter a name and body text of the news item and click Save
•
To generate an email template, click Send to my users. This will generate an email within your
open email account which will be pre-populated with a list of user email addresses and the body
text from the news item. You may now amend the email as you wish and send
•
Click Save & close.
Other changes
Save facility - A Save only facility has been introduced to the following screens; Create/update
report screens, Create/update group screens. This facility will allow users to save their work so
far without exiting the screen. The facility is accessed via a Save button on these screens.
Changes to tab names within the Create report screen - Some amendments have been made to
the titles of the tabs within the create report screen. For example, the Data columns (step 2) is
now renamed Data columns. These do not affect the content of the tabs.
Creating charts tabs - In order to improve usability in this area, chart management and
creation is now available within one permanent tab of the Create report screen, rather than two.
The Manage charts (optional) tab can be used to manage charts, with a Create chart tab
temporarily appearing when the Add chart button is pressed.
Page 12 of 14
Summary of changes - data
In addition to the new functionality, the following data will be added as part of the heidi 3 release and
will be available to all subscribed organisations:
Equality data
Work has been undertaken between HESA and Equality Challenge Unit to introduce to heidi a new
stream of data designed specifically to allow users to undertake detailed analyse of equality data.
This data introduces new breakdowns of student, staff and destination data for years 2006/07 and
2007/08, and can be found within the heidi data explorer under ‘Equality’. A specification of this data
can be found within the HESA data summary guide
(http://www.heidi.ac.uk/dox/heidi_summary_HESA_v1_0.pdf).
In addition Equality Challenge Unit has designed a set of 44 reports which will be available to all local
administrators within the folders ‘heidi equality standard reports – students 2007/08’ and ‘heidi equality
standard reports – staff 2007/08’.
Local administrators should consider making these folders available to other heidi users within their
organisation by updating user roles as follows:
•
Click on Roles on the heidi tool bar
•
Select a role for update and click on Update role
•
Tick the View column next to ‘heidi equality standard report – students 2007/08’ and ‘heidi equality
standard report – staff 2007/08’ within the heidi folder permission box
•
To save the change, click Save and close.
New data
The following data will be added as part of the heidi 3:
•
Student FTE by Institution, level of study, and subject of module (for 2001/02 to 2007/08)
•
Academic staff (excluding atypical) FPE by academic employment function, cost centre and
institution (2003/04 to 2007/08)
•
Academic staff FTE by Institution, cost centre, academic employment function, terms of
employment and source of basic salary (2003/04 to 2007/08)
•
Destinations of leavers - students Entering Further study FPE by JACS Principal Subject (2003/04
to 2007/08)
•
New fields within the UCAS datasets (2008/09 only) – previous educational sector for accepted
applicants and JACS subject line data for applications and accepted applicants.
Page 13 of 14
3. Future enhancements
The following functionality is currently being developed and will be released during October 2009:
•
Larger report download facility - increasing the number of columns that can be included within a
report downloaded to Excel
•
Chart enhancements – the ability to use institution short names within charts
•
Data explorer hover over unabbreviated help text
•
Finance data adjusting years.
We hope that the release of heidi 3 improves the value of the system to you. We are always keen to hear
feedback, especially ideas and suggestions for future releases of heidi. Please contact us at the email
address below.
The heidi team
September 2009
email: [email protected]
Page 14 of 14