1
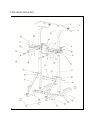
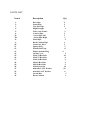
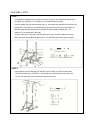
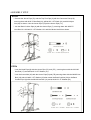
USER MANUAL – EN
IN 7181 Chin up rack inSPORTline Power Tower PT200
AM-102
Assembly Instruction
IMPORTANT SAFETY GUIDE
Safety Tips
Safety always comes first. Please keep the following points in mind at all times. Read and
follow the Safety Instructions completely before using your Power System. Failure to read
and follow any item in the Safety Instructions can result in serious bodily injury.
Keep the Owner's Manual and this Assembly Guide in a safe place. Make sure that everyone who uses the Power
System reads the Owner's Manual has a safe and enjoyable workout.
1. Before using your Power System, make sure it has been properly assembled and tightened following the Assembly
Instruction.
2. If at any time you feel pain, lightheaded or dizzy, please stop exercising immediately. You should also stop if you
experience undue stress, pressure or pain at anytime. Please see your physician before continuing with your program.
3. Please keep air children and pets away from the Power System during use as well as when the machine is
unattended.
4. When exercising on the Power System, keep children away from the Power System and make sure your hands
are clear on the Power System.
5. Make sure that all bolts and nuts are tight prior to each use. Periodic maintenance is required on all exercise
equipment in order to insure that it remains in good operating condition.
6. Always follow the correct exercise procedure for the Power System as shown In the Owner's Manual.
7. Use the machine on a flat and level surface. We recommend you exercise on a carpeted floor.
8. Follow your doctor's recommendations in developing your own personal fitness program.
9. Always choose the proper workout which best suits your physical strength and flexibility level.
10. The Power System and information in the manuals are not intended as a substitute for medical treatment.
11.Handicapped individuals should have medical approval and close supervision when using the Power System.
12. The Power System is for consumer use only; it is not for use in public or semipublic facilities.
Before starting any exercise or conditioning program you should consult win your personal physician
to see if you require a complete physical exam. This is especially important if you are over the age of
35, have never exercised before, are pregnant or suffer from any illness. READ AND FOLLOW THE
SAFETY INSTRUCTIONS in this manual. FAILURE TO FOLLOW THESE INSTRUCTIONS CAN
RESULT IN SERIOUS BODILY INJURY.
BEFORE YOU START
Prior to assembly, remove components from the box and verify that all the listed parts were supplied.
EXPLODED DRAWING
PARTS LIST
Item #
Description
1.
2.
3.
4.
5.
6.
7L.
7R.
8.
9.
10.
11.
12.
13.
14.
15.
16.
17.
18.
19.
20.
21.
22.
23.
24.
Base Pipe
Stand Pipe
Top Flex Pipe
High Draught
False work Frame
Connect Pipe
Ancon Pipe Lift
Ancon Pipe Right
Hand Pipe
Back Cushion Pipe
Connector Piece
Square Pulg
Handle Bar Grip
Ellipse Outside Plug
Adorn Cover
M10*70 Hex Bolt
M10*75 Hex Bolt
M10*20 Hex Bolt
M8*65 Hex Bolt
M8*20 Hex Bolt
M10 Nylon Nut
∅20*∅
∅10.3*1.5T Washer
∅16*∅
∅8.3*1.5T Washer
Ancon Mat
Back Cushion
Q'ty
2
2
2
1
2
2
1
1
2
1
2
2
8
4
2
16
8
2
4
2
24
50
6
2
1
ASSEMBLY STEP
STEP 1
* Join together the Base Pipe (1) with the Connect Pipe (6), securing them with M10*70
Hex Bolt (15), ∅20*∅10.3*1.5T Washer (21) and M10 Nylon Nut (20).
* Join the Stand Pipe (2) with the Base Pipe (1), securing them with M10*70 Hex Bolt (15),
∅20*∅10.3*1.5T Washer (21) and M10 Nylon Nut (20), then join the Connect Pipe (6)
with the Stand Pipe(2),securing them with M10*70 Hex Bolt(15),∅20*∅10.3*1.5T
Washer (21) and M10 Nylon Nut (20).
* Join the False work Frame (5) with the Base Pipe(1)and the Stand Pipe(2),securing
them with M10*70 Hex Bolt(15),∅20*∅10.3*1.5T Washer(21)and M10 Nylon Nut(20).
STEP 2
* Join together the High Draught (4) with the Top Flex Pipe (3), securing them with
M10*70 Hex Bolt (15), ∅20*∅10.3*1.5T Washer (21) and M10 Nylon Nut (20), then
put the Top Flex Pipe (3) on the Stand Pipe (2) as shown.
ASSEMBLY STEP
STEP3
* Connect the Ancon Pipe (7L) and the Top Flex Pipe (3) with the Connector Piece(10),
securing them with M10*75 Hex Bolt(16), ∅20*∅10.3*1.5T Wash (21) and M10 Nylon
Nut (20) as shown. Join the Ancon Pipe (7R) as the Ancon Pipe (7L).
* Join the Back Cushion Pipe (9) with the Ancon Pipe (7), securing them with M10*75
Hex Bolt (16), ∅20*∅10.3*1.5T Washer (21) and M10 Nylon Nut(20) as shown.
STEP4
* Join the Hand Pipe (8) with the Ancon Pipe (7L) and (7R) , securing them with the M10*20
Hex Bolt (17) and ∅20*∅10.3*1.5T Washer (21).
* Join the Ancon Mat (23) with the Ancon Pipe(7L)and (7R),securing them with the M8*65 Hex
Bolt (18) and ∅16*∅8.3*1.5T Washer (22).then screw the Back Cushion (24) to the Back
Cushion Pipe (9) with the M8*20 Hex Bolt (19) and ∅16*∅8.3*1.5T Washer (22).