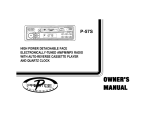
1
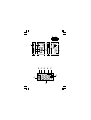
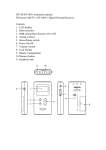
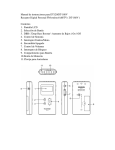
User Manual
DT-180 / 180V / 120
B C D
E
G
A
1
F
H
Controls
LCD display
Band selection
DBB (Deep Bass Booster) On/Off
Tuning Control
Stereo/Mono switch
Power On/Off
Volume Control
Lock Switch
Battery Compartment
Memory button
Earphone Jack
1
2
3
4
5
6
7
8
9
10
11
Display
A
B
C
D
E
F
G
H
Selected Band
90 minutes auto shut off
System lock
FM stereo indicator
Battery power indicator
Memory presets
DBB on
Frequency
GB
2
Battery Installation
Battery cover is located on the back of the
unit. Slide the cover in the direction of the
arrow to gain access to the battery
compartment. Insert one AAA (UM-4) battery
into the compartment. Make sure that the
battery is positioned in accordance with the
indicated diagram. Replace cover.
Note:
1. You can always monitor the battery power
from LCD display battery icon.
When battery power becomes very low
and unable to operate the radio,
low battery indicator
will flash together
with an “ E “ appears on the LCD display.
The radio will be shut off.
2. Make sure to replace the battery within
3 minutes. This will prevent any memory
presets from being lost during the battery
replacement.
3
Antenna/Earphone
Insert the earphone into the earphone jack.
The cord connecting the earphone to the
receiver acts as an antenna during FM and TV
(DT-180V) audio reception and should be
extended as much as possible to increase
the sensitivity.
A built-in ferrite bar antenna is provided for
AM reception and it is only necessary to
rotate the radio for maximum signal strength
during AM listening.
Important Note:
The radio will be auto shut off within
10 seconds when you unplug the earphone
from earphone jack for battery power saving.
GB
Volume Control
Using the volume control knobs to adjust
volume level. Display will show the changes
when you operate the volume control.
4
Tuning the radio
Band
AM
Frequency
DT-120/DT-180
DT-120/DT-180
DT-180V
DT-180V
Antenna
522 - 1629 kHz (9 kHz)
520 - 1710 kHz (10 kHz)
522 - 1629 kHz (9 kHz)
520 - 1710 kHz (10 kHz)
Internal/Rotate radio for
bes reception
Band
FM
Frequency 87.50 - 108 MHz
Antenna External/Make sure the earphone
in plugged into earphone jack
Band
TV
Frequency TV channels 2-13 (DT-180V)
Antenna External/Make sure the earphone
is plugged into earphone jack
5
90 Minutes auto shut off device
For saving battery power, this radio is
designed to auto shut off after 90 minutes
operation, LCD display shows .
For continuous listening if necessary,
pressing Power On/Off button for more than
2 seconds until LCD display disappears.
Scan Tuning
Turn on the radio, select required band by
pressing Band Selection button.
Press and hold down the Tuning Control
buttons for more than half a second and
release the button to commence Scan
Tuning. The radio will scan and stop
automatically when a station is found.
GB
6
Manual tuning
Turn on the radio, select required band by
pressing Band Selection button.
Desired station may be selected by pressing
the Tuning Control buttons intermittently until
the desired station is reached.
Or pressing and holding the Tuning Control
until the desired station is reached.
Memory Tuning (Station Preset)
Turn on the radio by pressing Power On/Off
button. Select required band by pressing
Band Selection button. Tune to the desired
station using the Scan or Manual tuning
described above. When the desired station is
reached, press and hold Memory button for
more than 2 seconds until display M x stop
flashing followed with a beep (via earphone).
It will replace previous memory station.
You may store 5 memory stations each band
(AM, FMI, FMII and TV).
7
Recall memory stations
Turn on the radio, select required band then
simply press and release Memory station
button. LCD display will show Memory preset
and radio frequency.
Stereo/Mono switch
The radio is designed to receive FM stereo
broadcastings. For weak FM station,
switch Stereo/Mono to Mono position.
LCD display Stereo icon will disappear.
GB
8
Change AM band tuning step
For Northern American countries and some
South American countries, AM tuning step is
10 kHz. On other countries is 9 kHz.
To change AM band tuning step, please follow
below steps.
1. Change the AM band tuning step from
9 kHz to 10 kHz When radio is OFF,
press and hold Tuning UP button then
switch on radio by pressing Power On/Off
button until LCD display flashes 10 and
then 520, indicating AM step has been
changed to 10 kHz tuning step.
2. Change the AM band tuning step from
10 kHz to 9 kHz When radio is OFF,
press and hold Tuning DOWN button then
switch on radio by pressing Power On/Off
until LCD display flashes 9 and then 522,
indicating AM step has been changed to
9 kHz tuning step.
Note:
To change AM step will erase all the AM
Memory preset stations.
9
System Lock
To prevent accidental changing of any of the
radio settings. Switch the Lock switch to
Lock position. LCD display lock icon will
appear. To release, simply switch the Lock
switch to its opposite position, LCD display
lock icon will disappear.
It’s important to make sure Lock switch is in
its off position when radio is to be operated,
as radio is completely inoperative until Lock
Switch is released.
GB
10
Specifications
Battery: 1 x AAA (LR03, UM-4)
Frequency Coverage:
FM: 87.50 – 108 MHz
AM:
522 – 1629 kHz ( DT-120/DT-180 9 kHz)
520 – 1710 kHz ( DT-120/DT-180 10 kHz)
522 – 1629 kHz (DT-180V 9 kHz)
520 – 1710 kHz (DT-180V 10 kHz)
TV: 2 – 13 channel (DT-180V)
Output Power: 1.0 mW + 1.0 mW
Earphone Jack: 3.5 mm diameter (stereo)
The company reserves the right to amend
the specifications without notice.
11
If at any time in the future you should need to
dispose of this product please note that:
Waste electrical products should not be disposed
of with household waste. Please recycle where
facilities exist. Check with your Local
Authority or retailer for recycling advice.
(Waste Electrical and Electronic Equipment
Directive)
GB
12