1
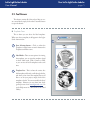
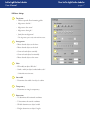
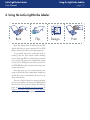
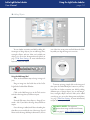
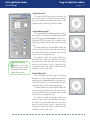
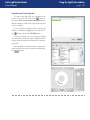
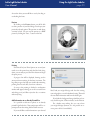
LaCie LightScribe Labeler
User Manual
Table of Contents
page Table of Contents
1. Introduction to the LaCie LightScribe Labeler
2
2. Installing LaCie LightScribe Labeler
2.1. Minimum System Requirements
2.2. Installation Procedure
3
3
3
3. Get acquainted with the LaCie LightScribe Labeler
3.1. Main Window
3.2. Tool Drawer
3.3. Print Options/Drive Info
4
4
5
8
4. Using the LaCie LightScribe Labeler
4.1. Using the Templates to Create a Label
4.2. Creating a Customized Label
4.3. Printing a Label
10
11
12
19
5. Troubleshooting and Software Updates
21
6. Frequently Asked Questions
6.1. Media Identification Numbers
24
26
7. Contacting Customer Support
7.1. LaCie Technical Support Contacts
27
28
Introduction
page LaCie LightScribe Labeler
User Manual
1. Introduction to the LaCie LightScribe Labeler
LightScribe Direct Disc Labeling is a new
technology that offers consumers and businesses a simple, no-hassle way to burn professional, silkscreen-quality labels on their CDs
and DVDs. Using the same laser that burns
data, customers burn their data as always, flip
the disc over, reinsert it into the drive and burn a precise,
iridescent label.
LightScribe Direct Disc Labeling technology requires three elements:
• LightScribe-enabled Optical Disc Drive – Drives
such as the LaCie d2 DVD±RW Drive with LightScribe enable validation of media types and control
of sled position, spindle speed and focus to burn the
label on LightScribe-compatible media.
• LightScribe-supported Software Applications
Only Licensed software applications, like the LaCie
LightScribe Labeler for Mac OS X, make the most
of the hardware and ensure the quality of label
printing.
• LightScribe-compatible Media – A micro-thin,
low-cost coating of a highly specialized material
on the label side of compatible media absorbs laser
light, triggering an image-producing chemical reaction. You can easily identify LightScribe-compatible
media through the LightScribe logo, found on media
packaging and in the inner hub of every disc. ReWritable
LaCie LightScribe Labeler
User Manual
Installing LaCie LightScribe Labeler
page 2. Installing LaCie LightScribe Labeler
2.1. Minimum System Requirements
■ Hardware requirements
• LightScribe-enabled Optical Disc Drive
• LightScribe media (CD or DVD)
• PowerPC G4 500MHz or later, or Intel Core Duo
processor
■ Software requirements
• Mac OS 10.3.9 or higher
Technical note: LaCie LightScribe Labeler version 1.2 or later is Universal Binary, meaning that it operates natively on Macintosh computers using both Intel processor and Power PC
processor chips.
• Mac OS 10.4 compatible (requires version 1.0.1 minimum)
2.2. Installation Procedure
1. Insert your LaCie DVD Utilities DVD-ROM disc
into your computer’s DVD drive or your new LaCie
drive.
2. Once the disc mounts to the desktop, double click on
the LaCie DVD Utilities icon to open the disc.
3. Next, open the LaCie LightScribe Labeler folder,
and double click the LightScribe Installer.
4. Follow the on-screen instructions to setup your software. A copy of the LaCie LightScribe Labeler software will be copied to your Applications folder.
5. After the installation has been completed, you will be
ready to begin using the LaCie LightScribe Labeler
application to create your custom CDs and DVDs.
Technical note: If you would like to install the application on more than one computer,
you need to reinstall the software package from the
LaCie DVD Utilities on each computer. You cannot just copy the application.
Your LaCie LightScribe Labeler
page LaCie LightScribe Labeler
User Manual
3. Get acquainted with the LaCie LightScribe Labeler
This chapter will help you become familiar with the
different LaCie LightScribe Labeler application windows. These sections will help you to identify and locate
different tools and capabilities, while also giving you an
overview of what each tool is and what it is capable of
doing.
3.1. Main Window
A
B
C
D
A
B
Label mode – This is where you select the printable area for the label: Title, Content or Full.
• In Title Label mode, only a narrow band is
burned, and the image is burned in the shortest amount of time.
• In Content Label mode, a wider band is
burned and the image burned takes a little
longer than the Title Label mode.
• In Full Label mode, the entire disc surface
may be covered, and images and linear text
may be added.
Design Area – This is the space in which you
will be able to design your LightScribe label.
The LaCie LightScribe Labeler is WYSIWYG
(What You See Is What You Get).
E
C
Label Area – This is the white space within
the Design Area that will be printed, and it is
dependent upon the choosenLabel mode (Title,
Content or Full).
D
Customize – Click on this button to open the
Customize Tool drawer. This drawer contains all
of the tools to customize your label. Please see
page 5, Tool Drawer for more information.
E
Print – Click on this button to open the print,
preview and label setup options dialog box.
Please see page 19, Print A Label for more
information.
Your LaCie LightScribe Labeler
page LaCie LightScribe Labeler
User Manual
3.2. Tool Drawer
This drawer contains all of the tools to help you create custom labels; simply click on the Customize button
to open the drawer.
■ Templates Pane
This is where you can select disc label templates.
When you select a template, it will appear in the LightScribe main window.
A
Pane Selection button – Click on either the
Templates or Edit button to switch between the
Templates and Edit screens.
B
Label Mode – There are two options for viewing
the templates: you can view the templates based
on their Label mode (Title, Content or Full),
or you can view all of the templates at the same
time.
C
Template List – This is where the various disc
label templates will reside; scroll through this list,
and when you’ve found the template that you’d
like to use for your project, simply click on the
template to load it. You cannot modify the list of
templates. However, you can obtain new background pictures from www.lightscribe.com. Go
to the Help menu for a direct link to the Label
Gallery.
A
B
C
Your LaCie LightScribe Labeler
page LaCie LightScribe Labeler
User Manual
■ Edit Pane
The Edit Pane allows you to customize the look of
your label; from this window you’ll be able to format
text, add a photo and define the look of your background
image.
Edit Pane: Tools
A
B
C
D
E
F
G
H
A
Use to move and/or resize images, objects and
texts.
B
Use to add an image object through the Finder.
C
Use to add linear text.
D
Use to add circular text, arching upwards.
E
Use to add circular text, arching downwards.
F
Use to create lines.
G
Use to create rectangles and squares.
H
Use to create circles and ellipses.
Edit Pane: Background
A
B
D
E
F
G
C
A
Use to add a background image through the
Finder.
B
Use to scale to fit and center a background image.
C
Use to remove a background image.
D
Drag images into this area to add a background
image.
E
Click to view or hide the background image.
F
Click to lock or unlock the background image.
G
Click to open the color pallete and choose a background color (colors will be printed as shades of
grey).
Your LaCie LightScribe Labeler
page LaCie LightScribe Labeler
User Manual
Edit Pane: Settings
A
Text format
• Click to open the Font formatting pallet
• Align text to the left *
• Align text to the center *
• Align text to the right *
A
B
• Justify the text alignment *
* The alignment options only work with linear text
B
Arrangement
• Move selected objects to the front
C
D
• Move selected objects to the back
• Center selected objects vertically
E
• Center selected objects horizontally
• Move selected object to the center
C
Color
• Fill: modify an object’s fill color *
• Stroke: modify an object’s stroke/outline color *
* Final will be monochromatic
D
Line width
• Determines the width of an object’s outline
E
Transparency
• Determines an image’s transparency
F
Dimensions
• X: determines the horizontal coordinate
• Y: determines the vertical coordinate
• Width: determines an object’s width
• Height: determines an object’s height
F
Your LaCie LightScribe Labeler
page LaCie LightScribe Labeler
User Manual
3.3. Print Options/Drive Info
This dialog box allows you to set printing options
and view information about the drive and discs.
■ Print Options
A
Contrast level – This is where you select the contrast level: Best offers optimized quality with a
longer print time, while Normal offers standard
quality with a shorter print time.
B
Number of copies – Enter the number of label
copies you wish to print (total number of copies
for all drives taken into account).
C
Drive: – Select the LightScribe drive you would
like to use (or select all of them by checking and
unchecking the boxes).
A
B
D
C
G
D
E
F
Preview – Click to view a preview of the label,
before it prints (in grayscale).
E
Cancel – Click this button to exit the Print Options/Drive Info dialog box.
F
Print – Click this button to begin printing your
LightScribe label.
G
Refresh - update the list of available LightScribe
drives
Technical note: Please note that you
can not print different labels at the same time.
Your LaCie LightScribe Labeler
page LaCie LightScribe Labeler
User Manual
■ Drive Info
A
A
Drive and media specifications – This is where
you can find information about the drive and
media:
• Drive manufacturer: describes who produced
the drive
• Drive model: describes the drive’s model number
• Path: displays the drive’s reference path (i.e. the
order of the drive in the list (number one is
your internal drive)
• Capability: describes the drive’s printing capability (to date only monochrome is supported)
B
C
D
• Media manufacturer I.D.: describes the media
manufacturer’s I.D. number (for a list of I.D.
numbers, see page 26)
E
• Label diameter: measures the diameter of the
label (in centimeters)
• Status: indicates whether a valid LightScribe
media has been inserted in the drive
B
C
D
E
Drive: – Select the LightScribe drive(s) you want
to use by checking/unchecking the boxes.
Preview – Click to view a preview of the label,
before it prints.
Cancel – Click this button to exit the Print Options/Drive Info dialog box.
Print – Click this button to begin printing your
LightScribe label.
Using the LightScribe Labeler
page 10
LaCie LightScribe Labeler
User Manual
4. Using the LaCie LightScribe Labeler
Tools
Tex
t
Text
Te x t
Background
Drag
Image
Here
Settings
Text
T
Arrangement
Fill / Stroke
Burn.
Flip.
Burn. Flip. Design. Print. It really is that easy! This
chapter will help you create customized CD or DVD
labels in artistic greyscale for your important projects.
To get started, choose the content that you’ll be
burning to the disc. Your content could be anything
from a simple data DVD to a slide-show presentation
to a music mix CD. Once you’ve compiled your content
for your CD or DVD, place your disc into your LaCie
d2 DVD±RW Drive, data side down. Next, burn your
content onto the disc.
Now that you’ve got your content burned, you’re
ready to add the silk-screen quality label. Simply eject
the disc, flip it over so that the data side now faces up
and re-insert the disc.
There are a couple of options for creating your labels:
you can use a template or create your own individualized
label based on your images and design. The following
pages, 11, Using The Templates To Create A Label, 12
Create A Customized Label and 19, Printing A Label,
will help guide you through the process.
Design.
Print.
LaCie LightScribe Labeler
User Manual
4.1. Using the Templates to Create a Label
The LaCie LightScribe Labeler offers templates
based upon the chosen Label Mode (Full, Content and
Title). By using the drop-down menu, you can even
view the templates based on a specific Label Mode, or
simply view all at the same time.
To load a template, simply scroll through the available templates and once you’ve found one that you’d
like to use, click on that template and it will be loaded.
Once the template is loaded, modify the text to suit your
needs.
■ Saving a Custom Template
In the current LightScribe Labeler version, you cannot save your own templates nor modify the list of templates. Regularly check our website for free updates of
this software. www.lacie.com/lightscribe
However if you have saved a project you would like
to reuse you can either open it and save it with a different name or simply copy it by dragging the project icon
while holding the ALT key.
You will find a series of free background pictures in
the Label Gallery on the www.lightscribe.com website.
Direct access to these label designs is available in the
help menu. Label designs are updated regularly.
Using the LightScribe Labeler
page 11
LaCie LightScribe Labeler
User Manual
4.2. Creating a Customized Label
Before you begin to create your label, first choose
which type of label you’d like to build: Title, Content
or Full.
When choosing your Label mode, keep in mind the
following:
• Title – burns within the narrow white band within
the Label Area. If an image or text is added, only
the area of the image or text within the Label Area
will be printed. Any part of the image or text that is
covered in grey will not be printed.
• Content – burns within the wider white band called
Label Area. If an image or text is added, only the area
of the image within the Label Area will be printed.
Any part of the image or text that is covered in grey
will not be printed. • Full – burns the entire surface of the disc, allowing
you to add curved and linear text, objects and images.
This option provides the most flexibility for creating
personalized discs due to the larger Label Area. The LaCie d2 DVD±RW Drives with LightScribe
burn labels in a circular pattern, starting with the innermost part of the disc and moving outward. The closer
your design is to the outmost border of the disc, the
more time it takes to print. If you burn a disc under Full
Label mode, the process takes longer than burning in
Title Label mode.
Once you’ve chosen Label mode, you’re ready to begin creating your label. Note that you can change the
label mode while designing your label.
Using the LightScribe Labeler
page 12
Using the LightScribe Labeler
page 13
LaCie LightScribe Labeler
User Manual
■ Adding a Background Image
A
E
F
B
D
C
There are three different ways to load a Background
Image:
Click on the Add Image icon (A) in the Background
section and select the image that you’d like to import.
OR,
Drag a picture into the Background section and
drop it into the Image box (B).
OR,
From the File menu, choose Import > Background
Image (Command + Shift + I) and select the image that
you’d like to import.
Once the Background Image is loaded, it will automatically be locked into place. If you would like to alter,
move or remove the Background Image, you will first
need to unlock the image.
• You can unlock the image by clicking on the Lock
icon (C) in the Background section of the Edit
Pane.
• When you image is inserted into the background, it
is automatically scaled to fit the Label Area. You can
then unlock it and modify the size. If you would like
to optimize the scaling, click on the Scale to Fit icon
(E).
• You can also hide the Background Image by clicking
on the Eye icon (D) in the Background section of
the Edit Pane. When the Background Image is being hidden, the Label Area becomes a white space. A
hidden background image will not print.
• There are two different ways to remove a Background
Image:
Important Info: Before importing a
Background Image, here are a few things to keep
in mind:
Image Size and Resolution
For optimum quality, please use a resolution of
600 dpi, sized at 2,773 pixel by 2,773 pixels.
For normal quality, please use a resolution of 72
dpi, sized at 2,773 pixels by 2,773 pixels.
Technical noteS: If you are using a color
image, it is also recommended that you use a
photo-manipulation application to convert the
image to greyscale.
We recommend you flatten layered pictures, as
layers tend to produce a lower quality of printing.
The LaCie LightScribe Labeler supports
transparency.
LightScribe Labeler Supported Image Formats
JPEG
TIFF
PNG
PSD
EPS
BMP
GIF
PCIT
PS
ICNS
JP2
QTIF
TGA
TARGA
SGI
PNT
PNTG
FPIX
CUR
ICO
FAX
Click on the Trash icon (F) in the Background section of the Edit Pane.
OR,
Unlock the Background Image, select it and then
press the Delete/Backspace button on your keyboard.
LaCie LightScribe Labeler
User Manual
Using the LightScribe Labeler
page 14
■ Adding Objects
You can further customize your label by adding different types of design objects; you can add images, lines,
rectangles, ellipses and text. After you’ve added your
objects, you can use the Arrangement tools (please see
page 7, Edit Pane: Settings, for more information) to
layer and center your objects.
one of the four corner points and hold down the Shift
key while you drag the image to its new size.
Using the Add Image Tool
There are three different ways to bring in image objects:
Drag an image into the Label Area of the LaCie
LightScribe Labeler Main Window.
OR,
Click on the Add Image icon in the Tools section
and select the image that you’d like to import.
OR,
From the File menu, choose Import > Image (Command + Alt + I) and select the image that you’d like to
import.
Once the image is added, it will have a bounding box
that allows you to modify the size of the image. If you’d
like to resize the image and keep its dimensions, click on
To remove an image, simply click on the image and
then press the Delete/Backspace button on your keyboard.You can further customize your label by adding
different types of design objects; you can add images,
lines, rectangles, ellipses and text. After you’ve added
your objects, you can use the Arrangement tools (please
see page 7, Edit Pane: Settings, for more information)
to layer and center your objects.
Technical noteS: For important
information about image resolution and formats,
please see page 13, Adding A Background Image.
LaCie LightScribe Labeler
User Manual
A B C
D
E
F
Using the LightScribe Labeler
page 15
Using the Line Tool
To use the Line Tool (A), simply click and drag the
line to set the length. Once the line has been created,
you can use either the Line Width slider (F) to set the
width of the line, or directly input the line width.
Using the Rectangle Tool
To use the Rectangle Tool (B), simply click and drag
the rectangle to create your object (hold down the Shift
key while dragging to Create a Square). Once the rectangle/square has been created, you can further modify
the object by adding a fill color and a stroke width and
color.
To modify the fill color, check the Fill box (D) in the
Color section of the Edit Pane and click on the adjacent
box, which will launch the color palette, where you will
be able to choose an applicable color.
Technical noteS:
Although you can use colors
for the various items, keep in
mind that the final printed
result will be grayscale.
To modify the outline color, check the Stroke box
(E) in the Color section of the Edit Pane and click on
the adjacent box, which will launch the color palette,
where you will be able to choose an applicable color.
To adjust line width of the stroke, use the Line Width
slider (F) or enter a specific value.
Using the Ellipse Tool
To use the Ellipse Tool (C), simply click and drag
the ellipse to create your object (hold down the Shift key
while dragging to Create a Circle). Once the ellipse/circle has been created, you can further modify the object
by adding a fill color and a stroke width and color.
To modify the fill color, check the Fill box (D) in the
Color section of the Edit Pane and click on the adjacent
box, which will launch the color palette, where you will
be able to choose an applicable color.
To modify the outline color, check the Stroke box
(E) in the Color section of the Edit Pane and click on
the adjacent box, which will launch the color palette,
where you will be able to choose an applicable color.
To adjust line width of the stroke, use the Line Width
slider (F) or enter a specific value.
LaCie LightScribe Labeler
User Manual
■ Adding Text
There are three different options for adding text to
your LaCie LightScribe Labeler project: Linear, Upper
Circular and Lower Circular.
Using the Linear Type Tool
To create a linear block of text, click on the
button to launch the Enter text window. From this window,
you’ll be able to type in your text and size and format it
accordingly.
To resize the text, change the font or color or add
shadows or underlines, highlight the text and click on
the
button to launch the Text Edit palette.
To align the text, highlight the text and click on either the Align Left, Center, Align Right or Justify buttons.
Once you’ve entered your text, click on the OK button. The Enter text window will close and the Select
tool will be transformed into a plus sign. Simply click on
the Label Area to add your text object to the label. From
here you can move the text object to its desired location.
If you’d like to reformat the text, double-click on the
text object to relaunch the Enter text window.
■ Adding Special Characters
You can use the Character Palette to insert special
characters, such as mathematical symbols, letters with
accent marks, or arrows and other “dingbats,” into your
documents.
In the Menu bar select Edit/Special Characters.
Using the LightScribe Labeler
page 16
LaCie LightScribe Labeler
User Manual
Using the Upper Circular Type Tool
To create a text object that arcs in relation to the top
curve of the disk, click on the
button to launch the
Enter text for circular text object window. From this
window, you’ll be able to type in your text and size it
accordingly.
To resize the text, change the font or color or add
shadows or underlines, highlight the text and click on
the
button to launch the Text Edit palette.
Circular text objects may not be aligned, justified
or centered. But, circular text may be adjusted with the
bring to front and send to back buttons of the Arrangement tools.
Even though the text itself cannot be centered, the
entire circular text box can be centered in the label using
the
buttons.
Using the LightScribe Labeler
page 17
LaCie LightScribe Labeler
User Manual
Using the Lower Circular Type Tool
To create a text object that arcs in relation to the
bottom curve of the disk, click on the
button to
launch the Enter text for circular text object window.
From this window, you’ll be able to type in your text and
size it accordingly.
To re-size the text, change the font or color or add
shadows or underlines, highlight the text and click on
the
button to launch the Text Edit palette.
Circular text objects may not be aligned, justified
or centered. But, circular text may be adjusted with the
bring to front and send to back buttons of the Arrangement tools.
Even though the text itself cannot be centered, the
entire circular text box can be centered in the label using
the
buttons.
Using the LightScribe Labeler
page 18
LaCie LightScribe Labeler
User Manual
4.3. Printing a Label
Once your label is properly laid out with your images, text and/or objects, you’re ready to print the label. To
launch the Print Options/Drive Info window, simply
click on the Print button. From this window, you’ll be
able to modify your print options, view a preview of the
item about to be printed and view information about
the drive and media.
■ Print Setup
Once you’ve clicked on the Print button in the main
window, the Print Options window will automatically
open (to go the Drive Info section, simply click on the
Drive Info tab). This window will allow you to set the
contrast level and gives you a printing time-line; make
several copies; and preview your design before printing.
Contrast Level
The Contrast Level allows you to further customize
your labels by adjusting the print contrast:
Best – This setting provides the sharpest contrast,
with a longer burn time.
Normal – This setting provides good quality, with
the fastest burn time.
Number of Copies
If you will be printing multiple copies of the same
label design, simply enter the total number of copies
that you’d like to print (the minimum is one and the
maximum is 999).
When printing multiple copies, once the first copy
is completed, the drive’s tray will open and a message
will appear, prompting you to either insert a new LightScribe disc or to cancel the printing process.
LightScribe Drives
In this window, you can view the connected LightScribe drives. If you have several labels to print, you can
Using the LightScribe Labeler
page 19
LaCie LightScribe Labeler
User Manual
Using the LightScribe Labeler
page 20
choose the drives you would like to use by checking or
unchecking the boxes.
Preview
By clicking on the Preview button, you will be able
to view a preview of your label design, based upon your
previously selected options. The preview can take about
a minute to load. You can save the preview as a BMP
picture by clicking the “Save...” button on the left.
Printing
Now that all of your Print Options are set and your
media is on the opened tray, with the label side facing
down, you are ready to press the Print button and begin
the print process.
A progress bar will be displayed, showing you the
amount of time remaining for the burn, in minutes. The
large blue progress bar helps you visualize the remaining
printing time for each drive, even from a distance.
As soon as the printing is finished, a confirmation
window will appear, alerting you to the successful burn
and asking you if you’d like to eject the disc or continue
without ejecting.
Add Information to an Already Printed Disc
It is possible to add text or photos to an already
printed LightScribe disc. New text/pictures will be superimposed over the exiting label and will not erase.
If you would like to add information to your burned
label, load your original design and clear the existing
text and graphics to avoid redundant burning. Then add
the new label information and burn the label again.
If you hide the background image (with the eye button), it will not print. When in doubt, use the Preview.
For a darker, more striking disc, you can re-burn
your original design (however, it is not possible to remove part or all of a burned label).
Troubleshooting
page 21
LaCie LightScribe Labeler
User Manual
5. Troubleshooting and Software Updates
In the event that your LaCie LightScribe Labeler
software is not working correctly, please refer to the following checklist to find out where the problem is coming from. If you have gone through all of the points on
the checklist and your drive is still not working correctly,
please have a look at the FAQs that are regularly published on our website – www.lacie.com. One of these
FAQs may provide an answer to your specific question.
You can also visit the drivers page, where the most recent software updates will be available.
If you need further assistance, please contact your
LaCie reseller or LaCie Technical Support (see 6. Contacting Customer Service for details).
Problem
Solution
What do I need to
update?
• LightScribe Labeler – this is your Mac OS application. Updating provides new capabilities
and resolves issues.
• LightScribe host software (also called “LightScribe library”) – provides communication
between system components. Host software updates are released regularly. We recommend
checking the LaCie website on a monthly basis. Updating resolves issues such as communication errors.
• Your drive’s firmware – update the compatibility of your LaCie drive with newly released
media.
When do I need to
make updates?
• LightScribe Labeler – to find out the version of your application, select the LightScribe
Labeler icon in your “Applications” folder, then press “Cmd+I” or open the application and
select “About LightScribe Labeler” in the menu bar. Compare it with the version recommended on our website.
• Host software – there is currently no way of checking the host software installed on your
computer. Host software is updated on, approximately, a monthly basis. Therefore, we recommend that you download the package and run the installation regularly. If similar host
software is already installed on your computer, it will not install.
• Firmware – firmware is not updated very often. Update your firmware if you experience
problems with media recognition. You can check your drive firmware by following this
process: Select “About this Mac” in the Finder menu bar and click on the “More info...”
button; this will launch the Apple Profiler. Your LaCie drive will be listed in the hardware
section (USB or FireWire), check the “Product Revision Level”. If in doubt, download the
firmware update. Your system will automatically check it against your current firmware and
let you know if it requires updating.
Troubleshooting
page 22
LaCie LightScribe Labeler
User Manual
Problem
Solution
I got an error message telling me that my
LightScribe drive is
being used by another
application and I cannot
burn labels.
A disc has been inserted into another CD/DVD drive – probably your internal CD/DVD
drive. Simply eject this disc and you will be able to use LightScribe Labeler again. LaCie is
currently working on resolving this issue. Please check that you have the latest software ver-
The LightScribe Labeler
inadvertently quit and
I cannot launch the application again.
In this case, you can either restart your computer or follow this process:
1. Go to your Utilities folder (CMD+shift+U)
sion (free on our website: www.lacie.com/support/drivers).
2. Open the Activity Monitor
3. Select all the LLLPrintTasks
4. Quit them using the red button found in the top left corner of the window
The application immediately quits after its
launch.
The application is missing a component to run. Please reinstall the full package on your
system – from your original LaCie DVD Utilities CD-ROM.
I inserted a LightScribe
disc, label side down,
into the drive but I got
a message telling me
that the media is not
recognized and should
be burned in generic
mode.
You have probably used one of the new v1.2 discs. The v1.2 discs, released in April 2006,
allow you to burn clearer labels at 30% faster than previous generation media. They are compatible with older drives but you will need to update the host software in order to be able to
burn them at full speed with the highest quality. (Host software 1.4.67.1 minimum – free on
I frequently get a
“communication error”
message.
Your host software/library is probably too old, so you should update it.
The application freezes
just after the BMP is
created.
This may be due to communication errors. Your host software/library is probably too old, so
you should update it.
I duplicated the application but the application
inadvertently quit.
You must restart your computer. This is why LaCie recommends updating to LightScribe
Labeler v1.1 if you would like to burn on more than one drive.
When I import a
Photoshop PSD file, the
quality is lowered.
Make sure to flatten the various layers of your file before importing the image. If you still
have a low quality image, save your image in TIFF or PNG format in order to keep its
transparency.
our website: www.lacie.com/support/drivers)
Troubleshooting
page 23
LaCie LightScribe Labeler
User Manual
Problem
Solution
The circular text appears
rough/pixilated.
Some fonts create this visual issue on your monitor screen. The actual result will not be affected and text will appear smooth when printed on the disc.
My label is cut off at the
top and bottom.
When this happens, please quit the application and try lower screen resolutions.
My label appears small
on the screen.
LaCie LightScribe Labeler could not define the monitor resolution. This is a problem encountered only with very early releases of the software. Updating to v1.0.3 or higher solves
I got this message: “The
LightScribe drive is currently in use”.
This only appears in older versions. Update to LightScribe Labeler v1.1 or later. In the
meantime, you can quit the application that is using your LightScribe drive – OR – power
the drive off and on (only if you have a single drive); then eject the media.
the problem. Go to: www.lacie.com/support/drivers for the update.
LaCie LightScribe Labeler
User Manual
Frequently Asked Questions
page 24
6. Frequently Asked Questions
Question
Solution
Is the LaCie LightScribe Labeler software
compatible with older
Mac operating systems?
LightScribe is only compatible with Mac OS 10.3.2 or higher.
Can other computer
applications be used
while my label is being
printed?
Yes. As with most software, you can work on other tasks while LightScribe is
working.
Is the LaCie LightScribe Labeler software
compatible with Mac
OS 10.4.x?
Yes. For Mac OS Tiger support, please download the update from the LaCie support Web
Can I move the application to another Mac OS
10.3.x system?
No. In order to run the application on a new system, you must install the package provided
with the DVD Utilities. The package installs the application and a LightScribe resource
library. If you move the application to a new system, the software will start and quit immediately because the library is not found on the system. Therefore, if you want to copy the
application onto a new system, you will have to install the whole package from your original
LaCie DVD Utilities CD-ROM.
Can I burn the label
before burning the data
onto the disc?
Yes. You can burn your label before or after burning your data to LightScribe media.
Why do my labels appear too faint and not as
clear as the preview?
This is due to the gold base of the discs. To increase the quality of your result: we recommend
using image manipulation software to change your color picture into grayscale and increase
the contrast prior to placing it in your design. We recommend pictures with a resolution of
600dpi for best results (see your User Manual for more details).
I have created a color
LightScribe label, so
why is no color printed
on the media when I
burn?
LightScribe currently supports burning in grayscale only.
Can I erase a burned
label?
No. You cannot erase information burned onto the label but you can add additional information.
page: www.lacie.com/support/drivers. Select “Software” from the category list.
LaCie LightScribe Labeler
User Manual
Frequently Asked Questions
page 25
Question
Solution
Can I add pictures/text
to a label that has already been burned?
Yes. Start with your original label template and then add the new label information. Be sure
to remove your previous information from the template to avoid burning it again. Note that
if you hide the background picture using the “Eye” button, the background will not print.
Can I save my own
template?
No. You have to save your project in your document folder and open it when you want to create a similar design. Note that free background pictures are available from
Can I change a template?
No. The existing templates cannot be altered. You must save your modifications under a different file name.
Can I burn onto several LightScribe DVD
drives?
Yes. Using version 1.1 or higher: multiple drive printing is integrated into the application. To
How can I move or
resize the background
image?
The background image is locked and scaled to fit the disc. You can unlock it by clicking the
lock button. You will then be able to move and resize the background image.
How can I learn the
function of a button?
Move the cursor over the button and a function description will appear after a few seconds.
How can I create an
exact square or circle?
First, select the appropriate tool, and then hold the “shift” key down while creating the square
or circle.
Why can’t I center or
justify the text I inserted
(text format buttons are
not available in the text
box)?
This is normal if you have entered circular text. Circular text cannot be centered or justified.
However, the whole text box can be centered in the middle of the picture. Therefore, if you
would like to center several lines, you can enter them in different text boxes and center those
boxes.
What is the extension of
a file created by LightScribe Labeler?
The extension is “.lightscribe”.
What happens if a disc
hasn’t been properly
inserted (label upwards
for instance)?
LightScribe automatically detects whether or not a disc has been inserted
correctly. If the disc is improperly inserted, it will eject and an error message will display.
Why can’t I email the
LightScribe file I created?
Your LaCie LightScribe Labeler creates folders. The file must be stuffed before it can be
emailed.
www.lightscribe.com (Label Gallery).
update your application, go to: www.lacie.com/support/drivers. On older versions,
you must duplicate the application as many times as required (Press the “Alt” key and drag
and drop the application logo). We recommend updating anyway since duplicating the application consumes more CPU power.
Frequently Asked Questions
page 26
LaCie LightScribe Labeler
User Manual
Question
Solution
The file created by
LightScribe Labeler is
too large. How can I
reduce the size?
This file is actually a folder that includes all the pictures you have used for your label design.
The larger the original pictures, the larger the final LightScribe file. If you want to reduce
the size of your final LightScribe file, you must reduce the size/resolution of your original
pictures.
When I try to import an
image via the “Import
Image” dialogue box,
nothing happens. Why?
Move the cursor to the main window until you see a plus sign (+). Click on the location
where you want to add your image.
What should I do if I
try to add text but nothing happens?
Move the cursor to the main window until you see a plus sign (+). Click on the location
where you want to add your text.
Why can’t I import several images at the same
time?
If you drag and drop several images at the same time, only the first one will be moved to the
design area. If you use the “Add Image” dialogue box, you can only select one image at a time.
6.1. Media Identification Numbers
This chart may help you identify your LightScribe
media. Please note that this list is not exhaustive and
new media are released regularly.
Info (see page 9 for details).
To view the your media’s I.D. number, insert your
disc label down, hit the print button then select Drive
from our website – www.lacie.com.
Media version 1.2 requires library/host software
version 1.4.62. or newer. Update your software for free
ID
Type
Version
Manufacturer
ID
Type
Version
Manufacturer
106
DVD+R
1.1
MKM
112
DVD+R
1.2
MKM
107
CD-R
1.1
CMC
113
CD-R
1.2
MBI
108
DVD+R
1.1
MBI
114
DVD+R
1.2
MBI
109
DVD+R
1.1
CMC
115
CD-R
1.2
CMC
111
CD-R
1.2
MKM
116
DVD+R
1.2
CMC
Contacting Customer Support
page 27
LaCie LightScribe Labeler
User Manual
7. Contacting Customer Support
■ Before you Contact Technical Support
1. Read the User Manual and review the Troubleshooting section on page 21.
2. Try to isolate the problem. If possible, make the drive
the only external device on the CPU, and make sure
that all of the cables are correctly and firmly attached.
Close all open applications.
If you have asked yourself all of the pertinent questions in the troubleshooting checklist
and check the LaCie website for possible updates
(www.lacie.com/lightscribe) and you still can’t
get your LaCie software to work properly, contact us via
the contacts on page 23. Before contacting us, make sure
that you are in front of your computer and that you have
the following information on hand:
•
•
•
•
•
Your LaCie drive’s serial number
Operating system and version
Processor type and speed
Amount of memory installed
Names of any other devices installed on your
computer, including CD/DVD burners
■ Information to Include in Email Correspondence
Information
Where to Find Information
1. Your LaCie Drive’s serial number
Located on a sticker at the back of drive or on the original packaging
3. Macintosh model
Click on the Apple icon in the menu bar and select About this Mac.
4. Operating system version
5. Processor type (G4 or Intel Duo Core for example)
6. Computer memory
7. The brands and models of other internal and external
peripherals installed on my computer
Click on the Apple icon in the finder bar and select About this Mac. Select
More Info... The Apple System Profiler will launch and will list your internal and external peripherals.
Contacting Customer Support
page 28
LaCie LightScribe Labeler
User Manual
7.1. LaCie Technical Support Contacts
LaCie Australia
LaCie Belgium
LaCie Denmark
LaCie Finland
LaCie France
LaCie Germany
LaCie Italy
LaCie Japan
LaCie Netherlands
LaCie Norway
LaCie Spain
LaCie Sweden
LaCie Switzerland
LaCie United Kingdom
Contact us at:
http://www.lacie.com/au/contact/
Contact us at:
http://www.lacie.com/dk/contact
Contact us at:
http://www.lacie.com/fr/contact/
Contact us at:
http://www.lacie.com/it/contact/
Contact us at:
http://www.lacie.com/nl/contact/
Contact us at:
http://www.lacie.com/es/contact/
Contact us at:
http://www.lacie.com/chfr/contact/ (Français)
LaCie Ireland
Contact us at:
http://www.lacie.com/ie/contact/
Contact us at:
http://www.lacie.com/be/contact/ (Français)
Contact us at:
http://www.lacie.com/fi/contact/
Contact us at:
http://www.lacie.com/de/contact/
Contact us at:
http://www.lacie.com/jp/contact/
Contact us at:
http://www.lacie.com/no/contact/
Contact us at:
http://www.lacie.com/se/contact
Contact us at:
http://www.lacie.com/uk/support/request/


![Overview cPR67 and cPR84 [v00]](http://vs1.manualzilla.com/store/data/005648847_1-d158a5d3d4b92d14c7a3179652b88ffd-150x150.png)