1
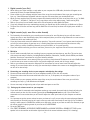
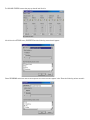
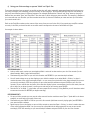
Nathusius’ Pipistrelle Survey Submitting your recordings If making recordings from a frequency division or other broadband detector, please burn them onto a CD and send it to us with your survey forms, even if you are planning to analyse your recordings yourself. This will be more straightforward if you used a solid state digital recorder than if you used a mini disc recorder, but no matter what recording device you used, the end result should be the same, as outlined below: One or more CDs containing separate folders with recordings from each survey you carried out (you may only be able to fit one survey on each CD) Each folder should be named after the survey site and survey date, e.g. “Lake Windermere 01Sept2012” Each folder should contain 20 sound files in .wav format (preferably PCM or standard wave). We can convert other file formats if needed. The 20 sound files should be numbered 01 to 20 (for ease of reference) and correspond to 10 Walks and 10 Spots and be named after the Walks/Spots they were recorded at, so you should end up with .wav files named as follows: 01 Walk 1 02 Spot 1 03 Walk 2 04 Spot 2 05 Walk 3 06 Spot 3 07 Walk 4 08 Spot 4 09 Walk 5 10 Spot 5 11 Walk 6 12 Spot 6 13 Walk 7 14 Spot 7 15 Walk 8 16 Spot 8 17 Walk 9 18 Spot 9 19 Walk 10 20 Spot 10 The sound files should contain the complete recordings you made at each Walk and Spot, not just the bits where bats were present. When burning your CD create a data disc rather than an audio disc. Please ensure the CD is clearly labelled with your name, the site name and survey date(s). Please send us a copy of your files on CD even if you are intending to analyse your recordings yourself. This is so that we can do spot checks on species identification and potentially do further analysis in future focussing on other species of interest. Transferring your recordings to your computer before burning them to CD Instructions are provided for the following recording devices: 1. Digital recorder (.wav files) 2. Digital recorder (.mp3 files) 3. Mini disc 4. Net MD Please refer to the instructions relevant to the recording device you used. If you need further advice on these or other recording devices please contact us at [email protected]. 1 1. Digital recorder (.wav files) When linking your digital recorder or card reader to your computer via a USB cable, the device will appear as an external drive when you open Windows Explorer. Create a folder on your computer with the name of the survey site and the date of the survey your recordings are from, e.g. “Lake Windermere 01Sept09” and then copy the files across from your recorder/flash card. When you have copied all the files across, rename them based on which bit of the survey they refer to, e.g. “01 Walk 1”, “02 Spot 1”, “03 Walk 2”, “04 Spot 2” etc. (it may help to refer to the table on page 1 when naming files). Refer to your survey form to double check which files correspond to which Walks and Spots. If you have followed the survey methodology correctly you should have 20 files relating to 10 Walks and 10 Spots. The Spot files will be four minutes long and the Walk files will most likely be shorter and slightly more variable in length. 2. Digital recorder (.mp3, .wma files or other formats) The instructions for transferring your recordings are the same as for .wav files above, but you will also need to convert your files to .wav format before they can be analysed (unless you will be using Wavesurfer or newer versions of BatSound which can handle mp3 files). If you don’t have audio conversion software then search on “free audio converter” in an internet search engine and you will find various options. A good one to try is Switch (http://www.nch.com.au/switch/) but there are many others, offering a variety of additional features you may find useful, so it is worth browsing. If you have trouble converting your files to .wav then just send us your .mp3/.wma files and we can convert them. 3. Mini disc You will need to manually feed your recordings into your computer and save them as .wav files. This can be done with most sound analysis software, including BatSound, BatScan, Wavesurfer, CoolEdit, Avisoft SASLab, and Adobe Audition. See also our instructions for using free Audacity software. Ensure the sound format is set to stereo (unless you are using a single channel FD detector such as the BatBox Baton in which case set to mono to reduce the file size), 44100 samples per second, and 16 bits per sample. Refer to your software user manual or Help topics for instructions on how to record sound files and adjust the settings. If you need further advice on using your sound analysis software then contact us at [email protected] and we will do our best to help. a) Connecting your recording device to your computer and adjusting the settings Connect a stereo audio lead to the line out or headphone socket of your mini disc recorder Connect the other end of the stereo audio lead to the line in or, if not present, the microphone socket of your computer. Create a folder on your computer with the name of the survey site and the date of the survey your mini disc recordings are from, e.g. “Lake Windermere 01Sept09”. You are now ready to begin saving each of your walks and spots as .wav files b) Setting up the volume control on your computer If your audio lead is connected to the headphone socket you can control the sound levels by simply adjusting the volume controls on the mini disc recorder (go straight to Checking sound levels on p.4). If your audio lead is connected to a line out socket then you will need to adjust the audio input levels on your computer as outlined below. It is important to get the correct volume but once you have set it up if you are using the same equipment (detector and recorder) you shouldn’t need to do it again unless you notice the sound levels are too high or low. The default setting in most systems is PLAYBACK to enable you to adjust the volume as you listen to audio files. However, to get the volume control for playing sounds in you must set it to RECORDING. Go to the START menu. Click START, PROGRAMS, ACCESSORIES, ENTERTAINMENT and VOLUME CONTROL or DOUBLE-LEFT CLICK on the speaker icon on the task bar at the bottom right hand side of the normal windows screen (if it is showing). 2 The VOLUME CONTROL screen that pops up should look like this: Left click on the OPTIONS menu, PROPERTIES and the following screen should appear: Select RECORDING and all the devices the computer can record from will appear in the ‘Show the following volume controls’: 3 Make sure the only box checked is the ‘Line’. This means that the computer will record through the LINE IN socket and that you can adjust the volume as required. If you do not have a line in on your computer and are feeding recordings in through the microphone socket, make sure ‘microphone’ is checked instead. NB on some newer machines that have combined MIC/LINE-IN the recording level is controlled by a RECORDING volume rather than Line-in. It is accessed in exactly the same way just tick RECORDING. Left click OK to see the control for the line-in (or microphone). This window controls the volume level of the LINE IN socket. By left clicking and holding on the bar it can be dragged up and down. Dragging the bar down makes the LINE IN less sensitive and upward more sensitive. To judge the correct sensitivity to use, you need to feed a sound into the computer. The sensitivity required will vary depending on the recording equipment and bat detector used. For the moment, minimise this screen by clicking on the minus sign in the top right hand corner so that it can be restored later. Checking sound levels When you feed in your recordings, check the amplitude graph to ensure that the sound levels are not too high or too low. If they are too high then the amplitude graph will look like Fig A below with the top and bottom of the oscillogram spikes cut off by the window edge. This is known as CLIPPING. If they are too low then the calls may be too quiet for analysis. Fig A. Sound levels set too high Fig B. Sound levels set too low As a general rule, the spikes should be around the halfway point in the window both above and below the line, as in Fig C. To adjust the sound levels to get the optimum setting, maximise the Recording Control box which should be hidden in the bar at the bottom of the screen by clicking on it and slide the volume bar up or down as required. If your audio lead is connected to the headphone socket on your mini disc recorder you can simply adjust the volume controls on the recorder. You may need to start the track again and replay the sound until the levels are set correctly. 4 Fig C. Sound levels set correctly c) Saving your field recordings as separate “Walk” and “Spot” files These notes have been kept as generic as possible so that they will make reasonable sense regardless of which software you are using to transfer your recordings from your minidisc to your computer. The terms RECORD and STOP are used loosely as they may have different names in different programs. For example, BatSound has “Record” and “Stop” buttons, whereas in BatScan they are called “Save” and “Stop Save”. Also the order in which things are done can differ. For example, in BatSound you name and save your file after you have recorded sound into it, whereas in BatScan you name and save your file before you record sound into it. Refer to the Track/file numbers on the reverse of the survey form you used in the field. If you noted your track/file numbers correctly in the field you should be able to see which tracks correspond to the start of each Walk and Spot. An example is shown below: RECORDING WALK 1 Look up which track number you noted against Walk 1 and scroll to that track on your mini disc recorder (in the above example, Walk 1 begins with track 001). Simultaneously press PLAY on your mini disc recorder and RECORD in your sound analysis software. You will need to keep an eye on the display on your minidisc recorder to see when Walk 1 finishes, i.e. when it reaches the start of the track listed against Spot 1 on your survey form (track 002 in the above example). As soon as you see this track begin, STOP the recording on your sound analysis software and press PAUSE on your mini disc recorder. (If your recorder has the facility to set the time display to show a countdown timer for each track, then use this to alert you to when the track is coming to an end and you will need to press PAUSE). Save the file as “01 Walk 1” in the folder you have created for this survey (if using BatScan you will have been asked to name and save the file BEFORE you began recording). RECORDING SPOT 1 On your minidisc recorder you may now be a few seconds into the track that starts “Spot 1” (track 002 in the above example), so scroll back to the start of the track. Simultaneously press PAUSE or PLAY on your mini disc recorder (whichever starts it playing again) and RECORD in your sound analysis software. Again keep an eye on the display on your minidisc recorder to see when Spot 1 finishes, i.e. when it reaches the start of the track listed against Walk 2 on your survey form (track 004 in the above example). As soon as you see this track begin, STOP the recording on your sound analysis software and press PAUSE on your mini disc recorder. 5 Save the file as “02 Spot 1” (if using BatScan you will have been asked to name and save the file BEFORE you began recording). RECORDING THE REMAINING WALKS AND SPOTS Repeat the above steps until you have saved your recordings from all 10 Walks and all 10 Spots as .wav files. When transferring your recordings from Spot 10, start at the relevant track (track 036 in the above example) and record for four minutes. It may help to refer to the table on page 1 when naming your files. The Spot files will be four minutes long and the Walk files will most likely be shorter and slightly more variable in length. If using BatSound, select File format: Wave (standard) when saving each file, so that the files can be opened in other software in future if needed. 4. Net MD If you have a Net MD recorder you can transfer tracks across to your computer and then open them in sound analysis software without manually feeding each track in, although it still takes time. You will need a line-in and a USB connection and some software called Win NMD available from http://winnmd.net or email Christian Klukas at [email protected]. This is not freeware and pricing depends on your location. When uploading your files, save and name them following the instructions in option 1 above). 6