1
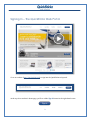
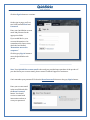
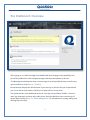
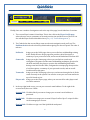
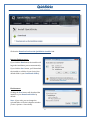
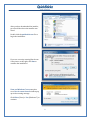
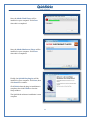
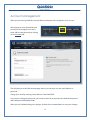
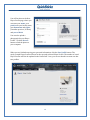
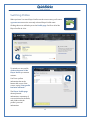
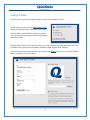
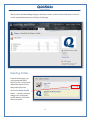
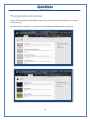
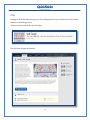
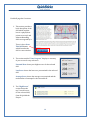
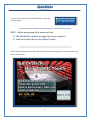
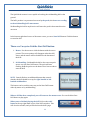
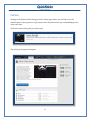
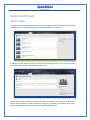
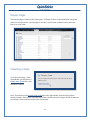
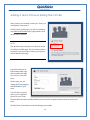
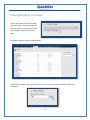
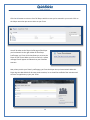
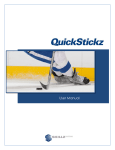
User Manual
User Manual
Thank you for purchasing QuickStickz. This User Manual has been designed to help you get the
most out of your QuickStickz training experience.
Signing In – The QuickStickz Web Portal
p. 3
How to sign into the Quickstickz web portal, as well as instructions on how to retrieve your
account information.
The Dashboard: Overview
p. 5
A quick tour of the QuickStickz web portal, identifying the main sections you’ll be using during
your practice sessions.
Installing QuickStickz
p. 7
A step-by-step guide to installing QuickStickz on your PC.
Account Management
p. 12
How to change the email address and password assigned to your QuickStickz account.
Profile Management
p. 13
How to create, edit, and delete Player Profiles on your QuickStickz account, and how to switch
between them.
Playing Drills and Games
p. 18
How to play the drills and games in the Quickstickz web portal.
Teams and Players
p. 25
How to create and edit a Team for your Player Profile, as well as how to search for other Players
and invite them to your Team.
Contact Us
p. 31
Questions? Comments? Need help? Find out how to contact the Quickstickz Support Team.
2
User Manual
Signing In – The QuickStickz Web Portal
Go to our website (http://quickstickz.com) to sign into the QuickStickz web portal.
At the top of our website’s home page, you’ll see a blue Sign In button in the right-hand corner.
3
User Manual
Click the Sign In button to continue.
On the sign-in page, you’ll see
two fields marked Email and
Password.
Enter your QuickStickz account
email and password in the
appropriate fields.
If you would like for your
account information to be
remembered for future visits,
check the box labelled
“Remember me on this
computer.”
Click the grey Sign In button to
enter the QuickStickz web
portal.
Note: Your QuickStickz account email is the email you provided upon purchase of the product. If
you don’t know your account email, please contact Technical Support for assistance.
Can’t remember your password? Click on the Reset Password link next to the grey Sign In button.
Enter your account email
in the text field and click
the Reset Password
button. You should
receive an email with
instructions on how to
reset your password.
4
User Manual
The Dashboard: Overview
After signing in, you will be brought to the Dashboard, the homepage of the QuickStickz web
portal. The Dashboard is used to display messages and important updates to the user.
The Messages box displays the most recent messages from the QuickStickz team, as well as any
open invitations to Teams (see p. , “Teams”).
Recent Activity displays the date and time of your last sign-in, the last drill you completed and
your score, and the total number of drills you’ve played in the current week.
The right-hand side of the Dashboard shows the currently selected Player Profile – the user’s
name, age, hometown, position, and profile picture. Each QuickStickz account can have up to 5
unique Player Profiles (see p. 13, “Profile Management,” for information on creating, editing, and
deleting Player Profiles).
5
User Manual
1.
2.
3.
Finally, there are a number of navigation tools at the top of the page, here divided into 3 sections:
1. The current Player’s name is listed here. This is also a link to the Player Profile page,
where the user can see a summary of his total practice time and drill scores. The user can
also edit his Player Profile information here (see p. 13, “Profile Management”).
2. The 5 tabs below the current Player name are the main navigation tools you’ll use. The
Dashboard tab is the tab selected by default when signing in to the web portal. The other 4
tabs are:
Drills tab:
Games tab:
Teams tab:
Players tab:
brings you to the Drills page, where you can find our stickhandling training
drills. Each drill has a unique page that provides a brief description, a
summary of your personal records, and an overall leaderboard for that drill.
brings you to the Games page, where you can find our arcade-style
videogames. The games use the same stickhandling techniques practiced in
the drills and allow the player to practice his stickhandling skills while
having some fun! Like the drills, each game has a unique page that provides
a brief description, a summary of your personal records, and an overall
leaderboard for that game.
brings you to the Teams page, where you can browse through a list of all the
teams currently in the system. You can also create your own team and invite
up to 30 friends to join.
brings you to the Players page, where you can search for other players and
view their statistics.
3. In the top right-hand corner, you can your account’s email address. To the right of the
account email, there are 3 links:
Account link: Click this link if you want to change your account’s email address or
password.
Profile link:
Click here to manage your account’s Player Profiles. Up to 5 unique Profiles
can be managed per account.
Sign Out link: Click here to sign out of the QuickStickz web portal.
6
User Manual
Installing QuickStickz
Before you start practicing, you’ll need to install some software that allows the QuickStickz camera
to communicate with the drills and games. This section will guide you through the installation
process.
Note: Before beginning the installation, make sure the QuickStickz
camera is NOT plugged in.
First, you’ll need to go to the Install page on the web portal.
Click on either the Drill tab or the Games tab – on the right-hand side of both of these pages, you’ll
see a link that will take you to the Install page.
Click on the QuickStickz Installer link to go to the
Install page.
7
User Manual
Click on the Download and run the QuickStickz installer link.
Internet Explorer users:
If you click the Run button, the installer will
begin the installation process automatically.
If you click the Save button, you’ll download
the installer to a folder of your choice (the
default folder is your Downloads folder).
Firefox users:
Clicking the Save button will download the
installer to your Downloads folder by
default.
Note: If you wish, you can change the
selected folder in Firefox’s Options window
(Tools > Options > General tab).
8
User Manual
After you have downloaded the installer,
go to the folder where the installer was
saved.
Double-click the quickstickz.exe file to
begin the installation.
If you see a security warning like the one
is the picture to the right, click Run to
continue the installation.
Vista and Windows 7 users may also
see a User Account Control window pop
up with a warning message.
Click Allow (Vista) or Yes (Windows 7) to
continue.
9
User Manual
A Setup window will open. Click Next to
continue.
Click the radio button that says “I accept the
agreement,” then click Next to continue.
The next window will tell you that Setup is
now ready to begin. Click Install to begin the
process. Setup will begin extracting files.
10
User Manual
Next, the Adobe Flash Player will be
installed on your computer. Click Close
when this is completed.
Next, the Adobe Shockwave Player will be
installed on your computer. Click Close
when this is completed.
Finally, the QuickStickz plug-ins will be
installed on your computer. Click Next, then
click Install to continue.
Click Finish when the plug-in installation is
complete, then click Finish to close the
Setup window.
The QuickStickz software installation is now
complete.
11
User Manual
Account Management
When you purchase QuickStickz, an email address and password is assigned to your account.
After signing in to the QuickStickz web
portal, you can change you account’s
email address and password by clicking
on the Account link.
This will take you to the Edit Account page, where you can enter in a new email address or
password.
Change your email by entering a new address in the Email field.
If you want to change the password, you’ll need to enter the new password in both the Password
and Password confirmation fields.
When you are finished making your changes, click the Save Account button to save your changes.
12
User Manual
Profile Management
A Player Profile manages a user’s personal information and keeps a unique record of scores
achieved in the QuickStickz drills and games. Each QuickStickz account can save up to 5 unique
Player Profiles.
By default, each QuickStickz account
has one Player Profile set up. Player
Profiles can be accessed on the Profile
link:
Users can create, edit and delete Player Profiles from this page.
Creating Profiles
To create a Player Profile, click on the Create
Another Profile link on the right-hand side of the
Profile page.
13
User Manual
You will be taken to the New
Player Profile page, where you
can enter your name, your
position on your hockey team,
your hometown and region
(Canadian province, US state),
and year of birth.
You can also upload a
photograph for your Player
Profile – click the Browse
button to find the photo on
your computer.
When you are finished entering your personal information, click the Save Profile button. The
newly created Player Profile will now be the currently selected Player Profile. The number of saved
Player Profiles will also be updated in the Profile link – here, you can see that this account now has
two profiles.
14
User Manual
Switching Profiles
When you have 2 or more Player Profiles saved to an account, you’ll notice
a green arrow next to the currently selected Player Profile name.
Clicking this arrow will take you to the Profile page. You’ll see all of the
Player Profiles in a list.
To switch to a new profile,
click on the name of the
Player Profile you want to
activate.
You’ll see a yellow
information bar at the
bottom left corner of the
screen, saying “Your profile
has been activated.”
The Player Profile page
shows personal
information, a summary of
scores achieved in the drills,
and a link to edit the
profile’s personal
information.
15
User Manual
Editing Profiles
You can edit the personal information of the currently selected Player Profile.
To edit a Player Profile, click the Edit Player Profile
link on the right-hand side of the Player Profile page.
You’ll be taken to an Edit Player Profile page, where
you can change the personal information saved under
that Player Profile.
Editing a Player Profile is the same as creating a new one; enter the personal information you want
to update in the appropriate fields (Name, Position, Town, Region, Year of Birth).
You can delete the current Profile Photo by clicking on the Delete link, or you can click the Browse
button to upload a new Profile Photo.
16
User Manual
After you have finished making changes to the Player Profile, click the Save Profile button. You will
see the updated information on the Player Profile page.
Deleting Profiles
From the Profile page, you
can permanently delete
Player Profiles – all personal
information and scores for
that profile will be lost.
Click on the Delete Profile
button – a window will open
asking you to confirm the
profile deletion. Click OK to
delete the profile.
17
User Manual
Playing Drills and Games
After you have installed the QuickStickz software and created your Player Profiles, you’re ready to
start practicing!
QuickStickz drills and games are accessed from the Drills tab and Games tab, respectively.
18
User Manual
Drills
Clicking on the Drills tab will bring you to the Drills page, where you will find a list of all available
drills for stickhandling practice.
Click on the name of the drill you wish to play.
This will open the page for that drill.
19
User Manual
Each drill page has 3 sections:
1. This section provides a
brief description of the
drill which explains
how it is played, how
points are scored, and
what stickhandling
skills are targeted by it.
There is also a Start
This Drill button
which launches the
drill in a new window.
2. The section entitled “Your Progress” displays a summary
of your scores for easy reference:
Personal Best: shows your highest score for the selected
drill
Last Score: shows the last score you attained in the selected
drill
Average Score: shows the average score attained and the
total number of attempts for the selected drill
3. The “High Scores”
section shows the
top 5 overall scores
for the selected drill,
from all QuickStickz
Players.
20
User Manual
To start a drill, click the Start This Drill button under the
drill description.
NOTE: Before playing any drills, make sure that
1) The QuickStickz camera is plugged into your computer!
2) You have selected the correct Player Profile!
A new window will open for the drill. After the drill is finished loading, you’ll see the menu screen
for the selected drill:
21
User Manual
The QuickStickz camera is now capable of tracking the stickhandling ball on the
ground.
The ball’s position is represented onscreen by the puck, which moves according
to the stickhandling ball’s movements.
Stickhandling the ball in any direction will move the puck in that same direction
onscreen.
In the bottom right-hand corner of the menu screen, you see a Start Drill button. Click this button
to start the drill.
There are 2 ways to click the Start Drill button:
1. Mouse: Use the mouse to click the button with the arrow
pointer. The arrow pointer will disappear when the drill
starts, and the mouse will be disabled for the duration of
the drill.
2. Stickhandling: Stickhandle the ball so the onscreen puck
moves over the Start Drill button. The puck will start
flashing. Hold the puck over the button for a few seconds to
start the drill.
NOTE: Some drills have an additional button that controls
whether the drill should be set up for right-handed or lefthanded stickhandlers.
This button can be used the same way as the Start Drill button:
either by mouse or by stickhandling.
When a drill has been completed, you will return to the menu screen. You can click the Start
Drill button to play again.
When you are finished playing the drill, click on the red X
button at the top right-hand corner of the drill’s window. This
will close the window, and you’ll be back at the drill’s page.
22
User Manual
Games
Clicking on the Games tab will bring you to the Games page, where you will find a list of all
available games. These games are a great way to have fun and continue your stickhandling practice
at the same time!
Click on the name of the game you wish to play.
This will open the page for that game.
23
User Manual
As you can see, the game pages are organized exactly the same way as the drill pages: there is a
description of the game, a section entitled “Your Progress” and a “High Scores” section.
Click the Start This Game button to launch the game in a
new window.
NOTE: Before playing any games, make sure that
1) The QuickStickz camera is plugged into your computer!
2) You have selected the correct Player Profile!
Each game has a menu screen similar to the drills’ menu screens. Using the menu screens for games
is identical to those for drills:
1. There will be a Start button on the menu screen that can be accessed either by the mouse
or by stickhandling.
2. When the game ends, you will be brought back to the menu screen.
3. The game window can be closed by hitting the red X button at the top right-hand corner of
the screen.
24
User Manual
Teams and Players
Teams Page
Clicking on the Teams tab will take you to the Teams page. All Quickstickz Teams are listed in
alphabetical order, along with any Team pictures that have been uploaded.
Clicking on a team name will take you to the Team profile page, where you can view all of the
Players that have joined or been invited to the team.
Every unique Player Profile has the ability to create one unique Team, and up to 30 different
Players can be invited to a Team. Teams are a great way to organize your friends into a single
group, making it easier to check their latest QuickStickz high scores.
25
User Manual
Players Page
The Players page is similar to the Teams page – all Player Profiles on the QuickStickz web portal
can be accessed from here. Use this page to search for your friends, compare scores, and invite
Players to your Team!
Creating a Team
Go to the Teams page - in the
right sidebar, you should see a
Create Your Team link – click
the link to continue.
Note: If you don’t see the Create Your Team link in the right sidebar, it means that you have
already created a Team for the currently active Player Profile. Switch to a Player Profile that has not
yet created a Team, and then return to the Teams page.
26
User Manual
Clicking the Create this team link will bring you to the New Team page. Enter the appropriate
information into the 3 fields provided:
Town: Enter the name of your hometown.
Region: Select a province or state from the
drop-down list.
Nickname: Enter the name of your Team.
Click the Save Team button to continue.
When you click the Save Team button, you’ll be taken to a new page that confirms the creation of
the team. You’ll see a yellow notification that says “Your team was successfully created.” The
creator of the team is listed as the first player on the team. The new team will also be listed on the
creator’s Player Profile page. To invite new players to the team, there is a link to the Players page on
the right sidebar of the team page. (see “Inviting Players to Your Team,” p. 30.)
27
User Manual
Adding a Team Picture & Editing Team Profile
After you have successfully created your Team, you
can upload a Team picture.
On the Team’s profile page, you will see a link that
says Edit Team Profile on the right sidebar. Click
on this link to continue.
NOTE:
The quickest way to find your own Team is to visit
your Player Profile page. The Team that you have
created, as well as any other Teams you’ve joined,
will be linked on this page.
You will be taken to an
Edit Team Profile page
that resembles the page
you used to create your
team.
On this page, you can
change the Town, Region,
and Nickname of your
team.
You will also see a place
where you can upload a
picture for your Team.
Click the Browse button and then find the picture on your computer that you wish to use for your
team.
Click the Save Team button to save all changes you’ve made.
28
User Manual
Inviting Players to your Team
On the right sidebar of your Team page,
you’ll see a link to the Players page. You
can click this link, or you can simply click
on the Players tab to visit the Players
page.
The Players page lists all Players alphabetically.
If you know the name of the Player you’d like to invite to your team, enter the Player name in the
Search bar.
29
User Manual
Click the Go button to retrieve a list of all Players with the name you’ve entered in your search. Click on
the Player name that you want to invite to your Team.
You will be taken to the Player Profile page of the Player
you’ve selected. On the right sidebar of that Player
Profile page, you’ll see a link that allows you to invite the
Player to your Team. When you click on the link, a yellow
message box will appear to indicate that your invitation
was sent.
Now, when you visit your Team’s profile page, you’ll see the Player that you have invited. When this
Player logs into QuickStickz for his next practice session, he or she will be notified of the invitation and
will have an opportunity to join your Team.
30
User Manual
Contact Us
Thank you for your interest in Quickstickz!
If you have any questions or comments regarding the Quickstickz system, or if you need help getting
Quickstickz to run on your PC, please contact Technical Support at the following:
Phone: (902)-407-3880
9am - 5pm, Mon. – Fri., Atlantic Standard Time
Email: [email protected]
Keep your head up!
-
31
QuickStickz Support Staff