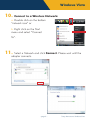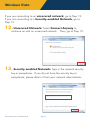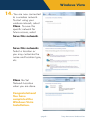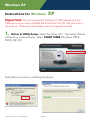
1
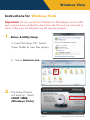
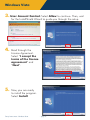
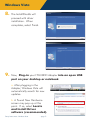
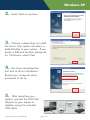
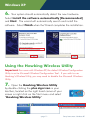
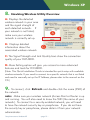
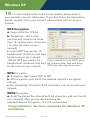
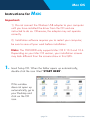
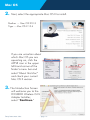
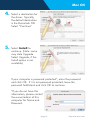
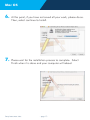
QUICK INSTALLATION GUIDE
Hi-GainTM Wireless-G USB Dish Adapter
Windows Vista
Windows XP
Mac OS
START HERE Part No. HWU8DD
Pre-Installation
Check Package Contents
- One Hi-Gain Wireless-G USB Dish Adapter
- One USB 2.0 Cable
- CD (Setup Drivers and User’s Manual for Mac & Windows)
- One Quick Installation Guide for Mac & Windows
Installation Instructions are divided into three sections: (Windows Vista, Windows XP,
and Mac OS)
•
•
•
For Windows Vista, go to page 2
For Windows XP, go to page 9
For Mac OS, go to page 13
This document only contains quick setup instructions. For more
settings, please refer to the User’s Manual located on the CD.
Support is available via website, email, and telephone:
Website: www.hawkingtech.com/support
E-mail: [email protected]
Tel (Toll Free US & Canada): 888-202-3344
Tel (International): 949-790-0810
- page 1 -
Windows Vista
Instructions for Windows Vista
Important: Do not connect the Wireless-G USB Adapter into the USB
port until you have installed the driver from the CD and are instructed to
do so. Otherwise, the Adapter may not operate properly.
1. Driver & Utility Setup:
a. Insert the Setup CD. Select
Open Folder to view files option.
b. Select autorun.exe
2.
The Setup Wizard
will load up. Select
START HERE
(Windows Vista)
- page 2 -
Setup Instructions: Windows Vista
Windows Vista
3. User Account Control: Select Allow to continue. Then, wait
for the InstallShield Wizard to guide you through the setup.
4.
5.
Read through the
License Agreement.
Select “I accept the
terms of the license
agreement” and
“Next”.
Now, you are ready
to install the program.
Select Install.
Setup Instructions: Windows Vista
- page 3 -
Windows Vista
6.
7.
Please wait until the Install Wizard completes.
Plug -in the Wireless Dish Adapter using the using the included
USB cable. Then click OK.
- page 4 -
Setup Instructions: Windows Vista
Windows Vista
8.
9.
The InstallShields will
proceed with driver
installation. When
completes, select Finish.
Now, Plug-in your HWU8DD Adapter into an open USB
port on your desktop or notebook.
a. After plugging in the
Adapter, Windows Vista will
automatically search for new
updates.
b. A Found New Hardware
screen may pop up at this
point. If so, select Locate
and Install Driver
software (recommended).
Setup Instructions: Windows Vista
- page 5 -
Windows Vista
10.
Connect to a Wireless Network:
a. Double click on the bottom
“network icon” or
b. Right click on the Start
menu and select “Connect
To”.
11.
Select a Network and click Connect. Please wait until the
adapter connects.
- page 6 -
Setup Instructions: Windows Vista
Windows Vista
If you are connecting to an unsecured network, go to Step 12.
If you are connecting to a Security-enabled Network, go to
Step 13.
12. Unsecured Network: Select Connect Anyway to
continue on with an unsecured network. Then, go to Step 12.
13. Security-enabled Network: Type in the network security
key or passphrase. If you do not have the security key or
passphrase, please obtain it from your network administrator.
Setup Instructions: Windows Vista
- page 7 -
Windows Vista
14. You are now connected
to a wireless network.
To start using your
wireless network, select
Close. To save this
specific network for
future access, select
Save this network.
Save this network:
Select a location or
you may customize the
name and location type,
etc.
Close the Set
Network Location
when you are done.
Congratulations!
You have
completed the
Windows Vista
Installation.
- page 8 -
Setup Instructions: Windows Vista
Windows XP
Instructions for Windows
XP
Important: Do not connect the Wireless-G USB Adapter into the
USB port until you have installed the driver from the CD and are instructed to do so. Otherwise, the Adapter may not operate correctly.
1.
Driver & Utility Setup: Insert the Setup CD. The Setup Wizard
will load up automatically, select START HERE (Windows 98SE,
2000, ME, XP)
Select Run to continue installing the driver.
Setup Instructions: Windows XP
- page 9 -
Windows XP
2.
Select Next to continue
3.
Choose a destination to install
the driver. Your system will select a
default folder in your system. If you
prefer a different location please do
so. Otherwise, select Next.
4.
You have completed the
first part of driver installation.
Restart your computer when
prompted to do so.
5.
After restarting your
system, connect the USB Dish
Adapter to your laptop or
desktop using the included
USB cable.
Setup Instructions: Windows XP
- page 10 -
Windows XP
6.
Your system should automatically detect the new hardware.
Select Install the software automatically [Recommended]
and Next. The wizard will automatically search and install the
software. Select Finish when the Wizard completes the installation.
Using the Hawking Wireless Utility
Important: For users with Windows XP, the default Wireless Configuration
Utility is set to Microsoft Wireless Configuration Tool. If you wish to use
Hawking’s Wireless Utility, you may need to disable the Microsoft Windows
Utility.
7.
Open the Hawking Wireless Utility
by double-clicking the plus sign icon in your
tool bar, located on the right hand corner of your
screen or right click on the Start menu and select
“Hawking Wireless Utility.”
- page 11 -
Setup Instructions: Windows XP
Windows XP
8.
Hawking Wireless Utility Overview
A: Displays the detected
wireless network in your area
and the signal strength of
each detected network. If
your network is not listed,
make sure your wireless
network is correctly set up.
B: Displays detailed
information about the
associated wireless network.
C: The Signal Strength and Link Quality bars show the connection
quality of your HWU8DD.
D: More Setting option will give you access to more advanced
features and tools for HWU8DD.
(Note: This Quick Installation Guide is intended for quick setup with available
wireless networks. If you need to connect to a specific network that is not listed
and need to manually set up the IP Address, please refer to the manual on the
CD.)
9.
To connect, click Refresh and double-click the name (SSID) of
the network.
note: Make sure your wireless network (Access Point or Router is up
and running. You will also need to know the SSID (the name of your
network). To connect to a security-enabled network, you will need
to have the network security key or passphrase. If you do not have
the security key or passphrase, please obtain it from your network
administrator.
Setup Instructions: Windows XP
- page 12 -
Windows XP
10.
In the Authentication and Security window, please enter in
your network’s security information. If you don’t have this information,
please request it from your network administrator who set up your
network.
WEP Encryption
a. Select 64-bit or 128-bit
b. Passpharse - this is case
sensitive and contains no more
than 16 alphanumeric characters.
( Must be the same as your
network).
c. 64-bit WEP key: exactly 10
hexadecimal characters and must
be the same as your network.
If your network is set to ASCII, go to
128-bit WEP key: exactly 26
hexadecimal characters and must the Authentication Type and select
ASCII from the drop down menu.
be the same as your network.
WPA Encryption
a. Encryption Type: Select TKIP or AES
b. All Encryptions must match the selected network’s encryption
settings.
c. Pre-shared Key: Should be 8-63 characters and must match your
network.
WPA2 Encryption
a. Enter Pre-shared Key (should be 8-63 characters and must match
your network). After you are done entering the
selected Network Encryption, click OK and proceed.
Congratulations! You have completed the Windows XP
installation.
Setup Instructions: Windows XP
- page 13 -
Mac OS
Instructions for
Mac
Important:
1) Do not connect the Wireless USB adapter to your computer
until you have installed the driver from the CD and are
instructed to do so. Otherwise, the adapter may not operate
correctly.
2) Installation software requires you to restart your computer,
be sure to save all your work before installation.
Note: The HWU8DD only supports Mac OS X 10.3 and 10.4.
Depending on your Mac OS version, your installation screens
may look different than the screens show in this QIG.
1.
Insert Setup CD. When the folder opens up automatically,
double click the icon titled “START HERE”.
If this window
does not open up
automatically, go to
your Desktop and
click on the CD
icon.
- page 14 -
Setup Instructions: Mac
Mac OS
2.
Next, select the appropriate Mac OS X to install.
Panther ~ Mac OS X10.3
Tiger ~ Mac OS X 10.4
If you are uncertain about
which Mac OS you are
operating on, click the
APPLE icon in the upper
left-hand corner of the
finder’s menu bar and
select “About this Mac”
and check your current
Mac OS X version.
3. The Introduction Screen
will welcome you to the
HWU8DD Wireless-G Dish
Adapter Installer,
select “Continue.”
Setup Instructions: Mac
- page 15 -
Mac OS
4.
5.
Select a destination for
the driver. Typically,
the default destination
is the Macintosh HD.
Select “Continue”
Select Install to
continue. (Note: some
may state Upgrade.
Select Upgrade, if the
Install option is not
available.)
If your computer is password protected*, enter the password
and click OK. If it is not password protected, leave the
password field blank and click OK to continue.
*If you do not have this
information, please contact
the owner/admin of this
computer for Name and
Password.
- page 16 -
Setup Instructions: Mac
Mac OS
6.
7.
At this point, if you have not saved all your work, please do so.
Then, select continue to Install.
Please wait for the installation process to complete. Select
Finish when it is done and your computer will reboot.
Setup Instructions: Mac
- page 17 -
Mac OS
CONNECTING TO YOUR WIRELESS NETWORK
After your computer reboots, insert the HWU8DD Dish Adapter into
an available USB port
Note: To make sure the
HWU8DD Adapter works
properly, you must turn off any
previously installed wireless
card (including the built-in
airport card.)
To turn the airport card off, locate the
airport wireless icon at the top right hand
corner and select “Turn Airport Off”
8.
Set up your Wireless Network you desktop or laptop. This is
required only if you are installing the HWU8DD/HWU8DDA for
the first time.
8a. Click on the APPLE icon in the
top left-hand corner and then select
SYSTEM PREFERENCES.
- page 18 -
a
Setup Instructions: Mac
Mac OS
8b. From the menu that
appears, double click the
NETWORK icon to begin
enabling your Hawking
wireless device before using
the wireless utility.
b
8c. Your computer should automatically
detect the USB Wireless-G adapter by
showing a pop-up window stating “New
Port Detected”. Be sure to note the port
number i.e. Ethernet Adapter (en#).
Click OK to continue.
If the “New Port Detected” screen
does not appear, you will need
to direct your system to use the
newly installed Wireless-G
Adapter manually. Go to System
Preferences, select Network.
Click on the “Show” field , select
Ethernet Adapter (en#).
(Note: # can be any number - it
does not have to be (en3)
as shown in the picture.)
Double click on the Ethernet Adapter.
Setup Instructions: Mac
- page 19 -
Mac OS
As a default setting, the Hawking Wireless Utility (WLAN)
should
automatically load on your Dock when when you insert the Hawking
Hi-Gain Adapter. However, if the WLAN icon does not automatically load up, go to FINDERAPPLICATIONUTILITY, and find the
WLAN in the UTILITY folder. Double-click on the WLAN icon to start
the WIreless Utility.
Wireless Utility Functions:
A Displays the available
wireless networks in your vicinity and the signal strength
information of each network.
To connect to a network
double-click the name of the
network. The “Refresh” button will rescan for available
networks. If your network
does not appear, check to
see if your network set up
correctly.
B Displays detailed information about the associated wireless network.
C The Signal Strength and Link Quality bars show the
connection quality of your HWU8DD to the wireless network. It
is best to rotate your antenna until you find a position with the
strongest signal.
D The CHANGE button will give you access to more
advanced features and tools for the HWU8DD. (See the next
page).
- page 20 -
Setup Instructions: Mac
Mac OS
ADVANCED / SECURITY SETTINGS
(For more advanced features and settings please view the users manual)
GENERAL SETTINGS - You may manually input your network
settings here. It is recomended to use the automatic settings.
SECURITY - If your wireless network
requires a security key you may enter
it in the Encryption Settings tab. If
you are unsure what your security
key is, please contact your network
administrator. The HWU8DDA
supports a wide range of security
levels. (WEP 64/128/256 and
WPA)
ADVANCED SETTINGS - It is
not recommeded to adjust these
settings. Please refer to the manual
if you wish to do so.
Congratulations! You have completed the configuration for the
HWU8DD Hi-Gain Wireless-G USB Dish Adapter.
WWW.HAWKINGTECH.COM
TECHNICAL SUPPORT
Email: [email protected]
Website: www.hawkingtech.com/support
Tel (Toll Free US & Canada): 888-202-3344
Tel (International): 949-790-0810
PRODUCT REGISTER
http://www.hawkingtech.com/registration.php
RMA INFORMATION
http://www.hawkingtech.com/rma.php
SALES INFORMATION
[email protected]
Hawking is a registered trademark of Hawking Technologies, Inc. ©2008 Hawking Technologies, Inc. All
rights reserved. Other brands and product names are trademarks or registered trademarks of their respective
owners. Apple, Mac, and Airport are registered trademarks of Apple Computer, Inc, No affliliation is implied or
expressed.
- page 20 Setup Instructions: Mac