1
OpenStage 5 SIP
OpenScape Voice
User Guide
A31003-S2000-U153-3-7619
Our Quality and Environmental Management Systems are
implemented according to the requirements of the ISO9001 and
ISO14001 standards and are certified by an external certification
company.
Copyright © Unify GmbH & Co. KG 09/2014
Hofmannstr. 51, 81379 Munich/Germany
All rights reserved.
Reference No.: A31003-S2000-U153-3-7619
The information provided in this document contains merely general descriptions or
characteristics of performance which in case of actual use do not always apply as
described or which may change as a result of further development of the products.
An obligation to provide the respective characteristics shall only exist if expressly agreed in
the terms of contract.
Availability and technical specifications are subject to change without notice.
Unify, OpenScape, OpenStage and HiPath are registered trademarks of Unify GmbH & Co. KG.
All other company, brand, product and service names are trademarks or registered trademarks
of their respective holders.
unify.com
Safety Precautions
3
Safety Precautions
Important Notes
7
Do not operate the telephone in environments where there is a danger of explosions.
7
Use only original accessories. Using other accessories may be dangerous, and will invalidate the warranty and the CE mark.
7
Never open the telephone or a key module. If you encounter any problems, contact the
administrator.
Trademarks
The device conforms to the EU guideline 1999/5/EG, as attested by the CE mark.
All electrical and electronic products should be disposed of separately from the municipal waste stream via designated collection facilities appointed by the government
or the local authorities.
Proper disposal and separate collection of your old appliance will help prevent potential negative consequences for the environment and human health. It is a precondition
for reuse and recycling of used electrical and electronic equipment.
For more detailed information about disposal of your old appliance, please contact
your city office, waste disposal service, the shop where you purchased the product or
your sales representative.
The statements quoted above are only fully valid for equipment which is installed and
sold in the countries of the European Union and is covered by the directive 2002/96/
EC. Countries outside the European Union may have other regulations regarding the
disposal of electrical and electronic equipment.
4
Safety Precautions
Location of the Telephone
• The telephone should be operated in a controlled environment with an ambient temperature between 5 °C and 40 °C (41 °F and 104 °F).
• Do not install the telephone in a room where large quantities of dust accumulate; this can considerably reduce the service life of the telephone.
• Do not expose the telephone to direct sunlight or any other source of heat, as this is liable to
damage the electronic equipment and the plastic casing.
• Do not operate the telephone in damp environments such as bathrooms.
Product support on the Internet
Information and support for our products can be found on the Internet at:
http://www.unify.com/.
Technical notes, current information about firmware updates, frequently asked questions and lots
more can be found on the Internet at:
http://wiki.unify.com/.
Contents
5
Contents
Safety Precautions. . . . . . . . . . . . . . . . . . . . . . . . . . . . . . . . . . . 3
Important Notes. . . . . . . . . . . . . . . . . . . . . . . . . . . . . . . . . . . . . . . . . . . . . . . . . . . . . . . . . . . . . . 3
Trademarks . . . . . . . . . . . . . . . . . . . . . . . . . . . . . . . . . . . . . . . . . . . . . . . . . . . . . . . . . . . . . . . . . 3
Location of the Telephone. . . . . . . . . . . . . . . . . . . . . . . . . . . . . . . . . . . . . . . . . . . . . . . . . . . . . . . 4
Product support on the Internet. . . . . . . . . . . . . . . . . . . . . . . . . . . . . . . . . . . . . . . . . . . . . . . . . . 4
General Information . . . . . . . . . . . . . . . . . . . . . . . . . . . . . . . . . . 8
About These Operating Instructions . . . . . . . . . . . . . . . . . . . . . . . . . . . . . . . . . . . . . . . . . . . . . . 8
Intended Use. . . . . . . . . . . . . . . . . . . . . . . . . . . . . . . . . . . . . . . . . . . . . . . . . . . . . . . . . . . . . . . . 8
Product Identification. . . . . . . . . . . . . . . . . . . . . . . . . . . . . . . . . . . . . . . . . . . . . . . . . . . . . . . . . . 8
Service . . . . . . . . . . . . . . . . . . . . . . . . . . . . . . . . . . . . . . . . . . . . . . . . . . . . . . . . . . . . . . . . . . . . 8
Notes and Symbols . . . . . . . . . . . . . . . . . . . . . . . . . . . . . . . . . . . . . . . . . . . . . . . . . . . . . . . . . . . . 9
Safety. . . . . . . . . . . . . . . . . . . . . . . . . . . . . . . . . . . . . . . . . . . . . . . . . . . . . . . . . . . . . . . . . . . . 9
Symbols in the Manual. . . . . . . . . . . . . . . . . . . . . . . . . . . . . . . . . . . . . . . . . . . . . . . . . . . . . . . 9
Introduction . . . . . . . . . . . . . . . . . . . . . . . . . . . . . . . . . . . . . . . 10
Overview . . . . . . . . . . . . . . . . . . . . . . . . . . . . . . . . . . . . . . . . . . . . . . . . . . . . . . . . . . . . . . . . . . 10
Secure Voice Transmission . . . . . . . . . . . . . . . . . . . . . . . . . . . . . . . . . . . . . . . . . . . . . . . . . . 10
Telephone Types . . . . . . . . . . . . . . . . . . . . . . . . . . . . . . . . . . . . . . . . . . . . . . . . . . . . . . . . . . . 10
Operating the Telephone . . . . . . . . . . . . . . . . . . . . . . . . . . . . . 11
OpenStage 5 SIP Control panel . . . . . . . . . . . . . . . . . . . . . . . . . . . . . . . . . . . . . . . . . . . . . . . . 11
Features . . . . . . . . . . . . . . . . . . . . . . . . . . . . . . . . . . . . . . . . . . . . . . . . . . . . . . . . . . . . . . . . . . 11
Programmable Keys . . . . . . . . . . . . . . . . . . . . . . . . . . . . . . . . . . . . . . . . . . . . . . . . . . . . . . . . . . 12
Standard Telephone Functions . . . . . . . . . . . . . . . . . . . . . . . . . . . . . . . . . . . . . . . . . . . . . . . . . 12
Multiline Functions . . . . . . . . . . . . . . . . . . . . . . . . . . . . . . . . . . . . . . . . . . . . . . . . . . . . . . . . . . 12
Incoming Calls . . . . . . . . . . . . . . . . . . . . . . . . . . . . . . . . . . . . . 13
Basic Functions. . . . . . . . . . . . . . . . . . . . . . . . . . . . . . . . . . . . . . . . . . . . . . . . . . . . . . . . . . . . . 13
Answering a Call . . . . . . . . . . . . . . . . . . . . . . . . . . . . . . . . . . . . . . . . . . . . . . . . . . . . . . . . . . 13
Open Listening During a Call . . . . . . . . . . . . . . . . . . . . . . . . . . . . . . . . . . . . . . . . . . . . . . . . . 13
Switching to Mute During a Call . . . . . . . . . . . . . . . . . . . . . . . . . . . . . . . . . . . . . . . . . . . . . . . 13
Ending a Call . . . . . . . . . . . . . . . . . . . . . . . . . . . . . . . . . . . . . . . . . . . . . . . . . . . . . . . . . . . . . 14
Call Pickup to a Line Key . . . . . . . . . . . . . . . . . . . . . . . . . . . . . . . . . . . . . . . . . . . . . . . . . . . . 14
Placing a call on hold . . . . . . . . . . . . . . . . . . . . . . . . . . . . . . . . . . . . . . . . . . . . . . . . . . . . . . . . 14
Transferring a call . . . . . . . . . . . . . . . . . . . . . . . . . . . . . . . . . . . . . . . . . . . . . . . . . . . . . . . . . . . 14
Blind transfer . . . . . . . . . . . . . . . . . . . . . . . . . . . . . . . . . . . . . . . . . . . . . . . . . . . . . . . . . . . . . 15
Transferring with consultation . . . . . . . . . . . . . . . . . . . . . . . . . . . . . . . . . . . . . . . . . . . . . . . . 15
Outgoing Calls . . . . . . . . . . . . . . . . . . . . . . . . . . . . . . . . . . . . . 16
Dialing and Making Calls. . . . . . . . . . . . . . . . . . . . . . . . . . . . . . . . . . . . . . . . . . . . . . . . . . . . . . 16
Off-Hook Dialing. . . . . . . . . . . . . . . . . . . . . . . . . . . . . . . . . . . . . . . . . . . . . . . . . . . . . . . . . . . 16
On-Hook Dialing. . . . . . . . . . . . . . . . . . . . . . . . . . . . . . . . . . . . . . . . . . . . . . . . . . . . . . . . . . . 16
Dialing Using a Line Key . . . . . . . . . . . . . . . . . . . . . . . . . . . . . . . . . . . . . . . . . . . . . . . . . . . . 16
Repeat Dialing . . . . . . . . . . . . . . . . . . . . . . . . . . . . . . . . . . . . . . . . . . . . . . . . . . . . . . . . . . . . 17
Dialing using the hot or warm line function . . . . . . . . . . . . . . . . . . . . . . . . . . . . . . . . . . . . . . 17
6
Contents
Selected Dialing . . . . . . . . . . . . . . . . . . . . . . . . . . . . . . . . . . . . . . . . . . . . . . . . . . . . . . . . . . . . 17
Using Selected Dialing . . . . . . . . . . . . . . . . . . . . . . . . . . . . . . . . . . . . . . . . . . . . . . . . . . . . . 17
Using Repertory Dial . . . . . . . . . . . . . . . . . . . . . . . . . . . . . . . . . . . . . . . . . . . . . . . . . . . . . . . 18
Callback . . . . . . . . . . . . . . . . . . . . . . . . . . . . . . . . . . . . . . . . . . . . . . . . . . . . . . . . . . . . . . . . . 18
Consultation call with a second station . . . . . . . . . . . . . . . . . . . . . . . . . . . . . . . . . . . . . . . . . . . 19
Start consultation . . . . . . . . . . . . . . . . . . . . . . . . . . . . . . . . . . . . . . . . . . . . . . . . . . . . . . . . . . 19
Ending a consultation call . . . . . . . . . . . . . . . . . . . . . . . . . . . . . . . . . . . . . . . . . . . . . . . . . . . 19
Do Not Disturb . . . . . . . . . . . . . . . . . . . . . . . . . . . . . . . . . . . . . 20
Ringer Off . . . . . . . . . . . . . . . . . . . . . . . . . . . . . . . . . . . . . . . . . . . . . . . . . . . . . . . . . . . . . . . . . . 20
Accepting a Call . . . . . . . . . . . . . . . . . . . . . . . . . . . . . . . . . . . . . . . . . . . . . . . . . . . . . . . . . . . 20
Activating Do Not Disturb . . . . . . . . . . . . . . . . . . . . . . . . . . . . . . . . . . . . . . . . . . . . . . . . . . . . . 20
Phone Lock . . . . . . . . . . . . . . . . . . . . . . . . . . . . . . . . . . . . . . . . . . . . . . . . . . . . . . . . . . . . . . . . . 21
Using Group Features . . . . . . . . . . . . . . . . . . . . . . . . . . . . . . . 22
Group Pickup . . . . . . . . . . . . . . . . . . . . . . . . . . . . . . . . . . . . . . . . . . . . . . . . . . . . . . . . . . . . . . 22
Using Group Pickup . . . . . . . . . . . . . . . . . . . . . . . . . . . . . . . . . . . . . . . . . . . . . . . . . . . . . . . . 22
Hunt Group . . . . . . . . . . . . . . . . . . . . . . . . . . . . . . . . . . . . . . . . . . . . . . . . . . . . . . . . . . . . . . . . 22
Accepting Calls in a Hunt Group . . . . . . . . . . . . . . . . . . . . . . . . . . . . . . . . . . . . . . . . . . . . . . 22
Taking a break in a Hunt Group . . . . . . . . . . . . . . . . . . . . . . . . . . . . . . . . . . . . . . . . . . . . . . . 22
Removing a Phone Number from the Hunt Group . . . . . . . . . . . . . . . . . . . . . . . . . . . . . . . . . 23
Messages Function . . . . . . . . . . . . . . . . . . . . . . . . . . . . . . . . . . . . . . . . . . . . . . . . . . . . . . . . . . 23
Retrieving Messages . . . . . . . . . . . . . . . . . . . . . . . . . . . . . . . . . . . . . . . . . . . . . . . . . . . . . . 23
OpenScape Voice Functions . . . . . . . . . . . . . . . . . . . . . . . . . . 24
Toggle Key . . . . . . . . . . . . . . . . . . . . . . . . . . . . . . . . . . . . . . . . . . . . . . . . . . . . . . . . . . . . . . . . . 24
Using Call Forwarding. . . . . . . . . . . . . . . . . . . . . . . . . . . . . . . . . . . . . . . . . . . . . . . . . . . . . . . . 24
Call Forwarding – Busy Line . . . . . . . . . . . . . . . . . . . . . . . . . . . . . . . . . . . . . . . . . . . . . . . . . 24
Call forwarding don’t answer . . . . . . . . . . . . . . . . . . . . . . . . . . . . . . . . . . . . . . . . . . . . . . . . . 25
Call forwarding unconditional . . . . . . . . . . . . . . . . . . . . . . . . . . . . . . . . . . . . . . . . . . . . . . . . . 26
Making anonymous calls. . . . . . . . . . . . . . . . . . . . . . . . . . . . . . . . . . . . . . . . . . . . . . . . . . . . . . 26
Deactivating . . . . . . . . . . . . . . . . . . . . . . . . . . . . . . . . . . . . . . . . . . . . . . . . . . . . . . . . . . . . . . 26
Activating . . . . . . . . . . . . . . . . . . . . . . . . . . . . . . . . . . . . . . . . . . . . . . . . . . . . . . . . . . . . . . . . 27
Temporarily activating anonymous calling for the next call . . . . . . . . . . . . . . . . . . . . . . . . . . 27
Temporarily deactivating anonymous calling for the next call . . . . . . . . . . . . . . . . . . . . . . . . 27
Using abbreviated dialing . . . . . . . . . . . . . . . . . . . . . . . . . . . . . . . . . . . . . . . . . . . . . . . . . . . . . . 28
Voice calling function . . . . . . . . . . . . . . . . . . . . . . . . . . . . . . . . . . . . . . . . . . . . . . . . . . . . . . . . 28
Voice calling . . . . . . . . . . . . . . . . . . . . . . . . . . . . . . . . . . . . . . . . . . . . . . . . . . . . . . . . . . . . . . 29
Announcing the local phone number. . . . . . . . . . . . . . . . . . . . . . . . . . . . . . . . . . . . . . . . . . . . . 29
Dialling the last caller . . . . . . . . . . . . . . . . . . . . . . . . . . . . . . . . . . . . . . . . . . . . . . . . . . . . . . . . 29
Retrieving and dialling the last answered caller . . . . . . . . . . . . . . . . . . . . . . . . . . . . . . . . . . . 29
Retrieving and dialling the phone number of the last caller dialled . . . . . . . . . . . . . . . . . . . . 30
Picking up out-of-hours calls . . . . . . . . . . . . . . . . . . . . . . . . . . . . . . . . . . . . . . . . . . . . . . . . . . . 30
Table of codes for OpenScape Voice functions . . . . . . . . . . . . . . . . . . . . . . . . . . . . . . . . . . . . . 31
Multiline . . . . . . . . . . . . . . . . . . . . . . . . . . . . . . . . . . . . . . . . . . 32
Types of Lines. . . . . . . . . . . . . . . . . . . . . . . . . . . . . . . . . . . . . . . . . . . . . . . . . . . . . . . . . . . . . . 32
Line Types. . . . . . . . . . . . . . . . . . . . . . . . . . . . . . . . . . . . . . . . . . . . . . . . . . . . . . . . . . . . . . . . . 32
Line Key Status Indication . . . . . . . . . . . . . . . . . . . . . . . . . . . . . . . . . . . . . . . . . . . . . . . . . . . 32
Direct Station Select key Status Indication . . . . . . . . . . . . . . . . . . . . . . . . . . . . . . . . . . . . . . 33
Multiline Calls . . . . . . . . . . . . . . . . . . . . . . . . . . . . . . . . . . . . . . . . . . . . . . . . . . . . . . . . . . . . . . 33
Using the Direct Station Select key . . . . . . . . . . . . . . . . . . . . . . . . . . . . . . . . . . . . . . . . . . . . 33
Contents
7
Telephone Settings . . . . . . . . . . . . . . . . . . . . . . . . . . . . . . . . . 34
Temporary Ringer Volume . . . . . . . . . . . . . . . . . . . . . . . . . . . . . . . . . . . . . . . . . . . . . . . . . . . . 34
Temporary Handset Volume . . . . . . . . . . . . . . . . . . . . . . . . . . . . . . . . . . . . . . . . . . . . . . . . . . . 34
Restart the phone . . . . . . . . . . . . . . . . . . . . . . . . . . . . . . . . . . . . . . . . . . . . . . . . . . . . . . . . . . . . 34
Web Interface. . . . . . . . . . . . . . . . . . . . . . . . . . . . . . . . . . . . . . 35
General Information . . . . . . . . . . . . . . . . . . . . . . . . . . . . . . . . . . . . . . . . . . . . . . . . . . . . . . . . . 35
Preparatory Steps . . . . . . . . . . . . . . . . . . . . . . . . . . . . . . . . . . . . . . . . . . . . . . . . . . . . . . . . . . . . 36
Menu Structure . . . . . . . . . . . . . . . . . . . . . . . . . . . . . . . . . . . . . . . . . . . . . . . . . . . . . . . . . . . . . . 37
Changing the User Password . . . . . . . . . . . . . . . . . . . . . . . . . . . . . . . . . . . . . . . . . . . . . . . . 37
Function Keys . . . . . . . . . . . . . . . . . . . . . . . . . . . . . . . . . . . . . . . . . . . . . . . . . . . . . . . . . . . . 38
Selecting Function Keys . . . . . . . . . . . . . . . . . . . . . . . . . . . . . . . . . . . . . . . . . . . . . . . . . . . . 39
Country Settings . . . . . . . . . . . . . . . . . . . . . . . . . . . . . . . . . . . . . . . . . . . . . . . . . . . . . . . . . . 40
Audio Settings . . . . . . . . . . . . . . . . . . . . . . . . . . . . . . . . . . . . . . . . . . . . . . . . . . . . . . . . . . . . 40
Call-Related Parameters . . . . . . . . . . . . . . . . . . . . . . . . . . . . . . . . . . . . . . . . . . . . . . . . . . . . 41
User Security Setting . . . . . . . . . . . . . . . . . . . . . . . . . . . . . . . . . . . . . . . . . . . . . . . . . . . . . . . 41
Alphabetic Reference . . . . . . . . . . . . . . . . . . . . . . . . . . . . . . . . . . . . . . . . . . . . . . . . . . . . . . . . 41
Labeling and Documentation . . . . . . . . . . . . . . . . . . . . . . . . . . 46
Attaching a Station Number Label . . . . . . . . . . . . . . . . . . . . . . . . . . . . . . . . . . . . . . . . . . . . . . 46
Labeling keys . . . . . . . . . . . . . . . . . . . . . . . . . . . . . . . . . . . . . . . . . . . . . . . . . . . . . . . . . . . . . . 46
Tips and Tricks. . . . . . . . . . . . . . . . . . . . . . . . . . . . . . . . . . . . . 47
Telephone Maintenance . . . . . . . . . . . . . . . . . . . . . . . . . . . . . . . . . . . . . . . . . . . . . . . . . . . . . . 47
Troubleshooting . . . . . . . . . . . . . . . . . . . . . . . . . . . . . . . . . . . . . . . . . . . . . . . . . . . . . . . . . . . . . 47
Contacts for Resolving Problems . . . . . . . . . . . . . . . . . . . . . . . . . . . . . . . . . . . . . . . . . . . . . . . . 47
Index . . . . . . . . . . . . . . . . . . . . . . . . . . . . . . . . . . . . . . . . . . . . 48
Important Functions at a Glance . . . . . . . . . . . . . . . . . . . . . . . 50
8
General Information
General Information
About These Operating Instructions
These operating instructions help familiarize you with OpenStage 5 SIP and its functions. The instructions contain important information for safe and proper operation of the OpenStage 5 SIP.
Follow them carefully to avoid improper operation and get the most out of your multi-function telephone in a network environment.
Everybody involved in installing, operating or programming the OpenStage 5 SIP must read these
operating instructions.
For your own protection, please read the section dealing with safety. Follow the safety instructions carefully in order to avoid endangering yourself or other persons and to prevent
damage to the unit.
The layout of these operating instructions is extremely user-friendly, offering a step by step guide
to the operation of OpenStage 5 SIP. Administrative tasks are described in a separate manual.
The quick reference guide provides concise explanations of frequently used functions.
Intended Use
The OpenStage 5 SIP telephone is a desktop unit designed for voice transmission and for connection to a LAN. Any other use is regarded as not prescribed.
Product Identification
The characteristics of the telephone – precise product name and serial number – are displayed on
the nameplate on the underside of the telephone. Please have these at hand when you contact
our service department regarding problems or defects on the unit itself.
Service
The Unify service department can only help you in the event of problems or faults with the
telephone unit.
Should you have any questions regarding the operation, your specialist retailer or network
administrator will gladly help you with the right answers.
For any questions regarding the telephone connection, please contact your network provider.
In the case of any trouble or defects on the unit itself, please dial the service number of your country.
General Information
9
Notes and Symbols
Safety
Information that is important for preventing injury or damages is marked specially, as they are important instructions for correct use of the unit.
symbol indicates a hazard. Failure to follow the instructions given
7 This
may result in injury or in damage to the unit.
This symbol indicates the following:
• Key information important for the proper use of the telephone
• Important information concerning the differences between single-line
and multiline operation.
Symbols in the Manual
Operating steps are explained in a logical sequence using graphics in the lefthand column. Below is an explanation of the symbols:
n
Lift the handset.
t
Replace the handset.
s
Conduct a call.
o
dd
u or v
Enter a telephone number or code.
Enter the code.
Press volume controls on the telephone.
Press the key.
Press the illuminated key.
Press the blinking key.
10
Introduction
Introduction
Overview
The OpenStage 5 SIP is a modern multi-function IP telephone. It is designed for connection to
data networks and is not directly connected an ISDN system or to the PSTN.
This manual describes how to use the OpenStage 5 SIP when it is connected to the
OpenScape Voice.
Some of the features described in this manual are only available because they are provided
by OpenScape Voice. If you are not using the OpenStage 5 SIP in a OpenScape Voice environment, ask the service team to provide you with the corresponding operating instructions.
The OpenStage 5 SIP enables voice communication via the standard Internet Protocol (IP). It is
compatible with the signaling stack in compliance with the SIP (Session Initiation Protocol) protocol specification.
The OpenStage 5 SIP can be used just like a conventional telephone – the only difference being
that your calls are directed via a data network. The telephone has an Ethernet interface so that
when using the TCP/IP protocol, you can make the telephone calls both via your own intranet and
via the worldwide Internet.
The OpenStage 5 SIP also supports other standard protocols, which optimizes the data and voice
transmission and simplifies the administration of the unit. For example, the administrator can
download updates for equipment software or feature enhancements to the OpenStage 5 SIP via
the FTP server.
A wide variety of features and programmable keys enable you to configure the OpenStage 5 SIP
to meet most requirements.
Secure Voice Transmission
Prerequisite: To be able to use secure voice transmission, this feature must be actiuvated by service personnel.
You can set up a secure connection withOpenStage 5 SIP phones if the receiving phone also has
the capability. The voice transmission is encrypted; it is decrypted in the receiving party’s telephone. Even the signaling for call setup and the exchange of encryption information occur over a
secure connection. The phones must have valid registration on an SIP server. You can set whether
a short tone can be heard if the connection is not secure (see Page 41).
Telephone Types
The administrator can set up the OpenStage 5 SIP as:
• a single-line telephone.
• a multiline telephone
Operating the Telephone
11
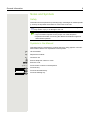
Operating the Telephone
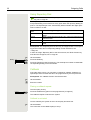
OpenStage 5 SIP Control panel
1
6
5
2
3
4
1
You can make and receive calls as normal using the handset.
2
Loudspeaker for open listening (under the handset – here not visible)
3
Audio keys are also available, allowing you to optimally configure the audio features on
your telephone Page 34.
4
The keypad is provided for input of phone numbers/codes.
5
The 8 programmable keys can be programmed with functions Page 38.
6
The LEDs indicate the status of the feature
Features
•
•
•
•
•
•
•
Loudspeaker
Repeat dialing
On-hook dialing
8 function keys (support dual-level programming)
Consultation, Call Transfer, Call Holding
Variable ringer tone, volume, and sequence
Simultaneous ringing, which alerts you to incoming calls at more than one location (server
based)
12
Operating the Telephone
Programmable Keys
The OpenStage 5 SIP is equipped with 8 function keys all of which are user-programmable on two
levels (the "Shift" keys should be retained). Two of these keys are pre-assigned in the first level.
Mute
1
Loudspeaker
2
Voice mail
3
Cancel/Release
4
Confirm
5
Blind Transfer
6
Hold
7
Shift
8
Function Key
7
8
Function
Cancel the current action.
Shift to the second key level.
Each feature key has a corresponding visual indicator (LED) to indicate the status of the feature.
Standard Telephone Functions
All the features described in this section are available for both single-line and multiline telephones.
The numeric keypad is used for dialing phone numbers. You can choose to dial a normal phone
number (E.164 phone number) or a URL. The number of digits in an E.164 number is restricted to
20 digits. Other numbers such as phone numbers to be dialed are restricted to 24 digits.
Dialing aids and enhanced functions can be activated using individually programmable function
keys.
Examples of dialing aids and enhanced functions:
•
•
•
•
Repeat dialing
Selected dialing
Mute
Last number redial
Multiline Functions
Some functions and features are only available to you if the administrator configured your telephone to support multiple lines. The following are some examples of special multiline telephone
features:
•
•
•
•
Dialing Using a Line Key
Manual hold
Multiline priority
Visual indicators for line key status
Most features are common to single-line and multiline telephones, but some features function in a slightly different manner depending on the telephone type. In this manual, these differences are described in the same section that describes single-line telephone features.
Incoming Calls
13
Incoming Calls
Basic Functions
All the features described in this section are available for both single-line
and multiline telephones.
Answering a Call
The telephone rings.
n
u or v
Lift the handset.
Set call volume. To raise or lower the volume, press the relevant key until the
desired volume is set.
Open Listening During a Call
You can allow other people in the room to join the telephone conversation. Inform the party at the other end of the line that you are switching to loudspeaker.
Prerequisite: You are conducting a call. The function key "Loudspeaker" is configured, see Page 39.
Activating the Loudspeaker Function
Loudspeaker
Press the key. The LED lights up, the loudspeaker is activated.
Deactivating the Loudspeaker Function
Loudspeaker
Press the key. The LED goes out, the loudspeaker is deactivated.
You can enable or disable an audible warning if the phone is configured for
payload security, but the connection falls back to an unencrypted call. (see
Page 41).
Switching to Mute During a Call
You can consult with other people in the room without the person on the other
end of the line hearing what is said.
Prerequisite:You are conducting a call. The function key "Mute" is configured,
see Page 45.
Activating the Mute Function
Mute
Press the Mute key. The LED lights up, the microphone on the handset is deactivated.
Deactivating the Mute Function
Mute
Press the Mute key. The LED goes out, the microphone on the handset is reactivated.
14
Incoming Calls
Ending a Call
t
Replace the handset.
or
Press the Cancel/Release key, if this key is configured ( Page 45). The call is
cleared down.
Cancel/Release
Call Pickup to a Line Key
Prerequisite: A line key with a separate telephone number is configured on your
telephone (consult the administrator).
The telephone rings. The LED for the line key blinks rapidly.
n
Line
Lift the handset.
Press the key. The LED lights up.
Placing a call on hold
You can use this function to place an ongoing call on hold, for instance, to prevent the other party overhearing a conversation with a colleague in the same
room.
Prerequisite: You are on a call and the "Hold" key must be configured, see
Page 39.
Hold
Press the "Hold" key. The call is on holod. The party on hold hears music.
Following a configured period of time a double beep reminds you that the party
is still on hold,
Hold
Press the "Hold" key to resume the held call. You can now make a consultation
call or end the call.
Transferring a call
You can transfer your current call to another party with or without consultation.
The features "Transfer on Hangup" and "Transfer on Ring" must be activated by
service personnel.
The following function keys should be configured, see Page 39:
• Blind Transfer
• Consult/Transfer
• Confirm
Incoming Calls
15
Blind transfer
Prerequisite: You are conducting a call.
Press the "Blind Transfer" key.
Blind Transfer
o
Enter the phone number of the party to whom you want to transfer the call.
Press the "Confirm" key or wait until the autodial delay expires ( Page 41).
Confirm
The call is transferred to a second station. You can hang up the handset or redial.
If the second party does not answer, you will be called back by the first party.
Transferring with consultation
Prerequisite: You are conducting a call.
Press the „Consult“ key.
Consult/Transfer
o
Enter the number of the second station to which you want to transfer the call.
Press the "Confirm" key or wait until the autodial delay expires ( Page 41).
Confirm
s
Announce the transfer to the party.
t
Replace the handset.
The call is transferred to the second station.
If the called party does not answer
Cancel/Release
Press the "Cancel/Release" key, you are reconnected with the first party.
16
Outgoing Calls
Outgoing Calls
Dialing and Making Calls
All the features described in this section are available for both single-line
and multiline telephones.
Off-Hook Dialing
n
Lift the handset.
p
Enter the phone number.
The called party does not answer or is busy:
t
Replace the handset.
On-Hook Dialing
p
Enter the phone number. After the auto Dial Timer has timed out the number will
be dialed (see Page 41).
The other party answers over loudspeaker:
n
Lift the handset.
The called party does not answer or is busy:
Press the key. The LED goes out.
Loudspeaker
You can enable or disable an audible warning if the phone is configured for
payload security, but the connection falls back to an unencrypted call. (see
Page 41).
If you are using a dial plan and have set Hot-Keypad (see Page 41),
dialing takes place automatically as soon as the character string entered
matches an entry in the dial plan.
Dialing Using a Line Key
Prerequisite: A line key with a separate telephone number is configured on your
telephone (consult the administrator).
Press the line key. The LED lights up.
Line
p
Enter the phone number.
n
Lift the handset.
If you pick up the handset before dialing or dial a number while the handset
is still on the hook, the main line or the next available line will be busy immediately.
Outgoing Calls
17
Repeat Dialing
Prerequisite: The "Repeat dialing" function key is configured, see Page 45.
The last number dialed is always automatically stored for repeat dialing.
n
Lift the handset.
Press the key. The last number dialed is redialed.
Repeat dialing
Dialing using the hot or warm line function
Your service personnel can configure a hot or warm line for your phone.
If you lift the handset of the phone or press the loudspeaker key
• with a hot line immediately or
• with a warm line after a defined period of time,
a number specified by service personnel is dialed.
Examples:
• The phone in the lift immediately dials the reception number.
• The phone at a patient’s bed dials the ward number e.g. after a minute if no
other number is dialed.
Selected Dialing
You can store frequently dialed numbers to a function key. There are two types
of selected dialing:
• Selected dialing: direct dialing of a telephone number, see Page 17.
• Repertory dial: direct dialing of a telephone number using dialing control functions, see Page 18.
Using Selected Dialing
You can store the function "Selected dialing" to the second level of a function key, see Page 38.
Prerequisite: The "Selected dialing" function key is configured with a corresponding phone number, see Page 39.
In order to assign "Selected dialing" to the second level, the function key "Shift"
must also be configured, see Page 38.
n
If req.
Lift the handset.
Shift
Press the Shift key.
Selected dialing
Press the "Selected dialing" function key. The stored number is dialed.
18
Outgoing Calls
Using Repertory Dial
You can store the function "Repertory dial" to the second level of a function
key, see Page 38.
The "Repertory dial" function is similar to selected dialing. However, it can also
incorporate dialing control functions at any point within the repertory dialing sequence. The OpenScape Voice automatically detects whether the digits represent a number or a URL.
Control Func- Action During Dialing
tion
OK
Deactivates the Auto Dial Timer, for example, and dials immediately.
Pause
Waits 3 seconds before sending any characters following this
control function.
Consult
Consultation is not supported by OpenStage 5 SIP.
Clear
Can be used to end calls if only this command has been entered.
Prerequisite: The "Repertory dial" function key is configured with a corresponding phone number and corresponding dialing control characters, see
Page 39.
In order to assign "Repertory dial" to the second level, the "Shift" function key
must also be configured, see Page 38.
n
If req.
Lift the handset.
Shift
Press the Shift key.
Repertory dial
Press the "Repertory dial" function key. The stored phone number is dialed with
corresponding dialing control characters.
Callback
If the other party is busy, you can place a request for callback. Callback is a
OpenScape Voice function and has to be programmed by service personnel.
Prerequisite: The callback function must be activated
n
o
Lift the handset
Enter the number
Placing a callback request
The other party is busy.
Press the Callback key (this must be programmed ( Page 45)
Callback
The callback request is stored in the system
Callback is activated
You are called by the system as soon as the party becomes free.
n
Lift the handset
The connection to the callback party is set up.
Outgoing Calls
19
Canceling callback requests
If for any reason callback requests are no longer required, you can cancel them.
Prerequisite: The telephone is in idle mode.
Press the Cancel Callbacks key (this must be programmed ( Page 45)
Cancel Callbacks
All callback requests are then cancelled.
Consultation call with a second station
During a call you can contact another station and put the call with the first station
on hold.
You can also transfer the held call to a second station, even if the party has not
yet picked up the handset (see Page 15).
Start consultation
Prerequisite: You are conducting a call.
Press the "Consultation" key.
Consult/Transfer
o
Confirm
Enter the number of the second station with which you want to make the consultation.
Press the "Confirm" key or wait until the autodial delay expires ( Page 41). The
connection is set up and you can now make the consulation.
Ending a consultation call
Cancel/Release
Press the "Cancel/Release" key, you are reconnected with the first party.
20
Do Not Disturb
Do Not Disturb
If you do not want to be disturbed by an incoming call ringing, you can deactivate
the ringer. The following options are available for selection:
• Ringer off, see Page 20
• Do not disturb, see Page 20
• Phone lock, see Page 21
Ringer Off
Prerequisite: The "Ringer off" function key is configured, see Page 45.
Activating the Ringer Off Function
Press the "Ringer off" function key. The LED lights up.
Ringer off
Incoming calls are signaled by a blinking "Ringer off" LED.
Deactivating the Ringer Off Function
Press the "Ringer off" function key. The LED goes out.
Ringer off
Accepting a Call
The LED blinks.
Ringer off
n
Lift the handset.
Activating Do Not Disturb
Prerequisite: The "Do not disturb" function key is configured, see Page 45.
Activating the Do Not Disturb Function
Do not disturb
Press the "Do not disturb" function key. The LED lights up.
If there is an incoming call, the caller hears the busy tone.
Deactivating the Do Not Disturb Function
Do not disturb
Press the "Do not disturb" function key. The LED goes out.
Do Not Disturb
21
Phone Lock
You can use this option to lock your telephone. Then unauthorized persons cannot make calls from your telephone or modify your user settings.
Prerequisite: The function keys "Phone lock" and "Confirm" are configured, see
Page 45.
You can only lock the telephone if you have set a user password, see
Page 37.
Activating the Phone Lock Function
Press the "Phone lock" fuction key. The LED lights up.
Phone lock
Deactivating the Phone Lock Function
Press the "Phone lock" fuction key.
Phone lock
p
Confirm
Enter the user password.
Press the Confirm key. The telephone is unlocked.
22
Using Group Features
Using Group Features
Group Pickup
Your administrator can combine several telephones to form a pickup group. If
your telephone belongs to a pickup group, you can pick up calls for another
group member. You can only belong to one pickup group at a time.
Using Group Pickup
You can answer a colleague’s telephone, for example, if they are away from their
desk.
Prerequisite: The "Group pickup" key is configured, see Page 45.
Your colleague receives an incoming and belongs to your pickup group (consult
the administrator):
n
Lift the handset.
Press the blinking key. You have taken over the call to your phone.
Group pickup
Hunt Group
The administrator can merge several telephones to form a hunt group. If your
telephone belongs to a hunt group, the OpenScape Voice routes calls for members of your group according to rules defined by the administrator. Hunt groups
provide a simple way to distribute calls among a group of stations.
Accepting Calls in a Hunt Group
Prerequisite: A line key with a hunt group telephone number is configured on
your telephone (consult the administrator).
The telephone rings. The line key LED blinks.
n
Line
Lift the handset.
Press the line key. The LED lights up.
Taking a break in a Hunt Group
Prerequisite: The "Make line busy" function key is configured ( Page 24).
If you want another group member to handle a call, you can also make your telephone appear busy to the hunt group. After you do so, your telephone does not
receive hunt group calls.
Activating the Make Line Busy Function
Make line busy
Press the "Make line busy" function key. The LED lights up. Your telephone is
set to busy within the hunt group.
Using Group Features
23
Deactivating the Make Line Busy Function
Press the "Make line busy" function key. The LED goes out. Your telephone can
be reached within the hunt group.
Make line busy
Removing a Phone Number from the Hunt Group
Prerequisite: The "Stop hunt" function key is configured ( Page 24).
You can remove your telephone from the hunt group. Incoming calls will no longer be routed to your telephone via the hunt group.
Activating the Stop Hunt Function
Press the "Stop hunt" function key. The LED lights up. Your telephone cannot be
reached within the hunt group.
Stop hunt
Deactivating the Stop Hunt Function
Press the "Stop hunt" function key. The LED goes out. Your telephone can be
reached within the hunt group.
Stop hunt
Messages Function
Prerequisite: The "Voice Messages" function key is configured.
Callers who attempt to contact you in your absence can leave messages in your
mailbox.
Retrieving Messages
n
Lift the handset.
Voice Messages
The "Voice Messages" LED lights up: New, unretrieved messages are waiting in
your mailbox.
Voice Messages
Press the "Voice Messages" function key: The voice message server answers.
Please follow the voice guidance.
24
OpenScape Voice Functions
OpenScape Voice Functions
The OpenScape Voice system supports a number of functions, which you can
activate or deactivate via the telephone. With a multiline telephone each function
relates to the prime line.
Toggle Key
To invoke the functions "make line busy" and "stop hunt" one of the function keys
can be defined and programmed as feature toggle key.
By pressing the function key, you can activate or deactivate the corresponding
OpenScape Voice function on the server.
You can only assign function keys on the first level because the LED associated
with the key is used to indicate the function’s status as either On (LED on) or Off
(LED off). The LED indicates the status of a function on the server. It can therefore change regardless of whether a function key is pressed or not.
Example:
Switching between "Line busy" and "Line free".
Precondition: Your service personnel has set up a key for the function "Busy"
(switch line "Busy" for the hunt group).
Make line busy
Press the "Make line busy" function key. The LED lights up. Your telephone is
set to busy within the hunt group.
Make line busy
Press the "Make line busy" function key. The LED goes out. Your telephone can
be reached within the hunt group.
Using Call Forwarding
This section describes the call forwarding functions supported by the
OpenScape Voice. These functions can be called up using the feature code. You
can also assign a frequently used function to a programmable key or a selected
repdial key.
Call Forwarding – Busy Line
With Call forwarding busy line (CFBL), you can use a feature code to activate
or deactivate forwarding for calls received on a busy line and define a forwarding
destination.
Your administrator may also have configured a permanent forwarding destination so that calls are automatically forwarded to this fixed phone number as soon as you activate CFBL forwarding.
OpenScape Voice Functions
^
j
or
25
Activating
Lift the handset.
Enter the code (see the table of codes Page 31)
if you also want to set the forwarding destination
j
enter the code with a phone number, for example, *901234567 to activate call
forwarding.
Z
You hear a confirmation tone.
^
j
Z
Deactivating
Lift the handset.
Enter the code (see the table of codes Page 31) to deactivate call forwarding.
You hear a confirmation tone.
Call forwarding don’t answer
With Call forwarding don’t answer (CFDA), you can use a feature code to activate call forwarding to another number if the handset is not picked up after a
certain number of rings (eight).
You can use the feature code to activate/deactivate this function and define a
forwarding destination.
Your administrator may also have configured a permanent forwarding destination so that calls are automatically forwarded to this fixed phone number as soon as you activate CFDA forwarding.
Activating
^
j
or
Lift the handset.
Enter the code (see the table of codes Page 31)
if you also want to set the forwarding destination
j
enter the code with a phone number, for example, *901234567 to activate call
forwarding.
Z
You hear a confirmation tone.
Deactivating
^
j
Z
Lift the handset.
Enter the code (see the table of codes Page 31) to deactivate call forwarding.
You hear a confirmation tone.
26
OpenScape Voice Functions
Call forwarding unconditional
With Call forwarding unconditional (CFV), all incoming calls are forwarded to
a different destination.
You can use the feature code to activate/deactivate this function and define a
forwarding destination.
Activating
n
Lift the handset.
o
Enter the code (see the table of codes Page 31) and the number of the phone
where you want to forward the calls.
Z
You hear a confirmation tone.
If the "Courtesy call" function is active, the OpenScape Voice dials the phone to
which you forwarded your calls.
• If the party at this phone answers, you can inform him or her that your calls are
being forwarded to his or her phone.
• If the forwarded-to party does not answer or is busy, repeat the activation procedure. As long as you do so within two minutes, you hear the confirmation
tone followed by dial tone. The OpenScape Voice does not attempt to alert the
party at the forwarding destination that the feature has been reactivated.
While unconditional call forwarding is activated, calls forwarded while the line
is in idle state are signaled by a brief ring on the phone to which they are forwarded (approx. 0.5 seconds). This serves as a reminder that this particular feature is activated.
Deactivating
^
j
Lift the handset.
Enter the code (see the table of codes Page 31). You receive a confirmation
tone.
Making anonymous calls
Your administrator decides whether or not your caller ID (name and phone number) is displayed on a called party’s station. Anonymous calling is when your
data is not transmitted. The settings configured can be deactivated, however, for
specific calls.
• If your caller ID is transmitted: your caller ID is displayed.
• If your caller ID is suppressed: "unknown" is displayed.
Deactivating
If your administrator permanently activated anonymous calling for your phone,
you can deactivate this setting as follows:
^
Lift the handset.
j
Enter the code (see the table of codes Page 31) to transmit the caller information.
Z
You hear a confirmation tone.
OpenScape Voice Functions
27
Activating
If your administrator activated caller ID transmission for your phone, you can deactivate this setting as follows:
n
Lift the handset.
o
Enter the code (see the table of codes Page 31) to suppress the caller ID.
Z
Wait until you hear the confirmation tone.
Caller ID transfer is suppressed. "unknown/Anonymous" appears on the called
party’s display instead of the caller ID.
Temporarily activating anonymous calling for the next
call
If your administrator activated caller ID transmission for your phone, you can deactivate this setting for the next call as follows:
^
Lift the handset.
j
Enter the code (see the table of codes Page 31).
Z
Wait until you hear the confirmation tone.
j
Dial the phone number of the party you want to contact.
Caller ID transmission is reactivated after this call.
Temporarily deactivating anonymous calling for the
next call
If your administrator suppressed caller ID transmission for your phone, you can
enable this setting for the next call as follows:
^
Lift the handset.
j
Enter the code (see the table of codes Page 31).
Z
Wait until you hear the confirmation tone.
j
Dial the phone number of the party you want to contact. When you end this call,
caller ID transmission is suppressed once again for the next call.
28
OpenScape Voice Functions
Using abbreviated dialing
Abbreviated dialing gives you access to a central list of frequently dialed phone
numbers.
You can dial a specific phone number by simply entering a digit string. As these
are three-digit numbers, you can store up to 1000 phone numbers. This list is
stored centrally and managed by your administrator.
^
j
Lift the handset.
Enter the code (see the table of codes Page 31) followed by a number between 0 and 999 for the phone number you want to dial.
The number is automatically dialed.
Voice calling function
With voice calling, the loudspeaker or speakerphone function of a destination
phone is activated automatically when the connection is established. Use of
these functions is conceivable for example between shop floor and spare part
storage.
Possible functions include:
• Voice calling
– with variable input of member number
• Voice calling
– to a saved member number
Prerequisites:
• The team member belongs to the same collective group as you and has likewise been assigned a member number.
• The team member's phone has a loudspeaker.
• Automatic answering is activated for the team member.
• The team member's phone is idle.
• The member numbers of the callers are known for the voice calling functions.
You can cancel voice calling or two-way voice calling by replacing the handset
or - during a consultation - resume the held call.
Voice calling connections can be established from the following states:
• In idle status
• During manual call holding
• In a consultation
Functions such as "call forwarding" or "do-not-disturb" are temporarily disabled on the destination caller's phone by the voice calling functions.
OpenScape Voice Functions
29
Voice calling
From your phone, you can directly call any team member whose telephone has
a loudspeaker.
Voice calling with variable input of member number
^
Lift the handset.
j
Enter the code for voice calling (see code table Page 31) followed by the one
or two-digit member number of the respective team member.
Z
As soon as the connection has been established, you will hear a confirmation
tone and can speak to the other party via the loudspeaker.
]
To end the call, simply hang up.
Voice calling to a saved member number
Prerequisite: The code for voice calling and the member number are programmed on a sensor key.
S
Press the programmed sensor key. A connection to that member's loudspeaker
will immediately be established: You can speak to the destination caller via your
speakerphone.
Announcing the local phone number
You can use this function in order, for example, to identify the phone number of
a phone in a conference room if it is not indicated on the display.
^
j
]
Lift the handset.
Enter the code for "Announcing the local phone number" (see code table
Page 31). The phone number is announced.
Then hang up.
Dialling the last caller
You can retrieve and dial the phone number of the last answered or dialled caller.
Retrieving and dialling the last answered caller
The following phone numbers can be saved for retrieval:
• The last answered call
• The last missed call
• The last picked up call (group call)
^
j
Lift the handset.
Enter the code for dialling the last answered caller (see code table Page 31).
The phone number is dialled and the connection is established.
30
OpenScape Voice Functions
Retrieving and dialling the phone number of the last
caller dialled
Instead, you can also use the normal redial functions of your phone as usual.
^
j
Lift the handset.
Enter the code for dialling the last caller dialled (see code table Page 31). The
phone number is dialled and the connection is established.
Picking up out-of-hours calls
If your switchboard is no longer attended after a certain time, an out-of-hours call
function can be configured on one or more phones for this period.
For example, if you hear one of the phones that has an out-of-hours call function
configured ringing when the office is closed, you can pick up the call early from
your phone.
You can also forward your phone to the phone with the out-of-hours call function
before leaving the office so that colleagues who have not yet left can pick up
calls for you.
^
j
Lift the handset.
Enter the code (see code table Page 31) for the out-of-hours call pickup in order to pick up the ringing call.
You can also configure a key for picking up out-of-hours calls.
OpenScape Voice Functions
31
Table of codes for OpenScape Voice
functions
Ask your administrator to enter the latest codes in the following table. Print this
page as an overview.
Function
Code
Description
Call forwarding busy line on
Page 25
Call forwarding busy line off
Page 25
Call forwarding don’t answer on
Page 25
Call forwarding don’t answer off
Page 25
Call forwarding unconditional on
Page 26
Call forwarding unconditional off
Page 26
Making anonymous calls off
Page 26
Making anonymous calls on
Page 27
Making anonymous calls temporarily on
Page 27
Making anonymous calls temporarily off
Page 27
Using abbreviated dialing
Page 28
Voice calling
Page 29
Announcing the local phone number
Page 29
Last answered caller
Page 29
Last dialled caller
Page 30
Picking up out-of-hours calls
Page 30
32
Multiline
Multiline
Types of Lines
The following are the types of lines:
• Private line: A line that is only accessible to one telephone.
• Shared line: A line that is accessible to multiple telephones.
• Direct Station line: A line with a direct connection to another telephone.
The LED associated with the line key indicates the status of a call on the line
regardless of whether the call is conducted on this particular multiline phone or
on another multiline phone. The LED associated with the Direct Station Select
key indicates 3 different states ( Page 33).
Line Types
You can use the available lines as described below. Regardless of the line usage, all of these lines can be either private or shared.
• Prime line: Every multiline telephone has one prime line. This line uses your
public number so that you can receive incoming calls on this line. You can use
a prime line either privately or as a shared line. Certain functions are only
available for the prime line, in order to prevent conflicts with the corresponding
secondary lines of other multiline telephones.
• Secondary line: You can use the prime line of a multiline telephone as a secondary line for another multiline telephone.
• Phantom line: A phantom line does not have a prime line at any telephone. A
typical application for a phantom line is a hunt group.
Line Key Status Indication
LED
Line status
Description
OFF
Idle
No connected calls.
BLINKING
SLOWLY
Idle (forwarded)
The line is forwarded immediately (prime line only) 1
ON
Busy (local) 2
The line is busy with a connection to the MultiLine telephone, or, respectively,
an outgoing call is issued from the MultiLine telephone.
Busy (remote station) The line is busy with a connection at another MultiLine telephone, or, respec4
tively, an outgoing call is issued from another MultiLine telephone.
1
2
The LED indicator on the prime line key indicates immediate forwarding instead of an idle line.
An active call is connected to the multiline telephone. A call is connected to the other telephone.
Multiline
33
Direct Station Select key Status Indication
LED
Line status
Description
OFF
Idle
The line assigned is not used.
ON
Busy
The main line of the target telephone is busy.
BLINKING
Incoming call
An incoming call is waiting on the main line of the target telephone.
Multiline Calls
While you are on a call, an incoming call is signaled by the LED on another line
key.
Press the blinking line key. The first line switches to manual hold mode and you
are connected with the caller on another line, e.g. Line 2.
Line 2
Once the call has been concluded and the second line connection cleared down,
you can return to the first call by pressing the line key, e.g. Line 1.
or
Line 1
Press the line key with the lit LED to put the current call on manual hold, e.g.
Line 1.
Once the call has been concluded and the line connection, e.g. for Line 2, has
been cleared down, you can return to the first call by pressing the corresponding
line key, e.g. Line 1.
Using the Direct Station Select key
Using a set up Direct Station Select key (DSS) you can call the target telephone directly or pick up a call for the target telephone.
Direct Station Select – Call other party
DSS
Press the Direct Station Select key to call the other party. The other party's
telephone rings.
Pick up a call for a Direct Station Select User
DSS
Press the blinking Direct Station Select key. The call is forwarded to the main
line of your telephone. You are connected to the caller.
34
Telephone Settings
Telephone Settings
Temporary Ringer Volume
Prerequisite: The telephone rings.
u or v
Adjust volume. To raise or lower the volume, keep pressing the keys until the desired volume is set.
Temporary Handset Volume
Prerequisite:You are conducting a call.
u or v
Adjust volume. To raise or lower the volume, keep pressing the keys until the desired volume is set.
Additional settings can be configured using the web interface Page 35.
Restart the phone
If the phone for any reason is not working properly, you can try to fix the error by
restarting.
v uqf:
Press the keys one after the other. The phone is restarted after 30 seconds.
Web Interface
35
Web Interface
General Information
OpenStage 5 SIP is equipped with an HTTP web server which enables information to be mapped
from the telephone to a web browser installed on a PC integrated into the LAN ("Web-based Management Tool").
The IP data for the OpenStage 5 SIP and the PC must be configured correctly for this.
The web interface contains the following form elements:
User
Click this link to access the relevant page.
Click this button to incorporate the changes into the current form. This transfers the changes to
the OpenStage 5 SIP.
Click this button to reset the changes in the current form to the former OpenStage 5 SIP values.
Click this button to perform an action (such as "Save", "Download", "Invoke" and "Restart"). A message is displayed in the event of an error.
Select an option from the List field.
Click the checkbox to activate or deactivate a function.
36
Web Interface
Preparatory Steps
Opening the Web Interface
To evoke the interface, open a web browser and enter the following URL:
https://[IP of the telephone]
Where [IP of the telephone] stands for the IP address of the OpenStage 5 SIP that you want to
map.
A host name has been assigned to your telephone; you can evoke the web interface using this
host name in the browser. Please check the name with your service personnel. You can then access the web interface for your telephone e.g. in the following format:
https://hostname.domainname
If applicable, confirm an advisory message of the browser with "Yes":
The homepage appears:
Call up the user interface
User
Click here to access the user area.
Enter the user ID for the OpenStage 5 SIP telephone (maximum length: 24) and click "Login". If a
user ID has not been specified, enter the default value "000000".
The administrator can set a minimum length (between 6 and 24 characters) for the user
password. If the minimum length was changed in the meantime so that your password is too
short now, you are asked to change your password ( Page 37). Only after you have
changed your password you can log on to the user interface.
Web Interface
37
Menu Structure
Click a field in one of the interface images to obtain more information about the field.
User menu
Change user password
Function keys
°
Phone
Country Settings
Audio Settings
Call-related parameters
Secure Call setting
Home
Changing the User Password
Enter your current password and your new password and confirm the new password. The minimum length set by the administrator is shown in the dialog.
38
Web Interface
Function Keys
Phone
The possibility of programming a key may be blocked by your service personnel. In this case
the "Edit" button is deactivated.
Web Interface
39
Selecting Function Keys
A list of all possible functions that can be assigned to a key is shown on page Page 45.
The possibility of programming a key may be blocked by your service personnel. In this case
you get the message "Locked by administrator" if you try to assign a function to this key.
Click a field in one of the interface images to obtain more information about the field.
"Loudspeaker" function key
"Selected dialing" function key
"Phone lock" function key
"Repertory dial" function key
40
Web Interface
"Feature toggle" function key
Info message
The function keys have been assigned the selected functions.
Country Settings
Click a field in one of the interface images to obtain more information about the field.
Audio Settings
Click a field in one of the interface images to obtain more information about the field.
Web Interface
41
Call-Related Parameters
Click a field in one of the interface images to obtain more information about the field.
User Security Setting
If the function is activated, you hear an acoustic signal if the voice connection is not secure.
Alphabetic Reference
This glossary provides administrators with basic information for performing configuration and diagnostics on the OpenStage 5 SIP.
• The section "Alphabetic Reference" explains terms found in the menus in alphabetic order.
• Clicking the icons will bring you to the relevant function descriptions:
–
Using the icons on the OpenStage 5 SIP
–
Using the icons via the web interface
• This is followed by the chapter "Abbreviations and Technical Terms".
Append codes
Append codes are control functions that are accepted at any position within the repertory dialing
sequence.
The following options are available for selection:
Function
OK
Clear
Consult
Pause
Status Indication
Any characters following this function are sent immediately as DTMF
signals after the call has been answered.
Clear the current call at this point.
This function is not supported by optiPoint 410 entry.
Any characters following this function are sent after three seconds.
Page 39
Audible secure call indicator
If the function is activated, you hear an acoustic signal if the voice connection is not secure.
Page 41
42
Web Interface
Auto-dial timer
Timeslot (in seconds) between the last digit input and the start of the dialing procedure.
• Minimum value: 1
• Maximum value: 8
• Default value: 6
Page 41
Country
From the list field, select the country where you would like to install the OpenStage 5 SIP. Countryspecific settings such as ringer or busy tone, for example, are configured with this option.
The following options are available for selection:
•
•
•
•
•
•
•
•
•
•
•
•
•
•
•
•
•
•
•
•
•
•
•
•
•
•
•
•
•
•
•
•
•
•
Argentina
Austria
Belgium
Brazil
Chile
China
Croatia
Czech Republic
Denmark
Estonia
Finland
France
Germany
Hungary
India
Ireland
Italy
Latvia
Lithuania
Luxembourg
Mexico
Netherlands
Norway
Poland
Portugal
RSA
Singapore
Slovakia
Spain
Sweden
Switzerland
Thailand
United Kingdom
United States
Page 40
Web Interface
43
DND
With this function you can allow a user to activate "Do not disturb".
Page 41
Feature code
Enter the code for the required OpenScape Voice feature, which you would like to assign to the
function key. OpenScape Voice supports the following features for example:
• Make line busy: the phone number is treated as busy for the hunt group.
• Stop hunt: the phone number is removed from the hunt group.
Page 40
Handset volume
Handset volume setting.
• Minimum value: 1 (quiet)
• Maximum value: 8 (loud)
• Default value: 4
Page 40
Idle dialing mode
You should only change this function if you are using a dial plan (programmed by administrator).
If the function is activated, you have the choice of two settings:
• Context
• Hot-Keypad
Context is the default setting. When on-hook dialing with this setting you must either confirm the
option "Dial", press the loudspeaker key or wait until the Auto Dial Timer has timed out in order to
set up the connection. If Hot-Keypad has been set, dialing takes place automatically as soon as
the character string entered matches an entry in the dial plan.
Page 41
Key click volume
Key click volume setting on the dialing keypad.
• Minimum value: 1 (quiet)
• Maximum value: 8 (loud)
• Default value: 2
Page 40
Loudspeaker volume
Setting the loudspeaker volume for OpenStage 5 SIP.
• Minimum value: 1 (quiet)
• Maximum value: 8 (loud)
• Default value: 2
Page 40
44
Web Interface
Melody
Setting the ringer melody for incoming calls.
• Minimum value: 1 (Melody 1)
• Maximum value: 8 (Melody 8)
• Default value: 2
In case of a multiline telephone, this setting can be set individually for each line. Please note the
message shown on the display.
Page 40
Parameters for "Phone lock"
Select this option to lock the telephone (only available if a user password has been configured
Page 37)
Page 39
Parameters for "Repertory dial"
Enter the control functions that are accepted at any position within the repertory dialing sequence,
see Page 41.
Page 39
Parameters for "Selected dialing"
Enter the phone number for selected dialing here.
Page 39
Ringer volume
Setting the ringer volume.
• Minimum value: 1 (quiet)
• Maximum value: 5 (loud)
• Default value: 3
In case of a multiline telephone, this setting can be set individually for each line. Please note the
message shown on the display.
Page 40
Rollover Volume
While you are busy on one line of a multiline telephone, the "Rollover" function shows you whether
another call is coming in on another line. You can set the volume level using the following values
(1-5):
• Minimum value: 1 (quiet)
• Maximum value: 5 (loud)
• Default value: 3
Page 40
Web Interface
45
Selecting a Function
Select the required functions for both first and second level function keys.
The following options are available for selection:
Function Key
Blind Transfer
Callback
Cancel Callbacks
Cancel/Release
Clear definition1
Confirm/Tick Key
Consult/Transfer
Do not disturb
DSS
Feature toggle
Group pickup
Hold
Line
Loudspeaker
Mute
Phone lock
Repeat dialing
Repertory dial1
Ringer off
Selected dialing1
Shift
Voice Messages
1
Explanation
Transfer call without consultation
Set up a callback
Cancel all Callbacks
Function key to abort a function or ending calls.
Clears the current definition.
Used to confirm entries.
Transfer call with consultation
Defines a function key for activating/deactivating Do not disturb.
Defines a function key as a Direct station select key.
Special functions OpenScape Voice.
Defines a function key for answering calls for your pickup group.
Assign a function key for holding calls.
Defines a function key as a line key.
Configures a function key as a loudspeaker key.
Defines a function key for muting the microphone.
Defines a function key for locking and unlocking the telephone.
Configures a function key as a redial key.
Configures a function key as a repertory dialing key and programs
a telephone number with control functionality.
Defines a function key to switch ringer on/off.
Configures a function key as a selected dialing key and programs a
telephone number.
Defines a function key for accessing the second level of function
keys.
Defines a function key for displaying voice messages.
Function keys are also available at a second level.
Page 38
Tone Sequence
Setting the ringer sequence for incoming calls.
• Minimum value: 1 (Sequence 1)
• Maximum value: 3 (Sequence 3)
• Default value: 2
In case of a multiline telephone, this setting can be set individually for each line. Please note the
message shown on the display.
Page 40
User Password
Password input for the web interface user area.
• Current password: enter currently valid password here.
• New password: enter new password here. The new password should be different from the default "000000".
• Confirm new password: confirm new password here.
• Default: 000000
Page 37
46
Labeling and Documentation
Labeling and Documentation
Attaching a Station Number Label
Self-adhesive station-number labels are also provided with your optiPoint 410 entry SIP V7.
Write numbers on the label (fire department, police, other telephone numbers), then peel it off and
affix it, with the handset lifted, in the recess on the telephone.
Labeling keys
The following options are available for labeling keys of the OpenStage 15 and/or
OpenStage Key Module 15 with the functions assigned to them or the saved numbers on them:
Labeling
• By hand:
Labeling strips are supplied with your OpenStage 15 and OpenStage Key Module 15. Note the
function or name in the white field on the strip and insert the strip on your OpenStage 15 or
OpenStage Key Module 15.
• With a computer via the Internet:
You can find the "online labeling tool" together with the user interface at
http://wiki.unify.com/index.php/Key_Labelling_Tool.
• Select the appropriate key labeling tool in your language. You can use the tool online via the
browser or you can download it for local use.
Tips and Tricks
47
Tips and Tricks
Telephone Maintenance
• Always use a damp or antistatic cloth to clean the telephone. Never use a dry cloth.
• If the telephone is very dirty, clean it with a diluted neutral cleansing agent containing surfactants,
such as dishwashing liquid. Afterwards remove all traces of the cleansing agent with a damp
cloth moistened with water only.
• Never use cleaners containing alcohol, cleaners that corrode plastic, or abrasive powders.
Troubleshooting
Pressed key does not respond:
Check whether the key is stuck.
Telephone does not ring:
Verify whether you have activated "Do not disturb". If yes, deactivate the "Do not disturb" function.
For other problems:
First contact your administrator. In case of irreparable faults, you must contact customer service.
Contacts for Resolving Problems
If you encounter a problem that lasts longer than five minutes, contact your service personnel.
48
Index
Index
M
Make Line Busy ....................................................... 24
Malfunctions ............................................................. 47
A
Announcing the local phone number ........................ 29
N
Nameplate .................................................................. 8
C
Callback ................................................................... 18
Calling ...................................................................... 16
Consultation ............................................................. 19
Contact Person ........................................................ 47
Context ..................................................................... 43
D
Dialing ...................................................................... 16
Direct Station line ..................................................... 32
Direct Station Select key .......................................... 33
Do Not Disturb .......................................................... 20
Activating Do Not Disturb ...................................... 20
Ringer Off .............................................................. 20
DSS .......................................................................... 33
E
Ethernet Interface ..................................................... 10
Explanation of Symbols .............................................. 9
G
Group Features
Group Pickup ........................................................ 22
Hunt Group ............................................................ 22
Group Pickup ........................................................... 22
H
Handset Volume ....................................................... 34
Hot line ..................................................................... 17
Hot-Keypad .........................................................16, 43
Hunt Group ............................................................... 22
L
Line Use ................................................................... 32
Phantom Line ........................................................ 32
Prime Line ............................................................. 32
Secondary Line ..................................................... 32
Location of the Telephone .......................................... 4
O
OpenScape Voice
Abbreviated Dialing
Two-Key Abbreviated Dialing ............................. 28
Making Anonymous Calls ..................................... 26
OpenScape Voice Functions .................................... 24
Operating Steps ......................................................... 9
Out-of-hours call ....................................................... 30
P
Phantom Line ........................................................... 32
Picking up out-of-hours calls .................................... 30
Precautions ................................................................ 3
Prime Line ................................................................ 32
Private Line .............................................................. 32
Programmable Keys ................................................. 12
Programmable Keys, Shift ....................................... 12
Protection of the Telephone ..................................... 47
R
Receive Volume ....................................................... 13
Repeat Dialing ......................................................... 17
Retrieving Messages ................................................ 23
Ringer Off ................................................................. 20
S
Secondary Line ........................................................ 32
Selected Dialing ....................................................... 17
Using Repertory Dial ............................................. 18
Using Selected Dialing .......................................... 17
Serial Number ............................................................ 8
Shared Line .............................................................. 32
Standard Telephone Functions ................................ 12
Station Number Label .............................................. 46
Stop Hunt ................................................................. 24
Index
T
TCP/IP Protocol ....................................................... 10
Telephone
Location ................................................................... 4
Telephone Settings .................................................. 34
Ringer Volume ...................................................... 34
Toggle Key ............................................................... 24
Types of Lines .......................................................... 32
Private Line ........................................................... 32
Shared Line ........................................................... 32
U
User Support .............................................................. 8
Using Group Features .............................................. 22
V
Voice calling ............................................................. 28
Volume ..................................................................... 13
W
Warm line ................................................................. 17
49
50
Important Functions at a Glance
Important Functions at a Glance
Making Calls:
Either: n + p.
Or: p + when the called party answers n.
Making Calls Using The Line Key:
+ p +n.
Line
Redialing the Previous Number:
n+
+ p.
Repeat dialing
Accepting Calls Using The Line Key:
+n.
Line
Activating the Loudspeaker Function:
s+
Loudspeaker
.