1
User Manual
HiPath 8000
OpenStage 40
www.siemens.com/enterprise
Safety precautions
Safety precautions
For your safety
The OpenStage IP telephone complies with the European standard EN 60
950, which deals with the safety of information technology appliances including electronic office equipment. This device has been designed with
safety in mind, thus protecting both individuals and objects.
There is always a danger of small objects being swallowed by young children.
Please ensure that such items are not accessible to children.
• Use only the enclosed power supply unit together with the special LAN
cable.
• Never open the power supply enclosure.
Caring for your telephone
•
•
•
The telephone must not be used in bathrooms, etc. as it is not splash
proof.
Before connecting or disconnecting the LAN cable, pull the power plug
out of the power outlet first.
Never allow the telephone to come into contact with staining or aggressive liquids such as coffee, tea, juice, or soft drinks.
Location of the telephone
•
•
•
•
•
2
The telephone should be operated in a controlled environment with an
ambient temperature between 5 C and 40 C.
To ensure good speakerphone quality, the area in front of the microphone (front right) should be kept clear. The optimum speakerphone
distance is 50 cm.
Do not install the telephone in a room where large quantities of dust
accumulate; this can considerably reduce the service life of the telephone.
Do not expose the telephone to direct sunlight or any other source of
heat, as this is liable to damage the electronic components and the
plastic casing.
Do not operate the telephone in damp environments such as bathrooms.
Safety precautions
Important information
Do not operate the telephone in potentially explosive
environments.
Q
For safety reasons, the telephone should only be operated with the appropriate power supply unit.
Use only original Siemens accessories. The use of other accessories may be hazardous and will render the
warranty and the CE marking invalid.
Never open the telephone or a key module. Should you
encounter any problems, contact the responsible service personnel.
The information provided in this document contains merely general descriptions or characteristics of performance which in case of actual use do
not always apply as described or which may change as a result of further
development of the products. An obligation to provide the respective characteristics shall only exist if expressly agreed in the terms of contract.
All trademarks used are the property of Siemens AG or their respective
owners.
3
Safety precautions
Trademarks
The device conforms to the EU directive 1999/5/EC as attested by the CE marking.
All electrical and electronic products should be disposed of
separately from the municipal waste stream via designated
collection facilities appointed by the government or the local
authorities.
Proper disposal and separate collection of your old appliance will help prevent potential damage to the environment
and human health. It is a prerequisite for reuse and recycling
of used electrical and electronic equipment.
For more detailed information about disposal of your old appliance, please contact your city office, waste disposal service, the shop where you purchased the product or your
sales representative. The statements quoted above are only
fully valid for equipment which is installed and sold in the
countries of the European Union and is covered by the directive 2002/96/EC. Countries outside the European Union
may impose other regulations regarding the disposal of
electrical and electronic equipment.
Customer Information
FCC and Industry Canada Compliance
This section describes the requirements for compliance with Federal Communications Commission (FCC) Rules and Industry Canada CS-03 standard.
FCC Compliance and Requirements
The following customer information is based on FCC rules and ACTA requirements.
Service
If you experience problem with the Siemens “OpenStage” IP-based telephones, contact Siemens customer support at 1-800-TEL-ROLM for information on service and repairs. The telephone company can ask you to disconnect the equipment from the network until the problem is corrected or
until you are sure that the equipment is not malfunctioning.
FCC Rules, Part 15
The Siemens “OpenStage” IP-based telephone has been tested and found
to comply with the limits for a Class B digital device, pursuant to Part 15 of
the FCC Rules. These limits are designed to provide reasonable protection
4
Safety precautions
against harmful interference when the equipment is operated in a residential installation. This equipment generates, uses, and can radiate radio frequency energy and, if not installed and used in accordance with the instructions, may cause harmful interference to radio communications.
However, there is no guarantee that interference will not occur in a particular installation. If this equipment does cause harmful interference to radio
or television reception, which can be determined by turning the equipment
off and on, the user is encouraged to try to correct the interference by one
or more of the following measures:
• Reorient or relocate the receiving antenna.
• Increase the separation between the equipment and receiver.
• Connect the equipment into an outlet on a circuit different from that to
which the receiver is connected.
• Consult the dealer or an experienced radio / TV technician for help.
FCC Rules, Part 68 and ACTA Customer Information
1. FCC Part 68 Registration
The Siemens “OpenStage” IP-based telephone is registered with FCC
under Part 68 as a VoIP phone capable of providing access and telecommunication via FCC Part 68 registered front-end gateways or host
terminal equipment to Public Switched Telephone Network. In order
for the FCC registration of the Siemens “OpenStage” IP-based telephone to be retained, all other products used in conjunction with the
Siemens “OpenStage” IP-based telephone must also be FCC Part 68
registered for use with the front-end terminal equipment. If any of
these components are not registered, Siemens is required to obtain
FCC Part 68 registration of the assembled equipment prior to connection to the telephone network. Part 68 registration requires Siemens
to maintain this approval and as such is responsible for the following:
• Any component added to the Siemens “OpenStage” IP-based telephone, whether it bears component registration or not, will require
a Part 68 compliance evaluation. Siemens may need to test and
make a modification filing to the FCC before that new component
can be used;
• Any modification/update made to the Siemens “OpenStage” IPbased telephone will require a Part 68 compliance evaluation. Siemens may need to test and make a modification filing to the FCC
before that modified component can be used;
• Siemens “OpenStage” IP-based telephone complies with and will
continue to comply with all the applicable rules and regulations in
Subpart D of the FCC Part 68 rules and the requirements adopted
by ACTC during the life-time of the product.
If at any time the ownership of Siemens “OpenStage” IP-based telephone is transferred to someone else (whether independently or as
part of a system), please supply this manual to the new owner.
2. Facility Interface Information
Siemens “OpenStage” IP-based telephone connects to the public
switched telephone network through FCC Part 68 registered front-end
host terminal equipment which specifies the Facility Interface Codes
(FIC), Service Order Codes (SOC) and the type of network jacks to be
used.
5
Safety precautions
3. REN
The ringer equivalence number (REN) is used to determine the quality
of devices which may be connected to the telephone line. Excessive
RENs on the telephone line may result in the devices not ringing in response to an incoming call. In most, but not all areas, the sum of RENs
should not exceed five (5.0). To be certain of the number of devices
that may be connected to a line, as determined by the total RENs, contact the local telephone company.
Note: REN is associated with the analog telephones. It is not applicable to Siemens “OpenStage” IP-based telephone. If requested, please
supply the product identifier in the format US:AAAEQ##TXXXX or the
REN of the FCC Part 68 registered front-end host terminal equipment
that has a direct Public Switched Telephone Network connection (i.e.
have a REN stated on the label) and the highest REN
4. Disruption of the Network
If the Siemens “OpenStage” IP-based telephone causes harm and disrupts the telephone network, the telephone company can discontinue
your service temporarily. If possible, the telephone company will notify
you in advance. If advance notice is not practical, they will notify you
as soon as possible. You are also informed of your right to file a complaint with the FCC.
5. Telephone Company Facility Changes
The telephone company can make changes in its facilities, equipment,
operations, or procedures that can affect the operation of your equipment. If they do, you should be notified in advance so you have an opportunity to maintain uninterrupted telephone service.
6. Hearing-Aid Compatibility
Telephones for emergency use and telephones installed in common areas such as lobbies, hospital rooms, elevators, and hotel rooms must
have handsets that are compatible with magnetically coupled hearing
aids. Persons who are not in common areas must also be provided
with hearing-aid compatible handsets, if needed.
The Siemens “OpenStage” IP-based telephone is hearing aid compatible and complies with the FCC Rules, Part 68, Section 68.316 Hearing
Aid Compatibility and 68.317 volume control requirements.
7. Programmed Dialer Features
When you program emergency numbers or make test calls to emergency numbers using Siemens products with programmed dialer features, stay on the line and briefly explain to the dispatcher the reason
for the call before hanging up. Perform these activities in off-peak
hours, such as early morning or late evening.
8. Electrical Safety Advisory
While the Siemens “OpenStage” IP-based telephone is fully compliant
with FCC rules and regulations, it is recommended that an alternating
current (ac) surge arrestor of the form and capability suitable for the
model purchased be installed in the ac outlet to which the power supply for Siemens “OpenStage” IP-based telephone is connected. Consult with you distributor as to the surge protector requirements for your
equipment.
6
Contents
Contents
Safety precautions . . . . . . . . . . . . . . . . . . . . . . . . . . . . 2
For your safety. . . . . . . . . . . . . . . . . . . . . . . . . . . . . . . . . . . . . . . . . . . . .
Caring for your telephone . . . . . . . . . . . . . . . . . . . . . . . . . . . . . . . . . . . .
Location of the telephone . . . . . . . . . . . . . . . . . . . . . . . . . . . . . . . . . . . .
Important information . . . . . . . . . . . . . . . . . . . . . . . . . . . . . . . . . . . . . . .
Trademarks . . . . . . . . . . . . . . . . . . . . . . . . . . . . . . . . . . . . . . . . . . . . . . .
Customer Information . . . . . . . . . . . . . . . . . . . . . . . . . . . . . . . . . . . . . . .
2
2
2
3
4
4
General information . . . . . . . . . . . . . . . . . . . . . . . . . . 12
About this manual . . . . . . . . . . . . . . . . . . . . . . . . . . . . . . . . . . . . . . . . .
Symbols used in the manual . . . . . . . . . . . . . . . . . . . . . . . . . . . . . .
Service. . . . . . . . . . . . . . . . . . . . . . . . . . . . . . . . . . . . . . . . . . . . . . . . . .
Intended use . . . . . . . . . . . . . . . . . . . . . . . . . . . . . . . . . . . . . . . . . . . . .
Telephone type . . . . . . . . . . . . . . . . . . . . . . . . . . . . . . . . . . . . . . . . . . .
Speakerphone quality and display legibility . . . . . . . . . . . . . . . . . . . . . .
Single-line telephone / multi-line telephone. . . . . . . . . . . . . . . . . . . . . .
12
12
13
13
13
13
14
Getting to know your OpenStage phone . . . . . . . . . 15
user interfaceOpenStage 40 . . . . . . . . . . . . . . . . . . . . . . . . . . . . . . . . .
Keys. . . . . . . . . . . . . . . . . . . . . . . . . . . . . . . . . . . . . . . . . . . . . . . . . . . .
Function keys. . . . . . . . . . . . . . . . . . . . . . . . . . . . . . . . . . . . . . . . . .
Audio keys . . . . . . . . . . . . . . . . . . . . . . . . . . . . . . . . . . . . . . . . . . . .
Navigator . . . . . . . . . . . . . . . . . . . . . . . . . . . . . . . . . . . . . . . . . . . . .
Programmable sensor keys . . . . . . . . . . . . . . . . . . . . . . . . . . . . . . .
Trunk keys (on multi-line phones only). . . . . . . . . . . . . . . . . . . . . . .
Keypad . . . . . . . . . . . . . . . . . . . . . . . . . . . . . . . . . . . . . . . . . . . . . . .
Graphic display . . . . . . . . . . . . . . . . . . . . . . . . . . . . . . . . . . . . . . . . . . .
Idle display view and icons . . . . . . . . . . . . . . . . . . . . . . . . . . . . . . .
Context-dependent displays . . . . . . . . . . . . . . . . . . . . . . . . . . . . . .
Ports on the underside of the phone. . . . . . . . . . . . . . . . . . . . . . . . . . .
Telephony interface . . . . . . . . . . . . . . . . . . . . . . . . . . . . . . . . . . . . . . . .
Single line view . . . . . . . . . . . . . . . . . . . . . . . . . . . . . . . . . . . . . . . .
Multi-line view . . . . . . . . . . . . . . . . . . . . . . . . . . . . . . . . . . . . . . . . .
Messages . . . . . . . . . . . . . . . . . . . . . . . . . . . . . . . . . . . . . . . . . . . . . . .
Voicemails . . . . . . . . . . . . . . . . . . . . . . . . . . . . . . . . . . . . . . . . . . . .
Calls . . . . . . . . . . . . . . . . . . . . . . . . . . . . . . . . . . . . . . . . . . . . . . . . .
Service menu . . . . . . . . . . . . . . . . . . . . . . . . . . . . . . . . . . . . . . . . . . . .
15
17
17
17
18
19
19
21
23
23
24
26
27
27
28
29
29
30
32
7
Contents
Basic phone functions . . . . . . . . . . . . . . . . . . . . . . . .35
Incoming calls . . . . . . . . . . . . . . . . . . . . . . . . . . . . . . . . . . . . . . . . . . . .
Answering a call via the handset . . . . . . . . . . . . . . . . . . . . . . . . . . .
Answering a call via the loudspeaker (speakerphone mode) . . . . . .
Answering a call via the headset . . . . . . . . . . . . . . . . . . . . . . . . . . .
Switching to speakerphone mode. . . . . . . . . . . . . . . . . . . . . . . . . . . . .
Switching to the handset. . . . . . . . . . . . . . . . . . . . . . . . . . . . . . . . . . . .
Open listening . . . . . . . . . . . . . . . . . . . . . . . . . . . . . . . . . . . . . . . . . . . .
Ending a call. . . . . . . . . . . . . . . . . . . . . . . . . . . . . . . . . . . . . . . . . . . . . .
Making calls. . . . . . . . . . . . . . . . . . . . . . . . . . . . . . . . . . . . . . . . . . . . . .
En-bloc dialing . . . . . . . . . . . . . . . . . . . . . . . . . . . . . . . . . . . . . . . . .
Off-hook dialing . . . . . . . . . . . . . . . . . . . . . . . . . . . . . . . . . . . . . . . .
On-hook dialing . . . . . . . . . . . . . . . . . . . . . . . . . . . . . . . . . . . . . . . .
Redialing . . . . . . . . . . . . . . . . . . . . . . . . . . . . . . . . . . . . . . . . . . . . . . . .
Activating/deactivating the microphone . . . . . . . . . . . . . . . . . . . . . . . .
Consulting a second party . . . . . . . . . . . . . . . . . . . . . . . . . . . . . . . . . . .
Canceling a consultation call . . . . . . . . . . . . . . . . . . . . . . . . . . . . . .
Switching to the held party (alternating) . . . . . . . . . . . . . . . . . . . . .
Connecting parties. . . . . . . . . . . . . . . . . . . . . . . . . . . . . . . . . . . . . .
Call forwarding. . . . . . . . . . . . . . . . . . . . . . . . . . . . . . . . . . . . . . . . . . . .
Programming call forwarding . . . . . . . . . . . . . . . . . . . . . . . . . . . . . .
Activating/deactivating call forwarding. . . . . . . . . . . . . . . . . . . . . . .
Activating call forwarding for all calls . . . . . . . . . . . . . . . . . . . . . . . .
Callback . . . . . . . . . . . . . . . . . . . . . . . . . . . . . . . . . . . . . . . . . . . . . . . . .
Requesting callback . . . . . . . . . . . . . . . . . . . . . . . . . . . . . . . . . . . . .
Responding to a callback . . . . . . . . . . . . . . . . . . . . . . . . . . . . . . . . .
Permitting a callback . . . . . . . . . . . . . . . . . . . . . . . . . . . . . . . . . . . .
Calling back missed calls . . . . . . . . . . . . . . . . . . . . . . . . . . . . . . . . . . . .
Programmable sensor keys . . . . . . . . . . . . . . . . . . . . . . . . . . . . . . . . . .
Programming programmable sensor keys . . . . . . . . . . . . . . . . . . . .
Programming enhanced functions . . . . . . . . . . . . . . . . . . . . . . . . . .
Using programmable sensor keys . . . . . . . . . . . . . . . . . . . . . . . . . .
35
35
35
36
36
37
37
37
38
38
38
39
39
40
41
41
42
43
44
45
47
48
49
49
50
51
52
53
54
55
57
Enhanced phone functions. . . . . . . . . . . . . . . . . . . . .58
Incoming calls . . . . . . . . . . . . . . . . . . . . . . . . . . . . . . . . . . . . . . . . . . . .
Rejecting a call . . . . . . . . . . . . . . . . . . . . . . . . . . . . . . . . . . . . . . . . .
Deflecting a call . . . . . . . . . . . . . . . . . . . . . . . . . . . . . . . . . . . . . . . .
Placing a call on hold . . . . . . . . . . . . . . . . . . . . . . . . . . . . . . . . . . . .
Call waiting (second call) . . . . . . . . . . . . . . . . . . . . . . . . . . . . . . . . .
Transferring a call. . . . . . . . . . . . . . . . . . . . . . . . . . . . . . . . . . . . . . .
CTI calls . . . . . . . . . . . . . . . . . . . . . . . . . . . . . . . . . . . . . . . . . . . . . .
Making calls. . . . . . . . . . . . . . . . . . . . . . . . . . . . . . . . . . . . . . . . . . . . . .
Dialing with the DDS key . . . . . . . . . . . . . . . . . . . . . . . . . . . . . . . . .
Dialing a phone number from a list . . . . . . . . . . . . . . . . . . . . . . . . .
Using autodial delay. . . . . . . . . . . . . . . . . . . . . . . . . . . . . . . . . . . . .
8
58
58
58
60
63
66
69
71
71
71
72
Contents
Conference . . . . . . . . . . . . . . . . . . . . . . . . . . . . . . . . . . . . . . . . . . . . . .
Establishing a conference . . . . . . . . . . . . . . . . . . . . . . . . . . . . . . . .
Conducting one-on-one calls . . . . . . . . . . . . . . . . . . . . . . . . . . . . . .
Ending a conference call . . . . . . . . . . . . . . . . . . . . . . . . . . . . . . . . .
Call lists . . . . . . . . . . . . . . . . . . . . . . . . . . . . . . . . . . . . . . . . . . . . . . . . .
Editing entries . . . . . . . . . . . . . . . . . . . . . . . . . . . . . . . . . . . . . . . . .
Delete all entries . . . . . . . . . . . . . . . . . . . . . . . . . . . . . . . . . . . . . . .
74
74
74
74
77
77
77
Making and receiving calls using multi-line phones
78
Incoming calls . . . . . . . . . . . . . . . . . . . . . . . . . . . . . . . . . . . . . . . . . . . .
Accepting calls for the primary line . . . . . . . . . . . . . . . . . . . . . . . . .
Accepting calls for secondary lines . . . . . . . . . . . . . . . . . . . . . . . . .
Making calls. . . . . . . . . . . . . . . . . . . . . . . . . . . . . . . . . . . . . . . . . . . . . .
Manual trunk seizure . . . . . . . . . . . . . . . . . . . . . . . . . . . . . . . . . . . .
Automatic trunk seizure . . . . . . . . . . . . . . . . . . . . . . . . . . . . . . . . . .
Dial last dialed number . . . . . . . . . . . . . . . . . . . . . . . . . . . . . . . . . .
During calls . . . . . . . . . . . . . . . . . . . . . . . . . . . . . . . . . . . . . . . . . . . . . .
Making and receiving calls on a single line . . . . . . . . . . . . . . . . . . .
Making and receiving calls with multiple lines. . . . . . . . . . . . . . . . .
Direct station selection key . . . . . . . . . . . . . . . . . . . . . . . . . . . . . . . . . .
Calling a station directly . . . . . . . . . . . . . . . . . . . . . . . . . . . . . . . . . .
Call pickup . . . . . . . . . . . . . . . . . . . . . . . . . . . . . . . . . . . . . . . . . . . .
Deflecting a call to a DSS station . . . . . . . . . . . . . . . . . . . . . . . . . .
Settings for multi-line phones (keyset) . . . . . . . . . . . . . . . . . . . . . . . . .
Displaying the line in the overview . . . . . . . . . . . . . . . . . . . . . . . . .
Setting the time for a delayed ringer . . . . . . . . . . . . . . . . . . . . . . . .
Configuring the line overview display . . . . . . . . . . . . . . . . . . . . . . .
Rollover for a line . . . . . . . . . . . . . . . . . . . . . . . . . . . . . . . . . . . . . . .
79
79
79
80
80
80
81
82
82
83
84
84
85
85
86
86
87
88
89
Privacy/security . . . . . . . . . . . . . . . . . . . . . . . . . . . . . . 90
Deactivating the ringer . . . . . . . . . . . . . . . . . . . . . . . . . . . . . . . . . . . . .
Do not disturb . . . . . . . . . . . . . . . . . . . . . . . . . . . . . . . . . . . . . . . . . . . .
Enabling do not disturb via a key . . . . . . . . . . . . . . . . . . . . . . . . . . .
Enabling do not disturb via the idle menu . . . . . . . . . . . . . . . . . . . .
Allowing "Do not disturb" . . . . . . . . . . . . . . . . . . . . . . . . . . . . . . . . .
Security . . . . . . . . . . . . . . . . . . . . . . . . . . . . . . . . . . . . . . . . . . . . . . . . .
Changing the User password. . . . . . . . . . . . . . . . . . . . . . . . . . . . . .
Locking the phone . . . . . . . . . . . . . . . . . . . . . . . . . . . . . . . . . . . . . .
90
91
91
91
92
93
93
94
9
Contents
Mobility function . . . . . . . . . . . . . . . . . . . . . . . . . . . . .96
Mobility scenarios . . . . . . . . . . . . . . . . . . . . . . . . . . . . . . . . . . . . . . . . . 96
Logging on and off at the same phone . . . . . . . . . . . . . . . . . . . . . . 96
Logging on and off at different phones . . . . . . . . . . . . . . . . . . . . . . 96
Logging on and off at the same phone . . . . . . . . . . . . . . . . . . . . . . . . . 97
Logging on to the phone . . . . . . . . . . . . . . . . . . . . . . . . . . . . . . . . . 97
Logging off from the phone. . . . . . . . . . . . . . . . . . . . . . . . . . . . . . . 98
Logging on at different telephones . . . . . . . . . . . . . . . . . . . . . . . . . . . . 99
Logging on with forced logoff at a remote phone . . . . . . . . . . . . . . 99
Logging on with forced, delayed logoff at a remote phone . . . . . . 100
HiPath 8000 functions . . . . . . . . . . . . . . . . . . . . . . . .102
Feature toggle key. . . . . . . . . . . . . . . . . . . . . . . . . . . . . . . . . . . . . . . .
Using system call forwarding . . . . . . . . . . . . . . . . . . . . . . . . . . . . . . .
Call forwarding busy line . . . . . . . . . . . . . . . . . . . . . . . . . . . . . . . .
Call forwarding don’t answer . . . . . . . . . . . . . . . . . . . . . . . . . . . . .
Call forwarding unconditional. . . . . . . . . . . . . . . . . . . . . . . . . . . . .
Call forwarding selective . . . . . . . . . . . . . . . . . . . . . . . . . . . . . . . .
Making anonymous calls . . . . . . . . . . . . . . . . . . . . . . . . . . . . . . . . . . .
Deactivating anonymous calling. . . . . . . . . . . . . . . . . . . . . . . . . . .
Activating anonymous calling. . . . . . . . . . . . . . . . . . . . . . . . . . . . .
Temporarily activating anonymous calling for the next call . . . . . .
Temporarily deactivating anonymous calling for the next call . . . .
Creating a list for selective calls . . . . . . . . . . . . . . . . . . . . . . . . . . . . .
For call acceptance . . . . . . . . . . . . . . . . . . . . . . . . . . . . . . . . . . . .
For call rejection. . . . . . . . . . . . . . . . . . . . . . . . . . . . . . . . . . . . . . .
Anonymous calls . . . . . . . . . . . . . . . . . . . . . . . . . . . . . . . . . . . . . . . . .
Rejecting . . . . . . . . . . . . . . . . . . . . . . . . . . . . . . . . . . . . . . . . . . . .
Accepting. . . . . . . . . . . . . . . . . . . . . . . . . . . . . . . . . . . . . . . . . . . .
Using abbreviated dialing . . . . . . . . . . . . . . . . . . . . . . . . . . . . . . . . . .
Single-key abbreviated dialing . . . . . . . . . . . . . . . . . . . . . . . . . . . .
Two-key abbreviated dialing . . . . . . . . . . . . . . . . . . . . . . . . . . . . .
Tracing a call . . . . . . . . . . . . . . . . . . . . . . . . . . . . . . . . . . . . . . . . . . . .
Group functions . . . . . . . . . . . . . . . . . . . . . . . . . . . . . . . . . . . . . . . . . .
Call pickup groups . . . . . . . . . . . . . . . . . . . . . . . . . . . . . . . . . . . . .
Hunt group functions . . . . . . . . . . . . . . . . . . . . . . . . . . . . . . . . . . .
10
102
103
103
104
105
106
107
107
107
108
108
109
109
110
111
111
111
112
112
112
112
113
113
114
Contents
Individual phone configuration . . . . . . . . . . . . . . . 116
Language settings . . . . . . . . . . . . . . . . . . . . . . . . . . . . . . . . . . . . . . . .
Selecting a language . . . . . . . . . . . . . . . . . . . . . . . . . . . . . . . . . . .
Setting the country . . . . . . . . . . . . . . . . . . . . . . . . . . . . . . . . . . . .
Display settings . . . . . . . . . . . . . . . . . . . . . . . . . . . . . . . . . . . . . . . . . .
Contrast . . . . . . . . . . . . . . . . . . . . . . . . . . . . . . . . . . . . . . . . . . . . .
Key module contrast . . . . . . . . . . . . . . . . . . . . . . . . . . . . . . . . . . .
Date and time . . . . . . . . . . . . . . . . . . . . . . . . . . . . . . . . . . . . . . . . . . .
Setting the time . . . . . . . . . . . . . . . . . . . . . . . . . . . . . . . . . . . . . . .
Setting the date . . . . . . . . . . . . . . . . . . . . . . . . . . . . . . . . . . . . . . .
Setting daylight saving time. . . . . . . . . . . . . . . . . . . . . . . . . . . . . .
Time display format . . . . . . . . . . . . . . . . . . . . . . . . . . . . . . . . . . . .
Date display format . . . . . . . . . . . . . . . . . . . . . . . . . . . . . . . . . . . .
Audio settings . . . . . . . . . . . . . . . . . . . . . . . . . . . . . . . . . . . . . . . . . . .
Setting the volume. . . . . . . . . . . . . . . . . . . . . . . . . . . . . . . . . . . . .
Adjusting room acoustics. . . . . . . . . . . . . . . . . . . . . . . . . . . . . . . .
Country setting for speakerphone mode . . . . . . . . . . . . . . . . . . . .
Setting the ringer melody . . . . . . . . . . . . . . . . . . . . . . . . . . . . . . .
Setting the ringer tone sequence . . . . . . . . . . . . . . . . . . . . . . . . .
Select and confirm the option shown.. . . . . . . . . . . . . . . . . . . . . . . . .
116
116
117
118
118
118
119
119
119
120
121
121
122
122
123
123
124
124
124
Web interface. . . . . . . . . . . . . . . . . . . . . . . . . . . . . . . 125
General . . . . . . . . . . . . . . . . . . . . . . . . . . . . . . . . . . . . . . . . . . . . . . . .
Calling up the Web interface . . . . . . . . . . . . . . . . . . . . . . . . . . . . . . . .
User login. . . . . . . . . . . . . . . . . . . . . . . . . . . . . . . . . . . . . . . . . . . .
Date and time . . . . . . . . . . . . . . . . . . . . . . . . . . . . . . . . . . . . . . . . . . .
Audio . . . . . . . . . . . . . . . . . . . . . . . . . . . . . . . . . . . . . . . . . . . . . . . . . .
Benutzerkonfiguration . . . . . . . . . . . . . . . . . . . . . . . . . . . . . . . . . . . . .
Abgehende Anrufe. . . . . . . . . . . . . . . . . . . . . . . . . . . . . . . . . . . . .
Incoming calls . . . . . . . . . . . . . . . . . . . . . . . . . . . . . . . . . . . . . . . .
Bestehende Verbindungen . . . . . . . . . . . . . . . . . . . . . . . . . . . . . .
Keyset . . . . . . . . . . . . . . . . . . . . . . . . . . . . . . . . . . . . . . . . . . . . . .
Phone . . . . . . . . . . . . . . . . . . . . . . . . . . . . . . . . . . . . . . . . . . . . . . . . .
Display settings . . . . . . . . . . . . . . . . . . . . . . . . . . . . . . . . . . . . . . .
Programmable keys . . . . . . . . . . . . . . . . . . . . . . . . . . . . . . . . . . . .
Locality . . . . . . . . . . . . . . . . . . . . . . . . . . . . . . . . . . . . . . . . . . . . . . . .
Security . . . . . . . . . . . . . . . . . . . . . . . . . . . . . . . . . . . . . . . . . . . . . . . .
125
126
126
127
127
128
128
129
131
132
133
133
134
136
136
Fixing problems . . . . . . . . . . . . . . . . . . . . . . . . . . . . . 137
Telephone maintenance . . . . . . . . . . . . . . . . . . . . . . . . . . . . . . . . . . . 137
Troubleshooting. . . . . . . . . . . . . . . . . . . . . . . . . . . . . . . . . . . . . . . . . . 137
Index . . . . . . . . . . . . . . . . . . . . . . . . . . . . . . . . . . . . . . 138
11
General information
General information
About this manual
This document contains general descriptions of the technical options,
which may not always be available in individual cases. The respective features must therefore be individually defined in the terms of the contract.
If a particular function on your phone is not available to you, this may be
due to one of the following:
• The function is not configured for you or your telephone. Please contact your system support representative.
• Your communications platform does not feature this function. Please
contact your Siemens sales partner for information on how to upgrade.
This user guide is intended to help you familiarize yourself with OpenStage
and all of its functions. It contains important information on the safe and
proper operation of your OpenStage phone. These instructions should be
strictly complied with to avoid operating errors and ensure optimum use of
your multifunctional telephone in the network.
These instructions should be read and followed by every person installing,
operating or programming an OpenStage phone.
For your own protection, please read the section dealing with safety
in detail. Follow the safety instructions carefully in order to avoid endangering yourself or other persons and to prevent damage to the
unit.
This user guide is designed to be simple and easy to understand, providing
clear step-by-step instructions for operating your OpenStage phone.
Administrative tasks are dealt with in a separate manual. The Quick Reference Guide contains quick and reliable explanations of frequently used
functions.
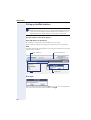
Symbols used in the manual
Operations or settings that can be made both at the phone and over the
Web interface are indicated by an icon and page reference.
V
z
12
is a direct reference to an operation or setting performed directly
on the
phone
is a direct reference to an operation or setting performed via the
web interface
General information
Service
The Siemens service department can only help you if you experience problems or defects with the phone.
Should you have any questions regarding operation, your specialist
retailer or network administrator will gladly help you.
For queries regarding connection of the telephone, please contact
your network provider.
If you experience problems or defects with the phone, please dial the service number for your country.
Intended use
The OpenStage phone is a desktop unit designed for voice transmission
and for connection to the LAN. It can also be used as a workstation device.
Any other use is regarded as unauthorized.
Telephone type
The identification details (exact product designation and serial number) of
your telephone can be found on the nameplate at the rear of the base unit.
Specific details concerning your communications platform can be obtained
from your service technician.
Please have this information ready when you contact our service department regarding faults or problems with the product.
Speakerphone quality and display legibility
•
•
To ensure good speakerphone quality, the area in front of the telephone
(front right) should be kept clear.
The optimum handsfree distance is 20 in. (50 cm).
Proceed as follows to optimize display legibility:
– Turn the phone to tilt the display. This ensures you have a frontal
view of the display while eliminating light reflexes.
– Adjust the contrast as required Æ page 118.
13
General information
Single-line telephone / multi-line telephone
Your OpenStage 40 is a multi-line telephone. This means that multiple
lines can be configured on your OpenStage phone, which is not the case
with single-line phones. Each line is assigned an individual phone number
which you can use to make and receive calls.
The programmable sensor keys function as line keys on multi-line phones
Æ page 19.
The "Line overview" tab on the telephony interface provides information
about the lines configured on your phone and the current status of each
line Æ page 28.
When using a multi-line phone to make and receive calls, certain particularities must be taken into account Æ page 78.
14
Getting to know your OpenStage phone
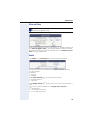
Getting to know your OpenStage phone
The following sections describe the most frequently used operating elements and the displays on your OpenStage phone.
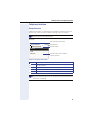
user interfaceOpenStage 40
8
1
2
3
4
5
6
7
1
You can make and receive calls as normal using the handset.
2
The graphic display permits intuitive operation of the phone q.
3
You can customize your telephone by assigning phone numbers and
functions to the programmable sensor keys Æ page 23.
4
You can use function keys when conducting a call to access frequently used functions (such as Disconnect) or to open the Program/Service menu and mailbox Æ page 17.
5
Audio keys are also available, allowing you to optimally configure
the audio features on your telephone Æ page 17.
6
The 5-way navigator is a convenient navigation tool Æ page 18.
7
The keypad can be used to enter phone numbers and text
Æ page 21.
8
Incoming calls are visually signaled via the call display.
For an overview of the telephone ports, see Æ page 26.
15
Getting to know your OpenStage phone
propertiesOpenStage 40
Display type
Illuminated display
Programmable sensor keys
Full-duplex speakerphone function
Headset
Interface for key modules
Wall mounting
16
LCD
40 x 6 characters
9
6
9
9
9
9
Getting to know your OpenStage phone
Keys
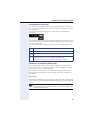
Function keys
Key
Function when key is pressed
s End (disconnect) call
, Open redial list
LED display
none
none
r Activate/deactivate forwarding
Red: call forwarding is activated
N Open service menu Æ page 32.
Red: Menu is active
O View messages Æ page 29.
Red: Menu is active.
White: New message.
Audio keys
Key
Function when key is pressed
p Activate/deactivate microphone (also for speakerphone mode)
o Activate/deactivate headset
- Lower volume of ringtone, handset and speaker.
n Activate/deactivate loudspeaker for speakerphone mode and open
listening
+ Increase volume of ringtone, handset and speaker.
17
Getting to know your OpenStage phone
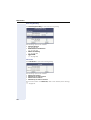
Navigator
With the touch guide, you can administer most of the functions featured
on your OpenStage phone as well as the displays.
Operation
Functions when key is pressed
Press c
Press a
•
•
•
•
Call up the context menu
Perform action
Go down a level
Call up the context menu in the idle
display
•
•
•
Short press: back one level
If held down: back to the first level
Extended long press: back to idle
mode
Cancel function
Quit the context menu
In input fields:
Delete character to the left of the
cursor
•
•
•
Press d
Press b
Press the i key.
•
•
•
Scroll downwards
Select element below
If held down: Jump to end of list/
menu
•
•
•
Scroll upwards
Select element above
If held down: Jump to start of list/
menu
•
•
•
Confirm input
Perform action
Call up the context menu
Before using the telephone, remove the protective covering from
the navigator surface.
18
Getting to know your OpenStage phone
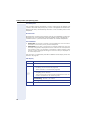
Programmable sensor keys
Your OpenStage 40 telephone features six programmable lit sensor keys.
To open the programming menu, press and hold down the relevant sensor
key Æ page 54.
To activate the programmed function, briefly press the relevant key
Æ page 57.
2. Level
Mirea, Ch.
You can label these keys with internal and external phone numbers or frequently used functions (platform-dependent; please contact the responsible service personnel).
The configured phone number or function name is displayed next to the
key.
Key
LED display
S Not lit: Line is free, function is deactivated
R Lit: Line is busy, function is activated
T Flashing: A call to the line is being established
Flashing quickly (short on, long off): forwarded call
Flashing quickly (long on, short off): call party is on hold
Trunk keys (on multi-line phones only)
The programmable sensor keys on multi-line phones function as trunk
keys. Each key that is assigned the function "line" is handled as a line. This
means up to six lines can be configured.
A distinction is drawn here between primary, secondary and phantom
lines. Each of these line types can be used on a private or shared basis
Æ page 20.
Primary line
All multi-line telephones have a primary line. This line can be reached in the
usual manner via your public phone number. Incoming calls are signaled on
this line.
To avoid conflict between the individual multi-line phones, you can
configure the functions "Do not disturb" and "Call forwarding" exclusively for the primary line.
19
Getting to know your OpenStage phone
Secondary line
The secondary line on your phone is used as a primary line by another subscriber in the LAN. Your primary line, which is configured on another telephone in the LAN, simultaneously functions as the secondary line on that
telephone.
Phantom line
Phantom lines are not used as primary lines by any telephones in the LAN.
Phantom lines are established when the number of lines provided by a
communications system exceeds the number of available telephones.
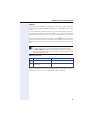
Line utilization
• Private line: A line that is used by a single telephone. This line cannot
be used as a secondary line by another telephone.
• Shared line: A line that is configured on multiple telephones. The line
status (if configured) is displayed in the line overview for all telephones
that share this line. If, for example, a shared line is being used by a telephone, a status message indicating that this line is busy is displayed on
all other telephones.
The line status is indicated by the LED in addition to the display in the line
overview Æ page 28.
LED display
LED
Explanation
S
Not lit: The phone is in idle mode.
Flashing:
• Incoming call on the line (Æ page 79)
• "Hold reminder" is activated (Æ page 61)
T
Flickering:
• Outgoing call on the line
• The incoming call was prioritized and selected via the "Automatic line selection for incoming calls"
Fast blinking: The line is on "Hold".
Blinking: Call forwarding is activated
R
20
Illuminated: The line is busy
Getting to know your OpenStage phone
Keypad
You can only use the digits 1 to 9 and 0 as well as the * and # characters
when dialing a number. The h navigation key is used to delete from right
to left.
In cases where text input is possible, you can use the keypad to input text,
punctuation and special characters in addition to the digits 0 to 9 and the
hash and asterisk symbols. To do this, press the numerical keys repeatedly.
Example: To enter the letter "h", press the number 4 key on the keypad
twice. When entering the text, all available characters for this key are displayed. After a short while, the character in focus is displayed in the input
field.
To speed up the input, you can confirm your entry by pressing "g"
on the navigator after you have selected the required character.
To enter a digit in an alphanumerical input field, press the relevant
key and hold it down. You no longer need to scroll through the entire
list of possible characters.
Multi-function keys
Key
Function during text input
) Write special characters
Function when held down
Deactivate the ring tone
( Switch between upper and Activate telephone lock
lower case
Alphabetic labeling of dial keys is useful when entering vanity numbers
(letters associated with the phone number’s digits as indicated on the telephone spell a name; e.g. 0700 - PATTERN = 0700 - 687837).
21
Getting to know your OpenStage phone
Character overview
Key
1x
1
s
2x
3x
4x 5x 6x 7x 8x 9x 10x 11x 12x 13x 14x
b
c
2
e
f
3
h
i
4
k
l
5
6 ?m n
o
6
ö
q
r
s
7
u
(v)
8
ü
9 w
x
y
z
9
(
2
1
2 a
3 d
4 g:
5
j
7 p
8 t
ä
ß
0 0
1
[1] next letter in upper case (active for maximum one second)
[2] Switching to number input
) .
,
?
!
’
"
-
(
) @
/
:
_
Text editor
In different situations (e. g. when labeling the programmable sensor keys)
a menu with functions appears under the character selection field. You can
enter punctuation and special characters or switch between the input of
alphanumeric upper and lower case characters or digits only.
You can select further editor functions via the touch guide:
• OK – Confirm and conclude complete input
• Cancel – Cancel entry without saving
• Mode Configuration via the key (
– 123 (# -> ABC) – Numerical entry
– ABC (# -> Abc) – Upper case characters
– Abc (# -> abc) – Initial character upper case
– abc (# -> 123 – Lower case characters
• Move cursor left to add or delete characters
• Move cursor right to add or delete characters
• Copy – Copy displayed character string
• Paste – Paste copied character string to cursor position
22
Getting to know your OpenStage phone
Graphic display
Your OpenStage 40 comes with a tilt-and-swivel black-and-white LCD display.
The left area contains the status bar on the first line, followed by a five-line
context-dependent field for additional displays. The right area shows the labels of programmable sensor keys.
Contrast and background lighting settings
Status bar
10:29 am
Wed 17.11.06
Level 2
Mirea, Ch.
Company name
07
Toussaint.
Rüscher
Programmable sensor
key list Æ page 23
Context-dependent
displays
Stahl, Ing
01234567
Iller, Zin
Own phone number
(idle display only)
Idle display view and icons
The time, weekday, and date are displayed in the status bar.
In addition, different icons represent different situations and switches:
Icon
Explanation
The ring tone is deactivated.
The "Do not disturb" function is activated.
The phone lock is activated.
A mobile user is logged on to the telephone.
The microphone is deactivated.
23
Getting to know your OpenStage phone
Context-dependent displays
Depending on the situation at hand, the graphic display on your OpenStage
phone displays different content, to which you can respond intuitively.
Information on actual events
The following icons appear centered on the display when your phone is idle
and signal current properties or events.
Example: You missed two calls in your absence.
02
You have two new voice messages that you can open by pressing O
Æ page 29.
Icons for events
Icon
Explanation
Callback requests are active.
You received new voice messages.
New entries have been added to the call lists.
Local call forwarding is active.
Context menus
An arrow beside a selected entry indicates the existence of a context
menu that you can open by pressing the i or g buttons on the touch
guide (Æ page 18). The range of functions available is situation-specific.
Consult
Hold
Call park
Disconnect
24
First entry
(selected on callup)
Selected entry
Getting to know your OpenStage phone
Idle display context menu
The following functions (where released) are available by pressing the right
key on the touch guide:
Redial {1} 1234
Ringer off
Do not disturb off
Mobile logon
Cancel call backs
First entry (selected when you call
up the menu, if you have already
dialed a phone number)
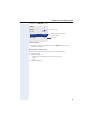
Selected entry
Only available when configured to support mobility
Pop-up menus
In many operating situations, suitable functions or information is offered in
an automatic pop-up window.
Example: You set up a consultation call. The pop-up menu opens and offers
suitable functions for selection with the touch guide.
012345|
2. Level
Dial
Mirea, Ch.
Redial {1}
Toussaint.
Retrieve held call
Rüscher
Stahl, Ing
Iller, Zin
A pop-up window automatically closes as soon as you have performed an
action.
To suppress information pop-up windows, press i on the touch guide.
25
Getting to know your OpenStage phone
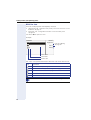
Ports on the underside of the phone
Power supply unit
PC
Network switch
Headset
Key module
Handset
26
Getting to know your OpenStage phone
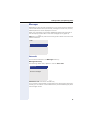
Telephony interface
Single line view
Additional information is displayed in the telephony interface when your
phone rings, when you dial a number or during a call, for instance.
The same information is available on multi-line telephones for the
selected line in the line overview.
Example:
Icon indicating call status
Smith Michael
3:16
08912345678
Call duration
Current call(s)
Consult
Hold
Call park
Context menu with situationspecific options
Icons for frequent call states
Icon
Explanation
The call is active
The call has been disconnected
You have placed the call on hold (e.g. consultation hold).
Your call partner has placed the call on hold
Detailed descriptions of the various functions can be found in the
sections "Basic phone functions" Æ page 35 and "Enhanced phone
functions" Æ page 58.
27
Getting to know your OpenStage phone
Multi-line view
Two tabs are displayed on the telephony interface:
• "[My phone]" tab - represents the primary line or the line view of a selected line Æ page 27
• "Overview" tab - configurable overview of the secondary lines
Æ page 20
Call: Press h to open this view.
Example:
Overview
Level 2
2
2
My phone
2
Line 2
Line 1
Line key labeling
Æ page 19
Line status
Line name
Status icon
The status icons provide information about the state of the relevant line.
Icon
Explanation
Call for the corresponding line.
Call for a line with suppressed ring tone Æ page 89.
"Hold reminder" is activated Æ page 61.
The line is currently not available.
The line is busy.
Please note the LED displays for the line keys Æ page 20.
28
Getting to know your OpenStage phone
Messages
Depending on the type and configuration of your communications platform
(contact the relevant service personnel), messages from services, such as,
HiPath Xpressions can be displayed in this list.
When new messages are received, a message appears (Æ page 24) on
the idle display and the LED on the O (Æ page 17) key lights up.
Call: Press the O key and use the touch guide to select and confirm the
relevant submenu.
Calls
Messages
Calls
Voicemails
You will find voicemails in the Messages directory.
Messages Directory:
The following default entry appears in the list: Voice mail
Voice mail
No new messages
Alternative call: Hold down the O key.
If your system is appropriately configured (contact the relevant service personnel), you can call the voice mailbox directly and immediately play back
the messages saved.
29
Getting to know your OpenStage phone
Calls
The following lists are available in the CallLog directory:
CallLog
Missed
Dialled
Received
Forwarded
The list contains the following default entries:
• CallLog (see below)
– Missed calls
– Dialed calls
– Answered calls
– Forwarded calls
The LED on the O key only goes out when all new messages have been
checked.
Call lists
All calls to your phone are timestamped and logged in consecutive order
in the call lists.
Each call list may contain up to 30 entries. Once this limit is reached, the
oldest entry in the log is deleted.
Multiple calls from the same number are only listed once. The number of
call attempts is logged in the "Details" context menu and additionally in the
"Missed Calls" log in the list display.
The list contains the phone number as well as the time of the last call.
Callers with suppressed numbers cannot be saved in the call lists.
Callers with suppressed numbers are listed as "Unknown" in the call
lists.
Only calls to the primary line are received on multi-line phones
(Æ page 14).
30
Getting to know your OpenStage phone
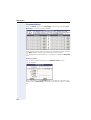
Example of the Missed call list:
Missed
Options
Time of call
11178
12:11
235689 g
10:25
[2568900
7:22
Selected new entry with
context menu
Old entry
Call list options
You can select the following function in the Options context menu:
Delete all Æ page 77
Entry-specific context menu
You can select the following functions for an individual entry:
• Dial Æ page 71
• Details Æ page 77
– Number of call attempts (up to 10 can be stored)
– Date
– Time
• Delete Æ page 77
31
Getting to know your OpenStage phone
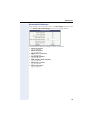
Service menu
You can make local settings here and use this menu to navigate to the
password-protected administration area.
Call: Press the N key and use the touch guide to select and confirm the
relevant menu.
Example:
Menu
User
Settings for the user
[Admin
Password-protected
administration area
Settings
You can specify call-related settings in the "User" menu. This menu contains several options for customizing the appearance of your telephone.
Select one of the following menus with the touch guide (Æ page 18):
• Date and time Æ page 119
• "Audio" q
• Configuration, for example Æ page 59 or Æ page 75
• Phone Æ page 53 Æ page 118
• Locality Æ page 116
• Security Æ page 93
• Network information Æ page 33
32
Getting to know your OpenStage phone
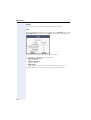
Network information
This overview in the user area of the Service menu provides you with information about the IP address of the phone and the HTML address of the
Web interface. It also provides real-time data about the network activity of
the phone.
This information overview can prove useful during debugging if you are
conducting a call with an administrator, for instance.
User
Date and time
[Audio
Configuration
Phone
Locality
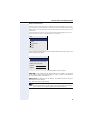
Select "Network information" from the menu and confirm your action. The
following overview opens:
IP address 192.168.1.9
[WBM URL http://192.168.1.
DNS domain opera.local
LAN RX:
LAN TX:
IP address: IP address assigned to the phone in the network.
WBM URL: HTTP address of the Web interface. This address is specified
in the address line of the Internet browser and is used to call the Web interface of the phone in the browser.
DNS domain: In addition to an IP address, the administrator can assign a
DNS domain to the phone
(e.g. http://my-openStage.phone/).
Further details about the network information values listed here can
be obtained from the responsible service personnel. Alternatively
you can refer to the OpenStage Administration Manual.
33
Getting to know your OpenStage phone
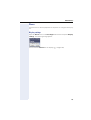
Administration
You can access the administration area via the "Admin" function and by entering the administration password.
Refer to the administration manual for your phone for more detailed information on this topic.
During a software update, the phone must not be disconnected
from the power supply unit, the LAN line or the phone line.
An update action is indicated by messages on the display and/or by
flashing LEDs.
34
Basic phone functions
Step by Step
Basic phone functions
Please read carefully the introductory chapter
"Getting to know your OpenStage phone"
Æ page 15 before performing any of the steps
described here on your phone.
Incoming calls
Your OpenStage phone rings with the tone signal set
when an incoming call is received. The call is also visually signaled on the call display.
If transmitted, calling party information (name, phone
number) appears on the graphic display.
.
An incoming call will interrupt any ongoing telephone setting operations. When the call ends,
you can press N to return to the point in the
menu structure where you were interrupted.
Answering a call via the handset
The phone is ringing. The caller is displayed.
^ Lift the handset.
if nec. +- Set the call volume.
Answering a call via the loudspeaker
(speakerphone mode)
The phone is ringing. The caller is displayed.
The pop-up menu opens:
Select and confirm the option shown. The n key
lights up.
Accept
or
n Press the key shown. The key lights up.
The speakerphone function is activated.
if nec. +- Set the call volume.
Suggestions for using speakerphone mode:
• Tell the other party that speakerphone mode is active.
35
Basic phone functions
Step by Step
•
•
Adjust the call volume while speakerphone mode is
active.
The ideal distance between the user and the phone
in speakerphone mode is 50 cm.
Answering a call via the headset
Prerequisite: A headset is connected.
The phone is ringing. The audio key o flashes.
o Press the key shown.
if nec. +- Set the call volume.
Switching to speakerphone mode
Make note of the two different processes and activate, if necessary, your preferred setting
Æ page 123.
Prerequisite: You are conducting a call via the handset
and the microphone and loudspeaker functions have
been activated by service personnel.
Standard mode
n and \ Hold down the key and replace the handset. Then release the key and proceed with your call.
US mode
If the country setting is set to US, you do not have to
hold down the loudspeaker key when replacing the
handset to switch to speakerphone mode.
n Press the key shown.
\ Replace the handset. Proceed with your call.
36
Basic phone functions
Step by Step
Switching to the handset
Prerequisite: You are conducting a call in speakerphone mode.
^ Lift the handset.
n The key shown goes out.
Open listening
You can let other people in the room join in on the call.
Let the other party know that you have turned on the
loudspeaker.
Prerequisite: You are conducting a call via the handset.
Activating
n Press the key shown.
Deactivating
n Press the lit key.
Switching to speakerphone mode
n \ Hold down the lit key and replace the handset.
Ending a call
s Press the key shown.
or
n Press the lit key.
or
Disconnect
Select and confirm the option shown in the connections’s context menu.
37
Basic phone functions
Step by Step
Making calls
If you are using a dial plan and "Sofortwahl" is set
Æ page 72, dialing is automatically performed as soon
as the character string entered matches an entry in the
dial plan.
If you selected the option "Busy When Dialing"
Æ page 73, you will not be interrupted by an incoming call. In this case, the caller hears the busy
signal.
En-bloc dialing
j Enter the phone number. Use the touch guide
Æ page 18 to correct entries as necessary.
^ Lift the handset.
or
n Press the key shown.
or In the pop-up menu:
Dial
Confirm.
The connection is set up.
Off-hook dialing
^ Lift the handset.
j Enter the phone number.
or In the pop-up menu:
Redial {1} S. Hawking
Select and confirm the option shown.
The connection is set up as soon as your input in complete.
38
Basic phone functions
Step by Step
On-hook dialing
n Press the key shown.
j Enter the phone number.
or In the pop-up menu:
Select and confirm the option shown.
Redial {1} S. Hawking
The connection is set up as soon as your input in complete.
Redialing
Redialing from the call list
Only calls to the primary line are received on
multi-line phones (Æ page 14).
, Press the key shown.
Niels, Bohr
07:06 am
Select and confirm the entry you want.
The phone number associated with the list entry is dialed.
Redialing from the pop-up menu
^ Lift the handset.
or
n Press the key shown.
Redial {1} S. Hawking
Select and confirm the option shown.
The last phone number entered is dialed.
Redialing from the idle menu
Redial {1} S. Hawking
Select and confirm from the idle display context menu
(Æ page 25). The last phone number entered is dialed.
39
Basic phone functions
Step by Step
Activating/deactivating the microphone
You can temporarily deactivate the microphone on your
handset to prevent the other party from overhearing a
conversation, for instance, with a colleague in the same
room.
Prerequisite: You are conducting a call.
Deactivating the microphone
p Press the key shown.
Activating the microphone
p Press the lit key.
40
Basic phone functions
Step by Step
Consulting a second party
You can call a second party while a call is in progress.
The connection to the first party is placed on hold.
Prerequisite: You are conducting a call.
Consult
Select and confirm the option shown in the connections’s context menu.
j Call the second party.
Ending a consultation call
In the pop-up menu:
Disconnect & return
Select and confirm the option shown.
The consultation call is disconnected. The call with the
first party is resumed.
Canceling a consultation call
If the called party does not answer
In the pop-up menu:
Disconnect & return
Select and confirm the option shown.
The call with the first party is resumed.
If the called party does answer
Disconnect & return
Select and confirm the option shown in the context
menu for the connection to the second station.
The call with the first party is resumed.
41
Basic phone functions
Step by Step
Switching to the held party (alternating)
Prerequisite: You are conducting a consultation call.
Alternate?
Select and confirm the option shown in the connection’s context menu.
It does not matter which context menu is open
when alternating. The "Alternate" function appears in both menus (active and passive connection).
You can switch back and forth between two subscribers by repeatedly selecting and confirming
"Alternate".
Ending an alternate operation
Disconnecting the held call:
Disconnect?
Select and confirm the option shown in the held connection’s context menu.
The held call is disconnected. The active call continues.
Disconnecting the active call:
Disconnect & return?
42
Select and confirm the option shown in the active connection’s context menu.
The active call is disconnected. The held call remains on
hold and can be managed via the context menu.
Basic phone functions
Step by Step
Connecting parties
You can join the first party with the party you consulted,
clearing down your connection to both parties in the
process.
Prerequisite: You are conducting a consultation call
Æ page 41 and call joining must be allowed Æ page 43.
Complete Xfer?
Select and confirm the option shown in the active connection’s context menu.
The active and held calls are joined. The active call and
the consultation call are cleared down.
or Connect by hanging up
] or n Replace the handset or, if you are in speakerphone
mode, press the loudspeaker key. The other two parties
are now connected to one another.
Allowing call joining
N Press the key shown.
User
Confirm.
if nec. j Enter and confirm the User password.
Configuration
Select and confirm the option shown.
Connected calls
Select and confirm the option shown.
Allow call joining
Select and confirm the option shown (z Æ page 131).
Yes
Select and confirm the option shown in the context
menu.
Save & Exit
Confirm.
43
Basic phone functions
Step by Step
Call forwarding
HiPath 8000 also supports system-based call forwarding. These functions are described on
Æ page 102.
You should never combine phone-based call
forwarding with system-based call forwarding in
HiPath 8000.
You can forward calls for your phone to another phone.
On multi-line telephones (Æ page 14), you can
only configure call forwarding for the primary
line.
Three forwarding conditions can be programmed in the
forwarding menu:
• All Calls
• Busy
• No reply
Because of its direct impact, "All Calls" call forwarding
has the highest priority followed by "No reply" and
"Busy".
If active, "All Calls" call forwarding is indicated on the
graphic display when the phone is idle.
Forwarded calls can be logged in a call list (see
Æ page 30).
There are three Destination options in the Edit call forwarding menu. These destination options are assigned
to the forwarding types.
All calls (off/on)
Destination
Busy (off/on)
Destination
No reply (off/on)
Destination
One phone number may already be assigned to each
destination. The Destination option may therefore be,
for example, Destination 12345.
44
Basic phone functions
Step by Step
Programming call forwarding
Configuring destination phone numbers for call forwarding
You can configure up to five destination phone numbers
for call forwarding. These destination phone numbers
can then be assigned different forwarding types. You
can then enable one of the forwarding types
(Æ page 47).
r Press the key shown.
The pop-up menu opens:
Edit call forwarding
Select and confirm the option shown.
An overview of call forwarding settings appears.
Destination
Select and confirm the option shown.
You can use each of the three Destination options to save destination phone numbers for the
relevant forwarding type.
Edit favourites
Select and confirm the option shown in the context
menu.
Destination 1
Select and confirm the option shown.
j Enter and confirm the destination phone number.
Define additional destination phone numbers for destination 2 to 5, as necessary.
Save & Exit
Select and confirm the option shown.
Assigning a destination phone number to a call forwarding type
r Press the key shown.
The pop-up menu opens:
Edit call forwarding
Select and confirm the option shown.
An overview of call forwarding settings appears.
Destination
Select and confirm the option shown for the call forwarding condition you want.
45
Basic phone functions
Step by Step
08972228596
Select and confirm the required destination phone number (z Æ page 129).
Save & Exit
Select and confirm the option shown.
Defining the ring duration before call forwarding on
no reply
You can define how often the phone should ring before
"No reply" call forwarding activates (z Æ page 129).
Prerequisite: The phone is idle.
r Press the key shown.
The pop-up menu opens:
Edit call forwarding
Select and confirm the option shown.
An overview of call forwarding settings appears.
Duration
Select and confirm the option shown.
j Enter a value for the duration.
Save & Exit
46
Select and confirm the option shown.
Basic phone functions
Step by Step
Activating/deactivating call forwarding
(z Æ page 129.)
Prerequisite: At least one destination phone number is
programmed (Æ page 45).
r Press the key shown.
The pop-up menu opens:
Select and confirm the option shown.
Edit call forwarding
An overview of call forwarding settings appears.
Select and confirm the option shown.
All calls
or
Select and confirm the option shown.
Busy
or
No reply
Select and confirm the option shown.
On
Select and confirm "On" or "Off" in the context menu.
Save & Exit
Select and confirm the option shown.
47
Basic phone functions
Step by Step
Activating call forwarding for all calls
Use the r function key to activate call forwarding for
all calls.
Prerequisite: There is at least one forwarding destination programmed Æ page 45.
r Press the key shown.
The pop-up menu opens:
Select and confirm the option shown. The r key
lights up. Call forwarding is activated.
Accept
If the phone is idle, the call forwarding icon K appears
on the graphic display with the destination phone number.
Deactivating call forwarding for all calls
r Press the lit key.
The pop-up menu opens:
The pop-up menu disappears after around five seconds
and the r key goes out.
or
Accept
48
Select and confirm the option shown.
Call forwarding is deactivated.
Basic phone functions
Step by Step
Callback
You can request a callback if the station called is busy or
if nobody answers.
You receive a callback when the other party’s line becomes free.
This option must be activated by your service
personnel.
On multi-line telephones Æ page 14, only the
callback requests for your primary line are
logged.
Requesting callback
Prerequisite: The station called is busy or nobody answers.
In the pop-up menu:
Select and confirm the option shown.
Call back?
Deleting callback requests
You can delete scheduled callback requests if you no
longer need to return a call, for example, at the end of
the working day.
Prerequisite: At least one callback was requested.
Select and confirm the option shown in the idle display
(Æ page 25) context menu.
Cancel call backs?
Disconnect?
m
Confirm in the pop-up menu. All callback requests are
deleted.
49
Basic phone functions
Step by Step
Responding to a callback
Prerequisite: A callback was requested. Your phone
rings and station information appears on the graphic display with the callback icon.
The pop-up menu opens:
Accepting a callback
Accept?
Select and confirm the option shown.
Rejecting a callback
Reject?
Select and confirm the option shown.
The callback request is deleted. The caller hears the
busy signal. The caller’s phone number is added to the
missed calls list.
Forwarding a callback
Deflect
Select and confirm the option shown.
j Enter and confirm the phone number.
50
Basic phone functions
Step by Step
Permitting a callback
Permitting callback on busy/no reply
N Press the key shown.
Select and confirm the option shown.
User
if nec. j Enter and confirm the User password.
Configuration
Select and confirm the option shown.
Outgoing calls
Select and confirm the option shown.
Callback: busy
Select and confirm the option shown (z Æ page 128).
or
Callback: no reply
Select and confirm the option shown (z Æ page 128).
Yes
Select and confirm the option shown in the context
menu.
Save & Exit
Select and confirm the option shown.
51
Basic phone functions
Step by Step
Calling back missed calls
Calls received while you are absent are indicated by a
message on the idle display (Æ page 24). The O
function key also lights up.
Missed calls are logged in the missed calls list. This list
provides information on the missed call and lets you call
back the number directly (call lists, see also
Æ page 30).
On multi-line telephones Æ page 14, only the
calls missed on your primary line are logged.
O Press the key shown.
CallLog
Select and confirm the option shown.
Missed
Select and confirm the option shown.
Niels, Bohr 20.05
52
10:06
Select and confirm the appropriate list entry. The phone
number associated with the list entry is dialed.
Basic phone functions
Step by Step
Programmable sensor keys
The phone features a range of functions that can, if required, be programmed on programmable sensor keys.
The phone comes with six programmable sensor keys,
all of which can be programmed on two separate levels.
The "Shifted" programmable sensor key, which allows
you to switch between the two programmable sensor
key levels, is preassigned. This programmable sensor
key should be maintained where possible so you can
switch between the two programmable sensor key levels.
The labels for the programmable sensor keys are displayed on the right side of the display.
The programmable sensor keys can also be programmed via the Web interface (Æ page 125).
53
Basic phone functions
Step by Step
Programming programmable sensor keys
S Press the sensor key you want to program until the field
opens. The programmable sensor key lights up permanently (z Æ page 134).
or You can also program keys via the user menu.
N Press the key shown.
Select and confirm the option shown.
User
if nec. j Enter and confirm the User password.
Phone
Select and confirm the option shown.
Program keys
Select and confirm the option shown. You are prompted
to press the key you wish to program.
S Press the sensor key you want to program until the field
opens. The programmable sensor key lights up permanently (z Æ page 134).
Select and confirm the option shown to program the
first level.
Normal
or
Shifted
Select and confirm the option shown to program the
second level.
Do not disturb
Select and confirm the required function in the list (for
instance Do not disturb).
Label
Select and confirm the option shown if you want to
change the label on the graphic display.
j Enter and confirm the label you want.
Save & Exit
54
Select and confirm the option shown.
Basic phone functions
Step by Step
Programming enhanced functions
Enhanced repertory dialing
S Press the sensor key you want to program until the field
opens. The programmable sensor key lights up permanently (z Æ page 134).
Normal
Select and confirm the option shown to program the
first level for instance.
Repertory dial
Select and confirm the required function in the context
menu.
Label
Select and confirm the option shown if you want to
change the label on the graphic display.
j Enter and confirm the label you want.
Setting
Select and confirm this option to enter a destination
phone number.
j Enter and confirm the stations’s destination phone
number.
You can select and insert special characters in the dialing sequence:
¬« Clear call
~ Make consultation
¬» Make normal call
¬¬ Pause
The pop-up menu also offers the following functions:
• Move cursor right and left
• Copy
• Paste
• Mode selection
• Cancel
• OK
Save & Exit
Select and confirm the option shown.
55
Basic phone functions
Step by Step
Feature toggle
Can only be used for Hunt group
functions (z Æ page 135).
S Press the sensor key you want to program until the field
opens. The programmable sensor key lights up permanently (z Æ page 134).
Normal
Select and confirm the option shown to program the
first level for instance.
Feature toggle
Select and confirm the required function in the context
menu.
Label
Select and confirm the option shown if you want to
change the label on the graphic display.
j Enter and confirm the label you want.
Setting
Select and confirm this option to enter a code.
j Enter and confirm the code, for example: *96 (contact
your service personnel).
Save & Exit
Select and confirm the option shown.
Forwarding
S Press the sensor key you want to program until the field
opens. The programmable sensor key lights up permanently (z Æ page 134).
Normal
Select and confirm the option shown to program the
first level for instance.
Forward all calls
Select a forwarding type:
• Forward all calls
• Forward no reply
• Forward busy
Select and confirm the function in the context menu.
Label
Select and confirm the option shown if you want to
change the label on the graphic display.
j Accept or edit the label and confirm.
Setting
Select and confirm this option to enter the forwarding
destination.
j Enter and confirm the phone number of the forwarding
destination.
Save & Exit
56
Select and confirm the option shown.
Basic phone functions
Step by Step
Immediate ring
This function allows you to switch the preset delay
(Æ page 87) on and off for all line keys.
Using programmable sensor keys
The use of programmed functions depends on the
phone’s status. The relevant display appears once you
have pressed a programmable sensor key.
Example 1: Accessing a stored contact or phone
number
Prerequisite: The idle menu is displayed on the graphic
display.
S Press the programmable sensor key for the stored contact until the connection setup procedure appears on
the graphic display. The programmable sensor key
lights up.
Example 2: Deactivating the ring tone for incoming
calls
S Press the "Ringer off" programmable sensor key. The
programmable sensor key lights up.
The ring tone is deactivated. In this case, the programmable sensor key flashes when an incoming call is received.
57
Enhanced phone functions
Step by Step
Enhanced phone functions
Incoming calls
Rejecting a call
You can reject an incoming call.
In the pop-up menu:
Reject
Select and confirm the option shown.
The caller hears a busy signal.
If the rejected caller’s phone number is transmitted, it is saved in the call list. You can then call
this party back at a later time.
Deflecting a call
Using call deflection
Prerequisite: An incoming call is displayed or signaled.
In the pop-up menu:
Deflect
Select and confirm the option shown.
The call is immediately deflected if a destination phone
number is programmed (Æ page 59).
or If you did not set a phone number when programming
call deflection, a pop-up menu appears prompting you
to enter a destination phone number for call deflection.
j Enter and confirm the destination phone number.
The call is deflected.
58
Enhanced phone functions
Step by Step
Permitting call deflection
(z Æ page 130.)
N Press the key shown.
User
Select and confirm the option shown.
if nec. j Enter and confirm the User password.
Configuration
Select and confirm the option shown.
Incoming calls
Select and confirm the option shown.
Deflecting
Select and confirm the option shown.
Allow deflection
Select and confirm the option shown.
Yes
Select and confirm the option shown in the context
menu.
Default destination
Select and confirm the option shown.
j Enter and confirm the phone number to which the station should be deflected.
Entering a destination phone number is not mandatory when call deflection is active. If you want
to deflect an incoming call, you are prompted to
enter a destination phone number if there is
none stored.
Save & Exit
Select and confirm the option shown.
Deflecting to a DSS number
A call can be deflected to a direct station selection
(DSS) subscriber using the DSS key, if the key is configured and the deflect function is activated by service personnel Æ page 85. In this case, the
Deflect to DSS
line contains the information Yes.
59
Enhanced phone functions
Step by Step
Placing a call on hold
You can use this function to place an ongoing call on
hold, for instance, to prevent the other party overhearing a conversation with a colleague in the same room.
The "Hold" function must be activated by the service
personnel.
Prerequisite: You are conducting a call.
Hold
Select and confirm the option shown in the connections’s context menu.
Retrieving a held call:
Reconnect
Select and confirm the option shown in the connections’s context menu.
Using line keys
On multi-line telephones you can use the line keys to
place ongoing calls on hold.
R Press the corresponding line key. The line key LED
starts flickering. The call is now on hold.
Retrieving a held call:
T Press the corresponding line key. The line key LED
lights up. The call is retrieved.
The LED display Æ page 20 or status display on
the "Overview" tab Æ page 28 indicates to other
multi-line telephones on which this line is also
configured, that the call is on hold. These phones
can then pick up the call.
60
Enhanced phone functions
Step by Step
Held call wait status
After placing a call on hold, you can replace the handset
and then decide if the call should be retrieved or disconnected.
Prerequisite: You placed a call on hold and replaced the
handset.
In the pop-up menu:
Select and confirm the option shown to resume the call
in speakerphone mode.
Retrieve held call
or
Disconnect
Select and confirm the option shown to disconnect the
call.
Activating/deactivating the hold reminder tone
N Press the key shown.
User
Select and confirm the option shown.
if nec. j Enter and confirm the User password.
Configuration
Select and confirm the option shown.
Connected calls
Select and confirm the option shown.
Allow hold rem.
Select and confirm the option shown (z Æ page 131).
Yes
Select and confirm the option shown in the context
menu.
Save & Exit
Select and confirm the option shown.
61
Enhanced phone functions
Step by Step
Setting the hold reminder time
Use the "Hold reminder" function to set the time after
which you want to receive an automatic reminder about
a held call.
The minimum value is 3, that is, the reminder is output
after three minutes. The maximum value is 15 minutes.
N Press the key shown.
User
Select and confirm the option shown.
if nec. j Enter and confirm the User password.
Configuration
Select and confirm the option shown.
Connected calls
Select and confirm the option shown.
Hold rem. delay
Select and confirm the option shown (z Æ page 131).
Save & Exit
j Enter a value between 3 and 15 and confirm.
Select and confirm the option shown.
Music on hold
Music on hold is played back when you are placed on
hold by another party, providing this option is active.
N Press the key shown.
User
Select and confirm the option shown.
if nec. j Enter and confirm the User password.
Configuration
Select and confirm the option shown.
Connected calls
Select and confirm the option shown.
Music on hold
Select and confirm the option shown (z Æ page 131).
Yes
Select and confirm the option shown in the context
menu.
Save & Exit
Select and confirm the option shown.
62
Enhanced phone functions
Step by Step
Call waiting (second call)
You can accept a second incoming call in the course of
an ongoing call. The caller hears the on-hook signal
while you hear a call-waiting signal tone.
You can ignore or accept the second call. Before you accept the second call, you can end the first call or place
it on hold for subsequent retrieval.
You can block the second call or the signal tone
(Æ page 65).
Accepting a second call
Prerequisite: You are conducting a call and call waiting
is allowed ( Æ page 65).
In the pop-up menu:
Accept
Select and confirm the option shown.
You can talk to the second party.
The connection to the first party is on hold.
Disconnect & return
Select and confirm the option shown in the second
call’s context menu.
The call with the second party is disconnected and the
connection to the first party is retrieved.
Rejecting a second call
Prerequisite: You are conducting a call and call waiting
is allowed (Æ page 65).
In the pop-up menu:
Reject
Select and confirm the option shown.
The second call is rejected. The caller hears the busy
signal. The caller’s phone number is added to the
missed calls list.
63
Enhanced phone functions
Step by Step
Deflecting a second call
Prerequisite: You are conducting a call and call waiting
is allowed (Æ page 65).
In the pop-up menu:
Deflect
Select and confirm the option shown.
j Enter and confirm the phone number.
The second call is deflected to the destination specified. You are reconnected with the first party.
Connecting parties
Complete Xfer
Select and confirm the option shown in the active connections context menu. The other two parties are now
connected to one another. You can now hang up or dial
another number for instance.
or Connect by hanging up
Prerequisite: Connect by hanging up is activated (contact your service personnel).
] or n Replace the handset or, if you are in speakerphone
mode, press the loudspeaker key. The other two parties
are now connected to one another.
64
Enhanced phone functions
Step by Step
Allowing call waiting
If the Call waiting (second call) function is deactivated, a caller hears the busy signal if you are already conducting a call.
Prerequisite: The option was programmed by your service personnel.
N Press the key shown.
User
Select and confirm the option shown.
if nec. j Enter and confirm the User password.
Configuration
Select and confirm the option shown.
Incoming calls
Select and confirm the option shown.
Handling
Select and confirm the option shown.
Allow call waiting
Select and confirm the option shown (z Æ page 130).
Yes
Select and confirm the option shown.
Save & Exit
Select and confirm the option shown.
65
Enhanced phone functions
Step by Step
Transferring a call
You can transfer your current call to another party with
or without consultation.
Blind transfer
Prerequisite: You are conducting a call. The options "Allow Call Transfer" and "Transfer on Ring" were selected
(Æ page 67).
Blind transfer
Select and confirm the option shown in the connections’s context menu.
j Enter and confirm the phone number of the second party to whom you want to transfer the call.
The graphic display returns to idle following successful transfer.
Transferring with consultation
You can announce a call to a recipient before transferring it.
Prerequisite: You are conducting a call. The options "Allow Call Transfer" and "Transfer on Ring" were selected
(Æ page 67).
Consult
Select and confirm the option shown in the connections’s context menu. The call is placed on hold.
j Enter the phone number of the party to whom you want
to transfer the call.
Dial
66
Confirm.
Enhanced phone functions
Step by Step
If the party answers:
Complete Xfer
Announce the call you want to transfer.
Select and confirm the option shown in the connections’s
context menu.
If the party does not answer:
You do not have to wait for the second party to answer
before you can transfer the call.
Complete transfer
Select and confirm the option shown in the connections’s context menu.
or Replace the handset or, if speakerphone mode is active,
press the lit n key to transfer the call.
If the party does not answer, you will be called back by
the first party.
Allowing call transfer
N Press the key shown.
User
Select and confirm the option shown.
if nec. j Enter and confirm the User password.
Configuration
Select and confirm the option shown.
Connected calls
Select and confirm the option shown.
Allow call transfer
Select and confirm the option shown (z Æ page 131).
Yes
Select and confirm the option shown in the context
menu.
Save & Exit
Select and confirm the option shown.
67
Enhanced phone functions
Step by Step
Allowing "Transfer on Ring"
N
User
If this option is allowed, you can activate call transfer by
replacing the handset even before the called party answers (z Æ page 128).
Press the key shown.
Select and confirm the option shown.
if nec. j Enter and confirm the User password.
Configuration
Select and confirm the option shown.
Outgoing calls
Select and confirm the option shown.
Transfer on ring
Select and confirm the option shown.
Yes
Select and confirm the option shown in the context
menu.
Save & Exit
Select and confirm the option shown.
68
Enhanced phone functions
Step by Step
CTI calls
Beep on auto-answer
Speakerphone mode activates automatically on your
phone if you use a CTI application (such as Outlook) to
dial a number when Auto Answer is active. If Auto Answer is not active, the phone rings first and you have to
press the loudspeaker key or lift the handset to set up
the call. This setting also defines whether or not incoming calls are automatically accepted. An alert beep
sounds when an incoming call is automatically accepted, if the function is active Æ page 130.
Prerequisite: The option was programmed by your service personnel.
N Press the key shown.
User
Select and confirm the option shown.
if nec. j Enter and confirm the User password.
Configuration
Select and confirm the option shown.
Incoming calls
Select and confirm the option shown.
CTI calls
Select and confirm the option shown.
Auto-answer
Select and confirm the option shown.
Yes
Select and confirm the option shown.
Beep on auto-answer
Select and confirm the option shown.
Yes
Select and confirm the option shown.
Save & Exit
Select and confirm the option shown.
69
Enhanced phone functions
Step by Step
Beep on auto-reconnect
When active, this option lets you resume a held call
with either the CTI application or phone. A beep sounds
when you toggle between an active call and a held call
if the function is active.
Prerequisite: The option was programmed by your service personnel.
N Press the key shown.
User
Select and confirm the option shown.
if nec. j Enter and confirm the User password.
Configuration
Select and confirm the option shown.
Incoming calls
Select and confirm the option shown.
CTI calls
Select and confirm the option shown.
Auto-reconnect
Select and confirm the option shown.
Yes
Select and confirm the option shown.
Beep on auto-unhold
Select and confirm the option shown.
Yes
Select and confirm the option shown.
Save & Exit
Select and confirm the option shown.
70
Enhanced phone functions
Step by Step
Making calls
Dialing with the DDS key
You can program frequently used phone numbers on
programmable keys (Æ page 53). If you press a direct
destination selection key for around three seconds, the
associated contact or phone number appears and dialing is initiated.
Prerequisite: A direct destination key is programmed
Æ page 53.
R Press the programmed DDS key. Dialing is initiated.
Dialing a phone number from a list
The following call lists are available in the "CallLog" directory:
• Missed
• Dialled
• Missed
• Forwarded
For a detailed description of the call lists, see
Æ page 30.
O Press the key shown.
CallLog
Select and confirm the option shown.
Dialled
Select and confirm the required call list.
Niels, Bohr
07:06am
Select and confirm the entry you want. The phone number associated with the list entry is dialed.
71
Enhanced phone functions
Step by Step
Using autodial delay
A number is automatically dialed after a set delay starting from the entry of the number’s last digit. The autodial delay can be used:
• when dialing in idle mode
• when deflecting an incoming call
• when setting up a consultation call
• when transferring an answered call.
The delay can be reduced by performing one of the following activities:
i • Press the key shown. This always works.
^ • Lift the handset. This only works if the phone number was entered when the phone was idle or if it
was entered for a consultation call when the handset was off hook.
n • Press the key shown. This only works if the phone
number was entered when the phone was idle and
the loudspeaker key was not lit or if the phone number was entered for a consultation call and the loudspeaker key was not lit.
If an emergency number is preset by your service personnel, the autodial delay for this phone
number is reduced to one second.
Settings for autodial delay
z Æ page 128
The setting does not affect automatic emergency
number dialing.
If you select Autodial delay, you must either confirm
the "Dial" option, press the loudspeaker key or wait until
the autodial delay expires to set up a call when dialing
with the handset on hook.
72
Enhanced phone functions
Step by Step
N Press the key shown.
User
Select and confirm the option shown.
if nec. j Enter and confirm the User password.
Configuration
Select and confirm the option shown.
Outgoing calls
Select and confirm the option shown.
Autodial delay
Select and confirm the option shown.
j Specify a value and confirm your entry.
Save & Exit
Select and confirm the option shown.
Allowing "Busy When Dialing"
If you activate this function, an incoming call received
while you are performing dialing is rejected. The caller
then hears the busy signal (z Æ page 128).
N Press the key shown.
User
Select and confirm the option shown.
if nec. j Enter and confirm the User password.
Configuration
Select and confirm the option shown.
Outgoing calls
Select and confirm the option shown.
Busy when dialling
Select and confirm the option shown.
Yes
Select and confirm the option shown in the context
menu.
Save & Exit
Select and confirm the option shown.
73
Enhanced phone functions
Step by Step
Conference
A conference is also referred to as a three-party or local
conference. It involves up to three participants.
Prerequisite: You are conducting a consultation call
Æ page 41 or have accepted a second call Æ page 63,
and the conference function is active Æ page 75.
Establishing a conference
You can initiate a conference by calling the "Conference" function in the context menu of either
the active or held call.
Select and confirm the option shown in the connection’s context menu. You are connected to both parties
at once.
Conference?
Conducting one-on-one calls
Party
Select the connection you want to clear down on the
display.
Disconnect
Select and confirm the option shown in the context
menu. You are now involved in a one-to-one call with the
remaining call party.
Ending a conference call
Allowing call partners to continue a conference after you exit
Prerequisite: The "Allowing joining in conferences ("
function is activated.
Select and confirm the option shown in the "Conference" context menu.
Exit Conf?
or
] or n Replace the handset or, if you are in speakerphone
mode, press the loudspeaker key. Both call partners remain connected. You are disconnected from the conference call.
74
Enhanced phone functions
Step by Step
Disconnecting a party
End Conf?
Select and confirm any of the connections in the context menu.
Both connections are cleared down – the conference is
cleared down.
Allowing a conference
This option allows or blocks the "Conference" function.
N Press the key shown.
User
Select and confirm the option shown.
if nec. j Enter and confirm the User password.
Configuration
Select and confirm the option shown.
Connected calls
Select and confirm the option shown.
Allow conferences
Select and confirm the option shown (z Æ page 131).
Yes
Select and confirm the option shown in the context
menu.
Save & Exit
Select and confirm the option shown.
75
Enhanced phone functions
Step by Step
Allowing joining in conferences
N
User
With this option, you can allow or block both of your call
partners from continuing the call after you exit the conference call.
Press the key shown.
Select and confirm the option shown.
if nec. j Enter and confirm the User password.
Configuration
Select and confirm the option shown.
Connected calls
Select and confirm the option shown.
Join in conferences
Select and confirm the option shown (z Æ page 131).
Yes
Select and confirm the option shown in the context
menu.
Save & Exit
Select and confirm the option shown.
76
Enhanced phone functions
Step by Step
Call lists
For a detailed description of the different call lists, see
Æ page 30.
Editing entries
select entry
O Press the key shown.
CallLog
Select and confirm the option shown.
Missed
Select and confirm the "Missed calls" list for example.
The list is sorted chronologically; the last caller entered
is listed as the first entry.
You can use the touch guide to scroll through the list.
Niels, Bohr
22.05 13:22
Select the list entry.
View details
Details
Select and confirm the option shown in the context
menu.
For display and information shown Æ page 31
Delete entry
Delete
Select and confirm the option shown in the context
menu.
The entry is deleted.
Delete all entries
O Press the key shown.
CallLog
Select and confirm the option shown.
Dialled
Select and confirm the "Dialed calls" list for example.
Options
Select the option shown.
Delete All
Select and confirm the option shown in the context
menu.
All entries in the list displayed are deleted.
77
Making and receiving calls using multi-line phones
Step by Step
Making and receiving calls using
multi-line phones
You can use your OpenStage 40 as a multi-line phone.
If you have any questions regarding how to configure
your OpenStage phone as a multi-line phone, please
contact your service personnel.
The following is a description of the telephony scenarios for multi-line phones. To facilitate comprehension,
you should familiarize yourself with the enhanced telephony application and how to use the line keys beforehand. Furthermore, you can specify individual settings
for your multi-line telephone. Refer to the following sections for a detailed description of the individual components:
• Introduction to multi-line phones Æ page 14
• Lines and line keys Æ page 19
• Multi-line telephony interface Æ page 28
• Individual settings Æ page 86
78
Making and receiving calls using multi-line phones
Step by Step
Incoming calls
Depending on your individual settings, you will be notified of incoming calls Æ page 124.
Accepting calls for the primary line
In this case, the telephone behaves in the same way as
a single-line telephone. See Æ page 35 and Æ page 58.
Accepting calls for secondary lines
Prerequisite: The secondary line is configured on your
multi-line telephone.
Using the handset
^ Lift the handset.
[ Conduct call.
The line that rings is automatically selected. If
calls are ringing on more than one line, you will
be connected to the line that has been ringing
the longest.
Using the line keys
T Press the blinking line key.
Speakerphone mode.
Accept
Select and confirm the option shown.
Speakerphone mode.
79
Making and receiving calls using multi-line phones
Step by Step
Making calls
You must seize a line before you can make calls on a
multi-line telephone.
Trunk seizure can be configured on an individual basis.
Your service personnel can determine if the lines on
your telephone can be automatically seized and with
which priority.
If you have seized a secondary line, this line is
reserved for you for making calls for a specific
period as defined by the service personnel. No
other user who has this line assigned to their
telephone can seize this line during this period.
Manual trunk seizure
^ or n or o Lift the handset or press the speakerphone mode or
headset key.
S Press the required line key.
or
h Press the key shown to open the Overview tab
Æ page 28.
Line 2
Select and confirm the required line (e.g. line 2). The selected line is displayed on the screen.
j Enter the phone number or use redial, for example. The
connection is set up.
Automatic trunk seizure
Prerequisite: Your service personnel has configured
automatic trunk seizure.
^ or n or o Lift the handset or press the speakerphone mode or
headset key.
R The line defined during configuration is seized.
j Enter the phone number. The connection is set up.
80
Making and receiving calls using multi-line phones
Step by Step
Dial last dialed number
The last number dialed on your telephone (regardless of
the line used for the call) is displayed for redialing via the
context menu of the selected number.
^ or n or o Lift the handset or press the speakerphone mode or
headset key.
S Press the required line key. (Æ page 80).
In the pop-up menu:
Redial {1} 12345
Confirm. The connection is set up.
81
Making and receiving calls using multi-line phones
Step by Step
During calls
Making and receiving calls on a single line
If you only use one line on your multi-line telephone to
make calls, and you receive calls on the same line, the
phone operates in the same way as a single-line telephone:
• Redialing Æ page 39
• Consultation Æ page 41
• Alternating Æ page 42
• Callback Æ page 49
• Hold Æ page 60
• Call waiting (second call) Æ page 63
• Transferring a call Æ page 66
• Conference Æ page 74
Functions available exclusively for the primary line:
• Call lists Æ page 30
• Voicemails Æ page 29
• Call forwarding Æ page 44
• Do not disturb Æ page 91
Depending on your individual settings, you will
be notified of incoming calls Æ page 89.
82
Making and receiving calls using multi-line phones
Step by Step
Making and receiving calls with multiple
lines
Incoming call on another line when dialing a number
Prerequisite: You are in the process of dialing a number
(Æ page 80). At the same time, a call is incoming on another line.
You can answer the call as normal (Æ page 79).
The line on which dialing is initiated is placed on hold
while you answer the call.
When you have finished the call, dialing is automatically
resumed on the held line.
Accepting a waiting call
Depending on the settings for "Rollover", you will
be notified of incoming calls Æ page 89.
Prerequisite: You are conducting a call. At the same
time, a call is incoming on another line.
[ Call on line 1.
In the pop-up menu for line 2:
Select and confirm the option shown.
Accept
or
T Press the line key for line 2. The call on line 1 is placed
on hold.
All multi-line users that share the line on which
the call is being held (Æ page 20) can now pick
up the held call. To prevent other users from answering the held call, you must place the call on
"Consultation"Æ page 41.
[ Conduct call on line 2.
\ End call on line 2.
T Press line key for line 1.
[ Retrieve call on line 1.
83
Making and receiving calls using multi-line phones
Step by Step
Direct station selection key
Apart from line keys, service personnel can also configure direct station selection (DSS) keys. You can use a
DSS key to call an internal station directly, pick up calls
for this station or forward calls directly to it.
Calling a station directly
You cannot use DSS if the user is on another call (flashing LED).
Calling from the idle menu
S Press the relevant DSS key.
or
h Press the key shown to open the Overview tab
Æ page 28.
Select and confirm the DSS line. The key lights up and
a connection is established.
DSS call 1
Service personnel can configure the DSS key so
that the connection is also established when the
DSS station has activated do-not-disturb or call
forwarding.
Consultation with the DSS station
S
Prerequisite: You are conducting a call and service personnel have configured the DSS key for consultation.
Press the relevant DSS key for the consultation. The key
lights up and a connection is established. If the station
answers, you can toggle, transfer the first call or initiate
a conference.
If service personnel have configured transfer instead of consultation, you can only transfer the
current call to the DSS station.
84
Making and receiving calls using multi-line phones
Step by Step
Call pickup
You can pick up calls for another DSS station. If a call is
waiting on their line, the LED flashes.
Indirect pickup
Prerequisite: The auto-answer function must be deactivated Æ page 69.
T Press the direct station selection key. The call is routed
to your primary line and rings.
^ or n or o Lift the handset or press the speakerphone mode or
headset key. You are connected with the other party.
Rejecting a call
Prerequisite: Service personnel must activate the reject option for DSS keys and auto-answer must be deactivated Æ page 69.
T Press the direct station selection key. The call is routed
to your primary line and rings.
Reject
Select and confirm the option shown in the pop-up
menu.
The caller hears a busy signal.
Direct pickup
Prerequisite: The auto-answer function must be activated Æ page 69.
T Press the direct station selection key. The call is routed
to your primary line and you are immediately connected
with the other party via speakerphone.
Deflecting a call to a DSS station
Prerequisite: The deflect function must be approved
for DSS keys (see Æ page 59).
If you receive a call on one of your lines, you can immediately deflect it to the DSS station.
T Your phone rings and a line key flashes.
S Press the relevant DSS key. The call is deflected to the
DSS station. If the DSS station does not answer, you
can pick up the call by pressing the DSS key.
85
Making and receiving calls using multi-line phones
Step by Step
Settings for multi-line phones (keyset)
The details for each keyset line contain supplementary
information for the user. The following uneditable fields
are displayed:
• Address
– Displays the phone number for the line
• Ring on/off
– Shows whether the ringer is activated for this line
• Selection order
Displays the priority of each line seizure when the handset is lifted or the loudspeaker key for this line is
pressed
Displaying the line in the overview
Specify here if the selected line should be displayed in
the line overview.
N Press the key shown.
User
Select and confirm the option shown.
if nec. j Enter and confirm the User password.
Configuration
Select and confirm the option shown.
Keyset
Select and confirm the option shown.
Lines
Select and confirm the option shown.
Line 1
Select and confirm the required line (e.g. line 1).
Allow in overview
Select and confirm the option shown (z Æ page 132).
Yes
Select and confirm the option shown in the context
menu.
Save & Exit
Select and confirm the option shown.
86
Making and receiving calls using multi-line phones
Step by Step
Setting the time for a delayed ringer
Specify the length of time before a held call should be
signaled on a line.
N Press the key shown.
User
Select and confirm the option shown.
if nec. j Enter and confirm the User password.
Configuration
Select and confirm the option shown.
Keyset
Select and confirm the option shown.
Lines
Select and confirm the option shown.
Line 1
Select and confirm the required line (e.g. line 1).
Ring delay
Select and confirm the option shown.
j Enter and confirm a delay value (z Æ page 132).
Save & Exit
Select and confirm the option shown.
You can activate and deactivate the set delay time for all
line keys using a function key Æ page 57.
87
Making and receiving calls using multi-line phones
Step by Step
Configuring the line overview display
Specify here the sequence in which the individual lines
in the line overview should appear on the display.
N Press the key shown.
Select and confirm the option shown.
User
if nec. j Enter and confirm the User password.
Configuration
Select and confirm the option shown.
Keyset
Select and confirm the option shown.
Overview
Select and confirm the option shown.
All lines that are displayed in the overview (Æ page 86)
are listed.
Select and confirm the required line (e.g. line 1).
Line 1
Select one of the following options from the context
menu to move an individual line:
• Move up
• Move down
• Move to top
• Move to bottom
or
Select and confirm the option shown to arrange the
lines in the same sequence as the line keys
Use FPK order
or
Add all lines
Select and confirm the option shown to display all line
keys in the overview.
The setting made for "Allow in overview"
(Æ page 86) is disregarded here.
Save & Exit
88
Select and confirm the option shown.
Making and receiving calls using multi-line phones
Step by Step
Rollover for a line
T
Your service personnel can determine how rollover calls
are to be signaled.
Only the relevant line key blinks.
or
ZT You hear a special advisory tone via the currently acor
tive microphone and the corresponding line key blinks.
ZT You here the configured ringer melody briefly (approx. 3 seconds) via the loudspeaker and the corresponding line key blinks.
The ringer melody is not played in speakerphone
mode.
Z t k The telephone rings using the configured call signal, the
corresponding line key blinks, and a pop-up menu containing the available information is displayed.
89
Privacy/security
Step by Step
Privacy/security
Deactivating the ringer
You can deactivate your ring tone if you do not want to
be disturbed by your phone ringing.
) Hold down the key shown.
The "Ringer off" icon appears in the status bar on the
idle display Æ page 23.
) Hold down the key once again to reactivate the ringer.
The icon disappears.
You can also switch the function on and off using the option in the idle menu.
Select and confirm the option shown.
Ringer off?
or
Deactivating the ring tone using a programmable
sensor key
Prerequisite: The "Ringer off" programmable sensor
key must be programmed (Æ page 53).
R Press the "Ringer off" programmable sensor key.
An incoming call is signaled by a single ring tone burst.
T The programmable sensor key blinks.
S Press the lit programmable sensor key once more to deactivate the "Ringer off" function.
90
Privacy/security
Step by Step
Do not disturb
If "Do not disturb" is activated, your telephone will not
ring. The caller hears the busy signal.
On multi-line telephones (Æ page 14) you can
only activate the "Do not disturb" function for
your primary line.
Prerequisite: A programmable key must be assigned
the function "DND" (Do Not Disturb) (see Æ page 53).
"Do not disturb" must be activated (Æ page 92).
Enabling do not disturb via a key
S Press the "Do not disturb" programmable key.
T The programmable key blinks to signal incoming calls.
The caller hears the busy signal. Calls for pickup groups
are however connected.
R Press the lit programmable key once more to deactivate
the "Do not disturb" function.
You can also use the programmable key to activate the "Do not disturb" function during a call or
deactivate it when an incoming call is being signaled.
or
Enabling do not disturb via the idle menu
Select and confirm the option shown in the idle menu.
The do not disturb icon appears in the header.
Do not disturb on
or
Do not disturb off
Select and confirm the option shown in the idle menu.
The "Do not disturb" icon is deleted.
91
Privacy/security
Step by Step
Allowing "Do not disturb"
N Press the key shown.
User
Select and confirm the option shown.
if nec. j Enter and confirm the User password.
Configuration
Select and confirm the option shown.
Incoming calls
Select and confirm the option shown.
Handling
Select and confirm the option shown.
Allow DND
Select and confirm the option shown (z Æ page 130).
Yes
Select and confirm the option shown.
Save & Exit
Select and confirm the option shown.
92
Privacy/security
Step by Step
Security
Changing the User password
Your User password protects your individual configurations, including your language settings. You can also use
the User password to lock your telephone Æ page 94.
The preset password "000000" corresponds to a
blank password. In other words, the phone cannot be locked and the user menu is not password protected.
N Press the key shown.
User
Select and confirm the option shown.
if nec. j Change and confirm User password.
Security
Select and confirm the option shown.
User password
Select and confirm the option shown.
j Specify a new password (at least six characters, text entry, see Æ page 22) and confirm your entry.
Confirm password
Select and confirm the option shown.
j Enter the password again and confirm.
Save & Exit
Select and confirm the option shown.
The User password can also be modified via the
Web interface (Æ page 136).
93
Privacy/security
Step by Step
Locking the phone
You can lock your phone to protect it against unauthorized access. In this way, no one can make calls or
change your user settings unless they know your user
password.
Predefined numbers from the dial plan can still be dialed
when the phone is locked. For more information, contact your administrator.
If an emergency number is entered by service personnel, "Emergency call" appears on the display when you
use the line on a locked phone.
You can only lock the phone if you set a user
password (Æ page 93). The password for this
should not match the default "000000".
Activating the phone lock
( Press the key until "Phone lock: Confirm locking the
phone" appears.
Confirm. The phone is locked.
Confirm lock
or
N Press the key shown.
User
Select and confirm the option shown.
j Enter and confirm the User password.
Security
Select and confirm the option shown.
Phone lock
Select and confirm the option shown.
Yes
Select and confirm the option shown.
Save & Exit
Select and confirm the option shown. The phone is
locked.
94
Privacy/security
Step by Step
Unlocking the phone
Unlock phone
Confirm.
or If the display is empty,
( Hold down the key shown until "Unlock phone Enter
Password" appears.
j Enter and confirm the User password. The phone is unlocked if the password is correct.
95
Mobility function
Step by Step
Mobility function
Prerequisite: Your phone is configured to support mobility by service personnel. A DLS server is available in
the LAN and its address is entered in the phone.
Mobility scenarios
When you log on to your phone, or any other mobilityenabled phone, the following scenarios are possible:
Logging on and off at the same phone
•
•
Log on as a mobility user Æ page 97.
Log off as a mobility user Æ page 98.
Logging on and off at different phones
In these cases, service personnel may have made the
following settings:
• Log on at a remote phone with forced logon, when
the user is still logged on at that phone Æ page 99.
• Delayed logon at a remote phone with forced logon,
when the user is still logged on at that phone and
the phone is busy Æ page 100.
96
Mobility function
Step by Step
Logging on and off at the same phone
Logging on to the phone
No other mobility user is logged on.
Logon via a key
If one of the program keys is configured for the mobility
function.
S Press the "Mobility" program key.
or Logon via a menu
Mobile logon
Select and confirm the option shown in the telephony
interface context menu (Æ page 25).
The Mobility logon dialog appears.
Mobility ID
Select and confirm the option shown.
j Enter and confirm the mobility code (generally your official phone number).
User password
Select and confirm the option shown.
j Enter the user password and confirm with OK (select
the input mode if necessary).
Logon
Select and confirm the option shown in the context
menu.
The following messages appear on the display:
• Logging on mobile user
• Validating
• Registering
• Downloading user data
Once the logon is complete, the mobility program key
LED lights up and the mobility icon
appears in the
graphic display next to the mobile phone number.
97
Mobility function
Step by Step
Logging off from the phone
Prerequisite: You are logged on as a mobility user.
R Press the "Mobility" program key.
or Log on via the telephony interface context menu
Æ page 27
Mobile logoff
Select and confirm the option shown. The logoff procedure starts immediately.
or If you need to enter a password, the following message
appears:
"Mobility logoff User password required"
Please Enter Password
Select and confirm the option shown. You will see the
prompt, "Please enter mobility password".
j Please enter user password.
Please Enter Password
Select and confirm the option shown.
If you enter the password incorrectly, the following message appears: "User password invalid".
You can cancel the function or retry the user
password.
The logoff procedure begins. In the graphic display, the
following messages appear:
• Logging off mobile user
• Uploading user profile
• Registering
• Downloading user data
After you have logged off, the mobility icon
den.
98
is hid-
Mobility function
Step by Step
Logging on at different telephones
If the user is already logged on at another phone and
"Logon with forced logoff" is deactivated for the mobility
user, the logon is rejected.
Logging on with forced logoff at a remote
phone
If the user is already logged on at another phone and
the remote phone is busy, the logon is rejected.
If the additional setting "Forced logoff during call" is
made by service personnel without entering a time, the
system does not take into account whether the remote
phone is busy or not.
Logon via a key
If one of the program keys is configured for the mobility
function.
S Press the "Mobility" program key.
or Logon via a menu
Mobile logon
Select and confirm the option shown in the telephony
interface context menu Æ page 27.
The Mobility logon dialog appears.
Mobility ID
Select and confirm the option shown.
j Enter and confirm the mobility code (generally your official phone number).
User password
Select and confirm the option shown.
j Enter and confirm the user password.
Logon
Select and confirm the option shown.
99
Mobility function
Step by Step
The following mobility messages appear in the display:
• Validating
• Logging off elsewhere
• Registering
• Downloading user data
The logoff is simultaneously displayed on the remote
phone. Once the logon is complete, the mobility program key LED lights up and the mobility icon appears in
the graphic display
.
Logging on with forced, delayed logoff at a remote phone
When the remote phone is busy and service personnel
have configured "Forced logoff during call" with a delay,
forced logoff only occurs once this time has elapsed.
Logon via a key
S Press the "Mobility" program key. You are prompted to
enter your mobility password.
or Logon via a menu
Mobile logon
Select and confirm the option shown in the telephony
interface context menu Æ page 27.
The Mobility logon dialog appears.
Mobility ID
Select and confirm the option shown.
j Enter and confirm the mobility code (generally your official phone number).
User password
Select and confirm the option shown.
j Enter and confirm the user password.
Logon
Select and confirm the option shown.
The following mobility messages appear in the display:
• Validating
• Logging off elsewhere
100
Mobility function
Step by Step
At the same time, the graphic display on the
busy remote phone shows "Forced logoff pending". After a time set by the service personnel,
the active call is ended and the remote logon is
performed.
•
•
Registering
Downloading user data
Once the logon is complete, the mobility program key
LED lights up and the mobility icon appears in the
graphic display
.
101
HiPath 8000 functions
Step by Step
HiPath 8000 functions
The System supports a number of functions that you
can activate and deactivate from your phone.
On multi-line telephones, the full scope of HiPath
8000 functions is only available for the primary
line.
Feature toggle key
You can pick a programmable sensor key and program it
as a feature toggle key for activating the "make line
busy" and "stop hunt" functions.
You can then use the programmable sensor key to activate or deactivate the relevant System function on the
server.
You can only program first-level programmable sensor
keys because those linked to LEDs are used to display
function status as either on (LED on) or off (LED off).
The LED indicates the status of the function on the
server and can therefore change without any of the programmable sensor keys being pressed.
If one of the programmable sensor keys is pressed, you
can see the status of the function on the graphic display.
Example:
Switching between "Line busy" and "Line free" (see also
Æ page 114).
Prerequisite: Your service personnel configured a programmable sensor key with the function "Busy" ("make
line busy" for the hunt group) Æ page 56.
S Press the programmable sensor key.
"Line busy" appears on the graphic display, for instance,
and the key lights up.
R Press the lit programmable sensor key once again to release the line.
"Line free" appears on the graphic display.
102
HiPath 8000 functions
Step by Step
Using system call forwarding
This section describes the system call forwarding functions in System. These functions are activated with feature codes. You can also program a frequently used
function on a programmable sensor key.
All call forwarding types described in this section
refer to system call forwarding which is controlled by HiPath 8000.
Never combine phone-based call forwarding
with system call forwarding.
Call forwarding busy line
With Call forwarding busy line (CFBL), you can use a
feature code to activate or deactivate forwarding for
calls received on a busy line and define a forwarding
destination.
Your service personnel may also have configured
a permanent forwarding destination so that calls
are automatically forwarded to this fixed phone
number as soon as you activate CFBL forwarding.
Activating
^ Lift the handset.
j Enter the code, for example, *90 (contact your service
personnel).
or if you also want to set the forwarding destination
j enter the code with a phone number, for example
*901234567 to deactivate call forwarding.
Z You hear a confirmation tone.
Deactivating
^ Lift the handset.
j Enter the code, for example, *91 (contact your service
personnel) to deactivate call forwarding.
Z You hear a confirmation tone.
103
HiPath 8000 functions
Step by Step
Call forwarding don’t answer
With Call forwarding don’t answer (CFDA), you can
use a feature code to activate call forwarding to another
number if the handset is not picked up after a certain
number of rings (2 to 7).
You can use the feature code to activate/deactivate this
function and define a forwarding destination.
Your service personnel may also have configured
a permanent forwarding destination so that calls
are automatically forwarded to this fixed phone
number as soon as you activate CFDA forwarding.
Activating
^ Lift the handset.
j Enter the code, for example, *92 (contact your service
personnel).
or if you also want to set the forwarding destination
j Enter the code with a phone number, for example,
*901234567 to activate call forwarding.
Z You hear a confirmation tone.
Deactivating
^ Lift the handset.
j Enter the code, for example, *93 (contact your service
personnel) to deactivate call forwarding.
Z You hear a confirmation tone.
104
HiPath 8000 functions
Step by Step
Call forwarding unconditional
With Call forwarding unconditional, all incoming calls
are forwarded to a different destination.
You can use the feature code to activate/deactivate this
function and define a forwarding destination.
Activating
^ Lift the handset.
j Enter the code, for example, *72 (contact your service
personnel).
Z Wait until you hear the confirmation tone.
j Enter the number of the phone to which you want to
forward the calls.
Z Wait until you hear the confirmation tone.
If the "Courtesy call" function is active, the System dials
the phone to which you forwarded your calls.
• If the party at this phone answers, you can inform
him or her that your calls are being forwarded.
• If the party does not answer or the station is busy,
activate the feature once again. If you complete this
operation within two minutes, you will hear the confirmation tone followed by the dial tone. System
does not output an acoustic signal to inform the other party at the forwarding destination about the second activation.
If Call forwarding unconditional is active, calls forwarded when the line is idle are signaled by a short ring
burst (around 0.5 seconds) at the forwarded station.
This is a reminder that this feature is active.
Deactivating
^ Lift the handset.
j Enter the code, for example, *73 (contact your service
personnel).
105
HiPath 8000 functions
Step by Step
Call forwarding selective
With Call forwarding selective, you can create a list of
phone numbers (selection list) that should be automatically forwarded. If a caller’s phone number matches an
entry in this list, the call is transferred to the forwarding
number. A forwarding number can be:
• another phone or another party
• a voice mailbox
• an announcement service.
If the caller’s number is not in the call forwarding list,
your phone rings as usual.
Activating
^ Lift the handset.
j Enter the code, for example, *63 (contact your service
personnel).
You are requested to add members to a list and then activate the property accordingly. The list can also be managed by your service personnel.
Deactivating
^ Lift the handset.
j Enter the code, for example, *83 (contact your service
personnel).
Z You hear a confirmation tone.
106
HiPath 8000 functions
Step by Step
Making anonymous calls
Your service personnel decides whether or not your caller ID (name and phone number) is displayed on a called
party’s station. Anonymous calling is when your data is
not transmitted. The settings configured can be deactivated, however, for specific calls.
•
•
If your caller ID is transmitted: your caller ID is
displayed.
If your caller ID is suppressed: "Private" is displayed.
Deactivating anonymous calling
If your service personnel permanently activated anonymous calling for your phone, you can deactivate this
setting as follows:
^ Lift the handset.
j Enter the code, for example, *64 (contact your service
personnel) to transmit the caller information.
Z You hear a confirmation tone.
Activating anonymous calling
If your service personnel activated caller ID transmission for your phone, you can deactivate this setting as
follows:
^ Lift the handset.
j Enter the code, for example, *45 (contact your service
personnel) to suppress the caller ID.
Z Wait until you hear the confirmation tone.
Caller ID transfer is suppressed. "Private/Anonymous"
appears on the called party’s display instead of the caller ID.
107
HiPath 8000 functions
Step by Step
Temporarily activating anonymous calling for
the next call
If your service personnel activated caller ID transmission for your phone, you can deactivate this setting for
the next call as follows:
^ Lift the handset.
j Enter the code, for example, *68 (contact your service
personnel).
Z Wait until you hear the confirmation tone.
j Dial the phone number of the party you want to contact.
Caller ID transmission is reactivated after this call.
Temporarily deactivating anonymous calling
for the next call
If your service personnel suppressed caller ID transmission for your phone, you can enable this setting for the
next call as follows:
^ Lift the handset.
j Enter the code, for example, *67 (contact your service
personnel).
Z Wait until you hear the confirmation tone.
j Dial the phone number of the party you want to contact.
When you end this call, caller ID transmission is suppressed once again for the next call.
108
HiPath 8000 functions
Step by Step
Creating a list for selective calls
For call acceptance
You can create a list of the phone numbers from which
you are willing to accept calls (also known as a selection
list). Your service personnel know how long this list may
be in the System used on site in your facility.
A connection is set up if a caller’s phone number matches a number in the selection list. If the caller’s number
does not appear in the list:
• the caller receives a message that the party refuses
to accept any calls from this number,
or •
the call is forwarded to an external phone number.
Contact your service personnel for information on how
your System is configured on site.
^ Lift the handset.
j Enter the code, for example, *27 (contact your service
personnel).
Various announcements deliver the following information:
• the name of the feature (selective call acceptance)
• the current status (active or inactive)
• the current scope of the selection list.
These announcements are followed by acoustic user
prompts that let you:
• add entries to the selection list
• delete entries in the selection list
• check the selection list
• activate or deactivate the function.
109
HiPath 8000 functions
Step by Step
For call rejection
As for selective call acceptance, you can create a selection list with the phone numbers of parties from whom
you are not willing to accept calls. Your service personnel know how long this list may be in the System used
on site in your facility.
A call is not connected if the caller’s phone number
matches a number in the selection list; the caller is notified that the called party rejects calls from this number. If the caller’s number is not in the selection list, the
call is to you as usual.
^ Lift the handset.
j Enter the code, for example, *60 (contact your service
personnel).
Various announcements deliver the following information:
• the name of the feature (selective call rejection)
• the current status (active or inactive)
• the current scope of the selection list.
These announcements are followed by acoustic user
prompts that let you:
• add entries to the selection list
• delete entries in the selection list
• check the selection list
• activate or deactivate the function.
110
HiPath 8000 functions
Step by Step
Anonymous calls
Rejecting
You can reject all calls from parties that activated a data
protection feature (for example, caller ID suppression)
to prevent their phone number from being transmitted.
In this case, you are not informed that a call was rejected.
^ Lift the handset.
j Enter the code, for example, *77 (contact your service
personnel).
Accepting
You can also accept calls from parties that activated a
data protection feature (for example, caller ID suppression) to prevent their phone number from being transmitted.
^ Lift the handset.
j Enter the code, for example, *87 (contact your service
personnel).
111
HiPath 8000 functions
Step by Step
Using abbreviated dialing
Abbreviated dialing gives you access to a central list of
frequently dialed phone numbers.
Single-key abbreviated dialing
This function lets you dial frequently dialed numbers
faster by simply pressing a numerical key. You can enter
eight phone numbers in this list. This list is managed by
the service personnel.
^ Lift the handset.
j Enter the code, for example, *74 (contact your service
personnel), followed by the digit (2 to 9) for the phone
number. The number is automatically dialed.
Two-key abbreviated dialing
This function lets you dial frequently dialed numbers by
simply pressing numerical keys. As these involve twodigit numbers, you can store up to 30 phone numbers.
This list is managed by the service personnel.
^ Lift the handset.
j Enter the code, for example, *75 (contact your service
personnel), followed by a number between 20 and 49
for the phone number you want to dial.
The number is automatically dialed.
Tracing a call
You can have the last incoming call automatically traced.
This is used in particular to identify malicious, bothersome or troublesome calls.
^ Lift the handset.
j Enter the access code, for example, *57 (ask your service personnel).
Z You hear a confirmation tone. The phone number of the
last incoming call is displayed.
112
HiPath 8000 functions
Step by Step
Group functions
To ensure optimum handling of specific calls, your telephone can be assigned to a pickup group and/or a hunt
group.
Call pickup groups
Your service personnel can incorporate multiple telephones in a call pickup group. If your telephone is assigned to a pickup group, you can also accept calls intended for other members of the group. Your telephone
can only be assigned to one call pickup group at any one
time.
If you want another member of the group to pick up an
incoming call, simply ignore the call.
Your service personnel can configure a call pickup group
as follows:
Notification:
Calls to a call pickup group are signaled in the same way
as other calls. However, the menu option "Pickup call"
appears instead of "Answer call". In addition, the caller
and the call destination are displayed on the graphic display. Requests for call pickup groups take priority over
call forwarding and refuse settings.
User-controlled
This function allows you to query the call pickup group.
If a call is pending for a call pickup group, you can accept
the call in the same way as you would accept a call signaled using the notification function. If there is no call to
pick up, a pop-up message is displayed informing you
that call pickup is not possible.
113
HiPath 8000 functions
Step by Step
Hunt group functions
Your service personnel can incorporate multiple telephones in a hunt group. If your telephone is assigned to
a hunt group, HiPath 8000 forwards calls for the members of your group in accordance with specific rules defined by your service personnel. Hunt groups are a simple solution for distributing calls to a group of
telephones.
If you want another member of the group to pick up an
incoming call, you can set your telephone to signal the
busy status for your line to the other members of the
hunt group. Hunt group calls will then no longer be forwarded to your telephone.
This feature can also be configured using the programmable feature toggle key Æ page 102.
Making a line busy
This prevents this line being used for calls in a hunt
group.
Activating
^ Lift the handset.
j Enter the code, for example, *96 (contact your service
personnel).
Z Wait until you hear the confirmation tone.
Deactivating
Make the line free once more for the hunt group.
^ Lift the handset.
j Reenter the code, for example, *96 (contact your service personnel).
Z Wait until you hear the confirmation tone.
114
HiPath 8000 functions
Step by Step
Marking the last line in the hunt group chain
Sets the "stop hunt" line in the hunt group chain. The
system will stop looking for a free line in the hunt group
chain after it reaches this line.
Activating
^ Lift the handset.
j Enter the code, for example, *97 (contact your service
personnel).
Z Wait until you hear the confirmation tone.
Deactivating
Unmark the line as the end of the hunt group chain.
^ Lift the handset.
j Reenter the code, for example, *97 (contact your service personnel).
Z Wait until you hear the confirmation tone.
115
Individual phone configuration
Step by Step
Individual phone configuration
Language settings
Selecting a language
N Press the key shown.
User
Select and confirm the option shown.
if nec. j Enter and confirm the User password.
Locality?
Select and confirm the option shown.
Speech?
Select and confirm the option shown (z Æ page 136).
English
Select and confirm the language in the context menu.
Save & Exit
Confirm.
You may choose from the following languages:
1. Espaбol
2. Deutsch
3. Nederlands
4. FranÐßais
5. English
6. CeÝ tina
7. Italiano
8. Polski
9. PortuguЙs
10. ‰³¦Êñá
116
Individual phone configuration
Step by Step
Setting the country
Adapt your phone settings to suit the country-specific
conditions (for example, transmission parameters)
(z Æ page 136).
The graphic display’s default appearance depends on the language package installed.
N Press the key shown.
User
Select and confirm the option shown.
if nec. j Enter and confirm the User password.
Locality
Select and confirm the option shown.
Country
Select and confirm the option shown.
Germany
Select and confirm the country in the context menu.
Save & Exit
Confirm.
You may choose from the following countries:
1. Argentina
2. Australia
3. Austria
4. Belgium
5. Brazil
6. Canada
7. China
8. Croatia
9. Czech Republic
10. Denmark
11. Finland
12. France
13. Germany
14. Hungary
15. India
16. Italy
17. Luxembourg
18. Mexico
19. Netherlands
20. Norway
21. Poland
22. Portugal
23. Slovakia
24. South Africa
25. Spain
26. Sweden
27. Switzerland
28. Thailand
29. United Kingdom
30. United States
31. Vietnam
117
Individual phone configuration
Step by Step
Display settings
Contrast
The display has six contrast levels that you can set according to your light conditions.
N Press the key shown.
User
Select and confirm the option shown.
if nec. j Enter and confirm the User password.
Phone
Select and confirm the option shown.
Display
Select and confirm the option shown.
Contrast
Select and confirm the option shown (z Æ page 133).
gh Set and confirm the contrast.
Save & Exit
Confirm.
Key module contrast
If a key module is connected to your OpenStage 40, you
can set contrast for it.
N Press the key shown.
User
Select and confirm the option shown.
if nec. j Enter and confirm the User password.
Phone
Select and confirm the option shown.
Display
Select and confirm the option shown.
Key.Module.Contr
Select and confirm the option shown (z Æ page 133).
gh Set and confirm the contrast.
Save & Exit
118
Confirm.
Individual phone configuration
Step by Step
Date and time
You can choose the date and time display here
(z Æ page 127).
You must set the date and time manually if your
phone is not connected to an (S)NTP server.
Setting the time
N Press the key shown.
User
Select and confirm the option shown.
if nec. j Enter and confirm the User password.
Date and time
Select and confirm the option shown.
Time
Select and confirm the option shown.
j Enter and confirm the time.
Save & Exit
Confirm.
Setting the date
N Press the key shown.
User
Select and confirm the option shown.
if nec. j Enter and confirm the User password.
Date and time
Select and confirm the option shown.
Date
Select and confirm the option shown.
j Enter and confirm the date.
Save & Exit
Confirm.
119
Individual phone configuration
Step by Step
Setting daylight saving time
(z Æ page 127.)
N Press the key shown.
User
Select and confirm the option shown.
if nec. j Enter and confirm the User password.
Date and time
Select and confirm the option shown.
Daylight saving
Select and confirm the option shown.
Yes
Select and confirm the option shown in the context
menu.
Save & Exit
Confirm.
Setting the difference between daylight saving and
standard time
This setting lets you specify the time difference that
should be applied for daylight saving time.
N Press the key shown.
User
Select and confirm the option shown.
if nec. j Enter and confirm the User password.
Date and time
Select and confirm the option shown.
Difference (mins)
Select and confirm the option shown.
j Enter and confirm the difference between daylight and
standard time in minutes.
Save & Exit
120
Confirm.
Individual phone configuration
Step by Step
Time display format
N Press the key shown.
User
Select and confirm the option shown.
if nec. j Enter and confirm the User password.
Locality
Select and confirm the option shown.
Time format
Select and confirm the option shown.
24 hour
Select and confirm the time format (12- or 24-hour display) in the context menu (z Æ page 136).
Save & Exit
Confirm.
Date display format
N Press the key shown.
User
Select and confirm the option shown.
if nec. j Enter and confirm the User password.
Locality
Select and confirm the option shown.
Date format
Select and confirm the option shown.
dd/mm/yyy
Select and confirm the format you want.
(z Æ page 136.)
Save & Exit
Confirm.
.
121
Individual phone configuration
Step by Step
Audio settings
Setting the volume
Use this selection to set the following volumes:
• Loudspeaker
• Ringer
• Handset
• Headset
• Handsfree
• Rollover
Example: Handset:
N Press the key shown.
User
Select and confirm the option shown.
if nec. j Enter and confirm the User password.
Audio
Select and confirm the option shown.
Volumes
Select and confirm the option shown.
Handset
Select and confirm the volume you want to adjust (for
example, "Handset").
gh Set and confirm the volume.
An acoustic sample of the current volume is output via
audio feedback when you adjust the volume.
Save & Exit
122
Confirm.
Individual phone configuration
Step by Step
Adjusting room acoustics
To ensure that the other party can hear you properly in
speakerphone mode, you can adjust the phone to the
room acoustics by choosing one of the following room
character conditions: "Normal", "Live", "Dead".
N Press the key shown.
User
Select and confirm the option shown.
if nec. j Enter and confirm the User password.
Audio
Select and confirm the option shown.
Settings
Select and confirm the option shown.
Room character
Select and confirm the option shown.
Normal
Select and confirm the room character in the context
menu (for example, "Normal") (z Æ page 127).
Save & Exit
Confirm.
Country setting for speakerphone mode
Enter the country setting you prefer for speakerphone
mode here (see Æ page 36).
N Press the key shown.
User
Select and confirm the option shown.
if nec. j Enter and confirm the User password.
Audio
Select and confirm the option shown.
Settings
Select and confirm the option shown.
Open listening
Select and confirm the option shown.
123
Individual phone configuration
Step by Step
Standard mode
Select and confirm the setting you want in the context
menu ("Standard mode" or "US mode").
(z Æ page 127)
Save & Exit
Confirm.
Setting the ringer melody
N Press the key shown.
User
Select and confirm the option shown.
if nec. j Enter and confirm the User password.
Audio
Select and confirm the option shown.
Settings
Select and confirm the option shown.
Ringer melody
Select and confirm the option shown.
2
Select and confirm the required ringer melody (between 1 and 8) (z Æ page 127).
Save & Exit
Select and confirm the option shown.
Setting the ringer tone sequence
N Press the key shown.
User
Select and confirm the option shown.
Audio
Select and confirm the option shown.
Settings
Select and confirm the option shown.
Ringer tone sequence
Select and confirm the option shown.
2
Select and confirm the required ringer tone sequence
(between 1 and 3) (z Æ page 127).
Save & Exit
Select and confirm the option shown..
124
Web interface
Schritt für Schritt
Web interface
General
The telephone features a HTTP Web server (Web-based
Management tool) which allows the phone to map its
contents to a Web browser on a PC integrated in the
LAN.
The Web interface allows you to set up your OpenStage
using the PC. The Web-based Management tool provides you with all the necessary setup options which
you can also call up and edit on the telephone via the
user area in the Service menu Æ page 32.
The Web interface contains the following form elements:
User pages Tab for calling up user settings
Click the button shown to transfer the changes to the
current form to the telephone.
Click the button shown to reset the changes made in
the current form to the original status.
Click the button shown to perform an action
(e.g. "Login").
Select an option from the drop-down listbox.
In the user menu, you can make changes to the following areas on your telephone:
• User login
• Date and time
• Audio
• User configuration
• Phone
• Locality
• Security
Settings that you make over the Web interface can also
be made directly at the phone. The V icon and page
reference indicate the relevant section where an appropriate description can be found.
125
Web interface
Calling up the Web interface
For further details on the IP address, Web interface address, and
additional information on how to connect the telephone to the network, refer to the chapter entitled "Applications available on your
OpenStage phone" under "Network information" Æ page 33.
To call up the interface, open a Web browser and enter the following:
http://[IP address of the phone]:[port] or
https://[IP address of the phone]
[IP address of the phone] is the IP address of your phone.
[Port] is the port address of the phone’s HTTP server. This is generally
8085.
The Web interface homepage opens once you have entered and confirmed
the phone’s IP address:
User selection
Phone information
User menu
User login
User login
Enter the User password and click Login. If you have not yet configured a
user password, leave the field blank and click Login.
126
Web interface
Date and time
You must set the date and time manually if your phone is not connected to an (S)NTP server.
Click Date and time in the User Pages tab to open the following dialog:
Enter the time and date as shown in the dialog (V Æ page 119). Mark the
field Allow daylight saving to set daylight saving time. Enter the difference between daylight saving and standard time in the Difference (minutes) field (V Æ page 120).
Audio
Click Audio in the User Pages tab to open the following dialog:
The following options are available for the Room character property
(V Æ page 123):
• Normal
• Echoing
• Muffled
Under Open listening (V Æ page 123), select either
• Standard mode or
• US mode
Under Ringer melody (V Æ page 124), you can set a value between 1
and 8.
There are two options available for the Ringer tone sequence
(V Æ page 124):
• 1.0 sec ON, 2.0 sec OFF
• 0.7 sec ON, 07 sec OFF
127
Web interface
Benutzerkonfiguration
Use this menu to set the conditions for incoming, outgoing, and active
calls.
Abgehende Anrufe
Open the Benutzerkonfiguration menu in the User Pages tab and click the
option Abgehende Anrufe. The following dialog appears:
You can make the following settings for outgoing calls:
• Autodial delay (seconds)
(V Æ page 72)
• Allow callback: busy
(V Æ page 51)
• Allow callback: no reply
(V Æ page 51)
• Allow busy when dialling
(V Æ page 73)
• Allow transfer on ring
(V Æ page 68)
128
Web interface
Incoming calls
Open the Benutzerkonfiguration menu in the User Pages tab and click the
option Ankommende Anrufe. You can select the following options:
• Forwarding
• Deflecting/Handling
• CTI-Anrufe
Forwarding
Use Forwarding to open the following dialog:
First configure the destinations under Forwarding favourites:
Destination 1 to Destination 5:
Enter a relevant destination (V Æ page 45)
The destinations only appear in the lists once you have entered them
and clicked Submit.
Now configure the conditions for call forwarding:
• Forward all calls allowed:
Activate this function (V Æ page 47) and
• to:
Select a destination (V Æ page 45)
• Forward on busy allowed:
Activate this function (V Æ page 47) and
• to:
Select a destination (V Æ page 45)
• Forward on no reply allowed:
Activate the function (V Æ page 47) and
• to:
Select a destination (V Æ page 45)
• No reply delay (seconds):
Enter a time by which a call should be accepted before it is forwarded
(V Æ page 46)
129
Web interface
Deflecting/Handling
Use Deflecting/Handling to open the following dialog:
The following options are available:
• Allow deflection
(V Æ page 59)
• Default deflect destination
(V Æ page 59)
• Allow call waiting
(V Æ page 65)
• Allow DND
(V Æ page 92)
CTI-Anrufe
Use CTI-Anrufe to open the following dialog:
The following options are available:
• Allow auto-answer
• Allow beep on auto-answer
• Allow auto-reconnect
• Allow beep on auto-reconnect
For more information on CTI-Anrufe, refer to the relevant phone settings,
V Æ page 69.
130
Web interface
Bestehende Verbindungen
Open the Benutzerkonfiguration menu in the User Pages tab and click the
option Bestehende Verbindungen. The following dialog appears:
You can enter the following settings for active connections:
• Allow call transfer
(V Æ page 67)
• Allow call joining
(V Æ page 43)
• Allow join in conference
(V Æ page 76)
• Allow hold reminder
(V Æ page 61)
• Hold reminder delay (minutes)
(V Æ page 62)
• Allow music on hold
(V Æ page 62)
• Allow conferences
(V Æ page 75)
131
Web interface
Keyset
Use this menu to configure the programmable sensor keys.
Lines
Open the Benutzerkonfiguration menu followed by the Keyset menu in the
User Pages tab and click the option Lines. The following dialog appears:
Use the Key button(s) to select a line (Key 1 to Key n).
You can edit the following fields in this dialog:
• Ring delay (seconds)
(V Æ page 87)
• Allow in overview
(V Æ page 86)
• Ring on/off
(V Æ page 89, currently only possible via the Phone menu)
All other fields are for information only and cannot be modified.
132
Web interface
Phone
Use this menu to set the properties for the phone or configure the key layout.
Display settings
Open the Phone menu in the User Pages tab and click the option Display
settings. The following dialog appears:
You can set the Contrast for the display (V Æ page 118).
133
Web interface
Programmable keys
Open the Phone menu in the User Pages tab and click the option Program keys. The following dialog appears:
In the drop-down lists, select a function to be assigned to the key and then
click Edit. Different dialogs appear depending on the function,
V Æ page 54. For most functions, it is enough to complete the Key label
field.
Repertory dialing
The following dialog may appear for the Repertory dial function
(V Æ page 55):
Enter a destination in the Key label field as the label for this sensor key.
Edit the relevant Dial string in accordance with the description in the dialog.
134
Web interface
Feature toggle
Can only be used for Hunt group functions (Æ page 114).
Change the Key label. In the Feature code field, enter the code *96 (contact your service personnel) and at the same time, under Description, enter "Busy/Free" (V Æ page 56)
Forwarding
Forwarding for all calls, busy or no reply.
Change the Key label. In the Forwarding type list, select the relevant entry. In the Destination field, enter the phone number of the call forwarding
destination.
135
Web interface
Locality
Click Locality in the User Pages tab to open the following dialog:
You can enter the following country-specific settings:
• Country
(V Æ page 117)
• Language
(V Æ page 116)
• Date format
(V Æ page 121)
• Time format
(V Æ page 121)
Security
Click Security in the User Pages tab to open the following dialog:
To change the user password, enter the old password followed by the new
one. Reenter the password for confirmation V Æ page 93.
136
Fixing problems
Fixing problems
Telephone maintenance
•
•
•
Always use a damp or antistatic cloth to clean the telephone. Never
use a dry cloth.
If the telephone is very dirty, clean it with a diluted neutral cleaner containing surfactants, such as a dish detergent. Afterwards remove all
traces of the cleaner with a damp cloth (using water only).
Never use cleaners containing alcohol, cleaners that corrode plastic, or
abrasive powders.
Troubleshooting
Pressed key does not respond:
Check if the key is stuck.
Telephone does not ring:
Check whether the "Do not disturb" function is activated on your telephone
("Do not disturb" appears on the screen Æ page 23). If so, deactivate it.
You cannot dial an external number:
Check whether your telephone is locked ("Phone locked: Enter Password"
appears on the screen"). If the phone is locked, enter your PIN to unlock it.
To correct any other problems:
First contact the relevant service personnel. If the service personnel are
unable to correct the problem, contact Customer Service.
137
Index
Index
A
Accepting calls
multi-line .................................................. 79
Administration ............................................ 34
Alternating ................................................... 42
Audio
room character ..................................... 123
volume ................................................... 122
Audio controls ............................................ 17
Audio keys ................................................... 17
Autodial delay ............................................. 72
C
Call
accept ....................................................... 35
deflect ...................................................... 58
end ............................................................ 37
forward ..................................................... 44
incoming .................................................. 35
reject ........................................................ 58
transfer ..................................................... 66
Call lists ........................................................ 30
Call settings
CTI calls .................................................. 123
MultiLine .................................................. 86
Call waiting .................................................. 63
Callback ....................................................... 49
CE marking .................................................... 4
Conference ................................................. 74
Connection options .................................... 26
Consultation ................................................ 41
Context menus ........................................... 24
D
Date ............................................................ 119
Daylight saving ......................................... 120
Direct destination selection (DDS) key .. 71
Display icons ............................................... 23
Display settings
Contrast ................................................. 118
Do not disturb ............................................. 91
DSS call
138
call deflection .......................................... 85
DSS key
consultation ............................................. 84
indirect pickup ........................................ 85
reject call .................................................. 85
During calls
multi-line .................................................. 82
F
Forced logoff ............................................. 100
Function keys ............................................. 17
G
General information ................................... 12
Graphic display ........................................... 23
Call lists .................................................... 31
Icon indicating call status ...................... 27
Service menu .......................................... 32
Voicemails ............................................... 29
Graphic display settings
Contrast ................................................. 118
H
HiPath 8000 .............................................. 102
abbreviated dialing
single-key abbreviated dialing ........ 112
two-key abbreviated dialing ............ 112
accepting anonymous calls ................ 111
call forwarding ...................................... 103
call tracing .............................................. 112
feature toggle key ................................ 102
functions ................................................ 102
hunt group ............................................. 114
list for selective calls ........................... 109
making anonymous calls ..................... 107
rejecting anonymous calls .................. 111
I
Icons ............................................................. 23
Important information ................................. 2
Incoming calls
multi-line .................................................. 79
Index
K
R
Key module contrast ............................... 118
Keypad ......................................................... 21
Redialing ...................................................... 39
multi-line .................................................. 81
Ringer off ..................................................... 90
L
Language setting ..................................... 116
country setting ...................................... 117
language for user prompts ................. 116
Last call
Hold .......................................................... 60
Line utilization ............................................. 20
lists (for phone numbers and contacts) . 77
Location of the telephone .......................... 2
Logging on and off as a mobility user ... 97,
99
M
Making calls
multi-line .................................................. 80
Microphone ................................................. 40
Mobility ........................................................ 96
forced logoff .......................................... 100
logon, logoff ...................................... 97, 99
Multi-line
accepting calls ........................................ 79
LED display ............................................. 20
Multi-line telephone ................................... 14
N
Navigator ..................................................... 18
O
Open listening ............................................ 37
Operating instructions ................................. 3
S
Safety precautions ....................................... 2
Second call .................................................. 63
Secondary line ............................................ 20
Security ........................................................ 90
Sensor keys
immediate ring ........................................ 57
Service menu .............................................. 32
Settings ...................................................... 116
Shared line ................................................... 20
Single-line telephone ................................. 14
Speakerphone distance .............................. 2
Speakerphone mode ........................... 35, 36
Status icons ................................................. 23
T
Telephone maintenance ..................... 2, 137
Telephony interface
single line ................................................. 27
Time ............................................................ 119
Time display format ................................. 121
Troubleshooting ........................................ 137
Trunk keys ................................................... 19
U
User interface ............................................. 15
User support ............................................... 13
W
Web interface ........................................... 125
P
Phantom line ............................................... 20
Phone number directories ........................ 77
Phone settings ......................................... 116
Pop-up menu .............................................. 27
Primary line ................................................. 19
Privacy .......................................................... 90
Private line ................................................... 20
Programmable sensor keys ............... 19, 53
139
Copyright © Siemens Enterprise
Communications GmbH & Co. KG 07/07
Hofmannstr. 51, D-81359 Munich
Order No.: A31003-S2010-U101-4-7619
The information contained in this document contains merely general descriptions or characteristics
of performance which in case of actual use do not always apply as described or which may change as a
result of further development of the products. An
obligation to provide the respective characteristics
shall only exist if expressly agreed in the terms of the
contract.
Subject to availability. Right of modification reserved.
The trademarks used are the property of
Siemens Enterprise Communications
GmbH & Co. KG or the respective owners.
www.siemens.de/enterprise